

Page 1

XDS Softwar e Ref er ence Guide
Refere nce guid e
R59770497/0A
17/11/2009
Page 2

Barco nv Simulation Division
Noordlaan 5, B-8520 Kuurne
Phone: +32 56.36.82.11
Fax: +32 56.36.84.86
E-mail: info@barco.com
Visit us at the web: www.barco.com
Printed in Belgium
Page 3

Changes
Barco provides this manual ’as is’ without warranty of any kind, either expressed or implied, including but not limited to the implied warranties or merchantability and fitness for a particular purpose. Barco may make improvements and/or changes to the product(s) and/or the
program(s) described in this publication at any time without notice.
This publication could contain technical inaccuracies or typographical errors. Changes are periodically m ade to the information in this
publication; these changes are incorporated in new editions of this publication.
Copyright ©
All rights reserved. No p art of this document may be copied, reproduced or translated. It shall not other
stored in a retrieval s ystem without the prior written consent of Barco.
wise be recorded, transmitted or
Software License Agreement
You should carefully read the following terms and co nditions before using this software. Your use of this software indicates your acceptance
of this license agreement and warranty.
Terms and Conditions:
1. No redistribution of the software is allowed.
2. Reverse-Engineering. You may not reverse engineer, d ecom pile, disassemble or alter anyhow this s oftware product.
Disclaimer of Warranty:
This software and the accompanying files are sold “as is” and without warranties as to performance or merchantability or any other warranties w hether expressed or implied. In no event shall B arco be liable for damage of any kind, loss of data, loss of profits, business
interruption or other pecuniary loss arising directly or indirectly. Any liability of the seller will be exclusively limited to replacement of the
product or r efund of purchase price.
Trademarks
Brand and product name s mentioned in this manual may be trademarks, registered tradem arks or copyrights of their respective holders.
All brand and product names mentioned in this manual serve as comments or examples and are not to be understood as advertising for
the products or their m anufacturers.
Page 4

Page 5

Table of contents
TABLE OF CONTENTS
1. Introduction ......... ................ ................ ................ ................ ................ ................ 5
1.1 About this m anual . . .................................................................................................................. 5
1.2 Related products . . ................................................................................................................... 5
1.3 Symbols and fonts . . .................................................................................................................. 6
2. Overview of the XDS software ................................................................................... 7
2.1 Introducing display software ......................................................................................................... 7
2.2 Introducing client software ........................................................................................................... 8
3. XDS Control Center ................................................................................................ 9
3.1 Starting the XDS Control Center application ........................................................................................ 9
3.2 Bringing up the XDS Control Center GUI........................................................................................... 11
3.3 XDS Control Center GUI ............................................................................................................ 12
3.3.1 XDS Control Center GUI: Levels of view..................................................................................... 13
3.3.2 XDS Control Center GUI: Changing the level of view . . . ....................................................................13
3.3.3 XDS Control Center GUI: Menu bar..........................................................................................14
3.3.4 XDS Control Center GUI: Toolbar............................................................................................ 14
3.3.5 XDS Control Center GUI: Sources View ..................................................................................... 15
3.3.6 XDS Control Center GUI: Layouts View ..................................................................................... 23
3.3.7 Setting privacy options........................................................................................................ 29
3.3.7.1 Enabling auto acc ept client connection................................................................................29
3.3.7.2 Block rem ote users from connecting to the display ...................................................................30
3.3.7.3 Disconnecting the clients............................................................................................... 30
3.3.8 Configuring GUI settings of XDS Control Center ............................................................................ 31
3.3.8.1 Configuring XDS Control Center settings ............................................................................. 31
3.3.8.2 Configuring log file settings ............................................................................................32
3.3.8.3 Configuring START menu settings..................................................................................... 32
3.3.8.4 Show/Hide sources in the source widget . . . ........................................................................... 33
3.3.8.5 Configure the viewer settings ..........................................................................................34
3.3.8.6 Setting default settings.................................................................................................34
3.4 Hiding the XDS Control Center application.........................................................................................34
3.5 Closing an XDS session.............................................................................................................35
3.6 Launching of a source ............................................................................................................... 36
3.6.1 Introduction. . . .................................................................................................................36
3.6.2 Launching a source from XDS CC GUI . . . ................................................................................... 36
3.6.3 Launching a source from START menu . .. ...................................................................................37
3.6.4 Launching a locked source . .................................................................................................. 37
3.7 Settings of a source — right-click option............................................................................................39
3.7.1 Locking aspect ratio........................................................................................................... 40
3.7.2 Maximizing the viewer ........................................................................................................41
3.7.3 Moving a window of which the top bar is off-screen ......................................................................... 44
3.7.4 Moving a window without window decoration ................................................................................ 45
3.7.5 Setting native resolution of a source .........................................................................................45
3.7.6 Showing/Hiding a window border . .. . ........................................................................................ 46
3.7.7 Zooming a window . . . ......................................................................................................... 47
3.7.8 Adjusting frame rate .......................................................................................................... 48
3.7.9 Setting image quality. ......................................................................................................... 49
3.7.10 Enabling hardware acceleration..............................................................................................49
3.7.11 Adjus ting the image . . .........................................................................................................50
3.7.12 Adjusting the image file....................................................................................................... 51
3.7.13 Setting Auto image............................................................................................................53
3.7.14 Knowing the details of installed XDS software...............................................................................53
3.7.15 Using remote keyboard/mouse control.......................................................................................54
3.7.16 Disable remote keyboard/mouse control..................................................................................... 55
3.8 Introduction to layouts ...............................................................................................................56
3.8.1 Introduction. . . .................................................................................................................56
3.8.2 Creating a layout ..............................................................................................................56
3.8.3 Saving a layout................................................................................................................57
3.8.4 Using the Save Layout Advanced dialog..................................................................................... 60
3.8.4.1 Launching the Sa ve Layout Advanced dialog ......................................................................... 60
3.8.4.2 Saving an application to the layout . ................................................................................... 62
3.8.4.3 Options in Save Layout Advanced dialog .............................................................................62
3.8.4.4 Adding an application tothe Layout ...................................................................................63
3.8.4.5 Adding a video insertion................................................................................................65
3.8.4.6 Creating layouts containing Multi-viewport windows ..................................................................67
3.8.4.7 Using Viewport InsertCalculator.......................................................................................70
3.8.5 Launching a layout . . . ......................................................................................................... 70
3.8.5.1 Launching a layout from different levels of view . . ....................................................................71
3.8.5.2 Launching two layouts on top of each other...........................................................................72
3.8.5.3 Using the navigation buttons...........................................................................................73
3.8.6 Managing Layouts ............................................................................................................73
3.8.6.1 Introduction to layout manager ........................................................................................ 73
3.8.6.2 Opening the layout manager . . . ........................................................................................73
R59770497 XDS SOFTWARE REFERENCE GUIDE 17/11/2009
1
Page 6

Table of contents
3.8.6.3 Adding a presentation..................................................................................................74
3.8.6.4 Renaming a presentation ..............................................................................................76
3.8.6.5 Moving a layout to another presentation . . . ...........................................................................77
3.8.6.6 Moving a layout up/down within the presentation..................................................................... 78
3.8.6.7 Copying a lay out to another presentation . ............................................................................79
3.8.6.8 Providing description for layouts....................................................................................... 80
3.8.6.9 Making a layout shared among all users (public layouts) . ............................................................81
3.8.6.10 Deleting a presentation ................................................................................................82
3.9 Using the video conference control ................................................................................................. 83
3.9.1 Overview ...................................................................................................................... 83
3.9.2 Launching the video conference control . . ...................................................................................83
3.9.3 Using the Dialing feature .....................................................................................................84
3.9.4 Adding a contact during a call ................................................................................................ 86
3.9.5 Removing a contact during a call.............................................................................................86
3.9.6 Arranging the names in alphabetical order................................................................................... 86
3.9.7 Controlling camera............................................................................................................ 87
3.9.8 Controlling the Microphone . ..................................................................................................88
3.9.9 Mute the microphone ......................................................................................................... 89
3.9.10 Toggling the layout ............................................................................................................90
3.9.11 Wake-up the video conference device .......................................................................................90
3.9.12 Hiding the Video conference device widget ..................................................................................91
3.9.13 Advanced features............................................................................................................ 91
3.9.13.1 Selecting a source as secondary input ................................................................................91
3.9.13.2 Launching a layout automatically at incoming/outgoing call ......................................................... 93
3.9.13.3 Usingpreset option.....................................................................................................94
3.10 Installing the license file............................................................................................................. 94
3.10.1 Importing the license fileto XDS .............................................................................................94
3.10.2 Installing a new license after license expiry .................................................................................. 95
4. Administering the XDS Control Center..... ................ ................ ................ ................ ...97
4.1 XDS User Management .............................................................................................................97
4.1.1 User Management: ON .......................................................................................................97
4.1.2 User Management: OFF......................................................................................................99
4.1.3 User Management ON: Entering Administrator mode . . . ...................................................................100
4.1.4 User Management OFF: Entering Administrator mode . . ...................................................................100
4.1.5 Fixed Public Layouts.........................................................................................................101
4.1.5.1 Making layoutpublic...................................................................................................101
4.1.5.2 Reusing a public layout ...............................................................................................103
4.1.6 Maintenance tasks . . . ........................................................................................................104
4.1.6.1 Creating and recalling restore points .................................................................................104
4.1.6.2 Deleting a restore point ...............................................................................................106
4.1.6.3 Reinitializing XDS system.............................................................................................106
4.1.6.4 Cleaning up cus tom files..............................................................................................107
4.2 Getting license......................................................................................................................108
4.2.1 Things to remember . ........................................................................................................108
4.2.2 License for LC-xx System installation.......................................................................................108
4.2.3 License for NW-xx System installation......................................................................................109
4.2.4 License for XDC-x000 System installation..................................................................................109
4.2.5 License for XDS-x000 System installation ..................................................................................109
4.2.6 Contacting Barco to get the license file .....................................................................................109
4.2.7 Whom to contact to get the license file? ....................................................................................110
5. XDS Remote Administration Center ..........................................................................111
5.1 Key capabilities .....................................................................................................................111
5.2 Installing XDS Remote Administration Center.....................................................................................111
5.3 Logging in to XD S Remote Adm inistration Center ................................................................................112
5.4 XDS Remote Administration Center interface . .. ..................................................................................112
5.4.1 Introduction. . . ................................................................................................................112
5.4.2 Menu bar .....................................................................................................................113
5.4.3 Using the left pane...........................................................................................................113
5.4.4 Using the Middle pane .......................................................................................................117
5.4.4.1 Using the tabs .........................................................................................................117
5.4.4.1.1 Using the General Tab .. . .......................................................................................118
5.4.4.1.2 Using the Display Details Tab...................................................................................120
5.4.4.1.3 Using the Hardware Details Tab................................................................................121
5.4.4.1.4 Using the User Management Tab...............................................................................122
6. Installation and updation of client software . . .. . . .. . . .. . . .. . . .. . . .. . . .. . . .. . . .. . . .. . . .. . . .. . . .. . . .. . . .. . . .. 127
6.1 Introduction .........................................................................................................................127
6.2 Minimum system requirements . . ..................................................................................................127
6.3 Installation ofclient software .......................................................................................................127
6.3.1 Selecting the client application ..............................................................................................127
6.3.2 Installing XDS Desktop Sharing client.......................................................................................128
6.3.3 Installing XDS Remote Control Center client ...............................................................................132
6.4 Updating/Uninstalling the client software . . . .......................................................................................132
6.4.1 Updating the client software .................................................................................................132
2
R59770497 XDS SOFTWARE REFERENCE GUIDE 17/11/2009
Page 7

Table of contents
6.4.2 Uninstalling the client software..............................................................................................132
7. XDS Desktop Sharing client ........ ................ ................ ................ ................ ........... 135
7.1 Introduction .........................................................................................................................135
7.2 Starting the XDS Desktop Sharing client ..........................................................................................135
7.3 Connecting to XDS d isplay(s) ......................................................................................................136
7.4 Setting security authentication .....................................................................................................137
7.5 Sharing your desktop ondisplay.................................................................................................. . 138
7.6 Stop sharing your desktop on display..............................................................................................139
7.7 Using the workspace ...............................................................................................................140
7.8 Connecting to displays in a different subnet .......................................................................................141
7.8.1 Overview .....................................................................................................................141
7.8.2 Scanning for displays in a different subnet ..................................................................................141
7.8.3 Deleting a display........................................................................................................... .144
7.9 Using Auto connect and Auto share ...............................................................................................146
7.10 Sh aring Windows M edia P layer image . . . .. .......................................................................................146
7.10.1 How to disable overlay in Windows Media Player? .........................................................................146
8. XDS Remote Control Center................................................................................... 149
8.1 Starting up the XDS Remote Control Center ......................................................................................149
8.2 XDS Remote Control Center GU I ..................................................................................................150
8.2.1 XDS Remote Control Center GUI: Menu bar ...............................................................................150
8.2.2 Selecting different views from Menu bar ....................................................................................151
8.2.3 XDS Remote Control Center GUI: Toolbar..................................................................................151
8.2.4 Showing/Hiding tool bars ....................................................................................................152
8.2.5 Stacking tool bars............................................................................................................ 152
8.2.6 Configuring GUI settings of XDS Remote Control Center..................................................................153
8.2.6.1 Configuring startup settings...........................................................................................153
8.2.6.2 Configuring network settings..........................................................................................153
8.2.6.3 Configuring source view settings .....................................................................................154
8.3 Immediate versus Preview mode ..................................................................................................154
8.3.1 Working in preview mode....................................................................................................155
8.4 Using the workspace ...............................................................................................................156
8.4.1 Manipulating windows .......................................................................................................156
8.4.2 Using right-click option.......................................................................................................156
8.4.2.1 Maximizing a window . .................................................................................................157
8.4.2.2 Minimizing a window . .................................................................................................157
8.4.2.3 Restoring a window . . .................................................................................................159
9. XDS Remote Keyboard Mouse Control........... ................ ................ ................ ........... 161
9.1 Installing the remote pointer........................................................................................................161
9.2 Configuring the XDS system.......................................................................................................163
9.2.1 Configuring the XDS configuration tool .....................................................................................163
9.3 Enabling Remote Keyboard/Mous e control . .......................................................................................165
10. Troubleshooting . ... . ... . ... . ... . ... . ... . ... . ... . ... . ... . ... . ... . ... . ... . . .. . . .. . . .. . . .. . . .. . . .. . . .. . . .. . . .. . . .. . 167
10.1 XDS software installation issues...................................................................................................167
10.1.1 Error message while installation is in progress .............................................................................167
10.2 License related issues..............................................................................................................167
10.2.1 License error .................................................................................................................167
10.2.2 Installing new license file ....................................................................................................167
10.2.3 License has expired......................................................................................................... . 168
10.3 XDS Control Center related issues ................................................................................................ 168
10.3.1 XDS Control Center does not startup .......................................................................................168
10.3.1.1 Starting XDS Control Center application manually...................................................................168
10.3.1.2 Stopping and starting the XDS software..............................................................................169
10.3.1.3 Verify theservices of Barco in XDS Control Center PC..............................................................169
10.3.2 XDS Control Center is not running . .. .......................................................................................170
10.3.3 XDS Control Center icon appears with red cross in the system tray. .. ....................................................171
10.3.4 XDS Control Center does not show hardware sources.....................................................................171
10.4 Source related issues ..............................................................................................................172
10.4.1 Error message while launching a source . ..................................................................................172
10.4.2 Launching a source takes long time. . .......................................................................................172
10.4.3 Misaligned insert in viewer window. . . .......................................................................................172
10.4.4 No image in inserts ..........................................................................................................173
10.4.5 Picture in the viewer is unclear/flickering ...................................................................................173
10.5 Projector source relatedissues ....................................................................................................174
10.5.1 Source shows black window on launch . . ..................................................................................174
10.5.2 Video conference GUI is not visible .........................................................................................174
10.5.3 The XDS Control Center software unable to connect with Video con ference device .....................................174
10.5.4 Sharing content tab of video conference GUI is disabled ..................................................................175
10.6 WND sourcerelated issues ........................................................................................................175
10.6.1 Sources connected to WND have black lines at top and bottom ...........................................................175
10.6.2 Color difference when displaying many finelines...........................................................................176
10.6.3 Channels have stereo reversed . . .. . .......................................................................................176
10.7 XDS Desktop Sharing issues ...................................................................................................... 176
10.7.1 Unable to start the XDS Desktop Sharing client . . ..........................................................................176
R59770497 XDS SOFTWARE REFERENCE GUIDE 17/11/2009
3
Page 8

Table of contents
10.7.2 Unable to find display in scanned Displays list . . . ..........................................................................177
10.7.3 Unable to connect to Display listed in Connections dialog .................................................................177
10.7.4 Display names do not appear in the Connections dialog ...................................................................177
10.7.5 Cannot share desktop on the Wall . . . .......................................................................................178
10.7.6 3D applications do not show up on display .................................................................................178
10.7.7 Running XDS Desktop Sharing client on Windows Vista...................................................................180
Index............... ................ ................ ................ ................ ................ ................ ..... 183
List of images.............. ................ ................ ................ ................ ................ ........... 187
4 R59770497 XDS SOFTWARE REFERENCE GUIDE 17/11/2009
Page 9
1. INTRODUCTION
Overview
• About this manual
• Related products
• Symbols and fonts
1.1 About this manual
Documentation
This manual is part of the documentation set describing the XD S software.
Part number Description Type Level Sensitivity
R59770418 User Guide Manual User Public
R59770497 Reference guide Manual Administrator Public
-
Versioning
This manual is applicable to the following software versions:
Manual version
R59770418 2
Installation manual Pre sentations Installer
XDS software version
1. Introduction
Confidential (Barco only)
1.2 Related products
Software related products
The XDS software suite is a set of software tools. The main tools are the following:
Description Components / Used for
XDS CC Wall installer SW - Display walls based on Transform A / W ND-264
XDS CC Projector installer SW Systems with a P C and 1 or 2 projectors (no Transform A, nor WND-264)
XDS CC XDC–3000 installer XDC-3000
XDS CC Remote pointer installer Remote Mouse and Keyboard control of image generators connected to the display wall
Hardware related products
Description Components/Used for
XDS-1000 Multi-channel, multi-windowing, stereo/mono video processor
XDS-400 4–channel, multi-windowing, stereo/mono video processor
XDS-200 2–channel, multi-windowing, stereo/mono video processor
XDS-100 1–channel, multi-windowing, stereo/mono video processor
WND264 Customizable, multi-channel, multi-windowing, stereo/mono
TransformA Customizable, multi-channel, multi-windowing, mono video
The following table lists the range of Barco projectors with embedded XDS proce ssor
- Software only display walls
Remote Control CenterXDS CC Client installer for Windows
Network Desktop Sharing
video processor
processor
R59770497 XDS SOFTWARE REFERENCE GUIDE 17/11/2009
5
Page 10
1. Introduction
Type of projectors
Mono projectors
Stereo projectors
The range of related hardware products may evolve over time, and Barco gives no guarantee that future versions of the XDS software will support all of the above hardware products.
1.3 Symbols and fonts
Symbols overview
The following icons are use d in the manual :
Icons Description
Info, term definition. General info about the term.
Projectors
Sim5W
NH12
NW12
Galaxy NH12
Galaxy NW7
Galaxy NW12
Note, gives extra information about the described subject.
Tip, gives extra advice about the described subject.
Font overview
• Buttons are indicated in bold, e.g. OK.
• Menu items are indicated in italic.
• Step related notes, tips, warnings or c autions are printed in italic.
• Procedure related notes, tips, warnings or caution
s are printed in bold between 2 lines preceded by the corresponding icon.
6
R59770497 XDS SOFTWARE REFERENCE GUIDE 17/11/2009
Page 11
2. Overview of the XDS software
2. OVERVIEW OF THE XDS SOFTWARE
Overview
• Introducing display software
• Introducing client software
Introduction
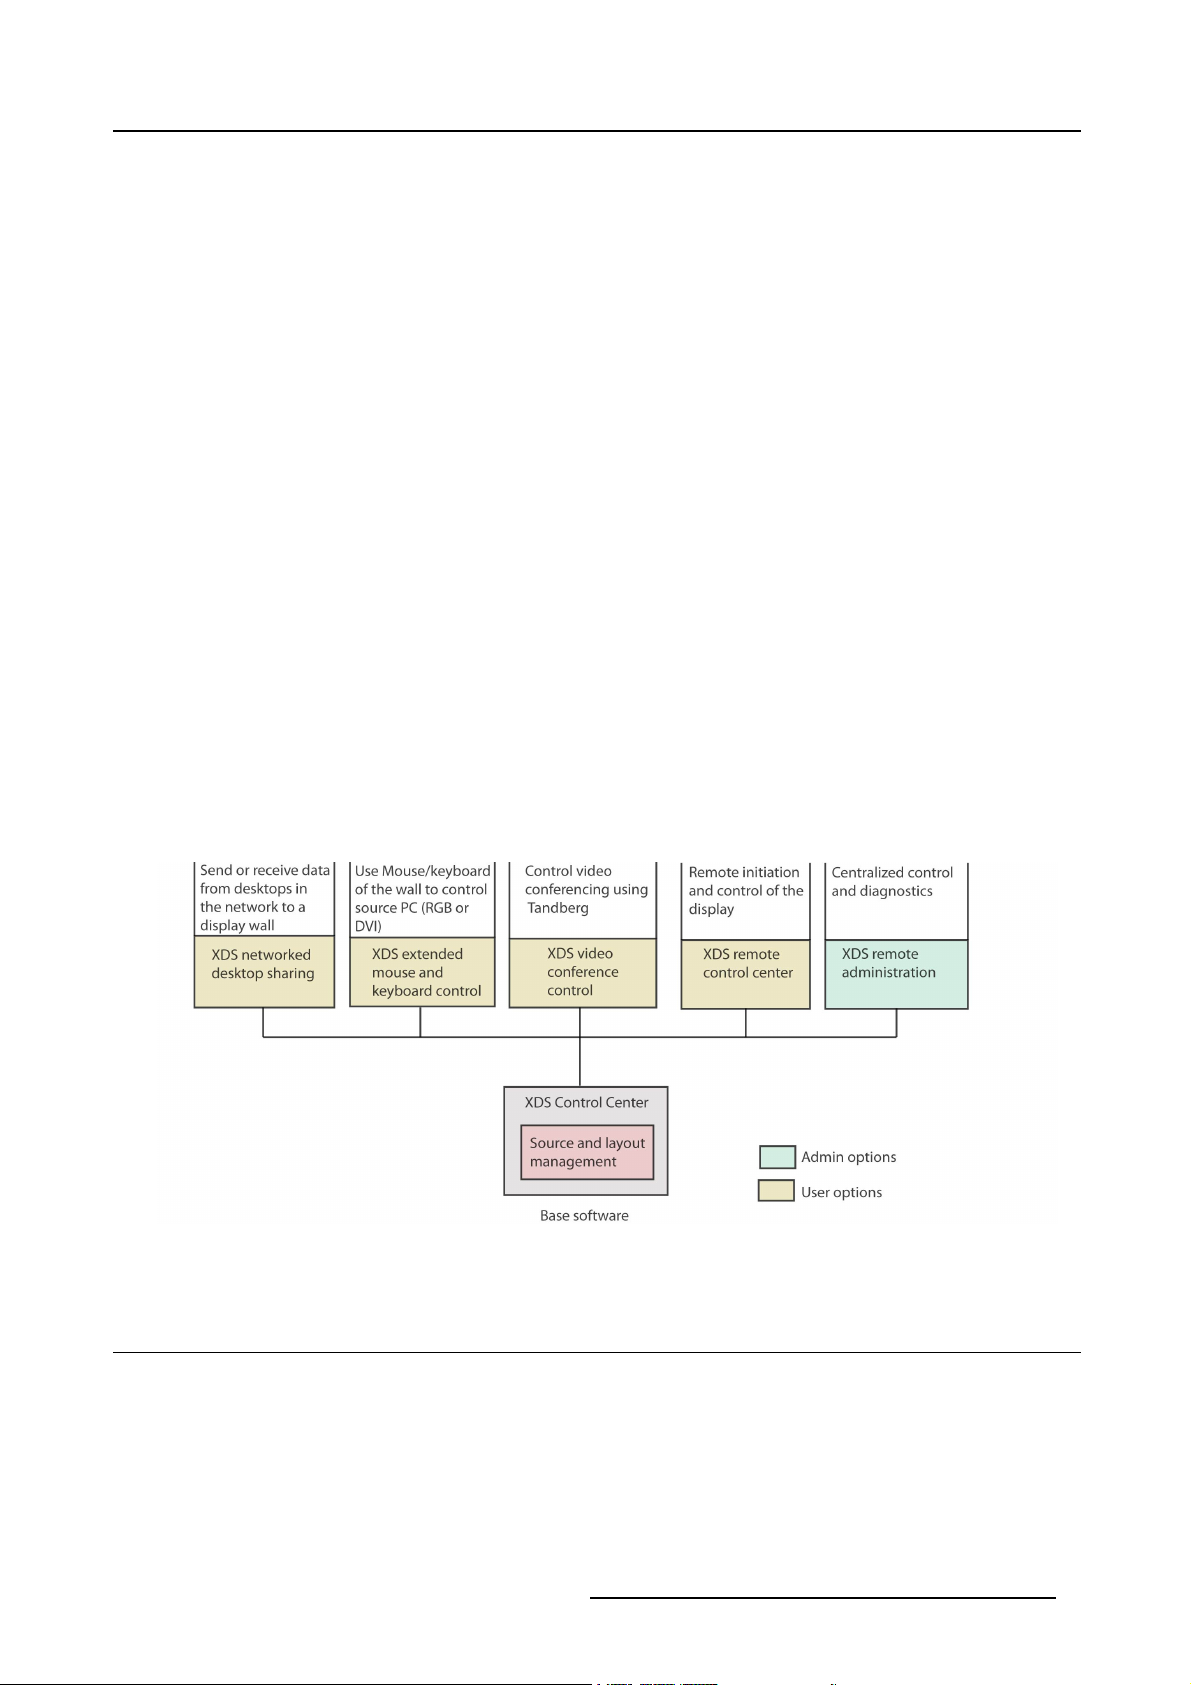
Barco’s XDS software is a flexible tool for managing mutli-windowing displays that us e Barco X DS mutli-windowing processors.
Besides the core functions of source and layout management, the XDS software also supports features like desktop sharing, r emote
source control, video conference control, extended mouse and keyboard control, remote administration and more. The XDS software
is easy to setup - and is well integrated into the operating system. It comprises of display software and client software. Using the
display software, you can launch different sources, organize them as layo uts, and save them under different presentations. Features
like sharing your desktop on the XDS display, controlling X DS displays remotely through LAN, and controlling your desktop from the
XDS display by enabling remote keyboard and mouse control, are some of the fun ctionalities of the client software.
The XDS Control Center software highlights:
- Wizard: Use the simple wizards that p op up for c onfigur ing different settings in just a few s imple s teps
- Source and layout managem ent: Use this feature to launch different sources, organize the sources as layouts, and save
them under different presentations
- Feedback: The feedback messages describe the status o f the action performed by you. It also describes the reason behind
that particular status message if the action has failed to perform. Feedback messages can be information message, warning
message or error message.
- Desktop sharing: Use the desktop sharing feature to share your desktop on the XDS display
- Video conference: Add a video conference system to XDS display and s
- Privacy settings: Restrict or derestrict a remote user from sharing his/her desktop on the XDS display during an ongoing
meeting. You can also disconnect t he c onnection between the XDS display and the remote user
- Shortcut keys: Instantly adjust setups without running the XDS Control Center application using the shortcut keys
- User management: During installation, enable this feature to use different sessions, each customized to different s ources
and layouts
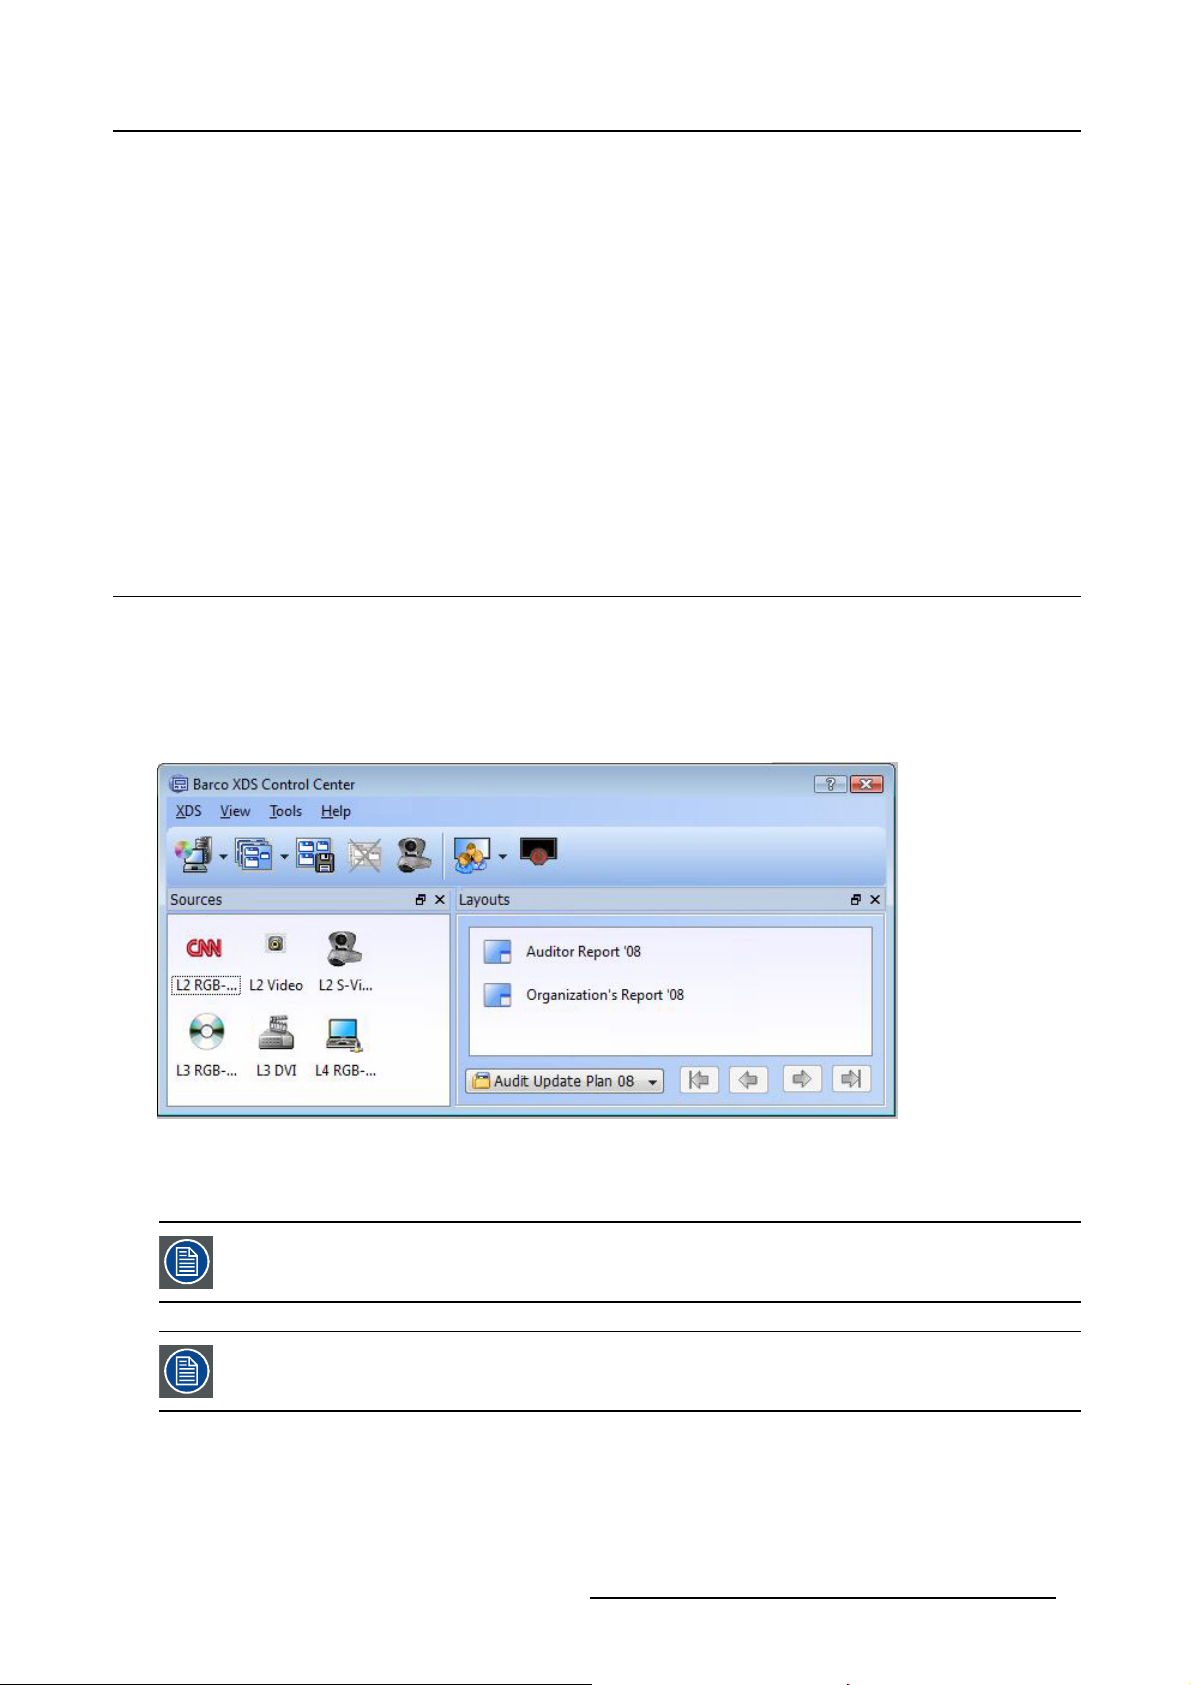
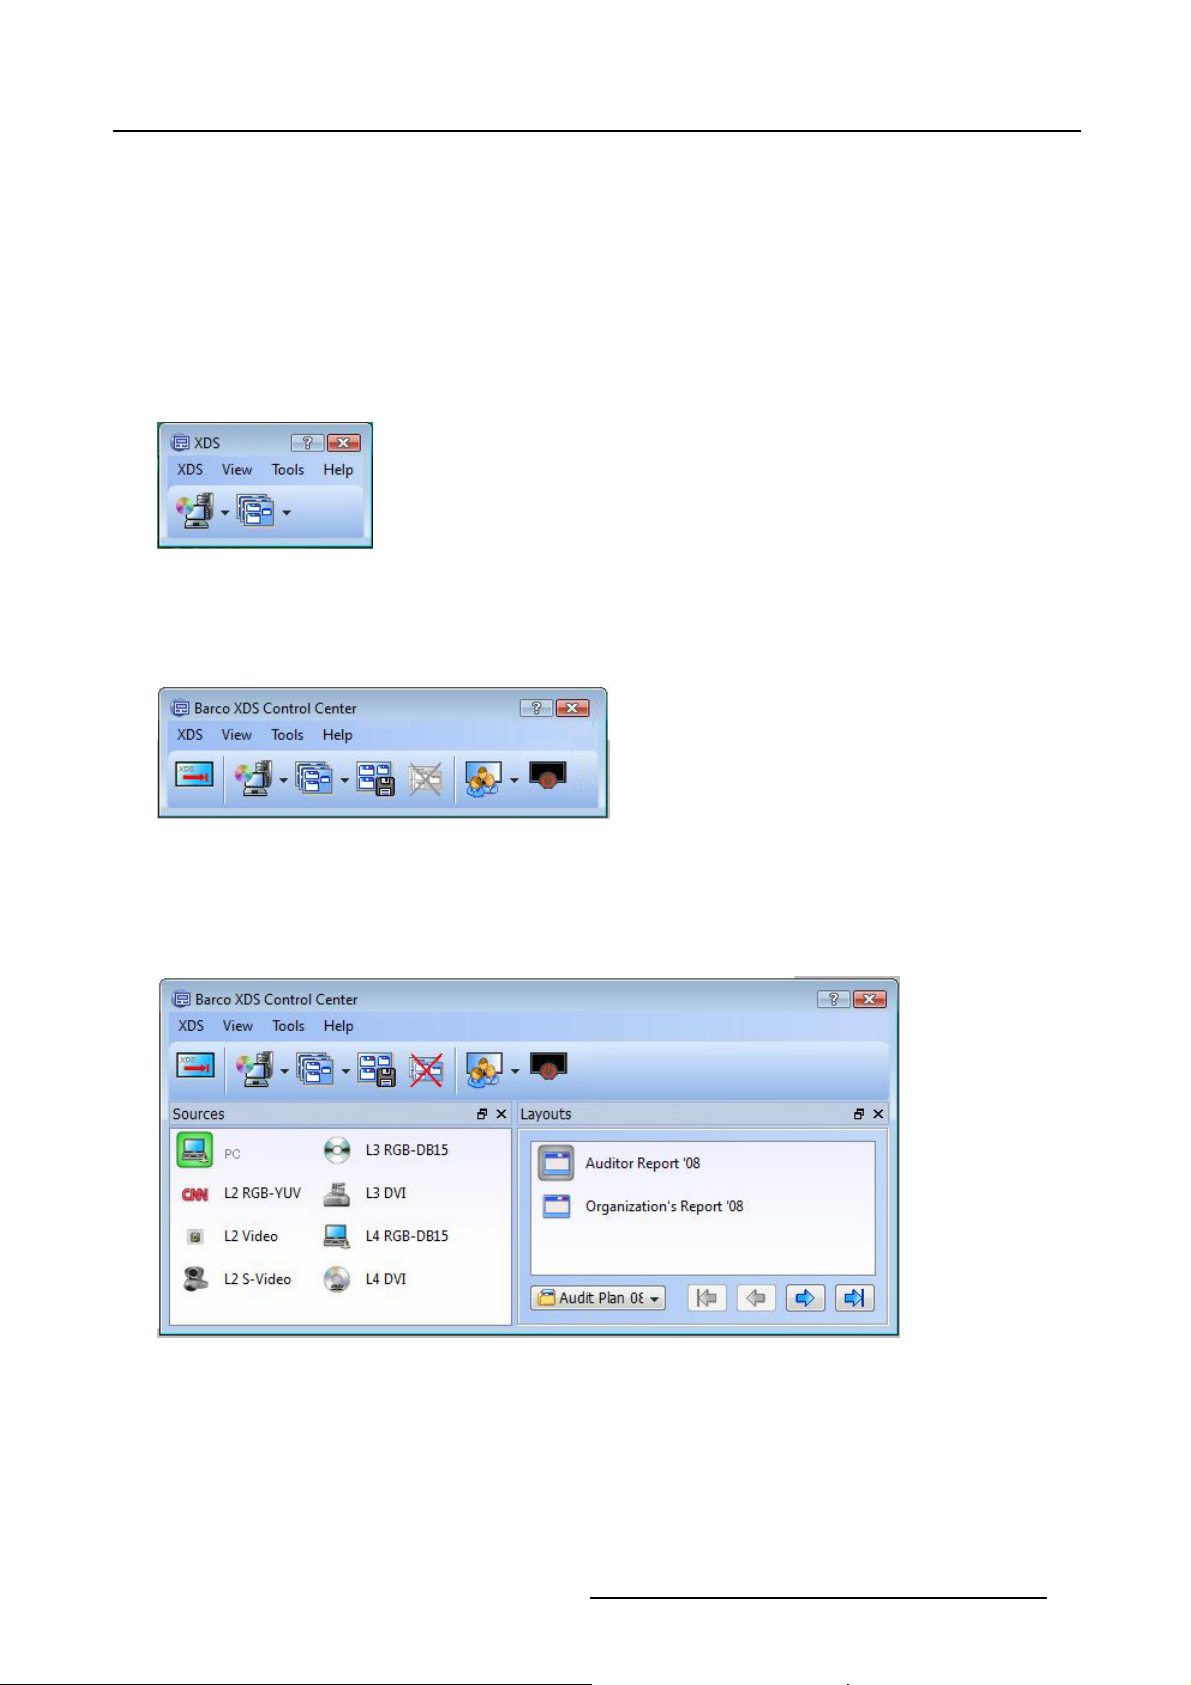
An overview of the XDS Control Center software is displayed below.
tart using its c ontrols instantly
Image 2-1
XDS Control Center software overview
2.1 Introducing display software
About XDS Control Center
The XDS Control Center is the main user Interface of XDS software. It provides an easy-to-use interface letting you perform various
operations in a quick way. Using this software, you can manage all the sources (i.e. hard wired sources and desktop sharing
sources). This software supports user management feature, which allows the creation of d ifferent user-owned sessions, in which
layouts can be created an d saved. The layouts and presentations created by one session user will not be visible for another session
user.
The XDS Control Center software provides many other functionalities su ch as modifying the viewer, managing the layout of different
sources, setting privacy options, configuring video conference device and integrating video conference control, and more. This
software gives yo u the flexibility to configure the GUI settings of XDS Control Center as per your choice.
R59770497 XDS SOFTWARE REFERENCE GUIDE 17/11/2009
7
Page 12
2. Overview of the XDS software
2.2 Introducing client software
About XDS Desktop Sharing
Using the XDS Desktop Sharing client software, y ou can launch a viewer s howing your desktop screen on the connected XDS
display(s). Provided you must be connected through network (LAN). In another scenario, a user of the display wall can launch a
viewer (using the XDS Control Center) showing the desktop of a remote user, after that user has connected to the display.
When using the XDS Desktop S haring client application, you can easily scan for the available displays on the network by click of
a button and get connected to the displays. You c an display your desktop on multiple XDS displays at the same time. You can
automate the connection and sharing of your desktop on a display by enabling auto connect and auto share option. This software
also contains authentication feature, which when enabled blocks the user of the XDS display from launching your desktop without
his/her authentication.
The image below gives you the usage model of the XDS display software and client software.
Image 2-2
XDS software: Usage model
About XDS Remote Control Center
The XDS Remote Control Center client software is an application running on a PC, allowing you to remotely control and manage an
XDS display in the network, which in turn is controlled by XDS Control Center. In other words, the XDS Rem ote Control Center is
the client version of the XDS Cont
server PC. On application startup, you can connect to any of the display systems in the local network. For connecting to external
displays, the external display scanner is used. You can work in online or offline mode to download, load, sav e, and upload different
configurations files for late r
rol Center. This software component is running on a client PC installed in the same LA N as the
use.
8
R59770497 XDS SOFTWARE REFERENCE GUIDE 17/11/2009
Page 13
3. XDS Control Center
3. XDS CONTROL CENTER
Overview
• Starting the XDS Control C enter application
• Bringing up the XDS Control Center GU I
• XDS Control Center GUI
• Hiding the XDS Control Center application
• Closing an XDS session
• Launching of a source
• Settings of a source — right-click option
• Introduction to layouts
• Using the video conference control
• Installing the license file
3.1 Starting the XDS Control Center application
How to start the XDS Control Center application?
After installing the XDS d isplay software, you need to reboot your sy stem (desktop g enerating PC). The X DS Control C enter application starts up.
Please wait for 20 to 30 secon ds for the XDS application to start up.
You will see an image similar to the image d isplayed below.
Image 3-1
XDS Control Center application: User management disabled
It is not necessary that the application should open up just like the image displayed above, which is the expert view, but it can also
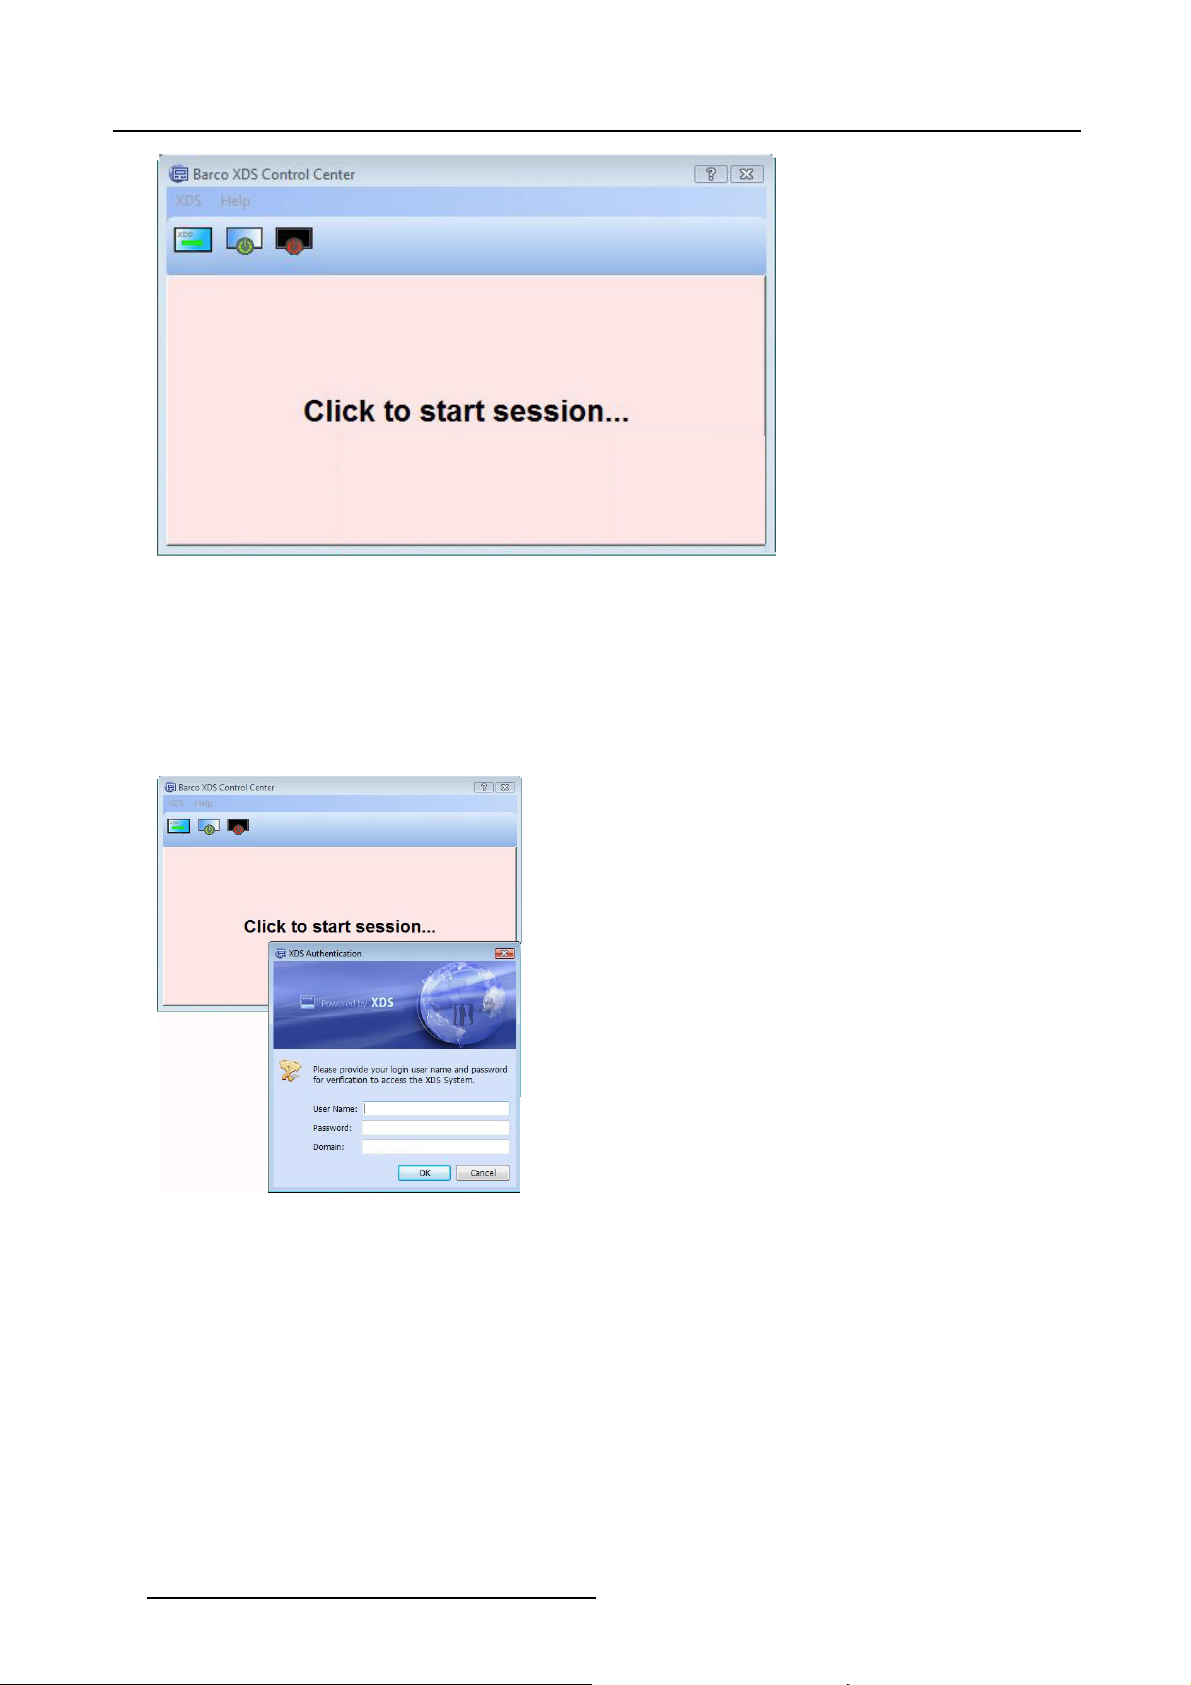
open up in minimal or compact view. Refer to "XDS Control Center GUI: Levels of view", page 13.
While installing, if User Management is disabled the ab ove scenario works fine. A default session will be
started. And anyone who logs in to the desk top generating PC will be able t o see the default session. But
with this option, only one user session can b e created.
The login details can be different to the Windows login of this computer. Different users can login to one
single X DS Control Center.
But, if you have enabled User Management option while installing, you might see the following image.
R59770497 XDS SOFTWARE REFERENCE GUIDE 17/11/2009
9
Page 14
3. XDS Control Center
Image 3-2
Start session
Click on Click to start session... to open the XDS control center application. For more details, please read the topic below.
The XDS A uthentication Dialog
During installation, if you have enabled User Management and selected the option, Automatically at Windows Login, then on
startup/login of Desktop generating PC, the XDS session w ill open automatically.
If you have enabled Us er Management and selected the option, Using XDS Authentication Dialog,thenonstartupyouwillbe
prompted to open a session by entering any valid credential of
that particular s erver’s dom ain.
Image 3-3
Authentication window
1. In the User Name text field, enter a valid user name
2. In the Password text field, enter the password for the spe cified user name
3. In the Domain text field, enter the domain name of the s erver
4. Click OK
The X DS Control Center application will open and the layouts and preferences of this particular session user will be loaded.
10
R59770497 XDS SOFTWARE REFERENCE GUIDE 17/11/2009
Page 15
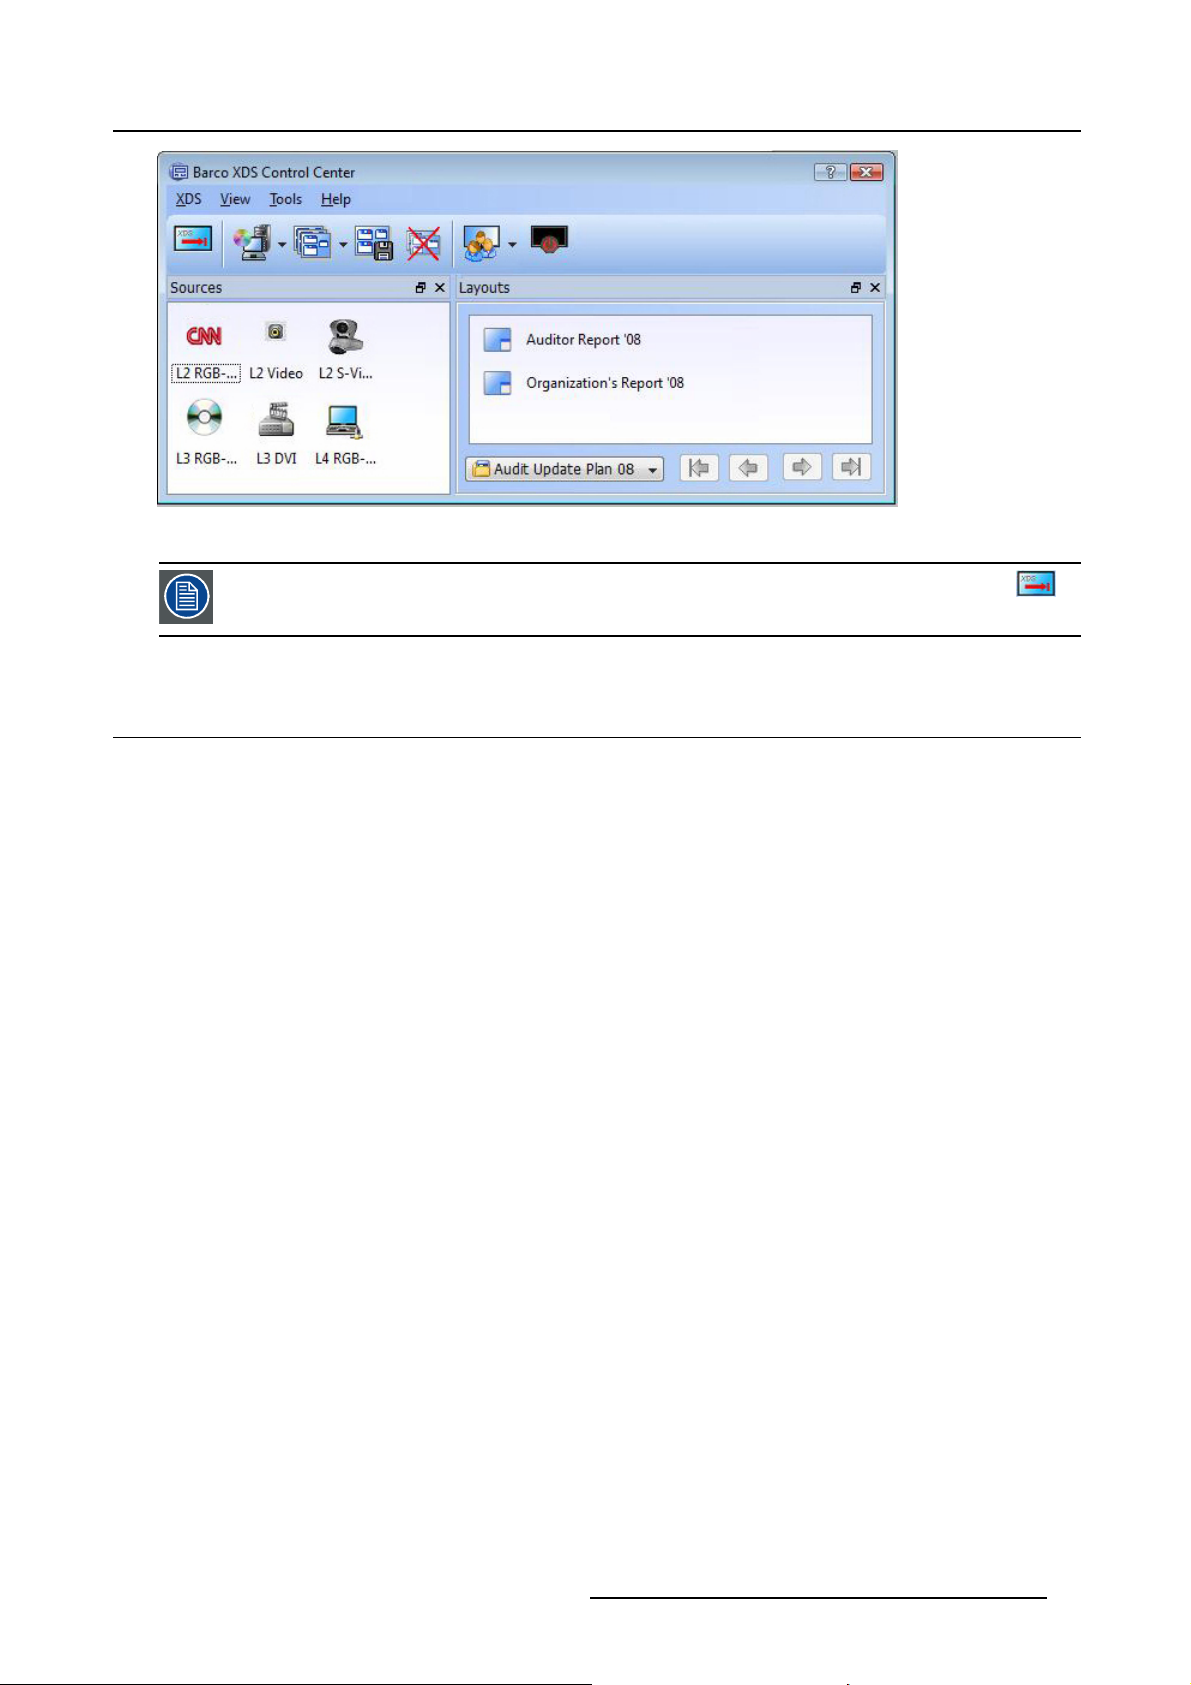
Image 3-4
XDS Control Center: Open a session
When user m anag emen t is enabled, you will find a new icon on the XDS Control Center application on
the toolbar. T his icon is u sed to close a session
3. XDS Control Center
3.2 Bringing up the XDS Control Center GUI
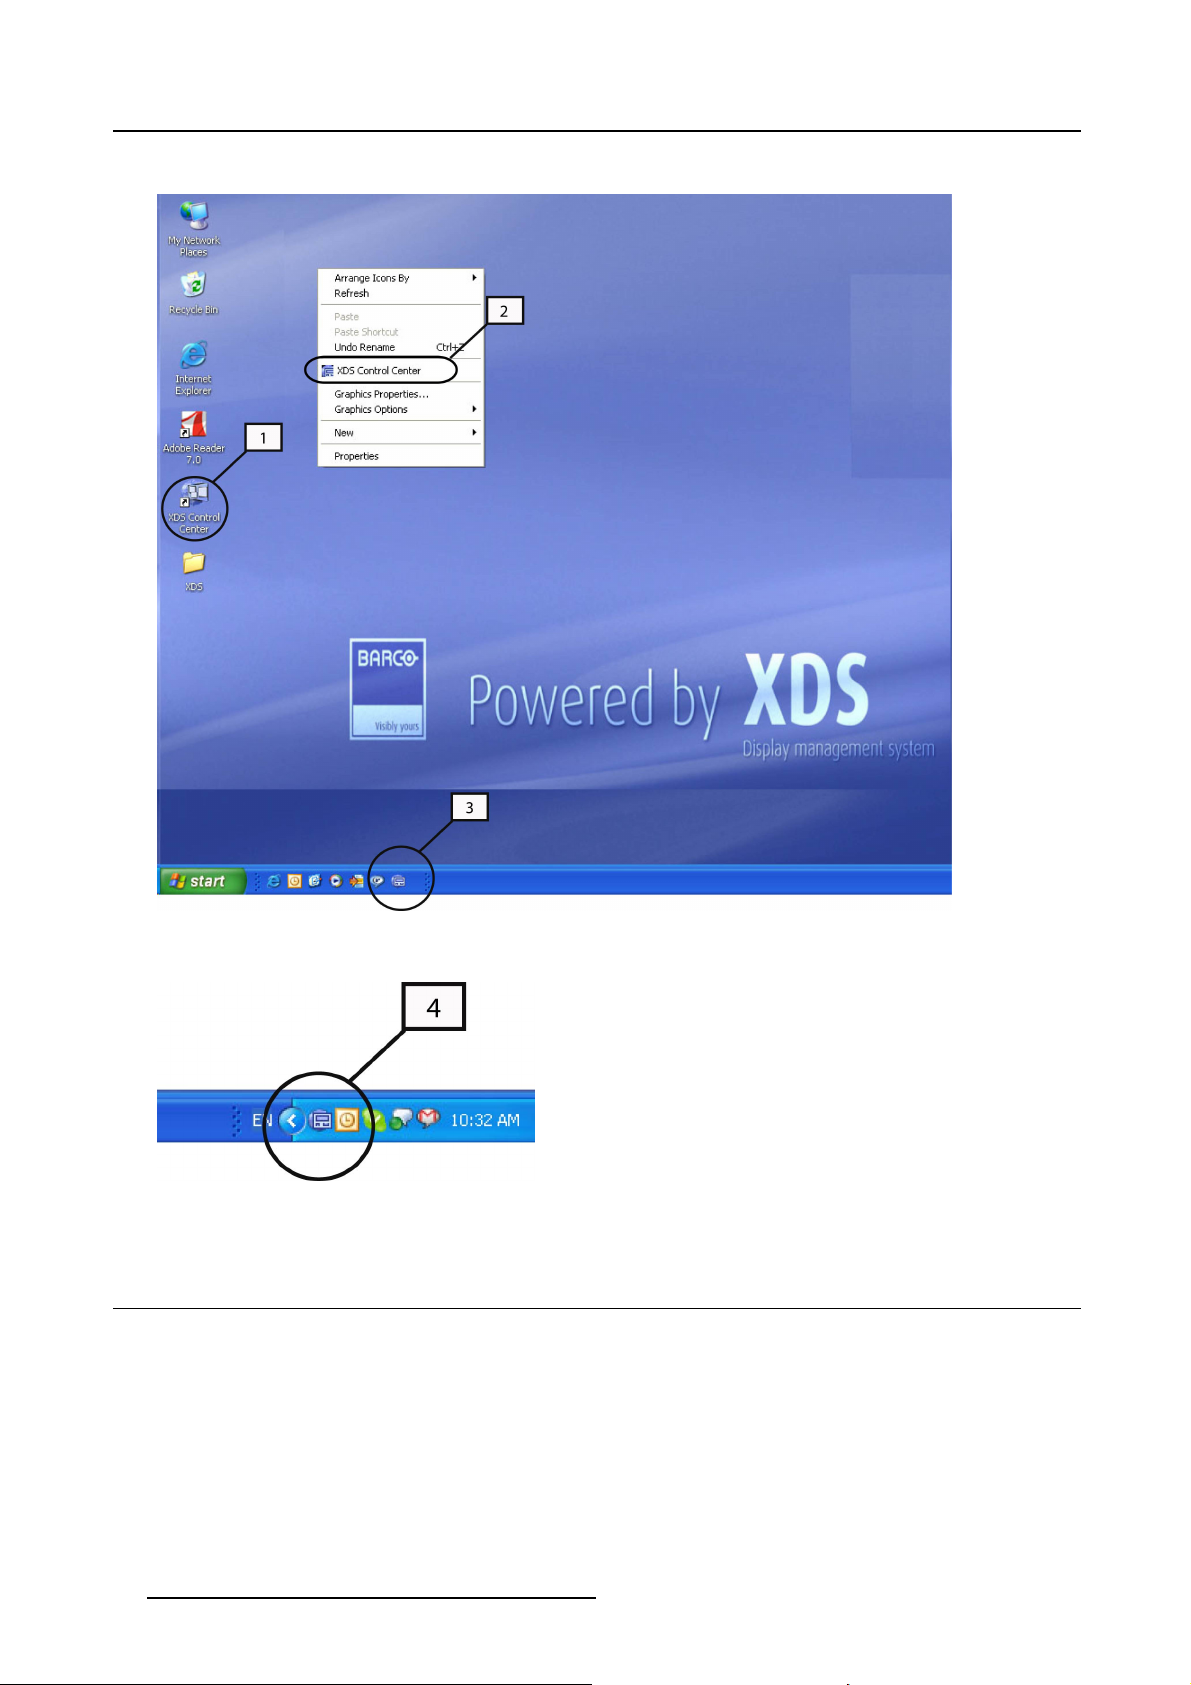
Different ways to bring up the XDS Control Center GUI
The various methods of bringing up the c ontrol center GU I from your desktop are displayed below.
• Double-click the XDS Control Center icon on your desktop. See Label 1.
• Right-click on y our desktop or in a v ideo insertion viewer and select X DS Control Center in the menu. See Label 2.
R59770497 XDS SOFTWARE REFERENCE GUIDE 17/11/2009
11
Page 16
3. XDS Control Center
• Single-click the XDS C ontrol Center icon in the tool bar. See Label 3.
Image 3-5
XDS software: different modes to invo
ke XDS CC G UI
• Double-click the XDS Control Center icon in the System tray. See Label 4.
Image 3-6
XDS software: invoke XDS CC GUI from tray
3.3 XDS Control Center GUI
Overview
• XDS Control Center GUI: Levels of v iew
• XDS Control Cen ter GUI: Changing the level of view
• XDS Control Center GUI: Menu bar
• XDS Control Center GUI: Toolbar
• XDS Control C enter GUI: Sour
• XDS Control C en ter GUI: Layouts View
• Setting privacy options
•Configuring GUI settings of XDS Control Center
ces View
12
R59770497 XDS SOFTWARE REFERENCE GUIDE 17/11/2009
Page 17
3. XDS Control Center
3.3.1 XDS Control Center GUI: Levels of view
Introduction
The X DS Control Center is the main user interface of the XDS software suite. When the XDS Control Center application is s tarted,
its window will be similar to any of the following views. The XDS Control Center GUI is designed as three views: minim al, compact
and exp ert. The degree of accessibility differs depending on the type of view. You can change the look and feel of the XDS Control
Center GUI to your wishes. See the XDS Software Reference guide for more details.
Minimal view
The minimal view is the basic view of the application. You can open a source from the sources drop-down list and you can open
a layout from the layouts drop-down list. You need to use the menu bar to access the many other features of the software. The
minimal view of X DS CC GUI is displayed below for your reference.
Image 3-7
XDS Control Center GUI: minimal view
Compact view
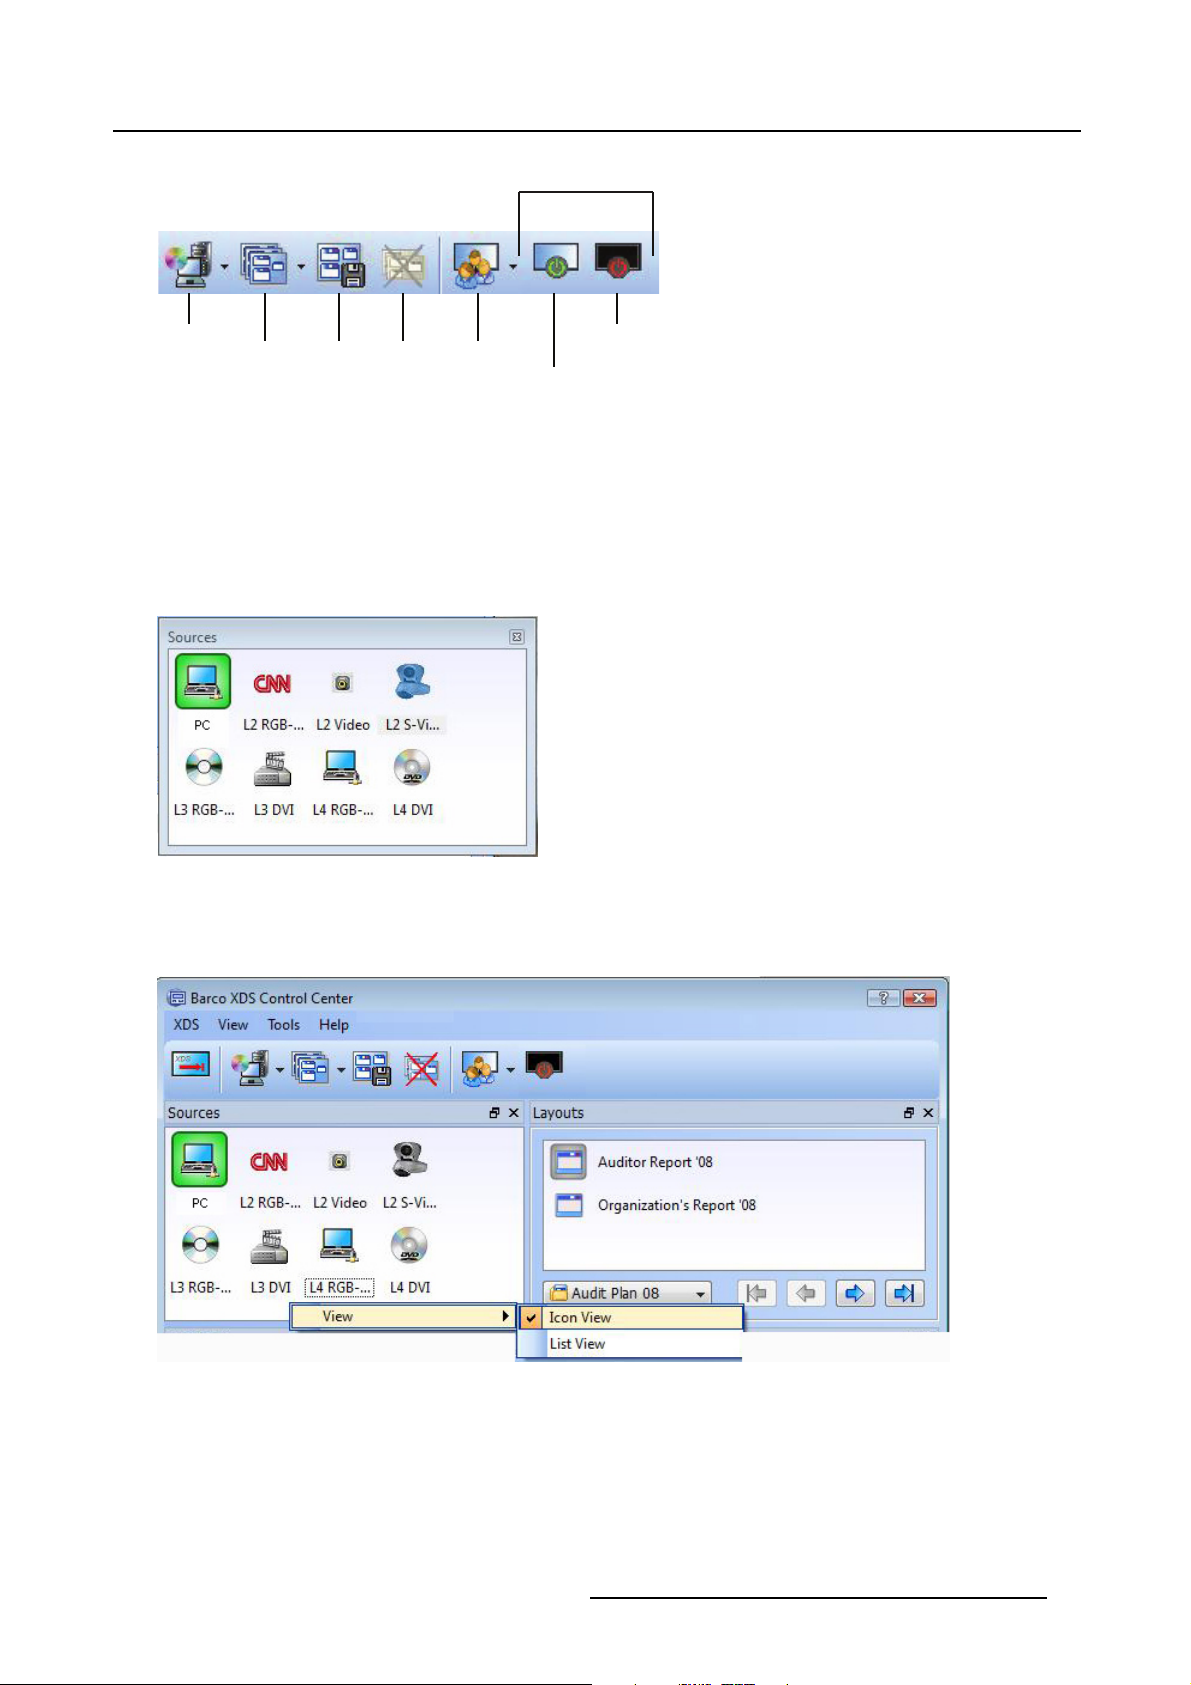
The compact view is the intermediate level which displays most of the software’s features in the toolbar. You can access various
functionalities u sing the tool bar, menu bar, and drop-down list.
Image 3-8
XDS Control Center GUI: compact view
Expert view
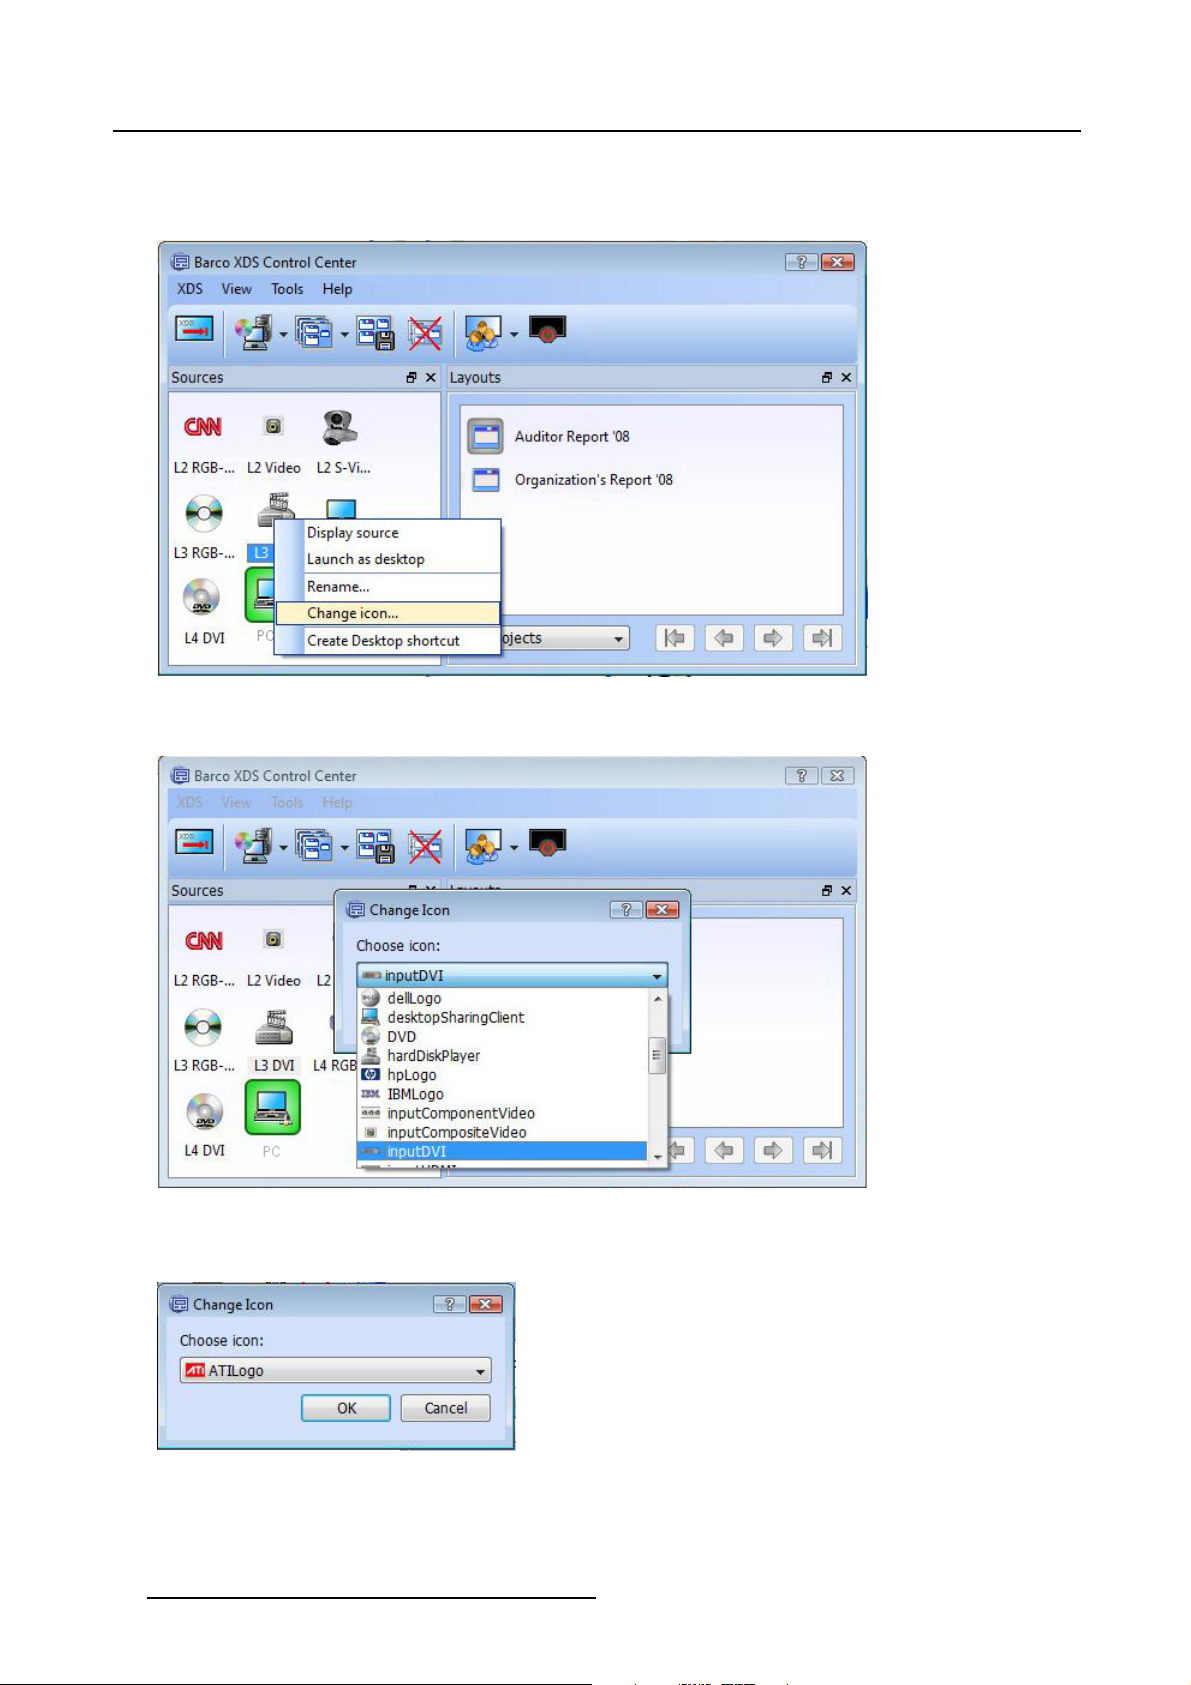
The expert view is the expanded view of the application. It gives a detailed look of the features available with the software such as
the layouts, sources, and reports. You can click to open a source directly from the Source dock widget or click open a layout from
the Layout dock widget.
Image 3-9
XDS Control Center GUI: expert view
3.3.2 XDS Control Center GUI: Changing the level of view
How to change the level of view?
You can sw itch to a different view depending on your requirement.
1. In the XDS Control Center GUI, click View from the menu bar
R59770497 XDS SOFTWARE REFERENCE GUIDE 17/11/2009
13
Page 18

3. XDS Control Center
A drop-down list will open.
Image 3-10
XDS CC GUI: change the level of view
2. Now click the view of your choice
3.3.3 XDS Control Center GUI: Menu bar
Menu bar
The application-specific menu bar of XDS software provides access to functions such a s launching s ources, saving layouts, changing
views, configuring the GUI settings, and importing a license file. The menu item s under each menu are displayed in the following
image.
MENU
XDS
Close XDS
Session
Privacy
Hide XDS
Control Center
Auto accept incoming
client connection
Don’t disturb my
meeting
Disconnect
Image 3-11
XDS Control Center GUI: Menu bar
View
Minimal User
Interface
Compact User
Interface
Expert User
Interface
Default Window
Arrangement
Close All Sources
Sources
Layouts
Video conference
system
Feedback
Tools
Save Layout
Save Layout
Advanced
Layout Manager
Configure
Restore Point
Manager
Help
Import License
File
Show Display
Information
About
• XDS: enables you to access privacy options and hide XDS C C GUI
• View: enables you to sw itch to different GUI views; switch to default window arrangement; hide and show Sources and Layouts
dock widgets; and hide and show F eedback window
• Tool s: enables you to save a layout; save a layout with advanced options; manage layouts using layout manager; save the
current state of XDS Control Center display; and m odify the GUI settings of XDS Control Center
• Help: enables you to import a licens e file, v iew the information entered while installing, and view the XDS version, module
version and Built date
3.3.4 XDS Control Center GUI: Toolbar
Toolbar
The tool bar is a user friendly tool with on-screen buttons and menus to get direct access to main features. The XDS Control Center
GUI toolbar is displayed below with an explanation of the buttons.
14 R59770497 XDS SOFTWARE REFERENCE GUIDE 17/11/2009
Page 19
This option varies depending
on the connected source
3. XDS Control Center
Click open
a source
Click open
a layout
Image 3-12
XDS Control Center: Toolbar
Save a
layout
Close all
displayed
sources
Set privacy
options
Switch on the
connected display
Switch o the
connected display
3.3.5 XDS Control Center GUI: Sources View
Introduction
The sources view provides a very flexible user interface to access the sour ces. You can dock the widget inside the XDS Control
Center GUI or drag the widget out of the dock area entirely so that it becomes a free floating widget. You can also change the view
of the s ource icon displayed in the widget.
Image 3-13
Sources widget
Icon view – List view
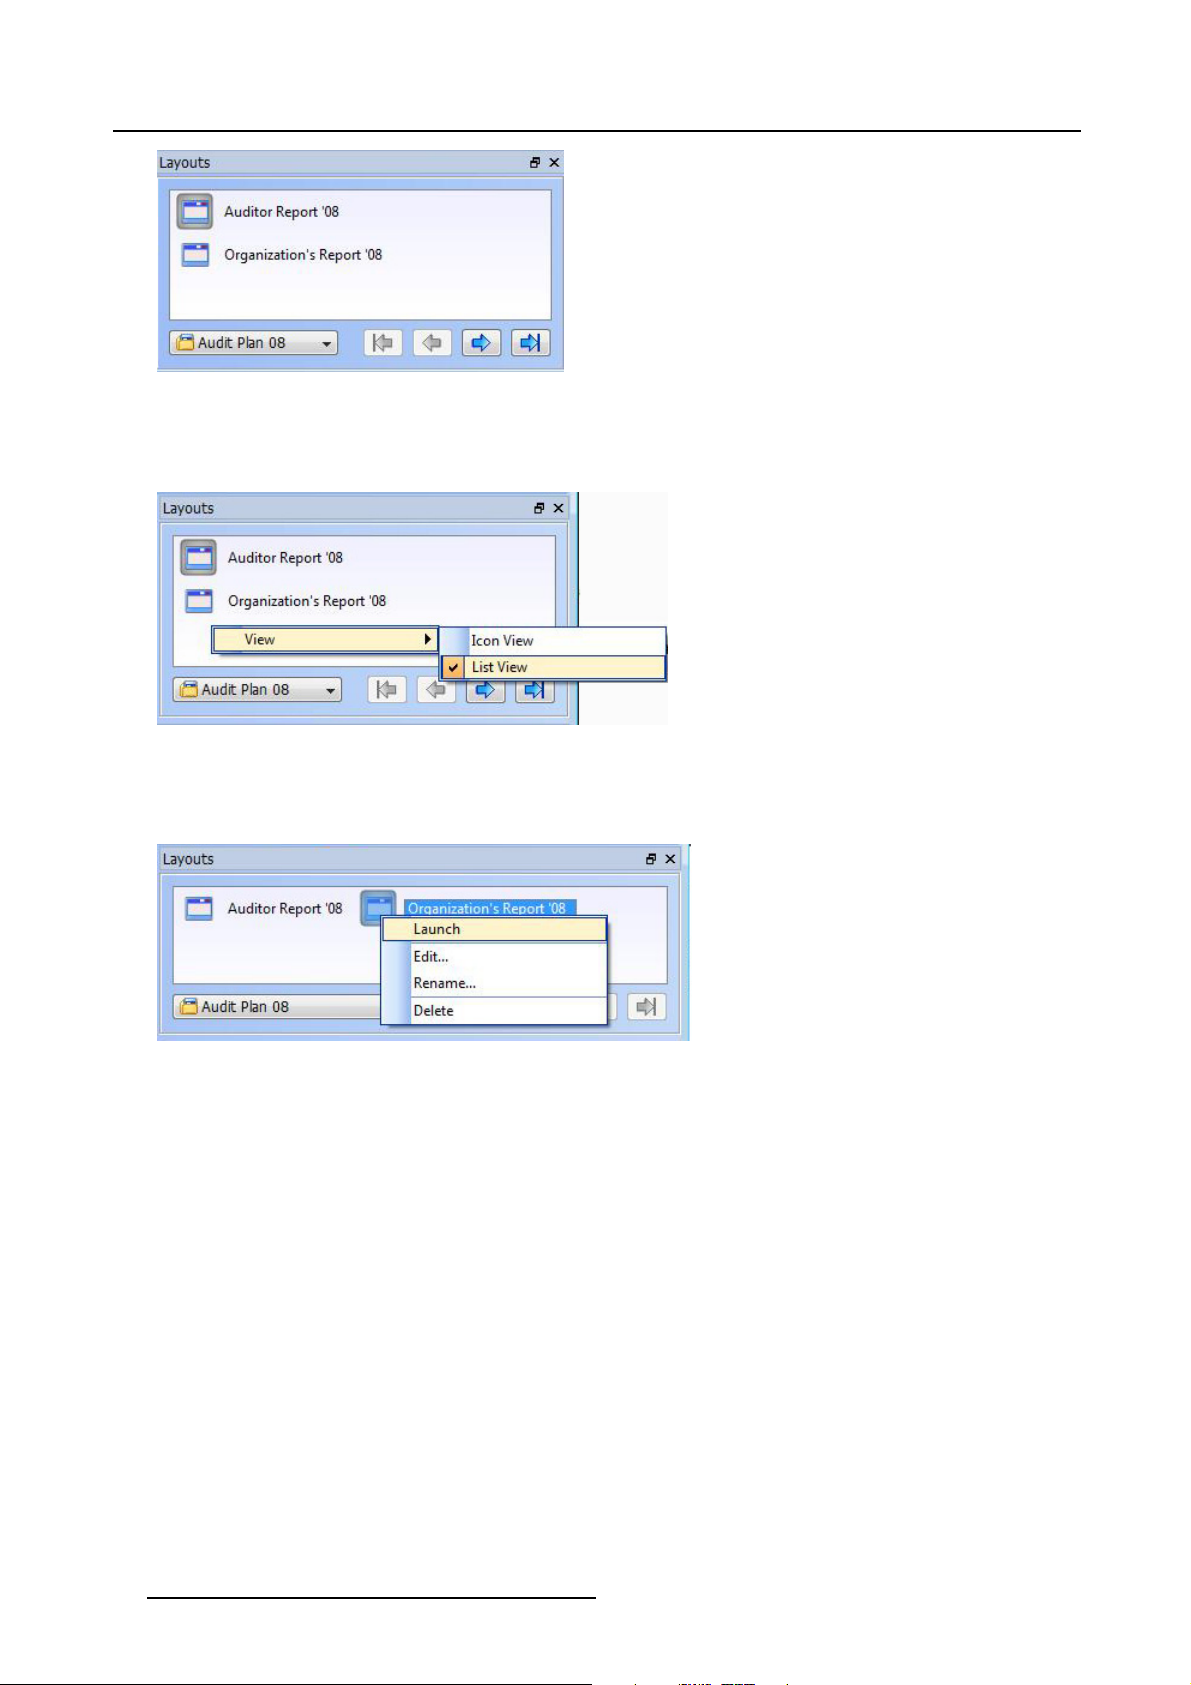
Right c lick on the widget to open the View menu. And switch to Icon View or List View by selecting your choice.
Image 3-14
Sources widget: Change view
Changing the icon of a source
You can change the icon of a source displayed on your S ources view. It can be the icon of an active source (a source which is
currently displayed), or an inactive source (a source which is not displayed).
R59770497 XDS SOFTWARE REFERENCE GUIDE 17/11/2009
15
Page 20
3. XDS Control Center
To change the icon for a source:
1. Right-click on the source icon to open the context menu
2. Click Change icon...
Image 3-15
Context menu: Change the icon
The Change Icon dialog box opens. It displays a list of available standard icons.
Image 3-16
Available standard icons
3. Select an icon from the drop-down list
4. Click OK
Image 3-17
Context menu: Select icon
The old icon will be replaced by the new icon.
16
R59770497 XDS SOFTWARE REFERENCE GUIDE 17/11/2009
Page 21

3. XDS Control Center
Image 3-18
Changed icon
The standard icons are available in .ico and .png format. You will find different resolutions of every standard
icon, i.e. 16 x 16, 24 x 24, 32 x 32, 48 x 48, and 64 x 64.
To k now m ore about adding new icons to the XDS Control Center GUI, refer to XDS Sofware R eference Guide.
Renaming a source icon
You can rename a source icon displayed on your source widget.
R59770497 XDS SOFTWARE REFERENCE GUIDE 17/11/2009
17
Page 22
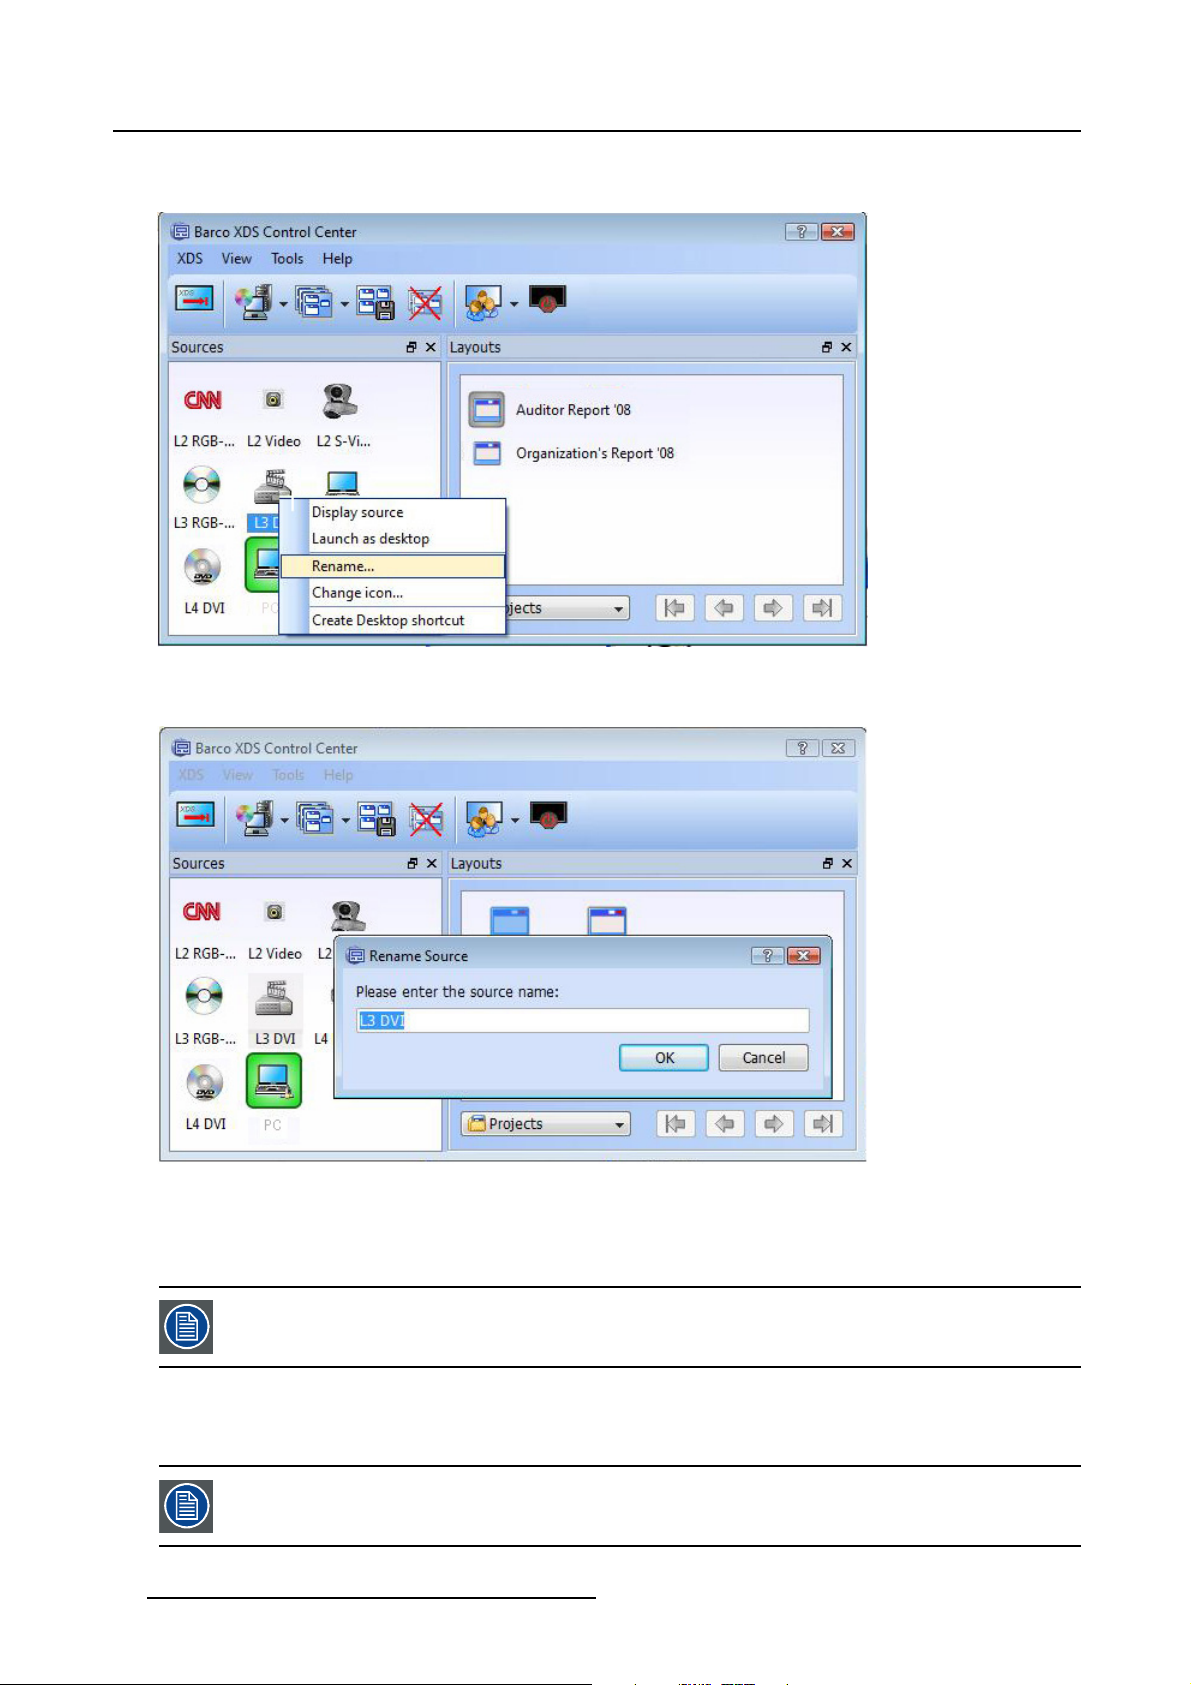
3. XDS Control Center
1. Right-click on the source icon to open the context menu
2. Click Rename...
Image 3-19
Rename the source icon
The Rename Sourc e dialog box opens.
Image 3-20
Enter a new name for source
3. Enter the new name for the source icon
4. Click OK
The old name will be replaced by t
he new name.
You cannot rename or change the icon of an active source (which refers to the displayed source) icon. You
will not find the option to rename when you right-click on an active source icon.
Launching a source as desktop background
You can set a source as desktop background of the display wall. In that case the selected source will act as w allpaper.
This capability is only possible with XDS-100 (the projectors with embedded XDS processor). It is not available
with XDS-150, XDS-200, XDS-400, and XDS-1000.
18 R59770497 XDS SOFTWARE REFERENCE GUIDE 17/11/2009
Page 23
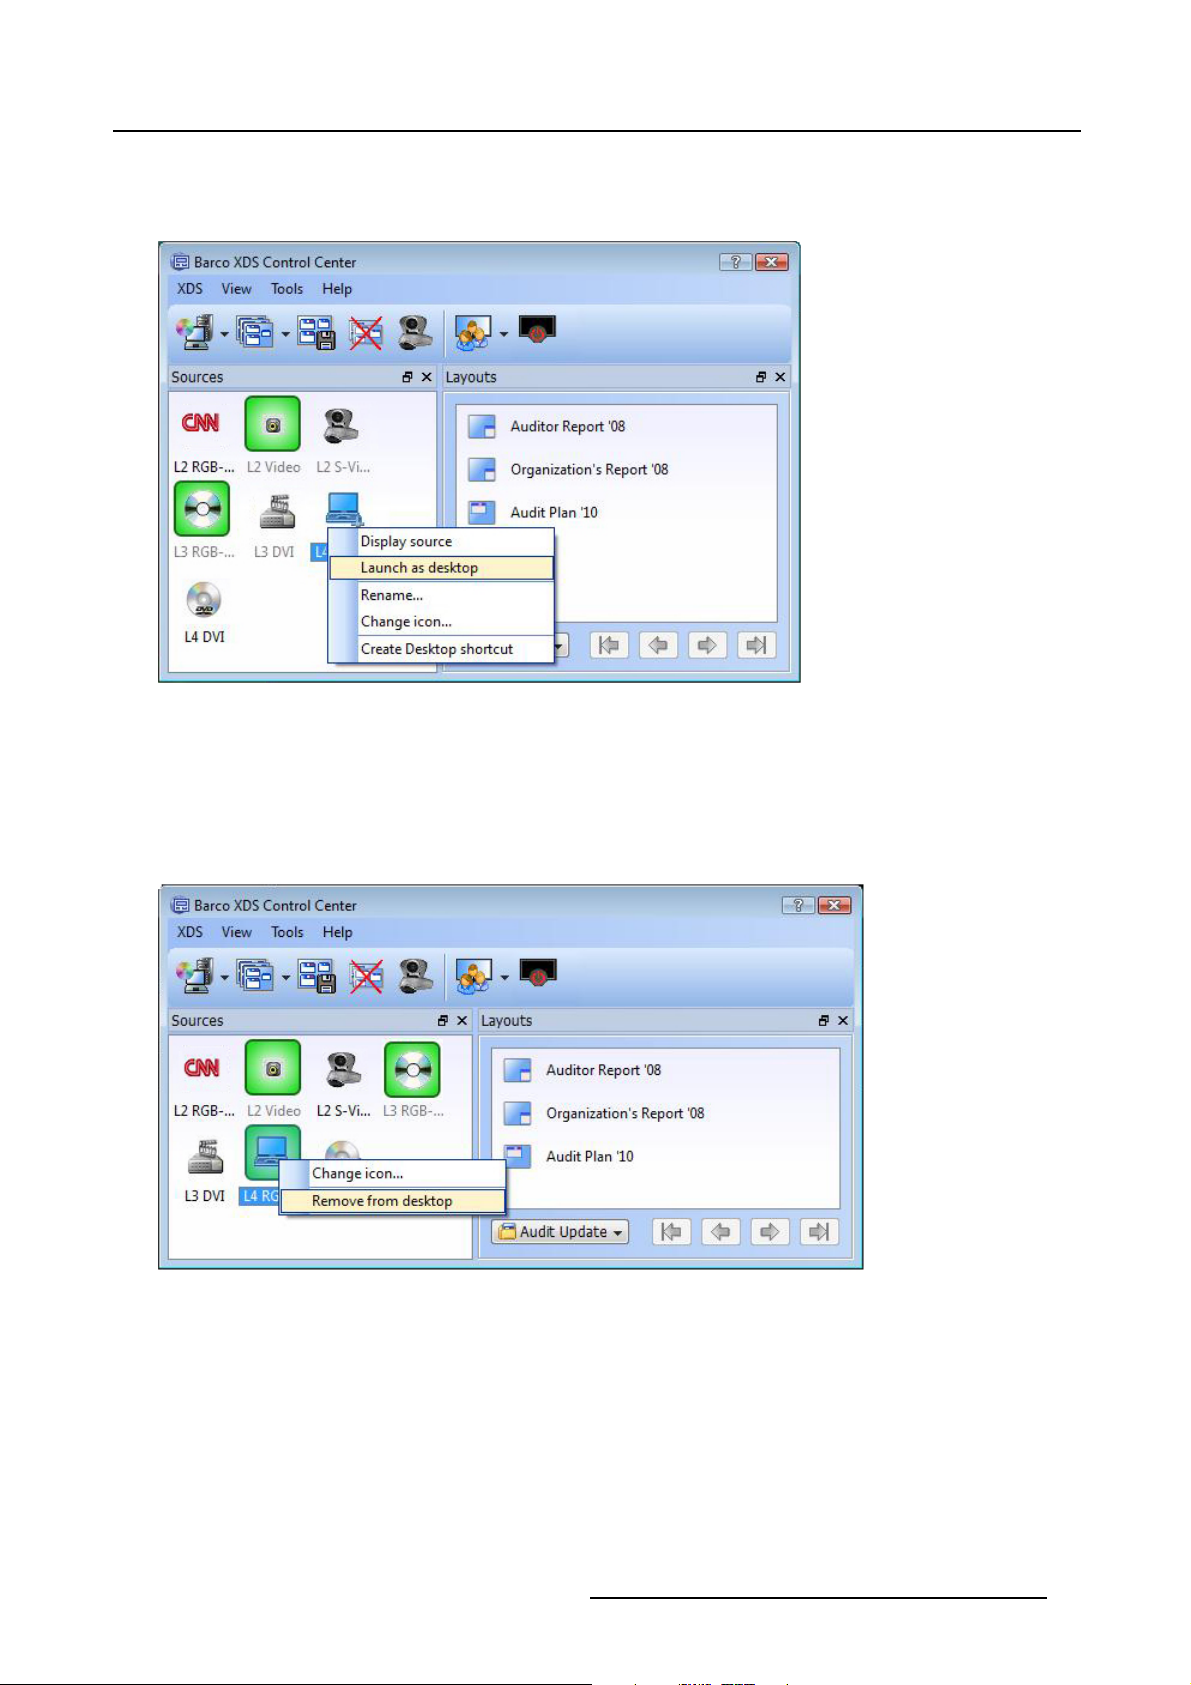
To set a source as desktop ba ckground:
1. Right-click on the source icon to open the context menu
2. Click Launch as Desktop
3. XDS Control Center
Image 3-21
Launch as desktop
The selected source will be displayed as desk top background on the display.
Removing a source used as des ktop background
To remove a source being used as a desktop background:
1. Right-click on the source displayed as desktop background to open the context menu
2. Click Remove from desktop
Image 3-22
Remove from desktop
The source will be removed from the desktop.
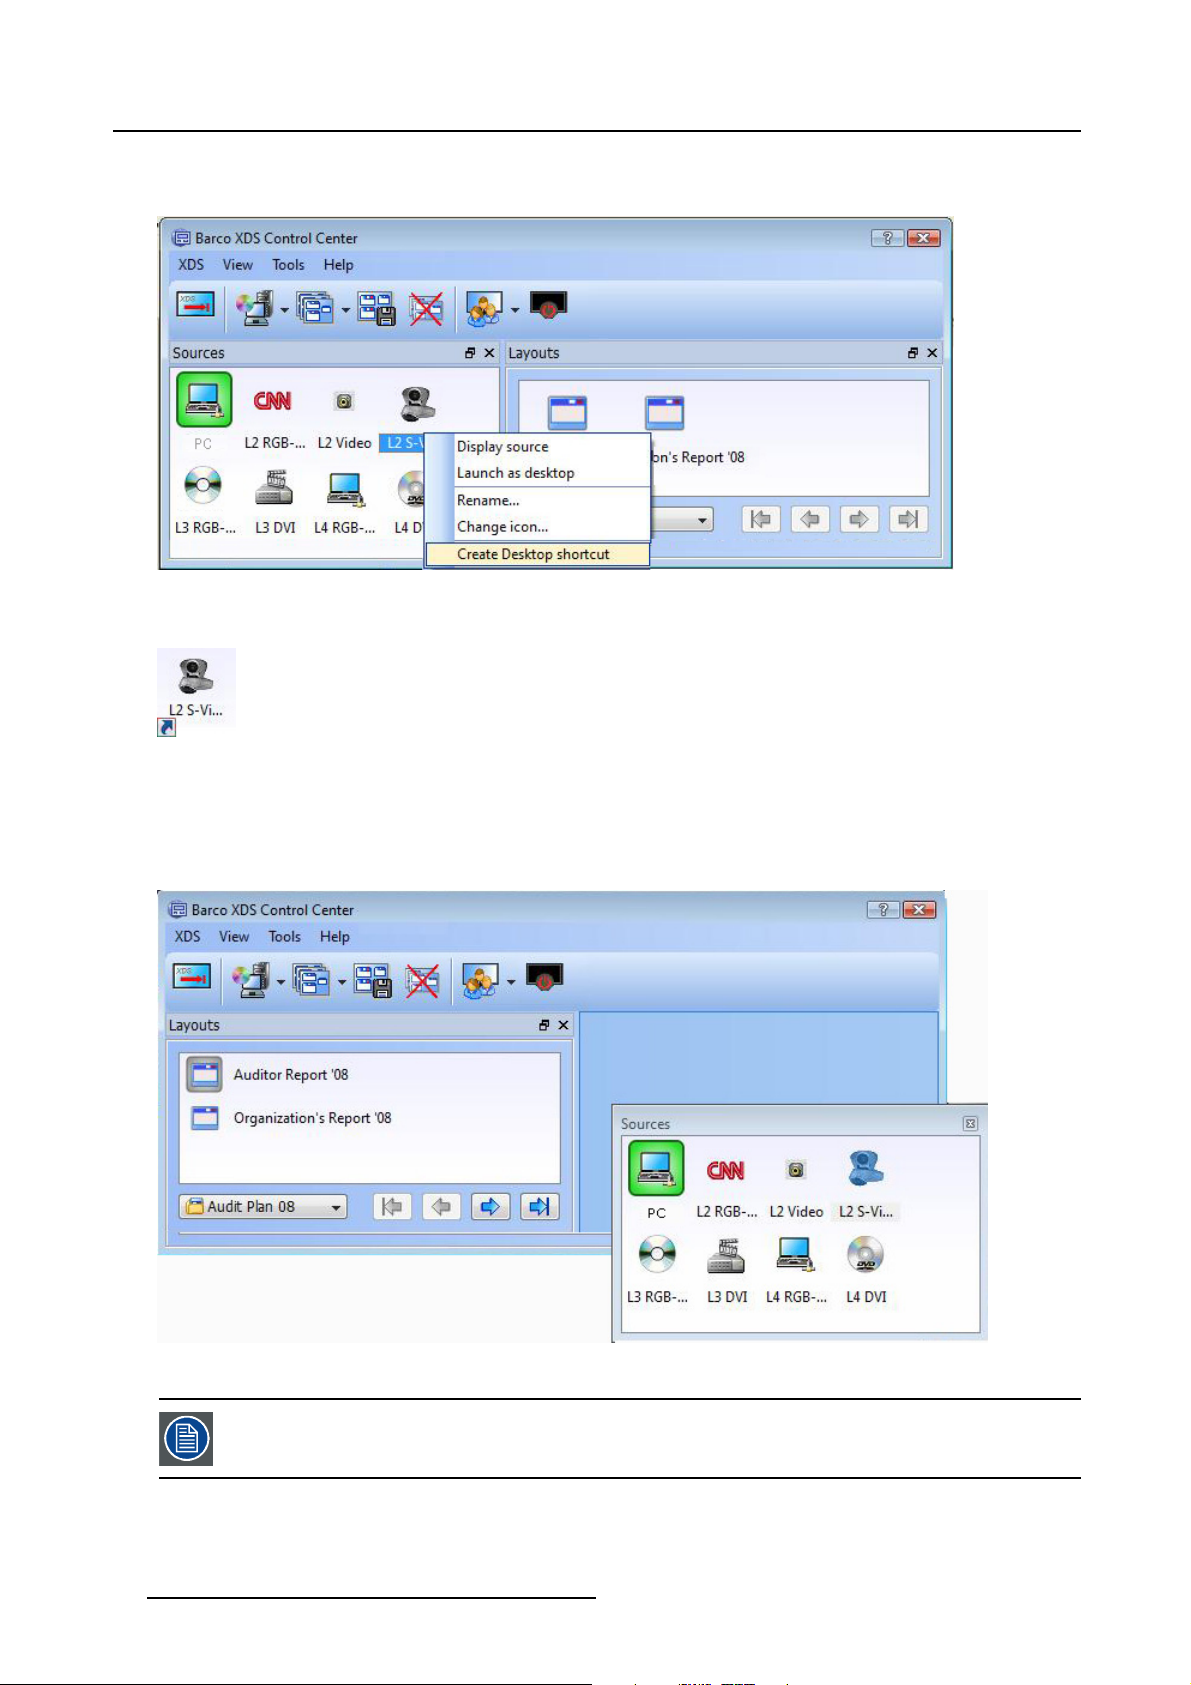
Creating a desktop shortcut for a source
To easily launch a source from the desktop, y ou c an c reate a shortcut of the source on the desktop.
R59770497 XDS SOFTWARE REFERENCE GUIDE 17/11/2009
19
Page 24
3. XDS Control Center
1. Right-click on the source to open the context menu
2. Click Desktop shortcut
Image 3-23
Context menu: Create desktop shortcut
You will find a shortcut of the s ource created on the desktop.
Image 3-24
Desktop shortcut
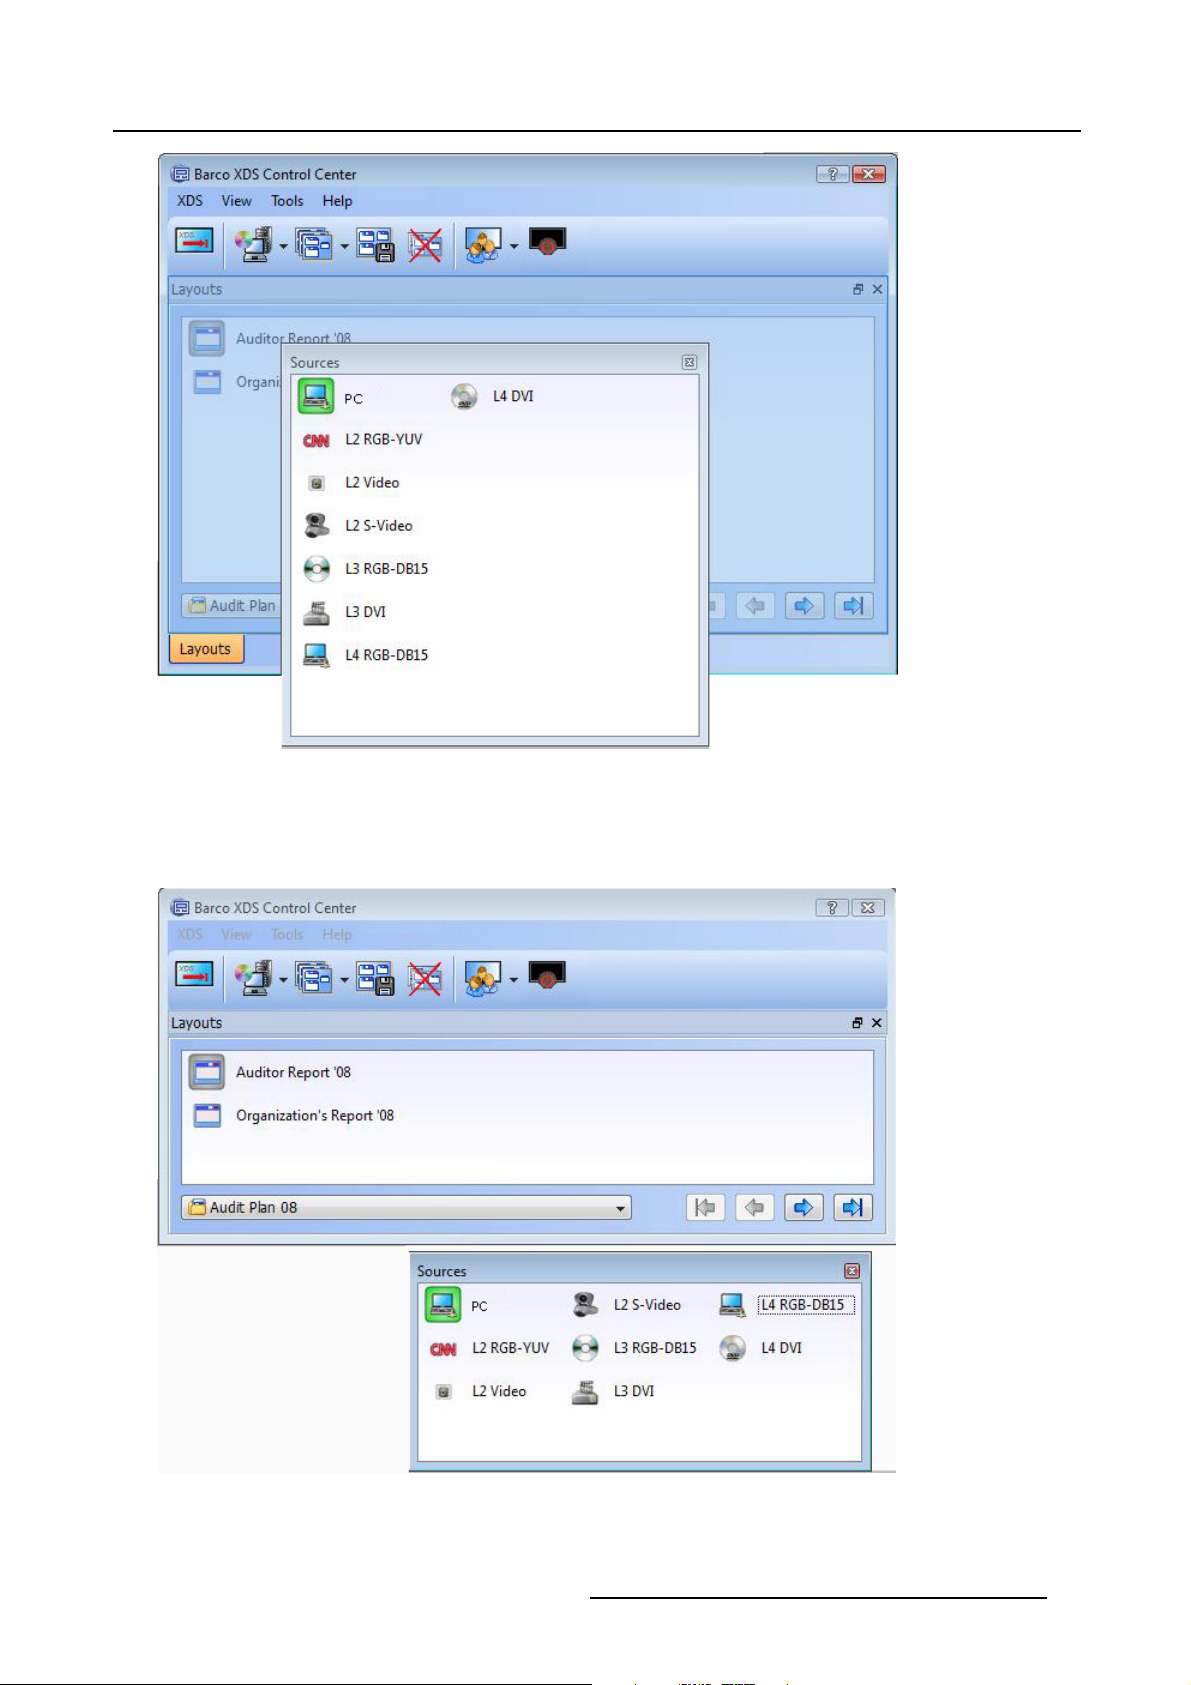
Dragging the widget inside the XDS Control Center GUI
Click the title bar of the widget and keep the button held down and
inside the GUI. When you move the widget inside, you will find that a receiving area will be highlighted in the XDS Co ntrol C enter
GUI.
move the widget anywhere inside the GUI to place the widget
Image 3-25
Sources widget: Docking the widget inside
When you drag the widget to dock it in a different position inside the GUI, make sure the GUI is big enough
for the widget to fit in. If the GUI is too small, then you will not be able to dock the widget inside. You can
maximize the GUI by pulling the sides or corners of the GUI.
Dragging the widget out of the XDS Control Center GUI
Use the title bar of the widget to drag it from one area to another.
20
R59770497 XDS SOFTWARE REFERENCE GUIDE 17/11/2009
Page 25
3. XDS Control Center
Image 3-26
Sources widget: Drag the widget out of the GUI
Undocking the widget from the XDS Control Center GUI
Use the Undock button or double click on the title bar to detach the widget from the XDS Control Center GUI to be an independent
widget.
Image 3-27
Sources widget: Undock the widget from the GUI as an independent window
R59770497 XDS SOFTWARE REFERENCE GUIDE 17/11/2009 21
Page 26

3. XDS Control Center
Docking the widget in the XDS Control Center GUI
Double click the title bar of the undocked widget to resume the widget back to its previous position inside the XDS Control Center
GUI.
Image 3-28
Sources widget: Dock the source widget
Stacking the widget
Click the title bar and drag and drop the w idget on top of an other widget to stack the source widget as tabbed page.
Image 3-29
Sources widget: Stack source widget
Make sure that the G UI is big enough to hold the widget. Maximize the XDS Control Center GUI by pulling the
corners or sides of the GUI.
Reverting to default window arrangement
You can return to the default arrangement of the widgets in the GUI, if their position or visibility has changed, by using the Default
Window Arrangement o
22
ption. In the View menu, click Default Window Arrangement.
R59770497 XDS SOFTWARE REFERENCE GUIDE 17/11/2009
Page 27
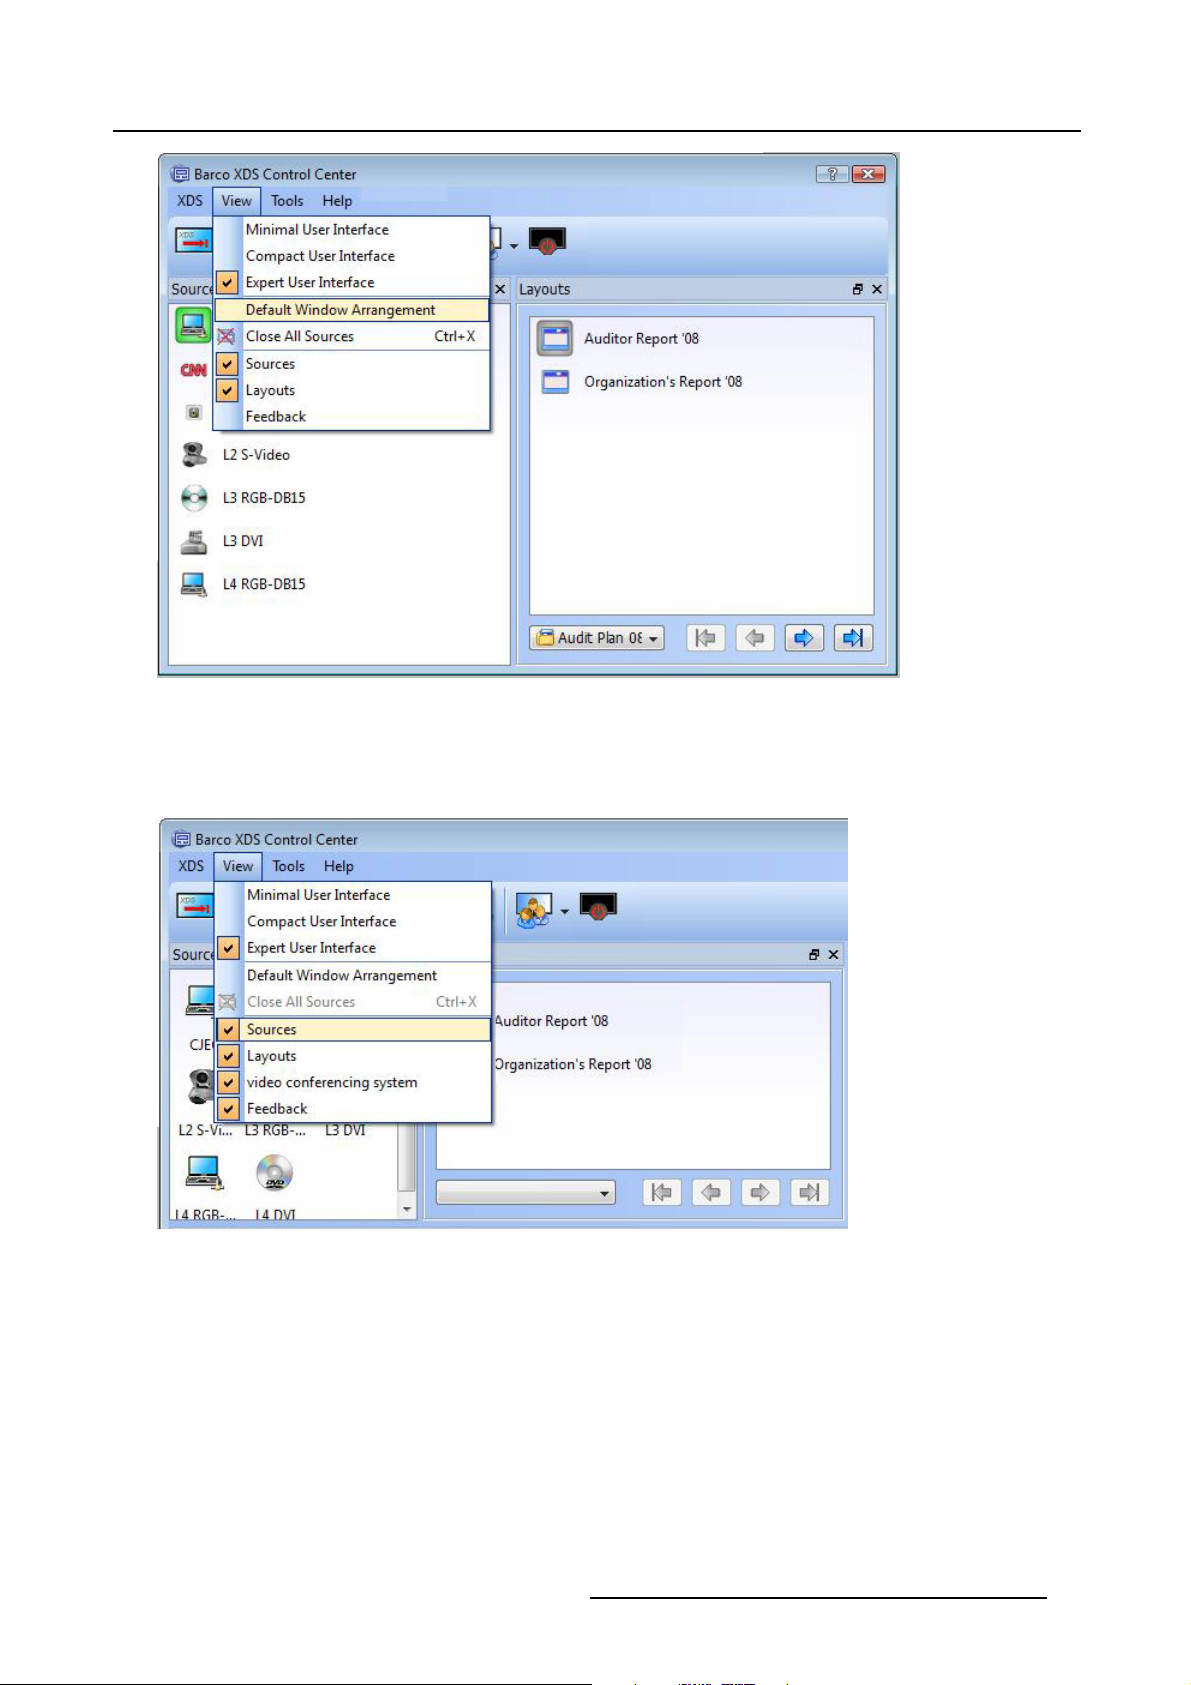
Image 3-30
Sources widget: Set default window arrangement
3. XDS Control Center
Closing or hiding the widget
If you do not want the sources widget to be displayed, you can hide the widget by unchecking Sources option from the View menu.
Or you can also close the source window using the Close button on the title bar.
Image 3-31
Hide source w idget
3.3.6 XDS Control Center GUI: Layouts View
Introduction
The Layo uts view provides an overview of the available layouts and presentations. Think of a presentation as a folder that contains
an ordered sequence of layouts. The Layout view allows you to select a presentation and provide buttons to navigate through the
layouts inside the selected presentation.
You can dock the Layout widget inside the XDS Control Center G UI or drag the dock widget out of the dock area entirely so that it
becomes a free floating widget. Use the title bar of the dock widget to drag it from one ar ea to another.
R59770497 XDS SOFTWARE REFERENCE GUIDE 17/11/2009
23
Page 28
3. XDS Control Center
Image 3-32
Layouts widget
Icon view – List view
Right click on the widget to open the View menu. A nd switch to Icon View or List View as per your choice.
Image 3-33
Sources widget: Change view
Launching a layout
You can launch a layout from the layout widget.
Image 3-34
Context menu: Launch a layout
To know more about launching a layout, please see "Launching a layout", page 70.
Renaming a layout
You can rename a layout from the layout widg
et.
24
R59770497 XDS SOFTWARE REFERENCE GUIDE 17/11/2009
Page 29
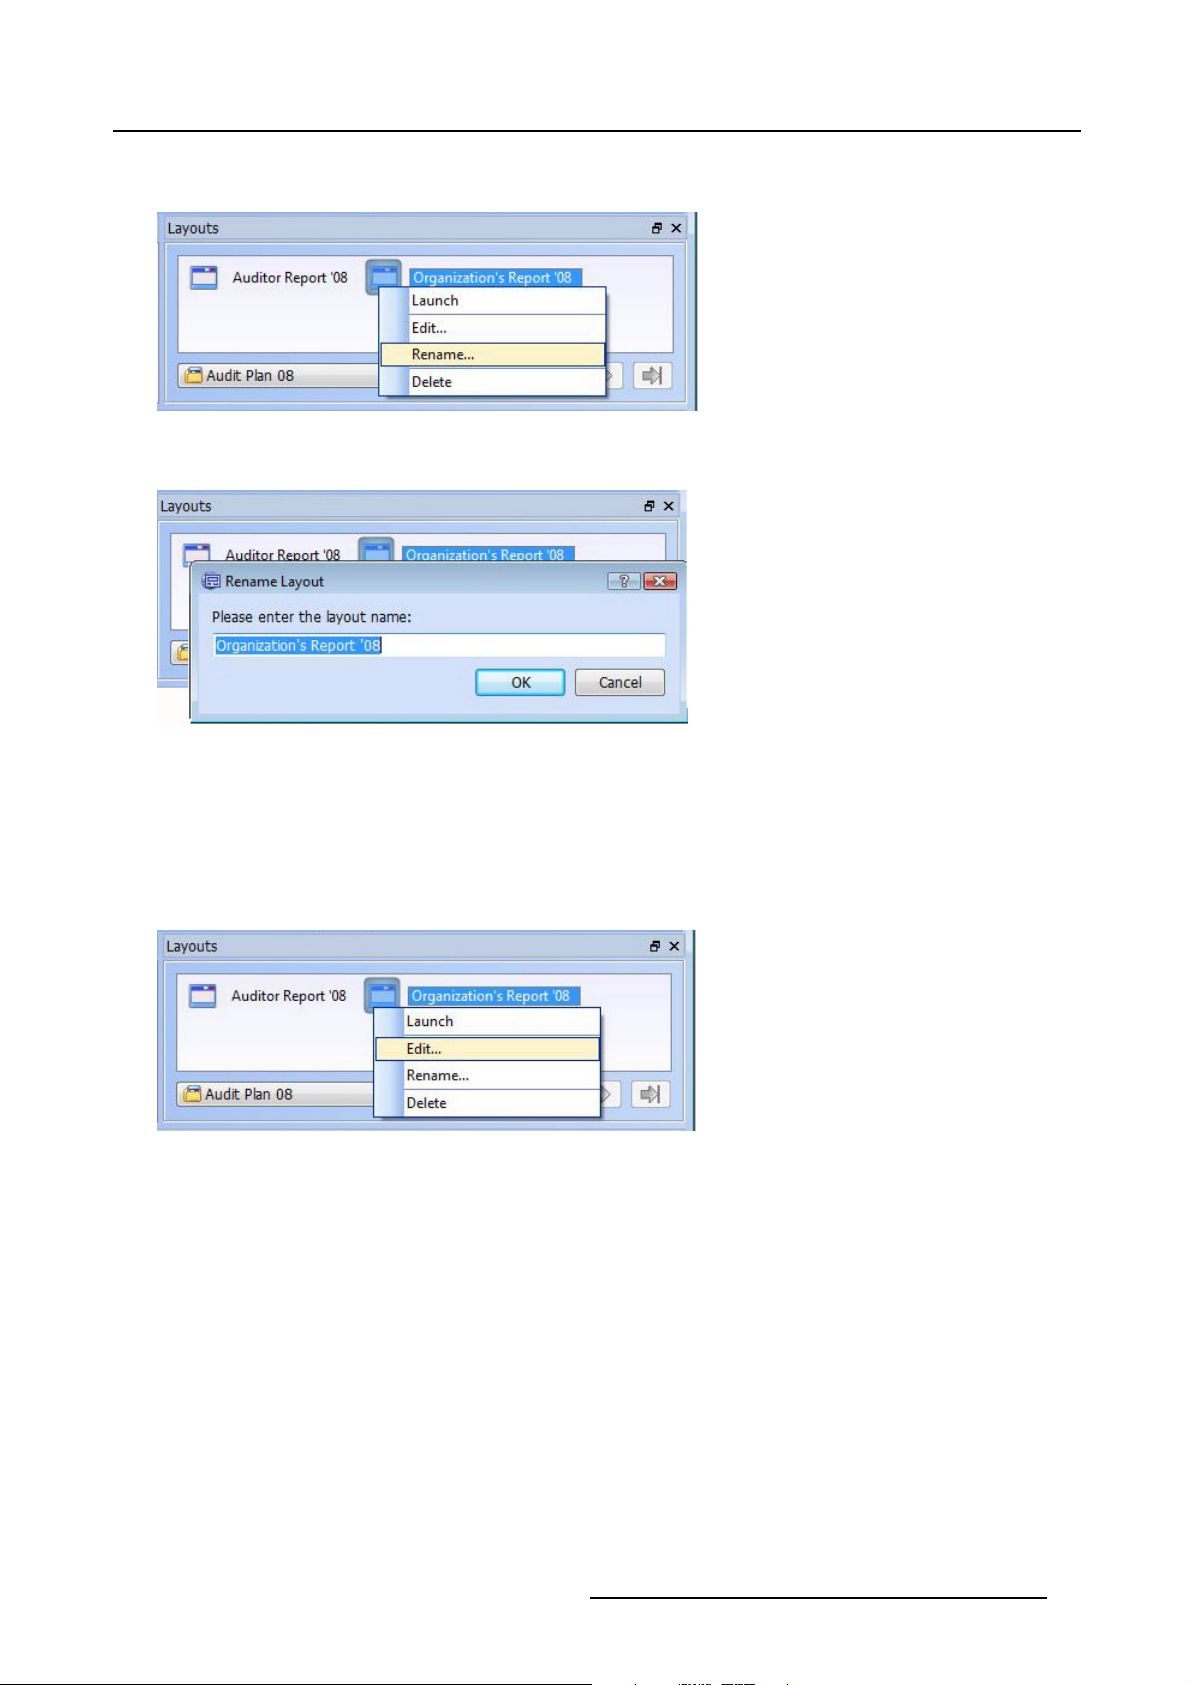
1. Right-click on the layout to open the context menu
2. Click Rename
Image 3-35
Context menu: Select the option Rename
The Rename Layout dialog box opens.
3. XDS Control Center
Image 3-36
Context menu: R ename the selected layout
3. Specify a new name for the layout
4. Click OK
The old nam e will be replaced with the new name.
Editing a layout
You can edit the settings of a layout such as video insert settings that includes changing the x and y position of the window, adjusting
the width and height of the window and more.
Image 3-37
Context menu: Select the Edit option
To know more about editing layout, please refer to the XDS Reference Guide.
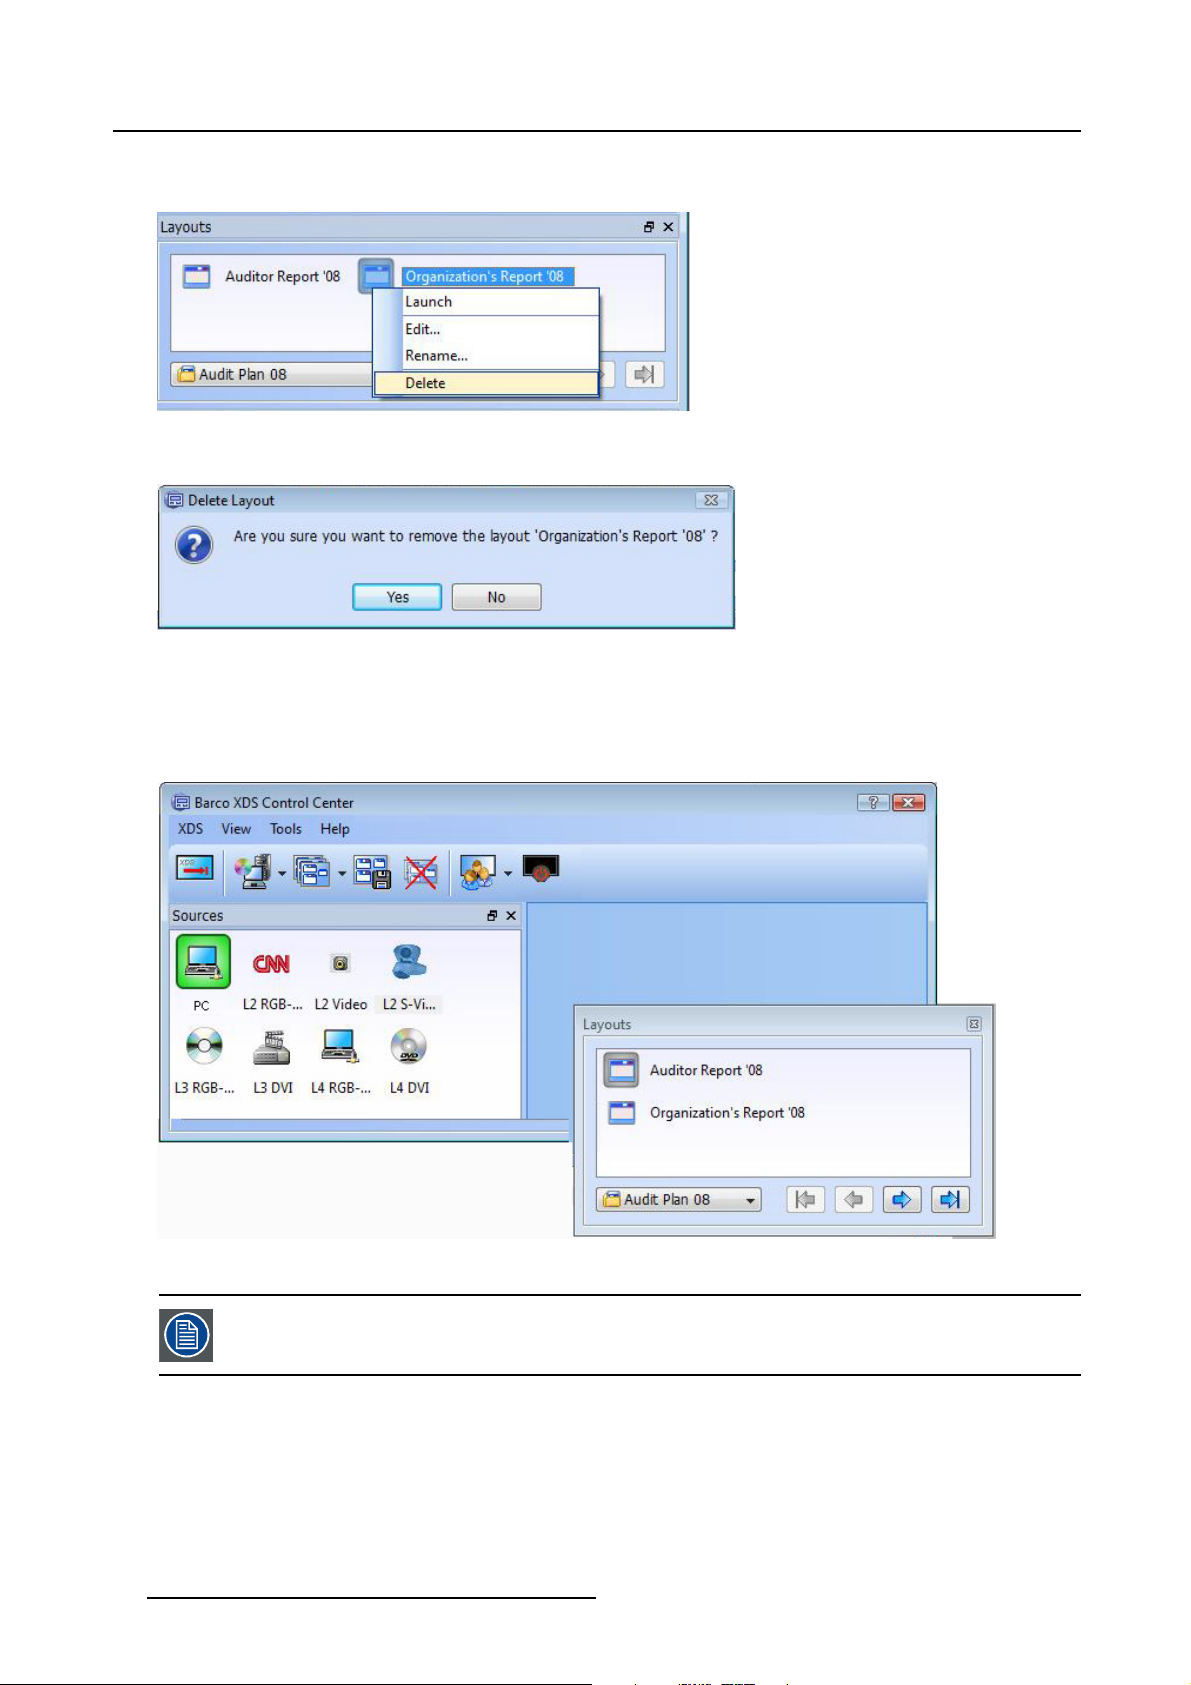
Deleting a layout
You can delete a layout from the layout widget. This will remove the layout from the presentation, where it is stored.
R59770497 XDS SOFTWARE REFERENCE GUIDE 17/11/2009
25
Page 30
3. XDS Control Center
1. Right-click to open the context menu
2. Click Delete
Image 3-38
Context menu: Select the Delete option
3. Youwillseeaconfirmation dialog appear. Click Ye s to confirm deletion
Image 3-39
Delete layout: Confirmatio n dialog box
Dragging the widget inside the XDS Control Center GUI
Click the title bar of the widget and keep the button held down and move the widget anywhere inside the GUI to place the widget
inside the GUI. When you move the widget inside, you will find that a receiving area will be highlighted in the XDS Co ntrol C enter
GUI.
Image 3-40
Sources widget: Dock widget inside GUI
When you drag the widget to dock it in a different position inside the GUI, make sure the GUI is big enough
for the widget to fit in. If the GUI is too small, then you will not be able to dock the widget inside. You can
maximize the GUI by pulling t
he sides or corners of the GUI.
Dragging the widget out of the XDS Control Center GUI
Use the title bar of the widget to drag it from one area to another.
26 R59770497 XDS SOFTWARE REFERENCE GUIDE 17/11/2009
Page 31

3. XDS Control Center
Image 3-41
Layouts widget: Drag the widget out of GUI
Undocking the widget from the XDS Control Center GUI
Use the Undock button or double click on the title bar to detach the widget from the XDS Control Center GUI to be an independent
widget.
Image 3-42
Layouts widget: Undock widget from GUI
R59770497 XDS SOFTWARE REFERENCE GUIDE 17/11/2009 27
Page 32

3. XDS Control Center
Docking the widget in the XDS Control Center GUI
Double click the title bar of the undocked widget to resume the widget back to its previous position inside the XDS Control Center
GUI.
Image 3-43
Layouts widget: Dock the widget
Stacking the widget
Click the title bar and drag and drop the widget on top o f another w idget to stack as tabbed pages. Sam e procedure applies to stack
the source widget as a tabbed page.
Image 3-44
Layouts widget: Stack the widget as tabbed page
While stacking the widget, m ake sure that the GUI is big eno ugh to hold the widget. Maximize the XDS Control
Center GUI by pulling the corners or sides of the GUI.
Reverting to default window arrangement
You can return to the default arrangement of the widgets in the GUI, if their position or visibility has changed, by using the Default
Window Arrangement option. From the View menu, select Default Window Arrangement.
28
R59770497 XDS SOFTWARE REFERENCE GUIDE 17/11/2009
Page 33

3. XDS Control Center
Image 3-45
Layouts widget: Revert to default window arrangement
Closing or hiding the widget
If you do not need the widget to be displayed, in the View menu, unch eck Layouts option to hide the layout widget. Or you can also
close the layout widget using the Close button on the title bar.
Image 3-46
Layouts widget: Close layout widget
3.3.7 Setting privacy options
Overview
• Enabling auto accept client conne ction
• Block remote users from connecting to the d isplay
• Disconnecting the clients
Introduction
Privacy options can be set from the X DS display. Or they can also be set from the XDS Remote Control Center. There are three
options of setting privacy namely, auto accept, don’t disturb, and disconnect.
3.3.7.1 Enabling auto accept client connection
How to enable auto accept client connection?
1. O pen XDS menu or click the Privacy Settings icon from the toolbar
R59770497 XDS SOFTWARE REFERENCE GUIDE 17/11/2009
29
Page 34

3. XDS Control Center
Image 3-47
Accept incoming client connection
2. S elect Privacy
3. Click Auto accept incoming c lient connection
Now when a remote user tries to get connected to the display or tries to share his/her desktop to the display, his/her desktop will
be connected to/shared on the display without any notification.
3.3.7.2 Block remote users from connecting to the display
How to block remote users from connecting to the display?
1. O pen XDS menu or click the Privacy Settings icon from the toolbar
2. S elect Privacy
3. Click Don’t disturb my meeting
Image 3-48
Restrict remote users from sharing their desktops
You will find a red sign on the Privacy settings ic on indicating that this particular option is set.
Image 3-49
Privacy setting icon
Now when a remote user tries to get co nnected to the display, his/her desktop will not be connected to the display. The remote
user will also receive a message that meeting cannot be disturbed.
Users that were already connected to the display before the Don’t Disturb function is activated will remain connected to the
display once the Don’t Disturb function is turned on. However, when suc h users get disconne cted from the display, they will not
be able to reconnect to this display again.
3.3.7.3 Disconnecting the clients
How to disconnect the clients?
1. O pen XDS menu or click the Privacy Settings icon from the toolbar
2. S elect Privacy
3. S elect Disconnect
4. S elect the client
5. S elect the name of the client
Image 3-50
Disconnect desktop sharing client
30 R59770497 XDS SOFTWARE REFERENCE GUIDE 17/11/2009
Page 35

3. XDS Control Center
Image 3-51
Disconnect remote control center client
3.3.8 Configuring GUI settings of XDS Control Ce nter
Overview
•Configuring XDS Control Center s ettings
•Configuring log file s ettings
•Configuring START menu settings
• Show/Hide sources in the source widget
•Configure the viewer settings
• Setting default settings
Introduction
Using the Configure dialog, you can set the size of icons, change the view of source and layout icons, change the font size, specify
the log file settings, show or hide sources widget, and configure viewer settings.
3.3.8.1 Configuring XDS Control Center settings
To configure XDS Control Center settings
1. O pen To ols menu
Image 3-52
Tools menu
2. Click Configure,,,
The Configure dialog box opens.
Image 3-53
Configure d ia log
3. S elect XDS Control Center from the left pane
4. Now using the drop-down list, select the required setting. The available configurations in the drop-down list for every item are
listed below for your reference.
R59770497 XDS SOFTWARE REFERENCE GUIDE 17/11/2009
31
Page 36

3. XDS Control Center
- Icon settings: You can choose the appropriate icon size
o
Icon size for toolbar: 16x16, 32x32, 48x48, 64x64
o
Icon size for view windows: 16x16, 32x32, 48x48, 6 4x64
- View settings: You can choose the default view o f sources and layouts icons in the sources and lay outs widget
o
Show sources as: Icons, list
o
Show layouts as: Icons, list
- Font settings: You can choose the font size of the text to be displayed for icons
o
Font size: Normal, Large
5. A fter s electing the required options, click Apply above settings as default for all Users
6. Click Apply to save the changes
7. Click OK to close the dialog
3.3.8.2 Configuring log file settings
To configure log file settings
1. O pen To ols menu
2. Click Configure...
3. O n the Configure dialog, select Log File from the left pane
Image 3-54
Log file settings
4. T he available configurations in the drop-down list f or every item are listed below for your reference.
- Log all messages of importance: Fatal, Error, Warn, In fo, Diag, Debug
- Log file size limit per application: < select the size limit >
- Maximum backup log fi les per application: < selec t the number >
The maximum number of log files that can be saved is 10.
5. Click Apply to save change s
6. Click OK to close the dialog
3.3.8.3 Configuring START menu settings
To configure START menu settings
1. O pen To ols menu
2. Click Configure...
3. O n the Configure dialog, select Start menu from the left pan
e
32
R59770497 XDS SOFTWARE REFERENCE GUIDE 17/11/2009
Page 37

3. XDS Control Center
Image 3-55
Start menu settings
The Start Menu Settings view displays the path of the folder where shortcut to layouts, and shortcut to sources are stored. Refer
to "Launching a source from START menu", page 37.
4. S elect the Menu type of your choice
5. Click Apply to save change s
6. Click OK to close the dialog
3.3.8.4 Show/Hide sources in the source widget
Procedure to show/hide sources in the source widget
1. O pen To ols menu
2. Click Configure...
3. O n the Configure dialog, select Source View from the left pane
Image 3-56
Source view settings
In the Source View Settings,youh
right pane which are hidden in the source widget.
4. To hide a source in the w idget, select that particular source in the left pane and click Hide>>
The selected sou rce will be moved to the right pane.
5. To show the hidden source in the widget, select that particular source in the right pane and click <<Show
The selected s ource will be moved t
6. Click Apply to save change s
7. Click OK to close the dialog
ave left pane displaying the s ources that are visible in the source widget, and sources on the
o the left pane.
R59770497 XDS SOFTWARE REFERENCE GUIDE 17/11/2009
33
Page 38

3. XDS Control Center
3.3.8.5 Configure the v iewer settings
To configure viewer settings
1. O pen To ols menu
Image 3-57
Viewer settings
2. Click Configure...
3. O n the Configure dialog, select Viewer Settings from the left pane
4. S elect the appropriate options:
- Default image quality: Low, Medium, High, Highest
- Default image rendering: Auto, Software only, Hardware accelerated
5. Click Apply above settings as default for all users
6. Click Apply to save change s
7. Click OK to close the dialog
3.3.8.6 Setting default settings
To set default settings
1. O pen To ols menu
2. Click Configure...
3. F rom the Configure dialog, click Defaults button found at the bottom-left corner
The default values will be se t.
3.4 Hiding the XDS Control Center application
How to hide an XDS Control Center application?
1. Click the XDS menu
2. Click Hide XDS Control Center
34
R59770497 XDS SOFTWARE REFERENCE GUIDE 17/11/2009
Page 39

Image 3-58
Hide XDS Control Center application
The XDS Control Center application will be hidden. To reopen the XDS application, see "Bringing up the XDS Control Center
GUI", page 11.
3.5 Closing an XDS session
3. XDS Control Center
The Close XDS session option is visible only when you have enabled User Management during installation.
How to close an XDS session?
1. If the XDS application is displayed as compact or expert view, you will find the XDS S ession icon on the top-left corner of the
GUI. It appears as a standard button on the toolbar. Click the XDS Session buttontoclosetheXDSsessionthatiscurrently
open.
Image 3-59
Compact and Expert view: Close XDS session
2. If the X DS application is displayed as minimal view, you will not find the XDS bu tton on the toolbar. But you need to use the XDS
menu. From the XDS menu, click Close XDS Session
Image 3-60
Minimal view: Close XD
S session
R59770497 XDS SOFTWARE REFERENCE GUIDE 17/11/2009 35
Page 40

3. XDS Control Center
3.6 Launching of a source
Source
In the XDS Control Center Suite, a source is any image generating dev ice connected to the projector, the WND-264,
the Transform A or the M atrix switcher or any com puter running the X DS Desktop Sh aring software.
Video insertion view er
In the X DS Co ntrol Center Suite, a video insertion viewer is a window in which a source is displayed.
Overview
• Introduction
• Launching a source from XDS CC GUI
• Launching a source from START m enu
• Launching a locked source
3.6.1 Introduction
What is in launching a source?
A source can only be displayed once! A displayed source is grayed o ut in two situations: it is being displayed
already, or it can not be displayed due to hardware restrictions. For example, if two DVI sources are connected
to one input layer of a projector, then only one of those DVI sources can b e displayed at a time, the other DVI
source being grayed out.
By launching a source you w ill be able to see the content of a connected device. You can launch any source from the X DS Control
Center GUI or from the Start menu. If you want to view a remote Desktop Sharing s ource, you can launch th at particular source
also from the Desktop Sharing PC, although admission by the XDS Control Center users (users of the display) may be required.
The topics below will give further detail you on how to launch a source.
3.6.2 Launching a source from XDS CC GUI
When opening a sou rce, the co ntent of the source is displayed in Video insertion viewer in its native size. The
source window (video Insertion viewer) will open in the upper left corner from the screen.
How t o launch a source from XDS CC GUI (minimal and compact view)?
1. F rom the XDS Control Center tool bar, click the Sources icon
A drop-down list open s.
Image 3-61
XDS CC GUI: Launching a source from compact view
2. Double-click the desired source from the drop-down list
36
R59770497 XDS SOFTWARE REFERENCE GUIDE 17/11/2009
Page 41

3. XDS Control Center
How to launch a source from XDS CC GUI (expert view)?
1. F rom the XDS Control Center sources dock w idget, double-click the source
Image 3-62
XDS CC GUI: launching a source from expert view
Note: The name of the launched source in the sources dock widget is grayed out and its icon has a green background to s how
a visual difference.
3.6.3 Launching a source from START menu
How to launch a source from Start menu?
1. Click Start menu
2. Click My Sources
Image 3-63
Select a source from START menu
3. S elect a s ource from the drop-down list
3.6.4 Launching a locked source
Whyisasourcelocked?
A source can sometimes appear with a lock s
credentials to view the source. This happens when the source is a rem ote source and the XDS Desk top Sharing c lient/remote
user has en abled user authentication during installation, or if the source is a RGB or DVI source, running XDS Remote Mouse and
Keyboard software with authent
For X DS Rem ote Mouse and Keyboard client software, you need to set the option to enable user authentication during installation.
See image displayed below for reference.
ication enabled.
ymbol. W hen you try to launch the locked source you will be prompted to enter your
R59770497 XDS SOFTWARE REFERENCE GUIDE 17/11/2009
37
Page 42

3. XDS Control Center
Image 3-64
XDS remote source: enabling user authentication
For XDS Desktop Sharing client software, you can enable the user authentication option during installation or from the GUI. See
"Setting security authentication", pa ge 137.
Hence that particular source can o nly be launched using the credentials of the OS running on that source computer.
Howtolaunchalockedsource?
1. In expert view, do uble-click the locked source from the sources dock widget in the XDS Control Center GUI or select the source
from the drop-down list in compact view
You will be prompted to enter your credentials or y our password.
Image 3-65
XDS remote source: user authentication
2. E nter the user nam e and password of the remote desktop
Note: Make sure you enter a valid user name and passw ord that exists in the dom ain of the re mote com puter
3. A fter authentication, an acceptance dialog w ill appear on the remote system
Image 3-66
XDS remote source: confirming authorization for remote user
4. W he n the r emote user accepts the request, the source will automatically launch in the connected display system
38
R59770497 XDS SOFTWARE REFERENCE GUIDE 17/11/2009
Page 43

3. XDS Control Center
3.7 Settings of a source — right- click option
Overview
• Locking aspect ratio
• Maximizing the viewer
• Moving a window of which the top bar is off-screen
• Moving a window without window decoration
• Setting native resolution of a source
• Showing/Hiding a window border
• Zooming a window
• Adjusting frame rate
• Setting image quality
• Enabling hardware acceleration
• Adjusting the image
• Adjusting the image file
• Setting Auto image
• Knowing the details of installed XDS software
• Using remote k eyboard/mouse control
• Disable remote keyboard/mouse control
Overview
Using the context menu, you can modify the settings of a source. For example, you can lock the aspect ratio, which will maintain the
proportions of the source; you can change the height and width of a viewer dis playing the source by customizing the aspect ratio.
You can maximize the viewer to full screen with no effect on the source.
The context menu can be opened via the mouse right-click on the source window.
Image 3-67
Open context menu
The standard options in the context m enu might slightly vary depending on the type of source.
Image 3-68
Context menu vie w
R59770497 XDS SOFTWARE REFERENCE GUIDE 17/11/2009 39
Page 44

3. XDS Control Center
In the image 3-69 below you will find options like Image Controls, Image File Controls, and Auto Image which
are not presen t in the image 3-68 above.
Image 3-69
Context menu vie w
3.7.1 Locking aspect ratio
How to lock aspect ratio?
When you launch a source, it opens up in its native size w ith a certain aspect ratio. You can also "unlock" the aspect ratio. This means
that when you scale the window, the aspect does not need to be preserved, meaning you can sc ale in one direction indepen dent of
the other.
1. F rom the viewer, right-click to open the context menu
2. S elect Aspect Ratio
A drop-down list open s.
Note: If the native size of the source matches one of the listed aspect ratios, the corresponding ratio will be chec ked in the list
and grayed out. If not, the Custom... option will be checked.
Image 3-70
Context menu: S elect the aspect ratio
3. S elect the required aspect ratio from the drop-down list
4. Click Auto to lock the aspect ratio
40
R59770497 XDS SOFTWARE REFERENCE GUIDE 17/11/2009
Page 45

Image 3-71
Context menu: Lock the aspect ratio
From now, when you r esize the viewer, the aspect ratio will be preserved.
How to specify a custom aspect ratio?
1. To specify your own aspect ratio other than the existing ratios, select Custom
3. XDS Control Center
Image 3-72
Context menu: Set the custom aspect ratio
The Custom Aspect Ratio dialog box opens.
2. A djust the Width an d Height and press OK for the changes to take effect
3.7.2 Maximizing the viewer
How to maximize viewer when aspect ratio is locked?
1. A fter locking the aspec t ratio, open the context menu once again. To know how to lock aspect ratio, see "Locking aspect ratio",
page 40.
2. S elect Full Screen
Image 3-73
Context menu: S elect full screen option
R59770497 XDS SOFTWARE REFERENCE GUIDE 17/11/2009 41
Page 46

3. XDS Control Center
Note: The viewer will not fill the full area of the screen, since the aspect ratio is locked. It will be scaled to the maximum
possible view, where the full source content remains visible without being stretched or shrunk. You will fin d black bars
on the bottom and top or on the left and r ight sides of the screen.
The images displayed below will give you an ov erview of maximizing the viewer to full screen with aspect ratio locked. You will
find that the aspect ratio is maintained.
Image 3-74
Context menu: Displaying the viewer with aspect ratio locked
Image 3-75
Context menu: Displaying the viewer with full screen option selected and aspect ratio locked
How to maximize the viewer when aspect ratio is unlocked?
1. F irstly, to unlock the aspect ratio, right-click on the viewer to open the context menu
2. S elect Aspect Ratio
3. S elect the option Unlock
42
R59770497 XDS SOFTWARE REFERENCE GUIDE 17/11/2009
Page 47

Image 3-76
Context menu: U nlocking aspect ratio
4. Now select the option Full Scree n from the c ontext menu
Or, you can also double-click on the title bar of the viewer window to maximize to full screen
3. XDS Control Center
Image 3-77
Context menu: Select full screen option when aspect ratio is unlocked
R59770497 XDS SOFTWARE REFERENCE GUIDE 17/11/2009 43
Page 48

3. XDS Control Center
You will fi nd that the image is stretched to its maximum with no regard to aspect ratio. For example, see image below. Compare
it with image 3-75. W he n y ou zoom, the aspect ratio will no longer be preserved in this case of the other. You can scale in one
direction independent of the other.
Image 3-78
Context menu: Displaying the viewer with full screen
option selected and aspect ratio unlocked
How to revert to normal view?
To return to normal view from full screen mode:
1. Right-click on the screen to open the context menu
2. De-select Full Screen option
Image 3-79
Context menu: De-select Full Screen option
3.7.3 Moving a window of which the top b a r is off-screen
How to move the window of which the top ba r is off-screen?
1. If the top-bar of the viewer window is out of the visible area, then place your mouse pointer on the visible area of the viewer
window
2. P ress CTRL button on your keyboard and move your mouse simultaneously to move the window. See lab el 1.
44
R59770497 XDS SOFTWARE REFERENCE GUIDE 17/11/2009
Page 49

Image 3-80
Moving the viewer window of which the top bar is off-screen
3. XDS Control Center
3.7.4 Moving a window without window decoration
How to move a window without decoration?
1. P lace your mouse pointer on the viewer window
2. P ress CTRL button on your keyboard and move your mouse simultaneously to move the window. See lab el 1.
Image 3-81
Move a window without decoration
3.7.5 Setting native resolution of a source
How to set na tive resolution of a source?
1. Right-click on the view
2. S elect the option Native Resolution (100%)
R59770497 XDS SOFTWARE REFERENCE GUIDE 17/11/2009
er to open the context m enu
45
Page 50

3. XDS Control Center
This option displays the source in its native size without scaling.
Note: Whenever a source is launched, it will open up in its native resolution and native as pect ratio. If the native aspect ratio
is listed in the standard ratios, the corresponding ratio will be checked in the list.
Image 3-82
Context menu: S et the native resolution
3.7.6 Showing/Hiding a window border
How to show a window border?
1. Right-click on the viewer to open the context m enu
2. S elect Show Window Decoration to see the window border.
For example, see image 3-83, it displays the source with the window border and the Show Window Decoration option is checked.
Image 3-83
Context menu: S how window decoration
Note: By default, the Sho w Window Decoration option is always enabled.
How to hide a window border?
1. Right-click on the source to
2. De-select S how Window Decoration option to hide the window border. Only the inserted source will be displayed.
The image 3-84 displays the source without the window border and the Show Window Decoration option is unchecked.
46
open the context menu
R59770497 XDS SOFTWARE REFERENCE GUIDE 17/11/2009
Page 51

Image 3-84
Context menu: Hi de window decoration
3.7.7 Zooming a window
3. XDS Control Center
zoom percent
The zoom percent is the percentage to either enlarge or reduce a source window from its original size. The standard
options are: 25%, 50%, 75%, 100%, 125%, 150%, 17 5% , 200%, and 250%.
How to z oom a window?
If your source is too large to fit on your display or t oo small to see the finer detail of the source on your display, you can adjust the
size of a viewer window by zooming or by using the standard zoom percent options.
1. Right-click on the source window to open the context-menu
2. S elect Zoom
Image 3-85
Source settings: Select the zoom percent
3. S elect the r equired zoom percent
R59770497 XDS SOFTWARE REFERENCE GUIDE 17/11/2009
47
Page 52

3. XDS Control Center
Or,
click on the viewer window and drag the c orner of the viewer window by con tinuously pressing the left mouse button or do the
same on the side borders
Image 3-86
Source settings: Zoom a window
Note: If the aspect ratio is Unlocked, the aspect ratio will not be maintained when zooming is d one with side borders.
3.7.8 Adjusting frame rate
frame rate
Specifies the number of frames to be displayed per second.
Adjusting the frame rate of a viewer is only possible for viewers that display a remo te desktop sharing source.
Frame rate
Frame r ate can influence the user’s experience in viewing the source window movement in two ways; s ometimes the illusion of
motion w ill not be effective, or if it is un sync hronized with the display device, the source window will show choppy m ovem ent.
Adjusting the frame rate enables you to get a smooth and unconstrained movement of source window and to have control on the
network bandwidth that is used, when shifting the v iewer from one position to another. The higher the frame rate, the smoother is
the movement of source window.
How to adjust frame rate?
1. Right-click on the source to open the context menu
2. S elect Maximum Frame Rate
Image 3-87
Context menu: Adjust the frame rate
A drop-down list opens with the standard frame rates.
48
R59770497 XDS SOFTWARE REFERENCE GUIDE 17/11/2009
Page 53

3. S elect the required frame rate or select Unlimited .
Note: Unlimited is the maximum frame rate that can be s et. It is equal to the highes t poss ible frame rate that the CPU of the
XDS Control Center P C (display) can support at that point of time.
3.7.9 Setting image quality
The image quality option appears only for XDS Desktop Sharing source.
How to set image quality?
Image quality settings has effects on frame rate and netw ork b andwidth usage.
1. Right-click on the source to open the context menu
2. S elect Image Quality
3. XDS Control Center
Image 3-88
Context menu: Select image quality
3. You can select any of the standard options: Low, Medium, High,orHighest
Note: Setting the image quality to Low will result in lower quality image compression, higher frame rate, and less network
bandwidth usage.
3.7.10 Enabling hardware acceleration
hardware acceleration
Using hardware to perform a function faster than is possible in software running on the CPU.
This option appears only for a desktop sharing source. Switching on hardware acceleration forces scaling to
be executed in the GPU.
How to enable hardware acceleration?
1. Right-click inside the viewer window to open the context men u
2. Click Hardware Accelerated
R59770497 XDS SOFTWARE REFERENCE GUIDE 17/11/2009
49
Page 54

3. XDS Control Center
Image 3-89
Hardware accelerated
3.7.11 Adjusting the image
How to use image controls?
1. Right-click inside the viewer window to open the context men u
2. Click Image Controls...
Image 3-90
Image control
The image control dialog box opens.
3. S elect the display from Select pro jector
Note: All adjustments ar e not possible for every type of signal. For an RGB signal, you can adjust the tint and sharpness. For
a video signal, you can adjust the contrast, brightness, tint (only for NTSC signals), and sharpness. For a DVI signal,
you can adjust the brightness and contr
Note: For multi-viewport windows that show multiple sources (e.g. clusters) in a single window, right-click on the source that
you want to control.
50
drop-down list
ast.
R59770497 XDS SOFTWARE REFERENCE GUIDE 17/11/2009
Page 55

Image 3-91
Adjust the image
4. S elect the signal type from the Signal Type drop-down list
5. A djust controls such as brightness, color, c ontrast, tint, and sharpness
6. Click Show Advanced to expand the dialog
3. XDS Control Center
Image 3-92
Advanced image controls
7. You can ad just for noise reduction and gamma
8. S elect the Color Temperature from the drop-down list. The available options are projector white, computer, video, film, and
disabled (to disable the opt
ion)
9. Click Hide Advanced to hide the advanced image controls
10.Click OK for changes to take effect
Note: Inactive controls are grayed out. In this case (for a data signal), color, tint and sharpness are grayed out
3.7.12 Adjusting the image file
How to use image file controls?
An image file contains the main c haracteristics of a source, for example, number of active lines. The system mem ory contains a
list of files c orresponding t
acustomfile is created. The file is automatically sav ed as a custom file. The image file controls function enables you to adapt and
save a custom file.
1. Right-click inside the viewer window to open the context men u
R59770497 XDS SOFTWARE REFERENCE GUIDE 17/11/2009
o the most comm on sources (standard files). When a ne w source corresponds with none of these files,
51
Page 56

3. XDS Control Center
2. Click ImageFileControls...
Image 3-93
Image file control
The image file controls dialog box opens.
Image 3-94
Image file control dialog
3. S elect the display from Select pro jector drop-down list
4. A djust controls such as active and total pixels
Note: Not all adjustments are available for each type of source, it can slightly differ depending on whether the source is a high
resolution/ stereo source (connected to WND 264) or a low resolution data or video source (connected to Transform A ).
5. Click Show Ad vanced Controls to expand the dialog
52
R59770497 XDS SOFTWARE REFERENCE GUIDE 17/11/2009
Page 57

Image 3-95
Advanced im age fi le controls
6. Click Hide Advanced Controls to hide the advanced c ontrols
7. Click OK for changes to take effect
3. XDS Control Center
3.7.13 Setting Auto image
How to set Auto image?
On setting auto image, the best suited image file for the selected source is created automatically.
1. Right-click inside the viewer window to open the context men u
2. Click Auto Image
Image 3-96
Auto image
3.7.14 Knowing the details of installed XDS software
How to know the details of the installed XDS software?
1. Right-click on the source to open the context menu
2. Click About
R59770497 XDS SOFTWARE REFERENCE GUIDE 17/11/2009
53
Page 58

3. XDS Control Center
Image 3-97
About screen
The XDS software version, module version, and th e date of the build is displayed.
3.7.15 Using remote keyboard/mouse control
key sequence
A key sequence, or key for short, is a sequence of one or more input events t
called as keyboard shortcut.
hat is meaningful as a unit. It is otherwise
Overview
When you have shared your desktop on the display through desktop sharing client, the user of the display can enable remote keyboard or mouse control to access your system. When enabled, the user of the display can use his/her keyboard and mouse to
control the applications in your desktop.
How to use remote keyboard/mouse control?
1. Right-click on the source window of the desktop sharing c lient
2. Click Enable Re mote Keyboard/Mouse Control
Image 3-98
Enable Remote Keyboard/Mouse Con
trol
54 R59770497 XDS SOFTWARE REFERENCE GUIDE 17/11/2009
Page 59

3. XDS Control Center
You will find a remote control bar attached to the title bar of the source window.
Image 3-99
Remote control b ar
3. Click the down arrow to open the drop-down list
You will find options to use key sequence; set zoom percentage, native resolution, aspect ratio; switch to full screen; show window
decoration; view the details of XDS software; and close viewer. All the options are described in previous topics except for key
sequence, please see "Settings of a source — right-click option", p age 39.
Note: When an XDS Desktop Sharing viewer has enabled remote keyboard mous e control and the mouse is positioned above
that viewer one will notice that not all key sequences reach the remote PC. Instead they get executed on the XDS PC.
Some key sequences, like CTRL+ALT+DEL are intercepted by the operating system of the XDS Control Center PC that
assumes they need to be executed on the XDS Control Center PC. To be able to send such key sequences to the remote
PC for execution on the remote P C, the Send Key Sequence menu in the control bar of the viewer m ust be used.
4. To use key sequence,
a) Open the drop-down list
b) Select Send Key Sequence
Image 3-100
Send key sequence
A drop-down list opens with a list of all the available keyb oard shortcuts.
c) Choose the key sequence of your choice
3.7.16 Disable r emote keyboard/mouse control
How to disable remote keyboard/mouse control?
1. F rom the remote control bar, click open the drop-down list
2. S elect Disable Rem ote Keyboard/Mouse Control
Image 3-101
Disable Remote Keyboard/Mouse Control
The user of the display will no longer be able to control the applications in your desktop.
R59770497 XDS SOFTWARE REFERENCE GUIDE 17/11/2009
55
Page 60

3. XDS Control Center
3.8 Introduction to layouts
Overview
• Introduction
• Creating a layout
• Saving a layout
• Using the S ave Layout Adv anced dialog
• Launching a layout
• Managing Layouts
3.8.1 Introduction
layout
An arrangement of source(s) and/or a pplication windows on the display desktop screen at a given point of time
presentation
A collection of layouts that ha ve been ordered by the user in a sequenc e
Overview
XDS allows you to save an arrangement of s ources and/or application windows on the display de sktop screen at a given point of
time, as a Layout. The layouts can be saved only under presentations. They can never be standalone.
All layouts r elated to Audit plan 09, can be saved under a presentation called “Audit Plan 09”, and all other layouts related to Audit
plan 08 can be saved under a presentation “Audit Plan 08.”
Image 3-102
Save layouts under Audit Plan 09
Layouts and presentations created by one session user cannot be seen by other session user, unless the privileges are set differently
by the administrator. When you double-click a layout, XDS will launch all the sources and application windows saved in this layout.
3.8.2 Creating a layout
How to create a layout?
To create a layout, you will need sources to be connected to the XDS display system.
1. A fter connecting the sources, y ou w ill find the icon s of the sources v isible on the source widget in the XDS Control Center GUI.
They are displayed with their default names. You c an rename the source icon as per your wish. To know how to rename a source,
refer to "XDS Control Center G UI: Sources Vie
Note: A source can be a rem ote desktop sharing source, which is connected through the network.
56
w", page 15.
R59770497 XDS SOFTWARE REFERENCE GUIDE 17/11/2009
Page 61

3. XDS Control Center
Image 3-103
Launch the desired sources
2. F rom the above image 3-103, let us consider that you want to display the following sources:
- PC: remote participant
- L2 Video: video signal of a video player running a movie
- L2 S Video: video conference
- L3 RGB DB15: im age representing an Microsoft Excel
3. Double-click on the desired sources (sources to be placed on the desktop to be a part of the layout) to launch them
All the selected sources are displayed on the desktop. Eac h source is displayed into a viewer. Each viewer displays the name
of the source on the title bar.
4. Now organize the different sources on the screen as per your wish. Position and scale the windows as per your desire in the
same way a s you would position and resize an y regular application
TM
sheet (This refers to a source window and not an application window)
Image 3-104
Organizing different sources to create a layout
You will see that a layout has b een created already.
3.8.3 Saving a layout
How to save a layout?
You can save a layout using the Save Layout dialog.
1. F rom the XDS Control Center GUI, click the Save Layo ut b utton from the toolbar or press CTRL+S
R59770497 XDS SOFTWARE REFERENCE GUIDE 17/11/2009
57
Page 62

3. XDS Control Center
Image 3-105
Save Layout icon
Or, open the Tools menu and click Sa ve Layout...
Image 3-106
Click Save Layout option
The Save Layout dialog opens.
Image 3-107
Save layout dialog
2. In the Presentation text field, select/specify a name for the presentation under which you w ant to save your layout
3. In the Layout name text field, specify a name for the layout
Note: Layouts must always be saved under a presentation. It can never be standalone. So make sure you select/specify a
name for presentation.
4. Click Save
58
R59770497 XDS SOFTWARE REFERENCE GUIDE 17/11/2009
Page 63

3. XDS Control Center
The layout is saved and added to th e layout widget. It will also be available under My layouts in the Start m enu. See image 3-109.
Image 3-108
Saved la yout visible in the layout widget
Image 3-109
Saved layouts visible from the Start menu
The saved layout will also be visible from the toolbar. Click Launch Layout icon in the toolbar. You will find a drop-down list of
the saved layouts.
Image 3-110
Saved layout visible from toolbar
R59770497 XDS SOFTWARE REFERENCE GUIDE 17/11/2009 59
Page 64

3. XDS Control Center
3.8.4 Using the Save Layout Advanced dialog
Overview
From the Save Advanced L ayout dialog, you can save applications windows along with sources in a layout. While using a multichannel PC, you can save a layout with multi-view port source window, i.e. save a layout containing mo re that one sources in a
single viewer window.
3.8.4.1 Launching the Save Layout Advanced dialog
Overview
You can launch the Save Layout Advanced dialog from the system tray or from the XDS Control Center. The following topics will
guide you how to launch the dialog in both ways.
How to launch the Save Layout Advanced dialog from XDS Control Center?
1. O n the XDS Control Center, open the Too l s menu
2. Click Save Layout Advanced...
Image 3-111
Click Save layout Advanced option
The Save Layout Advanced dialog opens.
Image 3-112
Save Layout Advanced dialog view
By default, the opened source windows will be checked. The other applications that are running will be visible in the list, but not
checked.
How to launch the Save Layout Advanced dialog from the system tray?
1. O n the system tray, click on the XDS Control Center icon
60
R59770497 XDS SOFTWARE REFERENCE GUIDE 17/11/2009
Page 65

The shortcut menu opens.
Image 3-113
System tray icon
2. S elect Save Layout
3. Click Save Layout Advanced...
The Save Layout Advanced dialog will ope n.
The Save Layout Advanced dialog can be viewed in two ways: re al-time mode and advanced info.
Real-time view
When this option is checked, the dialog displays the:
• name of the source window
• state of source window
• type of source (application, viewer or more)
• command line arguments of the application
In real-time view, the list of applications and video insertions get refreshed automatically.
3. XDS Control Center
Image 3-114
Real Time mode view
Advanced info view
Check this option to see advanced information about the running applications such as,
• the type of source
• status of window decoration
• X, Y position of top-left corner of source window (relat
• width and height of the source window, which includes the window border
• command line arguments of the application
ive to desktop, the t op-left corner of desktop is the origin (0,0))
R59770497 XDS SOFTWARE REFERENCE GUIDE 17/11/2009
61
Page 66

3. XDS Control Center
Image 3-115
Advanced info view
3.8.4.2 Saving an application to the layout
How to save an application to the layout?
1. F rom the Save Layout Advanced dialog, select the application you want to save to the layout
Image 3-116
Add application to layout
2. Now select the layout in which you want to save the application
If you want to create a new presentation, and new layout, then please refer to Adding a presentation.
3.8.4.3 Options in Save Layout Advanced dialog
Overview
The following diagram will let you know the available options in the Save Layout Advanced dialog.
Save Layout dialog options
Refresh Move upMove down Add Application... Add Video Insertion... Edit...
Image 3-117
Save Layout Advanced options
• Refresh: Click this button to
• Move down and Move up: Select any application/video insertion, move them up or dow n to change the z-order of sources in
layout
• Add Application: Add an application to the layout. See details below.
• Add Video Insertion: Add a source to layout. See details below.
• Edit: Edit an y application or video insertion settings. See details below.
• Delete: Delete any video insertion or application. See details below.
refresh the list of applications and video insertions
62
R59770497 XDS SOFTWARE REFERENCE GUIDE 17/11/2009
Page 67

3. XDS Control Center
3.8.4.4 Adding an appli cation to the Layout
Overview
If you want to add an unopened application or a file to a layout , use the Add Application button to add it to the layout.
How to add an appli cation to the layout?
1. F rom the Save Layout Advanced dialog, click Add Application...
The Add Application dialog opens .
Image 3-118
Add Application dialog
2. C heck Use default application for the selected file type to open the specified file in its default application
3. U nder Application Settings, click Browse... to open the specified file
If the file path is not given the specified application will be launc hed.
4. U nder File/Command Line Arguments, click Browse... to open the file to be launched
Image 3-119
Browse to open the file to be launched
5. Click Finish to c onfirm the settings
The file will be added to the layout.
Using Advanced option
1. Click Options > > to set advance options
R59770497 XDS SOFTWARE REFERENCE GUIDE 17/11/2009 63
Page 68

3. XDS Control Center
Image 3-120
Advanced options
2. C heck Don’t care if you do not want to specify the start
up directory
3. U nder Start from Directory, click Browse... to select the path of the startup directory
This is the directory from where the specified application will take the data required for its startup.
64
R59770497 XDS SOFTWARE REFERENCE GUIDE 17/11/2009
Page 69

3. XDS Control Center
Image 3-121
Startup directory
4. U nder Window Layout,
- Specify the X, Y position, which is the top-left of the application window
- Specify the width and height of the application window
- Select the state of the window from the drop-down list
The options are Normal, Maximized, and Minimized.
5. Click Finish to c onfirm the settings
3.8.4.5 Adding a video insertion
Overview
If you want to add an unopened source to a layout , use the Add Video Insertion button to add it to the layout.
How to add a video insertion?
1. F rom the Save L ayout Advanced dialog, click Ad
d Video Insertion...
R59770497 XDS SOFTWARE REFERENCE GUIDE 17/11/2009 65
Page 70

3. XDS Control Center
The Add Video Insertion dialog opens.
Image 3-122
Add Video Insertion
2. F rom the drop-down list of available video insertions, select the video insertion you want to add to the layout
3. Click Finish to confirm
Using Advanced options
1. F rom the Add Video Insertion dialog, click Options>>
The advanced Add Video Insertion dialog opens.
Image 3-123
Advanced: Add Video In sertion dialo g
2. F rom this dialog, specify or select the value for different attributes. See the image below for more details.
66
R59770497 XDS SOFTWARE REFERENCE GUIDE 17/11/2009
Page 71

Image 3-124
1. S pecify the title for video insertion
2. P rovide the top-left position, width and height of the video insertion window
3. Check to enable window decoration of video insertion window
4. Check to launch the source in full screen m ode
5. S elect the startup state of video insertion window from Normal, maximized, and minimized
3. U nder Behavior of Video Insertion Viewer, select the startup aspect ratio of the viewer
3. XDS Control Center
Image 3-125
Viewer aspect ratio
The Current state launches the video insertion viewer in its default ratio. The Native state launches the video insertion viewer
in its original size. You can also select the startup z oom level of the video insertion viewer.
Image 3-126
Zoom level
4. Click Finish to confirm settings
3.8.4.6 Creating layouts containing Multi-viewport windows
multi-view port layouts
layout containing viewer with m ultiple sources in one v iewer window
R59770497 XDS SOFTWARE REFERENCE GUIDE 17/11/2009 67
Page 72

3. XDS Control Center
Overview
A multi-viewport layout comprises of viewers having more than one sources in it. Any action performed on the viewer window suc h
as move, resize, or zoom will be performed on all the sources in t hat v iewer window.
For example, consider a PC with splitter card that divide the PC output into say two parts. Now the two inputs are connected to XDS
through two channels, these inputs will appear as two different sources. Now the user can make a layout having these inputs and
can arrange them, such that the whole layout shows complete desktop of the connected PC. See the image below to understand
multi-viewport layout.
Image 3-127
Single Viewport windows: Each window has one source
Image 3-128
Multi view port window: Single window has two sources in it
How to use multi-viewport layouts?
1. F rom the Add Video Insertion dialog, under the Video Source, select the source from the drop-down list
68
R59770497 XDS SOFTWARE REFERENCE GUIDE 17/11/2009
Page 73

Image 3-129
Select the source
2. Click Add to add the selected sour ce
3. XDS Control Center
Image 3-130
Add a video source
3. S elect a source from Source/Viewport Settings list b ox. See Label 1.
4. S et selected source’s geometry namely, top-left position with respect to viewer window, width and height with respect to viewer
window’s width a nd height (width = 1 and height = 1 is 100% of viewer windows” width and height). See Label 2.
5. A lso set the stencil size and position. See Label 2.
You can use the Viewport Insert Calculator to set the geometry settings. See Label 3. See the topic "Using Viewport Insert
Calculator", page 70f
or more details.
6. Click Finish to confirm the viewport settings. See Label 4.
R59770497 XDS SOFTWARE REFERENCE GUIDE 17/11/2009
69
Page 74

3. XDS Control Center
The two sources will be added to the single v iewer.
3.8.4.7 Using Viewport Insert Calculator
How to use the Viewport Insert Calculator?
1. F rom the Add Video Insertion dialog, click Viewport Insert Calculator...
The Multi-channel Insert Geo metry Calculator dialog opens.
Image 3-131
Multi-channel Insert Geometry Calculator
2. S pecify the row and column count of the viewports in the viewer window. See Label 1.
3. S pecify the resolution settings of th
4. S pecify the overlap settings of the viewport. See Label 3.
5. P rovide the viewport number (row, column), in which the selected source (source s elected from Source/Viewport settings list
box) will fit. S ee Label 4.
6. Click Apply to apply the settings to the selected source. See Label 5.
7. Click Close to close the dialog
e viewport. See Labe l 2.
3.8.5 Launching a layout
Overview
• Launching a layout from different levels of view
• Launching two layouts on top of each other
• Using the navigation buttons
70
R59770497 XDS SOFTWARE REFERENCE GUIDE 17/11/2009
Page 75

3.8.5.1 Launching a l ayout from different levels of view
How to launch a layout from minimal/compa ct view?
1. In minimal/compact view, click the name of the layout from the Launch Layout drop-down list.
Image 3-132
Launching a layout from minimal view
3. XDS Control Center
Image 3-133
Launching a layout from compact view
2. You can also launch the same layout from the Start menu. See image 3-109. Click the name of the layout to launch it.
How to launch a layout from the expert view?
1. In expert view, select the name of the presentation under whic h y ou have saved the layout
Image 3-134
Launching a layout from expert view
The layout saved under that particular pr esentation w ill be displayed in the layout widget.
2. Now double-click the name of the layout you want to launch
3. You can also launch the layout by using the right-click option
a) Right-click on the name of the layout to open the context menu
b) Click Launch
R59770497 XDS SOFTWARE REFERENCE GUIDE 17/11/2009
71
Page 76

3. XDS Control Center
3.8.5.2 Launching two layouts on top of each other
How to launch two layouts on top of e ach other?
After saving a layout, you will find the nam e of the saved layouts appear on the layout widget; in the d rop-down list of Launch Layout
from toolbar; and also in the Start menu.
From the image 3-135 below, let us consider that, you hav e created the layout Infrastructure Dev elopment with the following
sources:
•PC
• L2 Video
Image 3-135
From the image 3-136 below, let us consider that, you have created another layout Outsourcin g Facility with the following sources:
•L3DVI
•L4DVI
Image 3-136
Now when you right-click to launch each of the layouts, you will find an option Launch (keep current win dows) while opening a
second layout.
72 R59770497 XDS SOFTWARE REFERENCE GUIDE 17/11/2009
Page 77

3. XDS Control Center
Image 3-137
Launch two layouts at the same time
When you select this option the layout that is already launched will remain displayed on the screen, and the selected layout will be
launched. Since t he two layouts use different sources, both the layo uts can be launched at the same time. But if one of the same
sources is used in both the layouts, then both the layouts cannot be launched at the same time.
But if you click the option Launch, then the sources w hich as currently displayed on-screen will be closed automatically and the
selected layout will be launched.
3.8.5.3 Using the navigation buttons
How to use the navigation buttons?
1. Click to launch the first layout in the presentation
2. Click
3. Click
4. Click
to launch the layout just before the selected layout within that pre sentation
to launch the layout just next to the selected layout within that presentation
to launch the last layout in the presentation
3.8.6 Managing Layouts
3.8.6.1 Introduction to layout ma nager
Overview
By using XDS software’s Layout Manager dialog, y ou can handle multiple prese ntations and layouts. The layout manager enables
you to :
• Add a presentation
• Rename a presentation
• Move a layout to another presentation
• Move a layout up/down within the presentation
• Copy a layout to another presentation
• Provide a description for a layout
• Make a layo ut shared among all users (public layouts)
• Delete a presentation
First, let us see how to open the layout man
ager. The following topic will guide you how to open the layout manager.
3.8.6.2 Opening the layout manager
How to open the layout manager?
1. A fter creating and saving the layouts and presentations, click the Tools menu
2. Click Layout Manager...
R59770497 XDS SOFTWARE REFERENCE GUIDE 17/11/2009
73
Page 78

3. XDS Control Center
Image 3-138
Opening the layout manager
The Layout Manager dialog will open. You will see the list of pr esentations and layouts that you hav e created.
Image 3-139
Layout manager dialog
If User Management is enabled d uring installation, the layouts and presentations that you have created will
not be visible for another session user. If User M anageme nt is disabled during installation, the layouts that
you have created will be visible to every user who logs in to your XDS system .
3.8.6.3 Adding a presentation
How to add a presentati
1. F rom the Layout Manager dialog, right-click on the name of the session user
74
on?
R59770497 XDS SOFTWARE REFERENCE GUIDE 17/11/2009
Page 79

Image 3-140
Click the Add Presentation... option
2. Click Add Presentation...
The Add P resen tation dialog box opens
3. XDS Control Center
Image 3-141
Enter a new name for presentation
3. E nter a new name for presentation
For example, we have entered the presentation name as Maintenance Plans ’09.
4. Click OK
R59770497 XDS SOFTWARE REFERENCE GUIDE 17/11/2009
75
Page 80

3. XDS Control Center
Image 3-142
The Layout manager dialog displaying the new presentation
The new presentation will be created.
3.8.6.4 Renaming a presentation
How to rename a presentation?
1. R ight-click on the name of the presentation y ou want to rename
2. Click Rename...
Image 3-143
Click the option Rename...
76 R59770497 XDS SOFTWARE REFERENCE GUIDE 17/11/2009
Page 81

The Rename dialog box opens.
Image 3-144
Enter the new name for presentation
3. E nter the new name for the presentation
For example, we want to rename Audit Plan ’08 as Audit Plan Update ’08
4. Click OK
3. XDS Control Center
Image 3-145
The Layout manager dialog displaying the new name of the presentation
The old name will be replaced by the new name.
3.8.6.5 Moving a layout to another presentation
How to move a layout to another presentation?
1. S elect the layout you want to m ove
Let us consider, you want to move the layout Auditor Report ’08 to the presentation Audit Plan 09.
R59770497 XDS SOFTWARE REFERENCE GUIDE 17/11/2009
77
Page 82

3. XDS Control Center
Image 3-146
Select the layout that you want to move
2. N ow Drag the layout and Drop it on the name of another presentation
Image 3-147
Drag and Drop the layout to another presentation
The layout Auditor Report ’08 is now moved to the presentation Audit Plan 09. It is no longer available under the presentation
Audit Plan Update 08.
3.8.6.6 Moving a layout up/down within the presentation
How to move a layout up/down within the presentation?
1. S elect the layout you want to m ove
78
R59770497 XDS SOFTWARE REFERENCE GUIDE 17/11/2009
Page 83

Image 3-148
Move a layout within presentation
2. Click the navigation button Move Up Layout to move the layout one level up within a presentation
3. Click the nav igation button Move Down Layout to move the layout one level dow n within a presentation
3.8.6.7 Copying a layout to another presentation
3. XDS Control Center
How to copy a layout to another presentation?
1. Click the name of the layout you want to copy
For example, let us consider you want to copy the layout, Outsourcing Facility to the presentation Audit Plan 09
Image 3-149
Select the presentation you want to copy
2. N ow keep pressing CTRL and Drag the selected layout and Drop it on the name of the presentation
R59770497 XDS SOFTWARE REFERENCE GUIDE 17/11/2009 79
Page 84

3. XDS Control Center
Image 3-150
Drop the layout on the presentation
You wi ll find that the layout Outsourcing Facility has been c opied to Audit Plan 09 presentation.
3.8.6.8 Providing description for layouts
The description you provide for a layout will appear as a tool-tip when you m ove the mouse pointer over the
layout icon in the XDS Control Center.
How to provide description for a layout?
By default, every layout takes its original name as description. If you want to change it to a different description, then follow the
steps below.
1. Click the name of the layout
2. O n the Description text field in the bottom of the dialog, enter the required description
80
R59770497 XDS SOFTWARE REFERENCE GUIDE 17/11/2009
Page 85

3. XDS Control Center
Image 3-151
Specify the description for a layout
The next time you click on the layout, the new description will be displayed in the Description text field.
3.8.6.9 Making a layout shared among all users (public layouts)
How to make a layout shared among all users (public layouts)?
This option will let y ou share the layout with other users of XDS sessions.
1. Right-click on the nam e of the layout you want to share
Image 3-152
Click the option Expose layout (Read-only)
2. Click Expose layout (Read-only)
Note: This option can only be s
et by the ad ministrator. For normal session users this option is disabled. When enabled, all
users can view the layout but can not make any ed its to it.
R59770497 XDS SOFTWARE REFERENCE GUIDE 17/11/2009
81
Page 86

3. XDS Control Center
If User Managem ent is disabled dur ing installation, then
a) From XDS Control Center GUI, open Help menu
Image 3-153
Enter Administrator mode
b) Click Enter Adm inistrator Mode...
c) Make the required chang es
d) Click Leave Administrator Mod e to use the default session
Image 3-154
Leave Administrator mode
If User Management is enabled during installation, and you are a session user, then
a) Close the XDS session or logout
b) Open the session or re-login with administrator credentials
c) Make the required chang es
3.8.6.10 Deleting a presentation
How to delete a presentation?
1. Right-click on the name of the pres entation you want to delete
2. Click Delete
For example, we want to delete the presentation Maintenance P
Note: When you click Delete, all the layouts saved under this presentation will also be deleted.
lans ’09
Image 3-155
Click the option Delete
82 R59770497 XDS SOFTWARE REFERENCE GUIDE 17/11/2009
Page 87

Aconfirmation dialog box opens.
Image 3-156
Confirmation dialog to delete a presentation
3. Click Yes to confirm
3.9 Using the video conference control
Overview
•Overview
• Launching the video conference con trol
• Using the Dialing feature
• Adding a contact during a call
• Removing a contact during a call
• Arranging the names in alphabetical order
• Controlling camera
• Controlling the Microphone
• Mute the microphone
• Toggling the layout
• Wake-up the video conference device
• Hiding the Video conference device widget
• Advanced features
3. XDS Control Center
3.9.1 Overview
About video conference control
Currently, XDS software supports Tandberg’s MXP6000, MXP3000, Edge 85/95, and C60/C90 Video Conference
devices.
The XDS software easily integrates with the video conference device and enables you to control it. You have to configure the video
conference device manager to start using the controls. After configuring you will be ab le to perform the functions available in the
video conference device through the XDS Control Center application, su ch as dial a contact, control the camera, adjust the speaker
volume, and control the microphone.
To control the video conference device: After con figuring, you need to launch the video c onference device. See the topic be low to
launch the control.
3.9.2 Launching the video conference control
How to launch the video conference control?
1. A fter configuring the video conference device manager, the video conference icon will appear on the toolbar. Find the video
conference icon on the toolbar
2. Click the Show Video Conference Controls icon
R59770497 XDS SOFTWARE REFERENCE GUIDE 17/11/2009 83
Page 88

3. XDS Control Center
Image 3-157
The video conference controls will appear.
Image 3-158
Video conference controls view
3.9.3 Using the Dialing feature
Overview
The dialing feature enables y ou to dial a contact m anually or from a phone book.
Dialing a contact manually
1. F rom the Video Conf Device widget, click Dialer button. See Label 1.
84
R59770497 XDS SOFTWARE REFERENCE GUIDE 17/11/2009
Page 89

3. XDS Control Center
Image 3-159
Using the dialer
A keypad appears. See Label 2. Use it to enter an ISDN phone number or an IP address to establish a call. The entered digits
appear in the text field below the keypad.
2. Verify the phone num ber/IP address you have entered from the text field. See Label 3.
3. Click the green button on the bottom to establish the call. See La bel 4.
When a call is in progress, the red button to end a ca ll is enabled. S ee Label 5.
Dialing a contact via phone book
1. F rom the Video Conf Device widget, click Phone Book tab. See Label 1.
Image 3-160
2. S elect the category from the Co ntacts drop-down list, where the required contact numbers are stored. See Label 2.
Image 3-161
Select the category
R59770497 XDS SOFTWARE REFERENCE GUIDE 17/11/2009 85
Page 90

3. XDS Control Center
3. S elect a name from the list of contacts that are available. See Label 3.
4. Click the green button on the bottom of the w idget to establish a call. See Label 4.
When a call is in progress, the red button to end a ca ll is enabled. S ee Label 5.
Note: You can also double click on the name to start a call.
5. To search for a particular contact: See Label 6.
a) In the Search text field, enter the name of the contact
Image 3-162
Searchacontact
b) Then click the Search bu tton
This will identify and list the co ntacts that match the specified name in the selected group.
c) To close the search section, click the Close button
3.9.4 Adding a contact during a call
How to add a contact during a call?
You can add and call additional contacts while a call is in progress. After Dialing a contact, you will find a ’+’ sign appear on the
green Call button
1. Click P hone Book to select another contact, or click Dialer to en ter the numbe r of the additional contact
2. Click the green Call button to add and call a contact
3. P roceed with the same steps 1 and 2 to add more contacts to the call
.
3.9.5 Removing a contact during a call
How to remove a contact during a call?
1. F rom the Phone Book, select the participant you want to remove from the ongoing call
2. Click the red End Call button
to remove a contact
3.9.6 Arranging the names in alphabetical order
How to arrange names in alphabetical order?
1. Click Phone Book
The contacts will be listed in the order of creation date.
2. Click Name
86
R59770497 XDS SOFTWARE REFERENCE GUIDE 17/11/2009
Page 91

Image 3-163
Arrange the names in ascending order
The names will be a rranged in alphabetical order.
3. XDS Control Center
3.9.7 Controlling camera
Overview
After configuring the video conference device m anager, you will be able to control the camera through XDS Control Cen ter. The
camera control functions such as, move, zoom, and focus are available for you to control.
How to launch the c amera controls?
1. F rom the Video Conf Device widget, click Camera Control tab
The camera control functions are displayed.
Image 3-164
1. S elect the camera source
2. S hift the camera view upwards or downwards, or to the left or right
3. F o cus the camera view
4. Zoom the camera vie w
2. F rom this view, you can move, zoom, and focus the camera of the v ideo c onference devic e.
Each operation is mentioned in detail below.
Selecting the camera
1. F rom the Video Conf Device widget, click open the Select Cam era drop-down list
R59770497 XDS SOFTWARE REFERENCE GUIDE 17/11/2009
87
Page 92

3. XDS Control Center
The available cameras configured with XDS will be listed.
2. S elect the camera for which you want to adjust the settings
Image 3-165
Select the camera
Note: The camera can be local or remote.
Shifting the ca m era view
1. F rom the Video Conf Device widget, find the navigation buttons available on the left side
Image 3-166
Shift the camera view
The camera lens will be shifted ac cordingly.
2. C lick left, right, top, or bottom ar row to shift the v iew of the camera left, right, upwards, or downwards
Focusing the camera
1. F rom the Video Conf Device widget, find the focus section available on the right
Image 3-167
Focus the camera
2. Click f+to turn the camera lens towards the object to get a clear image
-
3. Click f
to turn the camera lens away from the object to get a clear image
Zooming the camera
1. F rom the Video Conf Device widget, find the Zoom section av ailable in the middle
Image 3-168
2. Click icon to zoom-in an image and icon to zoom-out in an image
3.9.8 Controlling the Microphone
How to control the microphone?
1. F rom the Video Conf Device widget, click Microphone Sensitivity tab
88
R59770497 XDS SOFTWARE REFERENCE GUIDE 17/11/2009
Page 93

3. XDS Control Center
Image 3-169
Microphone controls
The microphone controls are displayed.
2. F rom the Select Microphone drop-down list, select the microphone you w ant to control. See Label 1.
3. C heck Active if you want the selected microphone to be activated. See Label 2.
4. S elect Auto if you want the sensitivity setting to be s et automatically. See Label 3.
Note: When you select Auto, t he adjustment of eac h microphone’s sensitivity is done automatically to obtain the best possible
audio and minimize the background noise.
5. A djust the sensitivity of the microphone by dragging the bar towards the left or right. See Label 4.
3.9.9 Mute the microphone
How to mute the microphone?
1. F rom the Video Conf Device widget, click the Mute/Unmute button
Image 3-170
Mute microphone
2. To unmute, click the sam e button a gain
R59770497 XDS SOFTWARE REFERENCE GUIDE 17/11/2009
89
Page 94

3. XDS Control Center
Image 3-171
Unmute microphone
3.9.10 Toggling the layout
How to toggle the layout of the video conference device?
1. To sw itch to a different layout, from the Video Conf Device widget, click the Change Layout button
From the image below, you will find the Change layout button highlighted in red for your reference.
Image 3-172
Toggle layout
The layout will be c hanged on the display.
3.9.11 Wake-up the video conference device
How to wake-up the video conference device?
1. F rom the Video Conf Device widget, click the Wake up button
From the image below, you will find the wake-up button highlighted in red for your reference.
90
R59770497 XDS SOFTWARE REFERENCE GUIDE 17/11/2009
Page 95

3. XDS Control Center
Image 3-173
Wake up the video conference device
If the video conference device goes into standby mode, this button will wake up th e video c onference device.
3.9.12 Hiding the Video conference device widget
How to hide the video conference device widget?
1. Click the View menu
Image 3-174
2. De-select TandbergMXP6000 to hide the video conference widget
Select TandbergMXP6000 to launch the video conference widget
3.9.13 Advanced features
3.9.13.1 Selecting a source as secondary input
How to select a source as secondary input?
1. F rom the Video C onf Device widget, c lick Sharing Cont ent tab
R59770497 XDS SOFTWARE REFERENCE GUIDE 17/11/2009
91
Page 96

3. XDS Control Center
Image 3-175
Select the primary content
The Sharing Content tab displays two combo boxes.
- First combo box: Lists types of sources that can be displayed as primary video source
- Second combo box: Lists types of sources that can be displayed as secondary video source
2. F rom the drop-down list, select the primary content to be shared
3. S elect the checkbox to enable second item to be shared
Image 3-176
Info message while enabling a second item to be shared
Note: You can only add another item to be shared when you are in a call. Otherwise an error message will appear as displayed
in the image above.
4. F rom the drop-down list, select the secondary c ontent to be shared
Now the sources will be shared in the primary and the secondary layout.
92
R59770497 XDS SOFTWARE REFERENCE GUIDE 17/11/2009
Page 97

3. XDS Control Center
3.9.13.2 Launching a layout automatically at incoming/outgoing call
Overview
You need to configure the settings to launch a layout automatically at an incom ing call or when triggering a call. After configuration,
a window will open autom atically with the video c onference image at an incoming c all or when while triggering a call. Only an
administrator has the per missions to configure the settings.
How to launch a layout automatically at incoming/outgoing c all?
Whenever an incoming/outgoing call is accepted the specified layout will be launched.
1. F rom the video conference control view, Click the Options tab
Image 3-177
Using the Options tab
2. Click Configure to launc h Configure Call(s) Layout dialog
The Configure Call(s) Layout dialog is displayed below.
Image 3-178
Configure Call(s) Layout dialog
3. Click Ch ange to last selected layout mentioned b elow to set the last selected layout for incoming or outgoing call
Note: Only the last launched layout can b e set for incoming/outgoing call. Make sure you launch the required layout before
setting it for incoming or outgoing call.
Tip: The selected layout will be launched keeping the current windows on disp lay. So the best is to select a lay out that contains
the video conference source.
R59770497 XDS SOFTWARE REFERENCE GUIDE 17/11/2009
93
Page 98

3. XDS Control Center
3.9.13.3 Using preset option
How to use the preset option?
Preset option enables you to store the current state of the video conference system which may include cam era settings, microphone
settings, and more. You can save a preset and activate the preset from X DS. You can set or overwrite by saving to any available
preset id.
1. M ake all the settings that you require
Image 3-179
Using the preset option
2. F rom the video conference control view, click Presets tab
3. Click Save... to save the current state of video conference s
4. Click Activate to activate the selected preset for any conference
ystem as a preset
3.10 Installing the license file
Overview
To install a new licens e fi le to X DS, you need to i
3.10.1 Importing the license file to XDS
License is not required to run XDS Client software or XDS Remote Pointer software because all license checking is performed at the XDS display (desktop generating PC).
How to import the license file to XDS?
Perform the following steps to import the license fi le to XDS, and to start u sing the application.
1. L ogin to the XDS display PC with admini
2. S ave the acquired license file in a folder, for e.g. C:\\XDS.lic
3. F rom the XDS Control Center, open the Help menu
4. Click Import License File
5. S elect the license file from location where it is saved
In this case, it is at C:\\XDS.lic
6. Restart the X DS display PC
7. L ogin as a normal user
Note: To know how to get different licens e fi le depending on your type of installation requirement, see "Getting license", page
108.
mport the obtained license file to XDS to start using the XDS application.
strator privileges
94
R59770497 XDS SOFTWARE REFERENCE GUIDE 17/11/2009
Page 99

3. XDS Control Center
3.10.2 Installing a new license after license expiry
How to install a new license after license expiry?
1. L ogin to XDS Display PC with administrator privileges
2. G o to START men u > All P rograms > Ba rco XDS Control Software and click Stop XDS Software
3. G o to C:\Documents and Settings\All Users\Application Data\Barco\XDS directory and move your existing XDS.lic file to
another location
4. Now send a request to Barco for obtaining a new license file along with the System ID or the Projector serial number, depending
on the system installation. Finding System ID or Serial number depends on type of system installation. See "G etting license",
page 108 to get m ore details on how to get license.
R59770497 XDS SOFTWARE REFERENCE GUIDE 17/11/2009
95
Page 100

3. XDS Control Center
96 R59770497 XDS SOFTWARE REFERENCE GUIDE 17/11/2009
 Loading...