

Page 1
Xenon bulb lamp replacement
Installation manual
For DP-1200/DP-1500/DP-2000
R59770175/01
24/09/2008
Page 2

Barco NV Media and Entertainment Division
11101 Trade Center Drive, Rancho Cordova, California 95670, USA
Phone: +1 916 859-2500
Fax: +1 916 859-2515
E-mail: folsomsales@barco.com
Visit us at the web: www.barco.com
Barco nv Media & Entertainment Division
Noordlaan 5, B-8520 Kuurne
Phone: +32 56.36.89.70
Fax: +32 56.36.883.86
E-mail: sales.events@barco.com
Visit us at the web: www.barco.com
Printed in Belgium
Page 3

Changes
Barco provides this manual ’as is’ without warranty of any kind, either expressed or implied, including but not limited to the implied warranties or merchantability and fitness for a particular purpose. Barco m ay make improvements and/or changes to the product(s) and/or the
program(s) desc ribed in this publication at any time without n otice.
This publication could contain technical inaccuracies or typographical errors. Changes are periodically made to the information in this
publication; these changes are incorporated in new editions of this publication.
Copyright ©
All rights reserved. No p art of this document may be copied, reproduced or translated. It shall not other
stored in a retrieval system without the prior written consent of Barco.
wise be recorded, transmitted or
Guarantee and Compensation
Barco provides a guarantee relating to perfect manufacturing as part of the legally stipulated terms of guar antee. On receipt, the purchaser
must immediately inspect all delivered goods for damage incurred during transport, as well as for material and manufacturing faults Barco
must be informed immediately in writing of any complaints.
The period of guarantee begins on the date of transfer of risks, in the case of special systems and software on the date of commissioning,
at latest 30 days after the transfer of risks. In the event of justified notice of com plaint, Barco can repair the fault or provide a replacement
at its own discretion within an appr opriate period. If this measure proves to be impossible or unsuccessful, the purchaser can demand a
reduction in the purchase price or cancellation of the c ontract. All other claims, in particular tho se relating to compensation for direct or
indirect damage, and also damage attributed to the operation of software as well as to other services provided by Barco, b eing a component
of the s ystem or independent service, will be deemed invalid provided the damage is n ot proven to be attributed to the absence of properties
guaranteed in writing or due to the intent or gross negligence or part of Barco.
If the purchaser or a third party carries out modifications or repairs o n goods delivered by Barco, or if the goods ar e handled incorrectly,
in particular if the systems are com missioned operated incorrectly or if, after the transfer of risks, the goods are subject to influenc es not
agreed upon in the contract, all guarantee claims of the purchaser will be rendered invalid. Not included in the guarantee coverage are
system failures which are attributed to programs or special electronic circuitry provided by the purchaser, e.g. interfaces. Normal wear as
well as normal maintenance a re not subject to the guarantee provided by Barco either.
The environmental conditions as well as the servicing and m
the customer.
aintenance regulations specified in the this manual must be complied with by
Trademarks
Brand and product names mentioned in this manual may be trademarks, registered trademarks or copyrights of their respective holders.
All brand and product n ames mentioned in this manual serve as com men ts or examples and are not to be understood as adv ertising for
the products or their manufactures.
Page 4

Page 5

Table of contents
TABLE OF CONTENTS
1. Xenon bulb lamp ....... ................ ................ ................ ................ .................. .......... 3
1.1 Introduction ........................................................................................................................... 4
1.2 Supported xenon bulb lamps ......................................................................................................... 5
2. Xenon bulb lamp replacement process ...... ................ ................ ................ ................ .. 7
2.1 Removal of the lamp house .......................................................................................................... 8
2.2 Removal of the xenon bulb lamp . ................................................................................................... 10
2.3 Installation of the xenon bulb lamp..................................................................................................13
2.4 Installation of the lamp house .......................................................................................................18
2.5 Resetting the lamp parameters . . . .................................................................................................. 20
2.6 Realignment of the lamp in its reflector.............................................................................................21
Index............... ................ .................. ................ ................ ................ ................ .....23
R59770175 XENON BULB LAMP REPLACEMENT 24/09/2008 1
Page 6

Table of contents
2 R59770175 XENON BULB LAMP REPLACEMENT 24/09/2008
Page 7
1. Xenon bulb lamp
1. XENON BULB LAMP
Safety
Read all w arnings and cautions attentively. This to preven t personal injury wh ile installing an xenon bulb lamp in the lamp house of
the DP-1200/DP-1500/DP-2000 digital cinema projector. After this c hapter, additional “warnings” and “cautions” are given depending
on the installation procedure. Read and follow these “warnings” and “cautions” as w ell.
WARNING: DO NOT PERMIT UNAUTHORIZED PERSONNEL TO PERFORM OR ATTEMPT ANY PHASE OF
XENON BULB LAMP HANDLING OR SERVICE.
CAUTION: Xenon compact arc lamps are highly pressurized. When ignited, the normal operating temperature
of the bulb increases the pressure to a level at which the bulb ma y explode if not handled in strict accordance
to the manufacturer’s instructions. The bulb is stable at room temperature, but may still explode if dropped
or otherwise mishandled. Whenever the lamp house, containing a xenon bulb lamp, h as to be dismantled or
whenever the protective container or cloth has to be removed from the xenon bulb lamp, authorized protective
clothing MUST be worn!
WARNING: Always wear face protection (full face sh ield with neck p rotector) when handling xen on bulb
lamps.
WARNING: Always wear protective clothing (welder’s jacket) when handling xenon bulb lamps.
WARNING: Always w ear clean leather gloves with wrist protec
CAUTION: Expired xenon bulb lamps.
Dispose o f expired bulbs that are beyond warranty in the following manne r: wrap the bulb tightly in several
layers of canvas or heavy cloth. Place it on hard surface and shatter the en velope with a sharp hammer blow.
DO NO T place a n on shattered bulb in any ordinary refuse container.
When returning a xenon bulb lamp for warranty adjustm ent, pack it in its original shipping container. Complete
and return all required warranty information.
Overview
• Introduction
• Supported xenon bulb lamps
tors when handling xenon bulb lamps.
R59770175 XENON BULB LAMP REPLACEMENT 24/09/2008
3
Page 8
1. Xenon bulb lamp
1.1 Introduction
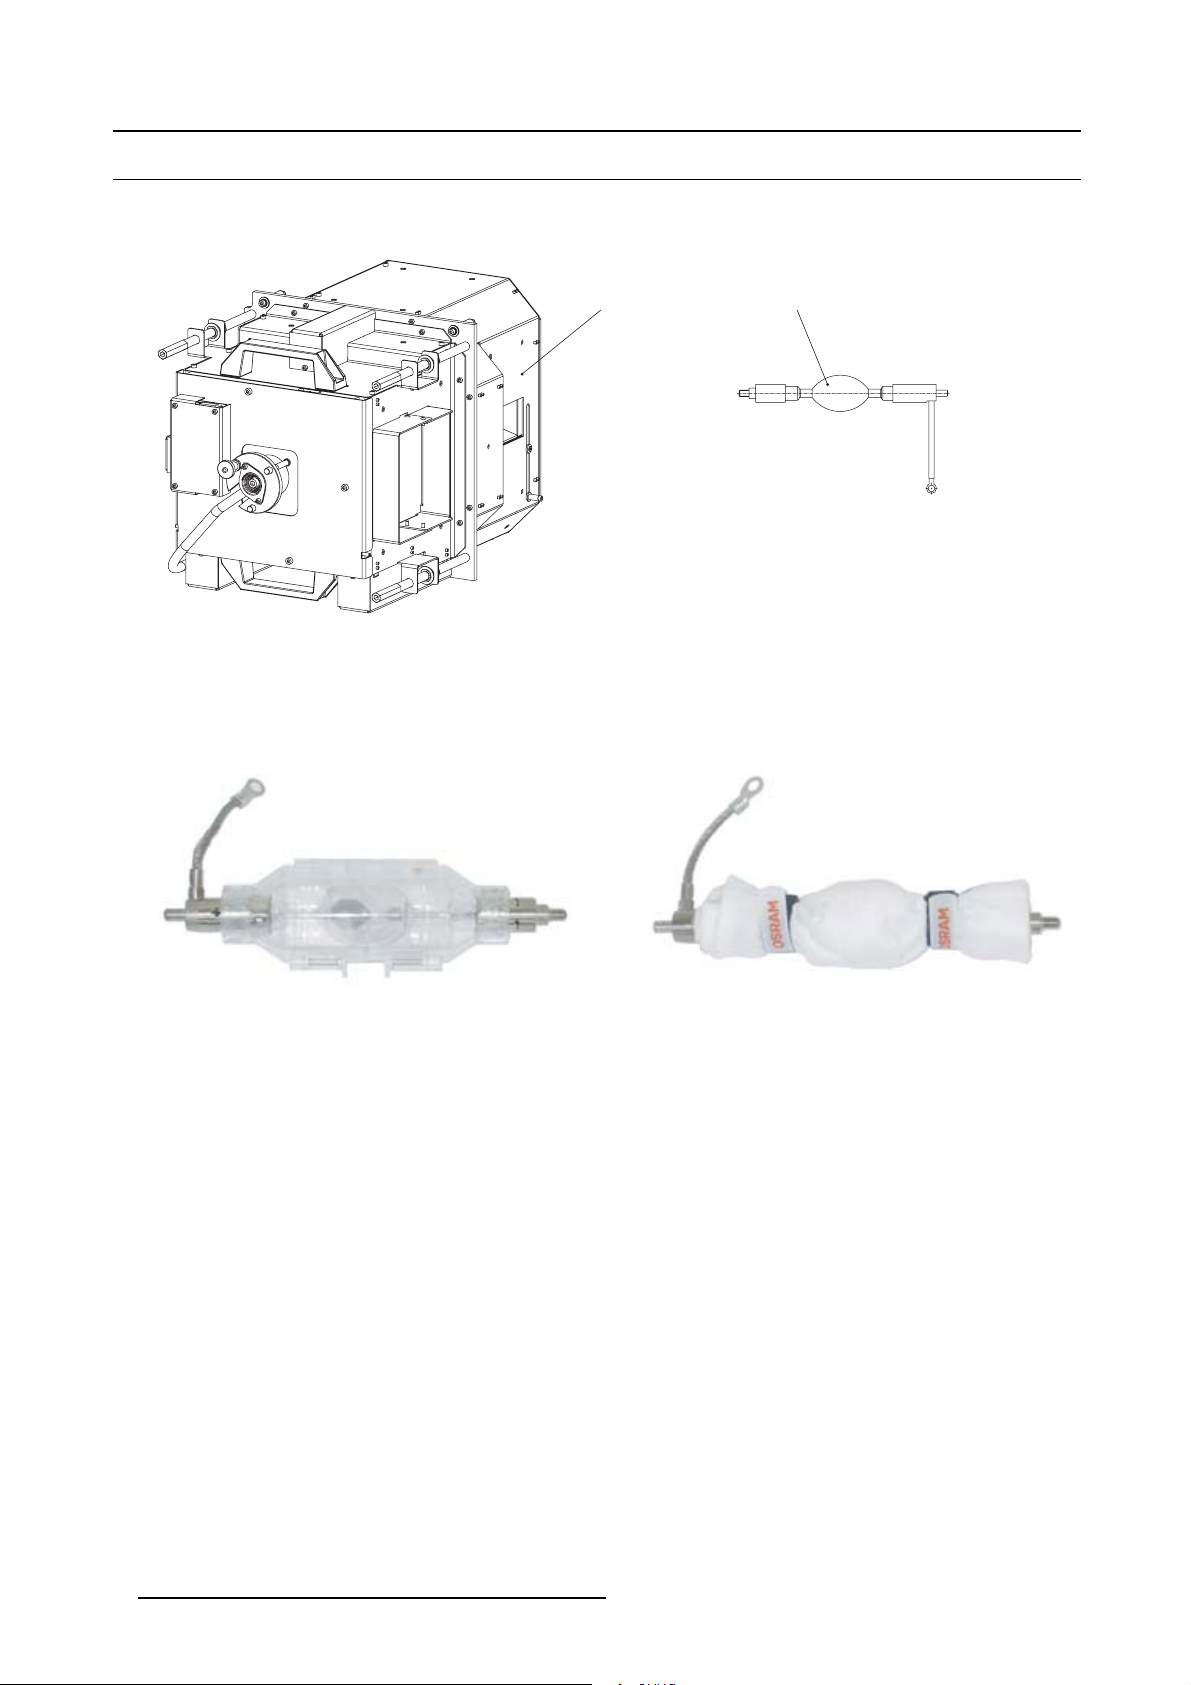
Lamp & lamp house
The xenon bulb lamp is delivered separately and has to be installed on site by a qualified service technician.
BA
Image 1-1
A Lamp house.
B Xenon b ulb lamp.
Protective package
The xenon bulb lamp is packed in a protective container or wrapped in a protective cloth. Never remove this protective container or
protective cloth without wearing adequate protective c lothing (face shield, clean cotton glovers, welder ’s jacket).
Image 1-2
Left: Xenon bulb lamp in protective container. Right: Xenon bulb lamp wrapped in protective cloth.
4 R59770175 XENON BULB LAMP REPLACEMENT 24/09/2008
Page 9

1.2 Supported xenon bulb lamps
Supported xenon bulb lamps (without lamp house)
Lamp
Osram x enon bulb lamp of 4 kW
Osram x enon bulb lamp of 3 kW
Osram x enon bulb lamp of 1,2 kW
Osram x enon bulb lamp of 2 kW
Ushio xenon bulb lamp of 4 kW
Ushio xenon bulb lamp of 3 kW
Ushio xenon bulb lamp of 2 kW
Ushio xenon bulb lamp of 1,2 kW
1. Xenon bulb lamp
Typ e
4kW DHP R9855937
3kW DHP R9855938
1,2kW DHP R9855959
2kW DHP R9855956
DXL40BAF R9855939
DXL30BAF R9855940
DXL20BAF R9855955
DXL12BAF R9855961
Order info
R59770175 XENON BULB LAMP REPLACEMENT 24/09/2008 5
Page 10

1. Xenon bulb lamp
6 R59770175 XENON BULB LAMP REPLACEMENT 24/09/2008
Page 11

2. Xenon bulb lamp replacement process
2. XENON BULB LAMP REPLACEMENT PROCESS
About this chapter
This chapter describes how to re place the xenon bulb lam p in the lamp hou se. Also included are the procedure to reset the lamp
parameters, which is required after a xenon bulb lamp replacement, and the procedure to realign the lamp in its reflector for optimal
performance.
Overview
• Removal of the lamp house
• Removal of the xenon bulb lamp
• Installation of the xenon bulb lamp
• Installation of the lamp house
• Resetting the lamp param eters
• Realignment of the lamp in its reflector
R59770175 XENON BULB LAMP REPLACEMENT 24/09/2008
7
Page 12

2. Xenon bulb lamp replacement process
2.1 Removal of the lamp house
WARNING: This procedure may only be performed by qualified technical service personnel.
CAUTION: Lamp casing is very hot after operation. To avoid burns, let the projector cool down for at least 15
minutes b efore proceeding to the lamp un it replacement.
CAUTION: Due to its h igh internal pressure, the lamp may explode in either hot or cold states if improperly
handled.
Necessary tools
7mmflat screw d river.
How to remove the lamp house of the projector ?
1. Switch off the projector.
2. Remove the lamp cover.
3. Release the three spring lock screws of the lamp hous e as illustrated.
Image 2-1
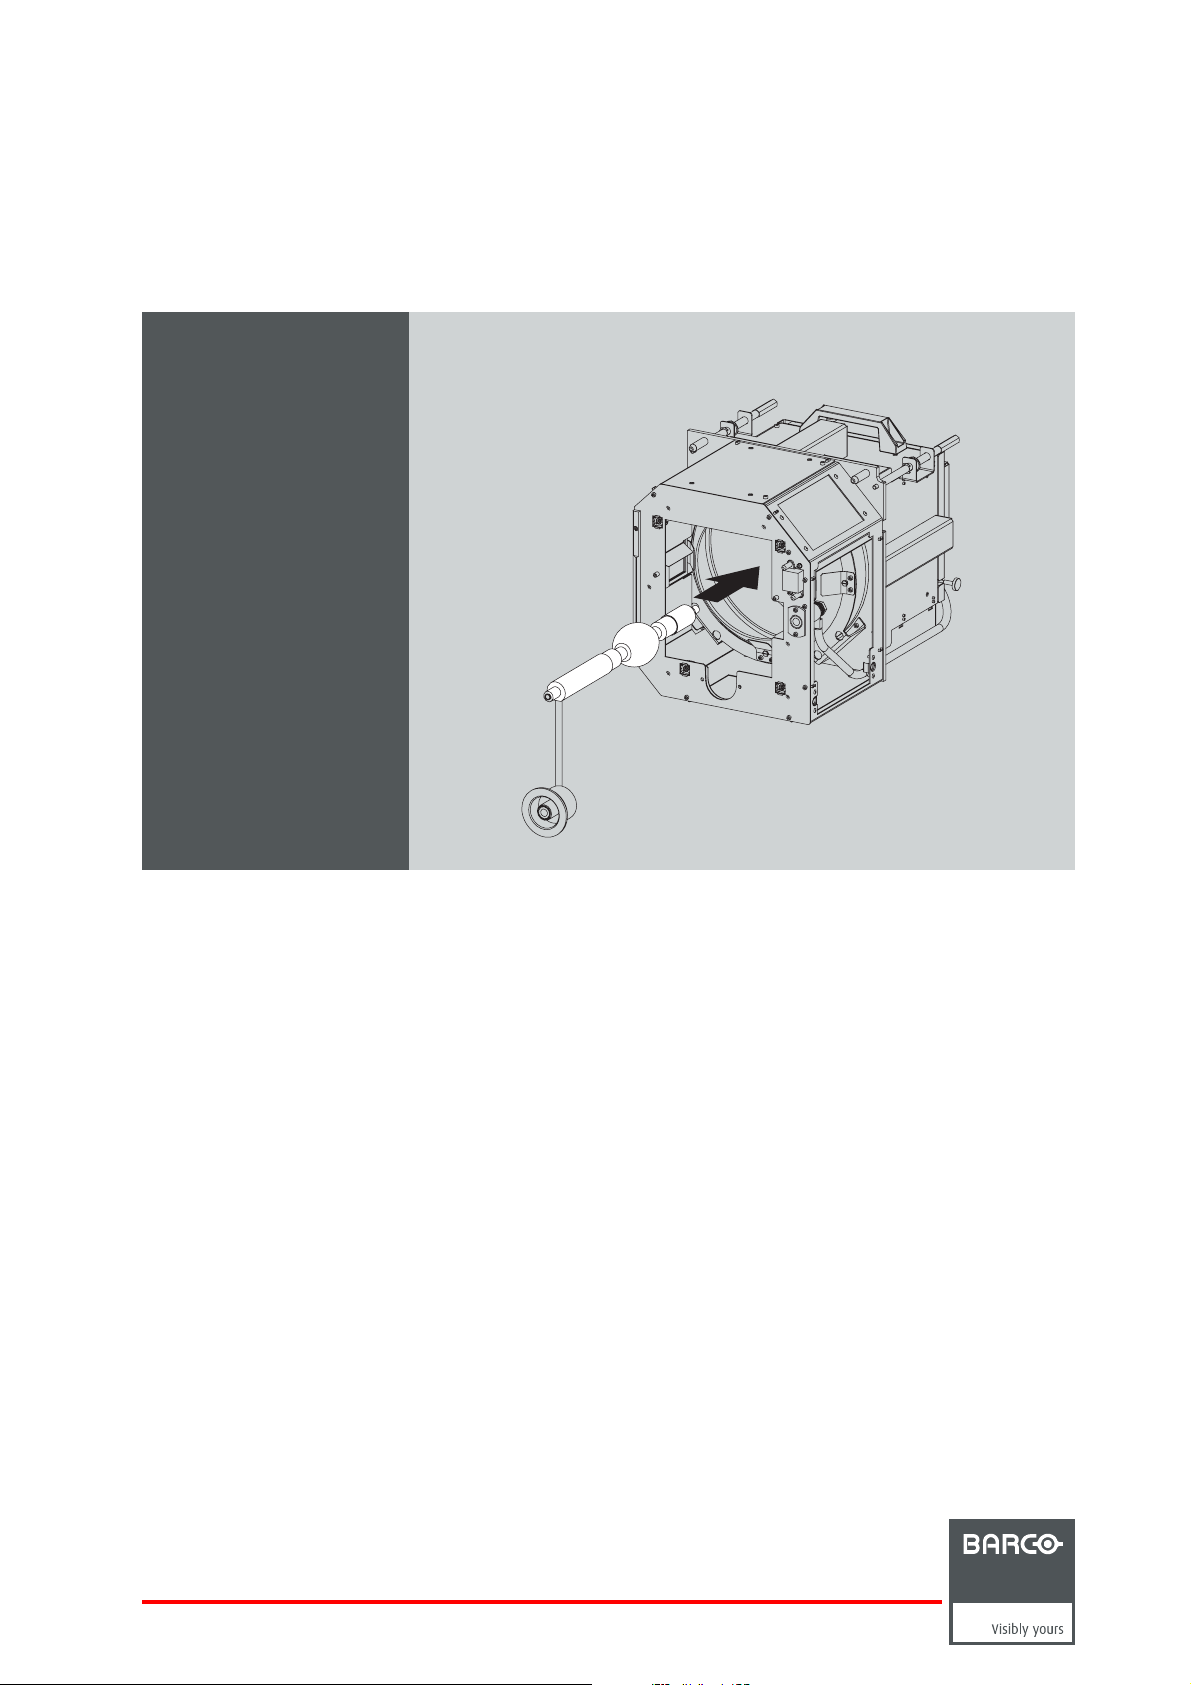
4. Hold fast the lamp house by the handles and pull the lamp house out of the projector.
Caution: Beware of the weight of the lamp assembly. Take the necessary precautions to avoid personal injury.
Image 2-2
5. Place the lamp house on a stable support.
8
R59770175 XENON BULB LAMP REPLACEMENT 24/09/2008
Page 13

2. Xenon bulb lamp replacement process
While starting up the projector, the electronics detect if a lamp is installed. If no lamp i s i nstalled, it i s n ot
possible to start up the projector.
R59770175 XENON BULB LAMP REPLACEMENT 24/09/2008 9
Page 14

2. Xenon bulb lamp replacement process
2.2 Removal of the xenon bulb lamp
WARNING: DO NOT PERMIT UNAUTHORIZED PERSONNEL TO PERFORM OR ATTEMPT ANY PHASE OF
XENON BULB LAMP HANDLING OR SERVICE.
WARNING: This procedure may only be performed by qualified technical service personnel.
CAUTION: Xenon compact arc lamps are highly pressurized. When ignited, the normal operating temperature
of the bulb increases the pressure to a level at which the bulb ma y explode if not handled in strict accordance
to the manufacturer’s instructions. The bulb is stable at room temperature, but may still explode if dropped
or otherwise mishandled. Whenever the lamp house, containing a xenon bulb lamp, h as to be dismantled or
whenever the protective container or cloth has to be removed from the xenon bulb lamp, authorized protective
clothing MUST be worn!
WARNING: Always wear face protection (full face sh ield with neck p rotector) when handling xen on bulb
lamps.
WARNING: Always wear protective clothing (welder’s jacket) when handling xenon bulb lamps.
WARNING: Always w ear clean leather gloves with wrist protectors when handling xenon bulb lamps.
Necessary tools
• 4 mm Allen wrench.
• 17 mm open ended spanner (2 pieces).
How to remove the xenon lamp bulb from the lamp house?
1. Ensure that you wear protective clothing, a full face shield and p rotective gloves.
2. Remove first the lamps house side cover and then the lamp house UV blocker assembly by releasing the r etaining thumbscrews
as illustrated. Support the xenon bulb lamp while removing the UV blocker assembly.
12
Image 2-3
10 R59770175 XENON BULB LAMP REPLACEMENT 24/09/2008
Page 15

2. Xenon bulb lamp replacement process
3. Release the x enon bulb lam p from its socket by removing the hexagon socket head cap sc rew and plane washer as illustrated.
Use a 4 mm Allen wrench.
Image 2-4
4. Slide the white anode socket, which is connected via a thick wire with the xenon bulb lamp, upwards away from its position and
then remo ve the xenon bulb lamp with anode socket from the lamp house.
Image 2-5
5. Place the xenon bulb lam p into a protective container or wrap a protective cloth around the xenon bulb lamp.
6. Remove the anode wire lug from the a
node socket. Use for that two open ended spanners of 17 mm. Hold fast the nut N1 with
one spanner while releasing the nut N2 with the other spanner. Note that a plane washer ( W1 & W2) is provided on both sides
of the anode wire lug (L).
R59770175 XENON BULB LAMP REPLACEMENT 24/09/2008 11
Page 16

2. Xenon bulb lamp replacement process
N1
N1
W2
N2
S
W1
L
N2
Image 2-6
7. Remove the cathode lamp adaptor (A) from the xenon bulb lamp (L) as illustrated. Usea4mmAllenwrenchtoreleasethe
fixation screw (S) of the adaptor.
L
S
Image 2-7
A
CAUTION: Expired xenon bulb lamps.
Dispose o f expired bulbs that are beyond warranty in the following manne r: wrap the bulb tightly in several
layers of canvas or heavy cloth. Place it on hard surface and shatter the en velope with a sharp hammer blow.
DO NO T place a n on shattered bulb in any ordinary refuse container.
When returning a xenon bulb lamp for warranty adjustm ent, pack it in its original shipping container. Complete
and return all required warranty information.
12 R59770175 XENON BULB LAMP REPLACEMENT 24/09/2008
Page 17

2.3 Installation of the xenon bulb lamp
WARNING: DO NOT PERMIT UNAUTHORIZED PERSONNEL TO PERFORM OR ATTEMPT ANY PHASE OF
XENON BULB LAMP HANDLING OR SERVICE.
WARNING: This procedure may only be performed by qualified technical service personnel.
CAUTION: Xenon compact arc lamps are highly pressurized. When ignited, the normal operating temperature
of the bulb increases the pressure to a level at which the bulb ma y explode if not handled in strict accordance
to the manufacturer’s instructions. The bulb is stable at room temperature, but may still explode if dropped
or otherwise mishandled. Whenever the lamp house, containing a xenon bulb lamp, h as to be dismantled or
whenever the protective container or cloth has to be removed from the xenon bulb lamp, authorized protective
clothing MUST be worn!
WARNING: Always wear face protection (full face sh ield with neck p rotector) when handling xen on bulb
lamps.
2. Xenon bulb lamp replacement process
WARNING: Always wear protective clothing (welder’s jacket) when handling xenon bulb lamps.
WARNING: Always w ear clean leather gloves with wrist protectors when handling xenon bulb lamps.
The DP-1200/DP-1500/DP-2000 projector is delivered without xenon bulb lamp installed. This procedure also
assumes that the lamp house is closed and that there is no xenon bulb lamp installed inside the lamp house.
Necessary tools
• 17 mm open ended wrench.
• Torque wrench with 17 mm hexagon socket
• Torque wrench with 5 mm Allen socket.
Necessary parts
• Lamp cathode adapter.
• Hexagon socket head screw M6 x 40.
• Plane washer.
How to install the xenon bulb lamp into the lamp house?
1. Ensure that you wear protective clothing, a full face shield and p rotective gloves.
2. Remove the UV blocker and side cover of the lamp
Note: In case of a lamp replacement, the UV blocker will be already removed.
house by releasing the retaining thumbscrews as illustrated.
R59770175 XENON BULB LAMP REPLACEMENT 24/09/2008
13
Page 18

2. Xenon bulb lamp replacement process
Image 2-8
3. Install the lamp cathode adaptor (A) upon the xenon bulb lamp (L) as illustrated. Use
(S)oftheadapter. Useforthatatorquewrenchwitha5mmAllensocket. Makesurethatthereisfullcontactbetweenthe
cathode adapter and t he lamp base.
Note: The cathode lamp adaptor is delivered in a separate bag with t
reuse the adaptor from the xenon bulb lamp which you want to replace.
torque 2,5 Nm to fasten the fixation screw
he projector. In case of a lamp replacement you have to
L
2,5 Nm
S
A
Image 2-9
4. Install t he anode wire lug (L) upon the anode socket (S). Hold fast the nut N1 with an open-end wrench while fastening the nut N2
with a torque of 9Nmusing a torque wrench. Ensure that at both sides of the wire lug L a plane washer (W 1 & W 2) is present.
Note: The anode socket is located just below the UV blocker and can easily be removed from the lamp house. In case of a lamp
replacement you have to reuse the anode socket whic h is connected to the xenon bulb lamp which you want to replace.
14
R59770175 XENON BULB LAMP REPLACEMENT 24/09/2008
Page 19

2. Xenon bulb lamp replacement process
N1
W2
N2
W1
L
Image 2-10
5. Remove the protective container or unwrap the protective cloth from the xenon bulb lamp.
Warning: E nsure that y ou wear protective clothing, a full face shield and protective gloves.
Tip: Write down the serial number of the lamp. You will need this while updating the lamp parameters after installation of the
lamp. The serial number of the lamp is engraved in the neck of the xenon bulb lamp.
6. Gently guide the xenon bulb lamp into position inside the lamp house as illustrated. Anode socket hanging vertical down. While
inserting the lam p, rotate it slightly, engaging the pins of the cathode adapter in the foreseen slots. This is to ensure the lamp
cathode is completely inserted.
Warning: M ake sure that the both pins of the cathode adapter are engaged in the foreseen slots.
S
9 Nm
N2
N1
Image 2-11
7. Insert the anode socket into position as illustrated.
Caution: Avoid any tension on the anode wire, so there is no mechanical stress on the bulb of the lamp.
R59770175 XENON BULB LAMP REPLACEMENT 24/09/2008
15
Page 20

2. Xenon bulb lamp replacement process
Image 2-12
8. Reinstall the UV blocker assembly as illustrated. Make sure that the xenon bulb lamp is properly supported by the lamp supporting
mechanism in the centre of the UV blocker. Use the opening at the side of the lamp house to guide the supporting pin of the
xenon bulb lam p into the anode supporting mechanism .
Image 2-13
9. Secure the UV blocker by fastening the four thumbscrews as illustrated.
Note: Please ensure that the thumb screws turning wires are flash with the cover or interference will occu r while inserting the
lamp house into the projector.
Image 2-14
10.Fasten the cathode side of the xenon bulb lamp using a hexagon socket head screw M6 x 40 and a plane washer as illustrated.
Use a torque of 2,5 Nm to fasten the hexagon socket head screw. Use for that a torque wrench with a 5 mm Allen socket.
Caution: Make sure that the both pins (reference A of image 2-15) of the cathode adapter remain engaged in the foreseen
slots. Therefor, use one hand to keep the xenon bulb lamp into position while inserting the hexagon socket head
screw.
16
R59770175 XENON BULB LAMP REPLACEMENT 24/09/2008
Page 21

2. Xenon bulb lamp replacement process
A
2,5 Nm
Image 2-15
11.Reinstall the side cover of the lamp h ouse as illustrated.
Note: Please ensure that the thumb screws turning wires are flash with the cover or interference will occu r while inserting the
lamp house into the projector.
Image 2-16
CAUTION: The “LAMP INFO” parameters which are stored on a chip inside the lamp house MUST be updated
after each installation of an xenon bulb lamp inside the lamp house. Neglecting this update will result in poor
performance and short life time of the xenon bulb lamp. See procedure "Resetting the lamp parameters", page
20.
A realignment of t he xenon bulb lamp in its reflector is required after the installation of t he xenon bulb lamp
in the lamp ho use. See procedure "Realignment of the lamp in its reflector", p age 21.
R59770175 XENON BULB LAMP REPLACEMENT 24/09/2008 17
Page 22

2. Xenon bulb lamp replacement process
2.4 Installation of the lamp house
WARNING: This procedure may only be performed by qualified technical service personnel.
CAUTION: Due to its h igh internal pressure, the lamp may explode in either hot or cold states if improperly
handled.
Necessary tools
7mmflat screw d river.
How to install the lamp house of the projector ?
1. Ensure the projector is switched off.
2. Remove the lamp cover.
3. Hold fast the lamp house by its handles and gently slide the lamp hous e into its socket. Note tha t the c ompartm ent is provided
with guides (G) to position the lamp house correctly.
C
G
Image 2-17
4. Push the lamp house forward until it slides fully into the projector.
5. Secure the correct position of the lamp house by tightening all three spring lock screws as illustrated.
Image 2-18
6. Reinstall the lamp cover of the projector.
18
R59770175 XENON BULB LAMP REPLACEMENT 24/09/2008
Page 23

2. Xenon bulb lamp replacement process
While starting up the projector, the electronics detect if a lamp is installed. If no lamp i s i nstalled, it i s n ot
possible to start up the projector.
R59770175 XENON BULB LAMP REPLACEMENT 24/09/2008 19
Page 24

2. Xenon bulb lamp replacement process
2.5 Resetting the lamp parameters
CAUTION: The “LAMP INFO” parameters which are stored on a chip MUST be updated after each installation
of an xenon bul b la mp inside the lamp house. Neglecting this update will result in poor performance and short
life time of the xenon bulb lamp.
How to reset the lamp parameters?
1. Start up the projector but do not ignite the lamp.
2. Go via the Communicator touch panel to the m enu “Installation”>“Lamp”>“Lamp information”.
3. While the Lamp information window is displayed, tip on Reset (1).
A reset message is displayed (2).
4. Fill out the article number of the new lamp (3a)
Or,
click on Select (3b) to display a list of possible article numbers (4). Select a article number (5) and click OK (6).
The software will check if the entered article number is a valid number (7).
5. Fill out the serial number of the lamp (8).
6. Click R eset (9 ).
Image 2-19
Reset lamp info
CAUTION: For more information about using the Communicator touch panel consult the user’s guide of the
communicator touch panel.
20 R59770175 XENON BULB LAMP REPLACEMENT 24/09/2008
Page 25

2. Xenon bulb lamp replacement process
2.6 Realignment of the lamp in its reflector
Each xenon bulb lamp installation requires a realignment of the lamp in its reflector for optimal performance
of the xenon bulb lamp in the DP-1200/DP-1500/DP-2000 projector. Furthermore, it is recommended to realign
the la mp aft e r the first run time of 100 and 200 hours. Especially the Z-axis of the lamp.
WARNING: This procedure may only be performed by qualified technical service personnel.
How to realign the lamp in its reflector?
1. Remove the cov er of the lamp compartment to gain access to the X-, Y-, and Z-axis adjustment thumbscrews of the lamp.
2. Switch on the projector and start up t he lamp.
3. Go via the Communicator touch panel to the menu “Installation” > “Lamp ” > “Light output”.
4. Set the “Light output mode”innormal mode and the “Lamp Dimming” on maximum (255).
Note: This window on the Communicator touch panel shows in the upper left corner the m easured value of the built-in light
sensor of the projector.
Image 2-20
5. Release the X -axis lock thum b screw (ref LX image 2-21) and Y-axis lock thumb screw (ref LY image 2-21).
6. Adjust the X-axis (ref X image 2-21), the Y-axis (ref Y image 2-21) and the Z-axis (ref Z image 2-21) for maximum current light
output (Footlambert Measured). Carefully turn the thum bscrew for maxim um light output. Once over the maximum, turn slightly
in opposite direction to r each the maximum light output again. Do this for each direction and minimum repeat this adjustment
cycle twice.
R59770175 XENON BULB LAMP REPLACEMENT 24/09/2008
21
Page 26

2. Xenon bulb lamp replacement process
Z
LX
Y
LY
Image 2-21
7. Fasten the X-axis lock thumb screw (ref LX image 2-21) and Y-axis lock thumb screw (ref
8. Switch off the projector.
9. Reinstall the cover of the lamp compartment.
X
LY image 2-21).
22
R59770175 XENON BULB LAMP REPLACEMENT 24/09/2008
Page 27

INDEX
Index
I
Install 13, 18
Lamp house 18
Xenon lamp 13
Introduction 4
L
Lamp 20–21
Realignment 21
Reset 20
Lamp house 8, 18
Install 18
Remove 8
R
Realignment 21
Lamp 21
Remove 8, 10
Lamp house 8
Xenon lamp 10
Replace 7
Lamp 7
Reset 20
Lamp 20
X
Xenon bulb lamp 3
Xenon bulb lamps 5
R59770175 XENON BULB LAMP REPLACEMENT 24/09/2008
23
 Loading...