

Page 1

User's manual
LC series
Page 2

Page 3

Title: LC SERIES
Date: April 2008
ProdID: R5976934
Revision: 08
This manual is divided into 13 chapters:
main
update
issue
Warranty
Rev. 05
statement
chapter 1
chapter 2 Rev. 03: new dimensions LC-47, rev. 06: new drawings
chapter 3
chapter 4
chapter 5 OSD update, rev. 06: OSD update (SDI/HD-SDI interface)
chapter 6
chapter 7 Rev. 09: Add: SDI/HD-SDI interface
chapter 8 Rev. 03: new dimensions LC-47, rev. 06: Add: SDI/HD-SDI interface
Rev. 07: new dimensions LCx-42, LCx47
chapter 9 Revised timing, rev. 06: SDI/HDSI timings
chapter 10
chapter 11 Rev. 03, FCC statement
chapter 12 - Rev. 06, installation of accessories
chapter 13 -
new: The corresponding chapters are new or completely revised.
corr.: Passages of the corresponding chapter were corrected; see modification bars.
add.: Passages of the corresponding chapter were added; see modification bars.
Document History
Modifications which result in a new version are indicated by a vertical bar.
Barco - LC series - R5976934 - user's manual - Revision 08 - April 2008
___________________________________________________________________________________________
i
Page 4

Trademarks
Brand and product names mentioned in this manual may be trademarks, registered trademarks or copyrights of
their respective holders. All brand and product names mentioned in this manual serve as comments or examples
and are not to be understood as advertising for the products or their manufacturers.
Copyright © 2005-2008 by Barco
Die Weitergabe sowie die Vervielfältigung aller Unterlagen, die von uns überlassen werden, deren Verwertung
und Mitteilung ihres Inhaltes an Dritte ist nicht gestattet, soweit dies nicht ausdrücklich zugestanden ist. Urheberrechte, insbesondere auch solche an Software, werden nur insoweit übertragen, als es für die Erreichung des
speziellen Vertragszwecks erforderlich ist. Zuwiderhandlungen können zu Schadensersatz verpflichten. Alle Rechte aus der Erteilung eines Patents oder der Eintragung eines Gebrauchsmusters verbleiben bei uns.
Copyright © 2005-2008 by Barco
All rights reserved. No part of this document may be copied, reproduced or translated. It shall not otherwise be
recorded, transmitted or stored in a retrieval system without the prior written consent of Barco.
_____________________________________________________________
ii
Barco - LC series - R5976934 - user's manual - Revision 08 - April 2008
Page 5

WARRANTY STATEMENT
WARRANTY STATEMENT
WARRANTY STATEMENTWARRANTY STATEMENT
Hardware warranty
The warranty period commences at the date of signature of the Certificate of Installation and Operation or as
soon as the purchaser, customer or any other party occupies or operates the system, or 3 months after shipping
in case no certificate of installation and Operation is provided.
• The Seller warrants the equipment manufactured by the Seller against defects in workmanship and material,
under normal use and in accordance with its specifications, during the period of 24 months from the aforementioned date. Any part of the equipment which is wholly manufactured by third parties, is guaranteed
under the conditions of such manufacturer and no separate warranty is given in respect thereof by the Seller.
• In the particular case of LCD displays, the warranty does not apply to the case of image retention phenom-
ena (shadows, dark lines and other image artifacts), that may result from a usage outside of the following
specification: in the course of 24 hours, the monitor can be used for maximum 2 shifts of 8 hours, with
minimum 1 hour of relaxation between the shifts.
• In the event of a defect in workmanship or material, the Seller will be obliged, at its choice and best effort
base, to replace or repair the defective equipment. The replacement part will be in good working order and
at least functionally equivalent to the item replaced.
• The warranty does not apply when the cause of the failure occurs after delivery of the equipment to the
Purchaser and results from abnormal conditions of operation, unauthorized access, improper use, unauthorized modification, lack of normal maintenance or unauthorized attempts to repair the equipment. See also
Pre installation requirements and conditions of use BCD system. A failure to follow these requirements can
result in delay and additional costs that will be invoiced to the purchaser.
• The Purchaser must notify the Seller of any complaint within eight days of discovery of any alleged defect.
Failure by the Purchaser to so notify the Seller will relieve the Seller of its obligations under this article.
• The foregoing warranty will not apply if any payment remains outstanding from the Purchaser to the Seller.
• All items, parts or components which are replaced by the Seller under warranty or otherwise shall become
the property of the Seller. All defective parts need to be sent back to the Seller.
• The replacement parts are free of charge during the warranty period.
• The Seller will ship the replacement parts to the Purchaser on a CIF
base. At the same time the Seller will issue a RAN number for returning
the defective parts.
• Traveling and Lodging of the service engineer will be invoiced to the Purchaser according to the Time & Ma-
terial Pricing rules of the Seller.
• On site labor of the service engineer will be invoiced to the Barco National Organization or Sales Partner
according to the Time & Material Pricing rules of the Seller.
• The remedies described above are Purchaser's sole remedies in the event of any breach of the warranty
provided above.
• Consumables (such as lamps, dust filters, ...) are excluded from warranty.
• The warranty period of repairs and spare parts is 3 months, or at minimum the original warranty period of
the system.
• The seller does no warrant uninterrupted or error-free operation of the installation
• The foregoing warranty is in lieu of all other warranties, whether oral, written, express, implied or statutory.
No implied or statutory warranties of merchantability or fitness for a particular purpose shall apply and all
warranties, conditions or other terms implied by statute or common law are hereby excluded.
Barco - LC series - R5976934 - user's manual - Revision 08 - April 2008
_________________________________________________________________________________________
iii
Page 6

Software warranty
The Seller makes no warranties with respect to the software and technical information and, such items are provided to the Purchaser on an "as-is" basis without warranty of any kind, including the warranties of merchantability and fitness for a particular purpose.
• The Purchaser acknowledges and agrees that the software provided by the Seller to the Purchaser in an
unmodified form is designed to operate with the hardware identified in the Certificate of Installation and
Operation, provided (i) the hardware is unmodified and (ii) the software, as unmodified, operates in conjunction with the proper computer equipment as designated in the Special Conditions.
• The Purchaser agrees to indemnify, defend and hold harmless the Seller from and against all claims, liabili-
ties, losses, damages and costs and expenses arising out of or resulting from the combination or integration
of the hardware and/or software with any item of any kind not furnished by the Seller.
____________________________________________________________
iv
Barco - LC series - R5976934 - user's manual - Revision 08 - April 2008
Page 7

Revision sheet
To:
• Barco Control Room GmbH
Barco Control Room GmbH
Barco Control Room GmbHBarco Control Room GmbH
An der Rossweid 5, D-76229 Karlsruhe
Phone: +49-721-6201-0, Fax: +49-721-6201-298
E-mail: docu.bcd.de@barco.com, Web: www.barcocontrolrooms.de
From:
Date:
Please correct the following points in this documentation:
page wrong correct
Barco - LC series - R5976934 - user's manual - Revision 08 - April 2008
__________________________________________________________________________________________
v
Page 8

Contents
1 Preliminary Remarks .........................................................................................................................1-1
1.1 How this manual is organized ....................................................................................................................1-2
1.2 Styles and symbols......................................................................................................................................1-3
1.3 Safety information.......................................................................................................................................1-4
1.3.1 Safety on installation..........................................................................................................................1-4
1.3.2 Safety on servicing .............................................................................................................................1-7
1.3.3 Safety on shipping..............................................................................................................................1-8
1.3.4 Precautions .........................................................................................................................................1-8
1.3.5 Malfunction or Trouble .......................................................................................................................1-8
1.3.6 Unpacking of devices..........................................................................................................................1-8
1.3.7 Modification of devices ......................................................................................................................1-9
1.3.8 Disposal or handing over to a new owner ........................................................................................1-9
1.3.9 Exemptions..........................................................................................................................................1-9
2 Unpacking and installation................................................................................................................ 2-1
2.1 Unpacking ....................................................................................................................................................2-2
2.2 Installation ...................................................................................................................................................2-3
2.2.1 Accessories..........................................................................................................................................2-3
2.2.2 Mounting of the table stand (optional).............................................................................................2-3
2.2.3 Dimensions of the 42" monitor:.........................................................................................................2-5
2.2.4 Dimensions of the 47" monitor:.........................................................................................................2-6
2.3 Examining the monitor................................................................................................................................2-7
2.3.1 Front view...........................................................................................................................................2-7
2.3.2 Side view.............................................................................................................................................2-7
2.3.3 Rear view............................................................................................................................................2-8
2.4 Cabling .........................................................................................................................................................2-9
2.5 Switching on and off ...................................................................................................................................2-9
2.6 Inserting batteries into the Infrared remote control unit....................................................................... 2-10
3 Design and function........................................................................................................................... 3-1
3.1 Display of choice..........................................................................................................................................3-2
3.2 Technology...................................................................................................................................................3-3
3.2.1 Principle of LCD technology................................................................................................................3-3
4 Controlling.......................................................................................................................................... 4-1
4.1 General.........................................................................................................................................................4-2
4.1.1 The push buttons ................................................................................................................................4-2
4.1.2 The IR remote control unit .................................................................................................................4-3
4.2 Terminology of the RCU controls ................................................................................................................4-4
4.3 Functions available with the IR Remote Control Unit................................................................................4-5
4.3.1 Displaying a monitor address ............................................................................................................4-5
4.3.2 Baud rate setting................................................................................................................................4-5
____________________________________________________________
vi
Barco - LC series - R5976934 - user's manual - Revision 08 - April 2008
Page 9

4.3.3 The function keys................................................................................................................................4-6
4.3.4 Picture controls with direct access.....................................................................................................4-6
4.3.5 Audio controls with direct access.......................................................................................................4-6
5 The On Screen Display (OSD) ............................................................................................................. 5-1
5.1 General.........................................................................................................................................................5-2
5.1.1 Navigation and adjustment................................................................................................................5-3
5.2 Activating the OSD.......................................................................................................................................5-4
5.3 The signal menu (first and second input)..................................................................................................5-6
5.3.1 Display.................................................................................................................................................5-7
5.3.2 Position............................................................................................................................................. 5-11
5.3.3 PIP control........................................................................................................................................ 5-14
5.3.4 Combination of signals for main image and PiP/PaP ................................................................... 5-17
5.3.5 Image ............................................................................................................................................... 5-18
5.3.6 Color ................................................................................................................................................. 5-26
5.4 OSD setting menu..................................................................................................................................... 5-29
5.4.1 Vertical ............................................................................................................................................. 5-30
5.4.2 Horizontal......................................................................................................................................... 5-30
5.4.3 Blend ................................................................................................................................................ 5-30
5.4.4 Time out ........................................................................................................................................... 5-31
5.4.5 OSD Zoom......................................................................................................................................... 5-31
5.5 Audio setting menu.................................................................................................................................. 5-32
5.5.1 Volume............................................................................................................................................. 5-33
5.5.2 Balance............................................................................................................................................. 5-33
5.5.3 Bass .................................................................................................................................................. 5-33
5.5.4 Treble ............................................................................................................................................... 5-34
5.6 Display parameter setting menu............................................................................................................. 5-35
5.6.1 Set display address.......................................................................................................................... 5-36
5.6.2 Baud rate.......................................................................................................................................... 5-36
5.6.3 Light Sensor ..................................................................................................................................... 5-37
5.6.4 Lower brightness level .................................................................................................................... 5-37
5.6.5 Ambient light threshold .................................................................................................................. 5-37
5.6.6 Auto Source Selection...................................................................................................................... 5-38
5.7 Reset menu............................................................................................................................................... 5-39
5.7.1 Factory Reset ................................................................................................................................... 5-40
5.8 Input Signal Selection............................................................................................................................... 5-41
5.8.1 Input selection with the function key F1........................................................................................ 5-44
6 Maintenance and servicing ............................................................................................................... 6-1
6.1 Cleaning .......................................................................................................................................................6-2
7 Technical data 42" version (LCN-42, LCS-42) .................................................................................... 7-1
7.1 General data ................................................................................................................................................7-1
7.2 LCD panel .....................................................................................................................................................7-1
7.3 Electrical data ..............................................................................................................................................7-1
7.4 Operating conditions ...................................................................................................................................7-2
Barco - LC series - R5976934 - user's manual - Revision 08 - April 2008
_________________________________________________________________________________________
vii
Page 10

7.5 CCFL (Cold Cathode Fluorescent Lamp) characteristics (ambient temperature (25 ±2)°C)......................7-2
7.6 Interfaces .....................................................................................................................................................7-2
7.6.1 Video IN (Composite Video)...............................................................................................................7-2
7.6.2 S-Video ................................................................................................................................................7-3
7.6.3 Component Video (mini DIN 8 pin) ...................................................................................................7-3
7.6.4 SDI/HDSDI IN/OUT (BNC) (LCS-42 only) ............................................................................................7-5
7.6.5 DVI .....................................................................................................................................................7-5
7.6.6 RGB IN (D-Sub 15 pin)........................................................................................................................7-6
7.6.7 RS232 IN..............................................................................................................................................7-6
7.6.8 RS232 OUT...........................................................................................................................................7-7
7.7 Factory settings ...........................................................................................................................................7-7
8 Technical data 47" version (LCN-47, LCS-47) .................................................................................... 8-1
8.1 General data ................................................................................................................................................8-1
8.2 LCD panel .....................................................................................................................................................8-1
8.3 Electrical data ..............................................................................................................................................8-1
8.4 Operating conditions ...................................................................................................................................8-2
8.5 CCFL (Cold Cathode Fluorescent Lamp) characteristics (ambient temperature (25 ±2)°C)......................8-2
8.6 Interfaces .....................................................................................................................................................8-2
8.6.1 Video IN (Composite Video)...............................................................................................................8-2
8.6.2 S-Video ................................................................................................................................................8-3
8.6.3 Component Video ...............................................................................................................................8-3
8.6.4 SDI/HDSDI IN/OUT (BNC) ...................................................................................................................8-5
8.6.5 DVI .....................................................................................................................................................8-5
8.6.6 RGB IN (D-Sub 15 pin)........................................................................................................................8-6
8.6.7 RS232 IN..............................................................................................................................................8-6
8.6.8 RS232 OUT...........................................................................................................................................8-7
8.7 Factory setting.............................................................................................................................................8-8
9 Compliant timing ............................................................................................................................... 9-1
9.1 SDI input signals ..........................................................................................................................................9-2
9.2 HD-SDI input signals....................................................................................................................................9-3
10 Troubleshooting ............................................................................................................................. 10-1
10.1 Faults....................................................................................................................................................... 10-2
10.2 Contact.................................................................................................................................................... 10-3
11 Compliance statement................................................................................................................... 11-1
11.1 FCC Compliance statement .................................................................................................................... 11-1
___________________________________________________________
viii
Barco - LC series - R5976934 - user's manual - Revision 08 - April 2008
Page 11

12 Accessories .....................................................................................................................................12-1
12.1 Required tools ........................................................................................................................................ 12-1
12.2 Table stand ............................................................................................................................................. 12-2
12.2.1 Scope of delivery........................................................................................................................... 12-2
12.2.2 Installation ..................................................................................................................................... 12-3
12.2.3 Dimensions .................................................................................................................................... 12-4
12.2.4 Height adjustment......................................................................................................................... 12-5
12.3 Screen bracket (adapter plate).............................................................................................................. 12-6
12.3.1 Scope of delivery........................................................................................................................... 12-6
12.3.2 Installation ..................................................................................................................................... 12-7
12.4 Fixed wall mount.................................................................................................................................... 12-8
12.4.1 Scope of delivery........................................................................................................................... 12-8
12.4.2 Installation ..................................................................................................................................... 12-9
12.4.3 Dimensions .................................................................................................................................. 12-10
12.4.4 Wall pattern ................................................................................................................................. 12-11
12.5 Tiltable wall mount .............................................................................................................................. 12-12
12.5.1 Scope of delivery......................................................................................................................... 12-12
12.5.2 Installation ................................................................................................................................... 12-13
12.5.3 Dimensions .................................................................................................................................. 12-14
12.5.4 Tilting ........................................................................................................................................... 12-15
12.6 Short ceiling mount.............................................................................................................................. 12-16
12.6.1 Scope of delivery......................................................................................................................... 12-17
12.6.2 Installation ................................................................................................................................... 12-18
12.6.3 Dimensions .................................................................................................................................. 12-20
12.6.4 Tilting ........................................................................................................................................... 12-21
12.7 Long ceiling mount............................................................................................................................... 12-22
12.7.1 Scope of delivery......................................................................................................................... 12-23
12.7.2 Installation ................................................................................................................................... 12-24
12.7.3 Dimensions .................................................................................................................................. 12-26
12.7.4 Tilting ........................................................................................................................................... 12-27
13 Contact ...........................................................................................................................................13-1
Barco - LC series - R5976934 - user's manual - Revision 08 - April 2008
_________________________________________________________________________________________
ix
Page 12

Page 13
1. Preliminary Remarks
1 Preliminary Remarks
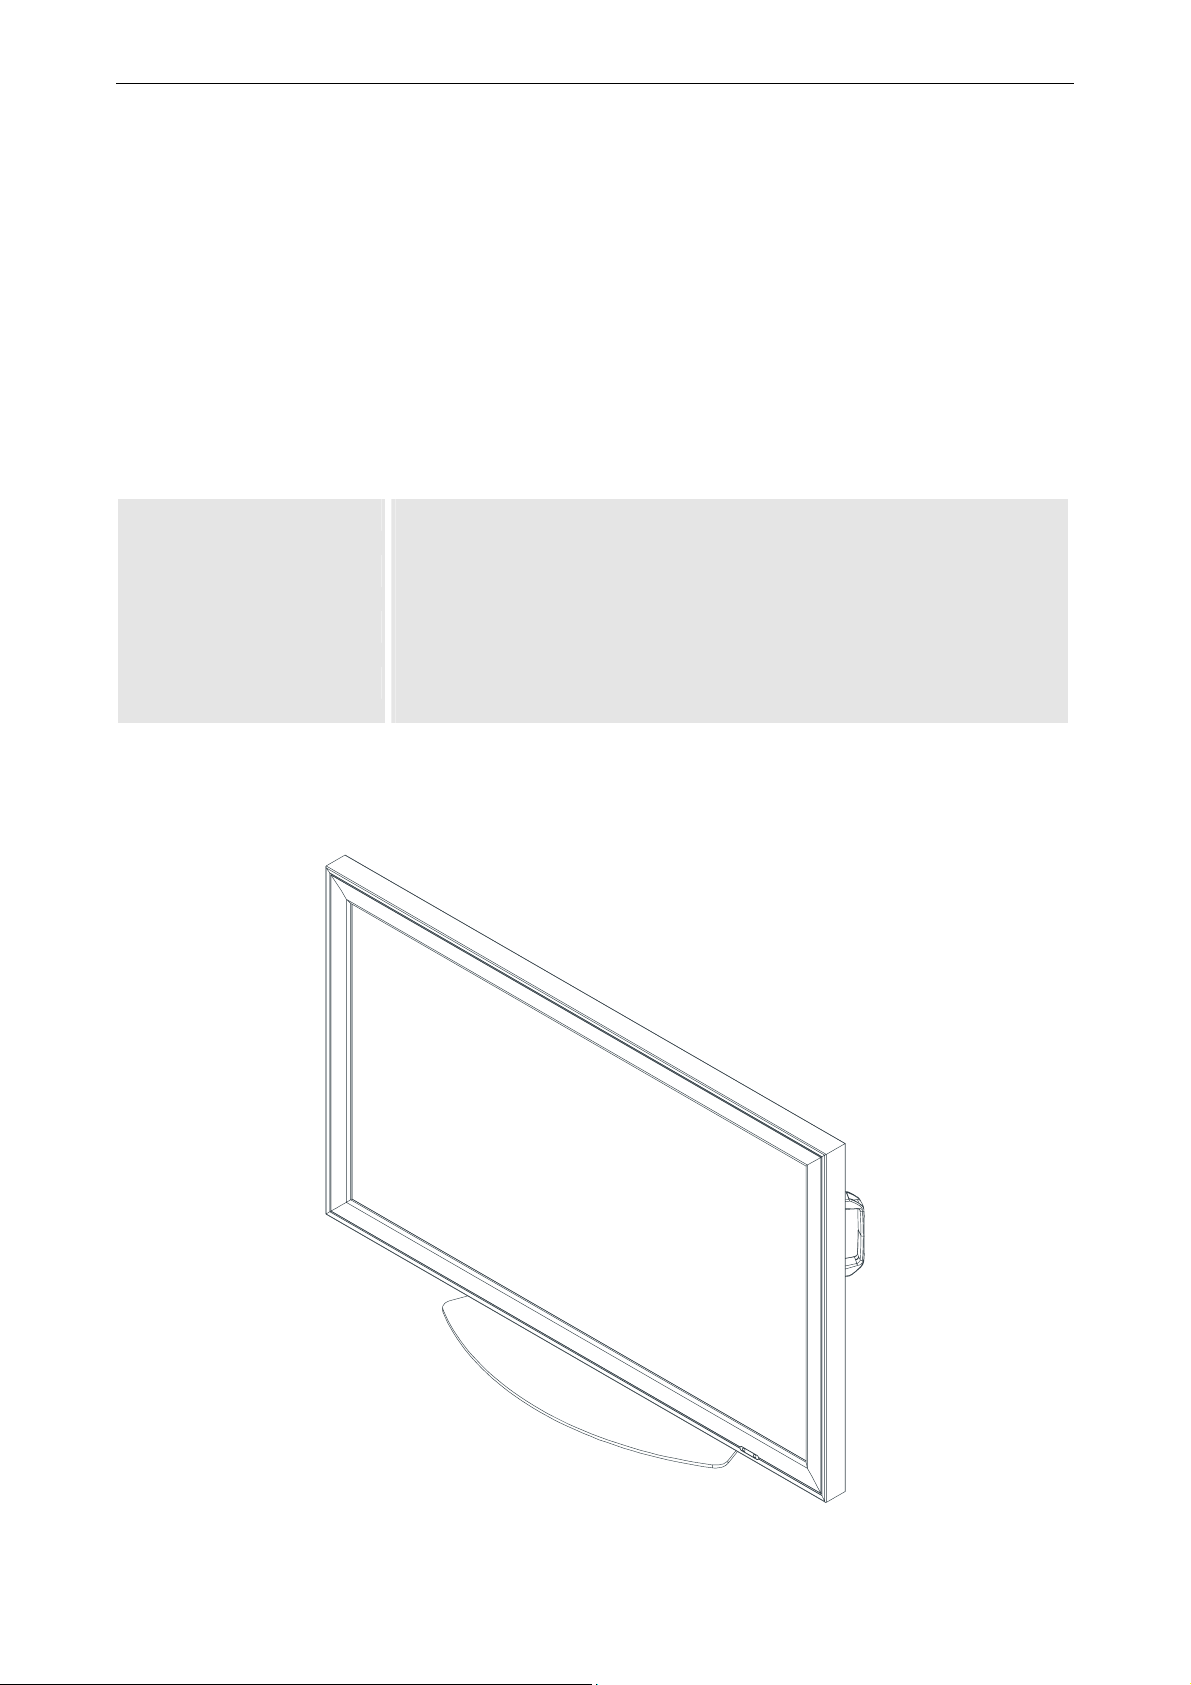
This manual describes unpacking, installation, cabling and controlling of the monitors of Barco's LC series.
The monitors of Barco's LC series are based on Super MVA TFT LCD technology and feature bright and wide images with clear contrast.
The LCD panels have 1920x1080 pixels (HD resolution) to allow extreme fine pictures at 16.7 millions colors.
The monitors provide a set of interfaces to connect any analog video and analog and digital RGB data .
All settings can easily be accessed and modified by means of the Infrared remote control unit and the
OnScreenDisplay.
RS232 remote control is also possible.
The monitors are available with a screen diagonal of 42" and 47".
LCN-47 Monitor with a screen diagonal of 47inch, Super MVA TFT LCD technology, HD
resolution (1920x1080 pixels), aspect ratio 16:9
LCS-47 Monitor with a screen diagonal of 47inch, Super MVA TFT LCD technology, HD
resolution (1920x1080 pixels), aspect ratio 16:9, HD-SDI input
LCN-42 Monitor with a screen diagonal of 42inch, Super MVA TFT LCD technology, HD
resolution (1920x1080 pixels), aspect ratio 16:9
LCS-42 Monitor with a screen diagonal of 42inch, Super MVA TFT LCD technology, HD
resolution (1920x1080 pixels), aspect ratio 16:9, HD-SDI input
Barco - LC series - R5976934 - user's manual - Revision 08 - April 2008
________________________________________________________________________________________
1-1
Page 14

1. Preliminary Remarks
1.1 How this manual is organized
This manual is divided into 13 chapters:
• Preliminary remarks
explains the structure of the manual itself and the used typographic styles and symbols. Safety information is
provided concerning the monitors of Barco's LC series.
• Unpacking and Installation
gives instructions how to unpack the monitors and general installation requirements
• Design and function
provides a technical description of the equipment listing the fundamental characteristics and functional principles. Knowledge of this section is not absolutely essential for operation.
• Controlling
explains how the monitors are controlled
• The On Screen Display
explains the commands of the menus
• Maintenance and servicing
explains how the equipment can be serviced.
• Technical data of the 42" versions
provides tabular overviews about the technical details of the monitor LCN-42 and LCS-42
• Technical data of the 47" versions
provides tabular overviews about the technical details of the monitor LCN-47 and LCS-47
• Compliant timing
lists the compliant timing of the monitor
• Trouble shooting
gives hints in case the monitor does not work
• Compliance statement
Includes the FCC statement
• Accessories
lists the available accessories and their installation
• Contact
lists address details of the help desk
Chapters, pages, and tables are numbered separately. Chapters are indicated by a »point syntax«, e. g. 4.2.3,
pages and tables by a »dash syntax«, e. g. 2-1.
___________________________________________________________
1-2
Barco - LC series - R5976934 - user's manual - Revision 08 - April 2008
Page 15

1. Preliminary Remarks
1.2 Styles and symbols
The typographic styles and the symbols used in this document have the following meaning:
Bold Labels, menus and buttons are printed in Bold font.
Condensed Links to both other chapters of this manual and to sites in the Internet are printed
condensed. In the on-line version of this manual all hyperlinks appear teal.
Courier
Courier bold
If you do not heed instructions indicated by this symbol there is a risk of damage to the
equipment!
If you do not heed instructions indicated by this symbol there is a risk of electrical shock
and danger to personal health!
Names of files and parts from programs are printed in the Courier font.
Inputs you are supposed to do from the keyboard are printed in Courier bold font.
If you do not heed instructions indicated by this symbol there is a risk of damage to parts,
which are sensitive towared electrostatic charge!
If you do not heed instructions indicated by this symbol there is a risk to get harmed by
sharp objects!
If you do not heed instructions indicated by this symbol there is a risk that parts may
explode!
If you do not heed instructions indicated by this symbol there is a risk that hot parts impact
persons or objects!
The sheet icon indicates additional notes.
Next to this icon you find further information.
This hand marks tips.
Next to this icon you find important notes.
Barco - LC series - R5976934 - user's manual - Revision 08 - April 2008
________________________________________________________________________________________
1-3
Page 16
1. Preliminary Remarks
1.3 Safety information
This section describes safety precautions which must be observed when installing a product from Barco.
Safety standards
The safety standards of information technology equipment impose important requirements on the use of safety
critical components, materials and isolation, in order to protect the user or operator against the risk of electric
shock and energy hazard, and having access to live parts.
Safety standards also impose limits to the internal and external temperature rises, radiation levels, mechanical
stability and strength, enclosure construction and protection against risk of fire.
Simulated single fault condition testing ensures the safety of the equipment to the use even when the equipment’s normal operation fails.
General safety instructions
• All the safety and operating instructions should be read before using this unit.
• The operating instructions manual should be retained for future reference.
• All warnings on the device and in the documentation manuals should be adhered to.
• All instructions for operating and use of this equipment must be followed precisely.
• All local installation codes should be adhered to.
Installation and preliminary adjustments should be performed by qualified Barco
personnel or authorized Barco service dealers.
1.3.1 Safety on installation
Check the power rating on your outlet before connecting the devices to the wall outlet or
to a power strip. Contact your facilities manager or a qualified electrician if you are not
sure what type of power is supplied to your building.
The devices are designed to operate with single-phase power systems having a
grounded neutral conductor. To reduce the risk of electrical shock, do not plug into any
other type of power system.
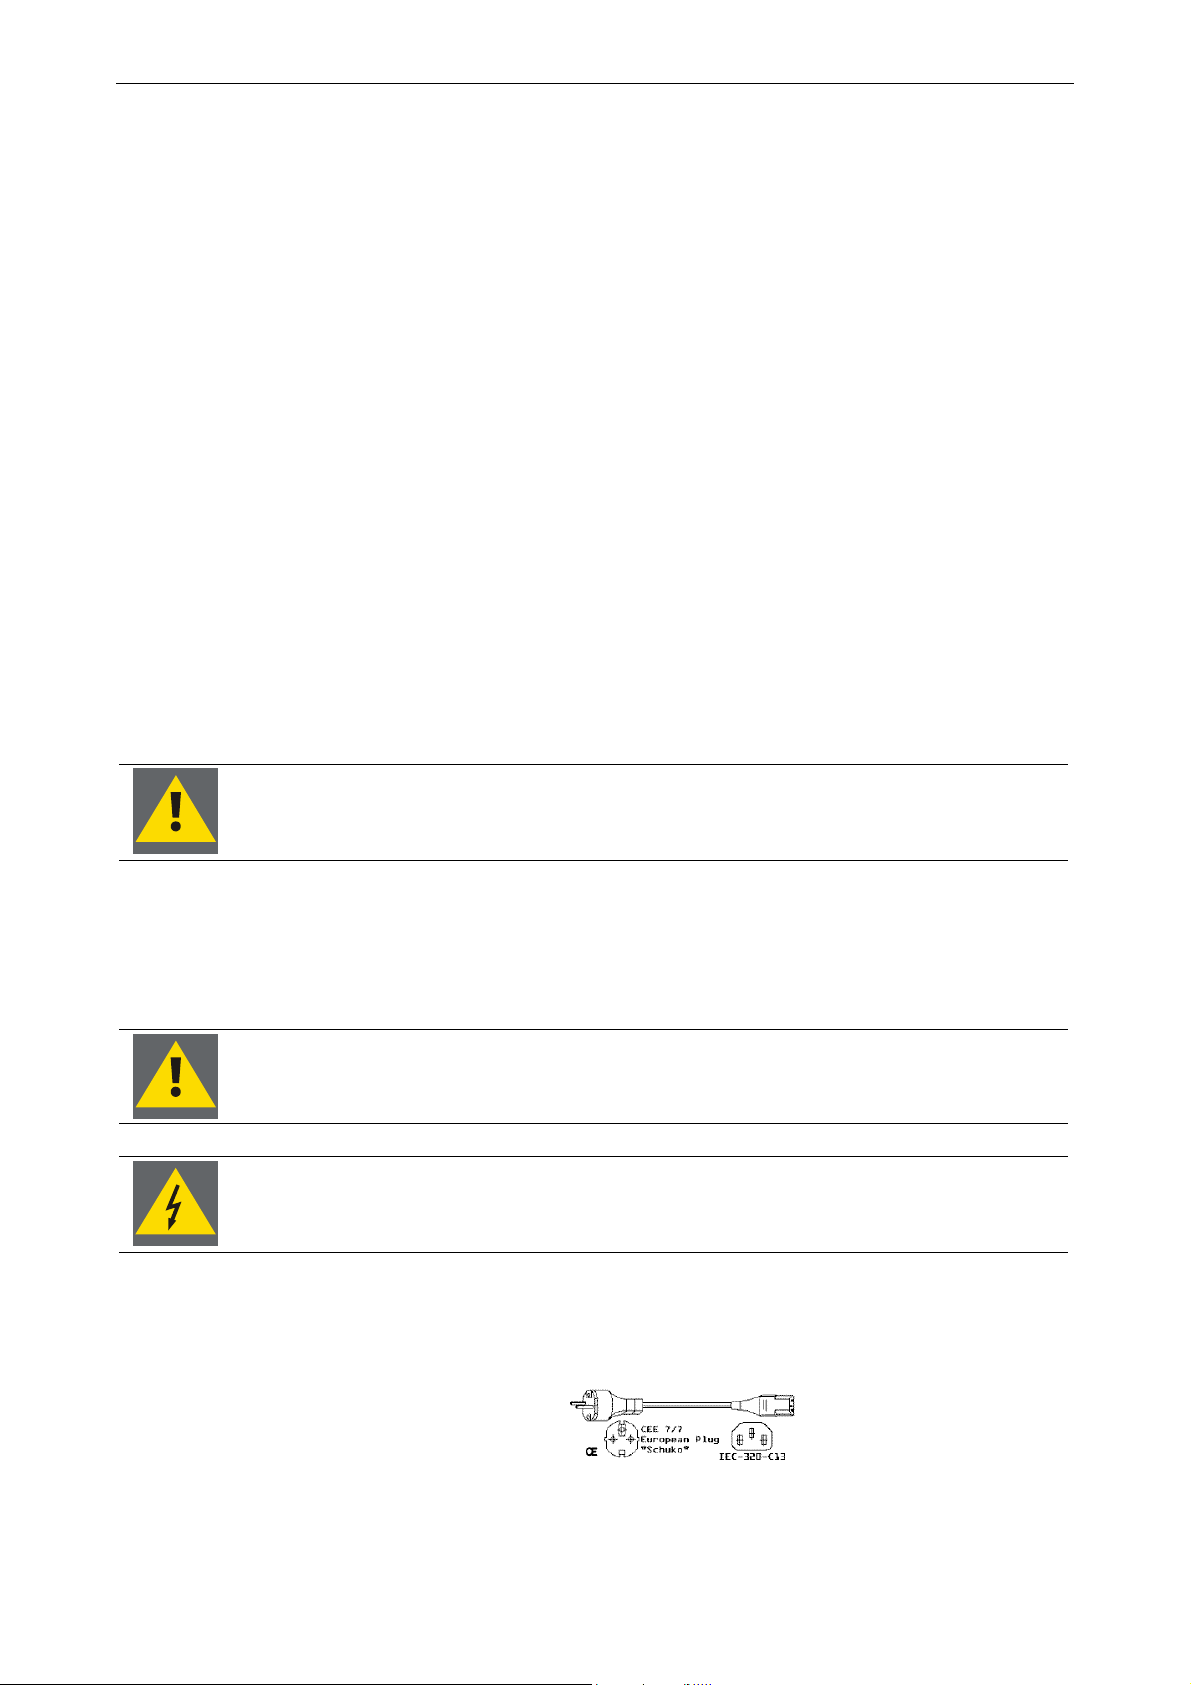
A. Mains lead (AC Power cord) with CEE 7 plug:
The colors of the mains lead are colored in accordance with the following code:
Green-and-yellow: Earth (safety earth)
Blue: Neutral
Brown: Line (live)
___________________________________________________________
1-4
Barco - LC series - R5976934 - user's manual - Revision 08 - April 2008
Page 17
1. Preliminary Remarks
B. Power cord with NEMA 15-5 plug:
The wires of the power cord are colored in accordance with the following code:
Green or green/yellow: Ground
White or blue: Neutral
Black or brown: Line (live)
• Do not allow anything to rest on the power cord. Do not locate this product where persons will walk on the
cord.
• To disconnect the cord, pull it out by the plug. Never pull the cord itself.
• If an extension cord is used with this product, make sure that the total of the ampere ratings on the products
plugged into the extension cord does not exceed the extension cord ampere rating. Also make sure that the
total of all products plugged into the wall outlet does not exceed 15 amperes.
• Never push objects of any kind into this product through cabinet slots as they may touch dangerous voltage
points or short out parts that could result in a risk of fire or electrical shock.
• Never spill liquid of any kind on the product. Should any liquid or solid object fall into the cabinet, unplug the
set and have it checked by qualified service personnel before resuming operations.
• Lightning - For added protection for this video product during a lightning storm, or when it is left unattended
and unused for long periods of time, unplug it from the wall outlet. This will prevent damage to the monitor
due to lightning and AC power-line surges.
Warning: Do not place flammable or combustible materials near the monitor!
Transportation
• Any transportation of the unopened unit in its packaging should be done by two persons.
• In transportation or storage of products in original packing, NEVER stack more than the number stated on the
carton box. This warning is also indicated on the side of the card box.
• For transportation or storage, observe the warnings and instructions on the side of the card box.
Nearby equipment
If air conditioning ducts or lamps, etc. are located near the installation site, the attendant dust, extreme temperatures, humidity, and condensation may become sources of trouble. Please take sufficient steps to avoid this.
Safety locations
Do not install the unit where it may be easily touched or leaned against. Avoid locations subject to high vibrations or severe impacts. Do not install the unit where it is exposed to humidity, oil, smoke or excessive dust.
Mechanical stress.
Please be careful not to apply strong mechanical stress (shock, drop) to the LCD module. Such stress may cause
break of screen glass and lamp or may be the cause for failure.
Pressure to screen surface.
Please be careful not to apply strong pressure to the screen surface. Such pressure may cause scratches at the
surface or may be the cause of failure.
Barco - LC series - R5976934 - user's manual - Revision 08 - April 2008
________________________________________________________________________________________
1-5
Page 18

1. Preliminary Remarks
Protection against scratch.
Please be careful not to hit, press or rub the screen surface with hard material like tools. In addition, please do
not put heavy or hard material on the screen surface, and do not stack monitors. Polarizer at the front surface
can be easily scratched.
Temperature dependence of the display.
Response speed (optical response) of the LCD display is dependent on temperature. Under low temperature,
response speed is slower. Also brightness and chromaticity change slightly depend on temperature.
Image retention
Displaying the same pattern for a long time may cause image sticking, vertical dark lines or other forms of image
artifacts. This is a common phenomenon of all LCD displays. It disappears after some time if the pattern is
changed, or the monitor is switched off. However, image retention is not subject of warranty.
For more information contact Barco for a white paper on this topic.
Lightning conditions
Consider existing lightning and sunlight angles when creating the installation layout. Extremely bright lightning
can reduce the visibility and the quality of the displayed image.
In extremely bright surroundings, adjusting screen intensity may not result in perceptibly brighter images. Keep
in mind that extreme intensity settings can reduce system service life.
Barco products are designed and manufactured to meet the most stringent safety regulations. Exposing flammable or combustible materials into close proximity of this device could result in the spontaneous ignition of that
material, resulting in a fire. For this reason, it is absolutely necessary to leave an "exclusion zone" around all
external surfaces of the monitor whereby no flammable or combustible materials are present. The exclusion zone
must be not less than 10 cm (4"). Do not cover the monitor with any material while it is in operation.
Keep flammable and combustible materials away from the monitor at all times. Mount the monitor in a well
ventilated area away from sources of ignition and out of direct sun light. Never expose this product to rain or
excessive moisture. In the event of fire, use sand, CO
, or dry powder fire extinguishers; never use water on an
2
electrical fire.
Always have service performed on this product by authorized Barco service personnel. Always insist on genuine
Barco replacement parts. Never use non-Barco replacement parts as they may degrade the safety of this device.
Use only the power cord supplied with your device. While appearing to be similar, other power cords have not
been safety tested at the factory and may not be used to power the display. For a replacement power cord, contact your dealer.
Slots and openings in the cabinet and the sides are provided for ventilation; to ensure reliable operation of the
device and to protect it from overheating, these openings must not be blocked or covered. This product should
never be placed near or over a radiator or heat register. This product should not be placed in a built-in installation or enclosure unless proper ventilation is provided.
___________________________________________________________
1-6
Barco - LC series - R5976934 - user's manual - Revision 08 - April 2008
Page 19
1. Preliminary Remarks
1.3.2 Safety on servicing
Do not attempt to service this device yourself, as opening or removing covers may expose you to dangerous
voltage potential and risk of electric shock! Refer all monitor service to a qualified Barco service center.
Adjust only those controls that are covered by the operating instructions since improper adjustment of the other
controls may result in damage and will often require extensive work by a qualified technician to restore the
product to normal operation.
Call for service in the following conditions:
• When the power cord or plug is damaged or frayed.
• If liquid has been spilled into the device.
• If the product has been exposed to rain or water.
• If the product does not operate normally when the operating instructions are followed.
• If the product has been dropped or the cabinet has been damaged;
• If the product exhibits a distinct change in performance, indicating a need for service.
Replacement parts
When replacement parts are required, be sure the service technician has used original Barco replacement parts
or authorized replacement parts which have the same characteristics as the Barco original part. Unauthorized
substitutions may result in degraded performance and reliability, fire, electric shock or other hazards. Unauthorized substitutions may void warranty.
Safety check
Upon completion of any service or repairs to this unit, ask the service technician to perform safety checks to
determine that the unit is in proper operating condition.
Protection
Please do not disassemble or modify the LCD module to avoid the possibility of electric shock, damage of electronic components, scratch at display surface and invasion of foreign particles. In addition, such activity may
result in fire accident due to burning of electronic component.
The LCD module disassembled or modified by customer is out of warranty.
Please be careful in handling of display with broken glass. When the display glass breaks, please pay attention
not to injure your fingers. The display surface has the plastic film attached, which prevents dispersion of glass
pieces; however touching broken edge will injure your fingers. Also the lamp (Cold Cathode Fluorescent Lamp) is
made of glass, therefore please pay attention in the same way.
Please do not touch the fluid flown out of broken display glass. If the fluid should stick to hand or clothes, wipe
off with soap or alcohol immediately and then wash it with water.
If the fluid should get in your eyes, wash your eyes immediately with pure water for more
than 15 minutes and then consult the doctor.
The lamp contains mercury inside. Please follow the regulations or rules established by
local authorities at its disposal..
Barco - LC series - R5976934 - user's manual - Revision 08 - April 2008
________________________________________________________________________________________
1-7
Page 20

1. Preliminary Remarks
1.3.3 Safety on shipping
Original shipping package
Save the original shipping packing material; they will come in handy if you ever have to ship one of your installed modules. For maximum protection, repack your set as it was originally packed at the factory.
1.3.4 Precautions
For your own protection, observe the following safety precautions!
• Observe all warnings and instructions printed on the devices!
• Check that the voltage and frequency of your power supply match those printed on the device label with the
rated electrical values!
• Servicing not explicitly mentioned in this manual should never be carried out by unauthorized personnel!
• Some parts of the body are hot during operation. Please be careful.
• In case of moving long-distance, wrap the unit with blanket to avoid damages. Be careful not to bump the
unit.
• Do not spray
Unused for long periods of time
For added protection for this video product during a lightning storm, or when it is left unattended an unused for
long periods of time, unplug it from the wall outlet. This will prevent damage to the LCD module due to lightning
and AC power-line surges
1.3.5 Malfunction or Trouble
Trouble take the following steps risk of
Smoke or peculiar smells comes from
the unit
No picture or sound Remove the power plug from the out-
Water is spilled or objects are
dropped inside the unit
The unit is dropped or the cabinet is
damaged
The power cord or plug is damaged
or becomes hot
Remove the power plug from the outlet immediately!
Make sure that the smoke or smell has
stopped, then contact your dealer for
inspection
let immediately!
Contact your dealer for inspection
Remove the power plug from the outlet immediately!
Contact your dealer for inspection
Remove the power plug from the outlet immediately!
Contact your dealer for inspection
Power off the unit with the power
switch on the rear side.
When the power plug has cooled
down, remove the power plug from
the wall outlet!
Contact your dealer for inspection
fire or an electric shock
fire or an electric shock
fire or an electric shock
fire or an electric shock
fire or an electric shock
1.3.6 Unpacking of devices
Note advises on the packaging for unpacking!
Please refer to chapter 2 Unpacking and installation
___________________________________________________________
1-8
Barco - LC series - R5976934 - user's manual - Revision 08 - April 2008
Page 21

1. Preliminary Remarks
1.3.7 Modification of devices
Mechanical or electrical modifications others than described in this manual must not be made to the devices.
Barco is not liable for damages resulting from modified devices.
Only authorized personnel should carry out other maintenance work not explicitly mentioned in this user's manual!
Never open the case of the monitor without first disconnecting the power supply cord!
Measurements and tests with an opened device may be carried out only in the factory or
by specially trained personnel, due to the dangers of electrical shock.
1.3.8 Disposal or handing over to a new owner
• It is recommended to initialize the unit by resetting it to factory's default, cf. 5.7.1 Factory Reset.
• Do not mix with other general waste.
• Do not dispose the LCD monitor in waste treated by a waste treatment center.
The lamp contains mercury inside. Please follow the regulations or rules established by
local autorithies at its disposal..
1.3.9 Exemptions
• This monitor is not liable for any damage caused by natural disaster (such as earthquake, thunder, etc.),
fires, acts by third parties, accidents, owner’s intentional misuse and fault, or uses in other improper conditions.
• This monitor is not liable for incidental damages (such as profit loss or interruption in business, modification
or erasure of record data, etc.) caused by use or inability to use of this product.
• This monitor is not liable for any damage caused by neglect of the instructions described in the owner’s
manual.
• This monitor is not liable for any damage caused by misuse or malfunction through simultaneous use of this
product and the connected equipment or software.
• This monitor is not liable for any damage caused by neglect of the instructions described about the installa-
tion stand in the owner’s manual.
• This monitor is not liable for any damage caused by improper installation.
Barco - LC series - R5976934 - user's manual - Revision 08 - April 2008
________________________________________________________________________________________
1-9
Page 22

Page 23

2 Unpacking and installation
2. Unpacking and installation
Barco - LC series - R5976934 - user's manual - Revision 08 - April 2008
________________________________________________________________________________________
2-1
Page 24
2. Unpacking and installation
2.1 Unpacking
The monitor is surrounded with foam for transportation protection and packed into a card box. Banding and fastening clips secure the package.
To unpack the monitor,
• Release the fastening clips
• Remove the banding
• Take the monitor out
• Remove the foam.
For later shipment, it is recommended to store the original packaging and to re-use it.
The following components are included in the delivery:
• The monitor itself
• 1 pc power cord (European, with CEE7 power plug)
• 1 pc power cord (American, with NEMA 15-5 (ANSI 73.11) power plug)
• 1 pc user's manual
• 1 pc Infra red remote control unit
• 1 pc RCA jack
• 1 pc DVI-D 24 pin cable
• 1 pc D-Sub 15 pin cable
• 1 pc S-Video Mini Din 4 pin cable
• 1 pc cable adapter Mini Din 8 pin to 3xRCA jack (for component video)
___________________________________________________________
2-2
Barco - LC series - R5976934 - user's manual - Revision 08 - April 2008
Page 25
2. Unpacking and installation
2.2 Installation
Installation and preliminary adjustments should be performed by qualified Barco
personnel or authorized Barco service dealers.
Installation of the monitor shall comply with the safety instructions as listed in chapter 1.3.1 Safety on installation
• Make sure that the installation place has sufficient stability!
• Do not place the monitor near heat sources!
• Use maximum 15mm/0.59 inch long screws. Longer screws may damage the monitor!
• Ensure that the display is operating within the specified operating range +5°C – +40°C | 41°F – 104°F, at max.
90% RH, non-condensing.
• Never restrict airflow into the display by blocking any vents or air intakes.
• Leave a clearance on all vented sides of the display to permit the required airflow. Clearance should be mini-
mum 15 cm but may be larger depending on the ambient environment.
Do not install the unit where it may be easily touched or leaned against. Avoid locations
subject to high vibrations or severe impacts. Do not install the unit where it is exposed to
humidity, oil, smoke or excessive dust.
2.2.1 Accessories
The product portfolio of accessories comprises a table stand, and wall and ceiling mounts. The installation of the
accessories is described in the installation section. The following chapter just gives a rough idea about mounting
the table stand.
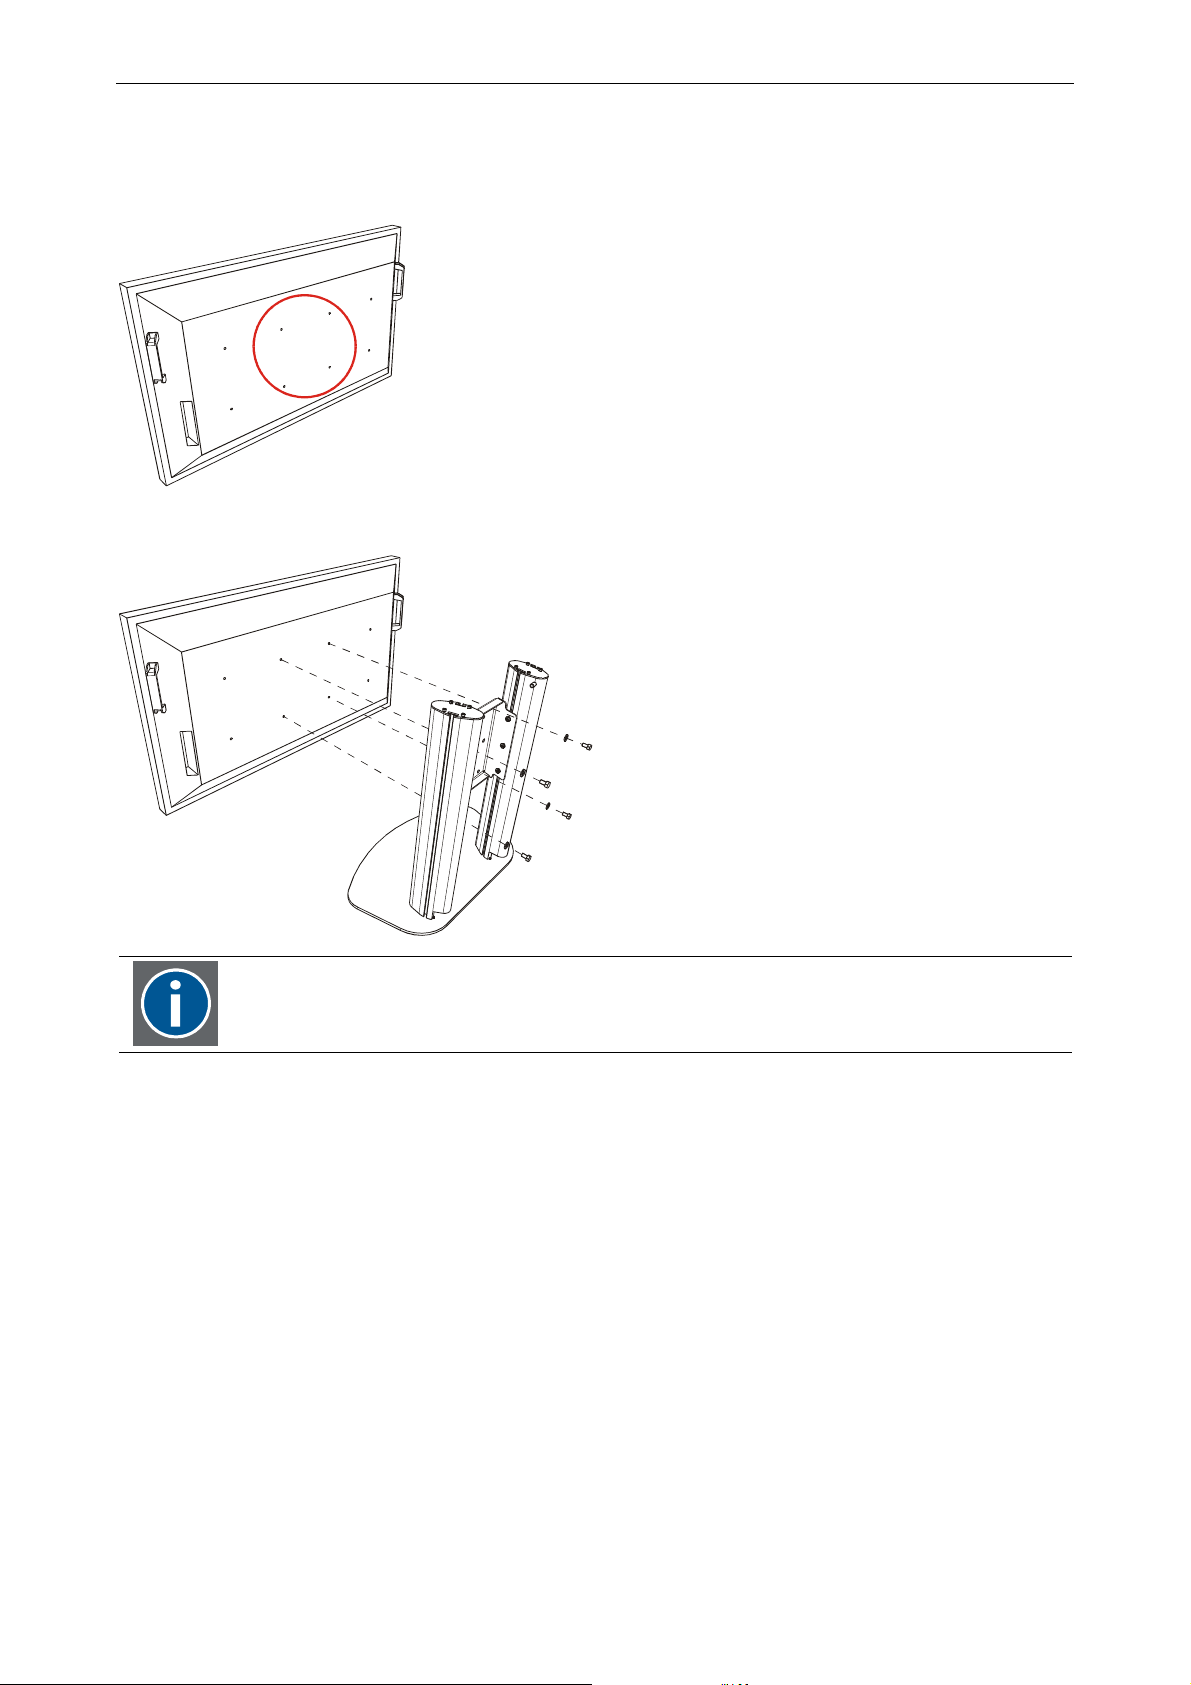
2.2.2 Mounting of the table stand (optional)
The table stand is an optional component.
The monitors feature on their rear side 2 parallel arrangements of 4 threads each. These threads comply with the
VESA standards, their horizontal and vertical distance is 200mm. They are equipped with the respective screws
(M8x15).
These screws are used to attach the table stand!
• Lay the monitor upside down on a clean(!) surface, bottom edge flush with e.g. edge of the table.
Soil or particles laying on the surface may irretrievably
damage the screen of the monitor!
Barco - LC series - R5976934 - user's manual - Revision 08 - April 2008
________________________________________________________________________________________
2-3
Page 26
2. Unpacking and installation
• Take a screwdriver for recessed head screws, size 8.
• Remove the 4 center screws and washers on the rear side of the monitor.
• Take the table stand and attach its mounting plate to the rear of the monitor using the previously removed
screws and washers.
Mind the correct orientation of the table stand!
• When the screws are fastened tightly, put up the monitor
___________________________________________________________
2-4
Barco - LC series - R5976934 - user's manual - Revision 08 - April 2008
Page 27
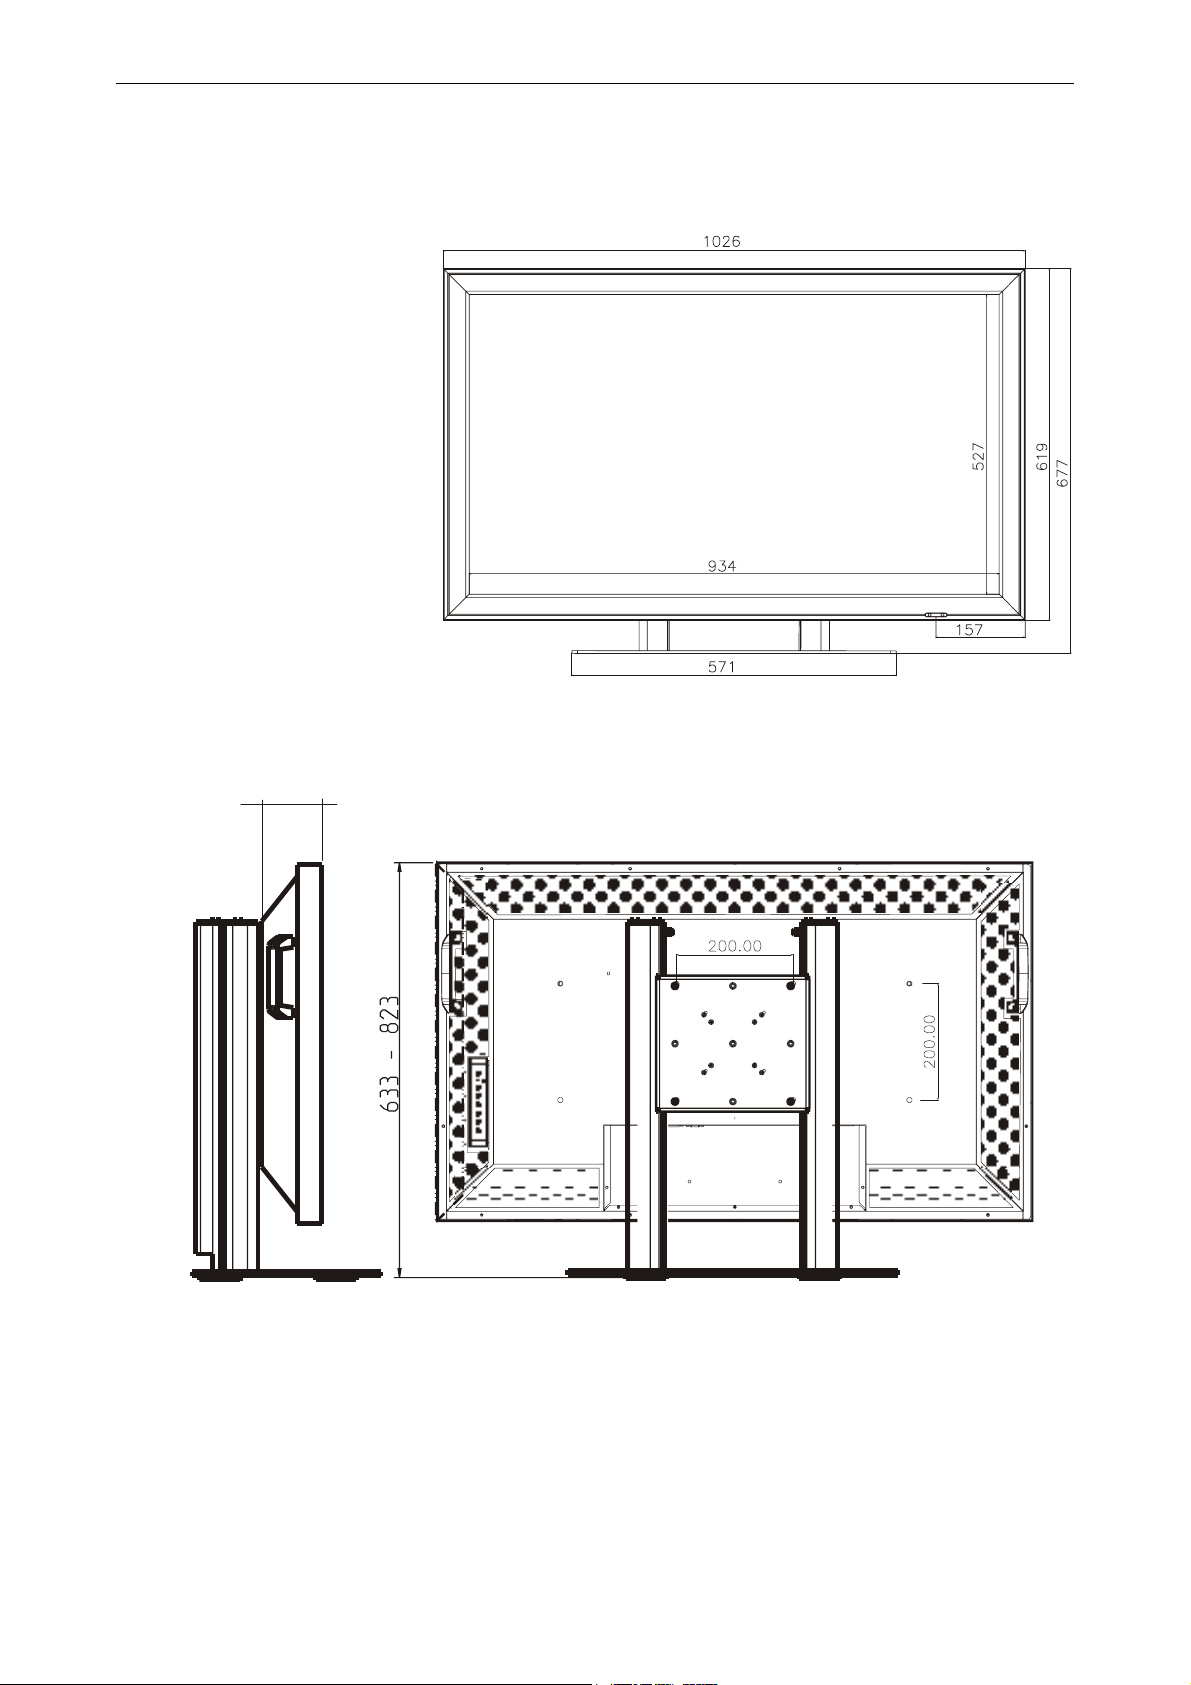
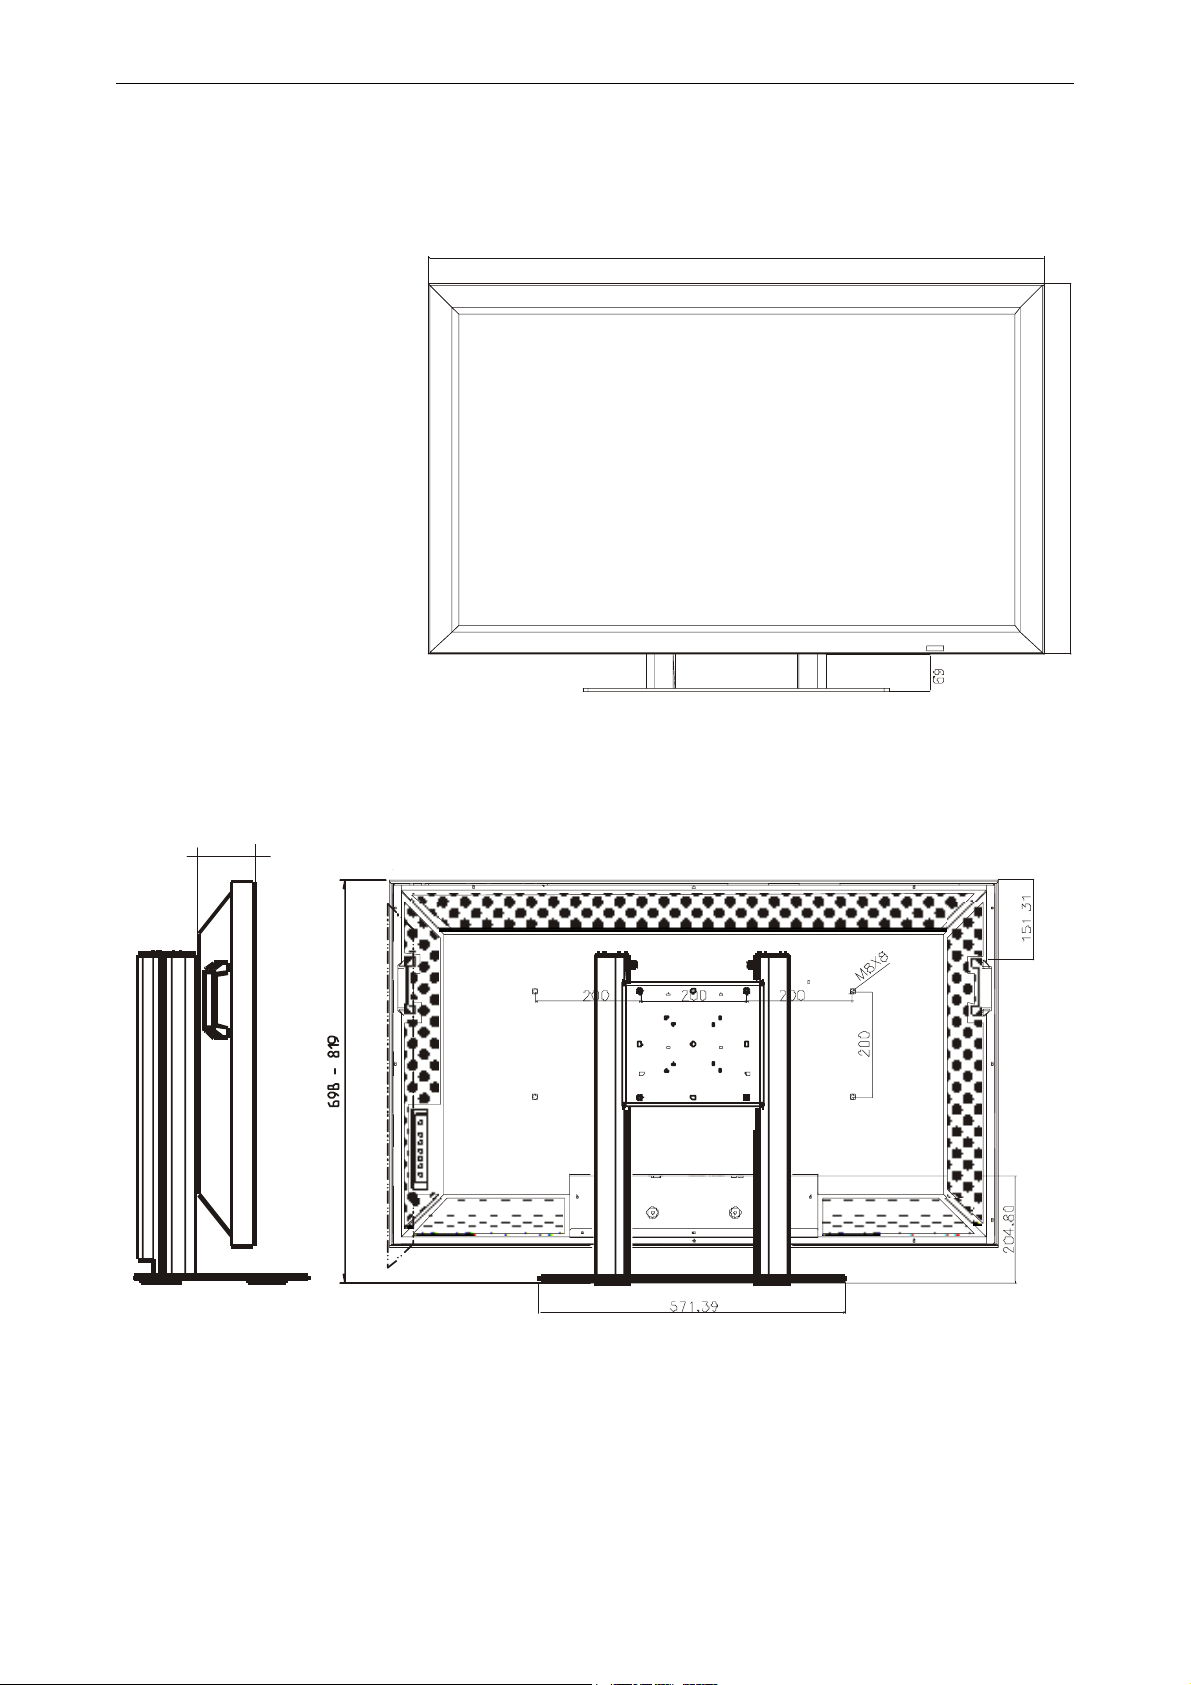
2.2.3 Dimensions of the 42" monitor:
2.2.3.1 Front view
2. Unpacking and installation
2.2.3.2 Side view and rear view:
123.7
Barco - LC series - R5976934 - user's manual - Revision 08 - April 2008
________________________________________________________________________________________
2-5
Page 28
2. Unpacking and installation
2.2.4 Dimensions of the 47" monitor:
2.2.4.1 Front view
1139.4
.4
4
8
6
2.2.4.2 Side view and rear view:
125
___________________________________________________________
2-6
Barco - LC series - R5976934 - user's manual - Revision 08 - April 2008
Page 29
2. Unpacking and installation
+
u
2.3 Examining the monitor
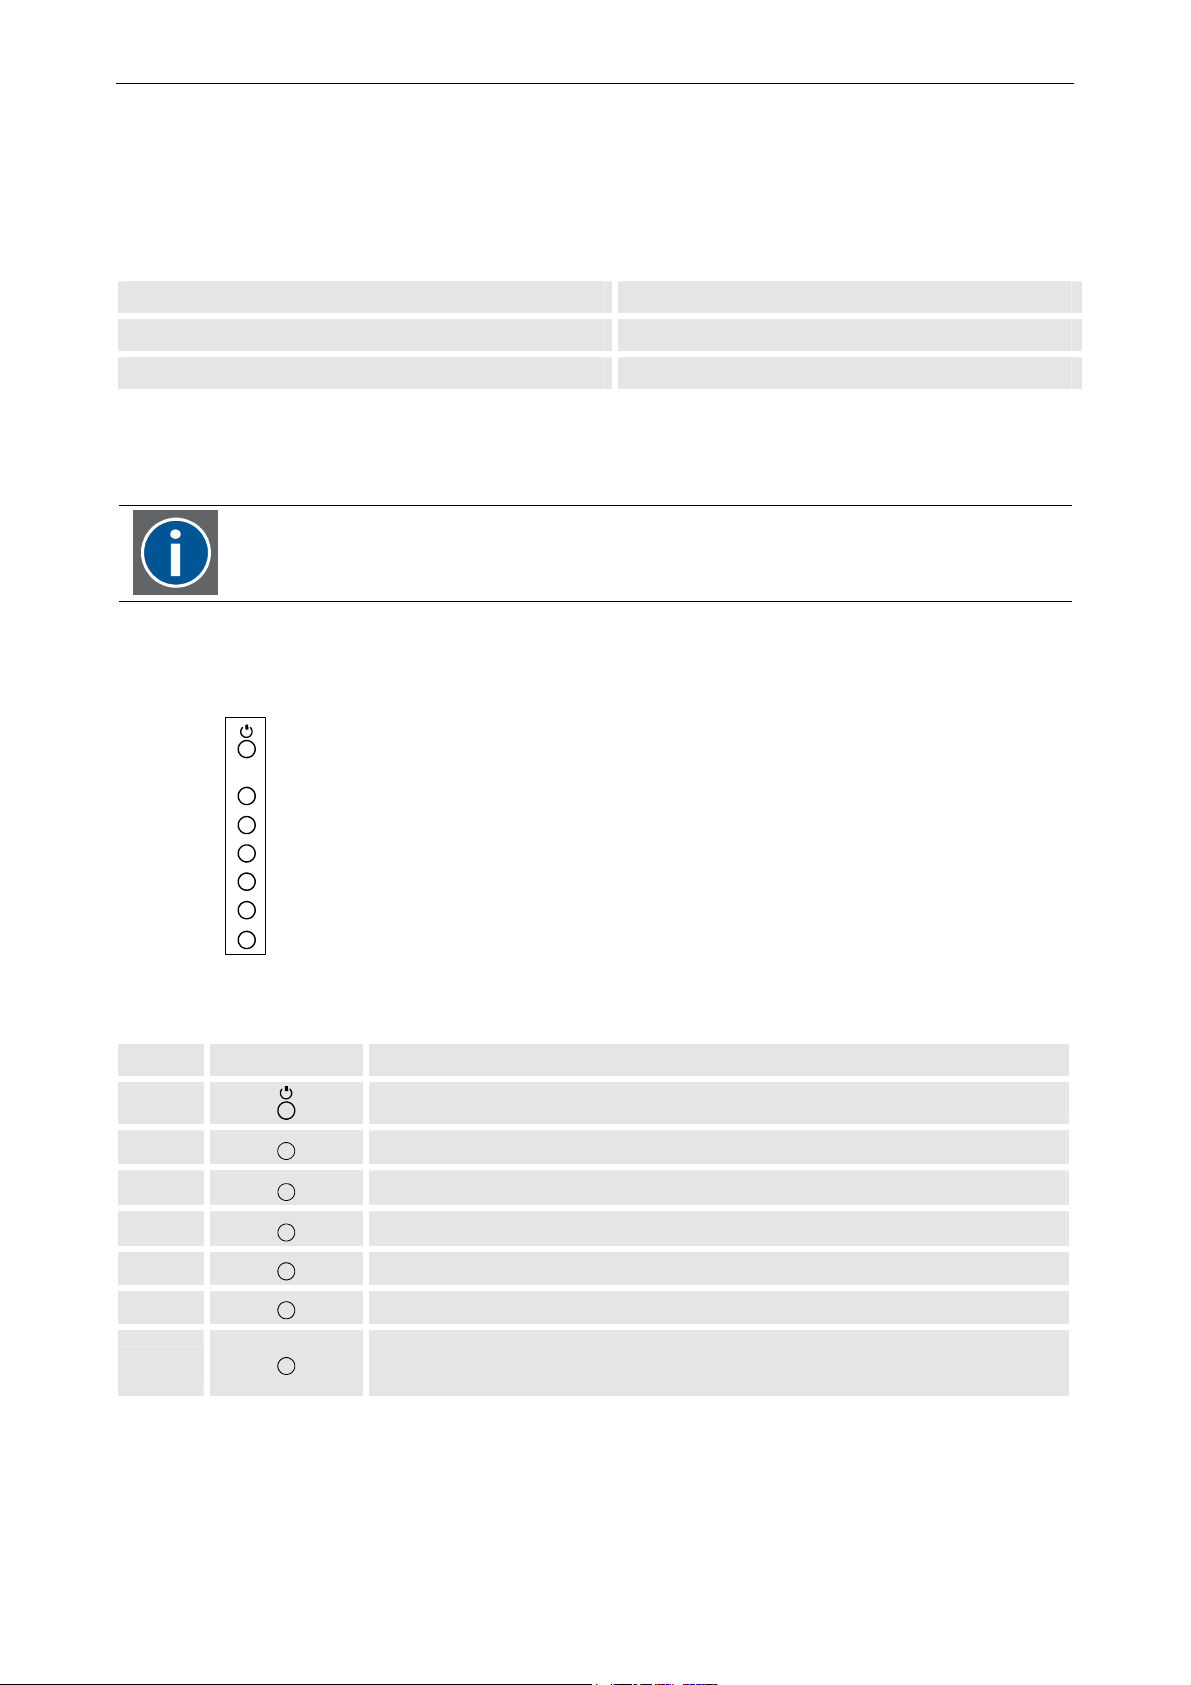
2.3.1 Front view
An LED on the bottom right edge indicates the operating status of the monitor.
LED indicator Mode
Orange Standby
Green In operation
Next the to LED indicator the sensor to receive the commands from the IR control unit is located as well as the
light sensor to determine the surrounding light intensity.
Take care that the sensors are not blocked by any objects placed in front of the monitor!
The preset for dim adjustment and bright adjustment can be set and controlled via the OSD, cf. 5.6.4 L.
2.3.2 Side view
ENTER
>/+
</-
><
Menu
The control elements of monitors are located on the right (seen from front). The 7 push buttons allow switching
the monitor from and to standby, to adjust volume and to activate and operate the OSD.
Item Refers to Function
1
2
3
4
5
6
ENTER
>/
</-
<
>
Standby / switch into operation
Activate selection
Scroll right for menu items / volume increase
Scroll left for menu items / volume decrease
Scroll down for menu items / Access signal input menu
Scroll up for menu items
7
Barco - LC series - R5976934 - user's manual - Revision 08 - April 2008
Men
OSD control menu button / Access or exit main menu /
Access or exit submenu / Exit selection
________________________________________________________________________________________
2-7
Page 30
2. Unpacking and installation
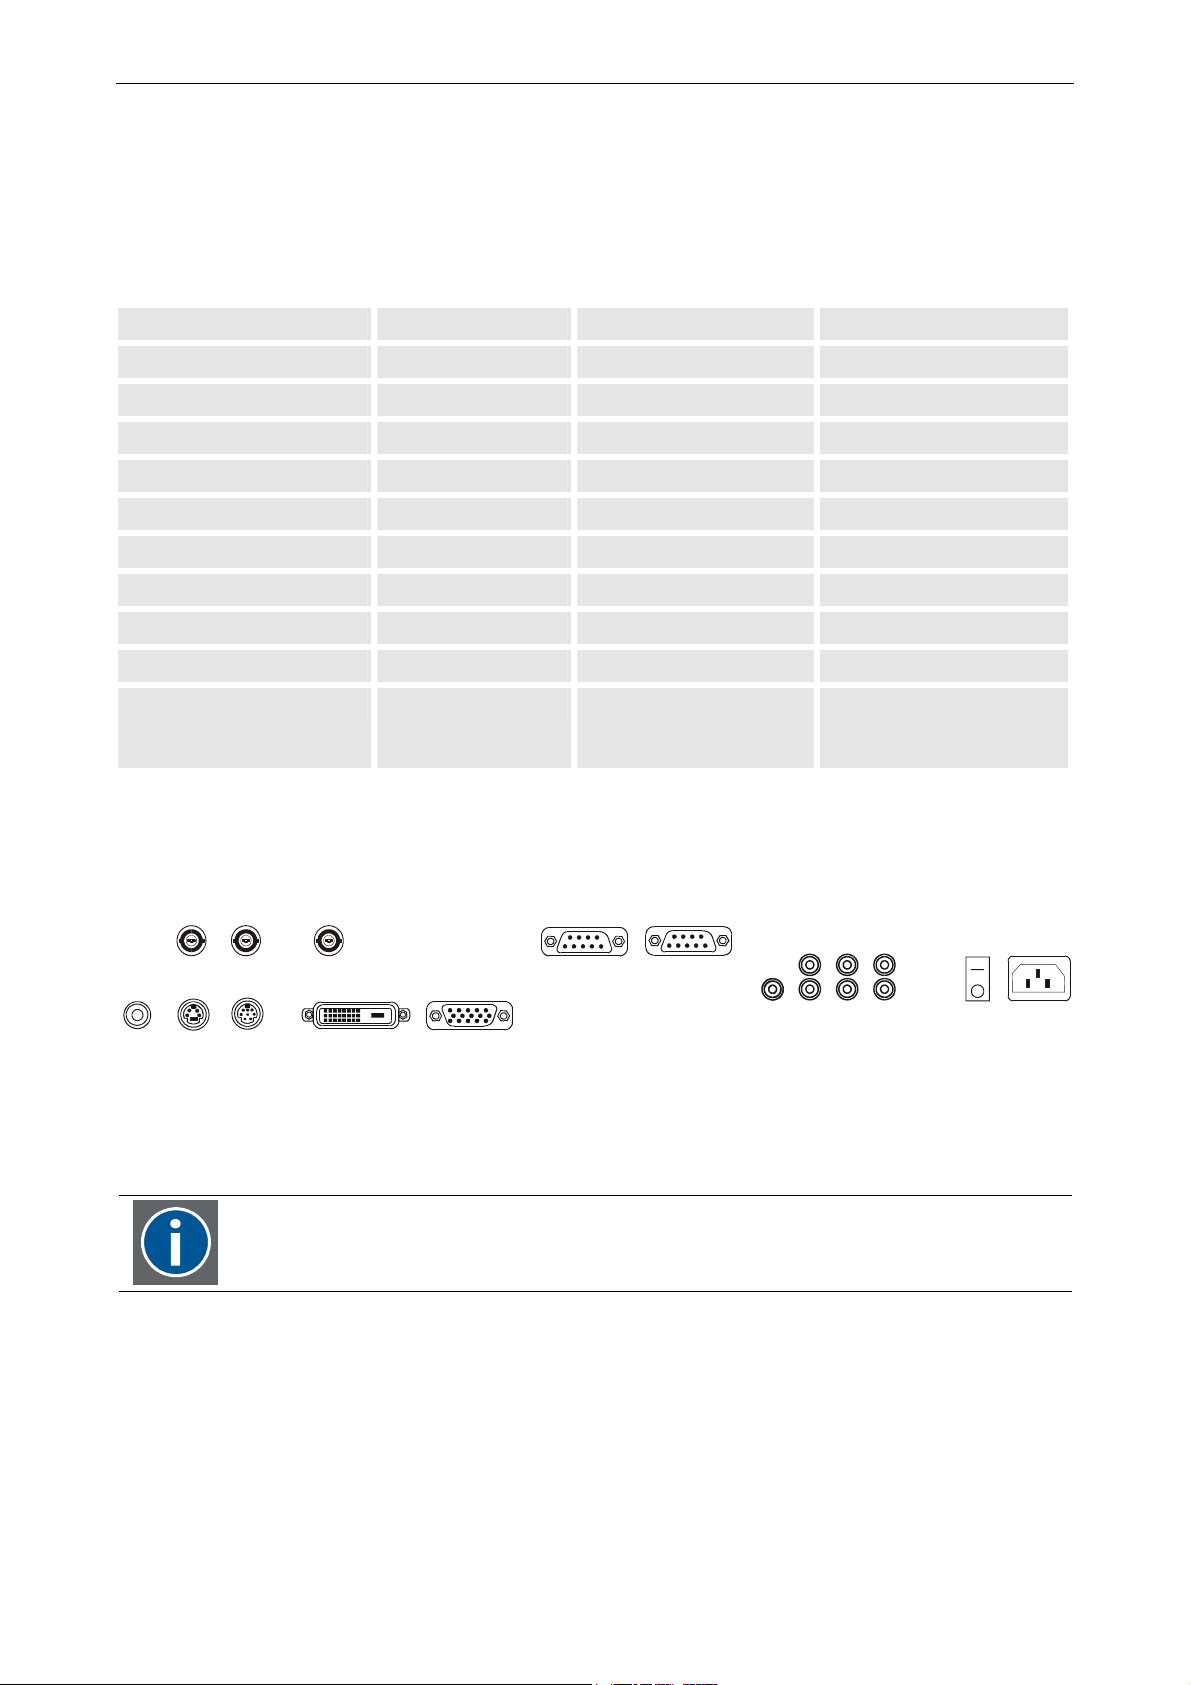
2.3.3 Rear view
On the rear, all interfaces as well as the power connector and the main power switch are located.
The standardized power socket is conform to IEC-320-13 and allows connecting local power cables. The internal
power supply is auto ranging from 100VAC to 240VAC.
The monitor allows connecting the following sources:
Input Interface signals
Video system input VIDEO IN RCA NTSC/PAL
S-VIDEO S-Video Mini Din 4pin NTSC/PAL
YUV (Y Pb/Cb Pr/Cr) Component Mini Din 7 pin NTSC/PAL
RGB input RGB Analog D-Sub 15 pin RGB analog
RGB Digital DVI-D 24 pin RGB digital
HD-SDI input *) Serial Digital BNC SDI / HD-SDI
HD-SDI output *) Serial Digital BNC SDI / HD-SDI
Signal receive&transmit RS232 IN D-Sub 9 pin
RS232 OUT D-Sub 9 pin
Audio RCA
(red: right (R),
white: left (L))
Audio in (L+R)
Audio out(L+R) (2x) and
Subwoofer
The pin assignments of the interfaces are listed in chapter 7.6 Interfaces and chapter 8.6 Interfaces, respectively.
HDSDI/SDI IN HDSDI/SDI OUT
VIDEO
IN
S-VIDEO
Y
Pb/Cb
DVIPr/Cr
RGB IN
RS232/INRS232/OUT
AC IN
SW
L/INL/OUT2L/OUT1
R/INR/OUT2R/OUT1
MAIN POWER
ON
OFF
Two sources can be viewed simultaneously in either PIP mode (Picture-in-Picture) or PAP mode (Picture-andPicture). In case more than one source is connected, the active sources and the display mode (one source or two
sources) are selected via the OSD.
*)
Only LCS-42 and LCS-47 feature the HD-SDI interfaces!
___________________________________________________________
2-8
Barco - LC series - R5976934 - user's manual - Revision 08 - April 2008
Page 31

2. Unpacking and installation
2.4 Cabling
All interfaces are located on the rear of the system!
Check the power rating on your outlet before connecting the monitor to the wall outlet
or to a power strip. Contact your facilities manager or a qualified electrician if you are
not sure what type of power is supplied to your building.
• Use the power cord delivered with your system:
• Plug in the female power connector into the male connector AC IN on the rear of the monitor.
• Plug in the CEE7-plug (or ANSI 73.11 plug) into the wall outlet.
The power input is auto-ranging from 100VAC to 240 VAC.
• Connect the video and RGB sources with the respective interface using the included cables.
The devices are designed to operate with single-phase power systems having a
grounded neutral conductor. To reduce the risk of electrical shock, do not plug into any
other type of power system.
2.5 Switching on and off
Use the main power switch on the rear of the system to power the system on and off.
When the monitor is powered on, it can be switched into operation or switched to standby, respectively, using
eater the top most push button on the rear right side of the monitor or using the IR remote control unit (RCU).
If the system is not operated for longer periods, it is recommended to switch it off using
the main power switch on the rear side and to disconnect it from the wall outlet.
When the monitor is powered off by switching off the main power switch, the front LED indicating the operating
mode is off! Also you cannot switch the unit into operation by using the remote control unit or the top most push
button.
To power on the unit, switch on the main power switch on the rear of the system. The LED indicator will be
turned on, and you can switch the monitor into operation either by using the RCU or the top most push button
the rear of the system.
Barco - LC series - R5976934 - user's manual - Revision 08 - April 2008
________________________________________________________________________________________
2-9
Page 32

2. Unpacking and installation
2.6 Inserting batteries into the Infrared remote control unit
The batteries are not yet inserted in the remote control to avoid remote control operation in its package, resulting in a shorter battery lifetime.
How to install the batteries:
• Push the cover tab with the fingernail a little backwards (as indicated by the arrow) and pull upwards the
cover top.
• Slide the cover forwards to remove-
• Insert two AA size batteries, making sure the polarities match the + and – marks inside the battery com-
partment.
• Insert the lower tab of the battery cover in the gap at the bottom of the remote control, and press the cover
until it clicks in place
Note that there may be laws concerning disposal and recycling of used batteries in your
country! Please contact your local authorities to get further information!
Avoid keeping used, old batteries inside the remote control, causing leakage of internal
liquid resulting metal rust or fatal damage to the remote control unit.
__________________________________________________________
2-10
Barco - LC series - R5976934 - user's manual - Revision 08 - April 2008
Page 33

3 Design and function
This chapter introduces the systems and explains some of their characteristics.
3. Design and function
Barco - LC series - R5976934 - user's manual - Revision 08 - April 2008
________________________________________________________________________________________
3-1
Page 34

3. Design and function
3.1 Display of choice
The state-of-the-art monitors deliver crisp, clear images detailed to perfection. Compatible with a wide variety of
signal sources, they are capable of showing analog video as well as data content.
Sources and interfaces
The monitor provides interfaces to connect composite video, S-Video, component video as well as analog or digital RGB.
Picture-in-Picture
Two of the connected sources can be displayed simultaneously, either next to each other (PAP: picture-andpicture), or one source embedded in the other (PIP: picture in picture).
The sources can be controlled individually (brightness, contrast, color)
Automatic brightness adjustment
A light sensor determines the surrounding light intensity. According the measurement, the panel will adjust to
one of the two preset brightness levels: bright mode or dim mode.
User friendliness
The monitors can intuitively be operated and controlled via the OSD and the Infra Red Remote Control Unit (IR
RCU).
The language of the OSD can be selected as well as its position on the screen, size, etc.
RS232 remote control is also possible.
In case you want to operate the monitor via RS232 Remote Control, contact Barco about
the protocol!
___________________________________________________________
3-2
Barco - LC series - R5976934 - user's manual - Revision 08 - April 2008
Page 35

3. Design and function
V=V
p
p
3.2 Technology
The monitors are based on LCD Super MVA technology. The benefits of this technology are wide viewing angles,
fast video response and high contrast ratio.
MVA stands for Multidomain Vertical Alignment.
3.2.1 Principle of LCD technology
These are the basics used in LCD technology:
• Light can be polarized
• Liquid crystals can transmit polarized light.
• Liquid crystals align themselves when a voltage is applied.
• Liquid crystals change the light's plane of vibration to match their own angle.
There are multiple operating principles of LCD's; one of them is the Multidomain Vertical Alignment which – not
surprising – is based on the Vertical Alignment (VA) technology.
With this operating principle, the LC molecules are completely perpendicular when no voltage is applied, and
thus they don't change the polarization of light. Light simply passes the LC, and is blocked by the front end polarizer (since this polarizer is rotated 90° against the back end polarizer which allowed the incident light to pass).
Because the blockage is complete, the quality of black produced this way is excellent!
When voltage is applied, the molecules shift to a horizontal position, producing a white image: the polarization
of the light is changed, and light can pass the front end polarizer.
Since the LC molecules are simply switched between vertical and horizontal alignment, response speeds are very
fast.
As a further development of the VA technology, with MVA technology the LC cell is divided in sub domains where
the molecules are oriented in opposite direction. This widens the viewing angles and enhances the performance.
The following picture shows the basic principle of VA technology:
V=0
max
backlight
back
olarizer
substrate
liquid crystal
substrate
olarizer
front
full black
full white
Barco - LC series - R5976934 - user's manual - Revision 08 - April 2008
________________________________________________________________________________________
3-3
Page 36

Page 37

4 Controlling
4. Controlling
Barco - LC series - R5976934 - user's manual - Revision 08 - April 2008
________________________________________________________________________________________
4-1
Page 38

4. Controlling
+
u
4.1 General
The monitors can be controlled via the 7 push buttons at the right or conveniently remote-controlled by the infrared remote control unit (RCU).
In case you want to use RS232 Remote Control, contact Barco!
The push buttons as well as the IR RCU make use of the OSD: the menu is displayed, a menu item is selected
and/or changed. Subsequently the OSD is closed again.
4.1.1 The push buttons
The push buttons are located on the right rear side of the monitor. The seven buttons are arranged in a vertical
row and have the following functions:
Push button Refers to Function
1 (top most)
2
3
4
5
6
7
ENTER
>/
</-
<
>
Men
Standby / switch into operation
Activate selection
Scroll right for menu items / volume increase
Scroll left for menu items / volume decrease
Scroll down for menu items
Scroll up for menu items
OSD control menu button / Access Main /
Sub-menu / Quick Menu Selection
___________________________________________________________
4-2
Barco - LC series - R5976934 - user's manual - Revision 08 - April 2008
Page 39

4. Controlling
4.1.2 The IR remote control unit
The remote control is used for control, adaptation and source selection. It is also used to switch between standby
and operational mode.
The remote control unit (RCU) includes a battery powered infrared (IR) transmitter that allows the user to control
the monitor remotely.
Barco - LC series - R5976934 - user's manual - Revision 08 - April 2008
________________________________________________________________________________________
4-3
Page 40

4. Controlling
4.2 Terminology of the RCU controls
1 Function keys
F1 Source selection
F2 PIP control setting
F3 Switch between master source and PIP source
F4 In VGA mode: White balance
F5 Shows the RS232 address of the monitor
2 ADJ ADJUST key, to enter the OSD
3 Address key has no function for this monitor
4 Selection key Switch the light sensor on/off
5 PAUSE Change baud rate of the serial interface
6 Standby stand by button, to start the monitor when the power switch is switched on and to
switch off the monitor without switching off the power switch.
7 Mute Switch off and on the sound (audio)
8 Help Indicates the resolution of the input video signal
9 Digit buttons 0-9: have no function for this monitor
10 Audio controls To control volume, balance, bass and treble of the audio signal
11 Picture controls Except for brightness and contrast, these keys have no function for this monitor
12 PHASE Adjust the phase of the signal
13 Freeze Auto adjust
14 TEXT Switch on/off the 4:3 mode
15 ENTER to confirm an adjustment or selection
16 Cursor Keys to make menu selections in the OSD.
RCU
cursor key up
cursor key down
cursor key right
cursor key left
Use the cursor keys up or right for increasing a value.
Use the cursor keys down or left for decreasing a value.
17 EXIT to leave a menu or the OSD
18 RC operating
indication
lights up when a button on the remote control is pressed. (This is a visual indicator
to check the operation of the remote control)
How to use the RCU?
Point the front of the RCU directly at the screen.
When using the IR remote control, make sure you are within the effective operating distance
(30m, 100ft in a straight line). The remote control unit will not function properly if strong light
strikes the sensor window or if there are obstacles between the remote control unit and the IR
sensor.
___________________________________________________________
4-4
Barco - LC series - R5976934 - user's manual - Revision 08 - April 2008
Page 41

4. Controlling
4.3 Functions available with the IR Remote Control Unit
4.3.1 Displaying a monitor address
The default (factory) address of a monitor is 1.
Via the OSD, every monitor can be assigned a unique address in the range of 1 and 255, cf. 5.6.1 Set display
address
With the IR remote control unit, all monitors with any address can be controlled.
With RS232 remote control, the monitors can be controlled individually if they had received a unique display
address. (This address can be displayed by means of the function key F5 on the IR remote control unit).
Press F5 on the IR remote control unit to display the assigned address of the monitor.
4.3.2 Baud rate setting
The default baud rate for RS232 communication is 115200 baud. The baud rate can be set in the OSD, cf.
5.6.2 Baud rate.
With the PAUSE key on the IR RCU the baud rate can directly be set to 115200, 38400, 19200, or 9600, respectively. Press PAUSE to display the currently set baud rate. Press PAUSE again to switch the baud rate to the next
lower setting. In case the baud rate is 9600, the next setting will be 115200.
Barco - LC series - R5976934 - user's manual - Revision 08 - April 2008
________________________________________________________________________________________
4-5
Page 42

4. Controlling
4.3.3 The function keys
Using the function keys, the respective OSD command will immediately be executed.
For information about the commands, please refer to the respective section in the OSD description.
Function key Description refers to
F1 Source selection 5.8.1 Input selection with the function key F1,
F2 PIP control setting 5.3.3 PIP control
F3 Switch between master source and PIP source,
the source assigned to input 1 will be assigned
to input 2 and vice versa
F4 In VGA mode: White balance This command has no equivalent in the
F5 Display the monitor address 5.6.1 Set display address
OSD: when e.g. a signal looks greenish,
pressing the function key F4 will correct
and adjust the color impression.
4.3.4 Picture controls with direct access.
Brightness and contrast can be controlled directly via IR RCU. When Brightness or Contrast is pressed, the respective OSD dialog pops up to allow the adjustment.
Please refer to respective section of the OSD description, cf. 5.3.1.1 Brightness, 5.3.1.2 Contrast.
4.3.5 Audio controls with direct access.
Volume, balance, bass and treble can be controlled directly via IR RCU. When the respective keys on the IR remote control unit are pressed,, the respective OSD dialog pops up to allow the adjustment.
Please refer to respective section of the OSD description, cf. 5.5 Audio setting menu
___________________________________________________________
4-6
Barco - LC series - R5976934 - user's manual - Revision 08 - April 2008
Page 43

5 The On Screen Display (OSD)
5. The On Screen Display (OSD)
Barco - LC series - R5976934 - user's manual - Revision 08 - April 2008
________________________________________________________________________________________
5-1
Page 44

5. The On Screen Display (OSD)
5.1 General
The monitors feature an OSD which allows selecting the input, to adjust the sources, to modify OSD settings, etc.
When activating the OSD, the main menu is displayed.
Except for the function keys and the direct access keys, it is always the main menu which
is the entry level for any modification.
The main menu is activated by pressing ADJ on the RCU or by pressing push button 7 (the bottom most push
button the right rear side).
A selected menu item shows a blue background, an unselected menu item a gray background.
A selected menu entry looks like a button and it is indicated with a blue dot.
The current status of the menu entry shows a blue background.
Grayed out menus or items are not available with the current configuration.
If a value has been modified, it will definitely be applied when quitting the dialog (even
when pressing EXIT!)
Therefore it is recommended to write down the values: there is no UNDO to a single
operation, only the global factory reset.
___________________________________________________________
5-2
Barco - LC series - R5976934 - user's manual - Revision 08 - April 2008
Page 45

5. The On Screen Display (OSD)
5.1.1 Navigation and adjustment
RCU Icon Push button (1: top most)
• Press the ADJ key to activate the OSD
• Use the left and right cursor keys to navi-
gate to a menu
• Press 7 to activate the OSD
• Press 3 and 4 to navigate to a
menu
Except for signal 1 and signal 2, the menus do not have a submenu.
Menus without a submenu display their settings dialog as soon as they are activated!
• Press Enter to select a menu with a sub
menu: the menu icon will turn blue
• Use the left and right cursor keys to
navigate to a submenu
• Press Enter to select: the item will turn
blue – or –
• Press the down cursor key:
• Use the up and down cursor keys to navi-
gate to the entries of a dialog.
The entry will get a "button look" and a
blue dot.
• In case an option is linked to a button:
use the left and right cursor keys to select one of the options
• Press 2 to select a menu with a sub
menu: the menu item will turn blue
• Press 3 and 4 to navigate to a sub
menu
• Press 2 to select: the item will turn
blue – or –
• Press 5
• Press 5 and 6 to navigate to the
entries of a dialog
The entry will get a "button look"
and a blue dot.
• In case an option is linked to a
button: use the push buttons 3 / 4
to select one of the options
• In case increase/decrease is linked to a
"slider": use the left and right cursor keys
to decrease/increase a value – or –
• In case increase/decrease is linked to a
button: use the Enter key to de-
crease/increase a value
• In case increase/decrease is linked
to a "slider": use the push buttons 3
/ 4 to decrease increase a value –
or –
• In case increase/decrease is linked
to a button: use the push button 2
to increase/decrease a value
As soon as a menu entry loses the focus, i.e. another entry is selected, the respective selection will be applied
without any further action: even when quitting the dialog with Exit, the modification will be applied!
• Press Exit to deactivate the dialog
• Press Exit to leave a sub menu
• Use the left and the right cursor key to
navigate to another menu
• Press Exit to close the OSD
• Press 7 to deactivate the dialog
• Press 7 to leave a sub menu
• Use 3 and 4 to navigate to another
menu
• Press 7 to close the OSD
Closing a first level dialog (i.e. a dialog linked to a menu, not to a sub menu) by means of the Exit key / the
push button 7 will close the OSD!
Barco - LC series - R5976934 - user's manual - Revision 08 - April 2008
________________________________________________________________________________________
5-3
Page 46

5. The On Screen Display (OSD)
5.2 Activating the OSD
The OSD can be activated and operated by means of the IR remote control unit (RCU) or the push buttons at the
right rear side of the monitor.
RCU Icon Push button (1: top most)
• Press the ADJ key to activate the OSD
Then the main menu is displayed (default: on the upper left corner of the monitor).
The OSD will be displayed at the position and size as defined in the OSD setting menu. If no
modifications have been made via this menu, the OSD will pop up in the upper left corner
of the monitor in normal mode (not Zoomed In, background opaque)
Icon description
signal menu for the first input,
to select and control the settings of a source
The currently assigned signal is indicated in the label beneath
Signal menu for the second input,
to select and control the settings of a source
The currently assigned signal is indicated in the label beneath
-
• Press 7 to activate the OSD
OSD setting menu, to control the position, transparency and time out of the OSD
Audio setting menu, to adjust volume, balance, bass and treble
Parameter setting menu, to set display address, baud rate, light sensor, lower brightness level,
ambient light threshold & auto source selection
Reset menu, to reset to factory defaults. It also shows runtime & serial number of the display
___________________________________________________________
5-4
Barco - LC series - R5976934 - user's manual - Revision 08 - April 2008
Page 47

5. The On Screen Display (OSD)
To activate a menu, proceed as follows:
RCU Icon Push button (1: top most)
• Use the left and right cursor key to select a
menu
• Menus without a submenu will turn blue
and display their settings dialog
• Menus with a sub menu will turn blue and
require an additional key stroke to open the
settings dialog:
Use Enter to open the signal setting submenu
Use the down cursor key to open the signal
selection dialog
• Use the push buttons 3, 4 to select a
menu
• Menus without a submenu will turn
-
blue and display their settings dialog
• Menus with a sub menu will turn
blue and require an additional key
stroke to open the settings dialog:
Use 2 to open the signal setting submenu
Use 5 to open the signal selection
dialog
Barco - LC series - R5976934 - user's manual - Revision 08 - April 2008
________________________________________________________________________________________
5-5
Page 48

5. The On Screen Display (OSD)
5.3 The signal menu (first and second input)
The signal menu allows to control and adjust the settings of the source
The commands can be applied for the first input and for the second input, respectively.
Please note: the Image setting and Position setting is only available for the first (active)
input!
In case more than one source is connected, the signal for input1 and input2 has to be
assigned, cf.. 5.8 Input Signal SelectionThe signal for input1 can also be selected via the
function key F1, 5.8.1 Input selection with the function key F1
RCU Icon Push button (1: top most)
• Press the ADJ key
• Use the left and right cursor keys to navi-
gate to the signal menu
• Press Enter to select
• Use the left ad right cursor keys to navi-
gate to Display
• Press Enter to select
The following sections will use the signal menu of the first input. For the second input, the
same dialogs are displayed, however some items are deactivated (Image, Position)
input1 input2
• Press 7
• Press 3 and 4 to navigate to the
signal menu
• Press 2 to select
• Press 3 and 4 to navigate to Display
• Press 2 to select
Nevertheless the dialogs may look different: some commands depend on the type of the
source. But this is independent from being input1 or input2!
The source menu button will turn blue. Subsequently the source sub menu opens with the items Display,
Position, PIP Control, Image, and Color
Image is only enabled for the source which is assigned to the first input!
The commands of Position are only enabled for the first input!
___________________________________________________________
5-6
Barco - LC series - R5976934 - user's manual - Revision 08 - April 2008
Page 49

5. The On Screen Display (OSD)
5.3.1 Display
On the Display dialog, brightness and contrast as well as hue, saturation, flesh tone can be adjusted (for VGA sources only: also black level adjustment)
To activate the Display dialog, proceed as follows:
RCU Icon Push button (1: top most)
• Press the ADJ key to activate the OSD
• Use the left and right cursor keys to navi-
gate to the signal menu
• Press Enter to select
• Use the left and right cursor keys to navi-
gate to Display
• Press Enter to select – or –
• Press the down key to activate the dialog
• Press 7 to activate the OSD
• Press 3 and 4 to navigate to the
signal menu
• Press 2 to select
• Press 3 and 4 to navigate to Display
• Press 2 to select – or –
• Press 5 to activate the dialog
Barco - LC series - R5976934 - user's manual - Revision 08 - April 2008
________________________________________________________________________________________
5-7
Page 50

5. The On Screen Display (OSD)
5.3.1.1 Brightness
Brightness can be adjusted in the range between 0 and 100.
LCD panel screens are lit with built-in fluorescent tubes above, beside and sometimes behind the LCD (Cold Cathode Fluorescent Lamp, CCFL). This light is adjusted using the Brightness setting.
How brightness is perceived depends on the environment and on the content being viewed, which means that
switching a source and/or the ambient light could require re-adjustment of brightness.
H
ow bright a pixel is perceived depends on both, brightness setting and contrast setting: bright-
ness setting affects all levels from white to black at once. Contrast setting affects all but black.
RCU Push button (1: top most)
• Use the up and down cursor keys to navigate to
the Brightness
• Use the left and right cursor keys to in-
crease/decrease the value in steps of 1
The current value is indicated.
The value is applied without any further action.
• Press 5 and 6 to navigate to Brightness
• Use 3 and 4 to increase/decrease the value in
steps of 1
The current value is indicated.
5.3.1.2 Contrast
Contrast can be adjusted in the range between 0 and 100.
The information content of a picture is related to contrast, not to brightness. The ratio between the brightest
white and the darkest black that a display can produce in a completely dark room is called the full field contrast
ratio.
RCU Push button (1: top most)
• Use the up and down cursor keys to navigate to
the Contrast
• Use the left and right cursor keys to in-
crease/decrease the value in steps of 1
The current value is indicated.
• Press 5 and 6 to navigate to Contrast
• Use 3 and 4 to increase/decrease the value in
steps of 1
The current value is indicated.
The value is applied without any further action.
___________________________________________________________
5-8
Barco - LC series - R5976934 - user's manual - Revision 08 - April 2008
Page 51

5.3.1.3 Hue
5. The On Screen Display (OSD)
Hue can be adjusted in the range between -45 and +45.
The color = hue is most noticeable in areas of white.
There are multiple color models, one of them is the HSV model describing color as hue (color), saturation (the
amount of white light in the color), and V (value, the amount of black/lightness/brightness).
With PAL, part of the color information on the video signal is reversed in phase with each line,
which automatically corrects phase errors in the transmission of the signal.
With NTSC, the Hue control allows to perform the correction manually and to adjust the color
RCU Push button (1: top most)
• Use the up and down cursor keys to navigate to
the Hue
• Use the left and right cursor keys to in-
crease/decrease the value in steps of 1
The current value is indicated.
The value is applied without any further action.
• Press 5 and 6 to navigate to Hue
• Use 3 and 4 to increase/decrease the value in
steps of 1
The current value is indicated.
5.3.1.4 Saturation
Saturation can be adjusted in the range between 0 and 100.
Saturation adjusts the amount of white light in the color.
RCU Push button (1: top most)
• Use the up and down cursor keys to navigate to
the Saturation
• Use the left and right cursor keys to in-
crease/decrease the value in steps of 1
The current value is indicated.
The value is applied without any further action.
• Press 5 and 6 to navigate to Saturation
• Use 3 and 4 to increase/decrease the value in
steps of 1
The current value is indicated.
5.3.1.5 Flesh tone
Flesh tone can be switched off, or turned on weak, soft, or strong.
When in bright areas of the pictures the skin-tones show chalky white, the normal skin tone color can be restored.
RCU Push button (1: top most)
• Use the up and down cursor keys to navigate to
the Flesh tone
• Use the left and right cursor keys to select one
of the options Off, Weak, Soft, Strong
The current selection is visualized by a white
caption.
• Press 5 and 6 to navigate to Flesh tone
• Use 3 and 4 to select one of the options Off,
Weak, Soft, Strong
The selection value is visualized by a white caption.
The selection is applied without any further action.
Barco - LC series - R5976934 - user's manual - Revision 08 - April 2008
________________________________________________________________________________________
5-9
Page 52

5. The On Screen Display (OSD)
5.3.1.6 Black level (only available for analog RGB)
Black level can be adjusted in the range between 0 and 100.
The black level is the deepest black of the monitor.
RCU Push button (1: top most)
• Use the up and down cursor keys to navigate to
the Black Level
• Use the left and right cursor keys to in-
crease/decrease the value in steps of 1
The current value is indicated.
The value is applied without any further action.
• Press 5 and 6 to navigate to Black Level
• Use 3 and 4 to increase/decrease the value in
steps of 1
The current value is indicated.
__________________________________________________________
5-10
Barco - LC series - R5976934 - user's manual - Revision 08 - April 2008
Page 53

5. The On Screen Display (OSD)
5.3.2 Position
On the Position dialog, the vertical and horizontal position of the image can be set as well as an area for zooming defined.
RCU Icon Push button (1: top most)
• Press the ADJ key to activate the OSD
• Use the left and right cursor keys to navi-
gate to the signal menu
• Press Enter to select
• Use the left and right cursor keys to navi-
gate to Position
• Press Enter to select – or –
• Press the down key to activate the dialog
• Press 7 to activate the OSD
• Press 3 and 4 to navigate to the
signal menu
• Press 2 to select
• Press 3 and 4 to navigate to
Position
• Press 2 to select – or –
• Press 5 to activate the dialog
The entries of Position are only enabled for the signal assigned to input 1.
Barco - LC series - R5976934 - user's manual - Revision 08 - April 2008
______________________________________________________________________________________
5-11
Page 54

5. The On Screen Display (OSD)
5.3.2.1 Zoom
Zoom can be selected to In and Out.
Zoom In
In
means to magnify the displayed picture. The magnification factor is related to the number of times the
button is activated. (The reverse operation is
Zoom Out
which reduces the picture back to the previous size).
The center of the original picture content will be "fixed" in the center of the monitor.
Due to the magnification, no longer the entire frame of the picture is displayed. To select the part of the frame to
be viewed, use the commands Zoom Horizontal Pan and Zoom Vertical Pan. Activating the Left/Right button
and the Down/Up button respectively resembles using the horizontal and vertical scrollbar to move the desired
portion of the picture content into the active window.
Each activation of the button means moving the picture 5 pixels in the selected direction.
RCU Push button (1: top most)
• Use the up and down cursor keys to navigate to
the Zoom
• Use the left and right cursor keys to select one
of the options In, Out.
The current value is visualized by a white caption.
• Use the Enter to increase/decrease the zoom
factor.
Zoom Horizontal Pan and Zoom Vertical Pan is only available if the picture has been
Zoomed In, i.e. has been magnified and the display can no longer show the entire content
of the picture frame.
• Press 5 and 6 to navigate to Zoom
• Use 3 and 4 to select one of the options In, Out.
The current value is visualized by a white caption.
• Use 2 to increase/decrease the zoom factor
5.3.2.2 Zoom Horizontal Pan
Zoom Horizontal Pan can be selected to Left and Right
RCU Push button (1: top most)
• Use the up and down cursor keys to navigate to
the Zoom Horizontal Pan
• Use the left and right cursor keys to select one
of the options Left, Right.
The current selection is visualized by a white
caption.
• Use the Enter to move the picture content in the
desired direction.
__________________________________________________________
5-12
• Press 5 and 6 to navigate to Zoom Horizontal
Pan
• Use 3 and 4 to select one of the options Left,
Right
The current selection is visualized by a white caption.
• Use 2 to move the picture content in the desired
direction.
Barco - LC series - R5976934 - user's manual - Revision 08 - April 2008
Page 55

5.3.2.3 Zoom Vertical Pan
Zoom Vertical Pan can be set to Up and Down
RCU Push button (1: top most)
5. The On Screen Display (OSD)
• Use the up and down cursor keys to navigate to
the Zoom Vertical Pan
• Use the left and right cursor keys to select one
of the options Up, Down.
The current selection is visualized by a white
caption.
• Use the Enter to move the picture content in the
desired direction.
• Press 5 and 6 to navigate to Zoom Vertical Pan
• Use 3 and 4 to select one of the options Up,
Down
The current selection is visualized by a white caption.
• Use 2 to move the picture content in the desired
direction.
5.3.2.4 Vertical
Vertical can be adjusted in the range from 0 and 255.
Vertical and Horizontal moves the screen content within the allocated position ("centered
window") of the monitor. It is not possible to move e.g. a PAL Video (720x540) with
display mode 1:1 to the upper left corner of the monitor: the allocated position is in the
range 600pixel to 1320pixel (horizontal, counting started on the top left corner) and in the
range 270pixel to 810pixel (vertical, counting started on the top left corner).
RCU Push button (1: top most)
• Use the up and down cursor keys to navigate to
the Vertical.
• Use the left and right cursor keys to move the
picture content in steps of 1
The current value is indicated.
The value is applied without any further action, e.g. the picture content is shifted in the desired direction.
• Press 5 and 6 to navigate to Vertical.
• Use 3 and 4 to move the picture content in steps
of 1
The current value is indicated.
5.3.2.5 Horizontal
Horizontal can be adjusted in the range from 0 and 255.
RCU Push button (1: top most)
• Use the up and down cursor keys to navigate to
the Horizontal.
• Use the left and right cursor keys to move the
picture content in steps of 1
The current value is indicated.
The value is applied without any further action, e.g. the picture content is shifted in the desired direction.
• Press 5 and 6 to navigate to Horizontal.
• Use 3 and 4 to move the picture content in steps
of 1
The current value is indicated.
Barco - LC series - R5976934 - user's manual - Revision 08 - April 2008
______________________________________________________________________________________
5-13
Page 56

5. The On Screen Display (OSD)
5.3.3 PIP control
On the PIP CONTROL dialog, the vertical and horizontal position of the image can be set as well as an area for the embedded picture be defined.
PIP means picture-in-picture and displays dual moving images from two separate sources (e.g., PC and video) at
the same time.
There are two different ways: one source is displayed in full size, and the other one is displayed in a small size
overlaying the full screen picture. The full screen picture is called master source, and the other one PIP source.
Besides this display mode, the two sources can be displayed "side to side", which is called PAP mode (picture
and picture).
The source selected on input 1 is always the master source, the source selected on input 2 is always the PIP
source.
The master source and the PIP source can be switched by means of the function key F3 on the RCU (which in fact
is changing sources at the inputs).
PIP settings made with input 2 are only applied when input 2 becomes the PIP master!
__________________________________________________________
5-14
Barco - LC series - R5976934 - user's manual - Revision 08 - April 2008
Page 57

5. The On Screen Display (OSD)
To activate the PIP CONTROL dialog, proceed as follows:
RCU Icon Push button (1: top most)
• Press the ADJ key to activate the OSD
• Use the left and right cursor keys to navi-
gate to the signal menu
• Press Enter to select
• Use the left and right cursor keys to navi-
gate to PIP control
• Press Enter to select – or –
• Press the down key to activate the dialog
• Press 7 to activate the OSD
• Press 3 and 4 to navigate to the
signal menu
• Press 2 to select
• Press 3 and 4 to navigate to PIP
Control
• Press 2 to select – or –
• Press 5 to activate the dialog
Barco - LC series - R5976934 - user's manual - Revision 08 - April 2008
______________________________________________________________________________________
5-15
Page 58

5. The On Screen Display (OSD)
5.3.3.1 PIP Mode
PIP Mode can be set to off, single, PAP.
When PIP mode is Off, only one source is displayed.
When PIP mode is Single, the source connected to input 1 is the master source and displayed according its set-
tings, whereas the source connected to input 2 is the PIP source and displayed either in Small, Medium or Large
size according the PIP Size selections.
The position of the PIP source is set using the Vertical and Horizontal adjustment.
PIP Size, Vertical and Horizontal are only enabled if PIP Mode is selected Single.
RCU Push button (1: top most)
• Use the up and down cursor keys to navigate to
• Use the left and right cursor keys to select one
The selection is applied without any further action.
In case no source is connected to input 2,
Single will result in an empty window with blue borders,
PAP will result in displaying source1 at the left half of the monitor (right half remains
black).
the PIP Mode
of the options Off, Single, PAP
The current selection is visualized by a white
caption.
• Press 5 and 6 to navigate to PIP Mode
• Use 3 and 4 to select one of the options Off,
Single, PAP
The current selection is visualized by a white caption.
Using the direct access key F2, the selected PIP mode can be toggled between On and Off.
Using the direct access key F3, the PIP master and the PIP source can be toggled.
5.3.3.2 PIP Size
PIP size can be set to small, medium, and large.
RCU Push button (1: top most)
• Use the up and down cursor keys to navigate to
the PIP Size
• Use the left and right cursor keys to select one
of the options Small, Medium, Large.
The current selection is visualized by a white
caption.
The selection is applied without any further action.
__________________________________________________________
5-16
• Press 5 and 6 to navigate to PIP Size
• Use 3 and 4 to select one of the options Small,
Medium, Large. The current selection is visualized
by a white caption.
Barco - LC series - R5976934 - user's manual - Revision 08 - April 2008
Page 59

5.3.3.3 Vertical
Vertical can be adjusted in the range from 0 to 255.
RCU Push button (1: top most)
5. The On Screen Display (OSD)
• Use the up and down cursor keys to navigate to
• Press 5 and 6 to navigate to Vertical
the Vertical
• Use the left and right cursor keys to in-
crease/decrease the value in steps of 1
The current value is indicated.
(increase: move down/decrease: move up)
• Use 3 and 4 to increase/decrease the value in
steps of 1
The current value is indicated.
(increase: move down/decrease: move up)
The value is applied without any further action.
5.3.3.4 Horizontal
Horizontal can be adjusted in the range from 0 to 255.
RCU Push button (1: top most)
• Use the up and down cursor keys to navigate to
the Horizontal
• Use the left and right cursor keys to in-
crease/decrease the value in steps of 1
The current value is indicated.
(increase: move right/decrease: move left)
The value is applied without any further action.
• Press 5 and 6 to navigate to Horizontal
• Use 3 and 4 to increase/decrease the value in
steps of 1
The current value is indicated.
(increase: move right/decrease: move left)
5.3.4 Combination of signals for main image and PiP/PaP
The following table lists the combination of signals for input 1 (main input) and input 2 (PiP/PaP). Not all combinations are possible; some cause disturbances or result in images which are not properly scaled.
Input 1 Input 2 Comment
VGA
DVI
DVI only possible for low resolutions,
higher resolutions cause an error message
(Pixel rate > 110MHz),
not recommended with Barco Transform H
system.
HD-SDI 1 or HD-SDI 2 OK
S-Video or Composite or Com-
OK
ponent
VGA only possible for low resolutions,
higher resolutions cause an error message
(Pixel rate > 110MHz),
not recommended with Barco Transform H
system.
HD-SDI 1 or HD-SDI 2 OK
S-Video or Composite or Component
Barco - LC series - R5976934 - user's manual - Revision 08 - April 2008
OK
______________________________________________________________________________________
5-17
Page 60

5. The On Screen Display (OSD)
Input 1 Input 2 Comment
VGA or DVI OK HD-SDI 1 or HD-SDI 2
ponent
S-Video or Composite or Component
VGA or DVI OK S-Video or Composite or Com-
HD-SDI 1 or HD-SDI 2 Not possible
Not possible
5.3.5 Image
On the Image dialog, the settings of the signal can be optimized.
For best image results, use short cables between the source and the monitor!
The image dialog depends on the source:
In case of analog RGB, the image settings comprises Scaling, Auto adjust, Phase, and Clock.
In case of S-Video/Video, the image settings comprise Scaling, Noise Reduction, Angle Filter, Film Mode Detect,
Sharpness.
In case of a DVI, due to the digital interface, no adjustment is required. Therefore the dialog only comprises Scal-
ing-
To activate the Image dialog, proceed as follows:
Image is only enabled for the source assigned to input 1!
To do the image adjustment for the source of input 2, this source has to be assigned to
input 1.
RCU Icon Push button (1: top most)
• Press the ADJ key to activate the OSD
• Use the left and right cursor keys to navi-
gate to the signal menu
• Press Enter to select
• Use the left and right cursor keys to navi-
gate to Image
• Press Enter to select – or –
• Press the down key to activate the dialog
__________________________________________________________
5-18
Barco - LC series - R5976934 - user's manual - Revision 08 - April 2008
• Press 7 to activate the OSD
• Press 3 and 4 to navigate to the
signal menu
• Press 2 to select
• Press 3 and 4 to navigate to Image
• Press 2 to select – or –
• Press 5 to activate the dialog
Page 61

5.3.5.1 Analog RGB
5. The On Screen Display (OSD)
Scaling
Scaling can be set to Native, Fill, Aspect, and 4:3.
Scaling means changing the resolution of an image.
Native is only enabled when the detected resolution of the source is lower than the resolution of the monitor.
'The monitor has a resolution of 1920x1080 pixel. In case the resolution of the source is lower (e.g. a PAL Video
with 720x540 pixels), when displayed 1:1, there will be a black border around the content.
In case Fill is selected, the content is displayed on the entire screen which, in case the ratio of the source is dif-
ferent from the ratio of the screen (e.g. a PAL Video, 4:3), results in a distortion of the content: with PAL, in horizontal direction, the pixels would be multiplied by a factor of 2.6, whereas in vertical direction the factor would
be 2.0.
With Aspect, the aspect ratio of the source is maintained: in the above mentioned example, the pixels both in
horizontal and in vertical direction would be multiplied by a factor of two, thus the content would have a black
border of 240 pixels both, on the left side and on the right side.
4:3
: if a PAL/NTSC source is connected to an input, the 4:3 setting displays the source without any distortion (e.g.
a circle remains a circle).
Barco - LC series - R5976934 - user's manual - Revision 08 - April 2008
______________________________________________________________________________________
5-19
Page 62

5. The On Screen Display (OSD)
RCU Push button (1: top most)
• Use the up and down cursor keys to navigate to
the Scaling
• Use the left and right cursor keys to select one
of the options Native, Fill, Aspect, 4:3.
The current selection is visualized by a white
caption.
The selection is applied without any further action.
• Press 5 and 6 to navigate to Scaling
• Use 3 and 4 to select one of the options Native,
Fill, Aspect, 4:3.
The current selection is visualized by a white caption.
Auto Adjust
When Auto Adjust is selected, the monitor adjusts itself to the timing of the source which matches best one of
the internal preset timings.
Use the key FREEZE on the remote control unit to immediately start Auto Adjust.
During the Auto Adjust process, the monitor displays an information "Auto Configuration".
In case Auto Adjust is not selected, or the results are not perfect, the timing of the source
has to be manually adjusted to the timing of the monitor using the controls Phase and
Clock.
Both controls are to minimize the interferences (noise). Clock is course adjustment
whereas Phase is fine tuning of the setting.
To do the adjustment, use a test pattern (e.g. vertical stripes) of the connected source!
RCU Push button (1: top most)
• Use the up and down cursor keys to navigate to
the Auto Adjust
• Use the left and right cursor keys to select
Select
The current selection is visualized by a white
caption.
The selection is applied without any further action.
• Press 5 and 6 to navigate to Auto Adjust
• Use 3 and 4 to select Select
The current selection is visualized by a white caption.
__________________________________________________________
5-20
Barco - LC series - R5976934 - user's manual - Revision 08 - April 2008
Page 63

5. The On Screen Display (OSD)
Phase
Phase can be adjusted in the range from 0 to 255.
It is recommended to have the monitor warmed up for about 5 minutes before adjusting phase.
Use the Phase adjustment to eliminate shimmering horizontal streaking.
If there are not only horizontal streaking but also vertical banding, start with Clock
adjustment!
RCU Push button (1: top most)
• Use the up and down cursor keys to navigate to
the Phase
• Use the left and right cursor keys to in-
crease/decrease the value in steps of 1
The current value is indicated.
The value is applied without any further action. Check the test pattern!
• Press 5 and 6 to navigate to Phase
• Use 3 and 4 to increase/decrease the value in
steps of 1
The current value is indicated.
Clock
Clock can be adjusted in the range from 0 to 255.
It is recommended to have the monitor warmed up for about 5 minutes before adjusting clock.
Use the Clock adjustment to eliminate broad vertical banding.
RCU Push button (1: top most)
• Use the up and down cursor keys to navigate to
the Clock
• Use the left and right cursor keys to in-
crease/decrease the value in steps of 1
The current value is indicated.
• Press 5 and 6 to navigate to Clock
• Use 3 and 4 to increase/decrease the value in
steps of 1
The current value is indicated.
The value is applied without any further action. Check the test pattern!
Barco - LC series - R5976934 - user's manual - Revision 08 - April 2008
______________________________________________________________________________________
5-21
Page 64

5. The On Screen Display (OSD)
5.3.5.2 S-Video
__________________________________________________________
5-22
Barco - LC series - R5976934 - user's manual - Revision 08 - April 2008
Page 65

5. The On Screen Display (OSD)
Scaling
Scaling can be set to Native, Fill, Aspect, and 4:3..
Scaling means changing the resolution of an image.
Native is only enabled when the detected resolution of the source is lower than the resolution of the monitor.
'The monitor has a resolution of 1920x1080 pixel. In case the resolution of the source is lower (e.g. a PAL Video
with 720x540 pixels), when displayed 1:1, there will be a black border around the content.
In case Fill is selected, the content is displayed on the entire screen which, in case the ratio of the source is dif-
ferent from the ratio of the screen (e.g. a PAL Video, 4:3), results in a distortion of the content: with PAL, in horizontal direction, the pixels would be multiplied by a factor of 2.6, whereas in vertical direction the factor would
be 2.0.
With Aspect, the aspect ratio of the source is maintained: in the above mentioned example, the pixels both in
horizontal and in vertical direction would be multiplied by a factor of two, thus the content would have a black
border of 240 pixels both, on the left side and on the right side.
4:3
: if a PAL/NTSC source is connected to an input, the 4:3 setting displays the source without any distortion (e.g.
a circle remains a circle).
RCU Push button (1: top most)
• Use the up and down cursor keys to navigate to
the Scaling
• Use the left and right cursor keys to select one
of the options Native, Fill, Aspect, 4:3.
The current selection is visualized by a white
caption.
The selection is applied without any further action.
• Press 5 and 6 to navigate to Scaling
• Use 3 and 4 to select one of the options Native,
Fill, Aspect, 4:3.
The current selection is visualized by a white caption.
Adaptive Deinterlacing
Adaptive deinterlacing can be selected to off, level 1, level 2, level 3.
Select the appropriate level of adaptive deinterlacing to optimize the quality of the video.
RCU Push button (1: top most)
• Use the up and down cursor keys to navigate to
the Adaptive Deinterlacing
• Use the left and right cursor keys to select one
of the options Off, Level 1, Level 2, Level 3
The current selection is visualized by a white
caption.
• Press 5 and 6 to navigate to Adaptive
Deinterlacing
• Use 3 and 4 to select one of the options Off,
Level 1, Level 2, Level 3
The current selection is visualized by a white caption.
The selection is applied without any further action.
Barco - LC series - R5976934 - user's manual - Revision 08 - April 2008
______________________________________________________________________________________
5-23
Page 66

5. The On Screen Display (OSD)
Noise Reduction
Noise reduction can be selected to off, low, medium, or high.
Noise is generally visible as "snow", or small dots that make the picture look fuzzy, With
amount of noise attenuation can be specified.
RCU Push button (1: top most)
Noise Reduction
the
• Use the up and down cursor keys to navigate to
the Noise Reduction
• Use the left and right cursor keys to select one
of the options Off, Low, Medium, High
The current selection is visualized by a white
caption.
The selection is applied without any further action.
• Press 5 and 6 to navigate to Noise Reduction
• Use 3 and 4 to select one of the options Off, Low,
Medium, High
The current selection is visualized by a white caption.
Angle Filtering
Angle filtering can be selected to on or off.
RCU Push button (1: top most)
• Use the up and down cursor keys to navigate to
the Angle Filtering
• Use the left and right cursor keys to select one
of the options Off, On
The current selection is visualized by a white
caption.
The selection is applied without any further action.
• Press 5 and 6 to navigate to Angle Filtering
• Use 3 and 4 to select one of the options Off, On
The current selection is visualized by a white caption.
__________________________________________________________
5-24
Barco - LC series - R5976934 - user's manual - Revision 08 - April 2008
Page 67

5. The On Screen Display (OSD)
Film Mode Detect
Film Mode Detect can be selected to be on or off.
Film is usually recorded at 24 frames per second. When converting film to NTSC video (59.94 Hz field rate), 2 film
frames generate 5 video fields (3:2 pull down). Film scenes with high-speed motion objects thus may show motion artifacts.
With Film Mode Detect on, the conversion to NTSC is detected and the original film frames are recreated by
blending the fields back together.
(3:2 pull down is only one of the pull down techniques and used as an example)
RCU Push button (1: top most)
• Use the up and down cursor keys to navigate to
• Press 5 and 6 to navigate to Film Mode Detect
the Film Mode Detect
• Use the left and right cursor keys to select one
of the options Off, On
The current selection is visualized by a white
• Use 3 and 4 to select one of the options Off, On
The current selection is visualized by a white caption.
caption.
The selection is applied without any further action.
This function may cause undesired effects on standard sources, therefore it can be disabled
(OFF) at any time.
Sharpness
Sharpness can be set in the range from -15 to +29
The edges are localized and the contrast between neighboring pixels enhanced.
RCU Push button (1: top most)
• Use the up and down cursor keys to navigate to
the Sharpness
• Use the left and right cursor keys to in-
crease/decrease the value in steps of 1
The current value is indicated.
The value is applied without any further action.
Barco - LC series - R5976934 - user's manual - Revision 08 - April 2008
• Press 5 and 6 to navigate to Sharpness
• Use 3 and 4 to increase/decrease the value in
steps of 1
The current value is indicated.
______________________________________________________________________________________
5-25
Page 68

5. The On Screen Display (OSD)
5.3.6 Color
On the Color dialog, the gamma correction factor can be selected as well as the color temperature.
To activate the Color dialog, proceed as follows:
RCU Icon Push button (1: top most)
• Press the ADJ key to activate the OSD
• Use the left and right cursor keys to navi-
gate to the signal menu
• Press Enter to select
• Use the left and right cursor keys to navi-
gate to Color
• Press Enter to select – or –
• Press the down key to activate the dialog
• Press 7 to activate the OSD
• Press 3 and 4 to navigate to the
signal menu
• Press 2 to select
• Press 3 and 4 to navigate to Color
• Press 2 to select – or –
• Press 5 to activate the dialog
__________________________________________________________
5-26
Barco - LC series - R5976934 - user's manual - Revision 08 - April 2008
Page 69

5. The On Screen Display (OSD)
5.3.6.1 Gamma Correction
The Gamma correction factor can be set to 2.2, 1.9, 2.5, and user.
Gamma is the relationship between the color values of the data and the color values displayed e.g. on a screen.
The Gamma coefficient makes it possible to adjust the brightness of the midtones only without affecting the very
bright and very dark areas..
If gamma is set too high, middle tones appear too dark. If it's set too low, middle tones appear too light.
Using Barco’s DCMS software (display consistency management software), the monitor can be calibrated and the
calibrated setting (look-up table, LUT) can be saved in the monitor. The gamma setting "user" activates the last
calibrated value.
RCU Push button (1: top most)
• Use the up and down cursor keys to navigate to
the Gamma Correction
• Use the left and right cursor keys to select one
of the options 2.2, 1.9, 2.5, user. The current
selection is visualized by a white caption.
The selection is applied without any further action.
• Press 5 and 6 to navigate to Gamma Correction
• Use 3 and 4 to select one of the options 2.2, 1.9,
2.5, user.
The current selection is visualized by a white caption.
5.3.6.2 Color Temperature
Color temperature can be selected to be 3200K, 5400K, 6500K, 9300K or custom (User, requires to adjust the
values for red, green, and blue).
Color temperature stands for the spectral properties of a light source.
Low color temperature implies warmer (more yellow/red) light while high color temperature implies a colder
(more blue) light.
The pictures of a monitor set to 9300K will look more bluish than if set to 3200K.
The following color temperature pre-sets can be selected:
Color temperature name / application
3200K Broadcast
5400K Film
6500K Video
9300K Computer
User custom
RCU Push button (1: top most)
• Use the up and down cursor keys to navigate to
the Color Temperature
• Use the left and right cursor keys to select one
of the options 3200K, 5400K, User, 6500K,
9300K.
The current selection is visualized by a white
caption.
The selection is applied without any further action.
Barco - LC series - R5976934 - user's manual - Revision 08 - April 2008
• Press 5 and 6 to navigate to Color Temperature
• Use 3 and 4 to select one of the options 3200K,
5400K, User, 6500K, 9300K.
The current selection is visualized by a white caption.
______________________________________________________________________________________
5-27
Page 70

5. The On Screen Display (OSD)
When User is selected, the values for red, green, blue can be individually be adjusted:
RCU Push button (1: top most)
• Use the up and down cursor keys to navigate to
• Press 5 and 6 to navigate to Color Temperature
the Color Temperature
• Use the left and right cursor keys to select User • Use the left and right cursor keys to select User
• Use the down and up cursor keys to select Red,
• Use the 5 and 6 to select Red, Green, Blue
Green, Blue
• Use the left and right cursor keys to in-
crease/decrease the value in steps of 1
The current value is indicated.
• Use 3 and 4 to increase/decrease the value in
steps of 1
The current value is indicated.
The selection is applied without any further action.
Manual modification of R, G, B requires some experience!
In case a VGA signal looks e.g. greenish, pressing the function key F4 (White balance) will
probably correct this. Thus no sophisticated color adjustment will be required.
__________________________________________________________
5-28
Barco - LC series - R5976934 - user's manual - Revision 08 - April 2008
Page 71

5. The On Screen Display (OSD)
5.4 OSD setting menu
On the OSD dialog, the position of the OSD can be defined as well as zoom, blend and time out of the OSD.
To activate the OSD menu, proceed as follows:
RCU Icon Push button (1: top most)
• Press the ADJ key to activate the OSD
• Use the cursor keys to navigate to the OSD
setting menu
• The icon will turn blue, and the setting
dialog will pop up
• Press 7 to activate the OSD
• Press 3 and 4 to navigate to the
OSD setting menu
• The icon will turn blue, and the set-
ting dialog will pop up
Each time the OSD opens, its position and behavior will be as set on this dialog.
Barco - LC series - R5976934 - user's manual - Revision 08 - April 2008
______________________________________________________________________________________
5-29
Page 72

5. The On Screen Display (OSD)
5.4.1 Vertical
The value can be set in the range form 0 to 255 (zero: top of OSD is level with top of monitor, 255: bottom of
OSD is level with bottom of monitor).
RCU Push button (1: top most)
• Use the up and down cursor keys to navigate to
the Vertical
• Use the left and right cursor keys to in-
crease/decrease the value in steps of 1
The current value is indicated.
(increase: move down)
The value is applied without any further action.
Vertical and Horizontal define the position of the OSD. Whenever the OSD is activated, it
will be displayed at the position defined by the vertical and horizontal setting.
• Press 5 and 6 to navigate to Vertical
• Use 3 and 4 to increase/decrease the value in
steps of 1
The current value is indicated.
(increase: move down)
5.4.2 Horizontal
The value can be set in the range form 0 to 255 (zero: left of OSD is level with left of monitor, 255: right of OSD
is level with right of monitor).
RCU Push button (1: top most)
• Use the up and down cursor keys to navigate to
the Horizontal
• Press 5 and 6 to navigate to Horizontal
• Use the left and right cursor keys to in-
crease/decrease the value in steps of 1
The current value is indicated.
(increase: move right)
The value is applied without any further action.
• Use 3 and 4 to increase/decrease the value in
steps of 1
The current value is indicated.
(increase: move right)
5.4.3 Blend
The value can be set in the range form 0 to 15 (zero: opaque, 15: transparent)
Use Blend to set the transparency of the OSD: when it Blend is set to zero, the background of the OSD will be
opaque thus entirely hiding the screen content at this position. To make the screen content visible in spite of the
overlaying OSD, increase the Blend parameter!
RCU Push button (1: top most)
• Use the up and down cursor keys to navigate to
the Blend
• Use the left and right cursor keys to in-
crease/decrease the value in steps of 1
The current value is indicated.
The value is applied without any further action.
• Press 5 and 6 to navigate to Blend
• Use 3 and 4 to increase/decrease the value in
steps of 1
The current value is indicated.
__________________________________________________________
5-30
Barco - LC series - R5976934 - user's manual - Revision 08 - April 2008
Page 73

5. The On Screen Display (OSD)
5.4.4 Time out
The value can be set between 0 and 60 seconds in steps of 5 seconds.
The OSD will close (disappear) automatically when no selections are made during a certain time. This period can
be set by means of the Time out parameter.
The OSD stays active as long as it is in use.
Independent from the Time out setting, you can close the OSD at any time by using the Exit
button the RCU or the push button 7 on the right rear side of the monitor.
RCU Push button (1: top most)
• Use the up and down cursor keys to navigate to
• Press 5 and 6 to navigate to Time out
the Time out
• Use the left and right cursor keys to in-
crease/decrease the value in steps of 5
The current value is indicated.
• Use 3 and 4 to increase/decrease the value in
steps of 5
The current value is indicated.
The value is applied without any further action.
5.4.5 OSD Zoom
Zoom can be selected in or out.
This command will magnify the OSD window and the icons by approx. the factor of 2.
RCU Push button (1: top most)
• Use the up and down cursor keys to navigate to
the OSD Zoom
• Use the left and right cursor keys to select one
of the options In, Out
The current selection is visualized by a white
caption.
• Apply the selection with Enter. • Apply the selection with 2
• Press 5 and 6 to navigate to OSD Zoom
• Use 3 and 4 to select one of the options In, OUt
The current selection is visualized by a white caption.
This selection has to be confirmed to be applied.
Barco - LC series - R5976934 - user's manual - Revision 08 - April 2008
______________________________________________________________________________________
5-31
Page 74

5. The On Screen Display (OSD)
5.5 Audio setting menu
On the Audio setting menu, the volume and the balance of the left/right speaker can be adjusted as well as
bass and treble (low frequencies and high frequencies).
To activate the Audio setting menu, proceed as follows:
RCU Icon Push button (1: top most)
• Press the ADJ key to activate the OSD
• Use the cursor keys to navigate to the
Audio setting menu
• The icon will turn blue, and the setting
dialog will pop up
• Press 7 to activate the OSD
• Press 3 and 4 to navigate to the
Audio setting menu
• The icon will turn blue, and the set-
ting dialog will pop up
__________________________________________________________
5-32
Barco - LC series - R5976934 - user's manual - Revision 08 - April 2008
Page 75

5.5.1 Volume
Volume can be adjusted in the range from 0 to 79.
Use the push button 3 on the right rear side of the monitor to directly increase the volume,
use the push button 4 to directly decrease the volume.
RCU Push button (1: top most)
5. The On Screen Display (OSD)
• Use the up and down cursor keys to navigate to
the Volume
• Use the left and right cursor keys to in-
crease/decrease the value in steps of 1
The current value is indicated.
The value is applied without any further action.
• Press 5 and 6 to navigate to Volume
• Use 3 and 4 to increase/decrease the value in
steps of 1
The current value is indicated.
5.5.2 Balance
Balance can be adjusted in the range from -15 to +15.
The zero position is in the center of the slider. In case the left and the right speaker are not balanced, i.e. one
side is predominant, adjust the setting in negative direction to bring out the left speaker, in positive direction to
bring out the right speaker.
RCU Push button (1: top most)
• Use the up and down cursor keys to navigate to
the Balance
• Use the left and right cursor keys to in-
crease/decrease the value in steps of 1
The current value is indicated.
The value is applied without any further action.
• Press 5 and 6 to navigate to Balance
• Use 3 and 4 to increase/decrease the value in
steps of 1
The current value is indicated.
5.5.3 Bass
Bass can be adjusted in the range from -7 to +7.
The zero position is in the center of the slider. In case the low frequencies are predominant, adjust the slider to
the left. In case they are rather faint or missing, adjust the slider to the right,
RCU Push button (1: top most)
• Use the up and down cursor keys to navigate to
the Bass
• Use the left and right cursor keys to in-
crease/decrease the value in steps of 1
The current value is indicated.
The value is applied without any further action.
Barco - LC series - R5976934 - user's manual - Revision 08 - April 2008
• Press 5 and 6 to navigate to Bass
• Use 3 and 4 to increase/decrease the value in
steps of 1
The current value is indicated.
______________________________________________________________________________________
5-33
Page 76

5. The On Screen Display (OSD)
5.5.4 Treble
Treble can be adjusted in the range from -7 to +7.
The zero position is in the center of the slider. In case the high frequencies are predominant, adjust the slider to
the left. In case they are rather faint or missing, adjust the slider to the right.
RCU Push button (1: top most)
• Use the up and down cursor keys to navigate to
the Treble
• Use the left and right cursor keys to in-
crease/decrease the value in steps of 1
The current value is indicated.
The value is applied without any further action.
• Press 5 and 6 to navigate to Treble
• Use 3 and 4 to increase/decrease the value in
steps of 1
The current value is indicated.
__________________________________________________________
5-34
Barco - LC series - R5976934 - user's manual - Revision 08 - April 2008
Page 77

5. The On Screen Display (OSD)
5.6 Display parameter setting menu
On the Display parameter setting menu, setting of display address, baud rate, light sensor, lower brightness
level, ambient light threshold & auto source selection can be done.
To activate the Display parameter setting menu, proceed as follows:
RCU Icon Push button (1: top most)
• Press the ADJ key to activate the OSD
• Use the cursor keys to navigate to the
Display parameter setting menu
• The icon will turn blue, and the setting
dialog will pop up
• Press 7 to activate the OSD
• Press 3 and 4 to navigate to the
Display parameter setting menu
• The icon will turn blue, and the set-
ting dialog will pop up
Barco - LC series - R5976934 - user's manual - Revision 08 - April 2008
______________________________________________________________________________________
5-35
Page 78

5. The On Screen Display (OSD)
To select a display parameter; proceed as follows:
RCU Push button (1: top most)
• Use the up and down cursor keys to navigate to
the desired parameter
• Use the left and right cursor keys to activate
the desired value.
The current selection is visualized by a white
caption.
The selection is applied without any further action.
• Press 5 and 6 to navigate to the desired parame-
ter
• Use 3 and 4 to activate the desired value
The current selection is visualized by a white caption.
5.6.1 Set display address
The value can be set in the range from 1 to 255.
If more than one monitor is installed, the monitors can independently be RS232 remote-controlled by means of
their display address.
Default monitor address is "1". Allowed addresses are in the range from 1 to 255.
1
" is the common address.
"
A monitor will listen to the commands explicitly sent to his specific address and to commands sent to the com-
mon address.
RCU Push button (1: top most)
• Use the up and down cursor keys to navigate to
the Set display address
• Press 5 and 6 to navigate to Set display address
• Use the left and right cursor keys to in-
crease/decrease the address in steps of 1
The current value is indicated.
The value is applied without any further action.
• Use 3 and 4 to increase/decrease the address in
steps of 1
The current value is indicated.
5.6.2 Baud rate
The value can be set to 115200, 38400, 19200, 9600.
RCU Push button (1: top most)
• Use the up and down cursor keys to navigate to
the Baud rates
• Use the left and right cursor keys to i select one
of the options 115200, 38400, 19200, 9600.
The current selection is visualized by a white
caption
The value is applied without any further action.
• Press 5 and 6 to navigate to Baud rate
• Use 3 and 4 to select one of the options 115200,
38400, 19200, 9600.
The current selection is visualized by a white caption
__________________________________________________________
5-36
Barco - LC series - R5976934 - user's manual - Revision 08 - April 2008
Page 79

5. The On Screen Display (OSD)
5.6.3 Light Sensor
The light sensor can be set on or off.
When a room is dark, the picture content can be viewed at lower brightness (power saving, avoiding eye fatigue). If enabled, the light sensor measures the ambient light, and if the room gets dark enough, the monitor
will be switched to the "dark mode" with a brightness set via the Light Sensor Value.
RCU Push button (1: top most)
• Use the up and down cursor keys to navigate to
the Light Sensor
• Use the left and right cursor keys to select one
of the options Off, On
The current selection is visualized by a white
caption.
The selection is applied without any further action.
• Press 5 and 6 to navigate to Light Sensor
• Use 3 and 4 to select one of the options Off, On
The current selection is visualized by a white caption.
5.6.4 Lower brightness level
The lower brightness level value can be set in the range from 0 to 100.
This parameter defines the brightness the monitor is automatically switched to when the ambient light is below
the threshold of the light sensor (dark mode, requires that the light sensor is set On!)
RCU Push button (1: top most)
• Use the up and down cursor keys to navigate to
the Lower brightness level
• Use the left and right cursor keys to in-
crease/decrease the value in steps of 1
The current value is indicated.
The value is applied without any further action.
• Press 5 and 6 to navigate to Lower brightness
level
• Use 3 and 4 to increase/decrease the value in
steps of 1
The current value is indicated.
5.6.5 Ambient light threshold
The ambient light threshold can be set in the range from 0 to 100.
This parameter defines the ambient light level below which the monitor will switch to a low backlight mode.
(dark mode, requires that the light sensor is set On!)
RCU Push button (1: top most)
• Use the up and down cursor keys to navigate to
the Ambient light threshold
• Use the left and right cursor keys to in-
crease/decrease the value in steps of 1
The current value is indicated.
The value is applied without any further action.
• Press 5 and 6 to navigate to Ambient light
threshold.
• Use 3 and 4 to increase/decrease the value in
steps of 1
The current value is indicated.
Barco - LC series - R5976934 - user's manual - Revision 08 - April 2008
______________________________________________________________________________________
5-37
Page 80

5. The On Screen Display (OSD)
5.6.6 Auto Source Selection
The Auto Source Selection can be set on or off.
When Auto Source Selection is on, the system searches for a valid input source signal.
RCU Push button (1: top most)
• Use the up and down cursor keys to navigate to
Auto Source Selection
• Use the left and right cursor keys to select one
of the options Off, On
The current selection is visualized by a white
caption.
The selection is applied without any further action.
• Press 5 and 6 to navigate to Auto Source Selec-
tion
• Use 3 and 4 to select one of the options Off, On
The current selection is visualized by a white caption.
__________________________________________________________
5-38
Barco - LC series - R5976934 - user's manual - Revision 08 - April 2008
Page 81

5. The On Screen Display (OSD)
5.7 Reset menu
On the Reset menu, the factory settings can be restored. It also shows runtime & serial number of the display.
To activate the Reset menu, proceed as follows:
RCU Icon Push button (1: top most)
• Press the ADJ key to activate the OSD
• Use the cursor keys to navigate to the
Reset menu
• The icon will turn blue, and the setting
dialog will pop up
• Press 7 to activate the OSD
• Press 3 and 4 to navigate to the
Reset menu
• The icon will turn blue, and the set-
ting dialog will pop up
Barco - LC series - R5976934 - user's manual - Revision 08 - April 2008
______________________________________________________________________________________
5-39
Page 82

5. The On Screen Display (OSD)
5.7.1 Factory Reset
Clicking the button Yes on the option Factory Reset will inevitable reset the monitor to its
factory settings.
All former adjustment and modifications will be lost!
These are the factory settings which are applied after selecting Yes with Factory Reset:
Item default adjust range
Power switch Off On/Off
Brightness 80 0~100
Contrast 50 0~100
Color temp. User User, 3200K,5400K,6500K, 9300K
Red 255 0~255
Green 255 0~255
Blue 255 0~255
Language English English
Auto
On On/Off
configuration
RCU Push button (1: top most)
• Use the up and down cursor keys to navigate to
• Press 5 and 6 to navigate to Factory Reset
the Factory Reset
• Use the left and right cursor keys to select one
of the options Yes, No
The current selection is visualized by a white
• Use 3 and 4 to select one of the options Yes, No
The current selection is visualized by a white caption.
caption.
The selection is applied without any further action.
__________________________________________________________
5-40
Barco - LC series - R5976934 - user's manual - Revision 08 - April 2008
Page 83

5. The On Screen Display (OSD)
5.8 Input Signal Selection
In case multiple sources are connected, the signal for the first input and the second input have to be defined.
To select the signal for the respective input, proceed as follows:
RCU Icon Push button (1: top most)
• Press the ADJ key to activate the OSD
• Use the left and right cursor keys to navi-
gate to the signal menu (for the first input)
• Press Enter to select
• Use the down cursor keys to open the
input signal selection dialog
• Press 7 to activate the OSD
• Press 3 and 4 to navigate to the
signal (for the first menu input)
• Press 2 to select
• Press 4 to open the input signal
selection dialog
After the source has been selected, its timing is displayed.
In case the timing of the source is not included in the presets of the monitor, the timing of
the monitor which matches best the timing of the source is displayed!
Barco - LC series - R5976934 - user's manual - Revision 08 - April 2008
______________________________________________________________________________________
5-41
Page 84

5. The On Screen Display (OSD)
The following sources can be connected to the monitor:
Input Interface signals
Video system input VIDEO IN RCA NTSC/PAL
S-VIDEO S-Video Mini Din 4pin NTSC/PAL
YUV (Y Pb/Cb Pr/Cr) Component Mini Din 8 pin NTSC/PAL
RGB input RGB Analog D-Sub 15 pin RGB analog
RGB Digital DVI-D 24 pin RGB digital
HD-SDI input Serial Digital BNC SDI / HDSDI
To select a signal, proceed as follows:
RCU Icon Push button (1: top most)
• Press the ADJ key to activate the OSD
• Use the left and right cursor keys to navi-
gate to the signal menu
• Press Enter to select
• Use the down cursor keys to open the
input signal selection dialog
• Use the left and right cursor keys to select
the desired signal
In case the signal is assigned to input 1, it cannot be assigned to input 2!
To change the signal of input 1 and input 2, input 1 has to be assigned to the signal which
up to then has been assigned to input 2.
In case of two valid signals, input 2 then will automatically be assigned to the signal which
up to then has been assigned to input 1.
In case of more signals, input 2 has to be explicitely assigned to a signal (all but the one
assigned to input 1).
• Press 7 to activate the OSD
• Press 3 and 4 to navigate to the
signal menu
• Press 2 to select
• Press 4 to open the input signal
selection dialog
• Press 3 and 4 to select the desired
signal
To select HD-SDI input 1 or HD-SDI input 2, first select HD-SDI in the OSD. When it is
highlighted, press 1 to select the signal connected to HD-SDI input 1, or press 2 to select
the signal connected to HD-SDI input 2.
__________________________________________________________
5-42
Barco - LC series - R5976934 - user's manual - Revision 08 - April 2008
Page 85

In case no signal is applied, the monitor displays a "no sync" message.
In case no cable is connected, the monitor displays a "no cable" message.
5. The On Screen Display (OSD)
In case the timing of the connected source is not compliant to the monitor, the monitor displays a "invalid mode"
message.
For a list of compliant timings, cf. chapter 9 Compliant timing
The monitor features autodetect. In case e.g. DVI is selected, but the only connected source
is VGA, the monitor will display the no sync message, and after a while automatically
switch to VGA.
Barco - LC series - R5976934 - user's manual - Revision 08 - April 2008
______________________________________________________________________________________
5-43
Page 86

5. The On Screen Display (OSD)
If no source is connected (neither no sync, no cable, no valid signal), the monitor switches to standby and displays the respective information:
Whenever one of these messages pop up, check the respective item and fix it!
5.8.1 Input selection with the function key F1
For input 1, the input can be selected using the function key F1. Pressing F1 "scrolls" through the inputs and
displays one after the other the respective icon.
Press Enter to directly select the desired input.
__________________________________________________________
5-44
Barco - LC series - R5976934 - user's manual - Revision 08 - April 2008
Page 87

6 Maintenance and servicing
Only authorized personnel should carry out other maintenance work not explicitly
mentioned in this manual!
Never open the case of the monitor without first disconnecting the power supply cord!
Measurements and tests with the opened device may be carried out only in the factory
or by specially trained personnel, due to the dangers of electrical shock.
6. Maintenance and servicing
Barco - LC series - R5976934 - user's manual - Revision 08 - April 2008
________________________________________________________________________________________
6-1
Page 88

6. Maintenance and servicing
6.1 Cleaning
Consult your dealer for internal cleaning once a year.
If you allow dust to accumulate on the unit, it may cause fire or malfunction when you operate it.
Refer to your dealer about the internal cleaning.
Power plug
If dust has collected on the power plug connectors, remove the plug from the outlet and clean off the dust. This
dust may cause a fire due to reduced insulation of the plug.
Cabinet
Unplug this product from the wall outlet before cleaning. Do not use liquid cleaners or aerosol cleaners. Use a
damp cloth for cleaning. To keep the cabinet looking brand-new, periodically clean it with a soft cloth. Stubborn
stains may be removed with a cloth lightly dampened with mild detergent solution. Never use strong solvents,
such as thinner or benzene, or abrasive cleaners, since these will damage the cabinet.
Contamination of screen surface.
When the screen surface of the monitor is contaminated, please wipe the surface softly with cotton swab or
clean cloth. If it is not enough, please take it away with cellophane tape or wipe the surface with cotton swab or
clean cloth containing solvent of 50% alcohol. In this case, please be careful so that the solvent does not get in
inside of the LCD module, because it may be damaged.
Water drop on LCD surface
Please do not leave LCD module with water drop. When the display surface gets water drop, please wipe it off
with cotton swab or soft cloth immediately, otherwise display surface will be deteriorated. If water gets in inside
the LCD module, the electric circuits may be damaged.
___________________________________________________________
6-2
Barco - LC series - R5976934 - user's manual - Revision 08 - April 2008
Page 89

7. Technical data 42" version (LCN-42, LCS-42)
7 Technical data 42" version (LCN-42, LCS-42)
7.1 General data
characteristic specification
Screen size
Aspect ratio
active area (HxW)
width x height x depth
(without stand!)
weight
42” diagonal
16:9
934mm x 527mm | 36.77in. x 20.75in.
1026mm x 619mm x 123.7mm | 40.39in. x 24.37in. x 4.87in.
29.5kg | 65.1lbs
7.2 LCD panel
characteristic specification
Driver element a-Si TFT active matrix
Pixel number (1920 x R.G.B. x 1080) pixel (HDTV)
Display colors 16.8 millions of colors
Viewing angle 176 degree vertical / 176 degree horizontal
Brightness 500 cd/m²
Table 7-1
Contrast ratio 1800:1
Response time (Gray to Gray) Typ. 6.5 msec, max. 12msec
VGA (D-Sub 15 pins), DVI (DVI-D 24 pins), Composite (RCA), S-Video
Interfaces
Dead pixel rate Max. 8 bright pixels out of which max. 2 clusters of two bright pixels.
(Mini-DIN 4 pin), Component (Mini-DIN 8 pin), SDI/HD-SDI in/out (BNC),
RS232 IN/OUT (D-Sub 9)
Max.10 dark pixels out of which max. 5 clusters of two dark pixels
Table 7-2
7.3 Electrical data
Characteristic specification
Power supply 100VAC-240 VAC, 50/60 Hz
Power consumption operating mode 234W | 116 BTU/h
Power consumption Standby mode 14.8W | 50.5 BTU/h
Table 7-3
Barco - LC series - R5976934 - user's manual - Revision 08 - April 2008
________________________________________________________________________________________
7-1
Page 90

7. Technical data 42" version (LCN-42, LCS-42)
7.4 Operating conditions
Characteristic specification
Storage temperature -20°C - +60°C | -4°F – 140°F, at max. 90% RH, non-condensing
Operating ambient temperature +5°C – +40°C | 41°F – 104°F, at max. 90% RH, non-condensing
Table 7-4
7.5 CCFL (Cold Cathode Fluorescent Lamp) characteristics (ambient temperature (25 ±2)°C)
Characteristic Typ. value
Lamp voltage 1520 VRMS
Lamp current 5.8 mARMS
Lamp starting voltage 2370 VRMS (0°C), 2160 VRMS (25°C)
Lamp life time 50,000hrs *)
Operating frequency 40-70 KHz
Table 7-5
The life time of a lamp is defined as when the brightness is larger than 50% of its original value and the effective discharge length is longer than 80% of its original length.
7.6 Interfaces
7.6.1 Video IN (Composite Video)
Item specification
Signal level 1.0Vpp
Connector type RCA Jack
Termination
___________________________________________________________
7-2
75Ω
Table 7-6
Barco - LC series - R5976934 - user's manual - Revision 08 - April 2008
Page 91

7.6.2 S-Video
Item specification
1,2 Ground
3 Y
4 C
Luminance level 1.0 Vpp
Color level 0.286 Vpp
Connector type Mini Din 4pin
7. Technical data 42" version (LCN-42, LCS-42)
4
3
1
2
Termination
75Ω
7.6.3 Component Video (mini DIN 8 pin)
7
8
6
3
4
5
1
2
Item specification Item specification
1 GND 5 GND
2 CB 6 CR
3 GND 7 not connected
4 Y 8 not connected
Connector type Mini Din 8pin
Table 7-7
Termination
Barco - LC series - R5976934 - user's manual - Revision 08 - April 2008
75Ω
Table 7-8
________________________________________________________________________________________
7-3
Page 92

7. Technical data 42" version (LCN-42, LCS-42)
White Yellow Cyan Green Magenta Red Blue Black
Y
IRE 75 69.5 59.1 53.6 21.4 15.9 5.4 0
mV 525 487 413 375 150 112 38 0
IRE 0 -37.5 8.6 -28.9 28.9 -8.6 37.5 0
Pb
mV 0 -263 60 -202 202 -60 263 0
IRE 0 3.4 -37.5 -34.1 34.1 37.5 -3.4 0
Pr
mV 0 24 -263 -238 238 263 -24 0
HDTV YPbPr 75% color bars. Values are relative to the blanking level.
White Yellow Cyan Green Magenta Red Blue Black
IRE 100 92.8 78.7 71.5 28.5 21.3 7.2 0
Y
mV 700 649 551 501 199 149 51 0
IRE 0 -50 11.5 -38.5 38.5 -11.5 50 0
Pb
mV 0 -350 80 -270 270 -80 350 0
IRE 0 4.6 -50 -45.4 45.4 50 -4.6 0
Pr
mV 0 32 -350 -318 318 350 -32 0
HDTV YPbPr 100% color bars. Values are relative to the blanking level.
White Yellow Cyan Green Magenta Red Blue Black
Table 7-9
Table 7-10
Y
IRE 75 66.5 52.6 44.0 31.0 22.4 8.6 0
mV 525 465 368 308 217 157 60 0
IRE 0 -37.5 12.7 -24.8 24.8 -12.7 37.5 0
Cb
mV 0 -263 89 -174 174 -89 263 0
IRE 0 6.1 -37.5 -31.4 31.4 37.5 -6.1 0
Cr
mV 0 43 -263 -220 220 263 -43 0
SDTV YCbCr 75% color bars. Values are relative to the blanking level.
Table 7-11
___________________________________________________________
7-4
Barco - LC series - R5976934 - user's manual - Revision 08 - April 2008
Page 93

7. Technical data 42" version (LCN-42, LCS-42)
White Yellow Cyan Green Magenta Red Blue Black
Y
IRE 100 88.6 70.1 58.7 41.3 29.9 11.4 0
mV 700 620 491 411 289 209 80 0
IRE 0 -50 16.9 -33.1 33.1 -16.9 50 0
Cb
mV 0 -350 118 -232 232 -118 350 0
IRE 0 8.1 -50 -41.9 41.9 50 -8.1 0
Cr
mV 0 57 -350 -293 293 350 -57 0
SDTV YCbCr 100% color bars. Values are relative to the blanking level.
7.6.4 SDI/HDSDI IN/OUT (BNC) (LCS-42 only)
1
2
1 Signal, typ. 0.8Vpp
2 Shield
SDI/HDSDI
SDI/HDSDI
BNC input, 75 Ω terminated
IN
BNC output, output impedance 75 Ω. Loop through of the active HDSDI input.
Out
Table 7-12
7.6.5 DVI
1
9
17
Pin signal assignment pin signal assignment
1 TMDS Data 2- 13 NC
2 TMDS Data 2+ 14 NC
3 TMDS Data 2 Ground 15 Ground (+5, Analog /V Sync)
4 NC 16 Hot Plug Detect (HPD)
5 NC 17 TMDS Data 0-
6 DDC Clock 18 TMDS Data 0+
7 DDC Data 19 TMDS Data 0 Ground
8 NC 20 NC
9 TMDS Data 1- 21 NC
10 TMDS Data 1+ 22 TMDS Clock Ground
11 TMDS Data 1 Ground 23 TMDS Clock +
12 NC 24 TMDS Clock -
8
16
24
Table 7-13
Barco - LC series - R5976934 - user's manual - Revision 08 - April 2008
Table 7-14
________________________________________________________________________________________
7-5
Page 94

7. Technical data 42" version (LCN-42, LCS-42)
7.6.6 RGB IN (D-Sub 15 pin)
5
10
15
1
6
11
Pin signal assignment pin signal assignment
1 Red video input 9 NC
2 Green video input 10 Ground
3 Blue video input 11 NC
4 NC 12 (SDA)
5 Ground 13 Horizontal sync (Composite sync)
6 Red video ground 14 Vertical sync
7 Green video ground 15 (SCL)
8 Blue video ground
Table 7-15
7.6.7 RS232 IN
Pin signal assignment
1 NC
2 Signal receive
3 Signal transmit
4 NC
5 Ground
6 NC
7 NC
8 NC
1
6
5
9
Table 7-16
___________________________________________________________
7-6
Barco - LC series - R5976934 - user's manual - Revision 08 - April 2008
Page 95

7.6.8 RS232 OUT
7. Technical data 42" version (LCN-42, LCS-42)
Pin signal assignment
1 NC
2 Signal transmit
3 Signal receive
4 NC
5 Ground
6 NC
7 NC
8 NC
1
6
5
9
Table 7-17
7.7 Factory settings
Item default adjust range
Power switch Off On/Off
Brightness 80 0~100
Contrast 50 0~100
Color temp. User User, 3200K,5400K,6500K, 9300K
Red 255 0~255
Green 255 0~255
Blue 255 0~255
Language English English
Baud rate 115200 115200, 38400, 19200, 9600
Auto
configuration
On On/Off
Table 7-18
Barco - LC series - R5976934 - user's manual - Revision 08 - April 2008
________________________________________________________________________________________
7-7
Page 96

Page 97

8. Technical data 47" version (LCN-47, LCS-47)
8 Technical data 47" version (LCN-47, LCS-47)
8.1 General data
characteristic specification
Screen size
Aspect ratio
active area (HxW)
width x height x depth
(without stand, with handle!)
weight
47” diagonal
16:9
1048mm x 593mm | 41.26in. x 23.35in.
1139.4mm x 684.4mm x 125mm | 44.86in x 26.94in X 4.92in
40.2kg | 88.7lbs
8.2 LCD panel
characteristic specification
Driver element a-Si TFT active matrix
Pixel number (1920 x R.G.B. x 1080) pixel (HDTV)
Display colors 16.8 millions of colors
Viewing angle 176 degree vertical / 176 degree horizontal
Brightness 500 cd/m²
Table 8-1
Contrast ratio 1800:1
Response time (Gray to Gray) Typ. 6.5 msec, max. 12 msec.
VGA (D-Sub 15 pins), DVI (DVI-D 24 pins), Composite (RCA), S-Video
Interfaces
Dead pixel rate
(Mini-DIN 4 pin), Component (Mini-DIN 8 pin), SDI/HD-SDI in/out (BNC),
RS232 IN/OUT (D-Sub 9)
Max. 8 bright pixels out of which max. 2 clusters of two bright pixels.
Max. 10 dark pixels out of which max. 5 clusters of two dark pixels
8.3 Electrical data
Characteristic specification
Power supply 100VAC-240 VAC, 50/60 Hz
Power consumption operating mode 303W | 1033.8 BTU/h
Power consumption Standby mode 19.9W | 67.9 BTU/h
Table 8-2
Table 8-3
Barco - LC series - R5976934 - user's manual - Revision 08 - April 2008
________________________________________________________________________________________
8-1
Page 98

8. Technical data 47" version (LCN-47, LCS-47)
8.4 Operating conditions
Characteristic specification
Storage temperature -20°C - +60°C | -4°F – 140°F, at max. 90% RH, non-condensing
Operating ambient temperature +5°C – +40°C | 41°F – 104°F, at max. 90% RH, non-condensing
Table 8-4
8.5 CCFL (Cold Cathode Fluorescent Lamp) characteristics (ambient temperature (25 ±2)°C)
Characteristic Typ. value
Lamp voltage 1750 VRMS
Lamp current 6 mARMS
Lamp starting voltage 2350 VRMS (0°C), 2150 VRMS (25°C)
Lamp life time 50,000hrs *)
Operating frequency 40-70 KHz
Table 8-5
The life time of a lamp is defined as when the brightness is larger than 50% of its original value and the effective discharge length is longer than 80% of its original length.
8.6 Interfaces
8.6.1 Video IN (Composite Video)
Item specification
Signal level 1.0Vpp
Connector type RCA Jack
Termination
___________________________________________________________
8-2
75Ω
Table 8-6
Barco - LC series - R5976934 - user's manual - Revision 08 - April 2008
Page 99

8.6.2 S-Video
Item specification
1,2 Ground
3 Y
4 C
Luminance level 1.0 Vpp
Color level 0.286 Vpp
Connector type Mini Din 4pin
8. Technical data 47" version (LCN-47, LCS-47)
4
3
1
2
Termination
75Ω
8.6.3 Component Video
7
8
6
3
4
5
1
2
Item specification Item specification
1 GND 5 GND
2 CB 6 CR
3 GND 7 not connected
4 Y 8 not connected
Connector type Mini Din 8pin
Termination
White Yellow Cyan Green Magenta Red Blue Black
75Ω
Table 8-7
Table 8-8
Y
IRE 75 69.5 59.1 53.6 21.4 15.9 5.4 0
mV 525 487 413 375 150 112 38 0
IRE 0 -37.5 8.6 -28.9 28.9 -8.6 37.5 0
Pb
mV 0 -263 60 -202 202 -60 263 0
IRE 0 3.4 -37.5 -34.1 34.1 37.5 -3.4 0
Pr
mV 0 24 -263 -238 238 263 -24 0
HDTV YPbPr 75% color bars. Values are relative to the blanking level.
Barco - LC series - R5976934 - user's manual - Revision 08 - April 2008
________________________________________________________________________________________
Table 8-9
8-3
Page 100

8. Technical data 47" version (LCN-47, LCS-47)
White Yellow Cyan Green Magenta Red Blue Black
Y
IRE 100 92.8 78.7 71.5 28.5 21.3 7.2 0
mV 700 649 551 501 199 149 51 0
IRE 0 -50 11.5 -38.5 38.5 -11.5 50 0
Pb
mV 0 -350 80 -270 270 -80 350 0
IRE 0 4.6 -50 -45.4 45.4 50 -4.6 0
Pr
mV 0 32 -350 -318 318 350 -32 0
HDTV YPbPr 100% color bars. Values are relative to the blanking level.
White Yellow Cyan Green Magenta Red Blue Black
IRE 75 66.5 52.6 44.0 31.0 22.4 8.6 0
Y
mV 525 465 368 308 217 157 60 0
IRE 0 -37.5 12.7 -24.8 24.8 -12.7 37.5 0
Cb
mV 0 -263 89 -174 174 -89 263 0
IRE 0 6.1 -37.5 -31.4 31.4 37.5 -6.1 0
Cr
mV 0 43 -263 -220 220 263 -43 0
SDTV YCbCr 75% color bars. Values are relative to the blanking level.
White Yellow Cyan Green Magenta Red Blue Black
Table 8-10
Table 8-11
Y
IRE 100 88.6 70.1 58.7 41.3 29.9 11.4 0
mV 700 620 491 411 289 209 80 0
IRE 0 -50 16.9 -33.1 33.1 -16.9 50 0
Cb
mV 0 -350 118 -232 232 -118 350 0
IRE 0 8.1 -50 -41.9 41.9 50 -8.1 0
Cr
mV 0 57 -350 -293 293 350 -57 0
SDTV YCbCr 100% color bars. Values are relative to the blanking level.
Table 8-12
___________________________________________________________
8-4
Barco - LC series - R5976934 - user's manual - Revision 08 - April 2008
 Loading...