

Page 1
FLM lamp house
R5976922/03
18/11/2008
Installation manual
Page 2

Barco nv Events
Noordlaan 5, B-8520 Kuurne
Phone: +32 56.36.89.70
Fax: +32 56.36.88.24
E-mail: sales.events@barco.com
Visit us at the web: www.barco.com
Printed in Belgium
Page 3
1. Installation process
1. INSTALLATION PROCESS
About this chapter
This chapter describes how to replace the (universal) lamp house from the FLM projector.
Adapted software for Universal Lamp House
The FLM projector software must be upgraded to version 1.7.17 or later prior to using the Universal Lamp House. The latest FLM
projector software can be downloaded from the Barco secured web site h
FLM projector). The FLM projec tor will not recognize the Universal Lamp House and will fail to start up the xenon bulb lamp when
neglecting this software upgrade. Use the Projector Toolset, which is also available on the secured B arco web site, to upgrade the
projector software. See user guide of the Projector Toolset for detailed instructions on how to upgr aded the projector software.
Overview
• Switching off
• Removal of the lamp cover
• Removal of the lamp house
• Installation of the lamp house
• Installation of the lamp cover
1.1 Switching off
ttps://my.barco.com (browse to the product page of the
How to switch off the projector?
1. P ress first Standby.
2. L et cool down the projector un til the fans decrease, at least 5 min.
3. S witch off the projector with the power switch.
1.2 Removal of the lamp cover
WARNING: This procedure may only be performed by qualified technical service personnel.
Necessary tools
7mmflat screw driver.
How to remove t he lamp cover of the projector ?
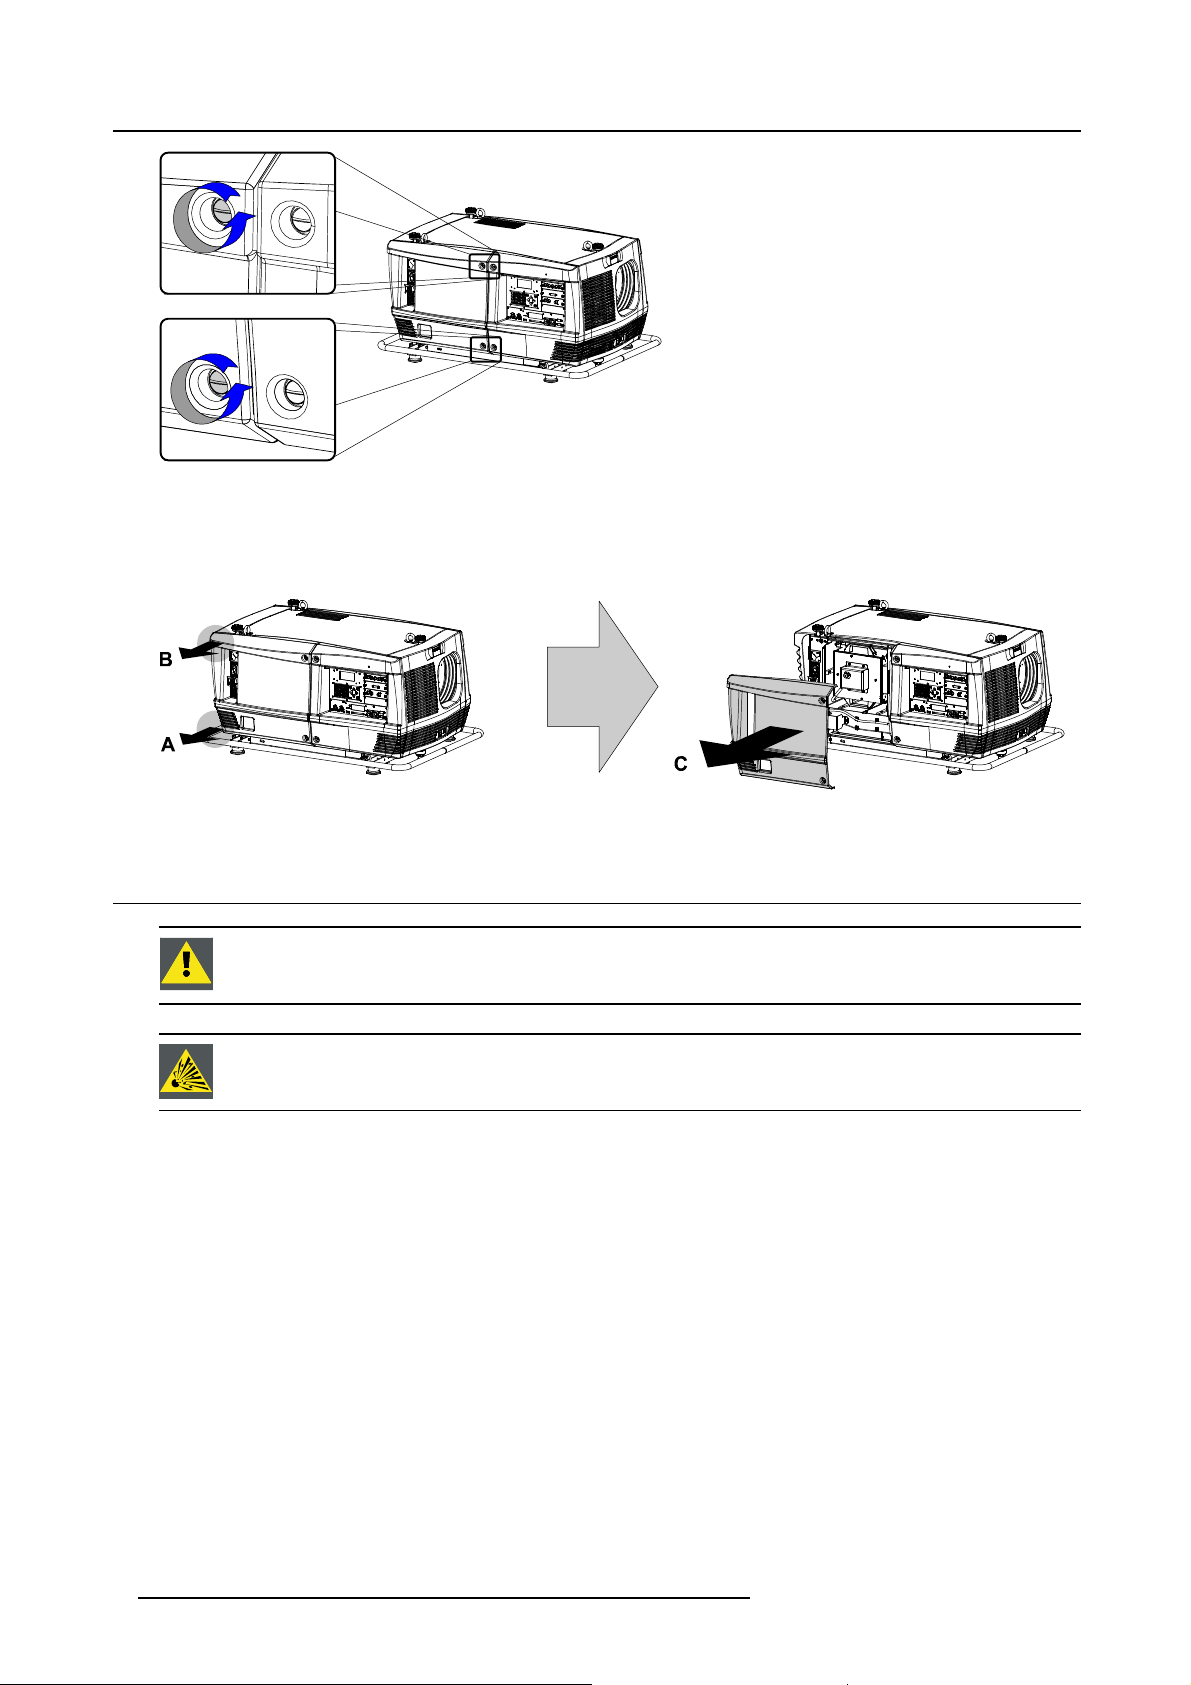
1. Release the two captive screws at the top and bottom right side of the lamp cover, using a fla t screw driver.
R5976922 FLM LAMP HOUSE 18/11/2008
1
Page 4
1. Installation process
Image 1-1
2. Remove the lamp cover from the projector doing the following:
a) gently pull out the left bottom corner (A) of the lamp cover,
b) then gently pull out the left top corner (B) of the lamp cover,
c) then move the lamp cover away from the projector (C).
Image 1-2
1.3 Removal of the lamp house
WARNING: This procedure may only be performed by qualified technical service personnel.
CAUTION: Never attempt to disassemble the lamp from its housing or to dispose of it. Return it to Barco.
Due to its high internal pressure, the lamp may exp lode in either hot or cold states if improperly handled.
Necessary tools
7mmflat screw driver.
How to remove the lamp house of the projector ?
1. S witch off the projector and unplug the power cord at the projector side.
2. Remove the lamp cover, see "Remo val of the lamp cover", page 1 .
3. Release the three spring lock screws of the lamp house a s illustrated.
2
R5976922 FLM LAMP HOUSE 18/11/2008
Page 5

Image 1-3
4. Clasp the lamp house by the handles and pull the lamp house out of the projector.
1. Installation process
Image 1-4
While starting up the projector, the electronics detect if a lamp is installed. If no lam p is installed, it is not
possible to start up the projector.
1.4 Installation of the lamp house
WARNING: This procedure may only be performed by qualified technical service personnel.
CAUTION: Never attempt to disassemble the lamp from its housing or to dispose of it. Return it to Barco.
Due to its high internal pressure, the lamp may exp lode in either hot or cold states if improperly handled.
Necessary tools
7mmflat screw driver.
How to install the lamp house of the projector ?
1. E nsur e the projector is switched off and the power cord at the projector side is unplugged.
2. Remove the lamp cover, if not removed yet. See "Removal of the lamp cover", page 1 .
R5976922 FLM LAMP HOUSE 18/11/2008
3
Page 6

1. Installation process
3. Clasp the lamp house by its handles and gently slide the lamp house into its socket. Note that the compartment is provided with
guides ( G) to position the lamp house correctly.
C
G
Image 1-5
4. P ush the lamp house forward until it slides fully into the projector.
5. S ecur e the correct position of the lamp house by tightening all three spr ing lock screws as illustrated.
Image 1-6
6. Reinstall the lamp cover of the proj
While starting up the projector, the electronics detect if a lamp is installed. If no lam p is installed, it is not
possible to start up the projector.
ector, see "Installation of the lamp cover", page 4 .
1.5 Installation of the lamp cover
Necessary tools
7mmflat screw driver.
How to install the lamp cove
1. Install the lamp cover of the projector doing the following:
a) Bring the lamp cov er towards its final position (A),
b) then gently push the locking stud at the left top corner (B) into its receiver,
c) then gently pu sh the lock ing stud at the left bottom corner (C) into its receiver.
4
r of the projector ?
R5976922 FLM LAMP HOUSE 18/11/2008
Page 7

Image 1-7
2. S ecure the lamp cover by locking the two captive screws at t he right side of the lamp cover.
1. Installation process
Image 1-8
R5976922 FLM LAMP HOUSE 18/11/2008 5
 Loading...