

Page 1
ImagePRO–4K Video Processor
Quick Start Guide - Setup
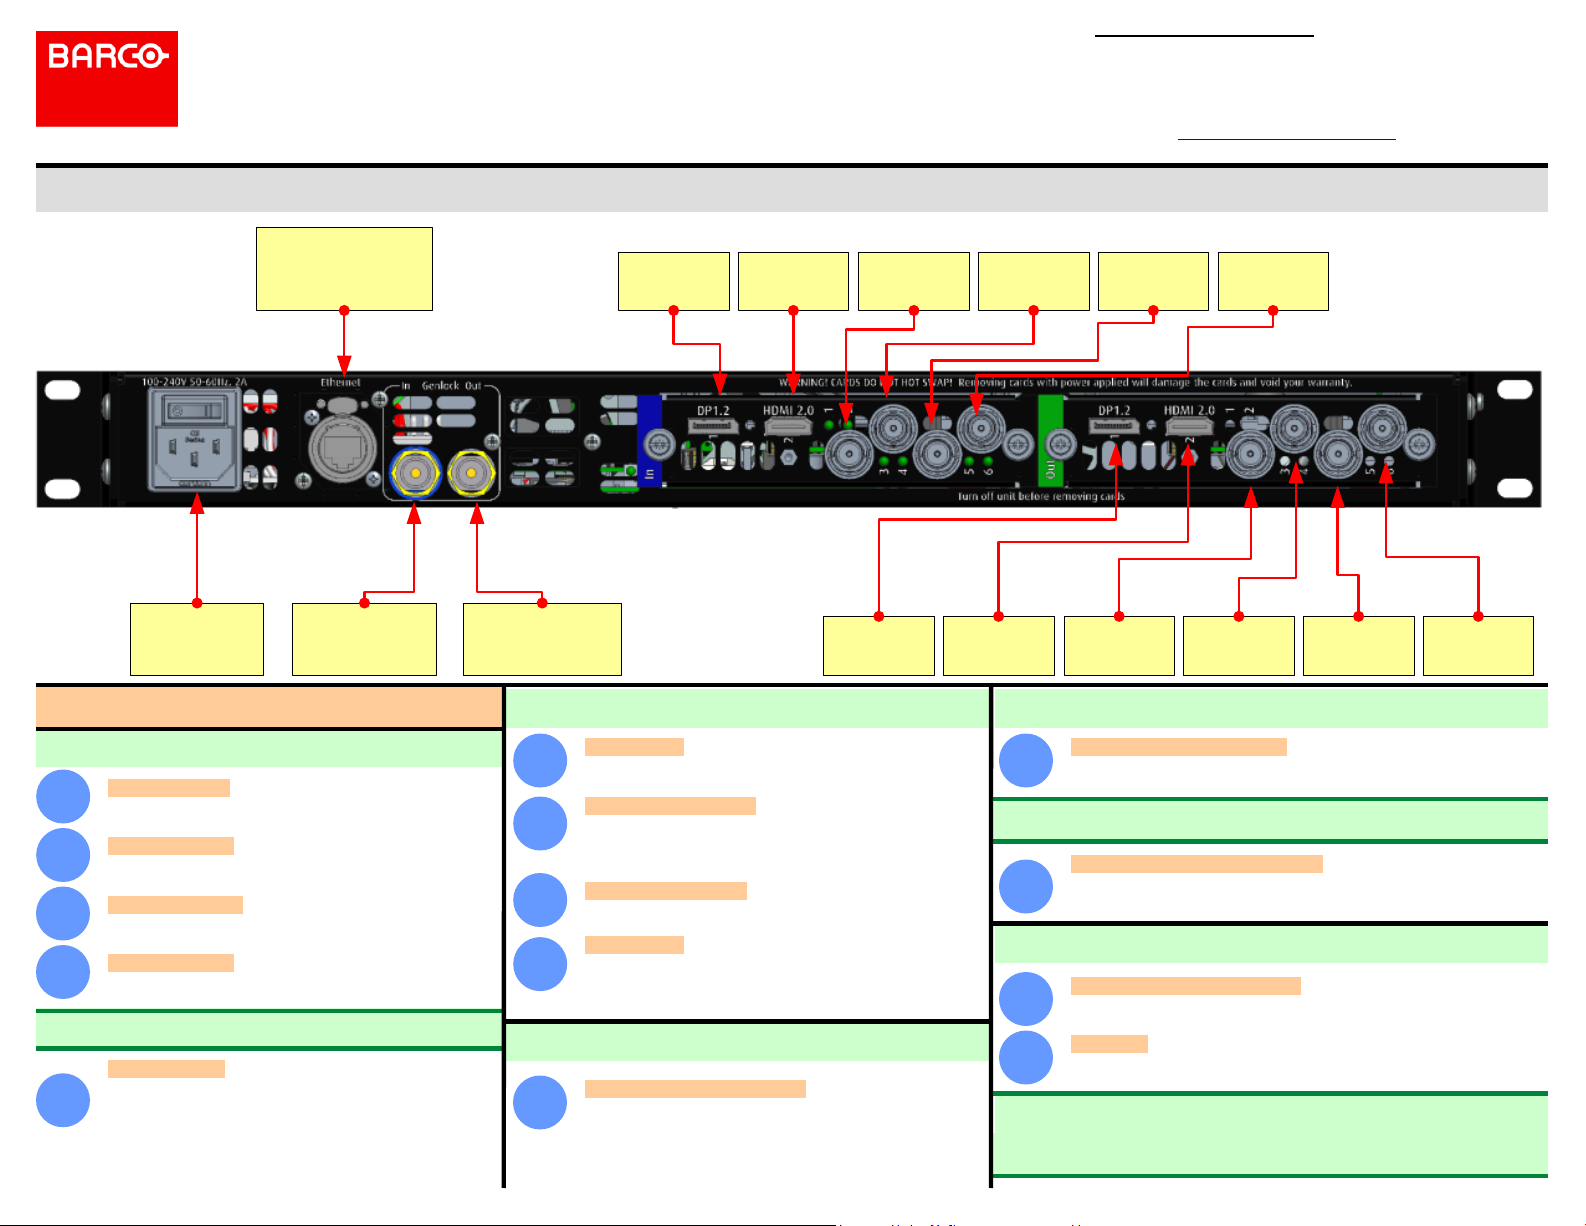
ImagePRO–4K Video Processor: Rear-Panel Setup
Ethernet
Connect to Event
Master Toolset or
External Controller
DP 1.2
Input
HDMI 2.0
Input
12G SDI
Input
12G SDI
Input
Barco Technical Support:
USA:
EMEA:
China:
APAC:
Support:
12G SDI
+1 (866) 374-7878
+32 (56) 36 8019
40088 22726
+603-78803362
www.barco.com/en/support
Input
12G SDI
Input
AC
Connect to AC
power source
Genlock
BNC Input
Quick install and setup
Getting started
Connect power — Ensure that power is properly connected
1
2
3
4
Note: To enter the Setup menu press the Adjust Knob.
5
to the ImagePRO–4K.
Connect inputs — Connect all input sources to the
ImagePRO–4K.
Connect outputs — Connect the output(s) on the
ImagePRO–4K to your projector(s) or other target devices.
Turn on power — Turn on power to the ImagePRO–4K,
your projector(s), and to all peripheral equipment.
Factory reset — If you are using the ImagePRO–4K for the
first time, or if you are using an ImagePRO–4K that has just
returned from an event, perform a full factory reset to restore
default system configurations.
Press the Adjust Knob to enter the Setup menu, then select
Reset / Factory on the display screen. Reset / Soft Reset
keeps the user settings.
Genlock
Generated
Reference Output
Setting up outputs
Native Rate — On the front panel, press the Adjust Knob to
enter the Setup menu, then select Setup / System menu and
6
select the desired Native Rate.
Assign primary output — If the primary output is DP,
proceed to the next step.
7
If your primary output is HDMI/SDI, go to Setup / Output /
AUX Adjustment and update the primary output.
Adjust output format — Go to Setup / Output / AUX
8
Adjustment and update the output format.
Test output — Turn on a test pattern, verify that you have an
image, and make any necessary adjustments. When
9
complete, turn off the test pattern.
Setting up an LED display
Position and adjust the image — Use the LED Setup Menu to
10
position the image on the LED wall or other display device,
scale the image, adjust Pan and Zoom settings, and save your
view.
DP 1.2
Output
HDMI 2.0
Output
12G SDI
Output
12G SDI
Output
12G SDI
Output
12G SDI
Output
Setting up inputs / source
11
Set and adjust inputs / source — Select inputs / sources and make any
necessary adjustments to color balance, timings, and so on.
Note: The ImagePRO–4K automatically acquires and configures inputs.
Save input / source configurations — After adjusting an input / source,
12
save the input /source configuration.
Repeat steps 11 and 12 for each input / source.
System settings
13
14
Adjust and save system settings — Adjust system parameters such as
Ethernet settings and HDCP parameters.
Save All — Select Save All. Save All is the last menu item on the Setup
page. Save All writes system settings to non-volatile memory.
ImagePRO–4K User’s Guide
For complete details on all installation and operations procedures, please
refer to the ImagePRO–4K User’s Guide (R5906167).
P/N 26-1602004-00, Rev 01
Page 2
ImagePRO–4K Video Processor
Quick Start Guide - Setup
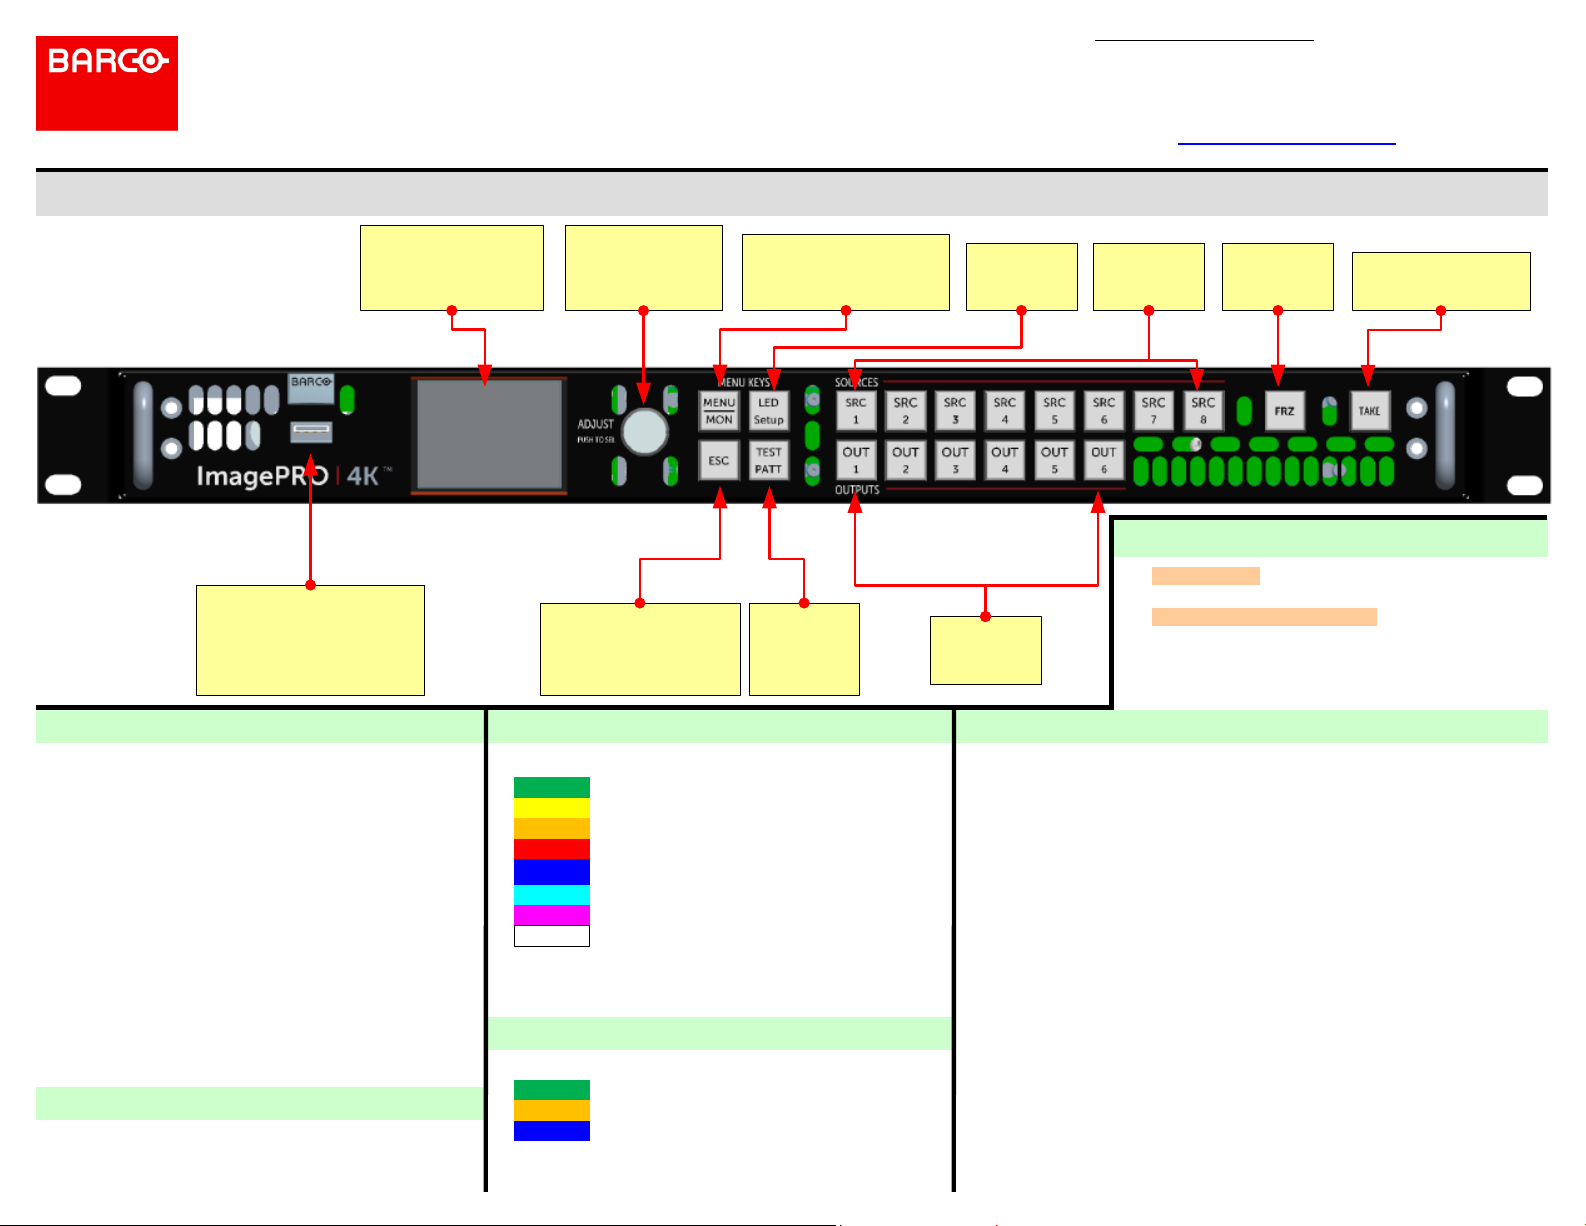
ImagePRO–4K Video Processor: Front-Panel Setup
Barco Technical Support:
USA:
EMEA:
China:
APAC:
Support:
+1 (866) 374-7878
+32 (56) 36 8019
40088 22726
+603-78803362
www.barco.com/en/support
Display Screen
Displays menus,
messages, and
live video
USB Port
Connect a flash drive to
back up and restore
configurations and to
upload firmware
Features overview
· 1RU rack-mount chassis
· Resolution up to 4096 x 2160 @ 60
· 4:4:4, 10-bit color (DP 1.2)
· Up to 6 inputs, each independently scaled to a different output
resolution
· DisplayPort 1.2 I/O
· HDMI 2.0/HDCP 2.2 I/O
· 1.5G/3G/6G/12G SDI I/O
· Up to 2x 4K60 inputs and outputs simultaneously
· Dedicated Genlock BNC connector
· Ethernet connection on the rear panel
· A USB port on the front panel
· Programmable input EDID
· Sync output
· Custom output formats
· Output rotation (90/180/270 degrees)
· Seamless cut transition or fade through matte color or a logo
Adjust Knob and Display screen
Press the Adjust Knob to enter menus on the display screen and to
make selections.
Turn the Adjust Knob to scroll up or down through the menus on the
display screen.
Adjust Knob
Navigate through
menus; push to
activate menus
ESC
Exits a menu, goes
back one level,
deactivates a selection
Menu/Monitor
Toggles between Menu
and Monitor Mode
TEST
PATT
Test
Patterns
Source-button states
· Brightly lit – Button is selected.
Green —Signal is active and assigned to PVW.
Yellow —Input source, still, logo, or matte color is present.
Amber —Signal is active on the PGM outputs.
Red —Loss of sync (LOS).
Blue —Source is frozen.
Cyan —A cue is mapped to the button (future).
Magenta —A user key is mapped to the button (future).
White —A preset is mapped to the button.
· Dimly lit – Source is mapped but not active.
· Not lit – Button is not mapped.
Output-button states
· Lit – Button is mapped, selected, or frozen.
Green —Button is mapped to an Aux.
Amber —Aux is selected to view in the front-panel monitor.
Blue —Aux is frozen.
· Not lit – Button is not mapped.
LED
Setup
Menus
Source
Buttons
1 – 8
FRZ
Freezes an
image
TAKE
Executes transitions
Remote control options
· Web Interface – Enables access from a computer,
· Barco Event Master Controllers – Event Master Toolset
Output
Buttons
1 – 6
smartphone, tablet, or other web-enabled device.
screen management software for PC or MAC; Event Master
Controllers.
Overview of key operations menus
Input Menu – Set input format; adjust brightness and contrast; adjust aspect ratio; set color
balance; size the image; save and manage input configurations; manage Input HDCP
settings.
Output (AUX) Menu – Set output format; detect output EDID; create an Area of Interest;
adjust timing and colorspace; set effects such as sharpness, strobe mode, color inversion;
manage Output HDCP settings.
Still Menu – Capture, rename, and delete stills. Set selected still as logo.
Preset Menu – Store and recall presets.
Transition Menu – Set transition timing and effects.
Button Mapping Menu – Map source and output buttons. SRC 1 – SRC 6 default to the
inputs of the Tri-Combo input card; SRC 7 defaults to “Matte”; and SRC 8 defaults to “Logo.”
OUT 1 – OUT 6 default to OUT 1 as Aux Channel A, OUT 2 as Aux Channel B; OUT 3 – 6
are not mapped.
System Menu – Set system mode and parameters including Operation Mode and Native
Rate; manage Genlock settings; USB Backup/Restore of configurations; set Ethernet
options; lock front panel; run diagnostics.
Custom Format Menu – Create, save, delete custom input and output formats.
LED Setup Menu – Quickly set up output area of interest, input scaling, and save the
settings.
Factory Reset – Restore factory default settings. Optionally, keep IP address and EDID
settings.
Firmware Upgrade – Update ImagePRO-4K firmware from a flash drive.
P/N 26-1602004-00, Rev 01
 Loading...