

Page 1
ICMP/ICMP-X HDD
ENABLING BRIGHT OUTCOMES
Installation manual
Page 2

Barco NV
Beneluxpark 21, 8500 Kortrijk, Belgium
www.barco.com/en/support
www.barco.com
Registered office: Barco NV
President Kennedypark 35, 8500 Kortrijk, Belgium
www.barco.com/en/support
www.barco.com
Page 3

Changes
Barco provides this manual 'as is' without warranty of any kind, either expressed or implied, including but not
limited to the implied warranties or merchantability and fitness for a particular purpose. Barco may make
improvements and/or changes to the product(s) and/or the program(s) described in this publication at any time
without notice.
This publication could contain technical inaccuracies or typographical errors. Changes are periodically made
to the information in this publication; these changes are incorporated in new editions of this publication.
The latest edition of Barco manuals can be downloaded from the Barco web site www.barco.com or from the
secured Barco web site https://www.barco.com/en/signin.
Copyright ©
All rights reserved. No part of this document may be copied, reproduced or translated. It shall not otherwise be
recorded, transmitted or stored in a retrieval system without the prior written consent of Barco.
Disposal Information
Waste Electrical and Electronic Equipment
This symbol on the product indicates that, under the European Directive 2012/19/EU governing waste
from electrical and electronic equipment, this product must not be disposed of with other municipal waste.
Please dispose of your waste equipment by handing it over to a designated collection point for the recycling of
waste electrical and electronic equipment. To prevent possible harm to the environment or human health from
uncontrolled waste disposal, please separate these items from other types of waste and recycle them
responsibly to promote the sustainable reuse of material resources.
For more information about recycling of this product, please contact your local city office or your municipal
waste disposal service.
For details, please visit the Barco website at: http://www.barco.com/AboutBarco/weee
EMC notices
EN55032/CISPR32 Class A MME (MultiMedia Equipment)
Warning : This equipment is compliant with Class A of CISPR 32. In a residential environment this equipment
may cause radio interference.
GB/T 9254 Class A ITE (Information Technology Equipment)
Warning : This is a class A product. In a domestic environment this product may cause radio interference in
which case the user may be required to take adequate measures.
BSMI Taiwan Class A statement:
警告使用者 : 此為甲類資訊技術設備,於居住環境中使用 ,可能會造成射頻擾動,在此情況下,使用者會被要
求採取某些適當的對策。
Federal Communications Commission (FCC Statement)
This equipment has been tested and found to comply with the limits for a class A digital device, pursuant to
Part 15 of the FCC rules. These limits are designed to provide reasonable protection against harmful
interference when the equipment is operated in a commercial environment. This equipment generates, uses,
and can radiate radio frequency energy and, if not installed and used in accordance with the instruction
manual, may cause harmful interference to radio communications. Operation of this equipment in a residential
area may cause harmful interference, in which case the user will be responsible for correcting any interference
at his own expense
Changes or modifications not expressly approved by the party responsible for compliance could void the
user's authority to operate the equipment
Page 4

FCC responsible: Barco Inc.
3059 Premiere Parkway Suite 400
30097 Duluth GA, United States
Tel: +1 678 475 8000
Guarantee and Compensation
Barco provides a guarantee relating to perfect manufacturing as part of the legally stipulated terms of
guarantee. On receipt, the purchaser must immediately inspect all delivered goods for damage incurred during
transport, as well as for material and manufacturing faults Barco must be informed immediately in writing of
any complaints.
The period of guarantee begins on the date of transfer of risks, in the case of special systems and software on
the date of commissioning, at latest 30 days after the transfer of risks. In the event of justified notice of
complaint, Barco can repair the fault or provide a replacement at its own discretion within an appropriate
period. If this measure proves to be impossible or unsuccessful, the purchaser can demand a reduction in the
purchase price or cancellation of the contract. All other claims, in particular those relating to compensation for
direct or indirect damage, and also damage attributed to the operation of software as well as to other services
provided by Barco, being a component of the system or independent service, will be deemed invalid provided
the damage is not proven to be attributed to the absence of properties guaranteed in writing or due to the
intent or gross negligence or part of Barco.
If the purchaser or a third party carries out modifications or repairs on goods delivered by Barco, or if the
goods are handled incorrectly, in particular if the systems are operated incorrectly or if, after the transfer of
risks, the goods are subject to influences not agreed upon in the contract, all guarantee claims of the
purchaser will be rendered invalid. Not included in the guarantee coverage are system failures which are
attributed to programs or special electronic circuitry provided by the purchaser, e.g. interfaces. Normal wear
as well as normal maintenance are not subject to the guarantee provided by Barco either.
The environmental conditions as well as the servicing and maintenance regulations specified in this manual
must be complied with by the customer.
Trademarks
Brand and product names mentioned in this manual may be trademarks, registered trademarks or copyrights
of their respective holders. All brand and product names mentioned in this manual serve as comments or
examples and are not to be understood as advertising for the products or their manufacturers.
Page 5

Table of contents
1 HDD(s) on ICMP ................................................................................................................................................................................................7
1.1 General......................................................................................................................................................................................................8
1.2 ICMP HDD ...............................................................................................................................................................................................9
1.3 What are the possible HDD swaps ........................................................................................................................................ 11
1.4 HDD status LEDs..............................................................................................................................................................................12
1.5 Removing a HDD from the ICMP.............................................................................................................................................14
1.6 Installing a HDD into the ICMP..................................................................................................................................................15
R5905769 /04 ICMP/ICMP-X HDD
5
Page 6

R5905769 /04 ICMP/ICMP-X HDD6
Page 7

HDD(s) on ICMP 1
About this document
This installation manual explains how to replace malfunction HDD(s) of the Barco ICMP (Integrated Cinema
Media Processor) installed in the field.
Clarification of term “ICMP” used in this document
When referring in this document to the term “ICMP” means that the content is applicable for following Barco
products:
• ICMP
• ICMP-X
CAUTION: Not withstanding the HDDs are technical hot swappable it is strongly advised to switch
off the projector prior to replace the HDD.
Removing a HDD while power is on will degrade the RAID configuration, inserting a HDD will cause
a performance drop in case of a playout, putting a set of HDD’s in the projector one by one when
power is on might trigger an unnecessary rebuild, …
In case only one HDD is replaced (RAID degraded mode) the ICMP automatically starts with the
RAID recovery process after the malfunction HDD is replaced. The red LED of the HDD which has
to be rebuilt is blinking. Rebuild process takes about 3 to 4 hours for 1TB HDD and could takes
about 13 to 14 hours for 4TB HDD. Once the RAID is completed the red LED turns off.
CAUTION: It's strongly recommended to complete the RAID recovery process prior to starting a
show. This to ensure that the content integrity is preserved and that the show is not interrupted.
In case more than one HDD must be replaced, the RAID is 'broken'. All content will be lost. Once
the HDDs are replaced, when the projector restarts, the ICMP automatically creates a new (empty)
RAID 5 configuration.
Overview
•
General
• ICMP HDD
• What are the possible HDD swaps
• HDD status LEDs
• Removing a HDD from the ICMP
• Installing a HDD into the ICMP
R5905769 /04 ICMP/ICMP-X HDD
7
Page 8

21
HDD(s) on ICMP
1.1 General
Document overview
This document gives a brief introduction into the ICMP HDD, provides in a table a summary of all types of
HDD swaps available, describes the LED status of the HDD and describes the HDD removal and installation
instructions.
The latest version of this document can be downloaded from the Barco website www.barco. com or from the
secured Barco website https://my.barco.com.
About ICMP
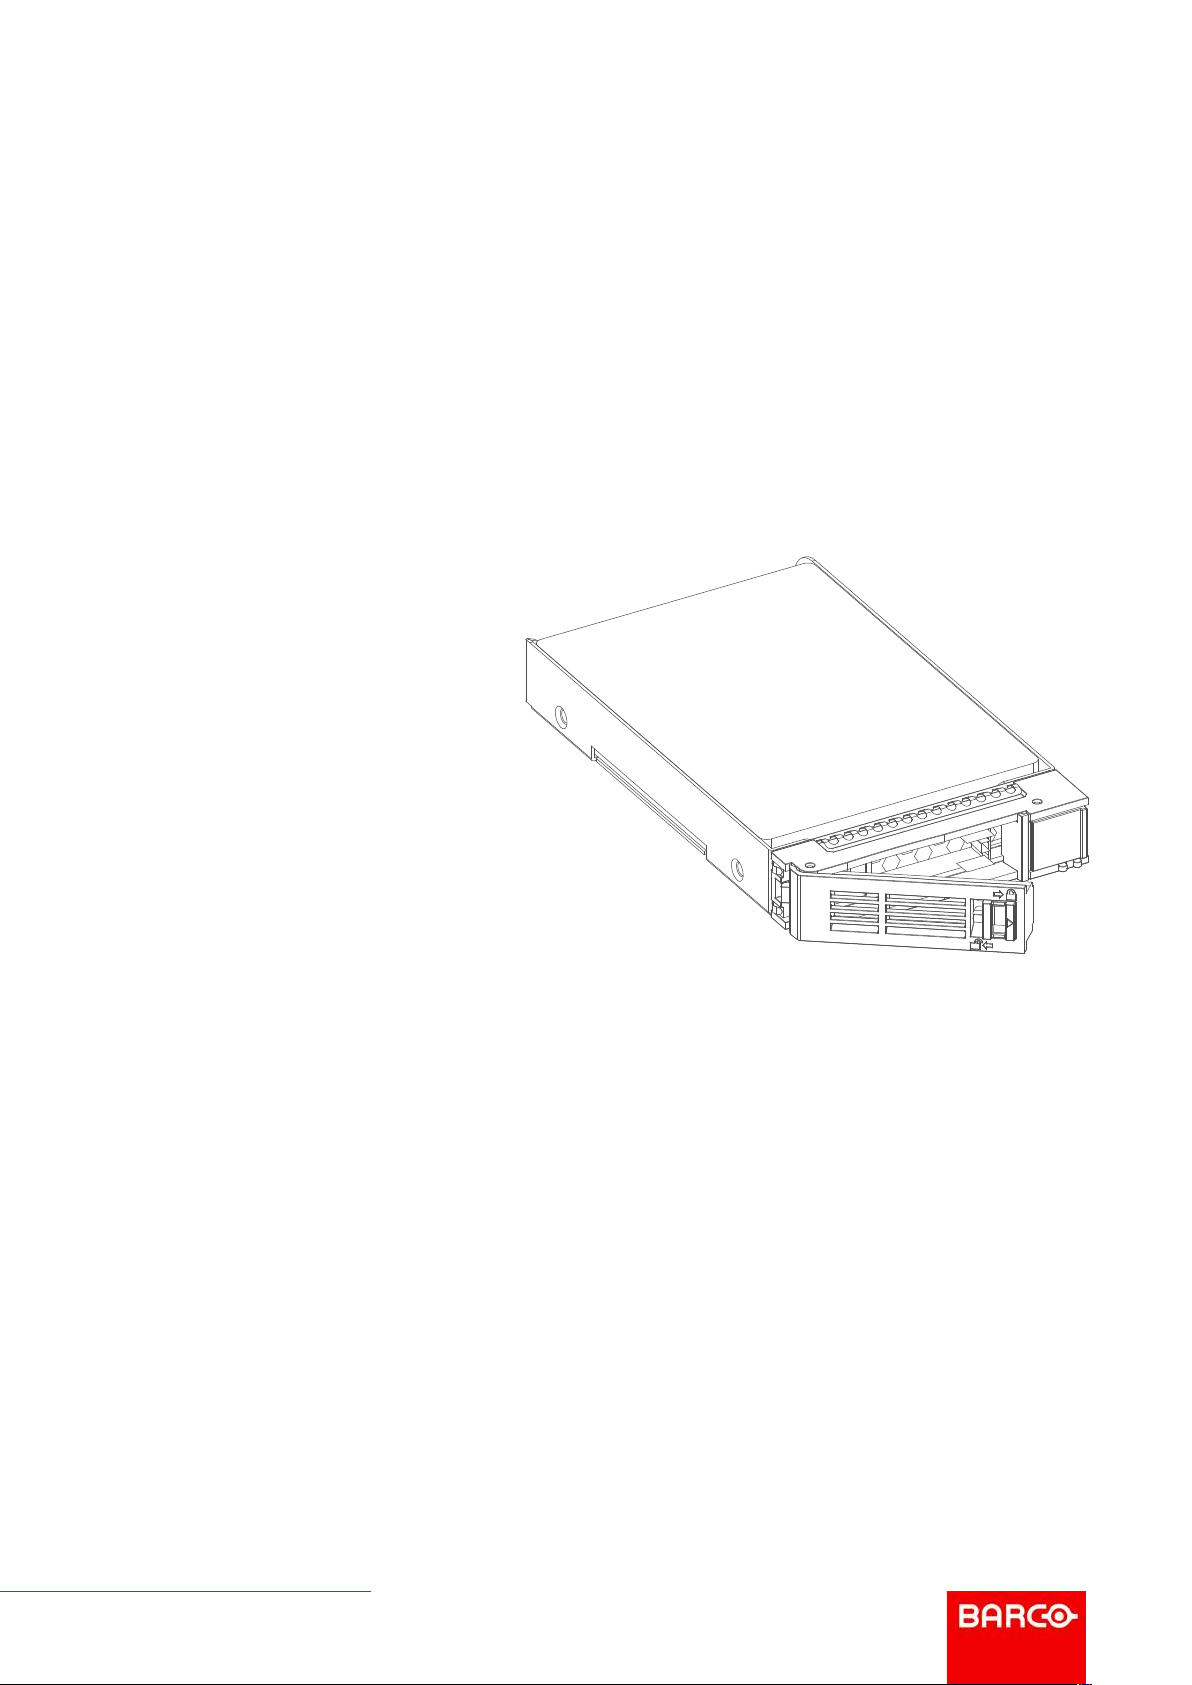
The ICMP is a removable electronic assembly situated in the Card Cage of the projector. The ICMP stores,
decrypts and decodes DCI cinema content and delivers it to the projector in a usable format, all integrated into
a single assembly placed directly in the projector.
Image 1-1
1 ICMP
2 HDDs for ICMP
There are several ICMP types (ICMP with Displayport, ICMP with HDMI 2.0, ICMP-X,...). For detail
information about the ICMP or Barco digital cinema projector refer to the manual of the projector which is also
available on the Barco website.
GEN1 and GEN2 storage controller
The ICMP-X is equipped with a GEN2 storage controller while the legacy ICMP has an GEN1 storage
controller.
The GEN2 storage controller supports SSD and uses another disk initialization type. This implies that HDDs
initialized for the legacy ICMP (with GEN1 storage controller) are not interchangeable with the ICMP-X without
re-initialization. Note that a re-initialization process result in lost of content. See “What are the possible HDD
swaps ”, page 11.
It’s possible to upgrade an ICMP with a GEN2 storage controller. For more info about the upgrade kit and
instructions see Barco website.
How to recognize an ICMP-X or an upgraded ICMP with GEN2 storage controller
At the first glance ICMP-X is very similar to ICMP (the previous generation device) however both devices are
not fully compatible and not interchangeable.
Unlike the previous versions the name of ICMP-X appears on the upper left side of the front face (under the
Barco logo).
R5905769 /04 ICMP/ICMP-X HDD8
Page 9

0
1234567
89
ICMP-X
HDD(s) on ICMP
Image 1-2
An upgraded ICMP with GEN 2 storage controller has a label “SSD READY - RAID GEN2” applied under the
Barco logo). This sticker comes with the upgrade kit; it will only be there when the “upgrader” applied it.
Image 1-3
It’s useful to recognize an ICMP from an ICMP-X or upgraded ICMP to know which HDDs can be
used without re-initialization.
1.2 ICMP HDD
About ICMP HDD
The three HDDs (local storage) in the ICMP, are set up in a RAID 5 configuration. This storage technique, that
combines multiple HDD components into a logical unit, manages enough redundancy information to continue
to operate properly after the loss of one HDD.
Image 1-4
CAUTION: A RAID 5 configuration with three HDDs allows a maximum loss of one disk. With the
simultaneous loss of more than one HDDs, data is lost and the RAID must be completely initialized
again after replacement of the defect HDDs with new HDDs!
About degraded mode
When a RAID array experiences the failure of one disk, it enters in degraded mode. Content storage and
playback remains available on the ICMP.
R5905769 /04 ICMP/ICMP-X HDD 9
Page 10

HDD(s) on ICMP
CAUTION: The loss of one disk causes no serious consequences on the ICMP. But action must be
taken quickly because the loss of a second disk will make the RAID system broken. The main cause
of the total loss of RAID is due in most cases to the loss of the second disk while the first has not
been rebuilt!
A failed drive should be replaced as soon as possible.
About “RAID recovery” process
The restoration from degraded to normal condition of the RAID 5 system is done automatically. When the
RAID controller detects a new HDD to replace the failed disk the recovery procedure starts automatically.
CAUTION: The automatic process does not work if more than one disk is lost. In that case the RAID
must be completely initialized again!
About RAID broken
When more than one HDD is out of order, the RAID is considered as 'broken' and the content is lost. The failed
HDDs must be changed and a new RAID must be created.
Exchange or re-use of a disk set
It's possible to have several sets of disks with one ICMP or to reuse a complete set of disks coming from
another projector with ICMP.
How to exchange:
• Exchange of HDD set between two ICMPs with the same storage controller:
It is sufficient to insert the three HDDs, from a valid RAID array, and let the system explore the new RAID.
The mounting order of the HDDs and the HDD slots do not matter. Of course, when using HDDs from
another ICMP it is necessary to retrieve from the content distributor the KDMs corresponding to the content
and the new ICMP.
• Exchange of HDD set between two ICMPs with a different storage controller:
After inserting the three HDDs it is necessary to perform a manual RAID initialization with (Web)
Communicator, the Barco projectors configuration software. The RAID initialization command (e.g. in Web
Communicator: Maintenance > Raid Storage) erases any data present on the HDDs and the old content
will be lost. This will only take a short while and after this process, the projector will reboot. You can start
immediately after booting with the ingest of your content.
The problem of non-compatibility between the two generations of storage controllers is also
encountered when installing a new set of hard drives on an ICMP-X. The HDD spare part kits
provided by Barco are configured by default to work with a GEN1 storage controller and it is
necessary to perform a manual RAID initialization when they are deployed on a GEN2 storage
controller.
Label the HDDs with the initialization type (GEN1 or GEN2) to make it visible for which type of
storage controller the disks can be used without requiring a re-initialization and lost of content
HDD storage capacity
Make sure that all HDDs in the ICMP HDD set have the same storage capacity. See label on top of the HDD to
know the storage capacity.
HDD storage
The maximum recommended storage period for the drive in a non-operational environment is 90 days. Drives
should be stored in the original unopened shipping packaging whenever possible. Once the drive is removed
from the original packaging the recommended maximum period between drive operation cycles is 30 days.
During any storage period the drive non-operational temperature, humidity, wet bulb, atmospheric conditions,
shock, vibration, magnetic and electrical field specifications should be followed.
R5905769 /04 ICMP/ICMP-X HDD10
Page 11

HDD(s) on ICMP
HDD models validated by Barco
Only the original HDD spare parts provided by Barco or models validated by Barco (see list below) can be
used in the ICMP. All deviations from this rule void warranty.
HDD model ICMP-X ICMP
1TB: HGST – Western Digital (order code:
HCC541010A9E630 or
HCC541010B9E660)
1TB: Western Digital black drives (order
code: WD10JQLX-22JFGT0)
2TB: Seagate (order code :
ST2000NX0253)
4TB: Seagate SSD (order code:
XA3840ME10063)
Yes Yes
Yes Yes
Yes Yes
Yes Yes, only if the GEN1 storage controller is
replaced by a GEN2 storage controller. Software
version 1.4.2 or higher is needed.
1.3 What are the possible HDD swaps
General
There are several possible scenarios for replacing (exchange) hard drives on the ICMP. The situation is
different depending on the device type (ICMP or ICMP-X) and whether to replace one or more disks.
Continuity of data present on the disks is also impacted depending on the type of exchange. Degraded
operation or RAID initialization may be required.
List of available actions
The following table exposes all possible swaps available concerning HDDs on ICMP:
Replacing drives should always be done while the power is off.
Type of HDD swap
1 HDD replaced. • Content is preserved.
3 HDDs replaced separately
(previous kit of one disk used
three times).
Barco HDD replacement kit
(Spare part kit provided by
Barco with a set of 3 hard
disks configured to GEN1
storage controller).
On ICMP On ICMP-X
• ICMP automatically starts rebuild.
• Process takes about 3-4 hours
for 1TB HDD and could takes
about 13-14 hours for 4TB HDD.
• All content will be lost.
• RAID initialization need to be
perform with Communicator.
• immediately usable after RAID
initialization + restart (content
can be ingested).
• RAID initialization does not need
to be performed.
• Content can be ingested
immediately.
• Content is preserved.
• ICMP-X automatically starts
rebuild.
• Process takes about 3-4 hours
for 1TB HDD and could takes
about 13-14 hours for 4TB HDD.
• All content will be lost.
• RAID initialization need to be
perform with Web Communicator.
• immediately usable after RAID
initialization + restart (content
can be ingested).
• RAID initialization needs to be
perform with Web Communicator.
• immediately usable after RAID
initialization + restart (content
can be ingested).
R5905769 /04 ICMP/ICMP-X HDD 11
Page 12

54
HDD(s) on ICMP
Type of HDD swap
Set of 3 HDDs with content
reused from an ICMP with
GEN1 storage controller.
Set of 3 HDDs with content
reused from an ICMP-X.
On ICMP On ICMP-X
On an ICMP with GEN1 storage
controller:
• Content is preserved but
certificates (KDM) need to be reingested.
On an ICMP with GEN2 storage
controller:
• All content will be lost.
• Only usable after RAID
initialization + restart (content
can then be ingested
immediately).
• Unit is equipped with an GEN1
storage controller (default
configuration):
• All content will be lost.
• RAID initialization needs to be
perform with Communicator.
• All content will be lost.
• Only usable after RAID
initialization + restart (content
can then be ingested
immediately).
• Content is preserved but
certificates (KDM) need to be reingested.
• Unit has been upgraded with a
GEN2 storage controller (+ ICMP
software 1.4.2 or higher is
installed):
• Content is preserved but
certificates (KDM) need to be
re-ingested.
1.4 HDD status LEDs
HDD status LEDs
Image 1-5
4 HDD I/O LED
5 RAID LED
Status LEDs on ICMP
HDD I/O RAID HDD Status
Off Off HDD idle / disk in RAID OK.
Blinking green Off HDD I/O activity / disk in RAID OK.
Blinking green Slow blinking
red
HDD disks not (yet) initialized (not supported on ICMP with GEN1 storage
controller).
R5905769 /04 ICMP/ICMP-X HDD12
Page 13

HDD I/O RAID HDD Status
Blinking green Fast blinking
red
Off Red HDD idle / Disk error. Consult the following troubleshooting table for
When entering a new HDD in an ICMP, the HDD RAID LED will be full red for a short time. This is
not an error, the HDD has not yet been “recognized” by the projector and ICMP.
Once the HDD has been accepted by the ICMP, the full red LED will start blinking in accordance
with the previous status table.
If the LED remains full red, an error has occurred. In this case, consult the following troubleshooting
table for curative actions.
HDD I/O activity / RAID rebuilding.
curative actions.
Troubleshooting
Situation Solution
One disk failed (red LED) + RAID degraded.
The ongoing event is not interrupted.
Note: The disk status (RAID degraded) can be
retrieved via the (Web) Commander. See user guide
of the (Web) Commander.
1. Switch off the power.
2. Replace the defect HDD with approved model of
the same storage capacity. See procedure
“Removing a HDD from the ICMP”, page 14, and
“Installing a HDD into the ICMP”, page 15.
Ensure to insert the HDD firmly.
3. Switch on the power.
Result: As soon the new HDD is detected by the
ICMP the rebuild of the RAID is started (Blinking red
LED).
HDD(s) on ICMP
One disk failed (red LED) + Error 10580 “local
storage not available”.
Note: The disk status (Error code) can be retrieved
via the (Web) Commander. See user guide of the
(Web) Commander.
Multiple disks failed (multiple red LEDs) + Error
10573 “The RAID is broken”.
Note: The disk status (RAID broken) can be
retrieved via the (Web) Commander. See user guide
of the (Web) Commander.
1. Switch off the power.
2. Replace the defect HDD with approved model of
the same storage capacity. See procedure
“Removing a HDD from the ICMP”, page 14, and
“Installing a HDD into the ICMP”, page 15.
Ensure to insert the HDD firmly.
3. Switch on the power.
Result: As soon the new HDD is detected by the
ICMP the rebuild of the RAID is started (Blinking red
LED).
1. Switch off the power.
2. Replace all defect HDDs with approved models of
the same storage capacity. See procedure
“Removing a HDD from the ICMP”, page 14, and
“Installing a HDD into the ICMP”, page 15.
Ensure to insert the HDDs firmly.
3. Switch on the power.
4. Start “RAID Initialize”. See user guide of the
(Web) Communicator.
Result: a new empty RAID is created.
R5905769 /04 ICMP/ICMP-X HDD 13
Page 14

HDD(s) on ICMP
Situation Solution
A set of HDDs initialized for a GEN 2 storage
controller is installed on a GEN 1 storage controller
(All red LEDs remain off) + Combination of three
errors (10580 “local storage not available”, 10585
“storage mount failed”, 10573 “the RAID is
broken”)
Note: The disk status (Error code) can be retrieved
via the (Web) Commander. See user guide of the
(Web) Commander.
1. To avoid any misidentification, double check
ICMP model and if HDD model is compatible with
installed storage controller (see list of HDD
models validated by Barco).
2. Start “RAID Initialize”. See user guide of the
(Web) Communicator. Note that all content will be
lost!
Result: a new empty RAID is created.
All HDD LEDs remain off + Error 10580 “local
storage not available”.
Note: The disk status (Error code) can be retrieved
via the (Web) Commander. See user guide of the
(Web) Commander.
In case the ICMP has to be returned to factory (e.g. for repair) the non defective HDDs should be
removed and kept.
1. Switch off the power.
2. Reseat all HDDs. See procedure “Removing a
HDD from the ICMP”, page 14, and “Installing a
HDD into the ICMP”, page 15. Ensure to insert
the HDDs firmly.
3. If problem remains try “RAID Initialize”. See user
guide of the (Web) Communicator. Note that all
content will be lost!
4. If problem remains contact Service for further
instructions.
1.5 Removing a HDD from the ICMP
In case the ICMP has to be returned to factory (e.g. for repair) the non defective HDDs should be
removed and kept.
How to remove a HDD ?
1. Switch off the projector.
2. Moving the latch towards the left.
Image 1-6
3. Push the unlock button to open the handle.
R5905769 /04 ICMP/ICMP-X HDD14
Page 15

Image 1-7
4. Pull the HDD out of its slot.
HDD(s) on ICMP
Image 1-8
To install an HDD, see the following procedure: “Installing a HDD into the ICMP”, page 15.
1.6 Installing a HDD into the ICMP
This procedure assumes that the HDD slot of the ICMP is empty. If not, see procedure “Removing a
HDD from the ICMP”, page 14.
CAUTION: Always use a new empty spare part HDD approved by Barco to replace a malfunction
HDD. Do not use a HDD from another ICMP HDD set.
CAUTION: Always make sure that all HDDs in the ICMP HDD set have the same storage capacity.
See label on top of the HDD to know the storage capacity.
Re-initialization or rebuild of RAID
Installing or exchange one or several HDDs into ICMP has an impact on data presents on the already inserted
drives. RAID integrity depends on the type of HDD swap. Refer to the chapter “What are the possible HDD
swaps ”, page 11.
How to install a HDD ?
1. Ensure that the projector is switched off.
2. Prepare the HDD for insertion by moving the latch towards the left and push the unlock button to open the
handle.
R5905769 /04 ICMP/ICMP-X HDD 15
Page 16

1
HDD(s) on ICMP
Image 1-9
3. Insert the HDD into the HDD slot. Ensure that the handle is sufficiently open so that the hook (reference 1) of
the handle can pass the front plate of the ICMP.
Image 1-10
4. Push the HDD completely and firmly inside its slot, close the handle, and move the latch towards the right.
Image 1-11
5. Switch on the projector.
In case you replace one HDD (e.g. degraded mode) the ICMP automatically starts with the RAID
recovery process. The red LED of the HDD which has to be rebuilt is blinking. This process takes
about 200 GB per hour. Once the RAID is completed the red LED turns off.
CAUTION: It's strongly recommended to complete the RAID recovery process prior to starting a
show. This to ensure that the content integrity is preserved and that the show is not interrupted.
R5905769 /04 ICMP/ICMP-X HDD16
Page 17

HDD(s) on ICMP
R5905769 /04 ICMP/ICMP-X HDD 17
Page 18

R5905769 /04 | 2019–10–21
Barco NV | Beneluxpark 21, 8500 Kortrijk, Belgium
Registered office: Barco NV | President Kennedypark 35, 8500 Kortrijk, Belgium
www.barco.com
 Loading...