

Page 1
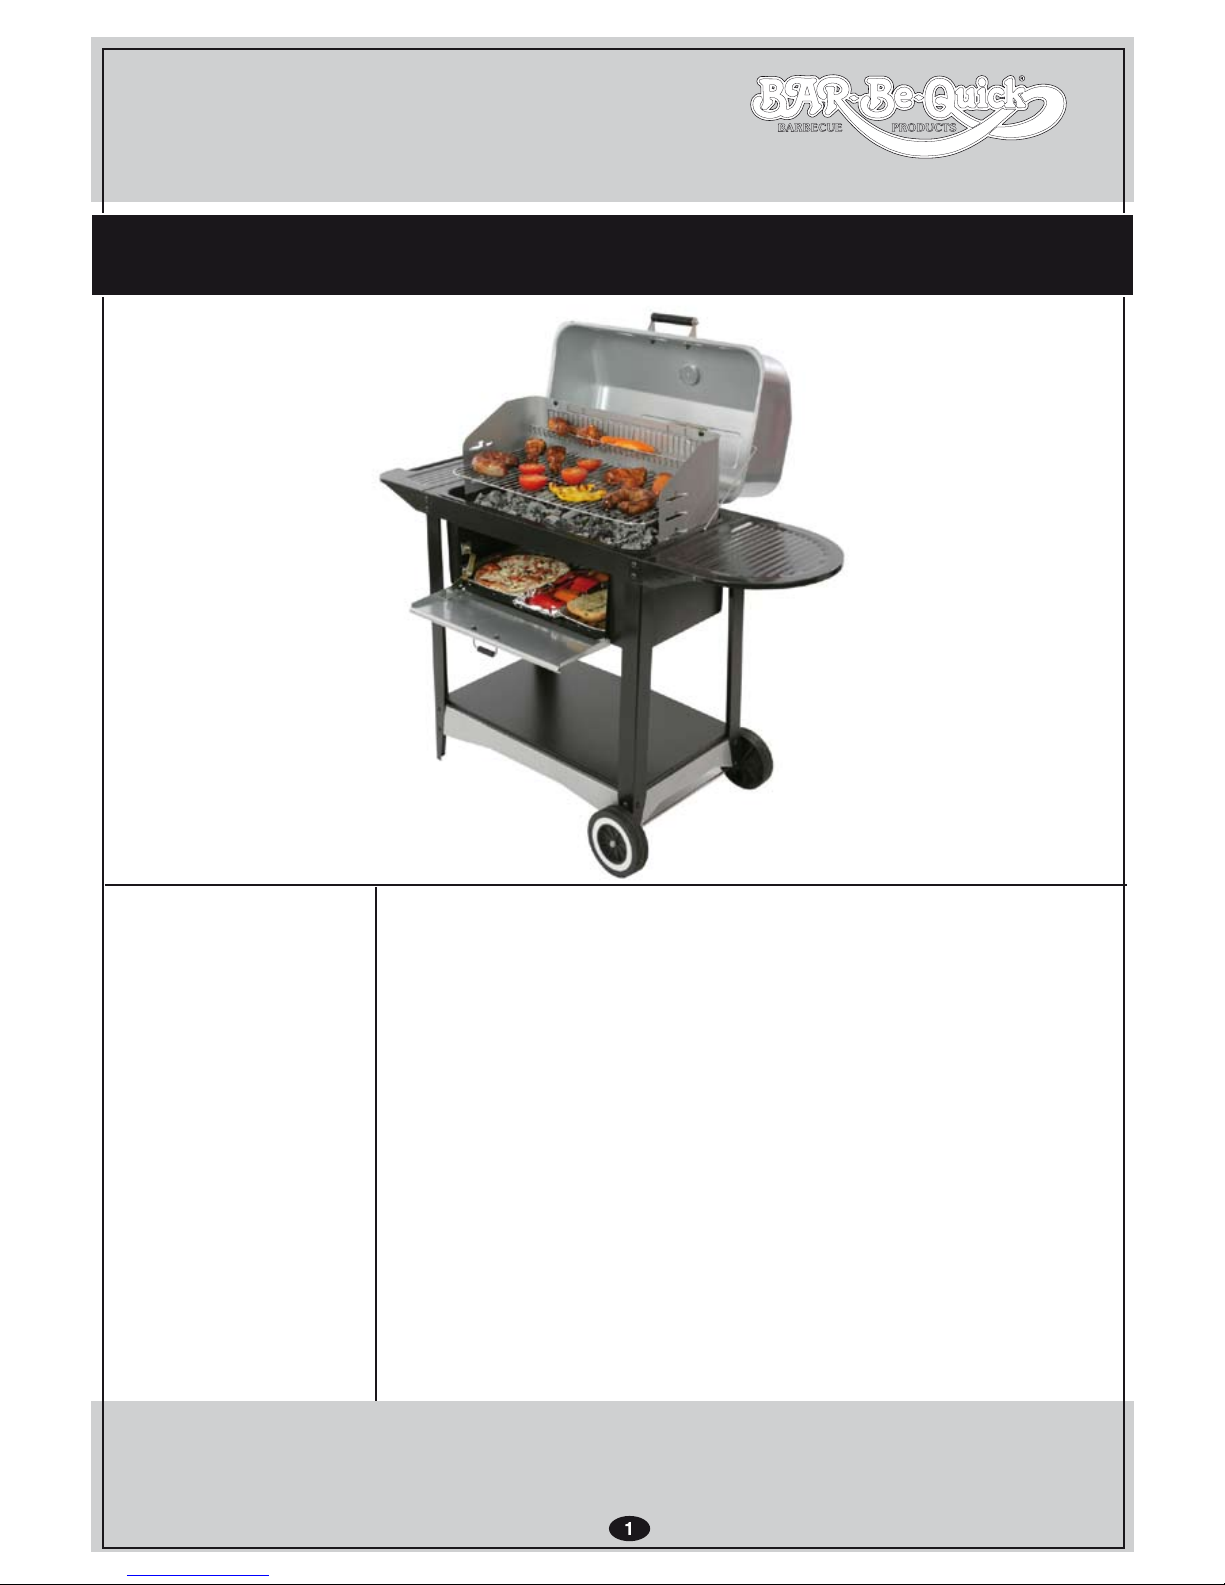
BQ2121-1a
TROLLEY
GRILL & BAKE BARBECUE
Before
you start
assembling
your
barbecue
here are
some
important
safety
warnings
Do not use indoors. Always site your barbecue outdoors and on level
ground away from trees and wooden fencing.
CAUTION! Do not use spirit or petrol for lighting or re-lighting.
Use a specially formulated barbecue lighting fluid, gel or fire lighters.
Do not attempt to light the fire if lighting fluid has been spilt over clothing
Do not try to re-light the fire with fluid/gel as the charcoal may still be
hot and cause a flare-up
WARNING! keep children and pets away from the barbecue area.
ATTENTION! This barbecue will become very hot. Do not move it during operation.
Always wear oven gloves when handling your hot barbecue.
Make sure that the barbecue has completely cooled before removing the ash.
Flame-ups can occur if hot fat drips onto the burning charcoal. Keep
a water sprayer handy to extinguish the flames.
1.
2.
3.
4.
5.
6.
7.
8.
9.
Helpline Details
Tel - 01282 478200 Email - [email protected] Web - www.barbequick.com
Rectella International Ltd. Bancroft Rd, Burnley. Lancs. BB10 2TP
Simple Assembly Instructions - Please keep for future reference
Page 2
A
B
C
D
E
F
G
H
J
K
L
M
N
O
P
Q
R
S
T
U
V
W
X
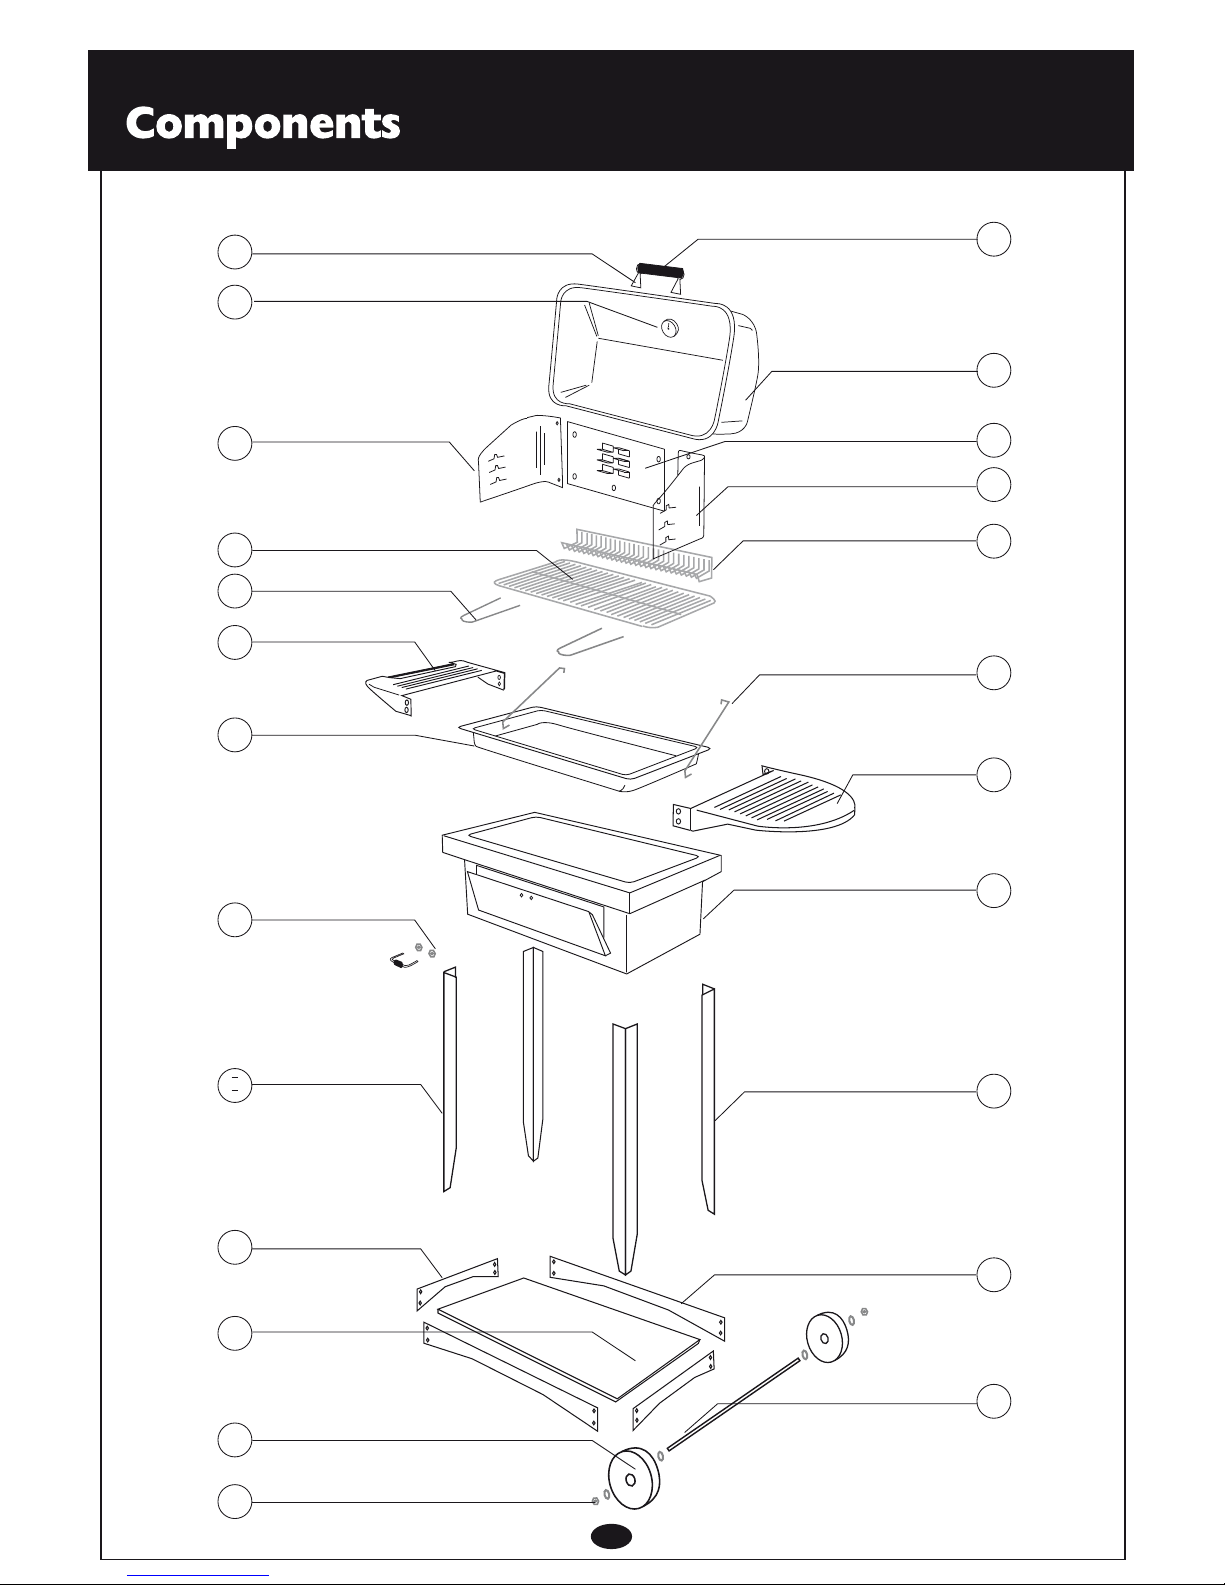
Top Cover Handle
Top Cover
Right Hand Wind Shield
Rear Wind Shield
Warming Basket
Lid Stays
Right Top Shelf
Oven
Short Legs
Long Shelf supports
Axle
Top Cover Handle Brackets
Temperature Gauge
Left Hand Wind Shield
Cooking Grill
Grill Handles
Left Top Shelf
Fire Tray
Oven Door Handle and Nuts
Long Legs
Short Shelf supports
Shelf
Wheels
Wheel Nuts
I
2
Page 3
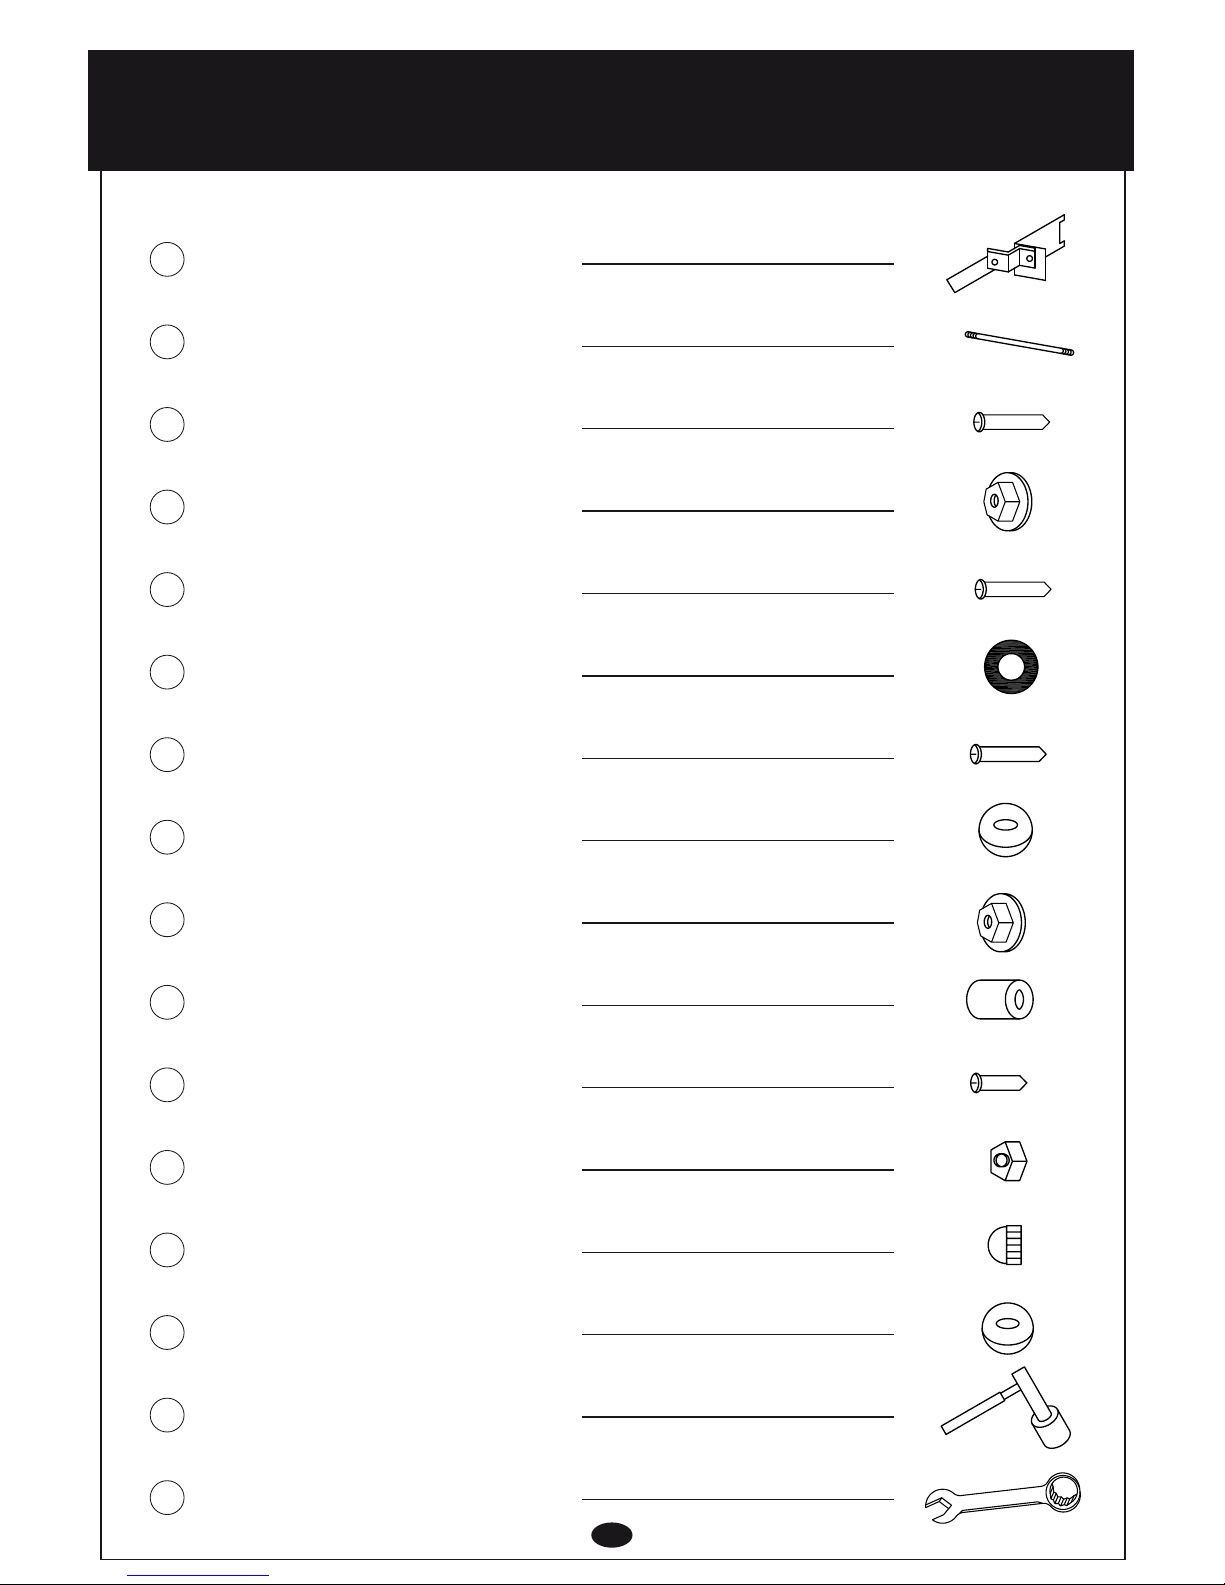
Door Stay Linkage x 1
Top Cover Handle Stud x 1
M6 x 14mm Screws x 16
M6 Washer-Nuts x 39
M6 x 16mm Screws x 2
M6 Fibre Washers x 8
M6 x 10mm Screws x 21
M6 Washer x 2
M5 Washer-Nuts x 6
Axle Spacers x 2
M5 x 10 Screws x 6
M8 Nyloc Nuts x 2
M6 Domed Nuts x 2
M8 Washers x 2
M6 Spanner x 1
M5 Spanner x 1
Components
3
aa
bb
cc
dd
ee
ff
gg
hh
ii
jj
kk
ll
mm
nn
oo
pp
Page 4
Important
Please read the following instructions carfully and completely BEFORE attempting to assemble the
barbecue. Keep all polythene wrappers away from children and dispose of all wrapping cartons thoughtfully.
Great care is taken during the manufacture of your barbecue to eliminate sharp edges. However, please
take care when assembling the barbecue to avoid injury
TOOLS NEEDED: CROSS HEAD SCREWDRIVER, SET OF METRIC SPANNERS OR ADJUSTABLE SPANNER AND A
CLEAN NON ABRASIVE SURFACE LARGE ENOUGH TO LAY THE FIRE TRAY UPSIDE DOWN
1. Check that you have all the parts and fixings listed above
2. Check parts for damage
3. Carefully clear any holes covered with paint or enamel.
4. For easier assembly, fit all screws and nuts initially hand tightened only
Stage One - Assemble the oven door
Assembly Instructions
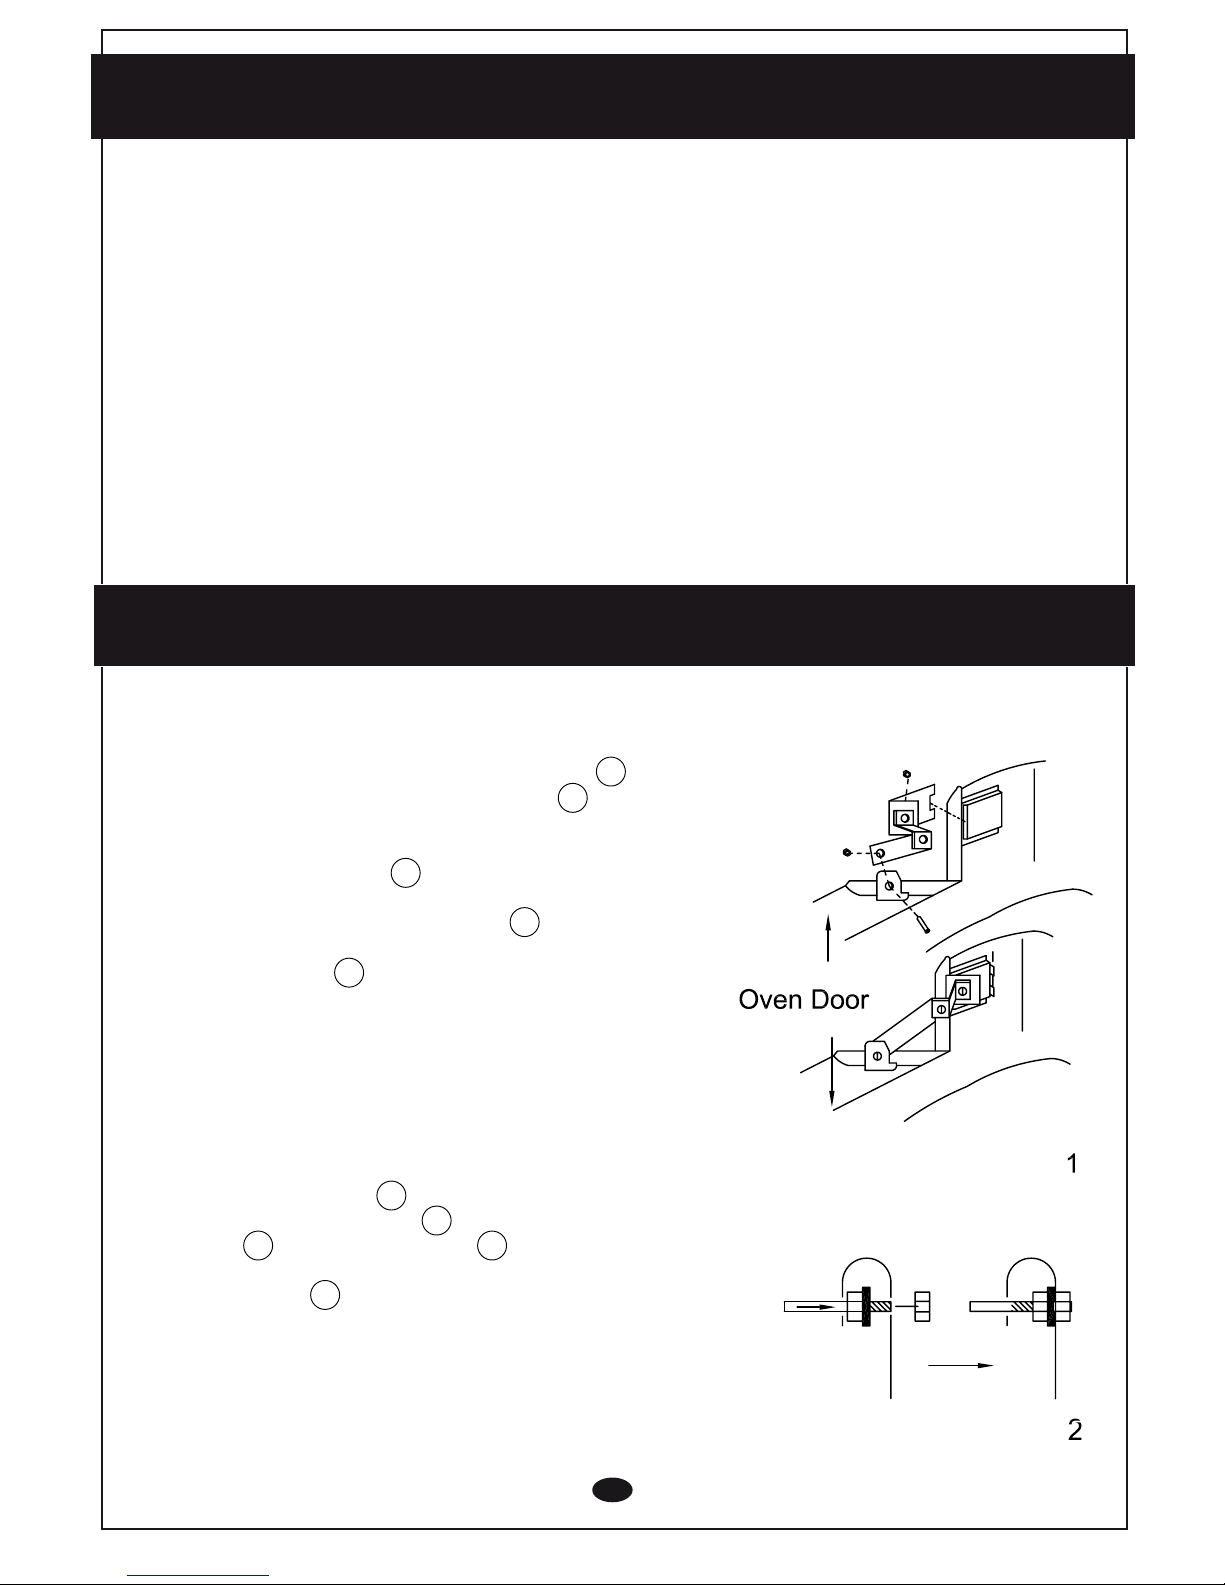
Assemble the oven door. Place the oven on its base . With
the door fully open insert the door stay linkage into the
slotted bracket located on the left hand side and the inside of
the door opening. Bend over both protruding lock tabs to
secure the door stay linkage .
Fit the other end of the door stay linkage to the oven
door-mounting bracket. Note that the washer fits between
the door stay linkage and the door-mounting bracket.
Tighten the nut only so far as to make the door movement
slightly stiff and that the door remains in the position that it is
left in without dropping.
See drawing 1.
Pass the oven door handle through the hole in the oven
door lip and screw two M5 nuts to the top of the thread on
the handle and fit two M5 washers to the exposed
thread, pass the exposed threads through the oven door panel
and fit one M5 nut to each thread and turn onto the thread
until the nut is flush with the exposed thread. Fully tighten the
handle by turning the nut in between the lip and the door.
See drawing 2
4
U
H
H
aa
aa
aa
aa
ii
ii
ii
Page 5
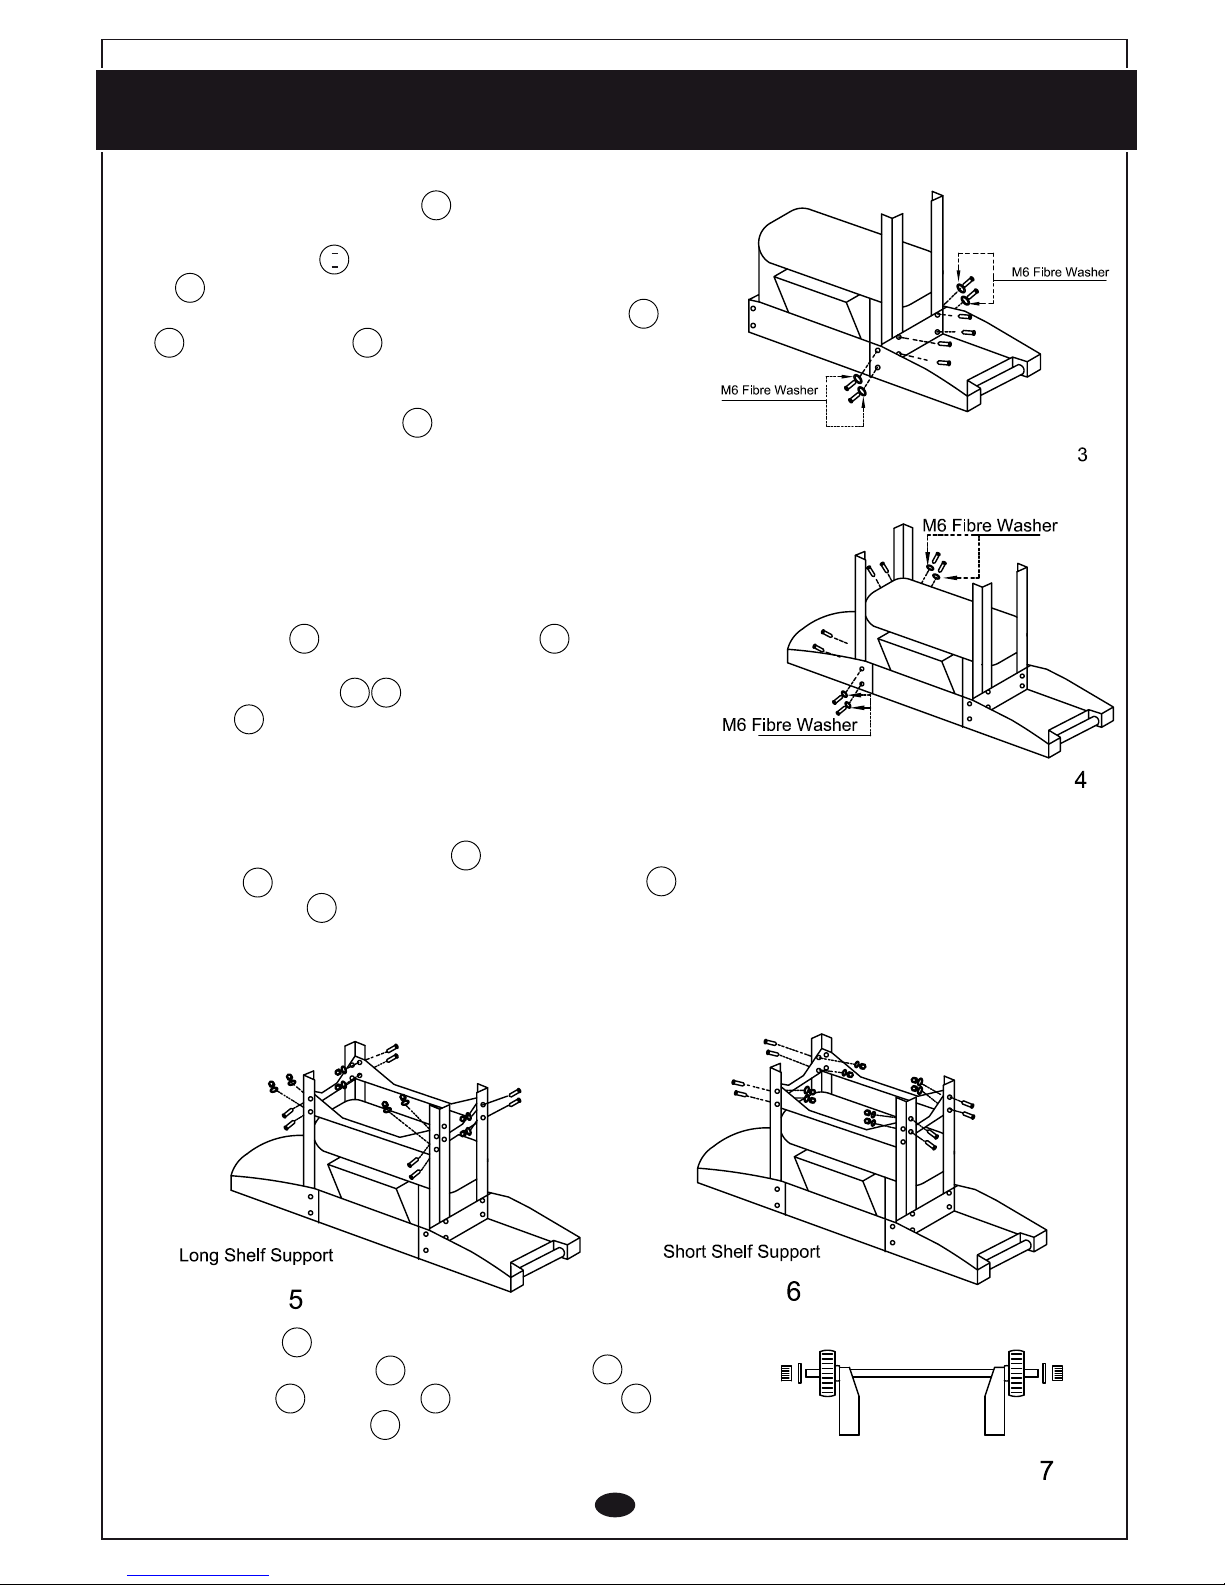
Stage Two - Assemble the top shelf and legs
Place the oven upside down on a clean, non
abrasive surface with the oven door facing you. Take
the two long legs and the top shelf (with handle on
it) . Attach them to the right of the oven using four
M6 x 14mm screws, washer-nuts per leg
. Use the spanner to make the fixing easier work.
Put the washer-nut into the slot with the spanner and
locate it with the screw. Tighten the screw from outside.
Only use M6 fibre washers on outer face as
indicated in drawing 3.
See drawing 3.
With the right shelf (curved) to the left of you take the
two short legs and the right top-shelf , attach
them to the left of the oven using four M6 x 14mm
screws, washer-nuts per leg. Only use M6 fibre
washers on outer face as indicated in drawing 4.
See drawing 4.
Fit both the long shelf supports and short shelf
supports to the legs with the M6 x 10mm screws
the washer-nuts to be fitted to the inside of the
legs.
See drawing 5 and drawing 6.
Slide the axle through the mounting holes in the
bottom of the short legs . Fit an axle spacer
then a wheel , M8 washer and M8 nyloc nut
to each end of the axle and tighten only as far as
will allow free rotation of the wheels.
See drawing 7
5
I
U
V
W
V
L
W
X
J
T
F
cc
cc
gg
jj
nn ll
dd
dd
ff
dd
oo
ff
Page 6
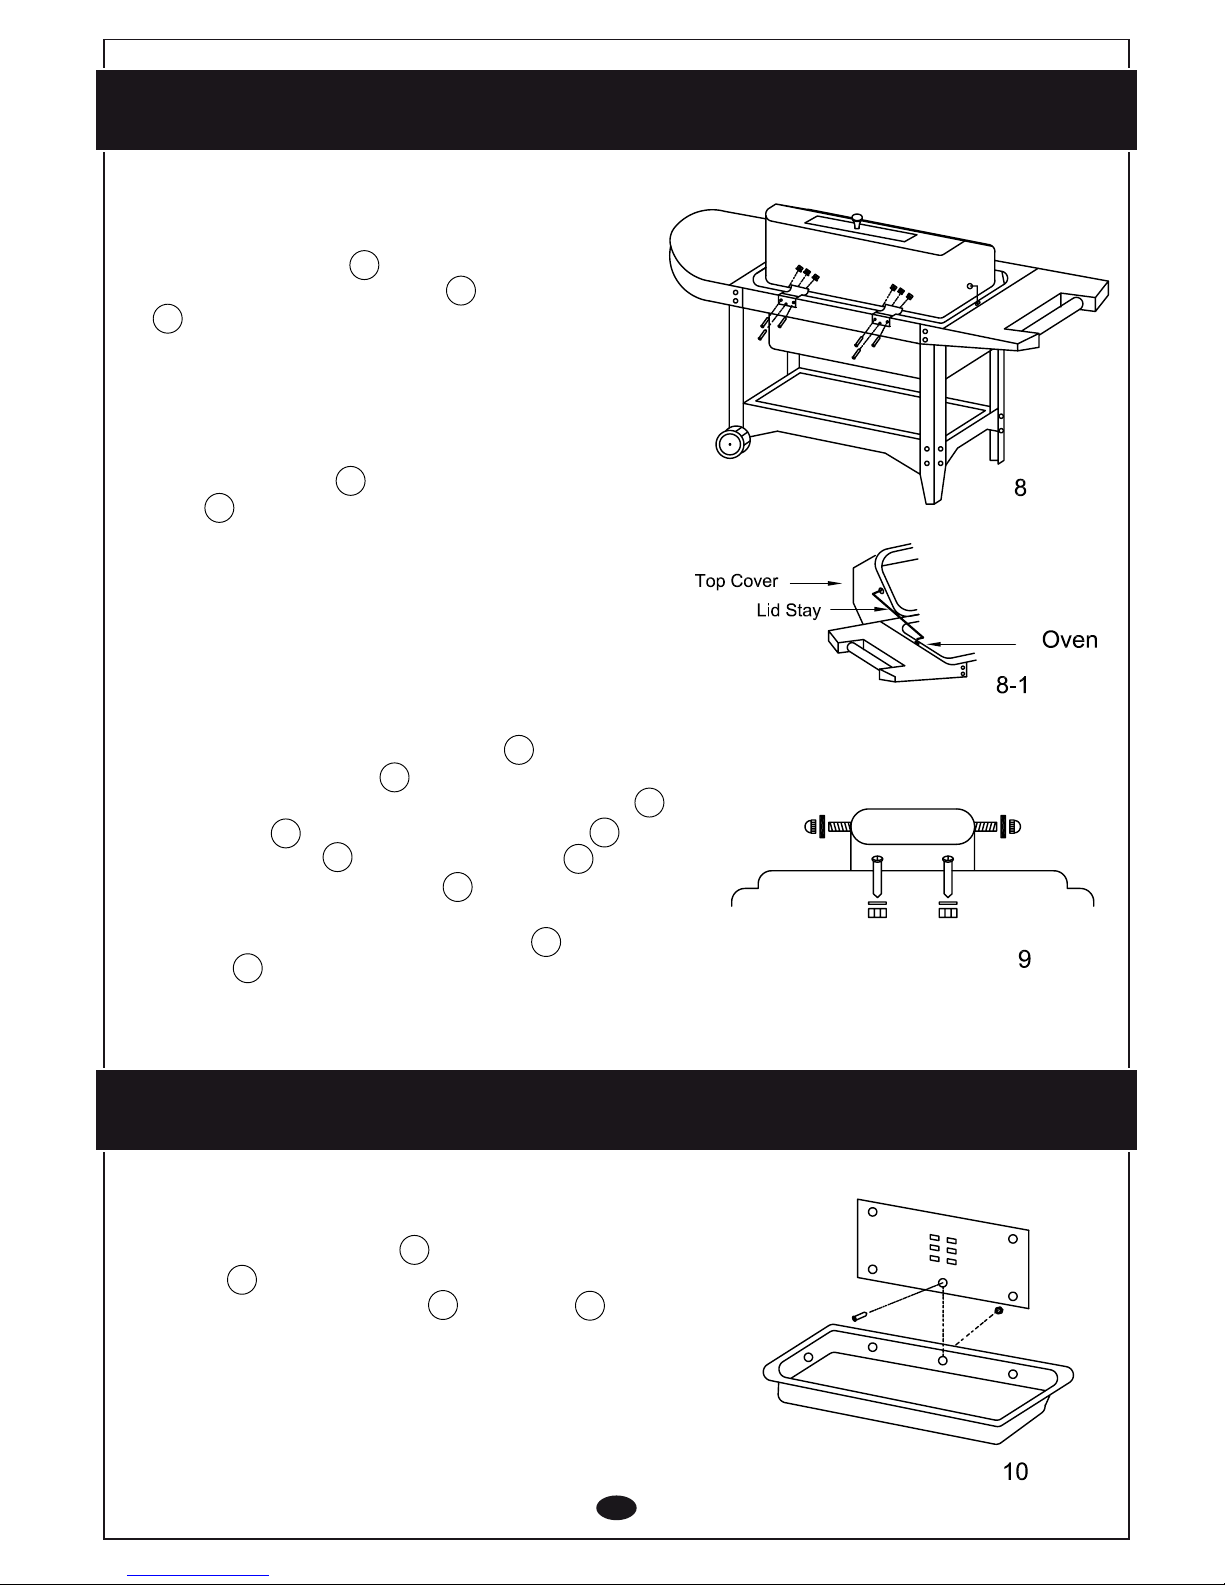
Place the rear wind shield against the back of the
fire tray facing inwards and locate loosely in position via an M6 x 10mm screw , washer-nut in the
lower central fixing hole.
See drawing 10
Stage Three - Assemble the lid
Stage Four - Assemble the wind shield
Attach the top cover to the oven with top cover
hinges and 6 of M5 x 10 screws and washer-nuts
using M5 spanner.
See drawing 8
Open the top cover , attach the right and left lid
stays to the top cover by crossing them through
the hole on the right and left side of the top cover
and then put the end into the square holes in the
oven.
See drawing 8-1.
Locate the two cover handle brackets onto the
outside of the top cover over the two 6mm
clearance holes. Use the two of M6 x 10mm Screws
washer-nuts and secure onto the top cover .
Locate the handle between the brackets and
pass the top cover handle stud through the
holes in the bracket and handle. Tighten all nuts
and fasten handle using 2 x domed nuts and M6
washers.
See drawing 9.
6
O
O
S
A
A
O
O
N
P
G
gg
dd
mm
dd
mm
dd
bb
kk
ii
Page 7
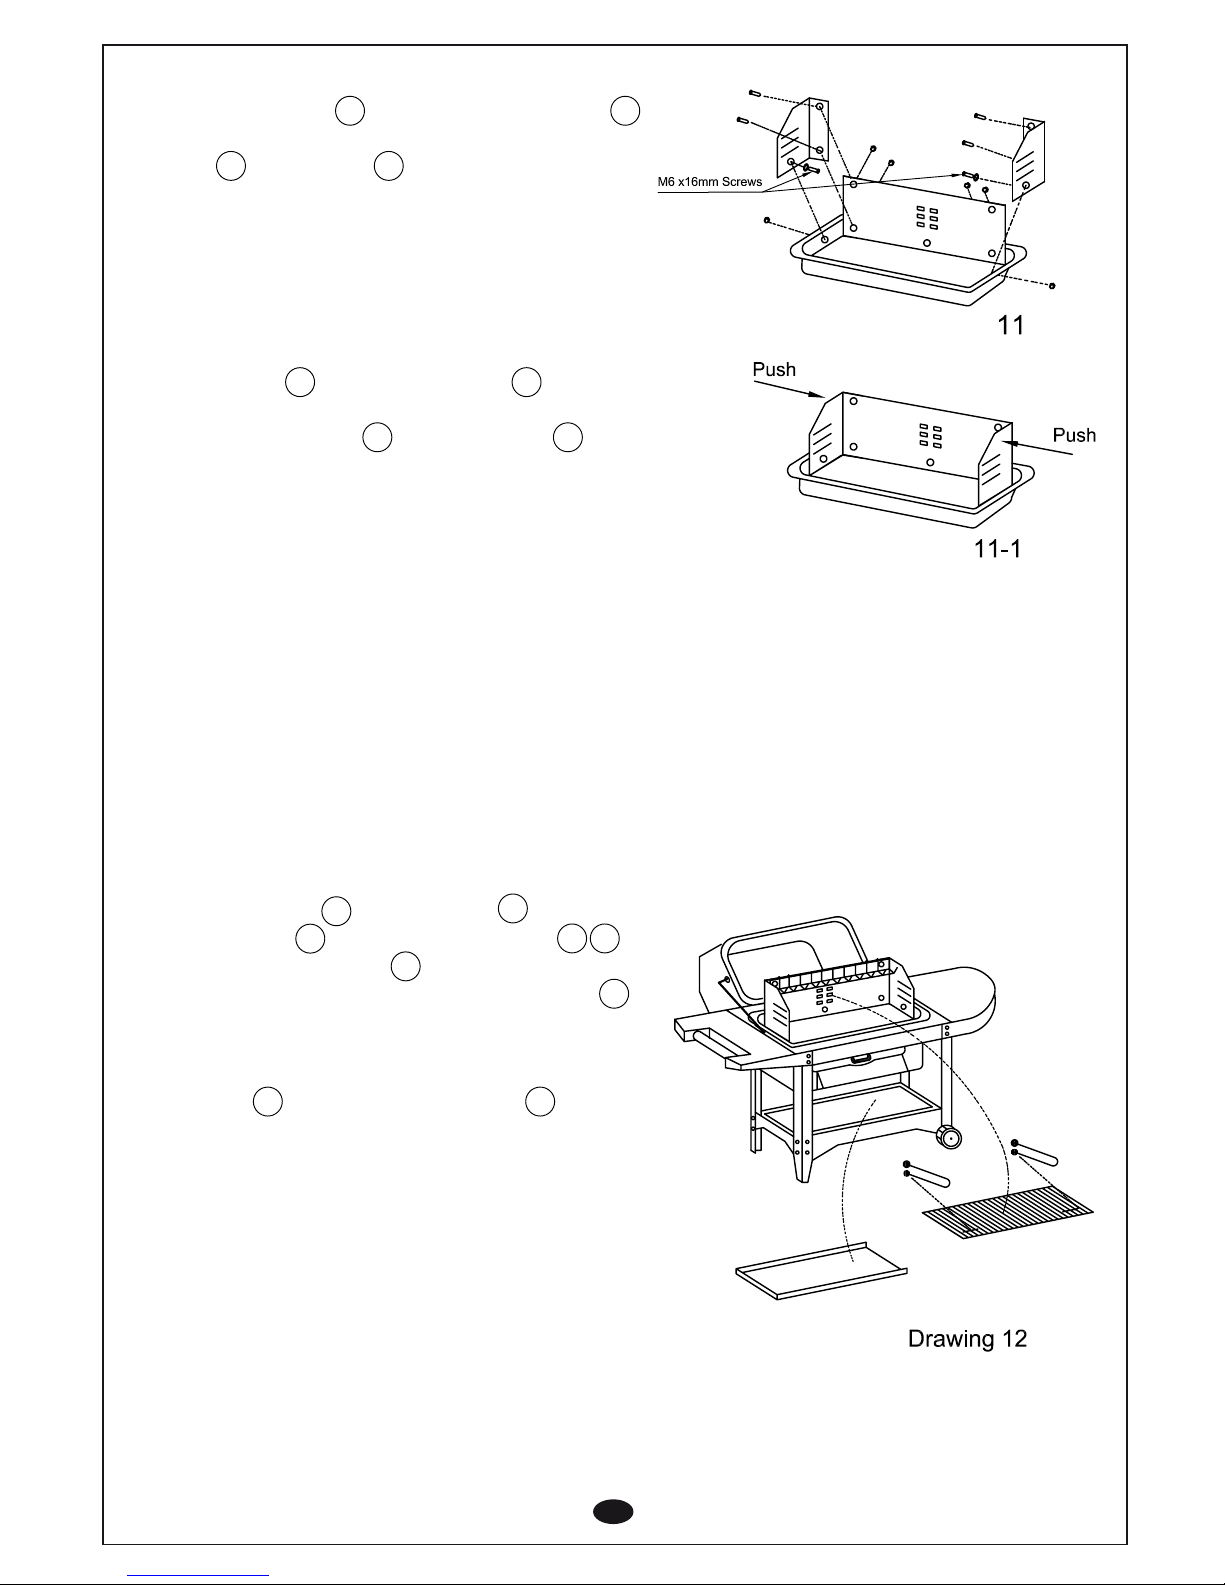
Loosely fit the right and Left hand wind shield
via the lower fixing holes using 2 off M6 x 10mm
screws , washer-nuts for the rear holes, 2 off
M6 x 16mm screws, washer-nuts for the side locating holes.
See drawing 11.
Push the right and left windshields inward to
locate at the right positions and then fasten using 2
off M6 x 10mm screws and washer-nuts .
See drawing 11-1
Fully tighten ALL fixings in the following sequence.
Four leg screws – top of oven .
All remaining leg screws.
Top wind shield mounting screws
Lower wind shield mounting screws.
Warning – Do not tighten the lower wind shield screws as over tightening may cause damage to your barbecue.
Finally Shelf support screws.
Combination
Place the fire tray onto the oven
Place the shelf onto the support panels
Clip the two grill handles onto the locations on
the left and right hand sides of the cooking grill
by slightly stretching the metal rod outwards so
they can slide on to the grips and squeezing to
tighten and hold safely in position. Place the warming basket onto the rear wind shield
See drawing 12
Note
The enamel on the fire tray is a hard finish, high
temperature resistant coating and must be treated
with care during assembly to prevent chipping.
Do not attempt to bend these parts. We recommend tightening screws and nuts only enough to
secure as over tightening may result in damage to
the enamel.
7
Q
G
D
K
E
R P
U
J
W
C
Q C
gg
dd
gg
dd
Page 8
8
Make sure the assembly instructions have been followed correctly.
HOW TO LIGHT
We recommend you light your Lumpwood / Briquettes with Bar-Be-Quick Lighting Fluid, Gel or Cubes.
USING CUBES (If using traditional lumpwood or briquettes)
Place two or three cubes in the firetray.
Pile the Lumpwood / Briquettes over the cubes in a pyramid shape, ensuring sufficient air space around the cubes
to allow to burn with a flame, then light the cubes.
USING LIGHTING FLUID or GEL (If using traditional lumpwood or briquettes)
Pile the Lumpwood / Briquettes in a pyramid shape. Cover generously with Lighting Fluid or Gel.
After approximately 1 minute light with a match or taper.
When burning is established, spread the fuel out evenly. After lighting, the barbecue should be ready for
cooking in approx. 30 min. The barbecue is ready when the flames have ceased and charcoal has a
coating of white ash.
Make sure the cooking grill is fully located in the supports before cooking commences.
More charcoal can be added if required.
Before placing the grill on the barbecue spray with vegetable oil to prevent food from sticking to the grill
To make it easier to clean your barbecue after use, line the firetray with aluminium cooking foil,
shiny side up. This process will lengthen the life of your barbecue and reflect the heat more efficiently
onto the food.
Charcoal is available in lumpwood form (large irregular pieces) and briquettes (uniform pieces).
As a guide lumpwood works best for quick cook foods such as sausages and burgers, whilst briquettes
are more suitable for slower cooking or roasts as they burn hotter and longer. Instant lighting lumpwood
is also available, just light the bag.
Do not use more than 3kg of charcoal with this barbecue. It’s not advisable to completely fill the firetray
as the barbecue may become too hot to cook successfully.
When using the oven for cooking the barbecue must be well alight for about 1 hour to reach cooking temperature.
Food can be cooked on the grill and stored in the oven to be served later, or part cooked in the oven and
finished on the grill later
The oven temperature will vary depending on the charcoal used, but can also be controlled by slightly
opening the oven door. Add charcoal to firetray when required to maintain the cooking temperature.
To clean your barbecue remove the firetray and soak the grills in hot soapy water as soon as possible after use.
Alternatively clean the grill with a barbecue cleaner and brush.
To prevent weather damage store in a dry place.
To purchase all your barbecue essentials visit www.barbequick.com
 Loading...