

Page 1
U
User manual
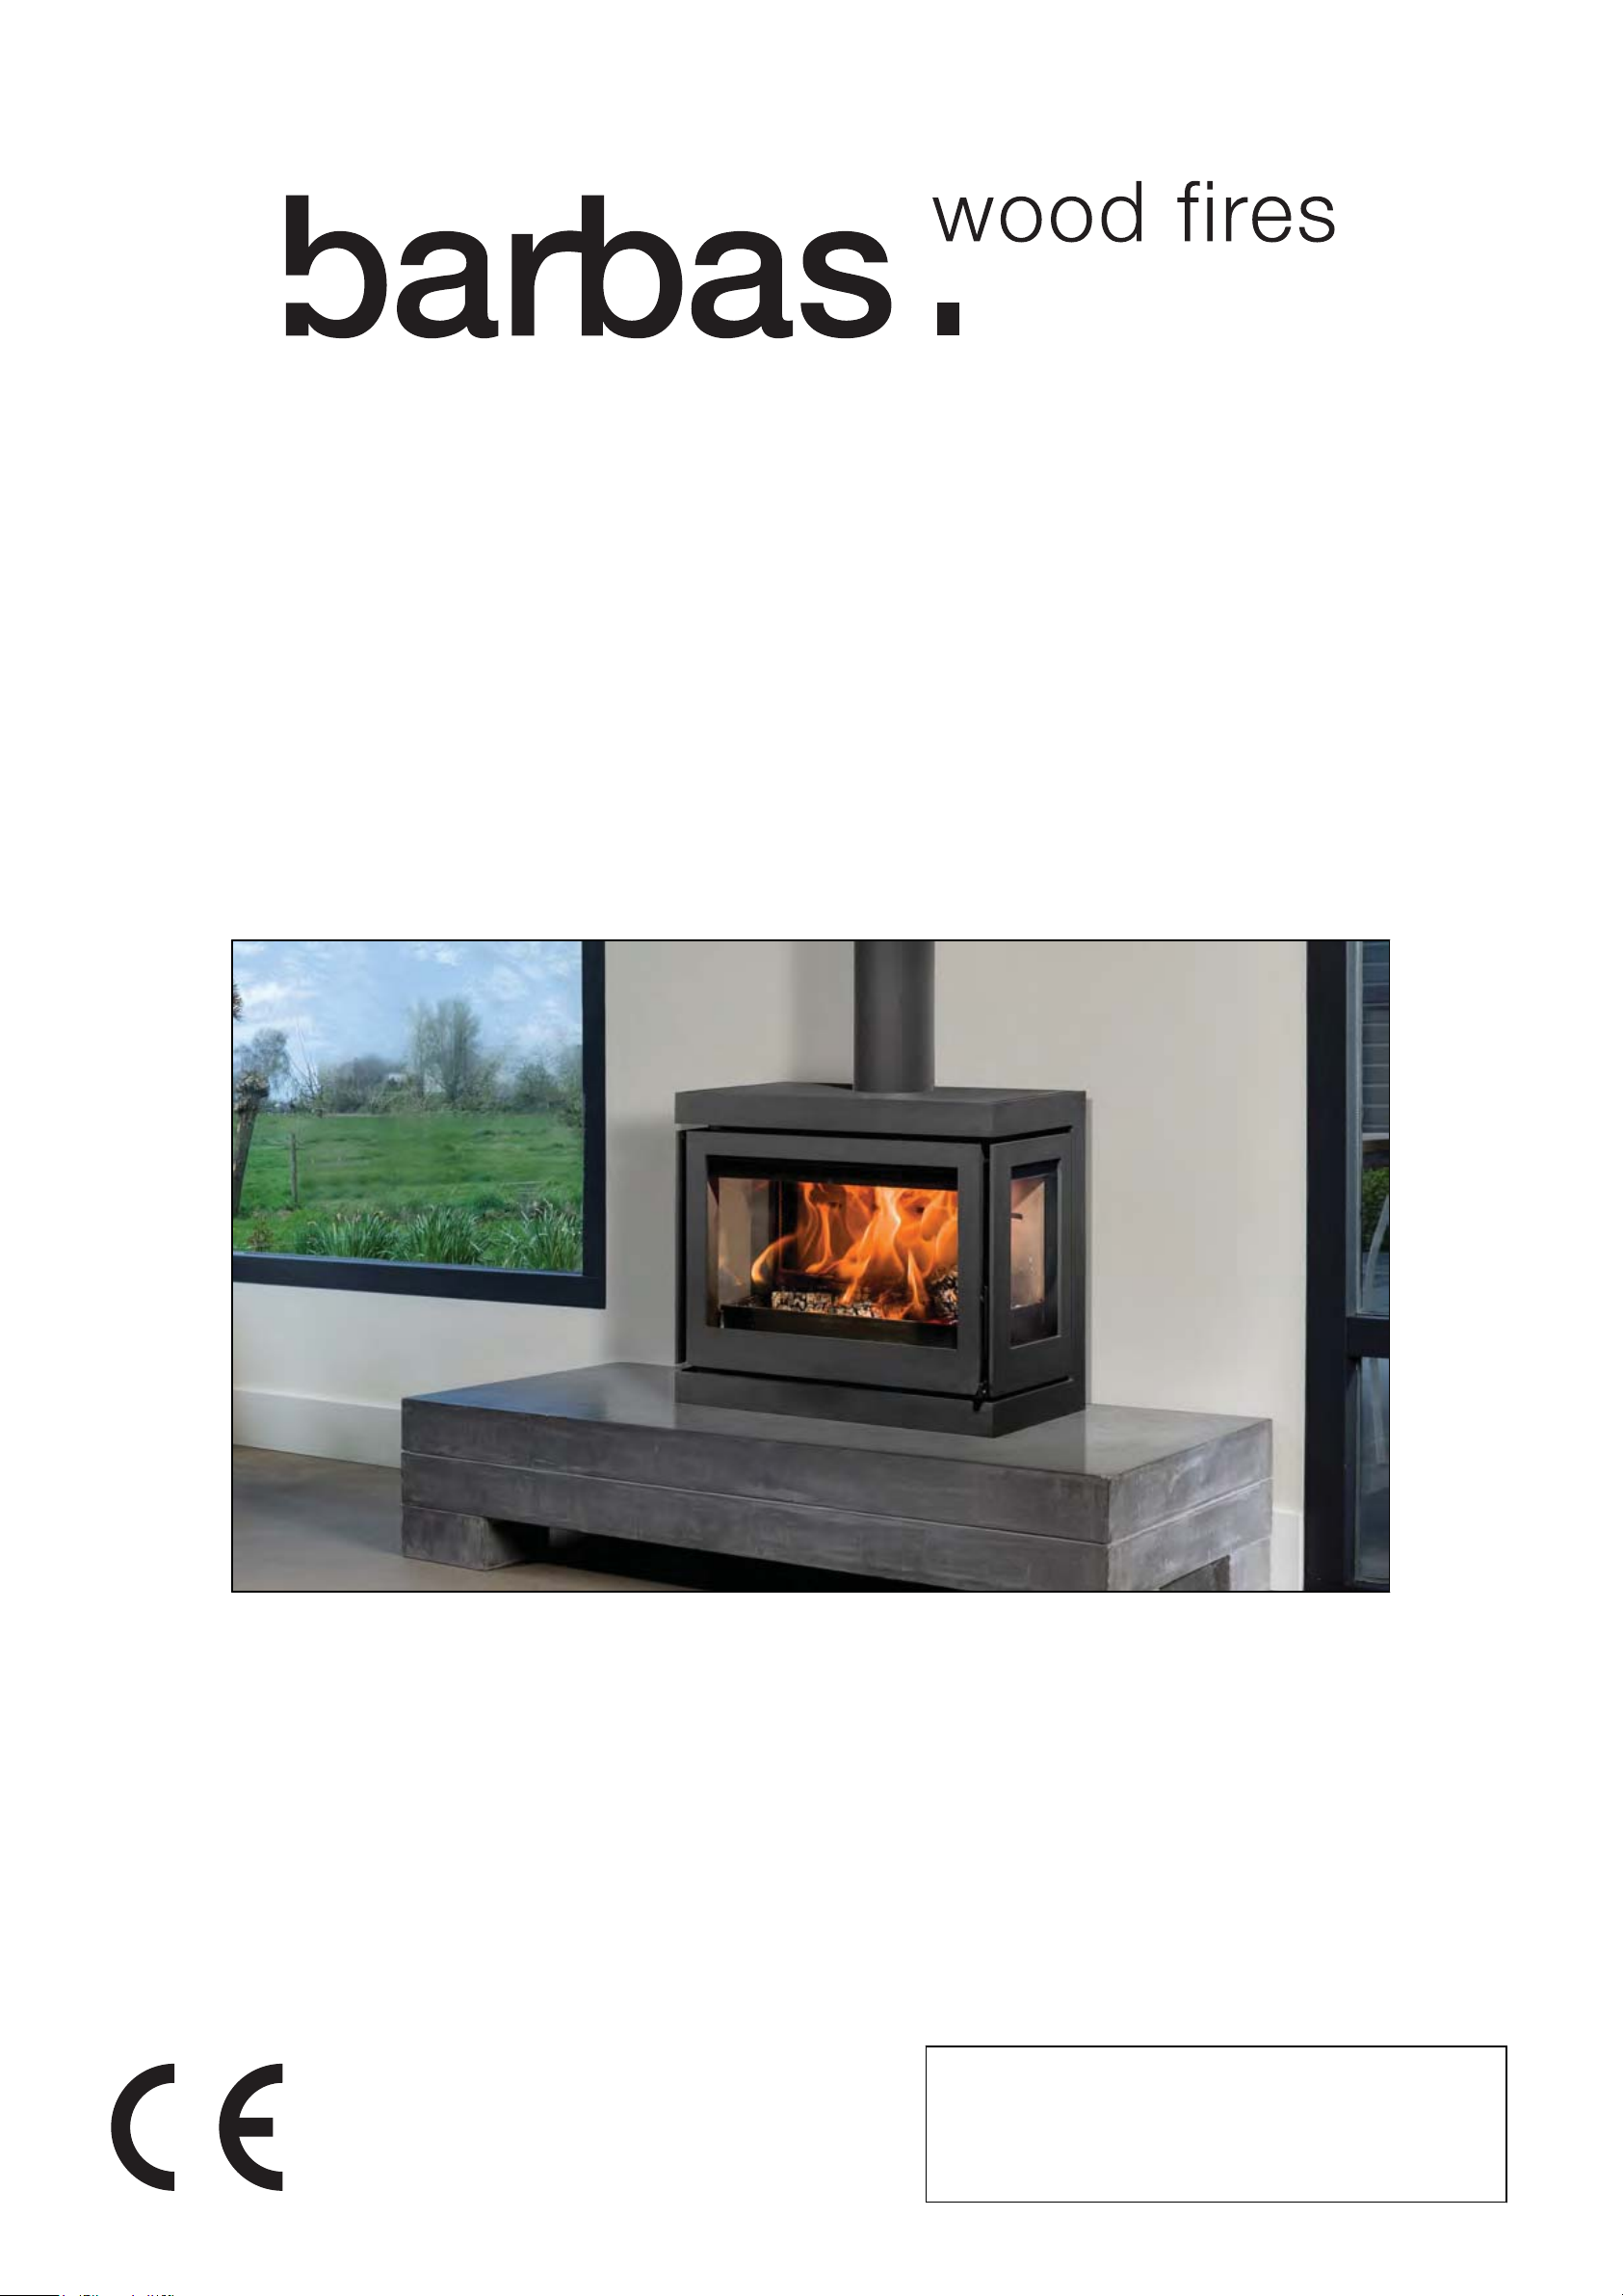
BOX Panorama 65
Version number : 01- 347422
Date: 01-11- 2018
Serial number:
Production date:
Page 2

©
Barbas Bellfires BV
Contact information
Introduction
2
©
This document or parts thereof may not be reproduced, stored in a retrieval system, or transmitted,
in any form or by any means, electronic, mechanical, photocopying, recording, nor otherwise,
without the prior written permission of Barbas Bellfires BV. This document could contain technical
inaccuracies or typographical errors. Barbas Bellfires BV reserves the right to revise this document
from time to time in the contents thereof.
Barbas Bellfires BV
Hallenstraat 17, 5531 AB Bladel, The Netherlands
Phone: +31 49 733 9200
E-mail: [email protected]
Box Panorama 65
Page 3

Contents
1 Declaration of Performance..................................................................... 5
2 The Clean Air Act 1993 and Smoke Control Areas..................................8
3 About this document................................................................................ 9
4 How to work with this document............................................................ 10
5 Description............................................................................................. 11
6 Safety.....................................................................................................15
7 Fuel........................................................................................................ 17
8 Operation............................................................................................... 18
9 Maintenance.......................................................................................... 24
10 Troubleshooting..................................................................................... 26
Contents
3
C
1.1 BOX Panorama 65.......................................................................................................................5
1.2 BOX Panorama 65 with wood log storage module...................................................................... 6
1.3 BOX Panorama 65 with support frame........................................................................................ 7
4.1 Warnings and cautions used in this document.......................................................................... 10
4.2 Related documentation..............................................................................................................10
5.1 Overview of the appliance..........................................................................................................11
5.2 Intended use.............................................................................................................................. 14
6.1 Safety instructions for operation................................................................................................ 15
6.2 Safety instructions with regard to the environment....................................................................15
7.1 Fuel types.................................................................................................................................. 17
7.2 Fuel amount...............................................................................................................................17
8.1 Preparation before first use........................................................................................................18
8.2 First use of the appliance...........................................................................................................18
8.3 Firing the appliance....................................................................................................................19
8.3.1 First load and ignition......................................................................................................19
8.3.2 Reload with fuel...............................................................................................................20
8.3.3 Control the burn process.................................................................................................20
8.3.4 Increase the flue draught ...............................................................................................21
8.3.5 General firing tips............................................................................................................23
9.1 Maintenance schedule...............................................................................................................24
9.2 Remove the ashes.....................................................................................................................24
9.3 Clean the glass.......................................................................................................................... 24
Box Panorama 65
Page 4

11 Technical data .......................................................................................28
12 Warranty Terms..................................................................................... 29
Contents
4
1
Box Panorama 65
Page 5
1
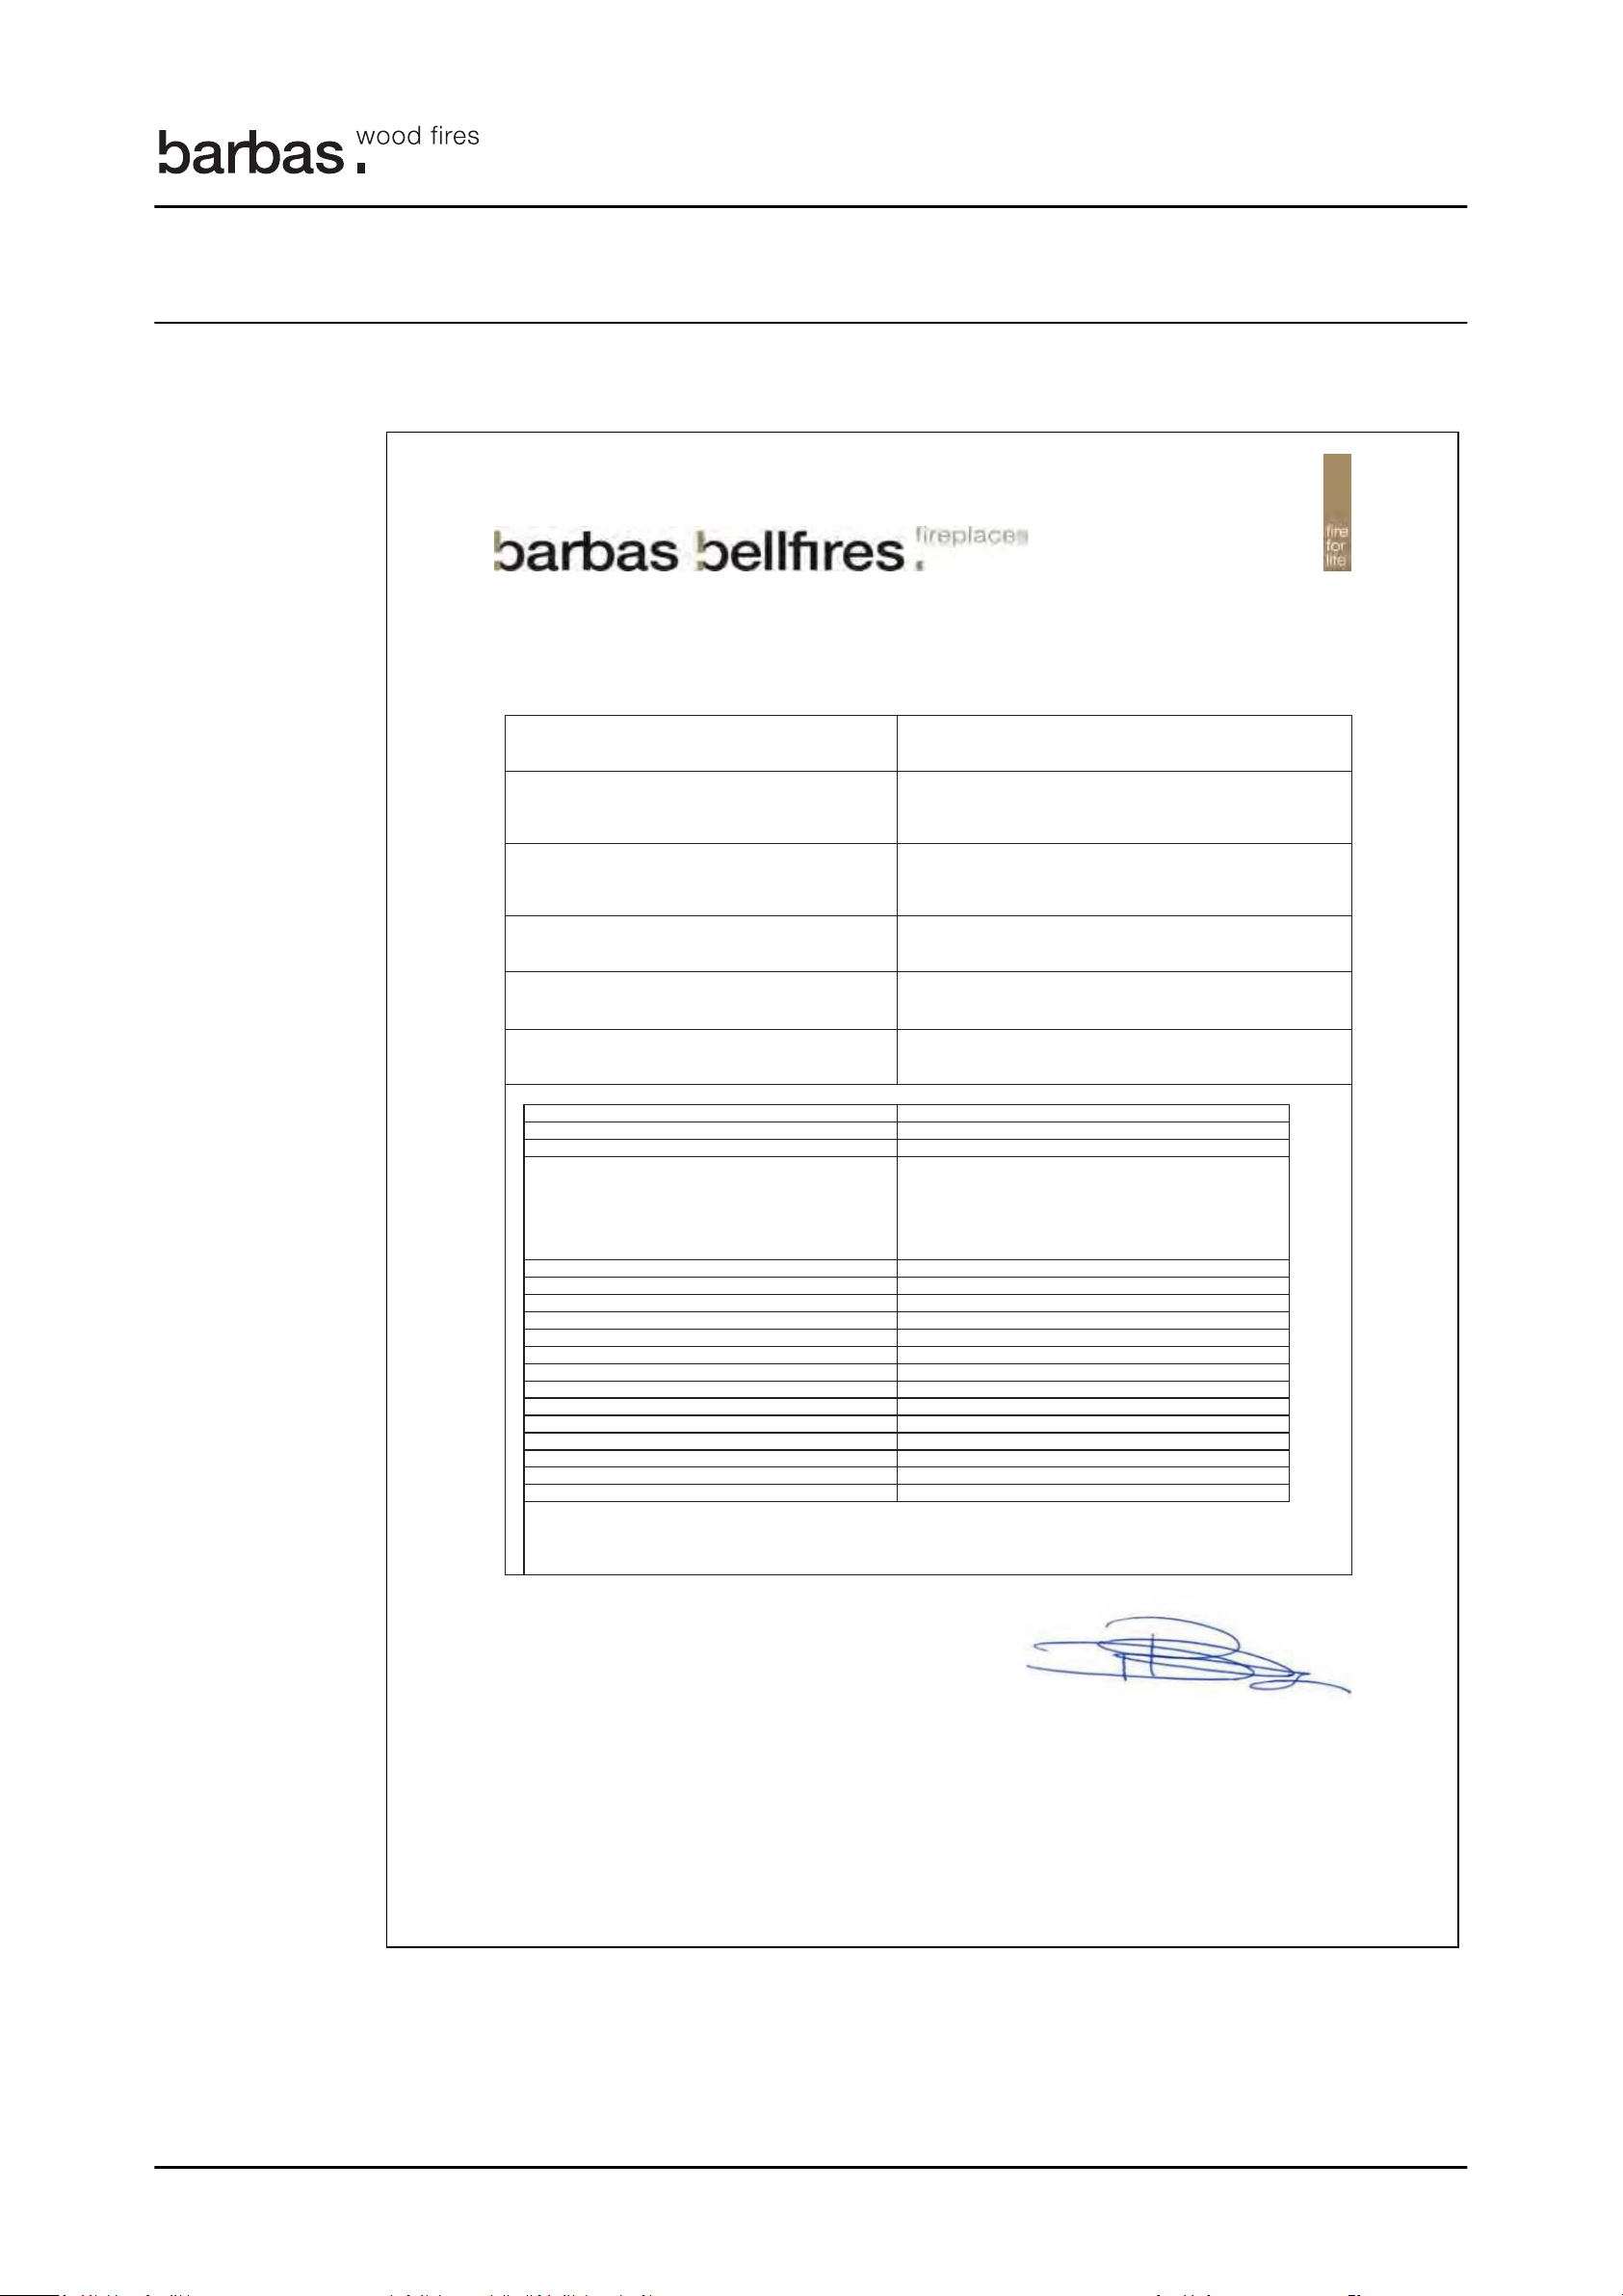
1 Declaration of Performance
1.1 BOX Panorama 65
Unique identification code of the product-type
Intended use or uses of the construction product, in
accordance with the applicable harmonised technical
specification, as foreseen by the manufacturer
Name, registered trade name or registered trade mark
and contact address of the manufacturer as required
pursuant to Article 11(5)
Where applicable, name and contact address of the
authorised representative whose mandate covers the
tasks specified in Article 12(2)
System or systems of assessment and verification of
constancy of performance of the construction product
as set out in Annex V
In case of the declaration of performance concerning a
construction product covered by a harmonised
standard
Fire safety
Distance to combustible materials Minimum distances, in mm
Rear = 200
Sides = 550
Ceiling = -
Front = 1150
Floor = 30
NPD
Thermal output
Energy efficiency
Signed for and on behalf of the manufacturer by:
Danny Baijens, CEO
(Name and function)
Bladel;
September 18, 2018
………………………………………………………………………
(place and date of issue) (Signature)
The performance of the product identified in point 1 is in conformity with the declared performance in point 7.
This declaration of performance is issued under the sole responsibility of the manufacturer identified in point 3.
Water heating output
- kW
Pass
Nominal heat output
9.2 kW
Room heating output
9.2 kW
Electrical safety
Pass
Cleanability
Pass
Maximum operating pressure
Not applicable
Flue gas temperature at nominal heat output
T = 322 °C
76.2 %
NPD
Pass
Risk of burning fuel falling out
Pass
Declaration of Performance
According to regulation (EU) 305/2011
No. 1.822.081-1 - CPR-2013/07/01
BOX Panorama 65
Room heater without hot water supply
Barbas Bellfires BV; Hallenstraat 17; 5531 AB Bladel; The Netherlands
Not applicable
System 3
The notified laboratory SGS Nederland BV, No. 0608 performed the
determination of the product type on the basis of type testing under system 3
and issued test report EZKA/2018-01/00004-5
Harmonized technical specification
EN13240:2001/A2:2004/AC:2007
Essential characteristics
Performance
CO = 0.1 vol%
Emission of combustion products
Mechanical resistance (to carry a chimney/flue)
Surface temperature
Release of dangerous substances
Pass
5
1.
Declaration of Performance
2.
3.
4.
5.
6.
7. Declared performance
8.
Box Panorama 65
Page 6
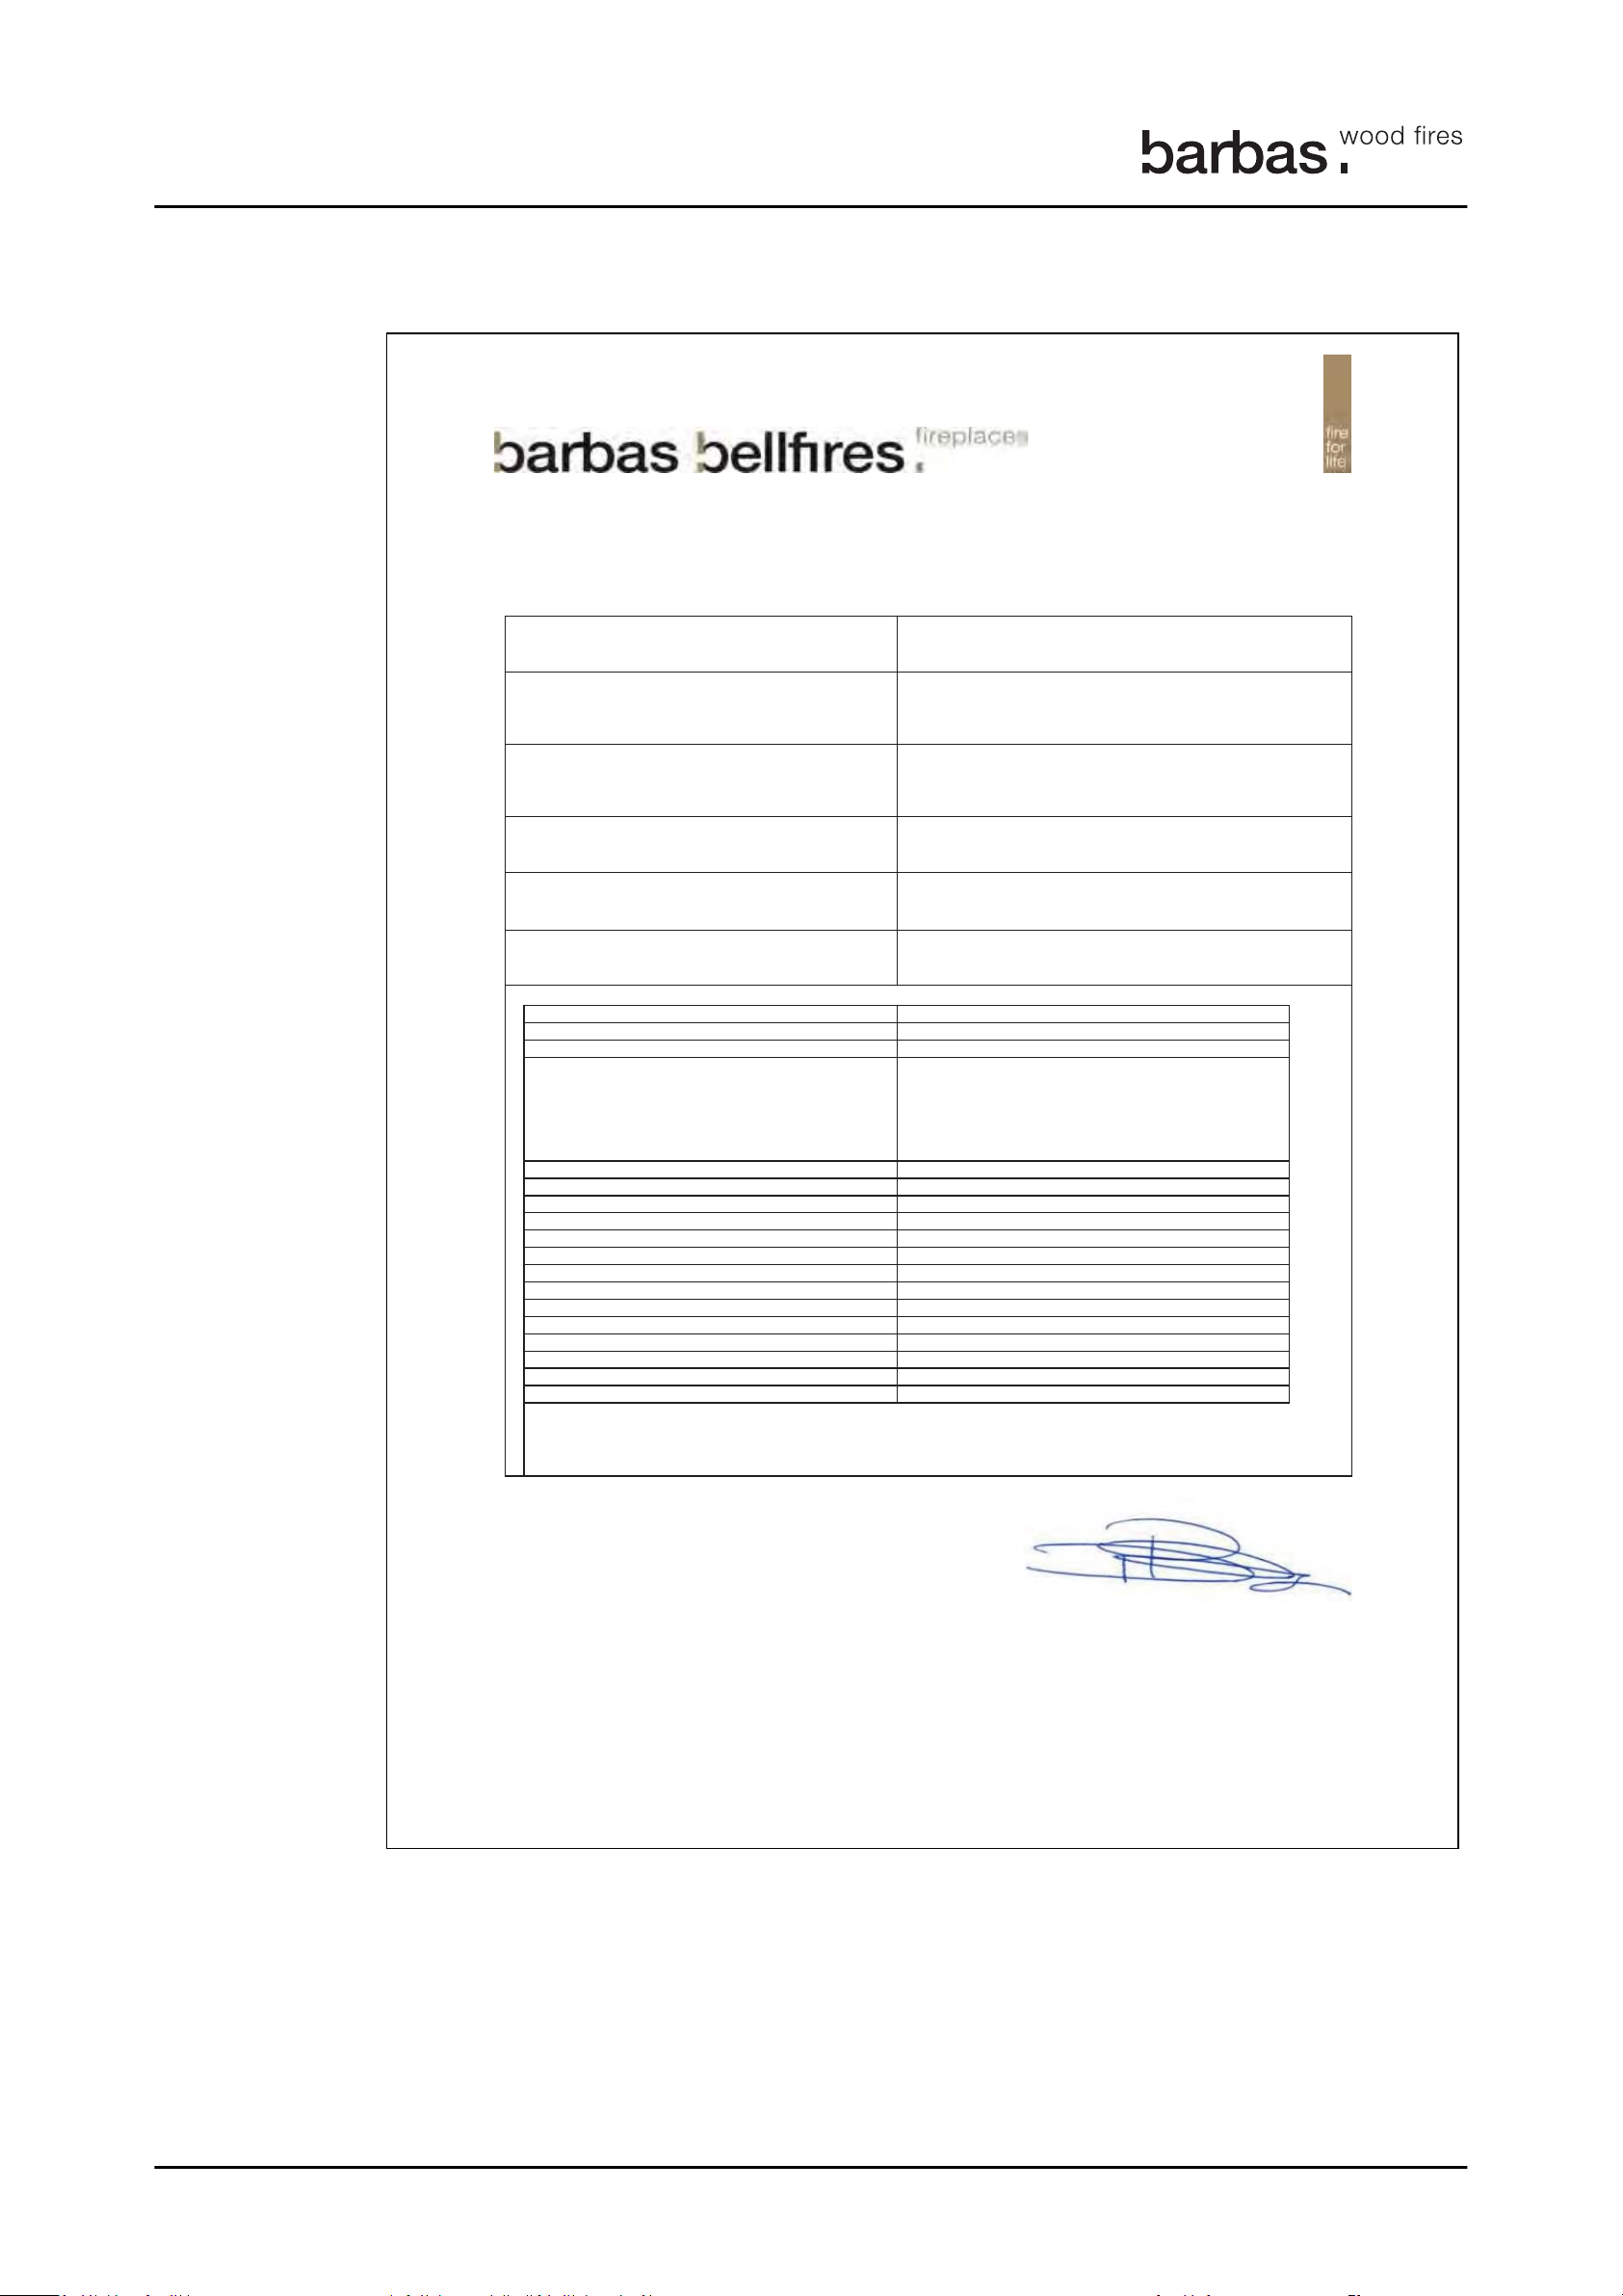
1.2 BOX Panorama 65 with wood log storage module
Unique identification code of the product-type
Intended use or uses of the construction product, in
accordance with the applicable harmonised technical
specification, as foreseen by the manufacturer
Name, registered trade name or registered trade mark
and contact address of the manufacturer as required
pursuant to Article 11(5)
Where applicable, name and contact address of the
authorised representative whose mandate covers the
tasks specified in Article 12(2)
System or systems of assessment and verification of
constancy of performance of the construction product
as set out in Annex V
In case of the declaration of performance concerning a
construction product covered by a harmonised
standard
Fire safety
Distance to combustible materials Minimum distances, in mm
Rear = 200
Sides = 550
Ceiling = -
Front = 1150
Floor = -
NPD
Thermal output
Energy efficiency
Signed for and on behalf of the manufacturer by:
Danny Baijens, CEO
(Name and function)
Bladel;
September 18, 2018
………………………………………………………………………
(place and date of issue) (Signature)
The performance of the product identified in point 1 is in conformity with the declared performance in point 7.
This declaration of performance is issued under the sole responsibility of the manufacturer identified in point 3.
Water heating output
- kW
Pass
Nominal heat output
9.2 kW
Room heating output
9.2 kW
Electrical safety
Pass
Cleanability
Pass
Maximum operating pressure
Not applicable
Flue gas temperature at nominal heat output
T = 322 °C
76.2 %
NPD
Pass
Risk of burning fuel falling out
Pass
Declaration of Performance
According to regulation (EU) 305/2011
No. 1.822.083-1 - CPR-2013/07/01
BOX Panorama 65 with woodlog storage module
Room heater without hot water supply
Barbas Bellfires BV; Hallenstraat 17; 5531 AB Bladel; The Netherlands
Not applicable
System 3
The notified laboratory SGS Nederland BV, No. 0608 performed the
determination of the product type on the basis of type testing under system 3
and issued test report EZKA/2018-01/00004-5
Harmonized technical specification
EN13240:2001/A2:2004/AC:2007
Essential characteristics
Performance
CO = 0.1 vol%
Emission of combustion products
Mechanical resistance (to carry a chimney/flue)
Surface temperature
Release of dangerous substances
Pass
Declaration of Performance
6
1
1.
2.
3.
4.
5.
6.
7. Declared performance
8.
Box Panorama 65
Page 7
1
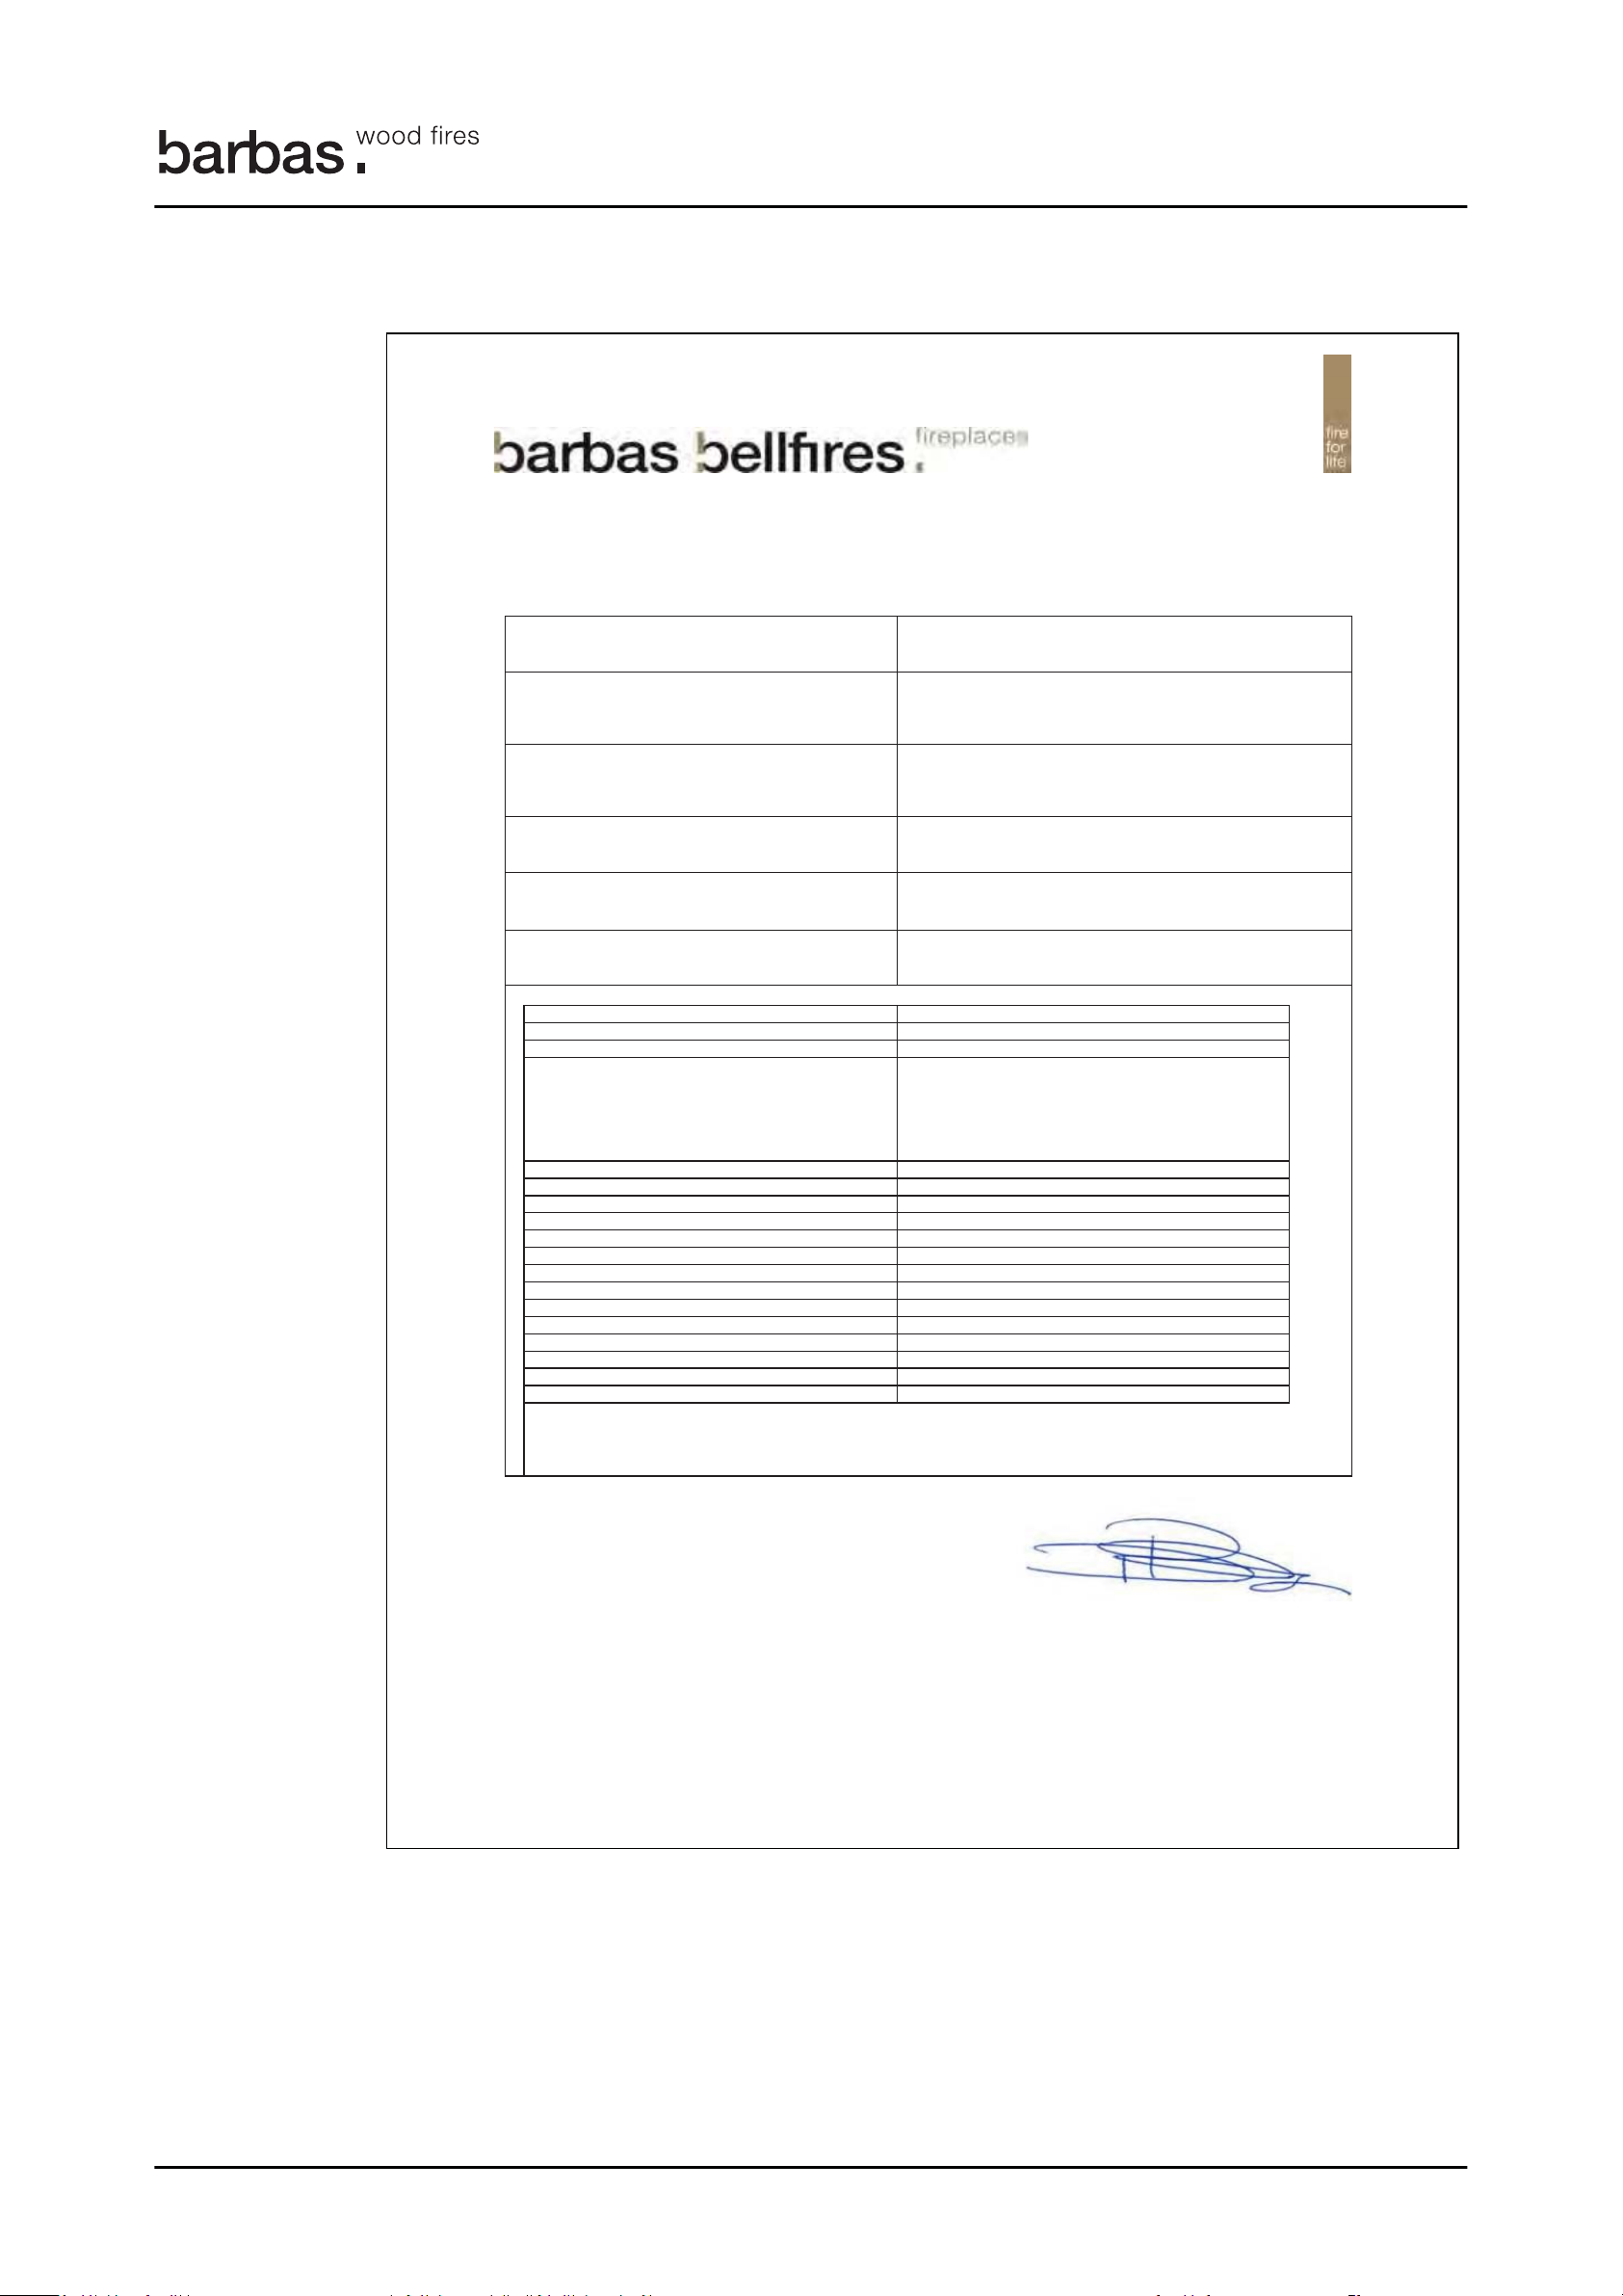
1.3 BOX Panorama 65 with support frame
Unique identification code of the product-type
Intended use or uses of the construction product, in
accordance with the applicable harmonised technical
specification, as foreseen by the manufacturer
Name, registered trade name or registered trade mark
and contact address of the manufacturer as required
pursuant to Article 11(5)
Where applicable, name and contact address of the
authorised representative whose mandate covers the
tasks specified in Article 12(2)
System or systems of assessment and verification of
constancy of performance of the construction product
as set out in Annex V
In case of the declaration of performance concerning a
construction product covered by a harmonised
standard
Fire safety
Distance to combustible materials Minimum distances, in mm
Rear = Onbrandbare wand
Sides = 550
Ceiling = -
Front = 1150
Floor = 30
NPD
Thermal output
Energy efficiency
Signed for and on behalf of the manufacturer by:
Danny Baijens, CEO
(Name and function)
Bladel;
September 18, 2018
………………………………………………………………………
(place and date of issue) (Signature)
The performance of the product identified in point 1 is in conformity with the declared performance in point 7.
This declaration of performance is issued under the sole responsibility of the manufacturer identified in point 3.
Water heating output
- kW
Pass
Nominal heat output
9.2 kW
Room heating output
9.2 kW
Electrical safety
Pass
Cleanability
Pass
Maximum operating pressure
Not applicable
Flue gas temperature at nominal heat output
T = 322 °C
76.2 %
NPD
Pass
Risk of burning fuel falling out
Pass
Declaration of Performance
According to regulation (EU) 305/2011
No. 1.822.082-1 - CPR-2013/07/01
BOX Panorama 65 with support frame
Room heater without hot water supply
Barbas Bellfires BV; Hallenstraat 17; 5531 AB Bladel; The Netherlands
Not applicable
System 3
The notified laboratory SGS Nederland BV, No. 0608 performed the
determination of the product type on the basis of type testing under system 3
and issued test report EZKA/2018-01/00004-5
Harmonized technical specification
EN13240:2001/A2:2004/AC:2007
Essential characteristics
Performance
CO = 0.1 vol%
Emission of combustion products
Mechanical resistance (to carry a chimney/flue)
Surface temperature
Release of dangerous substances
Pass
7
1.
2.
Declaration of Performance
3.
4.
5.
6.
7. Declared performance
8.
Box Panorama 65
Page 8

2 The Clean Air Act 1993 and Smoke Control
Areas
The Clean Air Act 1993 and Smoke Control Areas
8
2
The following Barbas BOX Panorama 65 appliances have been exempted or
recommended for exemption under section 21 of the Clean Air Act 1993 and can be used
in accordance with the intended use as described in this manual in smoke control areas
in the UK.
• Barbas BOX Panorama 65
• Barbas BOX Panorama 65 with wood storage
• Barbas BOX Panorama 65 with wall support frame
Under the Clean Air Act local authorities may declare the whole or part of the district of
the authority to be a smoke control area. It is an offence to emit smoke from a chimney of
a building, from a furnace or from any fixed boiler if located in a designated smoke control
area. It is also an offence to acquire an "unauthorised fuel" for use within a smoke control
area unless it is used in an "exempt" appliance ("exempted" from the controls which
generally apply in the smoke control area).
In England appliances are exempted by publication on a list by the Secretary of State in
accordance with changes made to sections 20 and 21 of the Clean Air Act 1993 by
section 15 of the Deregulation Act 2015. In Scotland appliances are exempted by
publication on a list by Scottish Ministers under section 50 of the Regulatory Reform
(Scotland) Act 2014. Similarly, In Northern Ireland appliances are exempted by
publication on a list by the Department of Agriculture, Environment and Rural Affairs
under Section 16 of the Environmental Better regulation Act (Northern Ireland) 2016. In
Wales appliances are exempted by regulations made by Welsh Ministers
Further information on the requirements of the Clean Air Act can be found here: https://
www.gov.uk/smoke-control-area-rules .
Your local authority is responsible for implementing the Clean Air Act 1993 including
designation and supervision of smoke control areas and you can contact them for details
of Clean Air Act requirements.
Box Panorama 65
Page 9

3
3 About this document
9
This document shows the necessary information to do these tasks on the BOX Panorama
65:
• Operate the appliance
• Do basic maintenance
This document refers to the BOX Panorama 65 as 'the appliance'. This document is an
essential part of your appliance. Read it carefully before you do work on the appliance.
Keep it in a safe place.
The original instructions of the document are in English. All other language versions of
the document are translations of the original instructions. It is not always possible to
provide a detailed illustration of every single item of the equipment. The illustrations in
this document show a typical setup. The illustrations are for instructional use only.
About this document
Box Panorama 65
Page 10
4 How to work with this document
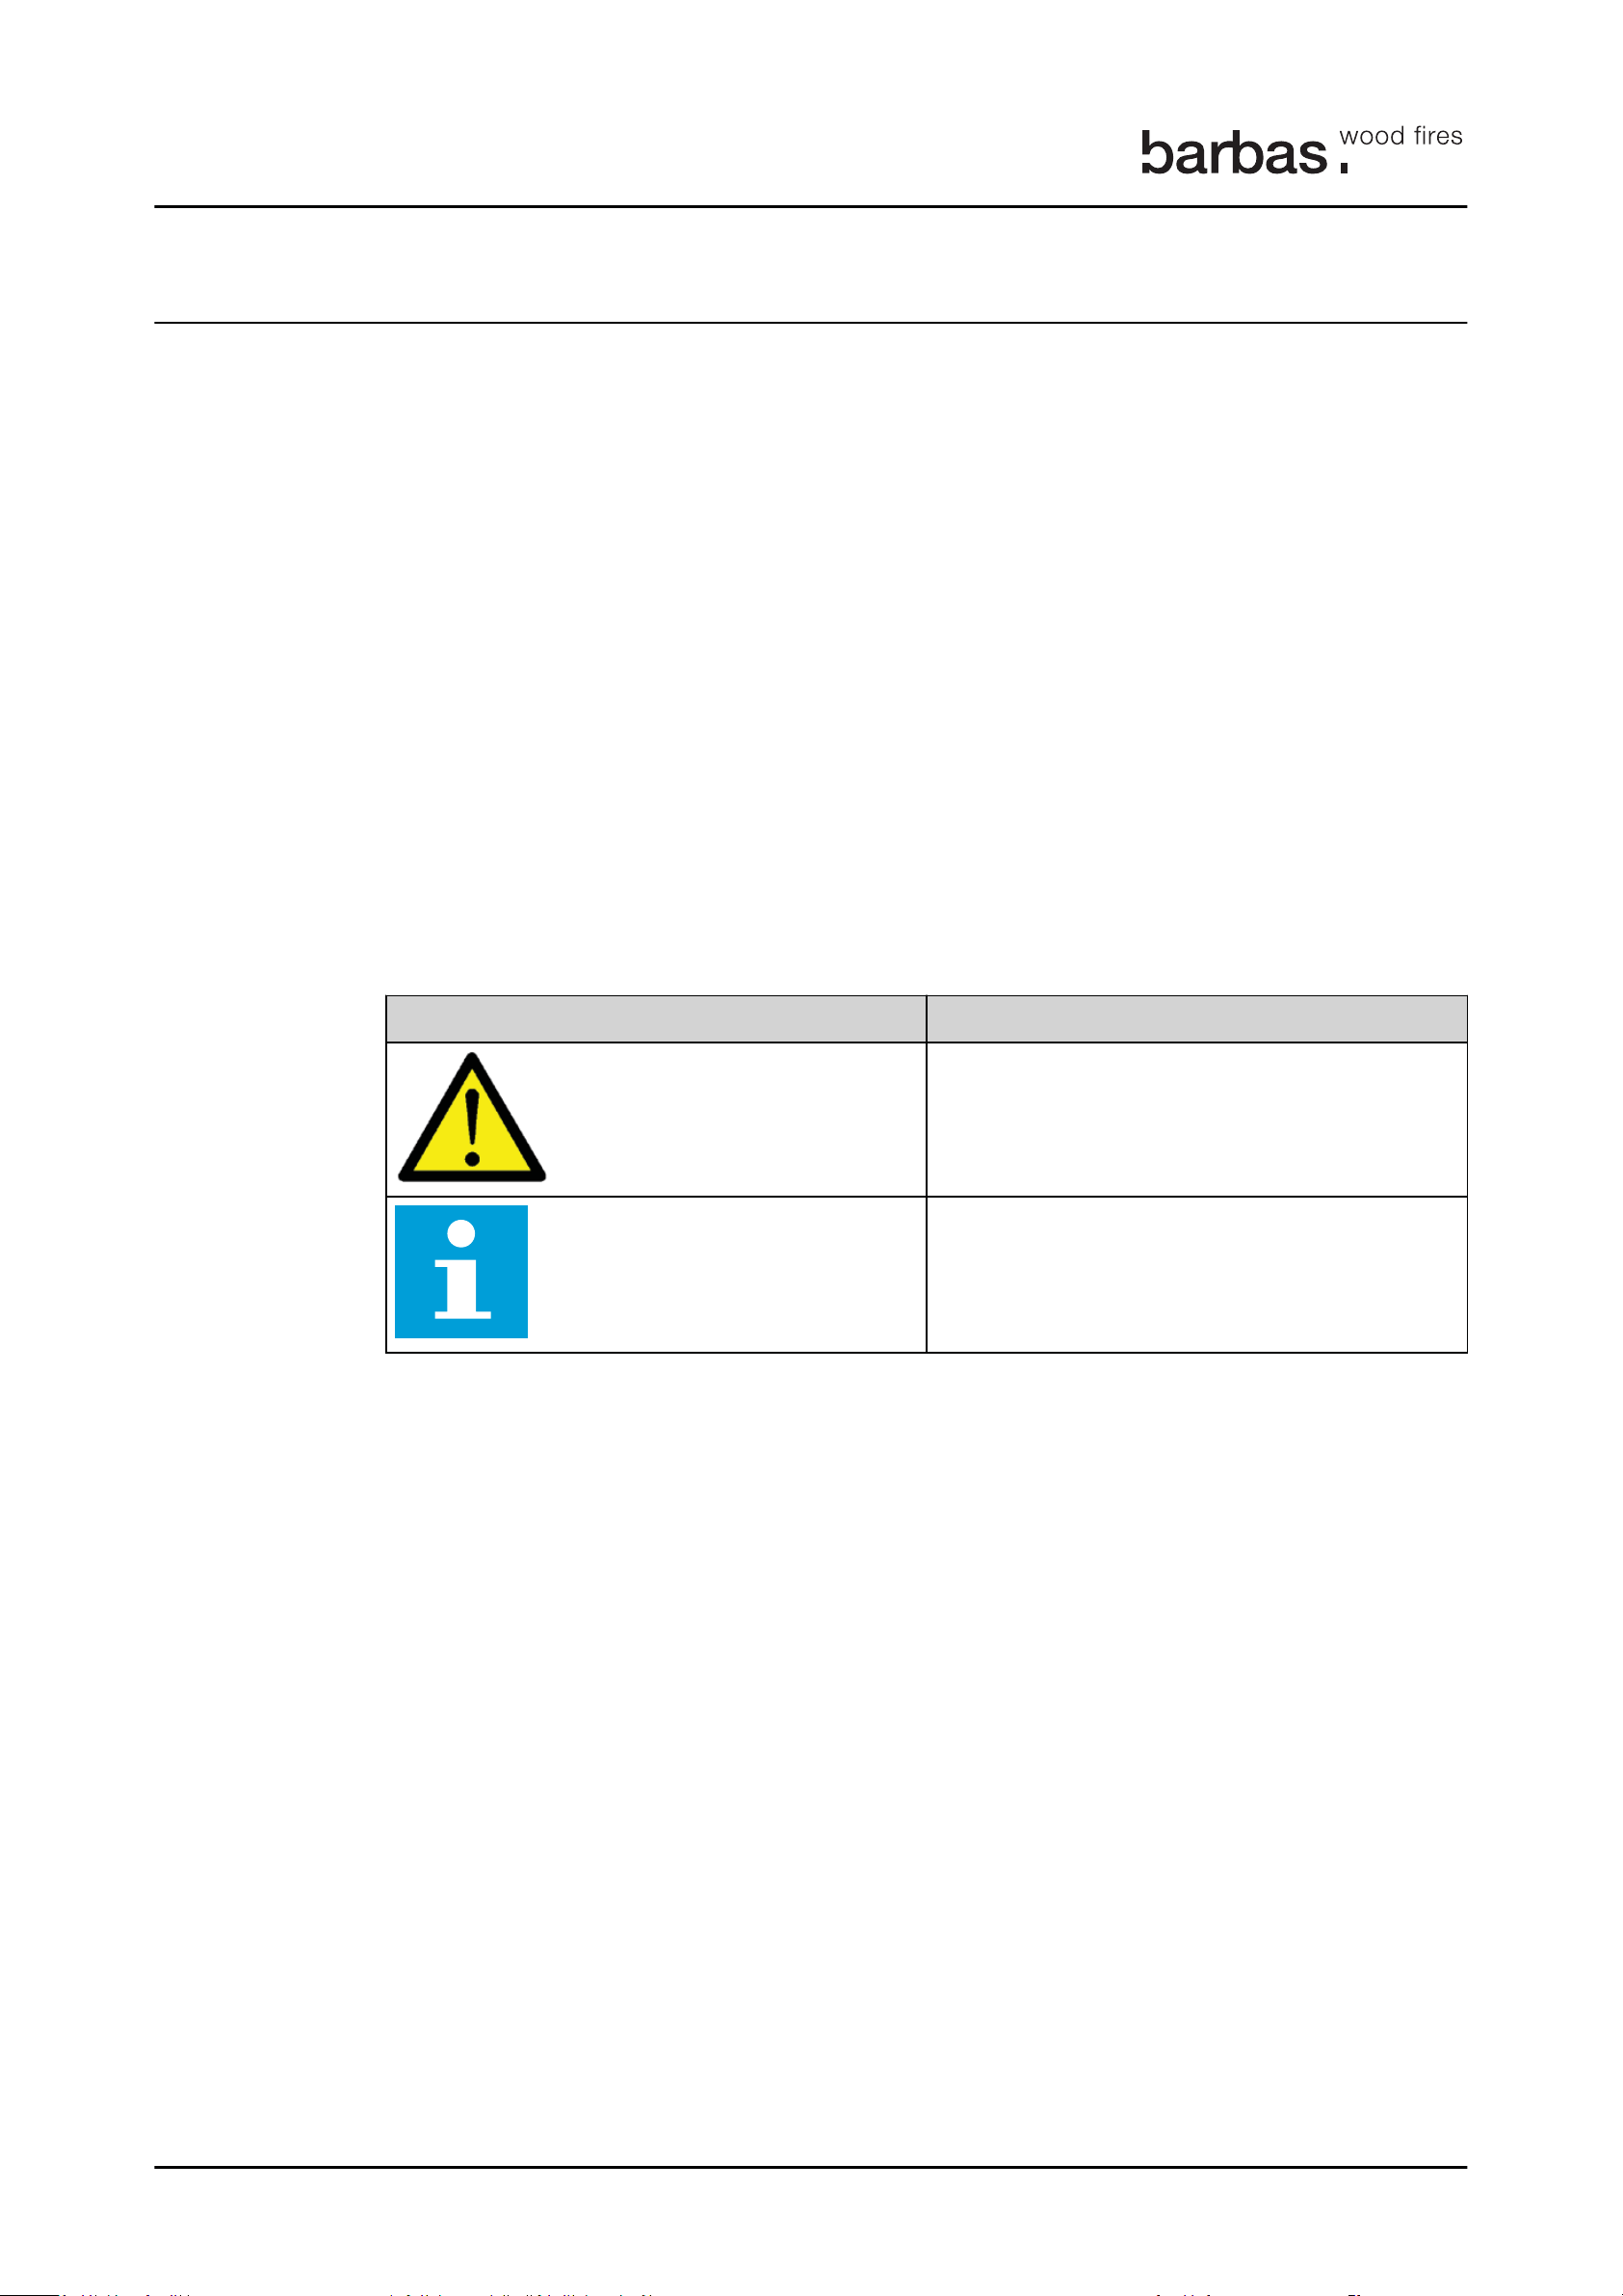
4.1 Warnings and cautions used in this document
Warning
Caution
Note
Symbol Description
4.2 Related documentation
How to work with this document
10
4
1. Make yourself familiar with the structure and content of the document.
2. Read the safety chapter in detail.
3. Make sure that you understand all the instructions.
4. Do the procedures completely and in the given sequence.
If you do not obey these instructions, there is a risk that can cause personal injury or
death.
If you do not obey these instructions, there is a risk of damage to the equipment or to
property.
A note shows more information.
Visual sign that there is a hazard
Visual sign that there is a notice
• Installation and maintenance manual
• User manual
Box Panorama 65
Page 11
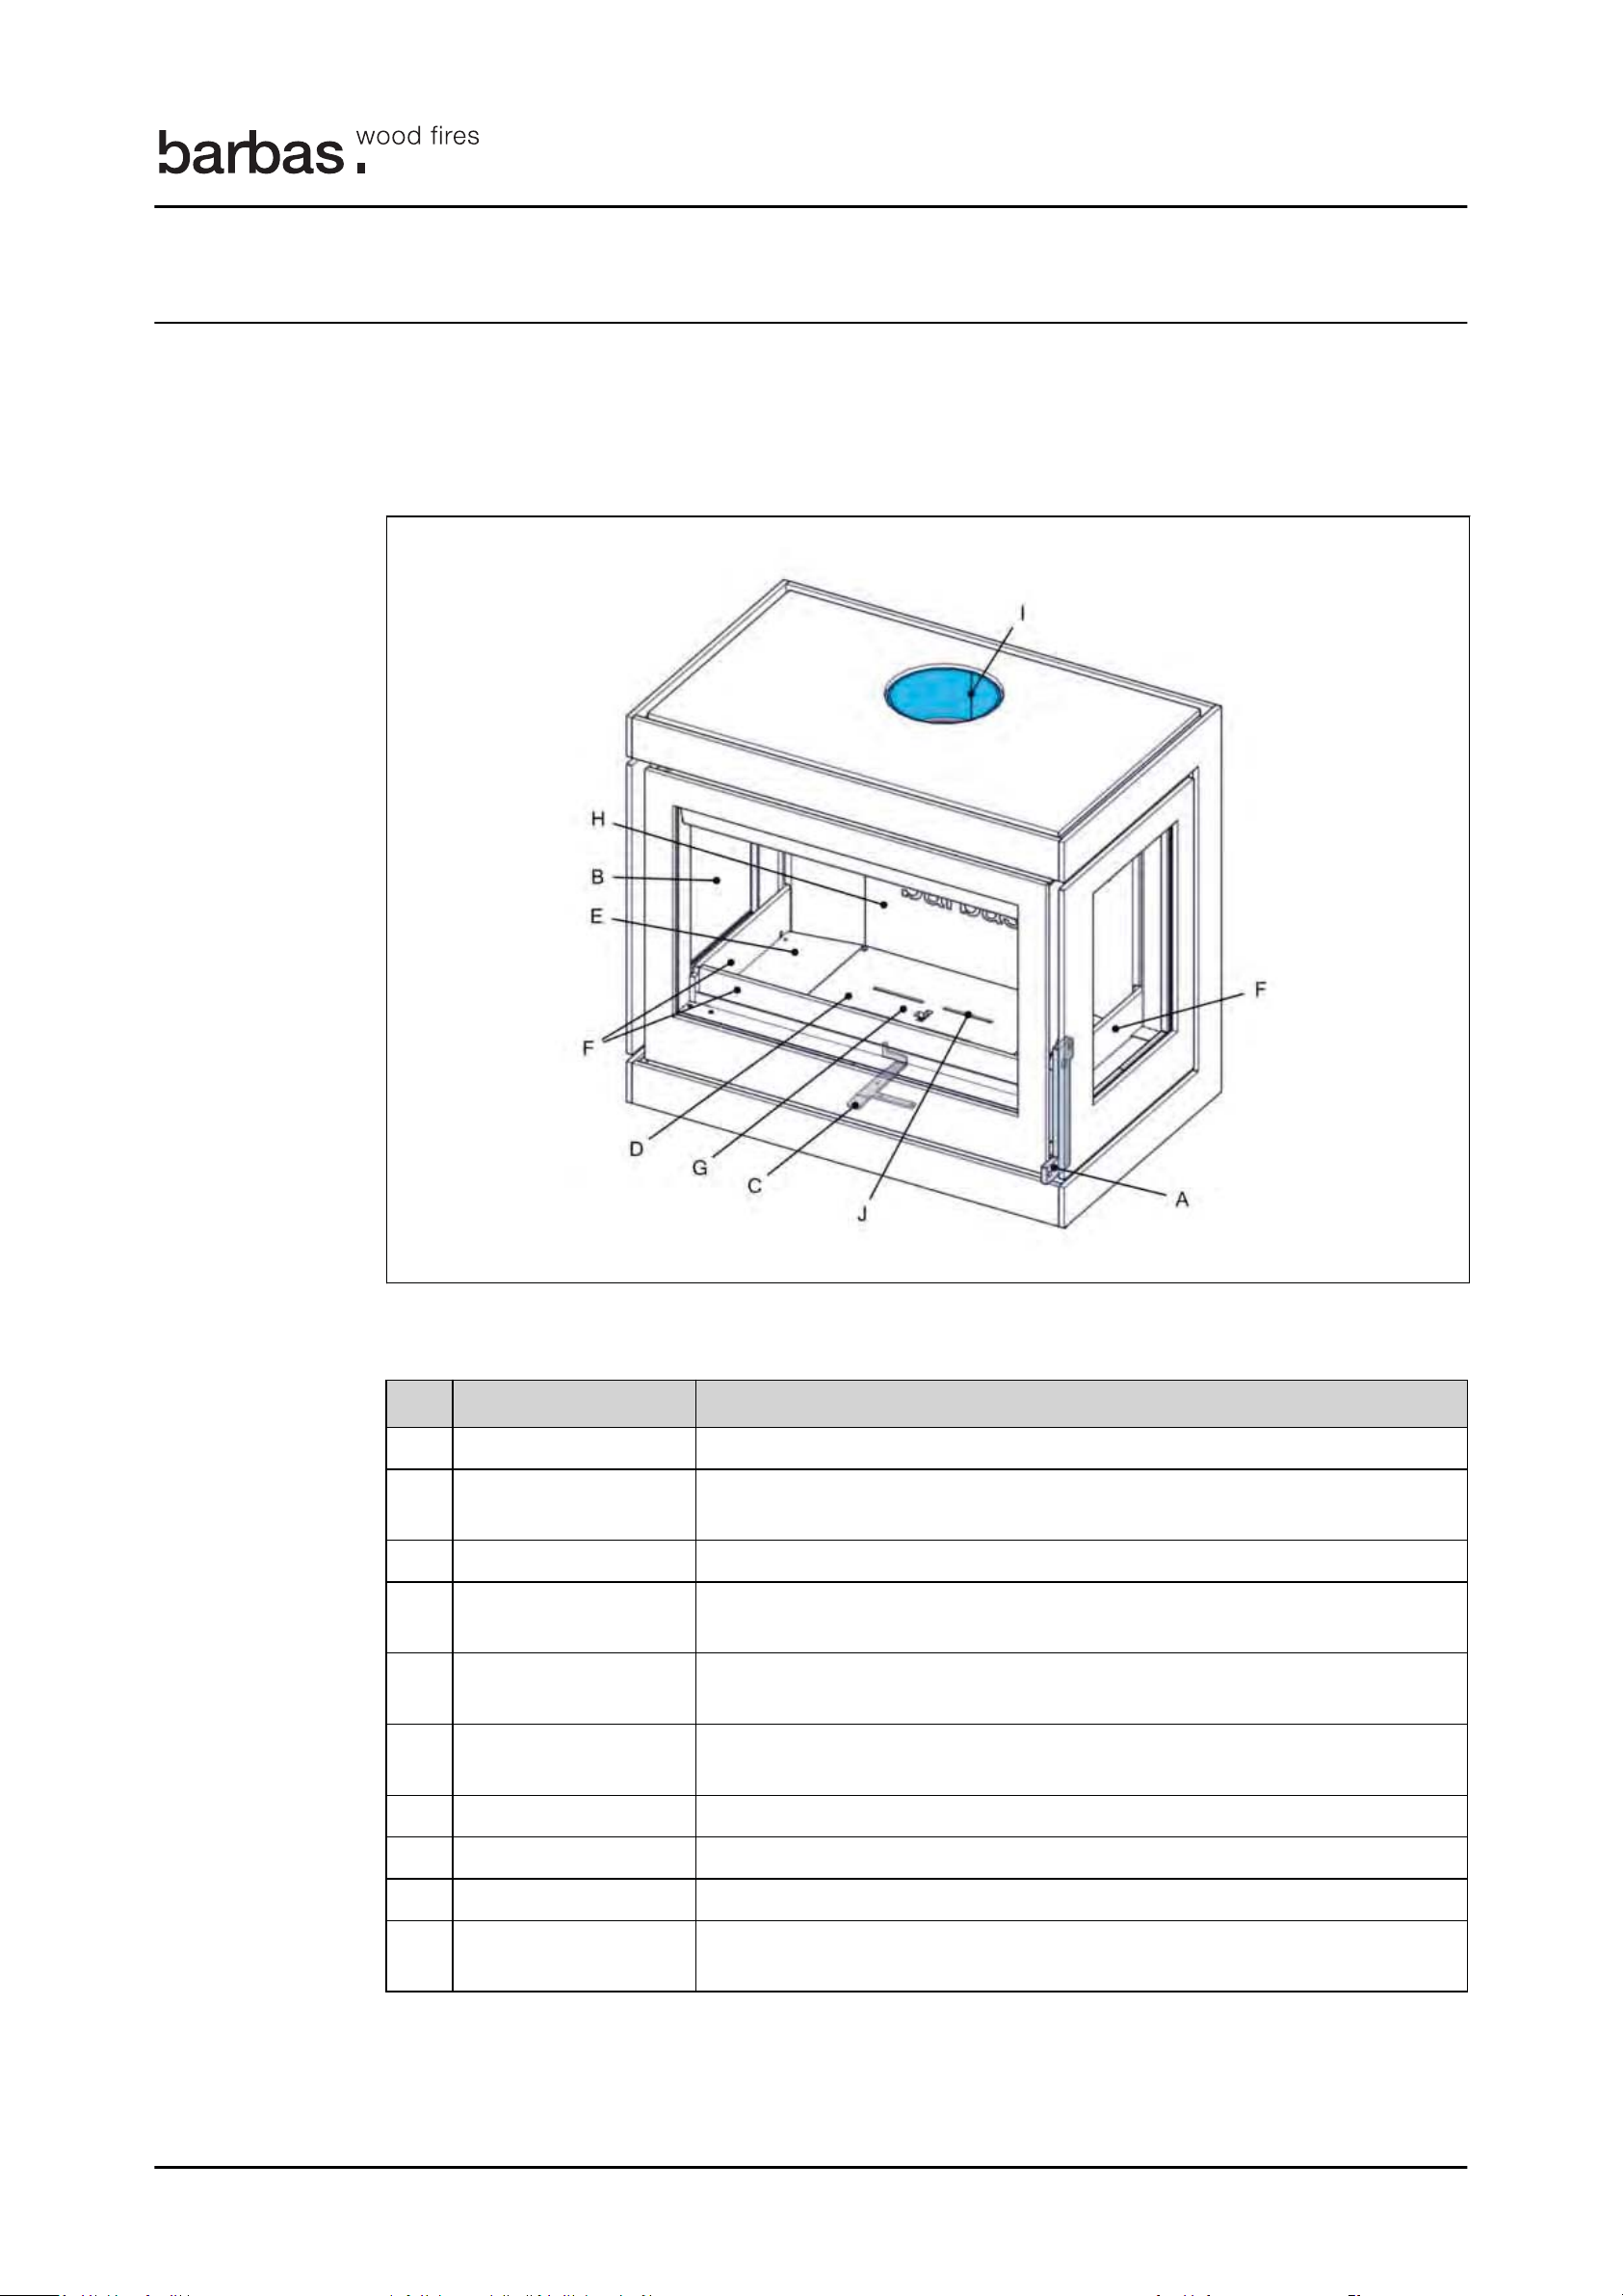
5
5 Description
5.1 Overview of the appliance
Table 1: Top view
Item Description
11
The appliance is optionally available with a support frame to attach the appliance against
a wall or optional available with a wood log storage module under the appliance.
Description
A Handle Use the handle to open and to close the door.
B Glass The glass keeps the flue gases inside the appliance and closes the
combustion chamber off.
C Control lever Use the control lever to control the amount of combustion air.
D Grate Cover of the ash tray. Inlet of the primary air into the combustion
chamber.
E Bottom plates Plates left and right from the grate, to protect the bottom of the appli-
ance
F Log guards 1 front plate and 2 side plates to prevent wood logs and ashes from
falling out of the appliance
G Ash tray Tray to collect the ashes that fall through the grate.
H Ceramic panel Cover of the rear of the combustion chamber.
Box Panorama 65
I Flue connection The connection to the flue system that extracts the flue gases.
J Primary air inlet Combustion air supply through the grate into the combustion cham-
ber. The function of primary air is to start the fire.
Page 12
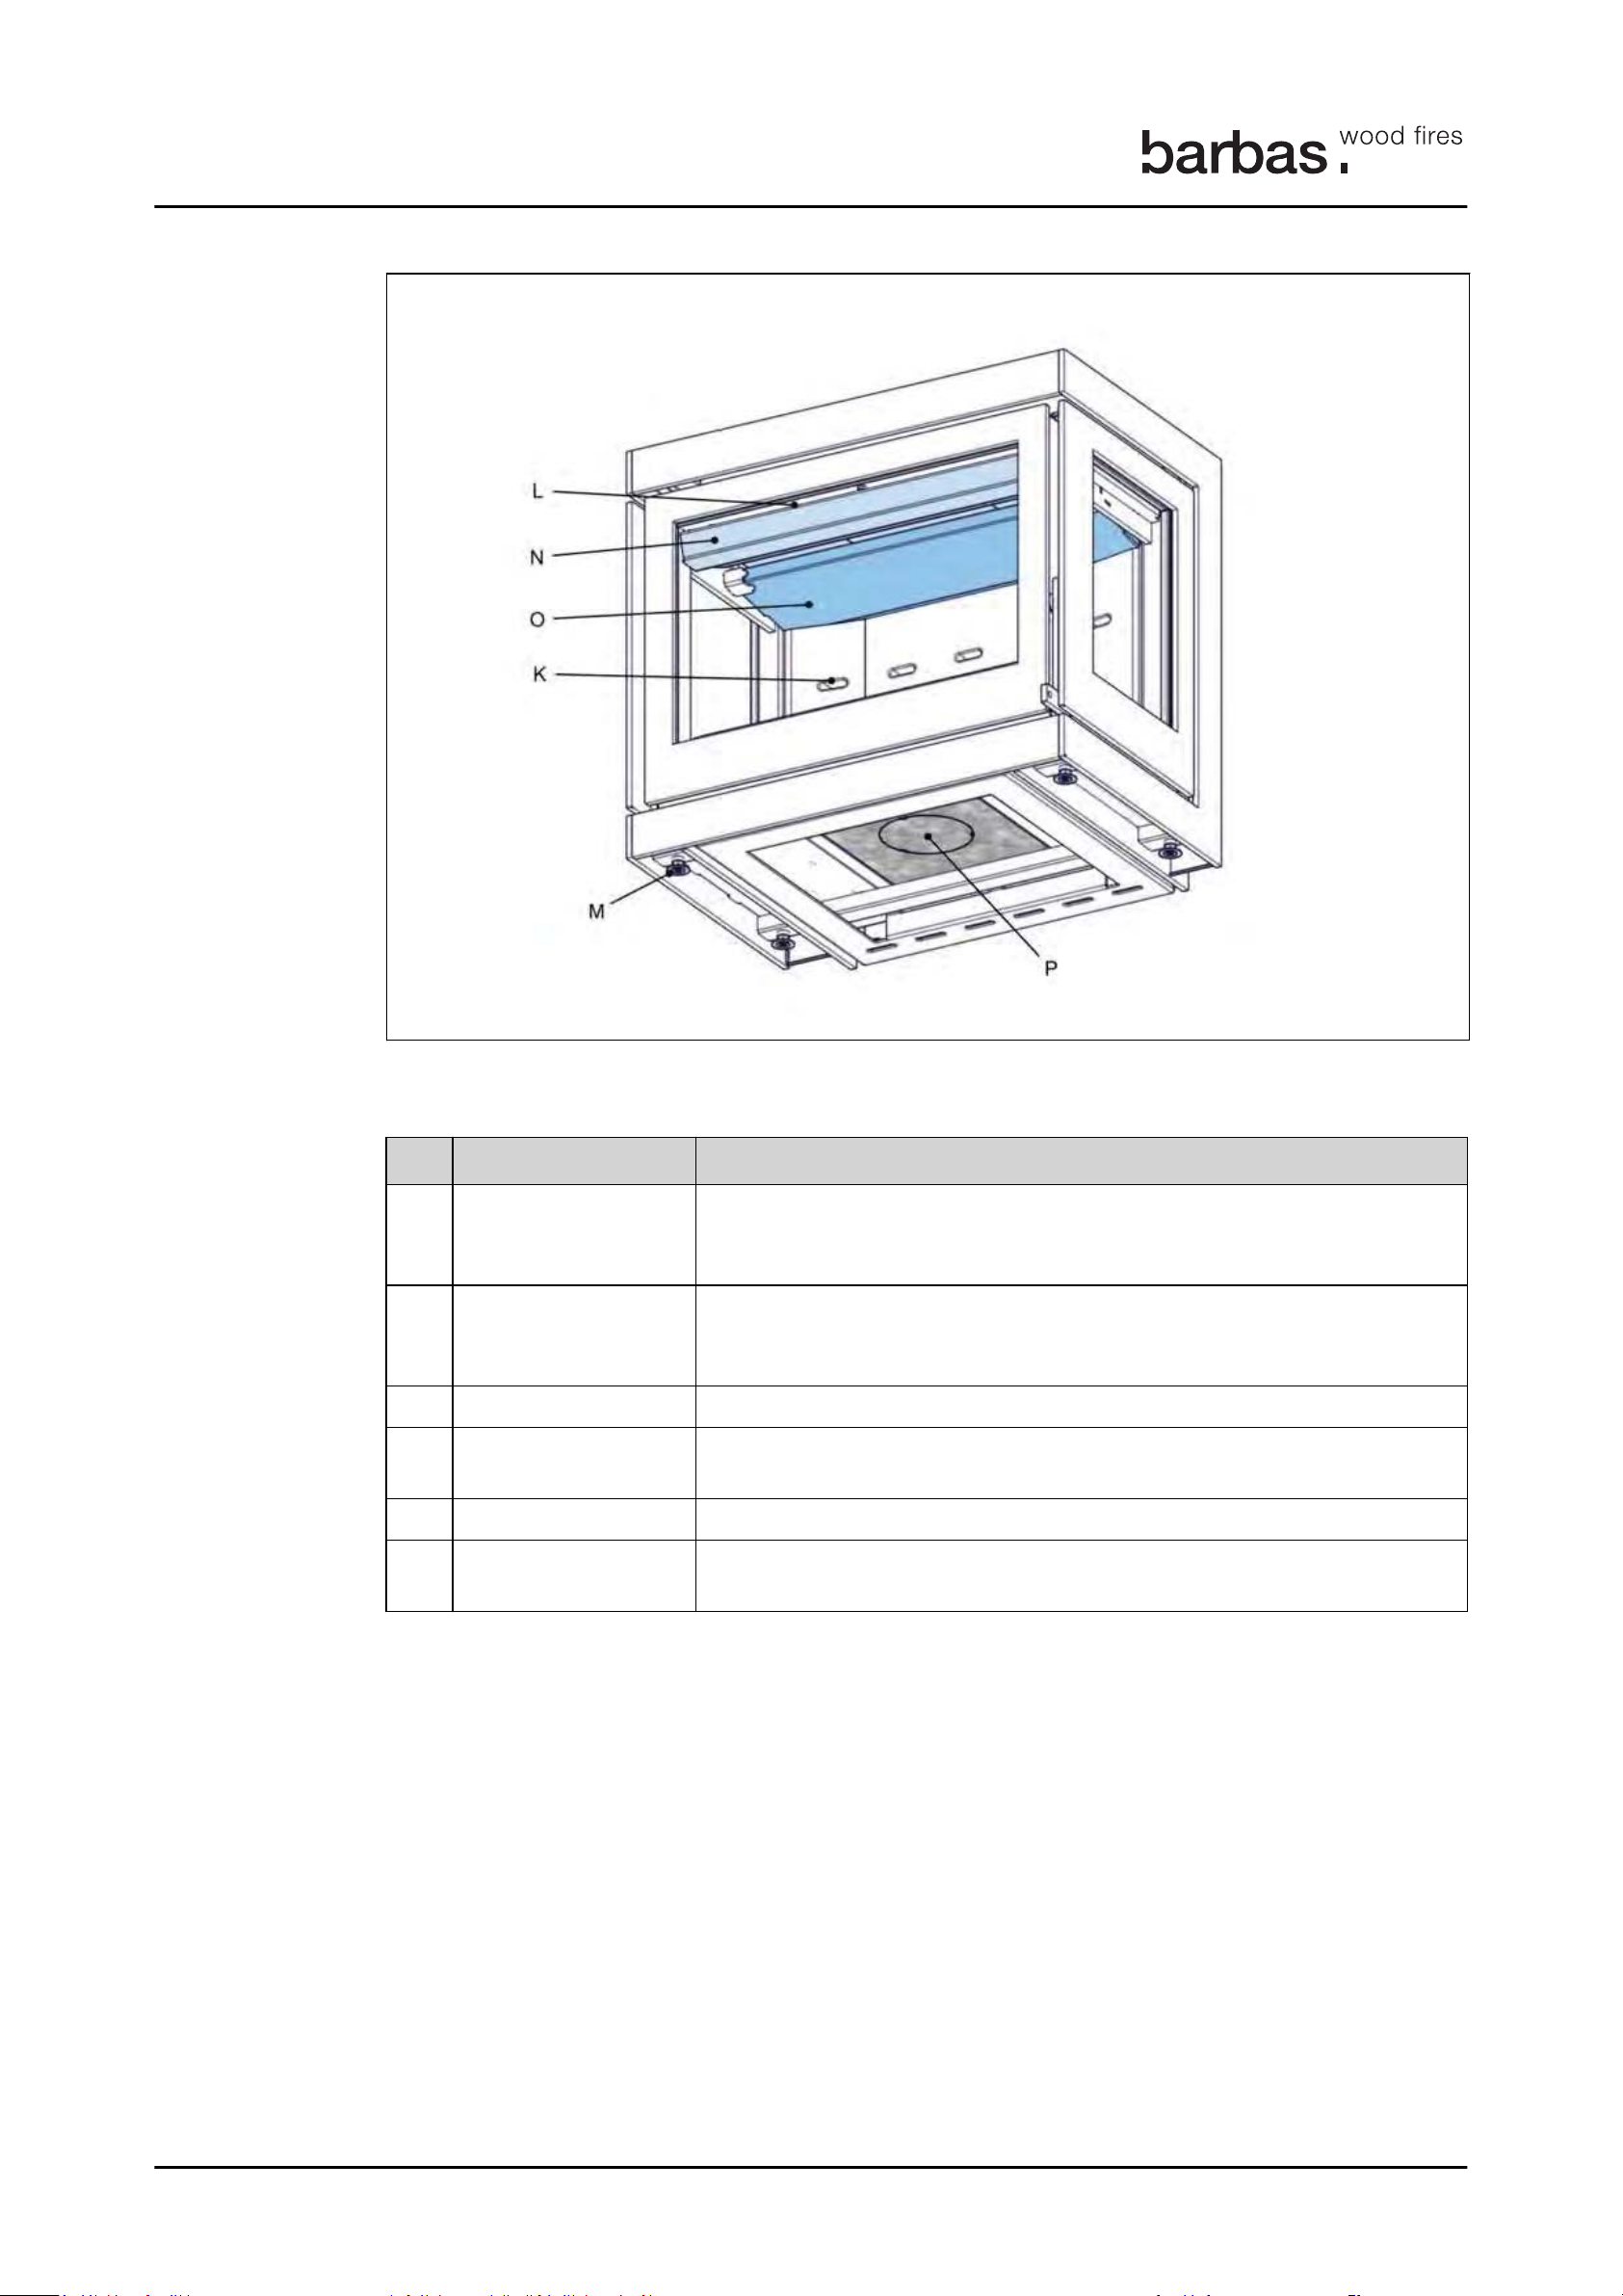
Table 2: Bottom view
Item Description
Description
12
T
K Secondary air inlet Combustion air supply through the rear wall into the combustion
chamber. The function of secondary air is to provide extra combustion air for clean combustion.
L Air wash inlet Combustion air supply through the top of the appliance into the com-
bustion chamber. The function of air wash is to prevent deposition of
soot on the glass.
M Adjustable feet 4 adjustable feet to level the appliance
N Upper baffle Steel plate in the top of the combustion chamber above the lower baf-
fle
O Lower baffle Ceramic plate in the top of the combustion chamber
P External combustion
air inlet (optional)
Provides the appliance with combustion air. This option is only available when ordered with the appliance.
Box Panorama 65
Page 13
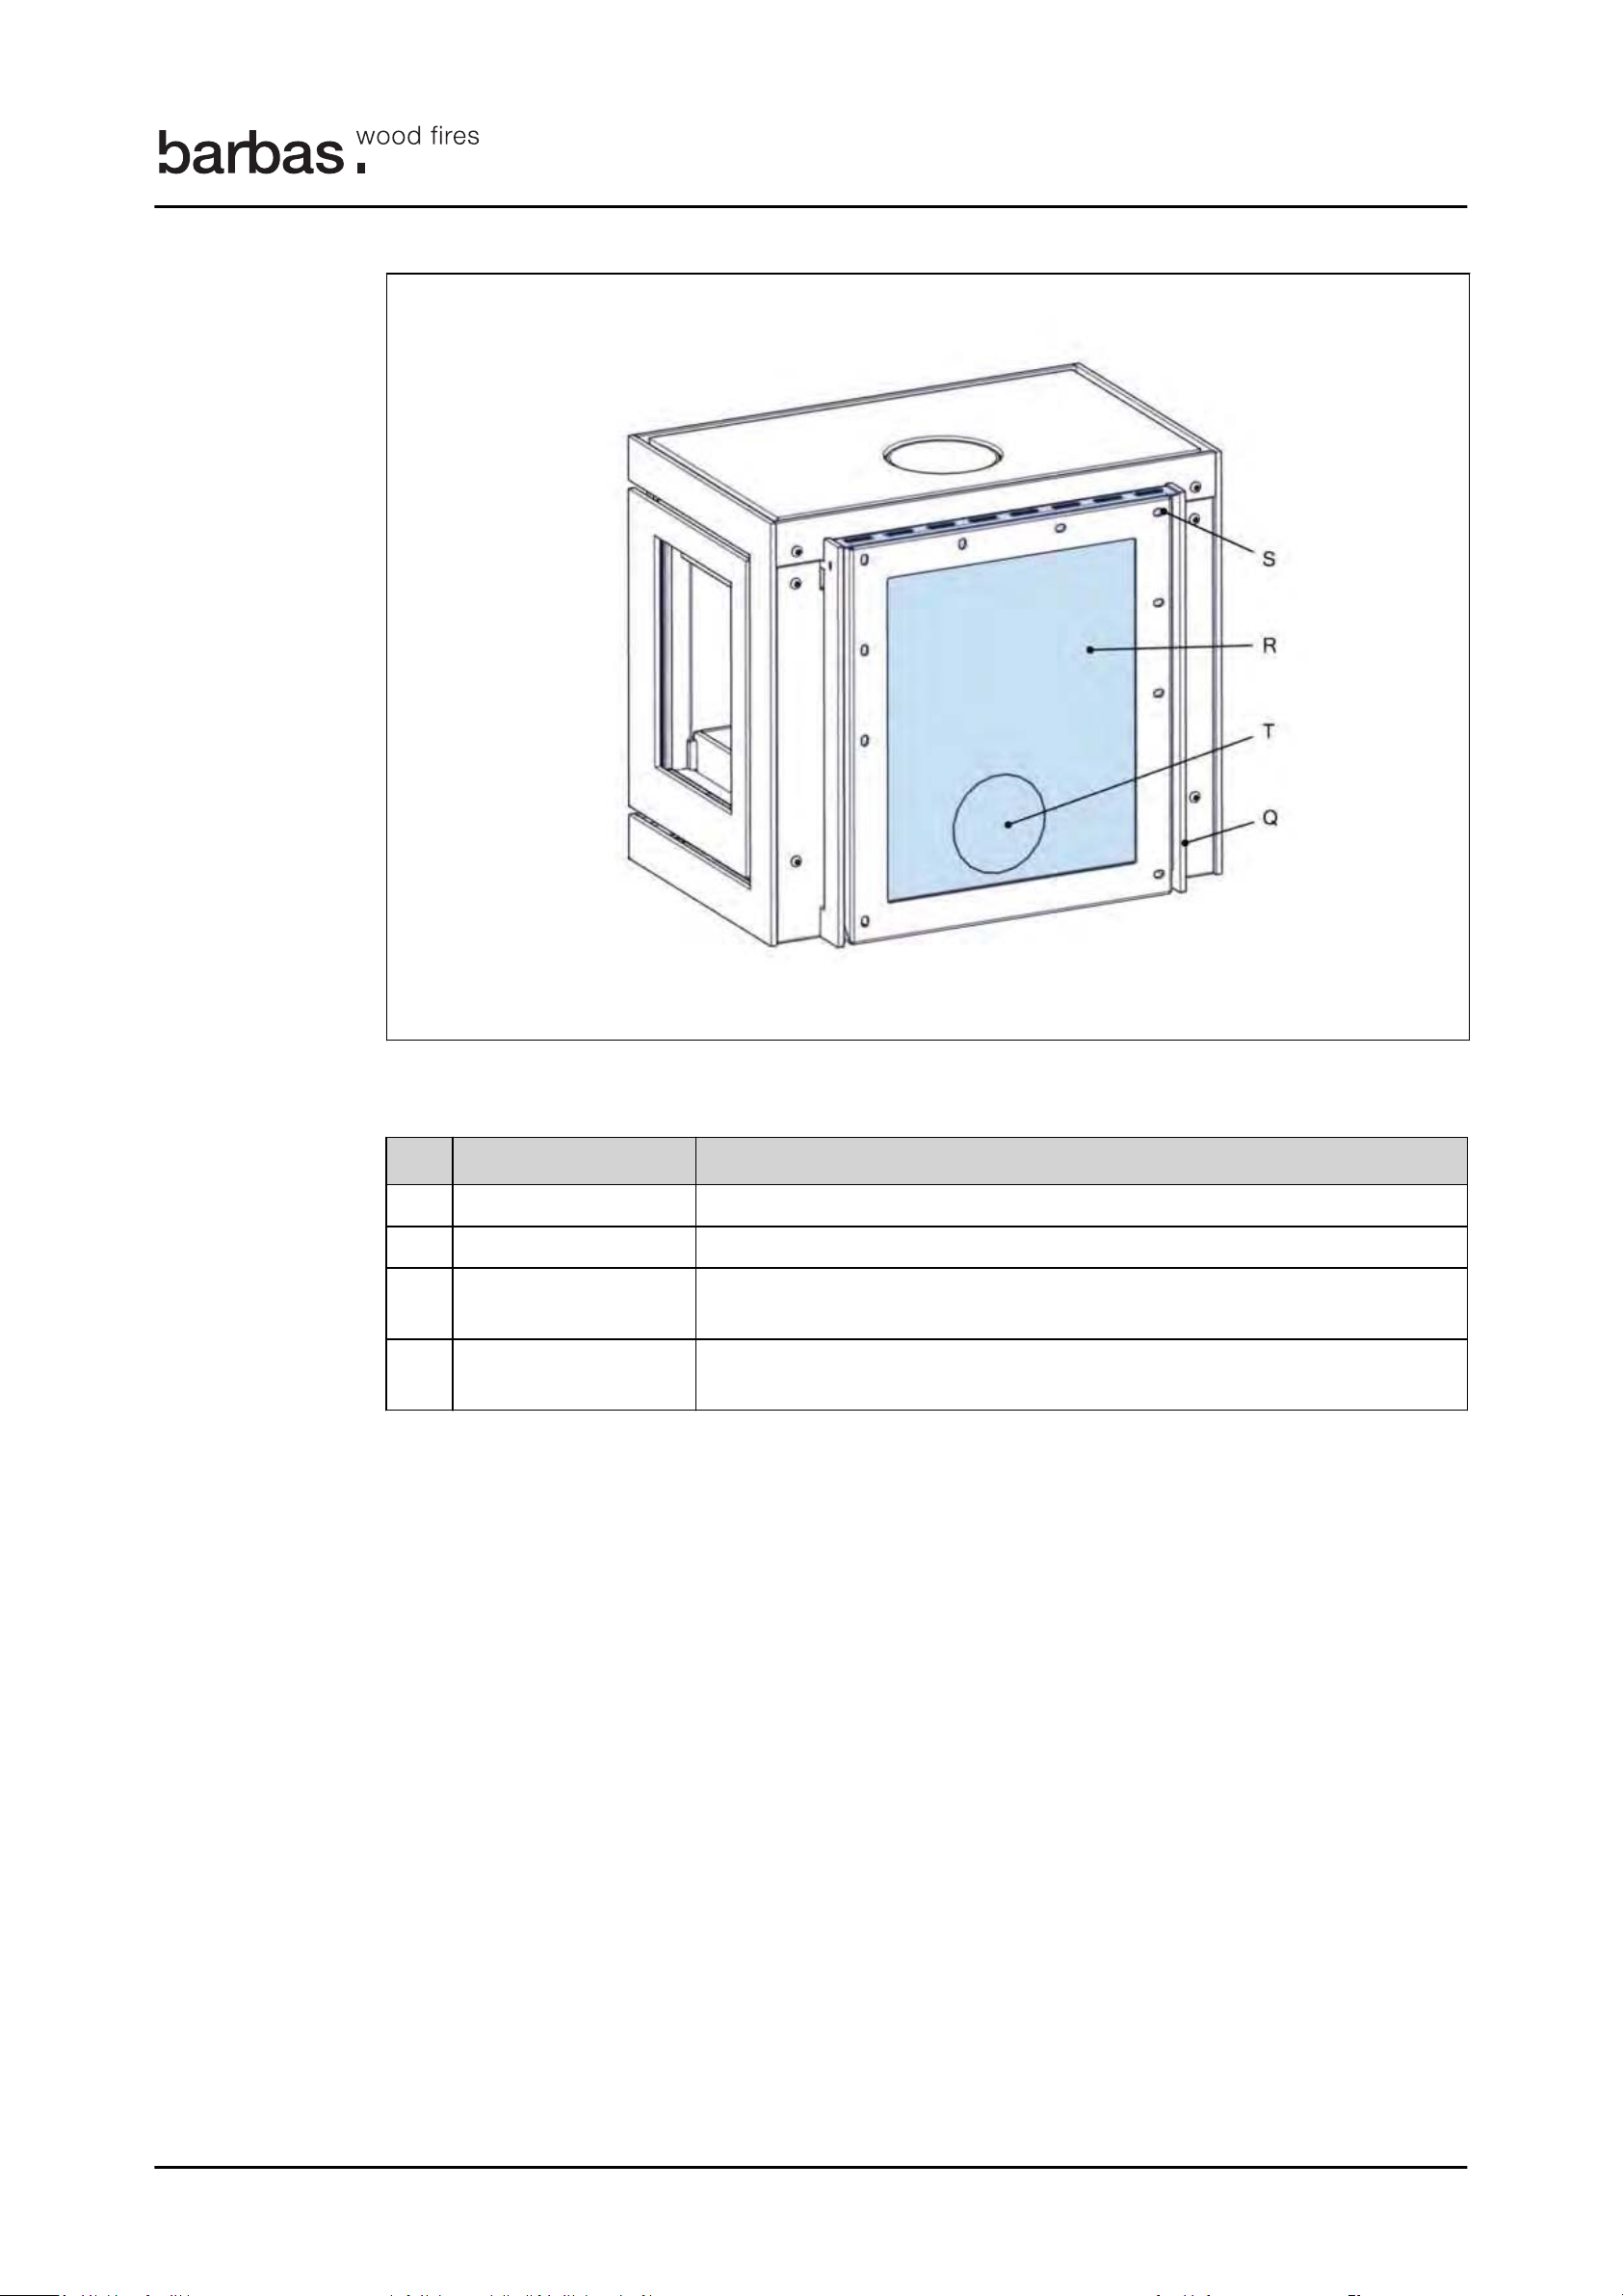
Table 3: Back view (for BOX Panorama 65 with optional support frame)
Item Description
Description
13
T
Q Support frame The optional support frame carries the appliance when put on a wall
R Cover Cover to protect the wall from heat radiation
S Screw holes Attach the support frame on a wall with screws through the screw
holes
T External combustion
air inlet (optional)
Provides the appliance with combustion air. This option is only available when ordered with the appliance.
Box Panorama 65
Page 14
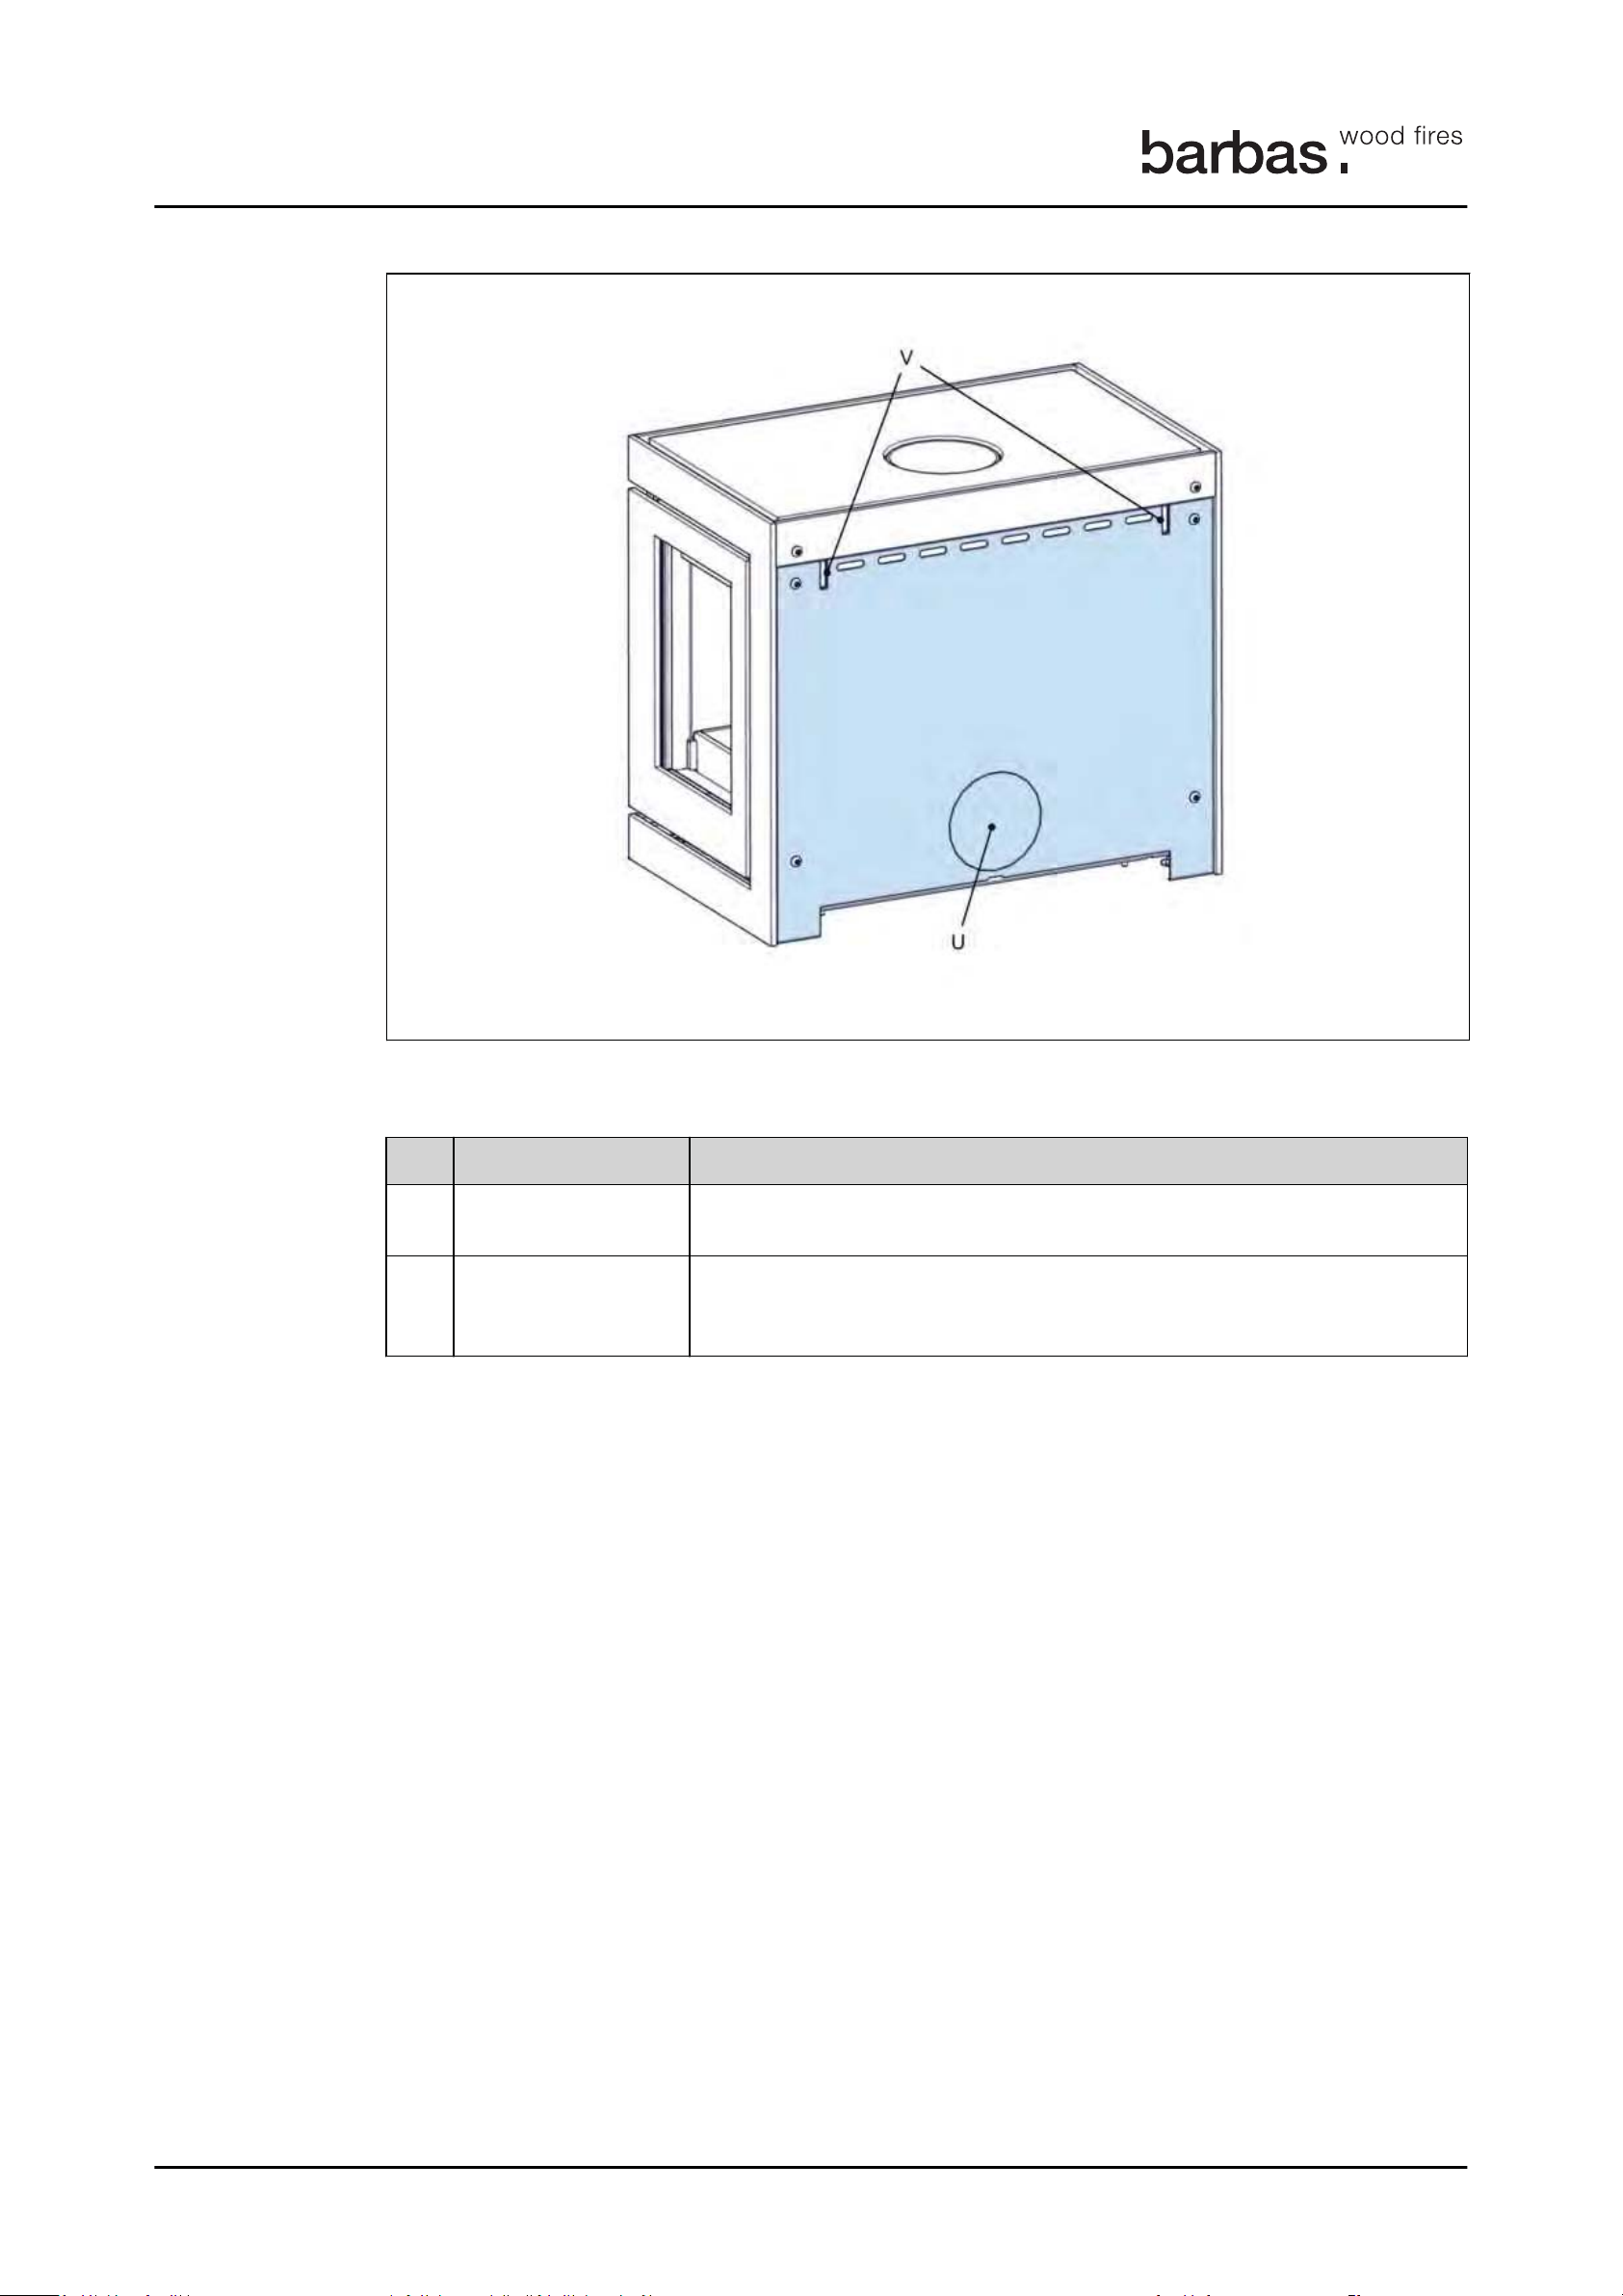
Table 4: Back view
Item Description
5.2 Intended use
Description
14
T
U External combus-
tion air inlet
V Slots Only for BOX Panorama 65 with optional support frame. The slots
The appliance is intended for indoor use to heat the room wherein it is installed. Do not
use it for other purposes.
The appliance is intended for use with wood logs or wood briquettes as fuel. Do not use
other fuels.
Provides the appliance with combustion air. This option is only available when ordered with the appliance.
make sure the appliance is in the correct position on the support
frame.
The appliance is intended for use with the door closed.
The appliance may only be used at the location that meets the requirements for the
installation of the appliance.
The appliance is intended for intermittent use and is not intended for continuous use.
The appliance is intended to heat the room by direct heating. It is not allowed to connect
the appliance to a central-heating installation.
Box Panorama 65
Page 15
6
6 Safety
6.1 Safety instructions for operation
Warning:
Caution:
Note:
6.2 Safety instructions with regard to the environment
15
• Do not put objects on top of the appliance.
• Do not let the appliance unattended when the fuel burns.
• Do not put flammable items within 120 cm from the front of the appliance.
• Do not put flammmable items within 60 cm from the sie of the appliance
• Do not use mineral fuel (example: coal, anthracite)
• Do not use the appliance with the door open. Smoke can escape from the
appliance. Only open the appliance door for a short time to reload with fuel
or to remove the ash.
Safety
• Make sure that children are supervised when they can reach the
appliance.
• Make sure that there is sufficient ventilation in the room in which the
appliance is installed.
• Do not use the appliance in case of visual glass damage.
• Make sure that the appliance is installed correctly. Refer to the Installation
and Maintenance manual. You can find the manuals on www.barbas.com.
• Wear the glove and use the operating hook or a poke when refilling the
appliance
• Make sure that your clothing does not touch the appliance. Especially
synthetic clothing ignites easily and burns intensely.
• Do not use the appliance when there is fog, haze or no wind.
• Do not make modifications to the appliance. Any modification will also
make your warranty invalid.
• Make sure to clean your chimney minimum every year to prevent a
chimney fire.
• Do not use freshly cut wood.
• Do not use more wood per load than prescribed. Overloading can cause
7.2
excess smoke. See also chapter
• Operation with the control lever open can cause excess smoke. The
appliance must not be operated with the control lever or door left open
except as directed in this user manual.
• Do not burn waste in the appliance.
• Do not prepare food in the appliance. This causes damage to your
appliance and chimney.
• Do inspect and clean the appliance, the chimney and the external
combustion air supply by a Barbas dealer minimum every year.
• Do not use the appliance continuously. The intended use is as intermittent
appliance.
.
• Dispose of the packing materials in an environmentally friendly way.
Box Panorama 65
Page 16

Safety
16
• Dispose of ceramic heat-resistant glass as household waste. Do not dispose of
ceramic heat-resistant glass in a glass recycling container.
• Dispose of an obsolete appliance according to instructions of the authorities or the
fitter.
• Obey the local regulations.
1
Box Panorama 65
Page 17
7
7 Fuel
7.1 Fuel types
Warning:
7.2 Fuel amount
Table 5: Recommended amount of fuel
Wood logs Wood briquettes
17
Do not use coal, anthracite, coal briquettes, liquid fuel or gel fuel. The
appliance is not designed for these fuels. Use of these fuels is dangerous and
can lead to bodily harm and to serious damage to the appliance.
The appliance has been recommended as suitable for use in smoke control areas when
burning clean dried hard wood logs as stated hereunder. All suitable fuels listed
hereunder can be used outside smoke control areas.
Suitable fuels are:
Fuel
• Hard wood logs (example: birch, beech, oak, ash).
• Soft wood (example: spruce, pine, poplar).
• Wood briquettes without binder.
Before use, wood must dry for minimum 2 years when freshly chopped. Kiln-dried wood
must dry for an extra half year. Dried wood logs must have a moisture content of 10 - 20
%.
Unsuitable fuels are:
• Painted wood.
• Impregnated wood.
• MDF, chipboard.
• Any kind of combustible waste.
• Paraffin impregnated compressed wood logs
• Freshly chopped wood
• Coal, anthracite and other bituminous fuels
• Lignite , peat
Using unsuitable fuels cause excess smoke, black glass, combustible deposits in the
chimney and can damage the appliance.
Load the appliance with the amount of fuel as listed hereunder. Put the load as one layer
on the floor of the combustion chamber. For the amount of fuel for the first load see
Amount 2 pieces 2 pieces
Weight Approximately 1.0 kg per piece Approximately 0.75 kg per
Length Approximately 30 cm Approximately 30 cm
piece
8.3.1
.
Box Panorama 65
Outline Approximately 25 cm Approximately 25 cm
The above listed amount burns for approximately 45 minutes. This time can be different,
dependent on the chimney draught and the position of the combustion air valve.
The amount of fuel specified here should not be exceeded, overloading can cause
excess smoke.
Page 18
8 Operation
8.1 Preparation before first use
8.2 First use of the appliance
Caution:
Note:
Operation
18
8
Report any defects to your dealer immediately.
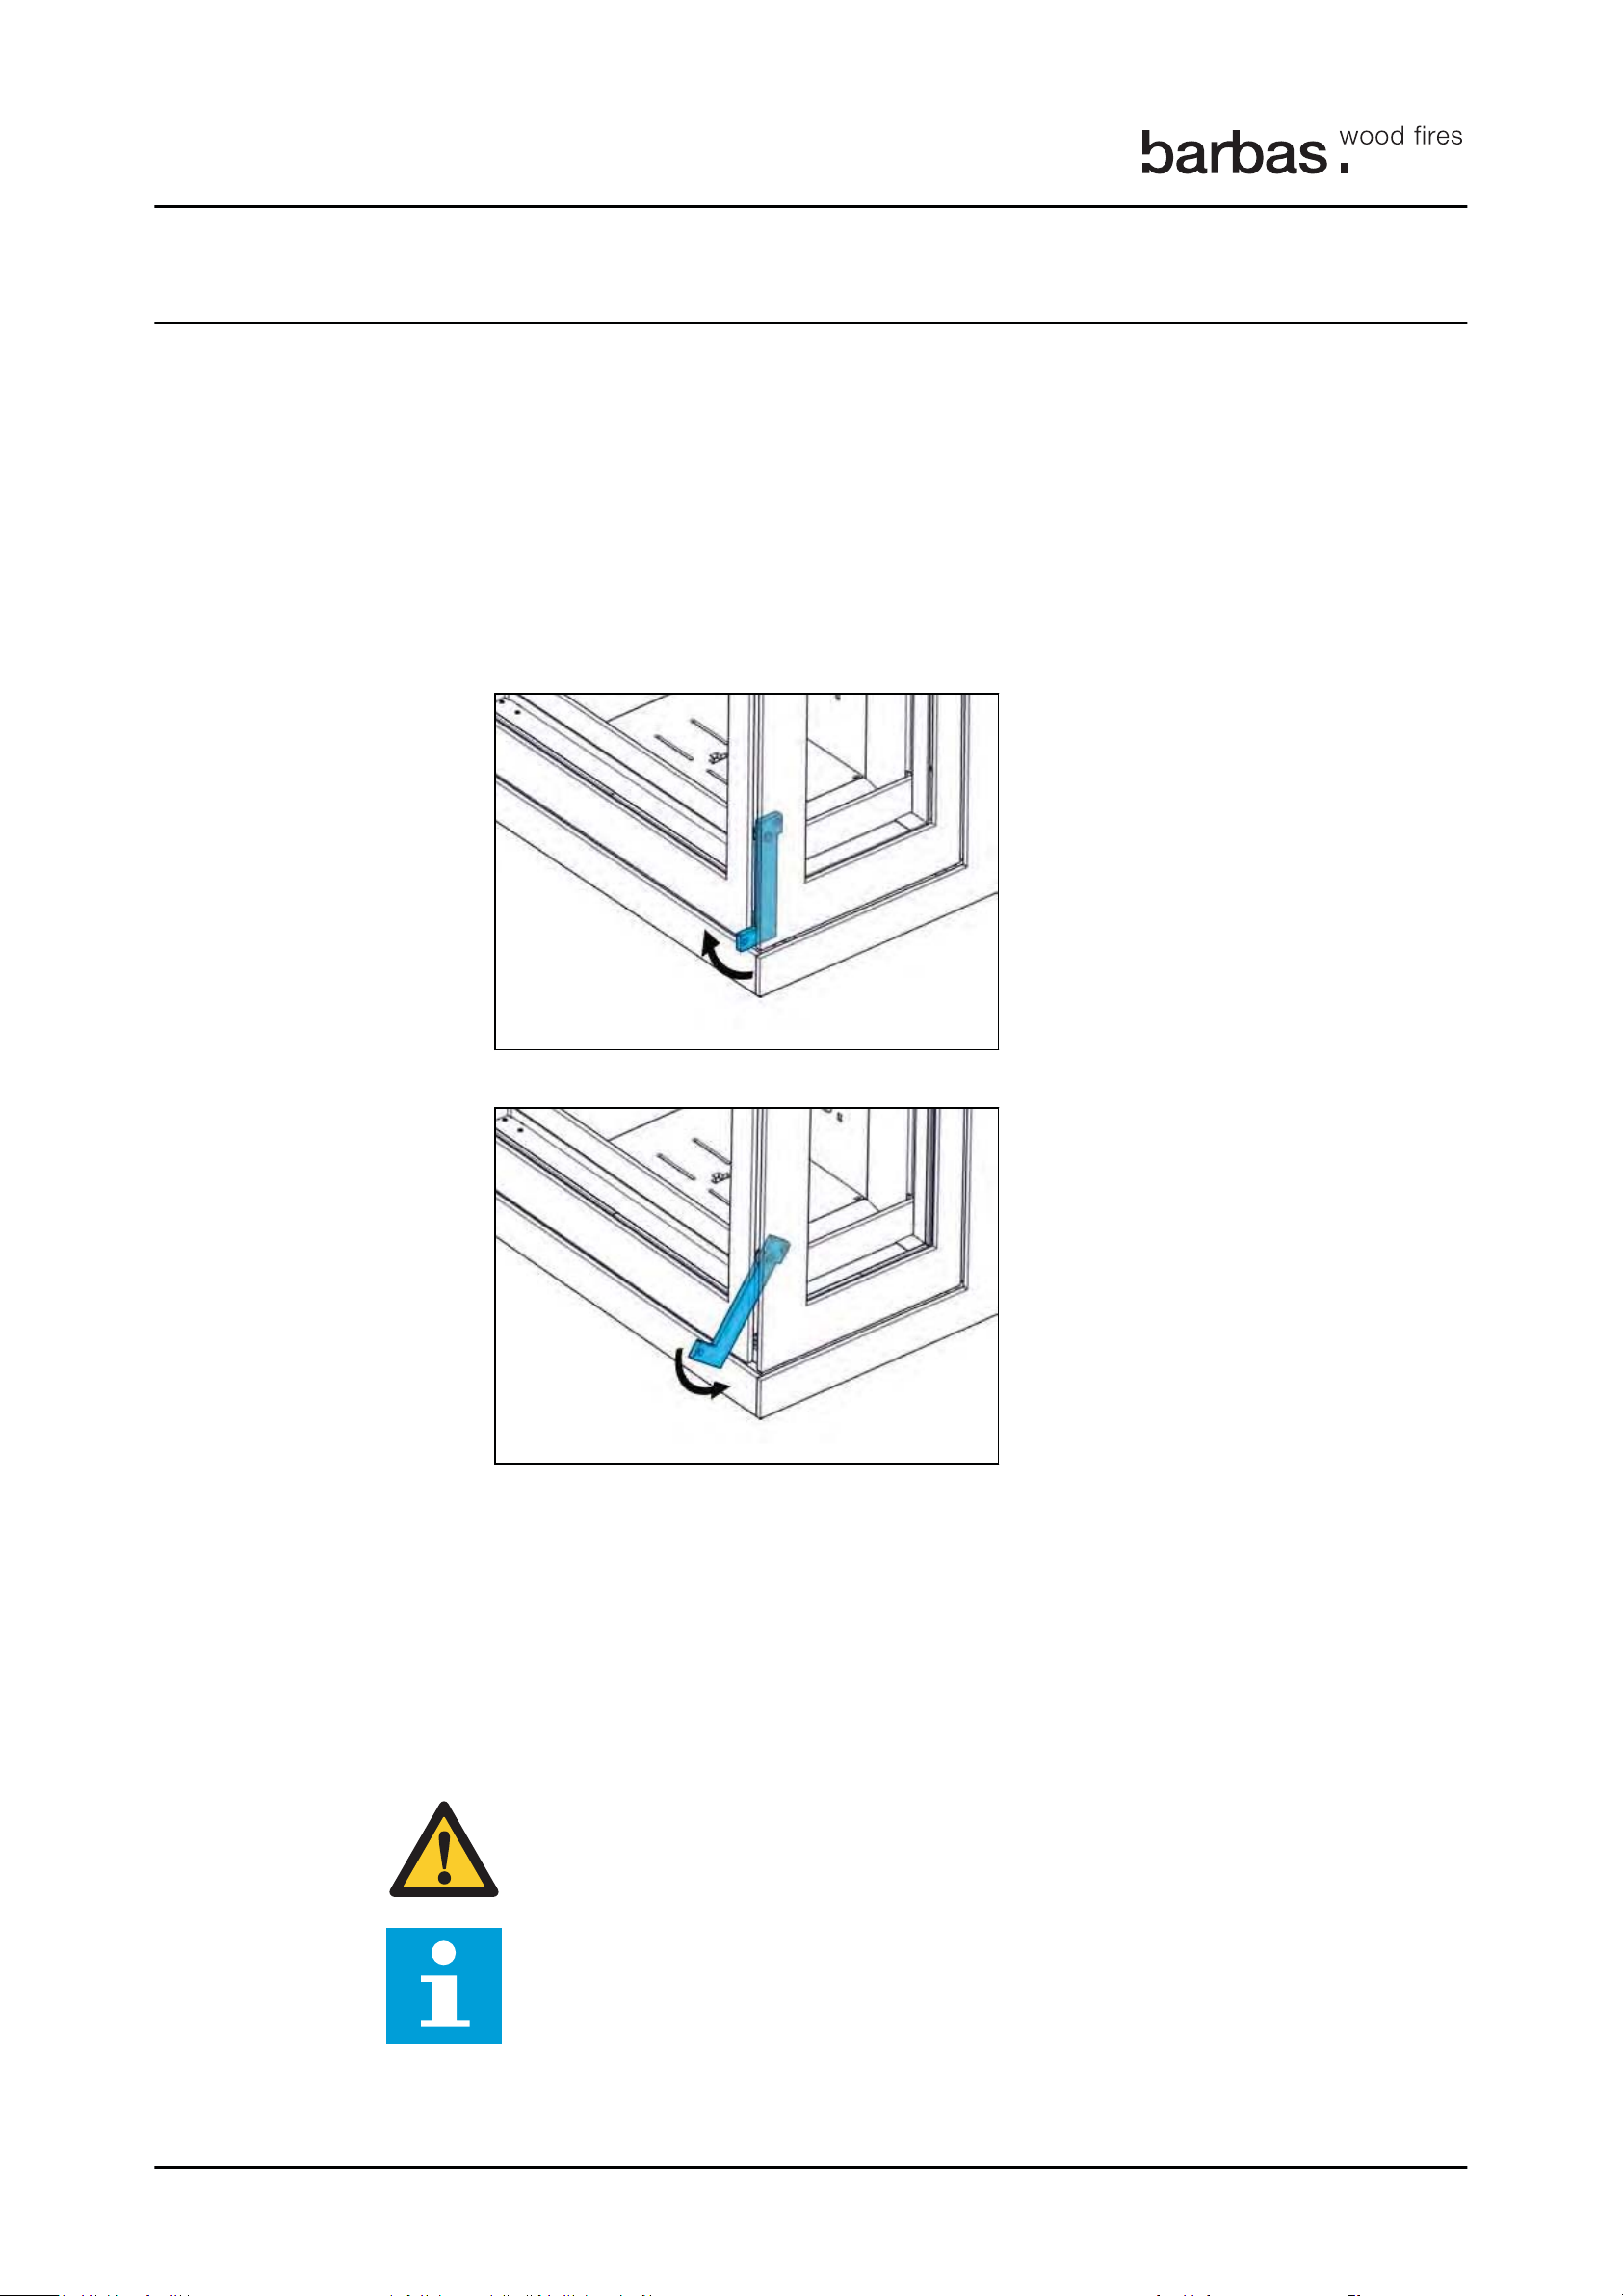
1. Make sure that the appliance is not damaged.
2. Make sure that the ceramic plate and the baffles are in the correct position.
3. Make sure that the glass is not damaged.
4. Make sure that the door opens and closes completely
a) Turn the handle forward to open the door.
b) Turn the handle downward to close the door.
5. Remove document and components from the combustion chamber.
6. Make sure that the control lever moves easy.
7. Make sure that the ash tray is empty.
8. Make sure that all package material, stickers, etc, have been removed from the
vicinity of the appliance after installation.
• Make sure there is sufficient ventilation in the room in which the appliance
is installed.
The appliance has a heat-resistant coating. When you use the appliance for
the first time, the coating can cause an unpleasant, but harmless smell.
Box Panorama 65
Page 19
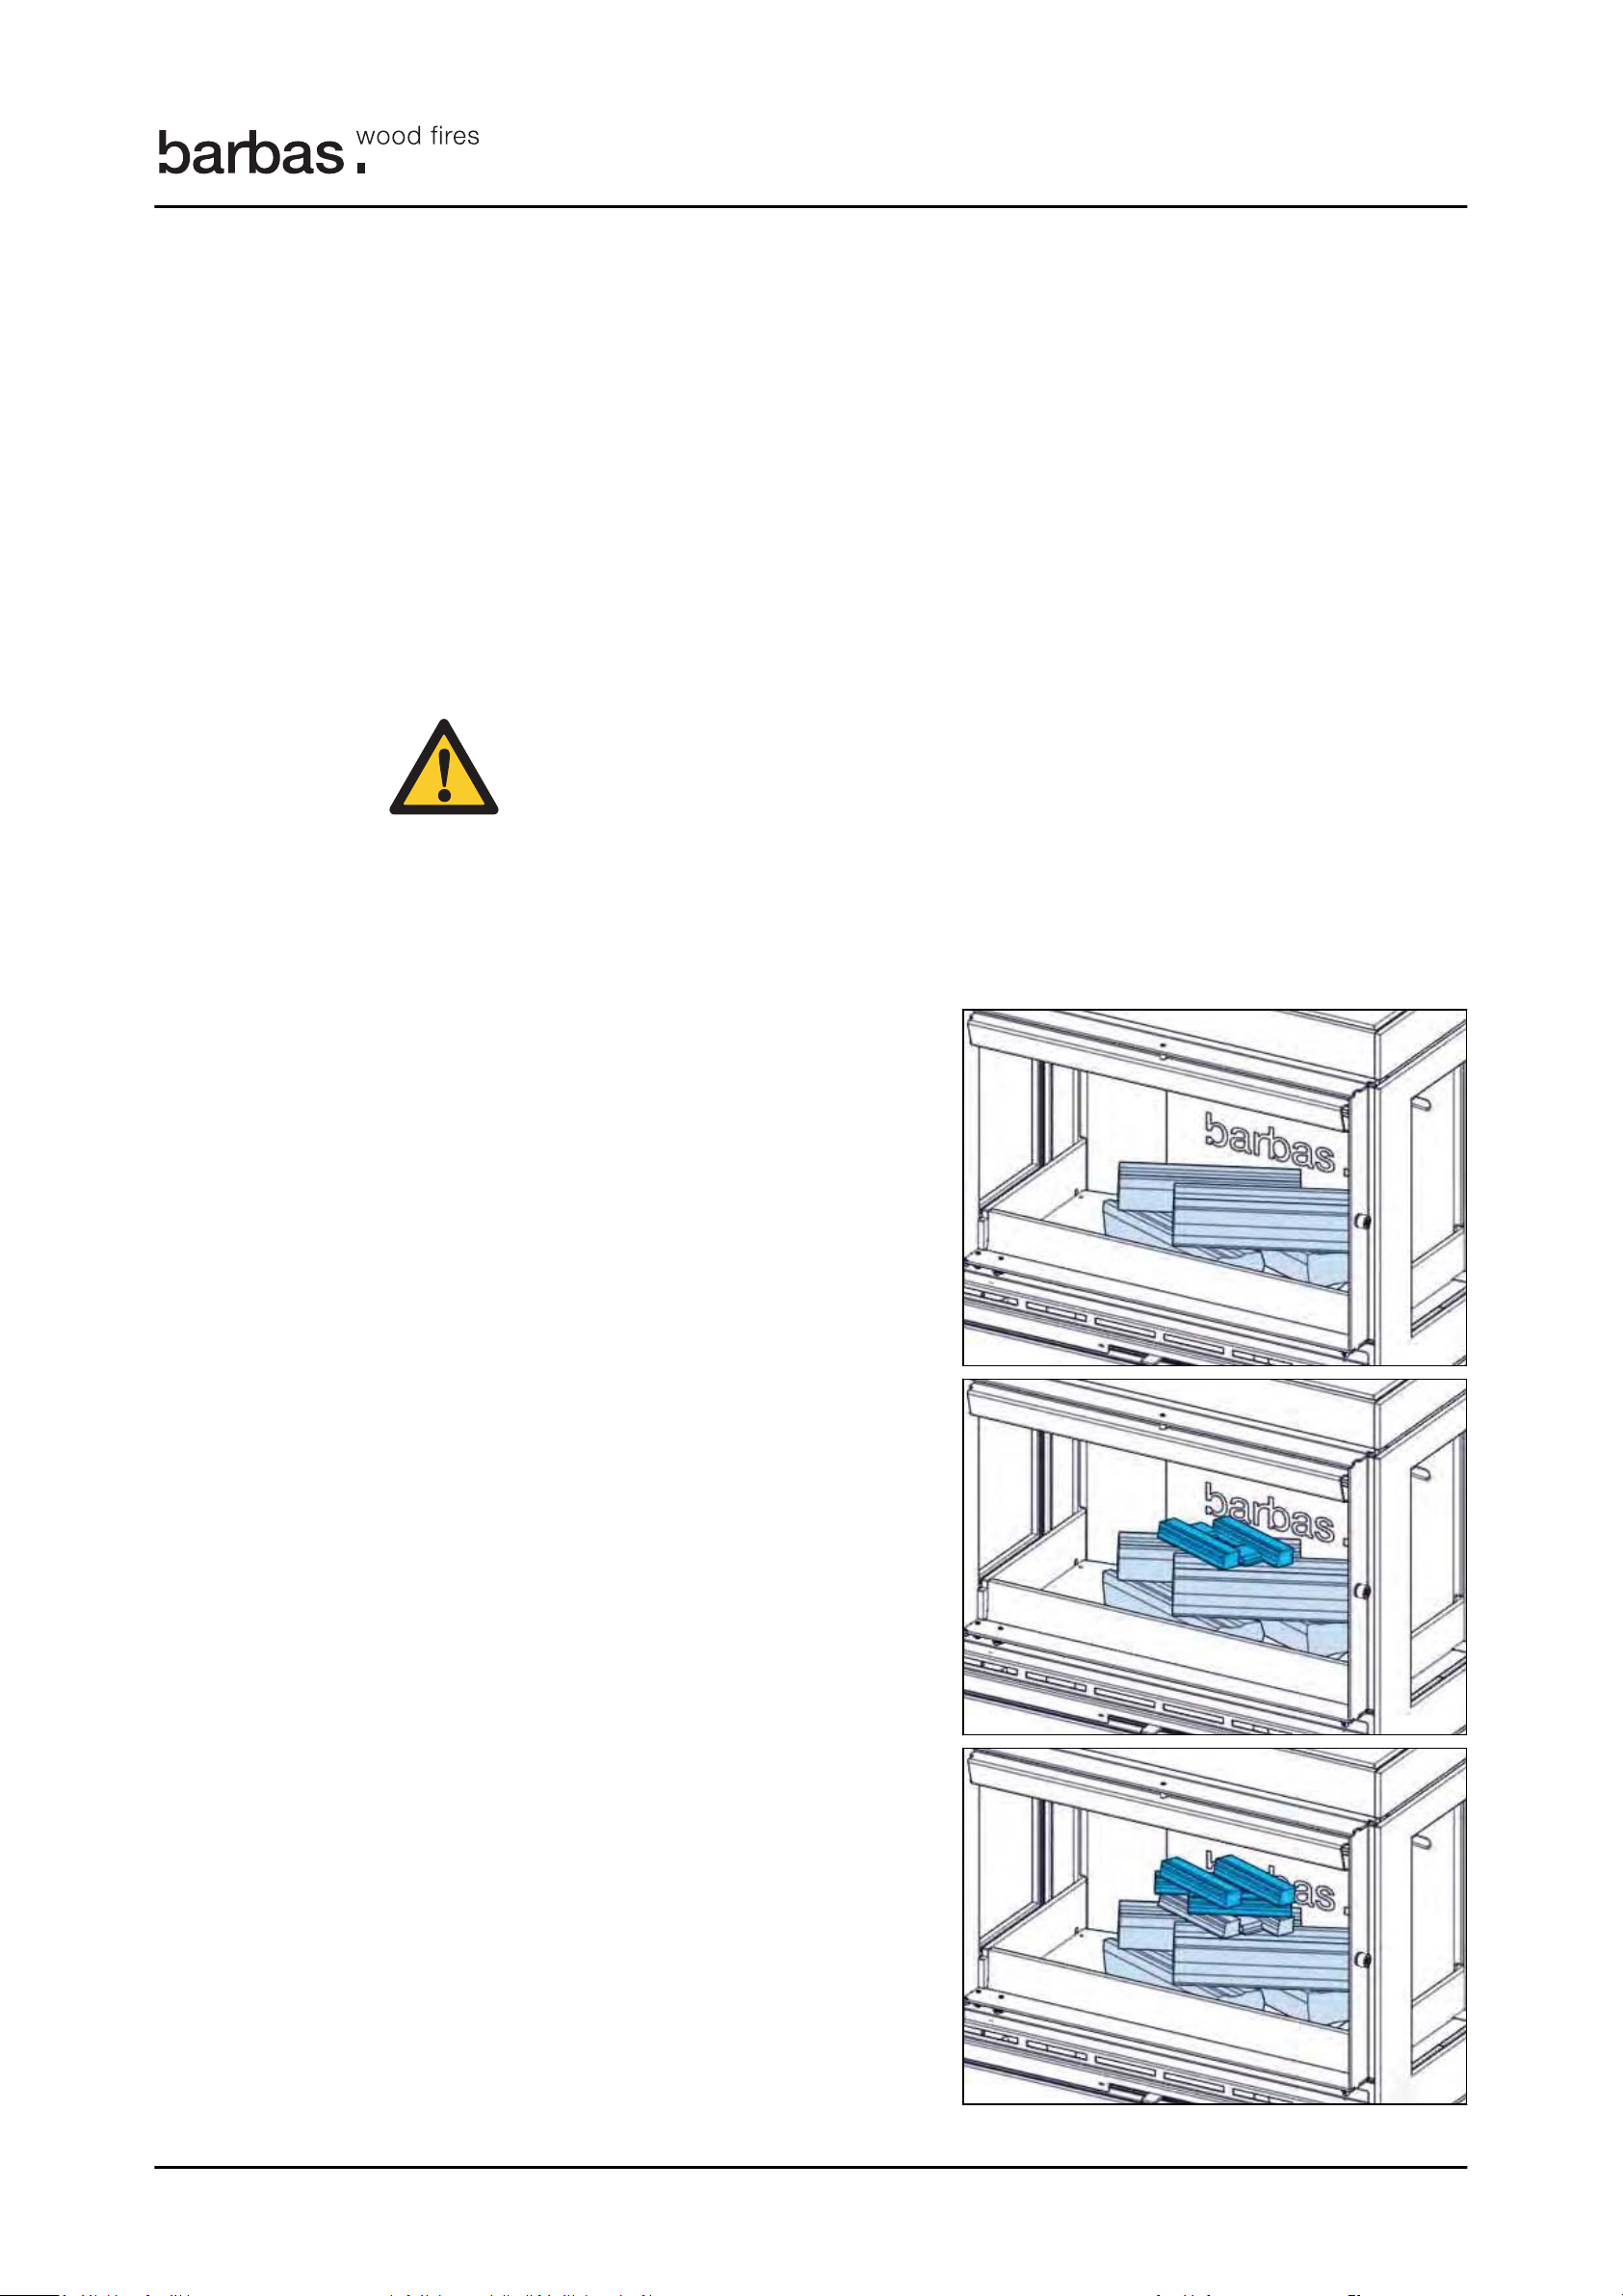
After first few times of use of the appliance, a light deposit on the inside of the glass may
8.3 Firing the appliance
8.3.1 First load and ignition
Warning:
19
occur caused by curing of the paint. This can be removed with glass cleaner or ceramic
hob cleaner.
8
At the beginning the appliance and chimney is cold. It is important that both the appliance
and chimney reach a temperature that guarantees a good functioning of the appliance. A
too low temperature results in incomplete combustion and a poor chimney draught. To
avoid this do the following:
Operation
Do not use the appliance when there is fog or haze or no wind.
1. Put the control lever in the far right position.
2. When, present, open the valve in the external combustion air supply line.
3. When present, open the chimney valve completely.
4. Open the door of the appliance.
5. Put minimum 4 wood logs crosswise
on the floor of the combustion
chamber.
6. Put some kindling wood and 1 or 2
firestarter cubes on top of the wood
logs.
7. Put some kindling wood above the
firestarter cubes.
Box Panorama 65
Page 20
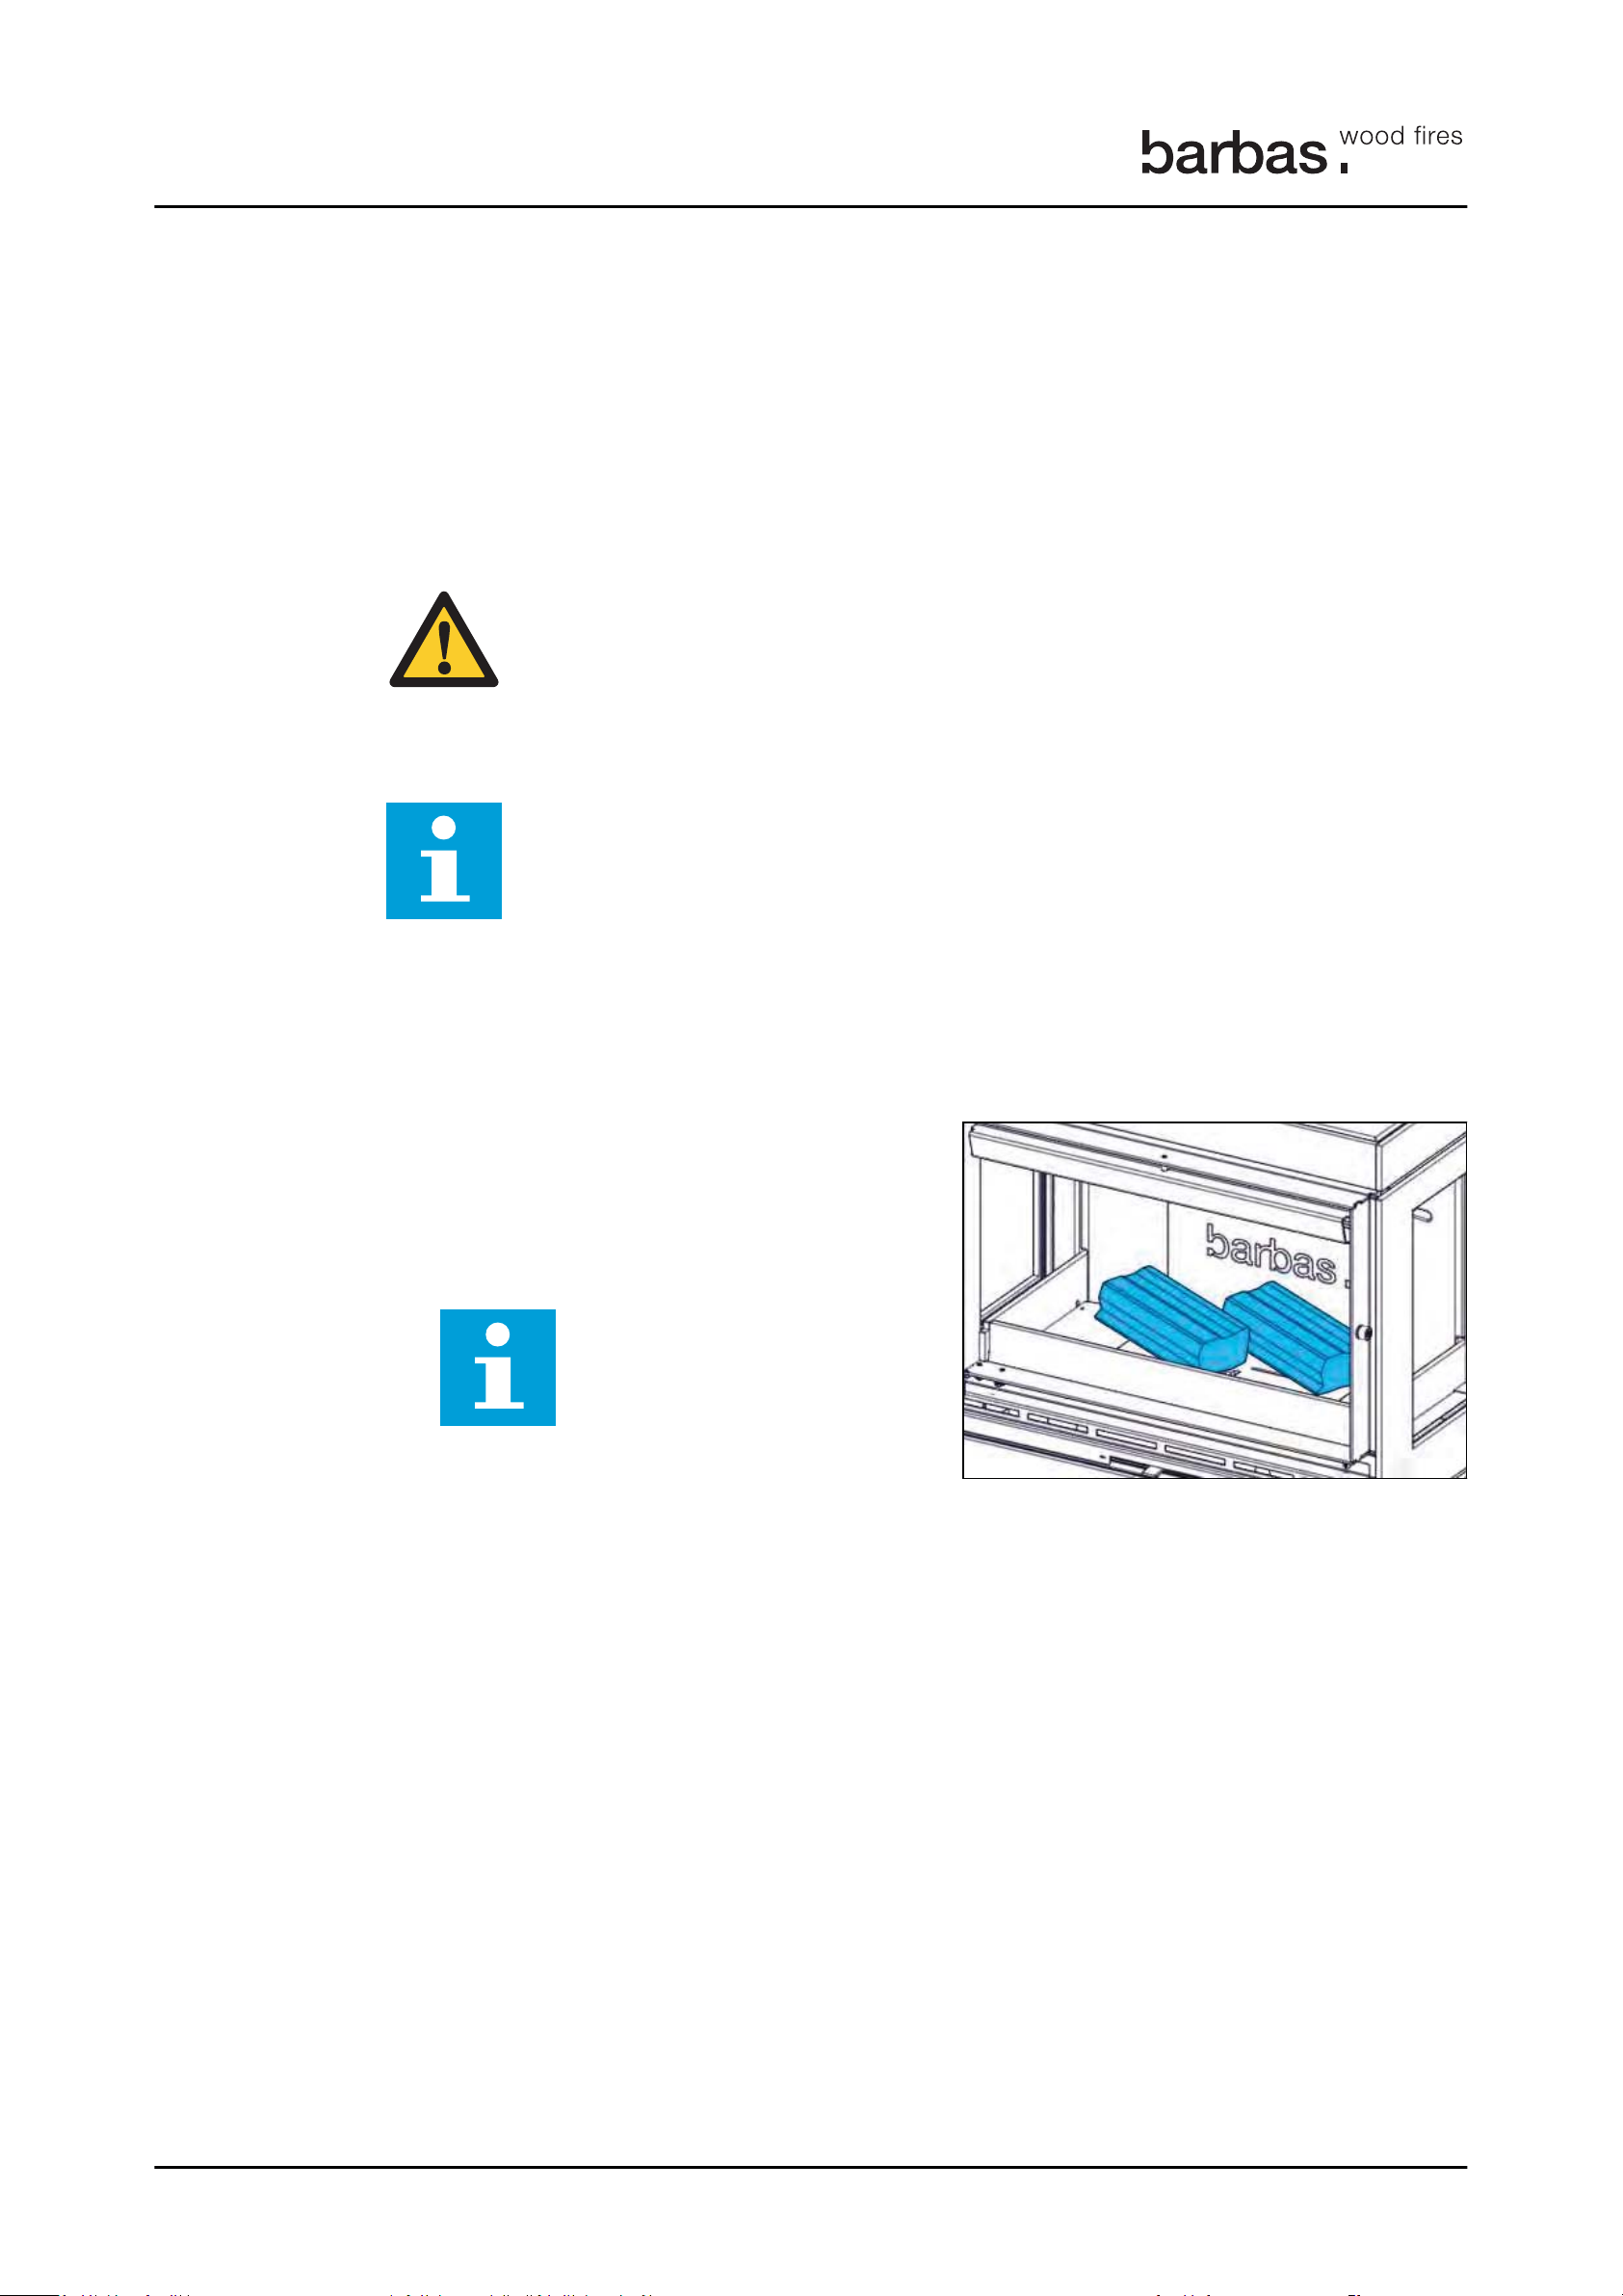
8.3.2 Reload with fuel
Caution:
Note:
Note:
8.3.3 Control the burn process
Operation
20
8. Light the firestarter cubes with a lighter or a match.
9. Close the door of the appliance.
After approximately 20 minutes the wood logs burn. Dependent on the quality of the
chimney the wood logs burn for approximately 1 to 1.5 hours. Do not open the door of the
appliance before the last flames have almost disappeared.
8
If there is insufficient burning material in the firebed to light a new fuel charge,
excessive smoke emission can occur. Refueling must be done onto a
sufficient quantity of glowing embers and ash to make sure that the new fuel
charge will ignite in a reasonable period. If there are too few embers in the fire
bed, add suitable kindling to prevent excessive smoke.
The procedure hereunder is a general description. The best reloading
moment is dependent on the flue draught. A high flue draught requires
reloading when the flames have completely disappeared. If the flue draught is
low, reloading must be done when there are still flames.
1. Wait until the last flames have almost disappeared.
2. Set the control lever in the far right position.
3. Open the door.
4. Reload the appliance with 2 wood
logs, placed flat and diagonally on
the combustion chamber floor. Use
the recommended amount of fuel.
Refer to chapter
can occur on the side
windows during the
combustion of the first
and second fuel load. To
avoid this, put the wood
logs on the combustion
floor as wide as possible,
so that the side windows
are heated good.
7.2
.
Some black deposit
5. Close the door.
6. After ignition of the fuel, move the control lever to the left to a position that gives a
quiet burning fire.
Control the burn process with the control lever. This lever controls the amount of primary
combustion air and both the secondary combustion air and airwash amount.
Box Panorama 65
Page 21
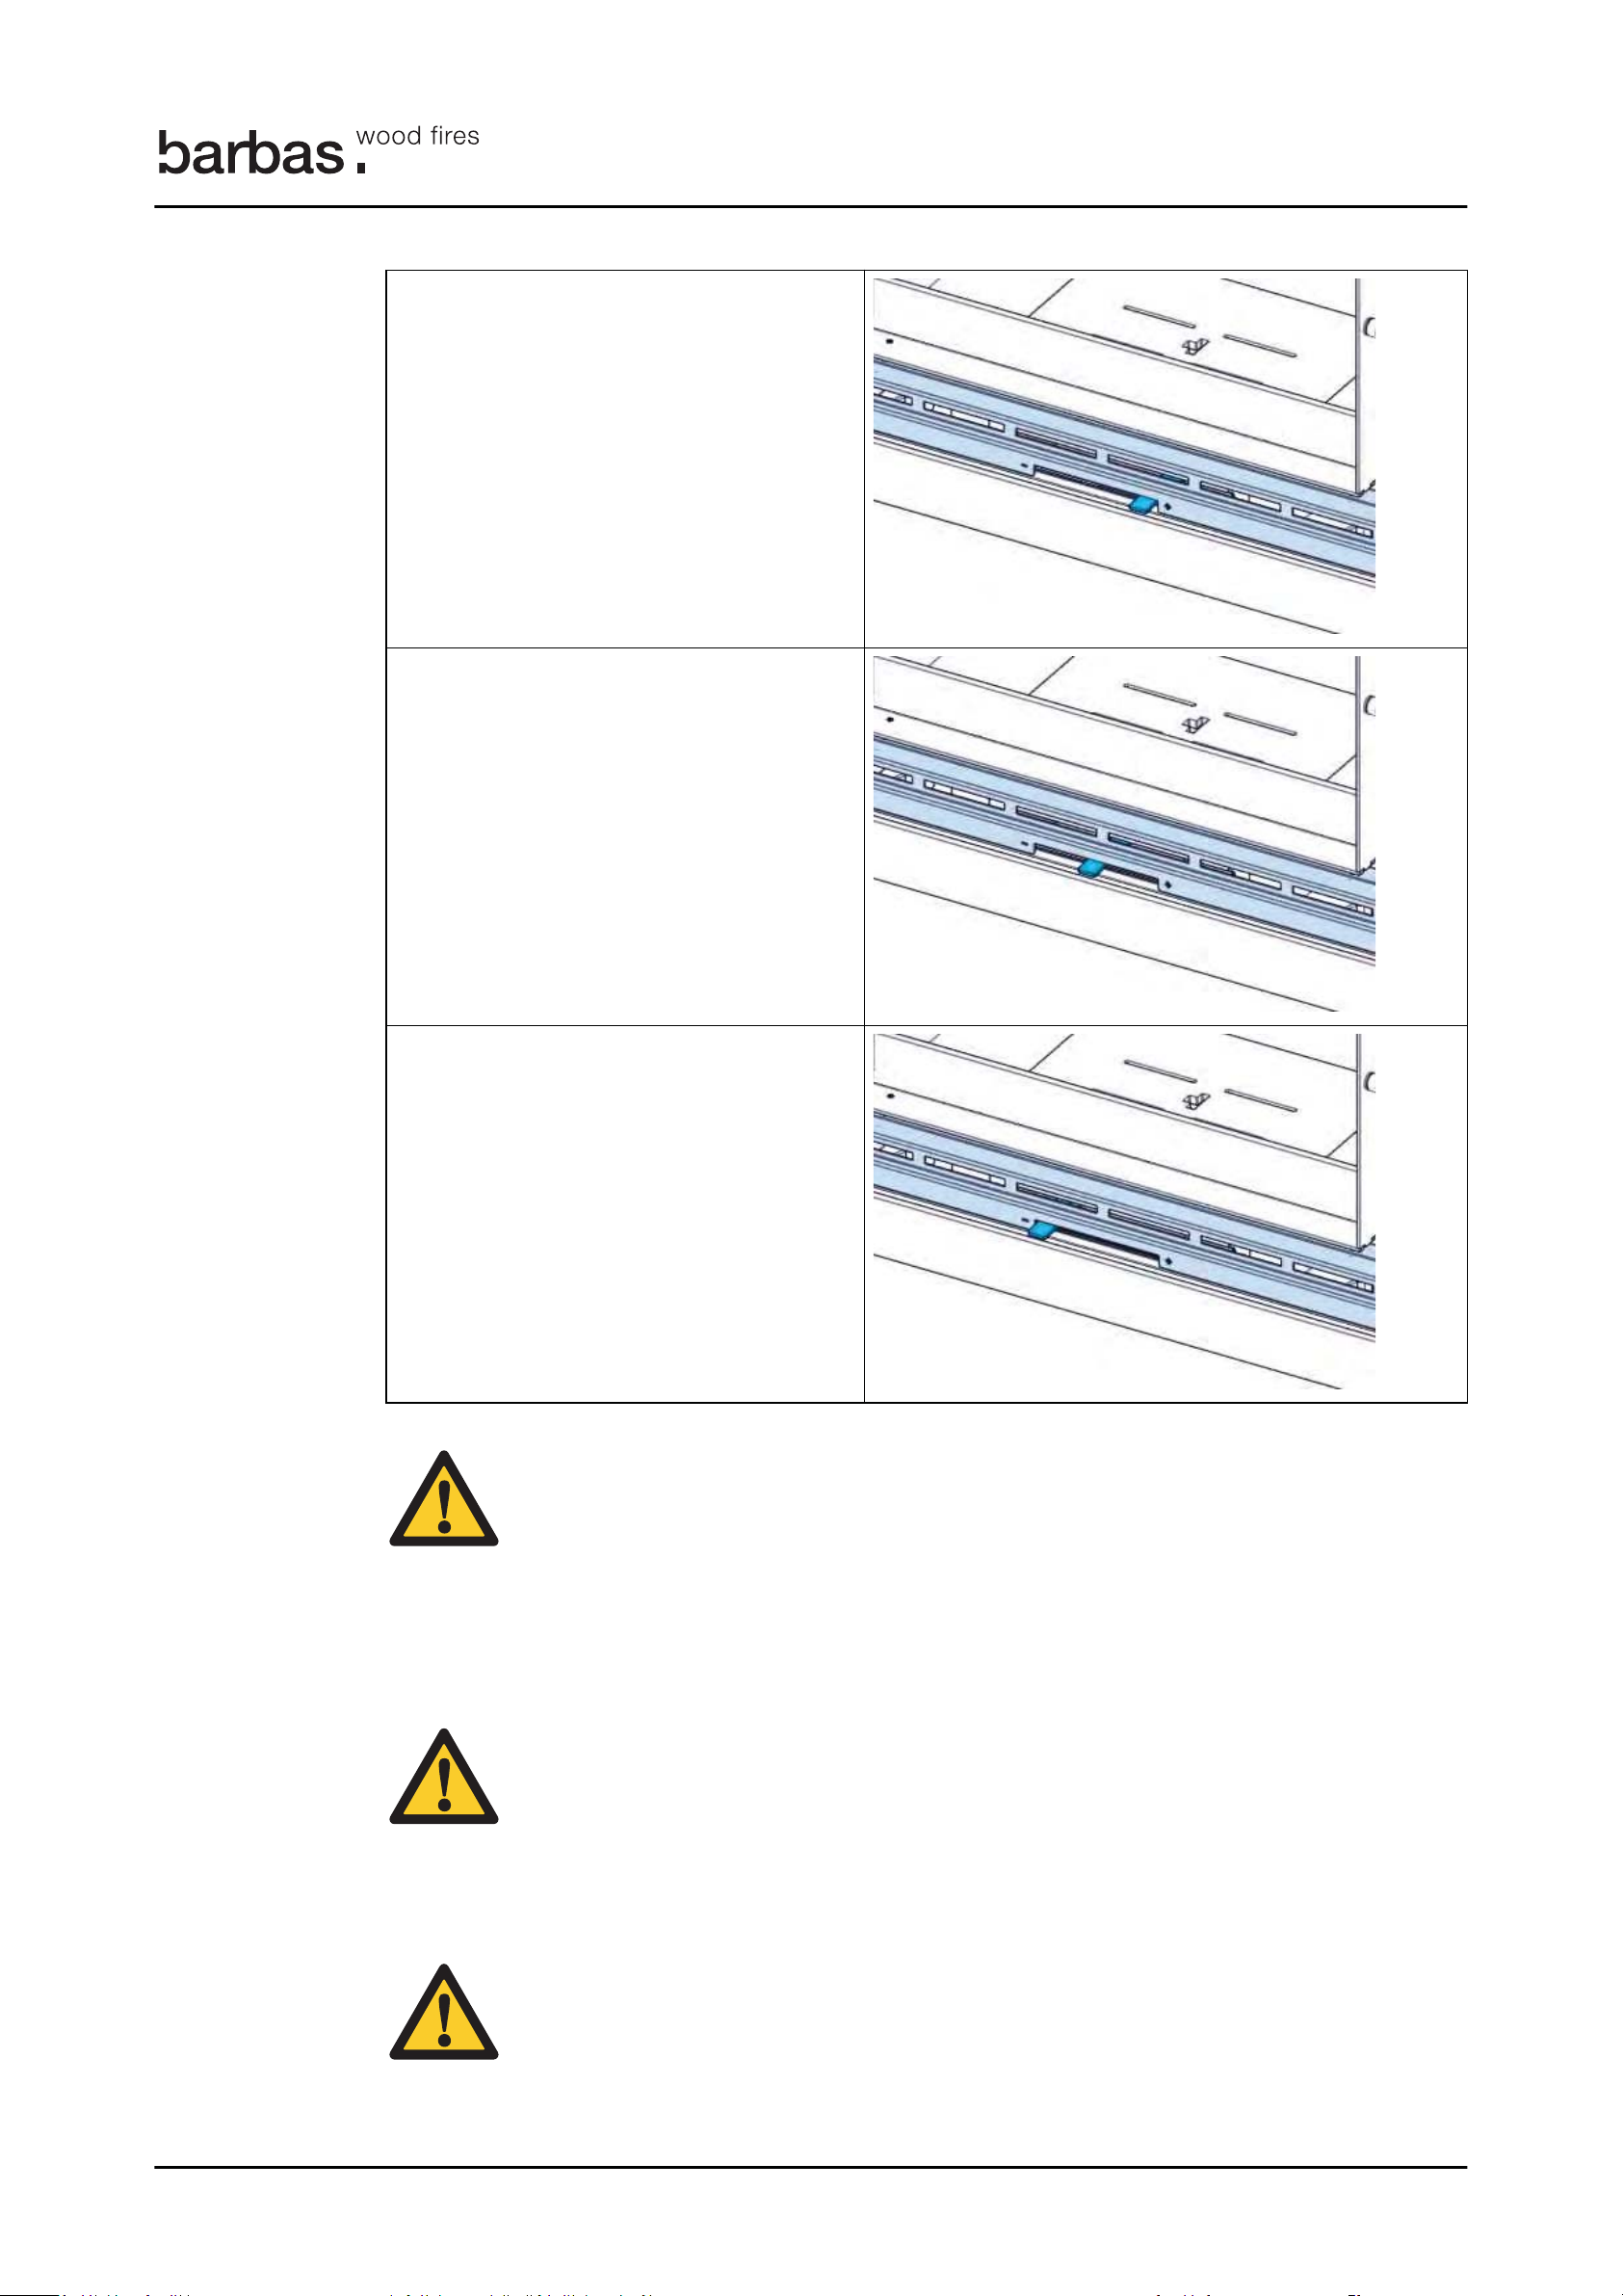
Control lever in the far right position:
Warning:
Caution:
8.3.4 Increase the flue draught
Warning:
21
primary air inlet maximum open
secondary air inlet maximum open
airwash inlet maximum open
Control lever in the center position:
Operation
primary air inlet is closed
secondary air inlet maximum open
airwash inlet maximum open
Control lever in the far left position:
primary air inlet is closed
secondary air inlet is closed
airwash inlet is closed
W
Setting the control lever in the far left position (all air inlets closed) when the
fuel is burning leads to excessive emission of hazardous gasses (example:
carbon monoxide) and soot deposit on the glass of the door and in the
chimney. Never close the air inlets when the fuel is burning. Always keep the
secondary air inlet and air wash inlet open by setting the control lever
somewhere in-between the center position and the far left position.
Continuous firing with the primary air inlet fully open (control lever in the far
right position) causes a white-hot fire that can damage the appliance. Use the
primary air only during the first fuel load and for ignition of a new fuel load.
appliance has cooled down and there are no glowing embers.
Do the procedure hereunder when you have made sure the
Box Panorama 65
Page 22
Operation
22
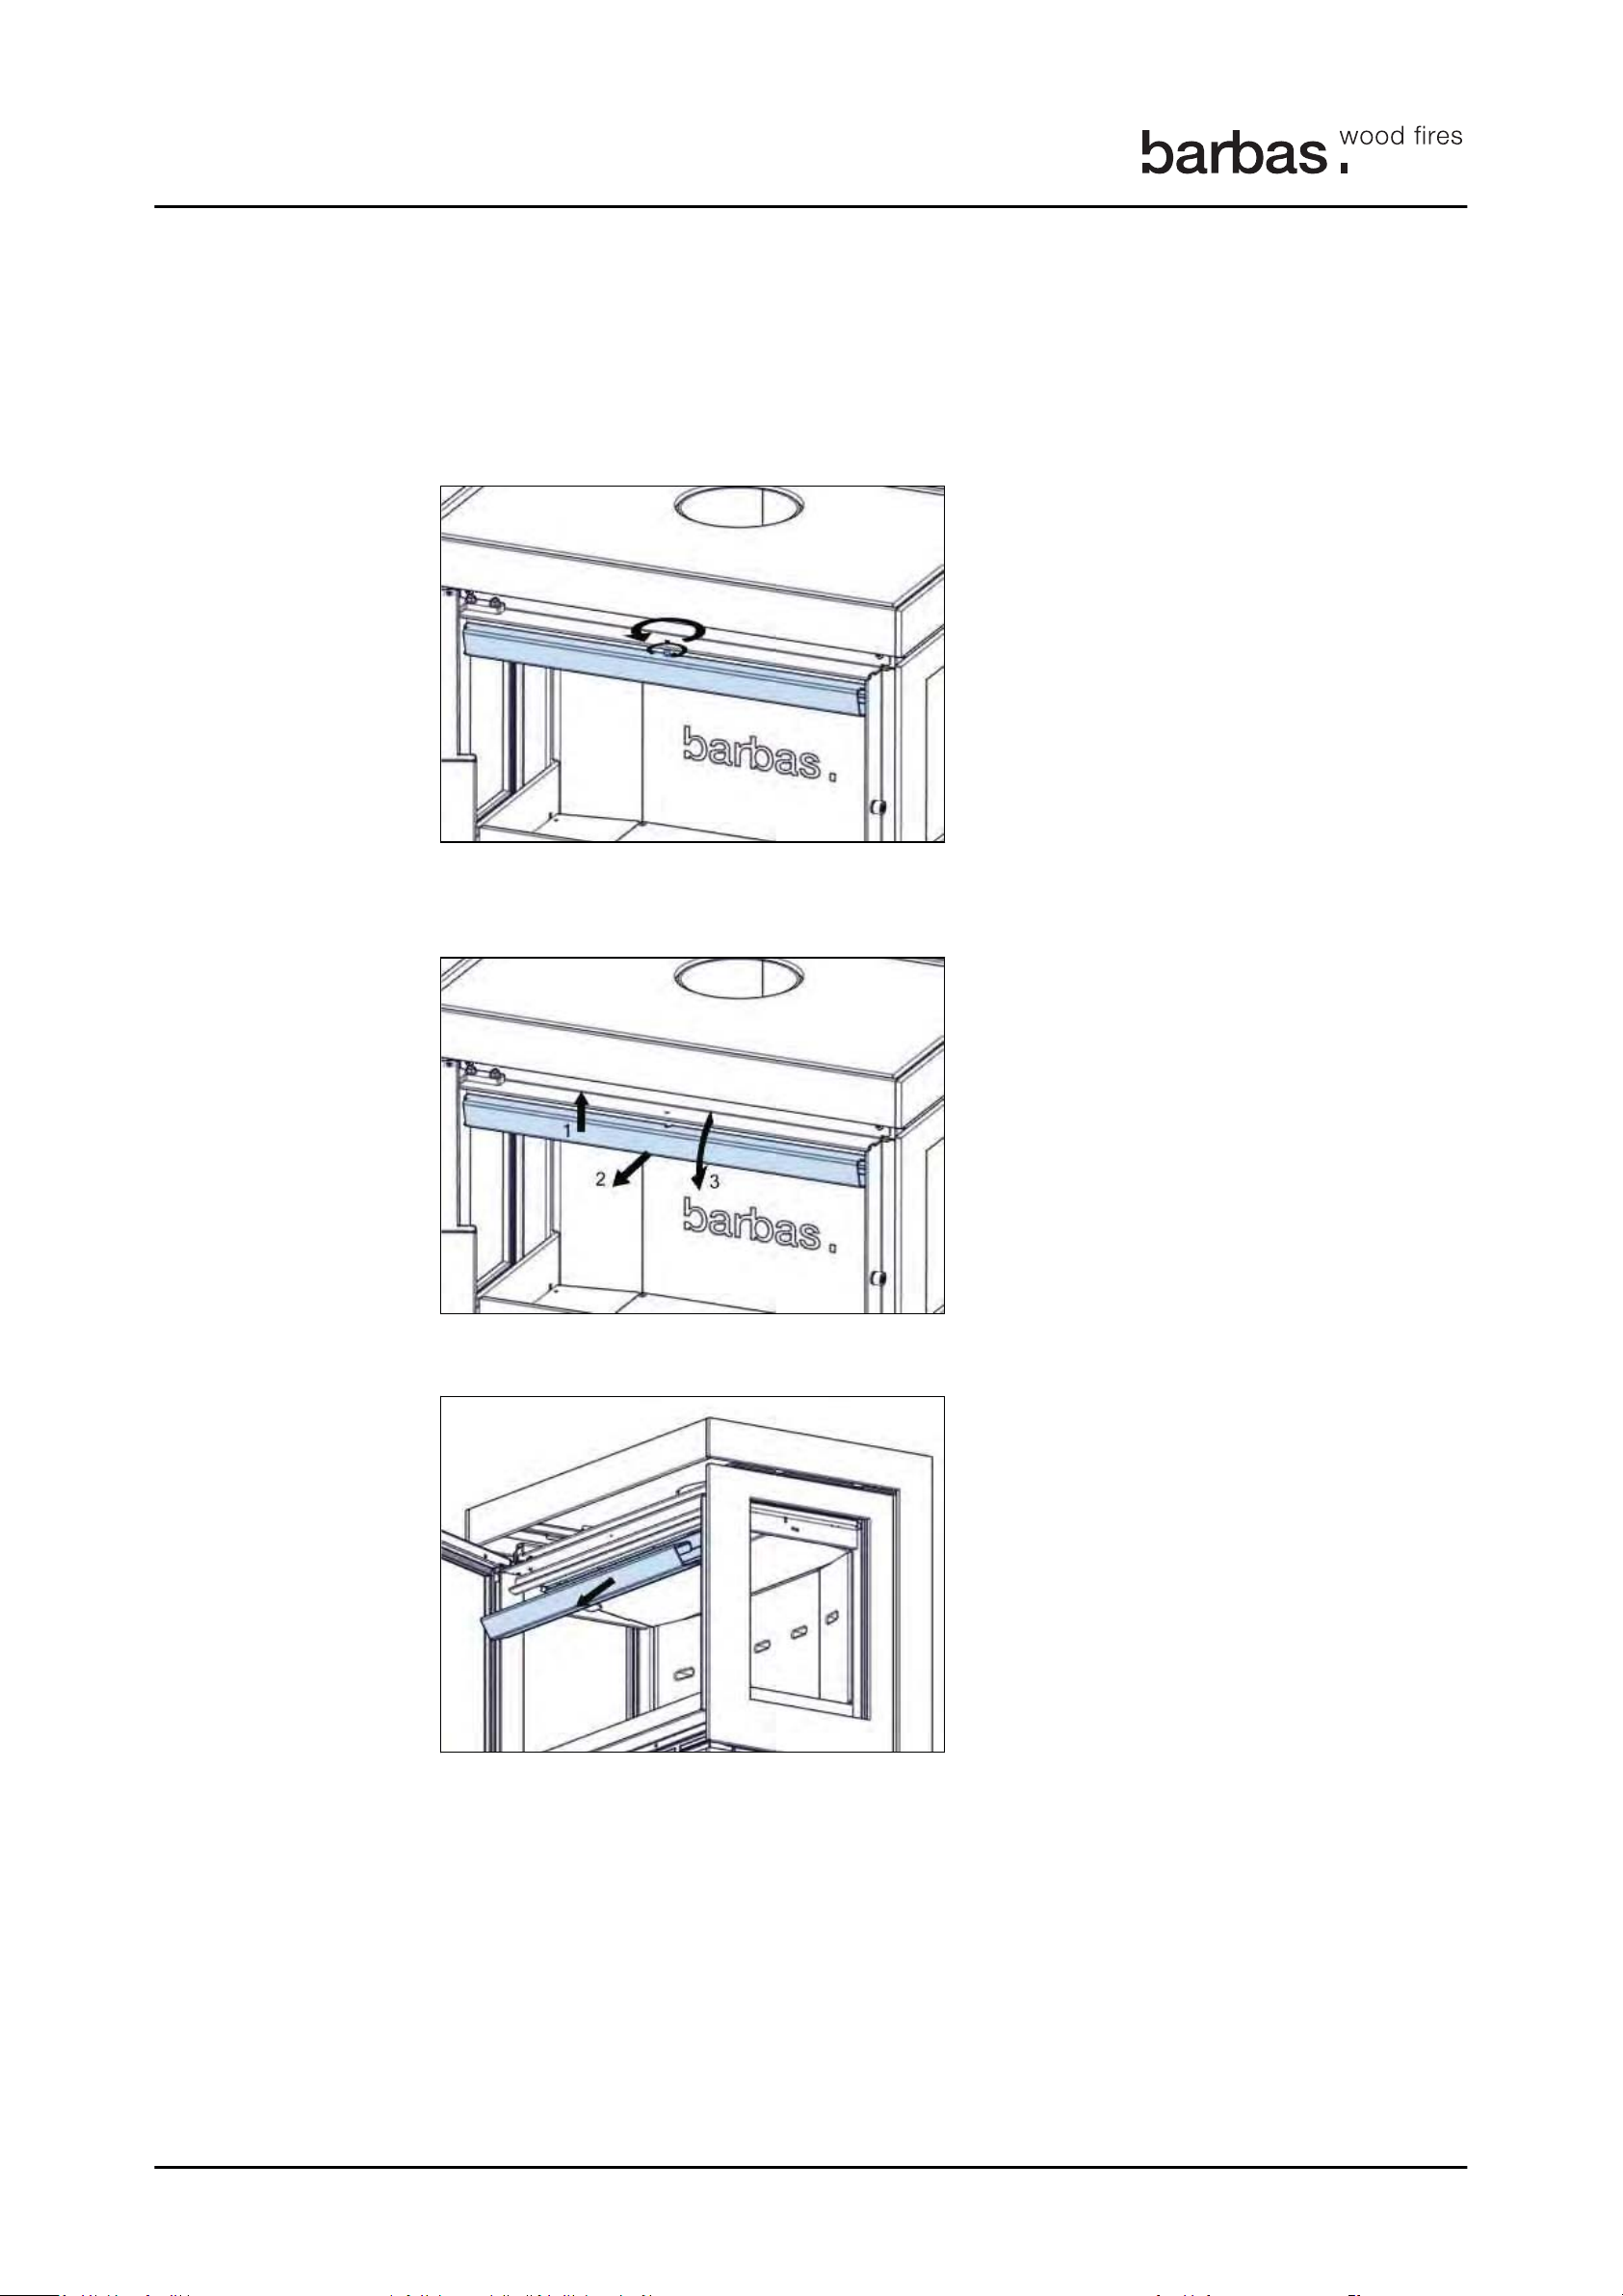
A low flue draught is caused by too much flow resistance. This causes insufficient flow of
the flue gas in the chimney. Do the next steps to decrease the flow resistance
1. Loosen the nut above the heat shield with a 3 mm hexagonal key and a 10 mm fork
spanner. Unscrew the socket screw. Make sure the nut stays attached to the socket
screw.
2. Push up (1) the front of the heat shield and pull it forward (2) and move downward to
a vertical position (3).
3. Remove the upper baffle from the appliance.
2
Box Panorama 65
Page 23
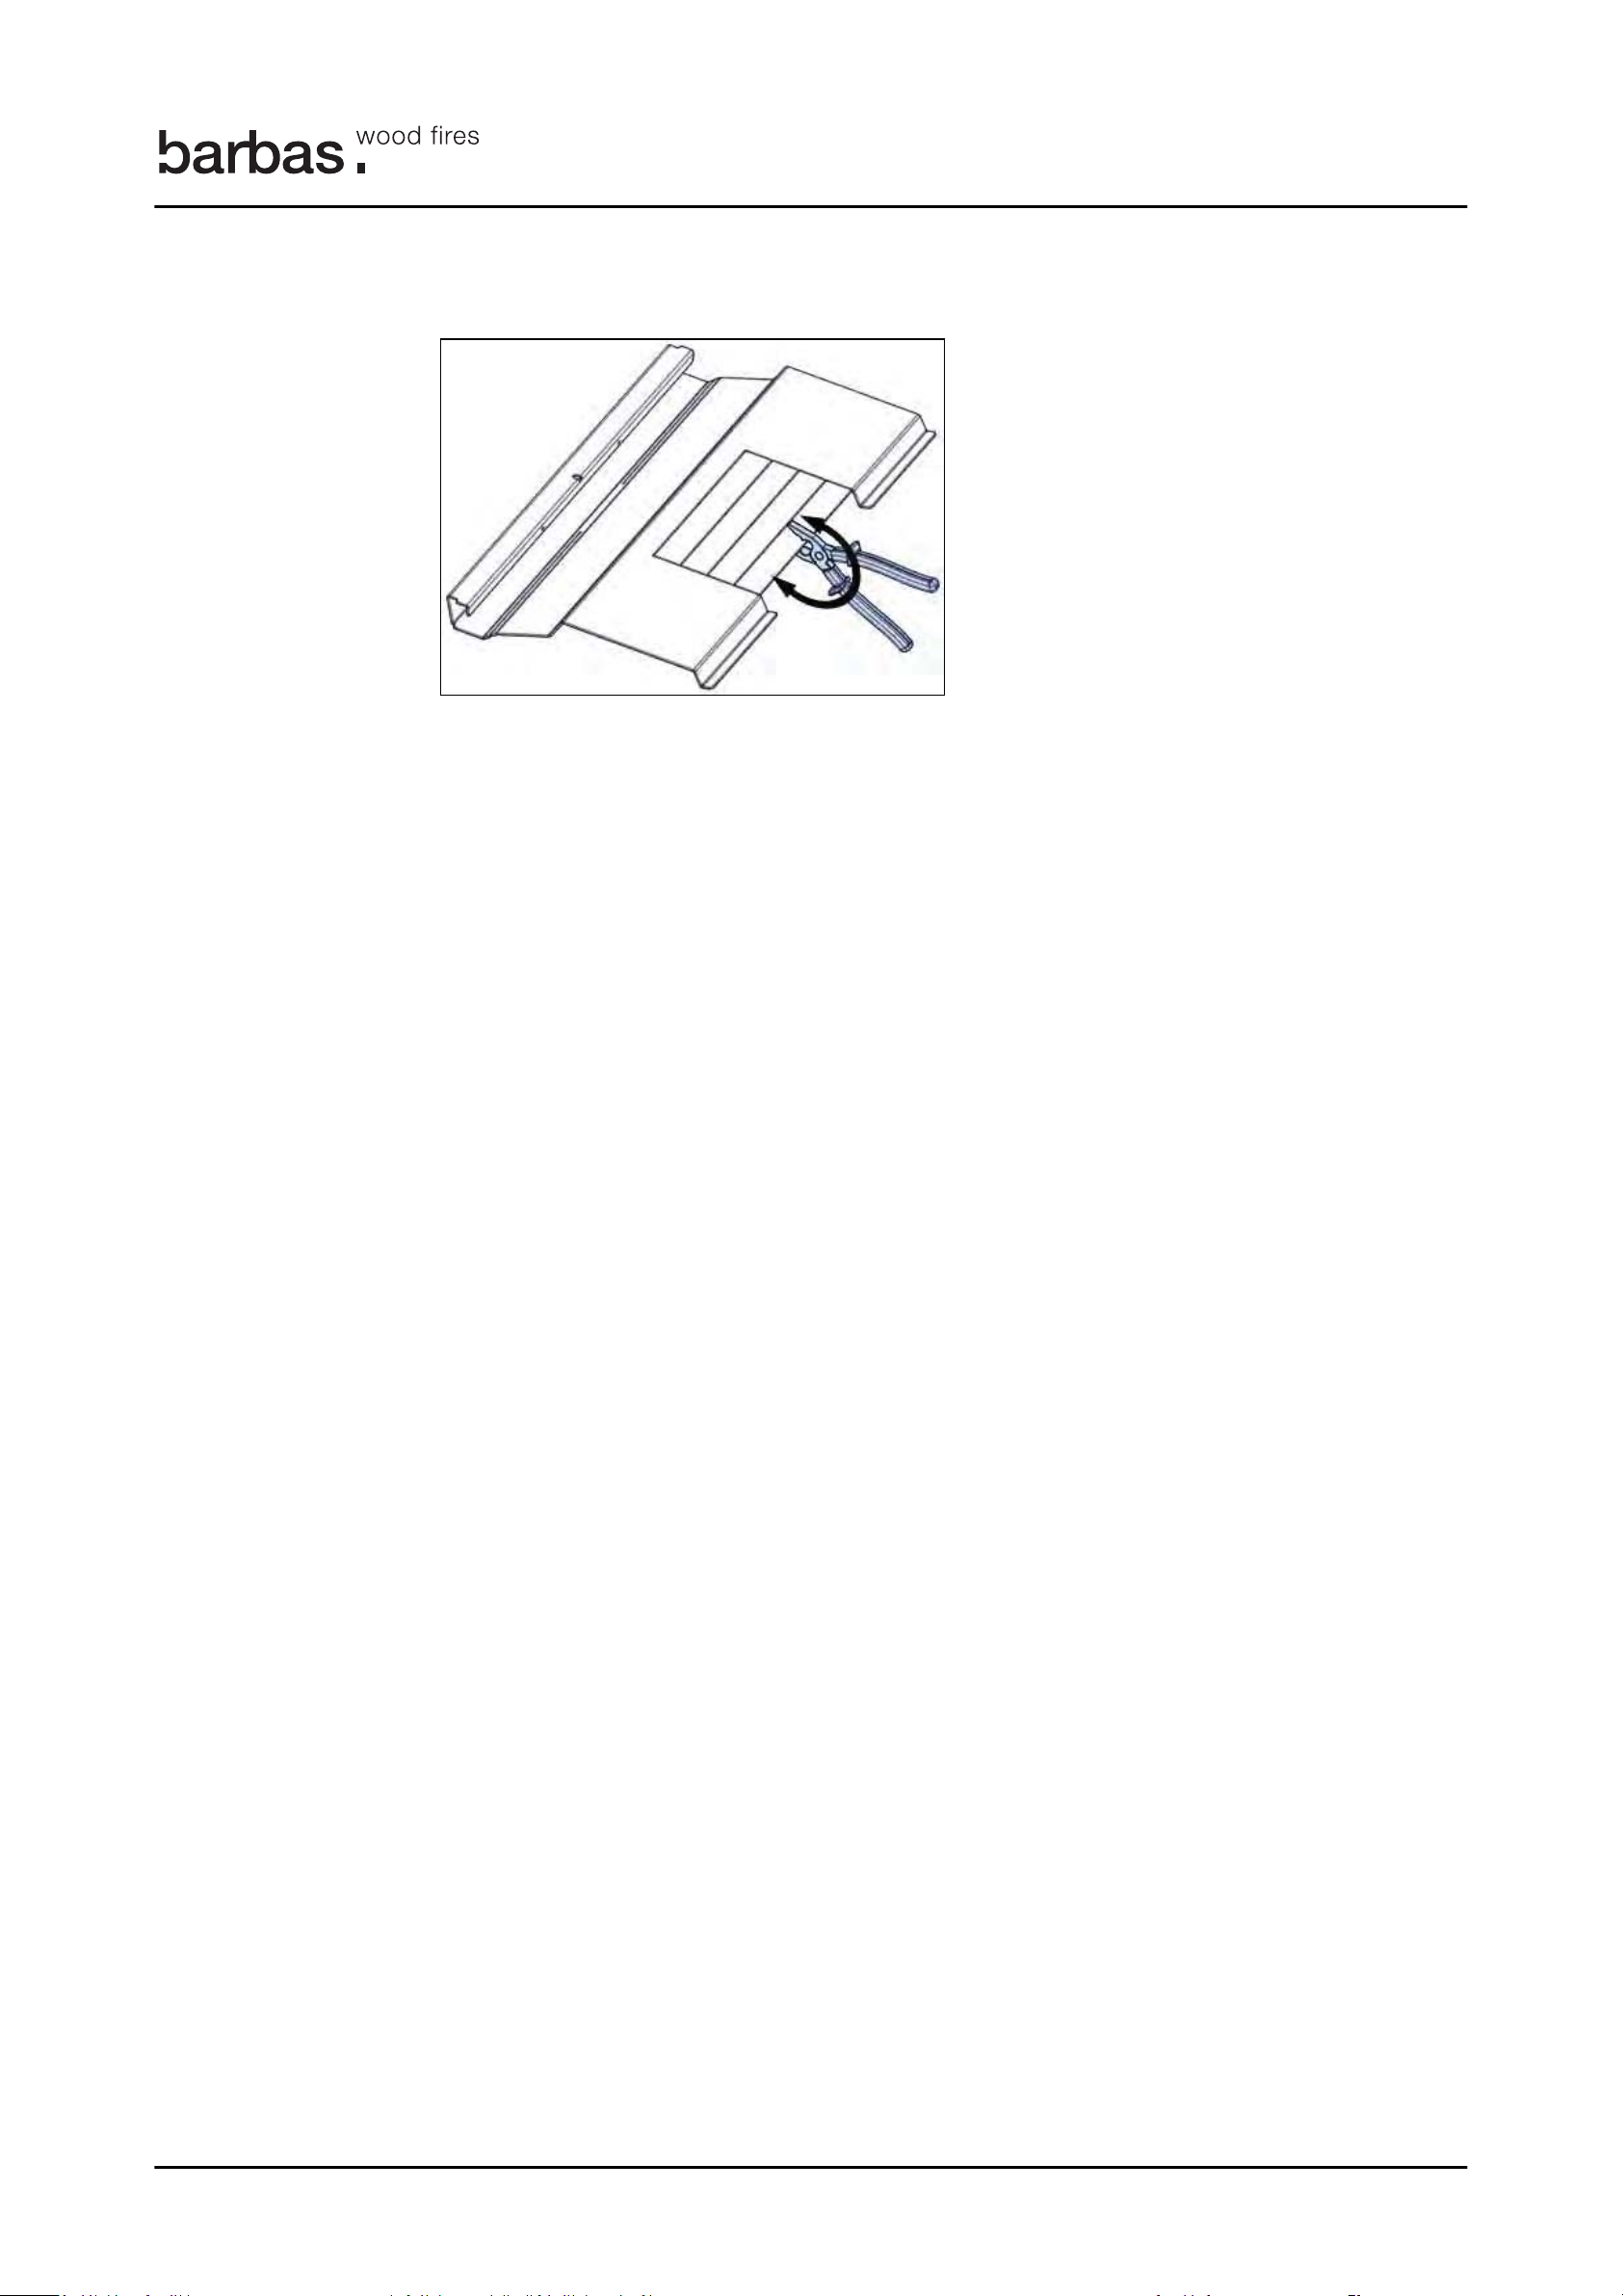
4. Break out 1 to 4 break strips from the baffle with a pair of pliers.
8.3.5 General firing tips
23
5. Do the steps 1 to 3 in opposite order to put the upper baffle in the appliance
Operation
8
• The appliance works best when it has heated up as described in chapter
Insufficient heating up leads to a low chimney draught, black deposits on the glass
and incomplete combustion. Good combustion is recognized by bright orange flames,
invisible smoke and no soot deposits on the glass. Use the control lever to get good
combustion. Refer to
• Make sure the door of the appliance is closed when in use. Only open the door for
ignition and to refuel.
• Do not remove all the ashes. An ash layer in the combustion chamber forms a heat
insulating layer, that helps the fuel to ignite easy.
• Do not set the control lever in the far left position (all combustion air inlets closed)
when the appliance is used. This will cause severe smoke development, soot
formation and increases the chance of a chimney fire.
• After the first load, do not overload the appliance with fuel. Refer to
recommended amount of fuel. Too much fuel leads to incomplete combustion, soot
formation and a chance of a chimney fire.
7.1
for advice on the required fuel quality.
7.2
8.3.1
for the
.
Box Panorama 65
Page 24
9 Maintenance
9.1 Maintenance schedule
Caution:
Table 6: Maintenance schedule
Task Frequency Procedure
9.2 Remove the ashes
9.3 Clean the glass
Caution:
do not use scouring liquid, scouring powder or
cleansing liquid that contains ammoniac
Tip:
Maintenance
24
9
Clean the glass when it is dirty. If the glass is not cleaned when it is dirty the
glass can become permanently dull.
Remove the ashes When necessary Refer to section
Clean the glass When necessary Refer to section
Maintenance by your fitter Yearly Refer to your dealer
Chimney sweep Yearly (or more often when
Appliance inspection Yearly Refer to the Installation and
1. Make sure that the appliance has cooled down and there are no glowing embers.
2. Remove the ashes with a small scoop.
3. Lift the grate with the operating hook and remove the grate.
4. Remove the ashtray and empty it.
5. Make sure there are no ashes in the space under the ash tray. Remove these ashes
when necessary.
necessary)
9.2
9.3
Refer to the Installation and
maintenance manual
maintenance manual
6. Put the ash tray back in the appliance.
7. Put the grate back in the appliance.
1. Make sure the appliance has cooled down and there are no glowing embers in the
combustion chamber.
2. To avoid any up swirl of ashes during cleaning, remove the ashes from the
appliance.
3. Clean the glass with a soft cloth, a sponge or paper. Use glass cleaner or ceramic
hob cleaner.
The side glass has a heat reflective coating on the outside. To avoid
damage to this coating, d
Use only:
to clean the outside of the glass.
• neutral cleaning liquids
• soft cloth or sponge
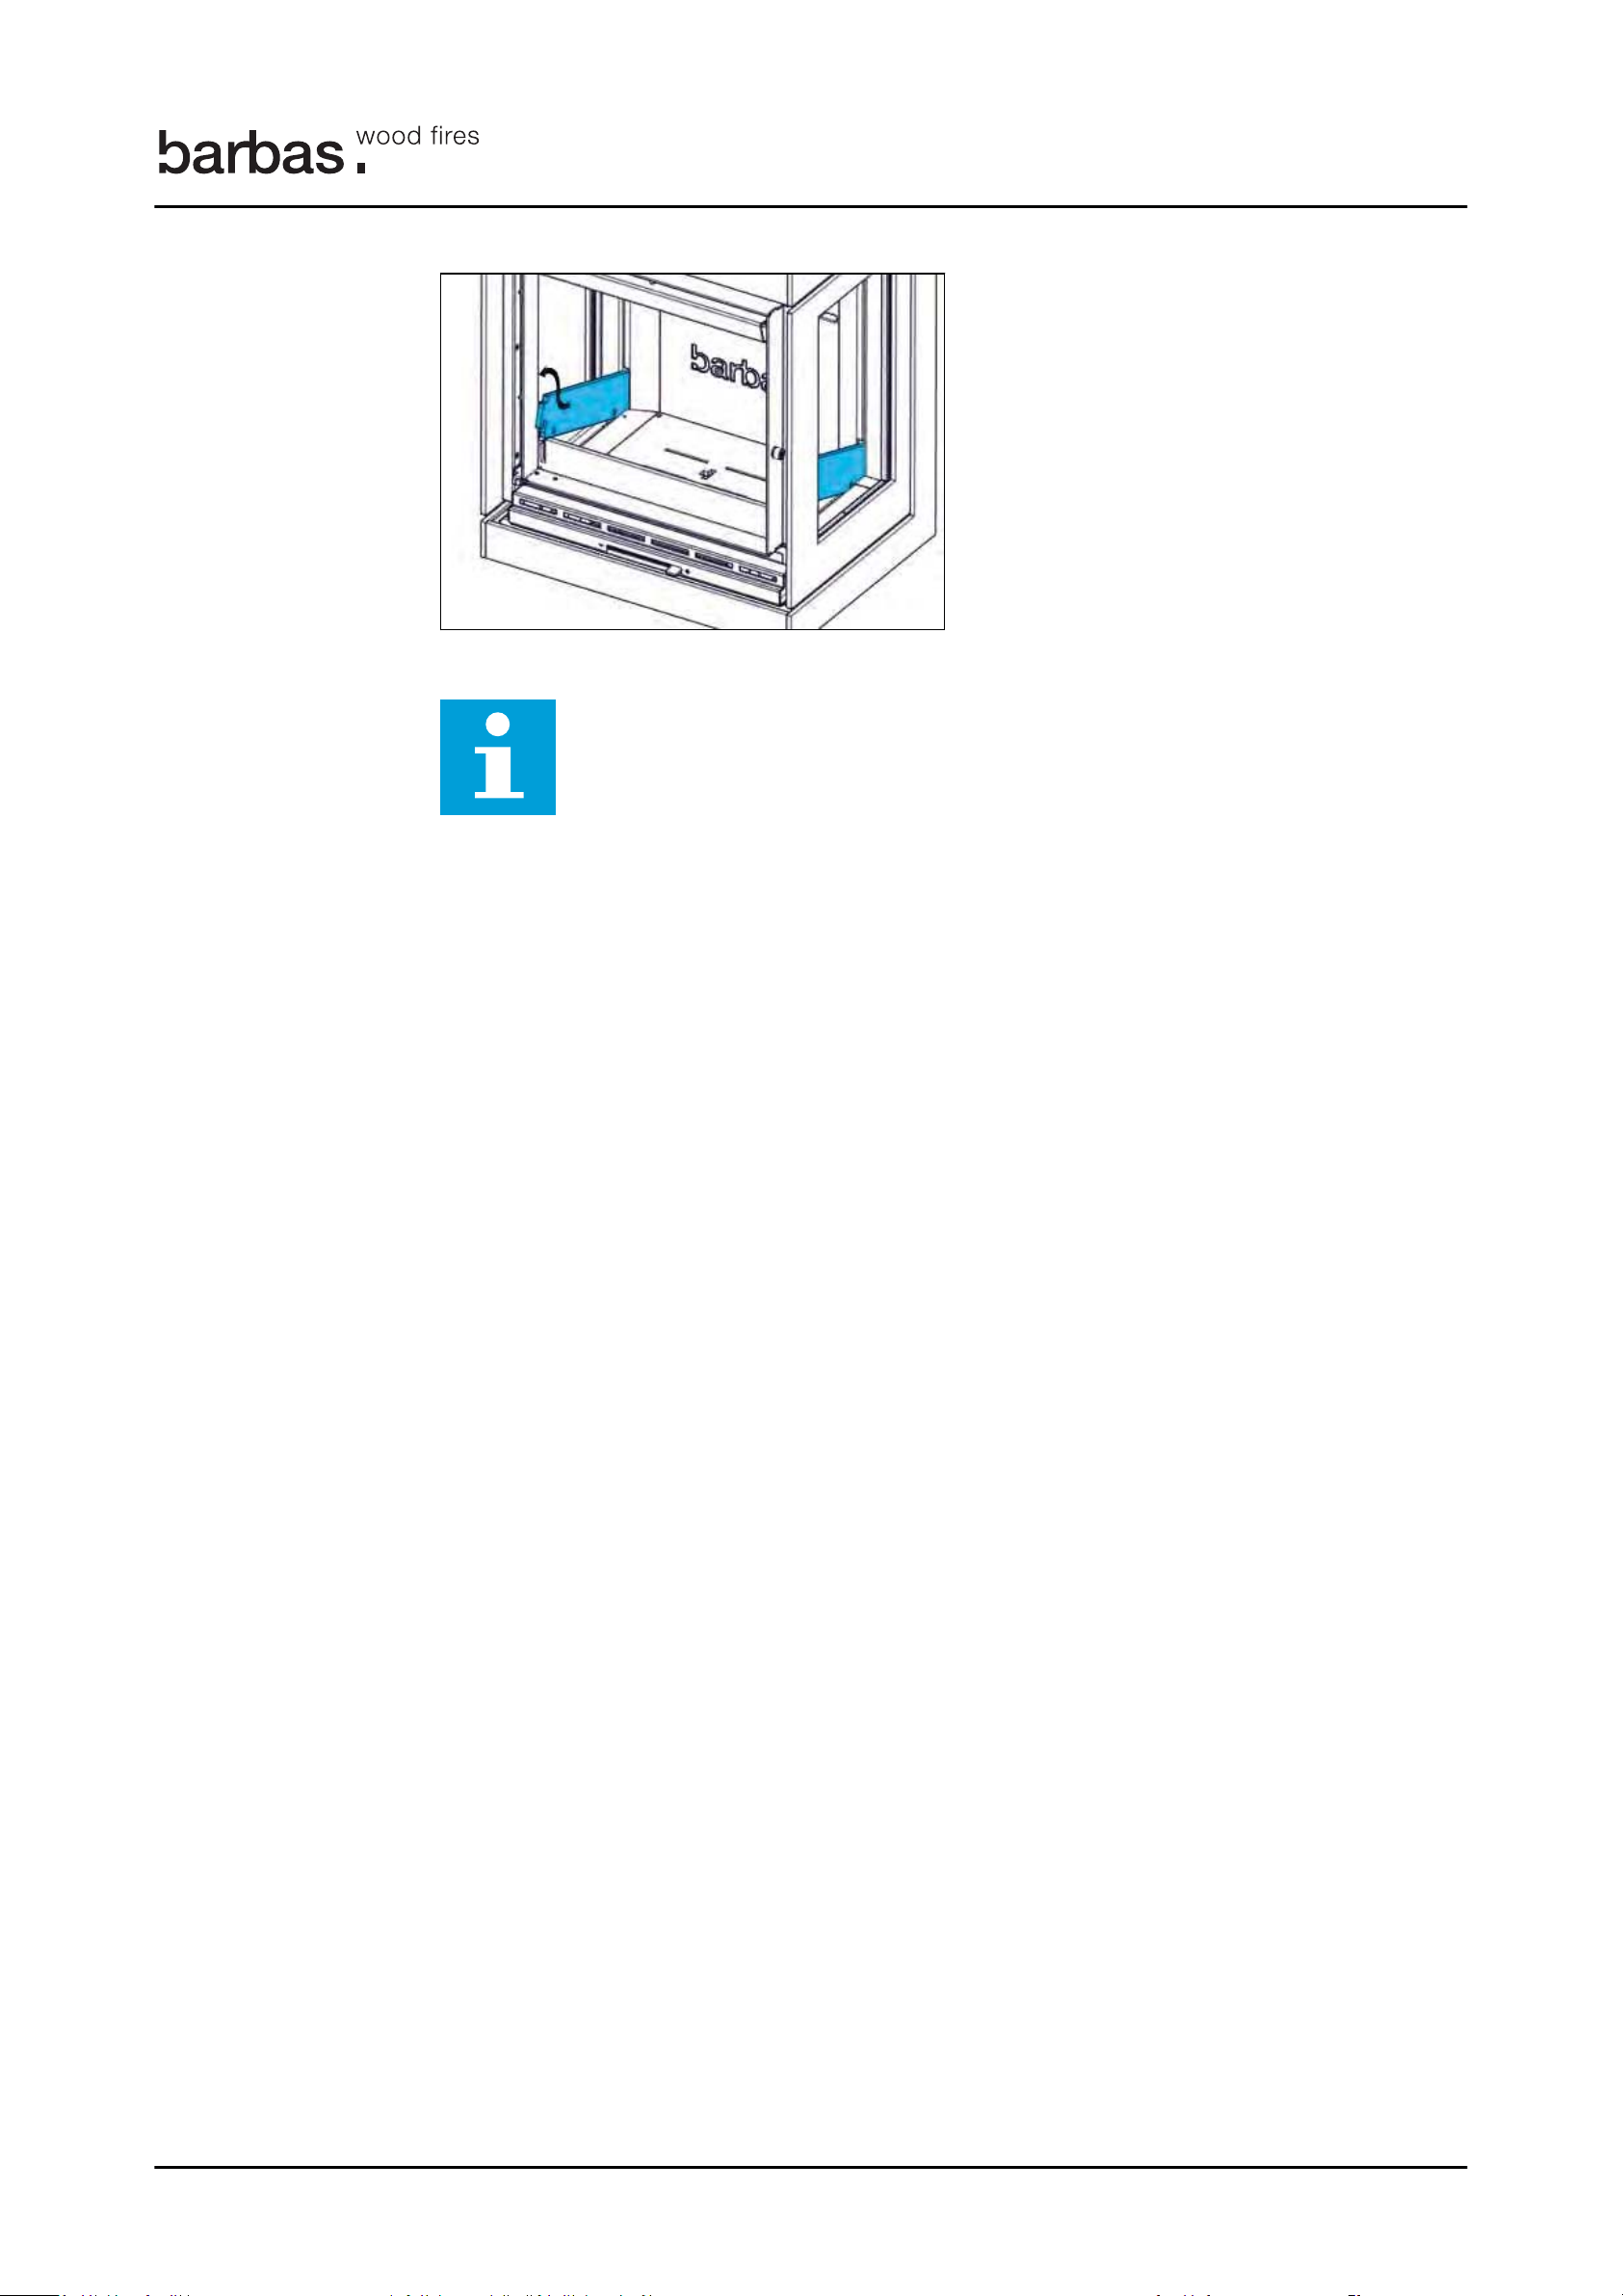
Remove the 2 side log guards before cleaning the 2 side glasses.
Box Panorama 65
Page 25
Note:
Maintenance
25
4. Make sure that the glass is dry. Water droplets can leave a mark on the glass.
N
Damaged or broken glass must be replaced before the appliance can be
used again.
Box Panorama 65
Page 26
10 Troubleshooting
Table 7: Troubleshooting
Problem Possible cause Possible solution
Warning:
Troubleshooting
26
1
Chimney fire (recognized by a
roaring sound in the chimney)
Ignition of soot and tar deposits in the chimney.
• Set the control lever in the far
left position.
• Call the emergency services.
(112)
• Put out the fire in the appliance
with sand.
Never use water
to put out the fire.
• Ventilate the house.
After the chimney has been extinguished, sweep the chimney and
inspect for damage.
Sweep the chimney minimum
once a year by a certified chimney
sweep.
The wood logs do not ignite The moisture content of the
wood logs is too high
The combustion chamber is
not warm enough
The wood logs burn too fast Primary air inlet is open. Close the primary air supply. Ad-
The chimney draught is too
high
• Use dried wood logs with a
moisture content of 10 - 20 %.
• Use wood briquettes
• Do the recommended ignition
procedure. Refer to chapter
8.3.1
.
• Use the recommended amount
7.2
of fuel. Refer to chapter
just the amount of secondary air
and air wash with the control lever.
8.3.3
Refer to chapter
• Reduce the amount of secondary air and airwash with the
control lever. Refer to chapter
.
.
8.3.3
The temperature of the room
does not rise sufficient
Excessive smoke escapes
when the door of the combustion chamber is open
• Contact your installer.
.
The fuel amount is too low Use the recommended amount of
7.2
8.3.4
.
.
The chimney draught is too
high
The chimney draught is too
low
fuel. Refer to chapter
Contact your installer.
• Do the recommended ignition
procedure. Refer to chapter
8.3.1
.
• Remove one or more break out
strips from the upper baffle.
Refer to chapter
• Contact your installer.
Box Panorama 65
Page 27
P
Problem Possible cause Possible solution
27
Troubleshooting
The glass becomes black The combustion chamber is
not hot enough
The moisture content of the
wood logs is too high
The seal around the door is
damaged
Some cold air flows out from
the front of the appliance when
the appliance is not in use.
The valve in the external
combustion air supply line is
missing or is open.
• Use the recommended amount
7.2
of fuel. Refer to chapter
• Increase the amount of combustion air with the control lever. Refer to chapter
• Put the wood logs diagonally
and as wide as possible on the
combustion chamber floor.
• Use dried wood logs with a
moisture content of 10 - 20 %.
• Use wood briquettes
Contact your dealer.
Close the valve in the external
combustion air supply line.
8.3.3
.
.
The underpressure in the installation room is too high
Reduce the underpressure, for example by opening a ventilation
opening in the installation room.
Box Panorama 65
Page 28
11 Technical data
Technical data
28
1
Name Barbas
Model BOX Panorama 65, BOX Panorama 65 with wood
Tested in accordance with EN 13240:2001-A2:2004
log storage module, BOX Panorama 65 with support frame
EN 16510-1 annex D, E, F
Energy efficiency index (according EU
2015/1186)
Energy efficiency class A
Fuel
Nominal fuel load 2 kg
Nominal heat output (net) 9.2 kW
Minimum heat output (net) 7 kW
Useful efficiency (Net Calorific Value (NCV))
at nominal heat output
Useful efficiency (Net Calorific Value (NCV))
at minimum heat output (indicative)
Indirect heating function No
Room sealed No
The specific precautions that shall be taken
when the local space heater is assembled, installed or maintained, are listed in the attached documents:
101,5
• Wood logs
• Wood briquettes (without binder)
76.2 %
80 %
• Installation and maintenance manual
• User manual
Box Panorama 65
Page 29

1
12 Warranty Terms
Barbas Bellfires Warranty Terms
Article 1: Warranty
Article 2: Warranty conditions
Article 3: Warranty exclusions
29
Barbas Bellfires B.V. guarantees the quality of the supplied Barbas appliance and the
quality of the materials used. All Barbas appliances are developed and manufactured
according to the highest possible quality standards. If, despite all this, something should
prove amiss with the Barbas appliance you have purchased, Barbas Bellfires B.V. offers
the following manufacturer’s warranty.
1. If Barbas Bellfires B.V. determines that the Barbas appliance you have purchased is
defective as a result of a flaw in the construction or material, Barbas Bellfires B.V.
guarantees to repair or replace the appliance free of charge, without charging any
costs for labor or spare parts.
Warranty Terms
2. Repair or replacement of the Barbas appliance will be undertaken by Barbas Bellfires
B.V. or by a Barbas dealer as designated by Barbas Bellfires B.V.
3. This warranty is supplementary to the existing legal national warranty of Barbas
dealers and Barbas Bellfires B.V. in the country of purchase and is not intended to
restrict your rights and claims based on the applicable legal provisions.
1. Should you wish to claim under the warranty, please contact your Barbas dealer.
2. Complaints should be reported as quickly as possible after they have manifested
themselves.
3. Complaints will only be accepted if they are reported to the Barbas dealer, together
with the serial number of the Barbas appliance which is stated on the front of the
instructions for use.
4. In addition, the original receipt (invoice, receipt, cash receipt) showing the date of
purchase must also be submitted.
5. Repairs and replacements during the warranty period do not give any entitlement to
an extension of the warranty period. After a repair or replacement of warranty parts,
the warranty period shall be deemed to have started on the date of purchasing the
Barbas appliance.
6. If a certain part is eligible for the warranty and the original part is no longer available,
Barbas Bellfires B.V. shall ensure that an alternative part of at least the same quality
shall be provided.
1. The warranty on the Barbas appliance ceases to be in effect if:
a. it is not installed according to the supplied installation instructions, and to
national and/or local regulations;
b. it has been installed, connected or repaired by a non-Barbas dealer;
c. it has not be used or maintained according to the instructions for use;
d. it has been changed, neglected or roughly treated;
e. it has been damaged as a result of external causes (outside the appliance itself),
for example, lightning strike, water damage or fire;
2. In addition, the warranty lapses if the original purchase receipt shows any change,
deletion, removal or if it is illegible.
Box Panorama 65
Page 30

Article 4: Warranty area
Article 5: Warranty period
Article 6: Liability
Warranty Terms
30
A
1. The warranty is only valid in those countries where Barbas appliances are sold
through an official dealer network.
1. This warranty will only be granted during the warranty period.
2. The body of the Barbas appliance is guaranteed for a period of 10 years against
construction and/or material faults, starting from the moment of purchase.
3. For other parts of the Barbas appliance, a similar warranty applies from the moment
of purchase for a period of one year.
4. For user parts such as glass, glass (cord) and the interior of the combustion
chamber, a similar guarantee is given until after the first burning.
1. A claim granted by Barbas Bellfires B.V. under this warranty does not automatically
imply that Barbas Bellfires B.V. also accepts liability for any possible damage. The
liability of Barbas Bellfires B.V. never extends further than that stated in these
warranty conditions. Any liability of Barbas Bellfires B.V. for consequential damage is
expressly excluded.
2. That stated in this provision is not valid if and to the extent that is derives from a
mandatory provision.
3. All agreements entered into by Barbas Bellfires B.V. are, unless specifically stated
otherwise in writing and to the extent that they are permitted based on applicable
law, subject to the FME-CWM general sales and delivery conditions for the
technology industry.
Barbas Bellfires B.V.
Hallenstraat 17 5531 AB Bladel
The Netherlands
Tel: +31-497339200
Email: [email protected]
Carefully retain the user manual; it shows the serial number of the appliance. You will
need this if you wish to claim under the warranty.
Box Panorama 65
Page 31

Warranty Terms
31
Box Panorama 65 3
Page 32

Y
Your Barbas dealer
001 - 011118 - 347422
 Loading...