

Page 1
16068_ins_sp_rotary
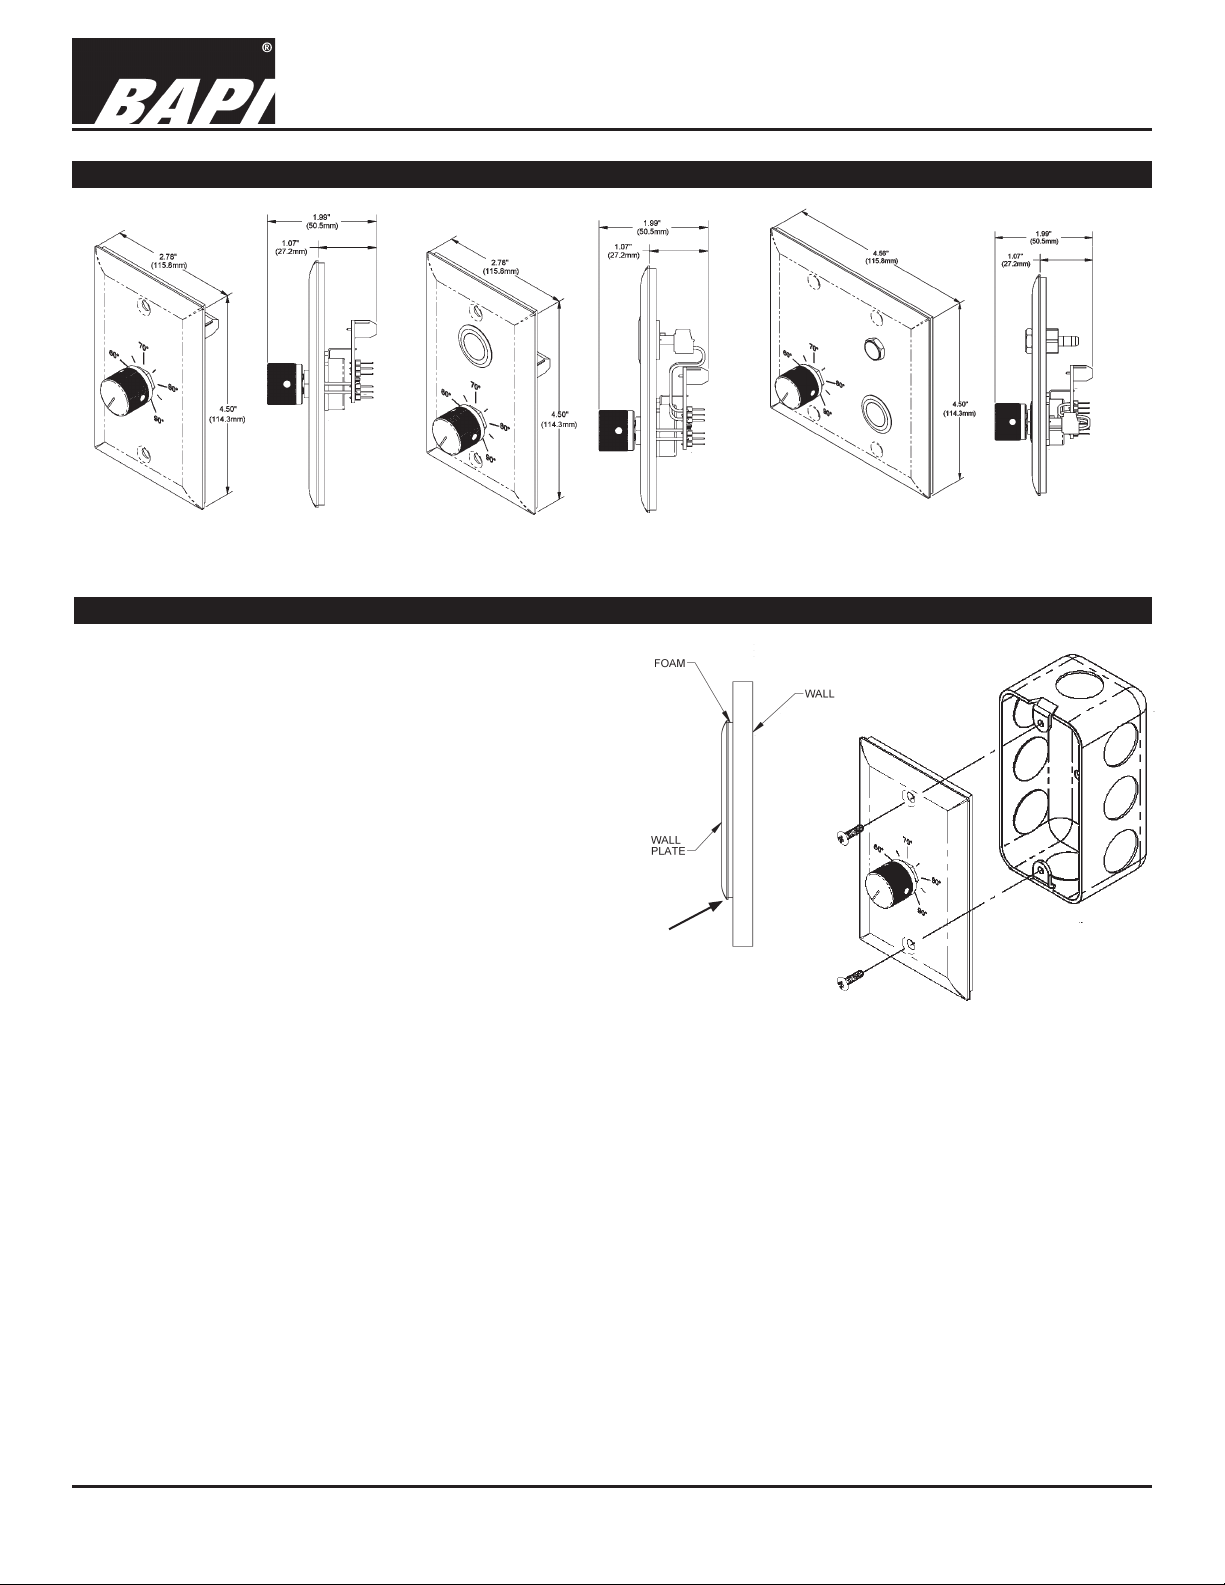
Product Identication
Fig. 1: Wall Plate with Rotary
Setpoint
Mounting
Stainless Wallplate with Rotary Setpoint
Fig. 2: Wall Plate with Rotary
Setpoint and Pushbutton Override
Installation & Operating Instructions
rev. 08/01/18
Fig. 3: Doublegang Wall Plate with
Rotary Setpoint, Pushbutton Override and
Pressure Pickup Port
Ensure the plate does not touch the
wall when it is mounted as this will
lead to slower response rates when the
environment changes.
Mounting hardware is provided for both junction
box and drywall installation.
Junction Box
1. Pull the wire through the wall and out of the
junction box, leaving about 6” free.
2. Terminate the unit according to the guidelines
in Termination on page 1.
3. Secure the plate to the box using the
#6-32 x 1/2” mounting screws provided or with
security screws which are sold separately.
(Call BAPI or visit the Accessories section of
our website for security screw ordering.)
Verify visible
air gap
between plate
and wall.
Fig 4:
Side View of
Mounted Plate
Fig 5:
J-Box Mounting
4. Tighten screws until the foam gasket on the
back plate is compressed about 50%. Ensure the plate doesn’t touch the wall (Fig 4).
Drywall Mounting
1. Place the plate against the wall where you want to mount the sensor and mark out the two mounting holes.
2. Drill two 3/16” holes in the center of each marked mounting hole. Insert a drywall anchor into each hole.
3. Cut hole between the mounting holes that clears the apparatus mounted on plate. Pull the wire through the wall hole
cut in step 2, leaving about 6” free.
4. Terminate the unit according to the guidelines in Termination on page 1.
5. Secure the plate to the drywall anchors using the #6 x 1” mounting screws provided. Tighten screws until the foam
gasket on the back plate is compressed about 50%. Ensure the plate doesn’t touch the wall.
Note: In any wall-mount application, the wall temperature and the temperature of the air within the wall cavity can cause
erroneous readings. The mixing of room air and air from within the wall cavity can lead to condensation, erroneous
readings and premature failure of the sensor. To prevent these conditions, seal the conduit leading to the junction box or
ll the box with insulation.
Specications subject to change without notice.
1 of 4
Page 2
Stainless Wallplate with Rotary Setpoint
Installation & Operating Instructions
16068_ins_sp_rotary
J-Loop Termination Technique
Incorporating a “J-Loop” (also known as a drip loop) into all terminations adds an additional layer of protection against
moisture and oxidation by
directing moisture away from
the connection. The idea is to
place the wire junction as high as
possible and form a “J” with the
leadwires. The bottom of this “J”
should be below the junction point.
Any moisture that collects on the
leadwires is pulled downward by
gravity to the bottom of this loop
and away from the junction.
J-Loop Technique J-Loop with Crimp-On SFC J-Loop with Twist-On SFC
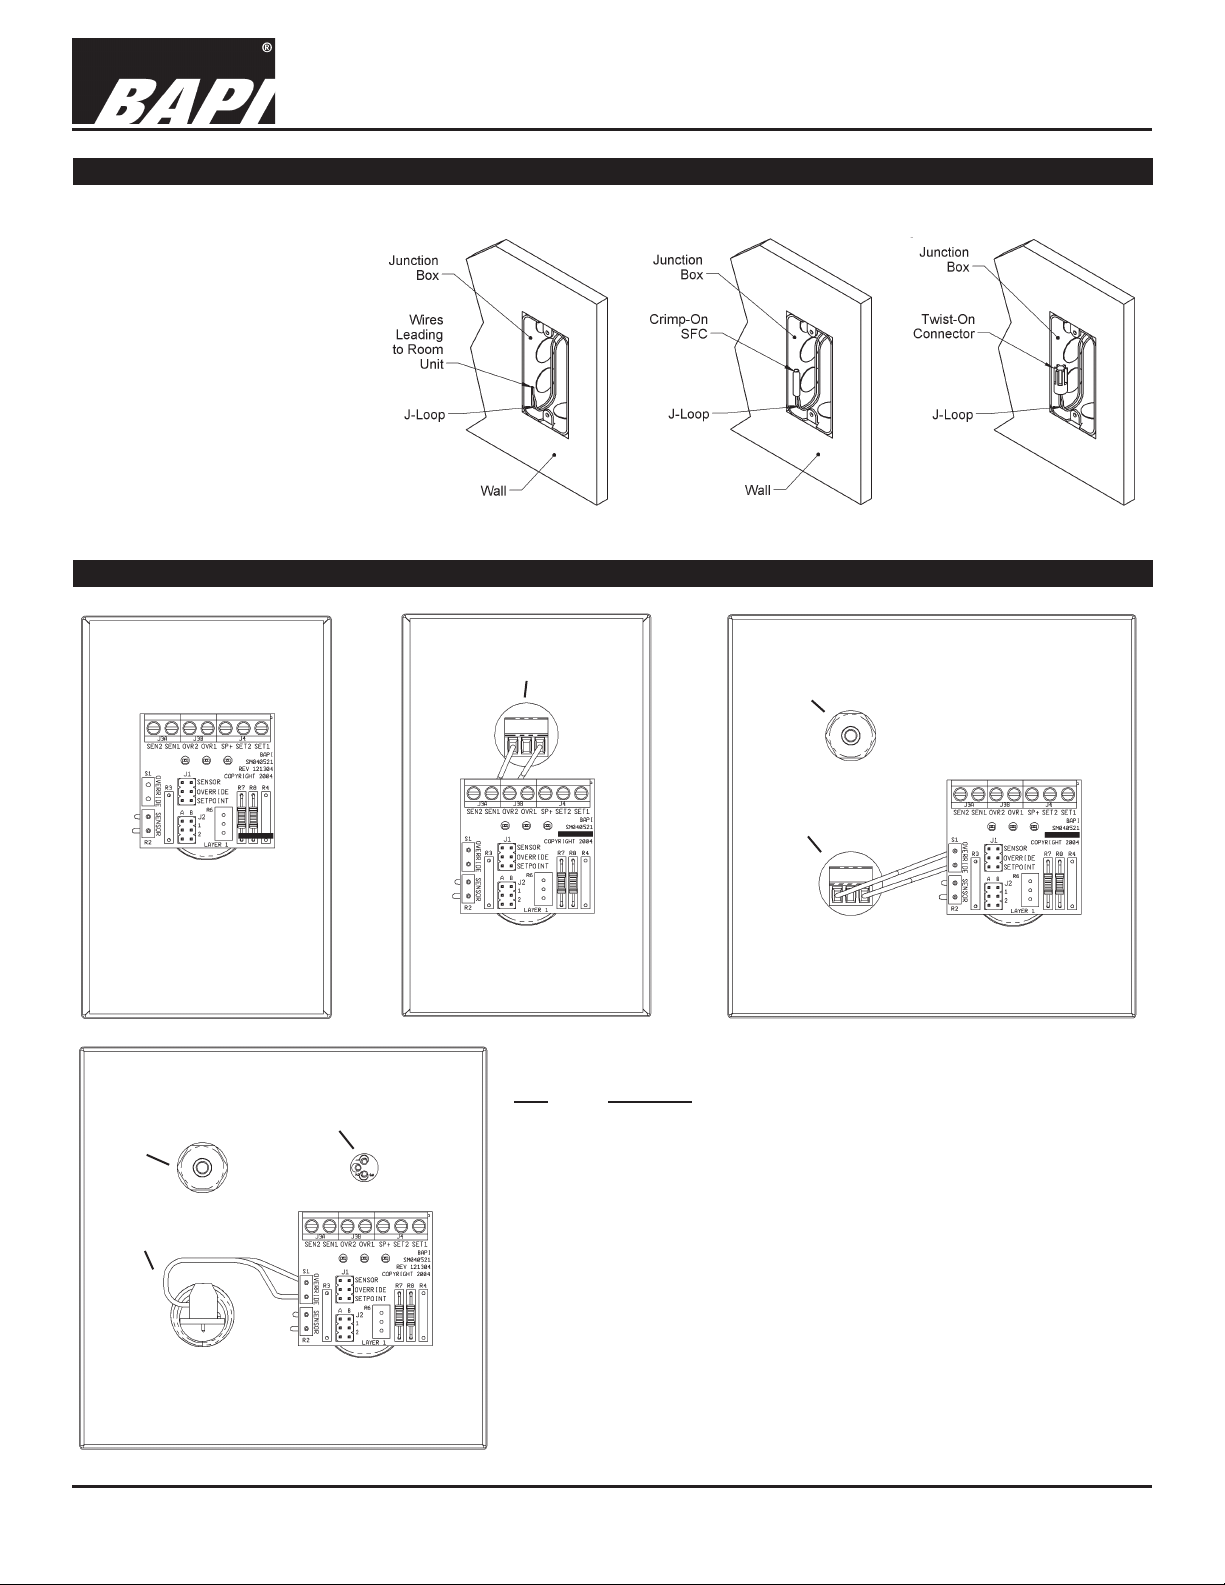
Termination
rev. 08/01/18
Fig. 5
Wall Plate with Rotary
Setpoint
Static
Comm. Jack
Wall Plate with Rotary
Setpoint and Override
Pressure
Port
Override
Fig. 8
Doublegang Wall Plate with Rotary
Setpoint, Override, Pressure Pickup Port
and 3.5mm Comm. Jack
Override
Static
Pressure
Port
Override
Fig. 6
Fig. 7
Doublegang Wall Plate with Rotary
Setpoint and Pressure Pickup Port
COMMON WIRING
PIN Function
SEN2 ....... Temperature, Resistance Output, To analog input of controller.
[Common Ground]
SEN1 ....... Temperature, Resistance Output, To analog input of controller.
OVR2 ....... Override, Normally OPEN, To analog or digital input of controller.
[Common Ground]
OVR1 ....... Override, Normally OPEN, To analog or digital input of controller.
SP+ .......... Setpoint voltage supply.
SET2........ Setpoint, To analog input of controller. [Common Ground]
SET1........ Setpoint, To analog input of controller.
Note: If unit is congured for common ground then SET2, OVR2 and
SEN2 are connected together.
Specications subject to change without notice.
2 of 4
Page 3

16068_ins_sp_rotary
Standard Override (O) 1 amp
Durable Override (O1) 250 milli-amps
Low Profile (O2) 125 milli-amps
Table 2 - Switch Contact Ratings
Termination continued...
Stainless Wallplate with Rotary Setpoint
Installation & Operating Instructions
rev. 08/01/18
Jumper Settings - J1 Options
Differential
Override in parallel
with setpoint:
Override in parallel
with sensor:
Override as a
separate input:
Common Ground
Override in parallel
with setpoint:
Override in parallel
with sensor:
Override as a
separate input:
Optional C35
Communications
Jack Pin Out
Pushbutton Override
Switch Wiring
The Wall Plate Pushbutton Override is a
dry contact, normally-open switch. The
contacts close for as long as you hold the
switch down. All switches are for NEC Class
2 circuits only.
Standard and Durable Override:
The Standard Override (O) and Durable
Override (O1) have two white wires attached
to either side of the override switch.
Fig. 9: Comm. Jack Wiring
Fig. 10: Wiring for the
Standard (O) and Durable
Pushbutton (O1) Override
Jumper Settings - J2 Options
Resistive Setpoint
Direct
Action
Reverse
Action
Voltage Setpoint
Direct
Action
C35 Terminal Block
Terminal Connection
Tip ................. White (Pin 1)
Ring ..............Red (Pin 3)
Ground .......... Black (Pin 2)
Sensor
Wires
Override
Switch
Wires
Reverse
Action
Fig. 11: Screw Terminals for
the Low Prole Pushbutton
(O2) Override. The center
terminal is not used.
Center Terminal
Not Used
Low Prole Override:
The Low Prole Override (O2) has three
screw terminals that accommodate 16 to 28
gauge wire. The center terminal is not used.
Low Prole Override with LED:
The Low Prole Override with LED (O2G
or O2R) has four screw terminals that
accommodate 16 to 28 gauge wire. The
terminals marked OVR are the dry contact
output of the override switch, and the + and terminals are power for the LED.
Table 1 - Switch Contact Ratings
Fig. 12: Wiring Examples for the Low Prole Pushbutton Override with
5 VDC and 24 VAC/VDC LED (O2G5 & O2G24 or O2R5 & O2R24)
Specications subject to change without notice.
3 of 4
Page 4

16068_ins_sp_rotary
Diagnostics
Stainless Wallplate with Rotary Setpoint
Installation & Operating Instructions
rev. 08/01/18
POSSIBLE PROBLEMS:
General troubleshooting
Temperature reading is
incorrect
Setpoint reading is
incorrect
POSSIBLE SOLUTIONS:
- Make sure the input is set up correctly in the controller’s and building automation software.
- Check wiring for proper termination
- Check for corrosion at either the controller or the sensor. Clean off the corrosion, re-strip
the interconnecting wire and reapply the connection. In extreme cases, replace the
controller, interconnecting wire and/or sensor.
- Label the terminals that the interconnecting wires are connected to at the sensor end and
the controller end. Disconnect the interconnecting wires from the controller and the sensor
and measure the resistance from wire-to-wire with a multimeter. The meter should read
greater than 10 Meg-ohms, open or OL depending on the meter. Short the interconnecting
wires together at one end. Go to the other end and measure the resistance from wire-towire with a multimeter. The meter should read less than 10 ohms (22 gauge or larger, 250
feet or less). If either test fails, replace the wire. Don’t forget to reconnect the wires.
- Make sure the sensor wires are connected to the correct controller input terminals.
- Check wiring for proper termination and make sure that leads are not touching.
- Measure the physical temperature at the sensor’s location using an accurate temperature
standard. Disconnect the sensor wires and measure the resistance across the sensor
output pins with an ohmmeter. Compare this resistance to the appropriate temperature
sensor table on the BAPI website. If the measured resistance is different from the
temperature table by more than 5%, call BAPI technical support. Find BAPI’s website at
www.bapihvac.com; click on the button labeled SENSORS on the left of the screen and
then click on the type of sensor you have. Don’t forget to reconnect the wires.
- Make sure that the setpoint output is correct. Remove the setpoint output wires and check
the output for the correct resistance or voltage output. See the product label for your
specic range.
Override is not working
correctly
- Check that the resistance across the override output is less than 5 ohms when the override
switch is pushed
- Make sure that the override jumper settings are correct.
Specications
Sensor: Passive Thermistor or RTD
Thermistor: Thermal resistor (NTC)
Temp. Output:
Accuracy(std):
Accuracy (High)
Stability:
Heat dissipation
Temp. Drift
Probe range:
RTD: Resistance Temperature Device (PTC)
Platinum (Pt)
Platinum (Pt)
Pt Accuracy (std)
Pt Stability
Pt Self Heating
Pt Probe Range
Nickel (Ni)
Ni Probe Range
Mounting: 2x4” J-box or Direct Wall
Lead Wire: 22AWG Stranded
........Resistance
........±0.36°F, (±0.2°C)
....±0.18°F, (±0.1°C), [XP] option
.................< 0.036°F/Year, (<0.02°C/Year)
....2.7 mW/°C
.............<0.02°C per year
.........-40° to 221º°F (-40° to 105°C)
.........100Ω and 1KΩ @0ºC, 385 curve,
.........1KΩ @0°C, 375 curve
...0.12% @Ref, or ±0.55°F, (±0.3°C)
.............±0.25°F, (±0.14°C)
......0.4 °C/mW @0°C
....-40° to 221°F, (-40 to 105°C)
.............1000Ω @70°F, JCI curve
....-40° to 221°F (-40 to 105°C)
Insulation: Etched Teon, Plenum rated
Sensitivity: Approximate @ 32°F (0°C)
Thermistor:
RTD (Plat)
0.385Ω/°C for 100Ω RTD
Nickel (NI): ........ 2.95Ω/°F for the JCI RTD
Enclosure: Stainless Steel Plate
Foamback: 0.25” Closed Cell Foam
Ambient (Encl.):
0 to 100% RH, Non-condensing, -40°F to 185°F, (-40° to 85°C)
Agency:
RoHS, CE, PT = DIN43760,
Options: Override Switch
O ....................... N.O. switch, 115 VAC, 1 amp max
O1
..................... N.O. switch, 28 VDC, 250mA amp max
O2
..................... N.O. switch, 4 to 48 VDC, 150mA max
O2G & O2R
....... Non-linier (See bapihvac.com for specs)
........ 3.85Ω/°C for 1KΩ RTD
IEC Pub 751-1983, JIS C1604-1989
..... O2 Switch w/ green or red LED,
5V (11mA) or 24V (15mA) power
Specications subject to change without notice.
4 of 4
 Loading...