

Page 1
Quick User’s Guide to The Yellow Radio
What follows covers basic steps needed to effectively communicate using this radio,
specifically:
-Turning the radio on and adjusting the volume,
-Selecting the proper channel for communication, and
-Fundamentals of talking on the radio.
Additionally, some basic “Tips” and “Traps” are included.
TURNING ON THE YR AND ADJUSTING THE VOLUME
The Off/On switch and volume control is located on the radio’s top next to the antenna. Twist
it clockwise to turn on the radio, turning it more increases the volume.
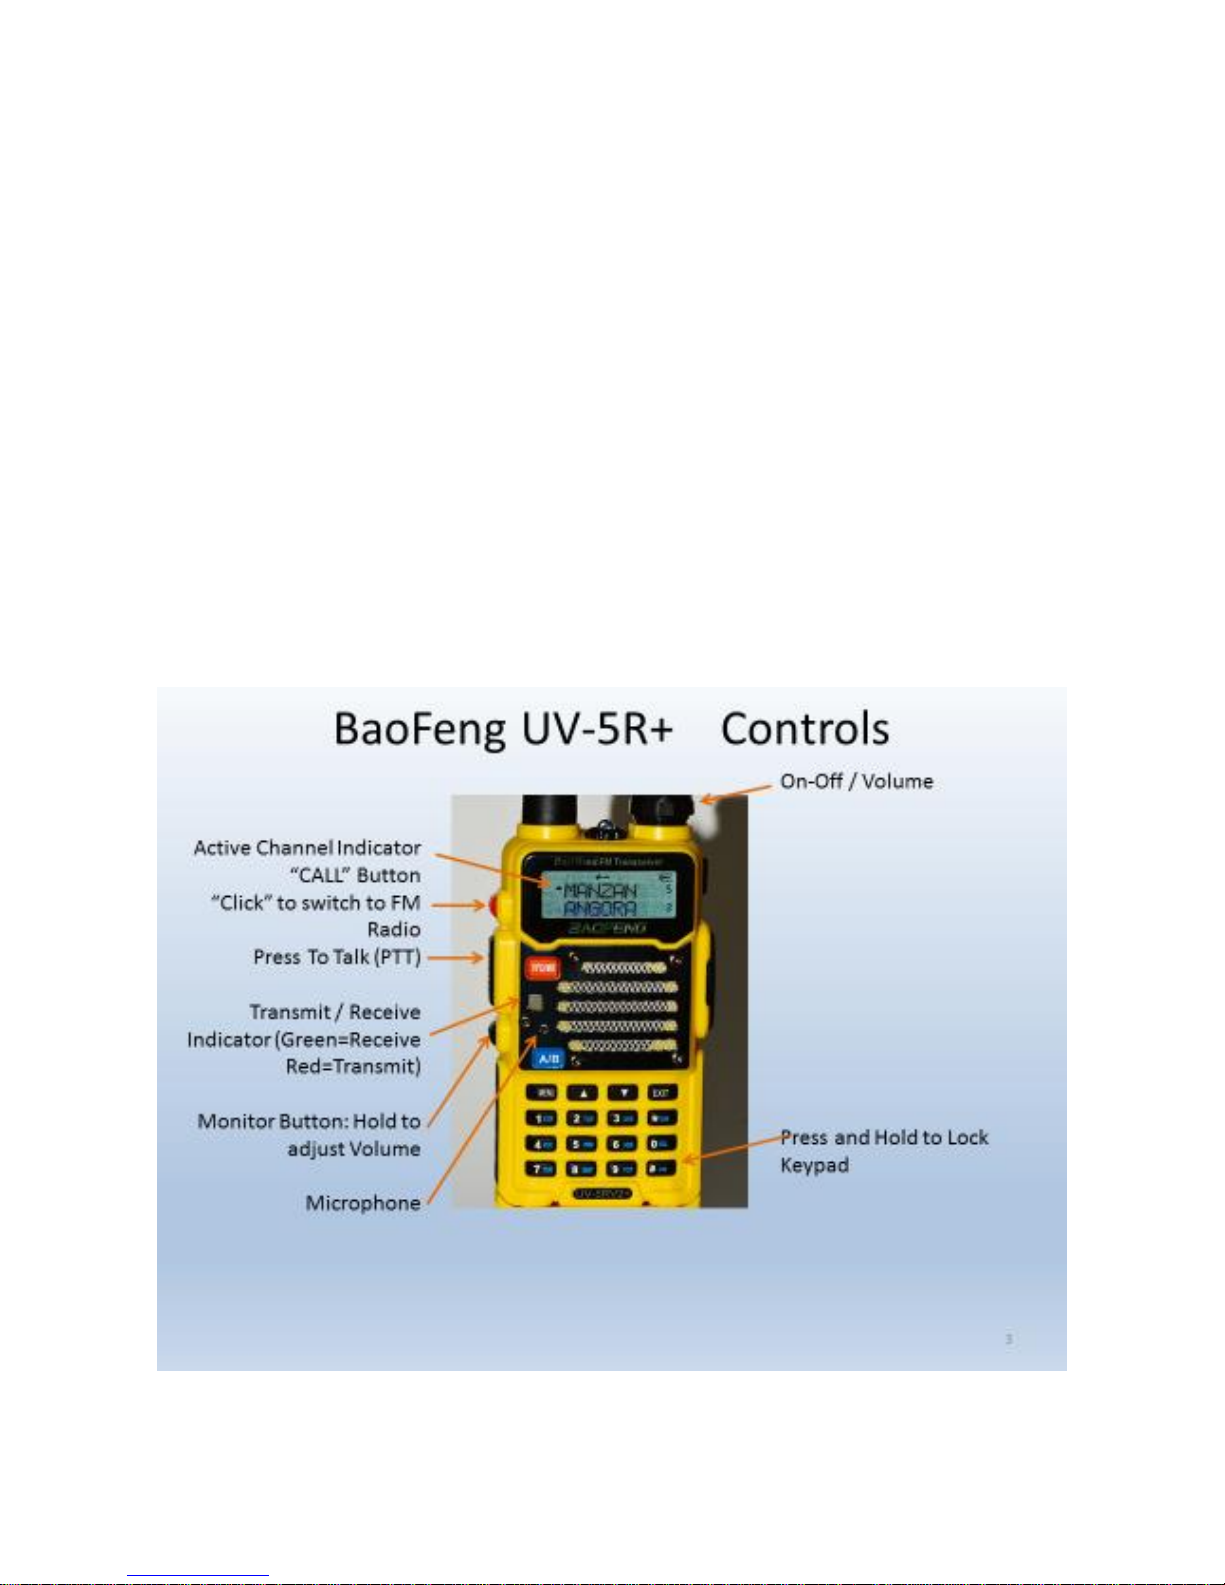
NOTE: The YR is silent unless a signal is being received. Turn the YR on and then press and hold
the Monitor Button as shown in Figure 1. You’ll hear static at increasing levels as you turn the
volume control clockwise. Adjust the volume level to your liking.
Figure 1
Page 1 of 6
Page 2
SELECTING THE PROPER CHANNEL FOR COMMUNICATION
There are two ways to select a channel on the YR,
direct entry using the keypad, and
Up/Dn arrow keys.
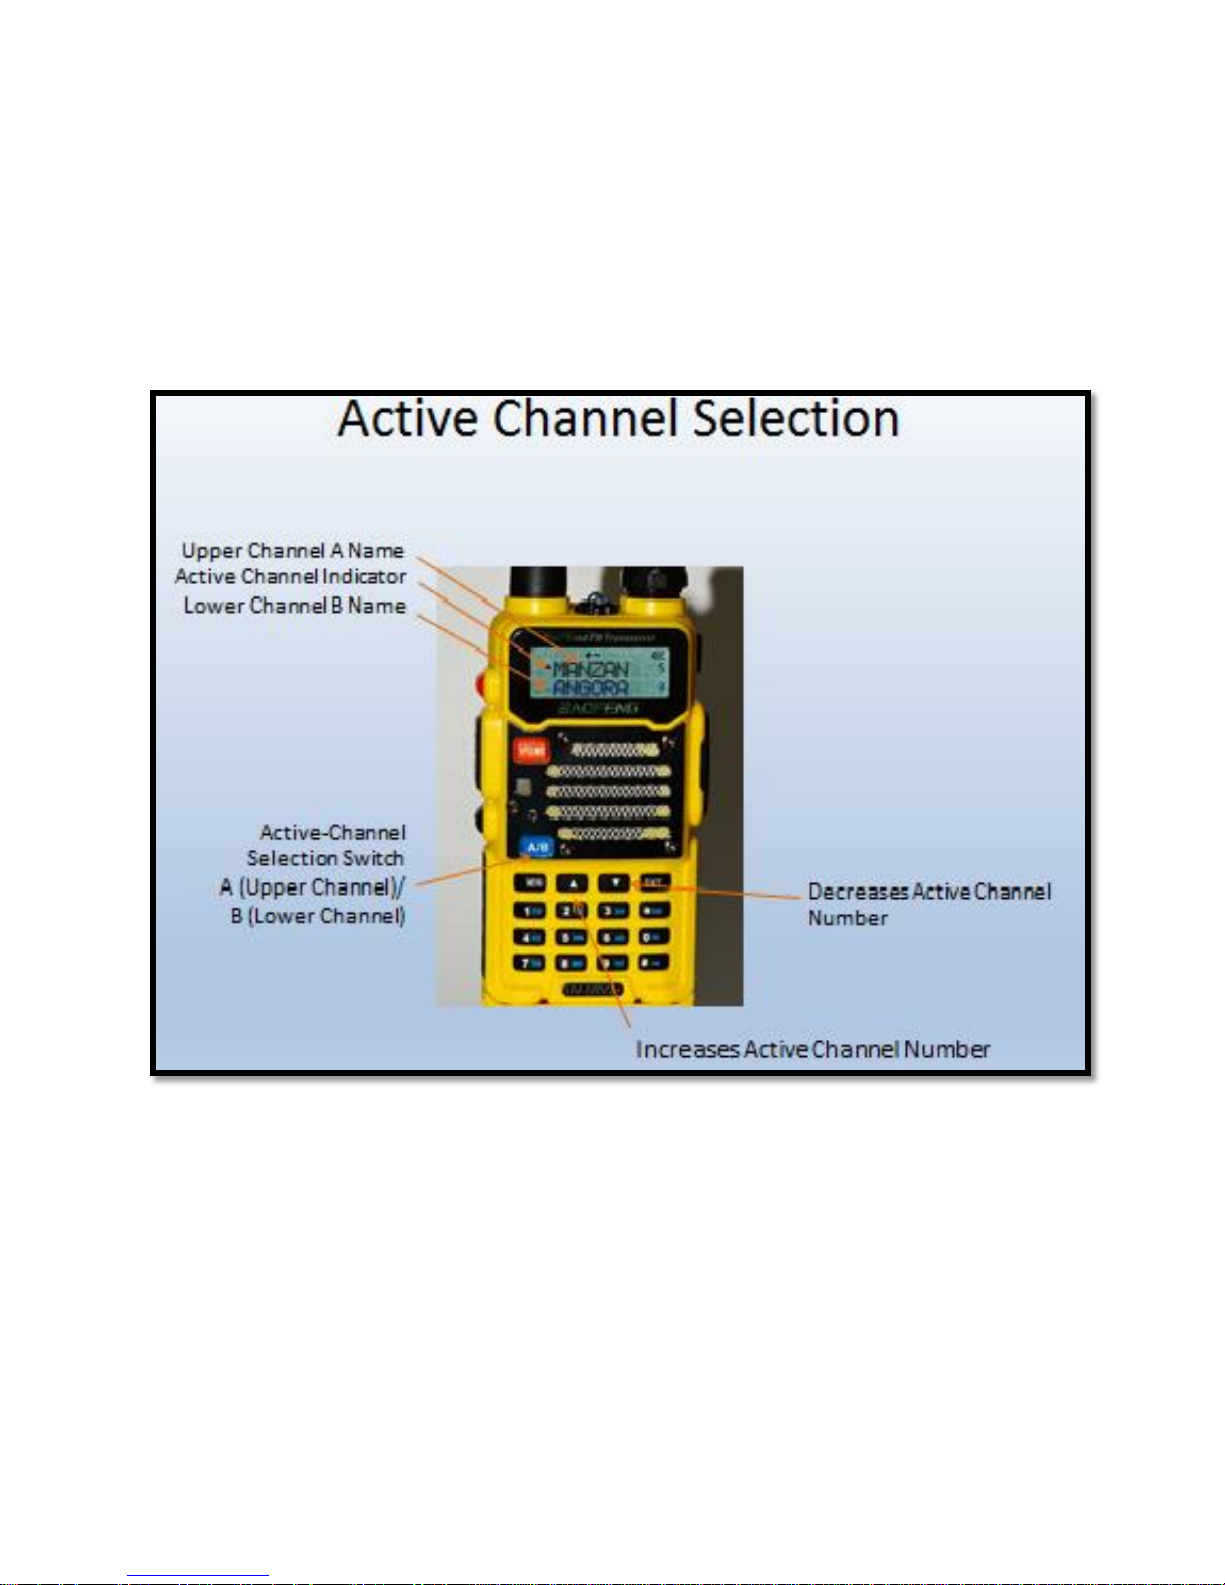
The YR is capable of displaying two channels, Channel A and Channel B as shown in Figure 2
below.
NOTE: The YR displays two channels, but it does not monitor both channels at the same time.
Refer to Figure 2 noting the “Active Channel Indicator” which consists of a small caret symbol
to the left of the active channel’s name. In Figure 2, it is to the left of the “M” in Manzanita.
Pressing the blue A/B button changes the active channel between either channel A or B. (Fig. 2)
The YR listens and talks only on the active channel.
Channel Selection using the keypad. The desired channel is selected by using the keypad to
enter a three-digit channel number, using prefix zeros if necessary. For example, the Manzanita
Figure 2
Page 2 of 6
Page 3

ham repeater is on channel 5 so enter 005 on the keypad. Manzanita’s local NOAA weather
broadcast is on channel 56 so enter 056. The Manzanita wide-area GMRS frequency used by
non-hams is on channel 119 so enter 119. Remember: Three digits are required, so use
prefix-zeros if necessary.
Channel Selection using the Up or Down arrow keys. It is also possible to step through the
active channel by pressing the ‘up-arrow key’ to increase the channel number or the ‘downarrow key’ to decrease the channel number. (Fig. 2)
TALKING ON THE RADIO
In general, the YR is used in two ways,
informal contact between one or more people, and
a “Net” where one person controls who talks to whom.
Informal Contact:
Before transmitting, stop and think about what you want to say and to whom you are
speaking.
Next, listen to the channel making sure no one is talking.
Finally, press the “Push-to-Talk” (PTT) button (Fig. 1) and hold it down.
Take a short breath after you press the PTT.
Talk across the microphone rather than directly into it.
When calling a person, use the form “Hey You, It’s Me,” for example, “Jane, it’s Sally.” Once
Jane answers, it is not necessary to keep repeating your names. It is necessary to say “Over”
when each of you finishes transmitting. Release the PTT button and listen.
Hint: Speak clearly at all times. Use “Affirmative” and “Negative” rather than “Yes” or “No” as
very short words tend to be clipped and not understood. Remember! Only one person may talk
at a time. This isn’t the telephone.
Joining a “Controlled Net:”
Everything said about an informal contact between two or more stations applies to a formal net
with additional rules coming into play.
With a net where one person is the control station (NC), that person directs all transmissions
between itself and any other station in the net. Net control is “mother,” and mother rules!
These rules include,
NC gives permission to speak
Contact NC when NC asks for “check ins”
Once checked into a net stay on that channel. Leave the channel only when NC gives
permission
Page 3 of 6
Page 4

Keep transmissions short and to the point, no chit-chat!
Leave a second or two between transmissions, that is don’t immediately push the PTT
once the other station says “Over” in case someone needs to break into the
conversation with emergency traffic
Page 4 of 6
Page 5
BASIC “TIPS” AND “TRAPS”
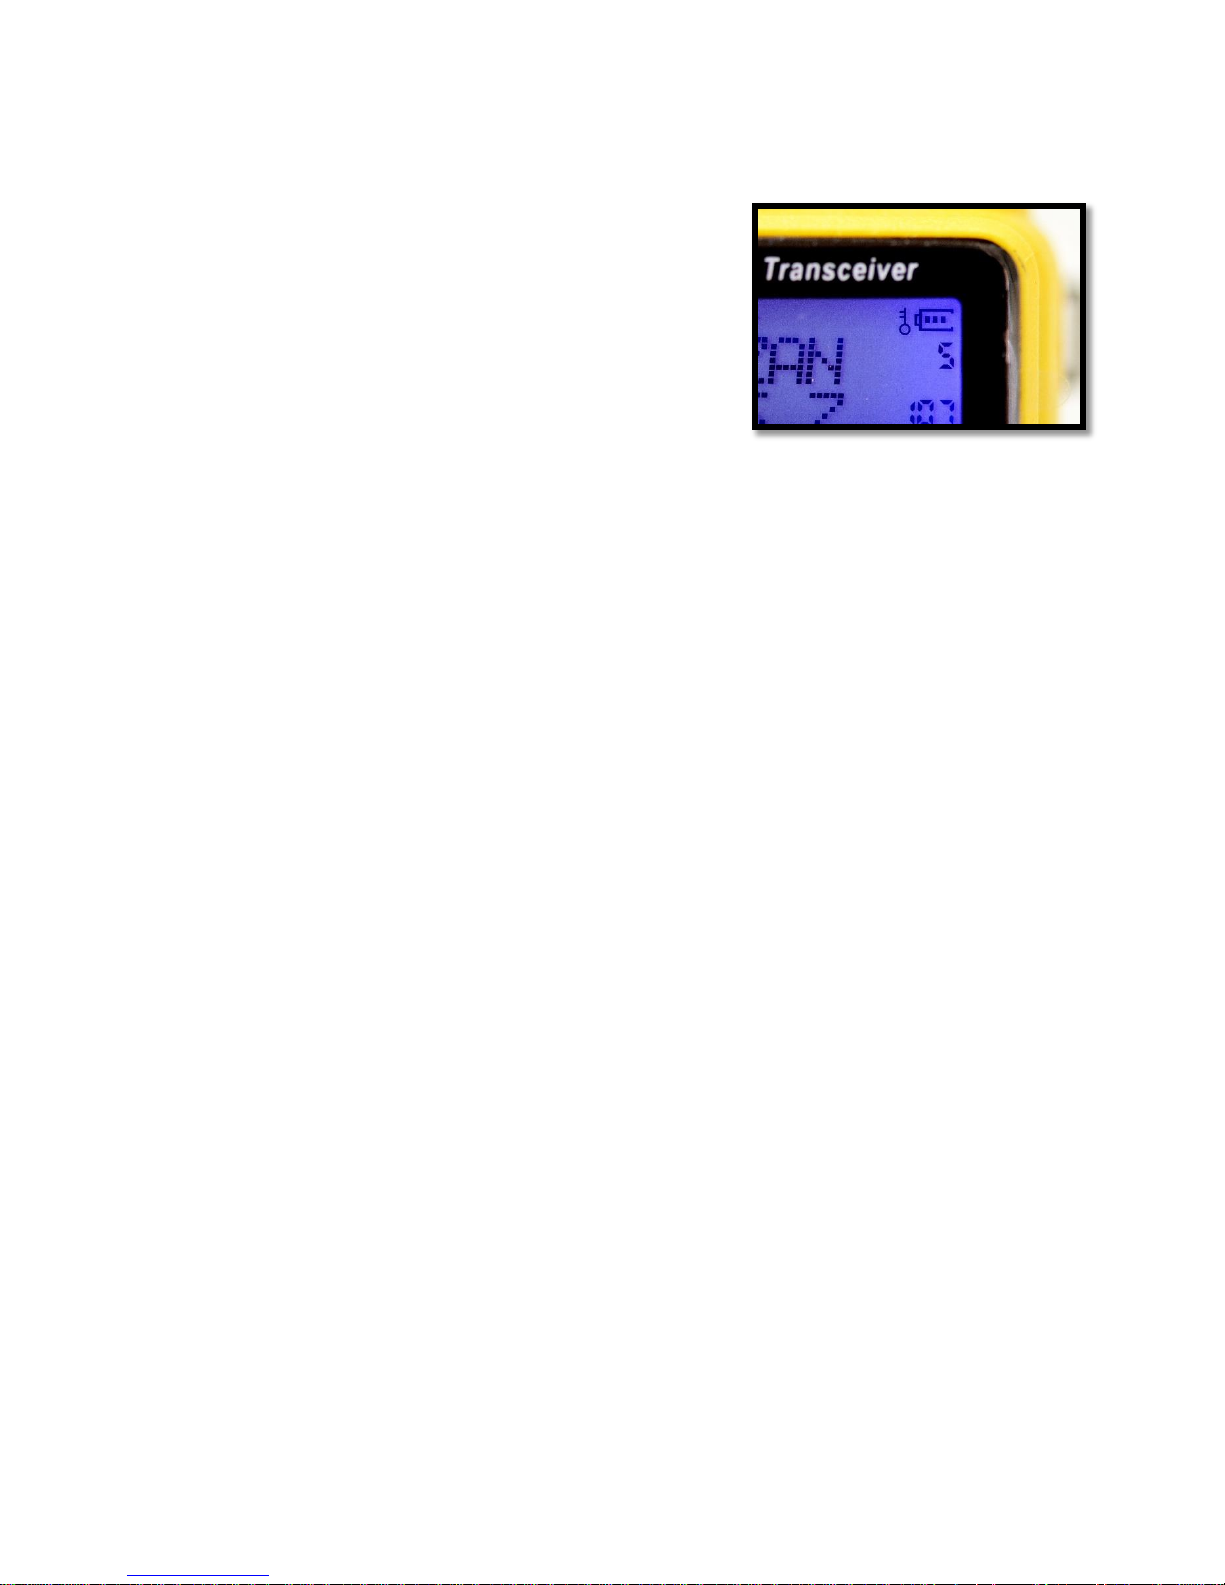
Tip. Lock the keypad. At times merely handling the YR
causes an accidental change in channels. To lock the
keypad, press and hold the “#-Key” for two seconds.
Repeat to unlock. When the keypad is locked, a small key
symbol appears to the left of the battery indicator located
in the upper right-hand corner of the YR’s display, as shown
to the right.
Trap. You can’t change channels. Check for the small key
symbol next to battery symbol in upper, right corner of the display screen indicating a locked
keypad. Press and hold the #-key for two seconds to unlock keypad. The key symbol
disappears.
Trap. You transmitted on the wrong channel. Check to see where the active-channel indicator
is located, see Figure 2. Use the blue A/B button to select the proper channel.
Trap. The A/B button fails to move the active-channel indicator. Check for locked keypad using
the same procedure as with the “can’t change channels” above.
Trap. The radio’s display is showing all numbers, such as 123.456. Press the red “VFO/MR”
button returning the display to read channel’s name. You should hear a voice say “Channel
Mode” as the display changes to actual channel names.
Tip. Two different antennas were included with the YR, a long one and a short one. The longer
antenna is more efficient in both “talking” and “listening” and its usage is recommended. The
short antenna works best when the YR isn’t being used for communication over several miles.
Tip. Turning the radio off and back on causes it to reset back to its basic setup. If you get
completely confused and don’t understand what the display reads or what the radio is doing,
turn it off and back on.
Tip. The radio is capable of receiving standard FM stations. In Figure 1 and located on the
upper left side of the radio is an orange button labeled “Call.” Click this to enter the FM
broadcast mode. Next, using the keypad, enter the desired station’s frequency, for example
entering 8, 8, 9, 0, 0 tunes the radio to All Classical Portland, 88.9 MHz. Note: If you hold the
“Call” button down too long, the radio enter its alarm mode with flashing lights and maybe a
loud sound. Click the “Call” button to exit. Turning the radio off and back on also cancels the
alarm.
Page 5 of 6
Page 6
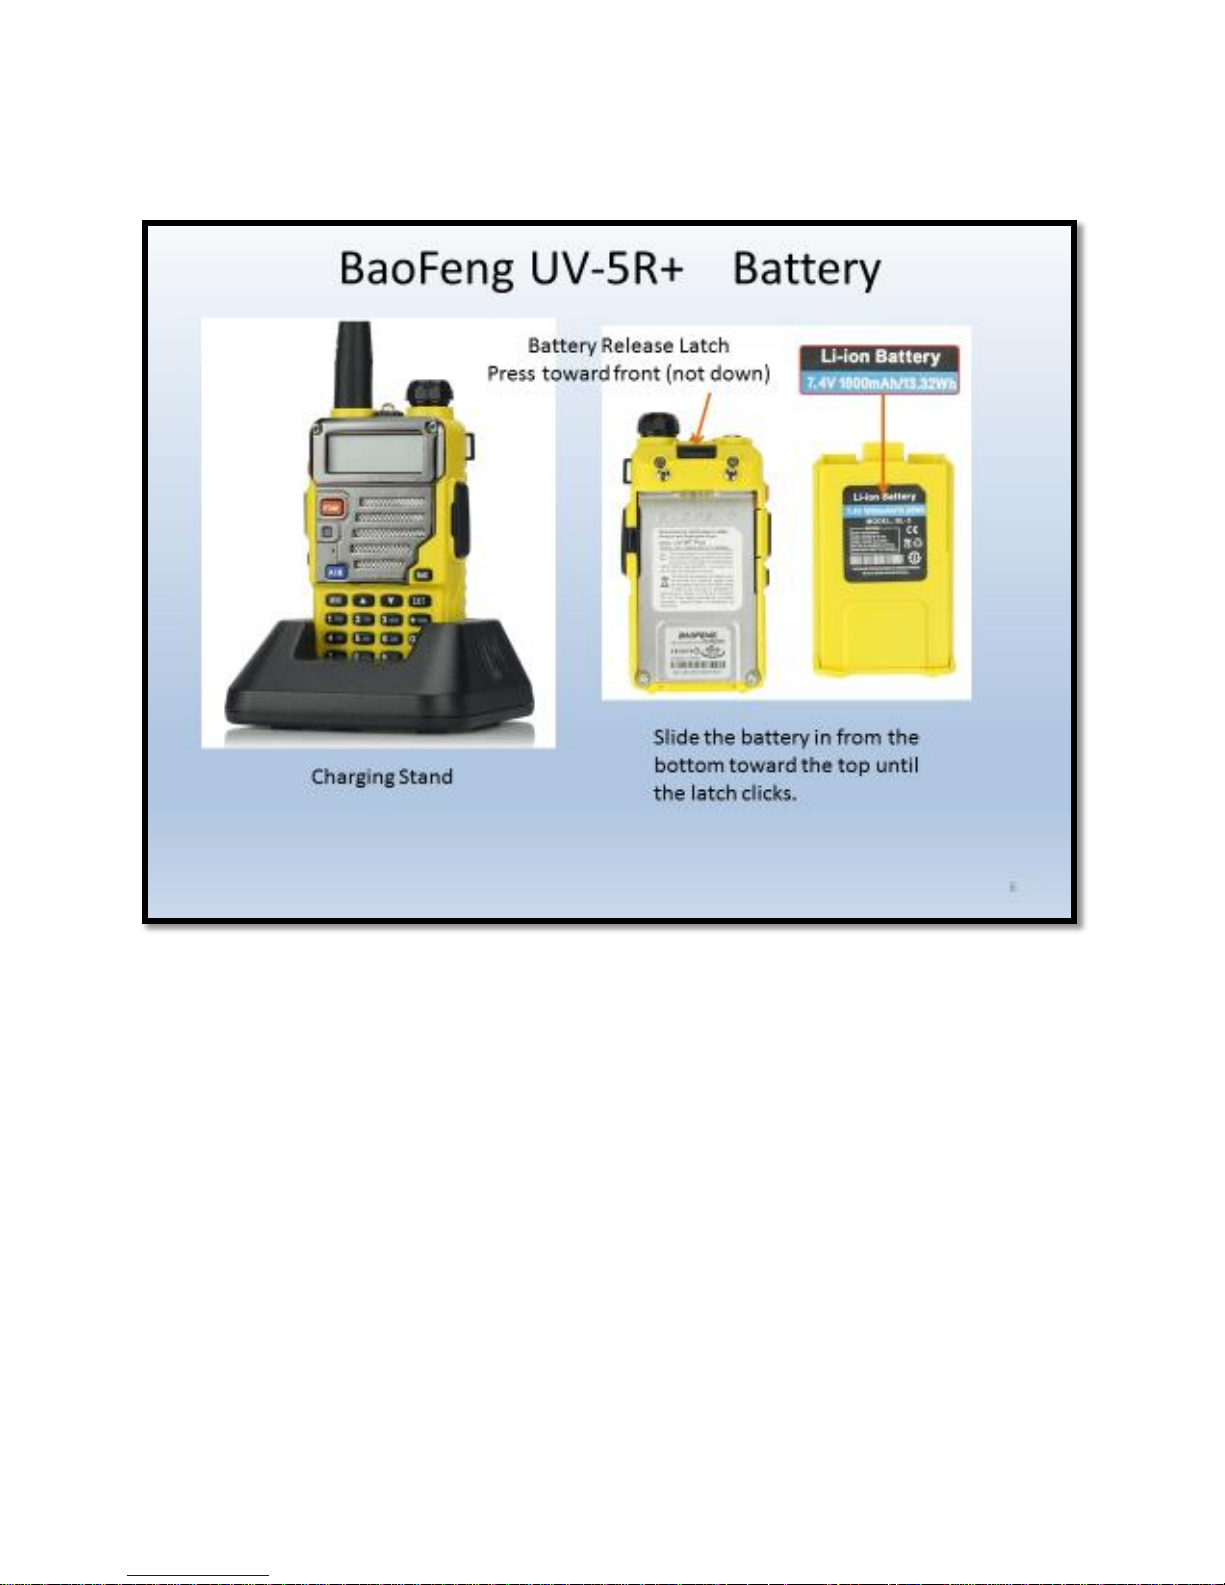
Tip. Included with the YR is a battery charger capable of holding the YR upright. (Fig. 3)
Figure 3
Connect this stand to AC power using the power adapter. The power cord plugs into the
charger’s back side. There is a LED in the base that shines red when charging and green once
the battery is completely charged. The radio may be left in the stand even after the charging
cycle completes. Note: if the charger is not making proper contact with the YR, it flickers
neither red nor green. Notice the charger has a “rib” protruding on each side of the hole where
the radio sits. These ribs slide into the grooves on either side of the battery. Make sure the YR
is properly inserted into the charger. Again, if the LED is either red or green, the YR is inserted
correctly.
Refer to Figure 3 for other tips on the battery’s removal or insertion into the YR.
Page 6 of 6
 Loading...