

Page 1
Page 2

To users
Thank you for your favor with our products.
We are dedicated to providing high performance
and high stability radio communication products.
This two-way radio is no exception. The radio is a
DMR dual-slot digital walkie-talkie developed and pro-
duced by my team with 3000 memory channels,
full-color LCD display and full keyboard hand-tuning
function. In order to make you fully understand the
various advantages of the radio performance and use
and maintenance methods, please read this manual
carefully.
Page 3

RF radiation information
This product is intended for professional applications that meet RF
radiation requirements. Users must be aware of the hazards of RF
radiation and take appropriate measures to meet the requirements of RF
radiation limit.
Common sense in RF radiation
RF refers to the electromagnetic frequency that can be radiated into
space. It is a technology widely used in the fields of communication,
medical treatment and food processing. It will produce some RF
radiation during use.
Control and operating instructions of RF radiation
In order to maximize the performance of the product and to ensure
compliance with the radiation limits in the relevant occupational or
controlled environment of the above criteria, the sending time shall not
exceed 50% of the rated factor and shall follow the instructions below:
• RF radiation is generated only during transmission (speech) rather than
reception (listening) and standby.
• The distance between the terminal and the body during transmission
should be at least 2.5 cm.
Main Features
●Broadband walkie talkie
Support UV double segment, frequency range
UHF400.000-480.000MHz / VHF136.000-174.000MHz
●DMO True2-Slot dual time slot
Direct mode dual-slot communication achieves two groups of calls at a
frequency point at the same time, so that the communication efficiency
is doubled and frequency resources are saved
●Digital and analog compatible, smooth over
Support DMR digital and analog two communication modes to ensure
that the original analog products smooth transition to digital products to
meet different communication needs
●Digital signaling function
Rich calling modes that support DMR protocol, including single call,
group call and all call; supports remote inhibit function and other
applications
●SMS function
Supports SMS, text editing and draft in 64 characters in Chinese and
English, so that text messages calls can be sent when voice call is
inconvenient
●High sound quality
This digital two-way radio uses advanced AMBE +2TM voice processing
technology to achieve high quality
●Manual writing-frequency
Supports channel / frequency mode, allows manual writing-frequency in
frequency mode, and writing-frequency software can be used to set the
required frequency without connecting the computer
Page 4

●High/low power switch
Meets the power requirements of different call distances to save more
energy
●Alarm function
Supports general alarm and silent alarm in emergency situations
●Digital mode supports the use of relays
●Side buttons can be customized without changing the user’ s
operating habits
User Safety Information
Please read the following information in order to use this two-way radio safely
and efficiently.
1.The maintenance work of the two-way radio can only be carried out by
professional technical personnel; assembly/disassembly without permission is
prohibited;
2.To avoid problems caused by electromagnetic interference and/or
electromagnetic compatibility, please turn off the two-way radio in places with
the sign “Please turn off two-way radio”, such as hospitals and other health care
facilities.
3.When taking airplane, please turn off the two-way radio when the crew
request.
4.In automobile with airbags, do not place the two-way radio in the inflation area
of the airbags.
5.Turn off the two-way radio before entering the flammable and explosive
environment;
6.Do not replace or charge the battery in flammable and explosive
environments;
7.Turn off the two-way radio before approaching the blasting area and
detonator area;
8.Do not use the two-way radio if the antenna is damaged, or else it may cause
minor skin burns;
9.Do not expose the two-way radio to direct sunlight or near the heating device.
10.While the portable two-way radio is transmitting, keep the radio in a vertical
position and keep the microphone about 5cm from the mouth.
11.Keep the two-way radio at least 2.5cm from the head or body during
transmitting.
12.If you are wearing the portable two-way radio on your body, make sure that
the antenna is at least 2.5cm away from the body when the two-way radio is
transmitting.
13.If the two-way radio has any odor or smoke, turn off the power immediately
and contact your dealer.
Page 5
Contents
Familiar with this machine
Status indication
Basic Operation
Menu operation
Menu seting
Appendix
01~07
08~10
11~28
29~69
70~93
94~99
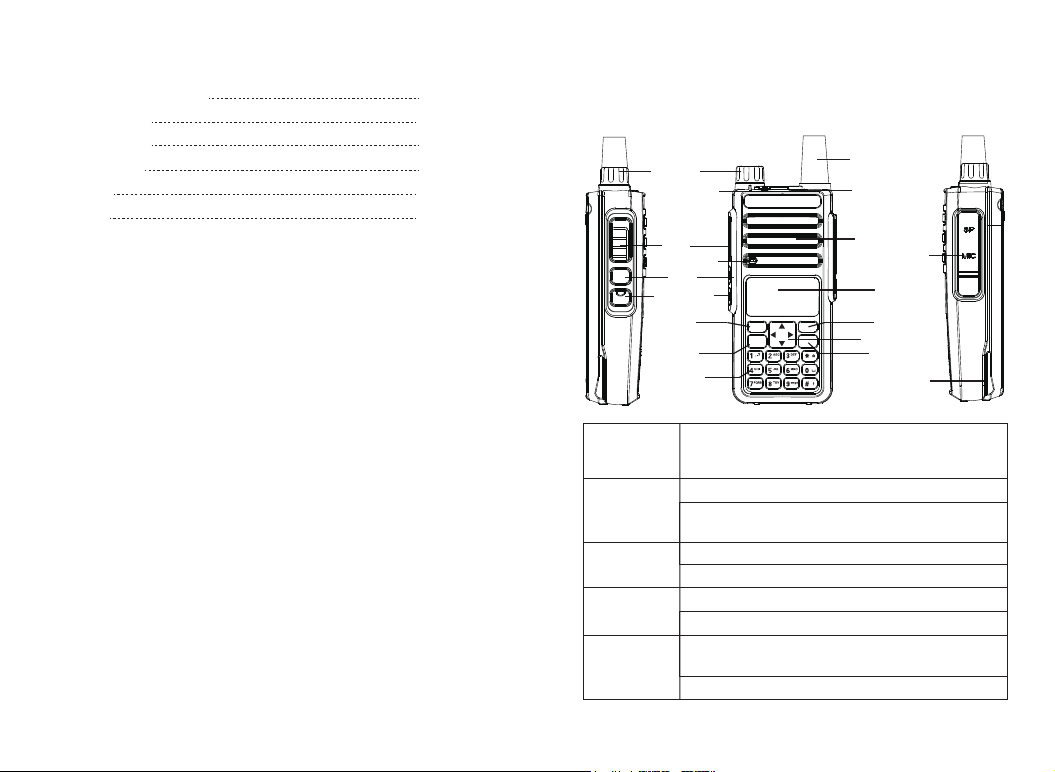
Familiar with this Product
You can familiarize yourself with the external structure and the functions
of programmable buttons of this product in this section.
Antenna
State indicator
lamp
PTT
Microphone
Moni
Low/High
Power Switch
MENU
VFO/MR
Keypoard
MENU
VFO/MR
BACK
A/B
LED Indicator
Loudspeaker
Mic/Spk/Write
Frequency Port
LED
BACK
Direction Key
P2 Key
Battery Pack
[PTT]Transmit
button
Side button 1
* Defaults to
[Moni] button
Side button 2
* Defaults to
[POWER] button
* Defaults to
[SOS] button
[MENU] button
Switch between transmission and reception; when transmitting,
press this button and speak to the microphone; release the
button to receive
Short press to check the battery voltage
Press and hold it to turn on the monitor function (only support
analog channels)
Short press to switch high and low power
Press and hold it to turn on the VOX
Press and hold it to enter the alarm mode
Short press and loosen to exit alarm mode
Press it to activate the menu mode, enter the menu and press
this button to select menu items
Press and hold it to enter the radio settings
01
Page 6
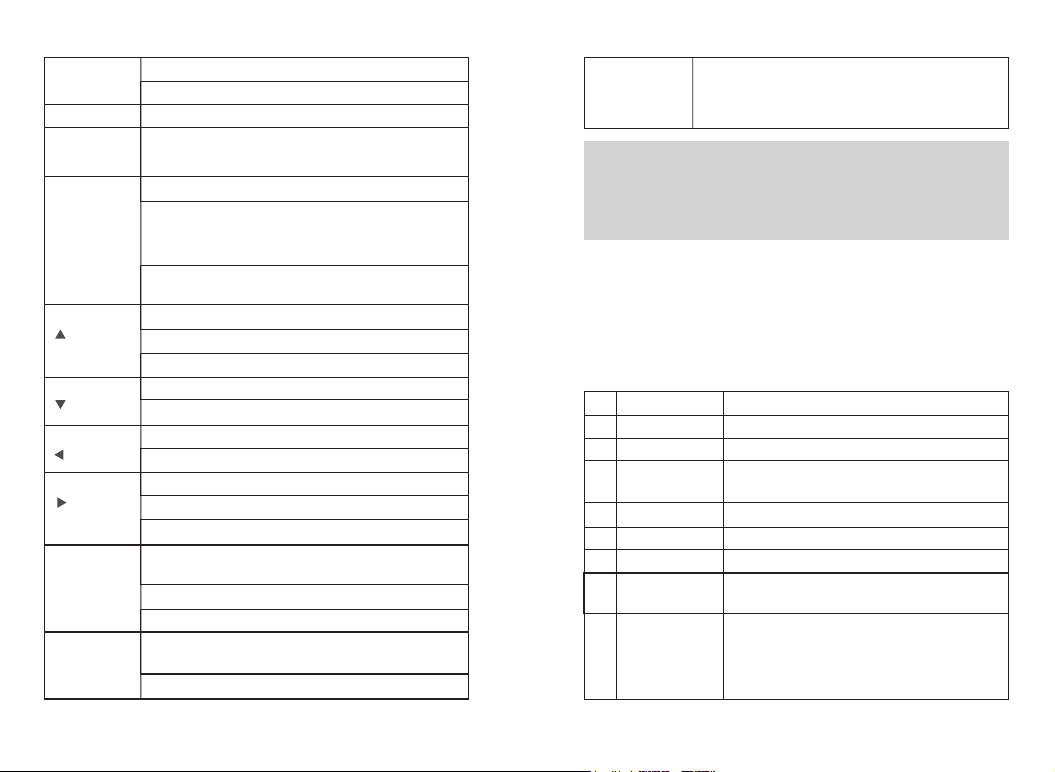
[BACK]/[Clear]
button
[VFO/MR] button
[A/B]button
0-9 number
buttons
[ ]button
[ ]button
[ ]button
[ ]button
[ * ]button
[ # ]button
02
Clear the entered information in input state
In menu mode.return to the previous menu
Switch the frequency mode and channel mode
switch the main channel and sub-channe,and the arrow
pointing channel is the main channel.
[0~9] code words in DTMF function
Select punctuation marks or letters in Pinyin input method.
If numeric shortcut function is set, you can press and hold this
button to jump to the corresponding contact.
The short press is used to activate menu mode, and after
entering the menu, use this key to select the items in the menu.
Code word A in DTMF function
Move up in SMS editing interface.
Move up; change the scanning direction in scanning state.
Code word B in DTMF function
Move down in SMS editing interface.
Move down; change the scanning direction in scanning state.
Move left in SMS editing interface.。
Code word C in DTMF function
Move right in SMS editing interface.
Code word D in DTMF function
Press and hold this button to lock on / off keyboard,Unlock the
combo keys [MENU] and [*]
Press this button to clear the data in message editing box.
Code word * in DTMF function
In the interface of input method, press this key to switch input
method mode(py.123.abc.ABC)
Code word # in DTMF function
In analog mode, the DTMF dial code box pops up with a
[ # ]button
short press of #. At this time, you can manually enter the
DTMF code word and press PTT to start the DTMF dial
function
Note: Four relay audio call signaling: press [PTT] + [CALL] to send
1000HZ signaling; press [PTT] + [VFO/MR] to send 1450HZ signaling;
press [PTT] + [A/B] to send 1750HZ signaling; press [PTT] + [BAND] to
send 2100HZ signaling.
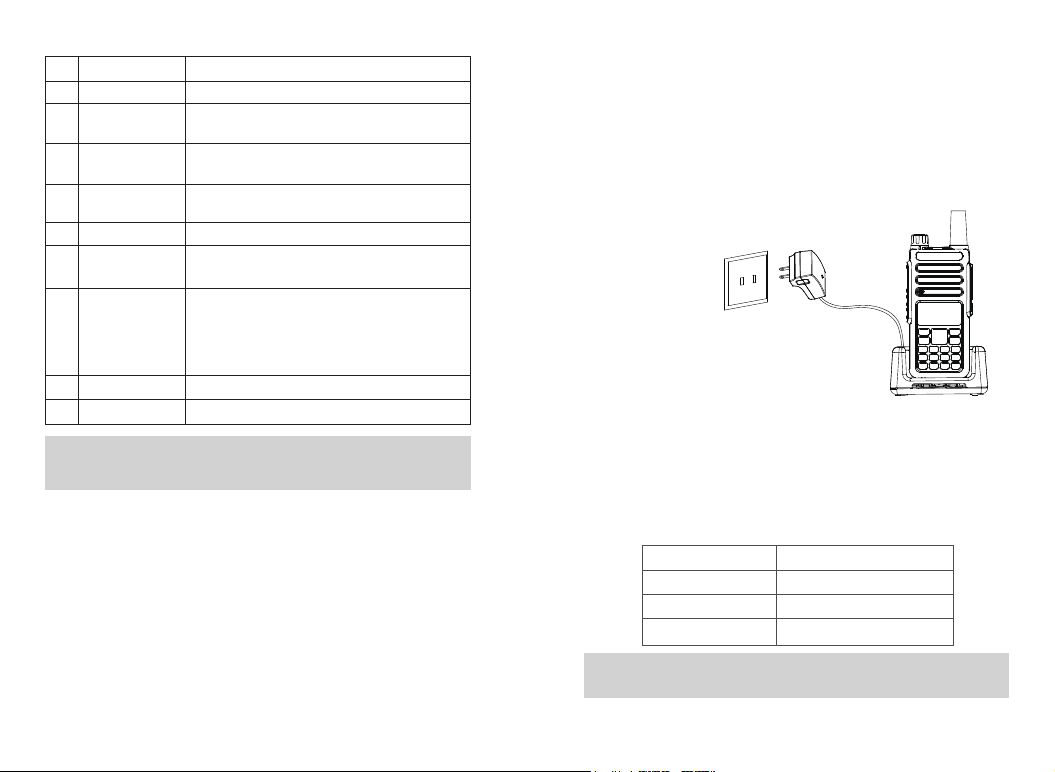
Programmable Buttons
In order to ease the operation, the two programmable buttons [SK1] and
[SK2] can be programmed by your dealer as function shortcuts, as shown
in the following table. For more information about each function, see the
“Function and Operation” section.
No.
Shortcut name
None
1
Prompt tone on/off
2
Emergency mode
3
on
Emergency mode off
4
Select high/low power
5
Monitor
6
Delete useless
7
channels
8
Push to talk 1
No function is assigned to the preset button.
Quickly enable or disable all prompt tones at the same time.
Quickly establish an emergency call. This is the
recommended option for the orange button.
Quickly end an emergency call initiated outward.
Quickly switch between high power and low power.
Quickly turn on or off the monitor function.
Quickly delete useless channels from the scan list
(except the selected channels).
Quickly make digital group calls, digital single call, call
prompts, or send text messages (only for digital mode)
via push to talk. (This option is only available if the
digital function is enabled on the device.) Push-to-talk 1
to push-to-talk 6 can be set.
Purpose
03
Page 7
No.
Shortcut name
Relay / offline
9
Scan on / off
10
Strict/normal
11
squelch
Encryption on/off
12
Voice control on/off
13
Area switching
14
Battery power
indication
15
Individual operation switch
16
End call
17
Quickly switch between relay mode and offline mode.
Quickly turn the scan function on or off. Note:
double-segment double-waiting scan does not work
Quickly switch between strict squelch and normal
squelch (only for analog mode).
Quickly turn on/off encryption for channel (only for
digital mode).
Quickly turn on or off the voice control function.
Quickly select the area, allowing the user to switch
between two areas.
Quickly access to battery power. The user can check
the battery status by LED. The battery power is
sufficient if the LED is constantly in green, the battery
power is still available if the LED is constantly in yellow,
and the battery power is low if the LED is in red.
Quickly turn on or off individual operation function.
Quickly end the phone call (only for digital mode).
Purpose
Note:Depending on dealer setting, different functions can be achieved by
pressing and pressing and holding the same button.
Preparation before use
Charging
Note:Be sure to ensure that the product is off when charging. Battery into
the charger may be charging red flashing constantly flashing, this is the
battery power is too low, the charger to protect the battery pre-charge
process, is a normal phenomenon, Generally continue for 30 seconds to
turn the red light of the normal state of charge.
1.Plug the power adapter into a power outlet;
2. Plug the other end of the power adapter into
the socket on the back of the charging cradle;
3. Insert the battery or the battery-equipped product into the charging
cradle correctly; the indicator light on the charging cradle shows the
charging status. When the indicator light is red, it indicates the start of
charging. When the indicator turns green, the charging is completed. The
specific table below.
Indicator display
Red light flashes
Red light
Green light
Current charge status
Battery power is too low
In charging
The charging is completed
Note:For best battery performance, charge for a minimum of 4 hours on
first charge.
04 05
Page 8

Battery information
●The first use of the battery
Since the battery is not fully charged at the factory, please charge the
new battery before use. Under normal circumstances, the battery when
used for the first time, need to charge 4 hours, lithium-ion battery
charging using slow charge or fast charge can be performed when
charging. It is recommended that the new battery be operated as above
for the first three uses. When you find the battery power is low, you need
to charge the battery.
●Suitable battery type
Please use the specified battery for charging; use of other batteries may
cause explosion, resulting in human injury.
●Battery safety attention
1. Do not allow metal contacts (including coins, keys, jewelry, or other
conductive metal) to be touched by the battery contacts or pole pieces.
Otherwise, the battery may short circuit, discharge, heat or leak, which
may result in damage to the item or personal injury. Therefore, be careful
when handling any battery.
2. Do not short-circuit the battery terminals or discard the battery in a fire.
Do not disassemble the battery pack. When the battery is discarded,
please put into a dedicated battery recycling box.
●Battery normal operation instructions
>Please charge the battery indoors, battery charging at room
temperature best.
06 07
>Under normal circumstances, the charger indicator from red to green
when the battery is fully charged, at this time the battery can be
removed.
>You can charge when Battery installed in the walkie-talkie, but when
charging is best to turn off the walkie talkie, to ensure that the battery is
fully charged.
>Please do not charge the battery when the battery power is not used up
(after the battery is exhausted, the voice prompt alarm will be given),
which will shorten the service life of the battery.
>Do not put a fully charged battery back on the charger to "power up"
again, as this operation significantly reduces the cycle life of the battery.
●Extend battery life
>Battery performance will reduce below -20 ℃ temperature conditions.
Prepare back-up batteries for use in colder weather. Please do not throw
away cold batteries that cannot work. These batteries may be used at
room temperature.
>Dusting the battery contacts may affect the battery life. Please wipe the
contacts with a clean, dry cloth before inserting the batteries into the
walkie-talkie.
●Battery storage needs to know
1.Since the battery will have a self-discharge phenomenon, the battery
when not in use for a long time, please fully charge the battery and then
stored to avoid over-discharge of its battery to damage the battery.
2. When the battery is in storage, remove the battery to recharge when
stored about 6 months. To avoid over-discharge of electrolyte affect
battery capacity.
Page 9
3. Pay attention to the temperature and humidity of the battery storage
environment. Store the battery at room temperature in a cool, dry place
to minimize self-discharge of the battery.
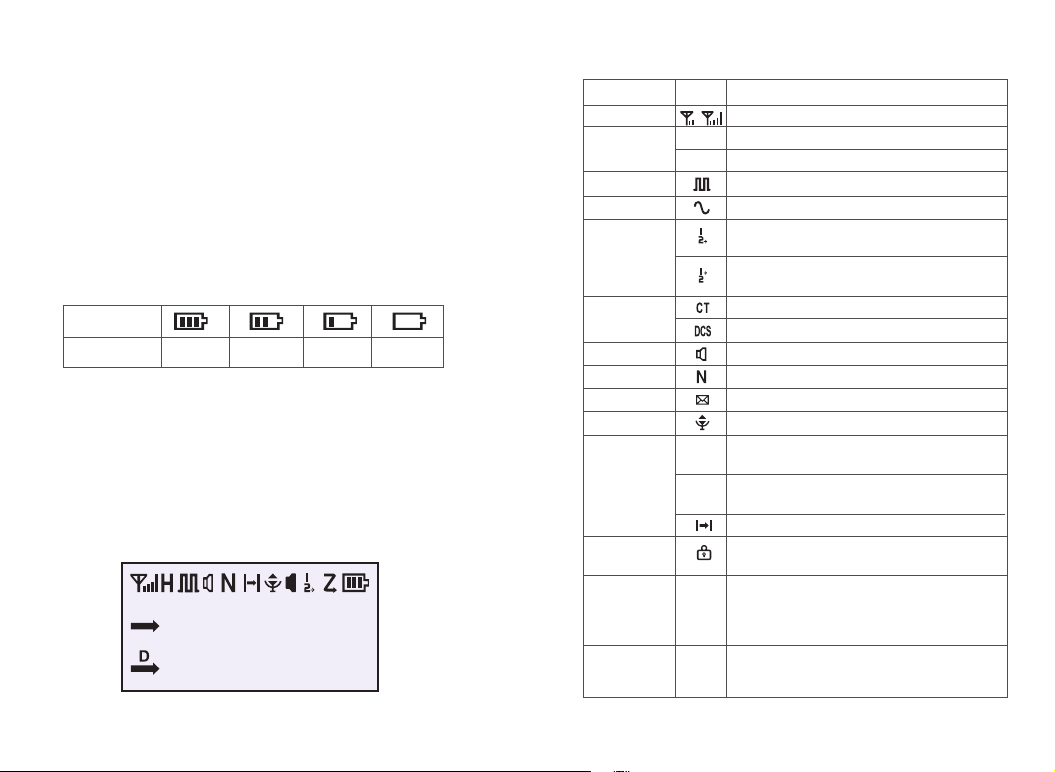
●Battery Voltage & Power Indication
If the dealer has set the 【battery power prompt】 shortcut key for the
product, you can press and hold the shortcut key to check the remaining
battery power by LED indicator, tone and battery icon. Release the
shortcut to cancel viewing the remaining battery power. The top right of
the screen shows the current battery power icon is as follows:
Battery icon
Battery power
High Medium Low Insufficient
Status indication
Description of LCD Icons
The LCD screen is used to display all the working status of the two-way
radio. The corresponding function icons are displayed on the screen
during operation. The screen allows you to know the meaning of the
icons and how to set the functions more quickly.
A
145.12500
173.97500
000
000
Description of LCD Icons
Icon name
Signal strength icon
Transmission power
icon
Digital icon
Analog icon
Direct mode slot
icon
Sub-audioicon
Speaker icon
Narrowband mode
Message icon
VOX icon
Relay mode icon
Keyboard Lock icon
Scrambling icon
Double-waiting icon
Description of product status
Icon
The more signal bars, the stronger the signal is
The current channel transmits at high power
H
The current channel transmits at low power
L
Digital mode
Analog mode
The current channel is in double slot direct mode and
slot 1 is active
The current channel is in double slot direct mode and
slot 2 is active
The current sub-audio is CTCSS
The current sub-audio is CDCSS
Speaker is enabled, and reception is effective
Work in narrowband mode
Receive a text message, or have an unread message
VOX has been turned on
The current transmission frequency is the reception
+
frequency plus a frequency bias (positive bias)
The current transmission frequency is the reception
-
frequency minus a frequency bias (negative bias)
Currently in offline state
The keyboard lock is locked;Lock status. Press the
combo keys [Menu] and [*] to unlock
The current reception frequency and the transmission
frequency are inverted (if the reception sub-audio and
R
transmission sub-audio are different, the sub-audio
will also be inverted)
Has been set to dual-band double-waiting function,
S
and allows waiting on two frequency bands displayed
on the screen at the same time
08 09
Page 10
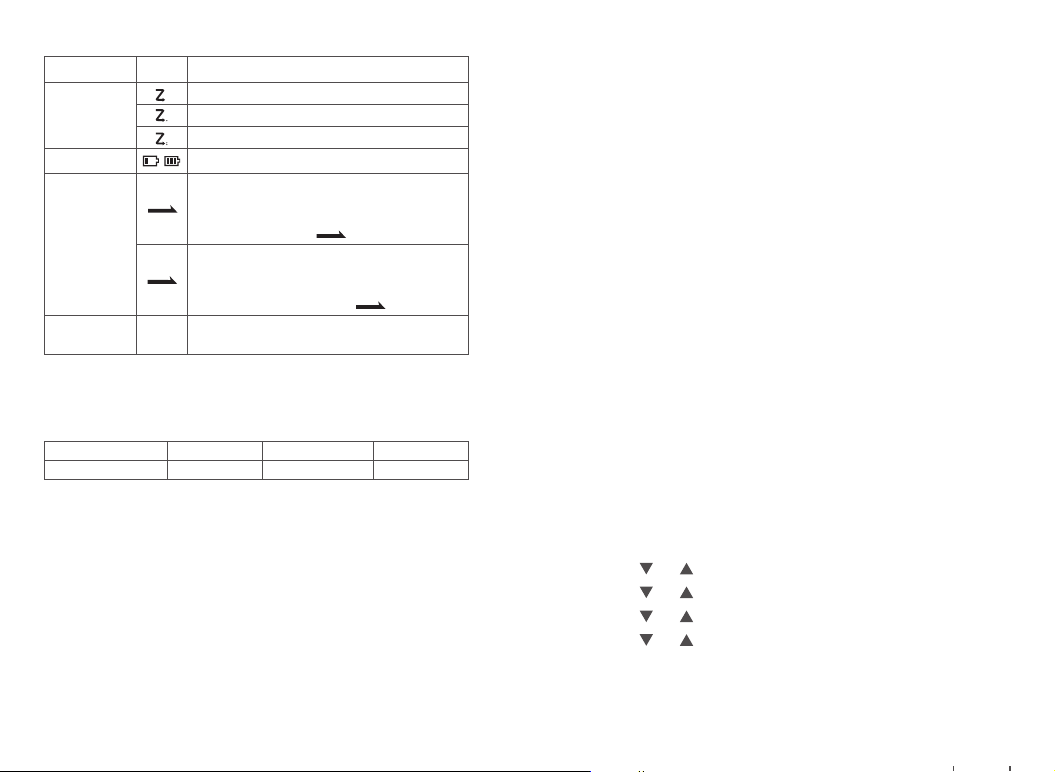
Icon name
Scan icon
Battery power icon
Pointer icon
Channel number
icon
LED Indicators
Description of product status
Icon
The scan is on and is in normal mode
The scan stays on priority channel 1
The scan stays on priority channel 2
The more bars, the more battery power
Currently pointing to the main digital mode; press A/B
button to switch the main channel up and down.
D
When double-waiting is turned on and works in digital
sub-channel, the icon is
Currently pointing to the main analog mode; press
A/B button to switch the main channel up and down.
A
When double-waiting is turned on and works in
analog sub-channel, the icon is
In channel mode, the current channel number is 001
001
(range 001~128)
D
A
This product has LED indicators so you can easily grasp the current
operating state.
Indicator status
Product status
Red on Green on Green flash
Transmitting Receiving Scanning
Basic Operation
Power on/off
To turn on the power, turn the [Power Switch / Volume Control] knob
clockwise until you hear a "click" sound and a short beep sounds. To turn
off the radio, turn the knob counterclockwise until you hear a click.
If you disable the tone function of this product (setting path: "Menu ->
Settings -> Walkie talkie Settings -> Tones / Tips-> All Tones -> off"), there
will be no boot tone.
If all LED's are disabled, the transmit / receive light does not come on
during turning on. A short beep sounds to indicate successful boot
detection. (Setting path: "Menu-> Settings-> Walkie talkie Settings->
LED-> off"), the LED will not light up.
Adjusting Volume
After turning on, turn the [Power switch / volume control] knob clockwise
to increase the reception volume, and turn counterclockwise to reduce the
reception volume.
Dual Mode Switch
Dual band mode can be selected through the menu; the path is as follows:
1.Press [ MENU] to enter menu mode.
2.Press [ ] / [ ] to set, then press【MENU】to select.
3.Press [ ] / [ ] to the radio setting, then press【MENU】to select.
4.Press [ ] / [ ] to “Double Wait”, then press【MENU】to select.
5.Press [ ] / [ ] to select the required option (Off/Double Wait/Single
Wait).
6.Press [MENU] return to theprevious menu.
10 11
Page 11

●When “ Off ” is selected, the machine operates in single band mode.
● When “ Single Wait ” is selected the machine only works on the main
channel, and the sub channel does not receive signal.
● When “Double Wait” is selected, the main channel and sub channel
scan in turn. When effective reception signal is scanned, the machine
locks and works; if the locked channel is not the main channel, points
to the temporary working channel, and disappears when the preset
time is up. If there is no temporary identification, the main channel pointed
by transmits when you press PTT.
Note: As the dual waiting mode is in main channel and sub channel
scanning states, DTMF, auto scan, individual operation and ARTS
auxiliary function do not work.
(VFO) VFO Mode
VFO mode is the basic mode for changing the operating frequency. In the
standby interface, press [VFO/MR] to switch to VFO mode, and press
[ ]/ [ ] to increase or decrease the frequency.
Quick Frequency Input
In addition to pressing [ ]/[ ], you can also input the frequency directly.
If the required operating frequency is far from the current frequency, you
can use the keypad to directly input the frequency.
>Press [VFO/MR] to switch to VFO mode.
• The frequency must be entered directly in VFO mode.
>Press the number buttons ([0] to [9]) to enter the desired frequency (The
first three decimal places are MHZ and the last five decimal places are
KHZ).
12 13
Note: Write frequency software configuration path: open the write software
-> Edit -> VFO mode -> VFO A -> digital / analog data -> channel mode ->
select "number."
• Or set VFO B to Analog. Normally set VFO A to digital mode and VFO B
to analog mode.
Digital - Analog Switching
Each channel of this product can be configured by the dealer as an analog
channel or a digital channel. If the current region contains a digital channel
and an analog channel, you can change the channel to an analog or
digital.
Keypad Lock & Unlock
If the keypad isn’t needed, you can lock into prevent misuse. You can lock
or unlock the keypad in the following ways:
•Keypad Lock: Press and hold the [#] button to lock the keypad.
•Keypad Unlock: Press [MENU] and [*] to unlock the keypad
Note: The default keypad lock range is all buttons on the panel, excluding
the side buttons SK1, SK2 and PTT.
Transmit and receive
Selecting Zone
Zone is a channel group in which you can include channels with the same
attributes (such as call type, digital mode and analog mode) in Zone,
which makes it easy for you to manage existing channels. The unit
supports up to 150 Zone, and each Zone contains up to 32 channels. You
can select a region in two ways:
Page 12

● Select from the menu: After entering the “Zone” menu, press [ ]/ [ ]
to select the required zone, and then press [MENU] to switch to the
selected zone.
● Select through the programming button: If the dealer has set the [Zone
switch] shortcut, you can press the shortcut to switch to the required zone.
Add Zone
The Add Zone through program software.
ID Selecting Channel, User ID & Call Group ID
In the standby interface, press [VFO/MR] to switch to MR (channel) mode,
and press [ ] / [ ] to select the desired channel, user alias or ID, or
call group alias or ID.
Receive and Reply to Group call
To receive a call to a user group, the two-way radio must be configured to
the call group.
1. The LED indicator light is green
2.The LCD screen displays: The first line shows Group Call, the second
line shows the group alias and the third line shows the caller ID and the
incoming call icon .(Only in Digital mode)
3.Press and hold the [PTT] button to reply,The LED indicator light is red.
4. Release the [PTT] button to receive.
5. If there is no voice activity for the scheduled time period, the call is
terminated.
6. You will hear a short tone, the screen shows the call ended.
Receive and Reply to Single call
14 15
Single call is a call from an individual two-way radio to another.
1. The LED indicator light is green
2. The LCD screen displays: The first line shows Single call, the second
line shows the Single calls and the third line shows the caller ID and the
incoming call icon .(Only in Digital mode)
3..Press and hold the [PTT] button to reply,The LED indicator light is
red.
4. Release the [PTT] button to receive.
5. If there is no voice activity for the scheduled time period, the call is
terminated.
6. You will hear a short tone, the screen shows the call ended.
Receive All call
All call is an individual walkie-talkie call to all walkie-talkies on the channel.
It is used to publish important notices that require special attention from
users.
1. LED indicator light is green.
2. he LCD screen displays: The first line shows the All call, the second line
shows the user's alias or ID and the third line shows the all call icon
(Only in Digital mode)
3. After the termination of all calls, the walkie-talkie will return to the screen
before receiving the call. If "channel idle tone" is enabled, you will hear a
short tone when the walkie talkie releases the [PTT] key, indicating that
the channel is ready for use and you cannot reply to all calls.
Note: When you receive an all call, if you switch to another channel, the
transceiver stops receiving the full call. During a full call, you will not be
able to use any of the preprogrammed keys until the call is ended.
Page 13

Start a walkie-talkie call
Start a walkie-talkie call
You can choose a channel, user ID or talk group in the following ways:
Channel knob
• Pre-programmed one-touch call button
• Address book list
• Manual Dialing (Via Contacts) - This method is suitable for single calling
only and dialing using the keypad
Use the channel Switch to place a call
Group call
To initiate a call to a user group, the transceiver must be configured to
belong to the talk group.
1. In the channel mode,press the [ ] / [ ] to select the channel using
the active talk group alias or ID.
2. Hold the walkie talkie in its upright position and keep it at a distance of
1 to 2 inches (2.5 to 5.0 cm) from the mouth.
3. Press [PTT] key to initiate a call, LED indicator light is red. The screen
displays the talk group alias or ID, as well as the group call icon.
4. Release the [PTT] key to answer. When the target radio replies, the
LED indicator will light green. The group call icon, call group alias or ID,
and walkie talkie alias or ID is displayed on the screen.
5. If the Channel Idle Tone feature is enabled, when the target radio
releases the PTT button, you will hear a short beep indicating that the
channel is free for you to answer. Press the PTT key to answer, or if
there is no voice activity for a predetermined period of time, the call is
terminated.
16 17
6. The walkie talkie returns to the screen before receiving the call. You
can also initiate a group call from your address book.
Single call
1. In the channel mode,press the [ ] / [ ] to select the channel using
the active user aliasl or ID.
2. Hold the walkie talkie in its upright position and keep it at a distance of
1 to 2 inches (2.5 to 5.0 cm) from the mouth.
3. Press [PTT] key to initiate a call, LED indicator light is red. The top line
of the screen shows status icons such as RSSI. In the display area below
the top line, the first line shows a single call, the middle shows a user
alias or ID, and the bottom shows a one-way icon (digital mode only).
4. Release the [PTT] key to answer. When the target radio replies, the
LED indicator will light green.
5. If the "Channel Idle Tone" feature is enabled, when the target radio
releases the [PTT] key, you will hear a short beep indicating that the
channel is free for you to answer. Press the PTT key to answer, or if
there is no voice activity for a predetermined period of time, the call is
terminated.
6. You will hear a short tone, the screen shows the call ended.
Note: You can also initiate a one-touch address book or make quick
contact access via the keyboard entry to find the desired walkie talkie.
All call
This feature lets you signal all users on the channel. The walkie-talkie
must be programmed to allow you to use this feature.
Page 14

1. In the channel mode, press the [ ] / [ ] to select the channel using
the active full call group alias or ID.
2. Hold the walkie talkie in its upright position and keep it at a distance of
1 to 2 inches (2.5 to 5.0 cm) from the mouth.
3. Press [PTT] key to initiate a call, LED indicator light is red. The screen
displays the all-call group alias or ID, as well as the all-call icon.
Note: Channel users cannot reply to all calls.
Use the one-touch call button to initiate a group call or a single call
One-touch calling features make it easy to group calls or single calls to
predefined aliases or IDs. This function can be assigned to short
programming or long programming keys.
You can assign only one alias or ID to a one-touch call key, and the
walkie talkie can have multiple programmed one-touch call keys.
1. Press the preprogrammed one-touch call button to initiate a group or
single call to a predefined alias or ID.
2. Hold the walkie talkie in its upright position and keep it at a distance of
1 to 2 inches (2.5 to 5.0 cm) from the mouth.
3. Press [PTT] key to initiate a call, LED indicator light is red. The screen
displays the talk group / user alias or ID, as well as the group call /
callout icon.
4. Release the [PTT] key to answer. When the target radio replies, the
LED indicator will light green.
5. If the "Channel Idle Tone" feature is enabled, when the target radio
releases the [PTT] key, you will hear a short beep indicating that the
channel is free for you to answer. Press the PTT key to answer, or if there is
no voice activity for a predetermined period of time, the call is terminated.
18 19
6. The walkie talkie returns to the screen before receiving the call.
Analog channel call
On the analog channel, hold down the [PTT] key and speak into the
microphone, to transmit. Please release [PTT ]key to receive.
DTMF call
Transmit:
•In the analog channel, press and hold the [PTT] key and press the
keypad number key.
•In the analog channel, long press [#] key to switch to manual dialing
mode, enter the desired number, short press [PTT] key to start DTMF
call.
Receive:
When the host computer has configured DTMF as the receiving signaling
system of the current channel, when decoding the code word is DTMF
personal ID code, the decoding is successful. During the resetting time, it
can talk to the other party. The reset time needs to be re-decoded.
One touch call
Analog mode, program the radio’ s one touch calls function:
1. Enter the corresponding DTMF number in DTMF Signaling -> Coding
-> Coding Sequence.
2. Programmable Button -> One Touch Access -> Mode -> (Analog) ->
SMS / Code -> (Select the corresponding code number)
3. (Programmable key) -> Walkie-talkie button -> Side key X -> Push to
talk X -> (Select the corresponding PTT serial number)
Page 15

After the above configuration, press the corresponding side button, you
can achieve one touch DTMF launch.
PTT ID call
In analog mode, you can program the radio to configure the DTMF
on-line code and off-line code; and enable the up-down-line code on the
analog channel. When enabled, the code will be sent each time the [PTT]
key is pressed, and the code will be released when the [PTT] key is
released.
VOX
VOX refers to voice directly trigger: microphone detects voice to trigger a
acoustic emission, walkie-talkie automatically launch the voice, that
users do not need to hold [PTT] button can be directly in the process of
speech. The LCD display icon
>Please adjust the voice gain level correctly according to the current
environment and normal speaking volume, so as to avoid frequent
accidental triggering (sensitivity too high) or difficult to trigger voice
control (sensitivity too low).
>The sensitivity of voice control transmission can be modified by
writing-frequency software, level 1 is the highest sensitivity level, and
level 10 is the lowest sensitivity level.
Emergency alarm function
Emergency alarm
In the event of an emergency, you can use this feature to ask your fellow
or control center for help. Emergency alarm has the highest priority, you
can alarm whether the walkie talkie is transmitting or receiving.
Alarm initiator to exit the alarm mode, there are two cases:
● Turn off the radio to exit the whole machine alarm.
● In other ways, when exiting alarm mode, the alarm on the current
channel can only be temporarily exited. When reselecting the channel,
the alarm will continue;
Note: The alarm function is enabled for you by the dealer (program path:
"Edit -> Digital Emergency Alarm System -> Emergency Alarm System ->
System1").
Alarm Type
The radio prompts in different modes for different alarm types, as shown
in the following table.
Alarm type
Disable
Conventional
Silent
Silence with
voice
Description
Turn off alarm function (alarm disabled), but it can receive alerts
from other radios.
When alarms, the radio gives an audible and visual prompt.
When alarms, the radio will not give any audible or visual prompt. At
the same time, no sound is made on any received audio.
When alarms, the radio will not give any audible or visual prompt.
However, the radio sounds when you press and hold the PTT button
to initiate a call or respond to a call.
20 23
Page 16
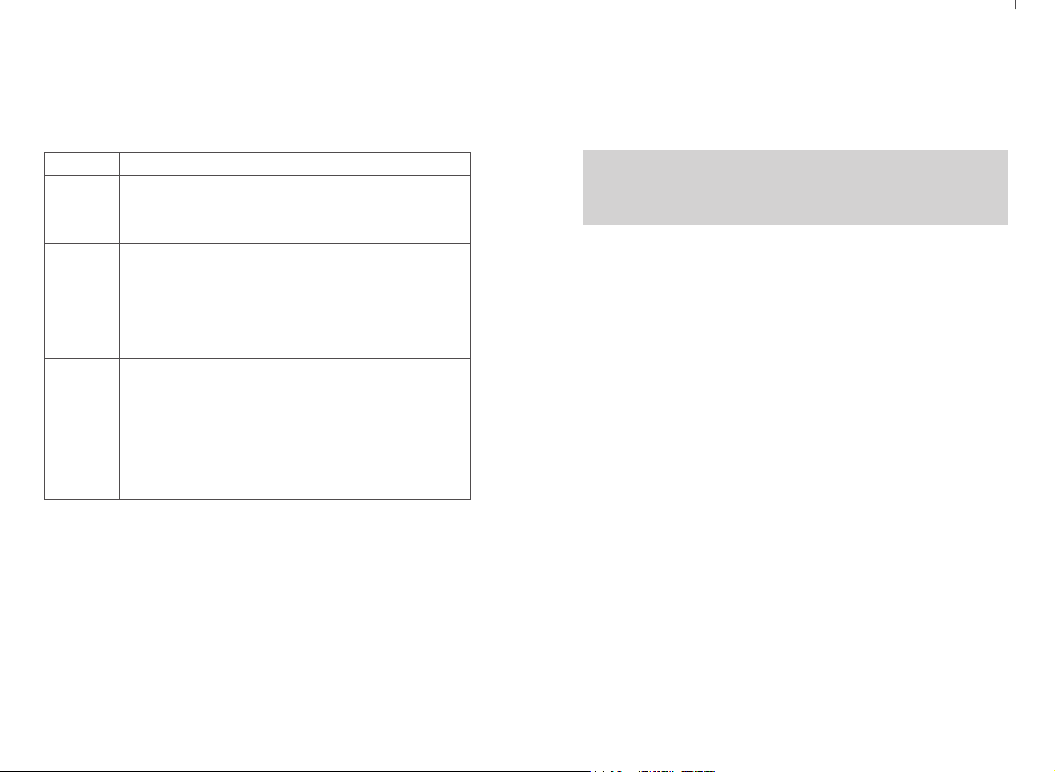
Alarm Mode
Except the alarm type “Disable” , other alarm types support the following
alarm modes. You can ask the dealer to select one of them (Note: The
following methods use “Conventional” alarm type as an example).
Alarm mode
Emergency
alarm
Emergency
alarm and
call (alarm
call)
Emergency
alarm and
voice
(emergency
call)
Description
In this mode, you can press and hold the [Emergency mode on]
button to send an alarm tone to your partners or control center but
can’ t talk to the other party.
In this mode, you can press and hold the [Emergency mode on]
button to send an alarm tone to your partners or control center, and
then press and hold the [PTT] button to speak to the microphone,
and your voice and surrounding background sound will be sent to
the receiver.
In this mode, you can press and hold the [Emergency mode on]
button to enter the alarm transmission channel. The product
automatically activates the “emergency microphone” (without
holding down the PTT button). You can speak to the microphone,
and your voice and the surrounding background sound will be sent
to receiver.
the screen displays a prompt that an emergency alert has been received,
until an acknowledgment is sent and the emergency mode exits. You will
not be able to receive any other prompts or show any other calls until you
exit the screen for receiving an emergency alert.
Note: Short press [BACK] key, and then press the pre-programmed
alarm close key, clear the prompt of receiving emergency alarm and exit
emergency mode.
Reply to emergency alert
When receiving an emergency alert:
1. Press any key to stop all audible alerts that have received an
emergency alert.
2. Hold the walkie talkie in its upright position and keep it at a distance of
1 to 2 inches (2.5 to 5.0 cm) from the mouth. If the "channel idle tone"
function is enabled, you will hear a short tone when the walkie talkie
releases the PTT key, indicating that the channel is now ready for use.
3. Press 【PTT】 key to start and emergency call to initiate walkie talkie
call. LED indicator light is red. The walkie talkie is in emergency call
mode.
4. Release the PTT key to answer. When the emergency call initiates the
Receive emergency alert
1. The number of alerts received when an emergency alert was received,
along with the alert that was received, alternating with the sender's alias
or ID.
2. A beep sounds and the LED flashes red.
3. If enabled, your transceiver will automatically acknowledge the
walkie talkie reply, the LED indicator will light green. You will see group
call icons, talk group IDs, and walkie talkie ID on the screen.
5. When the call is finished, press the [BACK] key briefly and then press
the Preset Alarm Off key to clear all prompts for emergency calls and exit
emergency mode.
6. The walkie talkie returns to the home screen.
emergency alert. When the walkie talkie receives an emergency alert,
21 22
Page 17

Send emergency alert
This feature allows you to send an emergency alert, which belongs to a
non-voice signal and will trigger a prompt on another transceiver.
1. Press the preprogrammed [Alarm On] button.
2. The screen displays Send Alert, alternating with walkie talkie ID. The
LED is lit red and the emergency call icon appears on the home screen.
3. When an emergency alert confirmation is received, an emergency call
tone sounds and the LED flashes green. The screen shows that the
emergency alert was successful.
• Or if the walkie talkie does not receive any emergency alert confirma-
tion and a beep sounds after all retries are exhausted, the screen
displays failed emergency alert.
4. The walkie-talkie exits the emergency alert mode and returns to the
home screen. If your walkie talkie is set to "silent," it will not show any
voice or visual cues in emergency call mode.
Send emergency alert with call
This feature allows you to send an emergency alert to another
transceiver. After confirmation, the two walkie talkies communicate via a
pre-programmed emergency channel.
1. Press the preprogrammed [Alarm On] button.
2. The screen displays Send Alert, alternating with walkie talkie ID. The
LED is lit red and the emergency call icon appears on the home screen.
3. When an emergency alert confirmation is received, an emergency call
tone sounds and the LED flashes green. The screen shows that the
emergency alert was successful.
23 24
4. Hold the walkie talkie in its upright position and keep it at a distance of
1 to 2 inches (2.5 to 5.0 cm) from the mouth.
5. Press [PTT] key to initiate a call, the LED indicator lights up in red, and
the group icon appears on the screen.
6. Release the [PTT] key to answer.
7. If the "Channel Idle Tone" feature is enabled, when the target radio
releases the [PTT] key, you will hear a short beep indicating that the
channel is free for you to answer. Press [PTT] key to answer.
Or press the pre-programmed alarm close button to exit emergency
mode.
8. The walkie talkie returns to the home screen. If your transceiver is set
to "Mute," it will not display any voice or visual cues in Emergency Call
mode and will not receive any response (call) from the target transceiver
until you press the {PTT} key to initiate the call. If your transceiver is set
to mute with Voice, it will not show any voice or visual cues in emergency
call mode or when you receive a call from the target radio. Only when
you press the [PTT] key to initiate or respond to the call, will prompt.
Send an emergency alert with voice follow
This feature allows you to send an emergency alert to another
transceiver. After confirmation, your walkie talkie microphone is activated
automatically, allowing you to communicate with other radios without
pressing the [PTT] key. This activated microphone status is called
"Emergency Microphone". If the [PTT] key is pressed during the
preprogrammed emergency microphone launch, the transceiver ignores
[PTT] press and remains in emergency mode.
Page 18

Note: If you press the [PTT] key during the emergency microphone and
continue pressing the key after the duration of the emergency micro-
phone, the transceiver continues firing until you release the [PTT] key.
1. Press the preprogrammed [Alarm On] button.
2. The screen displays send an alert, the LED is lit red and the
emergency call icon is displayed.
3. After the screen shows that the emergency alert is successful, speak
clearly toward the microphone. When the emergency microphone has
been activated, the transceiver automatically transmits a signal without
pressing the [PTT] key until the end of the emergency microphone time.
4. While transmitting, the LED is lit red and the emergency call icon
appears on the screen.
5. After the emergency microphone duration has expired, the transceiver
automatically stops transmitting. To launch again, press the [PTT] key.
If your walkie talkie is set to "silent," it will not display any voice or visual
cues in emergency call mode and will not receive any response from the
target walkie talkie until the preprogrammed emergency microphone
period has expired, and you Press [PTT] key. If your transceiver is set to
"silent with voice", it will not display any voice when you place an
emergency microphone call in emergency mode, or when the target
walkie talkie responds after the preprogrammed emergency microphone
interval Or visual cue. These prompts appear only when you press the
[PTT] key.
Note: If the emergency alert request fails, the walkie talkie returns to the
home screen.
25 26
Restart emergency mode
It can happened in two situations:
• When the transceiver is in emergency mode and changes channel, it
will exit emergency mode. If an emergency alert is activated on the new
channel, the transceiver resumes the emergency call.
• Press the preprogrammed [Alarm On] key in the emergency call start /
transmit state. This way the walkie talkie will exit the status and restart
the emergency call.
Exit emergency mode
The transceiver exits emergency mode when one of the following
happened:
• Receive emergency alert confirmation (emergency alerts only), or
• The number of major attempts to send an alert has been reached, or
• Press Preprogrammed [Alarm Off ], or
• Press the [PTT] key.
Note: If the radio is turn off, it will exist the emergency mode. When you
turn on again, the radio won’ t start resume emergency mode
Individual Operation
This feature is ideal for people who work alone. If you encounter
unexpected situations during individual operation, you can’ t operate the
radio in preset time. The radio will automatically send alarm to your
partner or control center for help.
1.Turn on individual operation
● Through writing frequency software, this function is turned on when the
radio is started.
Page 19

● Press the preset [Individual Operation] shortcut to enable this function.
2. If you do not operate the radio in the preset response time, the radio
will prompt before the response time is up (depending on the dealer
settings). At this point, you can end the prompt with a valid physical
operation (knob or button operation). When the response time is up, the
radio will automatically turn on the alarm system of the current channel.
3. Turn off individual operation
● Turn this function off by writing-frequency software.
● Press the preset [Individual Operation] shortcut again to turn off this
function.
Note: If you do not turn off the individual operation function before
shutting down, the function is still active the next time you turn on the
radio.
Encryption
Enabling encryption helps prevent unauthorized access to eavesdrop-
ping by other users who are on the channel and use the software
encryption method. The transmitted signal and user identification parts
are not encrypted. Your radio must have been encrypted on the channel
to enable to send encrypted transmissions, even when it is not
necessarily required to receive transmissions.
Basic Encryption
The radio can only be assigned one of the above encryption types. To
decrypt an encrypted call or data transmission, the radio which need to
be pre-programmed and the transmission radio must have the same
"Encryption Key" (for Basic Encryption).
27 28
If your radio receives encrypted calls with different encryption keys or
different key values and key IDs, you will hear the chaotic transmission
sound (basic encryption).
Press the Pre-programmed [Encryption] button to turn on or turn off the
encryption.
ANI ID code display
Under the Analog mode, you can set PTT ID by the program software.
The program software operation route: Channel information-> Analog
data-> Display PTT ID, tick this option, the LCD will display the ANI ID
code when receive the DTMF signal.
Menu operation
Press the [MENU] button in digital mode or digital channel to enter the
digital menu; press the [MENU] button in analog modem or analog
channel to enter the analog menu. The menu structure is shown in the
following figure, including all the menu items of this product. You can ask
the dealer to configure the menu items. You need to first press the
[MENU] button to enter the main menu, and then press the [ ]/ [ ]
button to navigate to desired submenu or option and press the [MENU]
button to confirm and complete your setting. This document only
describes the order of the menu items when the menu operation is
introduced. For example, the path to the contact list is “Contacts ->
Contact List” . The menu has automatic reset function. If you do not do
anything for the menu during preprogrammed time (configured by the
dealer), the product will automatically return to the standby screen. You
can ask the dealer to modify the auto reset time and cancel auto reset.
Page 20
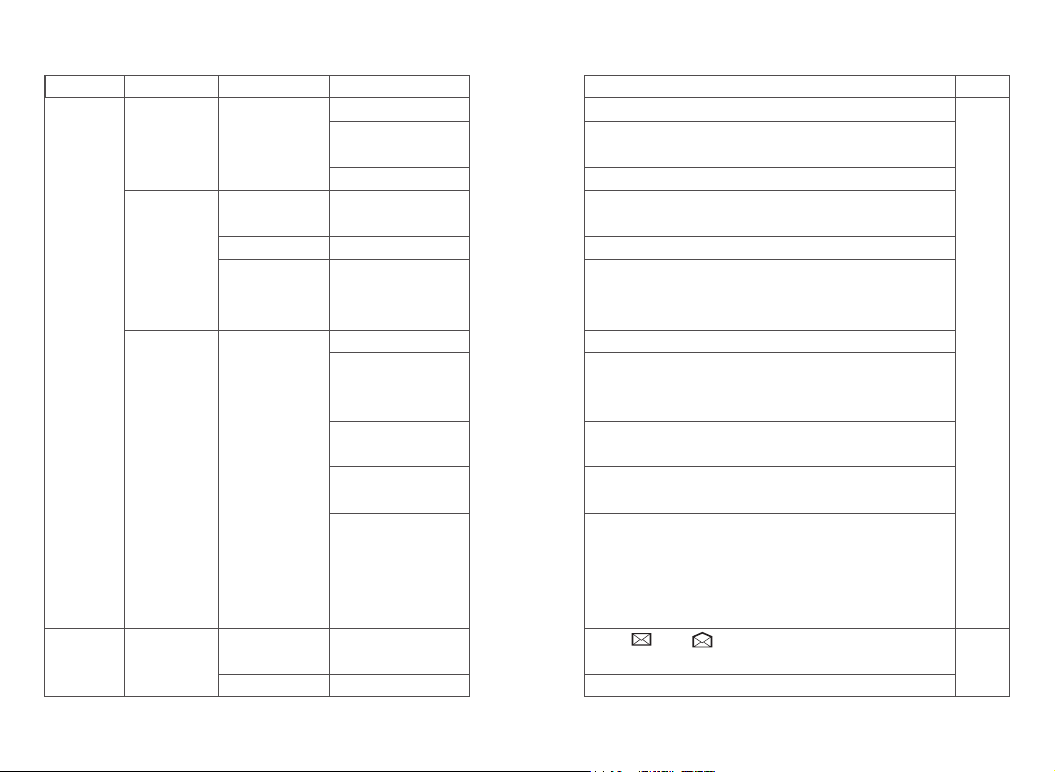
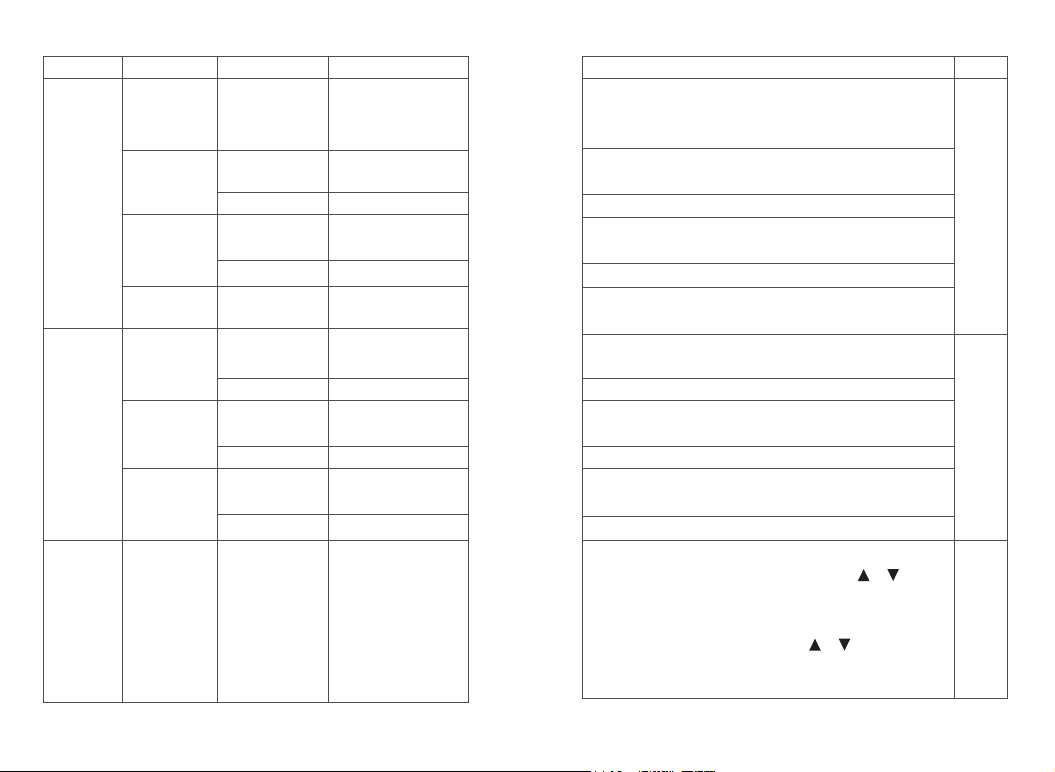
Menu list
Level 1 menu Remark
Contacts
SMS
Level 2 menu
Contacts
New contact
Manual dialing
Inbox
29 33
Level 3 menu
Contact list
Enter number
Alias
Tone
Enter number
Inbox list
Delete all
Options
View contacts
Quick configuration
Delete current contact
xxxx
Abcd
OFF
Tone 1~10
Call Alert
Radio Check
Remote Moni
Radio Active
Radio remote kill
List xxxx
es/No
Description of settings
View the contact name and number
Configure number 0~9 to the contact, select idle state to turn off
shortcut configuration
Delete current contact
Enter the contact number, up to 16777214, press the MENU button to
confirm or press EXIT to delete
Enter the name; support Chinese and English and special characters
There are 10 tones that can be selected. When the caller chooses to
enable the call prompt and the caller’s number is the new contact, the
unit issues this tone and the tone can be turned off if it is not necessary
Send call prompt to a contact, and the other party can call back directly
Initiate radio detection to a contact without interfering with each other
to confirm whether the other party has turned on the unit or uses in
the current channel.
Remotely activate the microphone of a contact, and monitor the voice
and background sound of the other party.
Send an activation command to a contact to resume normal use of
the two-way radio.
Send a remote inhibit command to a contact, so that the radio can’t
be used normally. Remote inhibited two-way radio can be remotely
monitored, but other functions can’t be used; it only allows re-writing
frequency through CPS software or activating the radio through
activation instructions
Unread , read ; press MENU to edit the contents, and
press MENU again to reply / forward / delete
Yes: Delete all No: Do not delete
For
digital
mode
only
Page 21
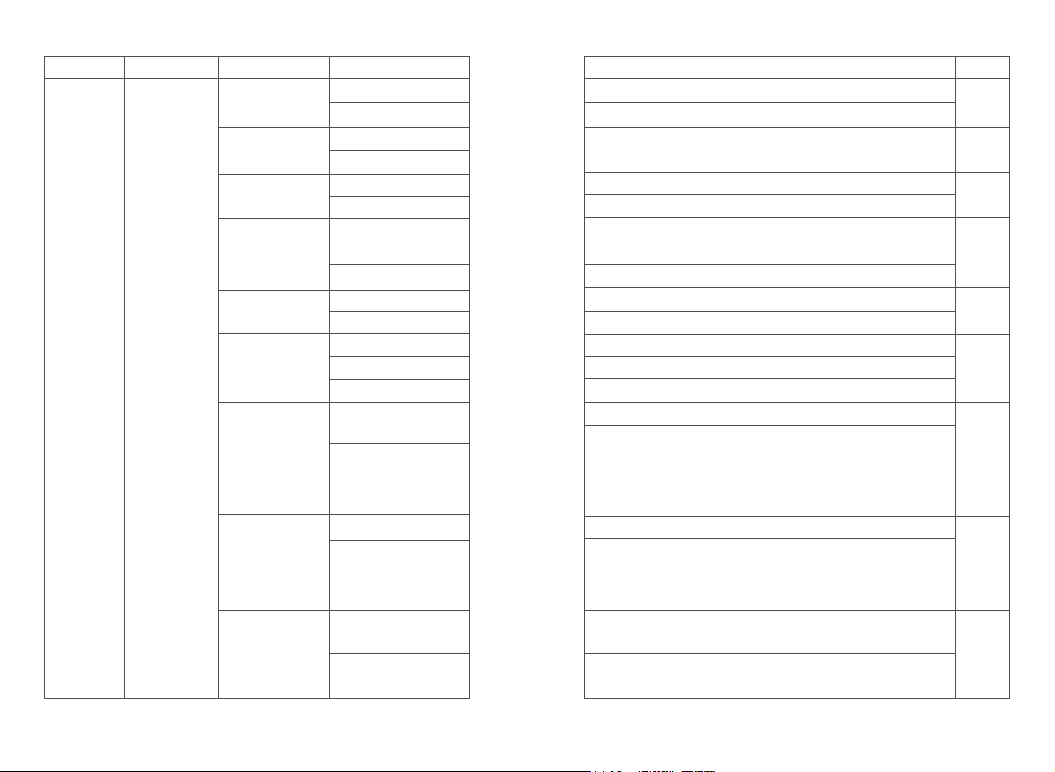
Level 1 menu
SMS
Level 2 menu
New message
Outbox
Drafts
Quick Text
Level 3 menu
Edit interface
Outbox list
Delete all
Drafts list
Delete all
List…
Options
List …
List …
Description of settings
Support Chinese and English and special characters, press the #
button to switch input method, and press MENU key to send / save /
clear
Press the MENU button to edit the content, and press MENU again to
retransmit / forward / edit / delete
Yes: Delete all No: Do not delete
Press the MENU button to edit the content, and press MENU again to
transmit / save / clear
Yes: Delete all No: Do not delete
Press the MENU button to edit the content, and press MENU again to
Remark
For digital
mode
only,
The
Software
menu
options
are
configu-
rable
transmit / save / clear
Outgoing single calls; press MENU to view / add to Contacts/ delete,
enter alias and save in contact list
Yes: Delete all No: Do not delete
Answered single calls; press MENU to view / add to Contacts/ delete,
enter alias and save in contact list
Yes: Delete all No: Do not delete
Missed single calls; press MENU to view / add to Contacts/ delete,
enter alias and save in contact list
Yes: Delete all No: Do not delete
For
digital
mode
only;
Call logs
Outgoing call
Answered call
Missed call
Outgoing List
Delete all
Answered List
Delete all
Missed List
Delete all
List…
List…
List…
Change the encoding and decoding of CTCSS/DCS. Press [MENU] to
For
analog
mode
only
Set
Inbox
CTCSS/DCS
C CTC/DCS
enter “CTCSS/DCS”, press [*] to select DCS, press [ ]/[ ] to
select DCS, code, press [#] to switch the positive phase (N) and
negative phase (I).
● Press [*] to select “CTCSS OFF”, press [ ]/[ ] to select CTCSS.
● You can also enter CTCSS/DCS with keypad, press the [MENU]
button to confirm, and press [BACK] to return.
31 32
Page 22
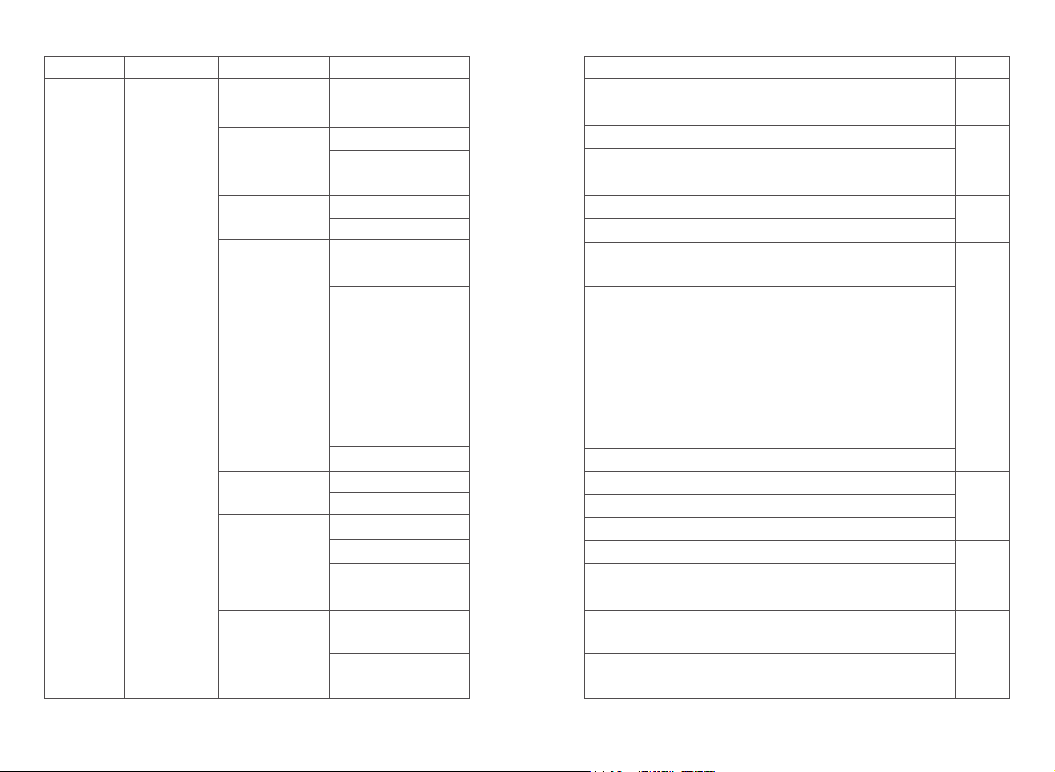
Level 1 menu Level 3 menu Options
Level 2 menu
CTCSS/DCS
R CTC/DCS
T CTC/DCS
Squelch
Strict
Normal
TX Power
Low
High
On
Talkaround
Off
N/W BAND
Narrow
Wide
Off
Busy Lock
Set Radio Set
Carry
QT/CC
OFF
Description of settings
Change the decoding of sub audio. Setting method is same as above
Change the coding of sub audio. Setting method is same as above
Low power transmission
High power transmission
ON; the function works only when “Allow offline” of current channel of
the host computer is ticked
Off
Narrowband works
Broadband works
Transmit when the channel is occupied
Press PTT to prohibit transmission when there is carrier wave
Match CTCSS / color code forbidden
Off, no transmission limit
Remark
The Software
menu options
are
configurable
Options can
be
configured
Options
can be
configured
For analog
mode only
Alarm in 10 seconds before transmission, and prohibit transmission
TOT
15 ~ 495S
when the time is up; for example, when it is set to 60 seconds, alarm is
sent for 10 seconds from the 50th second, and transmission is
prohibited at the 60th second
Vox
Off
On
VOX is turned off;
It is not necessary to press PTT when this option is on; you can speak to
transmit directly; voice sensitivity of the host computer can be set to 1~10,
Options
can be
configured
level 1 is the highest sensitivity level, and level 10 is the lowest sensitivity level
Off
Double Wait
Double Wait
The machine works in the main channel, the sub-channel can’t
transmit or receive
The machine works in the main channel, the sub-channel can’t
Options
can be
configured
transmit or receive
33 34
Page 23
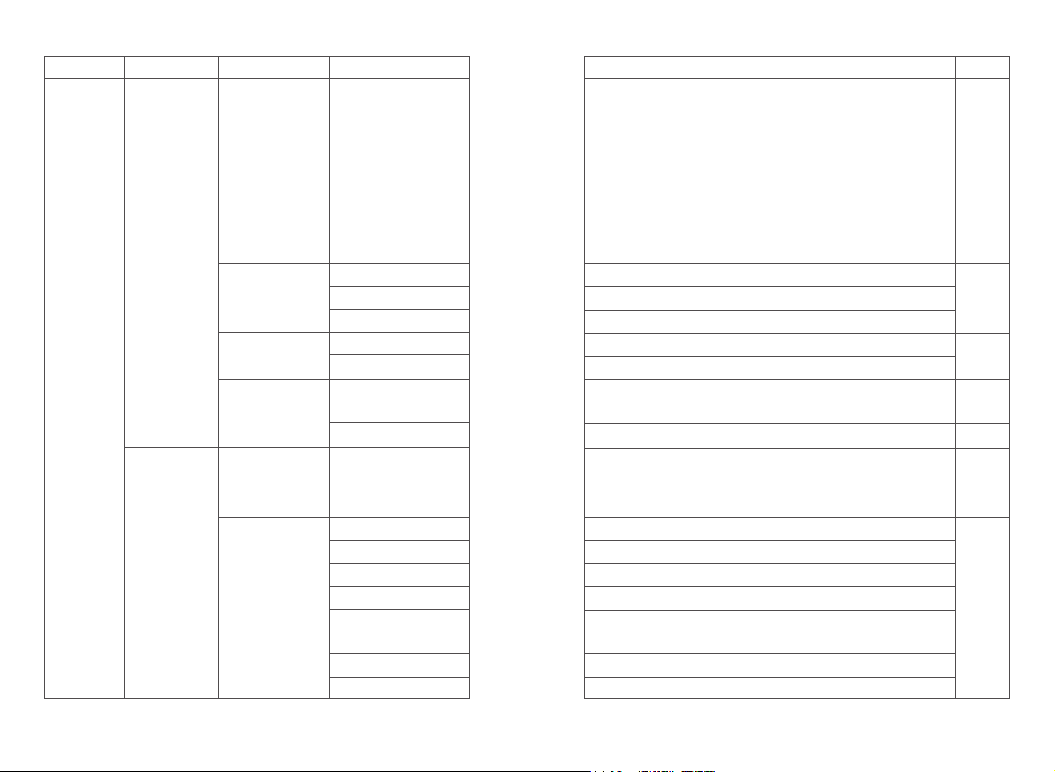
Level 1 menu Level 3 menu Options
Level 2 menu
Single Wait
Off
Encrypt
Power Save
On
Off
On
All Tone
Beep
Call Permit
Set Radio Set
Key Beep
Backlight
Always On
Always Off
5/10 sec
Keypad Lock
Manual
5/10/15 sec
Off
Indicator
On
Description of settings
Scan main channel and sub-channel in turn; call is locked when the
reception is effective; you can press PTT to talk with the other party
Turn off encryption
Turn on encryption function, and the two sides must pair the key to
make the call normally
Turn off power saving mode
Turn on the power saving mode; power saving ratio is 1:4
Options: Off/On. Turn off all tones when Off is selected, but do not
include emergency alarm tone
Options: Off / Digital / Analog. Pressing the PTT button will transmit the
signal through the channel and will sound a tone that prompts the user
to start speaking.
● OFF: Turn off this function
● Digital: Enable this tone only for digital channels
● Analog: Enable this tone only for analog channels
● Both:Enable this tone for digital channels and analog channels
Options: Off/On. There is no prompt tone when Off is selected
The background light is on all the time
The background light off all the time
Turn off the backlight automatically when the time is up
Press and hold # to lock, press the MENU and * to unlock
Auto lock; lock automatically at set time; press the MENU and # to
unlock
The indicator (transmission, receiving, boot, etc.) does not work when
it is off
Default option is on
Remark
Options can
be
configured;
for digital
mode only
Options
can be
configured
Options
can be
configured
Options
can be
configured
Options
can be
configured
35 36
Page 24
Level 1 menu Level 3 menu Options
Level 2 menu
Description of settings
Remark
Input correct password to enter the setup menu; the password can be
configured by default on host computer
Passwd Lock
Enter password
Options: On or Off / Changes boot password
● On or Off: Turn on if it is turned off, and turn off if itis turned on; when
On is selected, you need to enter the correct password and press the
MENU button to start the unit
Options
can be
configured
● Change boot password: You can enter a new password not more
than 6 digits; please remember after changing
The channel mode is displayed by channel number
The channel mode is displayed by channel name
The channel mode is displayed by frequency mode
Display according to the picture provided by the customer
Two lines, can be edited by software
English version, including menu, call tips, call logs and all other
interfaces
Simplified Chinese
Digital mode displays the digital ID of the unit, up to 16777214; analog
mode displays the DTMF ID of the unit, up to99999999; this option is
read only
The machine model
Unique alphanumeric character of the two-way radio
Reading and writing frequency software version
Hardware circuit board version
The software version of the internal hardware components of the
Options
can be
configured
Options
can be
configured
For
digital
mode
only
For
digital
mode
only
Set
Radio Set
Radio info
Mode
Screen
Language
Radio ID
Device Info
CH No.
CH Name
CH Freq
Picture
Character
English
Chinese
12345678
Model info
S/N
CPS version
Hardware version
Firmware version
two-way radio
DSP version
Program Time
DSP software version number of digital processing chip
The date and time of the last programming of the two-way radio
37 38
Page 25
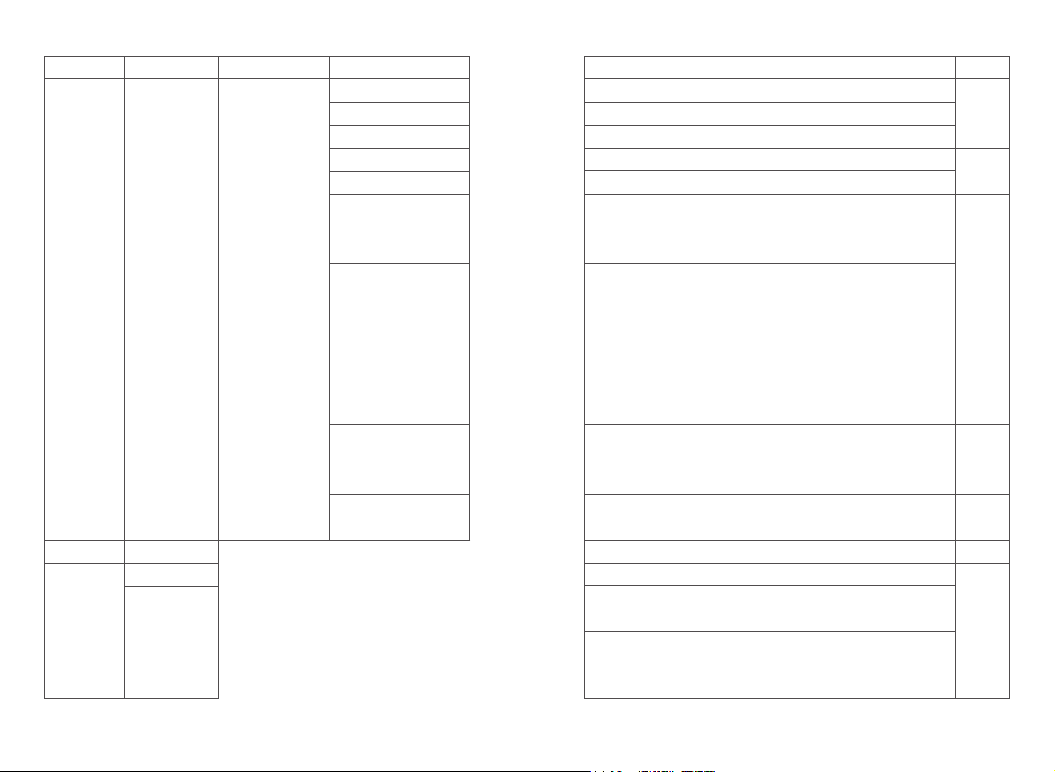
Level 1 menu Level 3 menu Options
Level 2 menu
Reception Frequency
Transmission Frequency
Channel Name
Color Code
Slot
Description of settings
To set reception frequency; press * to clear all, press BACK to delete one
To set transmission frequency; press * to clear all, press BACK to delete one
To set channel name; press * to clear all, press BACK to delete one
Options: 0~15 optional Valid for digital mode only
Options: 1~2 optional Valid for digital mode only
Remark
For digital
mode
only
The difference between transmission frequency and reception frequency
Shift Frequency
in frequency mode, whether frequency has difference depends on
frequency direction
Options: Off / Positive / Negative
>Off: Transmission frequency and reception frequency have no
Set Radio
Radio info
configuration
Shift Direction
difference in frequency mode
>Positive: In frequency mode, the transmission frequency is equal to the
reception frequency plus the difference frequency
>Negative: In frequency mode, the transmission frequency is equal to
the reception frequency minus the difference frequency
Options: 2.5K/5.0K/6.25K/10K/12.5K/25K/50K
Frequency Step
In the frequency mode, press []/[]to adjust the frequency value in steps;
scanning steps in frequency mode
Channel Type
Options: Analog / Digital
Switch analog and digital mode in frequency mode
Zone
Scan
Zone Name
On
Scan List
A list of regions that can support up to 150 regions
Switch on/off; scan function can be turned on only when the PC of
current channel has configured the scan list; it also can be turned on
through the function button defined as “scan switch”
Display the current scan list, which is read only
The
Software
menu
options
are
configurable
39 40
Page 26
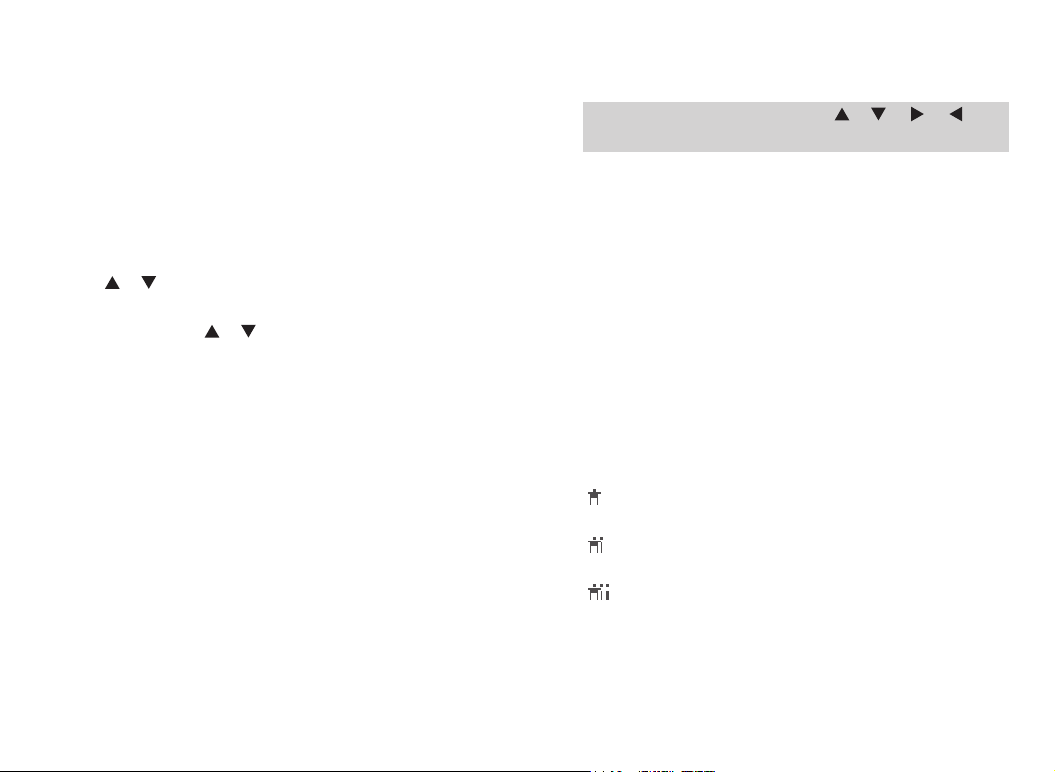
Input Method
You can enter user aliases, numbers and text messages via the keypad.
This product supports the English input method, Simplified Chinese
Pinyin input method, and number input method.
Press number button [1] to enter commonly used punctuation and
special characters. To enter a space, press the [0] button.
Note: In the input text display area, press [ ] / [ ] / [ ] / [ ] to
move the cursor up/down/left / right.
Simplified Chinese Pinyin Input Method
1. Press [#] to switch to Pinyin input method (LCD shows PY).
2. Press number buttons to enter the pinyin, and the LCD shows the
alternate pinyin and corresponding candidate Chinese characters.
3. Press [ ]/ [ ] to select the desired pinyin.
4. Press the [MENU] button to move the highlight to the Chinese
character area, and press [ ]/ [ ] to select the desired Chinese
character.
5. Press the [MENU] button to enter the selected Chinese character.
Repeat the above steps to complete the input.
English Input Method
1. Press [#] to switch to uppercase (LCD shows ABC) or lower case
(LCD shows abc) English input method.
2. Press the number buttons repeatedly until the desired letter appears.
Repeat the above steps to complete the input.
Number Input Method
1. Press [#]to switch to number input method (LCD shows 123).
2. Press the number buttons 0~9 to enter the corresponding number.
Input Special Characters
41 42
Contact list settings
Contact list provides "Address Book" for handheld walkie-talkies. Each
entry corresponds to an alias or ID used to initiate the call. In addition,
each entry is related to one of three types of call depending on the
setting: group call, single call, all call. Your walkie talkie supports digital
contacts.
The entry in the contact list shows the following information:
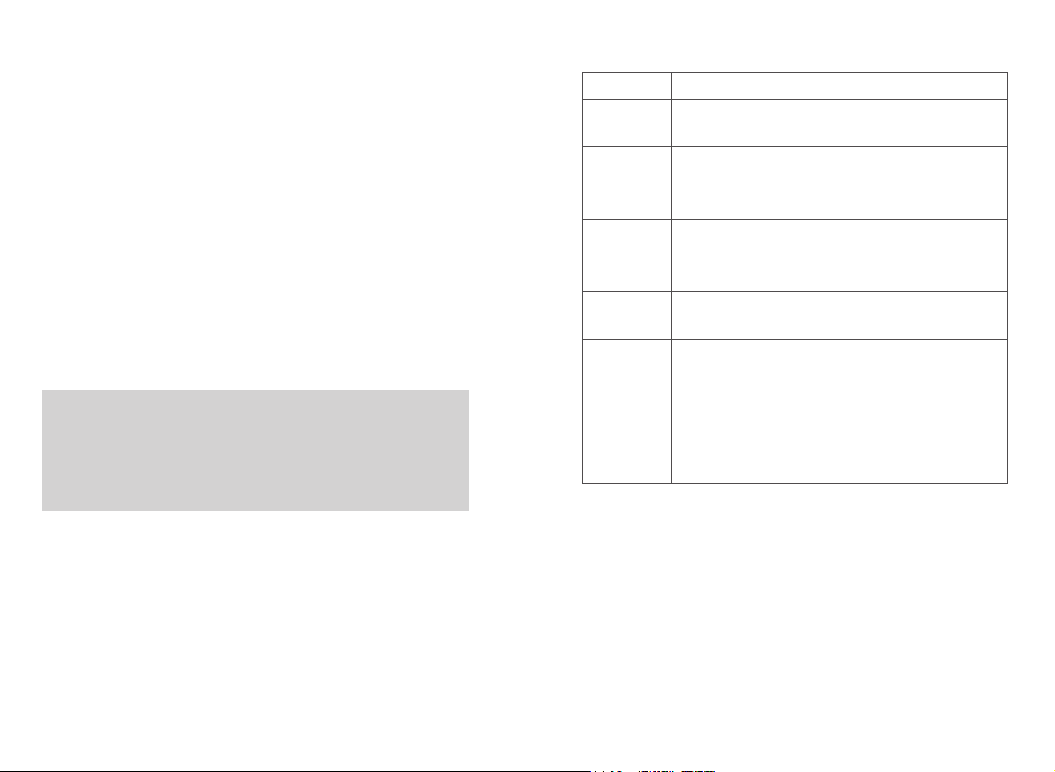
■ Call type ■ Call alias ■ Call ID
Note: You can add, delete, or edit contacts to your digital contact list.
Call icon
The following icons displayed on the LCD appear in the contact list or
call log to indicate the ID type.
Single call: In the contact list, it indicates the signed user alias
(name) or ID (number).
Group call: In the contact list, it indicates the group alias (name) or
ID (number).
All call: In the contact list, it indicates the group alias (name) or ID
(number).
Page 27
View Contact
You can view the contact details.
Edit Contact
You can modify the number and alias of a contact (single call contacts
only) in the contact list.
Delete Contact
You can delete a contact in the contact list.
New Contact
This menu allows you to create a new contact (single call contacts only)
to the contact list. The alias and number of all contacts must be unique,
and the range of entered contact number is 1~16776415.
Note:
●When entering a contact alias, you can press the [#] button to toggle
the input method.
●In addition to creating contacts through this menu, you can also save
numbers in the call log to the contact list.
The functional description is as follows:
Functional
Call prompt
Radio
detection
Remote
monitoring
Radio
activation
Radio remote
kill
Description
Send call prompt to a contact, and the other party can
call back directly
Initiate radio detection to a contact without interfering
with each other to confirm whether the other party has
turned on the unit or uses in the current channel.
Remotely activate the microphone of a contact, and
monitor the voice and background sound of the other
party.
Send an activation command to a contact to resume
normal use of the two-way radio.
Send a remote kill command to a contact, so that the
radio can’ t be used normally. Remote kill two-way radio
can be remotely monitored, but other functions can’ t be
used; it only allows re-writing frequency through CPS
software or activating the radio through activation
instructions
Manual Dialing
In the digital mode, press the [#] button to enter manual dialing, then you
can manually enter a single call number, and press PTT to transmit; you
can also enter a single call number, and press the [MENU] button to
perform operations such as call prompt, radio detection, remote monitor,
radio activation, and remote kill.
43 44
Push-to-call
You can ask the dealer to set [Push-to-call] shortcut, and press the
shortcut to initiate the corresponding operation. Specific operation
categories are as follows:
Business on digital channels:
>For group call contacts, you can initiate a group call or send text
message.
Page 28
> For single call contacts, you can initiate single call, send text message,
and initiate extended function. Extended functions include: call prompt,
radio detection, remote monitor, activation, and remote kill.
Call prompt
In digital mode, you can send call prompt to a contact, and the other
party can call back directly
This feature is only available for user aliases or IDs, and can be
accessed via the menu via Contacts or Manual Dialing.
Initiate a call prompt from the communication list
1.Press [MENU] key to enter the menu mode.
2. Press [ ]/[ ] key to contact list, then press [MENU] key to select
3. Press [ ]/[ ] tkey to the desired user alias or ID, then press
[MENU] key to select.
Or press [ ]/[ ] tkey to manually dial, then press [MENU] key to
select, flashing cursor appears, input the user ID you want to call, then
press [MENU] key.
4. Press [ ]/[ ] tkey to “call alert” , the screen displays the call
prompt: <User alias or ID>, and then press the [MENU] key to indicate
that the call has been sent.
5.When the walkie talkie send a call prompt, the LED indicator light is
red.
6.If you receive a call confirmation, a tone sounds and a call alert
appears.
Or if no call alert confirmation is received, a beep sounds and the screen
displays a call alert failure.
45 46
Receive and confirm call prompt
When you receive a call alert, the screen displays a call alert, alternating
with the alias or ID of the calling walkie-talkie.
1. You will hear a repeat tone. The LED flashes red.
2. Press and release the [PTT] key to confirm the prompt, or press the
[MENU] key to select "Ignore?" To ignored the call prompt.
Radio detection
In digital mode, you can initiate radio detection to a contact without
interfering with each other to confirm whether the other party has turned
on the unit or uses in the current channel.
Initiate radio detection
User menu function:
1. Press [MENU] key to enter the menu mode
2. Press [ ]/[ ] key to contact list, then press [MENU] key to select
3. Press [ ]/[ ] key to the desired user alias or ID, then press
[MENU] key to select.
Or press [ ]/[ ] key to manually dial, then press [MENU] key to
select, flashing cursor appears, input the user ID you want to call, then
press [MENU] key.
4. Press [ ]/[ ] key to “Radio Check” , the screen displays the
radio check <User alias or ID>, and then press the [MENU] key to
indicate that the call has been sent.
5. When the walkie talkie send radio detection, the LED indicator light is red.
6. If the target walkie-talkie is active in the system, a prompt is emitted
and the screen briefly shows “Radio check success” .
Page 29

Remote monitor
This function works only if the function is set and turned on by
writing-frequency software.
You can activate or remote kill any walkie-talkie in the system.For
example, you might want to disable a stolen walkie-talkie, prevent the
thief from using it, and enable it when recovered.
Initiate remote monitor
User menu function:
1. Press [MENU] key to enter the menu mode
2. Press [ ]/[ ] key to contact list, then press [MENU] key to select
3. Press [ ]/[ ] key to the desired user alias or ID, then press
[MENU] key to select.
Or press [ ]/[ ] key to manually dial, then press [MENU] key to
select, flashing cursor appears, input the user ID you want to call, then
press [MENU] key.
4. Press [ ]/[ ] key to “Remote monitor” , the screen displays the
remote monitor <User alias or ID>, and then press the [MENU] key to
indicate that the call has been sent.
5. When the walkie talkie send remote monitor, the LED indicator light is
red.
6. “Remote moni success” displays if it is successful, and “Remote
moni fail” displays if fails.
Receive remote monitor
After receiving the remote monitor command, it automatically starts
transmitting voice and surrounding environment background sound, and
exits automatically when the transmission time is up.
Radio activation and remote kill
47 48
Set activation and remote kill
In frequency software, the following operations are performed:
1.Edit -> DTMF-> signaling -> decode -> response type, select activation
and remote kill;
2.DTMF number -> Enter the number;
3.Select the corresponding receiving signaling system (the same system
as step 2) within the channel information and check decoding X (the
same number as that required in step 2).
4.When the corresponding DTMF number is received, the corresponding
ctivation and remote kill function will be realized.
Radio activation
In digital mode, you can send an activation command to a contact to
resume normal use of the two-way radio.
Initiate radio activation
User menu function:
1. Press [ ]/[ ] key to enter the menu mode
2. Press [ ]/[ ] key to contact list, then press [MENU] key to select
3. Press [ ]/[ ] key to the desired user alias or ID, then press
[MENU] key to select.
Or press [ ]/[ ] key to manually dial, then press [MENU] key to
select, flashing cursor appears, input the user ID you want to call, then
Page 30
press [MENU] key.
4. Press [ ]/[ ] key to “Radio active”, then press [MENU] key to select
5. The screen displays “Radio active” <User alias or ID>, the LED
indicator light is red.
6. Wait for confirmation
7. “Radio active success”displays if it is successful, and “Radio active
fail” displays if fails.
Receive radio activation
After receiving the radio activation command, send activation tone,
re-shutdown and then boot. It can also be activated by writing frequency
software.
Note: This function works only if the function is set and turned on by
writing-frequency software.
Radio remote kill
In digital mode, you can send a remote inhibit command to a contact, so
that the radio can’t be used normally.User menu function:
Initiate remote kill
1. Press [MENU] key to enter the menu mode
2. Press [ ]/[ ] key to contact list, then press [MENU] key to select
3. Press [ ]/[ ] key to the desired user alias or ID, then press
[MENU] key to select.
Or press [ ]/[ ] key to manually dial, then press [MENU] key to
select, flashing cursor appears, input the user ID you want to call, then
press [MENU] key.
49 50
4. Press [ ]/[ ] key to “Radio kill” , then press [MENU] key to select
5. The screen displays “Radio kill” <User alias or ID>, the LED indicator
light is red.
6. Wait for confirmation
7. “Radio kill success” displays if it is successful, and “Radio kill fail”
displays if fails.
Receive remote kill
After receiving the radio inhibit command, send inhibit prompt tone, and
press the [PTT] button to display “Transmission failed and inhibited” . It
can be activated by SMS writing frequency or wake-up.
Note: This function works only if the function is set and turned on by
writing-frequency software.
Group call from the contact lists
1. Press [MENU] key to enter the menu mode.
2. Press [ ]/[ ] key to contact list, then press [MENU] key to select,
3. Press [ ]/[ ] to the desired group name or ID.
4. Hold the walkie talkie in its upright position and keep it at a distance
of 1 to 2 inches (2.5 to 5.0 cm) from the mouth.
5. Press [PTT] key to initiate a call, LED indicator light is red. The screen
displays the talk group alias or ID, as well as the group call icon.
6. Release the [PTT] key to receive. When any user in the group
responds, the LED will light green. You will see the group call icon user
ID on the screen.
7. If the "Channel Idle Tone" feature is enabled, when the target radio
releases the [PTT] key, you will hear a short beep indicating that the
Page 31

channel is free for you to answer. Press the call key [PTT] to answer. If
there is no voice activity during the preprogrammed group call hang-up
time, the call is terminated.
Single call from contact lis
1. Press [MENU] key to enter the menu mode.
2. Press [ ]/ [ ] key to contact list, then press [MENU] key to select,
the items are arranged in alphabetical order.
3. Press [ ]/ [ ] to the desired user alias or ID.
Or press [ ]/ [ ] key to dial manually, then press [MENU] key to
select. If there is a user alias or ID dialed previously, the ID is displayed
with the blinking cursor and the keyboard is used to edit this ID.
Or press [ ]/ [ ] key to dial manually, then press [MENU] key to
select, use keyboard to input a new ID.
4. Hold the walkie talkie in its upright position and keep it at a distance of
1 to 2 inches (2.5 to 5.0 cm) from the mouth.
5. Press [PTT] key to initiate a call, LED indicator light is red. The first
line shows the user's alias or ID, the second line shows the single and
single call icons.
6. Release the [PTT] key to answer. When the radio responds, the radio
LED lights up green and the screen displays the ID of the transmitting
user.
7. If the "Channel Idle Tone" feature is enabled, when the target radio
releases the [PTT] key, you will hear a short beep indicating that the
channel is free for you to answer. Press the call key [PTT] to answer. If
there is no voice activity during the preprogrammed single call hang-up
time, the call is terminated.
51 52
8. You will hear a short tone; the screen shows the termination of the call.
If you release the PTT key while the walkie talkie is setting up a call, it
exits without any hint and returns to the previous screen. walkie talkies
can be preprogrammed to perform walkie-talkie presence detection prior
to setting up a single call. If the target walkie talkie does not answer, you
will hear a short beep, and the other party does not answer on the
screen. The walkie-talkie returns to the menu before starting the walkie
talkie presence test.
SMS Function
This product supports DMR data function, and allows sending and
receiving messages; the maximum length of each message is 144
characters. And SMS lines cannot be more than 50 lines.
Edit and Send Messages
Use the MENU function:
1.Press the [MENU] button to enter into the [MENU] mode.
2.Press the [ ]/ [ ] button, Select “Message “,press the [MENU]
button to select.
3.Press the [ ]/ [ ] button, Select “New Message” , press the
[MENU] button to select.
4.When blinking cursor appears, input the SMS by the keyboard, press
the [ ]button to move to left one, press the [ ] button to move to
right one.press [ BACK ]button to delete any useless character when
there are contents in the edit area, or else it will return to the upper menu
when there is no content in the edit area.
Page 32

• press the[ * ]button to delete all contents in the editing area;Press[ # ] to
switch input methods.
5.After finish the SMS content, press the [MENU] button to send or save
or clear all.
5.After finish the SMS content, press the [MENU] button to send or save
or clear all.
6.After send, press the [ ]/ [ ] button to the required name or ID,
then press the [MENU] button to select.
Or press the [ ]/ [ ] button to Manual Dialing, then press the
[MENU] button to select, input the user ID and press the [MENU] button.
7.The LCD shows the “Msg Sending” , confirm that the SMS is being
sent.
8. If the message sent successfully, a beep sound, and the screen shows
the message has been sent.
Or if the message has not been sent, a high-pitched tone sounds and the
screen shows that the message has failed to be sent. If the message
fails to be sent, the radio will return to the re-send selection screen.
Send Prefabricated SMS
This product supports at most 32 prefabricated SMS programmed by the
agent.
When a text message is predefined, you can edit each message before
sending it.
Use the MENU function:
1. Press the [MENU] button to enter into the MENU mode.
2. Press the [ ]/ [ ] button, Select “Message “,press the [MENU]
button to select.
53 54
3. Press the [ ]/ [ ] button, Select “Quick Text” , press the [MENU]
button to select.
4. Press the [ ]/ [ ] button to select required Prefabricated
SMS ,press the [MENU] button to select.
5. When blinking cursor appears, input the SMS by the keyboard, press
the [ ] button to move to left one, press the[ ]button to move to right
one. press[BACK] button to delete any useless character when there are
contents in the edit area, or else it will return to the upper menu when
there is no content in the edit area.
• press the [*] button to delete all contents in the editing area;Press [#]
to switch input methods.
6. After finish the SMS content, press the [MENU] button to send or save
or clear all.
7. After send, press the [ ]/ [ ] button to the required name or ID,
then press the [MENU] button to select.
Or press the [ ]/ [ ] button to Manual Dialing, then press the
[MENU] button to select, input the user ID and press the[MENU] button.
8. The LCD shows the “Msg Sending” , confirm that the SMS is being sent.
9. If the message sent successfully, a beep sound, and the screen
shows the message has been sent. Or if the message has not been sent,
a high-pitched tone sounds and the screen shows that the message has
failed to be sent. If the message fails to be sent, the radio will return to
the re-send selection screen.
Use the one-touch call button to send prefabricated SMS
1. Press the pre-programmed one-touch call; send a prefabricated SMS
to a predefined alias or ID.
Page 33

2. The LCD shows the SMS :< User/Call group alias or ID>, confirm that
the SMS is being sent.
3. If the message sent successfully, a beep sound, and the screen shows
the message has been sent.
Or if the message has not been sent, the screen shows that the
message has failed to be sent. If the message fails to be sent, the radio
will return to the re-send selection screen.
Receive SMS
When your radio is receiving a SMS, the screen displays the sender's
alias or ID and a text message icon on the left. Press[MENU] to view the
message.Press the [ ]/ [ ] button to select later to view or delete
messages.
When receive SMS, you can choose below options:
■Read ■Read later ■Delete
If you press the[PTT] button while the radio is displaying the prompt
screen, the radio will exit the SMS prompt screen and establishes a
individual call or group call.
Check the SMS
Use the MENU function:
1. Press the[MENU] button to enter into the MENU mode.
2. Press the [ ]/ [ ] button, Select “Message “,press the[MENU]
button to select.
3. Press the [ ]/ [ ] button, Select “InBox” , press the[MENU]
button to select.
4. Press the [ ]/ [ ] button to select unread messages ,press the
55 56
[MENU] button to read this message
•When the chosen SMS opened in the inbox and this SMS was sent from
Email program, and then it will appear a subject line.
5. Press the [BACK] button to return to inbox.
•Or press the[MENU] button to reply/transfer/delete SMS.
Manage the received SMS
This product will save the received message in the Inbox and can store
up to 50 received messages.
Support below SMS options:
■ Reply ■Transfer ■ Delete ■ Delete All
Store messages in your inbox according to the most recently received in
sequence.
You can return to the previous screen by pressing the [BACK] button at
any time.
Use the Menu function
1. Press the [MENU] button to enter into the MENU mode.
2. Press the [ ]/ [ ] button, Select “Message “,press the [MENU]
button to select.
3. Press the [ ]/ [ ] button, Select “InBox” , press the [MENU]
button to select.
4. Press the [ ]/ [ ] button to read SMS, if this SMS was sent from
Email program, then it will appear a subject line.
5. Press the [MENU] button to the current SMS, then press the [MENU]
button again to reply/delete/forward this SMS.
6. Press the [BACK] button to return to inbox.
Page 34
Note: Indicates unread message. Indicates read message.
Reply the SMS in the inbox
Use the Menu function:
1.Press the [MENU] button to enter into the MENU mode.
2.Press the [ ]/ [ ] button, Select “Message ” ,press the [MENU]
button to select.
3.Press the [ ]/ [ ] button to Inbox, press the [MENU] button to
select.
4.Press the [ ]/ [ ] button to required SMS, then press the [MENU]
button to select.
if this SMS was sent from Email program, then it will appear a subject
line.
5.Press the [MENU] button again to enter into the sub-menu.
6.Press the [ ]/ [ ] button to reply, then press the [MENU] button to
select.
7.Press the [ ]/ [ ] button Write SMS, then press the [MENU] button
to select. When a blinking cursor appears, edit text messages by the
keyboard.
Or press the [ ]/ [ ] button to the prefabricated SMS, then press the
[MENU] button to select. After choose the required SMS, a blinking
cursor will appear when press the [MENU] button, and you can edit your
SMS by keyboard if necessary.
8. After finish the edit, press the [MENU] button.
9. The LCD shows the “Msg Sending” , confirm that the SMS is being
sent.
10. If the message sent successfully, a beep sound, and the screen
57 58
shows the message has been sent.
- Or if the message has not been sent, the screen shows that the
message has failed to be sent. If the message fails to be sent, the radio
will return to the re-send selection screen.
Delete the SMS in the inbox
Use the Menu function:
1.Press the [MENU] button to enter into the MENU mode.
2.Press the [ ]/ [ ] button, Select “Message ” ,press the [MENU]
button to select.
3.Press the [ ]/ [ ] button to Inbox, press the [MENU] button to
select.
4.Press the [ ]/ [ ] button to required SMS, then press the [MENU]
button to select.
if this SMS was sent from Email program, then it will appear a subject
line.
5.Press the [MENU] button again to enter into the sub-menu.
6.Press the [ ]/ [ ] button to delete, then press the [MENU] button
to select.
7.Press the [ ]/ [ ] button to “YES” when the Delete appears, then
press the [MENU] button to select.
8. The screen will show the SMS has been deleted.
9. The screen will return to the inbox.
Delete all the SMS in the inbox
Use the Menu function:
1.Press the [MENU] button to enter into the MENU mode.
Page 35
2.Press the [ ]/ [ ] button, Select “Message ” ,press the [MENU]
button to select.
3.Press the [ ]/ [ ] button to Inbox, press the [MENU] button to
select.
4.Press the [ ]/ [ ] button to delete all, then press the [MENU]
button to select.
5.Press the [ ]/ [ ] button to “YES” when the Delete appears, then
press the [MENU] button to select.
6. The screen will show the inbox was emptied.
-When you choose” Inbox” and find there is no SMS, the screen will
indicate there is empty in the list, and if the key tone is opened, a low
tone beep sounds.
Manage the failed SMS
In the re-send selection screen, you can choose below options:
■Re-send
■Forward
■Edit
Re-send SMS
1.Press the [MENU] button to re-send the same SMS to the same
user/call group alias or ID.
2.2. If the message sent successfully, a beep sound, and the screen
shows the message has been sent.
Or if the message has not been sent, the screen shows that the
message has failed to be sent.
59 60
Forward SMS
Choose forward to send the SMS to another user/call group alias or ID.
1. Press the [ ]/ [ ] button to select “Forward” ,press the [MENU]
button to select.
2. Press the [ ]/ [ ] button to required alias or ID ,press the [MENU]
button to select.
- Or press the [ ]/ [ ] button to Manual Dialing, then press the
【MENU】button to select, input the user ID and press the [MENU] button.
3.The LCD shows the “Msg Sending” , confirm that the SMS is being
sent.
4. If the message sent successfully, a beep sound, and the screen shows
the message has been sent.
Or if the message has not been sent, the screen shows that the message
has failed to be sent. If the message fails to be sent, the radio will return to
the re-send selection screen.
Edit SMS
Choose Edit to write SMS before send it out.
If there is a subject line (as to the SMS received from the Email program),
then you can’ t edit to this subject line.
1. Press the [ ]/ [ ] button to Edit, then press the [MENU] button to
select.
2. When blinking cursor appears, input the SMS by the keyboard, press
the[ ]button to move to left one, press the[ ]button to move to right
one. press[BACK]button to delete any useless character when there are
contents in the edit area, or else it will return to the upper menu when there
is no content in the edit area.
Page 36

● press the [ * ] button to delete all contents in the editing area;Press
[# ] to switch input methods.
3. After finish the SMS content, press the [MENU] button to send or save.
4. After send, Press [MENU] to select the contact, press the [ ]/ [ ]
button to the required name or ID, then press the [MENU] button to
select.
•Or press the [ ]/ [ ] button to Manual Dialing, then press the
[MENU] button to select, input the user ID and press the [MENU] button.
5. The LCD shows the “Msg Sending”, confirm that the SMS is being
sent.
6. If the message sent successfully, a beep sound, and the screen shows
the message has been sent.
- Or if the message has not been sent, the screen shows that the
message has failed to be sent. If the message fails to be sent, the radio
will return to the re-send selection screen.
Manage the already sent SMS
The SMS was sent to another radio, it will be saved to “Sent item” file.
The sent SMS will be always added to the top list of “Sent item”. The
“Sent item” file can store at most 50 SMS sent recently. When the file is
full, the next sent SMS will automatically update the SMS record.
Press the[BACK]button to return to the previous screen at any time.
Read the already sent SMS
Use the Menu function:
1. Press the[MENU] button to enter into the MENU mode
2. Press the [ ]/ [ ] button, Select “Message ”,press the[MENU]
61 62
button to select.
3. Press [ ]/ [ ] o send the Outbox, and then press[MENU] to select
the outbox list.
4. Press the [ ]/ [ ] button to required SMS, then press the
[MENU]button to select.
If the SMS was sent by Email program, it will appear a subject line, the
icon at the top right of the screen indicates the state of the SMS.
Send the already sent SMS
When read the already sent SMS, you can choose below options:
■Re-send ■ Forward ■Edit ■Delete
1.When reading the SMS, press the [MENU] button again.
2.Press the [ ]/ [ ] button, Select “Re-send”, press the [MENU]
button to select.
3.The LCD shows the “Msg Sending”, confirm that the SMS is being
sent.
4. If the message sent successfully, a beep sound, and the screen shows
the message has been sent.
Or if the message has not been sent, a high-pitched tone sounds and the
screen shows that the message has failed to be sent. If the message fails
to be sent, the radio will return to the re-send selection screen. Press the
[MENU] button to re-send to the same user/call group alias or ID.
Note: Besides press the [MENU] button and the [ ]/ [ ] button, you
can return to this SMS by changing the volume or pressing any other
button.The radio will exit the re-sent selection screen when you press the
[MENU] button to make a individual call or group call or when you
response to group call. And you receive SMS/telemetry message/an
Page 37
emergency call or an alarm. Or you receive a call alert; the radio will also
exit the re-sent selection screen. The screen list will return to the re-sent
selection mode when you press the [MENU] button to response to
individual call(except when the radio indicates the call screen is not
received), or when the group call finished. By pressing the [ ]/ [ ]
button, enter into the transfer/edit/delete selection screen.
• Choose Transfer; send the selected SMS to other group call/user alias
or ID.
• Choose Edit, edit the SMS before send it out.
• Choose Delete, delete the selected SMS.
Note: If you exit the SMS sent screen when you send the SMS, the radio
will update the SMS state in the “Already sent item” file, and will not show
the reminder or any beep. If the radio mode changed or out of power
before the “Already sent item” updated, the radio will not handle the
sending SMS, and will show a icon indicated sent failed. Our radio will
solve 5 SMS at the same time. And the radio can’ t send new SMS and
will automatically show a icon indicated sent failed at this stage.
Delete the already sent SMS in “Already sent item” file
Use the Menu function:
1. Press the [MENU] button to enter into the MENU mode.
2. Press the [ ]/ [ ] button, Select “Message ” ,press the [MENU]
button to select.
3. Press [ ]/ [ ] o the OutBox, then press [MENU] key to select.
4. Press the [ ]/ [ ] button, Select “OutBox” , press the [MENU]
button to select.
5. Press the [MENU] button when delete SMS. And choose “YES” , the
screen will indicate the entire sent item is cleared.
-Or Press the [ ]/ [ ] button to “NO” when delete SMS, and press
the [MENU] button to return to the previous screen.
When you choose ” Already sent item” and find there is no SMS, the
screen will indicate there is empty in the list, and if the key tone is
opened, a low tone beep sounds.
Drafts
This product will save the edited messages in the drafts and support up
to 20 draft messages. When the Drafts are full, if a new message is
saved to the drafts, the earliest messages will be overwritten automati-
cally.
You can perform the following operation for any message in the drafts:
Send, edit, and delete.
When you send the message in the drafts, this product will save this
message to the Outbox and delete it from the drafts.
If you want to delete all messages in the drafts, select “SMS -> Drafts ->
Delete All” .
Preset Message
This menu has messagespre-set by the dealer. This product supports up
to 32 shortcut messages. You can choose a shortcut message to send
directly, or edit the message and then send.
63 64
Page 38
Call log
Your transceiver can record all dialed, picked-up and missed calls
recently. Use call logging to view and manage calls recently.
Check the latest call number
Menu items have missed calls, received calls and dialed calls.
1. Press [MENU] key to enter the menu mode.
2. Press [ ]/ [ ] key to Call Logs, then press [MENU] key to select.
3. Press [ ]/ [ ] to the desired list, then press [MENU] key to select.
4. The screen shows recent entries at the top of the list.
5. Press [ ]/ [ ] key to view the list, press [PTT]key to start a call
with the currently selected alias or ID.
Missed call screen
Whenever a missed call is placed, the transceiver will display a missed
call message, select to view or check later.
Note: If you press the PTT key when viewing missed call numbers, the
radio exits the Missed Call Screen and establishes a one-way call.
1. The screen displays Missed Calls, Missed Calls and View.
2. Press [MENU] key to check missed call ID, missed call record list will
be displayed on the screen. Press [MENU] to save or delete this item; or
press [ ]/ [ ] key to check later, then press [MENU] key to select
and return to the main screen.
Store an alias or ID from the list of missed calls
1. Press [MENU] key to enter the menu mode.
2. Press [ ]/ [ ] key to Call Logs, then press [MENU] key to select.
65 66
3. Press [ ]/ [ ] key to missed call, then press [MENU] key to select.
4. Press [ ]/ [ ] key to the missed call alias or ID, then press
[MENU] key to select.
5. Press [ ]/ [ ] key to save, then press [MENU] key to select.
6. A blinking cursor appears, enter the ID's alias if needed, and then
press the [MENU] key.
7. The screen shows that the contact has been saved.
You can also enter an alias ID.
Delete the call in the call list
1. Press [MENU] key to enter the menu mode.
2. Press [ ]/ [ ] key to Call Logs, then press [MENU] key to select.
3. Press [ ]/ [ ] key to the desired list, then press [MENU] key to
select.
4. Press [ ]/ [ ] key to the desired alias or ID, then press [MENU]
key to select.
5. Press [ ]/ [ ] to delete the entry? , Then press [MENU] key to
select whether to delete the item.
6. Select "Yes" to delete the entry by pressing the [MENU] key. The entry
appears on the screen. Or, select "No" and press the [MENU] key to
return to the previous screen.
When you select a call list but there is no entry in it, the screen will
display a blank list. At this moment, if the keyboard tone is on, a bass
tone sounds.
Scan function
Note: The scan function must to off double wait before it can be used.
Page 39

The scan function helps you to receive the communication activity from
other channels or groups call, further to know the current activity of the
relative team members. The radio can support up to 250 scan lists with a
maximum of 31 members. Every scan list supports the mix of analog and
digital channels. You can add/delete channel or prioritize channel by
editing scan list.
3.Press the [ ]/ [ ] button to add channel, then press the [MENU]
button to select.
4.Press the [ ]/ [ ] button to choose the required add channel, then
press the [MENU] button to select.
5. The screen indicates “Success to add channel” and back to the upper
menu automatically.
Scan the list
1. Use the [ ]/ [ ] to choose a channel with pre-programmed scan
list;
2.Press the [MENU] button to enter into the MENU mode;
3.Press the [ ]/ [ ] button to scan, then press the [MENU] button to
select;
4.Press the [ ]/ [ ] button to read the list, then press the [MENU]
button to select;
5.Use the [ ]/ [ ] button to read every member in the list.
If you set the priority, the priority icon will be displayed to the left of
member alias, that means this member is priority 1 channel or priority 2
channels , and if the priority is set as, the icon will not displayed. Several
priority 1 channel or priority 2 channels is not allowed in one scan list.
Or Select to delete a channel in the current scan list, but you cannot
delete the first channel in the scan list.
Add scan channel
1.Press the [MENU] button to enter into the MENU mode.
2.Press the [ ]/ [ ] button to scan, then press the [MENU] button to
select.
67 68
Scan instruction and method
The radio will check if there are any voice activities to the current
channel by pre-program the scan list cycling. The red LED indicator light
flash and the scan icon will appear in the screen.
During the duplex mode scan period, if you are on a digital channel and
your radio locks an analog channel, the digital mode will be automatically
switched to analog mode during the entire duration call.
There are two ways to scan:
• Manual scan: start to scan by pre-programming the scan turn on/turn
off button or the menu function, when start to scan, the radio will detect
all the channels/group calls pre-set in the scan list.
• Automatically scan: when you choose a channel/group calls which have
been activated, the radio will start to scan from the automatically
scanned channel.
Start and stop scan
Press the pre-programmed scan turn on/turn off button or enter into the
scan menu function
1. Use the channel knob to choose a channel with pre-programmed scan
list;
Page 40
2.Press the [MENU] button to enter into the MENU mode;
3.Press the [ ]/ [ ] button to scan, then press the [MENU] button to
select;
4. If the scan was stopped, the screen will indicate to open, or if the scan
is activated, the screen will indicate to close.
5.Use the [MENU] button to select.
6. When the scan is activated, the red LED indicator light flash, and the
scan icon will appear in the screen;
Or when the scan is stopped, the LED light will be off and no scan icon is
displayed.
Scan Reply
During scan, the radio will stop at the channel/group calls when the radio
detect activity channel/group calls,
This is called as the pre-programmed time limit for the “Scan suspend
time”
Progress:
1. Hold the radio in a vertical position and keep it 1-2 inches (2.5-5.0cm)
from your mouth. If the function of “Free channel beep” enabled. you will
hear a short beep sound when release the [PTT] button, this indicates
the channel is free and wait for your reply.
2.Press the [PTT] button during the suspend time. The LED light is red.
3.Release the [PTT] button to receive.
4.If you don’ t response during the suspend time, the radio will go on
scanning.
Menu setting
Radio setting
You can make the following settings according to your own preferences
and actual needs, so as to maximize their performance.
The setting method: Enter into the menu “Setting ->Radio setting” ,
select the corresponding setting to set. The press [MENU] to enter the
radio Settings.
The setting items are as below list:
Setting
options
1.Squelch
2.TX Power
3.Talk
around
4.Busy lock
5.Transmit
time-out
timer(TOT)
Options
and Range
Strict
Normal
Low
High
On
Off
Off
Carry
QT/CC
OFF
15 ~ 495S
Description of operation
Strictly filter the useless calls or background noise
Normally filter the useless calls or background noise
Low power transmission
High power transmission
ON; the function works only when “Allow offline” of current
channel of the Software is ticked
OFF
Transmit when the channel is occupied
Press PTT to prohibit transmission when there is carrier
wave
Match sub-audio / color code forbidden
Off, no transmission limit
Alarm in 10 seconds before transmission, and prohibit
transmission when the time is up; for example, when it is
set to 60 seconds, alarm is sent for 10 seconds from
the50th second, and transmission is prohibited at the 60th
second
69 70
Page 41
Setting
options
6.VOX
7.Double
wait
8.Encrypt
9.Power
Save
10.Beep
Options
and Range
Off
On
Off
Single Wait
Double Wait
Off
On
O
ff
On
All Tone
Call Permit
Description of operation
VOX is turned off;
It is not necessary to press PTT when this option is on;
you can speak to transmit directly; voice sensitivity of the
host computer can be set to 1~10, level 1 is the highest
sensitivity level, and level 10 is the lowest sensitivity level
Single channels mode
Switch upper and lower channels through the keypad;
when the machine works in the main channel, the
sub-channel can’ t transmit or receive
Scan main channel and sub-channel in turn; call is locked
when the reception is effective; you can press PTT to talk
with the other party
Turn off encryption
Turn on encryption function, and the two sides must pair
the key to make the call normally
Turn off power saving mode
Turn on the power saving mode; power saving ratio is 1:4
Options: Off/On. Turn off all tones when Off is selected,
but do not include emergency alarm tone
Options: Off / Digital / Analog. Pressing the PTT button
will transmit the signal through the channel and will sound
a tone that prompts the user to start speaking.
>OFF: Turn off this function
>Digital: Enable this tone only for digital channels
>Analog: Enable this tone only for analog channels
>Digital and Analog:Enable this tone for analog
channels and digital channels
Setting
options
10.Beep
11.Backlight
12.Keypad
Lock
13.LED
Indicator
14.Pass-
word Lock
15.Mode
16.Screen
Options
and Range
Key Beep
Always On
Always Off
5/10 秒
Manual
5/10/15 sec
Off
On
Enter
password
CH NO.
CH NAME
CH Freq
Picture
Character
Description of operation
Options: Off/On. There is no prompt tone when Off is
selected
Always on (power saving disabled)
Always Off
Turn off the backlight automatically when the time is up
Press and hold # to lock, press MENU and * to unlock
Auto lock; lock automatically at set time; press MENU
and * to unlock
The indicator (transmission, receiving, boot, etc.) does
not work when it is off
Default option is on
Input correct password to enter the setup menu; the
password can be configured by default on host
computer
Options: On or Off / Changes boot password
>On or Off: Turn on if it is turned off, and turn off if itis
turned on; when On is selected, you need to enter the
correct password and press the MENU button to start
the unit
>Change boot password: You can enter a new
password not more than 6 digits; please remember after
changing
The channel mode is displayed by channel number
The channel mode is displayed by channel name
The channel mode is displayed by frequency mode
Display according to the picture provided by the customer
Two lines, can be edited by Software
71 72
Page 42
Setting
options
17.Lan-
guage
18.CTCSS/
DCS
Options
and Range
English
Chinese
C CTC/DCS
R CTC/DCS
T CTC/DCS
Description of operation
English version, including menu, call tips, call logs and
all other interfaces
Simplified Chinese
Change the encoding and decoding of CTCSS/DCS.
Press [A/B] to selec “CTCSS/DCS” , press [ ]/[ ]
to select CTCSS/DCS code, press # to switch the
positive phase (N) and negative phase (I).
● Press [A/B] to select “CTCSS/DCS codec OFF” ,
press [ ]/[ ] to select analog CTCSS/DCS
frequency.
● You can also enter CTCSS/DCS with keypad, press the
[MENU] button to confirm, and press [BACK]to return.
Change the decoding of CTCSS/DCS. Setting method is
same as above
Change the coding of CTCSS/DCS. Setting method is
same as above
The menu functions as follows:
8.Press [MENU] to enter menu mode.
9.Press [ ]/ [ ] o set, then press [MENU] to select.
10.Press [ ]/ [ ] to the radio setting, then press [MENU] to select.
11.Press [ ]/ [ ] to “squelch” , then press [MENU] to select.
12.Choose “strict” or “norma” l, then press [MENU] to select.
13.Press[BACK]return to the home screen.
TX Power
This function can achieve quick switch of high/medium/low power. When
communication distance meets your requirements, low power can be
selected to save power. When low power does not enable you to
communicate with other walkie-talkies away from distance, and then
please choose high power.
According to the preprogrammed [Power Level Adjustment] shortcut keys,
switch transmitting power of the current channel between high, medium
and low. You can set the transmitting power level of each channel to be
high or low. The menu functions as follows:
Squelch
You can adjust the squelch level of walkie talkie, filters unusable calls of
low signal strength or channels of background noise that higher than
normal value.
Normally it is default value (that is regular filtering); strictly filter unwanted
calls or background noise, in the same time, calls from remote locations
can also be filtered out.
Press preprogrammed strict/normal squelch key to switch the squelch
level between normal and strict.
1.Press [MENU] to enter menu mode.
2.Press [ ]/ [ ] to set, then press [MENU] to select.
3.Press [ ]/ [ ] to the radio setting, then press [MENU] to select.
4.Press [ ]/ [ ] to “TX power” , then press [MENU] to select.
5.Follow the screen prompt to change the current Settings.
6.Press [MENU] to select new power level.
7.Return to the previous menu.Press [BACK] return to the home screen,
and screen displays the power level icon
Note: An H above the screen indicates the current high power; M
indicates the current medium power; L indicates the current low power.
73 74
Page 43
Talk around
In case of the repeater failure or beyond the coverage of the repeater
station, but both terminals are in the other's communication range, at this
time, you can press the [Off] shortcut button to switch to the direct mode,
further to achieve directly communication between two terminals.
Press the pre-programmed [Repeater / Off] shortcut button to open the
offline function; press this button again to turn off this function.
The menu function operated as below:
1.Press the [MENU] button to enter into the MENU mode.
2.Press the [ ]/ [ ] button to setting, then press the [MENU] button
to select.
3.Press the [ ]/ [ ] button to radio setting, then press the [MENU]
button to select.
4.Press the [ ]/ [ ] button to off line, then press the [MENU] button
to select.
5. If the radio is in the repeater station mode, the screen indicates “turn
off” , or if the radio is under off-line mode, the screen indicates “turn off” .
6. Press the [MENU] button to select.
7. The screen indicates the off-line is turn on, the iconflash, or the screen
indicates off-line is turn off.
8. The screen back to the upper menu automatically.
Even when the radio is turn off, the radio is kept off-line situation.
Busy lock
This function can be enabled by writing-frequency software to prevent
interference with other users that are transmitting on the same channel.
If you press and hold the [PTT] button while other users occupy the
75 76
channel, the product will beep and display “Transmission failed,
sub-audio disabled” or “Transmission failed, color code disabled” ,
prompting that transmission is disabled at this time. When the channel is
idle, you need to press and hold the [PTT] button to transmit
The menu function operated as below:
1. Press [MENU] to enter menu mode.
2. Press [ ]/ [ ] to set, then press [MENU] to select.
3. Press [ ]/ [ ] to the radio set, then press [MENU] to select.
4. Press [ ]/ [ ] to “Busy lock” , then press [MENU] to select.
5.The screen shows indicate Off or Carry or QT/CC, press [ ]/ [ ] to
the corresponding option, then press [MENU] to confirm and return to the
previous menu.
Transmit time-out timer(TOT)
The setting of the time-out timer function prevents the user from
occupying the channel for a long time. If the continuous transmitting time
exceeds the time set by the distributor, the radio will stop transmit and
make the warning sound. If want to stop the warning sound, please loose
[PTT] . If you need to transmit again, please press the [PTT] button again
after a period of time (specifically set by the dealer)
The menu functions as follows:
1.Press [MENU] to enter menu mode.
2.Press [ ]/ [ ] to set, then press [MENU] to select.
3.Press [ ]/ [ ] to the radio configuration, then press [MENU] to
select.
4.Use the keyboard to type the correct radio configuration password
(software Settings), then press [MENU] to select.
Page 44
5.Press [ ]/ [ ] tto “TOT” , then press [MENU] to select.
6.The screen shows infinity, 15S, 30S... 555S option (additive increase in
the range of 15S), press [ ]/ [ ] tto the corresponding option, then
press [MENU] to select, if you select to infinity, then the screen display
turn off the time-out timer, if you select others, the screen display xxS
has been selected.
Note: In the emergency alarm mode, this function is invalid.
VOX
This function allows you to initiate voice activation for hands-free calls on
programmed channels. Regardless of when the microphone on the
attachment with VOX function detects the voice, the radio will
automatically transmit the signal during the programmed time period.
Press the[PTT]during the radio operation will disable the VOX function, to
re-enable the VOX function need perform one of the following
operations:
• Close and re-open the radio;
• Change channel through channel knob;
• Perform the following procedure:
Enabling or disabling this function that is limited to radio of activating
these functions. The voice sensitivity of VOX is set in the radio
configuration.
To turn on or off this function by pre-programmed VOX open/close key.
The menu functions as follows:
1.Press[MENU] to enter menu mode.
2.Press [ ]/ [ ] to set, then press[MENU]to select.
3.Press [ ]/ [ ] to the radio setting, then press[MENU] to select.
77 78
4.Press [ ]/ [ ] to the VOX, then press [MENU] to select.
5.The screen displays open, press [MENU] to enable the VOX function.
• Or the screen shows off and press [MENU] to turn off the VOX function.
Double wait
The menu functions as follows:
1. Press [MENU] to enter menu mode.
2. Press [ ]/ [ ] to set, then press [MENU] to select.
3. Press [ ]/ [ ] to the radio set, then press [MENU] to select.
4. Press [ ]/ [ ] to the Double wait, then press [MENU] to select.
5. The screen displays “Off /Double Wait/Single Wait” . then press
[MENU] to select.
6. Press [MENU] to confirm and return to the previous menu.
Encrypt
In digtal mode, Turn on encryption function, and the two sides must pair
the key to make the call normally.
The menu functions as follows:
1. Press [MENU] to enter menu mode.
2. Press [ ]/ [ ] to set, then press [MENU] to select.
3. Press [ ]/ [ ] to the radio setting, then press [MENU] to select.
4. Press [ ]/ [ ] to the Encrypt, then press [MENU] to select.
5. Press [ ]/ [ ] to the select encrypt Off or On, then press [MENU]
to confirm and return to the previous menu.
Power Save
Page 45
After the power save function is on, the radio enters the power save
mode after 10 seconds in standby mode to save battery power.The
power saving ratio is 1:4.
The menu functions as follows:
1. Press [MENU] to enter menu mode.
2. Press [ ]/ [ ] to set, then press [MENU] to select.
3. Press [ ]/ [ ] to the radio setting, then press [MENU] to select.
4. Press [ ]/ [ ] to the Power Save, then press [MENU] to select.
5. Press [ ]/ [ ] to the select power savet Off or On, then press
[MENU] to confirm and return to the previous menu.
Beep
Including below options:
■All Tones ■Call Permit ■Key Beep
All tones
If necessary, you can start or stop all the radio tones and prompt tones
(except the emergency tones)
Turn on or turn off all the radio tones according to the all tones on/off by
pre-programmed.
The menu function operated as below:
1.Press the [MENU] button to enter into the [MENU] mode.
2.Press the [ ]/ [ ] button to setting, then press the [MENU] button
to select.
3.Press the [ ]/ [ ] button to radio setting, then press the [MENU]
button to select.
4.Press the [ ]/ [ ] button to tone/prompt one, then press the
[MENU] button to select.
79 80
5.Press the [ ]/ [ ] button to “all tones” , then press the [MENU]
button to select.
6.Press the [MENU] button to choose turn on, then all the tones and
prompt tones started, the screen indicates” All tones applied”
•Or press the [MENU] button the choose turn off, then all the tones and
prompt tones turned off, the screen indicates “All tones cancelled
key Beep
If needed, you can activate and deactivate keyboard sounds of
keystrokes. The menu functions as follows:
1.Press [MENU] to enter menu mode.
2.Press [ ]/ [ ] to set, then press [MENU] to select.
3.Press [ ]/ [ ] to the radio setting, then press [MENU] to select.
4.Press [ ]/ [ ] to tone/hint, then press [MENU] to select.
5.Press [ ]/ [ ] to “Key Beep” , then press [MENU] to select.
6.Press [ ]/ [ ] and select open, then turn on keyboard sounds, and
screen will display "keyboard sound application".
• Press [MENU] and select close, then turn off keyboard sounds, and
screen will display "keyboard sound cancellation"
Backlight
You can turn on or off the screen backlight of the walkie-talkie if needed.
This setting will also affect the back light of the menu and numeric
keyboard.
According to the pre-programmed backlight automatic on-off key,
switches backlight Settings. The menu functions as follows:
1.Press [MENU] to enter menu mode.
Page 46
2.Press [ ]/ [ ] to set, then press [MENU] to select.
3.Press [ ]/ [ ] to the radio setting, then press [MENU] to select.
4.Press [ ]/ [ ] to backlight, then press [MENU] to select.
5.The screen indicates normally open, normally off,5S, 10S, 15S options,
press [MENU] to select normally open, then screen backlight is always
open and light.
• Or if select 5S, 10S, 15S, the screen will turn off the screen backlight
without any operation after the corresponding time.
Keypad Lock
You can lock the radio keyboard to prevent accidental keystrokes.
Methods include manual keyboard locking and automatic keyboard
locking; among them the automatic keyboard locking includes 5S, 10S,
15S three time options. The menu functions as follows:
1.Press [MENU] to enter menu mode.
2.Press [ ]/ [ ] to set, then press [MENU] to select.
3.Press [ ]/ [ ] to the radio setting, then press [MENU] to select.
4.Press [ ]/ [ ] to the keypad lock, then press [MENU] to select.
5.Press [ ]/ [ ] to manual option, then press [MENU] to select, the
screen displays manual selection.
·The keyboard needs to be long pressed[ * ] on the main screen to lock
the keyboard.
6.Press [ ]/ [ ] to 5S,10S,15S, the screen displays the correspond-
ing time. Then, when the user does not have keyboard operation in the
corresponding time, the screen shows lock and returns to the home
screen.
7.To unlock the keyboard, press [MENU] first ,then press[ * ]
81
8.The screen shows the keyboard unlocking and returns to the home
screen.
LED Indicator
If needed, you can enable and disable the LED indicator light. The menu
functions as follows:
1.Press [MENU] to enter menu mode.
2.Press [ ]/ [ ] to set, then press [MENU] to select.
3.Press [ ]/ [ ] to the radio setting, then press [MENU] to select.
4.Press [ ]/ [ ] to the LED indicator light, then press [MENU] to
select.
5.The screen displays “open” , press [MENU] to enable the LED
indicator light, and the screen displays it is open.
• Or the screen shows “off” and press [MENU] to turn off the LED
indicator light, the screen displays it is close.
Password Lock
The menu functions as follows:
1.Press [MENU] to enter menu mode.
2.Press [ ]/ [ ] to set, then press [MENU] to select.
3.Press [ ]/ [ ] to the radio setting, then press [MENU] to select.
4.Press [ ]/ [ ] to the power-on password, then press [MENU] to
select.
5.Type the correct 8-bit password (can preset with the software), then
press [MENU] to select.
6.If the password is incorrect, the screen displays the wrong password.
Display options if the password is correct.
84
Page 47
7.If the first line indicates open, press [MENU] to display the power-on
password application, and then you need to type the correct password to
start the radio at the next boot. If the first line indicates close, press
[MENU] to display the boot password cancellation, and start the radio
directly at the next boot.
8.Press [ ]/ [ ] to change power-on password, then press [MENU]
to select.
9.Type the new 8-bit password, then press [MENU] to select.
10.Type the new 8-bit password again, then press [MENU] to select.
11.Display password change successfully.
The power-on password must be set to 6-bit.
Mode
Mode setting divided into:
• Serial number display: display the channel number
• Name display: displays the channel name
• Frequency display: display the channel frequency
The menu functions as follows:
1.Press [MENU] to enter menu mode.
2.Press [ ]/ [ ] to set, then press [MENU] to select.
3.Press [ ]/ [ ] to the radio setting, then press [MENU] to select.
4.Press [ ]/ [ ] to the mode setting, then press [MENU] .
5.Press [ ]/ [ ] to select “Serial numbe” “channel mode” or
“frequency mode” , then press [MENU] to select the corresponding
mode, the screen display the mode is selected.
6.The main interface will display the channel name or frequency
(receiving frequency) according to the selected mode.
In frequency mode, long press [VFO/MR] to switch between frequency
mode and channel mode. In frequency mode, you can manually type the
frequency.
Screen
If needed, you can enable and disable the boot screen display. The menu
functions as follows:
1.Press [MENU] to enter menu mode.
2.Press [ ]/ [ ] to set, then press [MENU] to select.
3.Press [ ]/ [ ] to the radio setting, then press [MENU] to select.
4.Press [ ]/ [ ] to the boot screen, then press [MENU] to select.
5.Press [ ]/ [ ] to select “images” or “default character” , then press
[MENU] to enable the corresponding boot screen.
The radio’ s boot screen can be set to simple images or short characters
by software.
Language
This radio supports both Chinese and English language. The menu
functions as follows:
1.Press [MENU] to enter menu mode.
2.Press [ ]/ [ ] to set, then press [MENU] to select.
3.Press [ ]/ [ ] to the radio setting, then press [MENU] to select.
4.Press [ ]/ [ ] to language selection, then press [MENU] to select.
5.Press [ ]/ [ ] to select the corresponding language, then press
[MENU] to select.
6.The screen shows the language selected and returns to the main
screen.
8584
Page 48
CTCSS
CTCSS can be set only under the simulated channel, includes:
■ CTCSS encode ■ CTCSS decode
CTCSS encode
The menu functions as follows:
1.Press [MENU] to enter menu mode.
2.Press [ ]/ [ ] to set, then press [MENU] to select.
3.Press [ ]/ [ ] to the radio configuration, then press [MENU] to
select.
4.Use the keyboard to type the correct radio configuration password
(software Settings), then press [MENU] to select.
5.Press [ ]/ [ ] to CTCSS, then press [MENU] to select.
6.Press [ ]/ [ ] to CTCSS encode, then press [MENU] to select.
7.The screen shows “OFF” or a group of CTCSS decode number, press
[ ]/ [ ] to close or select CTCSS decode number .
·The keyboard can also be enter manually.
·Press [*] key to switch to DCS, [ ]/ [ ] key to select DCS code,
press [#] key to switch between positive phase (N) and negative phase (I)
8.Then press [MENU] to select, which already set the corresponding
CTCSS decode value, the screen displays CTCSS encode XX.
CTCSS decode
The menu functions as follows:
1.Press [MENU] to enter menu mode.
2.Press [ ]/ [ ] to set, then press [MENU] to select.
3.Press [ ]/ [ ] to the radio configuration, then press [MENU] to
select.
86 87
4.Use the keyboard to type the correct radio configuration password
(software Settings), then press [MENU] to select.
5.Press [ ]/ [ ] to CTCSS, then press [MENU] to select.
6.Press [ ]/ [ ] to CTCSS decode, then press [MENU] to select.
7.The screen shows “OFF” or a group of CTCSS decode number, press
[ ]/ [ ] to close or select CTCSS decode number .
·The keyboard can also be enter manually.
·Press[*] key to switch to DCS, [ ]/ [ ] key to select DCS code,
press [#] key to switch between positive phase (N) and negative phase (I)
8.Then press [MENU] to select, which already set the corresponding
CTCSS decode value, the screen displays CTCSS encode XX.
Radio information query
Check the relevant information of this product, including: the radioModel
information, serial number, CPS version, hardware version, firmware
version, DSP version, programming time, etc information.
You can go back to the previous screen at any time by pressing[BACK].
Check radio ID
The menu functions as follows:
1.Press [MENU] to enter menu mode.
2.Press [ ]/ [ ] to set, then press [MENU] to select.
3.Press [ ]/ [ ] to the radio setting, then press [MENU] to select.
4.Press [ ]/ [ ] to the radio number, then press [MENU] to select.
5.The screen shows the radio ID and name.This information can only be
accessed but cannot be modified
Page 49
Check radio version
Check and indicate this radio’ s Model information, serial number, CPS
version, hardware version, firmware version, DSP version, programming
time, etc information.
The menu functions as follows:
1.Press [MENU] to enter menu mode.
2.Press [ ]/ [ ] to set, then press [MENU] to select.
3.Press [ ]/ [ ] to the radio information, then press [MENU] to
select.
4.Press [ ]/ [ ] to the radio version, then press [MENU] to select.
5.The screen shows the current Model information, serial number, CPS
version, hardware version, firmware version, DSP version, programming
time, etc information.
6.Press [BACK] to return to the previous menu.
Radio configuration
The product configuration is listed below:
Configuration
1.Reception
frequency
2.Transmission
frequency
3.Channel name
4.Color code
5.Time slot
6.Shift frequency
7..Shift frequency
direction
8.Frequency step
9.Channel type
Operating instructions
To set reception frequency; press * to clear all, press BACK to
delete one
To set transmission frequency; press * to clear all, press BACK
to delete one
To set channel name; press * to clear all, press BACK to
delete one
>Options: 0~15 optional
>Valid for digital mode only
>Options: 1~2 optional
>Valid for digital mode only
The difference between transmission frequency and reception
frequency in frequency mode, whether frequency has
difference depends on frequency direction
Options: Off / Positive / Negative
>Off: Transmission frequency and reception frequency have
no difference in frequency mode
>Positive: In frequency mode, the transmission frequency is
equal to the reception frequency plus the difference frequency
>Negative: In frequency mode, the transmission frequency is
equal to the reception frequency minus the difference
frequency
Options: 2.5K/5.0K/6.25K/10K/12.5K/25K/50K
>In the frequency mode, press []/[]to adjust the frequency
value in steps; scan in steps in frequency mode
Options: Analog / Digital
>Switch analog and digital mode in frequency mode
88 89
Page 50
The radio configuration is mainly to edit the channel content. Configure
paths: enter the Settings -> radio configuration menu, and select the
corresponding configuration items to configure.
Receiving frequency
The menu functions as follows:
1.Press [MENU] to enter menu mode.
2.Press [ ]/ [ ]to set, then press [MENU] to select.
3.Press [ ]/ [ ]to the radio configuration, then press [MENU] to
select.
4.Use the keyboard to type the correct radio configuration password
(software Settings), then press [MENU] to select.
5.Press [ ]/ [ ]to receiving frequency, then press [MENU] to select.
6.The screen shows the receiving frequency of the current channel, then
press [MENU] to select.
7.Press the keyboard to type the corresponding number, press[ ] to
delete the last number, press[BACK]to return to the previous menu.
8.After the changes, press [MENU] , the screen shows that the receiving
frequency has been saved.
Note: According to frequency range of software limit frequency changes
when editing and changing frequency, if less than the frequency range of
software, then the final change results will be the minimum value settings
on the software, the opposite is maximum.
Transmitting frequency
The menu functions as follows:
1.Press [MENU] to enter menu mode.
90 91
2.Press [ ]/ [ ]to set, then press [MENU] to select.
3.Press [ ]/ [ ] to the radio configuration, then press [MENU] to
select.
4.Use the keyboard to type the correct radio configuration password
(software Settings), then press [MENU] to select.
5.Press [ ]/ [ ] to transmitting frequency, then press [MENU] to
select.
6.The screen shows the transmitting frequency of the current channel,
then press [MENU] to select.
7.Press the keyboard to type the corresponding number, press[ ] to
delete the last number, press [MENU] to return to the previous menu.
8.After the changes, press [MENU] , the screen shows that the
transmitting frequency has been saved.
Note: According to frequency range of software limit frequency changes
when editing and changing frequency, if less than the frequency range of
software, then the final change results will be the minimum value settings
on the software, the opposite is maximum.
Channel name
The menu functions as follows:
1.Press [MENU] to enter menu mode.
2.Press [ ]/ [ ] to set, then press [MENU] to select.
3.Press [ ]/ [ ] to the radio configuration, then press [MENU] to
select.
4.Use the keyboard to type the correct radio configuration password
(software Settings), then press [MENU] to select.
5.Press [ ]/ [ ] to channel name, then press [MENU] to select.
Page 51
6.The screen shows the current channel name, then press[ # ]to switch
input method to type the related letters, numbers, or Chinese characters,
and input methods are same as SMS editing.
7.After the changes, press [ ]/ [ ] , the screen shows that the
channel name has been saved.
Add Channel
Method of cooperating MENU:
Entering the menu via [MENU] button.
Press [ ]/ [ ] to find SETTING, press [MENU] to confirm.
Press [ ]/ [ ] to find CONFIGURATION, press [MENU] to confirm.
Input the correct configuration password (setting by programming), press
[MENU] to confirm.
Press [ ]/ [ ] to find Add Channel, press [MENU] to confirm.
Press [ ]/ [ ] to select the channel, then press [MENU] to enter the
relevant channel and add the parameters.
Color code
Color code refers to a system. The same color code is necessary for the
terminals communicating with each other. The frequency is the integer
within 0~15. The color code only can be set in the digital model. Color
code can mark a system, and the terminals that communicate with each
other must set the same color code. Method of cooperating MENU:
Entering the menu via [MENU] button.
Press [ ]/ [ ] to find SETTING, press [MENU] to confirm.
Press [ ]/ [ ] to find CONFIGURATION, press [MENU] to confirm.
Input the correct configuration password (setting by programming), press
92 93
[MENU] to confirm.
Press [ ]/ [ ] to find Color code, press [MENU] to confirm.
Press [ ]/ [ ] to select the color code, then press [MENU] to confirm.
The color code selected will be in the display.
Relay Station Time Slot
The relay time slot refers to the slot for voice communication or data
transmission, which only can be modified within the digital channels.
Method of cooperating MENU:
Entering the menu via [MENU] button.
Press [ ]/ [ ] to find SETTING, press [MENU] to confirm.
Press [ ]/ [ ] to find CONFIGURATION, press [MENU] to confirm.
Input the correct configuration password (setting by programming), press
[MENU] to confirm.
Press [ ]/ [ ] to find Relay Station Time Slot, press [MENU] to
confirm.
Press [ ]/ [ ] to select the relay station time slot , then press [MENU]
to confirm. The time slot selected will be in the display.
The digital channel of host computer can be configured to dual capacity
direct mode. This mode supports parallel direct mode transmission of two
two-way radios transmitting on 12.5KHz channel bandwidth. The radios
in the same communication group must use the same time slot, and the
group using slot 1 will not interfere with the group using slot 2.
Page 52

Appendix
Online Update
1. Turn off the radio, and insert the writing frequency line;
2. Press and hold the [Side button 1] and [Side button2] at the same time
to turn on the radio, the green LED turns on, and thescreen is black,
indicating that the radio has entered the upgrade mode;
3. Start the upgrade software “Update.exe” on the computer; select the
corresponding serial port;
4. Click “Browse” to select the file to be upgraded (provided by the
manufacturer), for example: Dm-1801-V1.1.1.sgl;
5. Click “Download “and wait the download to complete. Remember that
the power mustn’ t be cut off in the update process, or else the SCM will
be scrapped;
6. Unplug the writing frequency line, turn off the radio or reboot.
Caution: Do not cut off the power in the update process, or else the SCM
will be scrapped.
Aging Test
In power off mode, press and hold the [Side button 1] and the number
button[2] to turn on the radio and enter the aging test, the radio displays “
RF Test ...” , the transmitter LED turns on and transmits 30 seconds,
then the receiver LED turns on and receives for 30 seconds; the
transmitter and receiver alternate until the power is used up. The radio
can be turned off in the aging process, and the aging channel is the
channel entered after turning on (either analog channel or digital
channel).
Initialize Defaults
In power off mode, press and hold the [Side button 1] and the number
button [1] to turn on the radio, and the LCD displays “Memory Reset?” ;
press the MENU button to enter initialization, and the LCD displays
“Memory Reset…” ; the initialization finishes after 10 seconds and the
radio turns on normally. Press other buttons to exit the initialization
interface and boot normally.
Note: The power mustn’ t be cut off in the initialization process, or else
the initialization will fail.
9594
Page 53
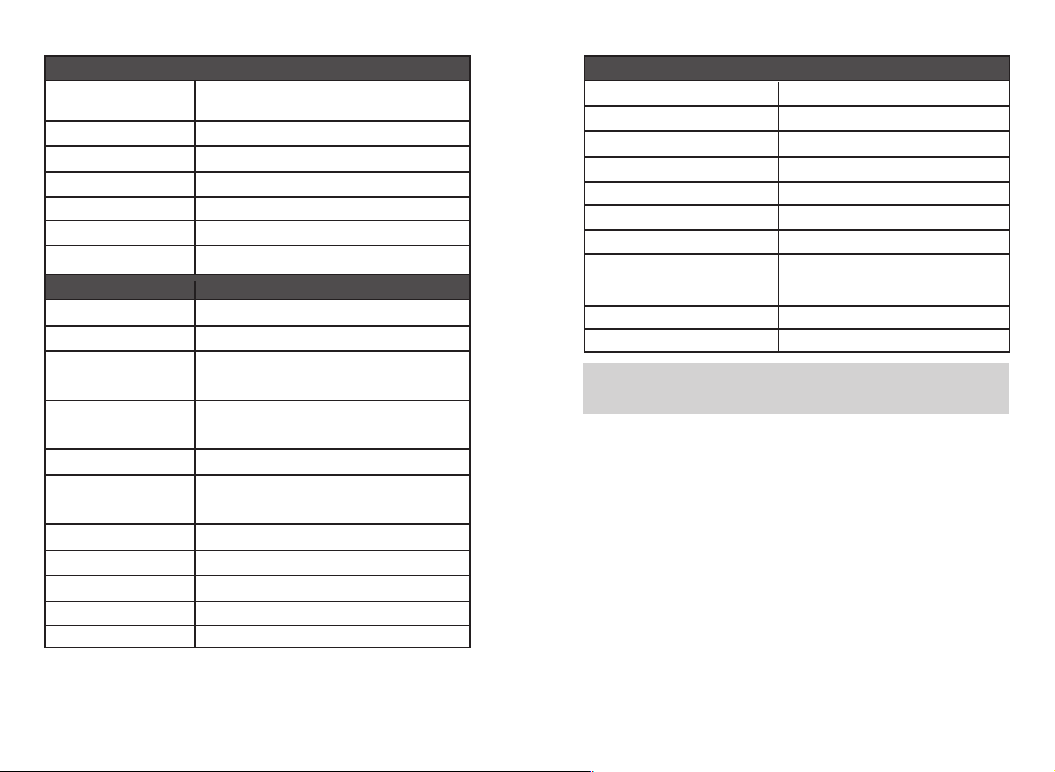
Main technological specification
VHF:
Frequency range
Memory Channel
Frequency Stability
Operating Temperature
Operating Voltage
Demission
Weight
136-174MHz
UHF:400-470MHz (Dual Band)
1024
±1.0ppm
-30℃~+60℃
DC 7.4V
133*62*32mm ( no including the antenna)
About 268g (Include in battery and antenna)
Transmission
Output power
Output Consumption
4FSK digital modulation
Response Antenna Port
Spurious
Digital Protocol
Vocoder type
High:5W/Low:2W
Digital≤0.9A
12.5KHz for data:7K60FXD 12.5KHz for data and
voice :7K60FXE
<5%
+1
~ -3dB
9KHz-1GHz: ≤-36dBm1GHz-12.75GHz: ≤-30dBm
ETSI-TS102 361-1,-2,-3
AMBE+2 TM
Reception
Digital receive sensitivity
Audio power
ansmission
-120dBm(BER≤5%) 1W
<10%
+1
~ -3dB
Note: All specifications may be modified without prior notice or
liability.
9796
Page 54
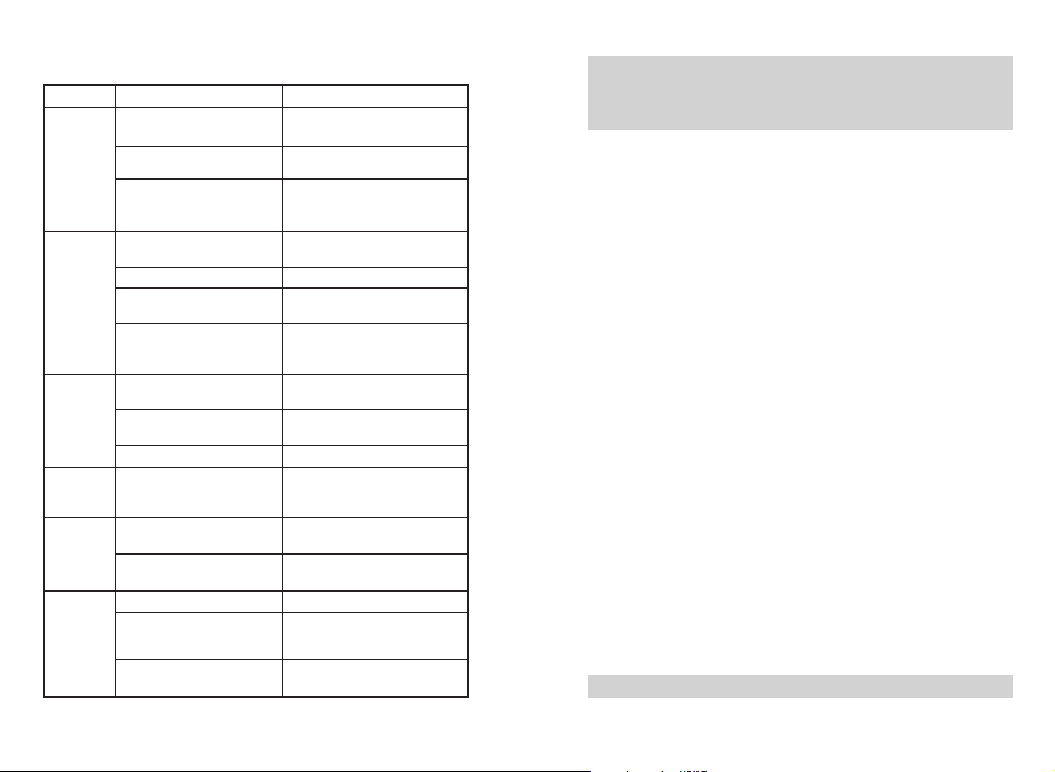
Troubleshooting:
Problem
The radio
doesn’t
start.
The sound
is small/
intermittent, or on
sound
when
receiving
the signal.
Cannot talk
with the
members
in the
same
group
Single call or
group call does
not work in the
digital channel
Other sound in
the channel,
which is not
from the
members
The loud
noise
Reason
The battery doesn’t be
installed correctly.
The battery runs out.
The battery is poor contact
causing by damaged or
dirty.
Battery voltage is low.
The voice is too small.
The antenna is loose.
The speaker is damaged
or dirty.
The frequency is different
with other members.
In the different digital or
analog channels
Too far away from each other
Be different in the
frequency/channel/color
code/ time slot
Interference from the same
frequency
The signal is not set yet.
Be too away from other members.
Poor location, such as blocked
by tall buildings, or located in
the basement
Interfere by the environment or electromagnetic
Solution
Remove and re-install the
battery.
Charging or change a new
battery.
Clearing the contact. Please
get contact with our distributor
to repair, if you cannot solve it.
Charging or change a new
battery.
Turn up the sound.
Turn off the radio and
re-install the antenna.
Clear the speaker. Please get
contact with our distributor to
repair, if you cannot solve it.
Resetting the same frequency
with them.
Correct to the same channel.
Get close with each other
Setting the same frequency/
channel/color code/ time slot
Change to new frequency, or
correct the squelch
Set the signal for all radio in
the group
Get close with other members.
Move to open environment,
restart the radio.
Avoid the device interfering the
radio
Note: As above method still cannot solve your problem, or you meet
other problem, please get contact with local distributor to get the
technological support.
Maintenance and clean
To keep the performance and extend the service life, please note the
content below for maintain the clear the radio.
■Maintenance
>Do not store the radio in an environment containing a corrosive
electronic circuit material.
>Do not directly lift an antenna or an external microphone in the course
of carrying or using a radio.
>Cover the appendage interface cover, when attachments are not used.
■Clean
>Please use clean, dry cloth or brush to wipe off the surface of the
walkie talkie and the dust attached to the charging pole on a regular
basis.
>Wipe the radio on dirt with dust, lint free cloth, to prevent poor contact.
>After long term use of radio, walkie talkie buttons, control knobs and
chassis are easy to dirty. You can use neutral detergent (do not use
strong corrosive chemicals) and wet cloth to clean. After cleaning, make
sure the radio is completely dry; otherwise please do not use it.
>When the walkie talkie does not in use, please attach the cover on the
socket.
Note: Please turn off the radio and remove the battery before clearing.
98 99
Page 55

FCC Statement
This device complies with Part 15 of the FCC Rules. Operation is subject to the following two conditions:
(1) This device may not cause harmful interference, and
(2) this device must accept any interference received, including interference that may cause undesired operation.
NOTE 1: This equipment has been tested and found to comply with the limits for a Class B digital device , pursuant to part 15 of the FCC Rules. These limits are
designed to provide reasonable protection against harmful interference in a residential installation. This equipment generates, uses and can radiate radio
frequency energy and, if not installed and used in accordance with the instructions, installed and used in accordance with the instructions, may cause harmful
interference to radio communications. However, there is no guarantee that interference will not occur in a particular installation. If this equipment does cause
harmful interference to radio or television reception, which can be determined by turning the equipment off and on, the user is encouraged to try to correct the
interference by one or more of the following measures:
- Reorient or relocate the receiving antenna.
- Increase the separation between the equipment and receiver.
-Connect the equipment into an outlet on a circuit different from that to which the receiver is connected.
-Consult the dealer or an experienced radio/TV technician for help.
NOTE 2: Any changes or modifications to this unit not expressly approved by the party responsible for compliance could void the user's authority to operate
the equipment.
Warning! : The portable radio generates RF
electromagnetic energy during transmit
mode. This radio is designed for and
classified as “Occupational Use Only,”
meaning it must be used only during the
course of employment by individuals aware
of the hazards and the ways to minimize such
hazards. This radio is NOT intended for use
by the “General Population” in an
uncontrolled environment.
The device complies with RF specifications
when the device used at 25 mm from your
front face and 0mm from your body, SAR
compliance for body-worn operating
configurations is limited to the specific belt
clip/ holster/accessories tested for this
product.
Body-worn accessories that do not meet these
requirements may not comply with RF
exposure requirements and should be
avoided. Maximum SAR Value (1g): 3.118
W/Kg.
Page 56

 Loading...