

Page 1
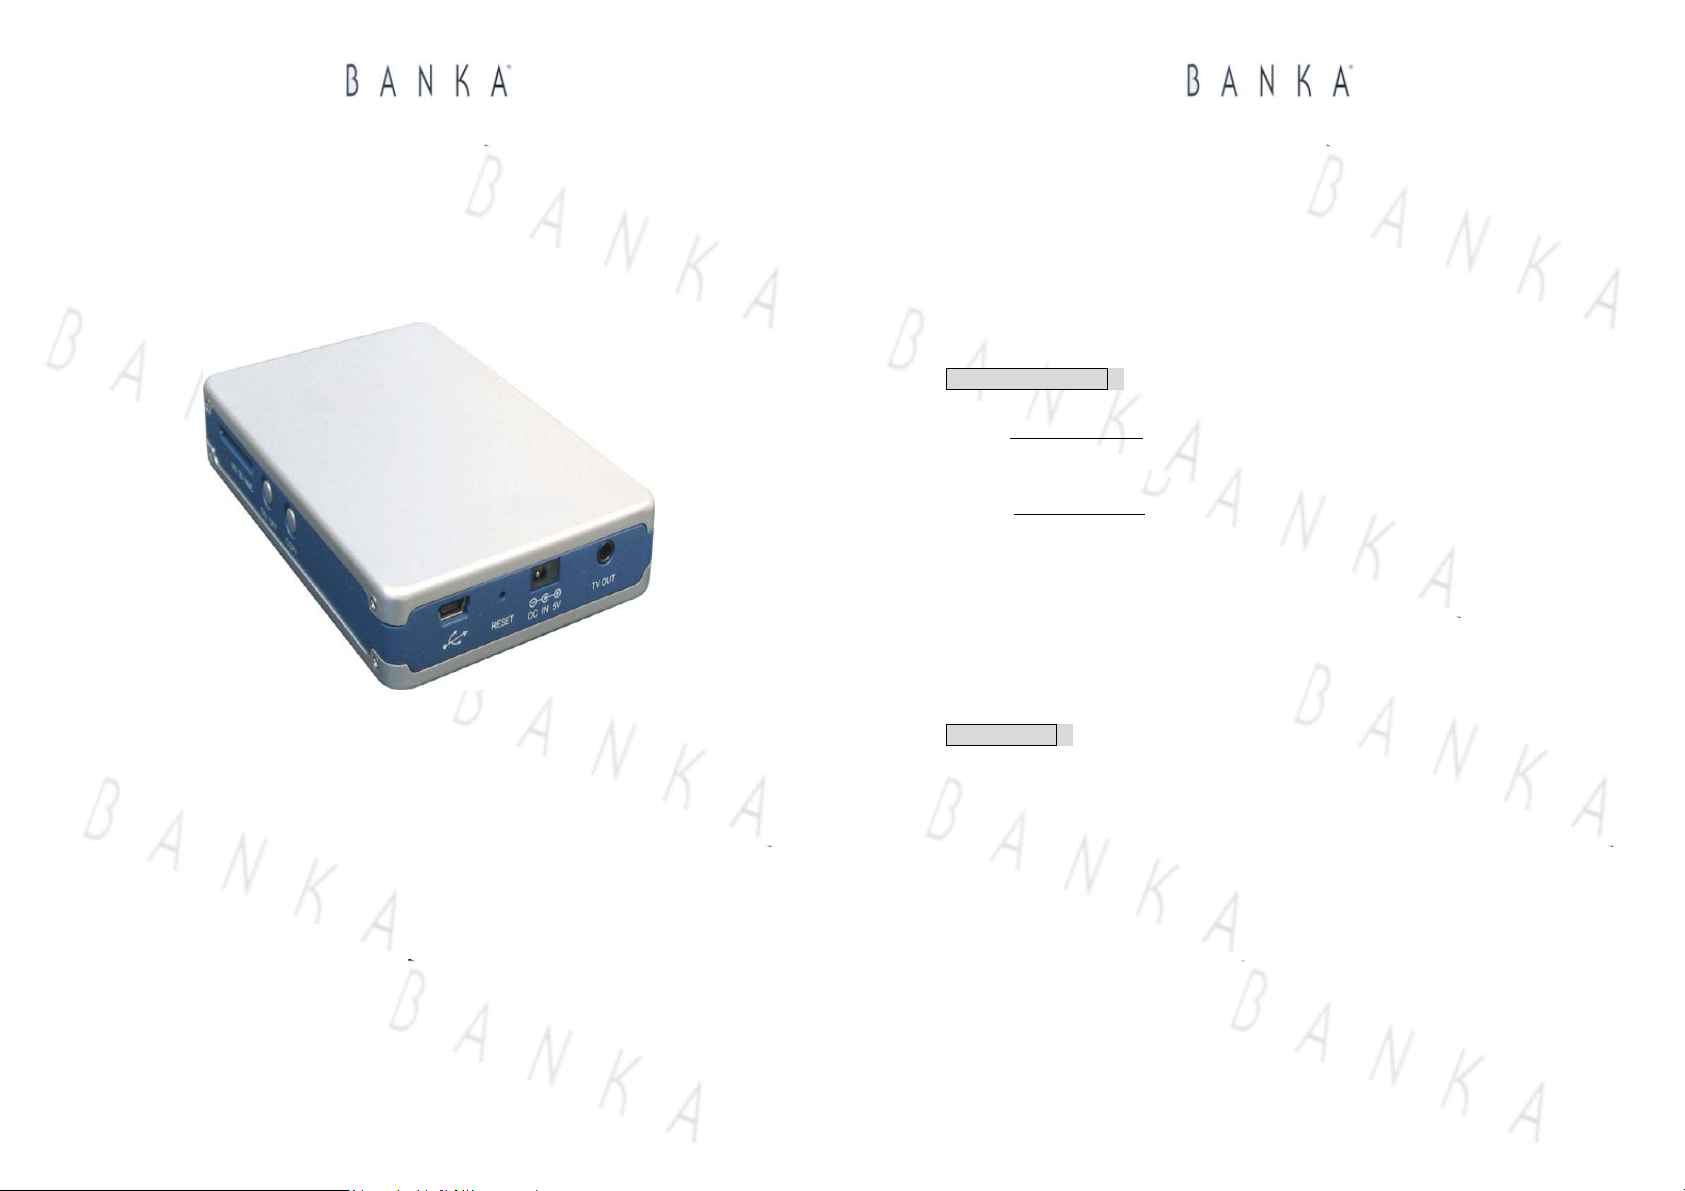
AV Album™ & Player
Please read this guide before using this Banka’s AV Album™ & Player
User Guide good for Model I & II
LDC044-5
AV Album™ & Player
Thank you for purchasing our Banka
®
Banka
AV Album™ & Player gives you unlimited joyful entertainment. Please spare a few
®
products!
moments to complete reading this User Guide, which will explains the unique features and
operational functions of this device, thus becoming helpful to facilitate the first step in
installation, and maneuvering.
Unique functionalities
1.Duplication backup
One-button touch, design to copy data into hard disk from card reader very easily and
conveniently, without a PC.
2. Playback or review
It can playback digital pictures through TV output.Therefore non-PC users will
be able to show pictures or videos on TV and share with a large audience. With
an IR interface, users may remotely control and playback digital pictures. It
supports all kinds of memory cards in common use such as Compact
Flash(CF),Micro-drive,Secure
Digital(SD),MultiMedia(MMC),MemoryStick(MS)and Memory Stick PRO(MS
PRO) card..
Safety message
Ensure all effort to prevent this Banka
®
AV Album™ & Player disk against shock and drop
when it is installed with the hard disk at the back. Place it and use it with due care for longer
product life cycle.
This is a translation based on the Chinese version User Guide, subject to its originality.
All rights reserved 2005, Lucas Industries Limited
(1)
This is a translation based on the Chinese version User Guide, subject to its originality.
All rights reserved 2005, Lucas Industries Limited
(2)
Page 2
AV Album™ & Player
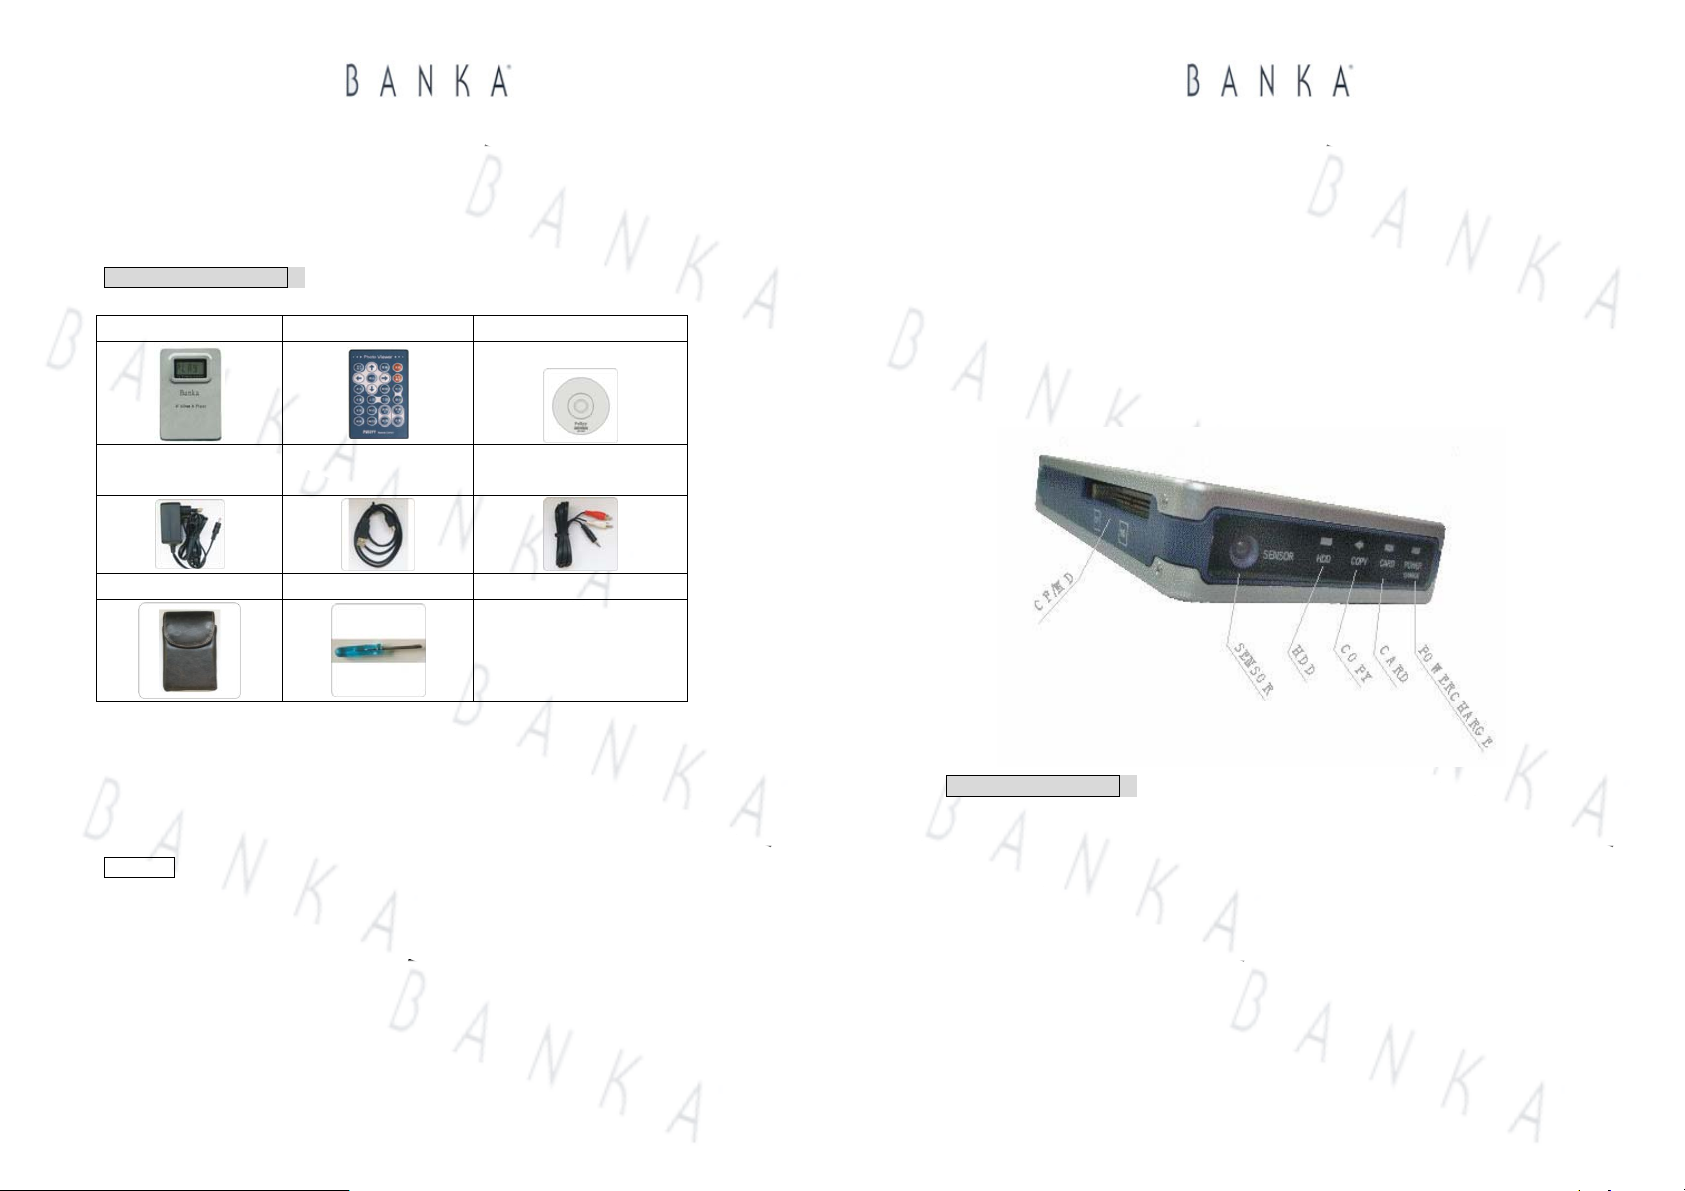
Accompanied accessories
1. Main unit 2. Remote control 3. Software disc
4. International power
adapter (110~240V)
5.USB Cord 6. AV Cable
1in2out (Red/White)
7. Protect pouch Pro screw-drive
z Colours of above essories might be a slight difference from physical outlook
z AV cable has 2 out-put heads, the red and the blue, due to the mono setting. We have
stepped up to provide stereo audio output very shortly.
Features:
Super powerful text and imaging feature, direct play digital photos and audio video clip
through TV screen.
No PC required, smart intelligently archiving content files (photos, images, MP3 etc from
memory cards.
Capability of copying, deleting files, and formatting memory cards & hard disk directly
without the PC.
Option to accomodate internal 2.5" notebook hard disk from 20G, 4G, 60G and 80G for larger
This is a translation based on the Chinese version User Guide, subject to its originality.
All rights reserved 2005, Lucas Industries Limited
(3)
AV Album™ & Player
storage capacity.
Accept 7 most popular memory cards: CFⅠ/CFⅡ/MD/SD/MMC/MS/MS PRO.
USB 1.1 version inferface.
Addition function as Mobile hard disk and USB Card Reader.
Equipped with Card size infrared remote control.
Built-in lithium battery(1200mAh)
Dual re-charging mode,
( i) by A/C power adapter
(ii) by USB power cord
Technical specifications
Storage media: 2.5 inches IDE hard disk (height >9.7mm)
Video, audio output port, TV output compatible dual system, OSD operating indication
Support 6 mega pixels in photo viewing, enlarging, rotating and automatic slide show
Support files of avi and mov in moive clip (photo + sound) playing, the highest 320x240x25
frame/sec
Data management: Copying, deleting, and formatting hard disk/memory cards without the PC
Built-in rechargeable lithium battery, 3.7V 1250mAh
Charging method: (i) by AC adapter (5V.2A) (ii) by PC USB cable
Card size infrared remote control
Support USB1.1, USB 2 interface, mobile had disk and USB card reader functionality
This is a translation based on the Chinese version User Guide, subject to its originality.
All rights reserved 2005, Lucas Industries Limited
(4)
Page 3
AV Album™ & Player
PC operating system required: Windows 2000/ME/XP/Mac, Win dows98/98S E require driver
kit
Weight:142g
External Measurement:78 x 118 x 23mm
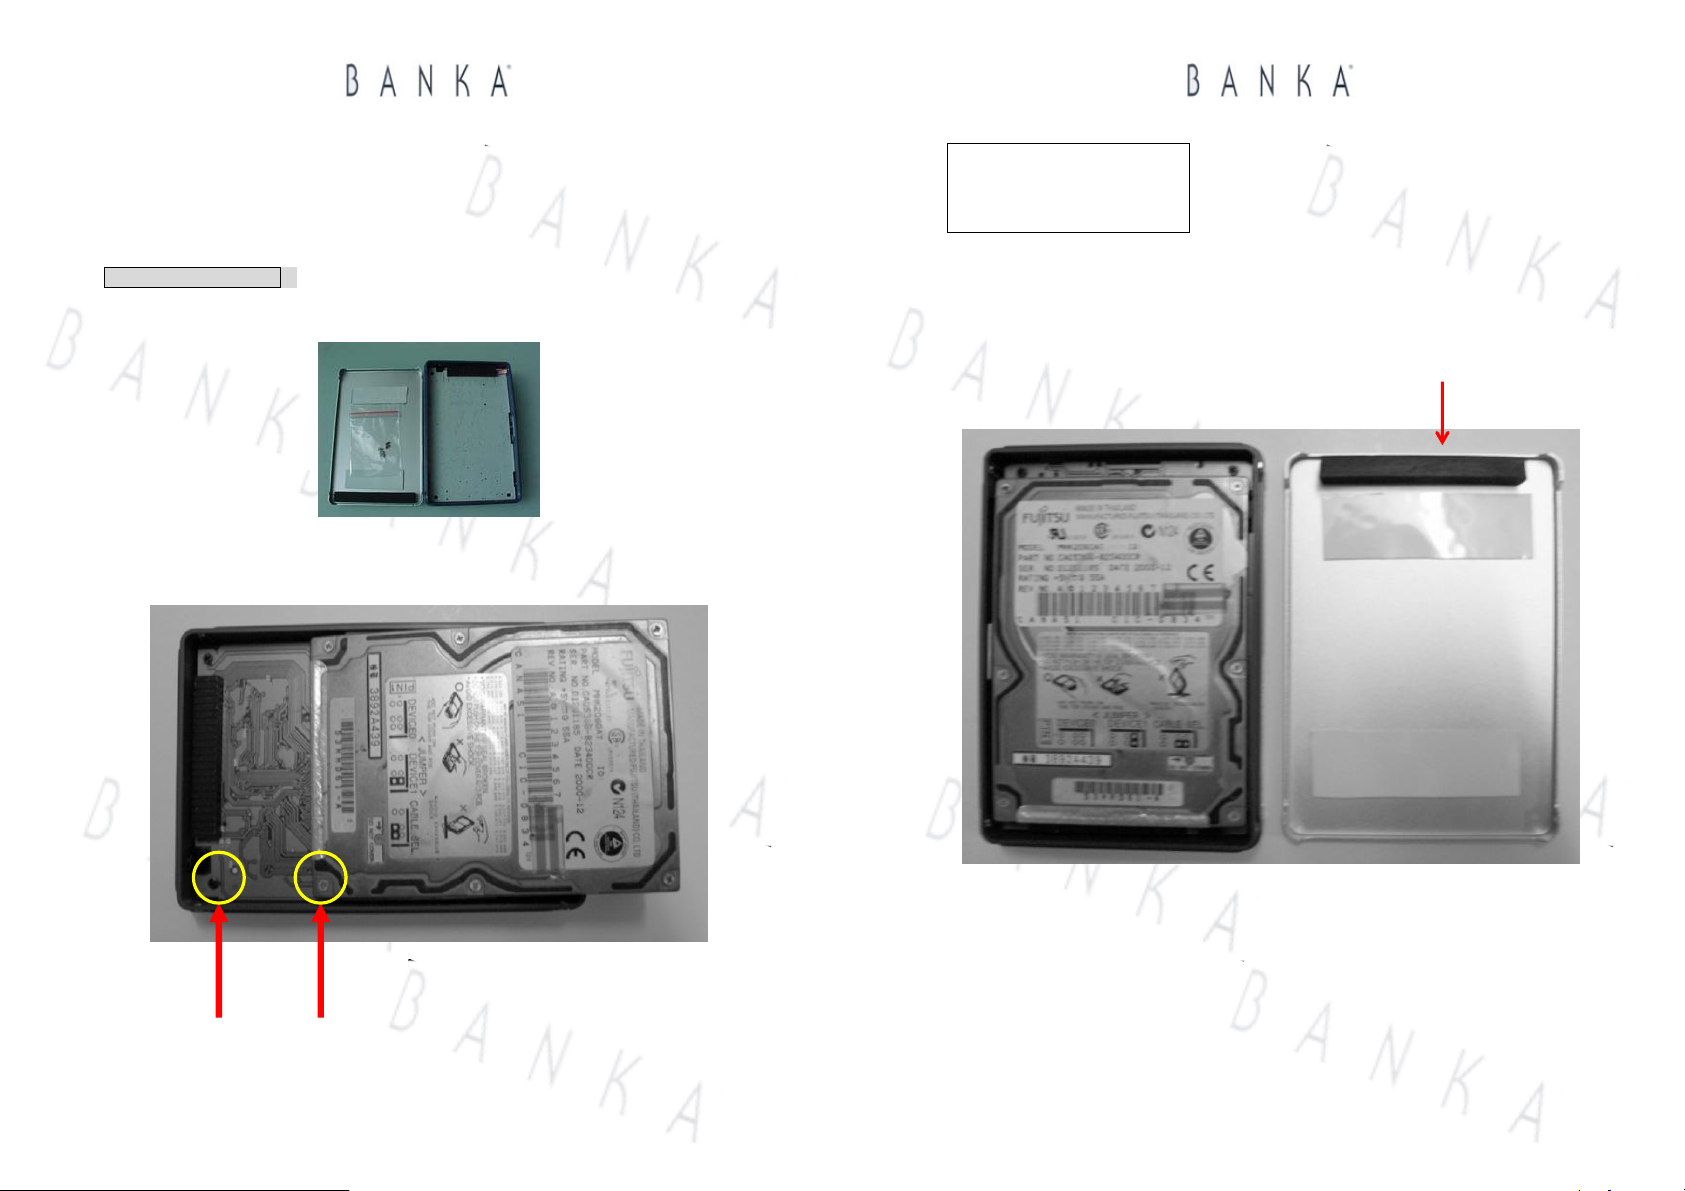
Installation of hard disk
1. Open the kit cover (if it is tighten up) with the Pro Screw Driver, or there are loosen screws
provided, see the illustrative diagram below.
2. Place the 2.5” hard disk (mobile/portable hard disk for notebook, height not exceeding
9.7mm) to the direction as indicated by the diagram below.
AV Album™ & Player
Warning:
Improper position will
damage the hard disk!
3. Make sure the hard disk accurately and tightly sit inside by moving it up and down, the
cushion bar has the effective result in corner the hard disk.
The rubber cushion
Match in accurate parallel positions to the same direction
This is a translation based on the Chinese version User Guide, subject to its originality.
All rights reserved 2005, Lucas Industries Limited
(5)
4. Place the cover and screw it with the Pro Screw Driver using appropriate force. Installation
This is a translation based on the Chinese version User Guide, subject to its originality.
All rights reserved 2005, Lucas Industries Limited
(6)
Page 4
AV Album™ & Player
is now complete.
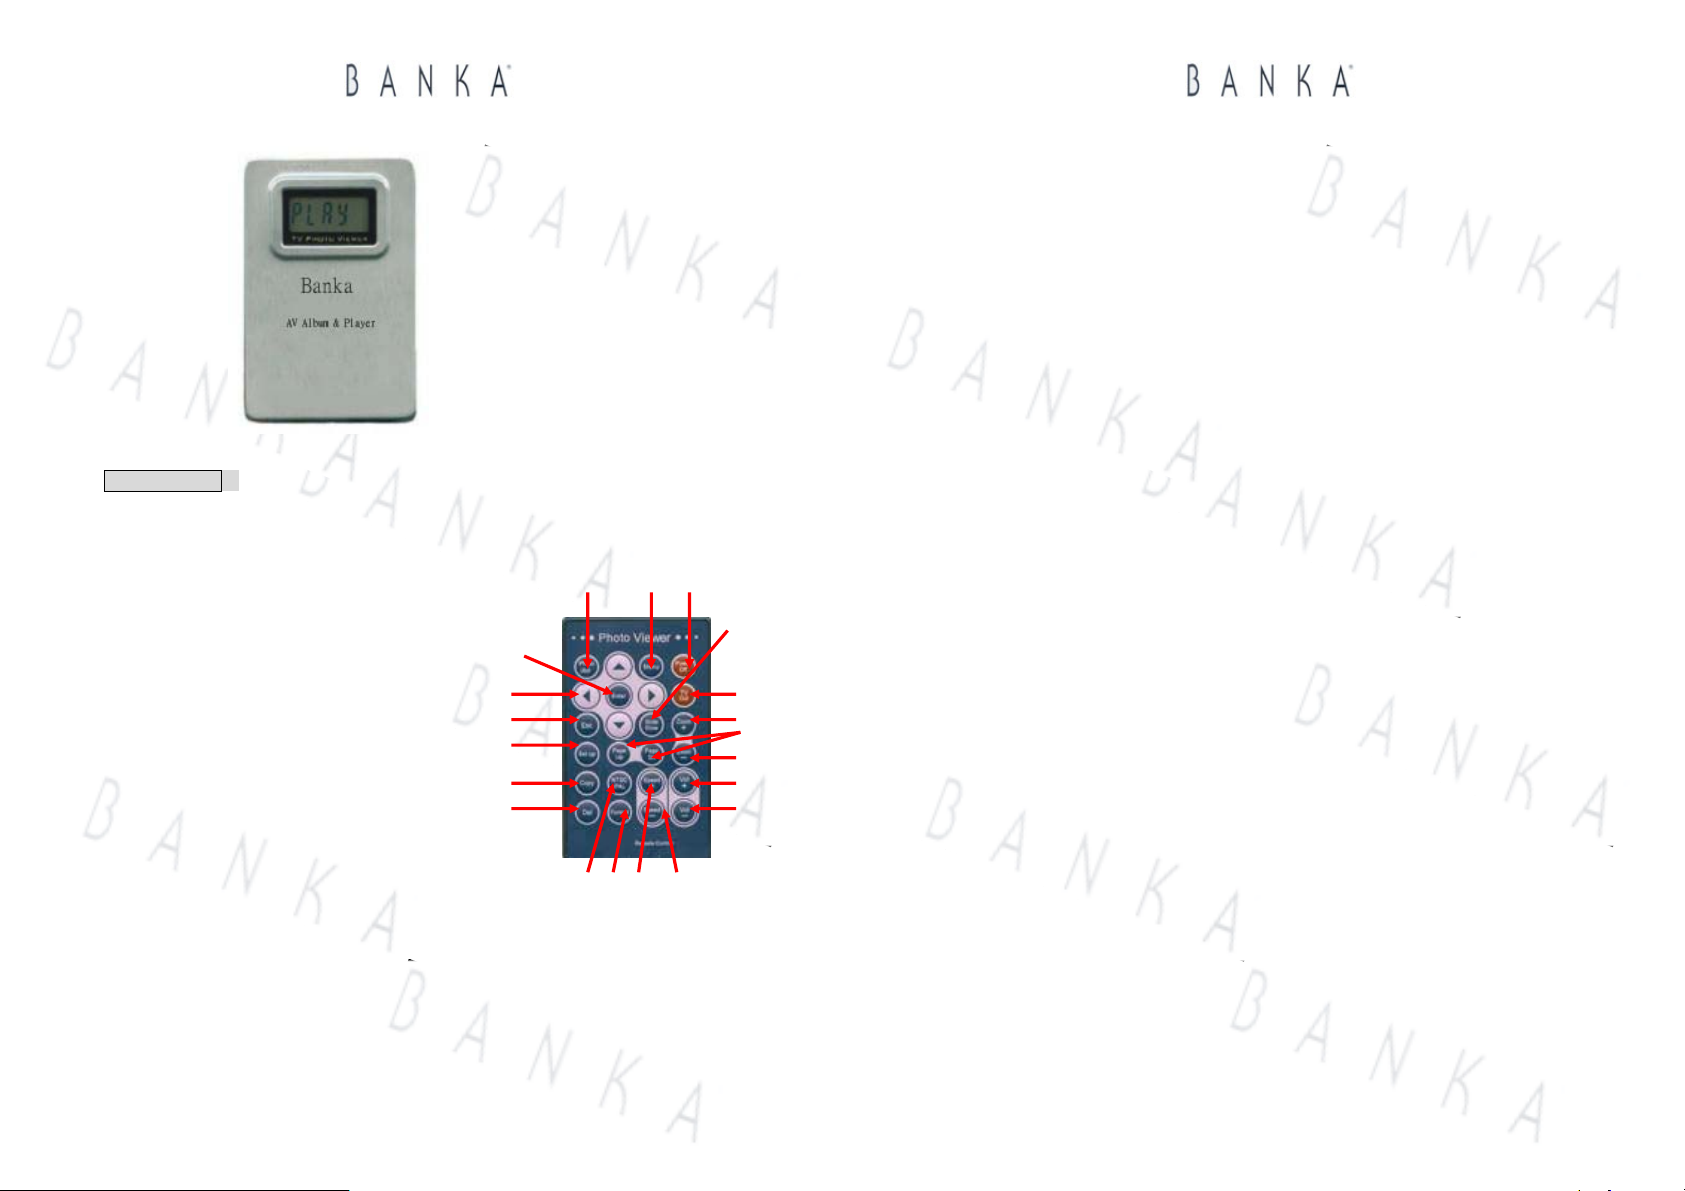
Remote Control
Pull away the transparent plastic leader, thus activating the battery of the Remote Control. Now
it is ready to use.
Keys:- (1) (2) (3)
(1) Photo/AVI
Change playing modes of both for photo and video; then (4)
Confirm the mode and the Software upgrade. (20)
(2) Menu (19) (5)
Go back to select card mode (18) (6)
(3) Power Off (17) (7)
Switch off (not for switching on) (8)
(4) Slide Show (16) (9)
Photo/video in automatic playing mode (15) (10)
(5) TV Out
Switch on/off for TV signal output; suitable for outdoor
not necessary for TV signal is strong, thus saving (14) (13) (12) (11)
energy consumption (Switch on TV signal will lower energy consumption by the unit)
(6) Zoom+ Enlarge viewing size
(7) Page Up/Page Down
Browse upper or lower photos by pressing the respective button
(8) Zoom- Minimize viewing size
(9) Vol+ Increase audio volume
AV Album™ & Player
(10) Vol- Decrease audio volume
(11) Speed- (12) Speed+
Playing speed mode, adjusting the fast/normal/slow for 3 speeds
(13) Format Under specific card/disk selection, format the memory cards or hard disk
(Please pay attention that this process will erase all contents/data permantly)
(14) NTSC Change to NTSC/PAL TV output system
(15) Del Delete contents/data
(16) Copy Under specific card selection, copy content therein to the hard disk
(17) Setup Entering to setup mode (for preview photo/video from specific card)
(18) Esc Escape or give up from previous selection
(19) Arrow signs (up/down/left/right) For choosing photos only, not function when in video
playing mode
(20) Enter Confirming execution
This is a translation based on the Chinese version User Guide, subject to its originality.
All rights reserved 2005, Lucas Industries Limited
(7)
This is a translation based on the Chinese version User Guide, subject to its originality.
All rights reserved 2005, Lucas Industries Limited
(8)
Page 5
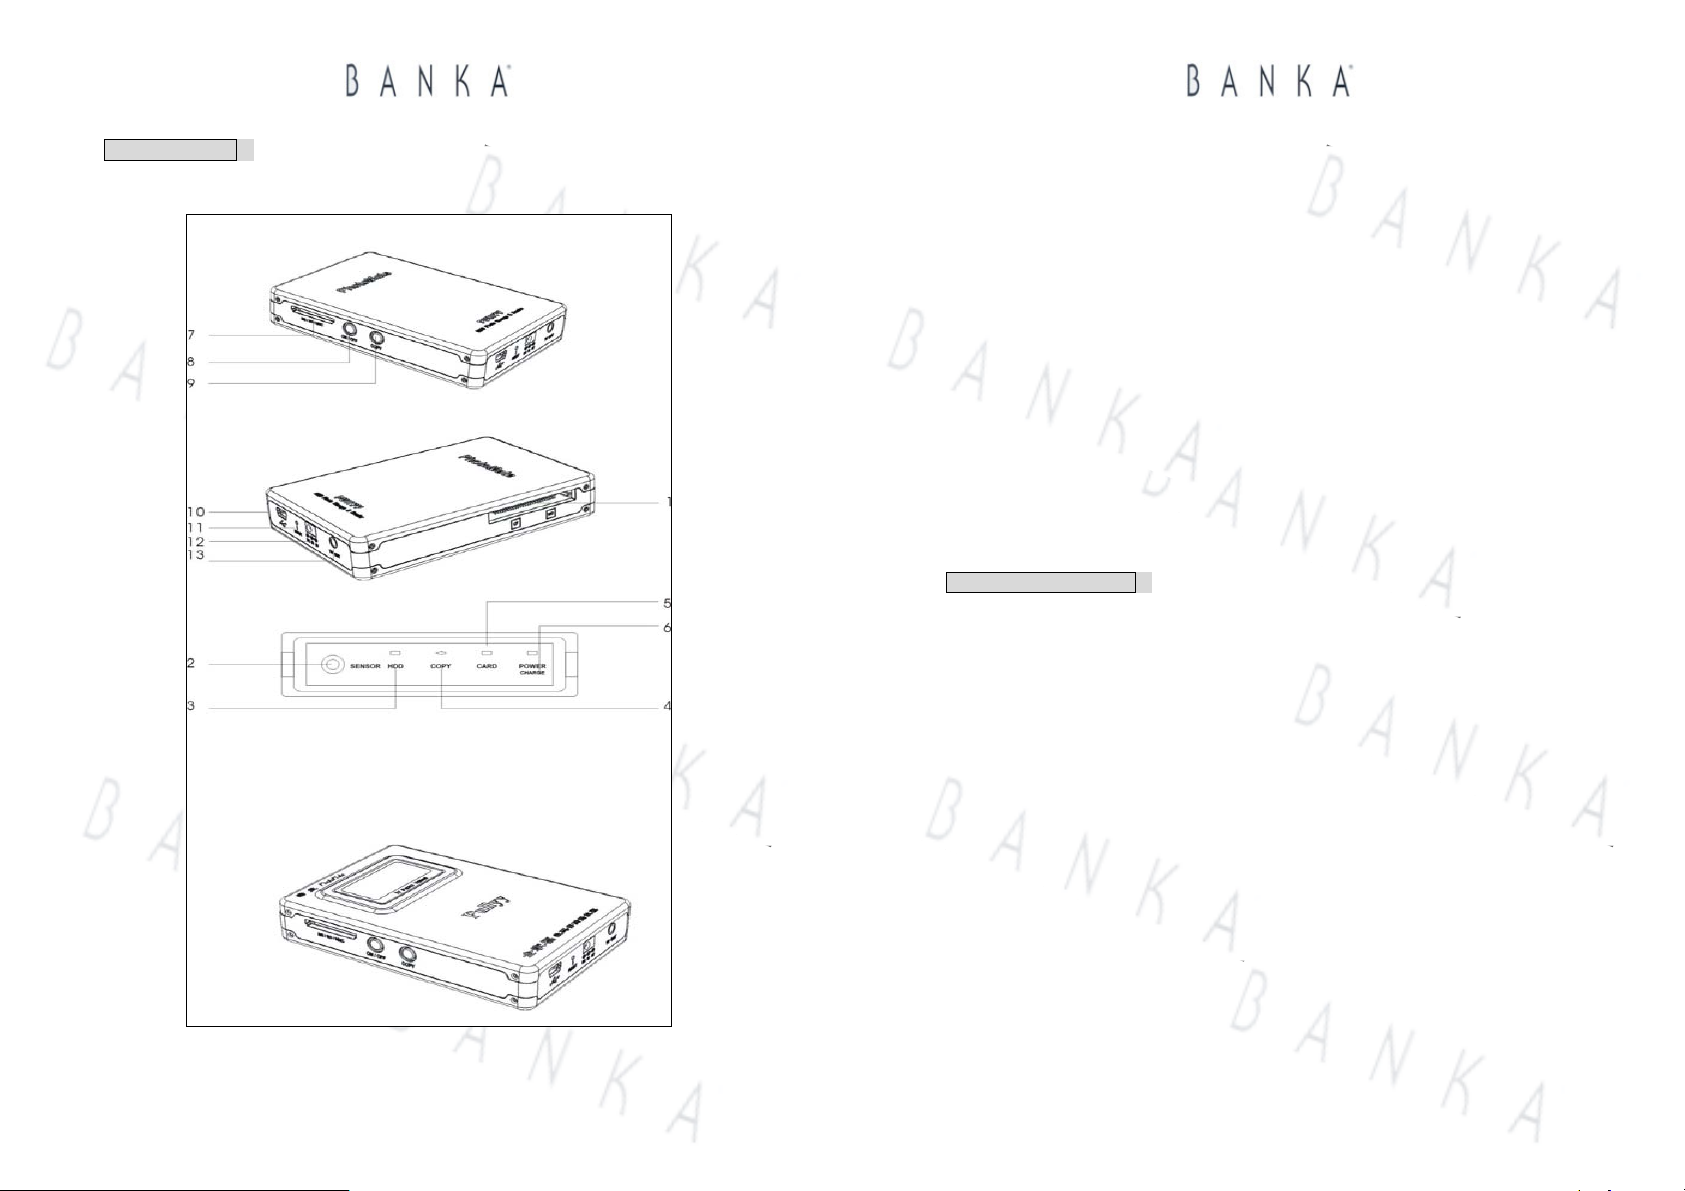
Physical structure
A) Illustrative Diagram
AV Album™ & Player
AV Album™ & Player
B) Fuctions
1. CF/MD card slots
2. Infrared reception
3. LED indication for successful copying
4. Copying LED
5. Memory Card processing LED
6. Switch on and recharging LED
7. SD/MMC/MS card slots
8. Power Switch On button (must press this button to switch on the unit)
9. Copy button
10. USB plug-in
11. RESET button (when unit is not functioning normally, use roun d head needle to press the
button, unit will switch automatically)
12. DC 5V input plug-in
13. TV audio image output plug-in
New hard disk formatting
(not for hard disk already provided, it has been done so prior to ship)
New purchased hard disk or those old one, should do the format for stable performance.
1. Connect the unit with AV cord (Accompanied accessories No. 6) with TV or projector
or any screen display device, plug in with the International Power Ad apter
(Accompanied accessories No. 4)
2. Switch on the TV or projector or respective screen display device, select the AV mode
3. Press “Power On/Off” button (No. 8 button) in the physical structure, for more than
0.5 second, to switch on the unit
4. Use the Remote Control (Accompanied accessories No. 2) and press (<) for left, and
(>) for right (No. 19 buttons on the Remote Control) until arrives at the selection of
hard disk. Press the Format button on the Remote Control, the unit will start to format
the hard disk
5. When the screen from TV or projector or the respective screen display device showing
completion, press the Enter ( No. 20 button on the Remote Control). The screen will
follow by a preview mode for photo or video, this means the form at is successful
6. Press ‘Power Off’ (No. 3 button) on the Remote Control, to switch off the unit
7. After formatting, all the contents/data previously stored in the hard disk have been
erased permanently!
This is a translation based on the Chinese version User Guide, subject to its originality.
All rights reserved 2005, Lucas Industries Limited
(9)
This is a translation based on the Chinese version User Guide, subject to its originality.
All rights reserved 2005, Lucas Industries Limited
(10)
Page 6
AV Album™ & Player
Copy feature for backup
Method A:
1. Insert memory card into respective card slot of this AV Album™ & Player, the unit
2. Press “Power On/Off” (No. 8 button in the physical structure) for more than 0.5 second to
switch on the unit
3. Press “Copy” (No. 9 button in the physical structure), the “Copy” LED (No. 4 LED in the
physical structure) will blink
4. When the “Copy” LED diminishes, copying process is finished. Hard disk LED (No. 3
LED in the physical structure) will light on, to represent the copying is successful.
5. Take out the memory, press again the “Power On/Off” to switch off the unit.
Method B;
1. Connect this AV Album™ & Player, the unit with AV cord (Accompanied accessories No. 6)
with TV or projector or any screen display device, plug in with the International Power
Adapter (Accompanied accessories No. 4)
2. Insert memory card into respective card
3. Press “Power On/Off” (No. 8 button in the physical structure) for more than 0.5 second to
switch on the unit. Using Remote Control (Accompanied accessories No. 2) to select the
buttons the Arrow signs (<left, >right) as indicated No. 19 buttons in the previous
paragraph Remote Control, until the screen display the “COPY “ and highlight (red frame)
the intended respective memory card pending copying
4. Press the “Copy” button (button No. 16 in the previous paragraph of Remote Control) to
execute the copying process. The TV screen will show the capacity informative data of
both the memory card and the hard disk
5. When the TV screen hints whether “COPY is required?”, press the “ENTER” button (No.
20 button in the previous paragraph of Remote Control) to confirm execution until screen
shows the copying is successful
6. Take out the memory card, press “Power Off” on the Remote Control (No. 3 button in the
previous paragraph of Remote Control), to switch off the unit
AV Album™ & Player
Exchange of contents
The correlating feature with computer
1. To connect this AV Album™ & Player, the unit with any computer using the USB cord
(Accompanied accessories No. 5)
2. Press “Power On/Off” (No. 8 button in the physical structure) for more than 0.5 second to
switch on the unit
3. The computer screen will indicate there are 3 new external drives, do any drag and drop or
transfer of contents like usual computing habit
4. When jobs completed, proceed the ‘Safely remove the external drive’ by stopping and
closing them in ‘My Computer’ or at the right bottom corner of the task bar. Disconnect the
USB cord from the unit, it will automatically switch off
5. If your operating system is Win98 or Win98Sec, please use the provided Software Disc
(Accompanied accessories No. 3) to install the driver before using this feature. Win2000,
XP and Mac can work straight without
Viewing photo/video
1. Connect the unit with AV cord (Accompanied accessories No. 6) with TV or projector
or any screen display device, plug in with the International Power Ad apter
(Accompanied accessories No. 4)
2. Switch on the TV or projector or respective screen display device, select the AV mode
Press “Power On/Off” button (No. 8 button) in the physical structure, for more than
0.5 second, to switch on the unit.
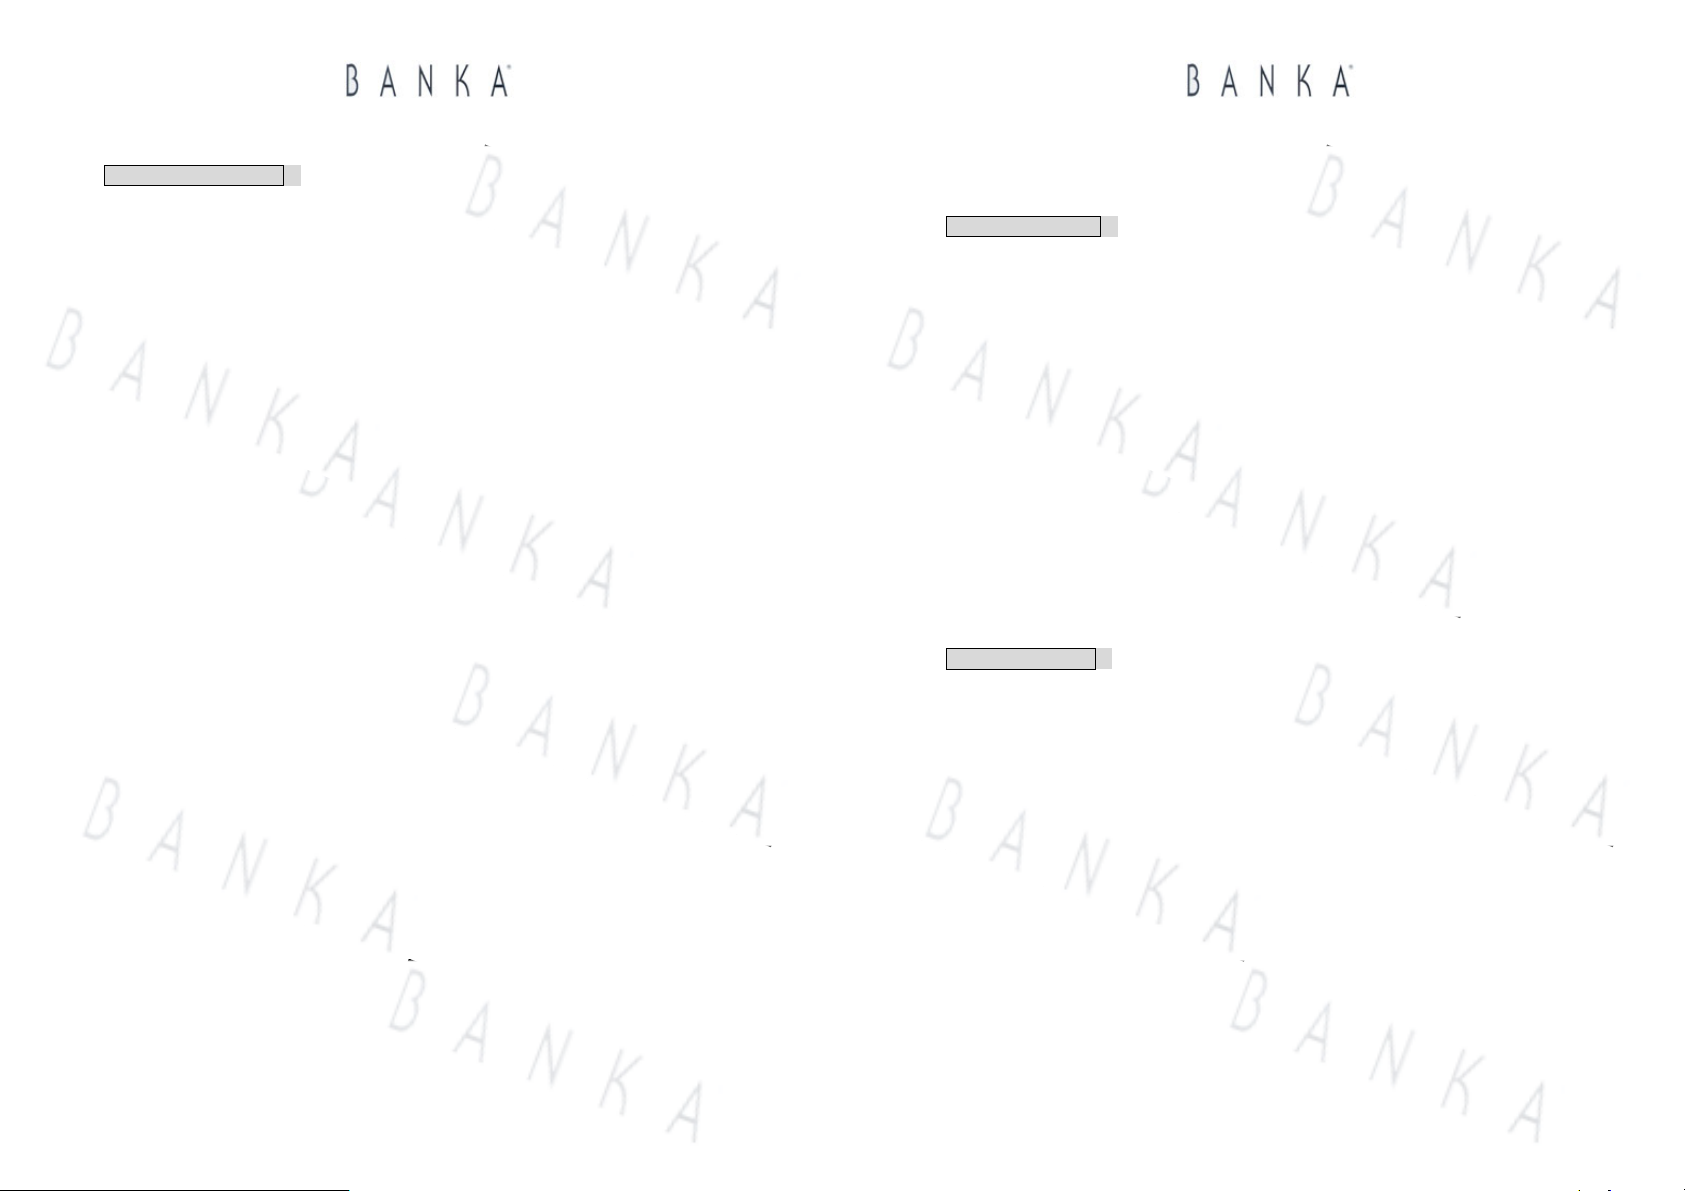
A) Entering into Selection of Card mode:
Setting the TV from NTSC or PAL system by pressing the NTSC/PAL button (No. button
14 on the Remote Control), the screen will show the diagram as follows. If not sure with
the pre-recorded contents, you can always switch this button to choose the best view result
later when it is playing.
By selecting the respective card, press the “ENTER’ button on the Remote Control
(No. 20 button in the previous paragraph of Remote Control)
This is a translation based on the Chinese version User Guide, subject to its originality.
All rights reserved 2005, Lucas Industries Limited
(11)
This is a translation based on the Chinese version User Guide, subject to its originality.
All rights reserved 2005, Lucas Industries Limited
(12)
Page 7
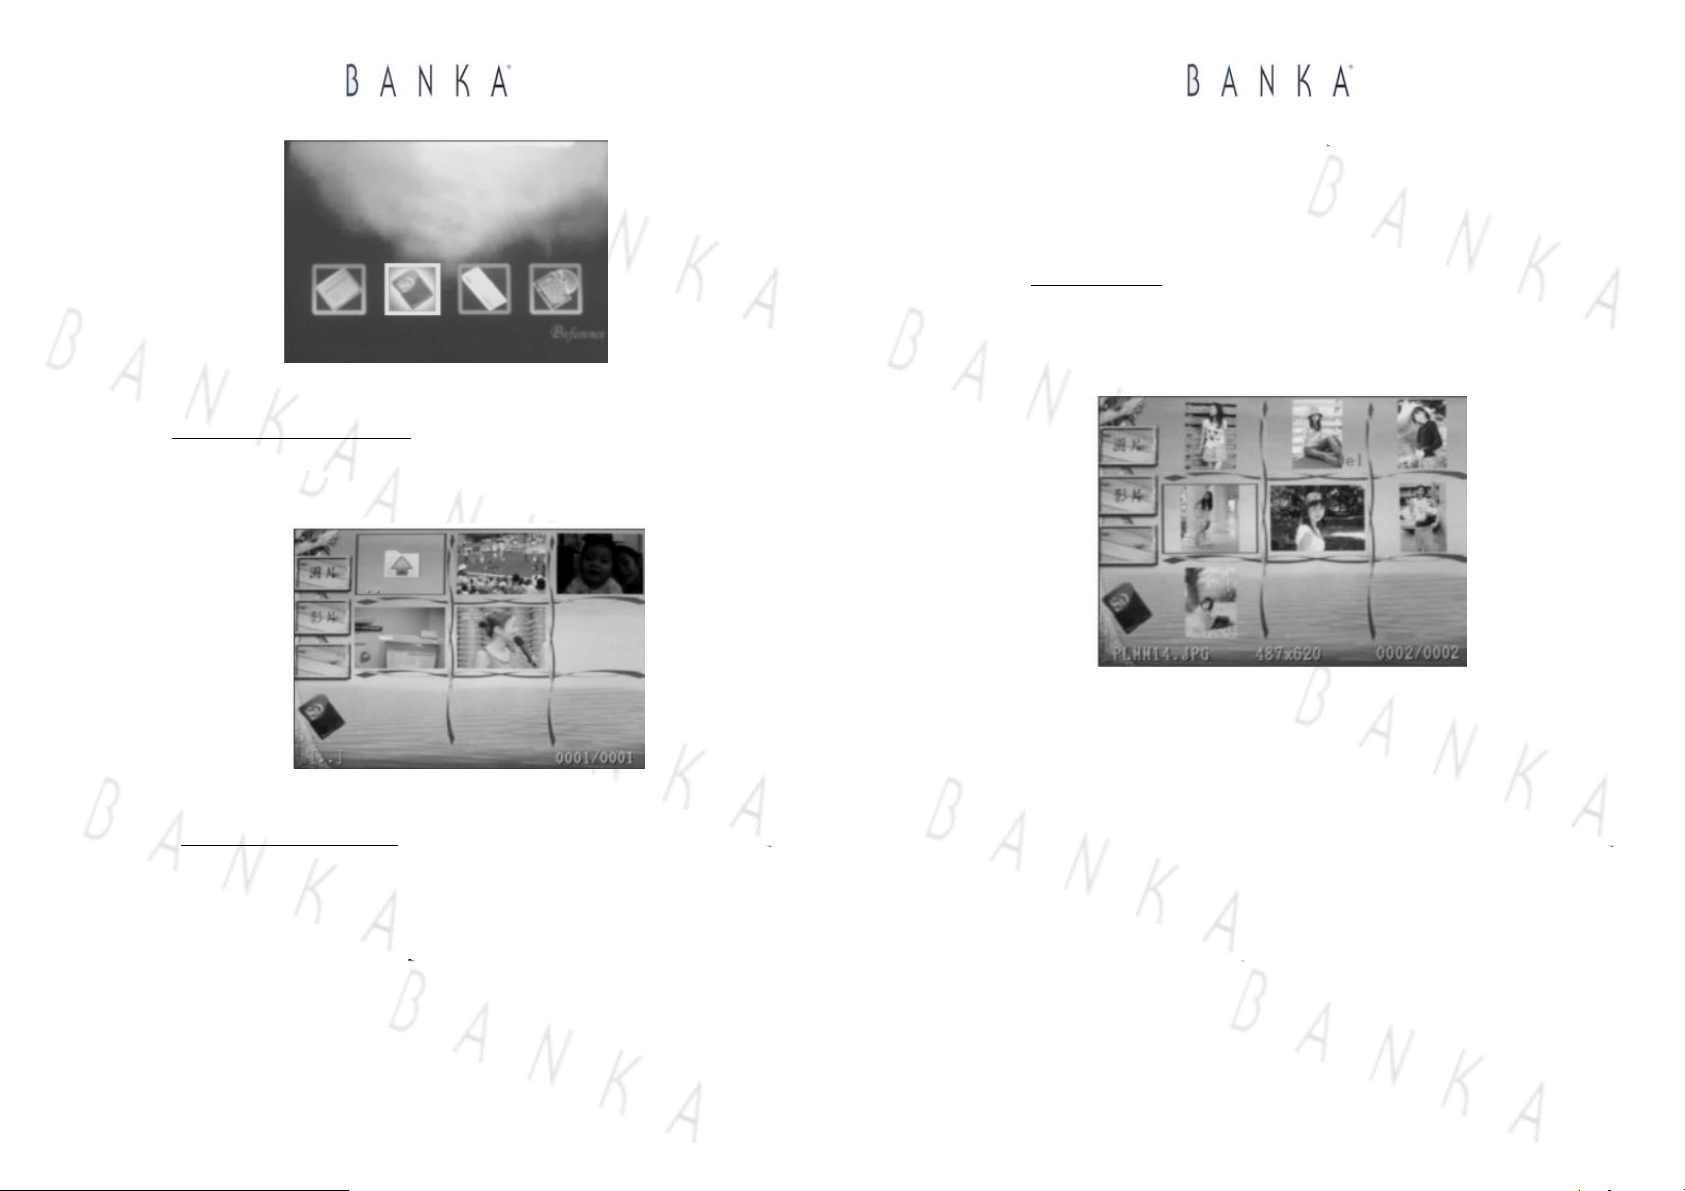
B) Photo Preview mode:
Entering into photo preview mode
previous paragraph of Remo te Control) until the screen shows the preview mode of
the photo as illustrative here under by the diagram
Back to Selection of Card mode
paragraph in the Remote Control) or the “MENU” button (No. 2 button in previous
paragraph in the Remote Control).
AV Album™ & Player
, press the Photo/AVI button (No. 1 button in the
: press “ESC” button (No. 18 button in previous
AV Album™ & Player
Selection of photos
(i) Entering into Photo preview mode: press the Photo/AVI button (No. 1 button in
the previous paragraph of Remote Control) until the screen show the preview
mode of the photo as illustrative here under by the diagram.
(ii) Under this environment, press the Arrow buttons (No. 17 buttons in the previous
paragraph of Remote Control) until arriving at the subject photo or the sub-index.
When the photos or the sub-index are more than 9 items, please use the Page
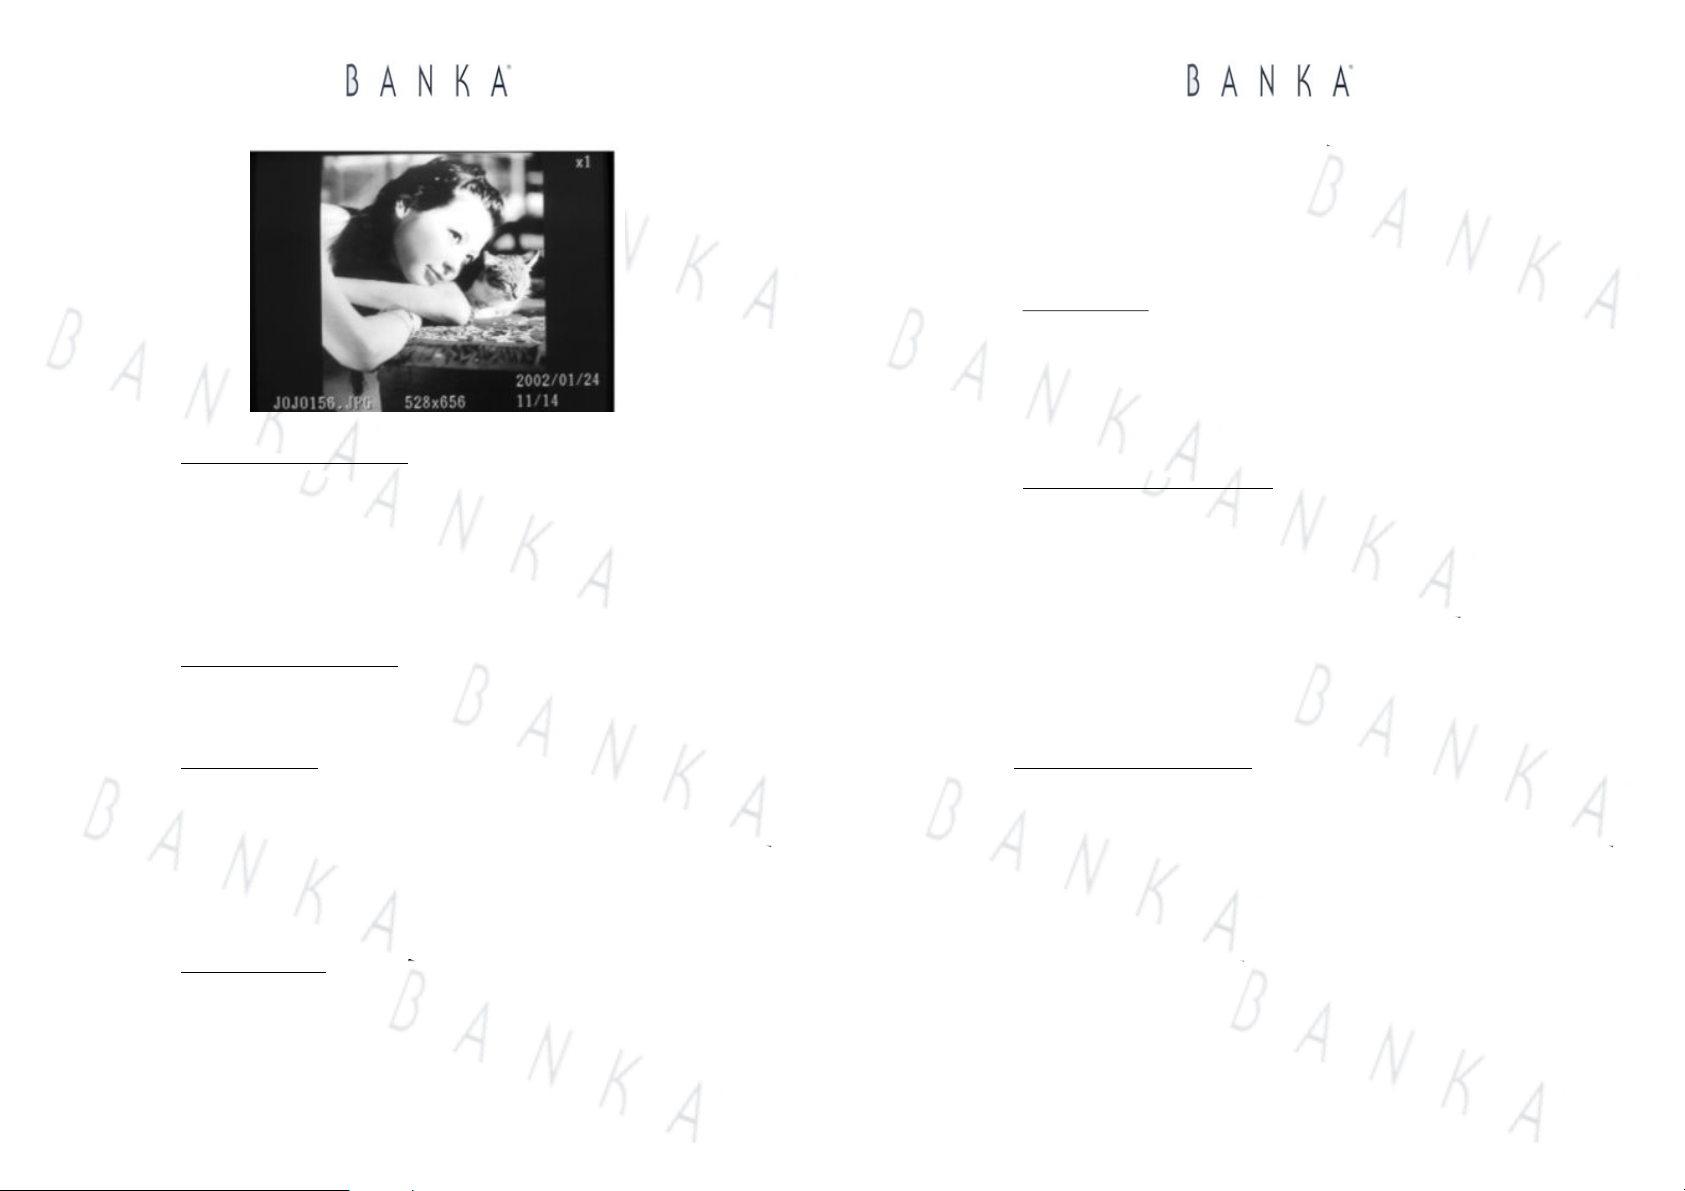
Up/Down buttons to scroll the screen. Press “Enter” button when gives you a full
screen display of the photos, as the below diagram shown:
This is a translation based on the Chinese version User Guide, subject to its originality.
All rights reserved 2005, Lucas Industries Limited
(13)
This is a translation based on the Chinese version User Guide, subject to its originality.
All rights reserved 2005, Lucas Industries Limited
(14)
Page 8
AV Album™ & Player
Operation in Playing Photo mode
Use the Arrow buttons (No. 17 buttons in the previous paragraph of Remote
Control),
(i) Forward/Backward of photo display, the Above (Λ) will get the previous photo
whereas the Below (V) will get the next photo.
(ii) Rotating the photo display, press the Left (<) to rotate the photo to the left and
press the Right (>) to rotate the photo to the right.
Back to Selection of Card mode
: press “ESC” button (No. 18 button in previous
paragraph in the Remote Control) or the “MENU” button (No. 2 button in previous
paragraph in the Remote Control).
Enlargement feature
Press “Zoom+” button (No 6 button in the previous paragraph of Remote Control)
to enlarge the size of photo, and press “Zoom-“ button (No. 8 button in the previous
paragraph of Remote Control) for the original size of it.
Under enlargement environment, using the Arrow buttons (No. 17 buttons in the
previous paragraph of Remote Control), the Above(Λ)/Below(V)/Left(<) /Right (>)
can move the direction of the photo.
Repeat photo playing
Press the “Slide Show” button, (No. 4 button in the previous paragraph of Remote
Control. The screen will start to play the first level of photo from the present
selection of photos if the collection is more than 9 items. Interval gap time between
AV Album™ & Player
each photo may be adjusted within the setting mode by 3 types, fast/normal/slow.
Press “ESC” will return to the Photo playing mode. During the Repeat playing, the
selection of photos tasks, such as scroll the photos by pressing the Arrow buttons
(No. 17 buttons in the previous paragraph of Remote Control) will become not
non-operative.
Deletion of photos
Highlighting the specific photo, press “DEL” button, (No. 15 button in the previous
paragraph of Remote Control). Selected photo will bear a mark ‘DEL’. Such action
can be repeated by this for deleting more photos. When the selection is completed,
press “ESC” and then “Enter”. The deletion is so processed. If press ‘ESC’ twice,
the deletion task will be abandoned.
Entering the photo Slide Show mode
Press the “Slide Show” button, (No. 4 button in the previous paragraph of Remote
Control. The screen will start to play the first level of photo from the present
selection of photos if the collection is more than 9 items.
C) V ideo Preview mode:
Entering into video preview mode
, press the Photo/AVI button (No. 1 button in the
previous paragraph of Remo te Control) until the screen shows the preview mode of
the video as illustrative here under by the diagram
This is a translation based on the Chinese version User Guide, subject to its originality.
All rights reserved 2005, Lucas Industries Limited
(15)
This is a translation based on the Chinese version User Guide, subject to its originality.
All rights reserved 2005, Lucas Industries Limited
(16)
Page 9
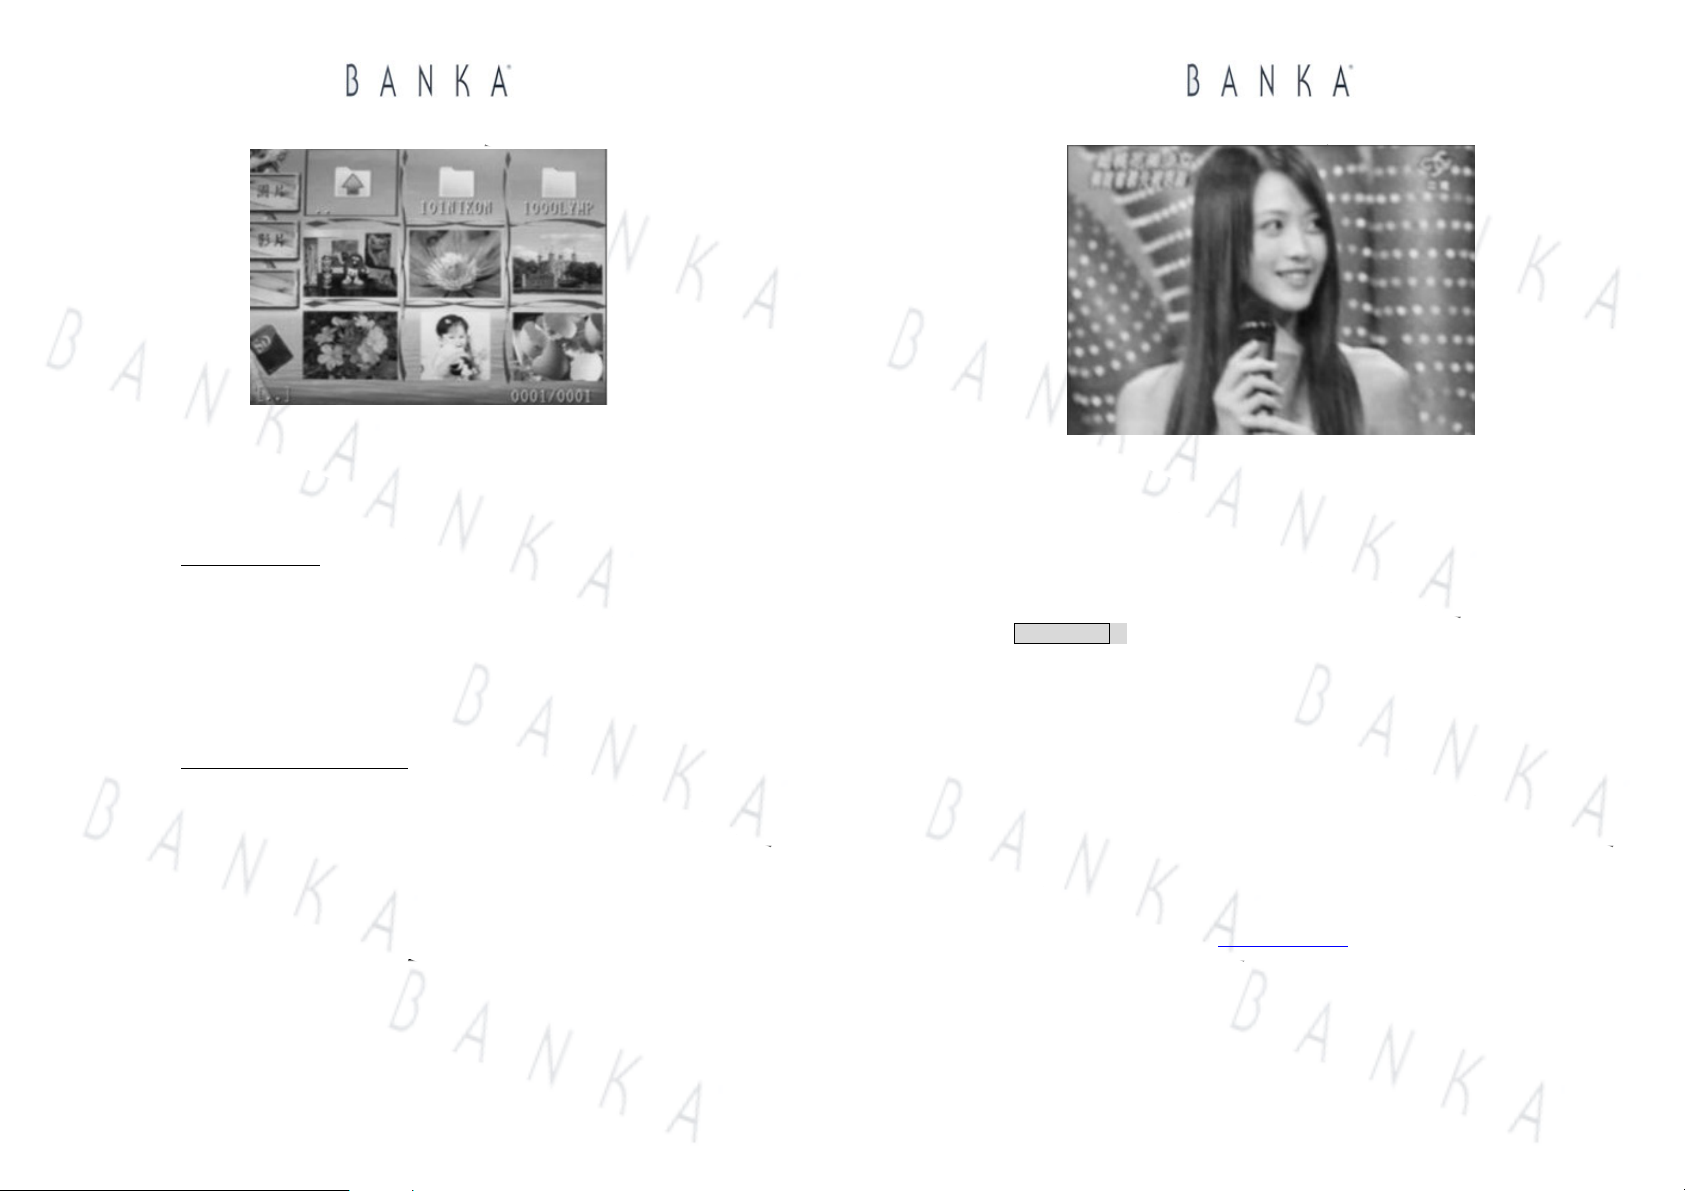
AV Album™ & Player
Selection of Video:
Under the Press the Arrow buttons (No. 17 buttons in the previous paragraph of
Remote Control until arriving at the subject photo or the sub-index. When the
photos or the sub-index are more than 9 items, please use the Page Up/Down
buttons to scroll the screen.
Operation in Playing Video mode
Audio volume: press “Volume+” and “Volume-“ to control the audio sound effect.
Playing speed: press the”Speed+” and “Speed-“ to control
Pause/Play: press “ESC” to halt the video playing, unless to press “Enter” to
confirm playing the video.
Back to Video preview mode: press “ESC” twice, back to the Video Preview mode.
Press “Enter” button when gives you a full screen display of the photos, as the
below diagram shown:
.
AV Album™ & Player
Press “Enter” button over the indices will allow to go either up levels of photos.
For the Repeat playing, Slide Show and Deletion of video, please refer to those
similar tasks previously explained in the Photo playing mode in the P. 14~15.
Setting mode
Entering into the setting mode, as shown by below, to select the desirable setting by
moving Arrow buttons (No. 17 buttons in the previous paragraph of Remote Control),
the Above(Λ)/Below(V)/Left(<) /Right (>)
z TV display system: Left(<) /Right (>)
z 3 Playing speeds fast/normal/slow: Left(<) /Right (>)
z Audio volume control: Left(<) /Right (>)
z Selection of screen display languages (Chinese Big5 and English are available)
z “Enter” button will confirm all execution of fuction
z Selection of setting: press the “Photo/AVI” button, move the optical point (Red
frame) to the accepting mode, then press “Enter”. The system will resume to
accepting mode.
z Please visit our website http://lucasind.com
to look for software upgrade when
available.
This is a translation based on the Chinese version User Guide, subject to its originality.
All rights reserved 2005, Lucas Industries Limited
(17)
This is a translation based on the Chinese version User Guide, subject to its originality.
All rights reserved 2005, Lucas Industries Limited
(18)
Page 10

AV Album™ & Player
About the battery
1. The unit is built-in with Lithium battery. For the first time usage, recharge the unit with
either the International Power adapter or the USB cord. It is recommendable to use the
International Power adapter to work in order to maintain its longer life cycle.
2. When recharging, LED will be green, and when the unit under operational working, it
will be orange.
3. The green LED will diminishes when the battery is fully charged and it will become red
if the unit is under operational working.
4. During operational working of the unit, the switch on LED in red will blink. This
represents the battery is running flat. Please hurry to finish any job and recharge the
battery.
5. A flat battery requires nearly 3 hours to recharge in full, and afterward, it can last more
than an hour for continuous operation.
Lucas Industries Limited
Website: http://lucasind.com
Products information; [email protected]
Technical support: [email protected]
This is a translation based on the Chinese version User Guide, subject to its originality.
All rights reserved 2005, Lucas Industries Limited
(19)
 Loading...