

Bang & Olufsen UG4 User Manual

Guide
DVD 1
For the US market only :
NOTE: This equipment has been tested and found
to comply with the limits for a class B digital device,
pursuant to part 15 of the FCC Rules. These limits
are designed to provide reasonable protection
against harmful interference in a residential
installation.
This equipment generates, uses and can radiate
radio frequency energy and, if not installed and
used in accordance with the instructions, may
cause harm ful interference to radio
communications. How ever, there is no guarantee
that interference will not occur in a particular
installation. If this equipment does cause harmful
interference to radio or television reception, which
can be determined by turning the equipment off
and on, the user is encouraged to try to correct
the interference by one or more of the following
measures:
– Reorient or relocate the receiving antenna
– Increase the separation between the equipment
and receiver
– Connect the equipment into an outlet on a
circuit different from that to which the receiver
is connected
– Consult the retailer or an experienced radio/TV
technician for help
For the Canadian market only:
CAUTION: To prevent electric shock do not use the
polarized plug, attached to this apparatus, with an
extension cord, receptacle or other outlet unless
the blades can be fully inserted to prevent blade
exposure.
This class B digital apparatus meets all require ments
of the Canadian Interference- Causing Equipment
Regulations.
WARNING: To prevent fi re or electric
shock, do not expose this appliance
to rain or moisture. Do not expose
this equipment to dripping or splashing and ensure that no objects fi lled
with liquids, such as vases, are placed
on the equipment.
To completely disconnect this equip-
ment from the AC Mains, disconnect
the power supply cord plug from the
AC receptacle.
This symbol indicates that a
dangerous voltage constituting a risk of electric shock is
present within this unit.
This symbol indicates that there
are important operating and
maintenance instructions in the
literature accompanying this
unit.
CAUTION: To reduce the risk of
electric shock, do not remove
cover (or back).
No User-serviceable parts inside.
Refer servicing to qualified service personnel.

Contents
Set up DVD 1, 4
Find out how to handle, place and set up your product. This chapter also contains
an overview of the socket panel.
Introducing DVD 1, 8
Find out how to use the Beo4 remote control and the close-up operation panel.
Daily use, 10
Find out all there is to know about the daily use of your product, including how to
play, cue and wind through a DVD, pause and stop playback, change chapters and
play an audio CD.
Preference settings, 12
Find out how to enter or change, for example, settings for language, picture, sound
and Parental Control.
On-screen menus, 14
Overview of the on-screen menus.
Maintenance, 18
Index, 20
3

Set up DVD 1
Follow the guidelines and procedures
on these pages when setting your
DVD 1 up for the first time.
DVD 1 placement guidelines
Place DVD 1 on a solid, level surface. Do not
place any items on top of DVD 1.
Place DVD 1 away from radiators and direct
sunlight.
Do not place DVD 1 on a carpeted surface, as
carpet blocks the ventilation holes in the base.
DVD 1 is intended for indoor use in dr y,
domestic environments only, with a
tempera ture range of 10–35°C (50–95°F).
Condensation can occur if DVD 1 is moved from
cold to warm surroundings. This may interrupt
playback. Before using DVD 1, let the player stand
someplace warm for one to two hours, until the
moisture evaporates.
4
To ensure proper ventilation, allow for at least 5
centimetres (2") of space at the sides of DVD 1
and 10 centimetres (4") above it.
Connect DVD 1 to your television
DVD 1 is constructed for connection to a Bang &
Olufsen television via a 21-pin AV cable, but
other cables are used in some countries. If
21-pin AV cables are not used in your country,
then you can follow the procedure described
below to connect DVD 1 to your Bang &
Olufsen television. For an overview of the
DVD 1 socket panel, please refer to page 6.
Register all equipment connected to your TV system,
including DVD 1. This is done via your television’s
‘Setup’ menu. Refer to the User’s Guide included
with your Bang & Olufsen television to ensure
proper connection and registration of extra
equipment.
Connection using a 21-pin AV cable…
> Connect the socket marked AV on DVD 1 to the
socket marked AV on your television via the
21-p in AV c ab le.
> If your television is equipped with a built-in
Dolby Digital module, connect the socket marked
DIGITAL OUTPUT on DVD 1 to the INPUT 1 socket
on your television. If the required cable is not
enclosed, it is available from your Bang & Olufsen
retailer.
> Set the switch marked Y/C-RGB-CVBS on the
rear of DVD 1 to the correct position:
CVBS
This switch setting is used when you connect
DVD 1 to an AV 9000, BeoVision LX,
BeoVision MS, or BeoVision MX 4000/4002/
6000/7000 television.
Y/C
This switch setting is used when you connect
DVD 1 to a BeoVision Avant 50 Hz television.
RGB
This switch setting is used when you connect
DVD 1 to any other Bang & Olufsen television.
> Finally, connect your DVD 1 to the mains with the
enclosed cable. Your DVD 1 is now in stand-by
mode – indicated by the red light in the display
panel.
Connection without a 21-pin AV cable…
Follow the procedure below to connect your DVD 1
to your Bang & Olufsen television:
> Connect the CTRL socket on DVD 1 to the CTRL
socket on your television.
> Connect the S-VIDEO socket on DVD 1 to the
S-VIDEO socket on your television.
> Connect the VIDEO socket on DVD 1 to the
VIDEO socket on your television.
> Connect the DIGITAL OUTPUT socket on DVD 1
to the COAX socket on your television.
> Connect the LINE OUT L and LINE OUT R sockets
for left and right channel audio output on DVD 1
to the L and R sockets on your television.
> Finally, connect your DVD 1 to the mains with the
enclosed cable. Your DVD 1 is now in stand-by
mode – indicated by the red light in the display
panel.
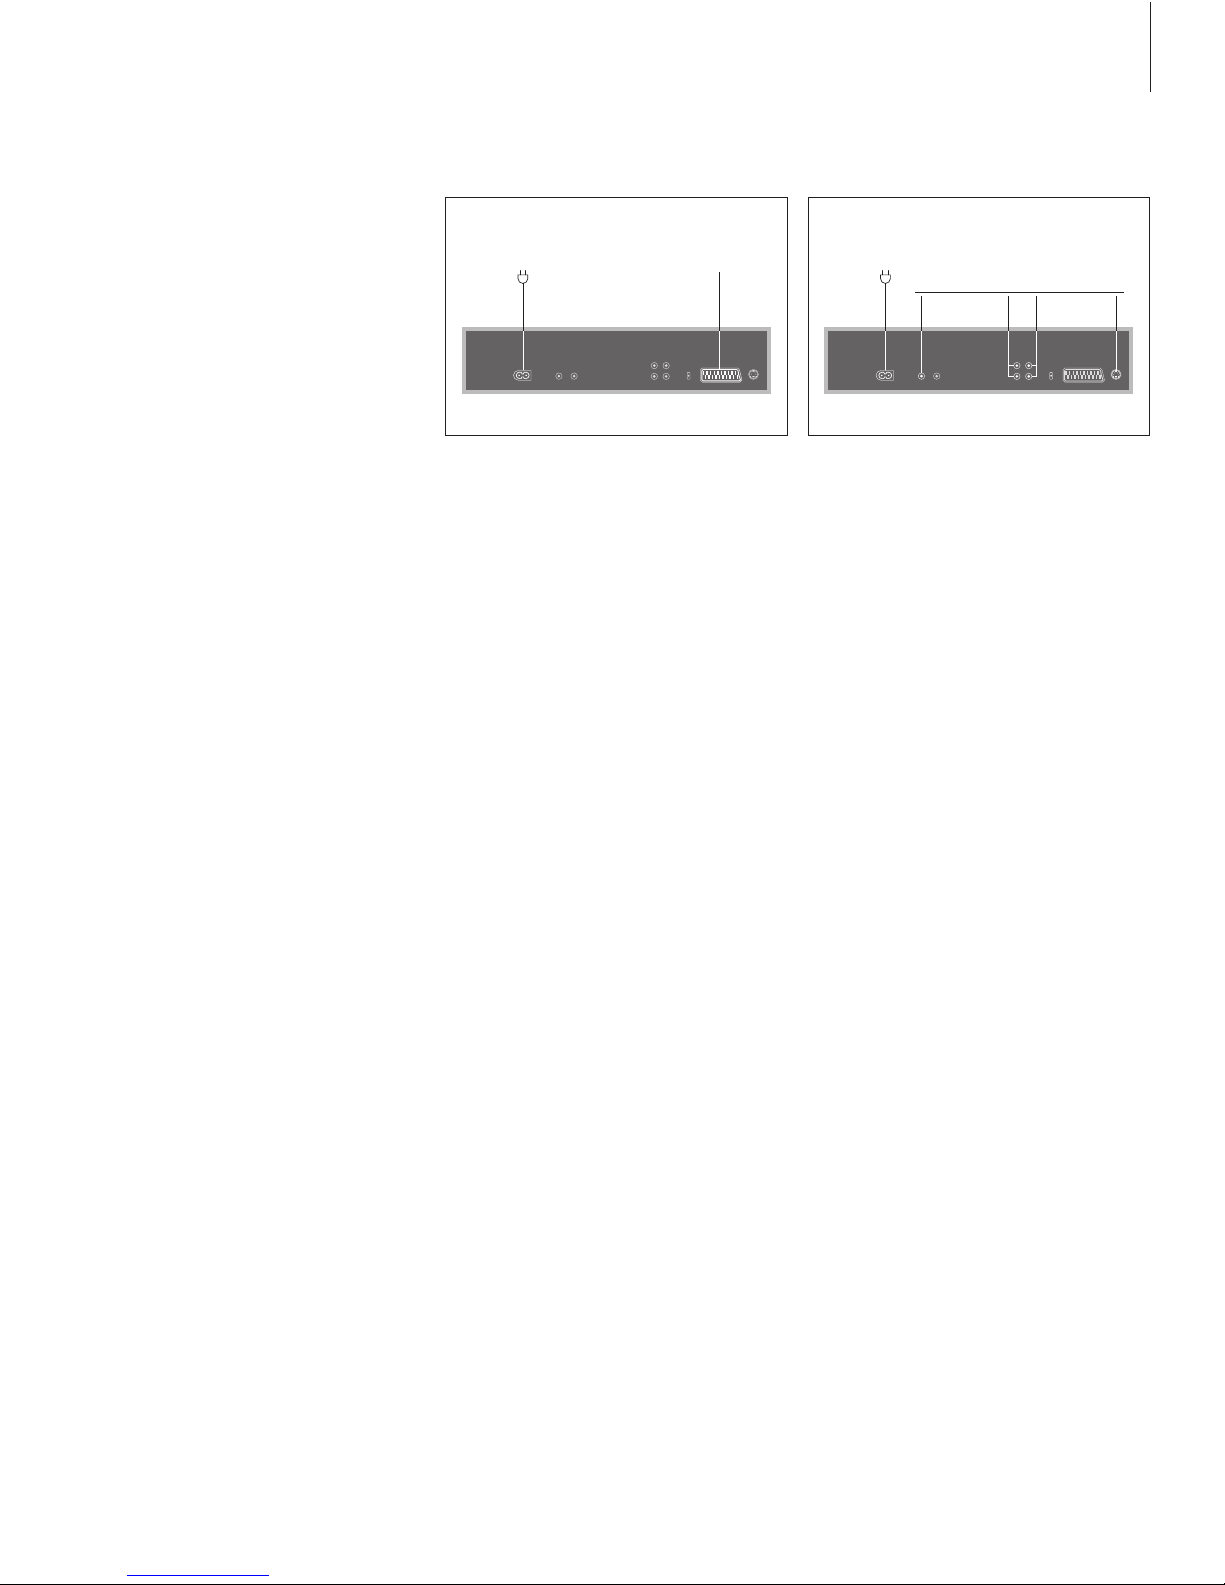
5
To the mains To TV To the mains
To T V

You can connect DVD 1 to your tele vision via
the socket panel on the rear of DVD 1.
Please consult the User’s Guides enclosed with
externally connected equipment to ensure
that it is connected in the proper manner.
Overview of the rear socket panel
~ (mains)
Socket for connection to the mains.
SERVICE
For use by qualifi ed service personnel only.
LINE OUT R VIDEO
LINE OUT L DIG. OUT
Audio signals are sent from DVD 1 to your television
via these four sockets. All four sockets are used
when you connect DVD 1 to a Bang & Olufsen
television which does not use a 21-pin video cable.
The DIGITAL OUTPUT socket is also used when
connecting DVD 1 to any Bang & Olufsen television
equipped with a Dolby Digital surround sound
module.
AV
21-pin socket for connection to the Bang & Olufsen
television.
CTRL S-VIDEO
Video signals are sent from DVD 1 to your television
via these sockets. The sockets are used to connect
DVD 1 to a Bang & Olufsen television which does
not use a 21-pin video cable.
The switch options
CVBS
This switch setting is used when you connect DVD 1
to an AV 9000, BeoVision LX, BeoVision MS or
BeoVision MX 4000/4002/6000/7000 television.
Y/C
This switch setting is used when you connect DVD 1
to a BeoVision Avant 50 Hz television.
RGB
This switch setting is used when you connect DVD 1
to any other Bang & Olufsen television.
>> Set up DVD 1
LINE OUT R VIDEO
LINE OUT L DIG. OUT
AV S-VIDEO
CTRLMAINS SERVICE
CVBS
RGB
Y/C
6

Set up DVD 1 with your particular
television…
This procedure will ensure that your DVDs are
played with the proper pic ture format,
regardless of the type of television you have.
DVD 1 must be switched on before you
perform this ‘once only’ operation.
Press LIST on Beo4 until V.SETUP*
appears in the Beo4 display
Press GO to display TUNE
Press 1 if your DVD 1 is connected
directly to a television from the
BeoVision MX-series (i.e. 4000/
4002, 6000/7000)
Press 2 if your DVD 1 is connected
to a BeoVision MX via an AV2
Expander box, or if it is
connected to any other Bang &
Olufsen television
Press GO to store the setup
*Add V.SETUP to Beo4…
Before you can set up DVD 1 to the correct television
type, you must add one ‘button’ to the Beo4 remote
control; V.SETUP is needed to set up DVD 1.
> Hold the • button while pressing LIST.
> Now, let go of both buttons.
> Press LIST until ADD? appears in the display.
> Press GO to call up the list of ‘buttons’ to add
from.
> Press LIST until V.SETUP is displayed.
> Press GO to add the ‘button’. ADDED appears
in the Beo4 display and you leave the setup
function.
You only need the V.SETUP ‘button’ once and can
therefore remove it after setting up DVD 1, if you
wish. This is done by repeating the procedure
described above, selecting REMOVE? instead of
ADD?.
LIST
V.S E TUP
GO
TUNE
1
2
GO
7
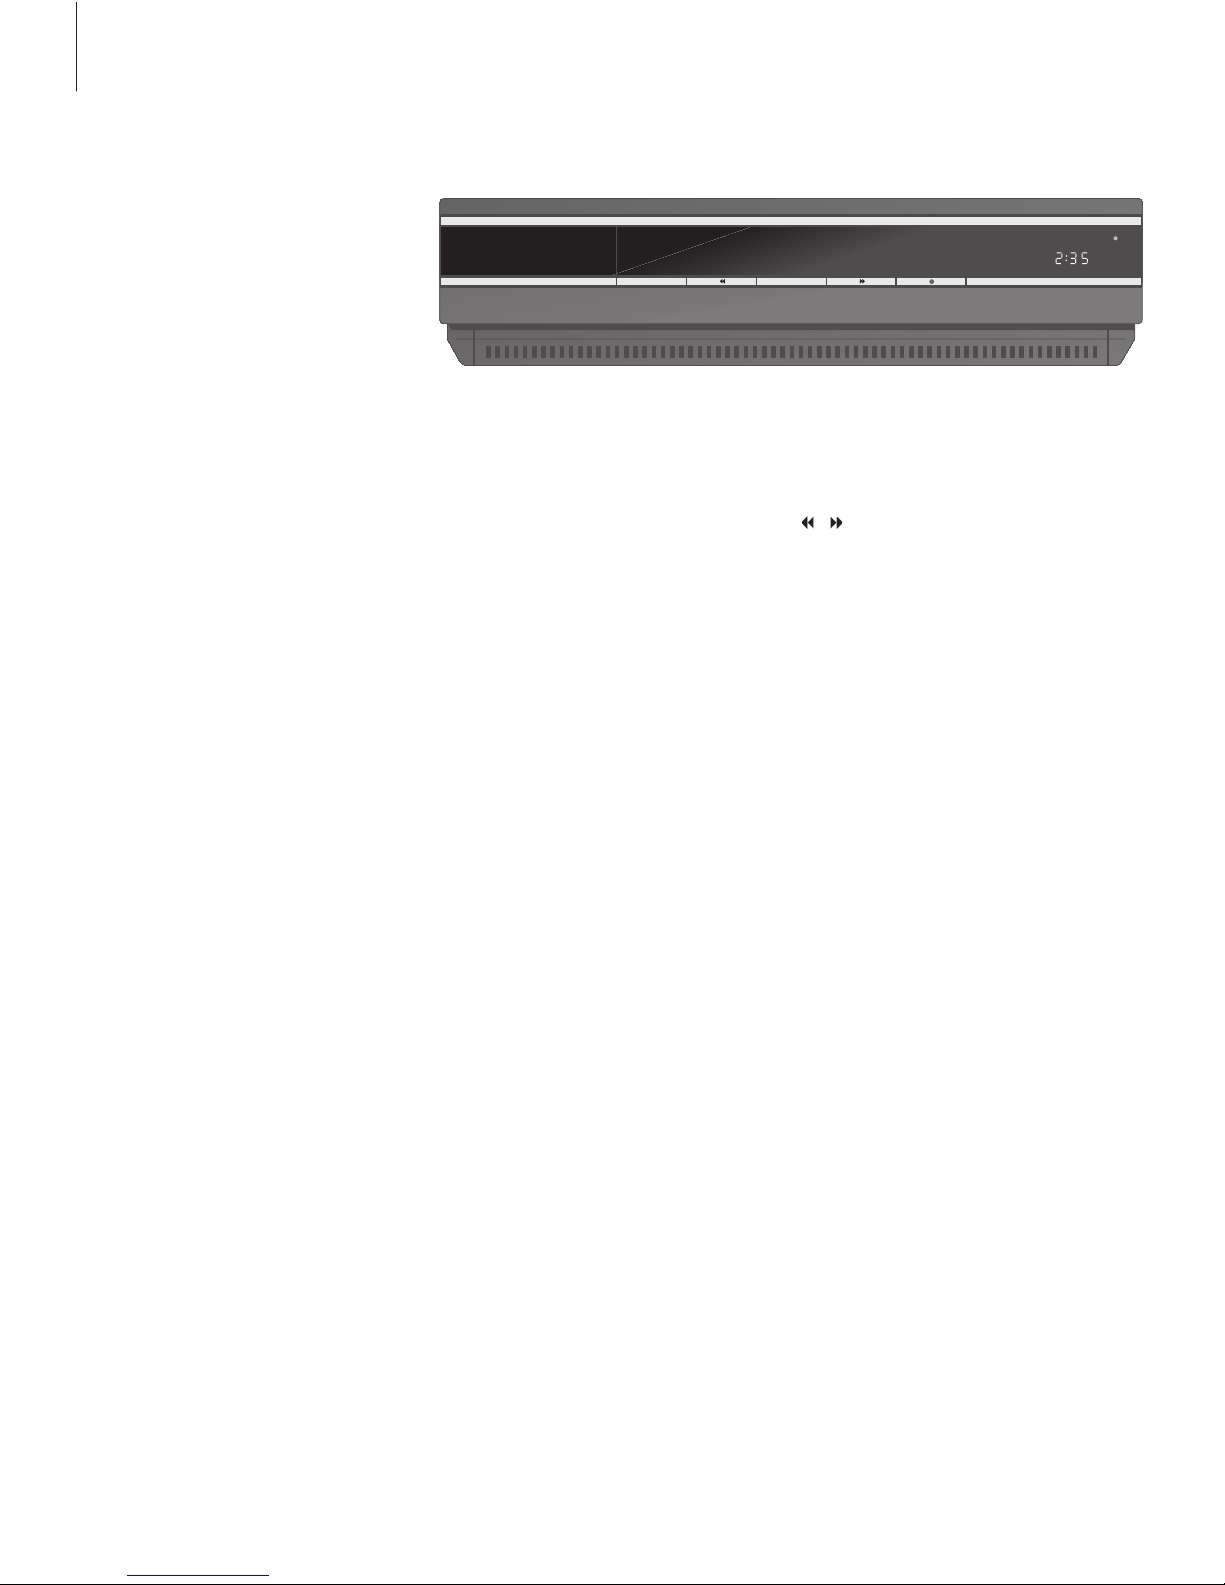
Introducing DVD 1
In this chapter, you will find
instructions explaining how to gain
access to DVD 1 functions via the
close-up operation panel on the front
of DVD 1 and via the Beo4 remote
control.
The close-up operation panel allows
you to load and unload discs, to start,
pause or stop playback, to cue
forward or backward on a disc or to
view the elapsed playing time.
To load a disc…
> Press EJECT on the close-up operation panel.
The loader slides out.
> Place a disc in the loader. For information about
valid disc formats, refer to ‘Play other disc formats’
on page 11.
> Press the DVD button on Beo4 or PLAY on the
close-up operation panel to close the loader and
start playback.
You can load a disc for playback at a later time.
Press EJECT from stand-by mode, place a disc in the
loader, and press EJECT again. DVD 1 will remain
in stand-by mode.
The close-up operation panel
EJECT
Press to open or close the loader.
Press to cue backward or for ward during
playback.
PLAY
Press to start playback. Press again to pause playback
at the current still picture or audio track.
• (Stand-by)
Press to switch DVD 1 to stand-by mode. Stops
playback without switching to standby if pressed
during playback or pause mode.
DISPLAY
The display to the right shows the elapsed playing
time of a DVD or the current track number being
played on an audio CD. Switching DVD chapters
causes the appropriate chapter number to be
shown in the display for a few seconds.
EJECT PLAY
8
 Loading...