

Page 1
BeoLab 1
Type 6841, 6842, 6843, 6844, 6845, 6846
Service Center repair guide
English, German, French, Italian, Spanish
Page 2

CONTENS
How to service...........................................................................................1
English German French Italian Spanish
How to service 1-1 1-2 1-3 1-4 1-5
Type survey 1-1 1-2 1-3 1-4 1-5
Specification guidelines for service use....................................1-6
Brief operation guide...............................................................................2
Wiring diagram (not BeoLab 1)..............................................................3
List of available parts and exploded view.......................................... 4
Available documentation............................................................4-3
Adjustments and repair tips ..................................................................5
English German French Italian Spanish
5-1 5-1 5-1 5-2 5-2
Disassembly................................................................................................6
English German French Italian Spanish
6-1 6-1 6-1 6-5 6-5
After repair tips........................................................................................ 7
English German French Italian Spanish
7-1 7-1 7-1 7-2 7-2
Page 3
How to service, English 1-1
HOW TO SERVICE
Front line service BeoLab 1 must be serviced in the consumers home in terms of electrical
symptoms or exchange of mechanical parts as front frame, front cover,
cabinet or foot. In this way you avoid having to transport the long and
heavy loudspeaker (184cm/36kg) from and back to the consumer.
For front line service we offer a back-up suitcase (same principle as for
the BeoVision’s). All needed electrical parts are found in the back-up
suitcase. Mechanical parts (front frame, front cover, cabinet or foot) must
be ordered separately.
Service documentation Service Documentation for the BeoLab 1 will be a “On-Site service guide”
and this “Service Center repair guide” with part no. for the back-up
suitcase, mechanical parts and User’s Guide.
TYPE SURVEY
Converting mains voltage supply
If it is necessary to change voltage supply, e.g. when moving between two
countries, it is necessary to order two back-up suitcases for the type sold
in the specific new country (one for each loudspeaker).
E.g.: Moving from EU (type 6841) to Japan (type 6844); order two Back-up
suitcases for type 6844, order no. : 3395147.
Type number Order no. Mains voltage Used in
6841 3395145 230V Europe/South America
6842 3395145 230V England
6843 3395146 120V USA/Taiwan/Canada
6844 3395147 100V Japan
6845 3395148 240V Australia
6846 3395145 220V Korea
Page 4

1-2 So werden servicearbeiten ausgeführt, Deutsch
SO WERDEN SERVICEARBEITEN AUSGEFÜHRT
Vor-Ort-Service Servicearbeiten an der BeoLab1, wie die Beseitigung elektrischer oder
mechanischer Fehler, werden direkt vor Ort beim Kunden vorgenommen.
Dazu zählt z.B. auch der Austausch von Front- und Lautsprecherabdeckungen,
Gehäuse und Standfuß. Auf diese Weise entfällt der Transport dieses langen
und schweren Lautsprechers (184 cm/36 kg) vom und zum Aufstellort beim
Kunden.
Für diesen Vor-Ort-Service bieten wir einen eigenen Servicekoffer an
(ähnlich wie beim BeoVision1), der alle notwendigen elektrischen
Bauteile, bzw. Baugruppen enthält. Mechanische Teile (Front- und
Lautsprecherabdeckung, Gehäuse, Standfuß) müssen separat bestellt
werden (siehe Abb. 4-2).
Service-Dokumentation Die Service-Dokumentation für den BeoLab 1 besteht aus einem
„Handbuch für den Vor-Ort-Service“ und dieser „Reparaturanleitung für
das Service-Center” mit Bestellnummern für den Servicekoffer,
mechanische Bauteile und Bedienungsanleitung.
TYPENÜBERSICHT
Umstellen auf eine andere
Betriebsspannung
Falls ein Umstellen auf eine andere Betriebsspannung notwendig ist, z. B.
beim Umzug in ein anderes Land, müssen zwei Service-Koffer für den im
neuen Land angebotenen Typ bestellt werden (je Lautsprecher ein
Koffer).
Beispiel: Bei einem Umzug aus der EU (Typ 6841) nach Japan (Typ 6844)
bestellen Sie zwei Service-Koffer für den Typ 6844, Bestellnummer:
3395147.
Typen Nr. Bestell Nr. Betriebsspannung verwendet in
6841 3395145 230V Europe/South America
6842 3395145 230V England
6843 3395146 120V USA/Taiwan/Canada
6844 3395147 100V Japan
6845 3395148 240V Australia
6846 3395145 220V Korea
Page 5
Methode d’entretien, français 1-3
METHODE D’ENTRETIEN
Entretien sur site BeoLab 1 doit être entretenu sur le site des consommateurs en ce qui
concerne les problèmes électriques ou l’échange de pièces mécaniques,
telles que le cadre frontal, le capot avant, le coffret ou le pied. Vous
évitez ainsi de transporter le haut-parleur, qui est long et lourd (184 cm/
36 kg), hors de chez le consommateur.
Dans le cadre de l’entretien sur site, nous proposons une malette
d’accompagnement (même principe que pour BeoVision). Cette malette
contient tous les composants électriques nécessaires. Les pièces
mécaniques (cadre frontal, capot avant, coffret ou pied) doivent être
commandées séparément.
Documentation d’entretien La Documentation d’entretien du BeoLab 1 se présente sous la forme d’un
Guide d’entretien sur site et du présent “Guide de réparation en station
technique“ qui comporte les numéros de pièces pour la malette
d’accompagnement, les pièces mécaniques et le Guide d’utilisation.
EXAMEN TYPE
Conversion de la tension
d’alimentation secteur
S’il s’avère nécessaire de modifier la tension d’alimentation, à l’occasion
d’un déménagement à l’étranger par exemple, il convient de commander
deux malettes d’accompagnement pour le type vendu dans le pays
concerné (une pour chaque haut-parleur).
Exemple : En cas de déménagement des Etats-Unis (type 6841) au Japon
(type 6844), commander deux malettes d’accompagnement pour le type
6844, n° de commande : 3395147.
N° de type N° de commande. Tension secteur Pays
6841 3395145 230V Europe/South America
6842 3395145 230V England
6843 3395146 120V USA/Taiwan/Canada
6844 3395147 100V Japan
6845 3395148 240V Australia
6846 3395145 220V Korea
Page 6
1-4 Assistenza, italiano
ASSISTENZA
Prima assistenza BeoLab 1 deve essere riparato al domicilio del consumatore relativamente
a guasti elettrici o sostituzione di parti meccaniche, quali telaio anteriore,
copertura anteriore, cabinet o sostegno. In tal modo si eviterà il trasporto
delle lunghe e pesanti casse acustiche (184cm/36kg) dal domicilio del
cliente.
Per la prima assistenza offriamo una valigetta di pezzi di ricambio (lo
stesso principio di BeoVision), nella quale è possibile trovare tutte le parti
elettriche necessarie. Le parti meccaniche (telaio anteriore, copertura
anteriore, cabinet o sostegno) devono essere ordinate separatamente.
Documentazione per l’assistenza La documentazione per l’assistenza di BeoLab 1 è costituita da una “guida
per l’assistenza a domicilio” e questa “guida alla riparazione del Centro
assistenza” con numeri di parte per la valigetta dei pezzi di ricambio,
parti meccaniche e Guida dell’utente.
INFORMAZIONI SUL TIPO
Trasformazione della tensione
di alimentazione
Se è necessario trasformare la tensione di alimentazione, ad esempio a
causa del trasferimento in un altro paese, occorre ordinare due valigette
di pezzi di ricambio per il tipo venduto nel nuovo paese (una per ciascuna
cassa acustica).
Ad esempio: Trasferimento da un paese UE (tipo 6841) in Giappone (tipo
6844); ordinare due valigette di pezzi di ricambio per il tipo 6844, N°
ordine: 3395147.
N° di tipo N° ordine Tensione alimentaz. Utilizzato in
6841 3395145 230V Europe/South America
6842 3395145 230V England
6843 3395146 120V USA/Taiwan/Canada
6844 3395147 100V Japan
6845 3395148 240V Australia
6846 3395145 220V Korea
Page 7
Cómo realizar el mantenimiento, español 1-5
CÓMO REALIZAR EL MANTENIMIENTO
Mantenimiento inmediato El mantenimiento del BeoLab 1 debe realizarse en el domicilio del
consumidor, por lo que se refiere a temas eléctricos o sustitución de
componentes mecánicos como la estructura frontal, la cubierta frontal, la
cabina o el pie. Así se evita tener que transportar el gran y pesado altavoz
(184 cm/ 36 kg) desde y hasta el domicilio del consumidor.
Para el servicio directo ofrecemos un maletín auxiliar (el mismo principio
que para el del BeoVision). Todos los componentes eléctricos se
encuentran en este maletín. Los componentes mecánicos (estructura
frontal, cubierta frontal, cabina o pie) deben solicitarse por separado.
Documentación de
mantenimiento
TIPOS
Conversión del voltaje de la red
eléctrica
La documentación de mantenimiento para el BeoLab 1 será una “Guía de
mantenimiento «in situ»” y esta “Guía de Reparación en taller” con los
números de referencia para el maletín auxiliar, los componentes
mecánicos y la Guía del Usuario.
Si fuera necesario cambiar el voltaje, por ejemplo, al ir de un país a otro,
sería necesario solicitar dos maletines auxiliares para el tipo que se venda
en cada país concreto (uno para cada altavoz).
Por ejemplo: Al viajar de la Unión Europea (tipo 6841) a Japón (tipo 6844),
pida dos maletines para el tipo 6844, número de referencia: 3395147.
Tipo ref. maletin Tensión de red Utilizado en
6841 3395145 230V Europe/South America
6842 3395145 230V England
6843 3395146 120V USA/Taiwan/Canada
6844 3395147 100V Japan
6845 3395148 240V Australia
6846 3395145 220V Korea
Page 8
1-6 Specification guidelines
Earth Phase
SPECIFICATION GUIDELINE FOR SERVICE USE BEOLAB 1
Type no.
6841 EUROPE 230V
6842 ENGLAND 230 V
6843 USA, CANADA,TAIWAN 120 V
6844 JAPAN 100 V
6845 AUSTRALIA 240 V
6846 KOREA 220 V
Dimensions Height 1840 mm
Foot ø 398 mm,
Weight 36 kg
Box for 1 loudspeaker / cabinet L 2000 x W 292 x H 262 mm
Box for 1 foot: L 500 x W 500 x H 200 mm
Cabinet finish Aluminium, black, green, red, blue (Avant colours)
Power Consumption typical 15 watts or SPL = 70 dB
Standby: <0.5 watts
Input impedance 47kΩ
Maximum Sound Pressure Level 105 dB (stereo, pair)
Power amplifiers 3
Long-term maximum, output power, per amplifier Bass: 300 watts
Midrange: 75 watts
Treble: 75 watts
Effective Frequency range 39 - 20,000 Hz According to IEC 268-5
Crossover freqency 800/4000 Hz
Cabinet principle Closed box
Magnetically shielded Yes
Woofers 2 x 16.5 cm (6.5")
Midrange 7.6 cm (3")
Tweeter 2.5 cm (1")
Net volume 16 litres
Bass equalisation ABL (Adaptive Bass Linearisation),
Switch for loudspeaker position: Free - Wall - Corner.
Input sensitivity (line) 125 mV (91dB SPL per channel at 1m)
Switch off time (line) 3 min.
Connections 2 x Power Link
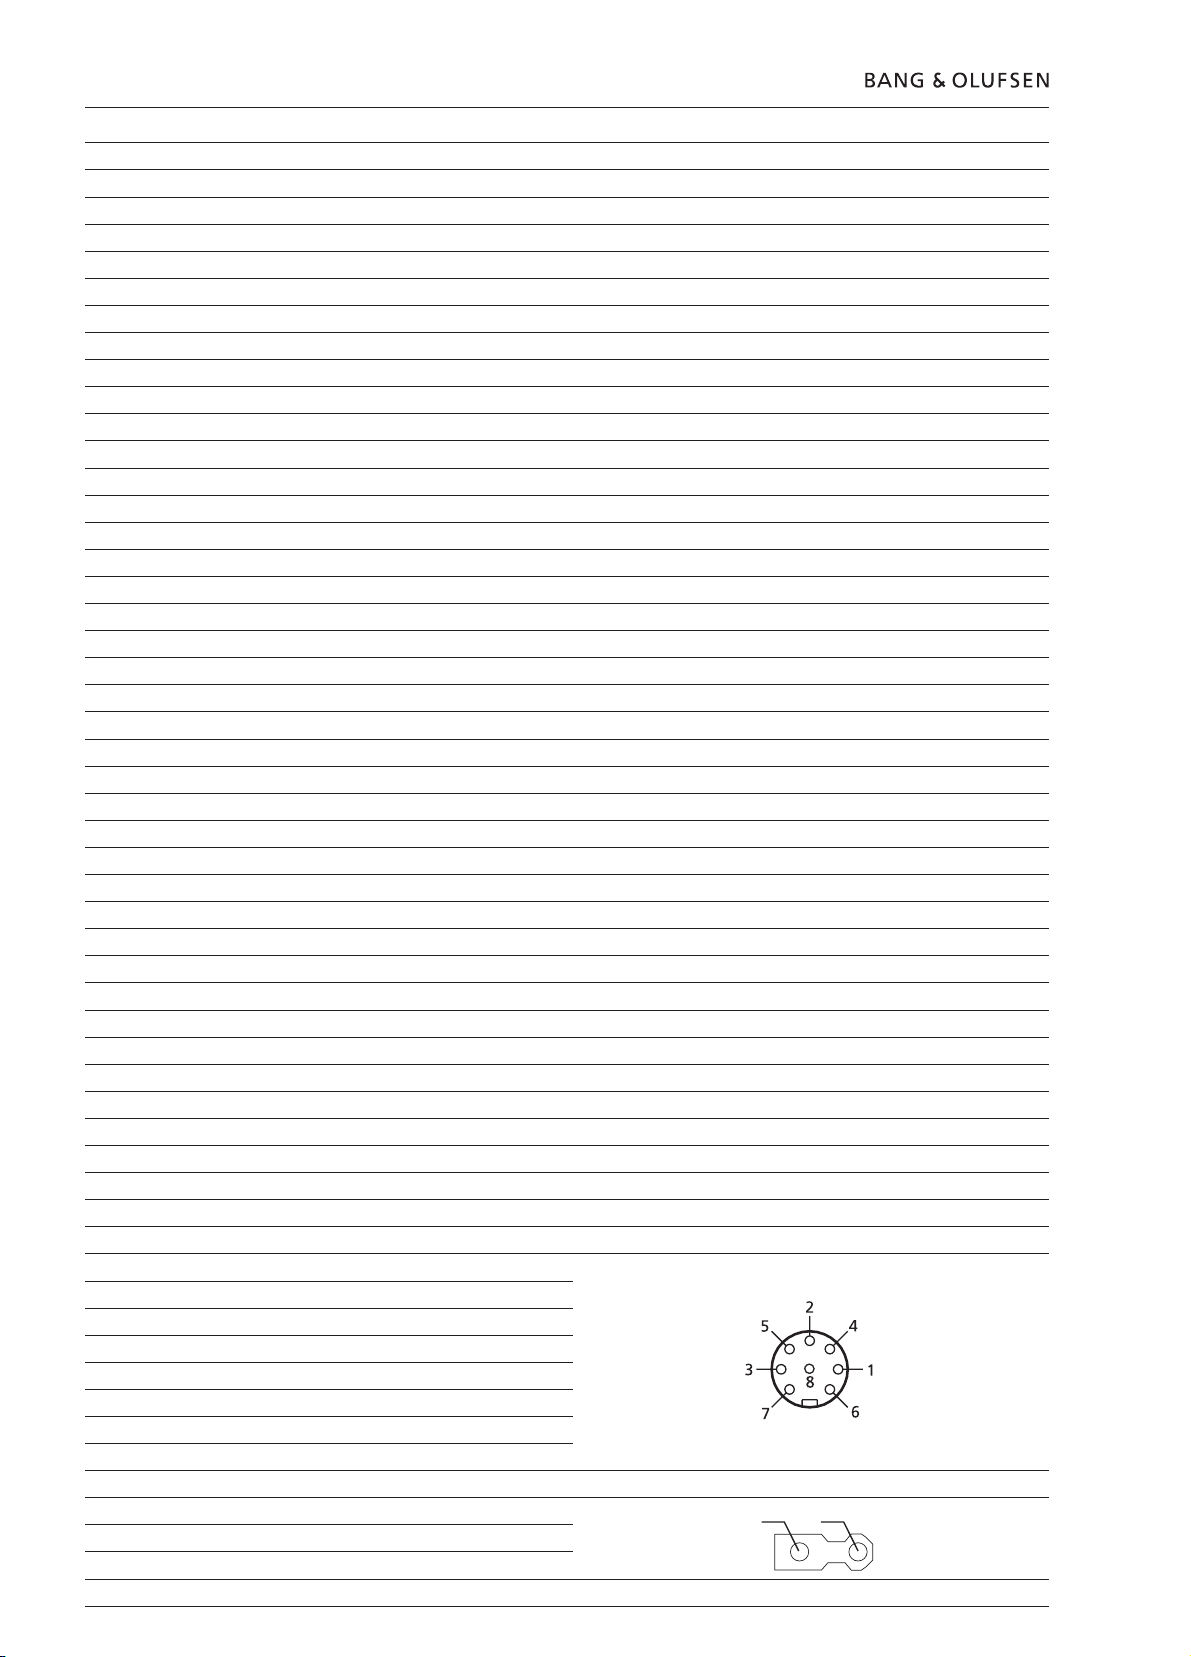
POWER LINK plug for BeoLab 1
Pin 1: Loop through, Power Link plugs
Pin 2: Signal GND
Pin 3: Audio Left 0V - 2V RMS
Pin 4: Power Link speaker ON = > 0.5V, OFF = < 0.5V
PIN 5: Audio Right 0V - 2V RMS
Pin 6: Loop through, Power Link plugs
Pin 7: Loop through, Power Link plugs
Pin 8: Loop through, Power Link plugs
Subject to change without notice
Phono (line)
Power Link
Mains Plug
Page 9

BRIEF OPERATION GUIDE
Brief operation guide 2-1
LINE
IN CORNER
AGAINST WALL
FREESTANDING
LINE
2
1
POWER LINK
L
1
POWER LINK
R
2
~ 40 cm
16"
~ 130 cm
51"
Page 10

4-1 List of available parts and exploded view
PARTS LIST
3395145 Type 6841 Back-up suitcase, 230V AC
- - 6842 -
- - 6846 3395146 - 6843 Back-up suitcase,120V AC
3395147 - 6844 Back-up suitcase, 100V AC
3395148 - 6845 Back-up suitcase, 240V AC
9001 3431083 Green Loudspeaker cabinet
3431084 Blue Loudspeaker cabinet
3431085 Grey Loudspeaker cabinet
3431086 Red Loudspeaker cabinet
3431087 Black Loudspeaker cabinet
9002 8006583 NTC-PCB (included in back-up suitcase)
9003 3320482 Green Front cloth
3320483 Blue Front cloth
3320484 Grey Front cloth
3320485 Red Front cloth
3320486 Black Front cloth
9004 2569663 Grey Front cover
2569664 Green Front cover
2569665 Blue Front cover
2569666 Red Front cover
2569667 Black Front cover
9005 2752051 Complete foot
9006 8480311 Woofer (included in back-up suitcase)
9007 8480312 Midrange (included in back-up suitcase)
9008 8480313 Tweeter (included in back-up suitcase)
999 8006578 Amplifier EU 230V (included in back-up suitcase 3395145)
8006579 Amplifier US 120V (included in back-up suitcase 3395146)
8006580 Amplifier JPN 100V (included in back-up suitcase 3395147)
8006581 Amplifier AUS 240V (included in back-up suitcase 3395148)
Survey of screws etc.
Mains cable
Parts not shown
1 2015139 Screw, 3.5 x 16 mm
2 2054016 Screw, 40 x 18 mm
3 2054018 Screw, 50 x 25 mm
4 3390563 Bag with six screws and Allen key
5 3151551 Holder front profile, upper left
6 3151574 Holder front profile, upper right
7 3151439 Holder front profile, lower
8 3103392 Foot, “soft”
9010 6100273 Europe/Korea, type 6841, 6846
9011 6100329 Great Britain, type 6842
9012 6100307 United States/Canada/Taiwan, type 6843
9013 6100331 Japan, type 6844
9014 6100332 Australia, type 6845
3390586 Cable hide set
3392588 Carton box for Iron foot
3396040 Foam pack for Iron foot
3392587 Carton box for loudspeaker
3396027 Foam pack for loudspeaker
3917105 Super foam 1mm+0.015mm (2 pce)
2777037 Handle type 80 (holder sheet)
2777038 Handle type 80 (strap)
3187200 Insert for plugs
6270644 Power Link Cable black, 2.5 m
6270645 Power Link Cable black, 5 m
6270646 Power Link Cable black, 10 m
6270647 Power Link Cable black, 20 m
3658269 Product cover (for transportation)
Page 11

EXPLODED VIEW
1
1
1
1
1
1
2
2
2
2
2
2
3
3
4
4
4
44
4
2
2
2
2
1
1
1
1
1
1
1
1
5
6
7
7
8
List of available parts and exploded view 4-2
9001
Back-up
suitcase
9003
9006
9007
9008
9002
9006
999
9004
9005
Page 12

4-3 Available documentation
AVAILABLE DOCUMENTATION
On-site service guide
User’s guide
3546039 Multi language
3506251 Denmark
3506252 Sweden
3506253 Finland
3506254 England
3506255 Germany
3506256 Netherlands
3506257 Franc
3506258 Italy
3506259 Spain
3506260 Japan
3506261 Korea
3506262 Taiwan
3506263 Hebrew
3506264 Poland
3506265 Portugal
3506266 Saudi Arabia
3506267 Greece
Page 13

Adjustments and repair tips, English - Deutsch - français 5-1
0
1
2
3
4
9
8
7
6
5
ADJUSTMENTS AND REPAIR TIPS
For instance, if the value on the
tweeter unit is “-1.5 dB”, the
position of the switch has to be 7.
Value on the back of the loudspeaker unit Switch position
1.8 – 2.3 0
1.3 – 1.7 1
0.8 – 1.2 2
0.3 – 0.7 3
- 0.2 – 0.2 4
- 0.3 – -0.7 5
- 0.8 – -1.2 6
- 1.3 – -1.7 7
- 1.8 – -2.2 8
- 2.3 – -2.5 9
Midrange
SW401
Tweeter
SW400
Woofer
TIPS FÜR EINSTELLUNGEN UND
REPARATUR
Wenn der auf der Hochtönergruppe
angegebene Wert z. B. “-1.5 dB”
beträgt, muß der Schalter in die
Position 7 gebracht werden.
SW402
CONSEILS DE REGLAGE ET DE
REPARATION
Par exemple, si la valeur figurant
sur le haut-parleur d’aigus indique
“-1,5 dB”, la position de
l’interrupteur doit être 7.
Check switch
Make sure that the switch on PCB1
is placed in the position to the
right.
Prüfen der Schalterstellung
Überprüfen Sie, ob daß der
Schalter am PCB1 in der rechten
Position steht.
L
Vérifier l’interrupteur
Vérifier que l’interrupteur situé sur
la carte PCB1 soit enclenché à
droite.
R
Page 14

5-2 Adjustments and repair tips, italiano - español
CONSIGLI PER LA REGOLAZIONE
E LA RIPARAZIONE
Ad esempio, se il valore indicato
per l’unità altoparlante è di “1,5
dB”, la posizione dell’interruttore
sarà 7.
Value on the back of the loudspeaker unit Switch position
1.8 – 2.3 0
1.3 – 1.7 1
0.8 – 1.2 2
0.3 – 0.7 3
-0.2 – 0.2 4
-0.3 – -0.7 5
-0.8 – -1.2 6
-1.3 – -1.7 7
-1.8 – -2.2 8
-2.3 – -2.5 9
Midrange
SW401
Tweeter
SW400
Woofer
SW402
SUGERENCIAS PARA
REPARACIÓN Y AJUSTES
Por ejemplo, si el valor en el
tweeter es “-1,5 dB”, la posición
del conmutador debe ser 7.
Controllare gli interruttori
Verificare che l’interruttore della
scheda PCB1 sia posizionato verso
destra.
5
4
6
7
3
8
2
9
1
0
Comprobación del conmutador
Asegúrese de que el conmutador
de la PCB1 está colocado a la
derecha.
L
R
Page 15

Disassembly, English - Deutsch - français 6-1
DISASSEMBLY
The loudspeaker in service position.
1. Push the release-mechanism.
2. Slide the front frame appr. 10 cm.
3. Lift the front frame up and away.
DEMONTAGE
Für Reparaturarbeiten bringen Sie
bitte den Lautsprecher in die
abgebildete Position.
1. Betätigen Sie den
Entriegelungsmechanismus.
2. Schieben Sie die Lautsprecherabdeckung um ca. 10 cm nach oben.
3. Nehmen Sie die Abdeckung vom
Gehäuse.
DEMONTAGE
Enceinte en position d’entretien.
1. Pousser le mécanisme de
désemboîtement.
2. Faire coulisser le cadre frontal
sur environ 10 cm.
3. Soulever et retirer le cadre
frontal.
Remove the two screws and slideoff the front cover.
1
2 ç
Entfernen Sie die beiden Schrauben ,
und ziehen Sie die vordere
Abdeckung heraus.
3 é
Retirer les deux vis et faire coulisser
le capot avant pour le déposer.
Page 16

6-2 Disassembly, English - Deutsch - français
Remove the six screws and pull off
the foot.
Remove the two screws with the
special key.
Entfernen Sie die sechs Schrauben,
und ziehen Sie den Fuß ab.
Entfernen Sie mit Hilfe des
Spezialschlüssels die beiden
Schrauben.
Retirer les six vis et désemboîter le
pied.
Retirer les deux vis à l’aide de la clé
spéciale.
Remove the ten screws, lift and flip
the cooling-profile.
Entfernen Sie die zehn Schrauben,
heben Sie dann den Kühlkörper an
und drehen Sie diesen auf die
Rückseite.
Retirer les dix vis, soulever et, d’un
petit coup sec, déposer le boîtier
muni de fentes d’aération.
Page 17

Disassembly, English - Deutsch - français 6-3
Lay down the cooling-profile in
service position.
Pull off the two plugs.
Legen Sie den Kühlkörper in der
Position für Reparaturarbeiten ab.
Ziehen Sie die beiden Stecker ab.
Placer le boîtier muni de fentes
d’aération en position d’entretien.
Déconnecter les deux prises.
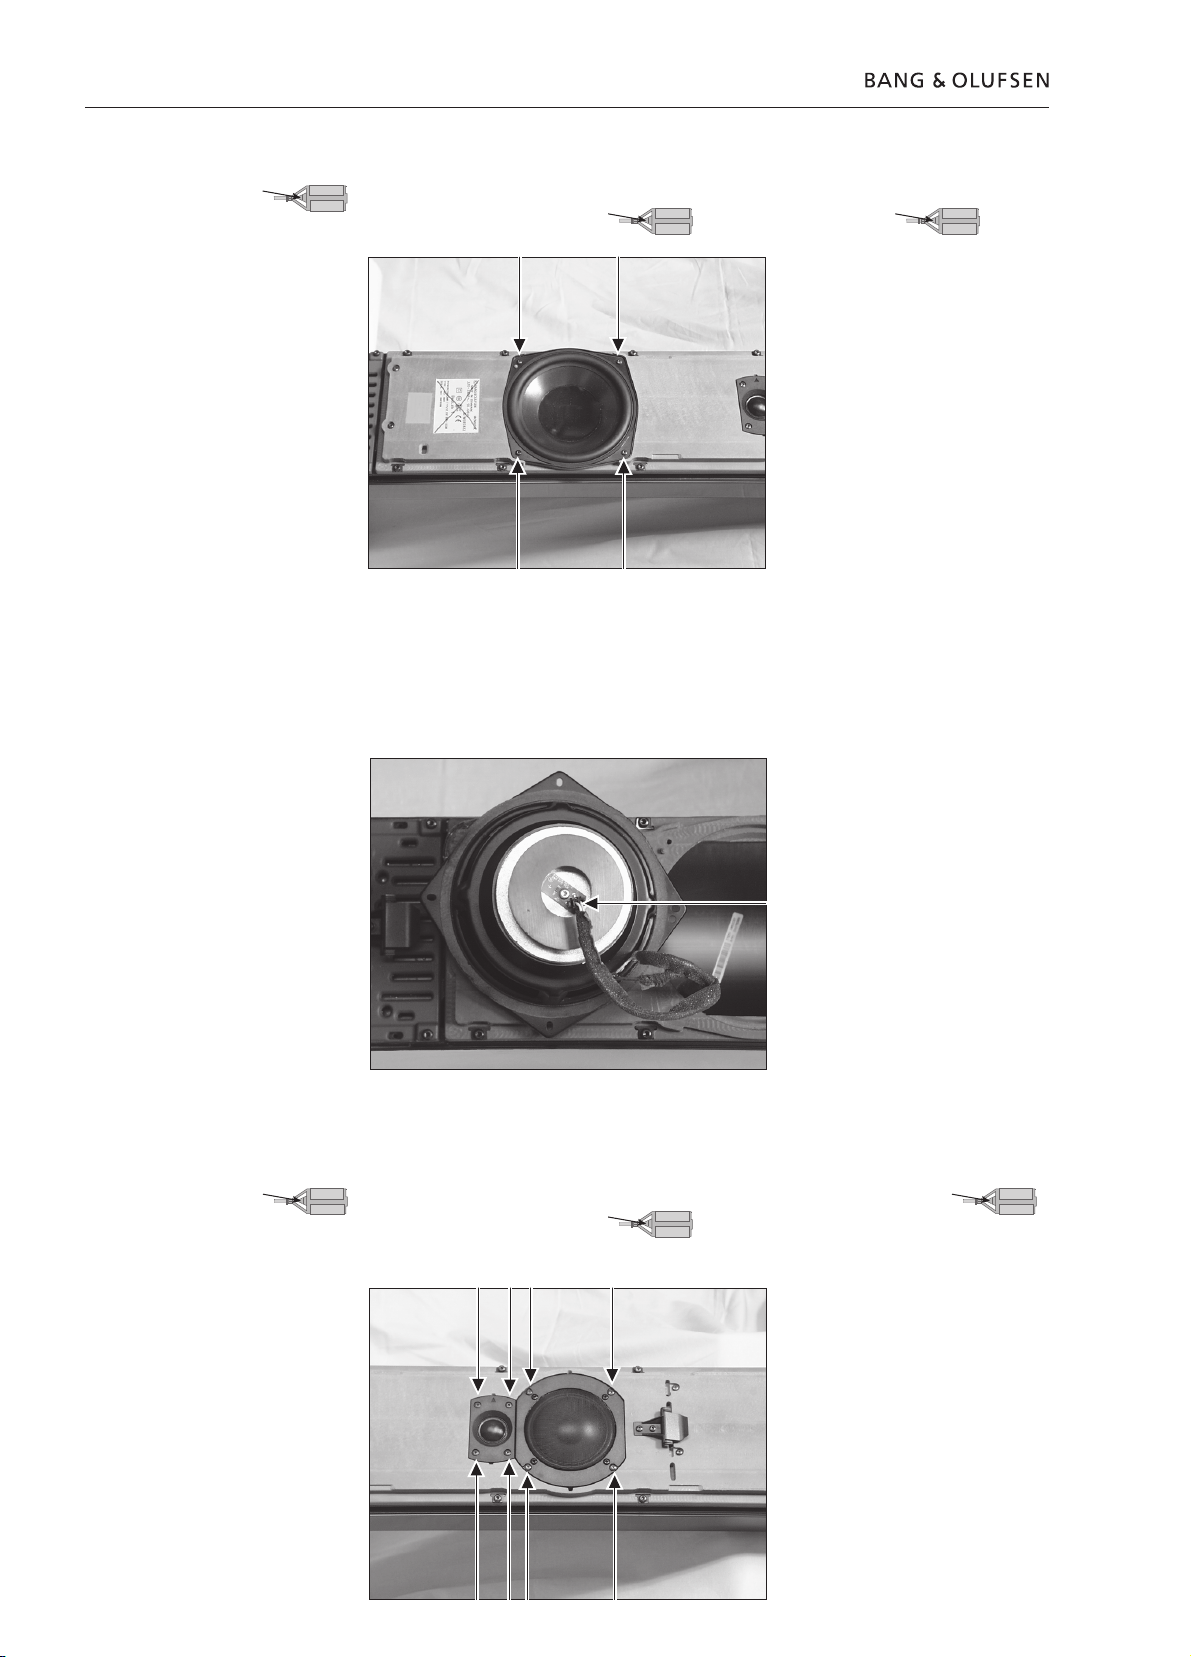
Remove the four screws and lift the
bass unit and disconnect the two
plugs. “Lock”
Enfernen Sie die 4 Schrauben,
heben Sie den Baßlautsprecher an
und ziehen Sie die beiden Stecker
ab. “Verriegelung”
Retirer les quatre vis et soulever le
haut-parleur de graves, puis
débrancher les deux prises.
“Clavette”
Page 18
6-4 Disassembly, English - Deutsch - français
Remove the four screws and lift the
bass unit and disconnect the two
plugs. “Lock”
Disconnect the plug to the NTCPCB.
Enfernen Sie die 4 Schrauben,
heben Sie den Baßlautsprecher an
und ziehen Sie die beiden Stecker
ab. “Verriegelung”
Ziehen Sie den Stecker zum NTCPCB ab.
Retirer les quatre vis et soulever le
haut-parleur de graves, puis
débrancher les deux prises.
“Clavette”
Débrancher la prise reliée à la carte
NTC-PCB.
Remove the screws and disconnect
the plugs. “Lock”
Entfernen Sie die Schrauben, und
ziehen Sie die Stecker ab.
“Verriegelung”
Retirer les vis et débrancher les
prises. “Clavette”
Page 19

Disassembly, italiano - español 6-5
SMONTAGGIO
Posizionamento della cassa acustica
per la manutenzione.
1. Premere il meccanismo di rilascio.
2. Fare scorrere il telaio anteriore
di circa 10 cm.
3. Sollevare e togliere il telaio
anteriore.
DESMONTAJE
Altavoz en posición de reparación y
mantenimiento.
1. Pulse el mecanismo de liberación.
2. Deslice el bastidor frontal
aproximadamente 10 cm.
3. Levante y retire la estructura
frontal.
Rimuovere le due viti e far scorrere
la copertura anteriore.
2 ç
1
3 é
Retire los dos tornillos y deslice
hacia afuera la cubierta frontal.
Page 20

6-6 Disassembly, italiano - español
Rimuovere le sei viti ed estrarre il
sostegno.
Rimuovere le due viti con l’apposita
chiave.
Retire los seis tornillos y saque el
pie.
Retire los dos tornillos con la llave
especial.
Rimuovere le dieci viti, sollevare e
rimuovere l’unità di raffreddamento.
Retire los diez tornillos, levante y
dé la vuelta a la placa de
refrigeración.
Page 21

Disassembly, italiano - español 6-7
Poggiare l’unità di raffreddamento
in posizione di riparazione.
Togliere le due spine.
Ponga el perfil de refrigeración en
posición de reparación y
mantenimiento.
Saque los dos enchufes.
Rimuovere le quattro viti, sollevare
l’unità basso e scollegare le due
spine. “Blocco”
Retire los cuatro tornillos, levante
la unidad de graves y desconecte
los dos enchufes.
“Bloqueo”
Page 22

6-8 Disassembly, italiano - español
Rimuovere le quattro viti, sollevare
l’unità basso e scollegare le due
prese. “Blocco”
Scollegare la spina dell’NTC-PCB.
Retire los cuatro tornillos, levante
la unidad de graves y desconecte
los dos enchufes.
“Bloqueo”
Deconecte el enchufe de la NTC-PCB.
Rimuovere le viti e scollegare le
spine. “Blocco”
Retire los tornillos y desconecte los
enchufes. “Bloqueo”
Page 23

After repair tips, English - Deutsch - français 7-1
AFTER REPAIR TIP
Cleaning the product
Clean the BeoLab 1 using a soft,
firmly wrung lint-free cloth which
you have dipped in a solution of
lukewarm water containing a few
drops of mild detergent, e.g. a dish
washing liquid.
Use a soft brush to remove any dust
on the base, before cleaning it with
a soft cloth.
Do not use alcohol or other
solvents to clean BeoLab 1.
TIPS NACH DER REPARATUR
Reinigen des Geräts
Verwenden Sie zur Reinigung der
Beolab1 ein fusselfreies und
weiches Tuch. Tauchen Sie dieses in
lauwarmes Wasser, in das Sie ein
paar Tropfen mildes
Reinigungsmittel, z.B.
Geschirrspülmittel gegeben haben.
Entfernen Sie mit Hilfe einer
weichen Bürste erst den Staub vom
Gehäuse, bevor Sie den
Lautsprecher mit einem weichen
Tuch abwischen.
Verwenden Sie zum Reinigen
des BeoLab1 keinen Alkohol
oder andere Lösungsmittel.
CONSEIL APRES REPARATION
Nettoyer le produit
Nettoyer BeoLab 1 à l’aide d’un
chiffon doux non pelucheux,
préalablement trempé dans une
solution d’eau tiède contenant
quelques gouttes d’un détergeant
léger (liquide vaisselle par
exemple), puis essoré.
Utiliser une brosse à poils doux
pour éliminer la poussière du
coffret, avant de le nettoyer à
l’aide d’un chiffon doux.
Ne pas utiliser d’alcool ou de
solvant pour nettoyer BeoLab 1.
Page 24

7-2 After repair tips, italiano - español
CONSIGLI SUCCESSIVI ALLA
RIPARAZIONE
Pulitura del prodotto
Per la pulizia di BeoLab 1 utilizzare
un panno morbido, ben strizzato e
privo di peli, precedentemente
inumidito in una soluzione tiepida
di acqua e poche gocce di detersivo
non troppo forte, quale ad esempio
un detersivo liquido per piatti.
Utilizzare una spazzola morbida
per rimuovere la polvere
eventualmente presente sulla base
prima di pulirla con un panno
leggero.
Non utilizzare alcol o altri solventi
per la pulizia di BeoLab 1.
SUGERENCIA TRAS LA
REPARACIÓN
Limpieza del producto
Limpie el BeoLab 1 utilizando un
paño suave, sin hilos y bien
escurrido después de haberlo
sumergido en una solución de agua
templada con unas cuantas gotas
de detergente suave, por ejemplo,
un líquido lavavajillas.
Utilice un cepillo suave para
eliminar el polvo que pueda haber
en la base antes de limpiarla con
un paño suave.
No use alcohol ni disolvente de
ninguna clase para limpiar el
BeoLab 1.
Page 25

Page 26

BANG & OLUFSEN
DK - 7600 STRUER
DENMARK
TELEPHONE (+45) 96 84 11 22*
TELEFAX (+45) 97 85 39 11
3538911 11-99
PRINTED IN DENMARK BY BOGTRYKKERGÅRDEN AS, STRUER
 Loading...