


Stelera
R205/R305
HSPA+
WiFi Router
User
Manual


Table of Contents
Table of Contents
Table of Contents.....................................................................1
Package Contents....................................................................3
Package Contents.................................................................................3
Features................................................................................................3
Hardware Overview...............................................................................4
Installation ................................................................................6
Wizard Setup.............................................................................9
Internet Setup.........................................................................11
Basic Setting .......................................................................................11
DDNS..................................................................................................15
Optional...............................................................................................16
Router Setup...........................................................................18
Network Setting...................................................................................18
Advanced Routing...............................................................................20
WiFi Setup...............................................................................22
Basic WiFi Network.............................................................................22
WiFi Security.......................................................................................23
Advanced WiFi Setting........................................................................27
WiFi Clients Filter................................................................................29
3.5G HSPA Setup....................................................................30
PIN Verification....................................................................................30
PIN Management ................................................................................30
Preferred Network...............................................................................31
Security Setup........................................................................33
Firewall................................................................................................33
Internet Access Policy.........................................................................35
Single Port Forward ............................................................................37
Port Range Forward............................................................................38
Port Range Trigger..............................................................................39
QoS.....................................................................................................40
1

Table of Contents
Admin Setup........................................................................... 42
Management ...................................................................................... 42
Diagnosis............................................................................................ 44
Recover & Renewal............................................................................ 45
Status...................................................................................... 47
3.5G HSPA & Internet......................................................................... 47
Router................................................................................................. 48
Appendix A: FAQ................................................................... 50
Appendix B: Specification.................................................... 56
Appendix C: Important Safety Information and Glossary.. 59
Europe – EU Declaration of Conformity ............................................. 59
Federal Communication Commission Interference Statement ........... 61
Glossary ............................................................................................. 63
2
Package Contents
Package Contents
Thank you for your purchase of this HSPA+ WiFi Router. This product is
designed to access the Internet via HSPA+ technology and share the
bandwidth through a WiFi network. It is easy to configure and operate
even for non-technical users. This manual contains instructions for
installing and configuring the product. Read the manual carefully before
you use the product, so that you can fully exploit the product functions.
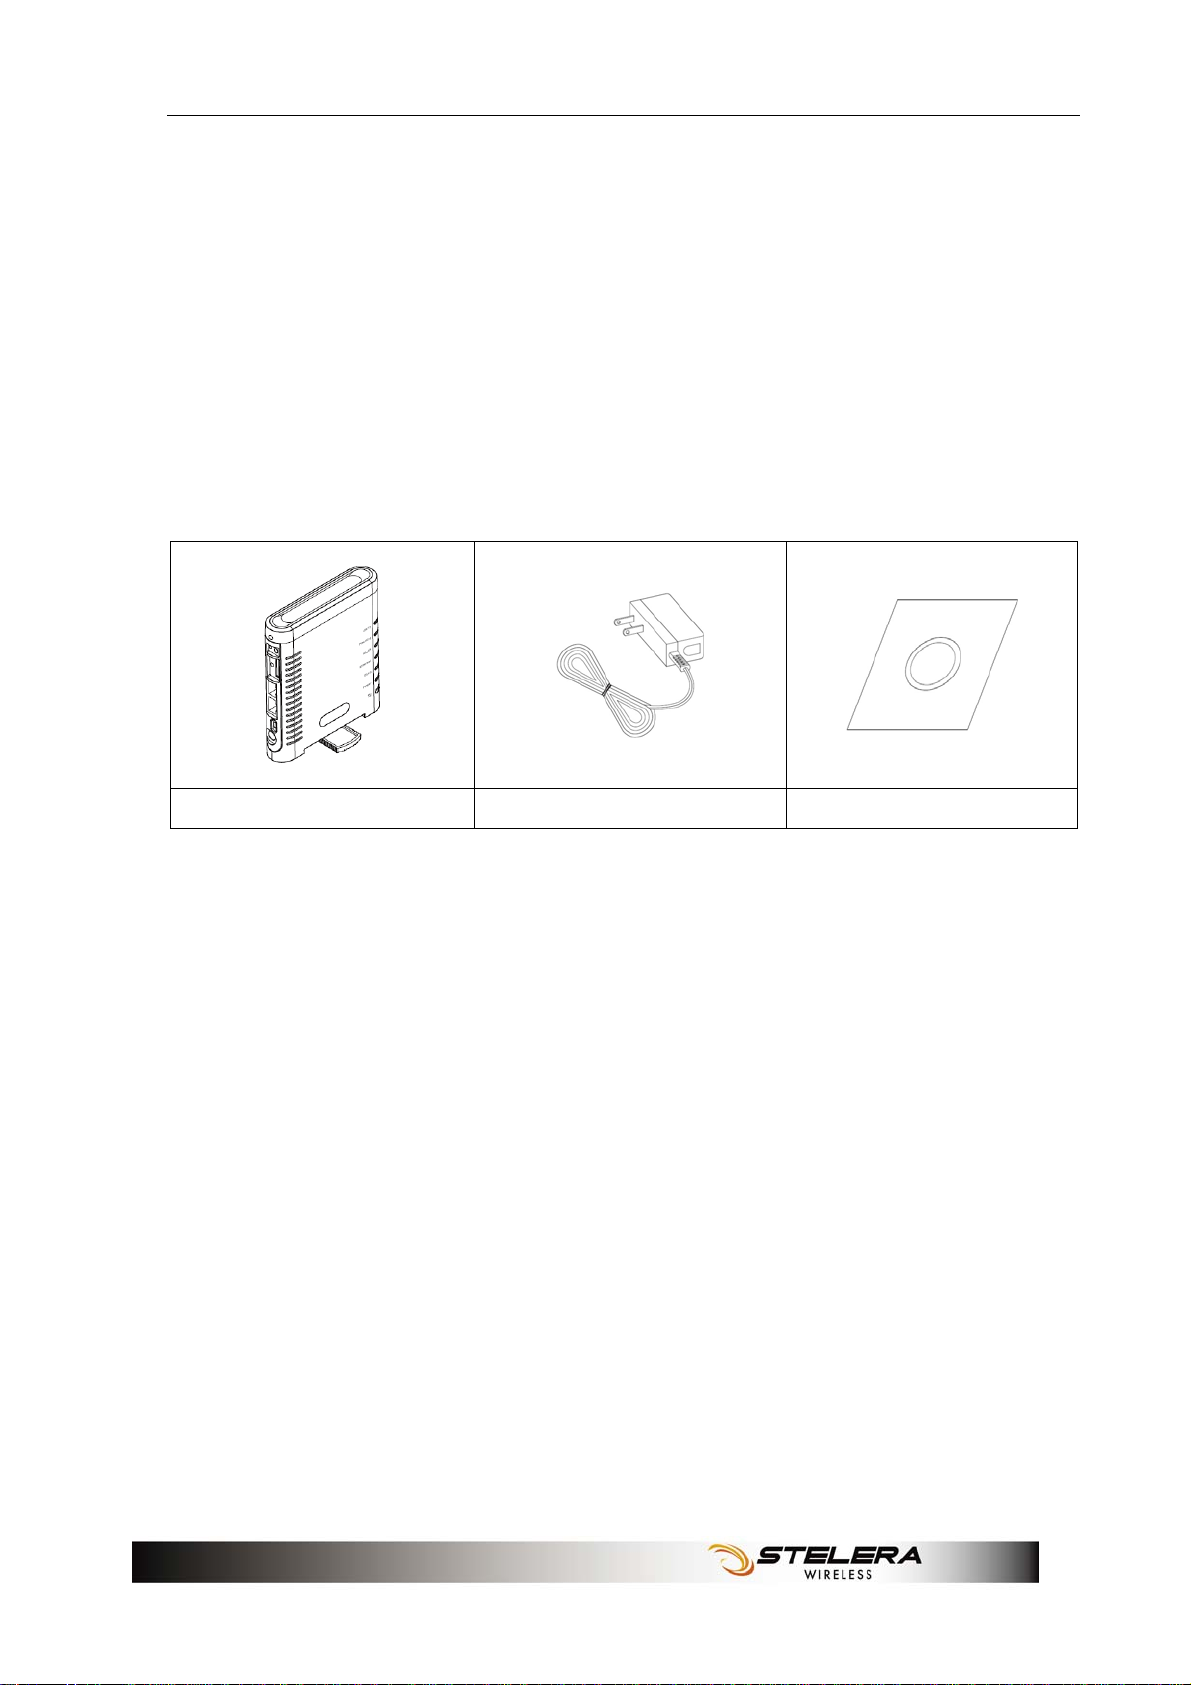
Package Contents
HSPA+ WiFi Router Power Adaptor User Manual CD
Features
- HSPA+ WiFi Router
- HSPA+ Downlink up to (R205 – 14.4), (R305 – 21/28) Mbps
Uplink up to 5.7 Mbps
- Support WiFi 802.11 b/g/draft n
- Support WAN/LAN Ethernet Port
- External 3G Antenna for Better Indoor Reception
- Sleek design and Easy to Use
3
Package Contents
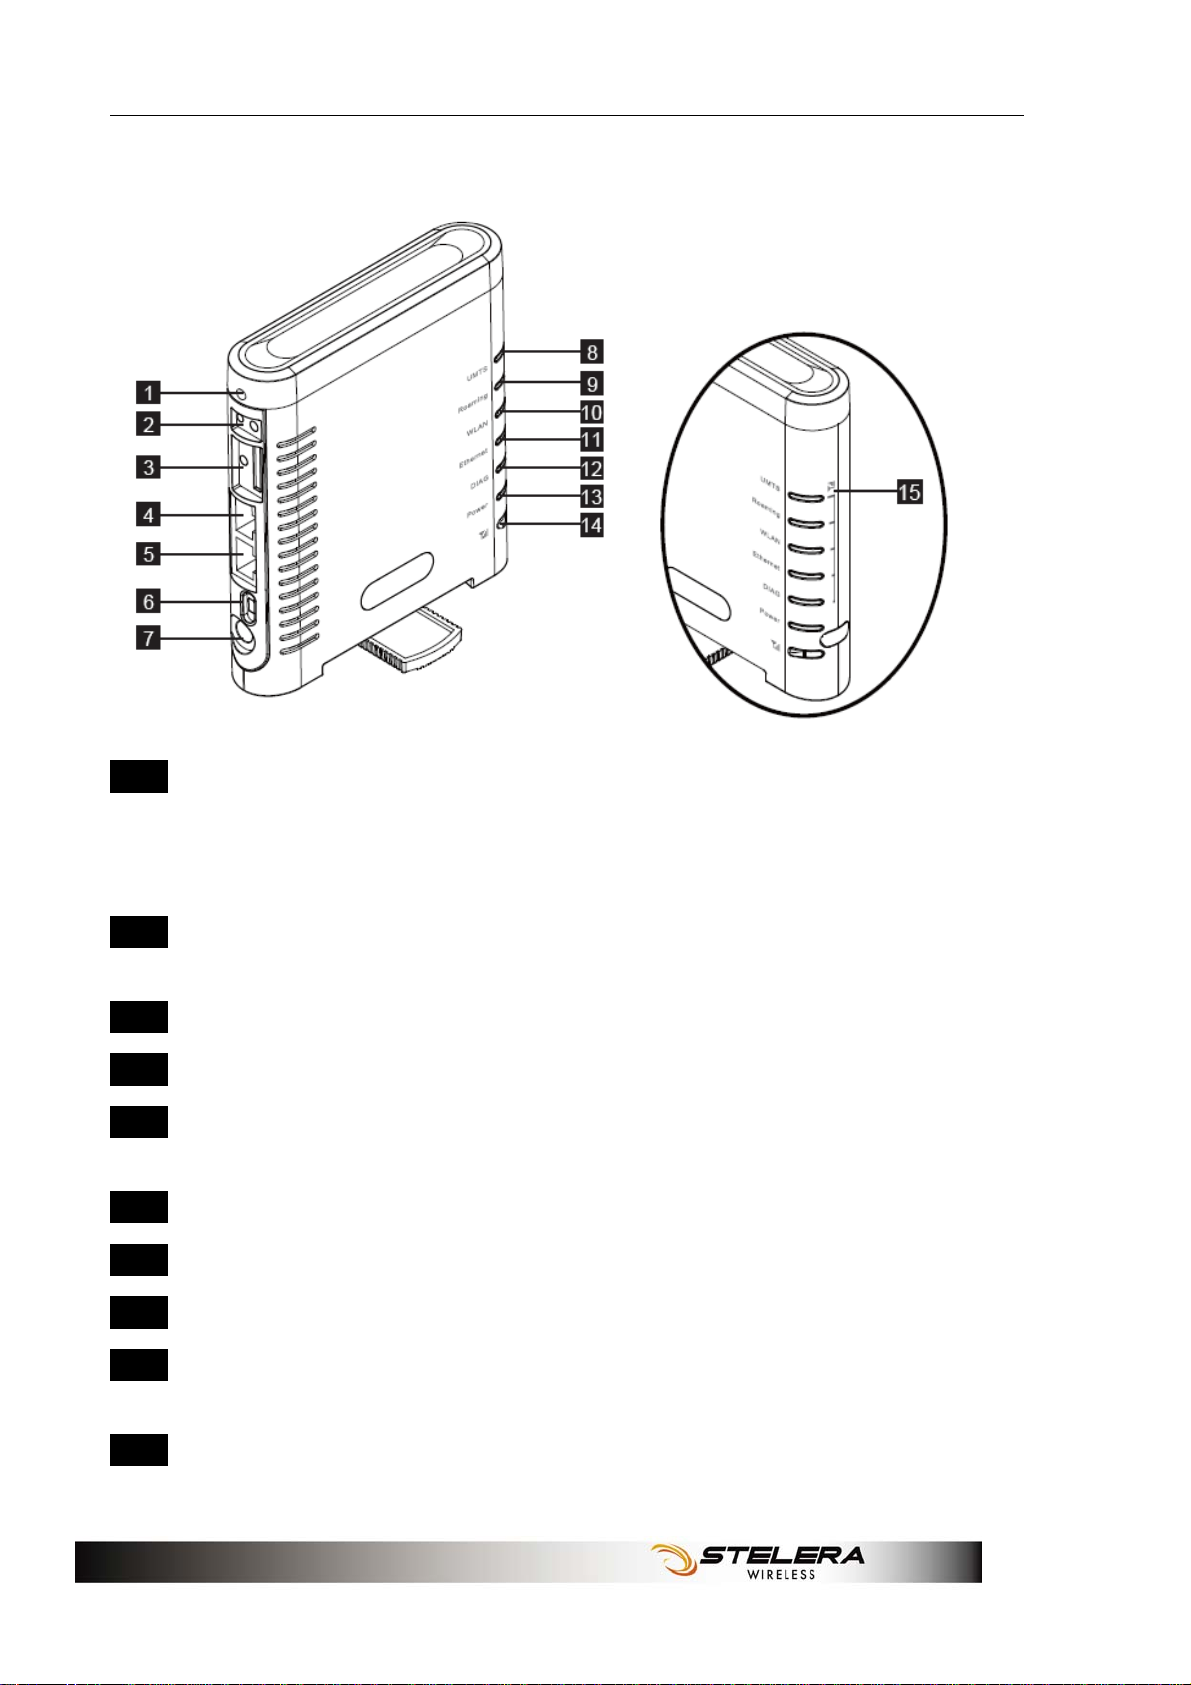
Hardware Overview
1 Reset Button To reset the Router, press the reset button
briefly.
To restore the Router's factory settings, press
the reset button for longer than 5 sec.
2 3G External
Antenna Port
To connect to the 3G External Antenna if
needed.
3 SIM Slot Insert SIM/USIM. Push-push type.
4 WAN Port Connect a DSL or Cable modem.
5 LAN Port Connect Ethernet devices such as computers,
switches, and hubs.
6 Power Switch To switch on/off the router.
7 Power Receptor Receptor for the Power Adaptor.
8 UMTS LED Reference below table.
9 Roaming LED Solid light shows the Router is connecting to
Roaming network.
10 WLAN LED Solid light indicates that the wireless segment is
ready.
4

Package Contents
Flashing light shows that data is being
transmitted via WLAN.
11 Ethernet LED Solid light shows that an Ethernet-enabled
computer is connected via the LAN port but no
data is being transmitted.
Flashing light shows that data is being
transmitted via LAN.
12 DIAG LED Reference below table.
13 Power LED Solid light indicates that the power supply is
connected properly.
14 3G Radio On/Off &
Signal Strength
Button
15 3G Radio Signal
Strength Indicator
Table for UMTS and DIAG LED:
Operation status UMTS DIAG
Power on and before kernel ready OFF Solid
Boot in progress (after kernel ready) OFF Flashing
Error in Router OFF Solid
Fail to boot module Solid Red Flashing
No SIM exist Flashing Red OFF
Waiting for PIN entering Flashing Red OFF
No network/Searching for network Flashing Red OFF
Short press – Enable Signal Strength indication
for 3 sec.
Long press (>5 sec) – 3G radio on/off
Indicates the 3G signal strength when 3G Radio
button is in short press.
3G camped Flashing Green OFF
3G connected Solid Blue/Green OFF
Reset in progress OFF OFF
5
Installation
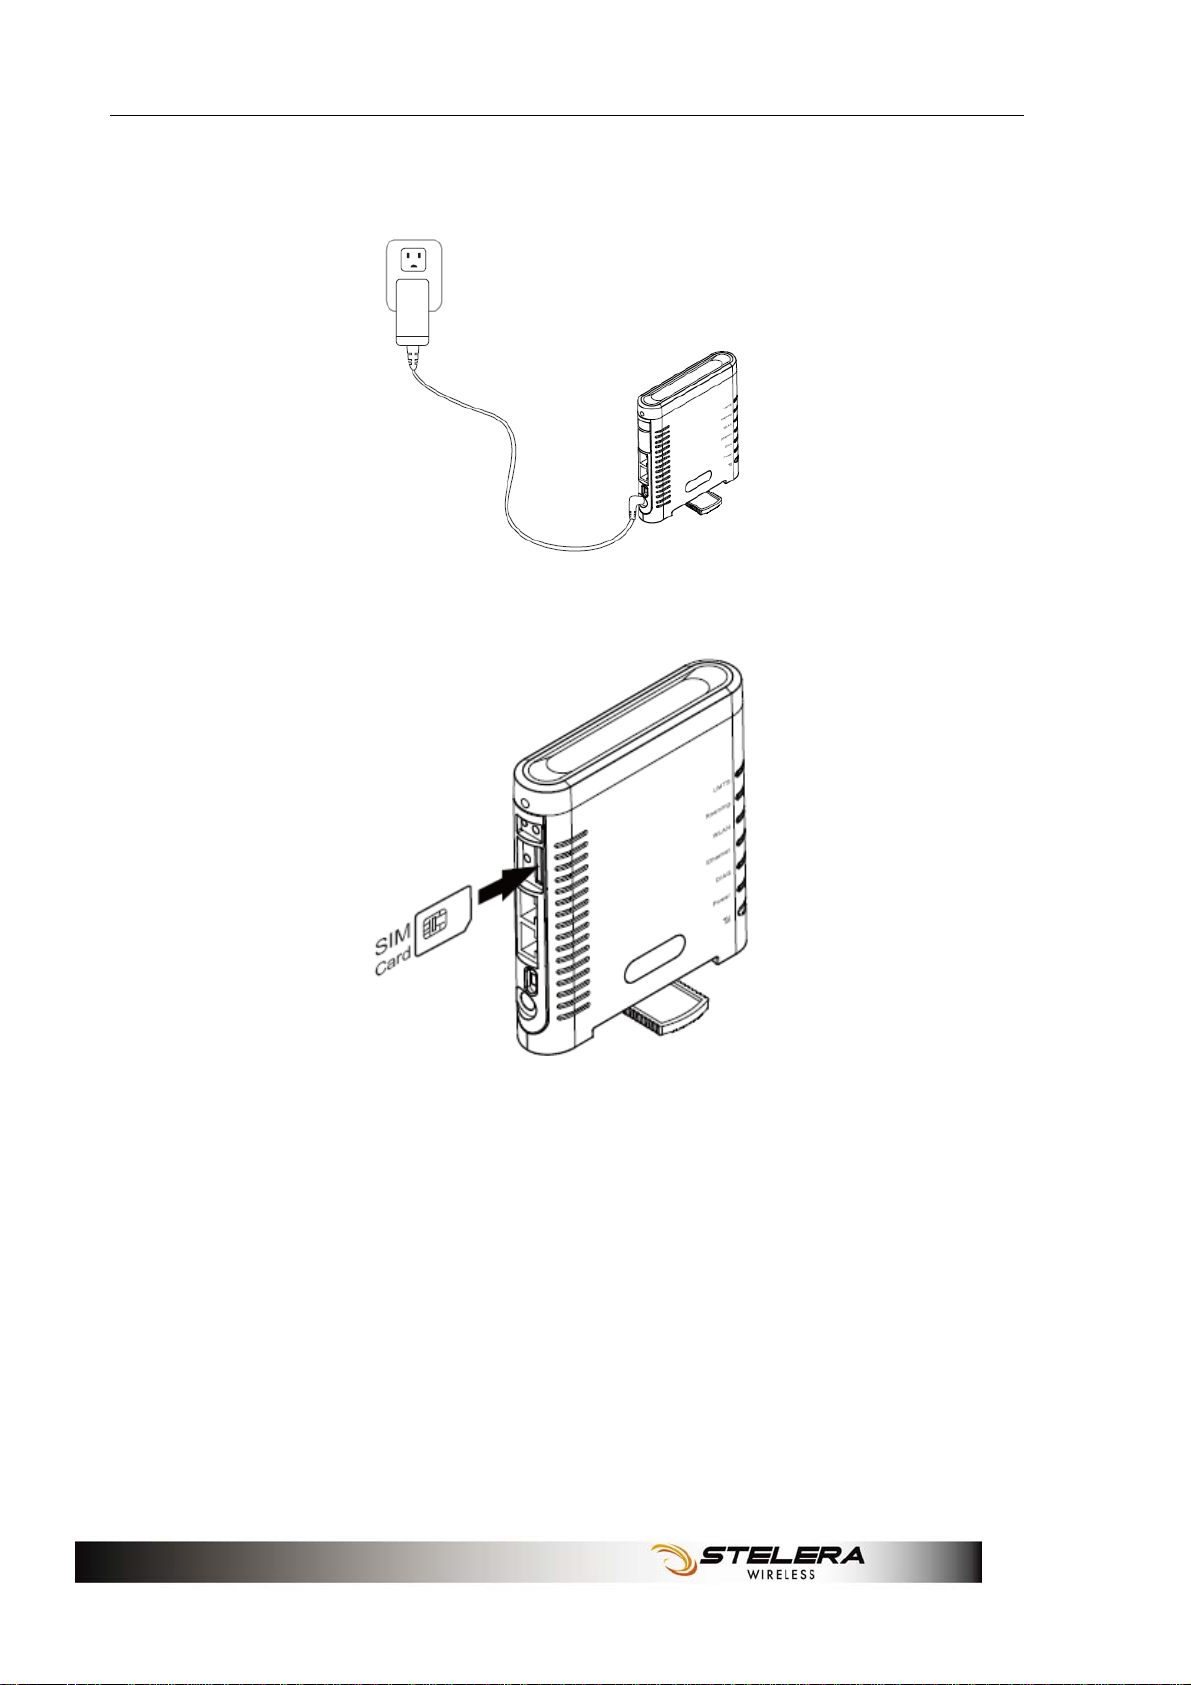
Installation
1. Connect the power adaptor to the Router and connect it to an outlet.
2. Insert your SIM card into the slot on the Router, making sure the SIM
card orientation matches the SIM card slot, as shown in the picture.
3. Turn on the Power switch.
6
Installation
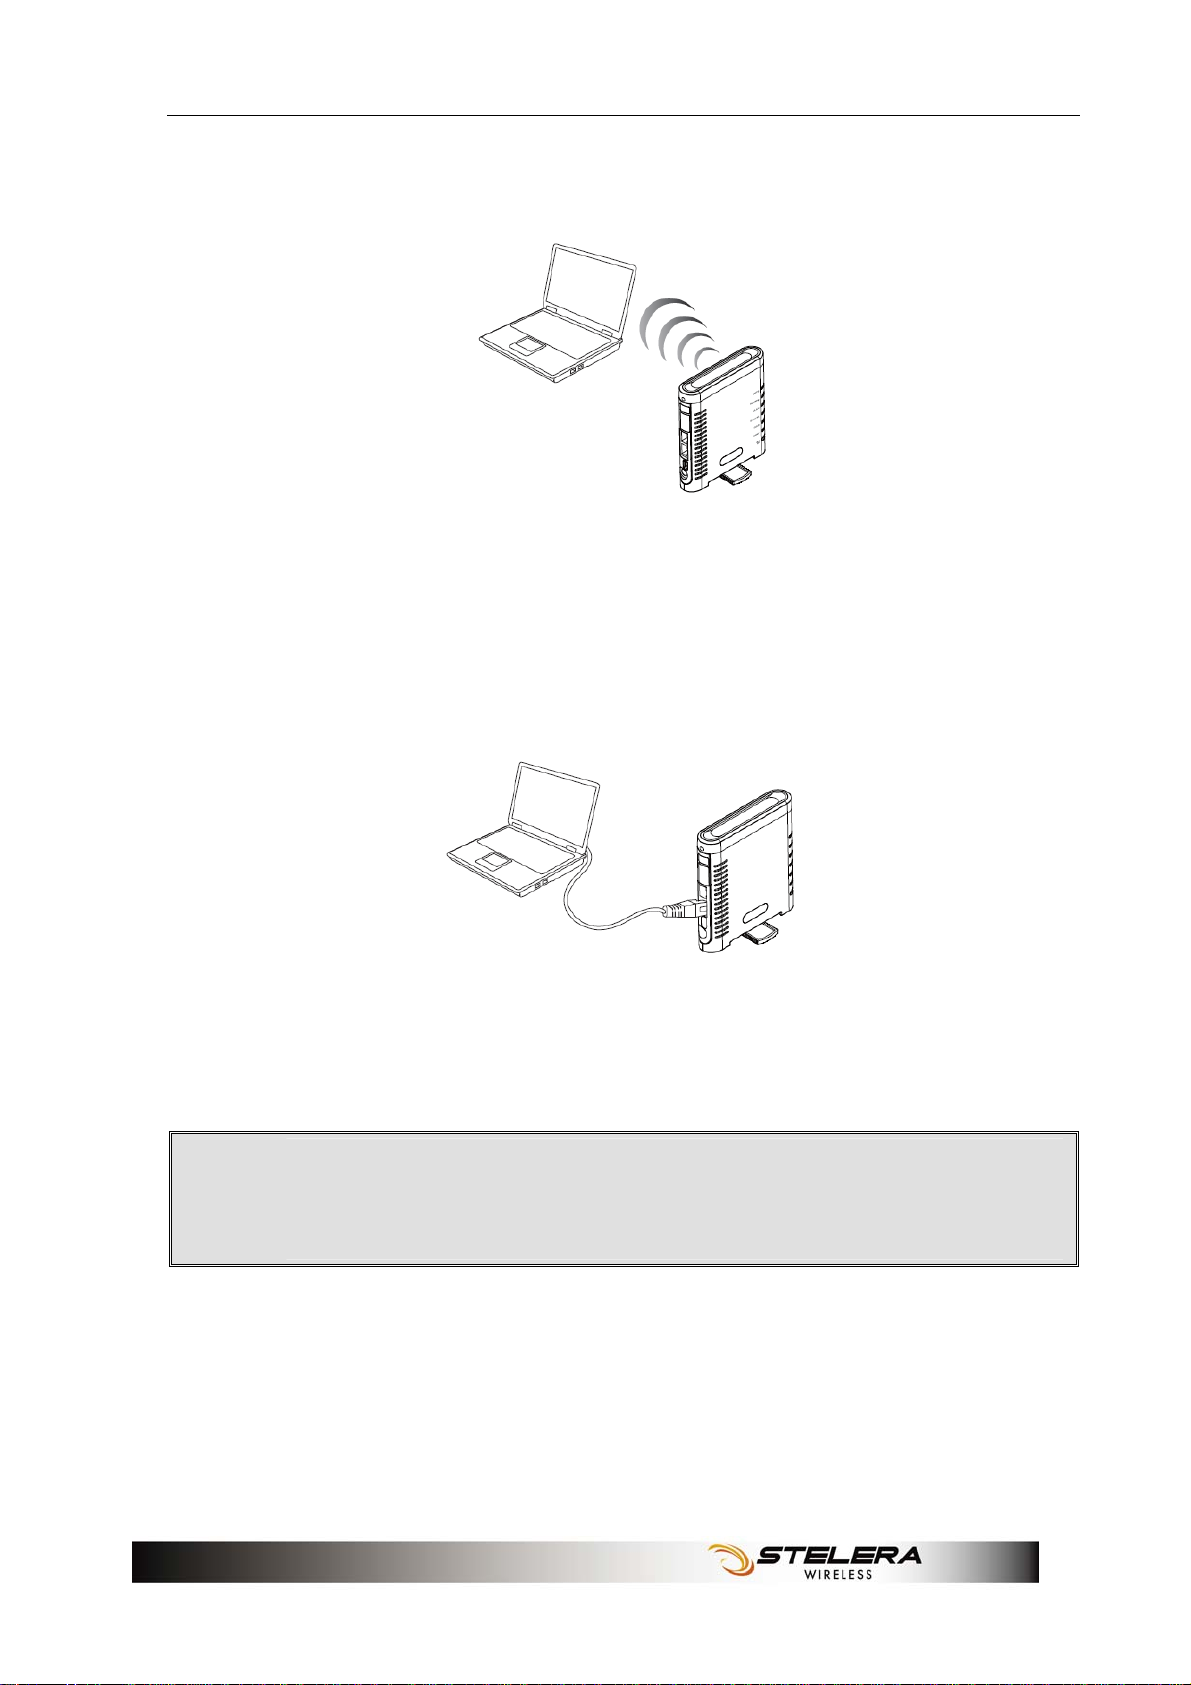
4. One of the following two methods can be chosen to link your Router
with PC.
A. To link the Router with your PC via WiFi, in Microsoft Windows, go to
Control Panel > Network Connections, right-click on Wireless
Network Connection,.and choose View A vailable Wireless
Networks. Select the HSPA_ROUTER wireless network, and click
Connect.
B. To link the Router with your PC via Ethernet cable, connect one end
of the cable to the LAN port on the Router, and the other end of the
cable to the Ethernet port on your computer.
Note: If you choose to access the Internet via Ethernet,
connect one end of the cable to the WAN port of Router, and
.
the other end to your xDSL/Cable Modem.
7
Installation
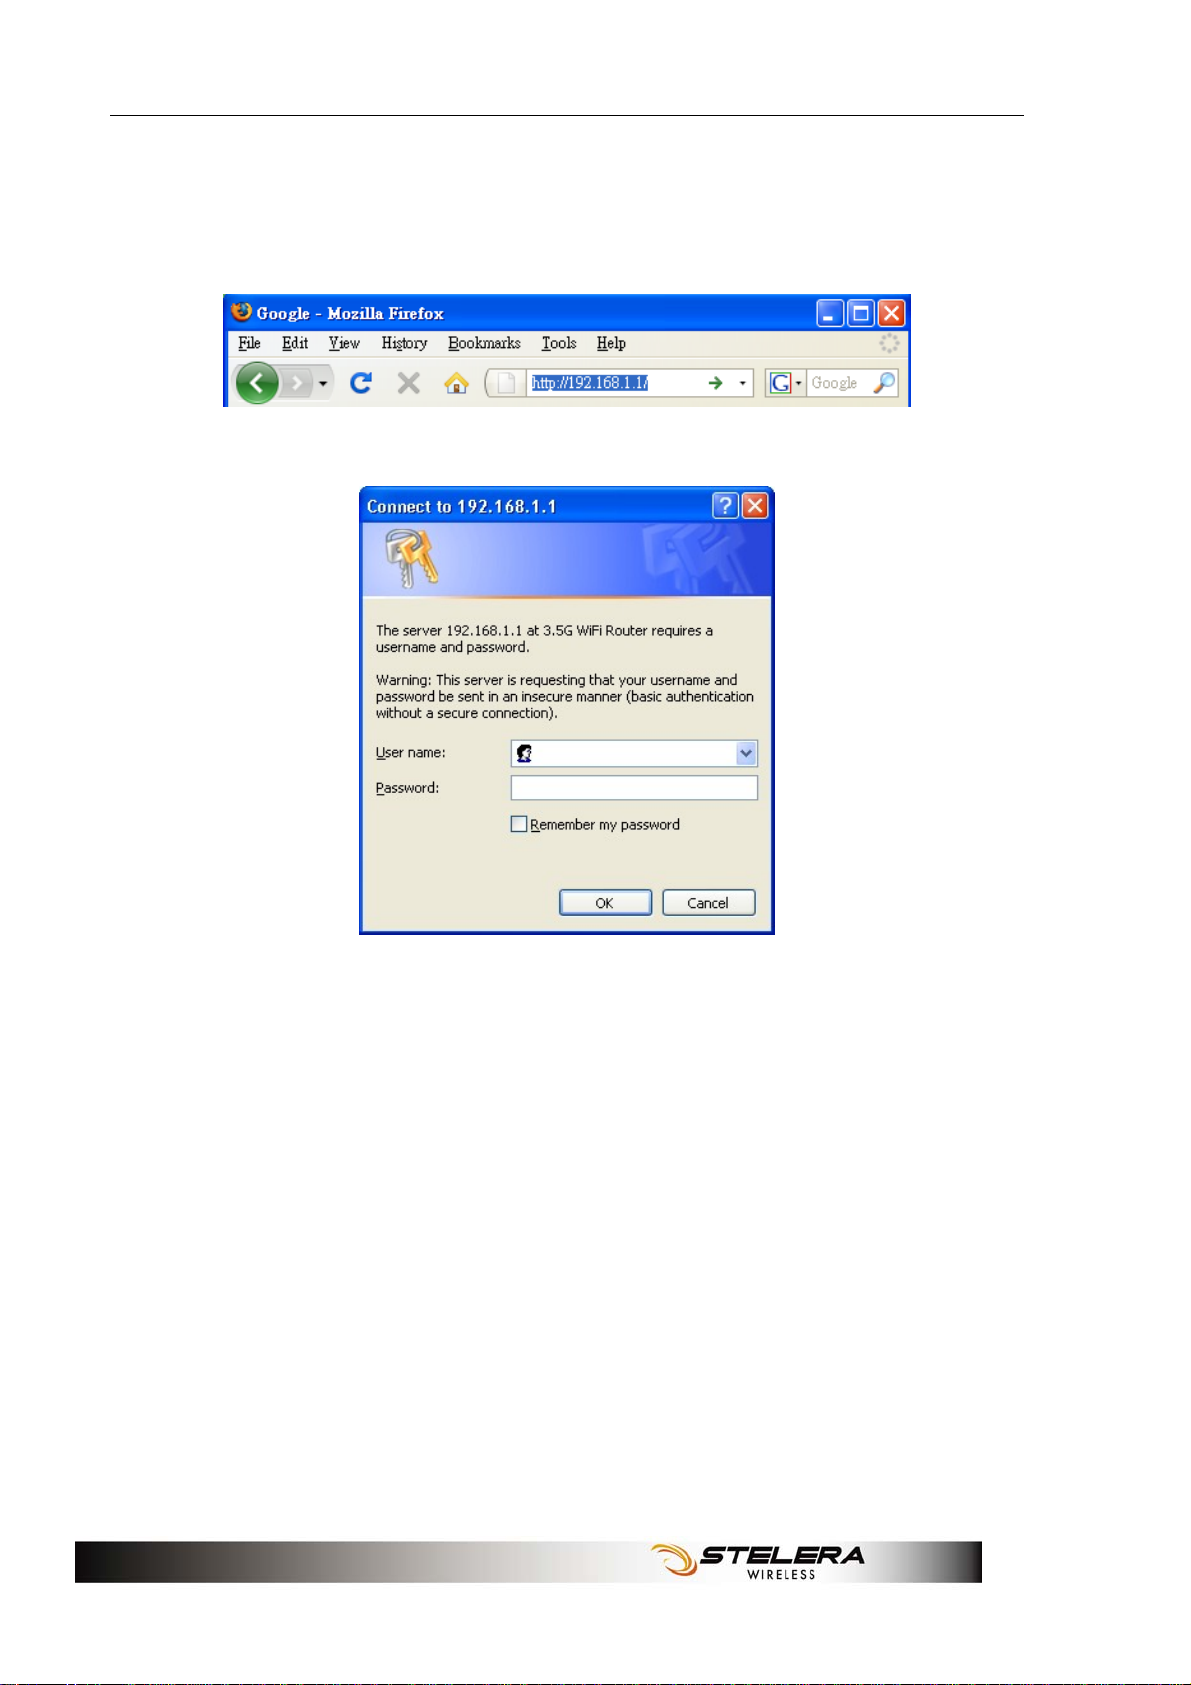
The Router uses a web-based configuration utility. To access the
configuration utility, open a browser (for example Internet Explorer) and
enter the IP address (http://192.168.1.1) or the URL
(http://R305.ROUTER) for the Router in your browser’s address bar.
Enter the Router User name (admin) and Password (hsparouter).
8
Wizard Setup
Wizard Setup
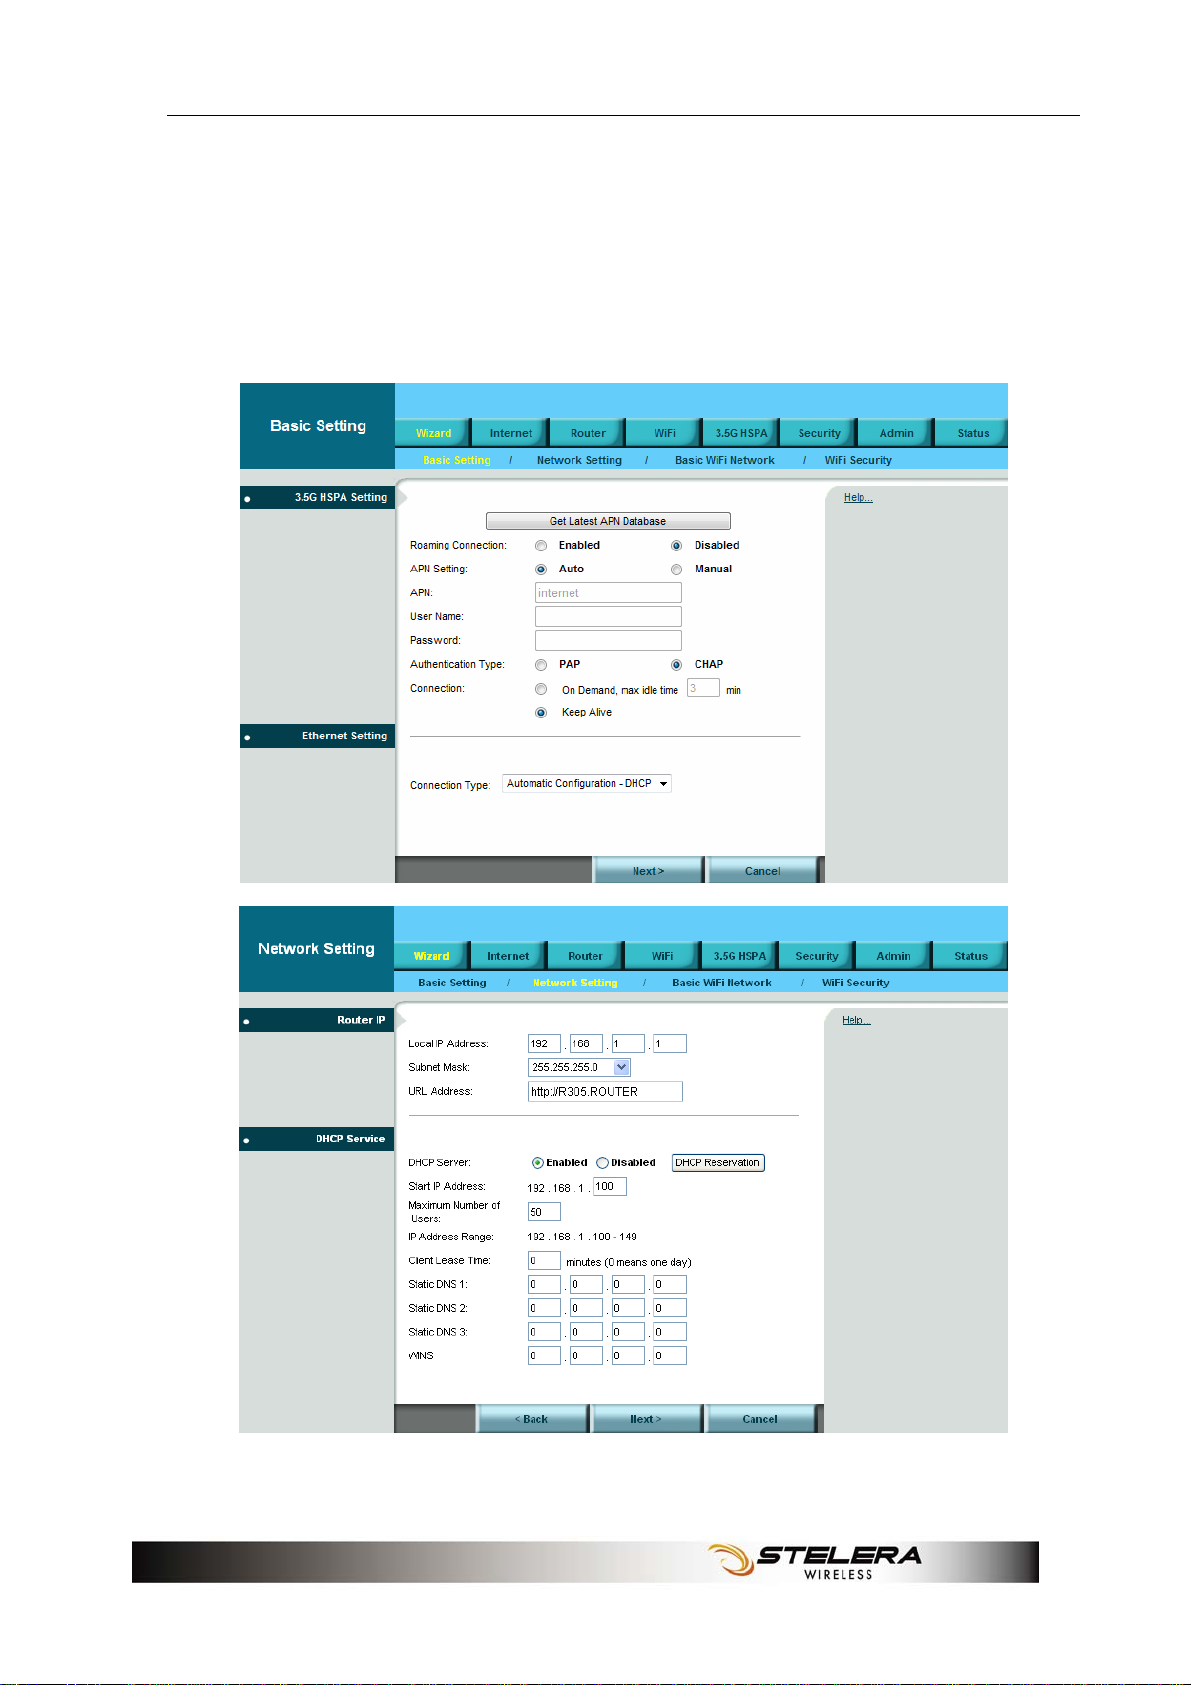
User can set preferred settings step by step via Wizard. If the router is in
Factory default settings, the GUI will always open Wizard > Basic Setting.
User can set the Wizard via Basic Setting> Network Setting > Basic WiFi
Network > WiFi Security.
9
Wizard Setup
10
Internet Setup
Internet Setup
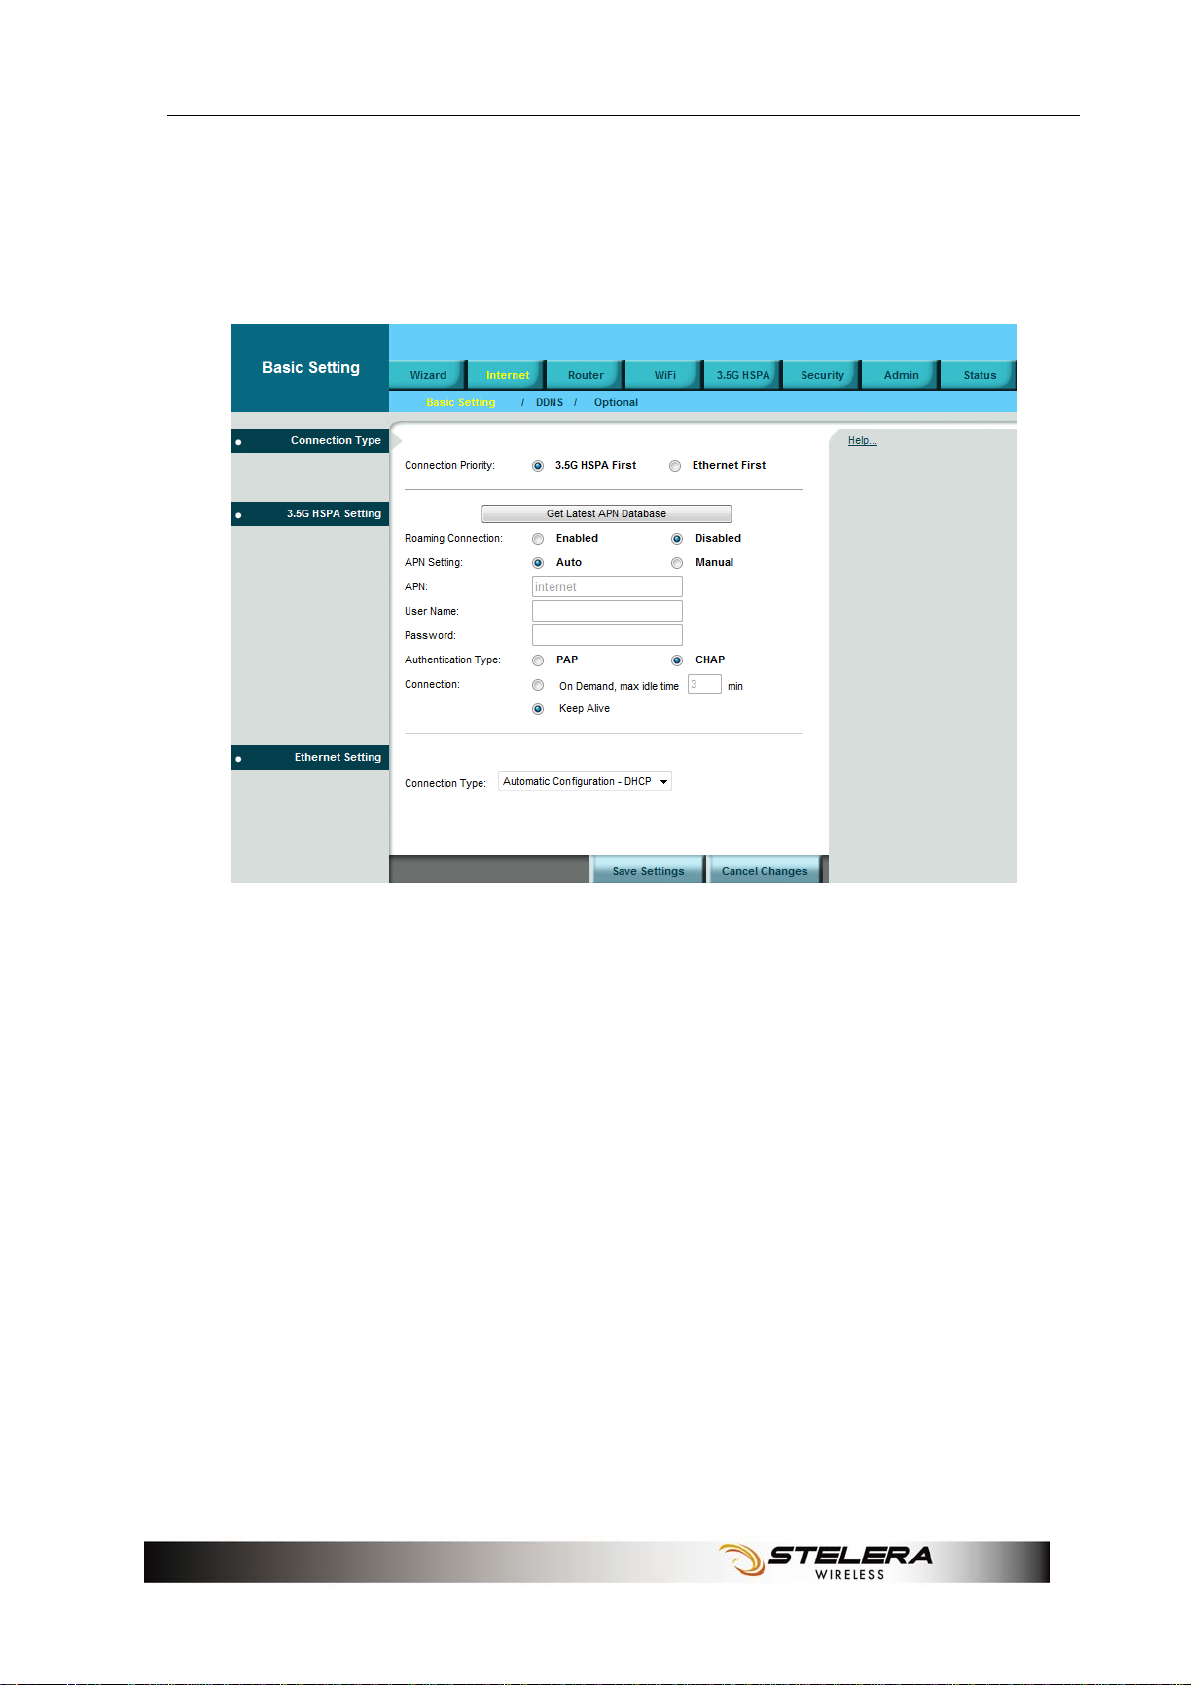
Basic Setting
Connection Type
The Router can link to the internet via 3.5G HSPA or Ethernet. Select the
connection type you prefer.
3.5G HSPA Setting
Get Latest APN Database
Get the latest Profile Name, Number, User Name, Password, and APN
from the web site automatically.
Roaming Connection
To allow roaming network connection, select Enabled. To block roaming
connection, select Disabled.
11

Internet Setup
Note: Charges for roaming connection may be high. Contact
.
APN Setting
The APN (Access Point Name) is provided by your mobile network
operator. You can choose to set the APN automatically or manually. In
most cases, the Router works properly when the APN is set to Auto.
To set the APN manually, contact your mobile network operator for the
APN, User Name and Password of the data service.
Authentication Type Setting
To allow user to set PAP (Password Authentication Protocol) or CHAP
(Challenge Handshake Authentication Protocol).
your mobile network operator for more information.
Connection
On Demand: You can set the idle time for the 3.5G HSPA connection.
When the Router is idle, the connection will be disconnected
automatically after the idle time expires.
Keep Alive: The connection is always kept on. If the HSPA connection is
disconnected, the Router tries to reconnect.
Ethernet Setting
Automatic Configuration - DHCP
Choose Dynamic IP Address to obtain IP Address information
automatically from your ISP. Select this option if your ISP does not give
you any IP numbers to use. This option is commonly used for cable
modem services.
12
Internet Setup
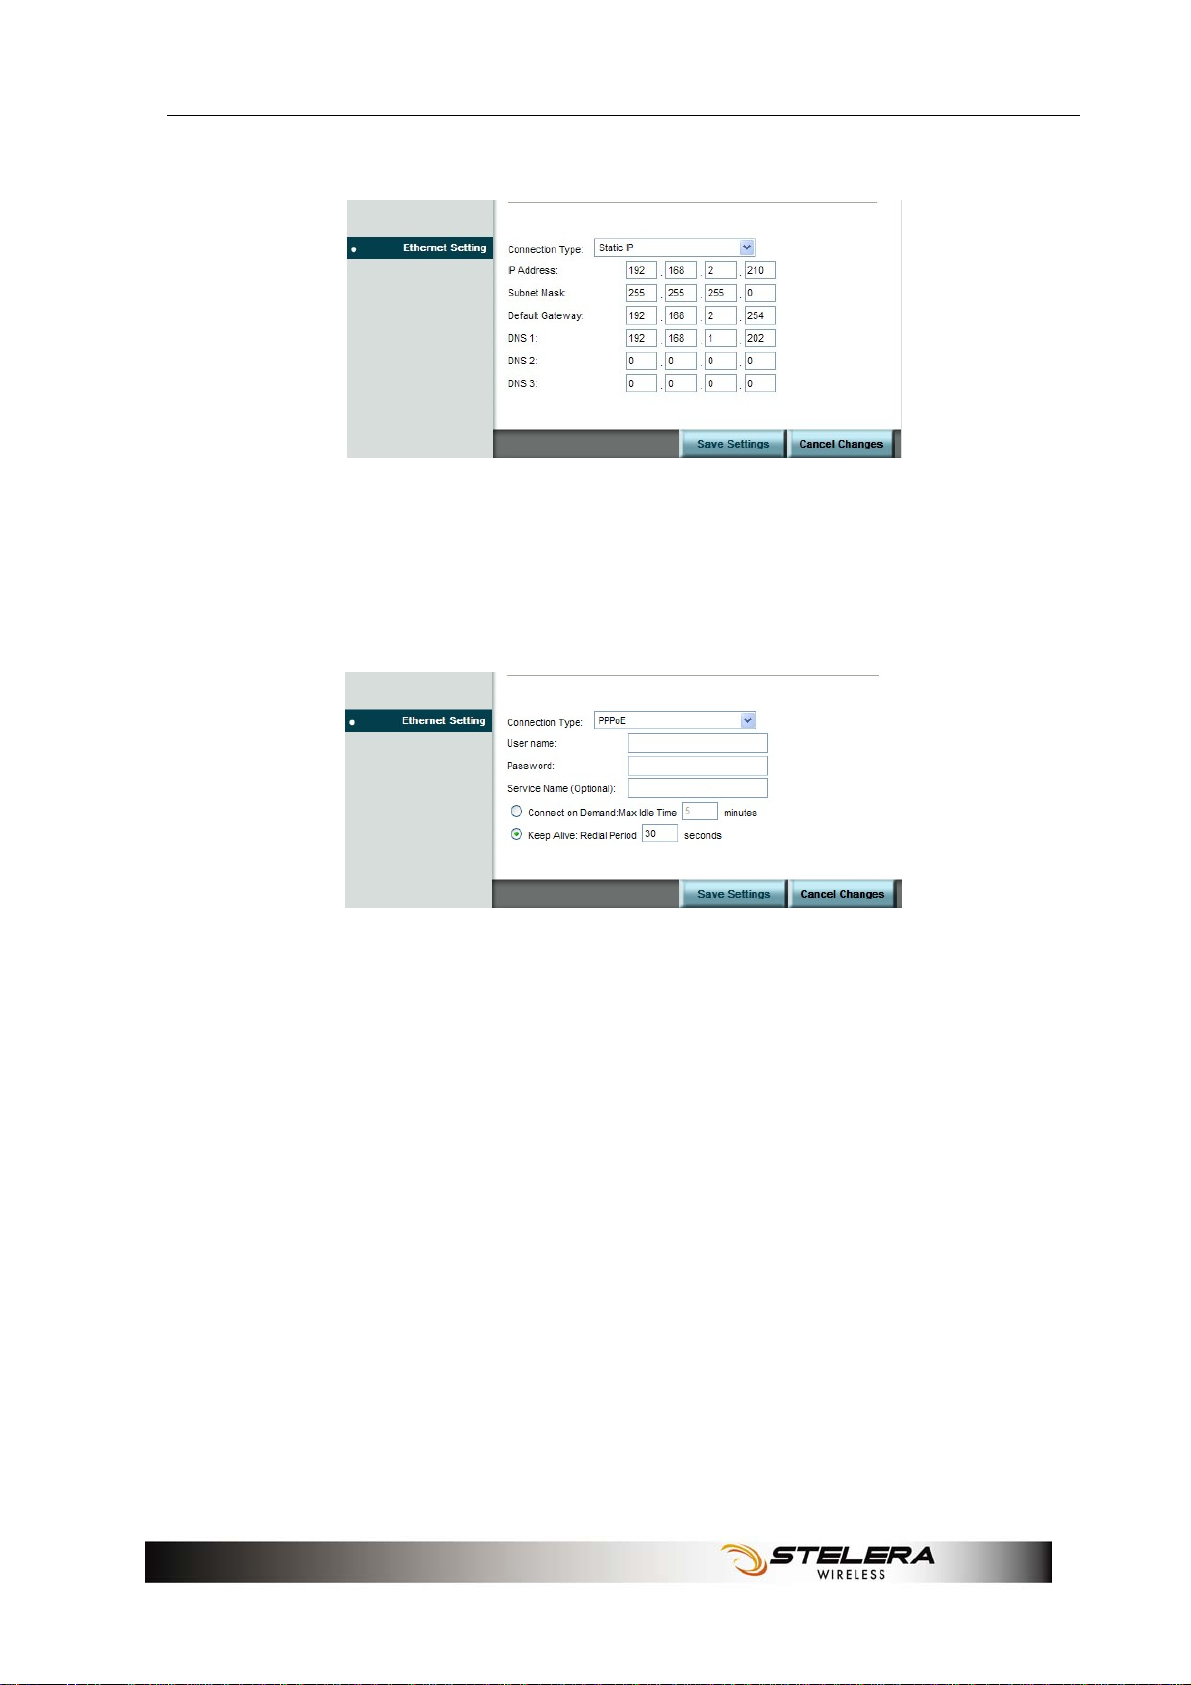
Static IP
Select Static IP if all WAN IP information is provided to you by your ISP.
You will need to enter the IP address, subnet mask, gateway address,
and DNS address(es) provided to you by your ISP.
PPPoE
Choose PPPoE (Point to Point Protocol over Ethernet) if your ISP uses a
PPPoE connection. Your ISP will provide you with a username and
password. This option is typically used for DSL services.
Service Name: Enter the ISP Service Name (optional).
Connect on Demand: Enter a maximum idle time during which the
Internet connection is maintained during inactivity.
Keep Alive: If you select this option, the Router will periodically check
your Internet connection. If you are disconnected, then the Router
automatically tries to re-establish your connection. To use this option,
select Keep Alive. In the Redial Period field, specify how often you want
the Router to check the Internet connection.
13
Internet Setup
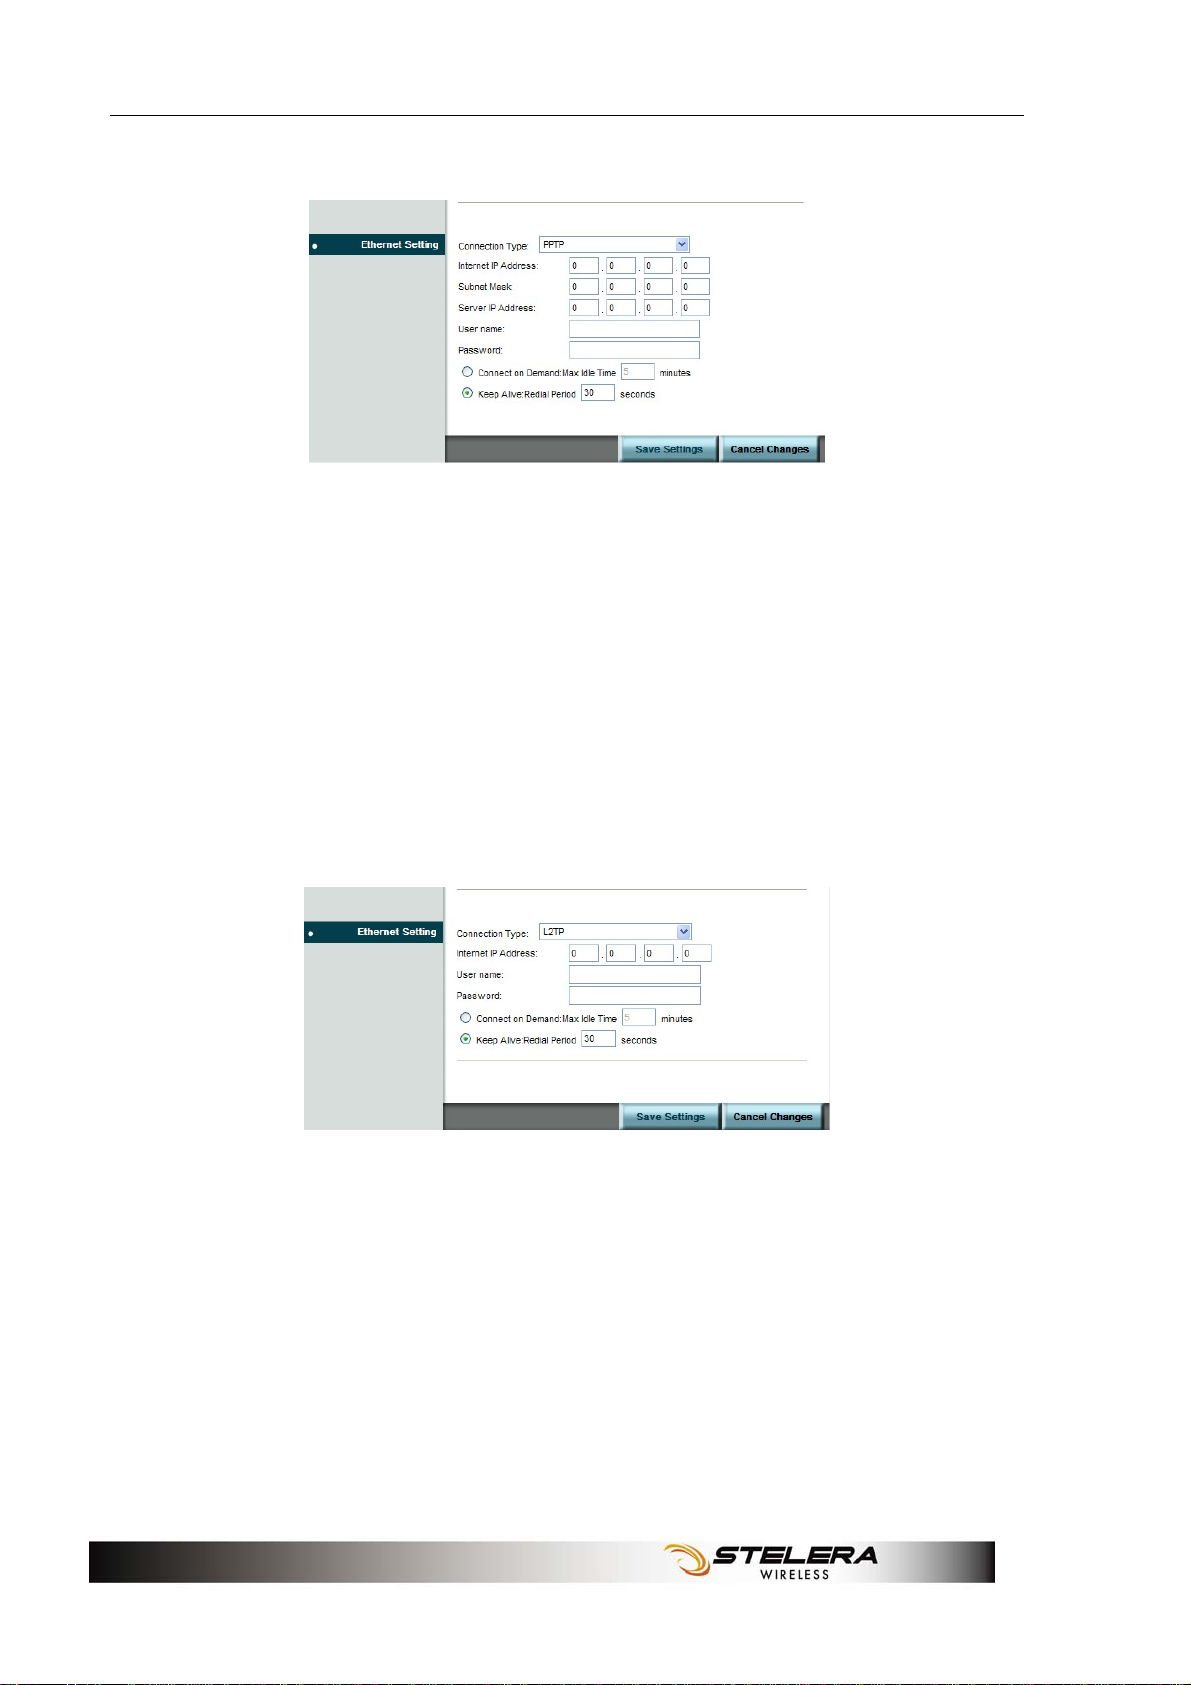
PPTP
Choose PPTP (Point-to-Point-Tunneling Protocol) if your ISP uses a
PPTP connection. Your ISP will provide you with a username and
password.
Internet IP Address: Enter the IP address
Subnet Mask: This is the Router’s Subnet Mask, as seen by users on the
Internet (including your ISP). Your ISP will provide you with the Subnet
Mask.
Server IP Address: Enter the Server IP provided by your ISP (optional).
L2TP
Choose L2TP (Layer 2 Tunneling Protocol) if your ISP uses a L2TP
connection. Your ISP will provide you with a username and password.
Internet IP Address: Enter the IP address provided by your ISP.
Connect on Demand: Enter a maximum idle time during which the
Internet connection is maintained during inactivity.
Keep Alive: Redial Period If you select this option, the Router will
periodically check your Internet connection. If you are disconnected, the
Router automatically tries to re-establish your connection. To use this
option, select Keep Alive. In the Redial Period field, you specify how
often you want the Router to check the Internet connection.
14
Internet Setup
DDNS
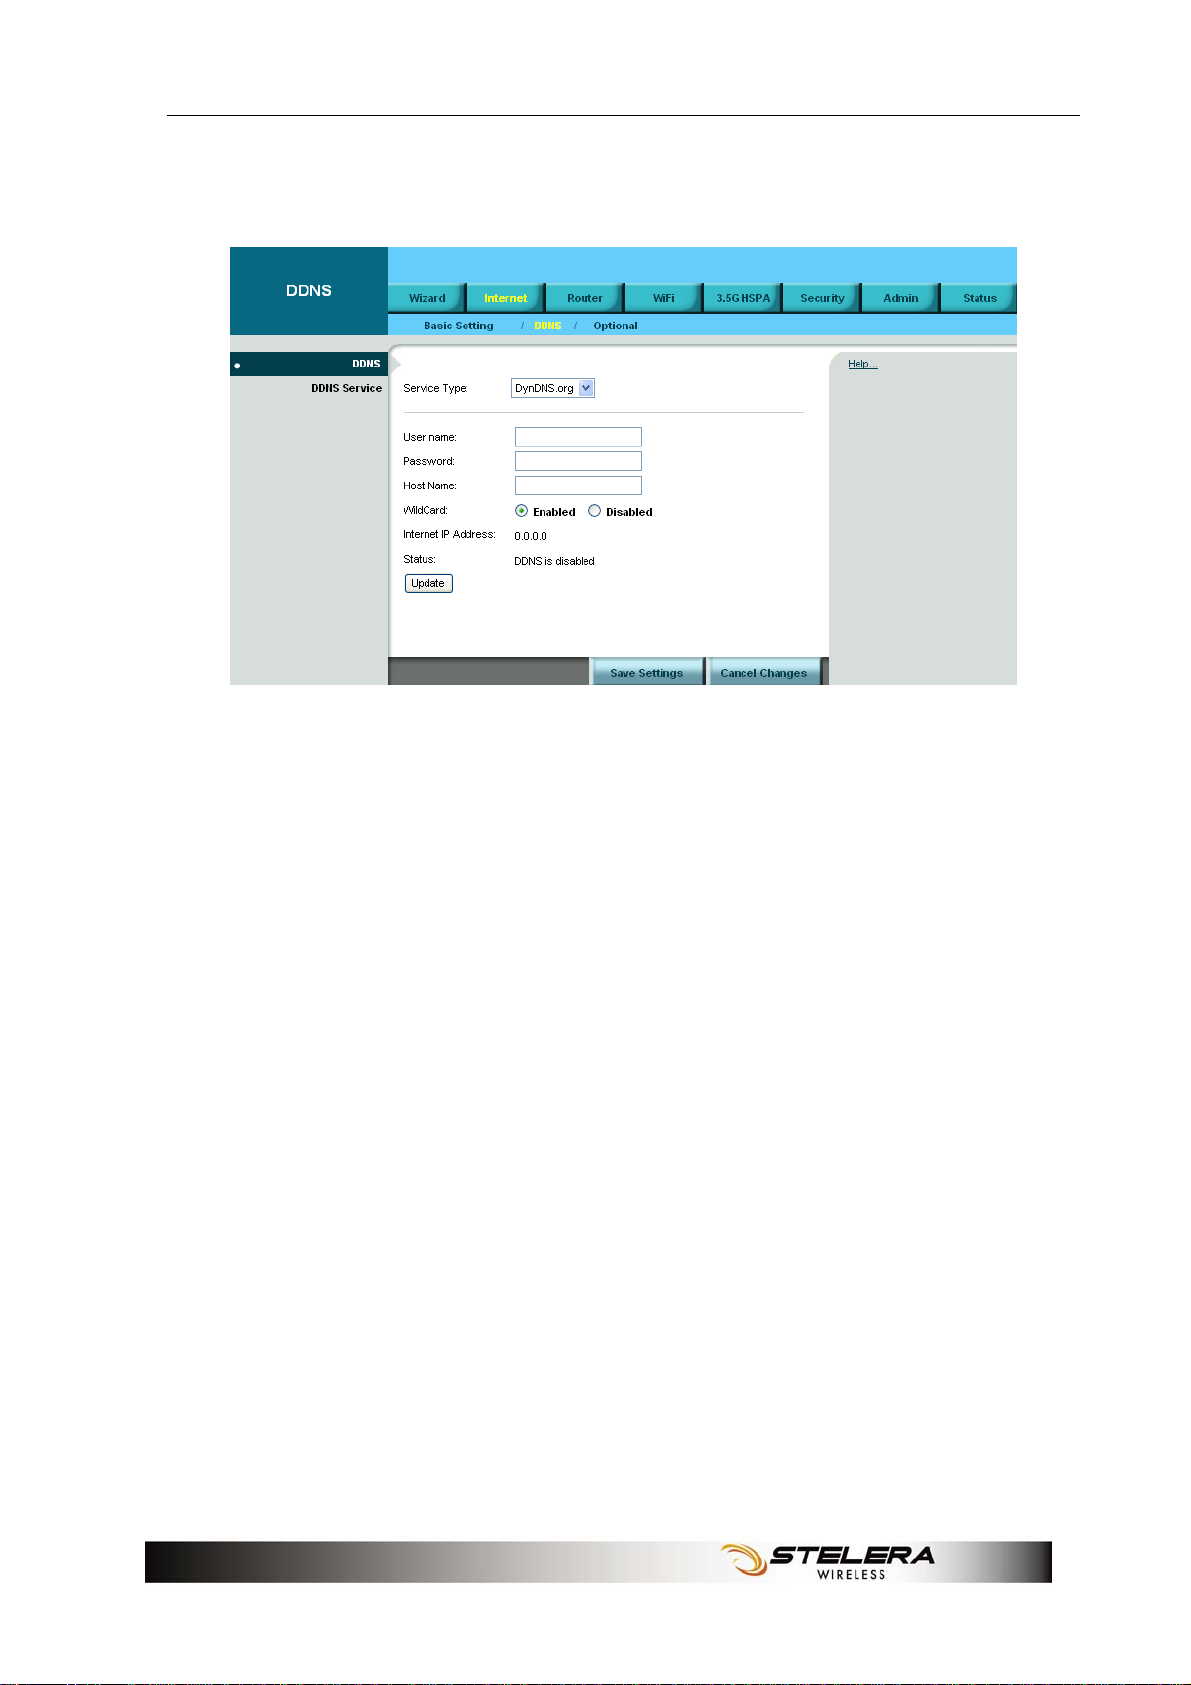
DDNS (Dynamic DNS Service) is a system which allows the domain
name data held in a name server to be updated in real time. It allows an
Internet domain name to be assigned to a computer with a varying
(dynamic) IP address. Before you can use this feature, you need to sign
up for DDNS service with a DDNS service provider, www.dyndns.org or
www.TZO.com.
Service Type: From the drop-down list, select your DDNS service type.
User name: Enter the user name for your DDNS account.
Password: Enter the password for your DDNS account.
Host name: The Host Name is optional but may be required by some
ISPs.
WildCard: Some DDNS servers support the wildcard alias feature which
points *.yourhost.dyndns.org to your computers automatically. All aliases
for your domain such as www.yourhost.dyndns.org will point to your
computer by default due to Wildcard Alias. This allows users to access
your computer using all types of derivatives of your domain name.
Internet IP Address: The Router’s Internet IP address is displayed here.
Because it is dynamic, it changes.
Status: This shows whether the DDNS service is enabled or disabled.
15
Internet Setup
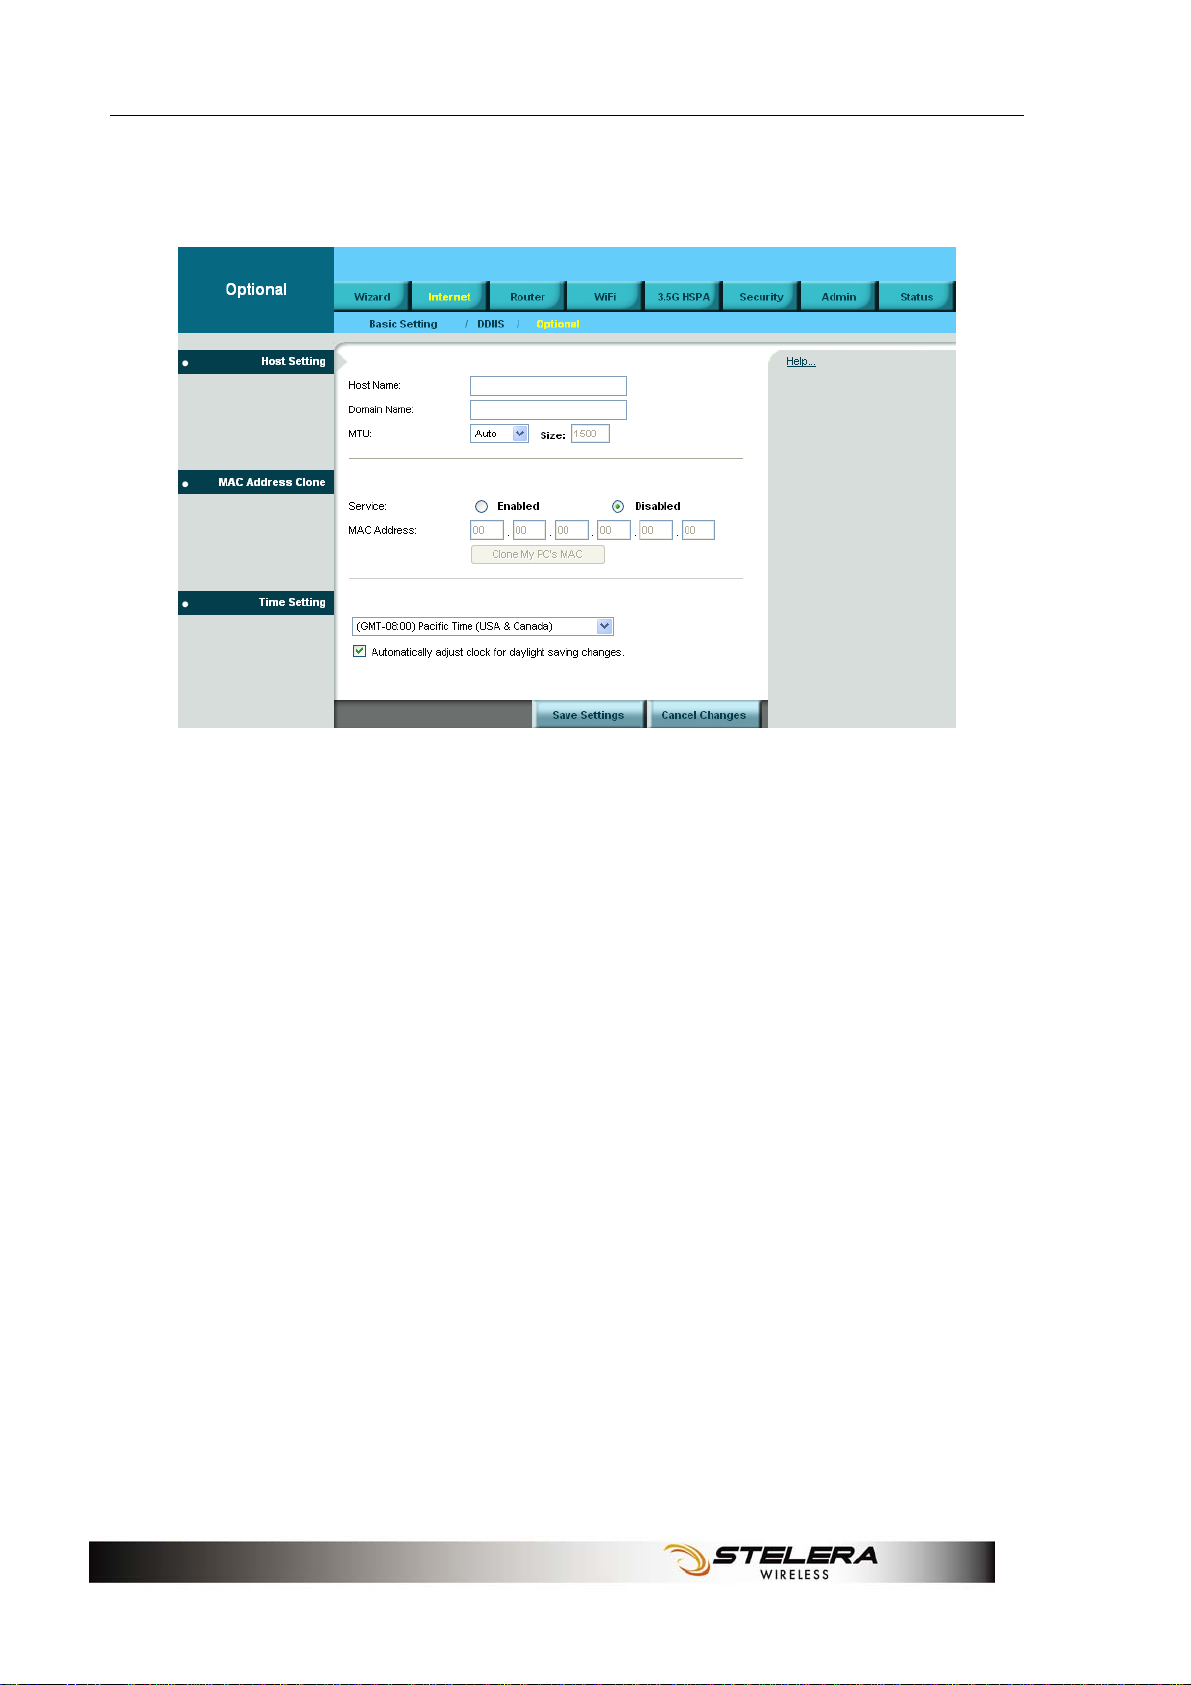
Optional
Host Setting
Host Name and Domain Name
These fields allow you to assign a host and domain name for the Router.
Some ISPs require these names as identification. In most cases, leaving
the fields blank will work.
MTU
MTU (Maximum Transmission Unit) specifics the largest packet size
permitted for Internet transmission. To have the Router select the best
MTU for your Internet connection, keep the default setting, Auto.
MAC Address Clone
Some ISPs will require you to register a MAC address in order to access
the Internet. If you do not want to re-register the MAC address with your
ISP, you can assign the MAC address you have currently registered with
your ISP to the Router by clicking the Clone My PCs MAC button.
16

Internet Setup
Time Setting
Select the Time Zone from the drop-down menu according to your current location.
Automatically adjust clock for daylight saving changes: Select the
checkbox to enable Daylight Saving time.
17
Router Setup
Router Setup
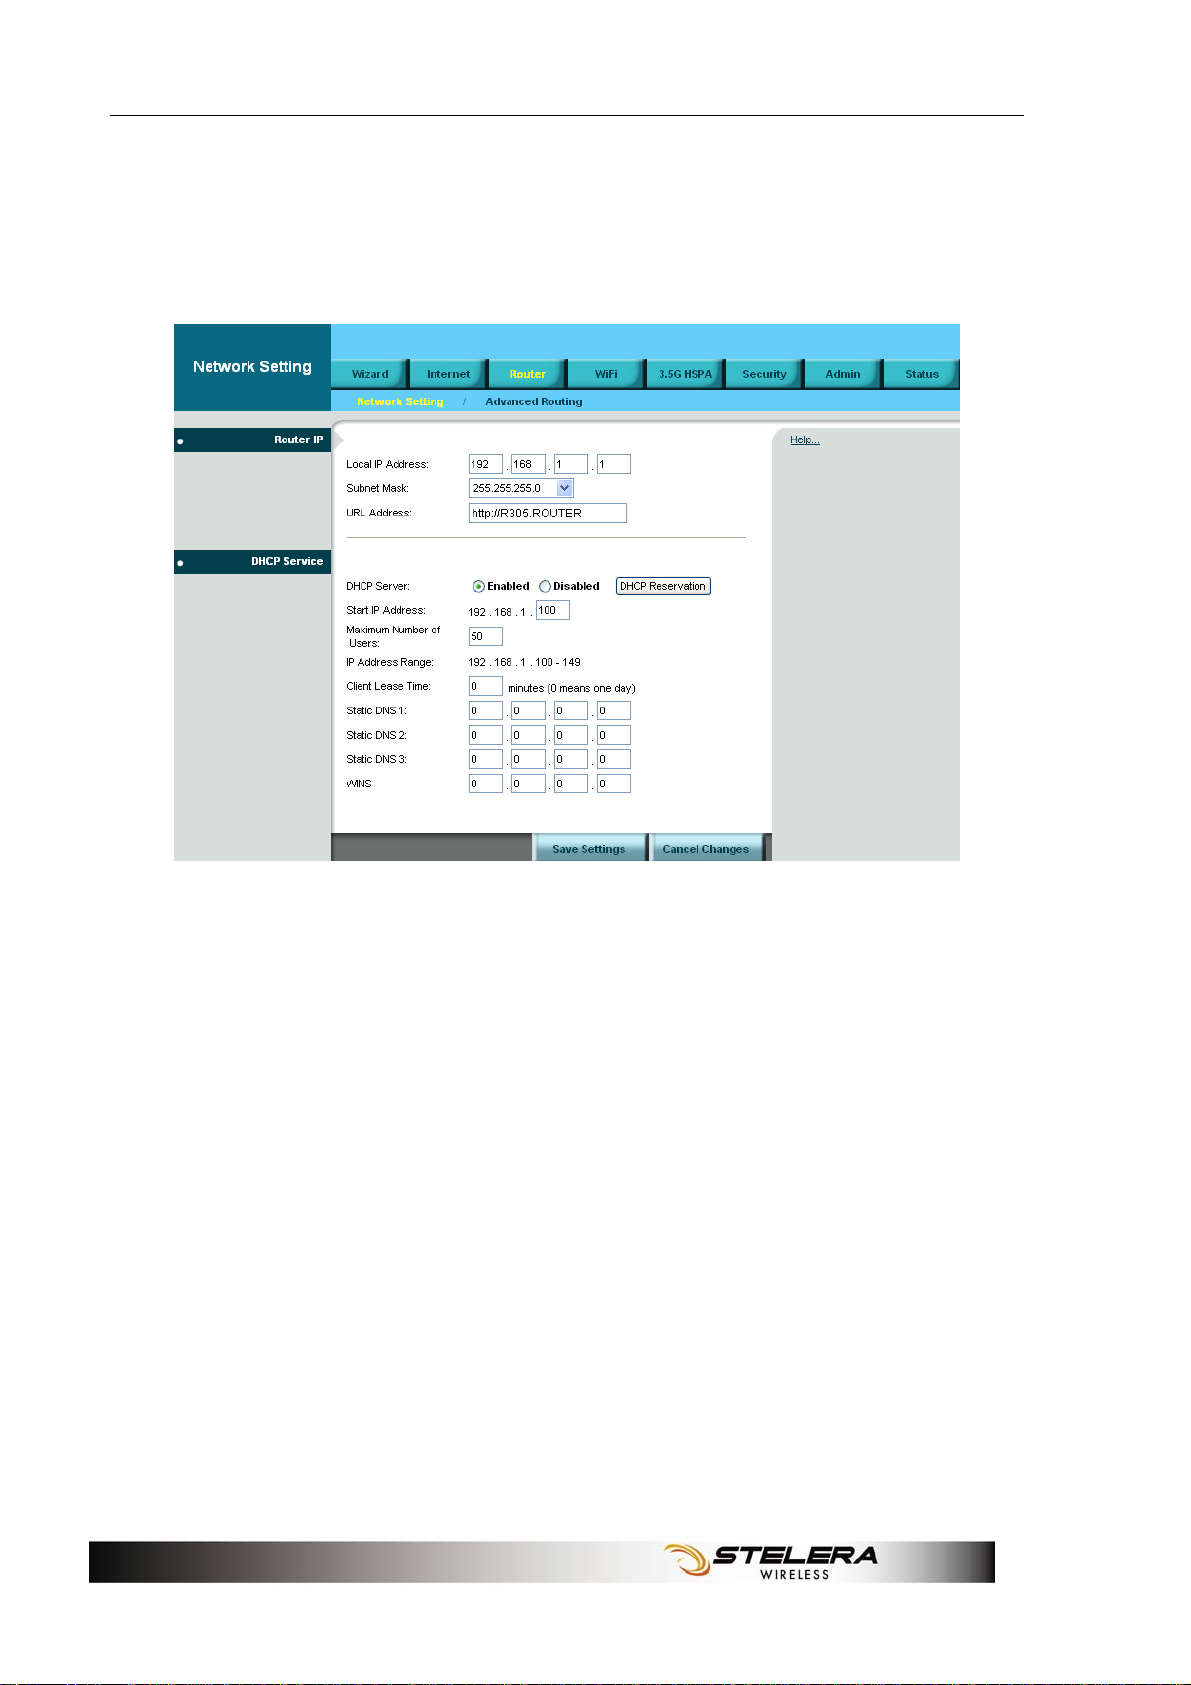
Network Setting
Router IP
This is the Router’s IP address and subnet mask which is seen in your
local network. The default IP address is 192.168.1.1, and the default
Subnet Mask is 255.255.255.0. Keeping the default values will work.
DHCP Service
DHCP stands for Dynamic Host Control Protocol. The DHCP Server will
automatically assign an IP address to the computers on the LAN/private
network. If the Router’s DHCP server option is enabled, make sure there
is no other DHCP server on your network.
18

Router Setup
DHCP Reservation
To assign the same IP address to a PC every time it reboots, click the
DHCP Reservation button.
A list of DHCP clients is displayed with the following information: Client
Name, Interface, IP Address, and MAC Address. Select a checkbox to
reserve a client’s IP address. To add clients, click Add Clients. To
manually assign an IP address, enter the client’s name in the Enter
Client Name field. Enter an IP address in the Assign IP Address field.
Enter a MAC Address in the To This MAC Address field. Click Add. A list
of DHCP clients and their fixed local IP addresses is displayed at the
bottom of the screen. If you want to remove a client from this list, click
Remove. To view the most up-to-date information, click Refresh.
Start IP Address: Enter a starting IP address for the DHCP server’s IP
assignment.
Maximum Number of Users: Enter the maximum number of PCs that
you want the DHCP server to assign IP addresses to.
DHCP Lease Time: The length of time for the IP address lease. Enter the
lease time in minutes.
Static DNS (1-3): The Domain Name System (DNS) is how the Internet
translates domain or website names into Internet addresses or URLs.
Your ISP will provide you with at least one DNS Server IP Address. You
can enter up to three DNS Server IP Addresses here. The Router will use
these for quicker access to functioning DNS servers.
WINS: The Windows Internet Naming Service (WINS) manages each
PC's interaction with the Internet. If you use a WINS server, enter that
server’s IP Address here. Otherwise, leave this blank.
19

Router Setup
Advanced Routing
NAT Setup
The Network Address Translation (NAT) service is a standard that allows
multiple computers on a private network to share a single IP address.
RIP
The Routing Information Protocol (RIP) helps the Router dynamically
adapt to changes of network connections by communicating information
about which networks each Router can reach and how far away those
networks are.
Static Routing
This section allows you to define fixed routes to defined destinations.
Route Entry: To set up a static route, select a number from the
drop-down list.
Enter Route Name: Enter a name for the route here.
20

Router Setup
Destination LAN IP: Enter the Destination IP address that will be
assigned to a specific network or host.
Subnet Mask: Enter the subnet mask associated with the Destination IP.
Gateway: This is the IP address of the gateway device that allows for
contact between the Router and the remote network or host.
Interface: This interface tells you whether the Destination IP Address is
on the LAN & Wireless (Ethernet and wireless networks) or the WAN
(Internet).
Show Routing Table: Click Show Routing Table to open a screen
displaying how data is routed through your local network. Click Refresh
to update the information.
VPN Passthrough
A Virtual Private Network (VPN) is a type of secured private network
connection, built upon publicly-accessible infrastructure such as the
Internet. They usually provide connectivity to various devices behind a
gateway or firewall.
IPSec Passthrough
IP Security (IPSec) provides authentication and encryption. Since it is
mainly a Layer 3 technology, it can secure all data on the network. To
allow IPSec tunnels to pass through the Router, click Enabled.
PPTP Passthrough
Point-to-Point Tunneling Protocol (PPTP) allows you to establish a
connection to an enterprise network. To allow PPTP tunnels to pass
through the Router, click Enabled.
L2TP Passthrough
Layer 2 Tunneling Protocol (L2TP) is an extension of the Point-to-Point
Tunneling Protocol and is also used to establish virtual private networks.
To allow L2TP tunnels to pass through the Router, click Enabled.
21

WiFi Setup
WiFi Setup
Basic WiFi Network
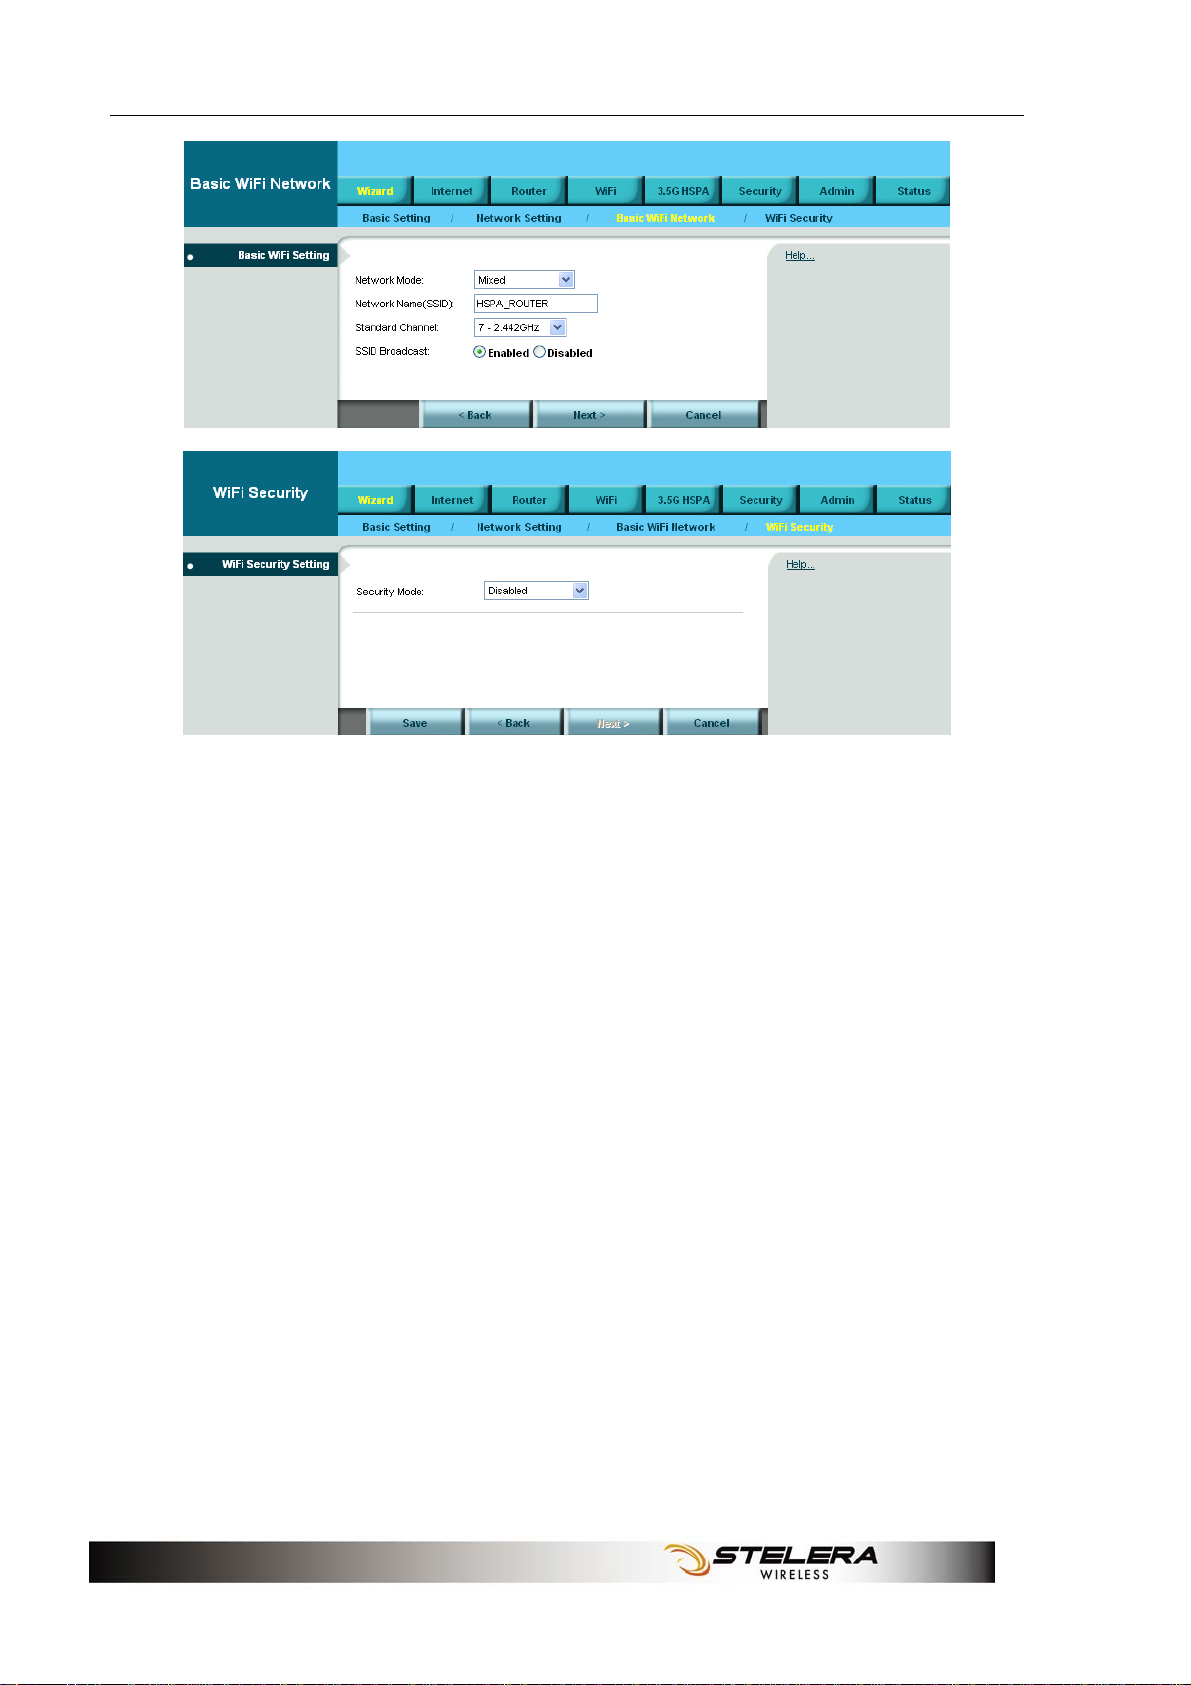
Basic WiFi Setting
Network Mode: From this drop-down menu, you can select the wireless
standards running on your network. If you have both 802.11g and 802.11b
devices in your network, keep the default setting, Mixed. If you have only
802.11g devices, select Wireless-G Only. If you have only 802.11b
devices, select Wireless-B Only. If you do not want to use any WiFi
network, select Disabled.
Network Name (SSID): Network Name is used for identifying the
Wireless LAN (WLAN). The default SSID is HSPA_ROUTER.
Standard Channel: The radio channel number. The permissible
channels depend on the Regulatory Domain.
SSID Broadcast: Disable this function will let your SSID setting not be
exposed to view in the air. For security purposes, you may choose to hide
your network’s SSID by selecting Disable from the drop-down list. This
will prevent computers scanning for the presence of wireless networks to
detect your network name. The default setting is Enabled.
22

WiFi Setup
WiFi Security
WiFi Security Setting
Router provides several different levels of security to protect your WiFi
network. Select a level in the Security Mode drop-down menu.
WEP
The Router supports two WEP (Wired Equivalent Privacy) standards:
64-bit and 128-bit. Select a standard from the drop-down list. The 64-bits
encryption requires 10 hexadecimal digits (letters a-f and numbers 0-9
are valid). The 128-bits encryption requires 26 hexadecimal digits (letters
a-f and numbers 0-9 are valid).You can set up to four different keys.
Passphrase: Strings of hexadecimal characters are not easy to
remember. This conversion utility converts a simple word or phrase into
hex, so that you can easily remember and regenerate the pass-phrase.
TX Key: You can specify which key you want to use for the WiFi network.
WPA, or WiFi Protected Access, is a WiFi standard that was designed to
improve the security features of WEP. WPA uses two encryption methods,
TKIP and AES, with dynamic keys.
23

WiFi Setup
WPA-Personal
Encryption: Choose TKIP or AES from the drop down list. (AES is a
stronger encryption method than TKIP.)
Passphrase: Enter a passphrase between 8-63 characters.
Key Renewal: Enter a key renewal value to tell the Router how often it
should change the encryption keys. The value must be between
60-99999.
WPA2-Personal
WPA2 is a more advanced, more secure version of WPA.
Encryption: Choose AES, or WPA-TKIP, or WPA2-AES from the drop
down list.
Passphrase: Enter a passphrase between 8-63 characters.
Key Renewal: Enter a key renewal value to tell the Router how often it
should change the encryption keys. The value must be between
60-99999.
24

WiFi Setup
WPA-Enterprise
This option features WPA used in coordination with a RADIUS server.
(This should only be used when a RADIUS server is connected to the
Router.)
Encryption: Choose TKIP or AES from the drop down list. (AES is a
stronger encryption method than TKIP.)
RADIUS Server: Enter the IP Address of the RADIUS server.
RADIUS Port: Enter the port number of the RADIUS server. The default
value is 1812.
Shared Key: Enter the key shared between the Router and the server.
Key Renewal: Enter a key renewal value to tell the Router how often it
should change the encryption keys. The value must be between
60-99999.
WPA2-Enterprise
This option features WPA2 used in coordination with a RADIUS server.
(This should only be used when a RADIUS server is connected to the
Router.)
Encryption: Choose AES or WPA-TKIP or WPA2-AES from the drop
down list.
25

WiFi Setup
RADIUS Server: Enter the IP Address of the RADIUS server.
RADIUS Port: Enter the port number of the RADIUS server. The default
value is 1812.
Shared Key: Enter the key shared between the Router and the server.
Key Renewal: Enter a key renewal value to tell the Router how often it
should change the encryption keys. The value must be between
60-99999.
RADIUS
RADIUS stands for Remote Authentication Dial-In User Service. It is a
networking protocol that uses access servers to provide centralized
management of access to large networks.
RADIUS Server:
Enter the IP Address of the RADIUS server.
RADIUS Port: Enter the port number of the RADIUS server. The default value is
1812.
Shared Key: Enter the key shared between the Router and the server.
Encryption: Select either 64-bits or 128-bits from the drop-down list The 64-bits
encryption requires 10 hexadecimal digits. The 128-bits encryption requires 26
hexadecimal digits .You can set up to four different keys.
Passphrase: Strings of hexadecimal characters are not easy to remember. This
conversion utility converts a simple word or phrase into hex, so that you can easily
remember and regenerate the pass-phrase.
TX Key: You can specify which key you want to use for the WiFi network.
26

WiFi Setup
Disabled
If you do not want to use any security method for your wireless network,
choose Disabled.
Advanced WiFi Setting
AP Isolation: This isolates all wireless clients and wireless devices on
your network from each other. Wireless devices will be able to
communicate with the Router but not with each other.
Frame Burst: Enabling this option may provide your network with greater
performance.
Authentication Type: The default is Open System authentication, where
the sender and the recipient do not use a WEP key for authentication. To
use a WEP key for authentication, select Shared Key.
Basic Rate: The Basic Rate setting is not actually one rate of
transmission but a series of rates at which the Router can transmit. The
Router advertises its Basic Rate to the other wireless devices in your
network, so they know which rates are used. The Router also advertises
that automatically selects the best rate for transmission. The default
setting is Auto, where the Router can transmit at all standard wireless
rates. The Basic Rate is not the actual rate of data transmission. If you
want to specify the Router’s rate of data transmission, configure the
Transmission Rate setting.
27

WiFi Setup
Transmission Rate: The rate of data transmission should be set
depending on the speed of your wireless network. You can select from a
range of transmission speeds.
CTS Protection Mode: CTS (Clear To Send) is a function used to
minimize collisions among wireless devices on a wireless local area
network (LAN). The default setting is Auto and the Router automatically
uses CTS Protection Mode when your Wireless-G products are
experiencing severe problems and are not able to transmit to the Router
in an environment with heavy traffic. This function boosts the Router’s
ability to catch all Wireless-B and Wireless-G transmissions, but it
severely decreases performance.
Beacon interval: Beacons are packets sent by an Access Point to
synchronize a wireless network. Specify a value. 100 is the default
setting.
DTIM Interval: The default setting for DTIM (Delivery Traffic Indication
Message) is 3. A DTIM is a countdown informing clients of the next
window for listening to broadcast and multicast messages.
Fragmentation Threshold: The fragmentation threshold, which is
specified in bytes, determines whether packets will be fragmented.
Packets exceeding the setting value will be fragmented before
transmission. 2346 is the default setting.
RTS Threshold: This value should remain at its default setting of 2347. If
inconsistent data flow is a problem, only a minor modification should be
made.
28

WiFi Setup
WiFi Clients Filter
WiFi Clients Filter
You can allow or deny specific users to access your wireless network by
using the WiFi Clients Filter.
Service:
To use the WiFi Clients Filter, select Enabled. To disable it, select
Disabled.
Filtering By: You can filter users by two methods: Prevent the listed PCs from
accessing the wireless network, or
network. Select the method you want.
Permit the listed PCs to access the wireless
Filtered Client List
Enter MAC addresses in the Filtered Client List section, and click Save Settings.
To display a list of network users, click Wireless Client List.
29

3.5G HSPA Setup
3.5G HSPA Setup
PIN Verification
If your SIM card PIN protection is enabled, you must enter the PIN code
for verification. Enter the code in the PIN Code field, and click Verify.
PIN Management
U/SIM's PIN Management
After your SIM card is verified, you can enable or disable the PIN protection
on your SIM card. Select Enabled or Disabled, and click Apply.
30

3.5G HSPA Setup
U/SIM's Change PIN
You can change the PIN code on the SIM card. Enter your original PIN
code in the Old PIN Code field, enter the new PIN code in the New PIN
Code field and the New PIN Confirm field, and click Change.
Preferred Network
Preferred Network
Network Type: In the drop-down menu, select the network type your SIM
card supports. If you do not know the network type, select Auto.
Frequency Band: Frequency band is the radio spectrum frequency
designated by the ITU for the operation of the GSM for mobile phones. To
accelerate the band search, choose one of the options from the
drop-down list according to your location (worldwide, Europe/Asia, or
North America). If you do not know the frequency band, select the
Worldwide.
31

3.5G HSPA Setup
Network Selection
To select the mobile network operator automatically, in the Select
Network field, select Auto. To select the operator from a list, select
Manual and click Rescan. The list is displayed below. Select the mobile
network operator you are currently using on your SIM card.
32

Security Setup
Security Setup
Firewall
Firewall
This tab is used to configure a firewall that filters out various types of
unwanted traffic on the Router’s local network.
SPI Firewall Protection
The SPI (stateful packet inspection) firewall is programmed to recognize
legitimate packets for different types of connections. Only packets
matching a known connection state will be allowed by the firewall; others
will be rejected.
Internet filter services
Filter Anonymous Internet Requests: This feature makes it more
difficult for outside users to work their way into your network.
Filter Multicast: Multicasting allows for multiple transmissions to specific
recipients at the same time. If multicasting is permitted, the Router allows
IP multicast packets to be forwarded to the appropriate computers.
33

Security Setup
Filter Internet NAT Redirection: To use port forwarding to block access
to local servers from local networked computers, select Filter Internet
NAT Redirection.
Filter IDENT (Port 113): This feature keeps port 113 from being scanned
by devices outside of your local network.
Web filter services
Using the Web Filters feature, you may enable up to four specific filtering
methods.
Proxy: Use of WAN proxy servers may compromise the Router's security.
Select this option to disable access to any WAN proxy servers.
Java: Java is a programming language for websites. Select this option to
disable Java. If you disable Java, you run the risk of not having access to
Internet sites created using this programming language.
ActiveX: ActiveX is a programming language for websites. Select this
option to disable ActiveX. If you disable ActiveX, you run the risk of not
having access to Internet sites created using this programming language.
Cookies: A cookie is data stored on your PC and used by Internet sites
when you interact with them. Select this option to disable cookies.
DMZ service
When a firewall is used, it is sometimes necessary to place some clients
(for example Internet games, video conferencing, or VPN connections)
outside of the firewall while leaving the others protected. You can do this
using a Demilitarized Zone. This feature allows you to specify the IP
address of the computers that are placed outside the firewall of your
network.
Source IP Address
If you want to allow any Internet IP address to access the exposed
computer, select Any IP Address. If you want to allow a specific IP
address or range of IP addresses to access the exposed computer, select
the second option and enter the IP address or range of IP addresses in
the fields provided.
Destination
Enter the IP address or MAC address of the computer you want to
expose.
34

Security Setup
Internet Access Policy
Access can be managed by a policy. Use the settings on this screen to
establish and access policies. To display a policy’s settings, select the
policy from the drop-down menu. To delete a policy, select the policy’s
number and click Delete This Policy. To view all the policies, click
Summary. To delete multiple policies, in the Summary screen, selecting
the policies and click Delete).
35

Security Setup
To create an Internet access policy:
1. Select a number from the Access Policy dropdown menu.
2. Enter a policy name in the field provided.
3. To enable the policy, select Enabled.
4. To select which PCs are affected by the policy, click Edit List. The List
of PCs screen appears. You can select a PC by MAC Address or IP
Address. You can also enter a range of IP Addresses if you want the
policy to affect a group of PCs. After making your changes, click Save
Settings to apply your changes or Cancel Changes to cancel your
changes. Then click Close.
5. Select the appropriate option, Deny or Allow, depending on whether
you want to block or allow Internet access for the PCs you listed on the
List of PCs screen.
6. Decide which days and what times you want this policy to be enforced.
Select the individual days during which the policy will be in effect, or
select Everyday. To set times for the policy, select 24 Hours, and
enter the times you want.
7. To filter websites by URL, enter URLs in the Website Blocking by
URL Address fields. To filter websites by keywords, enter keywords in
the Website Blocking by Keyword fields.
8. To filter access to various services accessed over the Internet, such as
FTP or telnet, select services in the Applications column, and click
Add to add them to the Blocked List. (You can only add up to 3
applications.) You can also add an application into the Applications
column. Enter the information in the Application Name, Port Range
36

Security Setup
and Protocol fileds, and click Add.
Single Port Forward
Single Port Forwarding
Port Forwarding allows you to set up public services on your network,
such as web servers, ftp servers, e-mail servers, and other specialized
Internet applications. To forward a port, enter the information in each field.
Application Name:
in the drop-down menu. For custom applications, enter the name of your application in
one of the available fields.
External Port: Enter the port number of external ports used by the server or
Internet application.
Internal Port: Enter the port number of internal ports used by the server or Internet
application.
Protocol: Select the protocol used for this application: TCP, UDP, or Both.
To IP address: For each application, enter the IP address of the PC running the
specific application.
You can select an application from the 10 preset applications
Enabled: To enable port forwarding for the application, select Enabled.
To apply the changes, click Save Settings.
37

Security Setup
Port Range Forward
Port Range Forwarding
Port Range Forwarding allows you to set up public services on your
network, such as web servers, ftp servers, e-mail servers, and other
specialized Internet applications.
Application Name: Enter the name of your application.
Start - End Port: Enter the number that starts the port range in the left
field and the number that ends the range in the right field.
Protocol: Select the protocol used for this application: TCP, UDP, or
Both.
To IP address: For each application, enter the IP address of the PC
running the specific application.
Enabled: To enable port forwarding for the application, click the Enabled
checkbox to enable port forwarding for the relevant application.
To apply the changes, click Save Settings.
38

Security Setup
Port Range Trigger
Port Range Triggering
This feature allows the Router to watch outgoing data for specific port
numbers. The Router remembers the IP address of the computer that
sends the matching data, so that when the requested data returns
through the Router, the data is pulled back to the proper computer by way
of IP address and port mapping rules.
Application Name: Enter the application name of the trigger.
Triggered Range: For each application, enter the triggered port number
range. Check with the Internet application documentation for the port
number needed. Enter the starting port number of the Triggered Range in
the left field. Enter the ending port number of the Triggered Range in the
right field.
Forwarded Range: For each application, enter the forwarded port
number range. Check with the Internet application documentation for the
port number needed. Enter the ending port number of the Triggered
Range in the right field.
Enabled: To enable port triggering for the application, select Enabled.
39

Security Setup
QoS
QoS Control
Quality of service is the ability to provide different priorities to different
applications, users, or data flows, or to guarantee a certain level of
performance to a data flow.
Wireless
WMM Support: If no devices on your network support WMM, select
Disabled. Otherwise, keep the default, Enabled.
No Acknowledgement: If the Router’s Acknowledgement feature is
disabled, the Router will not re-send data if an error occurs, then keep the
default, Disabled. Otherwise, select Enabled.
Internet Access Priority
You can set the Internet bandwidth priority for a variety of applications
and devices. There are four levels priority: High, Medium, Normal, and
Low. To use the Internet Access policies you set, select Enabled.
Category
There are four categories available. Select one of the categories and
proceed to the instructions for your selection.
To add an online games or applications:
40

Security Setup
1. Select the appropriate online games or applications.
2. Select the appropriate priority: High, Medium, Normal, or Low.
3. Click Add to save your changes.
To add a new online games or applications:
1. Select Add a New Game/Application.
2. Enter any name to indicate the name of the entry.
3. Enter the port range that the application will be using. You can have up to three
ranges to define for this bandwidth allocation. Port numbers can range from 1 to
65535.
4. Select the protocol TCP or UDP, or select Both.
5. Select the appropriate priority: High, Medium, Normal, or Low.
6. Click Add to save your changes.
To add an MAC address:
1. Enter a name for your device.
2. Enter the MAC address of your device.
3. Select the appropriate priority: High, Medium, Normal, or Low.
4. Click Add to save your changes.
To add a Voice Device:
1. Enter a name for your voice device.
2. Enter the MAC address of your voice device.
3. Select the appropriate priority: High, Medium, Normal, or Low.
4. Click Add to save your changes.
Summary
This lists the QoS entries you have created for your applications and
devices. Select Edit to edit an item or Remove to remove the item.
Preset items cannot be edited.
41

Admin Setup
Admin Setup
Management
Router Access
You can change the Router’s password here. Enter the password you want to set in
the Router Password field, and re-enter it in the Re-Enter to confirm field.
Then click Save Settings.
Web Access
Web Utility Access: HTTP (HyperText Transport Protocol) is the
communications protocol used to connect to servers on the World Wide
Web. HTTPs uses SSL (Secured Socket Layer) to encrypt data
transmitted for higher security.
Web Utility Access via Wireless: If you are using the Router in a public
domain where you are giving wireless access to your guests, you can
disable wireless access to the Router’s web-based utility. The wireless
42

Admin Setup
access to the Router web-based utility can be disabled. If you disable the
setting, you are only able to access the web-based utility via a wired
connection.
Remote Access
Remote Management: To access the Router remotely, from outside the
network, select Enabled.
Web Utility Access: Choose to access the Router via HTTP or HTTPs.
Remote Upgrade: To enable remote upgrade of the Router, select
Enabled.
Allow Remote IP Address: To allow any IP address to access to access
the Router, select Any IP Address. To allow a specific range of IP
addresses to access the Router, enter IP addresses.
Remote Management Port: Enter the port number that will be open to
outside access.
UPnP
UPnP: Universal Plug and Play (UPnP) is a set of computer network
protocols that allows compatible devices to be ready to work without any
configuration once they are connected to the network.
Allow Users to Configure: To enable manual changes to the Router
while using the UPnP feature, keep the default setting, Enabled. To
disable manual changes, select Disabled.
Allow Users to Disable Internet Access: To prohibit users from
accessing the Router web-based utilities, keep the default setting,
Disabled. Otherwise, select Enabled.
43

Admin Setup
Diagnosis
Log
The Router can keep logs of all traffic for your Internet connection. To
monitor the network, select Enabled.
You can view logs by clicking View Log. If you want to view logs in a
browser, enter an IP address in the Logviewer IP Address field. You can
enter this IP in a browser to view logs.
Ping Test
To check the status of a connection, enter the IP address or URL that you
want to ping in the IP or URL Address field, define the packet size you
want to use in the Packet Size field, And select the number of times you
wish to ping: 5, 10, 15, or Unlimited. Click Start Test to begin the ping
test. A new screen displays the test results.
Traceroute Test
To test the performance of a connection, enter a URL or IP address in the
IP or URL Address field, and click Start Test. A new screen displays the
test results.
44

Admin Setup
Recover & Renewal
Backup and Restore
Backup Configurations
Click Backup Configurations to back up your Router's current
configuration. In the file dialog box, select a location and file name for the
configuration file.
Restore Configurations
Click the Restore Configurations. In the file dialog box, click Browse to
locate the configuration file, and click Restore.
Factory Defaults
To reset the Router's configuration settings to the default values, click
Restore Factory Default.
APN Update
To update the APN database, click Get Latest APN Database. In the
45

Admin Setup
dialog box, click Start.
Router Upgrade
To upgrade the Router's firmware, click Browse and locate the latest
firmware upgrade file. After the file is located, click Start Upgrade. The
upgrade progress is displayed.
Warning: Upgrading firmware may take a few minutes; do not
;
turn off the power or press the Reset button during upgrade.
46

Status
Status
3.5G HSPA & Internet
Signal Quality
When you access the Internet via 2G or 3G, click Refresh to show the
signal strength.
U/SIM Status
Your SIM card verification status is shown in this area. Clicking Pin
unlock displays the PIN Verification tab.
Register Network
Network Name: This shows the name of your network operator.
Network Technology: This shows the network technology you are
47

Status
currently using.
Home/Roaming: This indicates whether the Router is in Home or
Roaming status.
Internet Connection
Connection Type: This indicates the type of Internet connection you are
using.
Internet IP Address: This is the Router's IP Address, as seen on your
local network.
Subnet Mask and Default Gateway: The Router’s Subnet Mask and
Default Gateway address are displayed here for DHCP and static IP
connections.
DNS1-3: The DNS (Domain Name System) IP addresses currently used
by the Router are shown here.
Router
48

Status
Firmware Information
Firmware Version: This is the Router’s current firmware.
Modem Version: This is the 3G Module’s current firmware.
APN Version: This is the APN’s current version.
Current Time: This shows the time, as you set on the Optional tab.
Local Network
Local MAC Address: This is the Router’s MAC Address, as seen by your
ISP
Router IP Address: The Router’s IP Address that appears on your local
network.
Subnet Mask: This shows the current subnet mask being configured for
your local network.
DHCP Server: The status of the DHCP server function is displayed here.
Start IP Address: This shows the beginning of the range of IP Addresses
used by devices on your local Ethernet network.
End IP Address: The end of the range of IP Addresses used by devices
on your local Ethernet network is shown here.
DHCP Client Table: Click this button to open a screen showing you
which PCs are utilizing the Router as a DHCP server.
WiFi Network
MAC Address: This is the Router’s MAC Address, as seen on your local
wireless network.
Mode: This displays the wireless mode (Mixed, Wireless-G Only,
Wireless-B Only, or Disabled) used by the network.
Network Name (SSID): This displays the wireless network name or
SSID.
Standard Channel: This displays the channel on which your wireless
network is broadcasting.
Security: This shows the security method you are using.
SSID Broadcast: This shows whether the Router's SSID Broadcast
function is on or off.
49

Appendix A: FAQ
Appendix A: F AQ
Q: How to connect to Router?
A: 1. Connect Ethernet cable between PC/NB and Router.
2. Use WiFi to connect.
Q: What’s the default “User name” and “Password” for the Router?
A: User name: admin
Password: hsparouter
Q: How to enter GUI?
A: 1. Connect PC/NB to Router.
2. Open Internet Explorer or other Web browser.
3. Input “http://192.168.1.1” (default) or “http://R305.Router”.
4. Input User name and Password.
Q: How to setup the configuration for the Router?
A: 1. Enter Wizard page to setup.
2. Enter each GUI page to setup.
Q: Why can’t I connect to the network via built-in 3G module?
A: 1. Check the SIM/USIM if it is inserted well.
2. Check the UMTS LED on Router if it is Solid.
3. Check the Status on GUI if the SIM/USIM detected well.
4. Check the Status on GUI if the APN it is correct.
5. Check the Internet on GUI if the Connection is “Keep Alive” or not.
Q: Why the Roaming LED on Router is light?
A: Because the SIM/USIM is in roaming network.
If you want to connect to the network while roaming:
1. Ask the operator of SIM to turn on the roaming service allowed to
connect to the network.
2. Set the Internet on GUI with Roaming Connection Enabled.
Q: Why can't I link on the GUI?
A: If you have changed your WiFi security, SSID, Local IP address, you
have to repair your network to get a new IP that you can link the GUI.
XP:
If you are a WiFi user, click Network Connections and right click on
Wireless Network Connection, click Repair.
50

Appendix A: FAQ
If you use Local Area Connection to connect the Router, click
Network Connections and right click on Local Area Connection, click
Repair.
51
Vista:
1. If you are a WiFi user, please click Network and Sharing Center >
Manage network connections > Wireless Network Connection >
Diagnose

Appendix A: FAQ
2. Please click Reset the network adapter “Wireless Network
Connection” and it will began to repair.
3. If you use Local Area Connection to connect the Router, please
click Network and Sharing Center > Manage network connections
> Local Area Connection > Diagnose, do the step 1 and following
the message to repair it.
Q: How to setup my WiFi settings from GUI?
A: Entering the GUI first then click WiFi > Basic WiFi Network, you can
setup your basic WiFi settings here.
If you want to set your WiFi Security please click “WiFi Security”.
There are six wireless security mode options supported by the
Router: WEP, WPA Personal, WPA2 Personal, WPA Enterprise,
WPA2 Enterprise, RADIUS.
52

Appendix A: FAQ
Q: How can I have a long-time link?
A: Please set the internet > Basic Setting > 3.5G HSPA Setting >
Connection to Keep Alive.
Q: Why can’t I use the Router in the office?
A: Your Router’s IP address might be conflict with the office default
settings.
Q: Why my internet speed is so slow with Router?
A: 1. You can check the GUI Status > Single Quality, the Rx Signal
Strength. If the footstep is too low it means the signal is too weak.
2. You can go to the GUI WiFi > Basic WiFi Network, change the
Standard Channel to others then save.
53

Appendix A: FAQ
Q: Why can’t I use VPN via Router?
A: You may check your office IP settings, the IP settings must not
conflict with each other.
Q: How do I do the settings when I use xDSL to link the Router?
A: 1. PPPoE: Go to the GUI Internet > Basic Setting > Ethernet Setting.
Change Connection Type to PPPoE Fill information in the blank of
Username and Password which provide by your ISP. Remember
to connect your xDSL or Modem to the WAN Port on your Router.
2. Static IP: Go to the GUI Internet > Basic Setting > Ethernet Setting.
Change Connection Type to Static IP. Fill information in the blank
provide by your ISP. Remember to connect your xDSL or Modem
to the WAN Port on your Router.
Q: Can I prevent others from using my Router?
A: Yes, there are some ways to prevent others from using your
ROUTER.
1. Enable your WiFi client filter.
2. Disabled your SSID Broadcast.
3. Setting your WiFi security.
Q: My PIN code is enabled and where can I input the PIN code to use my
Router?
A: Enter GUI > 3.5G HSPA > PIN Verification and input your PIN Code.
Q: Why does my SIM status display “No Device” or “SIM Error”, what can
I do?
A: You can check the SIM card is inserted correctly in your router.
Q: Where can I change the password of Router?
54

Appendix A: FAQ
A: Enter GUI > Admin > Management
Q: Can I backup all my settings of Router?
A: Enter GUI > Admin > Recover & Renewal, Select “Backup
Configuration”.
Q: How to use the Reset button on the Router?
A: 1. Short press the Reset can restart the Router.
2. Long press the Reset for more than 5 sec can reset the Router to
factory default.
Q: Where can I reset Router to factory default?
A: 1. Long press the Reset button on the Router for more than 5 sec.
2. Enter GUI > Admin > Recover & Renewal, Select “Restore Factory
Defaults”.
55

Appendix B: Specification
Appendix B: Specification
Form Factor
Dimension
(L x W x H, mm)
Weight (g) TBD
103.2 x 116 x 24 (PCB 92 x 106 x 1.2)
Interface
LAN port RJ45, 1 port
WAN port RJ45, 1 port, can be configured to be 2nd LAN port
Power supply plug Yes
Reset button Yes
SIM slot Yes, Push-push type
Connectivity and Data Speed
UMTS Band By built-in module
HSPA/WCDMA Data
Rate
WCDMA power class Power Class 3
WLAN 802.11b/g with Pre-n 2.4 GHz band
Downlink: up to 28.8 Mbps; Uplink: up to 5.7 Mbps
LAN Ethernet 10/100 Mbps
Antenna
GSM/WCDMA Main
Antenna
WCDMA RX Diversity
Antenna
3G External Antenna
Port
WiFi Antenna Embedded
WiFi External Antenna No
Embedded
Embedded
Yes
56

Appendix B: Specification
Protocol
Default connection "3.5G HSPA First" or "Ethernet First" customizable
Automatic WAN
connection fail-over
Supported
WME Traffic
Prioritization / Traffic
Supported
Shaping
Fixed WAN
connection
UMTS/HSPA
connection
DHCP, Static IP, PPPoE, PPTP, L2TP
Connection On Demand, Keep Alive, Auto APN matching
with USIM
Multiple VPN passthrough (IPsec, PPTP, L2TP), Internet
Security
access restriction, Firewall, DoS Prevention, Traffic and
Event Logging
Port forwarding, Port triggering, DMZ,Multicast
NAT-NAPT
Pass-Through, Static Routing, Dynamic Routing (RIP 1,
RIP2), QoS
DNS DNS Agent, DDNS
Yahoo messenger, AOL messenger, MSN messenger, ICQ,
ALG Support
RealAudio, NetMeeting, Telnet, FTP, Microsoft Traceroute,
Quake, IRC, Microsoft PPTP Client
Browser-based Admin
GUI
Browser-based Admin
GUI Multi-Language
Supported
Other Features
Setup Wizard in GUI.
Browser supported: IE, Firefox, Safari
Arabic, Dutch, English, French, German, Italian, Portugal,
Russian, Spanish, Traditional Chinese,
IPv4, TCP, UDP, ICMPv4, ARP, DHCP Server/Client,
HTTPs, NTP, TFTP server, MAC Clone
Wireless LAN
802.11b data rate 1/2/5.5/11 Mbps, Auto or Fixed Rate
802.11g data rate 6/9/12/18/24/36/48/54 Mbps, Auto or Fixed Rate
802.11n data rate 65Mbps/135Mbps (No MIMO)
WPA2/WPA/AES/TKIP, WPA/WPA2 PSK mode, 802.1x
Security
Other Features Support up to 32 simultaneous wireless users, WME
(identify all EAP types supported), 64/128 bits WEP
Encryption, MAC address filtering, open system and shared
key authentication, SSID Broadcast Disable
Status Indication
LED LED location from top to bottom:
57

Appendix B: Specification
Accessories
UMTS, Roaming, WLAN, Ethernet, DIAG and Power.
UMTS, Roaming, WLAN, Ethernet, DIAG LED will be
multiplexed for signal strength when 3G button short
pushed
Power adaptor
Supported, Input 100~240V, 50~60GHz
Output 12V, 1A (targeted)
Power Consumption
Voltage Supported, Input 100~240V, 50~60GHz
Data mode 4.0V Peak: 2.5A Average: 1A / 1.5V average: 0.5A
Environment
Operation
Temperature
Storage Temperature
Operating Humidity
Storage Humidity
0°C to 40°C (32°F to 104°F)
-20°C to 60°C (-4°F to 140°F)
10% to 80% Non-Condensing
5% to 90% Non-Condensing
Conformance
NCC
FCC
RoHS
58

Appendix C: Important Safety Information and Glossary
Appendix C: Important Safety
Information and Glossary
Europe – EU Declaration of Conformity
This device complies with the essential requirements of the R&TTE Directive
1999/5/EC. The following test methods have been applied in order to prove
presumption of conformity with the essential requirements of the R&TTE Directive
1999/5/EC:
- EN60950-1:2001 A11:2004
Safety of Information Technology Equipment
- EN50385 : (2002-08)
- Product standard to demonstrate the compliance of radio base stations and fixed
terminal stations for wireless telecommunication systems with the basic
restrictions or the reference levels related to human exposure to radio frequency
electromagnetic fields (110MHz - 40 GHz) - General public
- EN 300 328 V1.7.1: (2006-10)
- Electromagnetic compatibility and Radio spectrum Matters (ERM); Wideband
Transmission systems; Data transmission equipment operating in the 2,4 GHz ISM
band and using spread spectrum modulation techniques; Harmonized EN covering
essential requirements under article 3.2 of the R&TTE Directive
- EN 301 489-1 V1.6.1: (2005-09)
Electromagnetic compatibility and Radio Spectrum Matters (ERM);
ElectroMagnetic Compatibility (EMC) standard for radio equipment and services;
Part 1: Common technical requirements
- EN 301 489-17 V1.2.1 (2002-08)
- Electromagnetic compatibility and Radio spectrum Matters (ERM);
ElectroMagnetic Compatibility (EMC) standard for radio equipment and services;
Part 17: Specific conditions for 2,4 GHz wideband transmission systems and 5
GHz high performance RLAN equipment
This device is a 2.4 GHz wideband transmission system (transceiver), intended for
use in all EU member states and EFTA countries, except in France and Italy where
restrictive use applies.
In Italy the end-user should apply for a license at the national spectrum authorities in
order to obtain authorization to use the device for setting up outdoor radio links and/or
for supplying public access to telecommunications and/or network services.
This device may not be used for setting up outdoor radio links in France and in some
areas the RF output power may be limited to 10 mW EIRP in the frequency range of
59

Appendix C: Important Safety Information and Glossary
2454 – 2483.5 MHz. For detailed information the end-user should contact the national
spectrum authority in France.
0560
Česky
[Czech]
[Jméno výrobce] tímto prohlašuje, že tento [typ zařízení] je ve
shodě se základními požadavky a dalšími příslušnými
ustanoveními směrnice 1999/5/ES.
Dansk
[Danish]
Undertegnede [fabrikantens navn] erklærer herved, at følgende
udstyr [udstyrets typebetegnelse] overholder de væsentlige krav og
øvrige relevante krav i direktiv 1999/5/EF.
Deutsch
[German]
Hiermit erklärt [Name des Herstellers], dass sich das Gerät
[Gerätetyp] in Übereinstimmung mit den grundlegenden
Anforderungen und den übrigen einschlägigen Bestimmungen der
Richtlinie 1999/5/EG befindet.
Eesti
[Estonian]
Käesolevaga kinnitab [tootja nimi = name of manufacturer] seadme
[seadme tüüp = type of equipment] vastavust direktiivi 1999/5/EÜ
põhinõuetele ja nimetatud direktiivist tulenevatele teistele
asjakohastele sätetele.
English Hereby, [name of manufacturer], declares that this [type of
equipment] is in compliance with the essential requirements and
other relevant provisions of Directive 1999/5/EC.
Español
[Spanish]
Por medio de la presente [nombre del fabricante] declara que el
[clase de equipo] cumple con los requisitos esenciales y
cualesquiera otras disposiciones aplicables o exigibles de la
Directiva 1999/5/CE.
Ελληνική
[Greek]
ΜΕ ΤΗΝ ΠΑΡΟΥΣΑ [name of manufacturer] ΔΗΛΩΝΕΙ ΟΤΙ [type of
equipment] ΣΥΜΜΟΡΦΩΝΕΤΑΙ ΠΡΟΣ ΤΙΣ ΟΥΣΙΩΔΕΙΣ
ΑΠΑΙΤΗΣΕΙΣ ΚΑΙ ΤΙΣ ΛΟΙΠΕΣ ΣΧΕΤΙΚΕΣ ΔΙΑΤΑΞΕΙΣ ΤΗΣ
ΟΔΗΓΙΑΣ 1999/5/ΕΚ.
Français
[French]
Par la présente [nom du fabricant] déclare que l'appareil [type
d'appareil] est conforme aux exigences essentielles et aux autres
dispositions pertinentes de la directive 1999/5/CE.
Italiano
[Italian]
Con la presente [nome del costruttore] dichiara che questo [tipo di
apparecchio] è conforme ai requisiti essenziali ed alle altre
disposizioni pertinenti stabilite dalla direttiva 1999/5/CE.
Latviski
[Latvian]
Ar šo [name of manufacturer / izgatavotāja nosaukums] deklarē,
ka [type of equipment / iekārtas tips] atbilst Direktīvas 1999/5/EK
būtiskajām prasībām un citiem ar to saistītajiem noteikumiem.
Lietuvių
[Lithuanian]
Šiuo [manufacturer name] deklaruoja, kad šis [equipment type]
atitinka esminius reikalavimus ir kitas 1999/5/EB Direktyvos
nuostatas.
Nederlands
[Dutch]
Hierbij verklaart [naam van de fabrikant] dat het toestel [type van
toestel] in overeenstemming is met de essentiële eisen en de
andere relevante bepalingen van richtlijn 1999/5/EG.
60

Appendix C: Important Safety Information and Glossary
Malti
[Maltese]
Magyar
[Hungarian]
Polski
[Polish]
Português
[Portuguese]
Slovensko
[Slovenian]
Slovensky
[Slovak]
Suomi
[Finnish]
Svenska
[Swedish]
Hawnhekk, [isem tal-manifattur], jiddikjara li dan [il-mudel
tal-prodott] jikkonforma mal-ħtiġijiet essenzjali u ma provvedimenti
oħrajn relevanti li hemm fid-Dirrettiva 1999/5/EC.
Alulírott, [gyártó neve] nyilatkozom, hogy a [... típus] megfelel a
vonatkozó alapvetõ követelményeknek és az 1999/5/EC irányelv
egyéb elõírásainak.
Niniejszym [nazwa producenta] oświadcza, że [nazwa wyrobu] jest
zgodny z zasadniczymi wymogami oraz pozostałymi stosownymi
postanowieniami Dyrektywy 1999/5/EC.
[Nome do fabricante] declara que este [tipo de equipamento] está
conforme com os requisitos essenciais e outras disposições da
Directiva 1999/5/CE.
[Ime proizvajalca] izjavlja, da je ta [tip opreme] v skladu z
bistvenimi zahtevami in ostalimi relevantnimi določili direktive
1999/5/ES.
[Meno výrobcu] týmto vyhlasuje, že [typ zariadenia] spĺňa základné
požiadavky a všetky príslušné ustanovenia Smernice 1999/5/ES.
[Valmistaja = manufacturer] vakuuttaa täten että [type of equipment
= laitteen tyyppimerkintä] tyyppinen laite on direktiivin 1999/5/EY
oleellisten vaatimusten ja sitä koskevien direktiivin muiden ehtojen
mukainen.
Härmed intygar [företag] att denna [utrustningstyp] står I
överensstämmelse med de väsentliga egenskapskrav och övriga
relevanta bestämmelser som framgår av direktiv 1999/5/EG.
Federal Communication Commission
Interference Statement
15.21
You are cautioned that changes or modifications not expressly approved by the
part responsible for compliance could void the user’s authority to operate the
equipment.
15.105(b)
This equipment has been tested and found to comply with the limits for a Class B
digital device, pursuant to part 15 of the FCC rules. These limits are designed to
provide reasonable protection against harmful interference in a residential installation.
This equipment generates, uses and can radiate radio frequency energy and, if not
installed and used in accordance with the instructions, may cause harmful
interference to radio communications. However, there is no guarantee that
interference will not occur in a particular installation. If this equipment does cause
harmful interference to radio or television reception, which can be determined by
turning the equipment off and on, the user is encouraged to try to correct the
61

Appendix C: Important Safety Information and Glossary
interference by one or more of the following measures:
-Reorient or relocate the receiving antenna.
-Increase the separation between the equipment and receiver.
-Connect the equipment into an outlet on a circuit different from that to which the receiver is
connected.
-Consult the dealer or an experienced radio/TV technician for help.
This device complies with Part 15 of the FCC Rules.Operation is subject to the
following two conditions:
1) this device may not cause harmful interference and
2) this device must accept any interference received,, including interference that may
cause undesired operation of the device.
FCC RF Radiation Exposure Statement:
1. This Transmitter must not be co-located or operating in conjunction with any other
antenna or transmitter.
2. This equipment complies with FCC RF radiation exposure limits set forth for an
uncontrolled environment. This equipment should be installed and operated with a
minimum distance of 20 centimeters between the radiator and your body.
62

Appendix C: Important Safety Information and Glossary
Glossary
2G: Second-generation mobile networking technology. Represents a switchover from
analog to digital; most 2G networks use GSM.
3G: Third-generation mobile networking technology that enables simultaneous
transfer of voice and non-voice data; most 3G networks use WCDMA.
3.5G: A more recent standard of mobile networking technology; generally uses
HSDPA.
3.75G: A more recent standard of mobile networking technology; generally uses
HSUPA.
APN (Access Point Name/Network): Provides GPRS routing information. Consists
of:
Network ID: Identifies the external service requested by a GPRS user.
Mobile network operator ID: Specifies routing information.
ARFCN (Absolute Radio Frequency Channel Number): The specific ID numbers
for all radio channels used in cellular mobile communications.
bps (bits per second): How data flow is measured.
CHAP (Challenge Handshake Authentication Protocol): CHAP identifiers are
changed frequently and authentication can be requested by the server at any
time.
DNS (Domain Name System): Helps route network traffic by making the addressing
process more user-friendly.
DHCP (Dynamic Host Configuration Protocol): How devices obtain IP addresses
from a server.
DUN (Dial-Up Network): Windows component that enables online access via a
modem.
EDGE (Enhanced Data GSM Environment/Enhanced Data for Global Evolution):
Advanced GPRS that delivers multimedia and other data needing greater
bandwidth at up to 237 kbps.
GPRS (General Packet Radio Service): Delivers data in packets at up to 86 kbps.
GSM (Global System for Mobile Communications): The most popular cellular
network, mostly operates in 850-900 or 1800-1900 MHz; the primary 2G system.
HSDPA (High Speed Downlink Packet Access): Advanced WCDMA that delivers
downlink bandwidth intensive data at up to 7.2Mbps; typically associated with
3.5G.
HSUPA (High Speed Uplink Packet Access): Advanced WCDMA that delivers
uplink bandwidth intensive data at up to 5.76Mbps; typically associated with
3.75G.
HSPA + (High Speed Packet Access +): This is also known as HSPA Evolved, is the
next step and is more focused on delivering data services enabling speeds of up
63

Appendix C: Important Safety Information and Glossary
to 42Mbps in the downlink and 11Mbps in the uplink.
IMEI (International Mobile Equipment Identity): A number unique to each
GSM/UMTS device that can be used block network access by a stolen mobile
device.
IP (Internet Protocol): Routes packets over a network.
Kbps (Kilobits per second): A data flow measure; 1024 bits/second.
LAN (Local Area Network): A data network with limited range but good bandwidth.
Mbps (Megabits per second): A data flow measure; 1,048,576 bits/second.
PAP (Password Authentication Protocol): The difference between PAP
authentication and a manual or scripted login, is that PAP is not interactive. The
username and password are entered in the client's dialing software and sent as
one data package as soon as the modems have established a connection, rather
than the server sending a login prompt and waiting for a response.
PPP (Point-to-Point Protocol): An internet connection method.
PIN (Personal Identity Number): Four to eight digital numbers SIM card security
code; allows access to the carrier’s network.
Rx: Shorthand for Reception.
SIM (Subscriber Identity Module): A small card that contains key mobile device
identification, subscription and contact information.
Tx: Shorthand for Transmission.
WCDMA (Wideband Code Division Multiple Access): Advanced EDGE that
supports 384kbps data flow. Most 3G networks use this standard, the same as
UMTS.
64
 Loading...