

Page 1
User
Manual
BandLuxe
PR-30 Series
HSPA+ WLAN Router
P/N: <64006300011>
Page 2

Table of Contents
Introduction .............................................................................. 3
Features ................................................................................................ 3
Getting St arted ......................................................................... 4
Package Contents ................................................................................. 4
Hardware Overview ............................................................................... 5
Installation ............................................................................................. 6
USB Connectivity .................................................................................. 9
Basic Functions ................................................................................... 10
Powering On and Off ..................................................................10
Main Screen ...............................................................................10
Status Indicators ......................................................................... 11
Viewing Device Information ........................................................ 11
Enabling WLAN ..........................................................................14
Enabling WPS ............................................................................14
Notifications ................................................................................14
Battery information .............................................................................. 15
PR-30 Series Management .................................................... 17
Accessing the Device .......................................................................... 17
Wizard Setup....................................................................................... 18
Advanced ............................................................................................ 20
Info .............................................................................................20
HSPA Config ...............................................................................21
Network ......................................................................................23
WLAN .........................................................................................24
DHCP .........................................................................................26
PIN Management .......................................................................28
SD Card ......................................................................................29
Password ....................................................................................29
Upgrade ......................................................................................30
Backup & Restore ......................................................................31
File Sharing ......................................................................................... 32
Appendices ............................................................................. 34
Appendix A: F AQ ................................................................................. 34
Appendix B: Specifications .................................................................. 34
Appendix C: Important Safety Information .......................................... 37
1
Page 3

Europe – EU Declaration of Conformity ..................................... 37
GCF ........................................................................................... 38
RoHS/WEEE .............................................................................. 39
Glossary ............................................................................................. 39
2
Page 4

Introduction
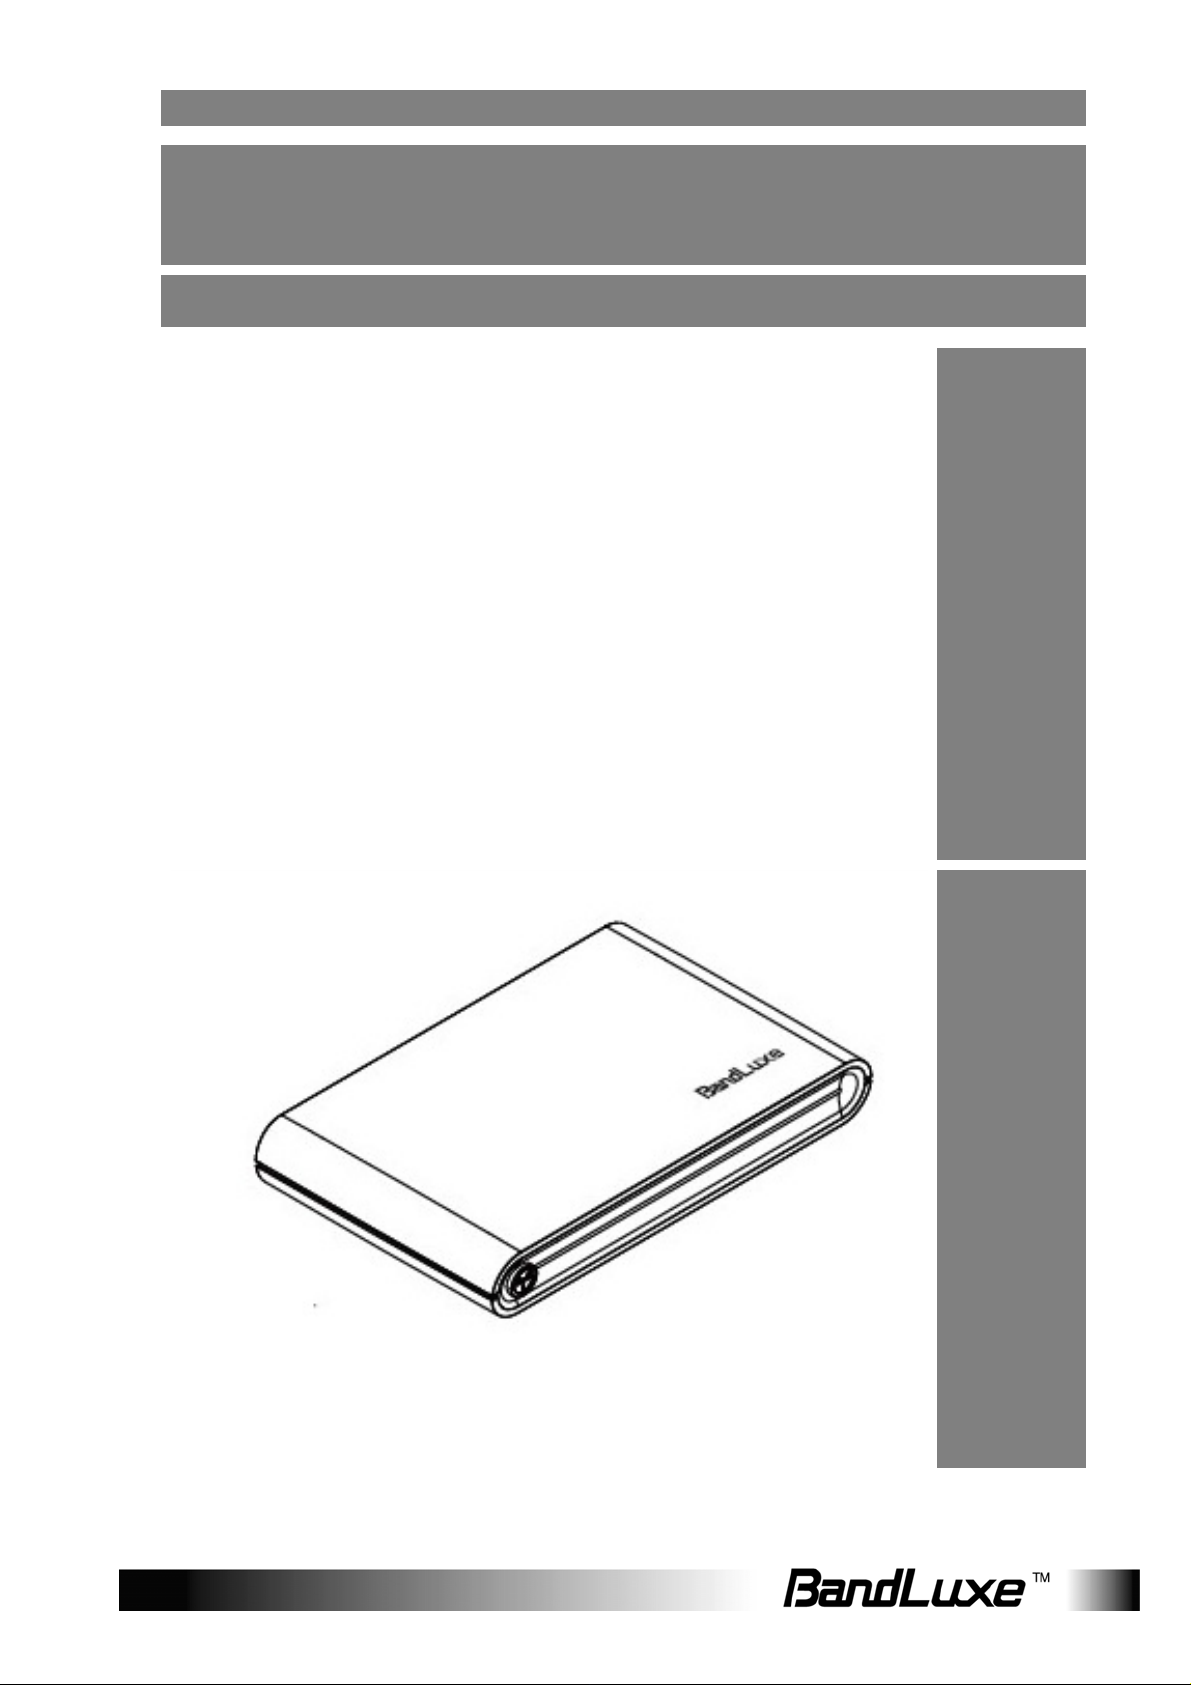
Introduction
Thank you for your purchase of the PR-30 Series HSPA+ WLAN Pocket
Router. This device is designed to access the Internet via 3.75G
technology and share the Internet through a WLAN network. You can also
share files with your friends with an optional microSD card. The PR-30 is
portable and easy to use. Reading the user manual will help you make
the most of your product.
Features
• HSPA+ WLAN Router
• WPS Support
• Supports up to 5 simultaneous wireless users
• Supports optional microSD card (up to 16 GB)
• Uplink speeds up to 5.7 Mbps
• Downlink speeds up to 21 Mbps
• Supports WLAN 802.11 b/g
• Operating Frequency Bands
o UMTS/HSPA+: PR30 – 850/1900
o GSM:
• External 3G Antenna Port Ready
850/1900 MHz
3
Page 5
Getting Started
Getting S tarted
This chapter will provide a hardware overview of the PR-30 Series
HSPA+ WLAN Pocket Router and step by step instructions on installing
the device.
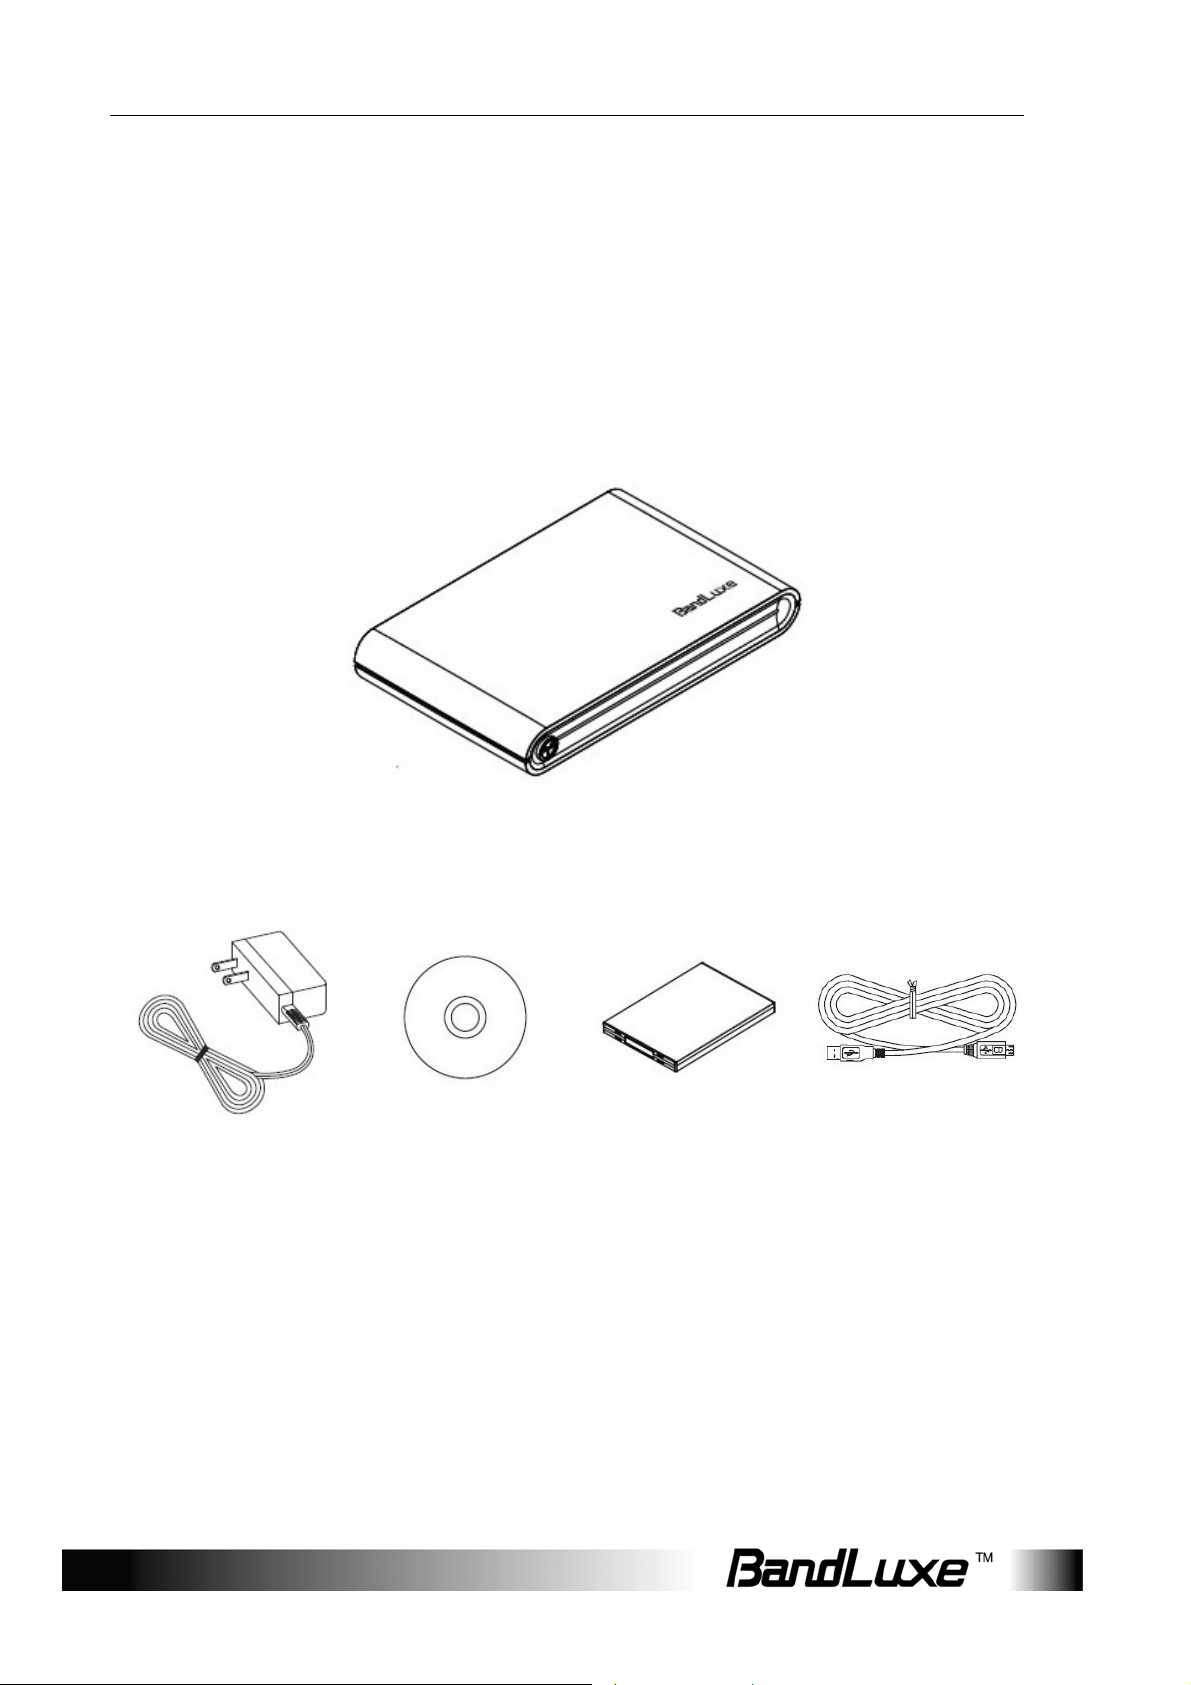
Package Contents
Power Adapter
PR-30 Series HSPA+ WLAN Router
User Manual
Battery USB Cable
CD
4
Page 6
Getting Started
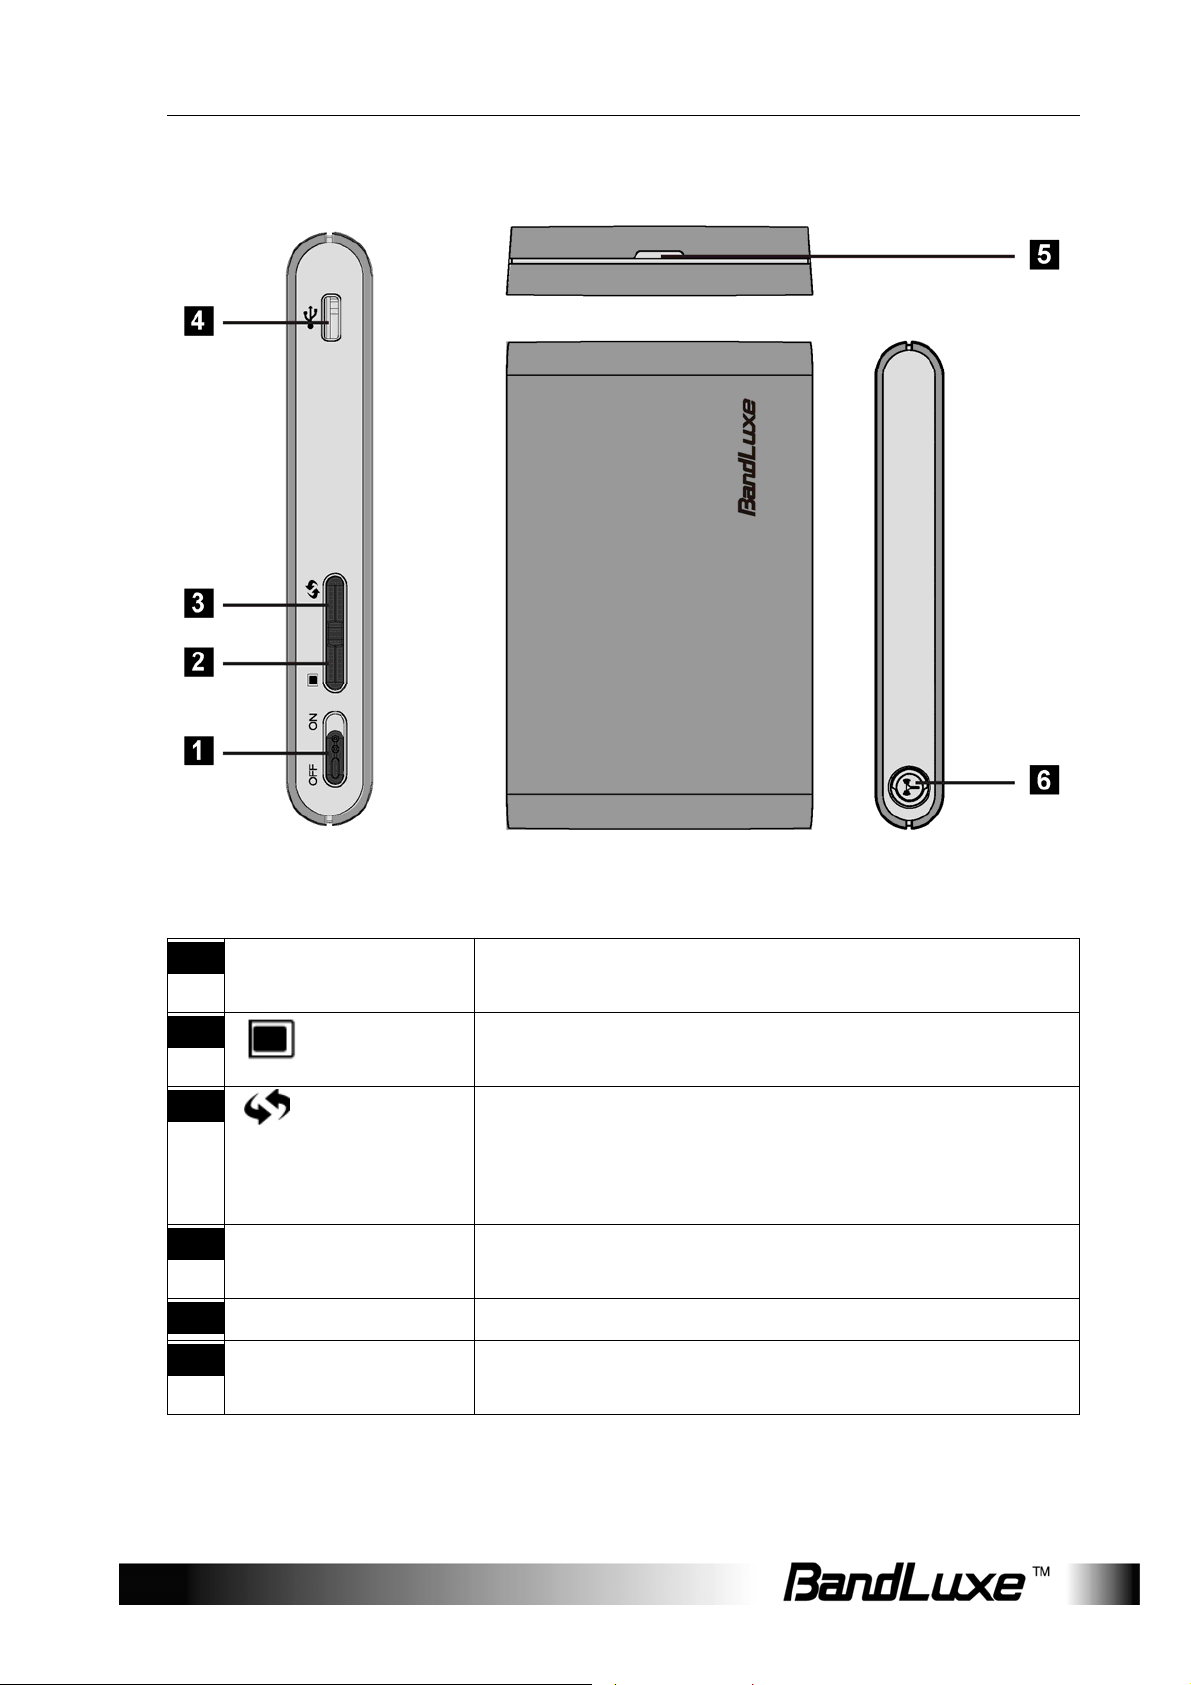
Hardware Overview
1 ON/OFF switch Powers on/off the router. See “Powering On and
Off”, p.10.
2
3
Scrolls through device information on the LCD
screen. See “Viewing Device Information”, p.11.
Activates/deactivates WPS. See ”Enabling
WPS”, p.14.
Enables/Disables WLAN. See “Enabling WLAN”,
p. 14.
4 USB port Connect the USB cable to the power adapter or
a PC. See “USB Connectivity”, p.9.
5 Back cover notch Use to open back cover.
6 3G external
antenna port
You can attach a 3G external antenna (optional)
for stronger signal strength.
Additional Button Functions:
5
Page 7
Getting Started
The screen automatically dims after a period of inactivity. To illuminate
the screen again, press the
or .
Hard Reset
To reset the device to factory default, press and hold both the
for at least 10 seconds.
Installation
and
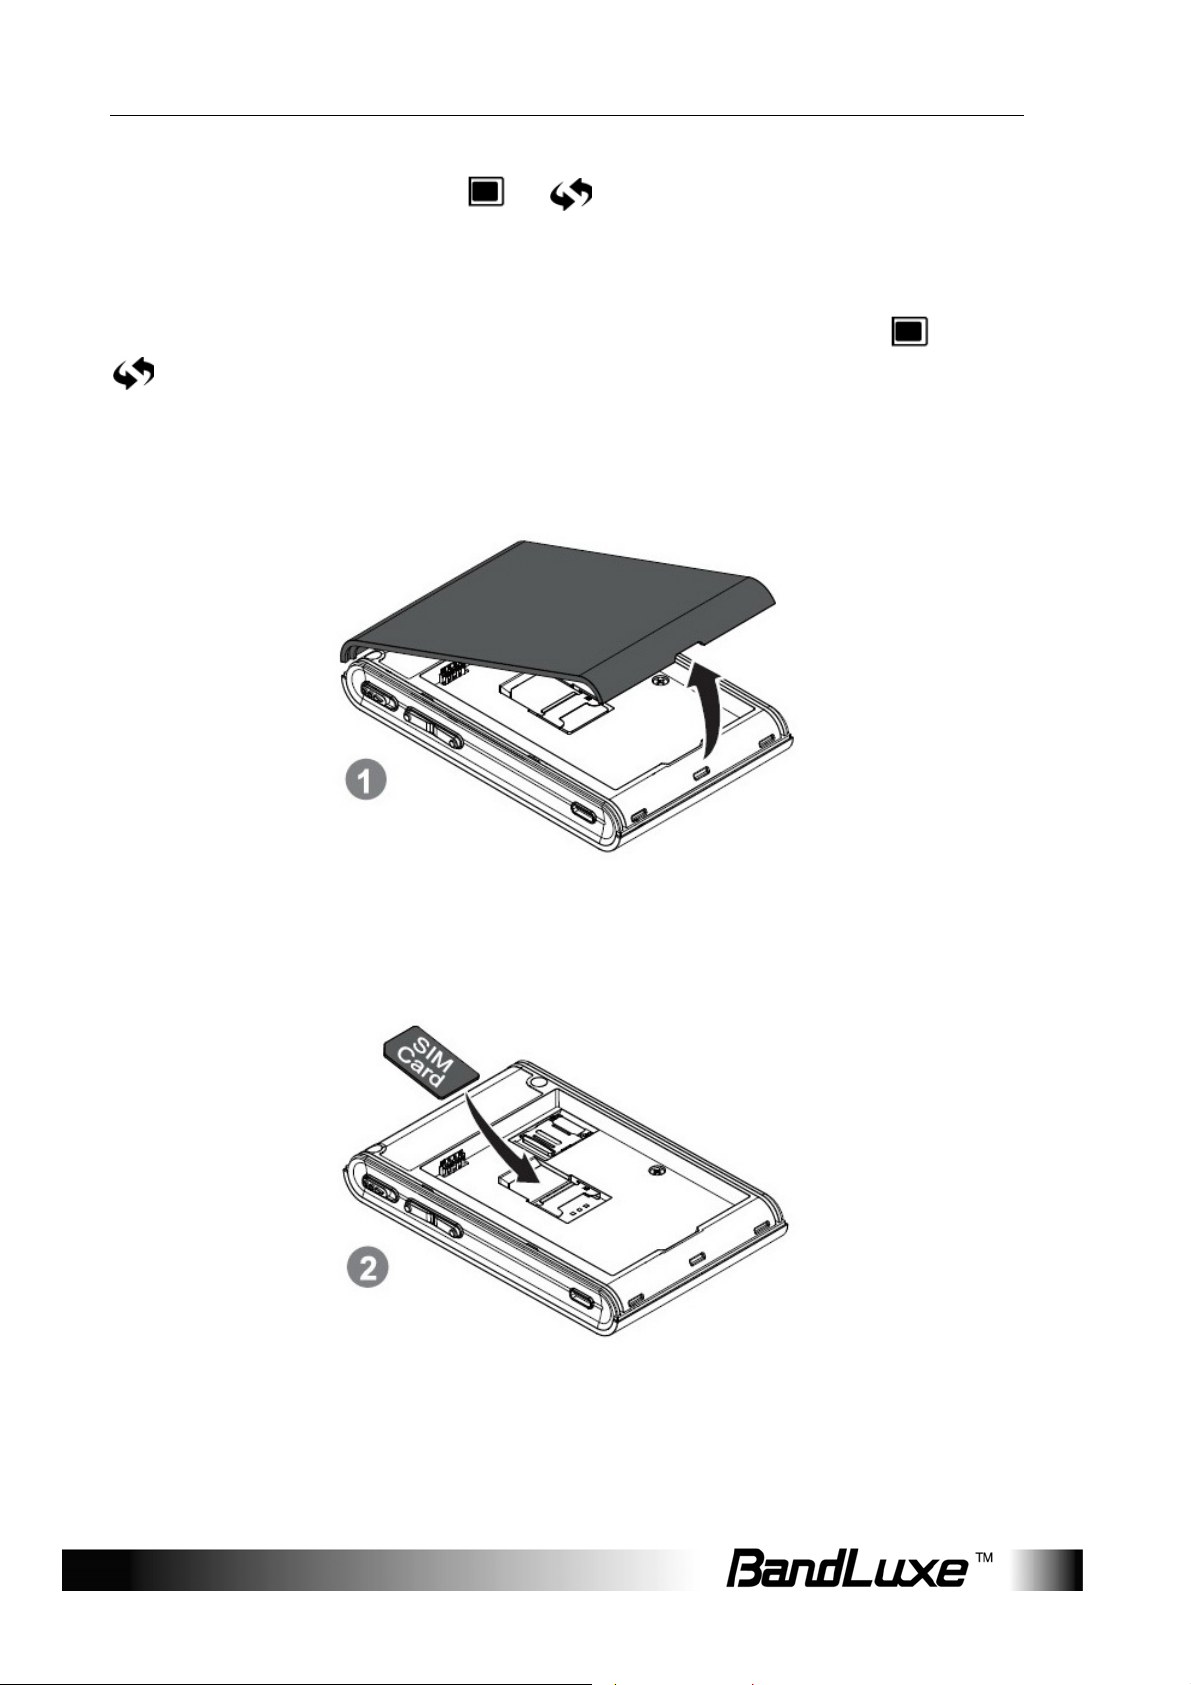
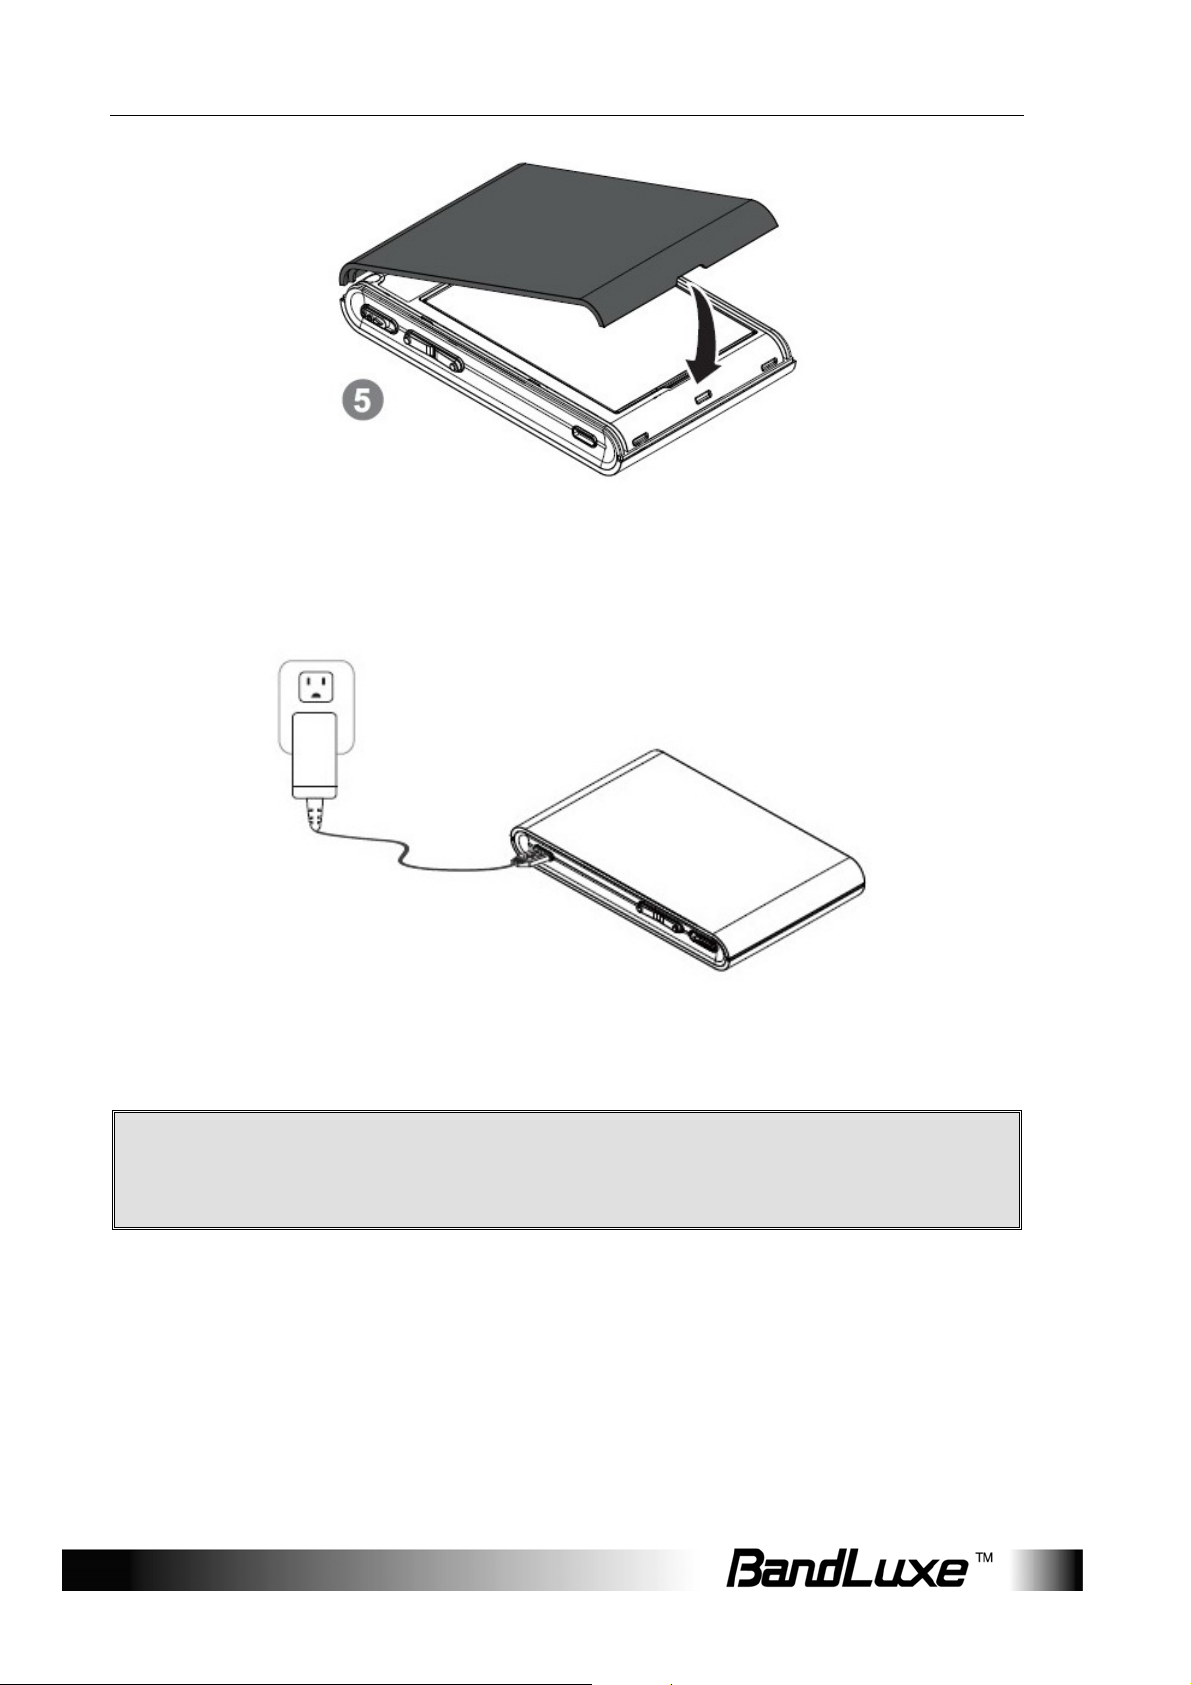
1. Remove the back cover of the device.
2. Insert the SIM card into the slot. Ensure the SIM card orientation
matches the SIM card slot.
6
Page 8

Getting Started
3. Insert the microSD card (optional) into the slot with the metal contacts
facing down and towards the slot.
NOTE: The optional microSD card allows for file sharing between PCs
on the same network when the PR-30 is connected via the USB
cable/WLAN to the client . For more details, see “File Sharing”, p.
32.
4. Insert the battery. Ensure the battery contacts are properly oriented.
7
Page 9
Getting Started
5. Replace the back cover of the device.
6. Connect the power adapter to the router. Plug the power adapter into a
wall outlet to charge the battery.
Warning: To prevent the battery from overheating, do not
;
NOTE: When the USB cable is connected to a PC, the cable provides
8
charge the device for long periods of time while using.
3.5G connectivity. The USB port may not provide sufficient charge
to replenish battery power. To charge the battery, use the power
adapter to connect the device to a wall outlet.
Page 10

Getting Started
7. Link the router to your PC.
• To link the router to your PC via a wireless connection, in Microsoft
Windows, go to Control Panel > Network Connections. Right click
on the Wireless Network Connection and choose View A vailable
Wireless Networks. Select the SSID and enter the password (see
the network information card in the box) and click Connect.
• To link the router to your PC via a USB connection, connect the
USB cable to the device and PC. Microsoft Windows automatically
installs RNDIS drivers and establishes a local area connection, as
indicated by the Local Area Connection icon on your PC.
To use the web-based interface to configure and manage the wireless
settings, see “PR-30 Series Management”, p. 17.
USB Connectivity
If the USB cable is connected between the device and a PC, the device
establishes a local area connection, indicated by the Local Area
Connection icon on the client PC, and a connection to the Internet via the
user's mobile network connection, such as HSPA.
If the USB cable is not used, the device may function as a wireless router
and/or an Internet access point.
As a wireless router, the PR-30 is capable of supporting up to 5
simultaneous wireless connections. In addition, the device allows users to
share a single Internet connection.
9
Page 11
Getting Started
If a microSD card is installed, the card may be used as a common
storage space among the connected PCs. The PR-30 supports
microSD cards up to 16GB. For more details, see “File Sharing”, p.
32.
USB No USB
Internet Access Yes Yes
Wireless connections No 5 simultaneous
File sharing Yes Yes
Basic Functions
Powering On and Off
To power the PR-30 on, slide the power switch located on the side of
the chassis to the ON position. When the PR-30 is powered on, the
screen displays a series of power-on animation.
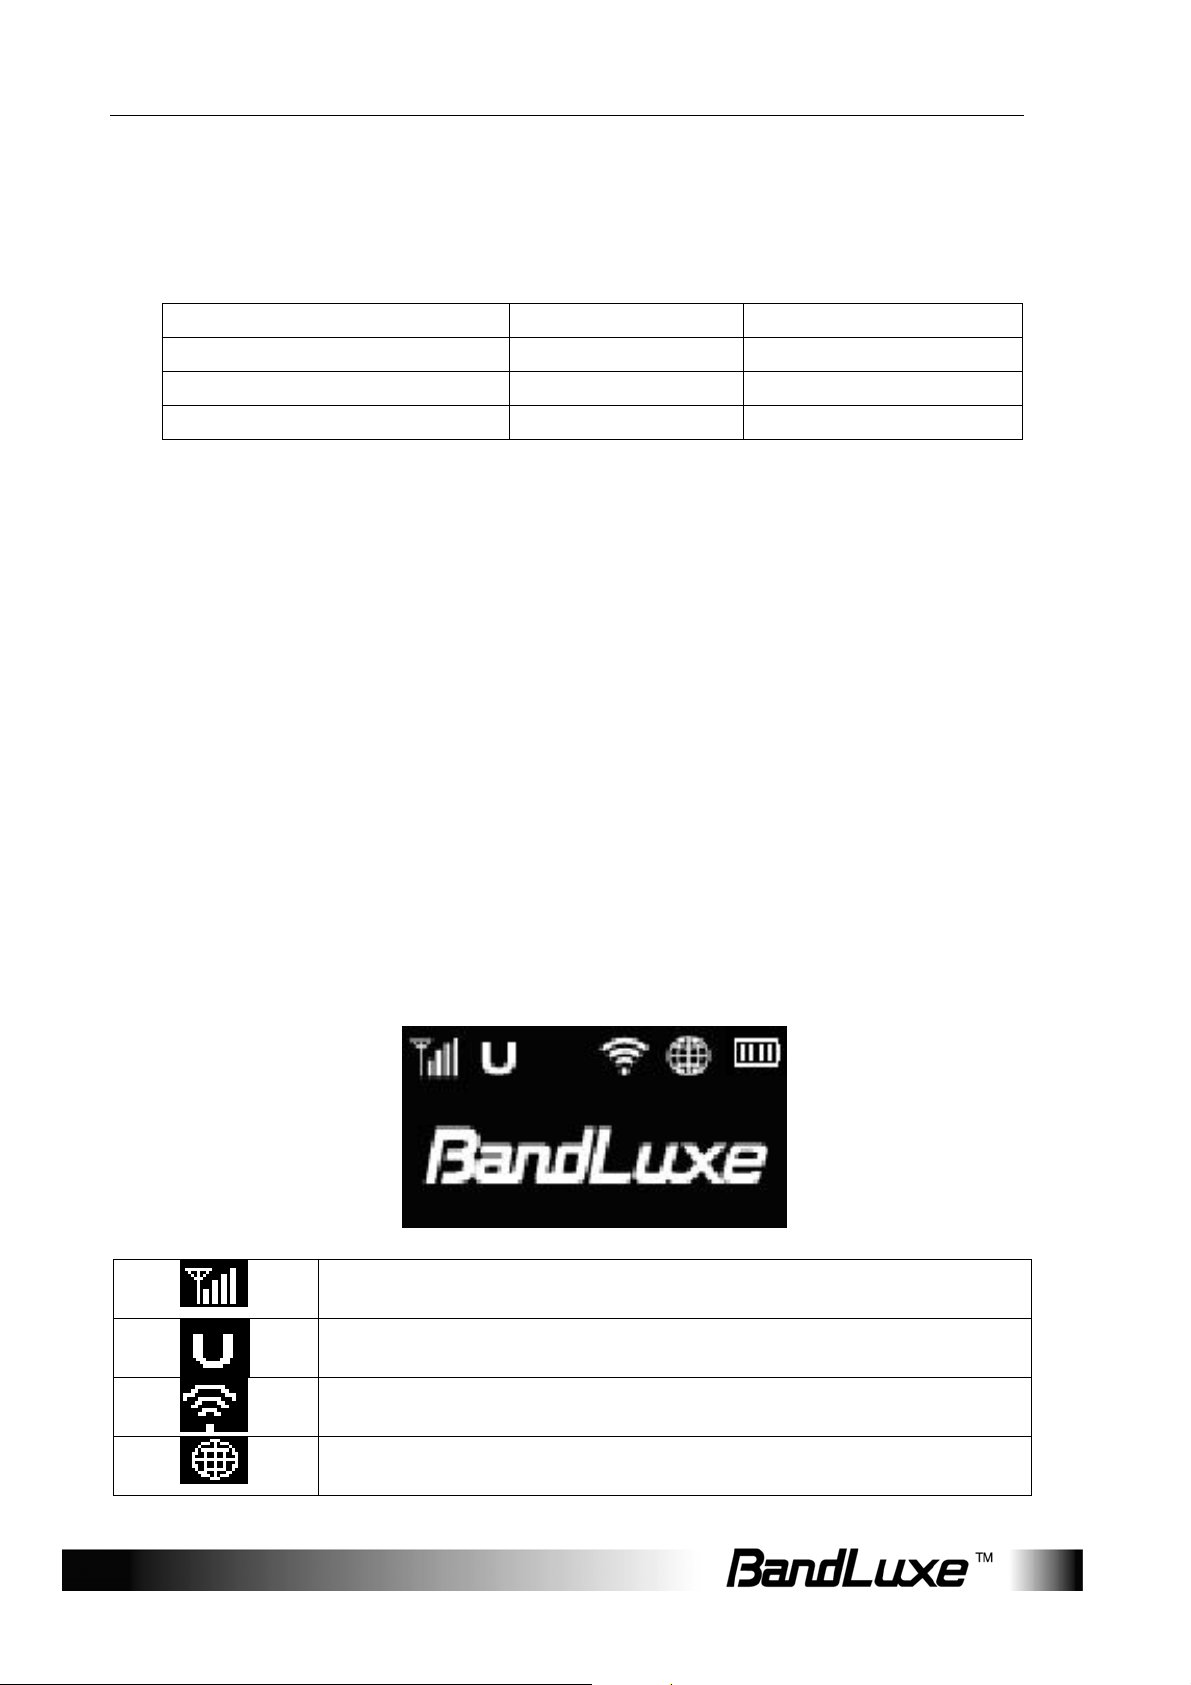
Main Screen
The Main Screen is the default display screen and provides a quick
glance at the status of the PR-30.
Signal Strength
10
Type of Radio Access Technology
WLAN On/Off
Radio Access Roaming On/Off
Page 12
Getting Started
Battery Level
Subscriber's Network Operator
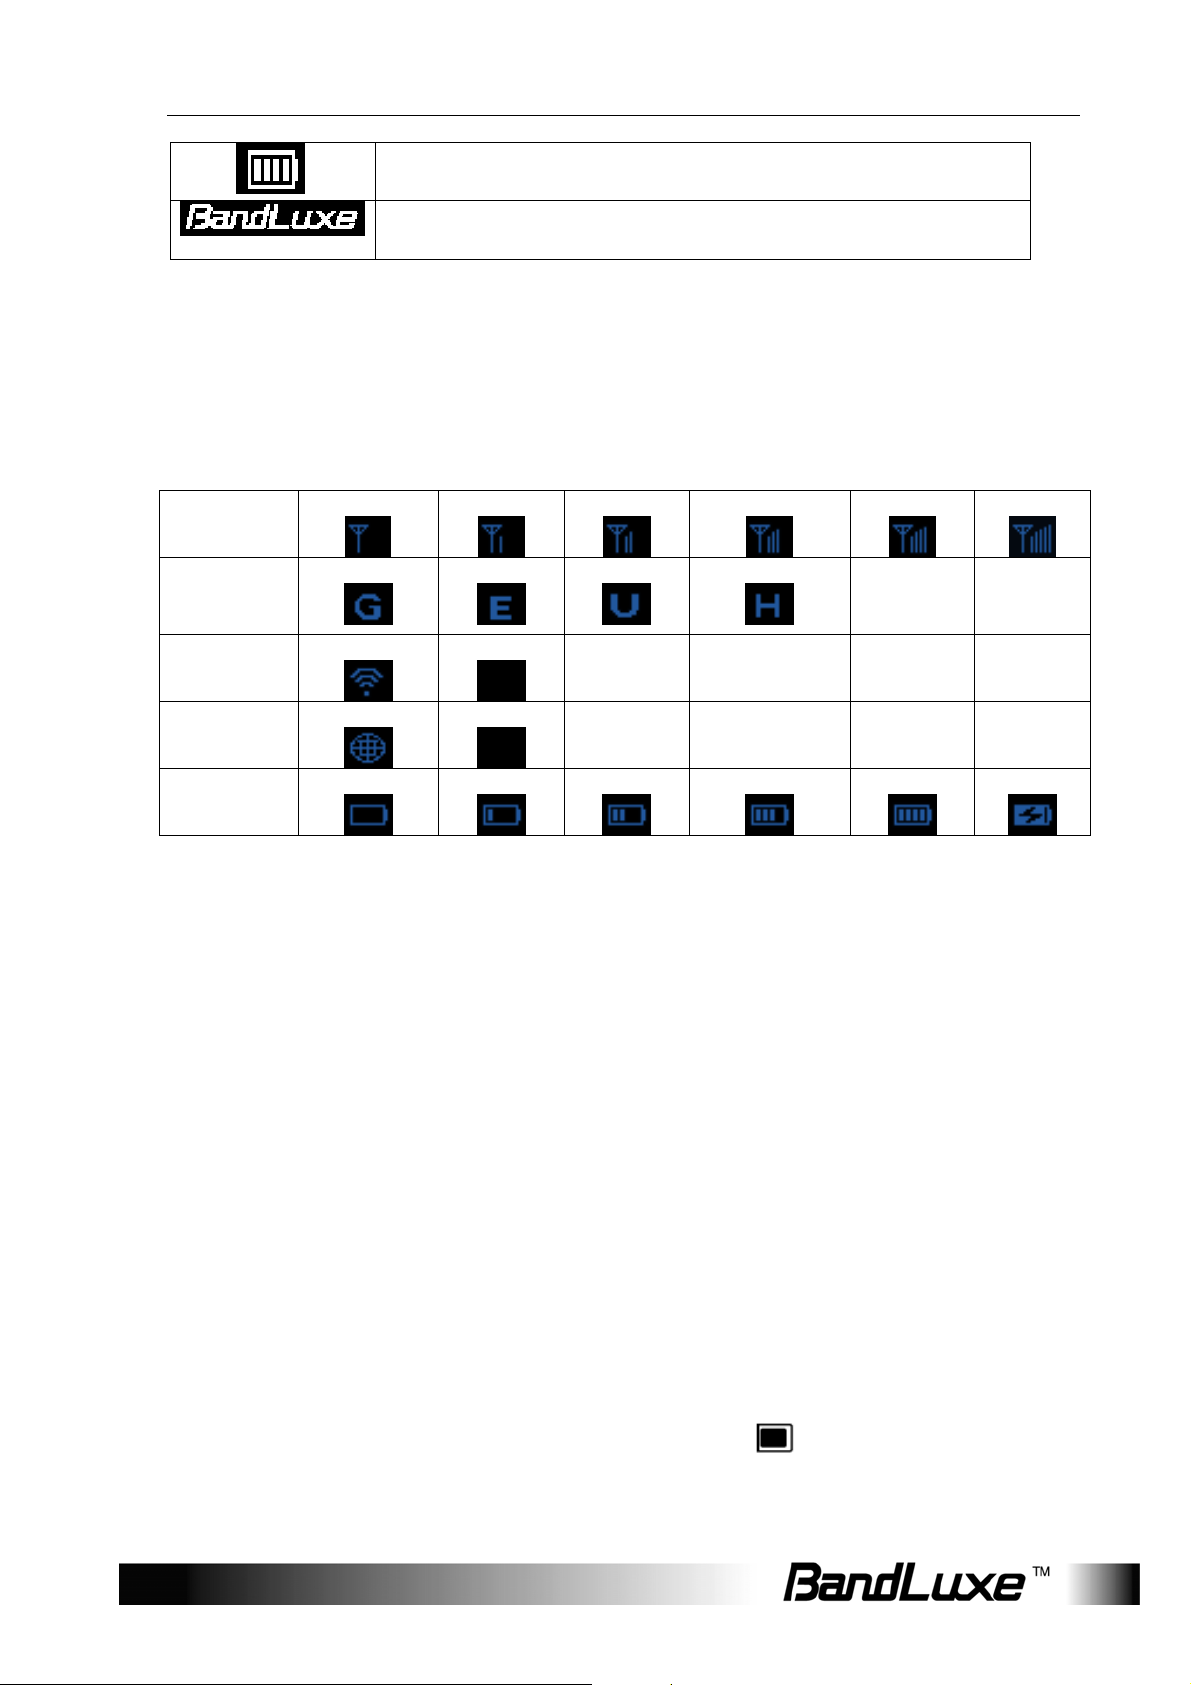
Status Indicators
The top of the screen may display the following icons, depending on the
status of the device.
Signal
Strength
Radio
Access
Network
WLAN On
Level 0
GSM/GPRS
Level 1
EDGE
Off
Level 2 Level 3 Level 4
UMTS HSPA/HSPA+
Level 5
Roaming On
Battery Level 0
Off
Level 1
Level 2 Level 3 Full
Charging
The Signal Strength icon indicates the relative strength of the radio signal
from the nearest base station.
The Radio Access Network icon indicates the subscriber’s network
mobile technology. It may vary from user to user and from region to
region.
The WLAN icon indicates whether the WLAN feature is enabled or
disabled.
The Roaming icon indicates whether it is a roaming status or not.
The Battery icon indicates the current battery level and whether the
battery is charging or not charging.
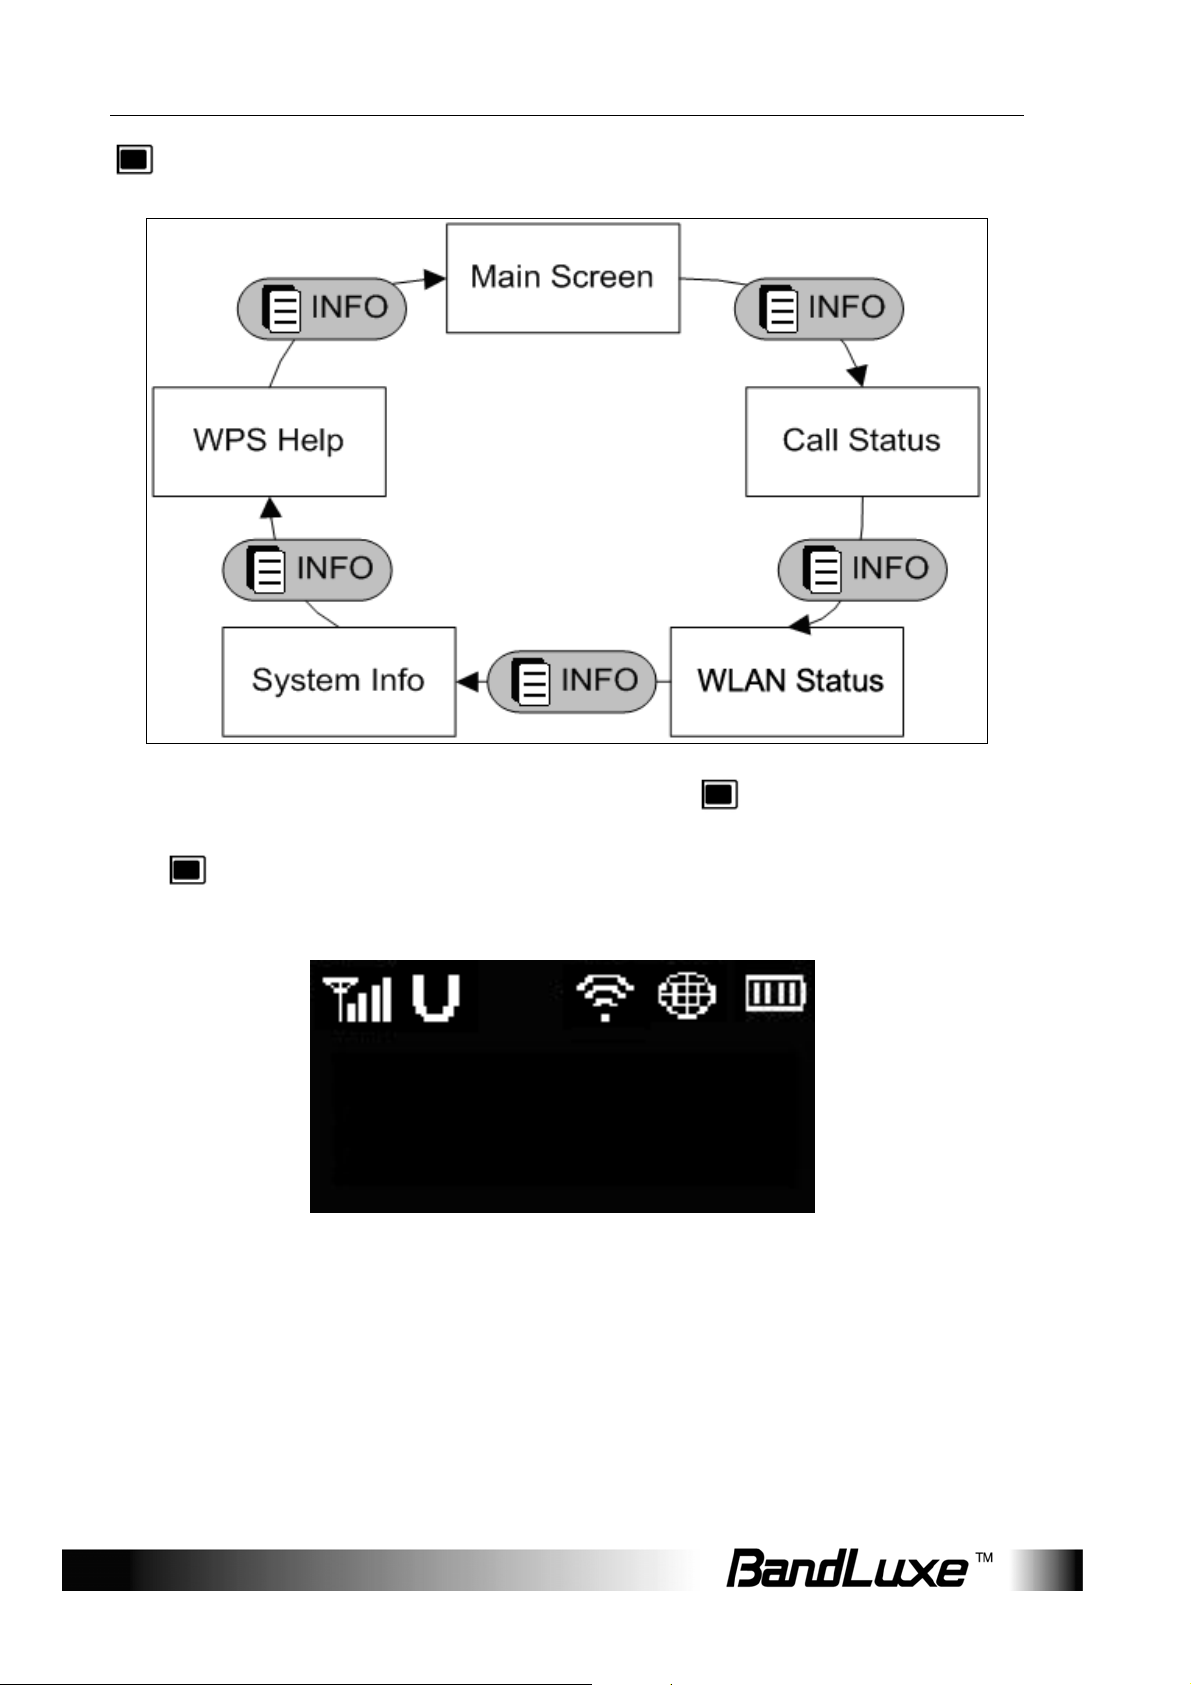
Vi ewing Device Information
From the Main Screen, the user can press the to view the device
status in more detail.
11
Page 13
Getting Started
Flow Diagram:
As indicated by the flow diagram, pressing the
cycles through each
screen. For example, starting from the Main Screen, if the user presses
the
twice, the WLAN Status screen is displayed on the screen.
UMTS
Disconnected
The Call Status screen displays the radio access technology of current
data call and the status of the call.
12
Page 14

Getting Started
(4)-SSID:
BR1E548B
The WLAN Status screen displays detailed information on the PR-30
WLAN Router’s network.
The top line displays the number of clients, in parenthesis, currently
connected to the network. The PR-30 WLAN Routers can support up to a
maximum of 5 simultaneous users on the network.
The bottom line displays the SSID of the network. By default, the SSID is
"BR + last 6 digits of the router's MAC address". To change the SSID, see
"WLAN”, p.24.
1.5.01.01.12
8.09-010
The System Info screen displays the firmware version of 3G module and
router.
The module firmware version is on the top line.
The router firmware version is on the bottom line.
To update the firmware, see “Upgrade”, p. 30.
The WPS Help screen provides hint s on how to activate the WPS Feature
on the PR-30 WLAN Router.
13
Page 15

Getting Started
Enabling WLAN
The toggles WLAN functionality on the device.
To disable WLAN, short press the
To enable WLAN, short press the
.
again.
Enabling WPS
WPS is a standard designed to easily setup and automatically configure
secure WLAN networks between two WPS supported devices. If the
client PC supports WPS, the WPS feature can be a user-friendly and
simple process to get your WLAN network up and running.
1. Enable WLAN.
2. Press and hold the
Device. is displayed.
3. Confirm the WPS option on the client PC trying to connect to the
PR-30. WPS connecting device followed by New device
connected is displayed. If you do not confirm the WPS connection
within 120 seconds, No Device found is displayed and you must
begin the process again.
When WPS is enabled, the screen automatically reverts to the WLAN
Status screen after a period of inactivity.
for at least 5 seconds. WPS: Connecting
Notifications
FW updating…
If the firmware on the PR-30 is being updated via the Web interface, the
screen informs the user of the process.
14
Page 16

Getting Started
PIN enabled act
via Web.
If the user has enabled the PIN security protection on the SIM card, the
screen directs the user to access Advanced > PIN Management via the
web interface before proceeding to use the Internet connectivity features
of the PR-30.
Battery information
The PR-30 is designed with power saving features to maximize battery
life. The device enters boot mode when the battery is nearly depleted.
Power State Wireless Feature System
3G connectivity
Nominal > Battery
Level 0
Boot mode < Battery
Level 0
Note: The safe temperature range for discharging and
charging the battery is as follows:
available
WLAN available
3G connectivity
available
WLAN available
Normal screen activity
Screen displays "Empty
Battery" with LCD always
on. When charging again,
it returns to normal
screen activity.
15
.
• Charging temperature: 0~40 degrees Celsius, maximum
45 degrees Celsius; once temperature exceeds 45
degrees the device will stop charging.
Page 17

Getting Started
Warning: When using in normal temperature environments,
high battery power consumption may cause the battery
temperature to exceed 45 degrees and thus stop charging if
;
connected to a wall outlet. It is not recommended to charge
and use the device at the same time.
Discharging (operating) temperature: 20~60 degrees Celsius,
maximum 75 degrees Celsius; once temperature exceeds 70
degrees the device will power off.
16
Page 18

PR-30 Series Management
PR-30 Series Management
Accessing the Device
The PR-30 WLAN Router uses the web-based interface for managing
and configuring wireless network settings. To access the interface, open a
browser such as Internet Explorer and enter the router’s default IP in the
browser’s address bar. Use the appropriate IP depending on the
connection method.
Connection method Default IP
USB 192.168.21.1
WLAN 192.168.100.1
When the login window appears, enter the default username, root, and
default password, 1234.
17
Page 19

PR-30 Series Management
Wizard Setup
Users can use the Wizard Setup to select language options and quickly
configure WLAN network settings.
To set the preferred web interface display language, select from the
drop-down menu or the country flags displayed.
To continue setup, click Next.
18
Page 20

PR-30 Series Management
The WLAN tab allows you to quickly configure your WLAN network.
Note: You may be required to reconnect to the router if you
.
SSID Network name of your WLAN network. It is case sensitive and can
not exceed 14 characters. Default name is printed on the network
information card.
Encryption Type Method of encryption used when transferring data
through the airwaves from the router to the client PC or vice versa. The
PR-30 WLAN Router supports 3 encryption types - WEP, WPA, and
WPA+WPA2.
WPA is a WLAN standard that was designed to improve the security
features of WEP. WPA2 is a more advanced, more secure version of
WPA.
change these settings from the factory default.
Passphrase (WEP only) Sequence of words or text used to automatically
generate a WEP Key. Enter a value between 8-63 characters.
WEP Key 1-4 (WEP only) Key required to decipher the data encryption
method. At least one key must be entered. Use a pre-existing passphrase
by selecting Generate 40bit Key or Generate 128bit Key or manually
19
Page 21

PR-30 Series Management
enter a WEP Key (letters from A-F and numbers 0-9). 40-bit WEP Keys
require 10 hexadecimal digits and 128-bit WEP Keys require 26
hexadecimal digits.
WPA Pre-Shared Key (WPA and WPA+WPA2) Key required to decipher
the data encryption method. Enter a value between 8-63 characters. This
field must not be left blank.
To complete setup, click Finish.
Advanced
The Advanced Tab gives the user more flexibility and control for
managing the PR-30 WLAN Router.
Info
This tab displays a summary on the current status of the device.
20
Page 22

PR-30 Series Management
System Status Displays the current state of the battery.
Local Network Displays the router's current IP and DHCP IP range. To
modify this entry, see "Network”, p. 23.
Register Network Displays information on the user’s mobile subscription
service.
Internet Connection Displays information on the current Internet
connection (if connected). To modify this entry, see "HSPA Config”, p. 21.
WLAN Network Displays information on the WLAN. To modify this entry,
see "WLAN”, p. 24.
Firmware Information Displays version numbers for the firmware.
To update the firmware, see “Upgrade”, p. 30.
To refresh these entries, reload your browser page.
HSPA Config
This tab allows you to change device settings related to the packet data
network for mobile technologies.
21
Page 23

PR-30 Series Management
Authentication Type The type of authentication used to connect to the
mobile data network. Contact your network mobile operator for details.
Roaming A feature of wireless telecommunication systems which allows
the mobile subscriber to use network services outside his/her home
mobile network, i.e. from one network provider to another.
Note: Rates for roaming can be very high. Contact your m obile
.
Redial Policy Select from the drop-down menu how often the device
connects to the Internet. Connect on Demand connects to the Internet at
user's request. The connection automatically disconnects after the idle
time expires and reconnects when uplink data is to be sent. Keep Alive
maintains an active Internet connection. If the connection is interrupted,
the router attempts to reconnect. Default option is Keep Alive.
Maximum Idle Time Select a maximum idle time (in minutes) during
which the Internet connection is maintained during inactivity. Not
applicable on Keep Alive connections. Default value is 3 mins.
Auto APN The APN (Access Point Name) is provided by your mobile
network operator for rates and more information.
22
Page 24

PR-30 Series Management
network operator. You can choose to set the APN automatically or
manually. In most cases, it is recommended to check this option. User
can press Update APN to get the latest APN data from server.
To set the APN manually, select your mobile network operator from the
Profile drop down box. The PR-30 automatically detects the operator(s)
in your area. Contact your operator for the APN, Username and
Password.
Preference Allows you to change the sequential order of the mobile
technology in which the device attempts to connect.
Select Network Allows you to select Network automatically or manually.
If you use Manual, you can choose one from list after pressing Scan
Network.
To preserve the changes you have made, click Save Changes . To apply
the saved changes, click Apply Changes. To abort the changes, click
Clear Changes.
Network
This tab allows you to change the local area network settings of the
device. For wireless settings, see "WLAN”, p. 24.
23
Page 25

PR-30 Series Management
Configuration The Router’s IP address and subnet mask which is seen
in your local network. The default IP address via USB is 192.168.21.1,
default IP address via WLAN is 192.168.100.1 and the default Subnet is
255.255.255.0. The Default Gateway is optional.
Basic Firewall Select to enable or disable the router's built-in firewall
feature.
To preserve the changes you have made, click Save Changes . To apply
the saved changes, click Apply Changes. To abort the changes, click
Clear Changes.
WLAN
This tab allows the user to change the router’s wireless settings.
Basic Configuration
Operation Mode Select the device's WLAN function mode. Auto-off
disables WLAN functions if no clients are connected after the Idle Time
expires (enter Doze mode). Manual-off maintains an active WLAN
24
Page 26

PR-30 Series Management
network regardless of the number of clients. The takes precedence
over this feature to enable or to disable WLAN. Default value is Auto-Off.
Doze mode: Main screen will display “sleep zzz” and press
to wake it up then press
to enable WLAN.
Maximum Idle Time Select from the drop-down menu the maximum idle
time (in minutes) the WLAN network is active in search of clients. Not
applicable on Manual-off connections. Default value is 10 mins.
Radio Select to enable or disable the WLAN antenna. By selecting the
Off option, you disable WLAN functions. Select On to re-enable. If you
have selected the Off option when connected via WLAN, use the USB
cable to regain access to the web interface. This option does not affect
the Internet connection.
Channel The radio channel number. The permissible channels depend
on the regulatory domain (e.g. in the USA, it is 1 to 11). Select Auto to
automatically use a permissible channel.
SSID Network name of your WLAN network. It is case sensitive and can
not exceed 14 characters. Default name is printed on the network
information card.
SSID Broadcast Option to broadcast your WLAN network name. For
security purposes, you may choose to hide your network’s SSID by
selecting Off. This prevents other PCs scanning for the presence of
wireless networks to detect your network name.
WLAN Security Setting
Encryption Type Method of encryption used when transferring data
through the airwaves from the router to the client PC or vice versa. The
PR-30 WLAN Router supports 3 encryption types - WEP, WPA, and
WPA+WPA2.
The router supports two WEP (Wired Equivalent Privacy) standards:
64-bit (40-bit Key) and 104-bit (128-bit Key).
WPA is a WLAN standard that was designed to improve the security
features of WEP. WPA2 is a more advanced, more secure version of
WPA.
25
or
Page 27

PR-30 Series Management
Passphrase (WEP only) Sequence of words or text used to automatically
generate WEP Key. Enter a value between 8-63 characters.
WEP Key 1-4 (WEP only) Key required to decipher the data encryption
method. At least one key must be entered. Use a pre-existing passphrase
by selecting Generate 40bit Key or Generate 128bit Key or manually
enter a WEP Key (letters from A-F and numbers 0-9). 40-bit WEP Keys
require 10 hexadecimal digits and 128-bit WEP Keys require 26
hexadecimal digits.
WPA Pre-Shared Key (WPA and WPA+WPA2) Key required to decipher
the data encryption method. Enter a value between 8-63 characters. This
field must not be left blank.
Note: Modifying and saving these settings interrupts your
.
current connection and requires you to reconnect to the router .
To preserve the changes you have made, click Save Changes . To apply
the saved changes, click Apply Changes. To abort the changes, click
Clear Changes.
DHCP
This tab allows the user to change the Dynamic Host Control Protocol
(DHCP) settings on the router.
26
Page 28

PR-30 Series Management
LAN DHCP
DHCP Option enables the router as a DCHP server. A DHCP Server
automatically assigns an IP address to the computers on the LAN/private
network.
Start Enter the starting IP address for the DHCP server’s IP assignment
range.
Limit Enter the total number of IP addresses which are assigned by the
DHCP server.
Lease Time (in minutes) The IP address lease time period. Enter the
lease time in minutes.
Active DHCP Leases Displays information on any clients connected to
the network.
To preserve the changes you have made, click Save Changes . To apply
the saved changes, click Apply Changes. To abort the changes, click
Clear Changes.
27
Page 29

PR-30 Series Management
PIN Management
This tab allows the user to manage U/SIM card PIN settings.
PIN Verification
SIM Status If you have enabled the PIN security protection on the SIM
card, this entry displays PIN Enabled. Conversely, if you do not have PIN
security enabled on your SIM card, this entry displays PIN Disabled.
PIN Code If your SIM card PIN security protection is enabled, you must
enter the PIN code for verification. Enter the code in the PIN Code field,
and click Verify.
PIN Management
You can enable or disable the PIN security protection on your SIM card.
Select Enabled or Disabled. If you change the status of the PIN protection
your SIM card, you must enter the PIN code.
PIN Modification
You can change the PIN code on the SIM card. Enter your original PIN
28
Page 30

PR-30 Series Management
code in the Old PIN Code field, enter the new PIN code in the New PIN
Code field and the New PIN Confirm field, and click Change.
SD Card
This tab allows the user to change settings on the PR-30 for the microSD
card.
Network Sharing Select to Enable or Disable file sharing on the
microSD card when the device is in router mode.
To preserve the changes you have made, click Save Changes . To abort
the changes, click Clear Changes.
Password
This tab allows the user to change the web interface login password.
29
Page 31

PR-30 Series Management
Enter the new password in New Password and in Confirm Password.
The password in both fields must match in order to successfully change
the password.
To preserve the changes you have made, click Save Changes . To abort
the changes, click Clear Changes.
Upgrade
This tab allows the user to upgrade the firmware of the router or 3G
module.
30
Page 32

PR-30 Series Management
Check Do not save current configuration if you do not want to save the
current configuration before upgrading the firmware.
To upgrade the device's firmware version, click Browse to locate the new
firmware version. Click Upgrade to start the upgrade process.
Warning: Firmware upgrades may take a few minutes; do not
;
To preserve the changes you have made, click Save Changes . To abort
the changes, click Clear Changes.
turn off the power or reset the device during upgrade. Do so
may result the device inoperable.
Backup & Restore
This tab allows the user to manage the device’s configuration settings.
31
Page 33

PR-30 Series Management
Backup Configuration Use this option to back up the router's current
configuration settings to the PC. Enter a file name for configuration file
and click Backup.
Restore Configuration Use this option to restore the router’s
configuration settings from a backup file. Click Browse to locate the
configuration file and click Restore.
Reset Function Use this option to reset the device to factory default from
web page directly.
File Sharing
If a microSD card is installed, the card functions as a common storage
space which is shared between the PCs connected to the PR-30's WLAN
network.
1. Enable WLAN on the device.
2. Connect to the device's WLAN network on the client PC.
3. Open My Computer and type \\192.168.100.1. A folder
32
Page 34

PR-30 Series Management
"PR_SD_Shared" is displayed.
4. Copy files you wish to share with the network into the folder, or copy
files others have shared with you from the folder.
33
Page 35

Appendices
Appendices
Appendix A: F AQ
Q: What is the default “Username” and “Password” for the router?
A: User name: root
Password: 1234
Q: How do I enter the web interface?
A: 1. Open Internet Explorer or any Web browser.
2. Input “http://192.168.21.1” (via USB) in the address bar.
3. Input username and password.
Q: How do I use WPS to setup a connection?
A: 1. Press and hold the
for at least 5 sec.
2. Accept the WPS option on PC requesting connection.
Q: How do I configure settings for the router?
A: 1. Use the Wizard Setup.
2. Modify the settings under the Advanced tabs.
Q: Why can’t I connect to the Internet via built-in 3G module?
A: 1. Check if the SIM/USIM is inserted properly.
2. Check if the correct network operator name and network
technology is displayed on the LCD.
3. Check the SIM/USIM status under Advanced > Pin Management.
4. Check if the APN is correct under Advanced > HSPA Config
5. Check the Internet on GUI if the Connection is “Keep Alive” or not.
Appendix B: Specifications
Note: Specifications are subject to change without notice.
Physical
802.11 b/g with 1x1 antenna design (no
WLAN
Cellular modem
Dimension (LxWxH, mm) 105 x 66 x 14.8
34
diversity).
Coverage : 10m
Embedded,
GPRS/EDGE/WCDMA/HSPA/HSPA+
Page 36

Appendices
Weight (g) 135g
Interface
USB interface for PC connection Connect via RNDIS / CDC-ECM drivers
LCD Display 1"
Power Switch
Built-in Battery 2,200 mAH
Yes
Power on/ off:
Yes
Short press, trigger LCD display while in sleep
mode
Short press, turn on/off WLAN while LCD is on
Long press (>5s), start WPS while LCD is on
Power supply plug
SIM slot Yes, hidden under battery
MicroSD slot Yes, support up to 16 GB, hidden under battery.
Yes
Charging via USB (Micro-USB)
Connectivity and Data Speed
GSM Band 850/1900 MHz
UMTS/HSPA+ Band
HSPA+ Data Rate Downlink: up to 21Mbps, Uplink: up to 5.7Mbps
EDGE/GPRS class B, multislot class 12
WLAN 802.11b/g
PR30: 850/1900 MHz
Antenna
WLAN Antenna Embedded
Cellular Embedded Antenna Yes
Receive Diversity Antenna embedded antenna, support for 2100MHz
Cellular External Antenna Port Yes
Protocol
UMTS/HSPA connection
Connection On Demand, Connection when
available, Auto APN matching with USIM
Multiple VPN pass-through (IPSec, PPTP,
Security
NAT-NAPT
DNS DNS Agent
ALG Support
Other Features
35
L2TP), Internet access restriction, Firewall, DoS
Prevention, Event Logging
Port forwarding, Port triggering,Multicast
Pass-Through, QoS
Yahoo messenger, AOL messenger, MSN
messenger, ICQ, RealAudio, NetMeeting,
Telnet, FTP, Microsoft Traceroute, Quake, IRC,
Microsoft PPTP Client
IPv4, TCP, UDP, ICMPv4, ARP, DHCP
Server/Client, HTTPs, NTP
Page 37

Appendices
Browser-based Administration GUI
Browser-based Administration GUI
Language Support
Web-based Setup Wizard in GUI.
Browser supported: IE, Firefox, Safari
English
Wireless LAN
802.11b data rate 1/2/5.5/11 Mbps, Auto or Fixed Rate
802.11g data rate
Security
WPS Yes
Other Features Support up to 5 simultaneous wireless users
1/2/5.5/11/6/9/12/18/24/36/48/54 Mbps, Auto or
Fixed Rate
WPA2/WPA/AES/TKIP, WPA/WPA2 PSK mode,
None/64/128 bits WEP Encryption, MAC filter,
open system and shared key authentication,
SSID Broadcast Disable
Accessories
with Micro-USB head
AC adapter
Battery
Supported, Input - 100~240V 50~60Hz, output –
5V, 2A
High capacity re-chargeable Li-ion battery, DC
3.7V, 2200mAH
Environment
Operation Temperature 0oC to 40oC
Storage Temperature -20oC to 60oC
Operating Humidity 10% to 80% Non-Condensing
Storage Humidity 5% to 90% Non-Condensing
Certification & Conformance
CE
GCF
RoHS/WEEE
36
Page 38

Appendices
Appendix C: Important Safety Information
Europe – EU Declaration of Conformity
European Union Notice
Products with CE marking comply with the R&TTE Directive (99/5/EC), the EMC
Directive (2004/108/EC), and the Low Voltage Directive (2006/95/EC) issued by the
Commission of the European Community.
Compliance with these directives implies conformity to the following European
Norms (in parentheses are the equivalent international standards).
EN 60950-1 (IEC 60950-1)
Safety of Information Technology Equipment.
EN 300 328
Electromagnetic compatibility and Radio spectrum Matters (ERM); Wideband
Transmission systems; data transmission equipment operating in the 2.4 GHz
ISM band and using spread spectrum modulation techniques.
EN 301 489-24
Electromagnetic compatibility and Radio spectrum Matters (ERM);
Electromagnetic Compatibility (EMC) standard for radio equipment and services;
Part 24: Specific conditions for IMT-2000 CDMA direct spread (UTRA) for mobile and
portable (UE) radio and ancillary equipment.
ETSI EN 301 511
Global system for mobile communications (GSM); Harmonised EN for mobile stations
in the GSM 900 and GSM 1800 bands, covering essential requirements of article 3.2
of the R&TTE directive (1995/5/EC).
ETSI EN 301 489-1
Electromagnetic compatibility and Radio spectrum Matters (ERM);
Electromagnetic Compatibility (EMC) standard for radio equipment and
services; Part 1: Common technical requirements.
ETSI EN 301 489-7
Electromagnetic compatibility and Radio spectrum Matters (ERM);
Electromagnetic Compatibility (EMC) standard for radio equipment and services;
Part 7: Specific conditions for mobile and portable radio and ancillary equipment of
digital cellular radio telecommunications systems (GSM and DCS).
ETSI EN 301 489-17
Electromagnetic compatibility and Radio spectrum Matters (ERM);
37
Page 39

Appendices
Electromagnetic Compatibility (EMC) standard for radio equipment and services;
Part 17: Specific conditions for 2.4 GHz wideband transmission systems.
ETSI EN 301 908-1 & -2
Electromagnetic compatibility and Radio spectrum Matters (ERM); Base Stations (BS),
Repeaters and User Equipment (UE) for IMT-2000 Third Generation cellular networks;
Part 1: Harmonised EN for IMT-2000, introduction and common requirements,
covering essential requirements of article 3.2 of the R&TTE Directive.
EN 50385
Product standard to demonstrate the compliance of radio base stations and fixed
terminal stations for wireless telecommunication systems with the basic restrictions or
the reference levels related to human exposure to radio frequency electromagnetic
fields (110 MHz - 40 GHz) - General public.
Federal Communication Commission Interference
Statement
This equipment has been tested and found to comply with the limits for a Class B
digital device, pursuant to Part 15 of the FCC Rules. These limits are designed to
provide reasonable protection against harmful interference in a residential installation.
This equipment generates, uses and can radiate radio frequency energy and, if not
installed and used in accordance with the instructions, may cause harmful
interference to radio communications. However, there is no guarantee that
interference will not occur in a particular installation. If this equipment does cause
harmful interference to radio or television reception, which can be determined by
turning the equipment off and on, the user is encouraged to try to correct the
interference by one of the following measures:
x Reorient or relocate the receiving antenna.
x Increase the separation between the equipm ent and receiver.
x Connect the equipment into an outlet on a circuit different from that to which the
receiver is connected.
x Consult the dealer or an experienced radio/TV technician for help.
FCC Caution
To assure continued compliance, any changes or modifications not expressly
approved by the party responsible for compliance could void the user's authority to
operate this equipment. (Example - use only shielded interface cables when
connecting to computer or peripheral devices).
This device complies with Part 15 of the FCC Rules. Operation is subject to the
following two conditions:
(1) This device may not cause harmful interference, and (2) This device must accept
any interference received, including interference that may cause undesired operation.
38
Page 40

Appendices
FCC Radiation Exposure Statement
This transmitter must not be co-located or operating in conjunction with any other
antenna or transmitter.
This equipment complies with FCC RF radiation exposure limits set forth for an
uncontrolled environment.
Max. SAR levels: 1.180 W/kg
GCF
RoHS/WEEE
Glossary
2G: Second-generation mobile networking technology. Represents a switchover from
analog to digital; most 2G networks use GSM.
3G: Third-generation mobile networking technology that enables simultaneous
transfer of voice and non-voice data; most 3G networks use WCDMA.
3.5G: A more recent standard of mobile networking technology; generally uses
HSDPA.
3.75G: A more recent standard of mobile networking technology; generally uses
HSUPA.
APN (Access Point Name/Network): Provides GPRS routing information. Consists
of:
Network ID: Identifies the external service requested by a GPRS user.
Mobile network operator ID: Specifies routing information.
ARFCN (Absolute Radio Frequency Channel Number): The specific ID numbers
for all radio channels used in cellular mobile communications.
bps (bits per second): How data flow is measured.
CHAP (Challenge Handshake Authentication Protocol): CHAP identifiers are
changed frequently and authentication can be requested by the server at any
39
Page 41

Appendices
time.
DNS (Domain Name System): Helps route network traffic by making the addressing
process more user-friendly.
DHCP (Dynamic Host Configuration Protocol): How devices obtain IP addresses
from a server.
DUN (Dial-Up Network): Windows component that enables online access via a
modem.
EDGE (Enhanced Data GSM Environment/Enhanced Data for Global Evolution):
Advanced GPRS that delivers multimedia and other data needing greater
bandwidth at up to 237 kbps.
GPRS (General Packet Radio Service): Delivers data in packets at up to 86 kbps.
GSM (Global System for Mobile Communications): The most popular cellular
network, mostly operates in 850-900 or 1800-1900 MHz; the primary 2G system.
HSDPA (High Speed Downlink Packet Access): Advanced WCDMA that delivers
downlink bandwidth intensive data at up to 7.2Mbps; typically associated with
3.5G.
HSUPA (High Speed Uplink Packet Access): Advanced WCDMA that delivers
uplink bandwidth intensive data at up to 5.76Mbps; typically associated with
3.75G.
HSPA+ (High Speed Packet Access +): This is also known as HSPA Evolved, is the
next step and is more focused on delivering data services enabling speeds of up
to 42Mbps in the downlink and 11Mbps in the uplink.
IMEI (International Mobile Equipment Identity): A number unique to each
GSM/UMTS device that can be used block network access by a stolen mobile
device.
IP (Internet Protocol): Routes packets over a network.
Kbps (Kilobits per second): A data flow measure; 1024 bits/second.
LAN (Local Area Network): A data network with limited range but good bandwidth.
Mbps (Megabits per second): A data flow measure; 1,048,576 bits/second.
PAP (Password Authentication Protocol): The difference between PAP
authentication and a manual or scripted login, is that PAP is not interactive. The
username and password are entered in the client's dialing software and sent as
one data package as soon as the modems have established a connection, rather
than the server sending a login prompt and waiting for a response.
PPP (Point-to-Point Protocol): An internet connection method.
PIN (Personal Identity Number): Four to eight digital numbers SIM card security
code; allows access to the carrier’s network.
Rx: Shorthand for Reception.
SIM (Subscriber Identity Module): A small card that contains key mobile device
identification, subscription and contact information.
Tx: Shorthand for Transmission.
40
Page 42

Appendices
WCDMA (Wideband Code Division Multiple Access): Advanced EDGE that
supports 384kbps data flow. Most 3G networks use this standard, the same as
UMTS.
WPA: Wi-Fi Protected Access
WPS: Wi-Fi Protected Setup
41
 Loading...