

Foreword
Congratulations on your new investment. You chose one of the best high-tech, GPS enabled,
mobile radar and laser detector available on the market today. The Radenso Pro M-Edition is the
evolution of the Radenso equipped with an additional circuit designed to detect the newest
Multaradar and Gatos RT 3 delivering astonishing detection range on all radar bands. Coupled
with multiple filters against annoying false alerts your Radenso Pro M-Edition will alert only when
it counts.
Extremely sensitive high performance windshield mounted radar detector.
Longest detection range on all bands.
Multaradar and Gatso RT 3 capable.
Selectable X, K, Ka narrow, MRCD, MRCT and Gatso radar bands tuned to the exact
radar frequencies used in North America for increased range and reduced false alarms.
Selectable Ka POP radar band (ON/OFF).
Selectable 2-level Traffic Sensor Rejection Filter (TSR Low and TSR High).
Selectable 2-level filter for MRCD bands.
Selectable Ka band filter.
Highway, City and AutoCity Mode.
Revolutionary Auto City Mode with selectable band filtering based on speed settings.
MUTE Mode mutes all K and X band alerts as long as it is activated. Ka and Laser alerts
are not muted.
Bright, Dim and Dark Display modes.
Smart Dark Display Mode (turns on display only for alerts).
Bright Alphanumeric LED display.
AutoMute reduces volume of alerts after 2 seconds.
Preloaded GPS Speed and Red Light Camera database.
Unlimited free lifetime updates for database and firmware - no obsolescence ever.
7 selectable display modes (Speed/Time, Speed/Voltage, Battery/Voltage, Time,
Speed, Speed/Compass).
Displays radar frequency during visual alert.
Voice Alerts with frequency announcement during alert.
Mark your own POI locations for future alerts.
GPS lockout of false alert areas.
User-friendly, easy intuitive voice-guided feature section.
Large suction cups for firm, secure installation on windshield.
Power Cord with Power ON/OFF button.
Optional Direct Wire power cord available.
1 year manufacturer’s warranty.
To start using your Radenso Pro-M radar detector follow these easy steps:
1. Slide the windshield mounting bracket into the QuickMount slot at the front of the radar
detector.
2. Plug the small end of the power cable into the power jack on the Radenso Pro-M on the left
side and connect the large plug with the 12V power socket in your car.
3. Press the red button at the large end of the power cable (at the 12V socket) to turn the power
cable on. The button will light up and indicate if Power is on.
4. Press the Power button (left button on top of unit) for 2 seconds to turn on Radenso PRO M.
Unit will power up with the start-up sequence. After a few seconds, the Radenso Pro-M will
notify you with a voice message that the satellite is connected.
5. Adjust the volume level by pressing the volume buttons “+2 or ”-” located on the right side of
the unit.
Radenso Pro-M is now ready to go. If you want to change any of the default settings of your unit
please refer to the next pages.
The Radenso Pro-M is one of the most powerful radar detectors in the industry. It’s designed to
protect the driver from speeding tickets/fines. The Radenso Pro-M communicates with the driver
in English and it’s main functions are the detection of microwave radars (X / K / Ka narrow bands),
laser guns, red light cameras and fixed- speed cameras (GPS database).
Notifications:
When a radar signal is detected, the driver will be alerted by a visual text warning and a
voice/tone alert. The display and voice alert will indicate the detected radar band, frequency and
signal strength. A beeping warning tone will increase its intensity with increasing signal strenght.
The signal strenght has ten levels. GPS alerts are reported by voice; for example “Speed Camera”.
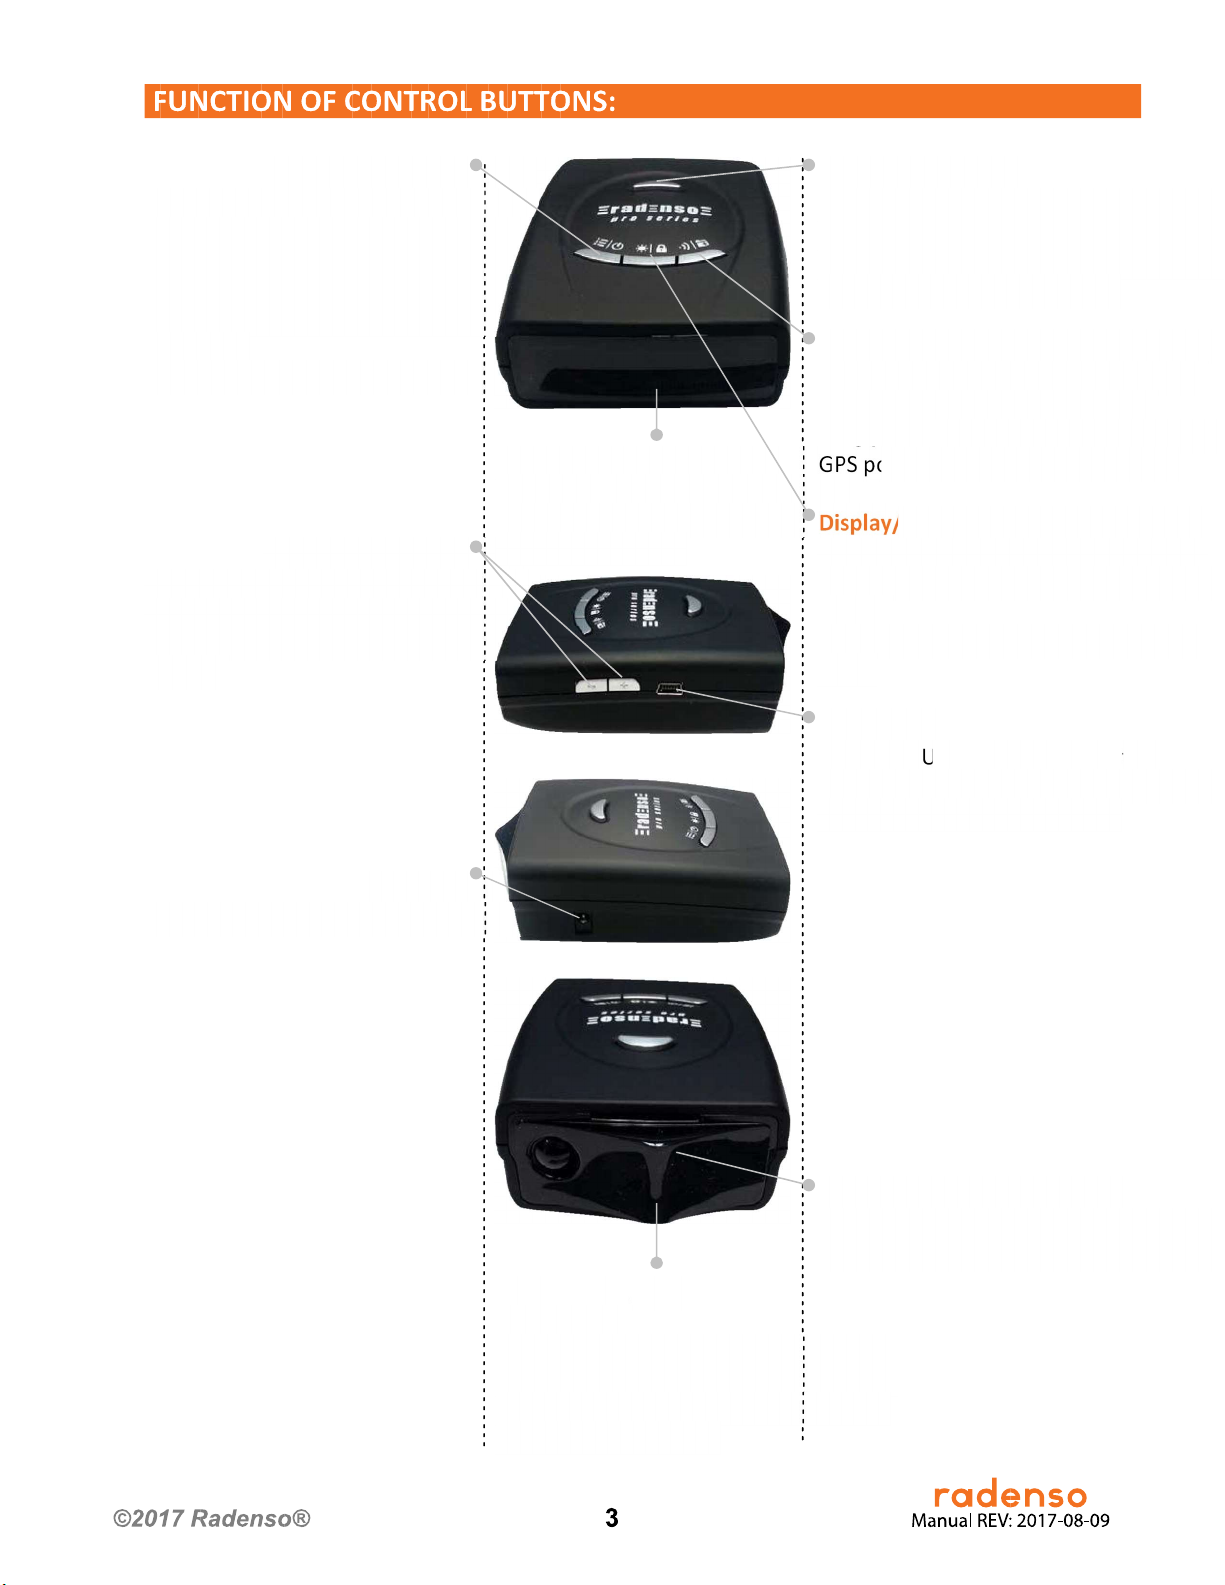
Power/Menu Botton
Alphanumeric Display Raden
Short press: You will enter into
setup menu. During an alert
pressing the button mutes the
volume. The next alarm will be
reported again with the Default
volume.
Long press: Turn unit ON / OFF.
Volume Buttons [+ -]
Short press: Changing volume of
the Radenso Pro-M or change
program options in the Menu
Mode.
so Pro-M will show selected
display mode, visual alerts and
text messages.
Release Button
Press this button and slide the
windshield mount until it is
locked. Press button to unlock
the mount for removal.
Mode/Sensitivity/Mark Button
Short press: Scroll between High-
way/City/AutoCity modes.
Long press: Add your own POI
GPS point for future alarms.
Display/Alert Lockout Button
Short press: Select display bright-
ness (bright, dim, smart dark, full
dark).
Long press: Lockout alert location.
USB Port
USB Connect to
cable data
update database and/or firmware from our website.
Plug power card into this port.
Power Jack
Windshield Mount Slot
Insert the windshield mount into
this slot until you hear the “click”.
Rada r Ho rn A ntenn a a n d
Laser Lens
Needs unobstructed view of
the road ahead. Do not mount
behind metal coated windshields or wipers.
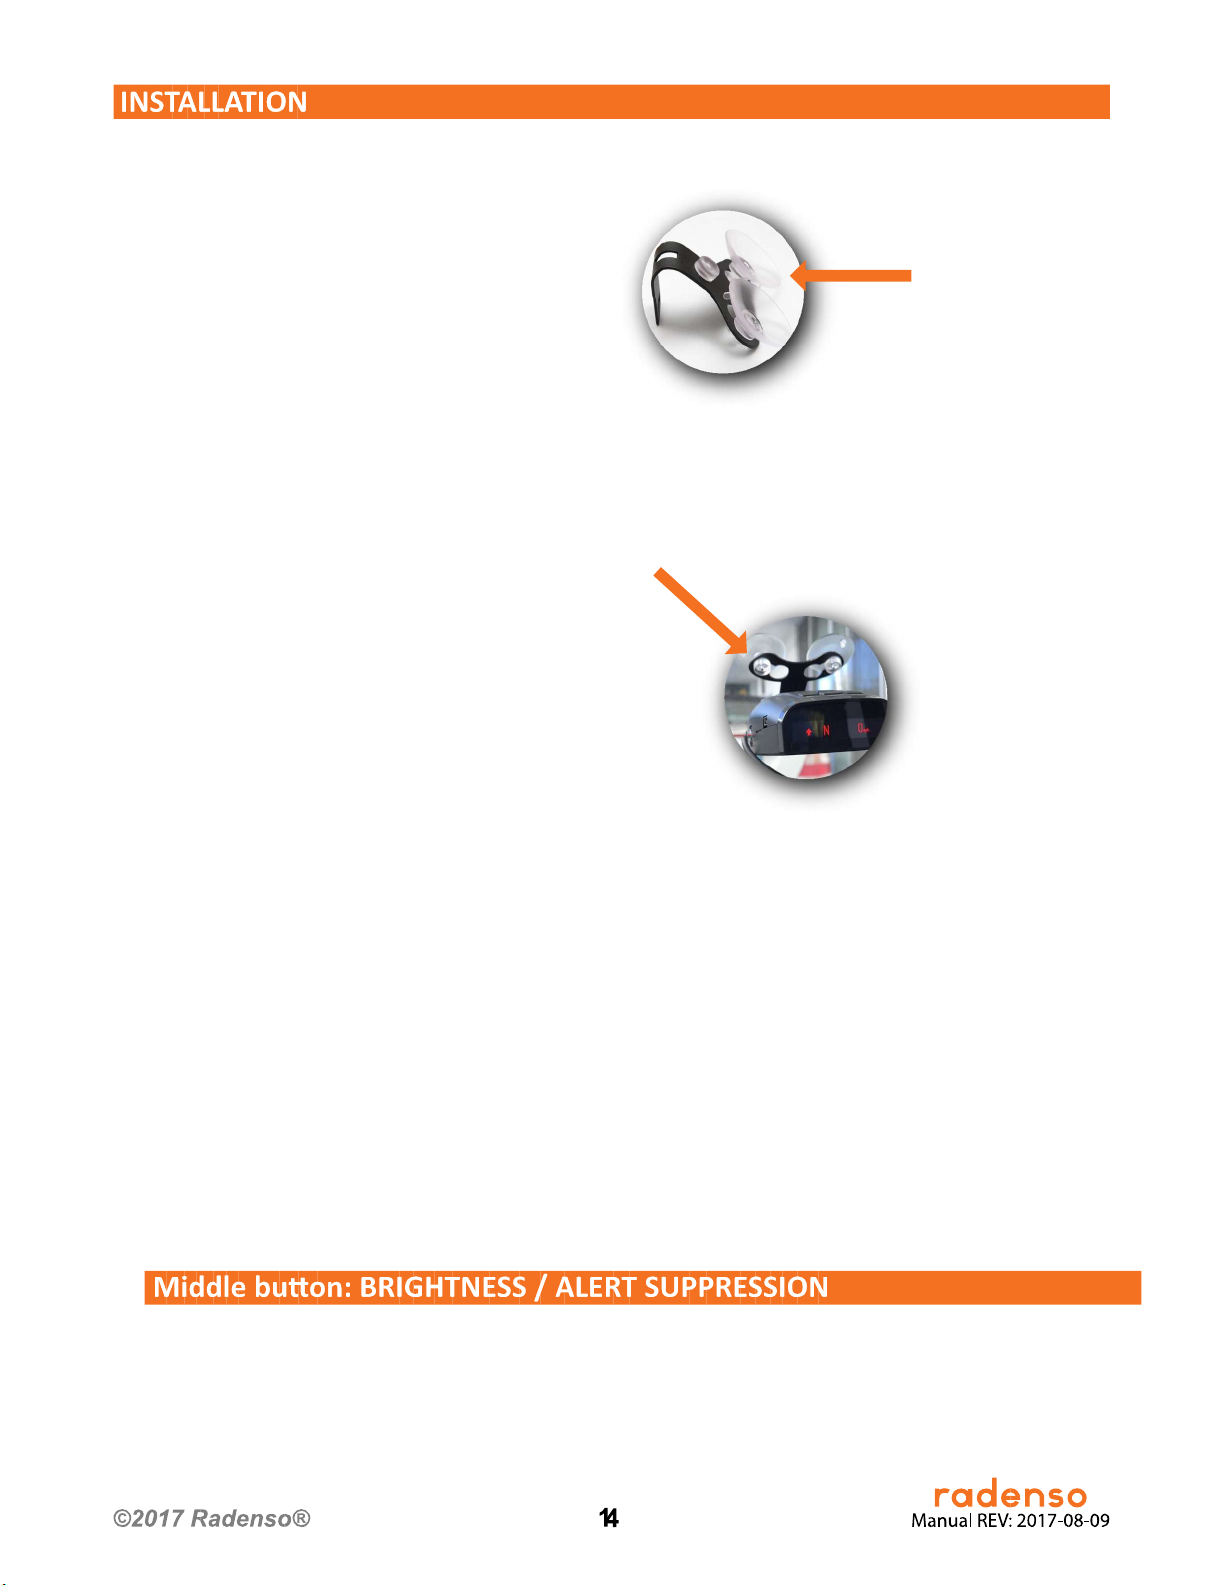
The Radenso Pro-M windshield mount allows a firm and secure installation of the radar
detector at the windshield of your vehicle. Locate an area at the windshield that enables an
unobtrusive installation with clear view to the road
ahead.
1. Place the nipple of the suction cups in the large hole of
the bracket and
pull the suction cup into the small Rubber Damper
hole to secure them. Push the rubber damper
into the hole in the middle of the bracket.
2. Attach the windshield mount to the desired area of the windshield. Make sure it is in a level
position parallel to the road ahead. To adjust the angle if necessary, gently push or pull on the
bracket to bend it. DO NOT use the detector to bend the
bracket.
3. Insert the windshield mount into the slot at the front of
the detector until it is locked in position.
For firm and secure adhesion to the windshield, clean the windshield and suction cups before
usar installing.
4. Plug the small end of the power cable into the detector (located on the left side) and the large
end into your vehicle’s 12V ACC socket.
5. To remove Radenso Pro-M from the windshield press the release button on top of the unit
and slide the unit off the mount.
Left button: MENU / ON-OFF.
Short press: You will enter into setup menu. During an alert pressing the button will mute the
volume. The next alarm will be reported again in the standard volume.
Long press: Turn ON / OFF Radenso Pro-M.
Short press: You can change the brightness of the display -> Bright -> Dim -> Smart Dark -> Full
Dark.
Bright: Brightest display setting.
Dim: Slightly dimmed display.

Smart Dark: Display is deactivated but will come on with text warning during an alert.
Full Dark: Display is completely deactivated. Only voice and tone alerts are active.
Long Press: Holding the button for 2 seconds during an obvious false alert will lockout the
location in the future. The signal will then be reported and the alarm suppressed when passing
the market location again. You can reactivate the location again by holding the button when
approaching the marked location.
During start up: Pressing and holding the button during startup will reset the Radenso Pro-M to
factory reset settings and will display the uploaded Firmware version.
Short press: You can scroll between Highway / City / Auto City modes. In City or Auto City modes
the sensitivity of X / K / Ka bands can be reduced according to user preference.
Long Press: Add your own POI GPS point for future alarms.
Short press: Changing alert volume of Radenso Pro-M or change program options while in Menu
Mode.
Press left button to enter Menu Mode.
Press left button again to go from one menu option to the next.
Press VOLUME + or – button (on the right side of detector) to change your setting within the
category. To save the changed selection simply wait a few seconds without pressing any button.
The unit will display “Setting Completed” to confirm your selection. Alternatively, you can leave
the menu and save the setting by tapping the right button.


The AutoCity driving mode allows the setting of minimum alert detection speed for signal
suppression and signal filtering resulting in significantly reduced false alerts. Select AutoCity in
Setting Mode.
Setting AutoCity speed: (feature selectable only if Setting Mode is set
to AutoCity): Tapping the Middle button lets you select the speed for editing
Left speed setting indicates the speed below which the radar reception of the detector will be
complete ly disabled (in example above 20 mph). No signals from
police radar or false signals from automatic door openers will be reported.
The right speed setting indicates the speed below which the detector will detect alerts in City
mode with reduced radar sensitivity (in example above 40 mph).
+ / - buttons on the right side of the detector will change the specific speed setting.
RECOMMENDATION “20” and “35”: The detector will not alert to any signal below 20 mph and
will operate with reduced radar reception between 20 and 35 mph. Maximum detector
sensitivity will be achieved above 35 mph.
Setting City and AutoCity sensitivity (this option is available only in City or AutoCity Mode): By
means of the Middle button you can select the radar band for editing.
To change the sensitivity of signal reception use + / - button on the
side of the unit. The level of signal suppression can be selected in the range 0-9. The displayed
numbers indicate the sensitivity reduction in the different radar bands. The example displayed
above indicates that the X Band sensitivity is reduced by 50%, K Band sensitivity reduced by 20%
and Ka Band sensitivity is not reduced at all (0% reduction).

The detector lets you mark known false alert areas so that you will not receive audio alerts in the
future at the marked location. The detector stores the GPS coordinates as well as radar band,
radar frequency and signal strength and compares it each time with the actual signal received. If
the received signal at the lockout location is different from the saved signal in terms of frequency
and/or signal strength the detector automatically unmutes and you will be alerted by audio again.
The display will show the band and signal strength and a small “L” icon in front of the radar band
letter indicates that the area is locked out. You can then either ignore the alert or delete the
previously saved locked out and re-save the new one.
To set a GPS lockout press the middle button during an alert for 2 seconds. The detector will state
“Lockout started” and will complete the process by stating “False alert area added”. To manually
unlock the detector press the middle button for 2 seconds in a locked out area. You can also
delete all lockouts in the menu.


Operating Frequency:
FCC COMPLIANCE
GPS: SiRF STAR IV
Ka narrow: 33.80, 34.7, 35 5 GHz
(± 120 MHz)
Ka Wide: 33.4 GHz - 36.0 GHz K
narrow: 24.1 GHz (± 70 MHz)
K wide: 24.1 GHz (± 150 MHz)
Operating Frequency:
Operating temperature: -30° - +180 ° F (-20° - +85° C)
Operating voltage: 11-16 V
Energy consumption: 250 mA normal, 330 mA max. (12V)
Dimensions: 2.44 x 3.62 x 1.33 inch
62 x 92 x 34 mm
X band: 10.525 GHz (± 50 MHz)
Laser: 904mm
This device complies with part 15 of FCC rules: Operation is subject to the following two conditions: (1) This device may not cause harmful interference.
(2) This device must accept any interference received including interference that may cause undesired operation.
NOTE: THE GRANTEE IS NOT RESPONSIBLE FOR ANY CHANGES OR MODIFICATIONS NOT EXPRESSLY APPROVED BY THE PARTY RESPONSIBLE FOR COMPLIANCE.
SUCH MODIFICATIONS COULD VOID THE USER’S AUTHORITY TO OPERATE THE EQUIPMENT.
FCC NOTE: This equipment has been tested and found to comply with the limits for a Class B digital device, pursuant to part 15 of the FCC Rules. These
limits are designed to provide reasonable protection against harmful interference in a residential installation. This equipment generates uses and can
radiate radio frequency energy and, if not installed and used in accordance with the instructions, may cause harmful interference to radio communications.
However, there is no guarantee that interference will not ocurr in a particular installation. If this equipment does cause harmful interference to radio or
television reception, wich can be determined by turning the equipment off and on, the user is encouraged to try to correct the interference by one or
more of the following measures:
-Reorient or relocate the receiving antenna.
-Increase the separation between the equipment and receiver.
-Connect the equipment into an outlet on a circuit different from that to which the receiver is connected.
-Consult the dealer or an experienced radio/TV technician for help.
DATABASE & FIRMWARE UPDATES:
Radenso Pro-M is web ready and equipped with a Mini USB data port. It is recommended to check for
GPS Database updates every three months. To download updates of the GPS database or to update the
firmware follow the instructions described in the “UPDATE” section of the Radenso Homepage
http://radenso.com
Your Dealer:

ONE (1) YEAR LIMITED WARRANTY
RADENSO warrants, for two years, to the original retail owner, this RADENSO product to be free from defects in
materials and craftsmanship with only the limitations or exclusions set out below.
WARRANTY DURATION: This warranty to the original user is valid for 12 months after the date of original retail
sale.
SCOPE OF WARRANTY:
From the date of original consumer purchase and for the respective periods specified above, RADENSO agrees to
repair or replace, at its sole expense, all RADENSO brand products purchased directly from RADENSO or from an
Authorized RADENSO Dealer, which are defective in material and/or workmanship during ordinary consumer use.
Repairs may be completed using new or refurbished parts that meet or exceed RADENSO specifications for new
parts. RADENSO, at its sole discretion, may replace a product, with a refurbished or reconditioned unit having
comparable features and a limited consumer warranty.
EXCLUSIONS:
IF YOU PURCHASE A RADENSO PRODUCT FROM AN UNAUTHORIZED DEALER, YOUR RADENSO WARRANTY WILL
NOT BE VALID.
This Warranty does not apply with respect to the following:
1. Defects or damage caused by accident, fire/smoke, flood/water damage, power surge (or related electrical
abnormalities), lightning or other acts of nature.
2. Defects or damage caused by abuse, misuse, negligence, accident, unauthorized product modification or
service, or failure to observe the instructions contained in the manual furnished at the time of original
purchase.
3. Deterioration/failure due to corrosive atmosphere, including but not limited to; smoke, high humidity or
extreme temperature.
4. Damage caused during shipment or handling.
5. Products purchased from anyone other than Radenso or an Independent Radenso Authorized Dealer. If you
are uncertain as to whether a dealer is authorized, please contact Radenso’s Customer Service.
6. Products that have had their serial numbers altered or removed.
7. Products purchased in “AS IS” condition or noted as “DEMO”, “DISPLAY”, “OPEN BOX”, or “CLEARANCE”.
8. Products that have been altered or repaired by anyone other than Radenso or a Radenso authorized service
station in a manner that has affected their performance, stability or reliability.
9. Accessories attached to or to be used with Radenso products, such as antennas, mounts, cables, etc.
10. Any product attached to or used with the RADENSO product.
11. Packing materials and cosmetic items.
12. Installation and removal of Radenso products from the vehicle.
13. Maintenance, cleaning or periodic check-ups.
OBTAINING OF WARRANTY SERVICE
If, after following the instructions in this Operating Guide, you are certain that the product is defective, pack the
product carefully (preferably in its original packaging) and include evidence of original purchase and a note
describing the defect. The product should be shipped freight prepaid, by traceable means, or delivered, to
warrantor at: RADENSO, 1100 Sycamore St. 1st floor, Cincinnati OH 45202
1-888-RADENSO (1-888-723-3676) 9 a.m. to 5.00 p.m., Eastern Time, Monday through Friday

 Loading...