

Page 1

The
BandLux e
™
C170
Series
User
Manual
Page 2

Contents
Chapter 1
Getting Started 3
Chapter 2
Connecting 9
Chapter 3
SMS 12
Chapter 4
Settings 14
Chapter 5
Statistics & Information 17
Chapter 6
Q&A 19
Chapter 7
Important Safety Information and
Glossary 22
Page 3

The BandLuxe™ C170 Series
Chapter 1
Getting Started
Page 4
4
Chapter 1
0BGetting Started
What’s in the box
1. BandLuxe C170 Series:
Insert this into an USB port.
Features
● Supports 2G, 3G and 3.5G standards
● SMS Messaging
● USB Interface
● microSD storage
● Windows Vista, XP and 2000 compatibility
● Does not interfere with other USB
peripherals
● Multi language interface (English, French,
German, Italian, Sp anish, Traditional Chinese,
Russian, Portuguese and Finnish)
● Plug & Play
Before You Install
Information
Before installing the C170 Series, we recommend obtaining the
following information from the SIM Card Mobile network operator:
Access Point Name (APN)
- For many carriers, the APN may simply be Internet.
Phone Number
- The Phone Number to dial to establish a network connection.
BandLuxe software helps input this number correctly.
Password (Optional)
- Some (but not many) carriers require a password.
Notice: BandLuxe™ C170 Series is radio
device, please be aware to keep metal
materials away from the device.
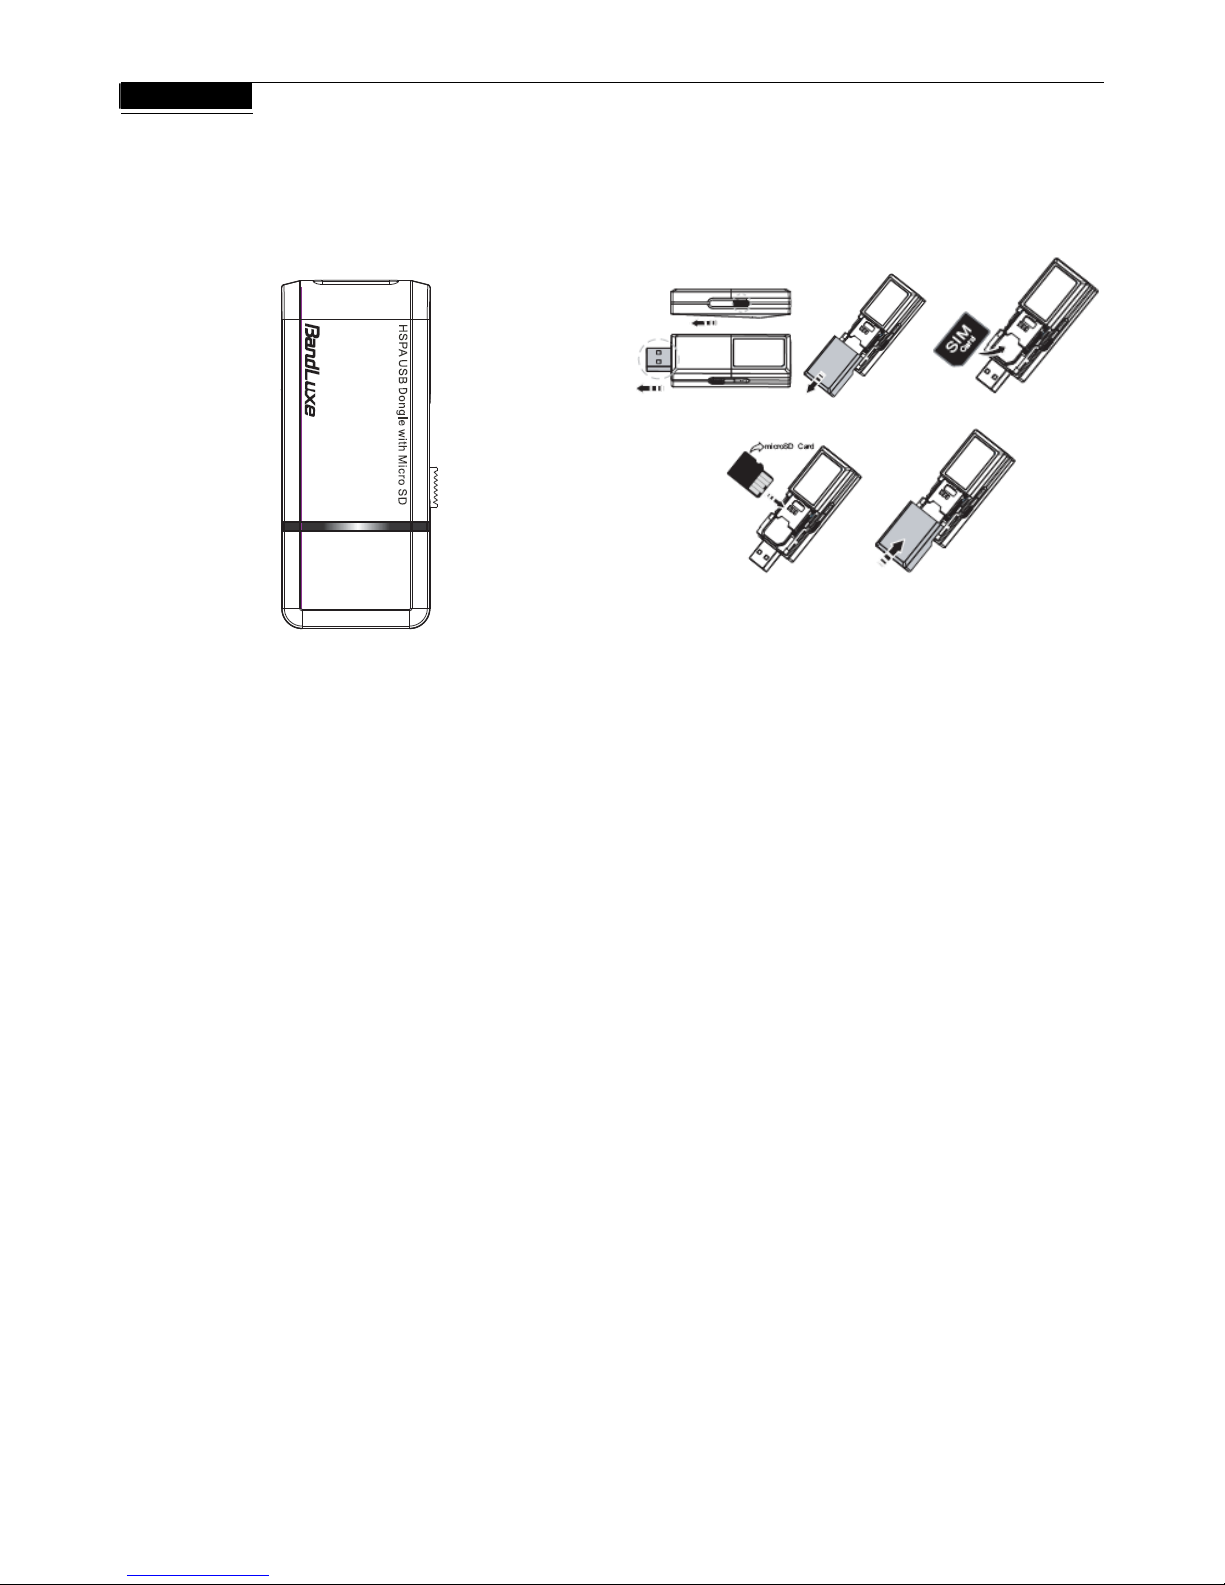
Insert the SIM Card & microSD Memory Card
a. USB connector can be extended by shifting the left-side switch.
IM card. (fig. 3)
ontact of microSD
*microSD card is an optional purchased accessory.
Series may now be
ies into the computer.
2. The LED should light up when connection is established, though it
may be obscured.
(fig.1)
b. Remove the back cover. (fig. 2)
c. Follow the arrow direction to insert the S
d. Micro SD card reader is equipped. Golden color c
card should be faced up to insert. (fig. 4)
e. Replace the back cover. (fig. 5)
Hardware Installation
With the SIM card properly inserted, the C170
installed into the computer via USB port.
1. Insert the C170 Ser
Page 5
5
Chapter 1
0BGetting Started
Software Installation
The process and appearance of certain software elements in Windows
Vista will be somewhat different than in 2000/XP. These differences
are minor and should not limit the functionality of the C170 Series in
any way.
New Hardware Detection
Windows 2000/XP
Once the C170 Series is connected, a dialog box should pop up from
the Toolbar Hardware Connection Icon. The device will be identified as
the BandLuxe C170 Series 3.5G HSDPA Utility.
Windows Vista
In Vista, a pop-up window may appear. Click
Allow
to proceed.
After the first pop-up, all other aspects for software installation will be
identical in all compatible versions of Windows.
Software installation should proceed automatically . If it does not, it may
be initiated from My Computer, w here the C170 Series will be
identified as a CD-ROM device. Sometimes a restart will occur during
installation. If it does, reinitiate installation from My Computer.
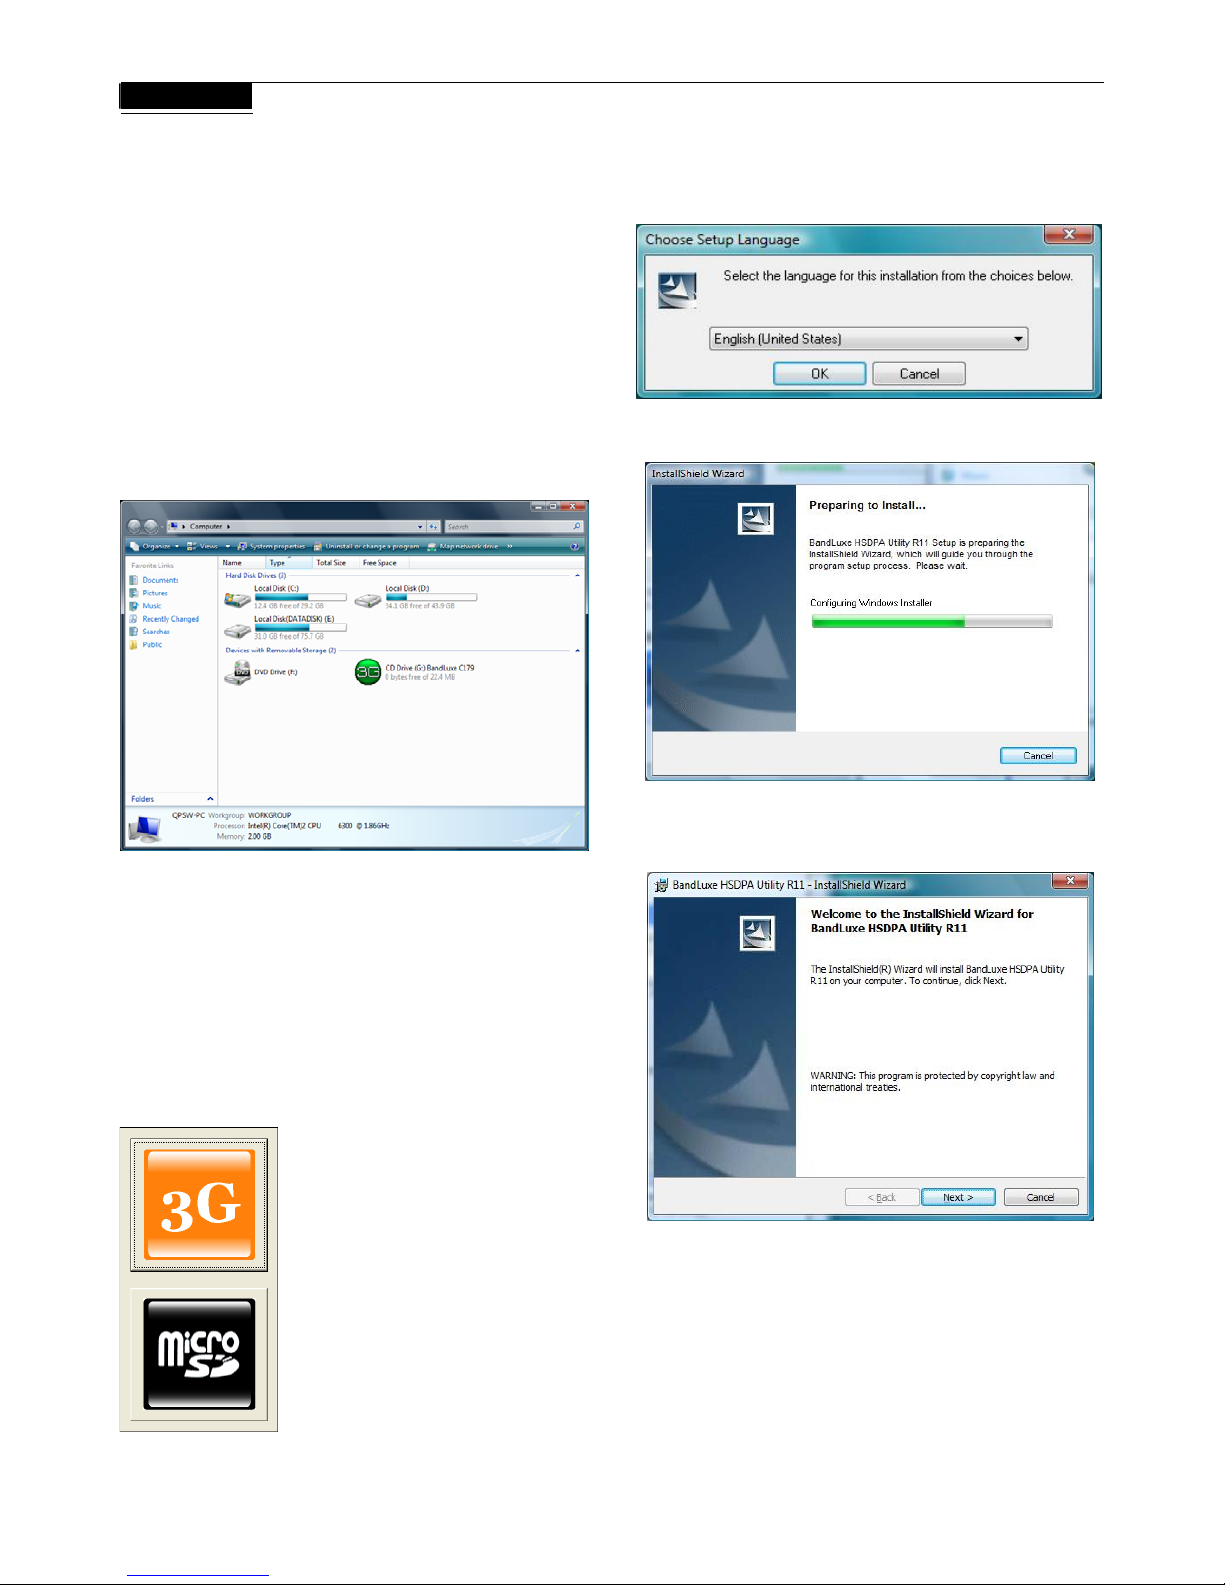
3G Modem or microSD card reader
When the device is connected to computer for the first time, please
choose the upper option (3G) of the pop-up dialog to install the
software. The InstallShield Wizard window will open, indicating that the
Wizard is checking the installed OS version. If choose the bottom
option (microSD) of the pop-up dialog, the device will be used as
microSD card reader.
InstallShield Wizard
Setup Language Selection
Preparation
The C170 Series will automatically use the appropriate language for
your OS, if available.
Welcome
The Setup Wizard window opens automatically. The first page contains
OS compatibility and legal disclaimers. Click
Next
to continue.
Page 6
6
Chapter 1
0BGetting Started
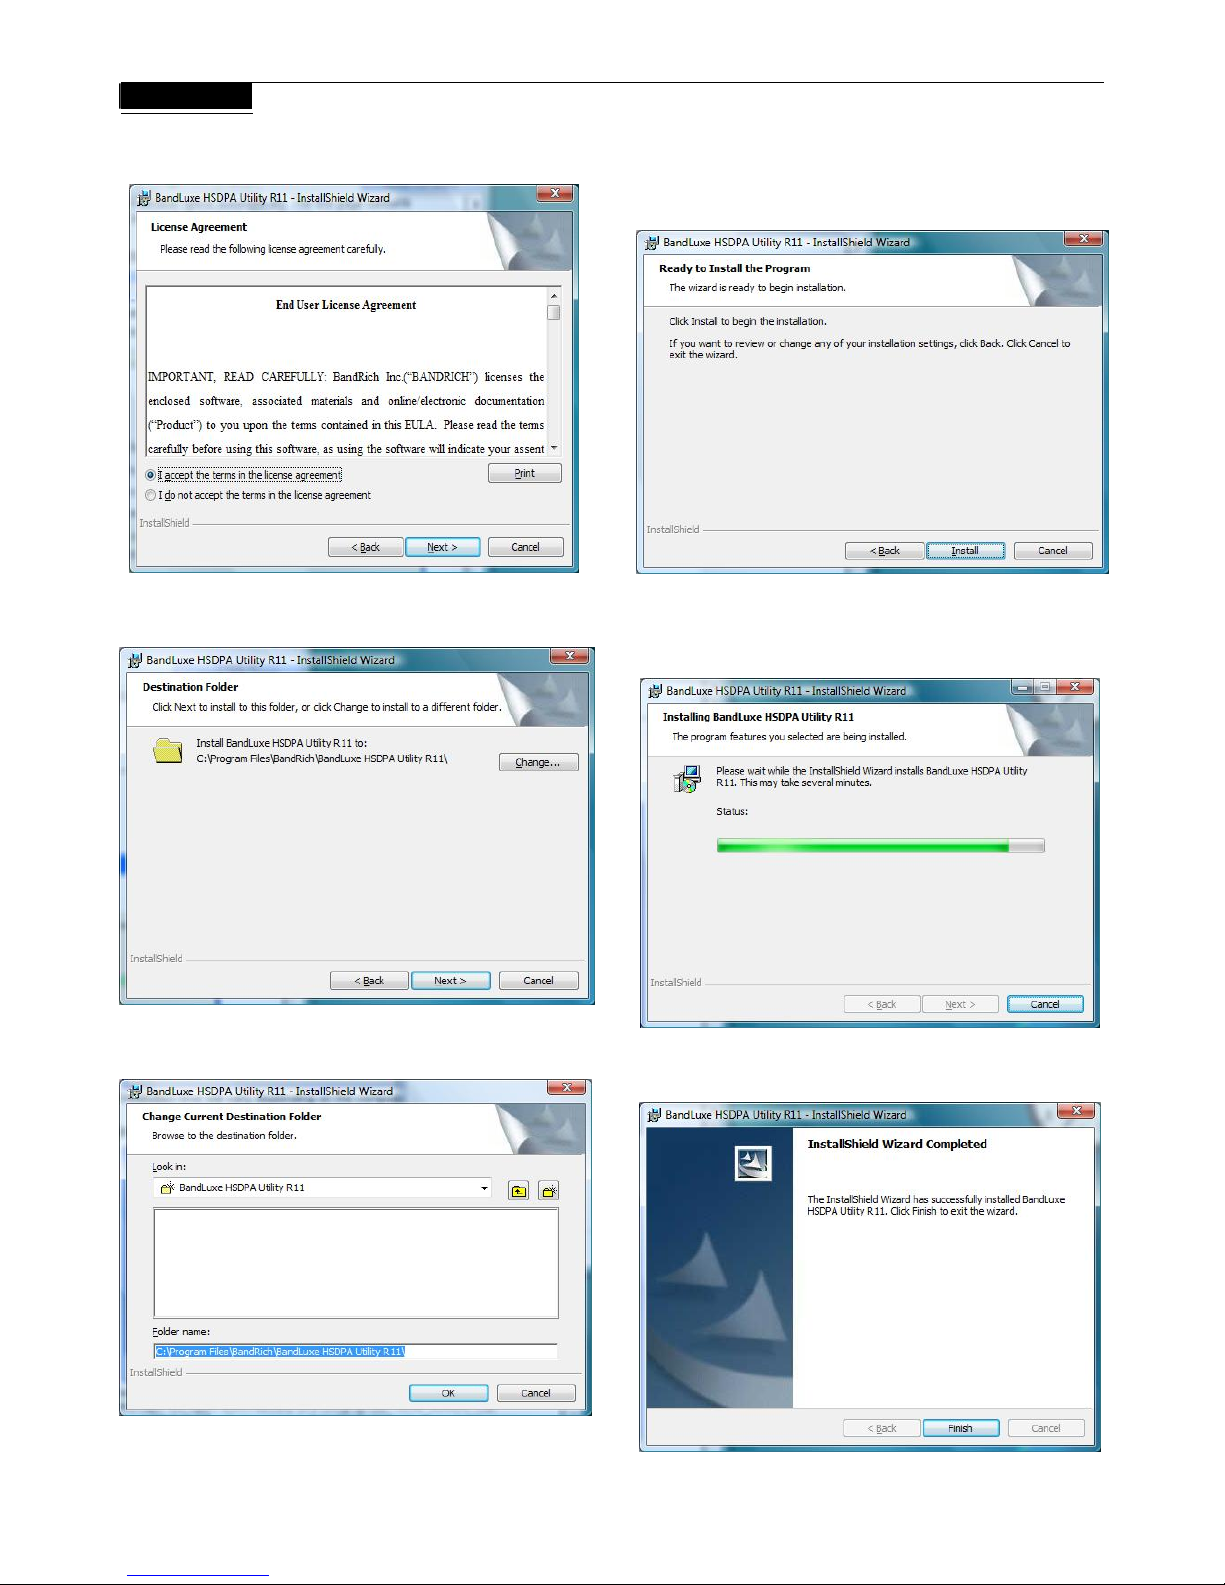
License Agreement
Click
I accept the terms in the license agreement > Next
to
continue.
Select Installation Folder
Click
Change
to manually select a folder.
Change Current Destination Folder
Highlight the folder and click
OK
to select it. Click
Cancel
to close the
Browse window.
Confirm Installation
lick
Back
to change any preceding information or settings. Click
tallation.
C
Install
to begin ins
Installation
ng on the computer. Installation time will vary, dependi
Installation Complete
allation is complete, click Finish to exit. The Connection
Manager will open automatically.
When inst
Page 7

7
Chapter 1
0BGetting Started
Page 8
8
Chapter 1
0BGetting Started
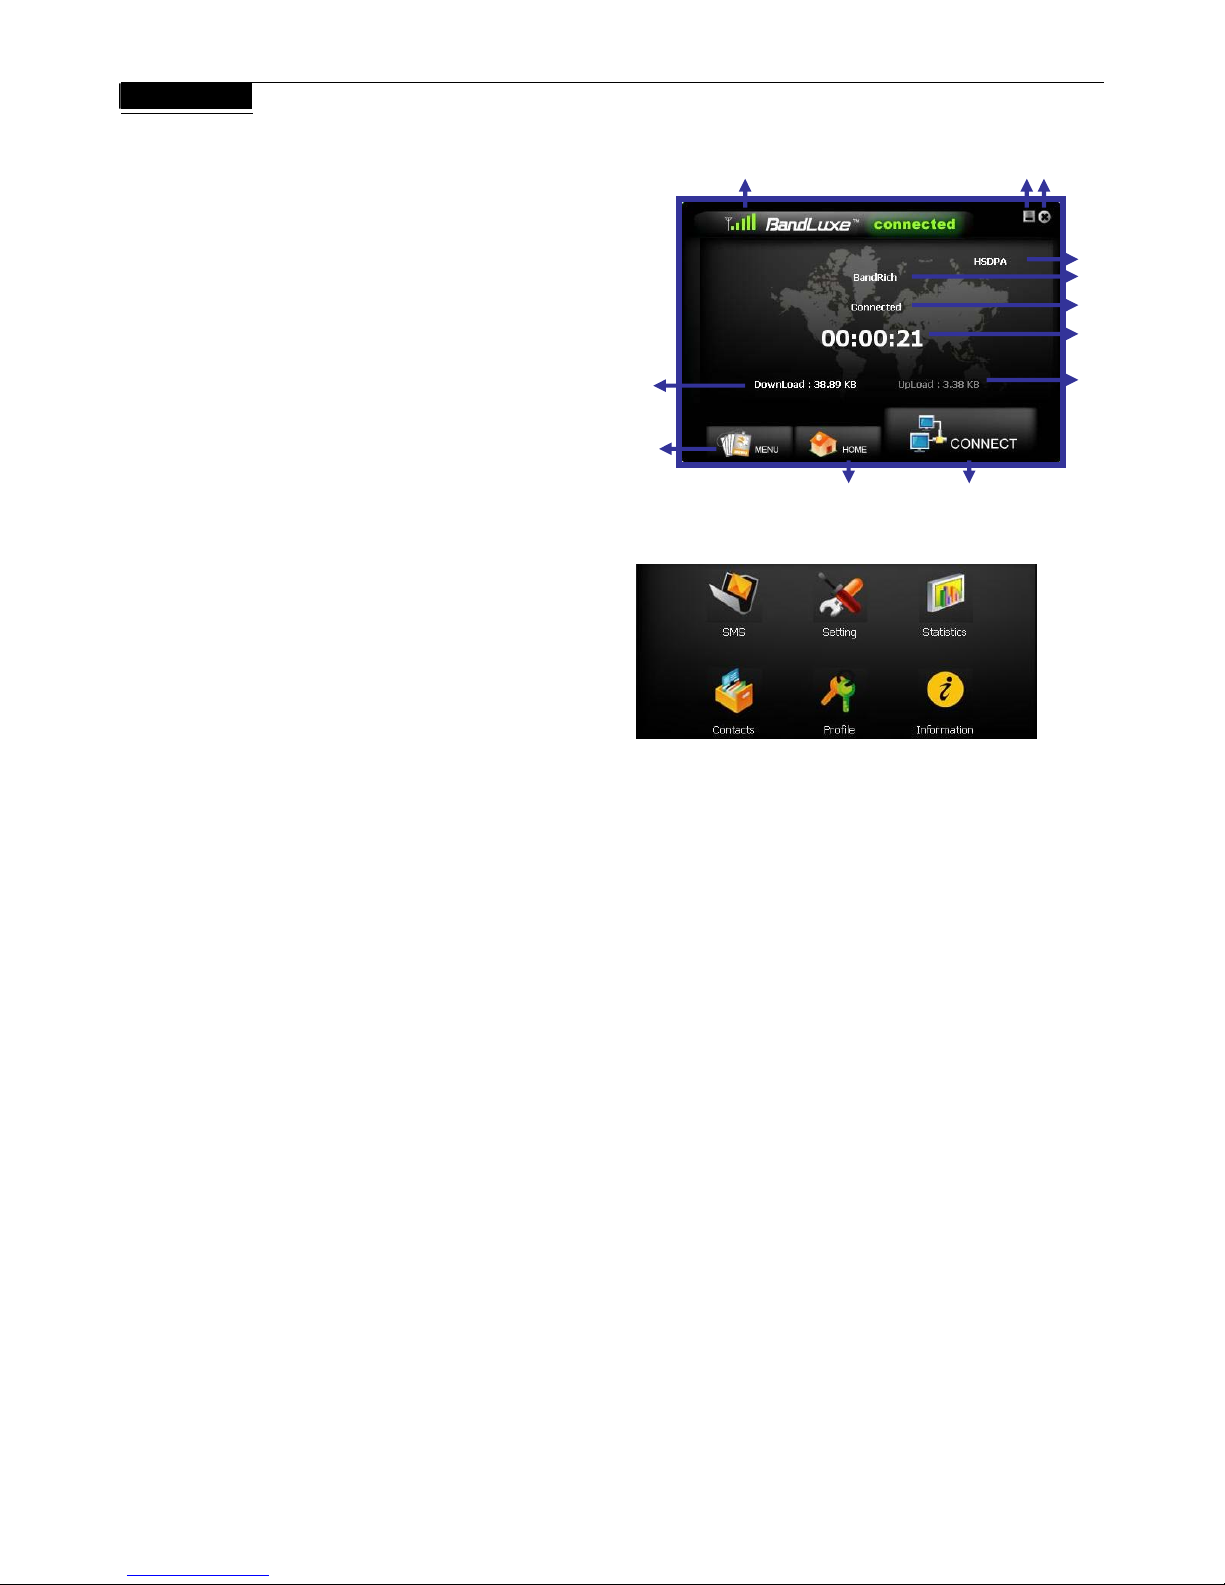
Home Screen
1. Signal Strength
2. Minimize
3. Radio T echnology
4. Mobile Network Operator
5. Connection Status
6. Connection Time Elapse
7. T otal Data Uploaded
8. T otal Data Downloaded
9. Menu
10. Home Screen
11. Connect/Disconnect
12. Close
Note:
The Home screen only indicates 3G
After installation, the C170 Series automat
functions upon successful connection to th
can be sent or received, even if the Home
nnection.
Menu Screen
SMS:
Text message folders such as Inbox, Draft, etc.
Setting:
General, SMS, SIM, Radio and Network preferences.
Statistics:
Upload/Download graphs, totals and connection log.
Contacts:
C170 Series, SIM Card and Outlook Contact lists.
Profile:
Connection profile setup/options.
Information:
Device, Version and Signal specifics.
(internet) connection status.
ically initiates 2G (SMS)
e computer. Text messages
screen indicates no
co
1
212
3
4
5
6
7
11
10
9
8
Page 9

Th e BandLuxe™ C170 Series
Chapter 2
Connecting
Page 10
10
Chapter 2
Connecting
nection
utton.
Establishing a Con
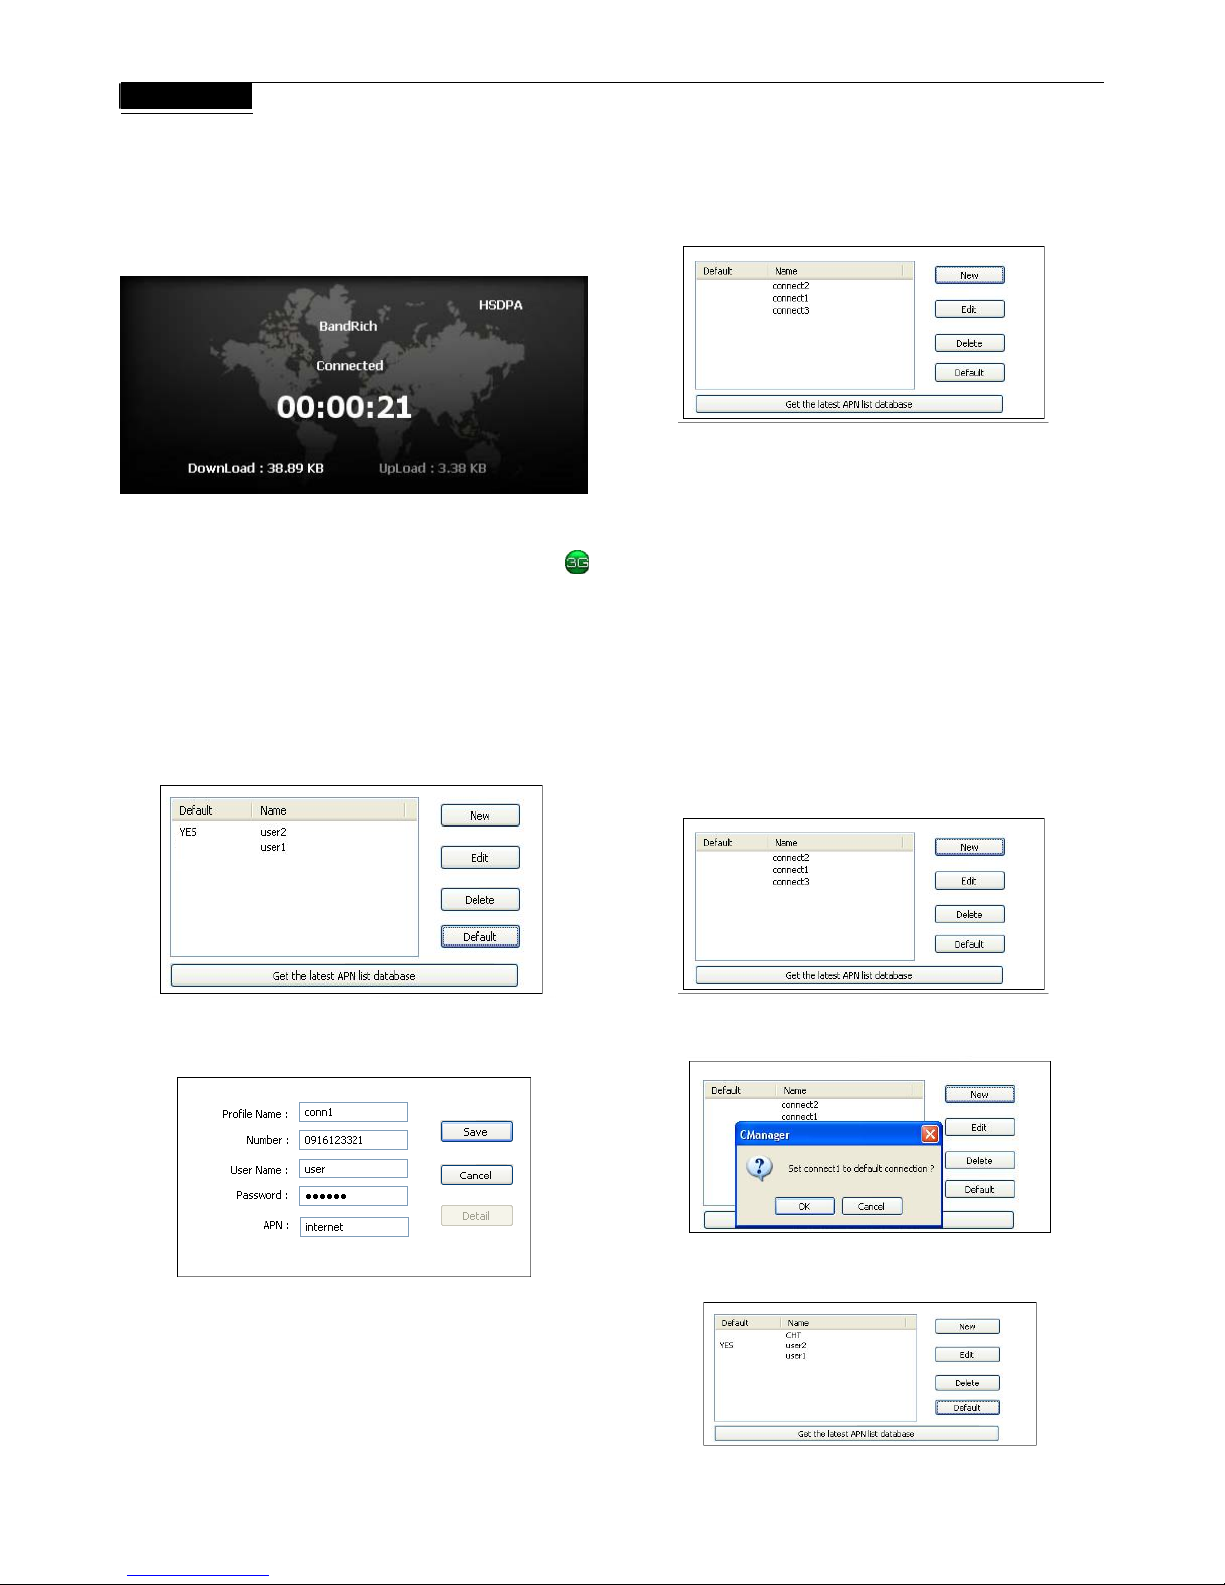
With the C170 Series fully installed, an online connection can now be
made. The C170 Series will automatically scan your system and
create a default profile, which should work in the vast majority of cases.
To test it, simply click the Connect b
running an r icon
Connection should take about 5 seconds. When established, the
Home screen should show Connected, with the onscreen clock
d the Download/Upload tallies running. The toolba
w
e
properl y
need to be cre
1. Click
profile, showing the operator's name of the SIM card.
ill also change color to indicate the connection protocol (same as
LED indicator). See Specifications for details.
If connection is unsuccessful, check if the device and SIM card ar
y connected and inserted. If they are, a new internet profile ma
ated.
Create a Profile
Menu > Profile. The profile menu will contain the default
2. Click , all 5
sp
New to create a new profile. Depending on the carrier
aces may not need to be filled to proceed.
3. Choose a Profile Name. The name is arbitrary and is helpful when
different connection methods are available.
4. Inquire with the Mobile network operator (SIM carrier) as to whether
the User Name and Password are required.
5. The Password can be any combination of letters, numbers or
symbols and is case sensitive.
6. Enter the Access Point Name (APN) supplied by the SIM card
carrier.
e number for establishing the wireless connection,
card carrier; click Save.
7. Enter the phon
supplied by the SIM
for a wireless connection.
nnection should take
en should show
8. On the Profile window, click the newly created profile and then click
Default. Click OK to set this profile as the default (only the default
can be connected).
9. The BandLuxe C170 Series is now ready
Click the Connect icon to establish it. Co
about 5 seconds. When established, the Home scre
Connected, with the onscreen clock running and the Download/
Upload tallies counting.
Note:
If you switch to a different SIM card, the default profile will no
longer be valid. You will have to create a new profile in the
manner just described. If you do not have access to all the
information necessary to create a new profile, uninstall and
reinstall the BandLuxe software. The new default profile should
work for the new SIM card.
Choose a Profile
Different profiles may be needed, depending on current location.
1. Click Menu > Profile.
2. Highlight the desired profile and click Default.
3. Click OK on the confirmation window if this is the desired profile.
4. The word YES will appear next to the default profile.
Page 11
11
Chapter 2
Connecting
Profile Properties
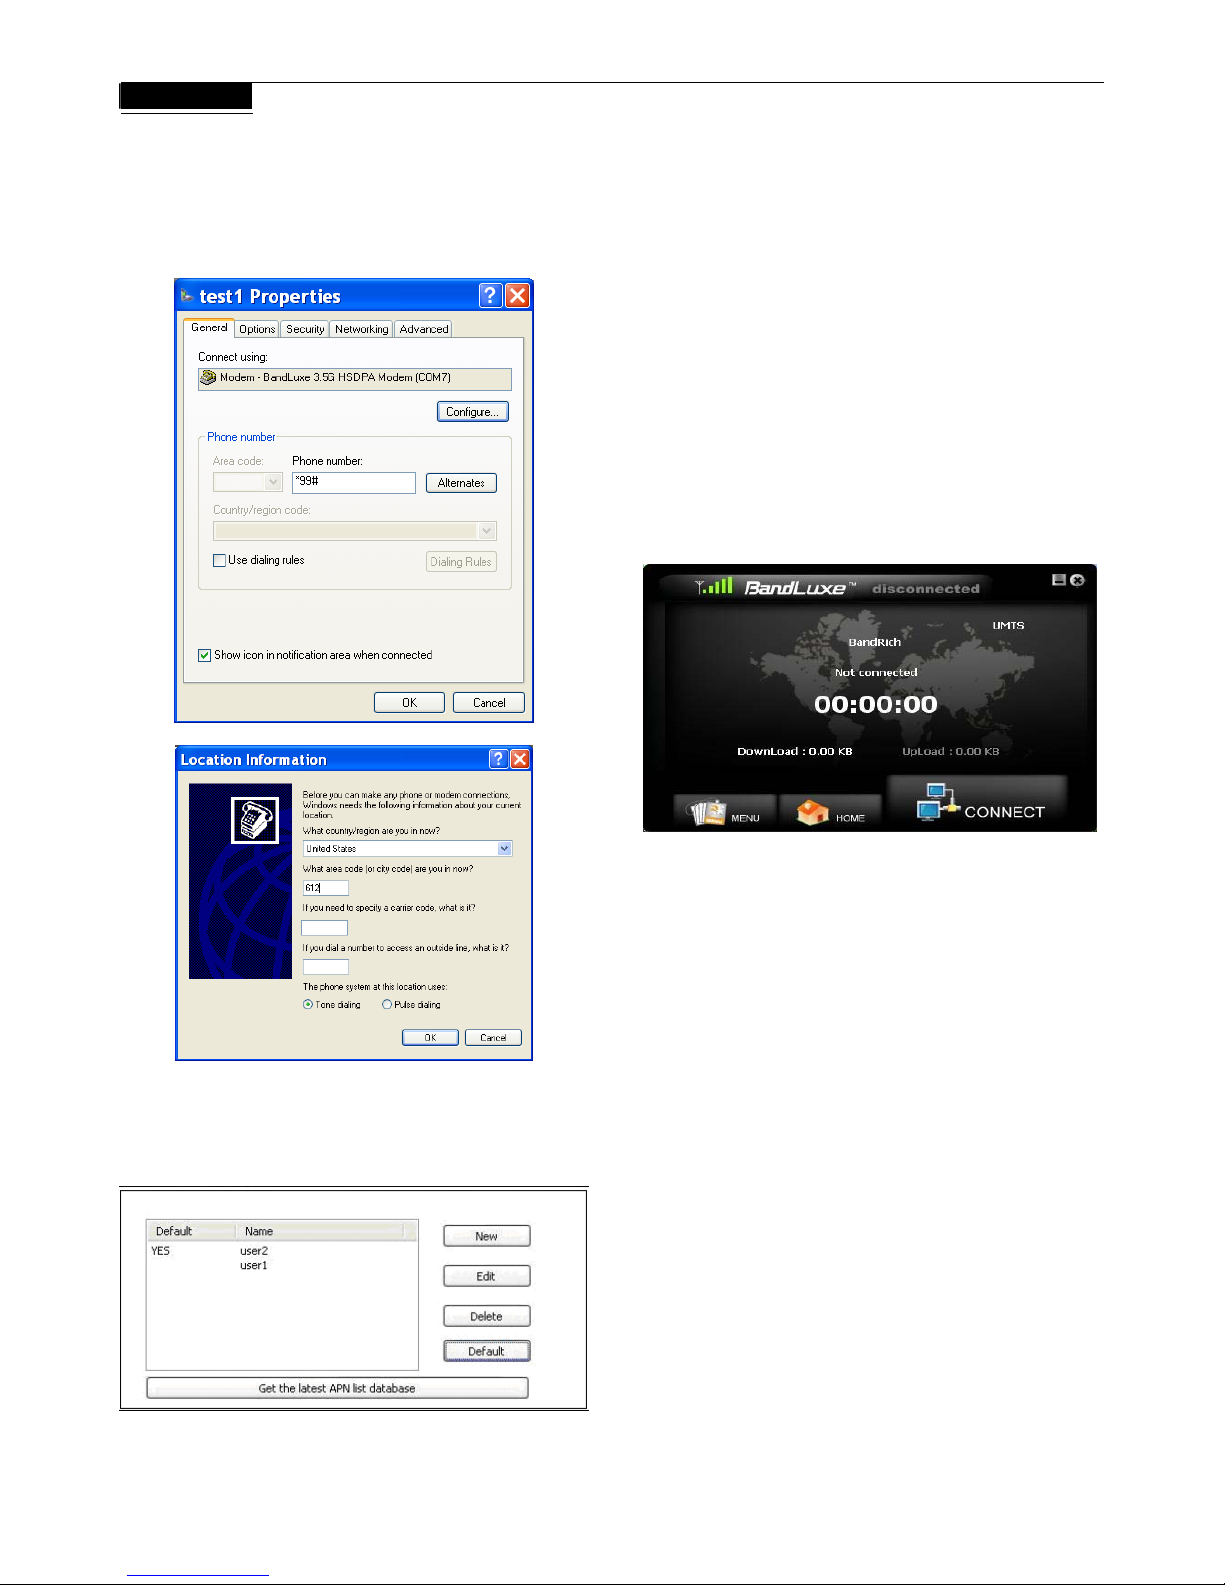
Profiles can be fine tuned after cre
click
Edit
to adjust the default profile. To adjust a non-default profile,
highlight it and then click
Edit
. Click
Detail
on the Edit window to view
the Properties menu, General Tab.
ation. In the Profile window, simply
Get the latest APN List Database
The
Profile
provides the APN List Update function. When the network
connection is established, the APN List will be updated after clicking
this button.
Connect using
If other modems are available, they will be listed here. Click
Configure
to adjust the BandLuxe modem settings.
Phone number
ing rules
to access the Location Information window to
fic dialing information such as
tone/pulse dialing
,
,
area & carrier code
, and
outside line access
en completed.
er Properties menu tabs are generic to the Windows OS
e discussed further.
Connecting & Disconnecting
General
Check
Use dial
add more speci
current region
number
.
Click OK wh
This and oth
and will not b
If a default profile has been selected, a connection can be made or
ended at any time by clicking the Connect button on the Menu screen.
However, connection status will not be obvious unless the Home
screen is displayed. The Statistics or Signal Information windows also
clearly display connection status.
Page 12

e™ Series
Chapter 3
The BandLux C170
SMS
Page 13
13
Chapter 3
SMS
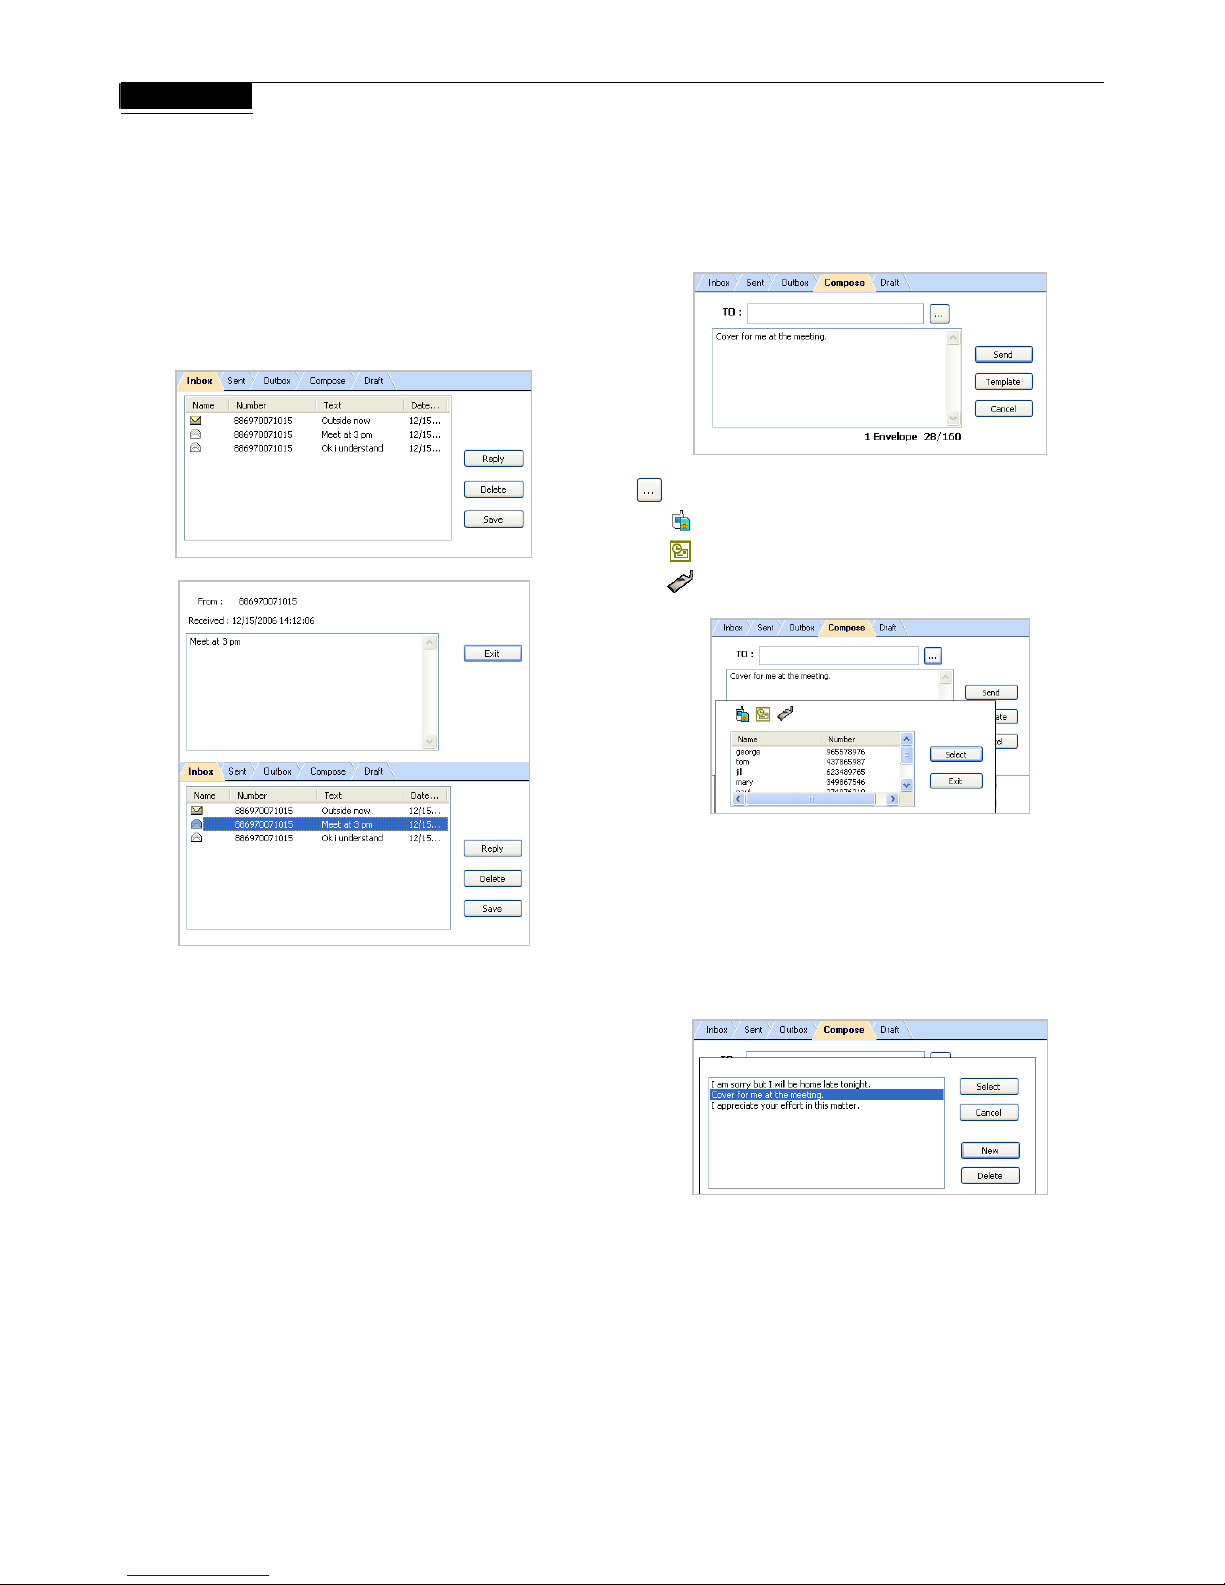
The Connection Manager allows th
any other mobile device. Each me
Sent and Draft folders displays the
the body text of the message and the date it was stored in the folder.
Inbox
Contains received messages. Save, Delete or Reply to Inbox
messages by highlighting them and pressing the appropriate button.
Highlight a message to make it scroll open above. Unread messages
are closed envelopes while read messages are open.
e same standard SMS options as
ssage stored in the Inbox, Outbox,
Name and Number of the contact,
Sent
Contains all successfully sent messages. Highlight a message and
press
Delete
to erase it.
Outbox
Contains completed but unsent messages. Send or Delete messages
by highlighting them and pressing the appropriate button.
es.
To:
Contains the Phone Number of the recipient.
Message Body:
Up to 160 characters.
Compose
Contains all tools for creating messag
Press to see contact lists.
- SIM Card Contacts
- Outlook Contacts
- C170 Series Contacts
Highlight a Contact and click
Select
to choose it. Click
Exit
to return to
the Compose screen.
Click
Template
to view all stored templates, or create/delete one.
Highlight a template and click Select to insert it into the message.
Click
New
to create a new template. Click
Save
to add the new
template to the list of existing ones. Click
Cancel
to return to the
Template list window.
Highlight a template and click
Delete
to erase it.
Draft
Contains saved but unfinished messages. Highlight a draft and click
Edit
to send the message back to the Compose window.
Page 14

The BandLuxe™
Chapter 4
C170 Series
Settings
Page 15
15
Chapter 4
Settings
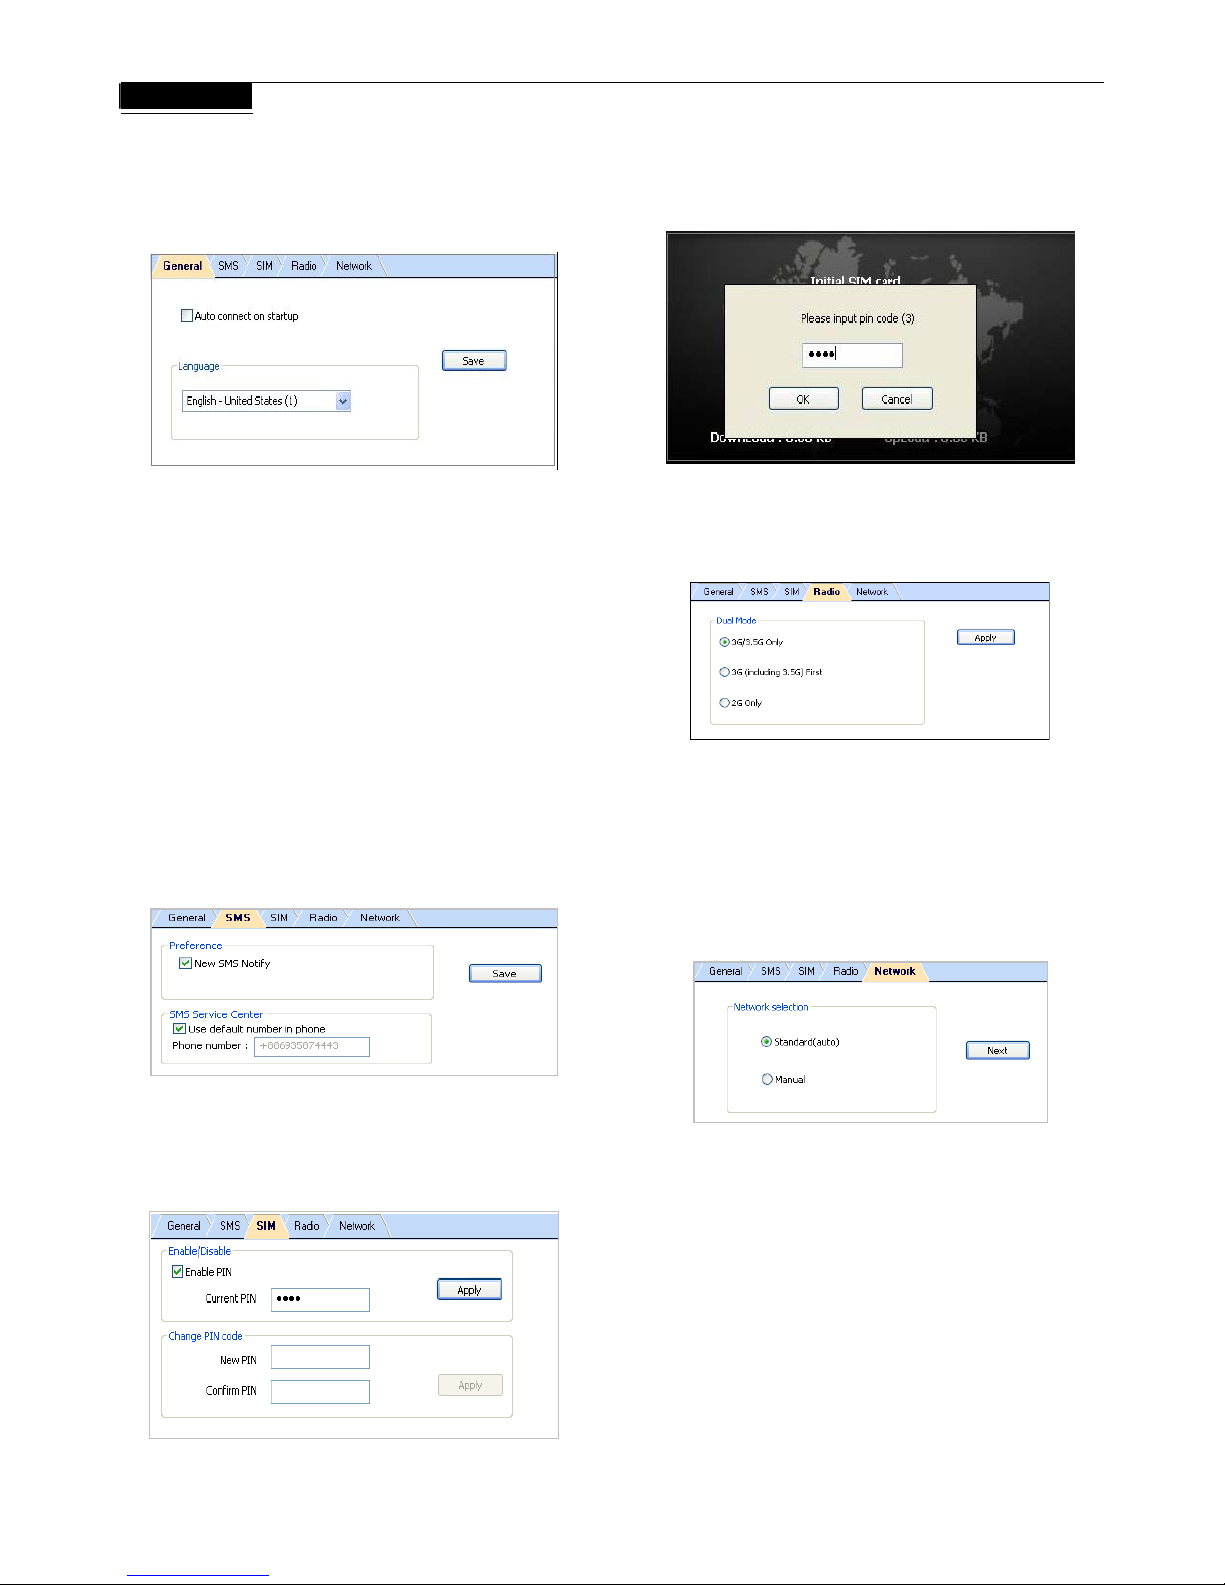
connect on startup to have the C170 Series connect to the
General
Check Auto
internet automatically during startup.
Langua
The Con choose
language, click the menu and highlight & select a language. Click
ve
to implement the chosen language. The Connection Manager
will then return to the Home Screen with the chosen language.
SMS
Preference
New SMS Notify: Check to be notified when a new text message
arrives. If enabled, the Toolbar Connection Manager Icon will change
to an Envelope Icon. An envelope icon will also appear in the upper left
corner of the Home screen when a new message arrives.
SMS Service Center
Use default number in phone: Uncheck to manually input service
center number.
Click
Save
after making any changes.
ge
nection Manager offers multi languages interface. To
a
Sa
SIM
Enable/Disable or change the SIM card Personal Identification
Number (PIN). Press
Apply
after making any changes. A SIM card
must be inserted for this function to be activated.
If a PIN code is enabled, it will be asked for during SIM card
initialization. After 3 incorrect PIN code entries, the SIM card will be
locked. Contact your operator to unlock it.
Radio
Dual Mode- Features various network search options. Note that 3G
(including 3.5G) First is the default setting.
After making changes to either, click
Apply
.
Network
Network Selection
Standard (auto)
Search for networks in the order specified in the
Prefer list. Click
Standard (auto)
>
Next
to view and adjust the Prefer
list.
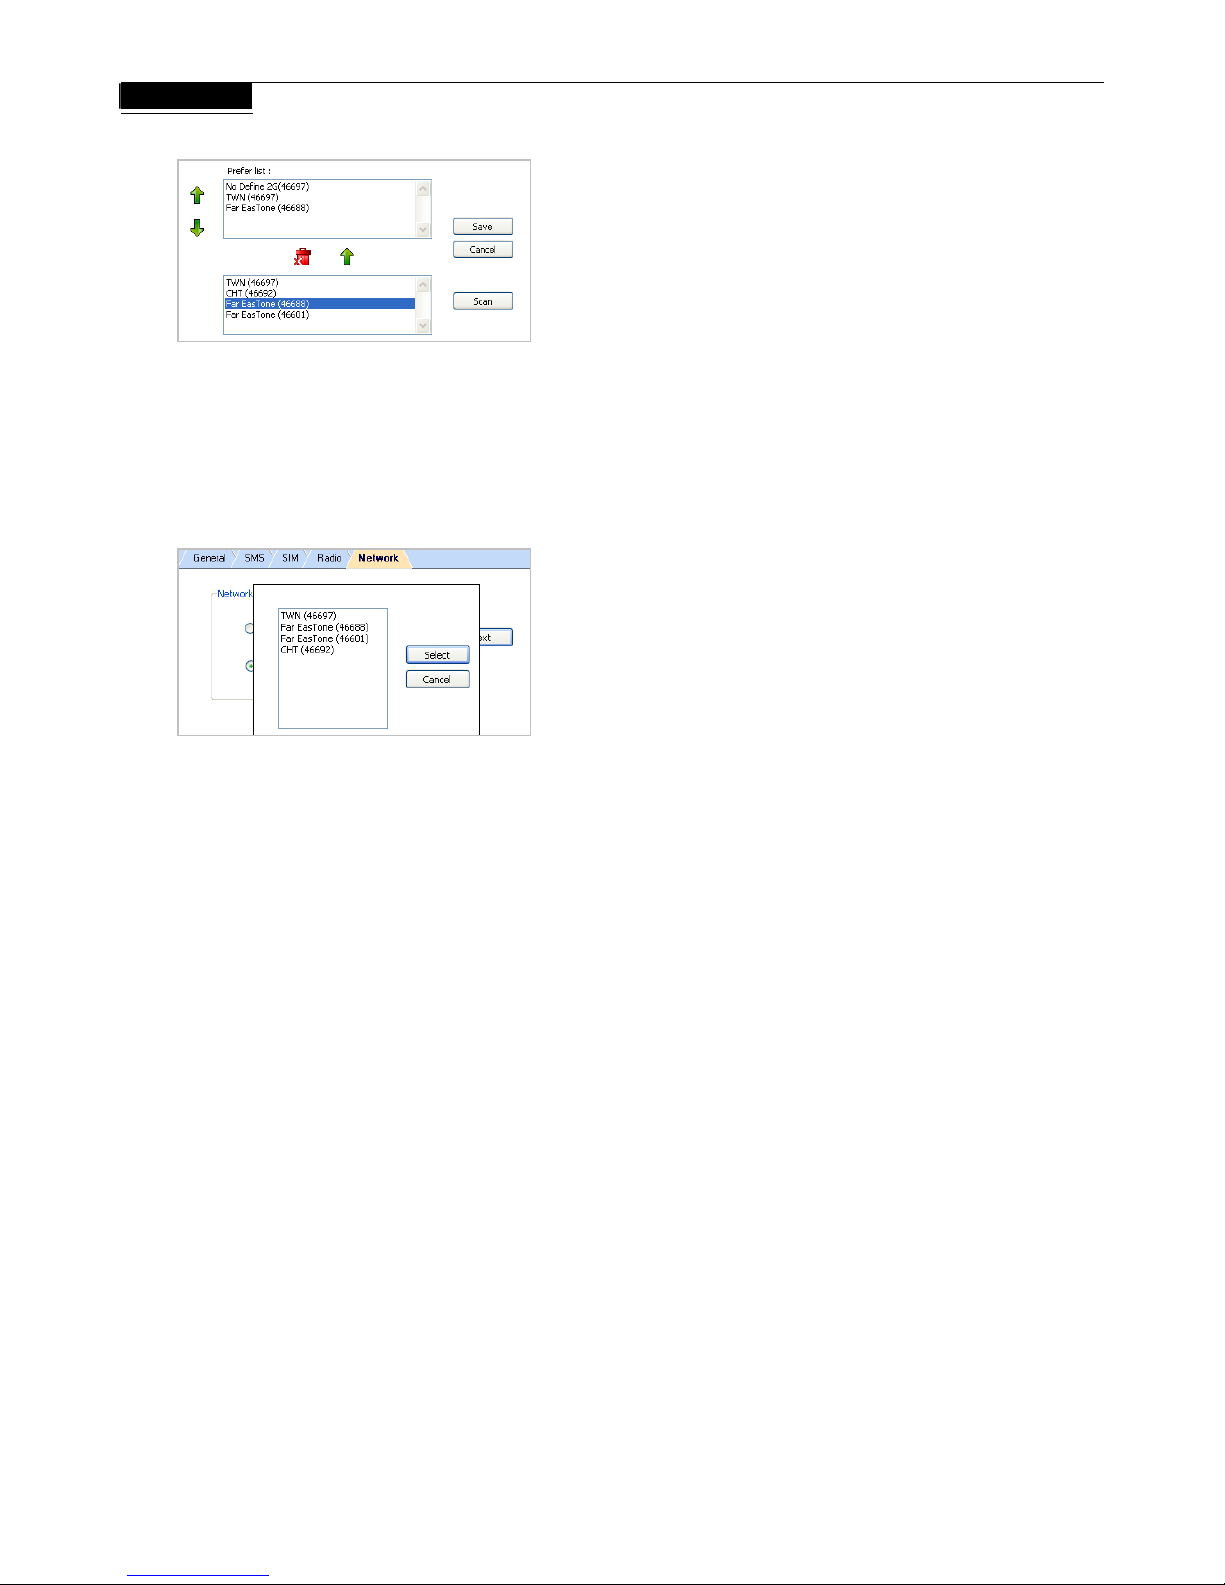
The top list is the Prefer list; the bottom lists all available networks.
Click
Scan
to bring up the list of all available networks.
In the Prefer list, highlight a network and click the up arrow to the left to
move it up the list (increase its preference); clicking the down arrow
does the opposite. Clicking the red icon removes the highlighted
network from the Prefer list.
In the bottom list, highlight a network and click the up arrow above to
move that network to the Prefer list.
Page 16
16
Chapter 4
Settings
If changes are made, click
Save
.
Manual
Choose a
the list. Hi
click
Canc
Note that
N
nnected
network from all the available. Click
Manual
>
Next
to see
ghlight a network and click
Select
. If no change is needed,
el
.
etwork
can only be accessed when the C170 Series is not
to a network. co
Page 17

The BandLuxe™ C170 Series
Chapter 5
Statistics & Information
Page 18
18
Chapter 5
Statistics & Information
Statistics
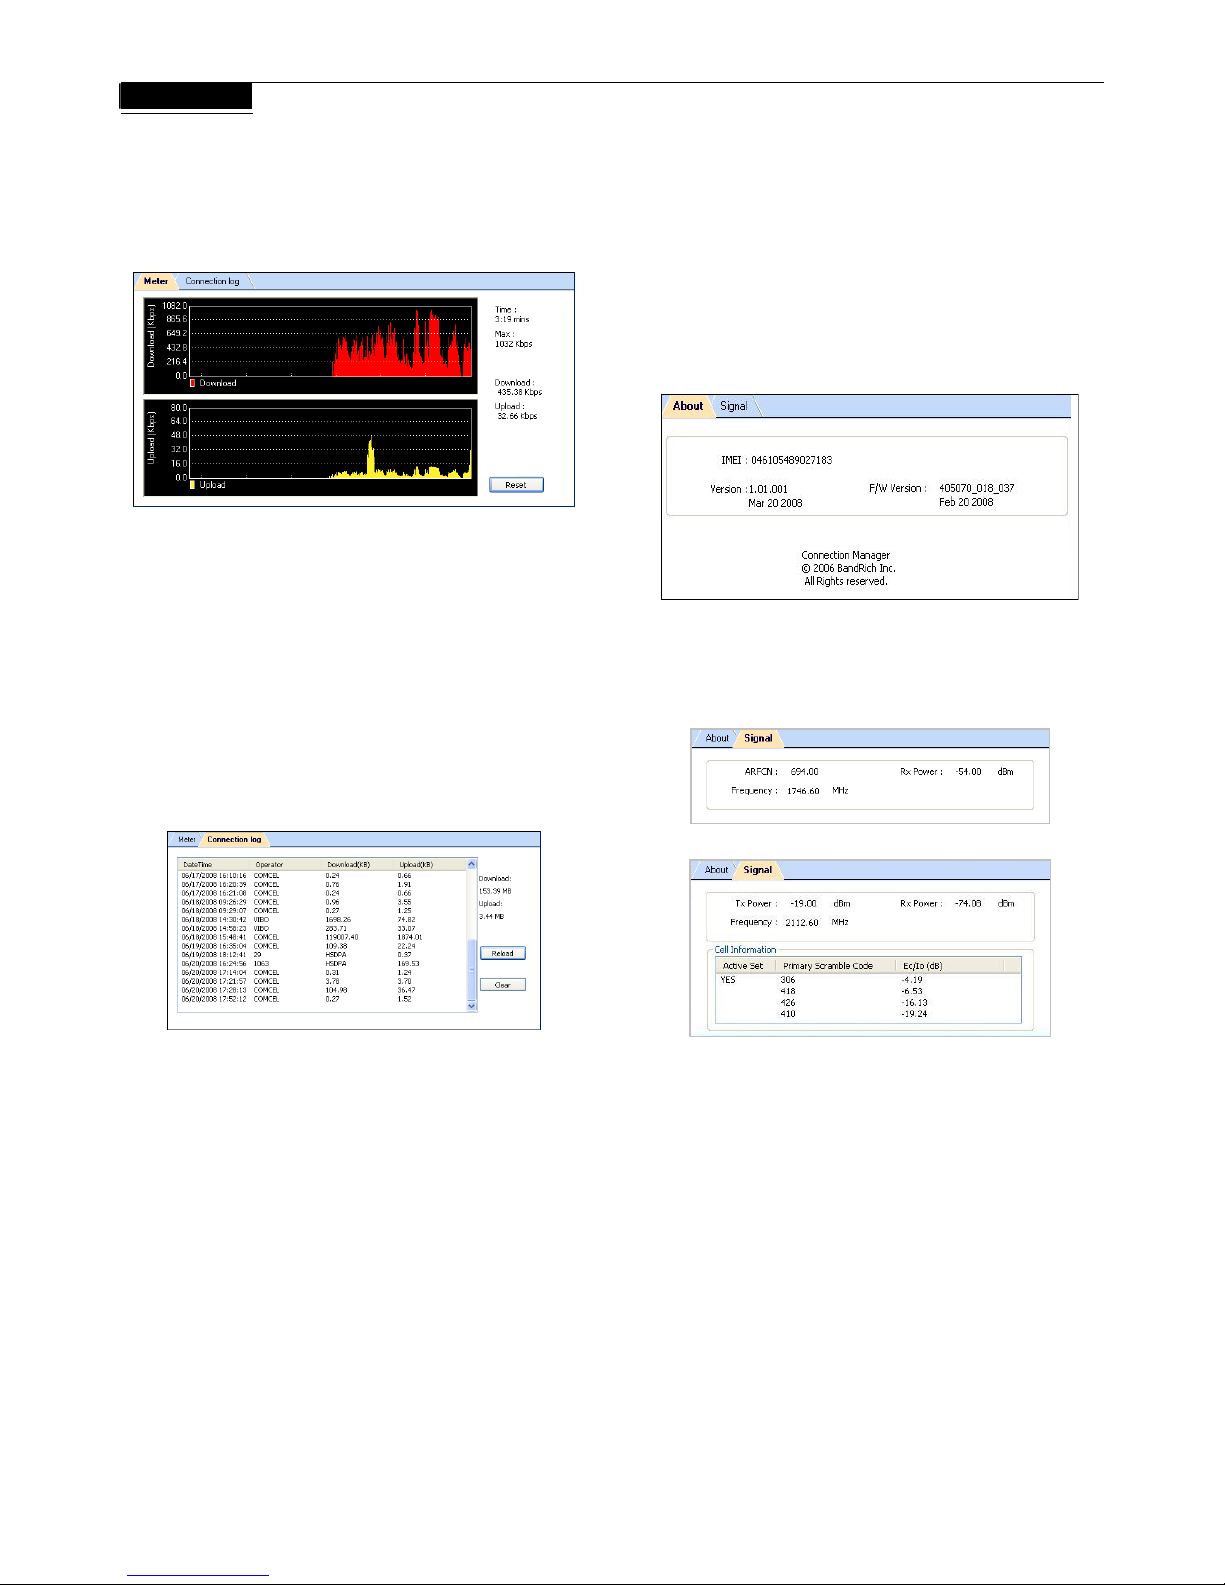
The Statistics screen displays a graph of recent u
activities. If there is no data, the C170 Series is offline. Click
Menu
>
Statistics
.
pload and download
Time:
Elapsed Connection Time
- Returns to zero upon disconnection
- Reset does not affect it
Max:
Maximum Throughput
Download:
Current Downloading Throughput
Upload:
Current Uploading Throughput
Click
Reset
to end the current graphs and start over. This will not af fect
the actual connection.
Connection log
Click
Menu
>
Statistics
>
Connection log
to see data counting by
each and total connection status
Each data counting
-
DateTime
: The date and time of connection log
-
Operator
: Telecom network operator
-
Download(KB)
: Downloaded Throughput
-
Upload(KB)
: Uploaded Throughput
Total data counting
-
Download
: Total Downloaded Throughput
-
Upload
: Total Uploaded Throughput
Click
Reload
to reload the latest data information. Click
Clear
to
clear all data counting information
* The data counting here is only for reference, please check
operator for real data throughput if any.
ecifications. Click
Menu
>
Information
.
About
Click
Menu
>
Information
>
About
tab to see version data.
IMEI:
International Mobile Equipment Identity number
ction Manager Software Version
irmware Version
Information
The Information screen offers version or signal sp
Version:
Conne
F/W Version:
F
Signal
Click the
Signal
tab to see signal data. The bottom half of the screen
will be empty when there is no connection or during a 2G connection.
Displayed indicators will vary, depending on your protocol.
Connected (2G)
Connected (3G)
ARFCN:
See Glossary
Tx & Rx Power:
Transmission/Reception strength, in decibel meters
(dBm)
Frequency:
In MHz
Active Set:
UMTS cell actually transmitting data, marked YES
Primary Scramble Code:
Individual UMTS cell ID code
Ec/Io:
Reception/Interference (S/N), Connected (3G) in decibels (dB)
Page 19

The BandL uxe™ C
pt
170 Series
Cha er 6
Q&A
Page 20
20
Chapter 6
Q&A
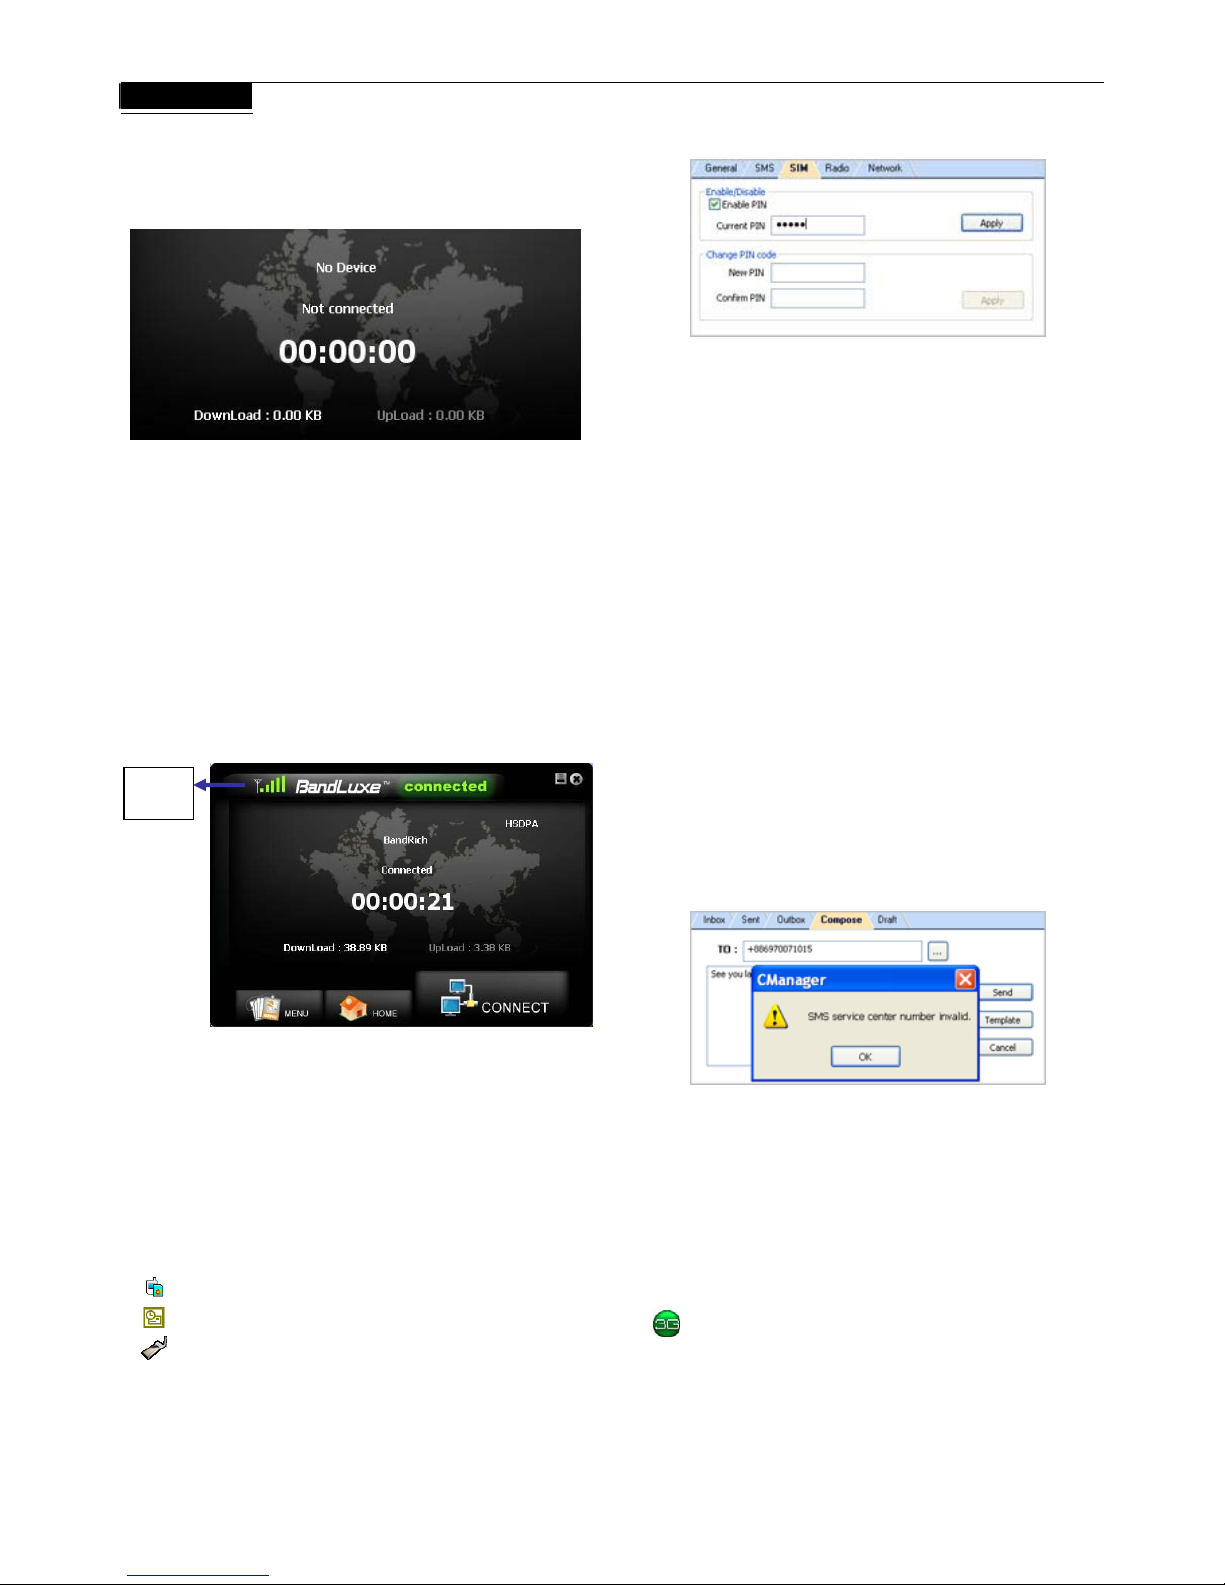
Q: Why does the Home screen display
No
Q: My OS is Microsoft 2000 SP4, so why is
software installation still not working?
A:
Two more Microsoft HotFix downloads are needed:
1. KB893803: Windows Install 3.1
ttp://www.microsoft.com/downloads/details. a spx?FamilyID=889482fc-5f
56-4a38-b838-de776fd4138c&displaylang=en&Hash=PAFe2q2M7AKW
EGBcm62PeiJS4ViwKMUiwH7KOHOV4d4P8gXcVDuwnXIDI9LT%2bqx
85W4mPHaGPwG4ne6KUKaD3Q%3d%3d#filelist
2. KB842773: Windows 2000 HotFix (Update for BITS 2.0 and
Device
?
A:
Make sure that the C170 Series is plugged in/inserted correctly. If it
is, and No Device is still displayed, check the LED.
If the LED is not lit, the problem could be:
- The USB port is not activated. Check the Device Manager.
Q: The Home screen is stuck on
Initial SIM Card
,
what do I do?
A:
Replug/reconnect the C170 Series. If this does not work, restart the
computer. If this does not work, check the SIM card, which may
have a poor connection or be locked.
h
tp://www.microsoft.com/downloads/details.
aspx?FamilyID=3ee866a0-3a09-4fdf-8bdb-c906850ab9f2&DisplayLan
Q:
s
) _ + ` - = { } | : “ < > ? [ ] \ ; ‘ , . /
Q: The Connection Manager is prompting me
that my SMS service center number is invalid.
What do I do?
WinHTTP 5.1)
ht
g=en
Why do some SMS text symbols display
incorrectly on the receiving phone?
A:
This is related to the different decoding schemes used by variou
mobile phone brands. Known problem symbols include:
~ ! @ # $ % ^ & * (
Q: The SIM card is working, so why can’t the
C170 Series make a connection?
A:
Signal
rength
dicator
St
In
A:
Check the profile information; click
Menu
>
Profile
. See Chapter 2
for details.
If profile settings are in order, the radio or network settings may
need adjustment. Click
Menu
>
Setting
. See Chapter 4 for details. If
Radio and Network settings are in order, please check the signal
strength indicator in the upper left corner of the Connection
Manager.
Q: How do I import contacts into the Connection
A:
Click
Setting
>
SMS
and change the SMS service number. See
Chapter 4
for details.
Q: The InstallShield Wizard does not
automatically open when I first plug in the
C170 Series, what do I do?
A:
In My Computer, right click on the drive with the Connection
Manager icon and select AutoPlay. This should initiate the
InstallShield Wizard.
Manager?
Click
Menu
>
Contacts
>
- Import from the SIM Card.
- Import from Outlook.
BANDLUXE C170 Series (H:)
- Import from the C170 Series Contacts folder.
Q: C
an I prevent others from using my C170 Series?
A:
Yes. Click
Menu
>
Setting
>
SIM
to enable or change the SIM card
PIN code.
Page 21
21
Chapter 6
Q&A
Q: My computer cannot boot with the C170
Series connected. Why?
A:
As discussed in Chapter 1, durin g installation the C170 Series is
displayed in My Computer as a portable storage device.
The computer treats the C170 Series as if it were a CD drive. Because
of this, your computer may be trying to boot from it, as if it were
expecting a Boot CD. Disconnect the C170 Series before booting.
Q: How do I view the .pdf Quick Start Guide and
User Manual?
A:
Click
Start
>
Programs
>
BandLuxe
>
BandLuxe HSDPA utility
R11
and choose either document. Both require Adobe Acrobat
6.0+.
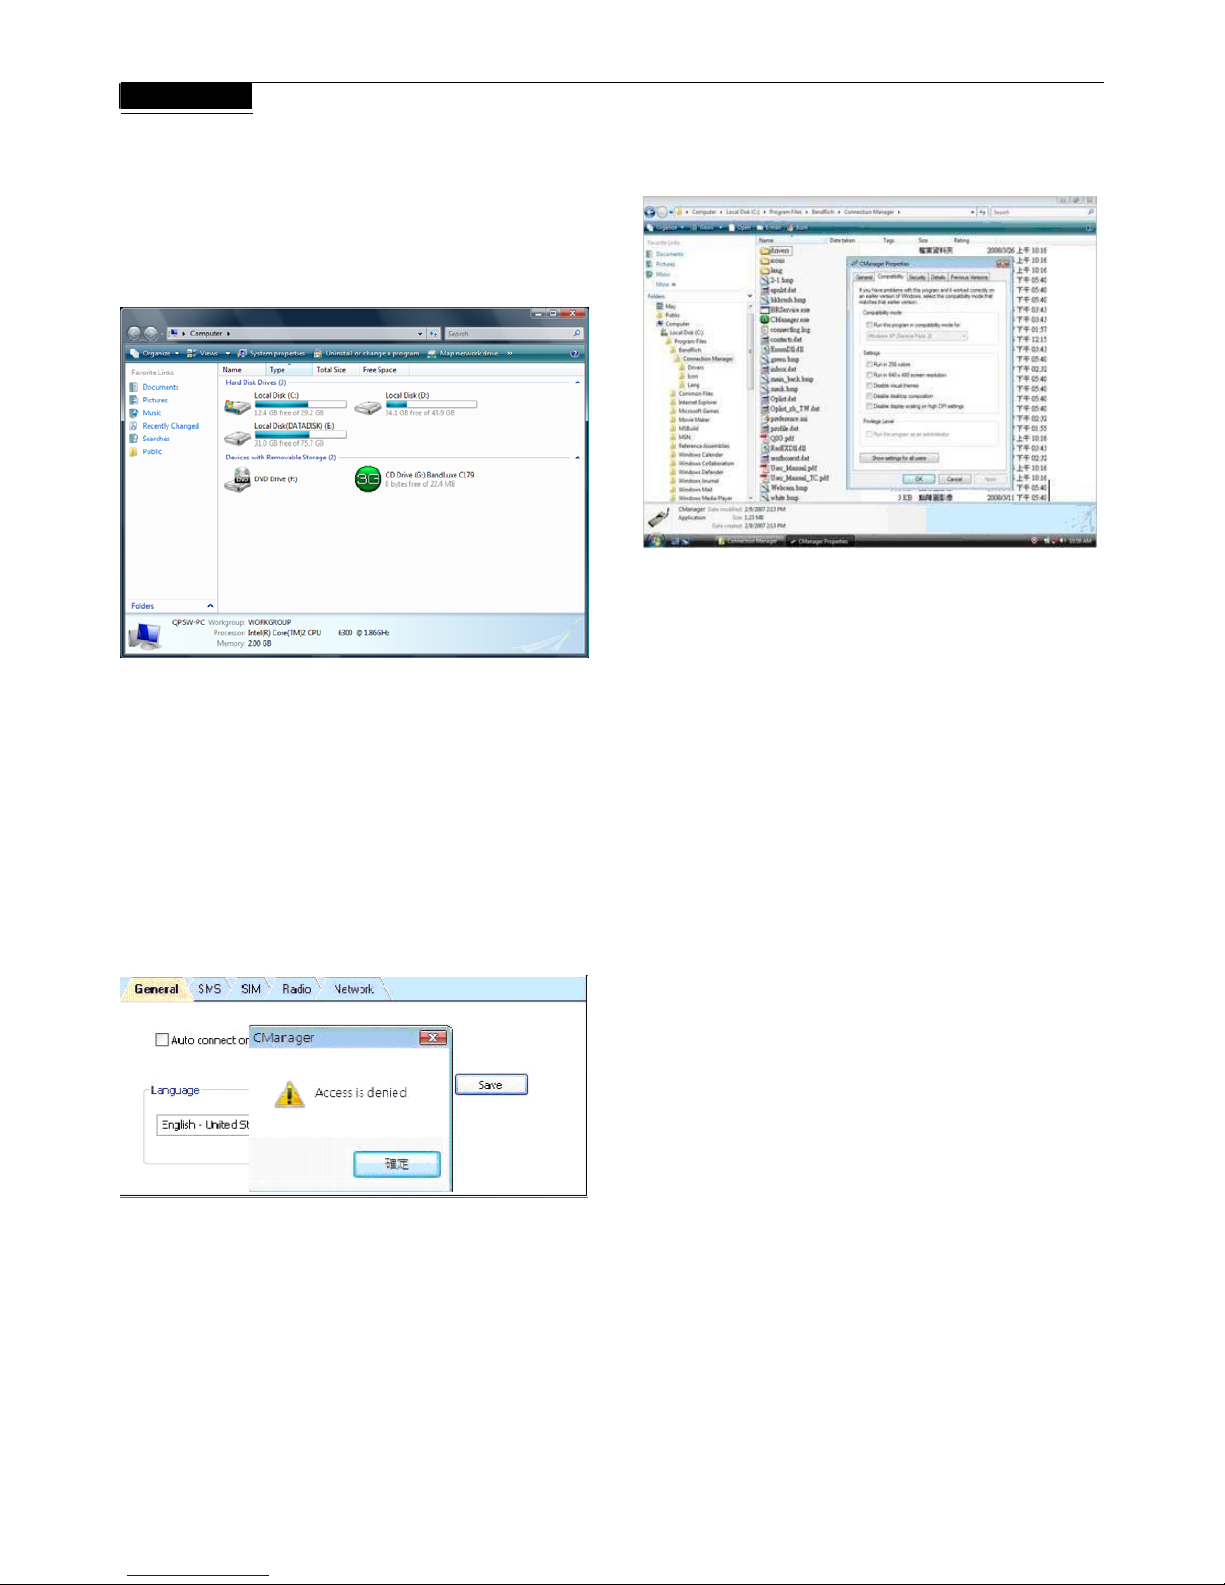
Q: The Connection Manager is having troubles
running on Vista. What do I do?
A:
You may be having a problem with Vista’s user control functions.
1. Open the Connection Manager folder.
2. Right click
CManager.exe > Properties
>
Compatibility
tab.
3. Check
Run this program as an administrator
.
Q: What microSDHC
TM
card tested in the
BandLuxe C170 Series?
A:
BandLuxe C170 series have microSDHC
TM
reader and support up
to 8GB microSDHC
TM
cards. Due to the availability of microSDHCTM
cards, we have successfully tested 4GB and 8GB microSDHC
TM
cards from SanDisk.
4. Click
Apply
> OK.
Page 22

e BandLuxe™ ies
pt
Th C170 Ser
Cha er 7
Importan
Glossary
t Safety
Information and
Page 23

23
Chapter 7
Important Safety Information and Glossary
io
eral
ulting from the delays or errors in data transmitted or
ceived by the BandLuxe C170 Series, or failure of the BandLuxe
ive such data.
demark of BandRich Inc.
y
be susceptible to ra ce resulting in danger; specifically:
and regulations and obey all signs and
ys t nd remove the C170
or when you
may cause interference or danger.
Wher sive atm s may b t.
- Do not operate y es in any where a potentially
explo atmosp ist. Sparks in such areas could cause
bod en
aw com an s.
- Users are advised not to operate the C170 Series whi
se on. Users are reminded to observe
the uipment in fuel depot
storage and distribution areas), chemical plants or where blasting
re in progress.
potentially
arly m
deck on boats, chemical transfer or storage facilities,
gas (such as propane or butane),
as grain,
ould
advi icle engine.
d life support equipment.
- Do not operate you Series in a where me
fe supp ipment, uipm ay
e to an of radio interference. In such areas, the
host communications device must be turned off. The C170 Series
als that could interfere with this equipment.
orne.
gulations state that
uspend w oarding an airplane.
se ensure that t urned off and your C170
Series is removed from the card slot prior to boarding aircraft in
ols.
While operating a vehicle.
- The driver or mobile network operator of any vehicle should not
operate a wireless data device while in control of a vehicle. Doing
so will detract from the driver or mobile network operator’s control
and operation of that vehicle. In some countries, operating such
communications devices while in control of a vehicle is an offense.
s
a conformity marking consisting of the letters “CE”.
The CE Mark is
This product conf
directive 1999/5/EC in order t has
deter
the
er 0678 after the CE mark.
rs to the safety
rate the equipment.
nst harmful
ations. However, there is no guarantee
ined by turning the equipment off and
e equipment into an outlet on a circuit different from that
sly
rference and
Safety Information Regulation
Important Notice
Due to the transmission and reception properties of cellular
communications, data can occasionally be lost or delayed. This can be
due to the variation in radio signal strength that results from changes in
CE Marking
This device has been tested to and conforms to the regulatory
requirements of the European Union and has attained CE Marking.
The CE Mark is
the characteristics of the radio transmission path.
Although data loss is rare, the environment where you operate the
C170 Series may adversely affect communications. Variations in rad
signal strength are referred to as fading. Fading is caused by sev
different factors including signal reflection, the ionosphere, and
interference from other radio channels.
BandRich Inc. or its partners will not be held responsible for damages
of any kind res
The CE Mark applies to products regulated by certain European health,
safety and environmental protection legislation.
obligatory for products it applies to: the manufacturer affixes the
marking in order to be allowed to sell his product in the European
market.
orms to the essential requirements of the R&TTE
o attain CE Marking. A notified body
mined that this device has properly demonstrated that the
requirements of the directive have been met and has issued a
favorable certificate of expert opinion. As such the device will bear
notified body numb
re
C170 Series to transmit or rece
BandLuxe™ is a registered tra
The CE Marking is not a quality mark. Foremost, it refe
rather than to the quality of a product. Secondly, CE Marking is
mandatory for the product it applies to, whereas most quality markings
Potential Hazards
are voluntary.
Marking: The product shall bear the CE mark, the notified body
Do not operate the BandLuxe C170 Series in an environment that ma
dio interferen
number(s) as depicted to the right. CE 0678.
Areas where prohibited by the law.
- Follow any special rules
15.21 Federal Communications Commission
(FCC) Statement
You are cautioned that changes or modifications not expressly
notices. Alwa urn off the host device a
Series from the card slot when instructed to do so,
suspect that it
e explo osphere e presen
our C170 Seri
here may ex
area
sive
an explosion or fire resulting in
ply with all signs
ily injury or ev
d instruction
death. Be
are and
le at a
refueling point or rvice stati
restrictions no use of radio eq s (fuel
approved by the part responsible for compliance could void the user’s
authority to ope
15.105(b) Federal Communications
Commission (FCC) Statement
This equipment has been tested and found to comply with the limits for
a Class B digital device, pursuant to part 15 of the FCC rules. These
limits are designed to provide reasonable protection agai
interference in a residential installation. This equipment g
operations a
- Areas with a
enerates,
uses and can radiate radio frequency energy and, if not installed and
used in accordance with the instructions, may cause harmful
interference to radio communic
explosive atmosphere are often but not
always cle arked. Potential locations can include gas stations,
below
that interference will not occur in a particular installation. If this
equipment does cause harmful interference to radio or television
reception, which can be determ
vehicles using liquefied petroleum
areas where the air contains chemicals or particles, such
tal po ea where you wdust or me wders, and any other ar
normally be sed to turn off your veh
on, the user is encouraged to try to correct the interference by one or
more of the following measures:
Near Medical an
- Reorient or relocate the receiving antenna.
r C170 ny area dical
equipment, li
be susceptibl
ort equ
y form
or near any eq ent that m
- Increase the separation between the equipment and receiver.
- Connect th
to which the receiver is connected.
may transmit sign
- Consult the dealer or an experienced radio/TV technician for help.
You are cautioned that changes or modifications not expres
ble for compliance could void your
On an aircraft, either on the ground or airb
to FAA re- In addition quirements, many airline re
you must s ireless operations before b
Plea he host device is t
approved by the party responsi
authority to operate the equipment.
Operation is subject to the following two
conditions:
order to comply with these regulations. The C170 Series can
transmit signals that could interfere with various onboard systems
and contr
1) this device may not cause inte
2) this device must accept any interference, including interference that
may cause undesired operation of the device.
Page 24
24
Chapter 7
Important Safety Information and Glossary
FCC RF Radiation Exposure Statement:
3. This Transmitter must not be co-located or operating in conjunction
with any other antenna or transmitter.
4. This equipment complies with FCC RF radiation exposure limits set
forth for an uncontrolled environment. This equipment should be
installed and operated with a minimum distance of 20 centimeters
between the radiator and your body.
SAR compliance has been established in a laptop computer with side
PCMCIA ExpressCard slot configuration as tested in this filing, and
can be used in laptop computers with substantially similar physical
dimensions, construction, and electrical and RF characteristics.
Compliance of this device in all final host configurations is the
responsibility of the Grantee. End-users must be provided with specific
information required to satisfy RF exposure compliance for all final
host devices.
Specifications
System Requirements
Operating System: Windows Vista, Windows XP SP2+, Windows
2000 SP4+
Mac OS X 10.4.x, Mac OS X 10.5 or later
Hard Drive Space: 30 MB
Web Browser: Internet Explorer 6.0+
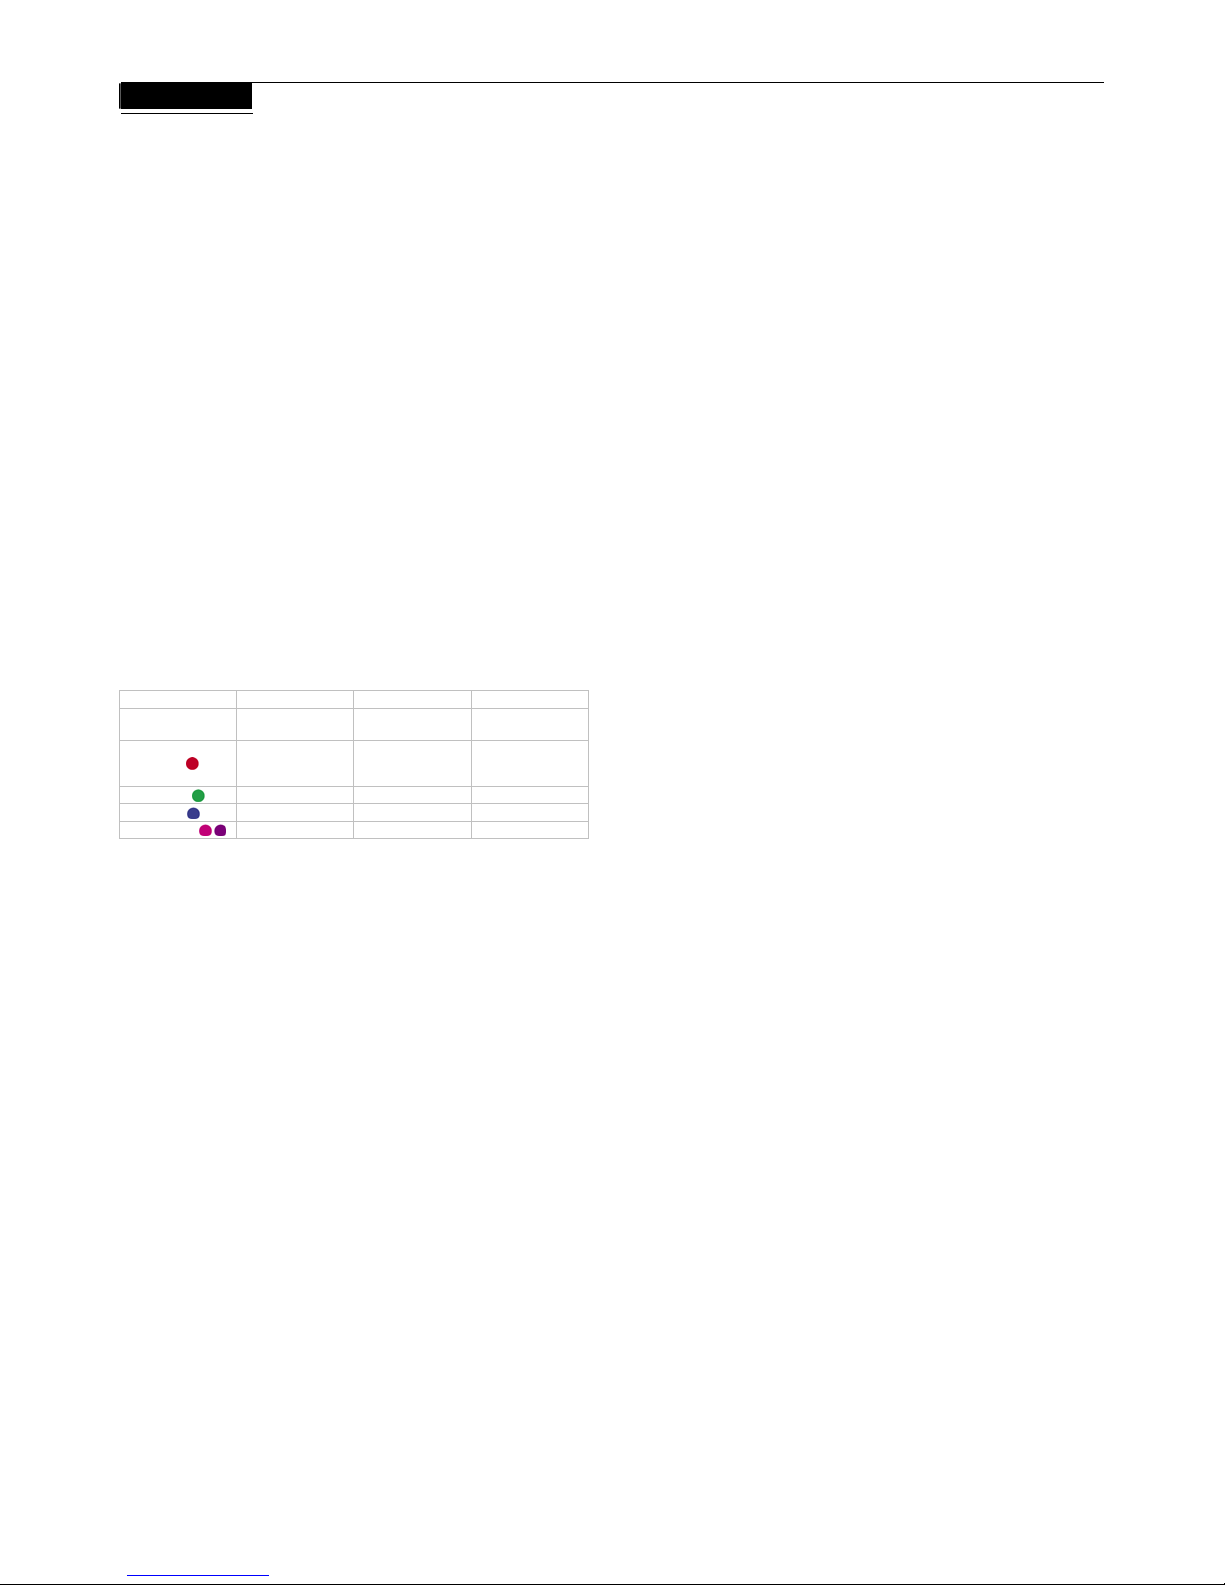
LED Indicators
Color Indicator Flashing Solid
Off
Not Connected/
Flight Mode
NA NA
Red SIM Card/Service
No coverage/
still searching
Error (SIM card
missing, failed
verification)
Green WCDMA Available Connected
Blue HSDPA NA Connected
Pink/Purple / GPRS/EDGE Available Connected
Hardware
Dimensions: 59.9 x 25.5 x 14.5 mm Typical (USB dongle
closed)
Weight: 22g
Onboard Memory: 64 MB NAND Flash & 64 MB SDRAM
GSM Bands: 850, 900, 1800, 1900
UMTS Bands:
C170 C177 C179
UMTS Band 2100 850/1900 900/2100
Connectivity
Internet: DUN
Data Speed Downlink: 3.6Mbps (Max)
in bps: Uplink: 384kbps
Radio/Band Selection: 3/3.5G: 2100 Only or 850+1900 or 900+2100
2G: EU+Asia (900/1800), US (850/1900)
IP Settings: APN, DNS, DHCP vs. Static, Radius
Glossary
2G:
Second-generation mobile networking technology. Represents a
switchover from analog to digital; most 2G networks use GSM.
3G:
Third-generation mobile networking technology that enables
simultaneous transfer of voice and non-voice data; most 3G networks
use WCDMA.
3.5G/ HSPA:
A more recent standard of mobile networking technology;
generally uses HSDPA and HSUPA
APN (Access Point Name/Network):
Provides GPRS routing
information. Consists of:
Network ID: Identifies the external service requested by a GPRS
user.
Mobile network operator ID: Specifies routing information.
ARFCN (Absolute Radio Frequency Channel Number):
The
specific ID numbers for all radio channels used in cellular mobile
communications.
bps (bits per second):
How data flow is measured.
DNS (Domain Name System):
Helps route network traffic by making
the addressing process more user-friendly.
DHCP (Dynamic Host Configuration Protocol):
How devices obtain
IP addresses from a server.
DUN (Dial-Up Network):
Windows component that enables online
access via a modem.
EDGE (Enhanced Data GSM Environment/Enhanced Data for
Global Evolution):
Advanced GPRS that delivers multimedia and
other data needing greater bandwidth at up to 237 kbps.
GPRS (General Packet Radio Service):
Delivers data in packets at
up to 86 kbps.
GSM (Global System for Mobile Communications):
The most
popular cellular network, mostly operates in 850-900 or 1800-1900
MHz; the primary 2G system.
IMEI (International Mobile Equipment Identity):
A number unique to
each GSM/UMTS device that can be used block network access by a
stolen mobile device.
IP (Internet Protocol):
Routes packets over a network.
HSDPA (High Speed Downlink Packet Access):
Advanced WCDMA
that delivers downlink bandwidth intensive data at up to 7.2Mbps;
typically associated with 3.5G.
HSUPA (High Speed Uplink Packet Access):
Advanced WCDMA
that delivers uplink bandwidth intensive data at up to 5.76Mbps;
typically associated with 3.5G.
Kbps (Kilobits per second):
A data flow measure; 1024 bits/second.
LAN (Local Area Network):
A data network with limited range but
good bandwidth.
Mbps (Megabits per second):
A data flow measure; 1,048,576
bits/second.
PPP (Point-to-Point Protocol):
An internet connection method.
PIN (Personal Identity Number):
Four to eight digital numbers SIM
card security code; allows access to the carrier’s network.
Rx:
Shorthand for Reception.
SIM (Subscriber Identity Module):
A small card that contains key
mobile device identification, subscription and contact information.
SMS (Short Messaging Service):
Allows text messages of up to 160
characters.
Tx:
Shorthand for Transmission
.
UMTS: Universal Mobile Telecommunications System
is one of
the
third-generation (
H3GH
)
H
cell phoneH technologies
WCDMA (Wideband Code Division Multiple Access):
Advanced
EDGE that supports 384kbps data flow. Most 3G networks use this
standard; aka UMTS.
 Loading...