

Page 1
BAND-IT-IDEX, Inc.
A Unit of IDEX Corporation
4799 Dahlia Street
Denver, CO 80216-0307 USA
P: 1-800-525-0758
F: 1-800-624-3925
Document # P91687 Rev. H
© Copyright
BAND-IT-IDEX, Inc. 2010
All rights reserved
www.BAND-IT-IDEX.com
Page 1 of 4
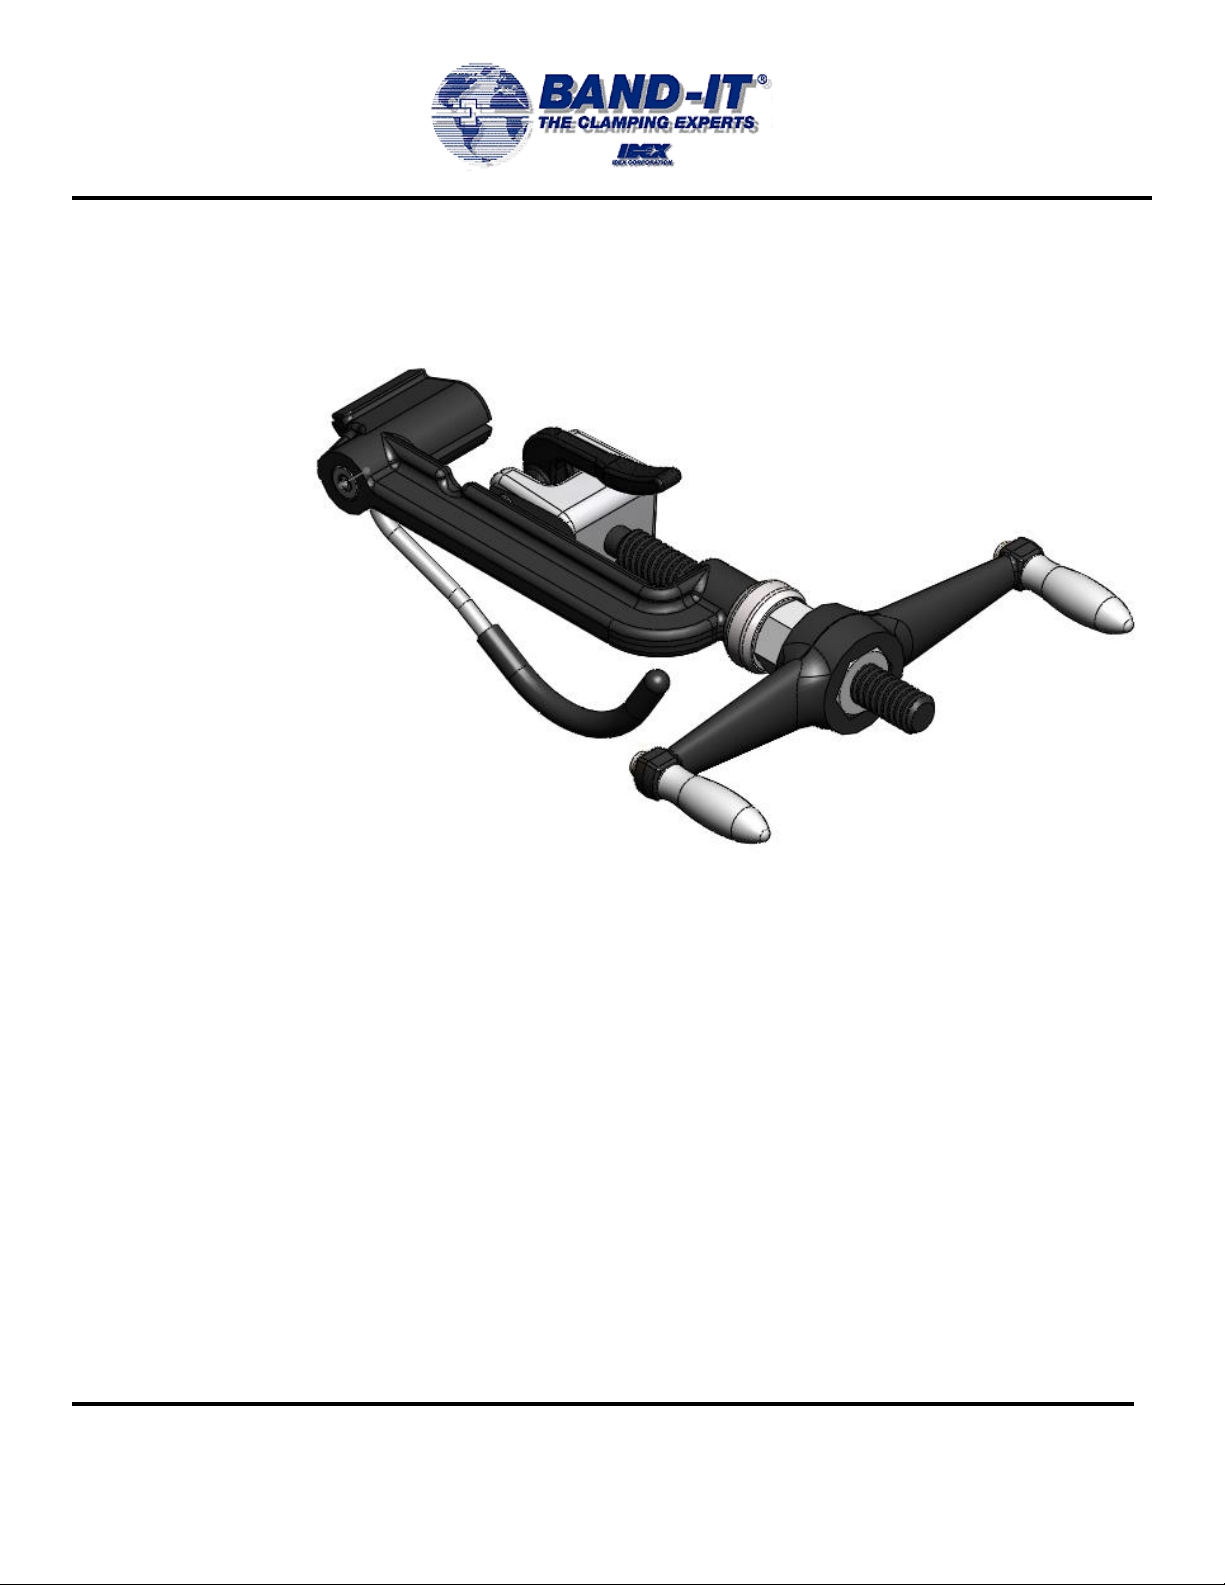
C00369 Heavy Duty
Hand Tool
Instruction
Manual
Safety Practices:
1. Read this manual and become familiar with the tool before use.
2. Protective eyewear should be worn during use.
3. Wear appropriate gloves for handling steel.
4. When applying clamps, care should be taken to insure fingers are not in contact with
the clamp during installation.
5. Never attempt to clamp objects which have the potential to burst, shatter or
otherwise cause bodily harm.
6. Do not use tool on live electrical sources.
Introduction:
The C00369 Tool installs any BAND-IT Band of .030" thickness or less and 3/4" Giant
Band of .044" thickness.
Table of Contents:
1. Introduction & Safety Practices
2. Operating Instructions
3. Tool Assembly Parts List
4. Cleaning & Warranty
Page 2
BAND-IT-IDEX, Inc.
A Unit of IDEX Corporation
4799 Dahlia Street
Denver, CO 80216-0307 USA
P: 1-800-525-0758
F: 1-800-624-3925
Document # P91687 Rev. H
© Copyright
BAND-IT-IDEX, Inc. 2010
All rights reserved
www.BAND-IT-IDEX.com
Page 2 of 4
C00369 Heavy Duty
Hand Tool
Operating
Instructions
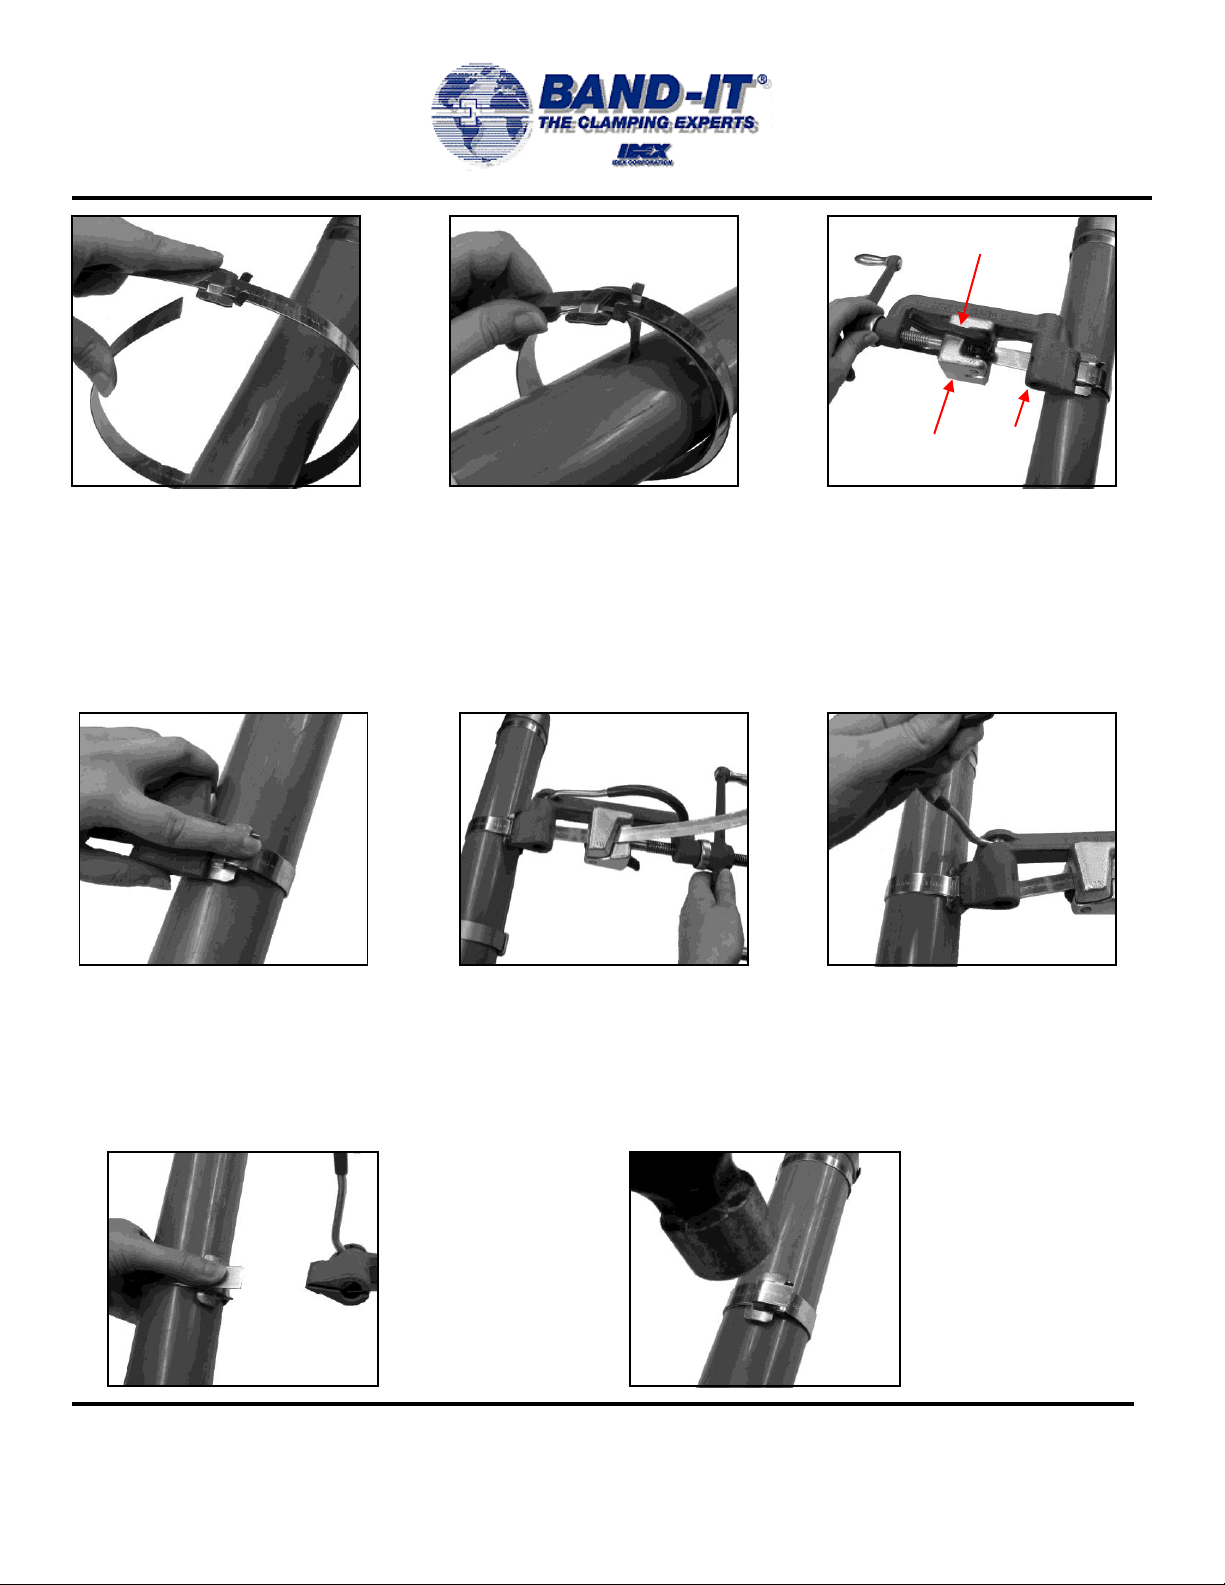
1. Slide buckle on band as shown.
Bring tip of band around workpiece
and again through buckle.
Note: Band may be used from bulk roll
as this completely eliminates waste of
band.
2. Insert band around workpiece
again and through buckle. Double
wrapping develops much more radial
compression than single wrapping.
Bend end of band under buckle.
3. Place band in opening of tool nose
and Gripper Block. Move into slot as
far as possible, to avoid buckle sliding
into Tool Nose. Tighten band clamp by
turning the Tension Handle clockwise
while holding Band Gripper tight against
band. NOTE: The spring load of the
band gripper is not intended to secure
and prevent the band from slipping
during tension process.
4. Place finger on BAND-IT Band at
buckle bridge while tensioning. When
you observe the band stops moving
through the buckle, maximum pressure
is being exerted around the workpiece.
Stop turning handle.
5. Roll tool over buckle, backing off
with Tension Handle 1 - 1½ turns
throughout entire rolling operation.
Failure to back off tension with tension
handle throughout roll-over may result
in breaking the band. There is no loss
of tension as band released is used up
in this process.
6. Rotate Cutting Handle forward to cut
the band. When applying Giant Band
clamps, prior to cutting off clamp,
release Band Gripper and push Tool
Nose away from buckle approx. ¼”.
7. Remove tool, holding
stub of band down.
8. Hammer down buckle ears
to complete BAND-IT clamp.
Tool Nose
Gripper Block
Band Gripper
Page 3

BAND-IT-IDEX, Inc.
A Unit of IDEX Corporation
4799 Dahlia Street
Denver, CO 80216-0307 USA
P: 1-800-525-0758
F: 1-800-624-3925
Document # P91687 Rev. H
© Copyright
BAND-IT-IDEX, Inc. 2010
All rights reserved
www.BAND-IT-IDEX.com
Page 3 of 4
C00369 Heavy Duty
Hand Tool
1. To assist in removing threaded parts,
apply heat to soften locking compound.
2. When connecting item 13 (Set Screw)
to item 14 (Cutter Bar), clean threads
(male and female) of foreign matter, then
apply one drop of medium strength
locking compound (Loctite 242 or equiv.)
onto male thread and connect parts
together.
3. Kit # C01899 contains one each Band
Gripper, one Gripper Spring and one Pin.
Replace all parts as a set to maximize
tool performance. Periodic cleaning of
band gripper teeth will improve tool
performance.
C00369 BAND-IT TOOL
REPAIR PARTS LIST
ASSY #
ITEM
DESCRIPTION
QTY
C01899
1
PIN, ECCENTRIC LEVER PIVOT
1 2 BAND GRIPPER
1 3 GRIPPER SPRING
1
C02187
4
TOOL FRAME
1
C04799
5
SPIN GRIP
2 6 EXTERNAL RETAINING RING
2 7 BUSHING, TENSION HANDLE
1 8 TENSION HANDLE
1 9 SET SCREW, HALF DOG
1
C04986
10
TENSION SCREW, 5/8”,
LUBRICANT, FIN
1
C05887
11
CUTTER BAR HANDLE
1
12
VINYL GRIP
1
13
SET SCREW
1
14
CUTTER BAR
1
C07086
15
THRUST BEARING
1
3 4 10 2 11
12
14
15 1 5 6 7 9 8
13
Tool Assembly
Parts List
Page 4

BAND-IT-IDEX, Inc.
A Unit of IDEX Corporation
4799 Dahlia Street
Denver, CO 80216-0307 USA
P: 1-800-525-0758
F: 1-800-624-3925
Document # P91687 Rev. H
© Copyright
BAND-IT-IDEX, Inc. 2010
All rights reserved
www.BAND-IT-IDEX.com
Page 4 of 4
C00369 Heavy Duty
Hand Tool
Cleaning &
Warranty
Gripper Cleaning Instructions:
1. To remove Gripper, align
Gripper Pin hole with notch in
tool frame. Using a punch and
hammer, punch Pin out of
Slide Block.
2. Using a wire brush, clean all
foreign matter from teeth.
3. To replace Pin, Gripper
Spring must be seated in
Tension Screw hole. Align
Gripper hole with Slide Block
hole and insert Pin using a
hammer.
Refer to website for warranty information: http://www.band-it-idex.com/warranty.html
NOTE: Periodically apply food-grade white lubricant or equivalent to Tension Screw thread (item
10 on page 3) to prevent excessive wear.
If tool fails to securely grip tail of clamp, follow Gripper cleaning instructions above.
 Loading...