

Page 1
BAND-IT-IDEX, Inc.
A Unit of IDEX Corporation
4799 Dahlia Street
Denver, CO 80216-3070 USA
P: 1-800-525-0758
F: 1-800-624-3925
Document # P05886 rev. G
© Copyright
BAND-IT-IDEX, Inc. 2012
All rights reserved
www.BAND-IT-IDEX.com
Page 1 of 4
C00169 Hand Tool
Operating
Instructions
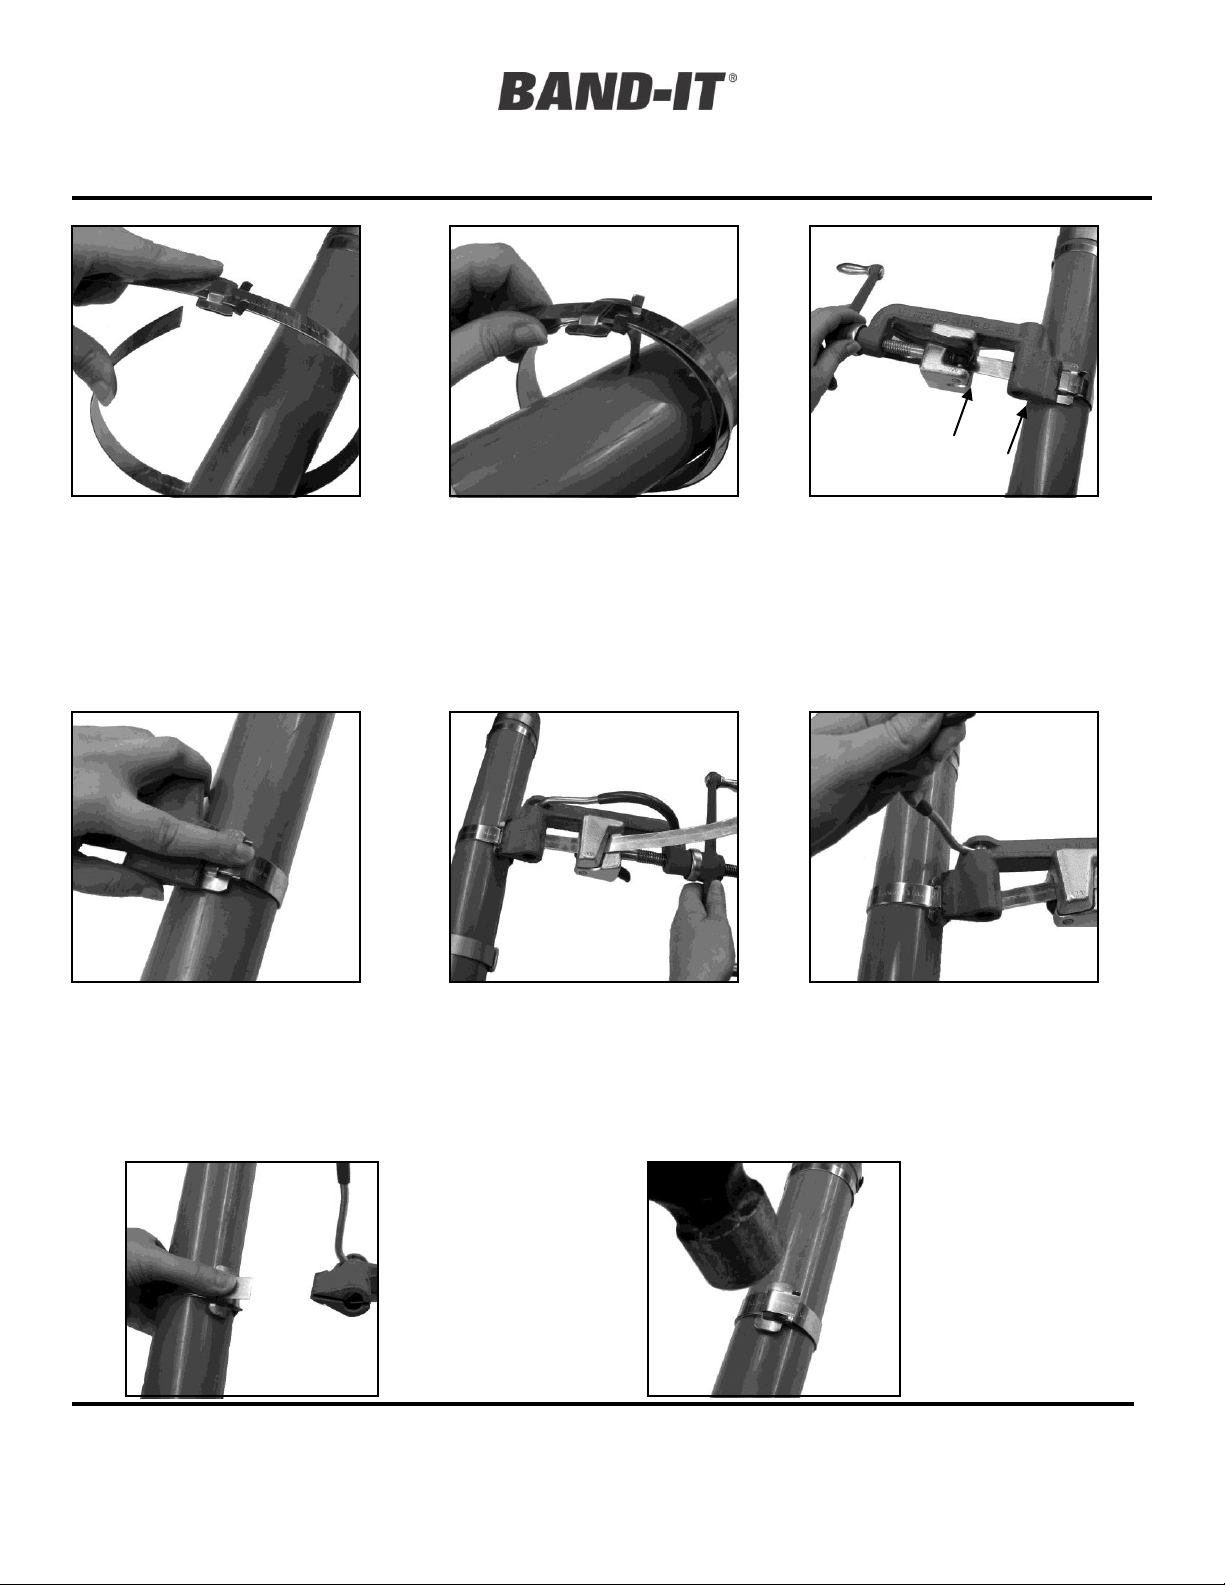
1. Band may be used from bulk roll as
this completely eliminates waste of
band. Slide buckle on band as shown,
bringing end of band around object to
be clamped and again through buckle.
NOTE: The tension screw thread
should be lubricated regularly.
2. Continue band around object once
more and again through buckle.
Double banding develops a great deal
more radial compression than single
banding. Bend end of band under
buckle.
4. Place finger on BAND-IT Band at
buckle bridge while tensioning with tool
handle. When you feel BAND-IT Band
stop moving through buckle as you are
turning handle, maximum pressure is
being exerted by the BAND-IT Band
around object being clamped. Stop
turning handle.
5. Roll tool over buckle, backing off
with tension handle throughout entire
rolling operation. Failure to back off
with tension handle through-out entire
course of roll-over may result in
breaking of band. There is no loss of
tension as band released is used up in
the bend.
6. Pull cutting handle to cut the band.
7. Remove tool,
holding stub of band
down with thumb.
8. Hammer down
buckle ears to hold
band stub in place
to complete BANDIT clamp.
3. Place band in opening of tool nose
and gripper block. Move into slot as far
as possible, to avoid buckle sliding into
tool nose. Tighten band clamp by
turning the tension handle clockwise
while holding band gripper tight against
band. NOTE: The spring load of the
band gripper is not intended to secure
and prevent band from slipping during
tension process.
Page 2
BAND-IT-IDEX, Inc.
A Unit of IDEX Corporation
4799 Dahlia Street
Denver, CO 80216-3070 USA
P: 1-800-525-0758
F: 1-800-624-3925
Document # P05886 rev. G
© Copyright
BAND-IT-IDEX, Inc. 2012
All rights reserved
www.BAND-IT-IDEX.com
Page 2 of 4
C00169 Hand Tool
Cleaning and
Accessories
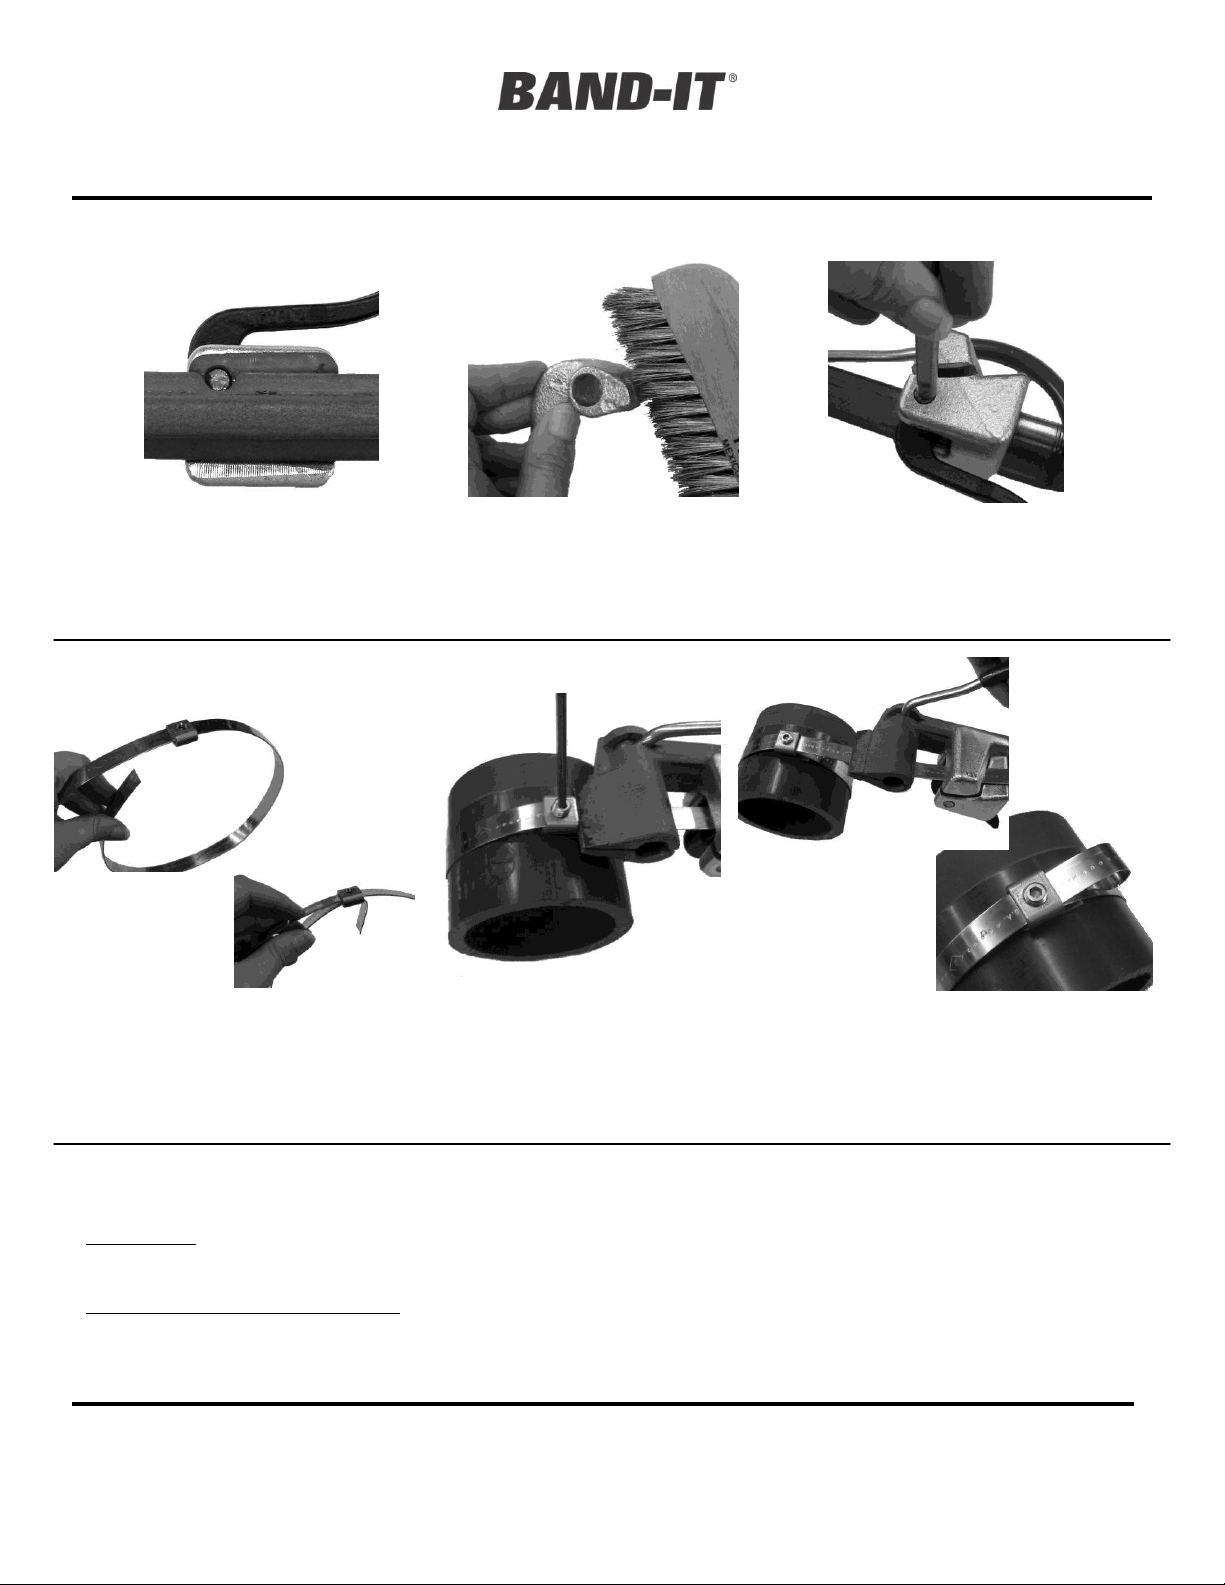
Gripper Cleaning Instructions:
1. Remove gripper. Align gripper pin
hole with notch in tool frame. Using a
punch and hammer, punch pin out of
slide block.
2. Using a wire brush, clean all
foreign matter from teeth.
3. Replace pin. Gripper spring must be
seated in tension screw hole. Align
gripper hole with slide block hole, insert
pin in hole and hammer pin in place.
Scru-Lokt Buckles:
1. The BAND-IT Scru-Lokt clamp,
using the Scru-Lokt buckle, is
applied in exactly the same way as
the BAND-IT clamp except that the
tool is not rolled over.
2. After tension is applied, insert set screw in
Scru-Lokt buckle and tighten. To permit
taking up Scru-Lokt clamp, or to re-use, a 3
inch (7.5 cm) stub should be left so that tool
will be able to re-grip band later.
3. Where stub of band is left
for Scru-Lokt clamp, it may be
folded under as shown.
Tool Accessories:
JR Adapters: The JR adapters (J00169 and J05069 heavy duty) are used with the BAND-IT C00169 tool when
BAND-IT JR. preformed clamps are used.
C04388 Close Quarter Tension Nut: In cramped quarters, use instead of tool tension handle.
NOTE: See general catalog or web site for instructions and ordering information.
Page 3

BAND-IT-IDEX, Inc.
A Unit of IDEX Corporation
4799 Dahlia Street
Denver, CO 80216-3070 USA
P: 1-800-525-0758
F: 1-800-624-3925
Document # P05886 rev. G
© Copyright
BAND-IT-IDEX, Inc. 2012
All rights reserved
www.BAND-IT-IDEX.com
Page 3 of 4
C00169 Hand Tool
Tool Assembly
Parts List
1. To assist in removing threaded parts, apply heat (softens locking compound).
2. When connecting the tension screw to the slide block, clean threads (male and female) of foreign
matter, then apply two drops of medium strength locking compound (Loctite 242 or equiv.) onto male
threads and connect parts together. Apply .03 oz. of food-grade white lubricant or equiv. to tension screw
thread.
3. When connecting the set screw to the cutter bar, clean threads (male and female) of foreign matter,
then apply one drop of medium strength locking compound (Loctite 242 or equiv.) onto male thread and
connect parts together.
4. Kit # C00689 contains the Tension Handle Assembly and the Tension Screw. Both parts should be
changed as a set to reduce accelerated wear. Review note 2.
5. Kit # C01899 contains the Band Gripper, Gripper Spring and Groove Lock Pin. Replace all parts as a
new set to maximize tool performance. Periodic cleaning of band gripper teeth will improve tool
performance.
6. Kit # C02499 contains the Slide Block, Groove Lock Pin, Band Gripper, Gripper Spring, and Tension
Screw. Periodic cleaning of band gripper teeth will improve tool performance. Review note 2.
TOOL FRAME
THRUST BEARING
SLIDE BLOCK
GROOVE LOCK PIN
BAND GRIPPER
TENSION SCREW
GRIPPER SPRING
SPIN GRIP
EXTERNAL RETAINING RING
EXTERNAL RETAINING RING
SCREW RETAINING RING
TENSION HANDLE
CUTTER BAR HANDLE
VINYL GRIP
SET SCREW
(On far side)
CUTTER BAR
SEE SHEET 4 FOR REPAIR PART NUMBERS
1
Page 4

BAND-IT-IDEX, Inc.
A Unit of IDEX Corporation
4799 Dahlia Street
Denver, CO 80216-3070 USA
P: 1-800-525-0758
F: 1-800-624-3925
Document # P05886 rev. G
© Copyright
BAND-IT-IDEX, Inc. 2012
All rights reserved
www.BAND-IT-IDEX.com
Page 4 of 4
C00169 Hand Tool
Parts List and
Warranty
REPAIR PARTS LIST FOR C00169
PART #
DESCRIPTION
C01140
TOOL FRAME
C01687
THRUST BEARING
C02499
SLIDE BLOCK ASSEMBLY
INCLUDES: SLIDE BLOCK, PIN, BAND GRIPPER,
SPRING, TENSION SCREW.
C01899
KIT, GRIPPER ASSEMBLY
INCLUDES: GRIPPER, PIN, AND GRIPPER SPRING
C05887
KIT, CUTTER BAR ASSEMBLY
INCLUDES: CUTTER BAR HANDLE, VINYL GRIP,
SET SCREW, AND CUTTER BAR
C00689
KIT, TENSION HANDLE AND SCREW
Refer to website for warranty information: http://www.band-it-idex.com/warranty.html
 Loading...