

Page 1
Banana Pi D1 Camera Quick Start Guide
1.How to record a video
In a fully charged or connecting micro - power USB cable, BPI-D1 will automatically start the default
set of video application. Start recording the video and sound and generate file storage to TF card.
Recorded 30 minutes to automatically generate and save for a video file. Click the “function key "
button, then manually stop recording the current task and generate a complete video file, start the next
record files after 10 seconds.
[Reminder]: Micro-USB interface supports USB flash disk connected through USB female port of
OTG cable, when there is no TF card, support recording videos directly to the external USB drive.
2.How to connect to the AP
Connect to the specified AP
The USB-WiFi module is connected to the USB interface of OTG. Press the BPI-D1 "primary key"
button, green LED will keep long bright after flashing about 8 seconds; it means BPI-D1 work in AP
mode.
1)Connect any mobile devices (e.g. Smartphone, tablet or computer) to the WiFi connection “SSID=
XXX_D1_A39XXX” and enter the default password “12345678”.
2)In Internet Explorer, enter the FTP address “ftp://192.168.0.1”. (user name: admin, password: admin)
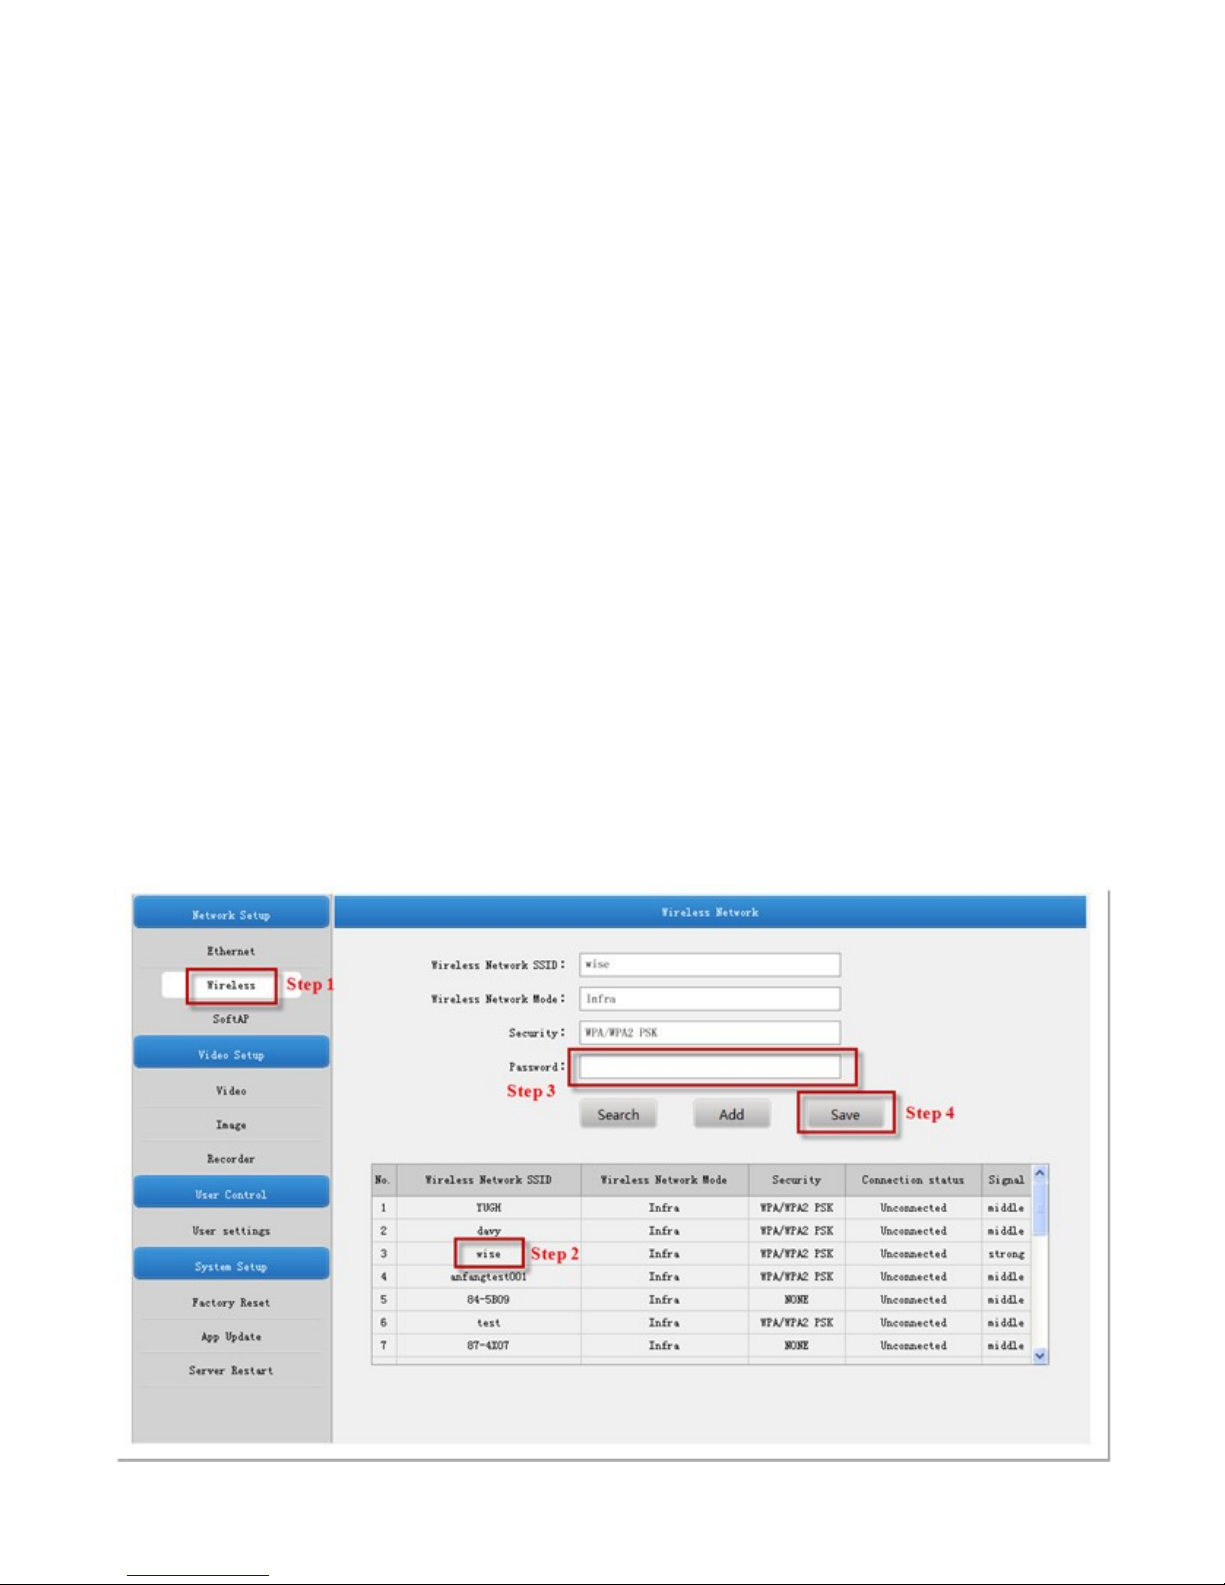
3)Click "Ethernet”, select one of the available WiFi. The SSID parameter will be displayed in the
above, click password blank and enter the known password, then click the "save". After flashing on the
screen, four parameters in the form disappeared that the connection is successful.
4)Click on the (39) Boot/WPS button, BPI-D1 switches to slave mode; you will see LED flashes from
fast into slow, which has been connected to the specified WiFi-AP.
Page 2
3. View Real-time Video
View in range of LAN
At present, viewing real-time video can be achieved in the LAN through VLC player or MX Player.
If the two players installed on your PCs or mobile devices, it could be view via network stream. To
do this:
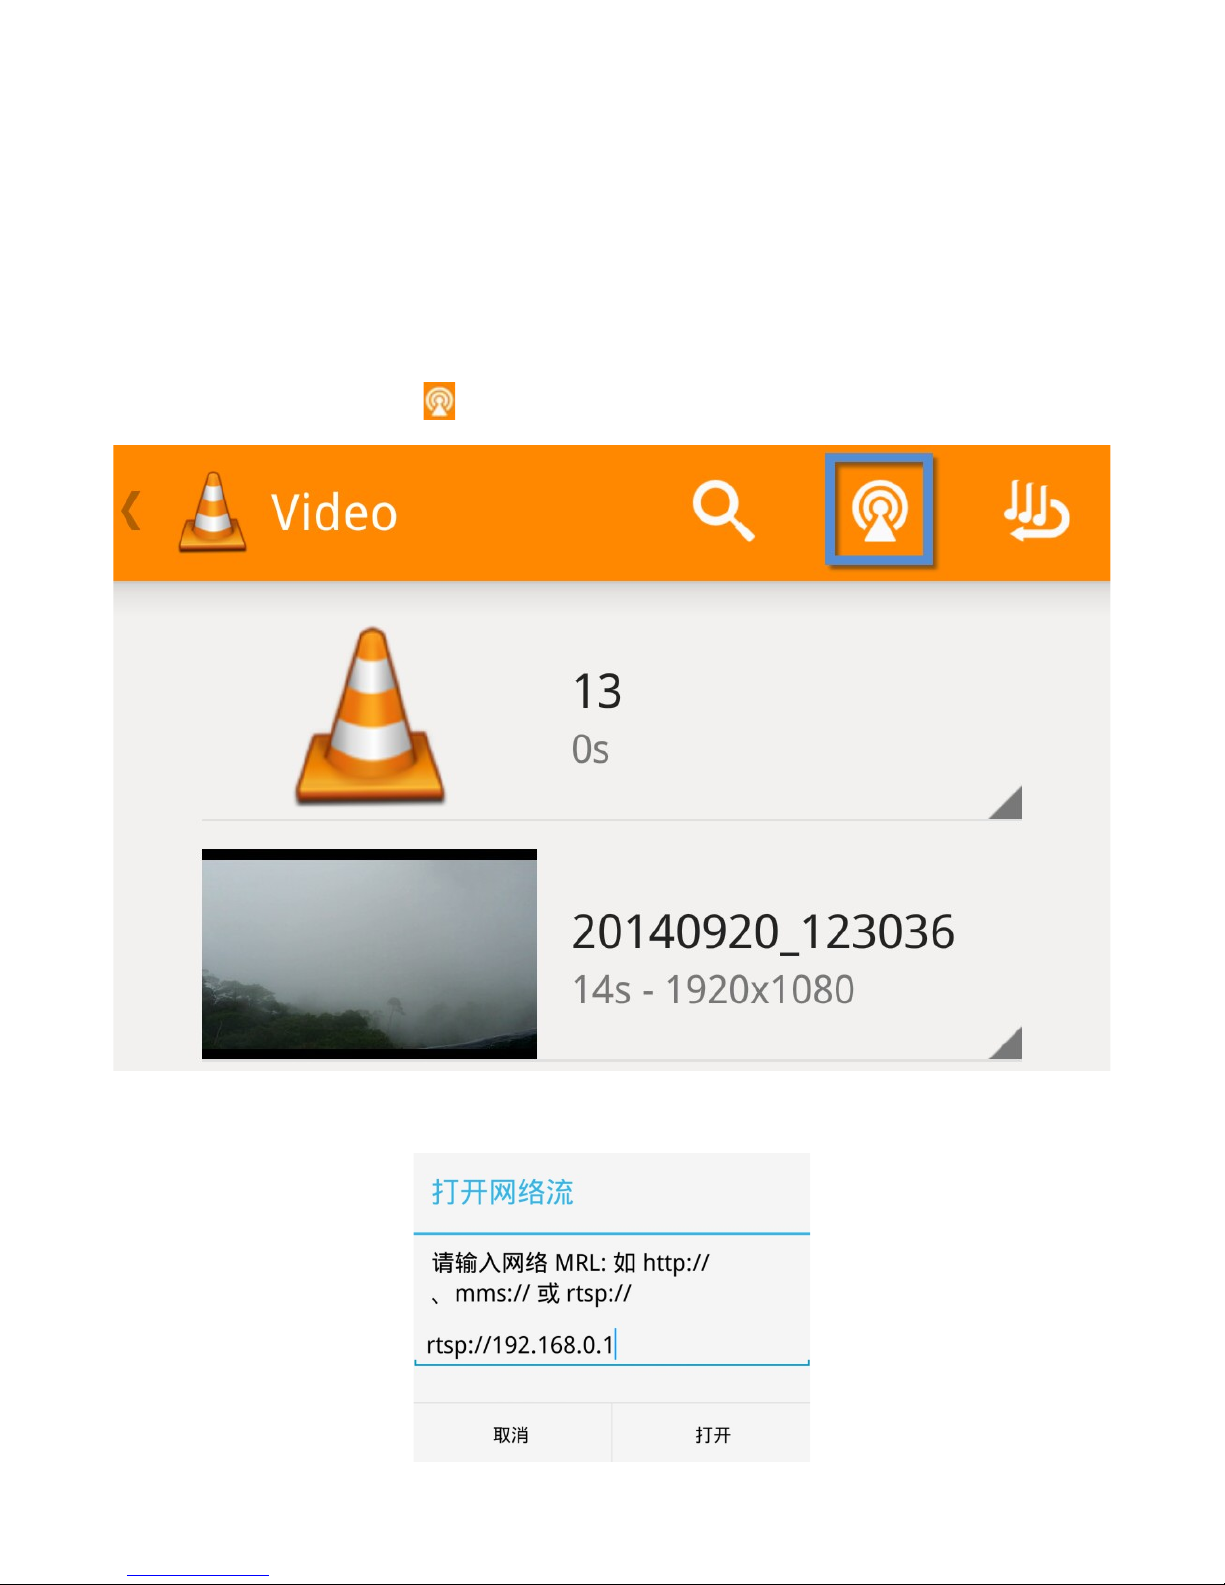
【Notes】: Just take the case of VLC player
1) Install VLC player on your PCs or mobile devices.
2) Connect any mobile devices (e.g. Smartphone, tablet or computer) to the WiFi connection “SSID=
XXX_D1_A39XXX” and enter the default password “12345678”.
3) Open VLC player and click “ ”and open network stream
4) Enter the AP of BPI-D1“rtsp://192.168.0.1”, click “open(打开)” and view the real-time video
Page 3

[Reminder]: Real-time video may be delay, which related to the network transmission.
4.How to view files
Option ①: Remove the SD card from the board and insert it into the SD card reader of a computer.
Option ②: Battery mode, using micro-USB data cable to connect the D1S and PC. PC client can
access the contents of TF card through the data cable, while charging the lithium battery.
[Reminder]: Micro-USB interface supports USB flash disk connected through USB female port of
OTG cable, Support directly copy files from the TF card to the external usb drive.
Option ③:Connect PC or mobile devices to the SSID access point named“BPI_D1_XXYYZZ”, and
access files at the FTP address ftp://192.168.0.1.
[Reminder]: Support IE, Chrome, Opera, Safari or Firefox browser login FTP to view or download. If
you need play the video you will need to install player support for H.264 or MJPEG decoding format.
5.How to set
Record Parameters Settings
When D1S power is ON, video recording will start automatically according to the default set. If you
want to set the D1S video parameters, you can refer to the following steps:
1.Switch on the WiFi and switch to the AP mode(The LED light will remain steady). Connect any
mobile devices (e.g. smartphone, tablet or computer) to the WiFi, connection “SSID=
BPI_D1_XXYYZZ” and enter the FTP address “ftp://192.168.0.1”.
[Reminder]: User Name: admin; Password: admin
2.Click the "Video Settings" or "Record Settings" can adjust the record parameters.
[Reminder]: After saving the changed settings,all setup are validated only after manually re-open after
switching off the device.
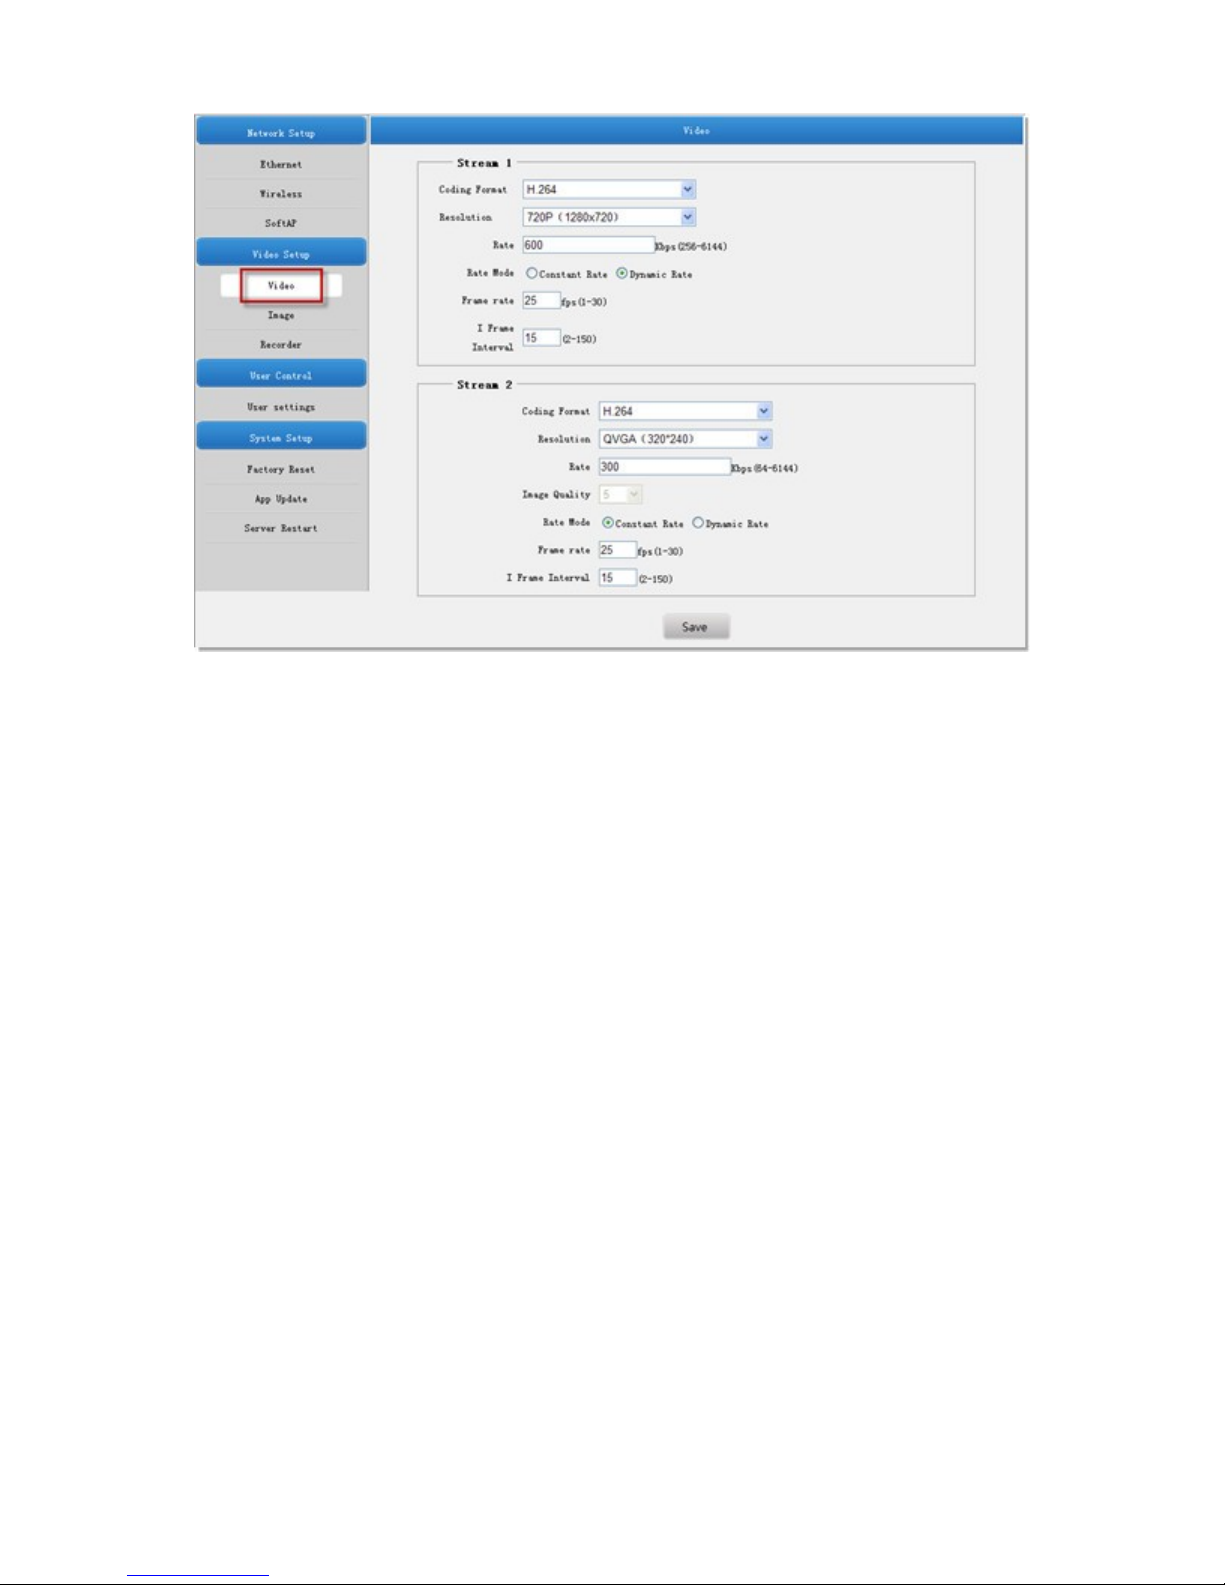
Video Settings
"Video" related to the format of the final recorded and resolution, devices support the two coding
formats which are H.264 and MJPEG; relevant parameters can be set manually according to the
required. After setting,click "Save".
Page 4
Record Settings
“Record” related to recording save time, the number of video files and the size of video files, devices
support the two coding formats, setting Loop Recording Time and Timed Loop Recording; relevant
parameters can be set manually according to the required. After setting,click "Save".
Video Stream: Choose the two streams in the “Video” which are H.264 and MJPEG.
Loop Recording Time: Finish a video and save a file according to setting recording time.
Timed Loop Recording: Start recording according to Loop Recording Time setting after switch on the
device,beyond the setting time automatically stop recording.
Page 5

Reminder]: Video resolution depends on choosing a different video stream, and the generated video file
size will be different.
Relevant Information
WiFi LED at work
D1S "function key" button, click open WiFi AP mode, and then click close. “Green LED”will flash for
about 8 seconds:
LED Statu
s
WiFi work in AP mode, you can search the AP SSID.
Light
Flash
( for example, XXX_D1_A39XXX)
WiFi work in slave mode, it will automatically connect the AP that set the
parameters before.
WiFi ON/OFF Energy Consumption
WiFi ON/OFF to save the power consumption, the two statuses generally as follows:
Description
Page 6

1.WiFi OFF, BPi-D1 is recording and saved to TF card, current 5V power is about 250mA.
2.WiFi ON, BPi-D1 is recording and saved to TF card, at the same time D1S connected to the network
through WiFi,current 5V power is about 350mA.
3.It can be used to predict 500mah lithium batteries can maintain BPi-D1 work 1 to 2 hours.
Program the Firmware
Important Notes before You Start:
1.You must use the compatible version of the firmware programing software with source codes.
2.The software works on Windows XP Service Pack 3 and newer versions.
3.The software file path is located at: /lamobo.dev/tool/burntool in the code directory
4.Before programing the firmware, please make sure to copy and paste the 3 compiled files “zImage,”
“root.sqsh4,” and “root.jffs2” to the root directory.
(Note: The complied files are saved at: /lamobo.dev/output)
How to Program the Firmware
1.Battery mode, press and hold the "primary key" 5 seconds off BPI-D1 power. Before the PC inserts
BPI-D1 micro - USB programming cable, double-click firm programming tools icon, runs the burn
tool. Holding down the "function key" and the micro - USB programming cable connecting to the PC,
the module enters the programming mode. At this time BPI-D1 LED no instructions. If there is no
lithium battery, you do not need to connect the micro USB power cable.
Page 7

2.After the PC inserts BPI-D1 micro - USB programming cable, the firm programming tools will detect
the launch of the application. Once connected, a yellow status bar will appear next to the device in the
window, and the status will show “Ready” (please recheck and repeat the steps above if no response).
Press the “Start” button on the top to start the firm programming automatically.
3.Burning completed, micro-USB data cable disconnected with PC.
Status Descriptions
The status, progress and elapsed time will appear in the programing window.
[Successful]
Once the status and progress bar turn green, the progress bar reaches 100%, and the status reads
“Completed,” the firmware has been programmed successfully.
Page 8

[Unsuccessful]
When the status and progress bar turn red, the status area will display one of several error messages,
indicating an unsuccessful programing attempt.
If the operation is unsuccessful, please retry after adjusting the following settings:
1.Click Settings, select “Researcher” as the User Name, leave the Password blank, and then select
“OK”.
1. Choose “General” on the left-side menu and check the two boxes “force write to the mac address”
and “force write serial number,” and then select “OK.”
2. Repeat steps 1-3 in the “How to Program the Firmware” and try again.
Page 9

Page 10

Interface connections:
Page 11

GPIO Pin De*nitions:
Power Supply
Battery mode: Built-in lithium battery power supply
Page 12

External power supply mode: DC-micro-USB power cable at the same time for cha
rging the D1S built-in lithium battery.
 Loading...