

Page 1

D700
user manual
Page 2

2
Page 3
1
Contents
1 Introduction 3
1.1 Welcome 3
1.2 Notifications 4
1.3 Safety Instruction 4
1.4 Abbreviation/Terminology 5
2 Bamboo Tablet Introduction 6
2.1 Bamboo Accessories Introduction 6
2.2 Bamboo Operation and Preparation 6
2.3 Bamboo Status and Reminder 7
3 Quick Start Guide 8
3.1 Keys Function 8
3.2 Startup and Shutdown 8
3.3 Open and Close the Screen 9
3.4 Usage of Touch Screen 10
3.5 Main Interface 11
3.6 Visit Application Procedures 15
3.7 USB Connection 16
3.8 Words Input 17
3.9 Application Technique 18
4 Basic Setting 19
4.1 Wireless and Internet 19
4.2 Bluetooth 20
4.3 Display 21
4.4 Management 23
4.5 SD Card and Bamboo Storage 23
4.6 Date and Time 24
4.7 Language Setting 25
4.8 About Bamboo Tablet 25
4.9 Fixed-time Startup and Shutdown 26
4.10 Security Settings 27
D700
Page 4

2
5 Multi-Media 29
5.1 Music 29
5.2 Video 30
5.3 Photo Gallery 32
5.4 Camera 33
5.5 Connection of HDMI 34
5.6 FM Radio 34
5.7 Analog TV 36
6 Communication Function 39
6.1 Phone 39
6.2 Text Message 40
6.3 Contact List 41
7 Internet 42
7.1 Browser 42
7.2 Email 44
8 GPS Function 46
9 Other Application Procedures 48
9.1 Clock 48
9.2 Calculator 48
9.3 File Manager 49
9.4 Recorder 51
10 Installation of Procedures 52
10.1 Installation 52
10.2 Uninstall 52
10.3 Update Path 52
11 System Upgrade 53
11.1 Preparation for System Upgrade 53
11.2 Restore Factory Setting 53
11.3 System Upgrade 53
12 Trouble-Shooting 58
Appendix 59
Contact 60
Page 5

3
1 Introduction
1.1 Welcome
Thank you for purchasing this exceptional product – the Bamboo D700 tablet.
Our story is a simple one, though unique.
Since 2010, we’ve worked hard to develop a tablet computer focused on
the middle market, not as a luxury item but as a durable and long lasting
product with features that can match (and exceed) any luxury brand at
prices that appeal to the everyday individual backed by 12 months warranty.
We’re very happy to say, “We’ve done it!” The Bamboo D700 is a high
definition (HD) tablet with a dual-core processor, functioning on a
dominant 1GHz frequency and based on Google’s Android 4.0 operation
system (upgradeable) and seamlessly put together to provide superior
performance. We’re so confident in the Bamboo’s awesome operational
power and features; we encourage you to challenge other tablet owners
(irrespective of the brand) to a competition!
The Bamboo D700 is designed with various functions including dualSIM to make voice calls and to browse the internet on 2G, 3G, or WIFI
networks. It’s a mobile internet device that provides real-time, on-demand
access to content, the internet, computing and communication tools, and
high-quality services.
It comes pre-loaded with special features unique to the Bamboo D700
such as a mobile terrestrial TV to keep you connected to your favourite
tv channels even when you’re on the move, a point-of-sale application for
small businesses, a job/career tool to connect you to the job offers suited
specially for you; as well as social sharing and a dual-facing (front and
back) camera to store and share memories.
In essence, you are holding a device that will change your life!
Page 6

4
1.1 Welcome continued
This manual systemically introduces the functions, use, techniques and
necessar y information to enjoy your Bamboo D700 tablet. Please read this
manual carefully before operating your Bamboo D700 tablet.
Some of the contents in this manual may differ from your tablet depending
on the sof tware of the tablet. Actual color may vary.
Your tablet is designed to make it easy for you to access a wide variety of
content. For your protection, we want you to be aware that some applications
that you enable may involve the location of your tablet being shared.
1.2 Notifications
preventive maintainance
- Please always keep the Bamboo D700 tablet dry. To avoid corrosion,
faults, the device short-circuiting and electric shocks, please do not
expose the device, battery and charger to direct contact with water
and moisture, and don’t operate the device or charger with a wet
hand.
- To avoid failure of device, batter y and charger, please protect the
device, battery, and charger from violent shocks or shakes.
- To avoid failure of device, batter y and charger, please protect the
device, battery, and charger from overtly hot or extremely cold
circumstances.
- Never shake, throw, prod, drop, extrude, or bend the Bamboo D700
tablet.
- Never disassemble the device and accessories, otherwise repairs will
not be covered by warranty.
1.3 Safety Instruction
Before the operation of the Bamboo D700, please read this chapter and
instruct your kids accordingly. For further details, please refer to the
safety instructions portion of this manual.
- Do not use the Bamboo D700 tablet when driving.
- In medical areas, please abide by prescribed rules and regulations.
Page 7

5
Please switch off the Bamboo when in (or near) medical facilities.
- To avoid interruption of wireless signals on planes, please switch off
the Bamboo or change to airplane mode when boarding a flight.
- To avoid electronic equipment failure, please switch off the
Bamboo in the vicinity of high-accuracy electronic equipments with
electromagnetic fields.
- Do not disassemble the Bamboo and accessories. Only authorized
agents are allowed to repair and service the Bamboo.
- Please keep the Bamboo far away from magnetic equipments. These
may erase the data stored in the magnetic equipments or on the
Bamboo.
- Do not use the Bamboo close to high temperature or inflammable gas.
- Protect the Bamboo and accessories from little kids. Always ensure
adequate supervision.
- Please comply with relevant rules and regulations, and respect others’
privacy and legal rights while using the Bamboo.
- Please strictly adhere to related instructions in the manual when using
USB cable to ensure the safety of the Bamboo or PC.
- Do not use the Bamboo in the bathroom or other humid environment,
and ensure you protect the Bamboo from liquid-wash or wet
substances.
1.4 Abbreviation/Terminology
abbreviation/
terminology full name description
MID Mobile Internet Device Mobile Internet Terminal
WIFI Wireless Fidelity Based on IEEE 802.11b
standard wireless LAN
TF TransFlash Alternative name Micro-SD,
super miniature memory card
HDMI High Definition
Multimedia Interface
High Definition Multimedia
Interface
Page 8

6
2 Bamboo Introduction
2.1 Bamboo Accessories Introduction
package
Below are the items included in your Bamboo package. Kindly comfirm
you have:
- Bamboo D700 device
- Power adaptor
- USB cable
- User’s manual
2.2 Bamboo Operation and Preparation
battery charging
We recommend you plug and fully charge the Bamboo on first use.
Please use the provided AV adaptor to fully charge your Bamboo
(at least 4 hours).
to charge:
1. Plug the the power adptor to the Bamboo and plug to power outlet.
2. Red LED light indicates it’s being charged. When fully-charged, the LED
light will turn to Green. Please wait until it is fully charged and don’t
pull out the adaptor while charging.
Page 9
7
2.3 Bamboo Status and Reminder Icons
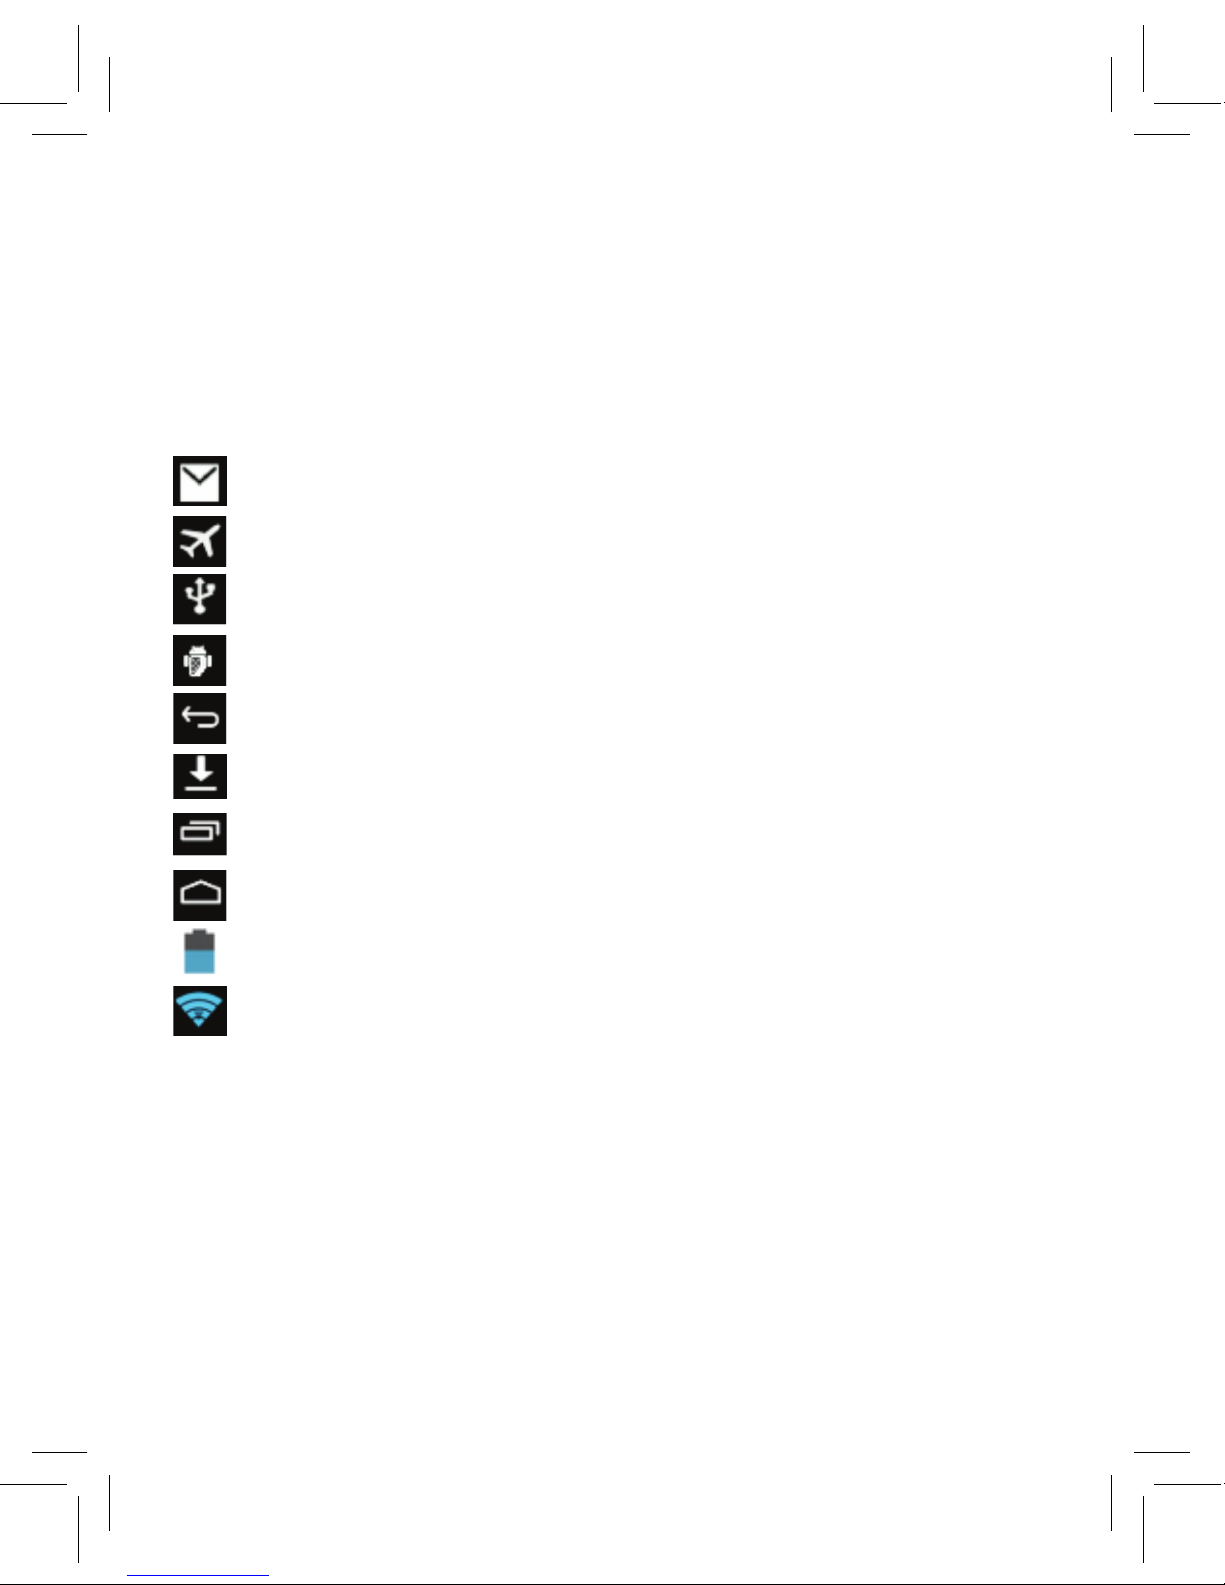
reminder icons
When a remind icon appears on your reminder window, please hold the
column and slide downwards with your finger. Choose the menu you need,
and confirm the information. You can then close the reminder window by
clicking the column to slide up. Some of the more regular status icons
include:
New email
Airplane Mode on
USB connected
USB adjustment connected
Return button
Downloading
Display recently-used application
Home button
Current power levels
WIFI connected, internet is available
reminder board
Reminder icons will work while receiving emails or performing other
functions. As stated above, you can open the reminder board to view the
detailed information.
open the reminder board
When the reminder column shows a new reminder icon, please hold the
column and slide downwards with your finger, and then the reminder
board is opened.
Page 10
8
3 Quick Start Guide
3.1 Key Functions
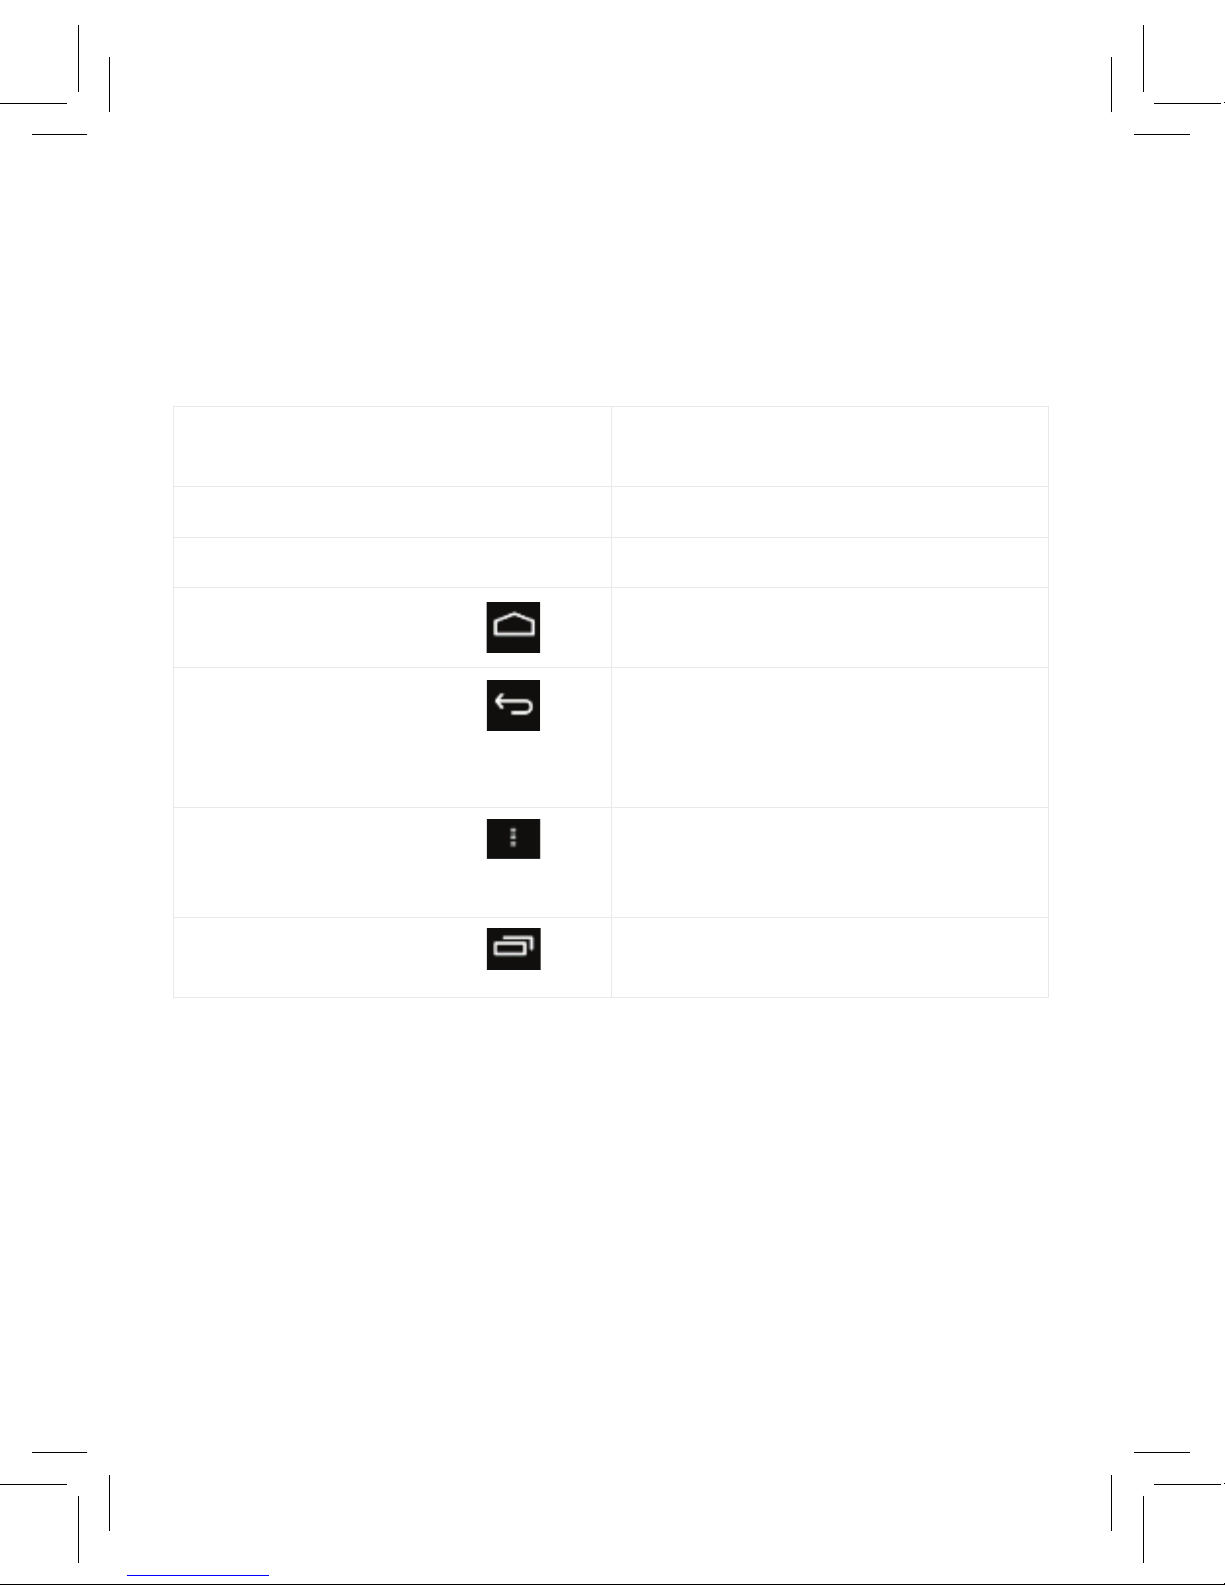
key function description
Power button Short press to sleep/wake up, long
press to startup and shutdown
Volume + (up) Increase the volume
Volume – (down) Decrease the volume
Home button (home) Click this icon in any interface and
it will return to main interface
Back button (back) Click this icon in any interface and
it will return you to the previous
menu
Menu button This icon will be displayed
whenever you are in the menu
interface
Display recently-used
application
Display recently browsed histor y
3.2 Startup and Shutdown
startup
Press the power button for three seconds and the tablet will startup. By
default the system enters into screen lock status. Press the power button
lightly to unlock.
shutdown
1. Long press the power button and a pop-up shut-down window will appear.
2. Shut-down window contains mute mode, airplane mode and shutdown
options.
3. Click shutdown (the last step item) to switch off your Bamboo.
Page 11
9
3.3 Open and Close of the Screen
Screen will close on its own when not in operation after a certain period.
1. Screen will close on its own when not in operation for some time to
save battery power.
2. When screen is open, press power key lightly and the screen will be
closed immediately.
open the screen when it is closed
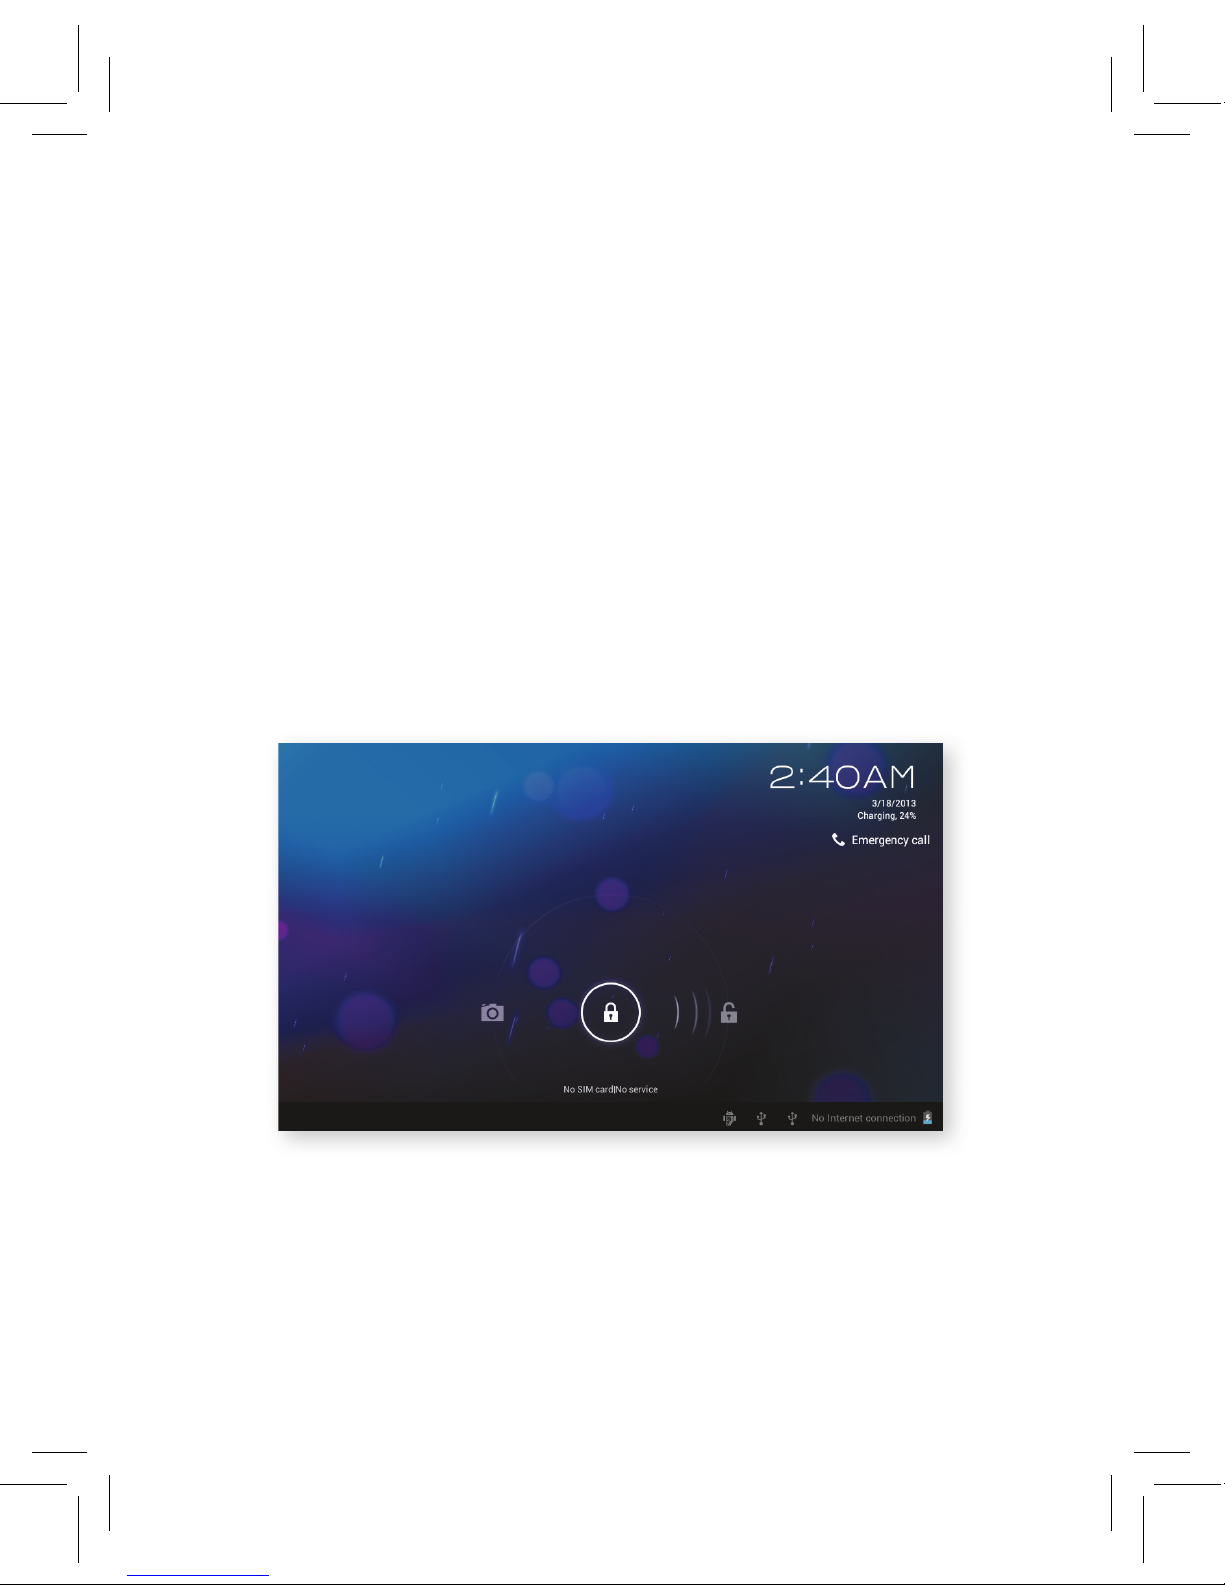
If the screen is closed (in power-save mode), press the power button
lightly to open the screen. The screen will open up and show a page
similar to the picture below. Use your finger to slide to the right to unlock
the screen or slide to the left to enter into the camera function.
3.1
Page 12

10
3.4 Use of Touch Screen
bamboo operating methods
Highlighted below are the various methods to view the main screen, the
menu and the applications on your Bamboo.
Click When you want to use the on-screen touch keyboard
for typing or to choose an application in the menu
interface, all you need to do is touch the screen with
your finger.
Press If you want to open an item such as a link or textbox in
a webpage, press the link with your finger.
Slide Slide to the lef t, slide to the right, slide up or slide
down. A vertical or horizoncial movement with your
finger on the touchscreen will move things around.
Press & Pull Press your desired object on the touchscreen and pull
together or pull apart to contract or expand objects.
This feature is particularly useful when you want to
zoom-in or zoom-out of images.
Rotate The Bamboo comes with a 5- point multitouch screen
option and you can rotate the Bamboo sideways to
change the screen direction from horizoncial to vertical
or vice-versa. This function is especially useful when
typing or when watching movies.
Page 13
11
3.5 Home Page
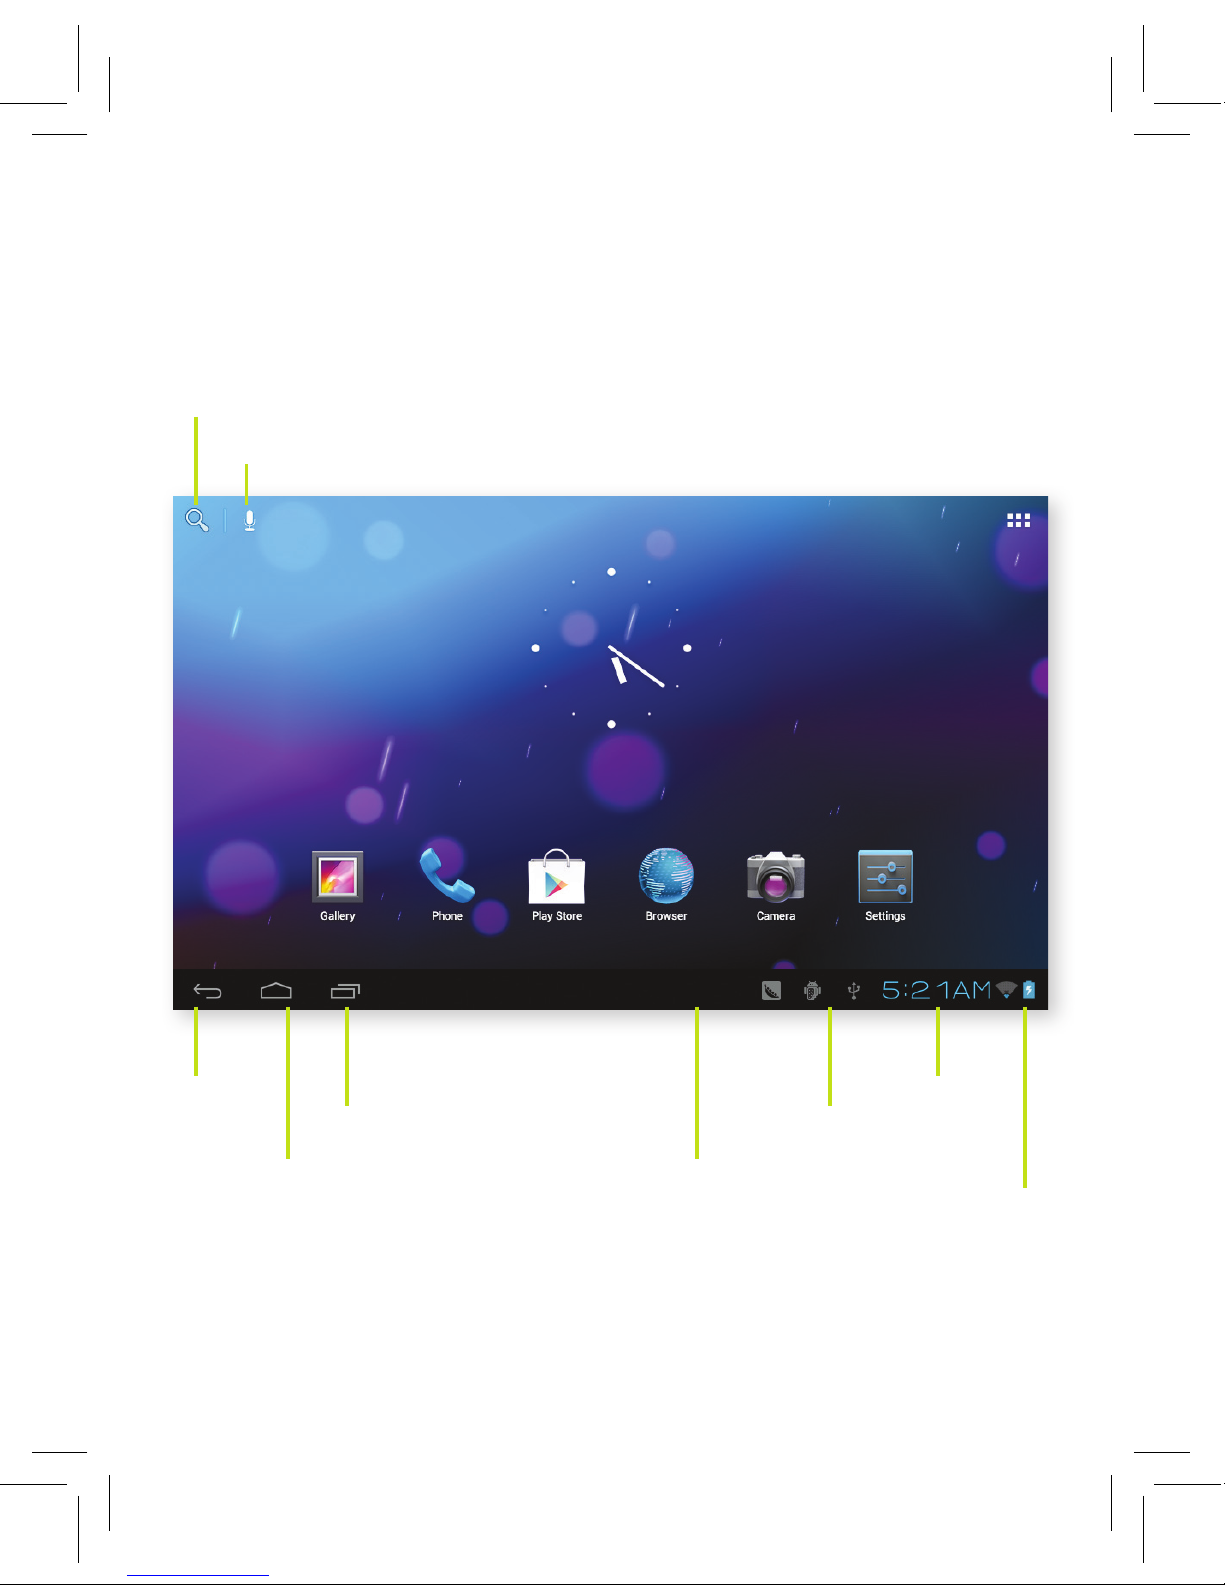
The main interface looks like the image in picture 3.2 below. Press the
blank spaces on the touch screen and a pop-up window will appear, giving
you the option to set a wallpaper, or customize folders, widgets, and
shortcuts.
Return
Search
Reminder
message
Time
Battery
level
View recently
used application
Home
Voice search
Notice
column
3.2
Page 14
12
3.5 Home Page continued
the extended home page
The home page can be extended to several screens to provide more space
or to provide customized landing pages where you can put new-added
applications, shortcuts or widgets. For instance, you can create a home
screen for yourself with your most used apps and create a homescreen for
your child with apps that are child-friendly.
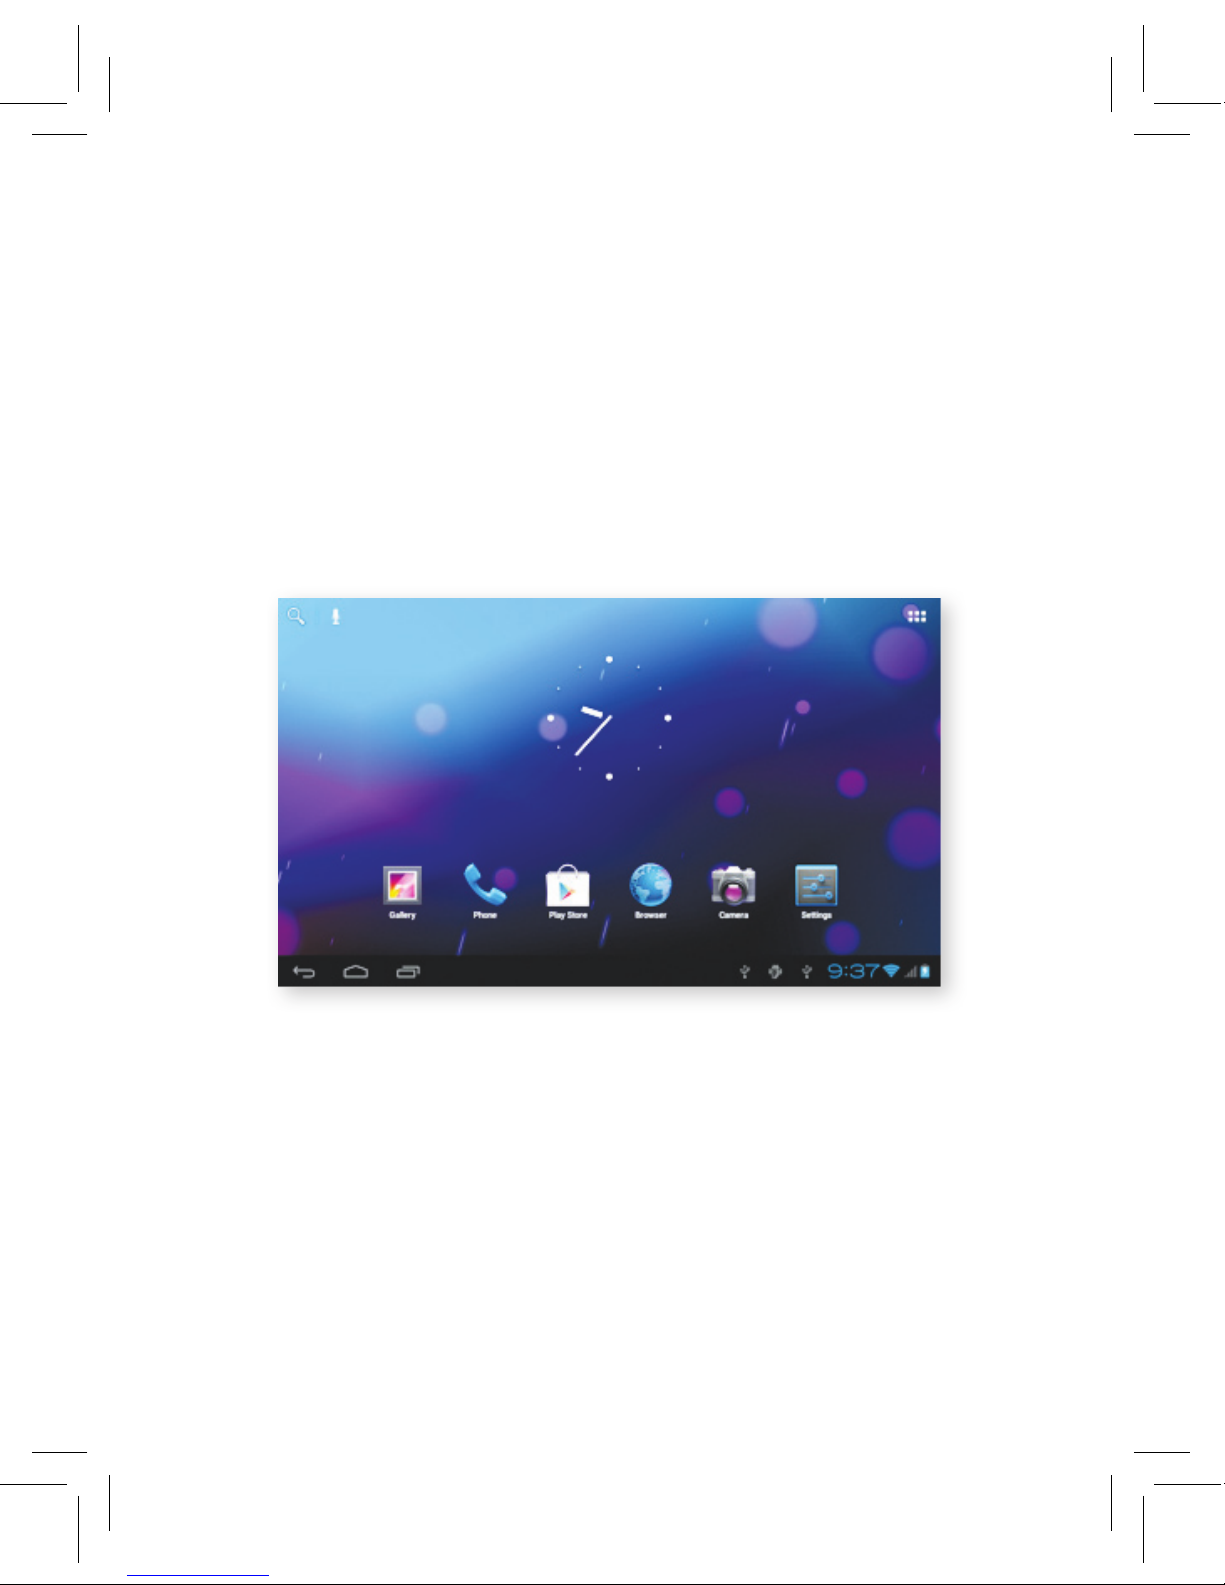
Click on the the blank space on home page and while your finger is still
on the screen, slide right or left to get an extended home page as seen in
image Picture 3.2.1 below.
icon management in bamboo screen
In the older Android operating systems (below Android 2.3), you would
have to create folders on your desktop computer, drop-in desired icons
into the folder and transfer back to the tablet.
The Android 4.0 system makes the function of creating new folders much
easier. To create a folder to manage your icons, see steps below:
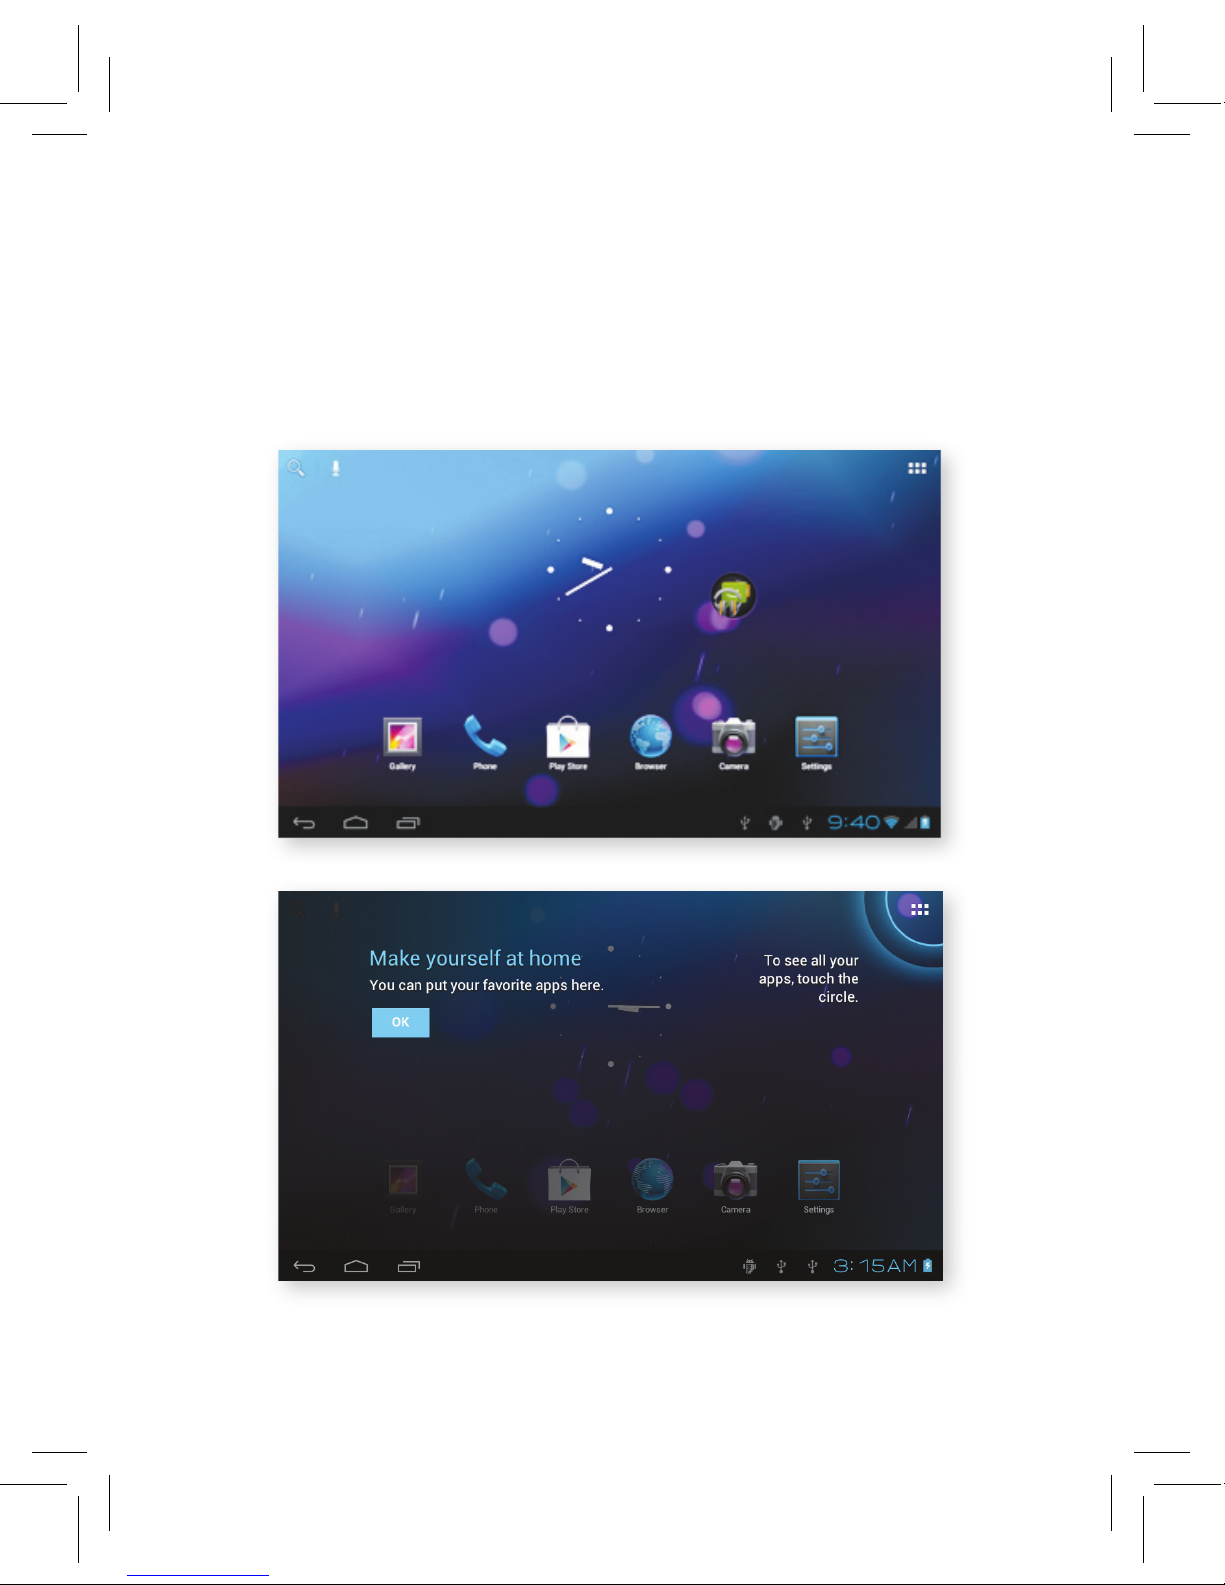
1. Drag the icons you desire to group together on one icon (you can
overlay several icons together) as seen in image 3.2.2 below.
2. Thereafter, click on the overlayed icons and the applications are
displayed as a folder as seen in image 3.2.3.
3.2.1
< >
Page 15
13
3.2.2
3.2.3
Click on the unnamed folder (items in the darkened box) and a pop-up
keyboard will give you the option to rename the folder. Note that the
position of icons can be changed by a long press and by dragging the
icons on the touchscreen.
Page 16

14
3.5 Home Page continued
remove the icons in desktop
1. A long press on the icons you desire remove, will reveal
the icon (see right) on the top-right side of the screen.
2. Drag the icon to be deleted above the ‘remove’ icon. Once the icon
turns red, remove your finger from the touchscreen to delete the icon.
change the wallpaper of the screen
1. On the home screen page, use your finger and press on any blank
space in the main screen for a few seconds. A pop-up window will
appear to change the wallpaper.
2. Click the gallery or wallpaper option to select the source of the
desired wallpaper.
voice search
1. Touch the microphone icon.
2. Choose the search engine you would like to use. Google is the default
search engine on the Bamboo.
3. On first use, set the desired language in voice search window, and
click confirm.
4. Speak to the microphone with your serch option and the browser will
open the search result list.
Note: before voice searching, please make sure your internet is well
connected.
Page 17
15
3.6 Visit Application Procedures
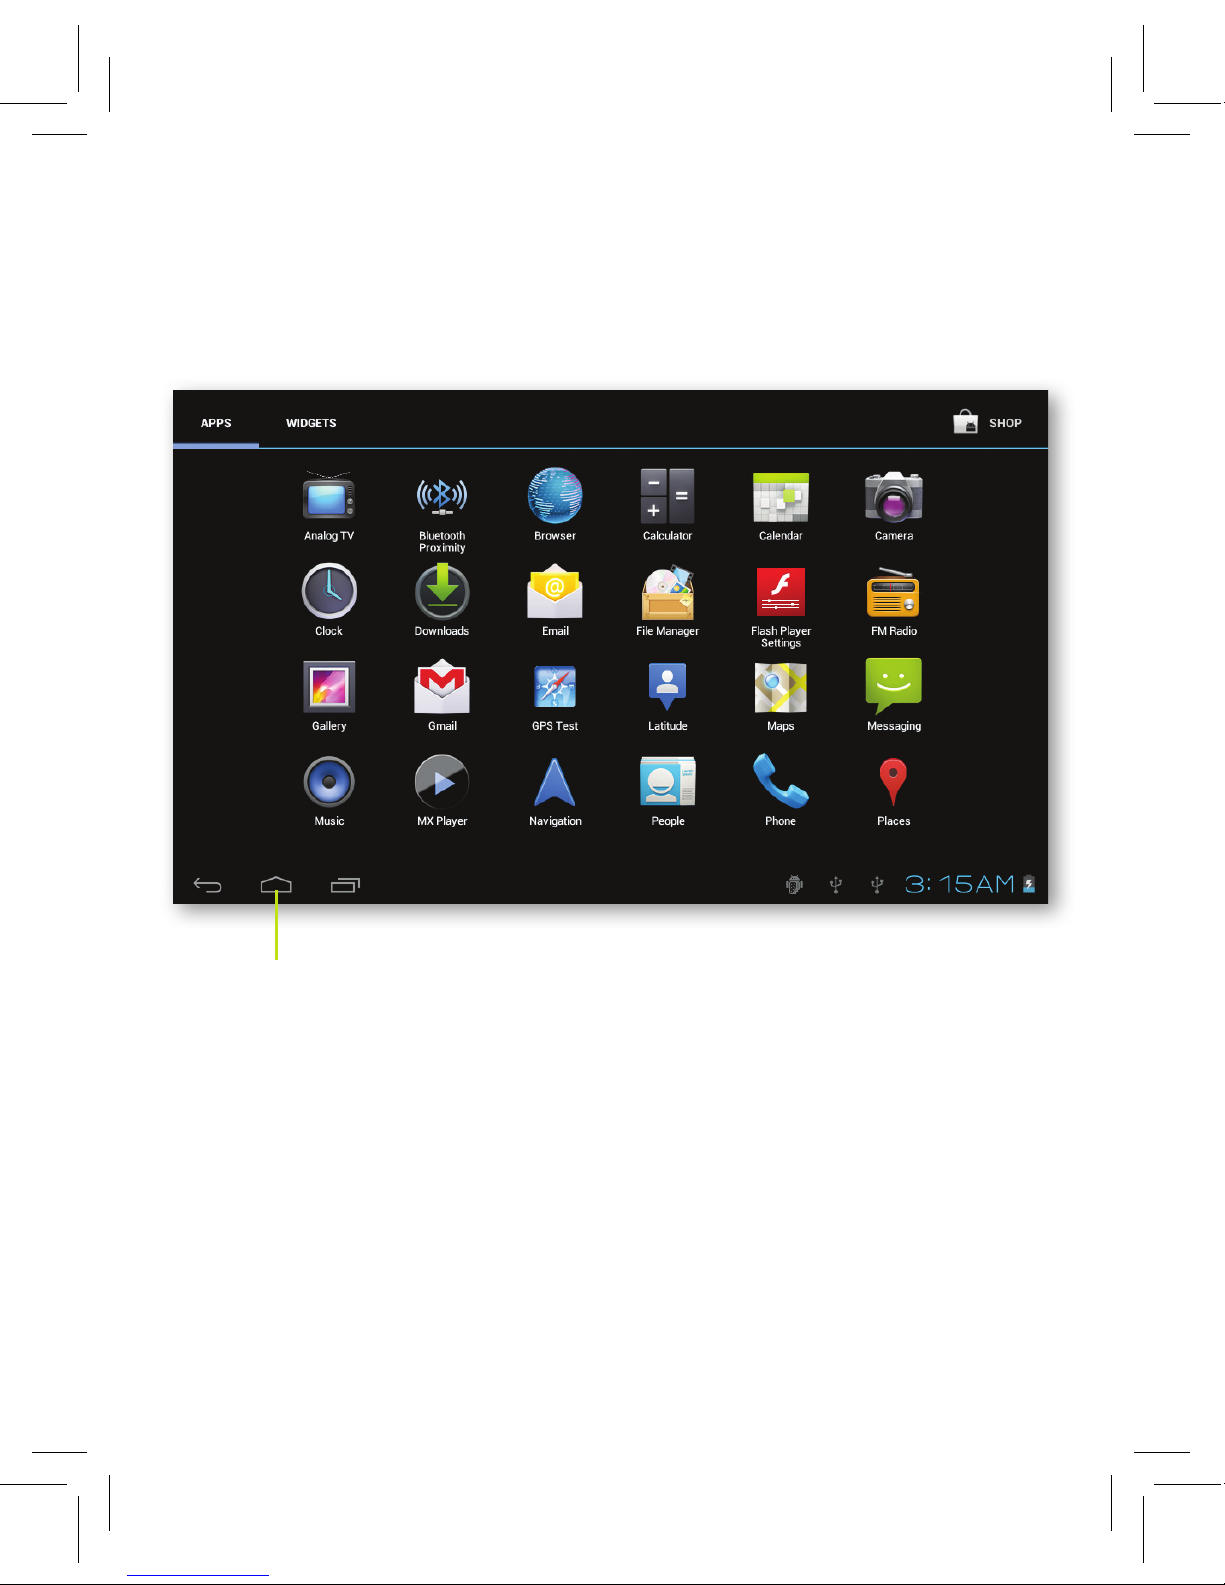
As seen in Picture 3.3 below, enter into the main menu interface and
choose from the various application procedures you would like to use.
3.3
Return to homepage
Page 18
16
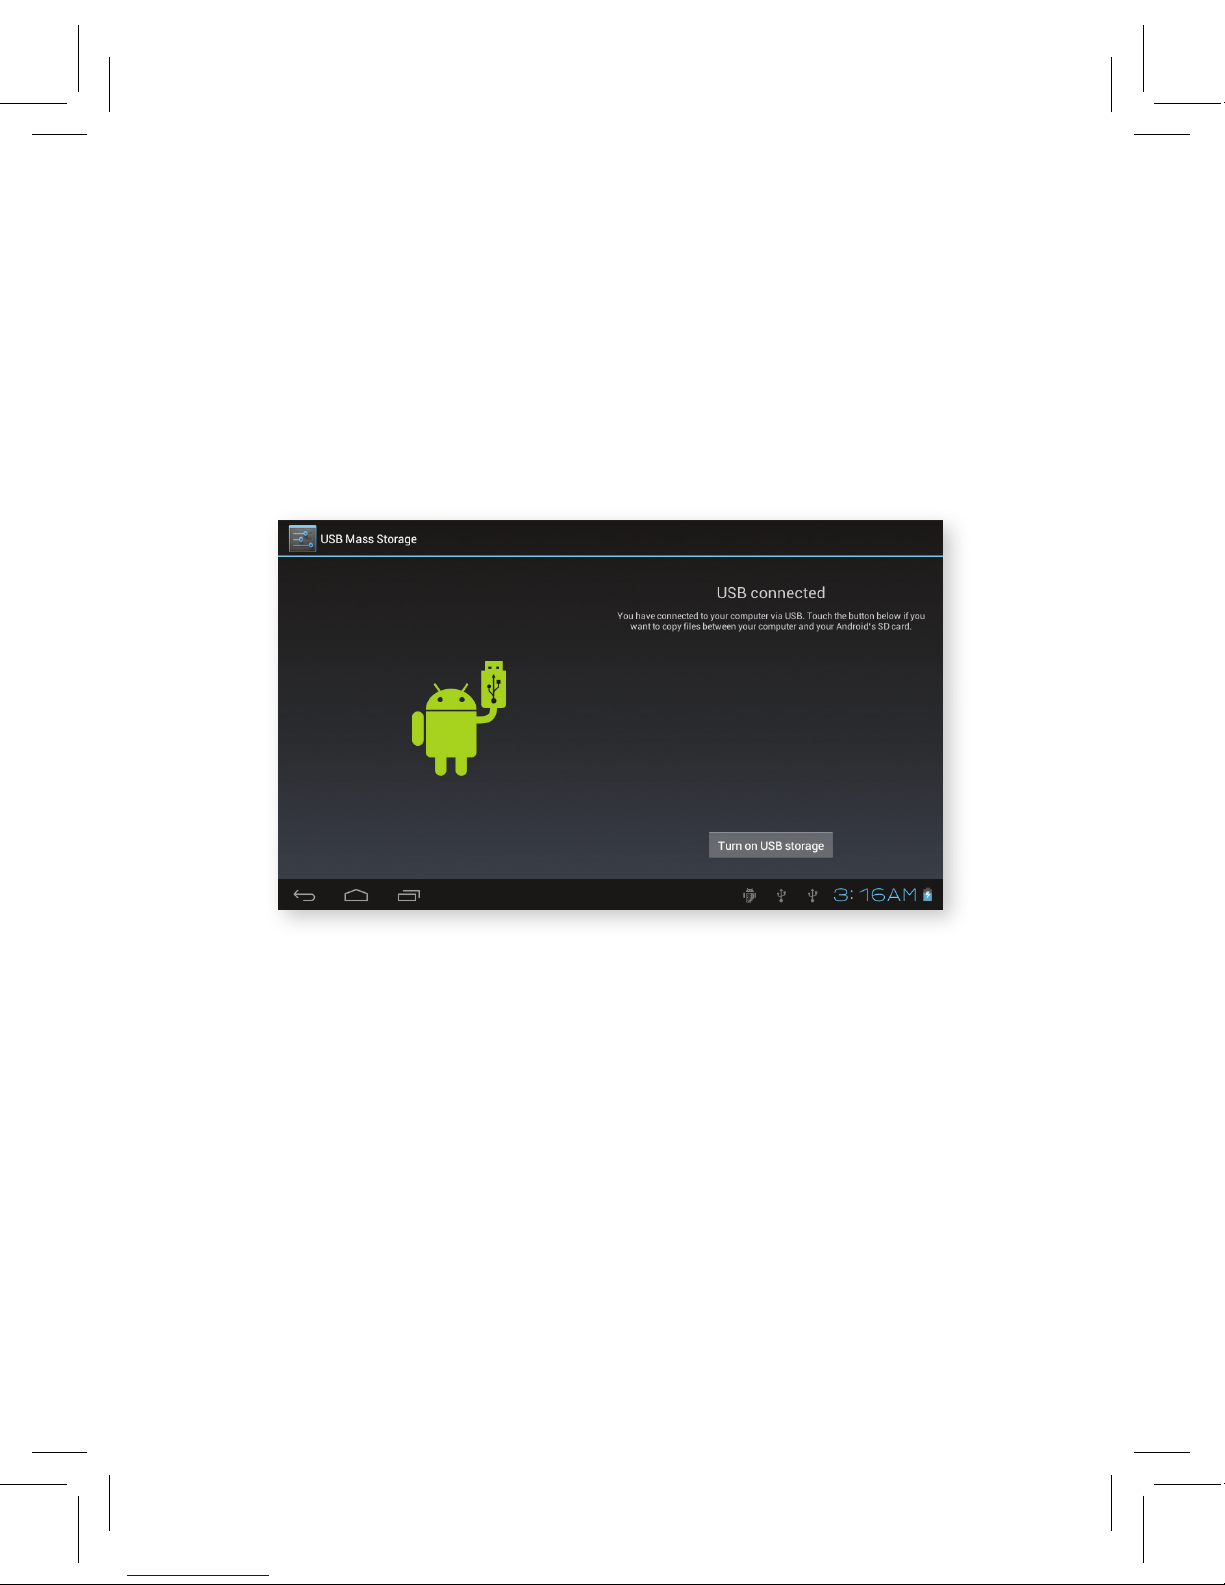
copy documents to memory card
1. Connect the Bamboo to computer with USB cable.
2. Turn on USB storage to connect with your computer.
3. Open the My computer folder in your computer and check for items in
“removable disc”.
4. Copy the documents you need into “removable disc”.
5. After copying finishes, click Turn off USB storage to uninstall.
Note:
1. When the Bamboo is connected with a USB cable and you open the
USB storage configuration, you can’t view items on the memory card
through the Bamboo. It is only after you detach the USB cable that you
can view items on your memory card.
2. Before copying, please confirm there is an SD card in the Bamboo and
that items can be read.
3.4
3.7 USB Connection
bamboo storage configuration
Before transmitting documents, you have to conduct a storage
configuration for your Bamboo:
1. Connect the Bamboo and computer via a USB cable. A reminder
column and image will appear.
2. In the reminder board, click the USB Connected option, it will show an
image as per Picture 3.4, then click Turn on USB storage.
3. Now the USB is connected successfully.
Page 19
17
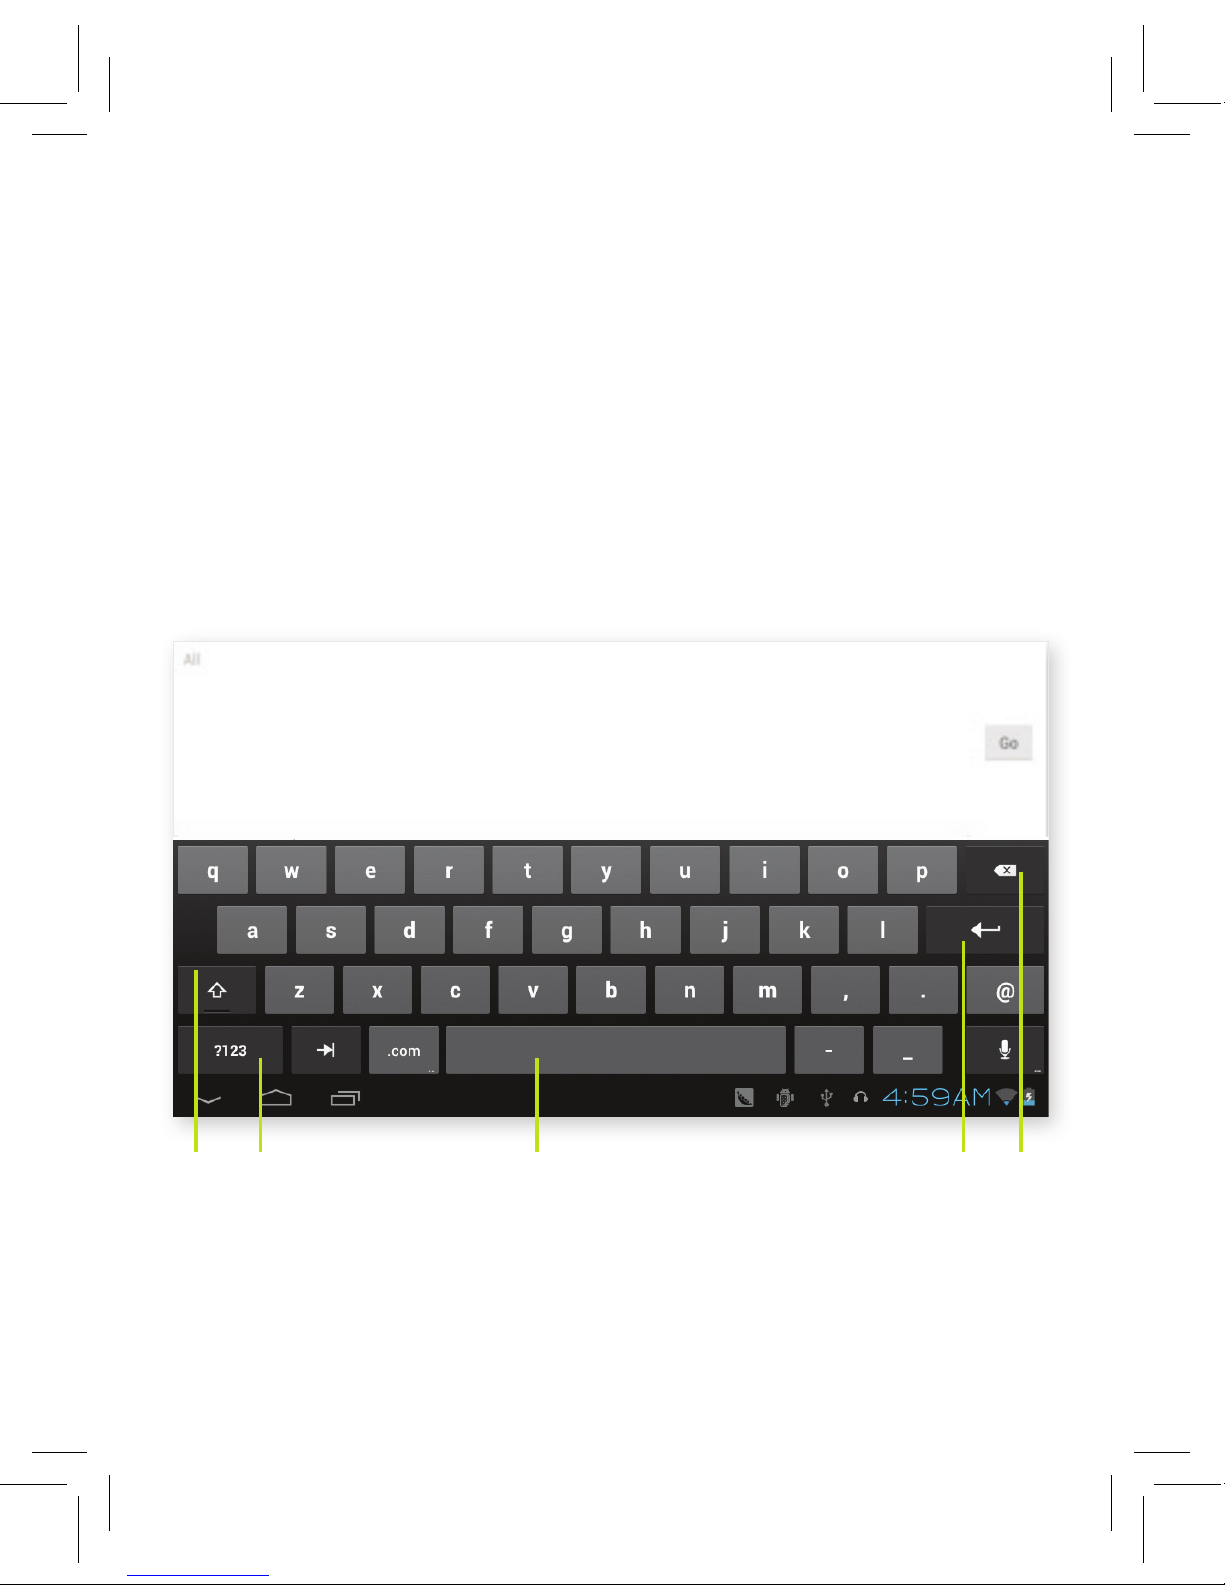
3.8 Typing words
You can enter text using the onscreen keyboard. Some apps open it
automatically. In others, you open it by touching where you want to type.
choose the typing method you want
1. Click on Settings.
2. Click Language and Keyboard.
3. In the text setting area will reveal all the installed words-typing
methods in your MID.
4. Tick the typing method you want.
use and switch of input method
3.5
1
2 3 54
1. Switch between capital and small letters.
2. Switch input mode.
3. Click to insert the space.
4. Enter key to execute commands.
5. Delete the character in the left of cursor. click and hold to delete all
the characters to the left of the cursor.
Page 20

18
3.9 Operation technique
enter widgets interface
In the application interface, click the widgets link at the top of the screen,
or slide the screen. It will swtich into widgets interface. Press the widget
for a few seconds to create its shortcut, then you can enter into the
application through the shortcut icon.
create application shortcut icons in the desktop
In the application interface or widgets interface, press any icon to switch
into desktop automatically, drag and hold the icon, and you can move it to
any position in the desktop.
Note: System will require you to make more choices and then you can
activate this widget. If the target position has no space, the widget won’t
be added in the main screen.
Page 21
19
4 Basic Settings
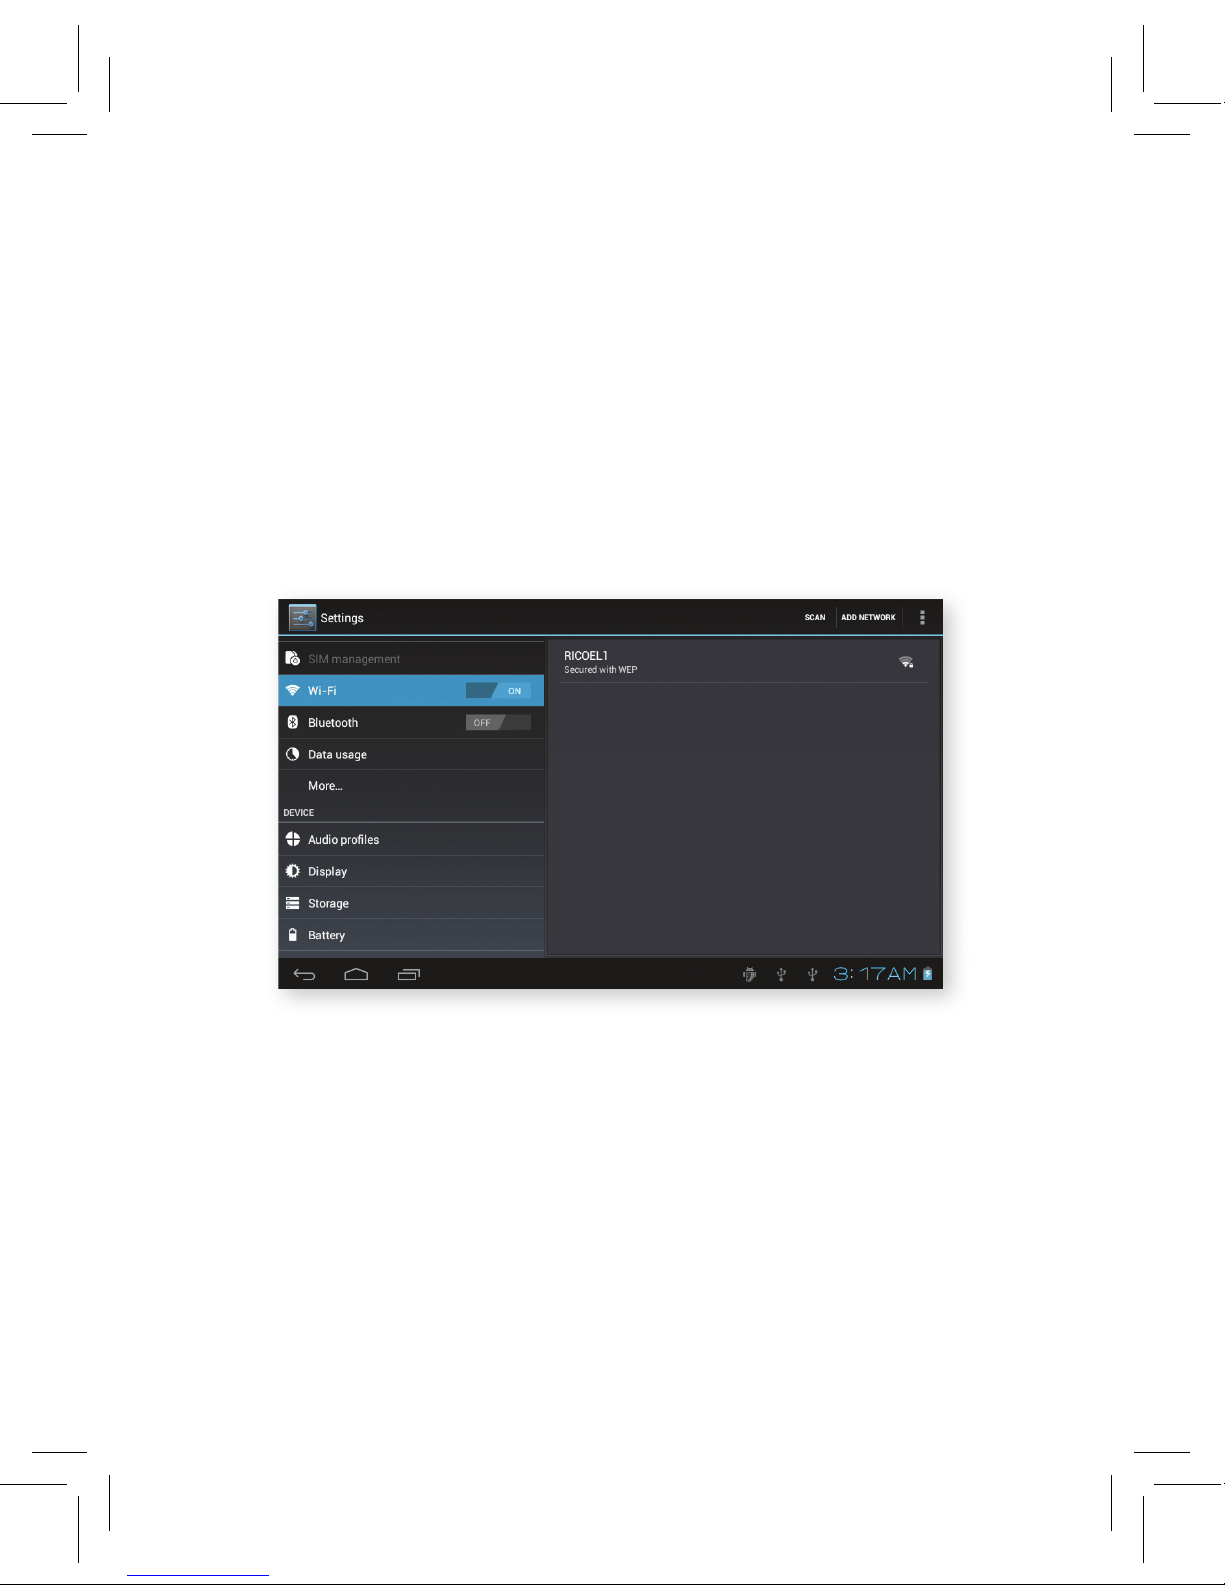
4.1 Wireless & Internet
connect wi-fi
1. In the main menu or interface, choose settings.
2. Click WLAN, open Wi-Fi, and Bamboo will automatically search for
the available Wifi wireless internet networks. See Picture 4.1
3. Choose the Wi-Fi internet you want to connect to. If it has password,
a popup will appear in a password window. Enter the password, and
click connect.
4.1
Page 22
20
4.2
4.3
4. Click the available Bluetooth device and connect to it. Note that you
may need to enter a password to connect the device.
5. After successfully connecting to a Bluetooth device, you have the
option of renaming your device.
4.2 Bluetooth
bluetooth function
1. Click settings in main menu interface.
2. Click bluetooth and open it.
3. Click search available devices and the Bamboo will automatically search
for nearby bluetooth devices. See Picture 4.2.
Page 23
21
4.4
4.3 Display
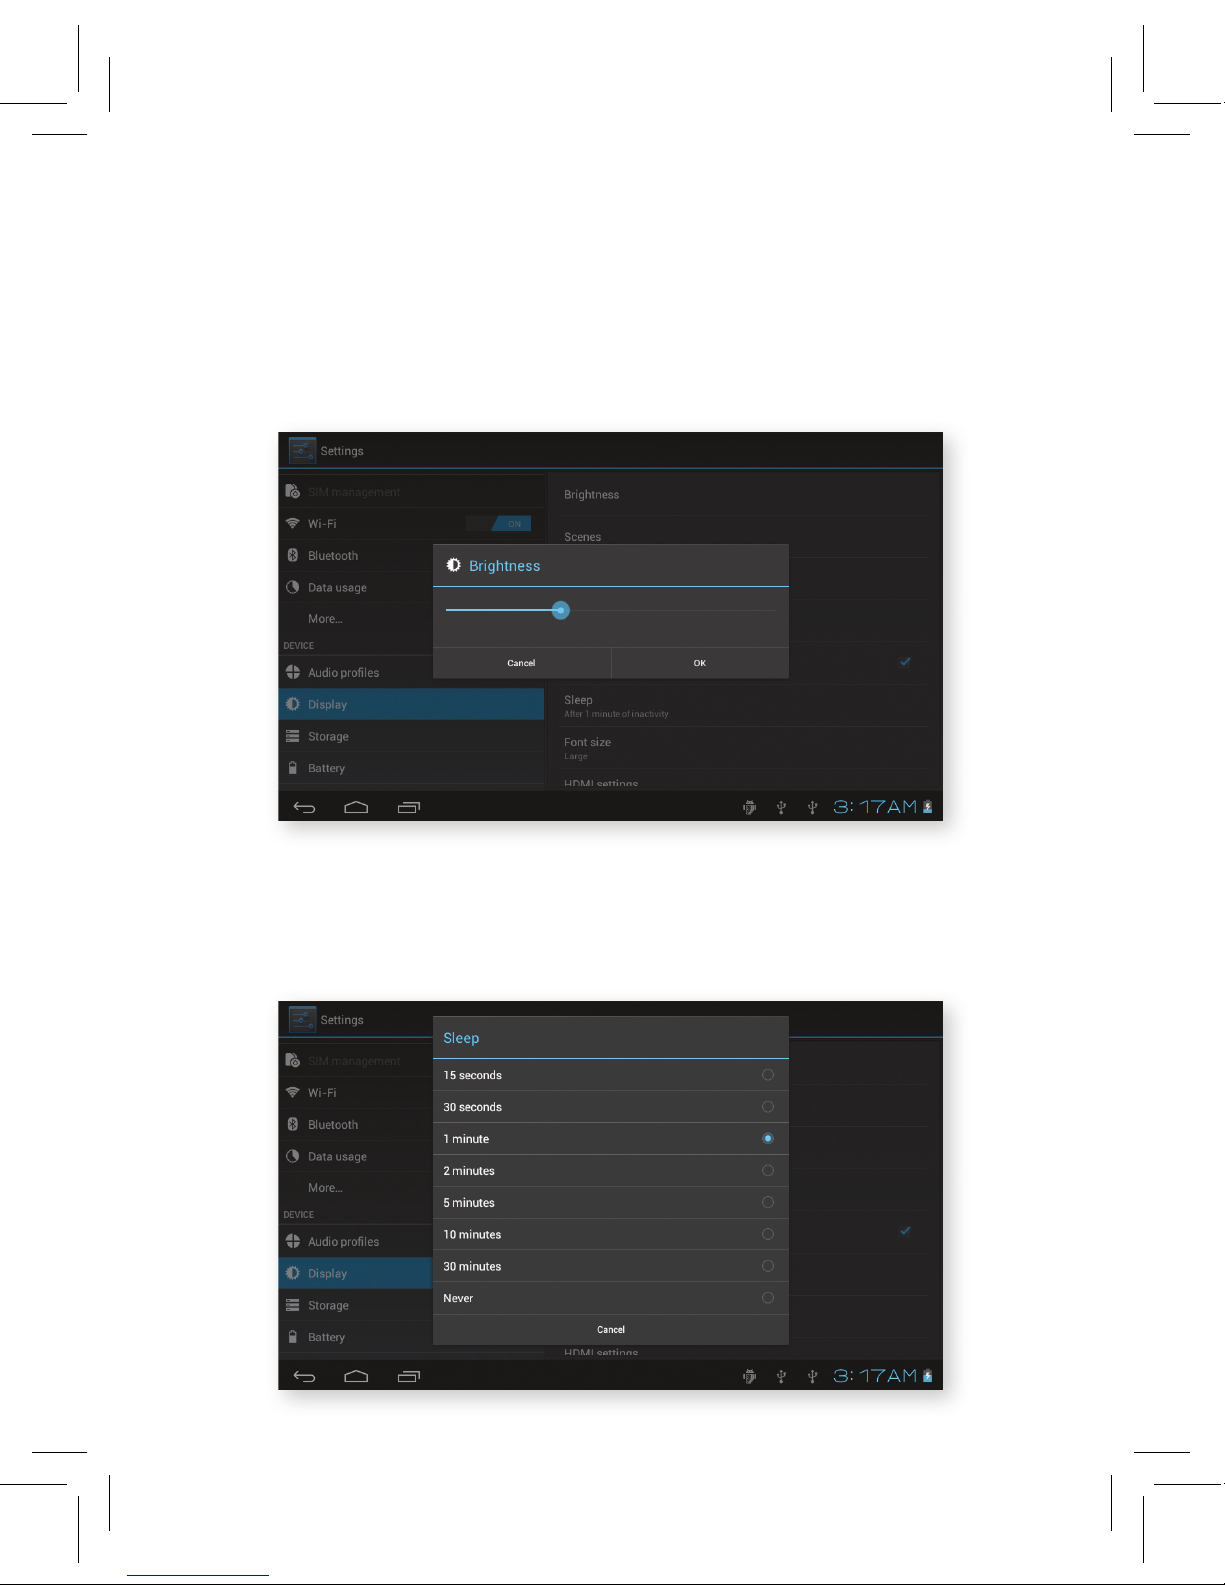
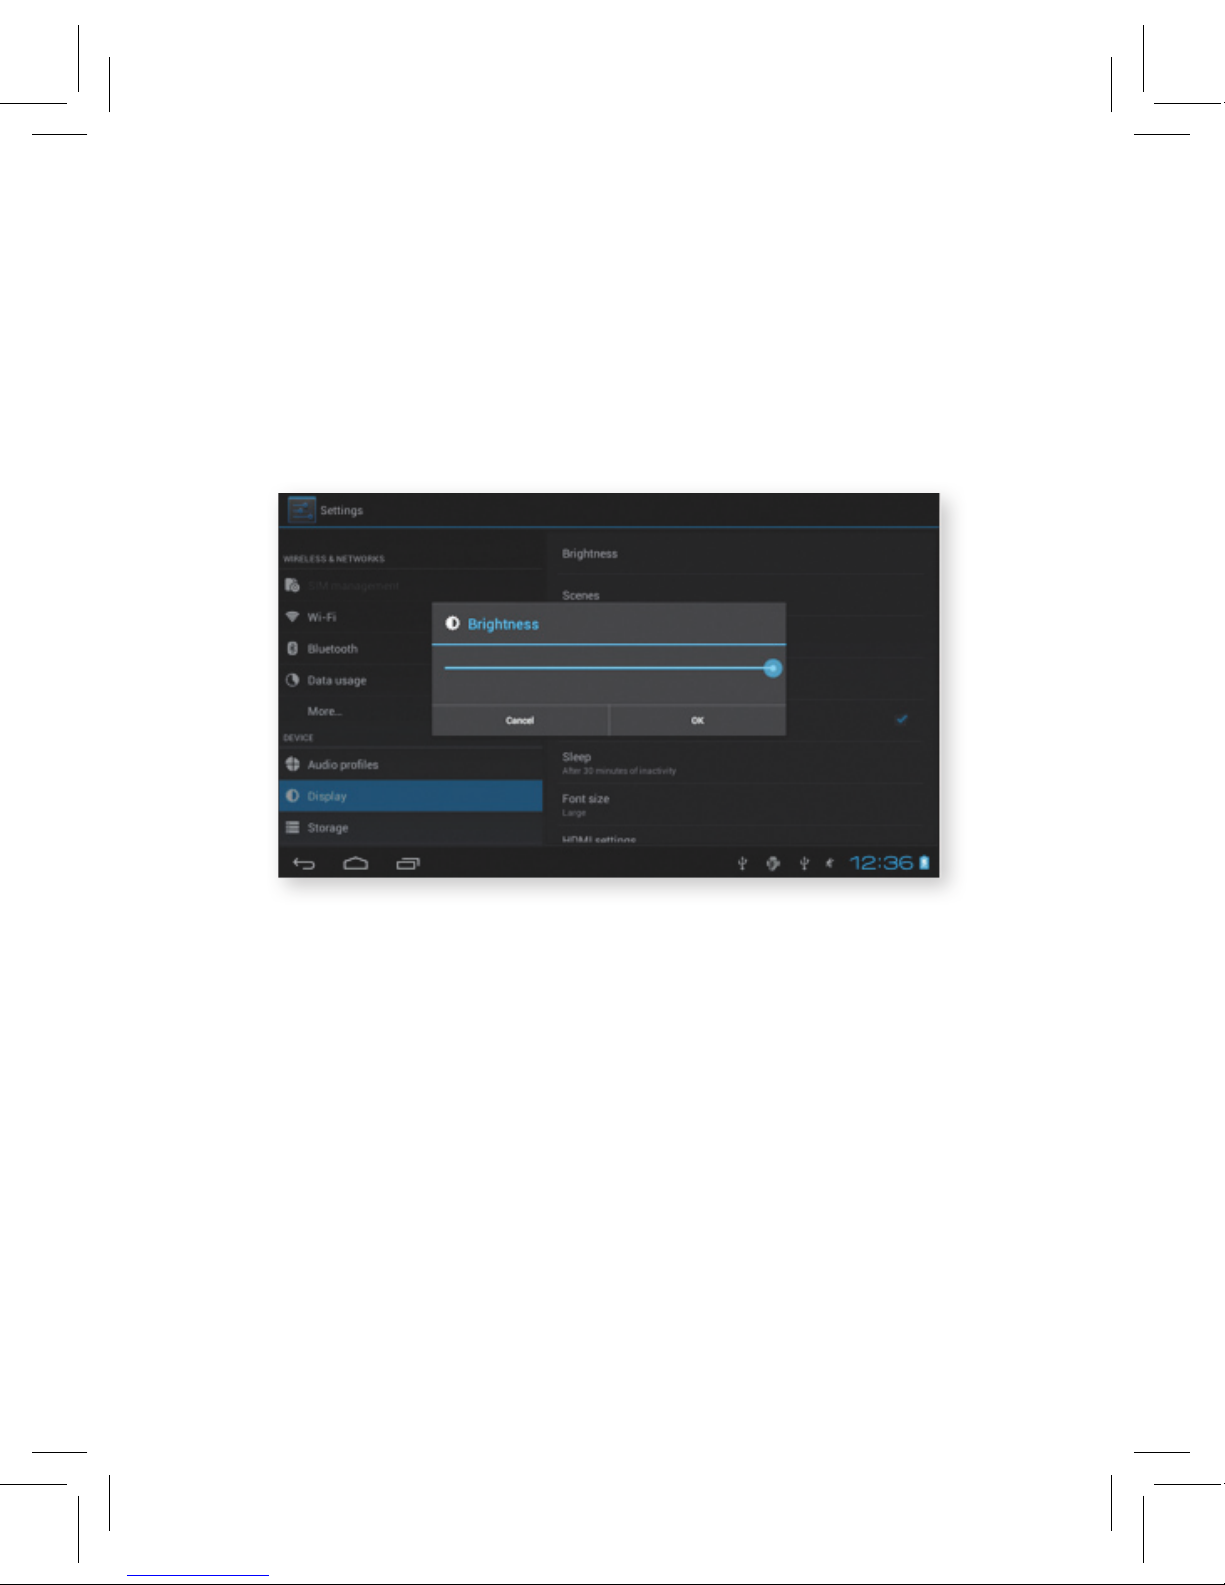
adjust screen brightness
1. Click Settings.
2. Click Display.
3. Choose Brightness.
4. When the brightness setting board pops up, drag the buttons to adjust
the brightness.
5. Click OK.
Page 24
22
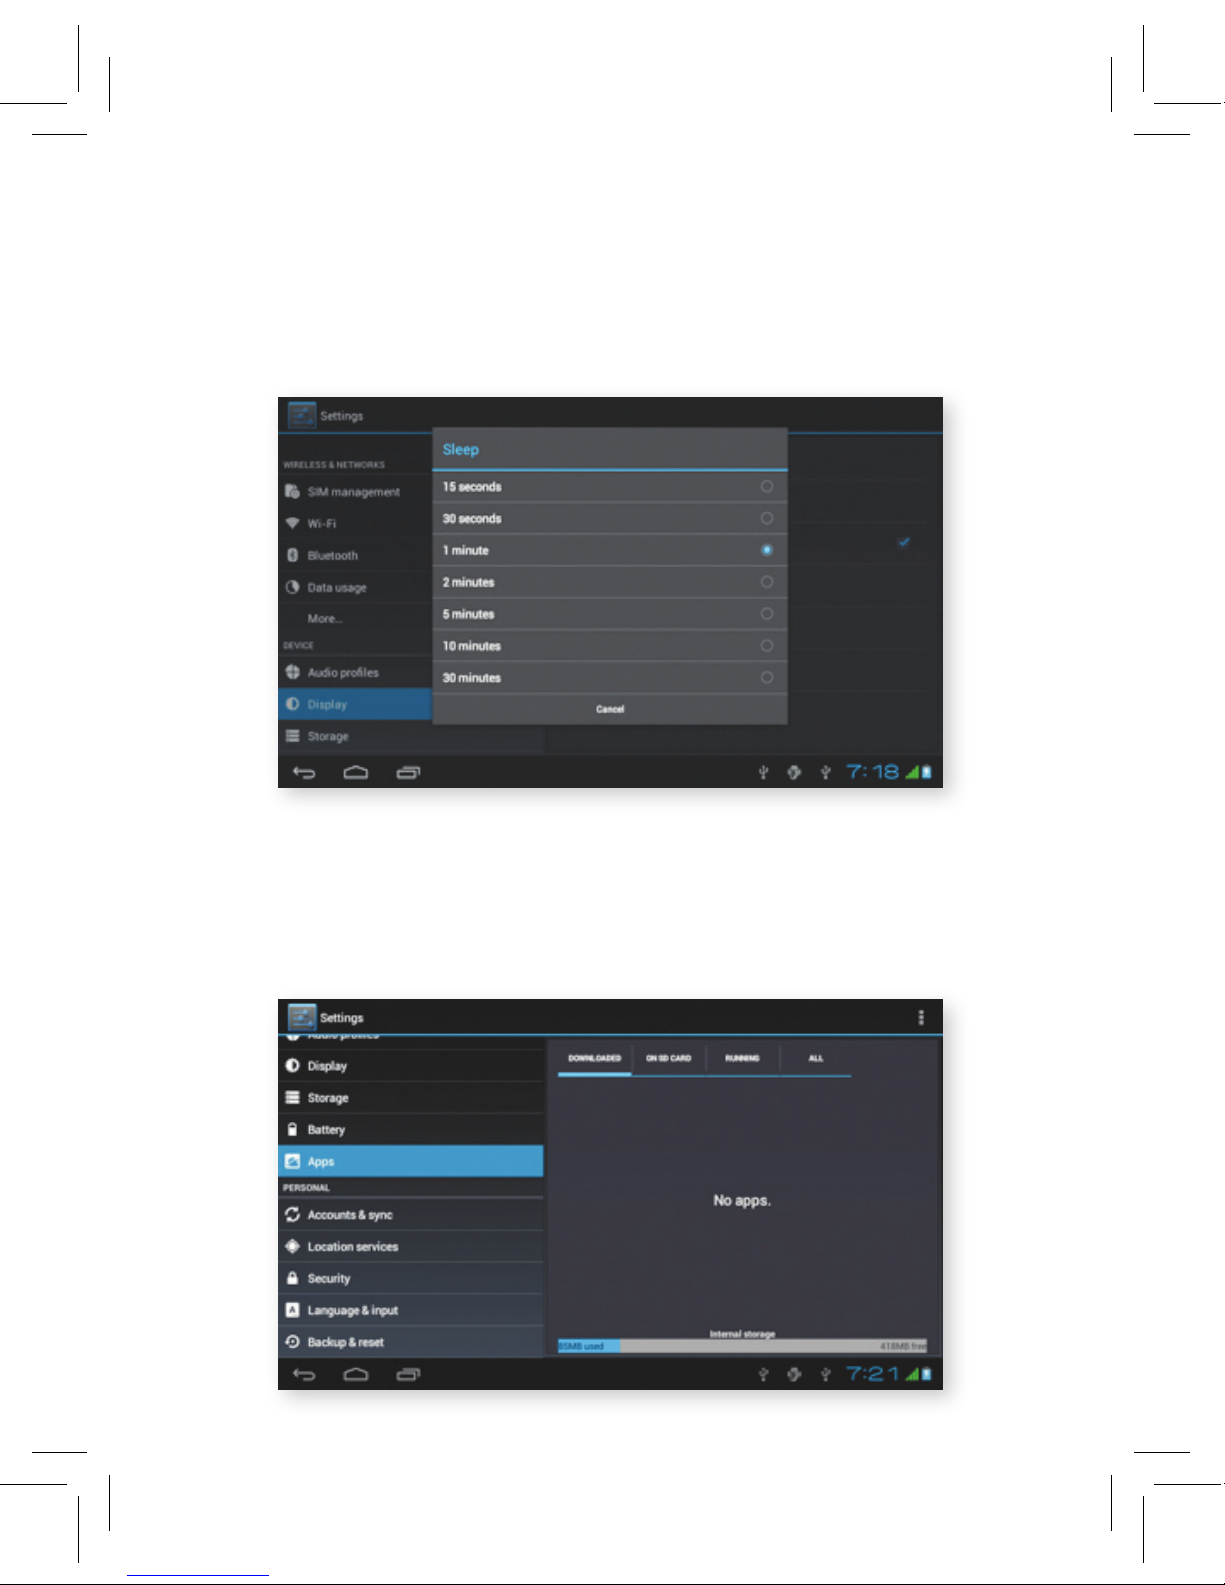
adjust the screen standby time
1. Click settings.
2. Click display.
3. Click sleep.
4. Screen standby time setting pops up.
5. Select your desired standby time.
4.5
4.6
4.4 Management of Application Procedure
1. Choose settings.
2. Choose apps.
3. Therefter you can manage or delete installed applications.
Page 25
23
4.5 SD Card and Bamboo Storage
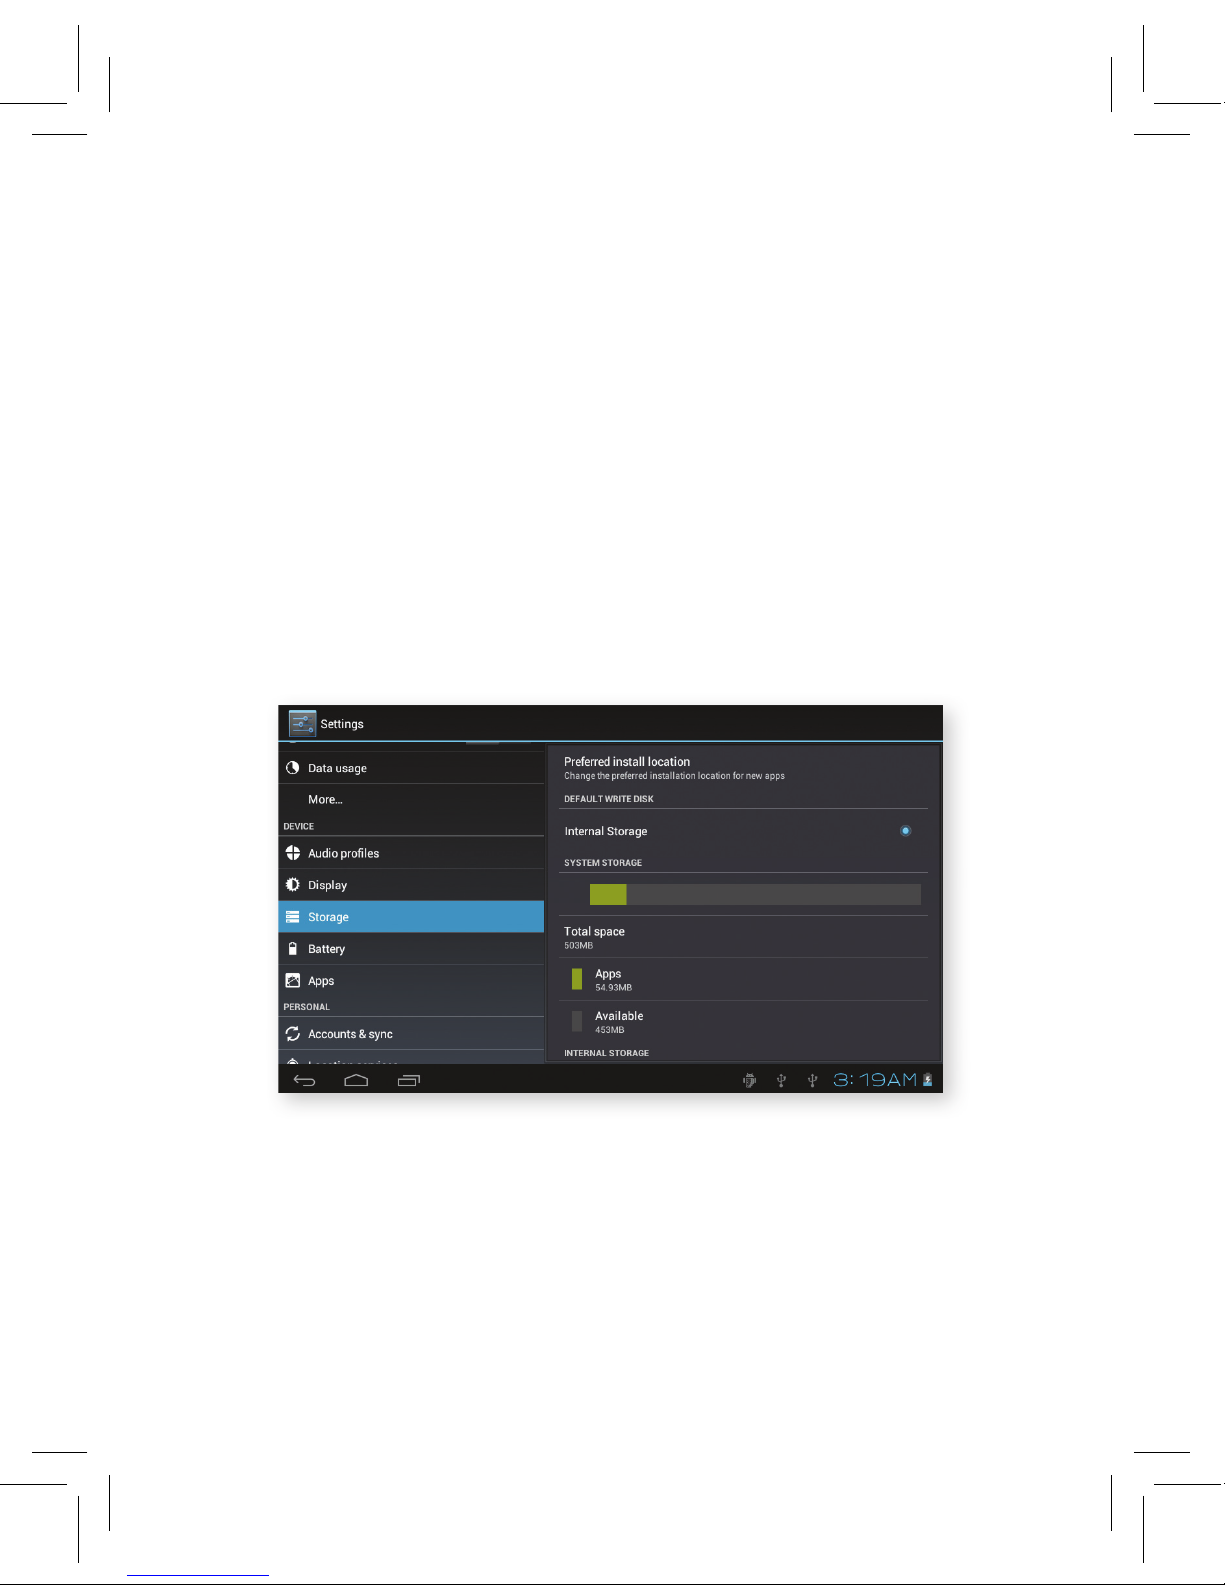
check the sd card and internal available space
1. Click settings.
2. Click storage.
3. Check the available space of SD card.
4. Check the internal storage space.
safely remove sd card
Safe removal of SD card can protect SD card and extend working life of
the card.
1. Click settings.
2. Click storage.
3. Click remove SD card.
4. Now it is now safe to remove SD card.
4.7
Note: removing SD card safely can protect and extend SD card lifetime.
Page 26
24
4.8
4.6 Date and Time
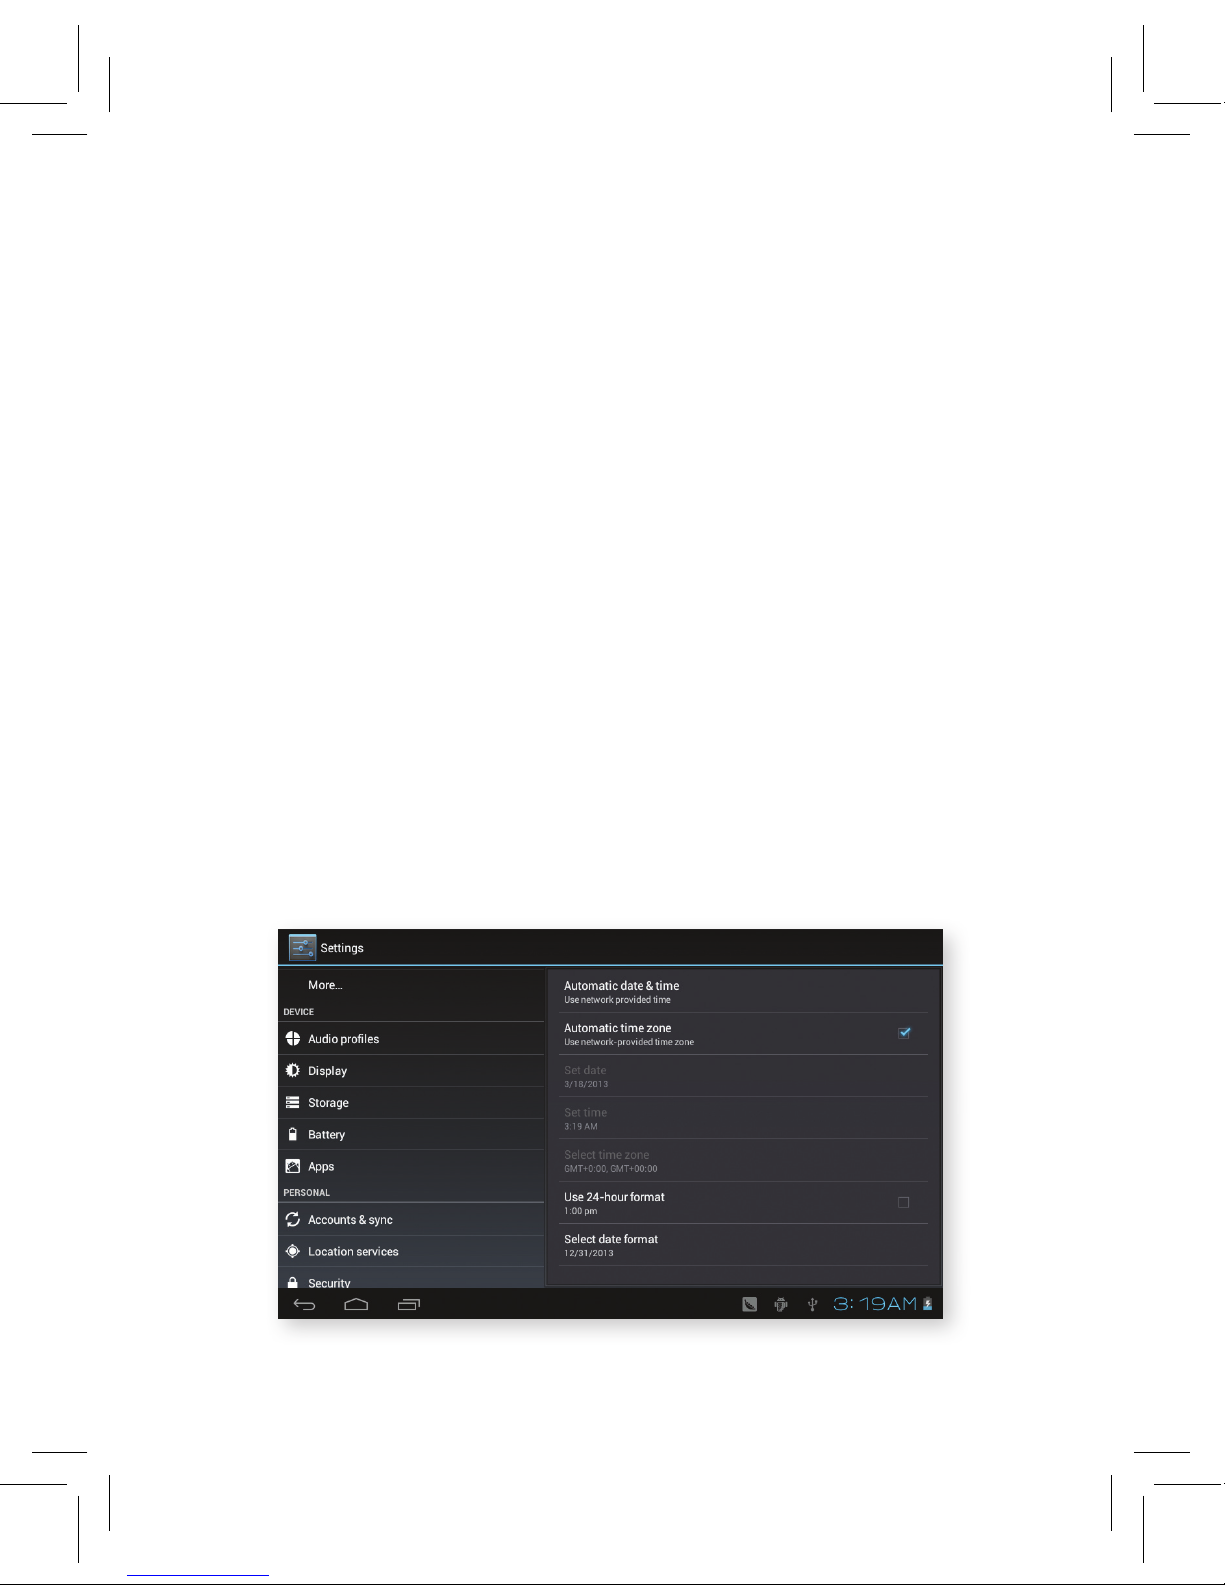
By default, the Bamboo will voluntorily apply the date, zone, and time
provided by internet.
to set this manually (set date, time and zone)
1. Click settings.
2. Slide down the screen, then click date and time.
3. Turn off “auto setting of date and time”.
4. Turn off “auto setting zone’.
5. Click zone selecting & choose the zone lists. Slide down the list to view
more zones.
6. Click date setting, then click up or down button to adjust date, month,
and year.
7. Click setting when you finish selection.
8. Click time setting, then click up or down button to adjust hour and
minute.
9. Click AM or PM to change between morning or afternoon (this option is
unavailable when you se 24-hour format).
10. Click settings to finish.
11. Click 24-hour format, switch between 12-hour or 24-hour format. The
time format you choose will be used on the alarm clock.
12. Click date format setting, then choose the time format you want to
show on tablet.
Note: If you use the default internet time option provided, you will not
able to set the date, time and time zone.
Page 27

25
4.7 Language Setting
1. Click settings.
2. Click language and keyboard.
3. Click language selection, then choose the language you want, slide
down to view more languages.
4.8 About Tablet
view the tablet status
1. Click setings.
2. Click about tablet, you can view the battery level, status messages and
version number.
system update
1. Click settings.
2. Click about tablet.
3. Click system update, update directed.
Note: Please make sure you have saved your previous information on the
external memory before updating the system.
view system version
1. Click settings.
2. Click about tablet.
3. You can view model number, battery levels and internal version.
Page 28
26
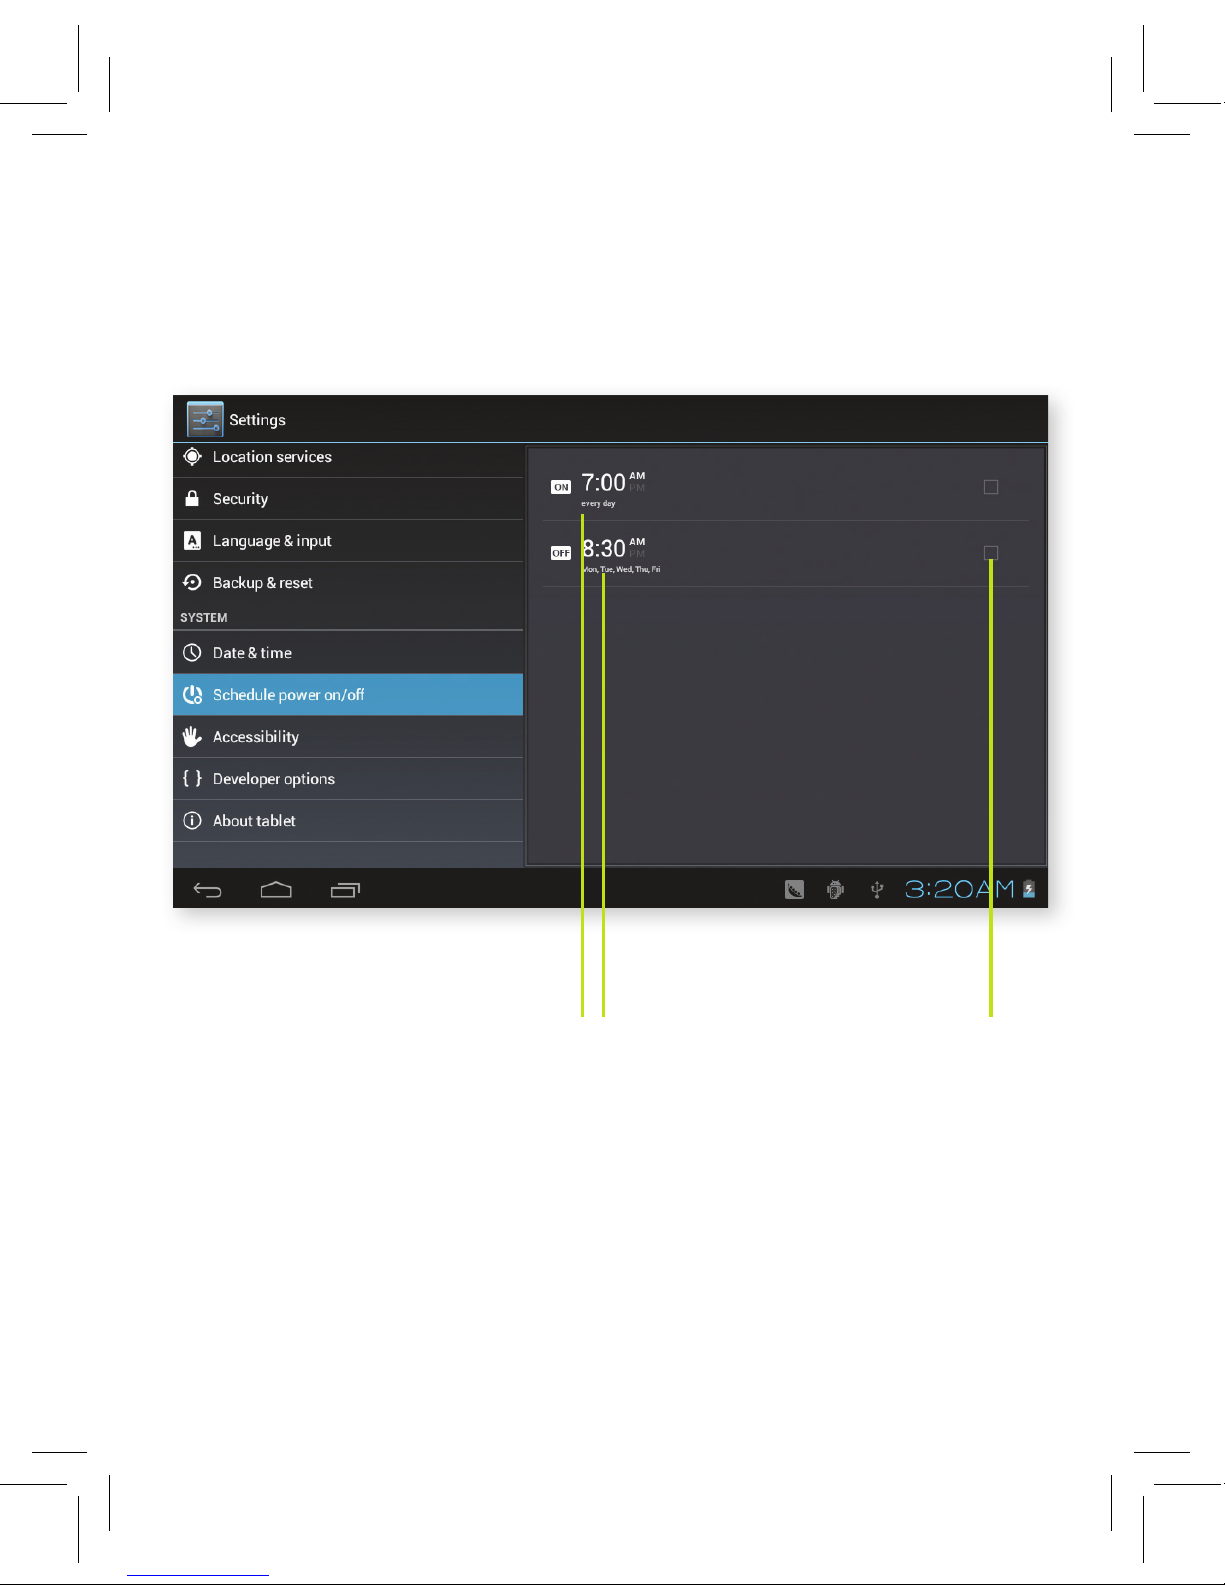
4.9 Fixed-time Startup and Shutdown
1. Click settings.
2. Click fixed-time startup and shutdown.
3. Select schedule power on/off.
4.9
Click to enter
into fixed-time
startup setting
Open/close
fixed-time
shutdown
Click to enter
into fixed-time
shutdown setting
Page 29
27
4.10
4.10 Safety Settings
set locked screen
Lock the touch screen by using the lock icon or password if desired.
Note: You should enter the passcode after setting screen is locked.
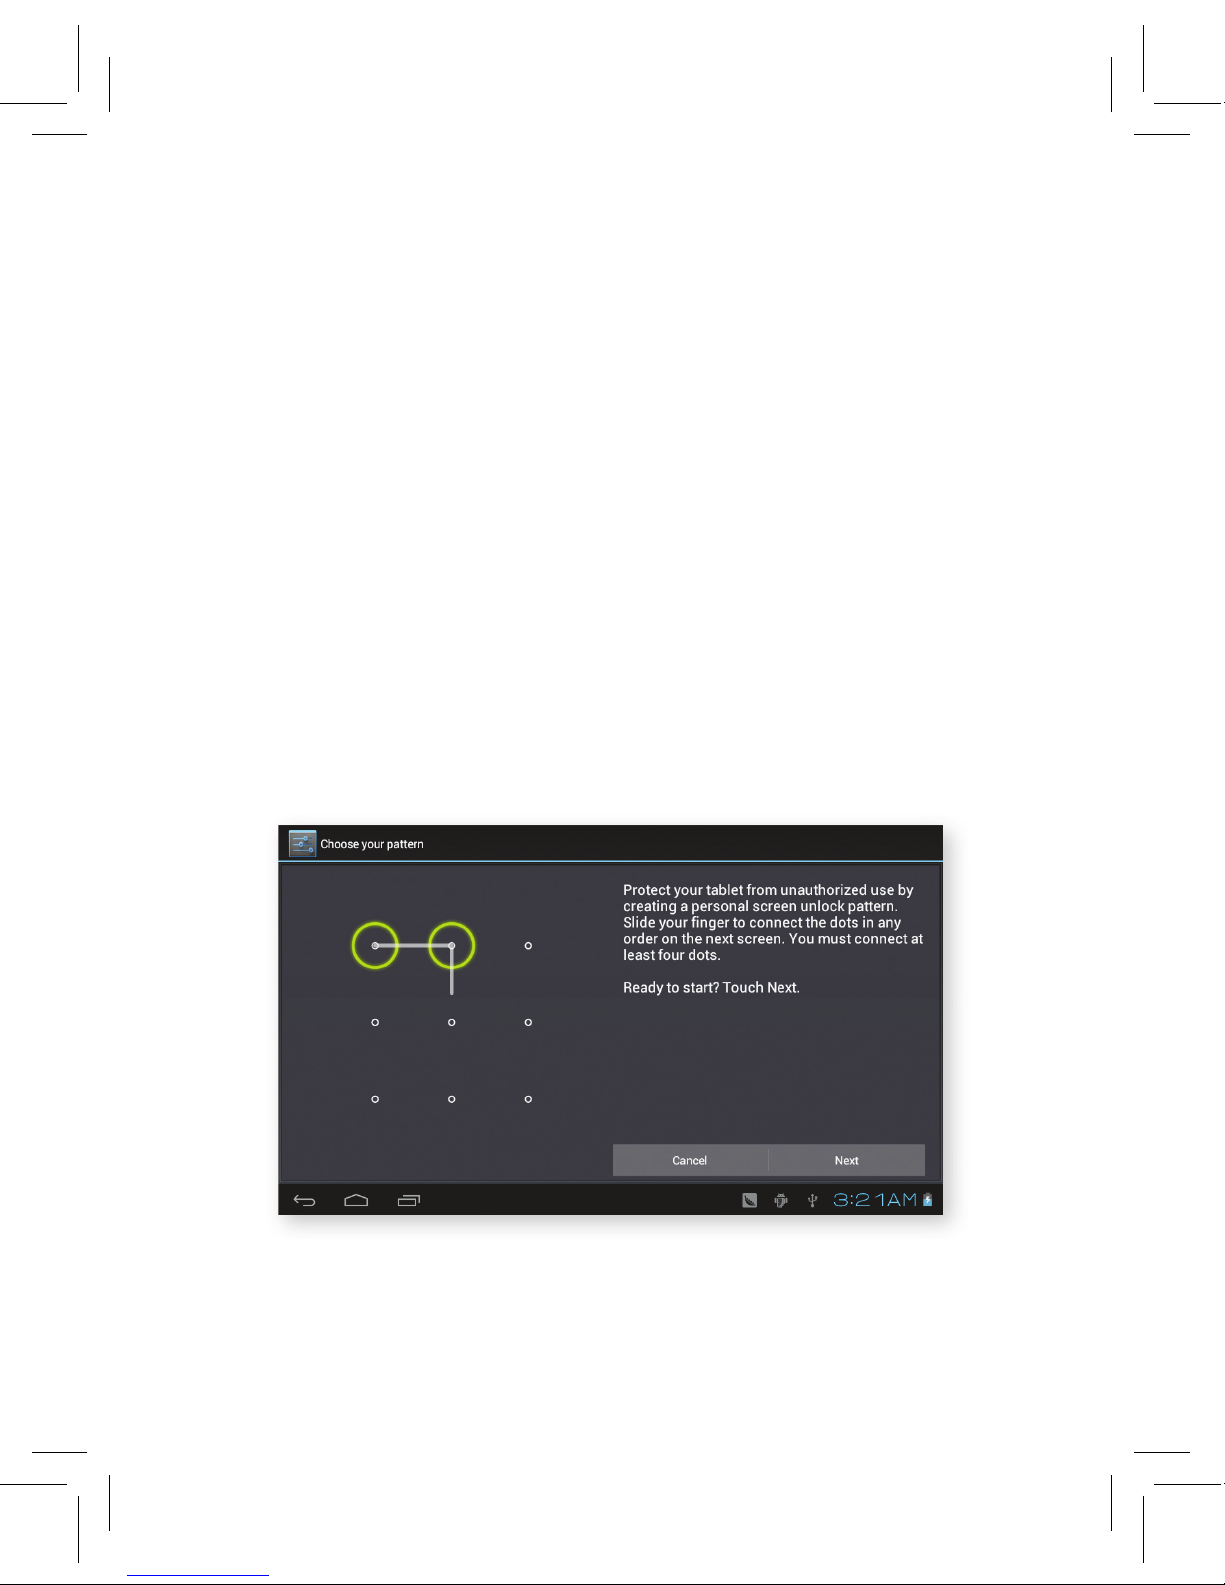
set unlocked picture
1. Click settings.
2. Click safe.
3. Click lock the screen.
4. Choose picture in text setting area.
5. Click next.
6. The unlocked pattern board will pop up. There are nine touch spots.
Connect 4 points from vertical, horizontal or diagonal directions. As in
Picture 4.10, remove your finger from the screen when you finish. The
system will record yous new unlock pattern.
7. Click continue.
8. When you see the reminder, enter the unlock pattern, then click
confirm.
Page 30

28
4.10 Safety settings continued
set unlock pin code
1. Click settings.
2. Click safe.
3. Click screen locked.
4. Choose PIN in text setting area.
5. Enter new PIN code(numbers) and click continue.
6. Ener new PIN code again and click confirm.
set unlock password
1. Click settings.
2. Click safe.
3. Click screen locked.
4. Set password in text seting area.
5. Set new password(letters and numbers) and then click continue.
6. Enter the password again and the click confirm.
Page 31
29
5 Multi-Media
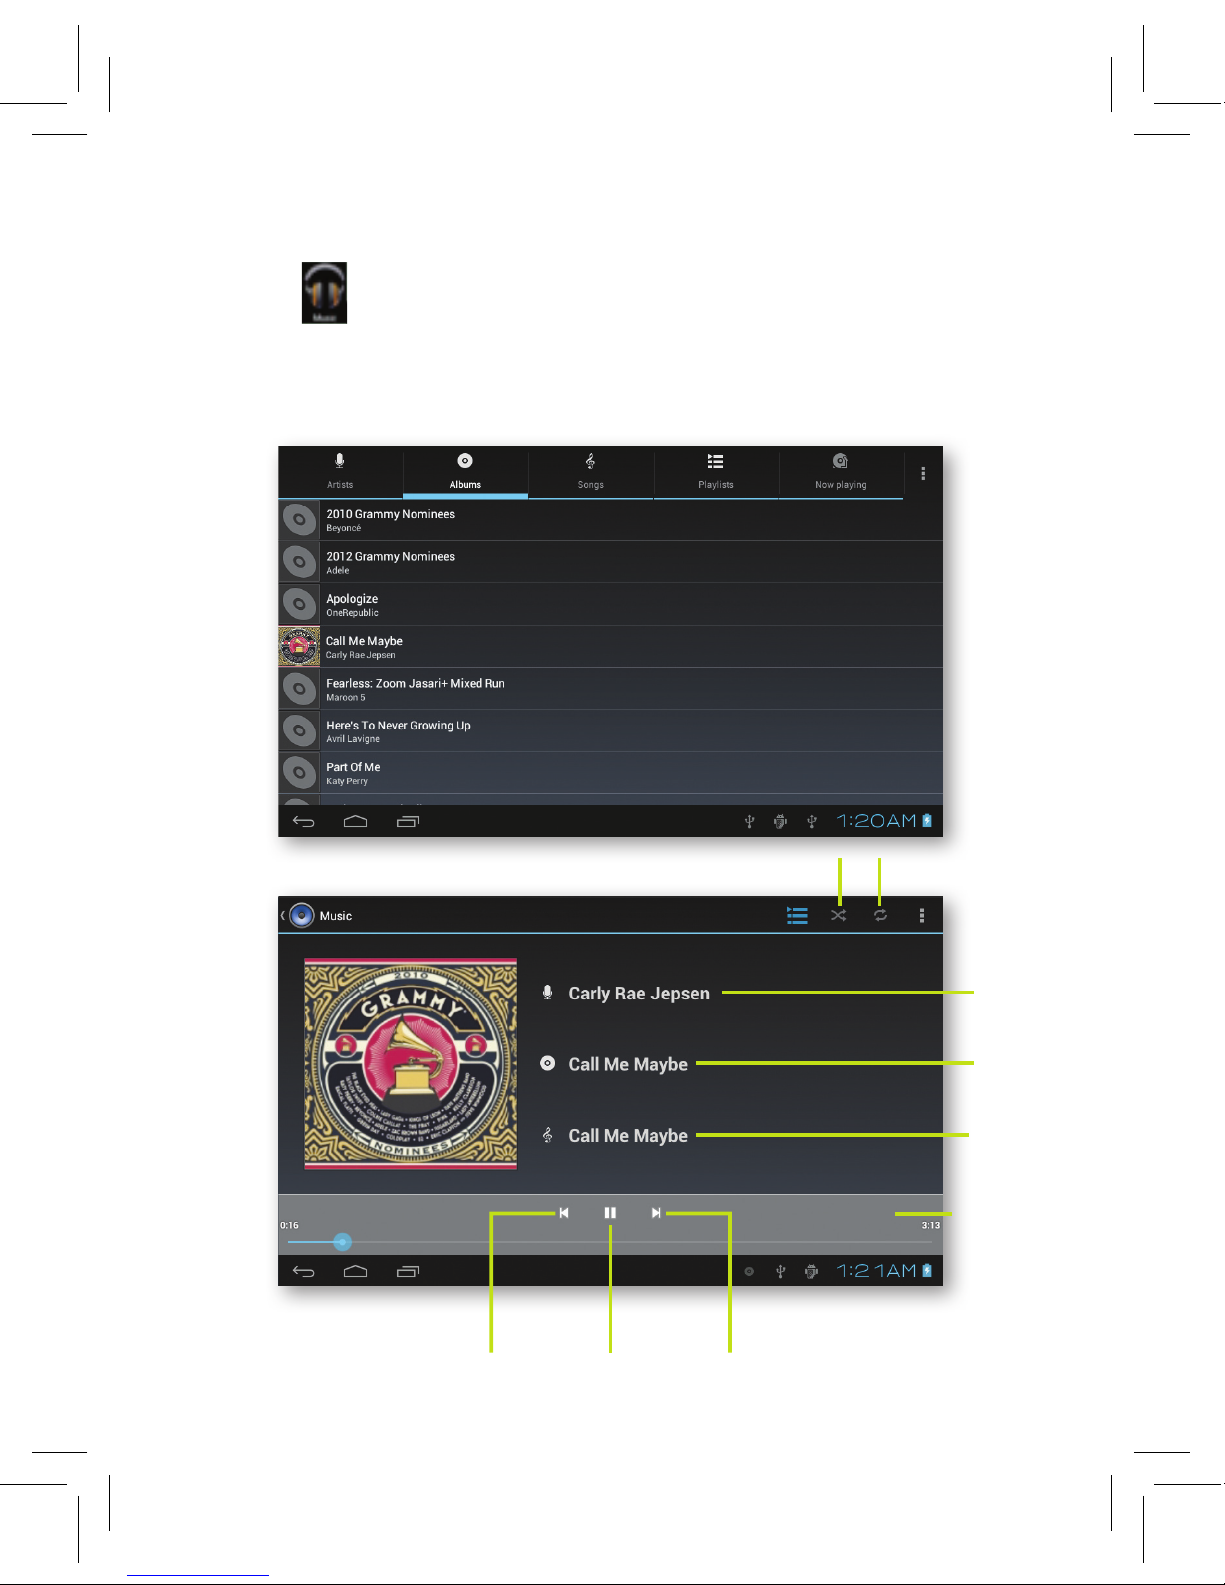
5.1 Music
to enter into the music player:
1. In menu or desktop, click the music icon to enter into music player.
2. Click the songs you would like to listen to.
5.1
5.2
Previous
song
Song
Artist
Album
Next
song
Random play
Pause/
play
Loop play
Drag the progress bar to adjust the play progress.
Page 32
30
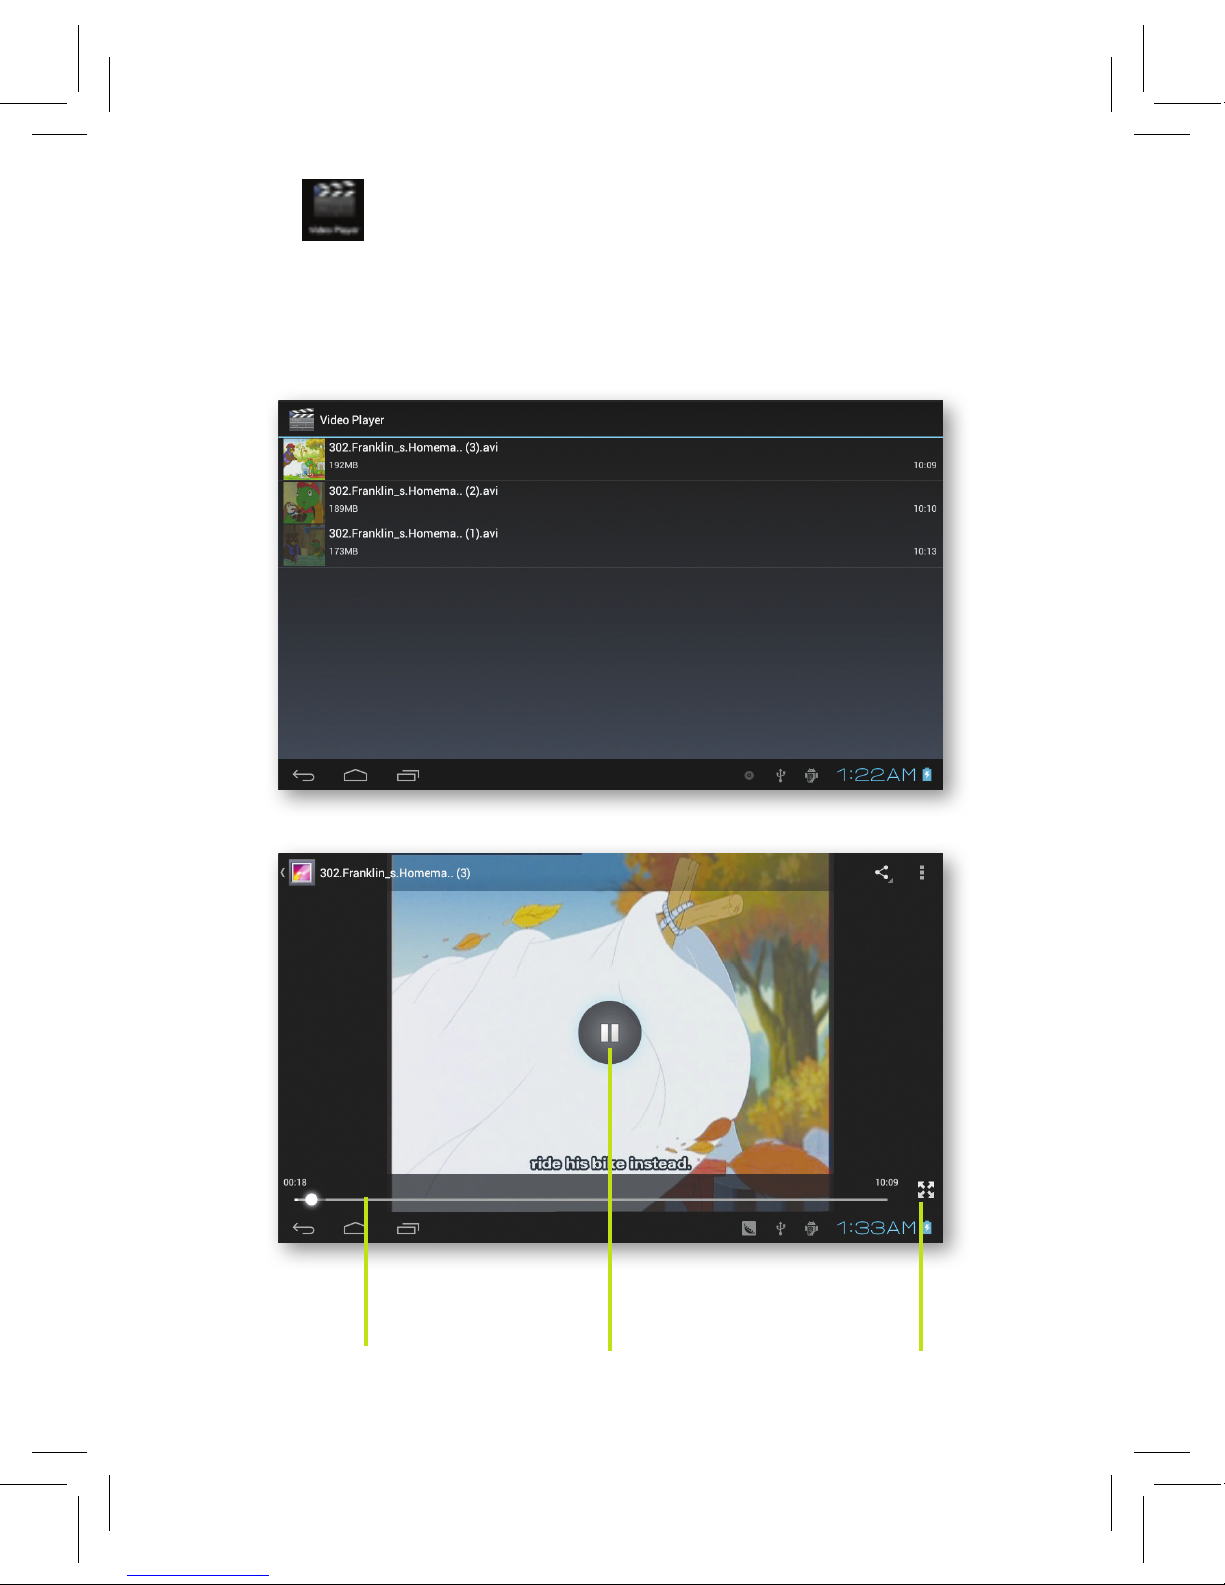
5.3
5.4
Choose the
screen mode
Adjust play
progress
Play/
pause
5.2 Video
To enter into video player:
1. Choose video icon in main menu.
2. Choose the video you want to play.
Page 33

31
5.3 Photo Gallery
The Photo gallery application can automatically search for photos and
video files in your SD card, and will classif y these photos and videos into
folders. You can use this application to view and edit photos, set the
photos as wallpaper and watch videos.
view pictures
1. Click gallery application.
2. Enter into gallery, click the folder you want to view.
3. Click the picture you want to view, the system will display it in full
screen mode automatically.
4. You can zoom in and zoom out of pictures. Put two fingers on the
screen, then seperate the fingers (or gather join up the fingers and the
picture will zoom in) or double click the screen.
Note: when you browse the pictures, slide left or right to view more pictures.
edit and set pictures
When you check the pictures in full screen mode, click menu key to
display menu selection, you can choose the selection you need to edit and
set pictures.
slide show
1. Open a picture, use virtual key to click menu key, display menu
selection.
2. Click slide show, it will auto loop play (or choose button in the
picture folder).
crop
1. Click menu key to display menu selection.
2. Then click crop, click and drag related area to adjust the cropper.
3. Click cropper and drag it inside and outside to adjust the image.
4. After adjusting to the size you want, click crop.
5. If you wish to give up to crop, click cancel to return to picture browse.
Page 34
32
5.3 Photo Gallery continued
Edit
1. Click menu key, display the menu selection.
2. Click edit.
3. Adjust the brightness, style, color, etc.
4. Click save.
5. If you want to exit the edit option, click return key.
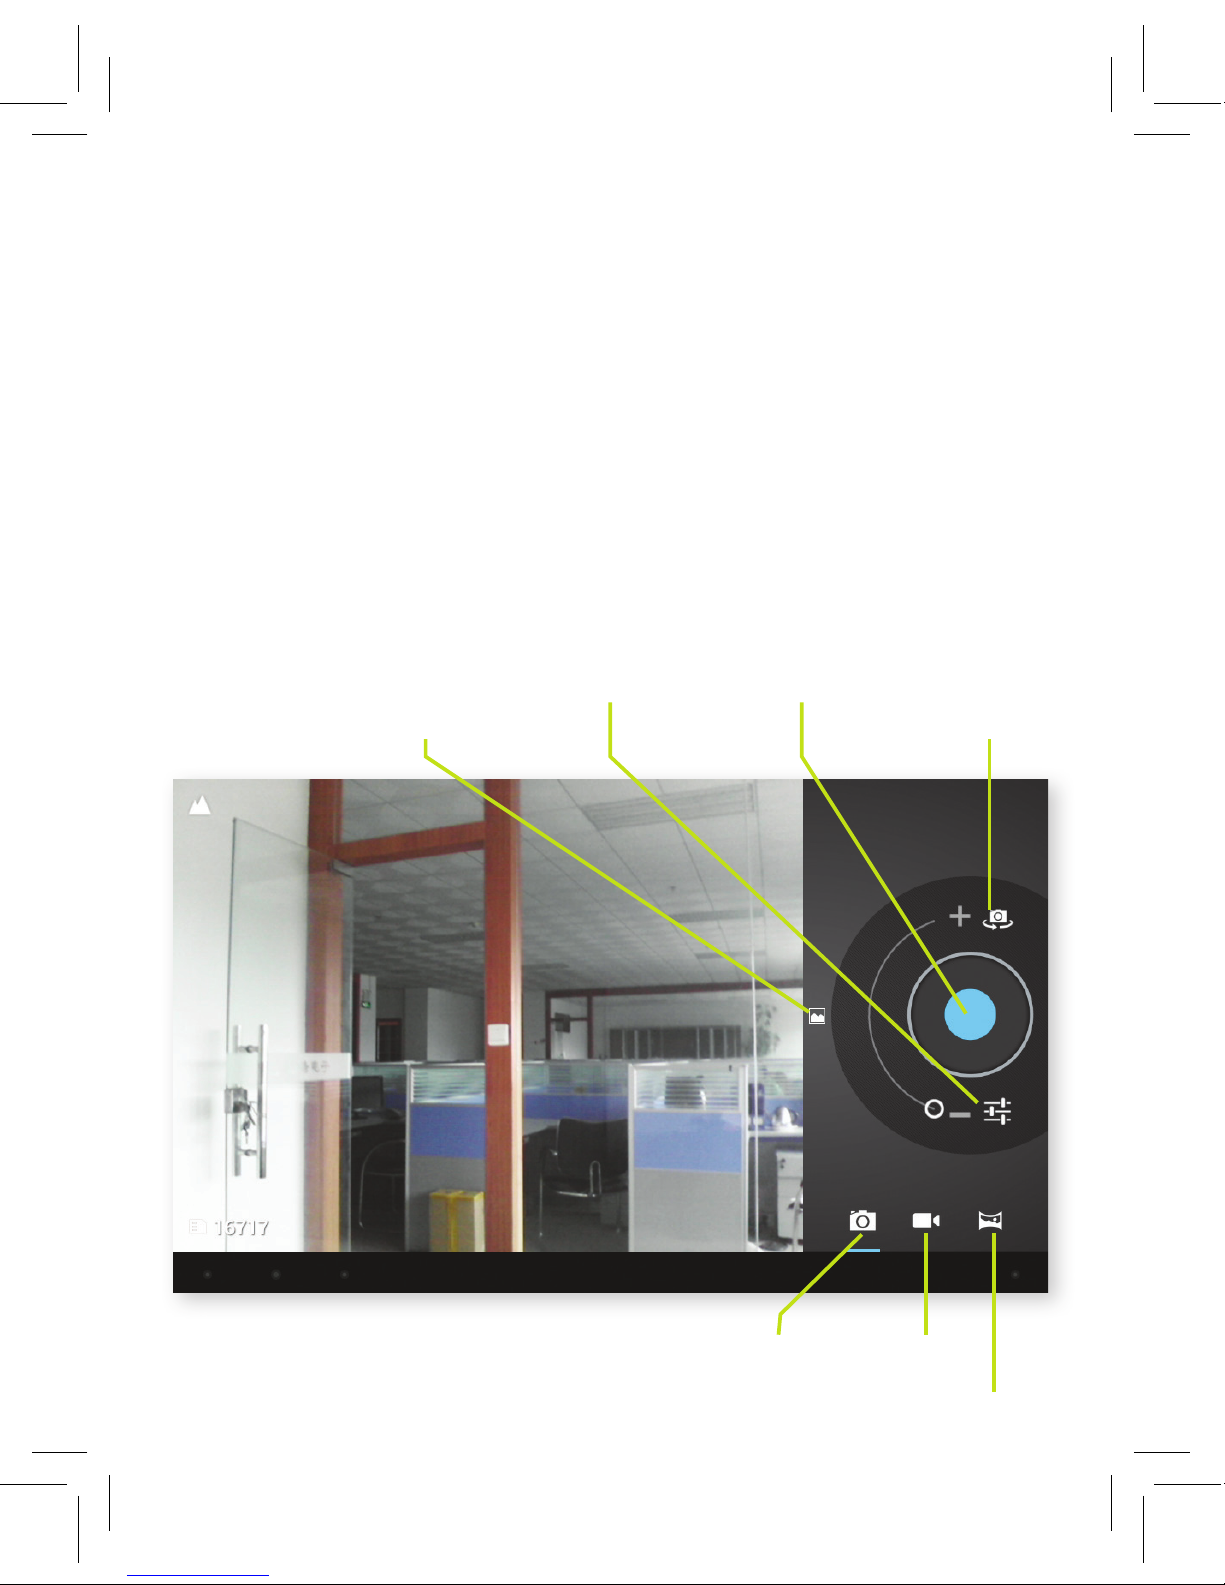
5.4 Camera
In the main interface or desktop, click camera ison to enter the camera
menu.
- See operation of camera button in Picture 5.5
- Switch camera: choose Menu key, click switch front/back camera, as
Picture 5.5
Camera
View gallery
Switch front/
back camera
Click to take
picturesSub menu
Video
Full screen play mode
5.5
Page 35
33
5.5 HDMI Connection
To use HDMI connection, set the HDMI output method; tablet connection
and high definition TV. Play connected videos in full screen mode with
HD resolution.
Note: High definition TV should be adjusted as HDMI output.
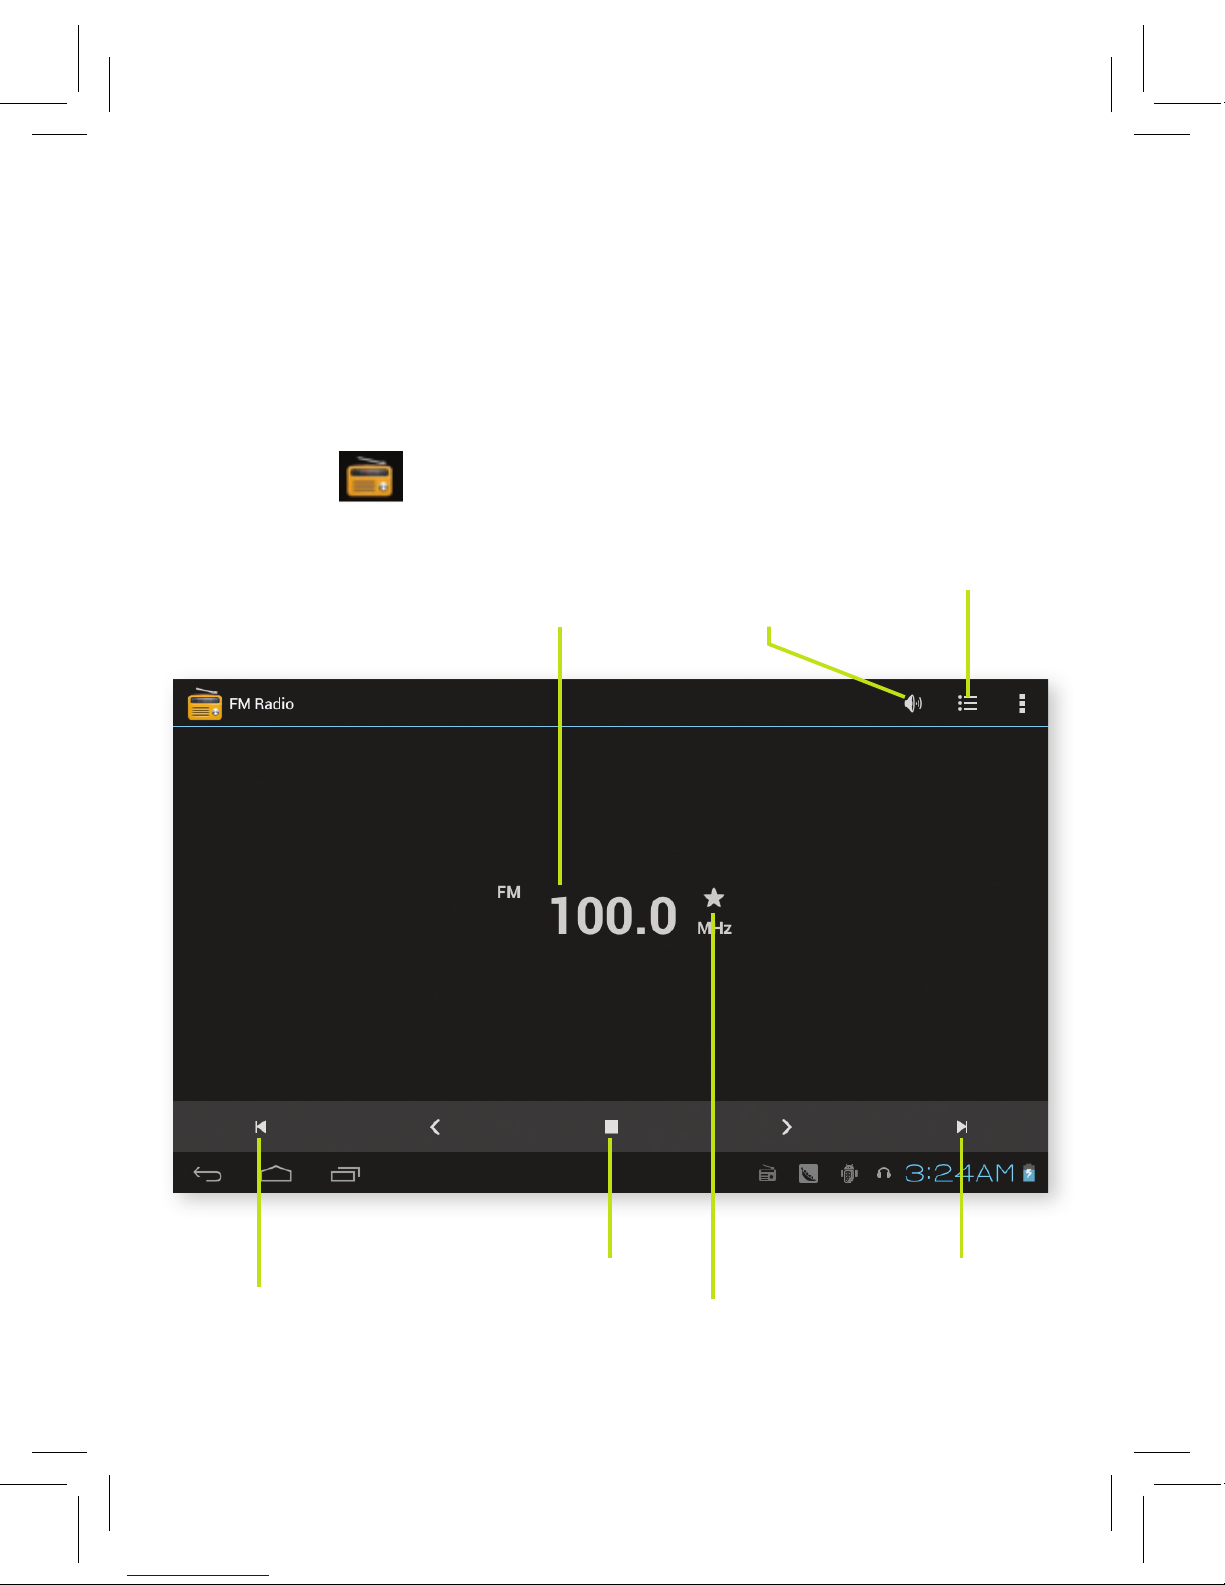
5.6 FM Radio
Click on the radio icon to enter FM radio interface, see Radio button
operations on Picture 5.6:
Play/pause
Save button
Previous
channel
Next channel
Enter into
channel listCurrent frequency Open speaker
5.6
Page 36
34
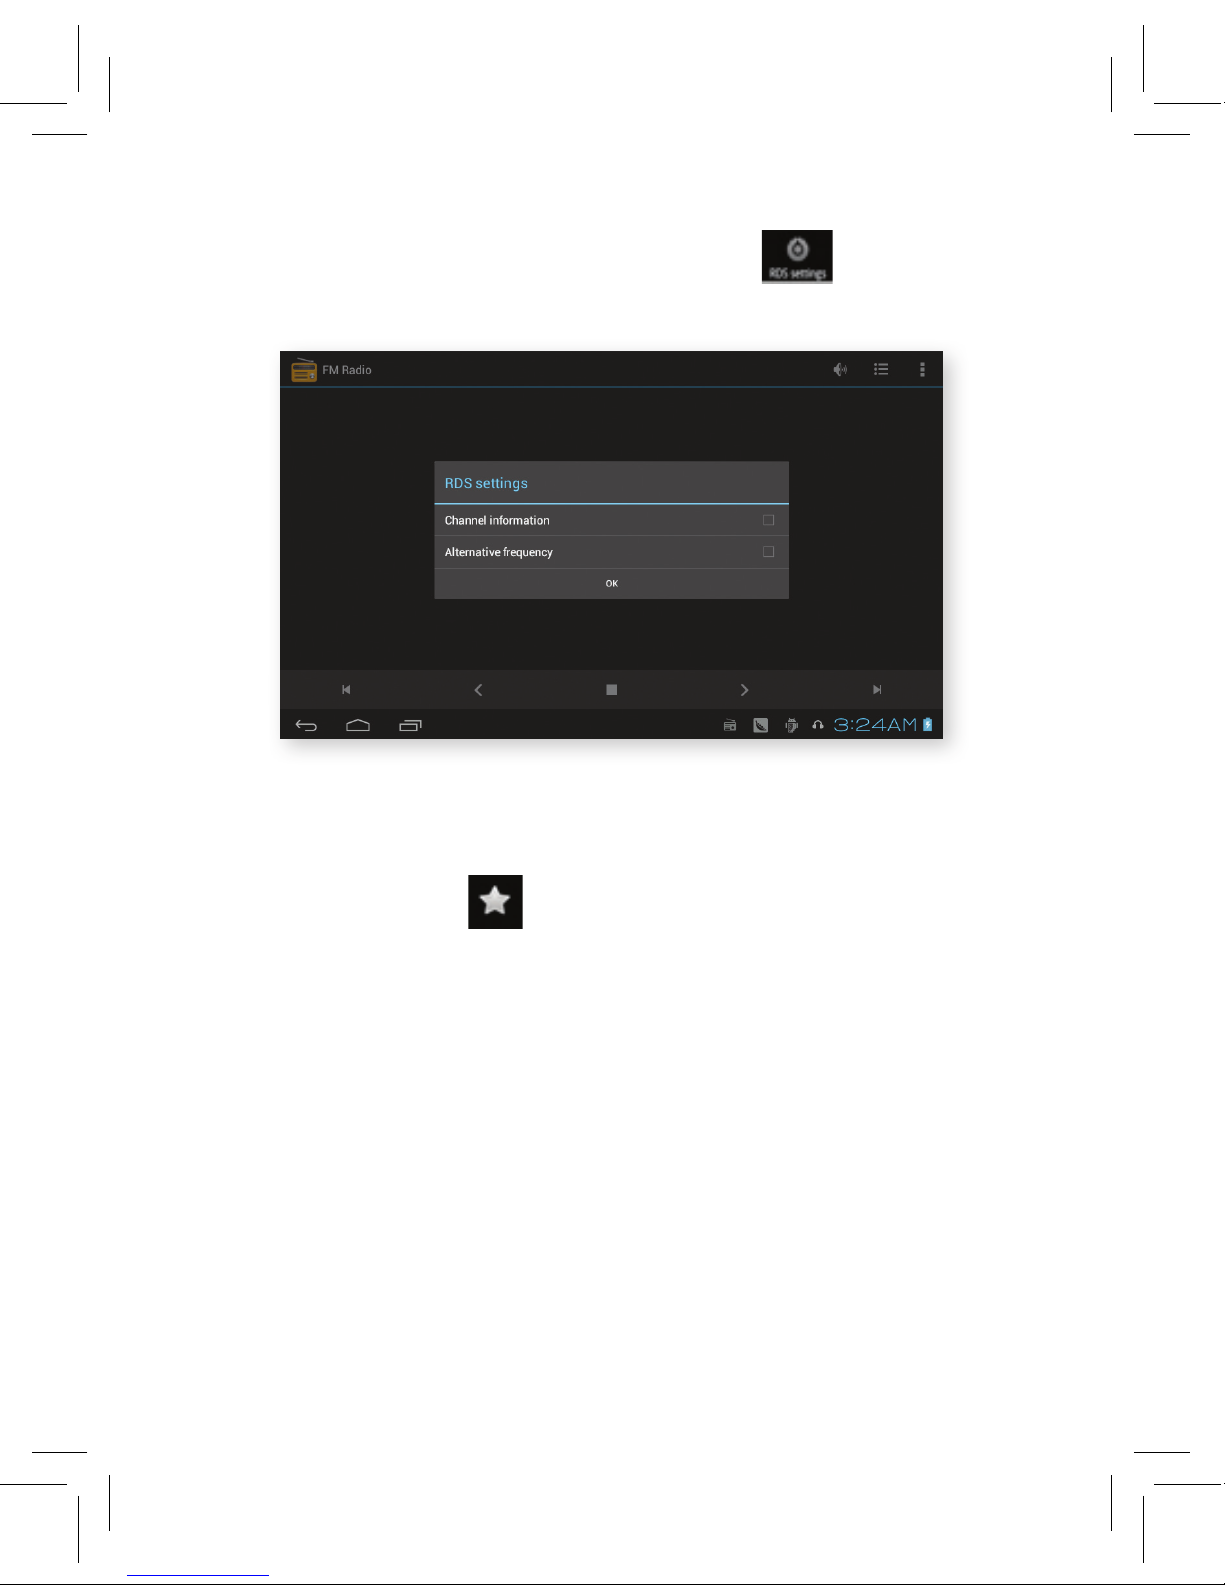
5.7
- RDS setting: click menu key in interface, click button, enter
into RDS setting as Picture 5.7, and make your desired selection.
- search channel: Click menu in the main interface, click search button,
it will start to auto search channels, the searched channels will be
saved in the channels list.
- save channels: Click button in the main interface to save the
channel, and the channel will be saved in channels list.
5.6 FM Radio continued
Page 37
35
5.7 Analog TV
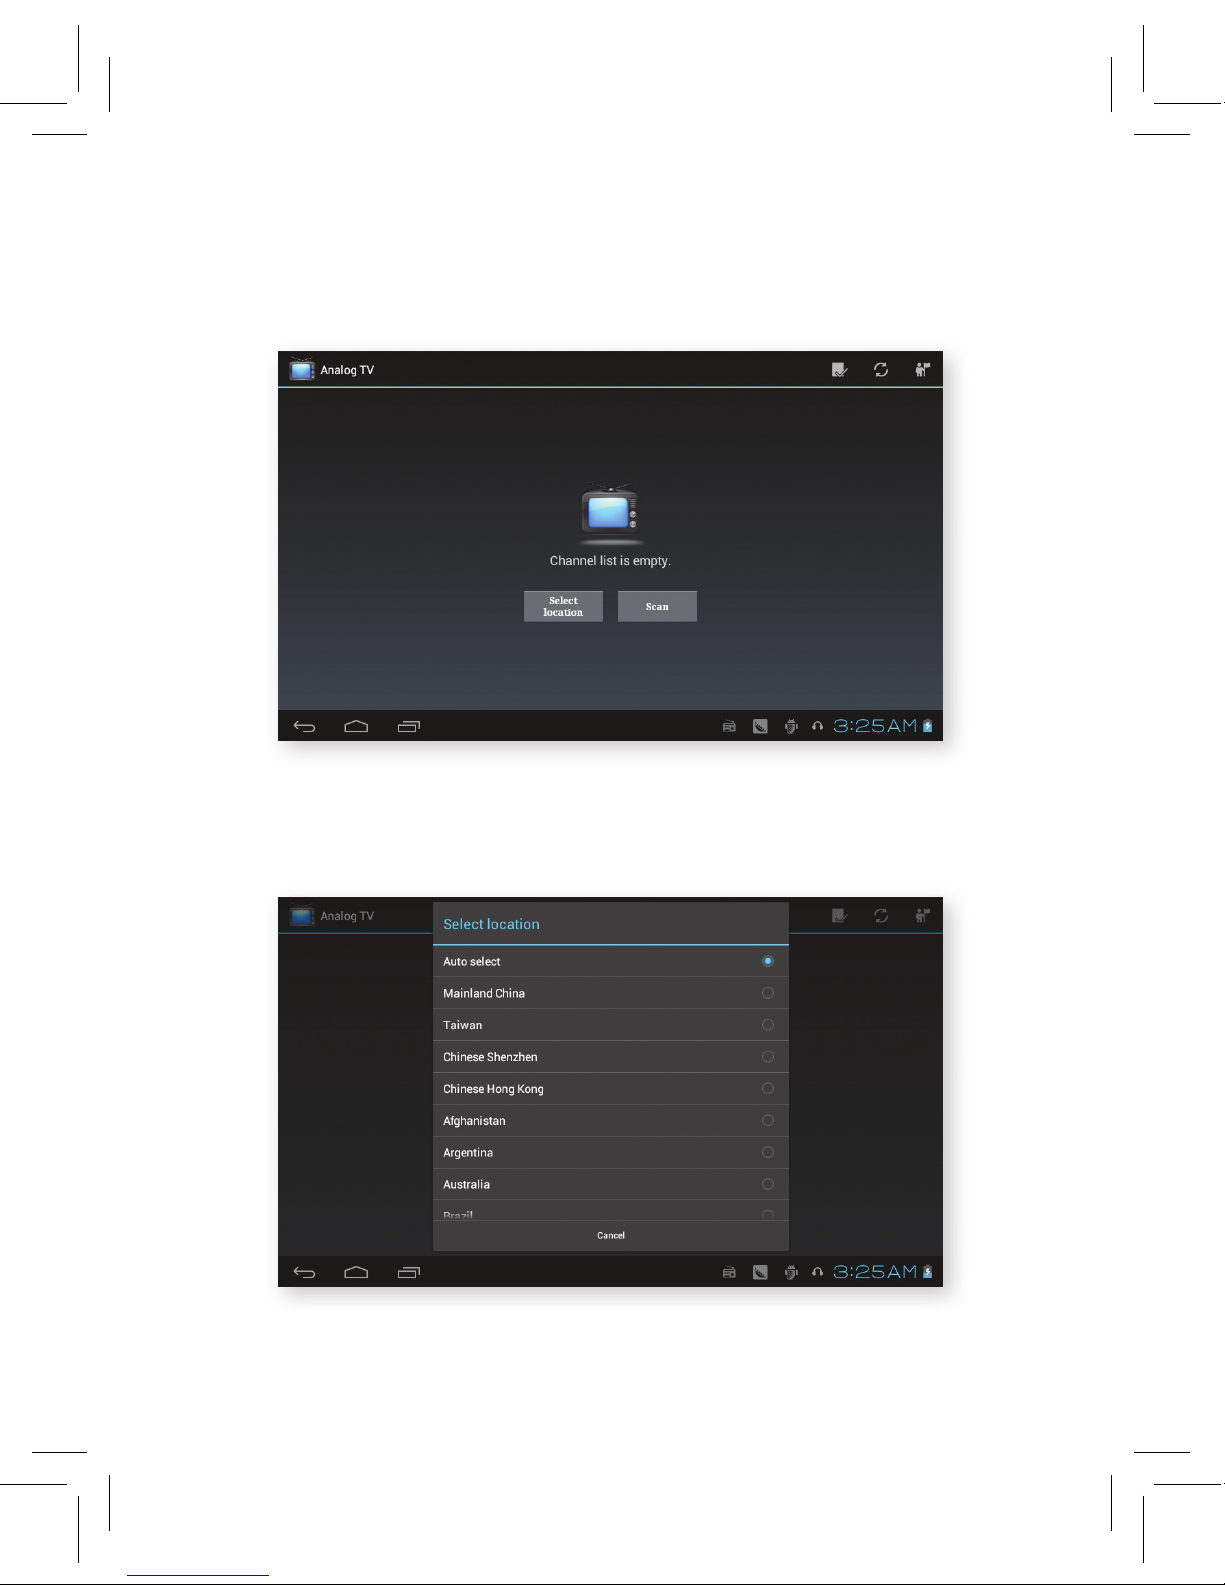
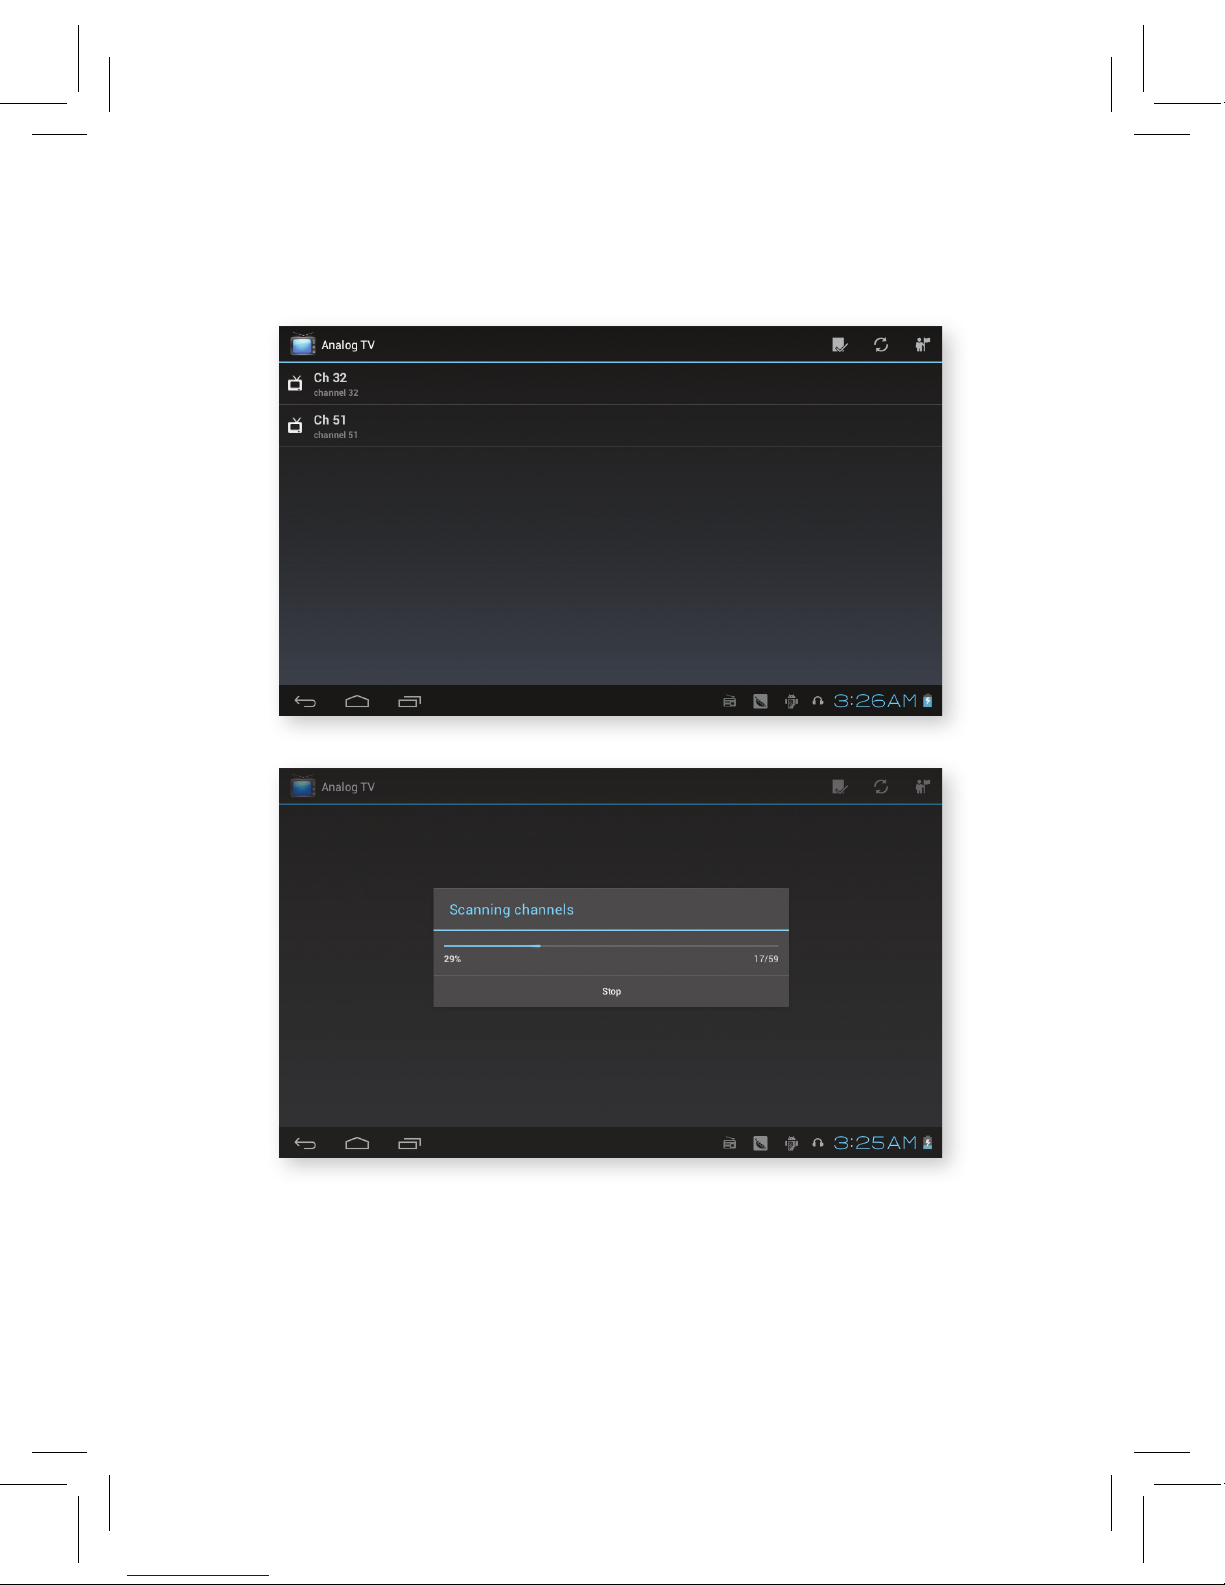
1. Click analog TV application in main menu interface to enter into mobile
TV, as in Picture 5.8 below.
5.8
5.9
2. Select location, as Picture 5.9 below. If you cannot find your country,
use United Kingdom as default.
Page 38
36
Current
channel
5.10
5.11
3. Search programs, as Picture 5.10-5.11
5.7 Analog TV continued
Page 39
37
5.12
5.13
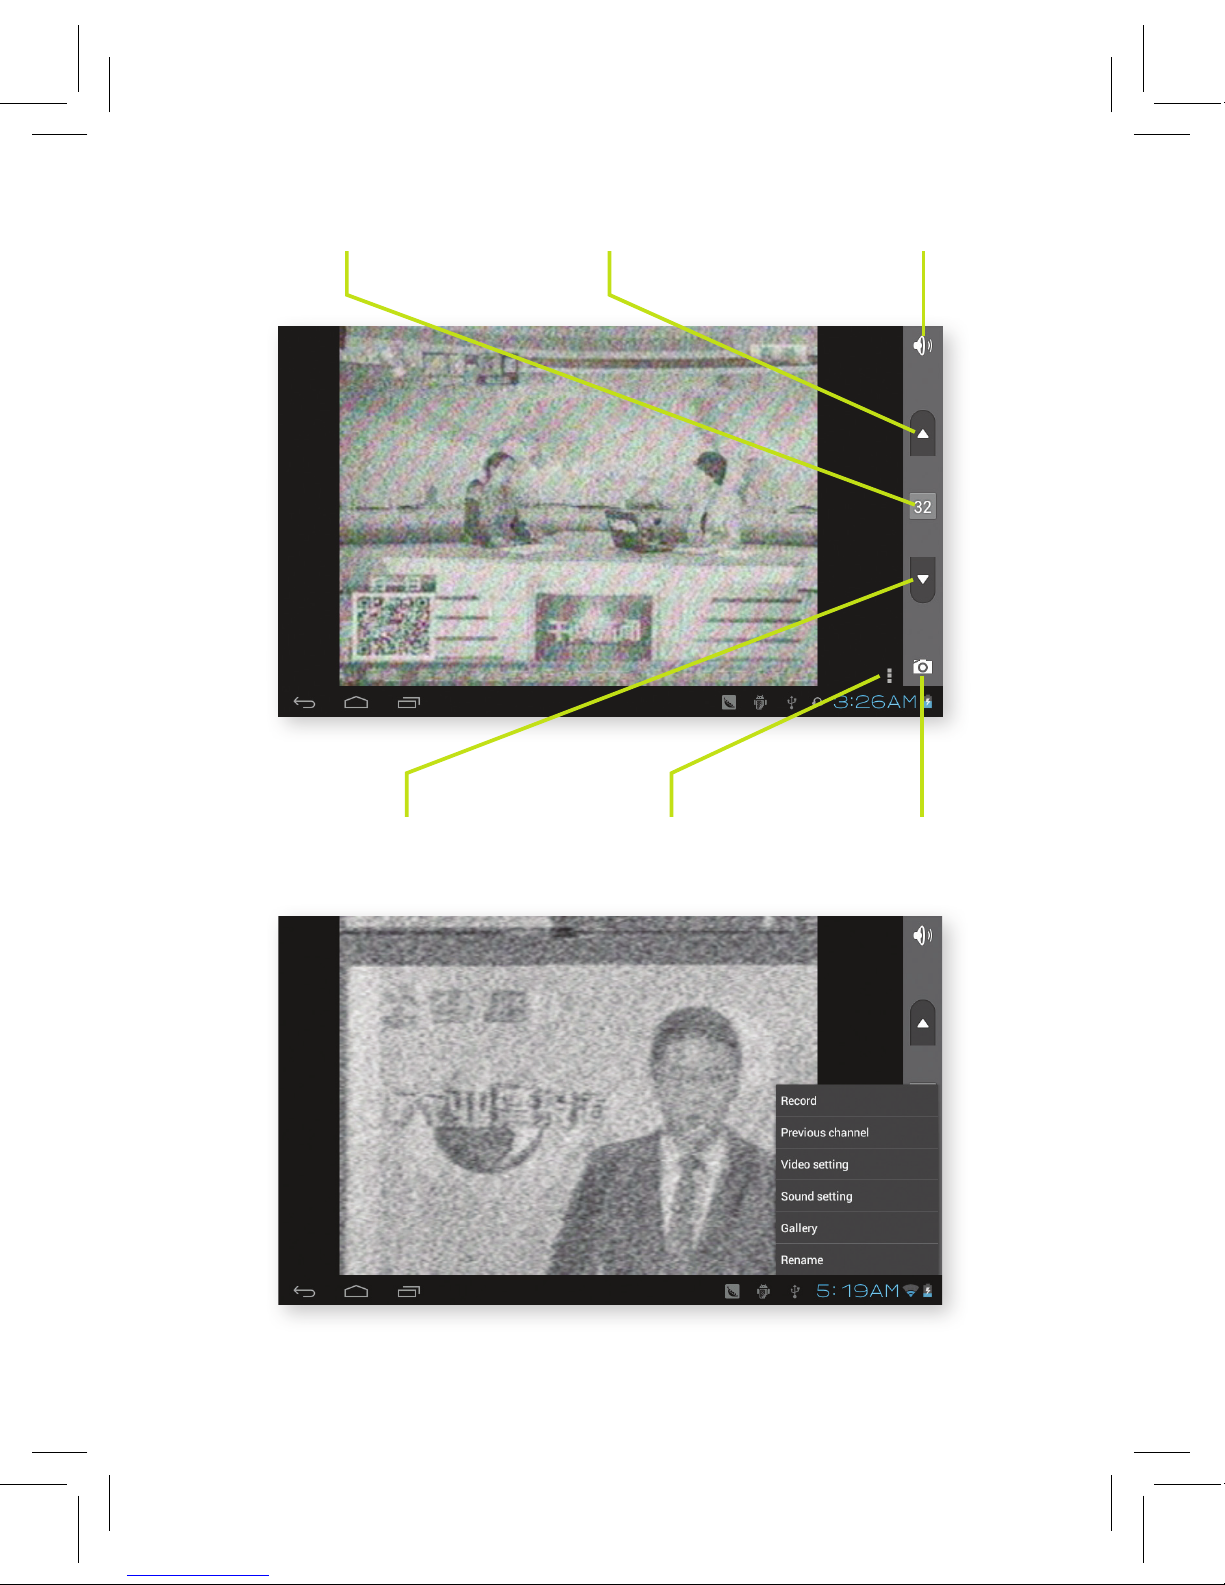
4. Select channel, enter into play interface, as Picture 5.12
5. Click menu button, more function, as Picture 5.13
Open/mute
volume
Menu
key
Previous
channel
Next
channel
Current
channel
Screen
shot
Page 40
38
6.1
6 Communication Function
6.1 Phone
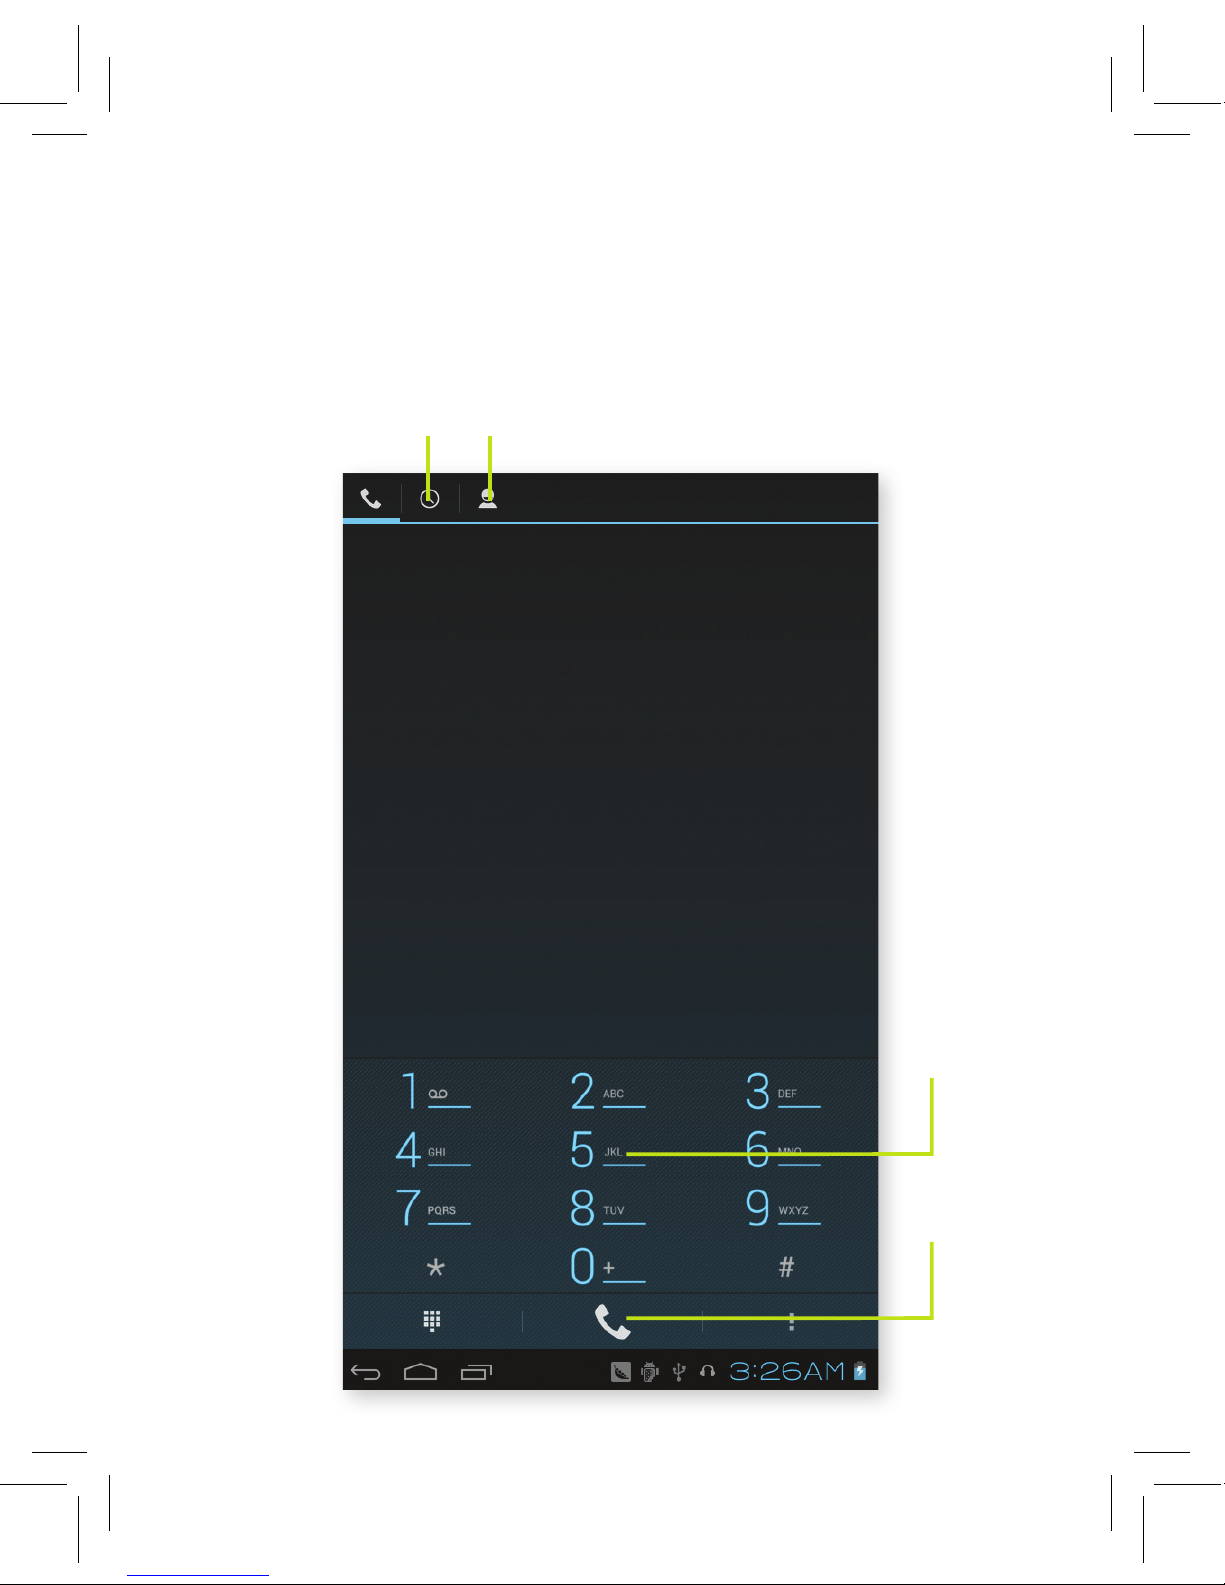
1. Click phone application procedure.
2. Operate as in Picture 6.1
Call history Contact list
The area
of dial
phone
Dial
phone
numbers
Page 41
39
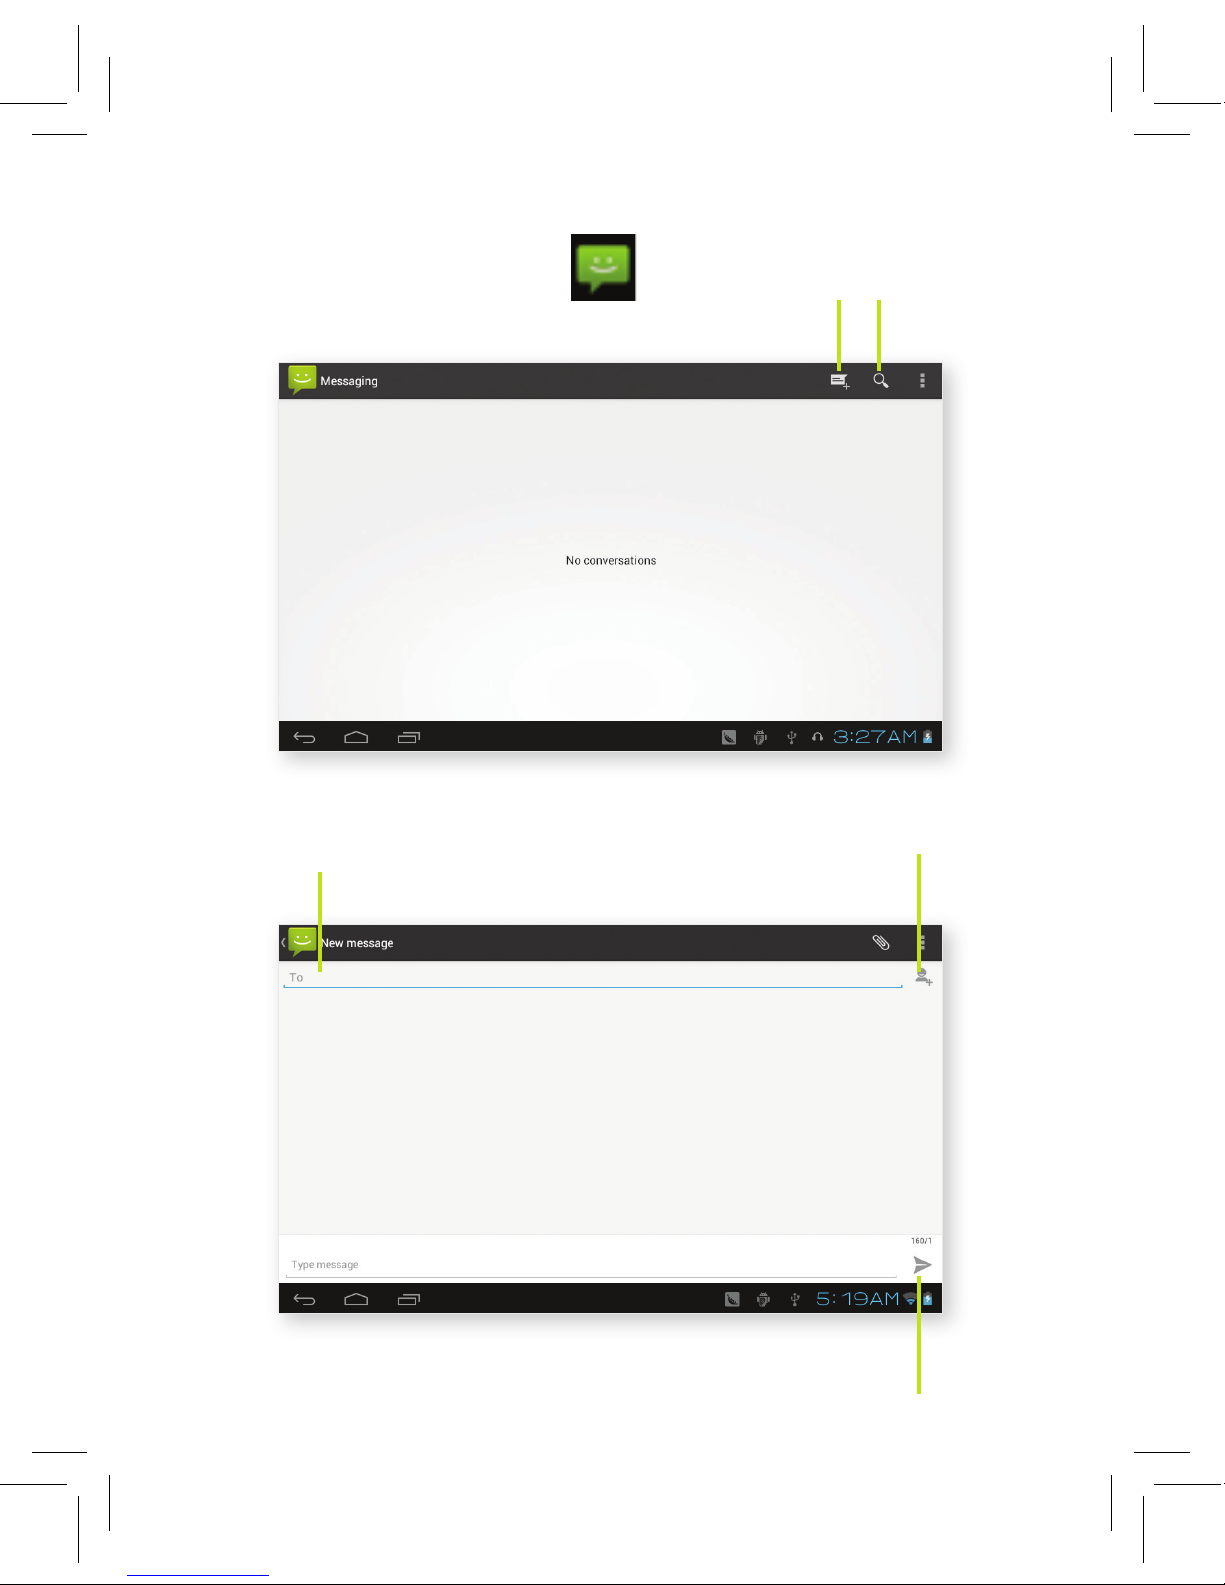
6.2 Text Message
1. Enter into main menu, choose application icon.
2. Click edit new message.
6.2
6.3
Edit new
message
Search text
message
Add
receiverDirectly input phone number
Send
message
Page 42
40
6.4
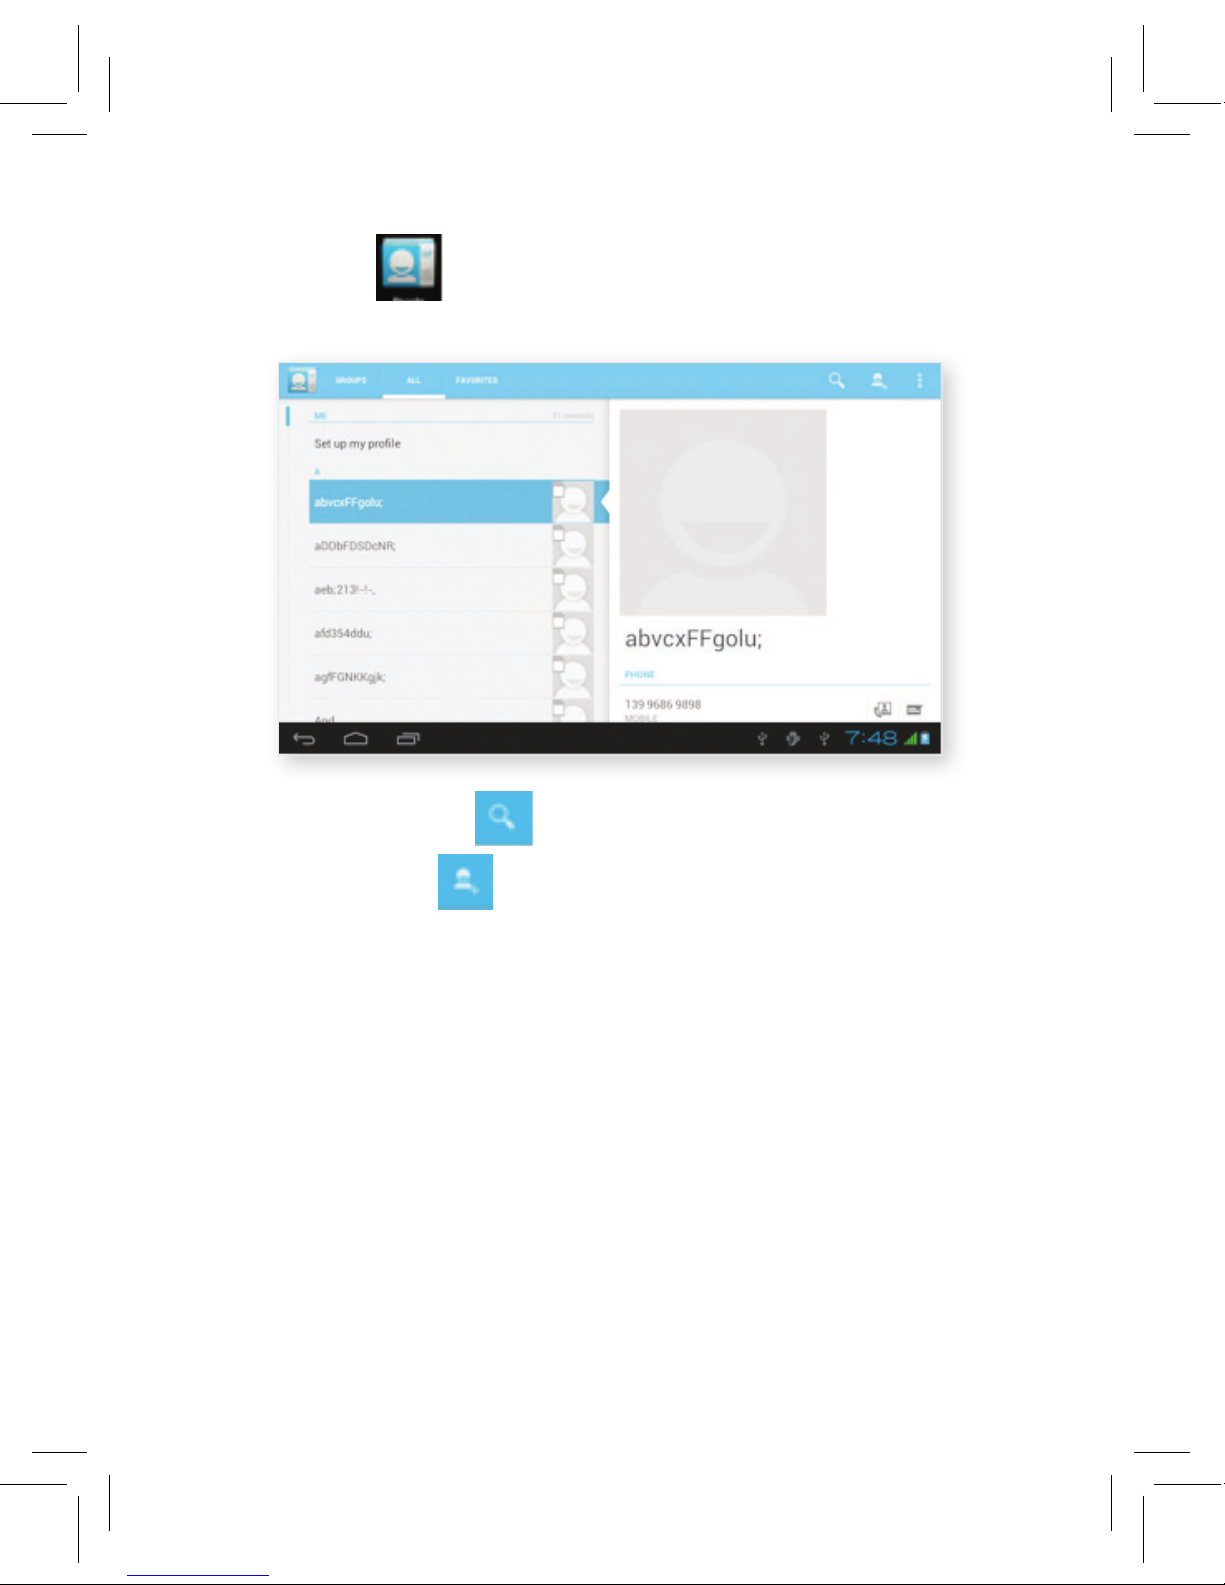
6.3 Contact List
Click contact list in the main interface, enter into the contact list as
in Picture 6.4
- search contact: click button, enter into search function.
- add contact: click button, enter into add contact interface.
Page 43
41
7 Internet
7.1 Browser
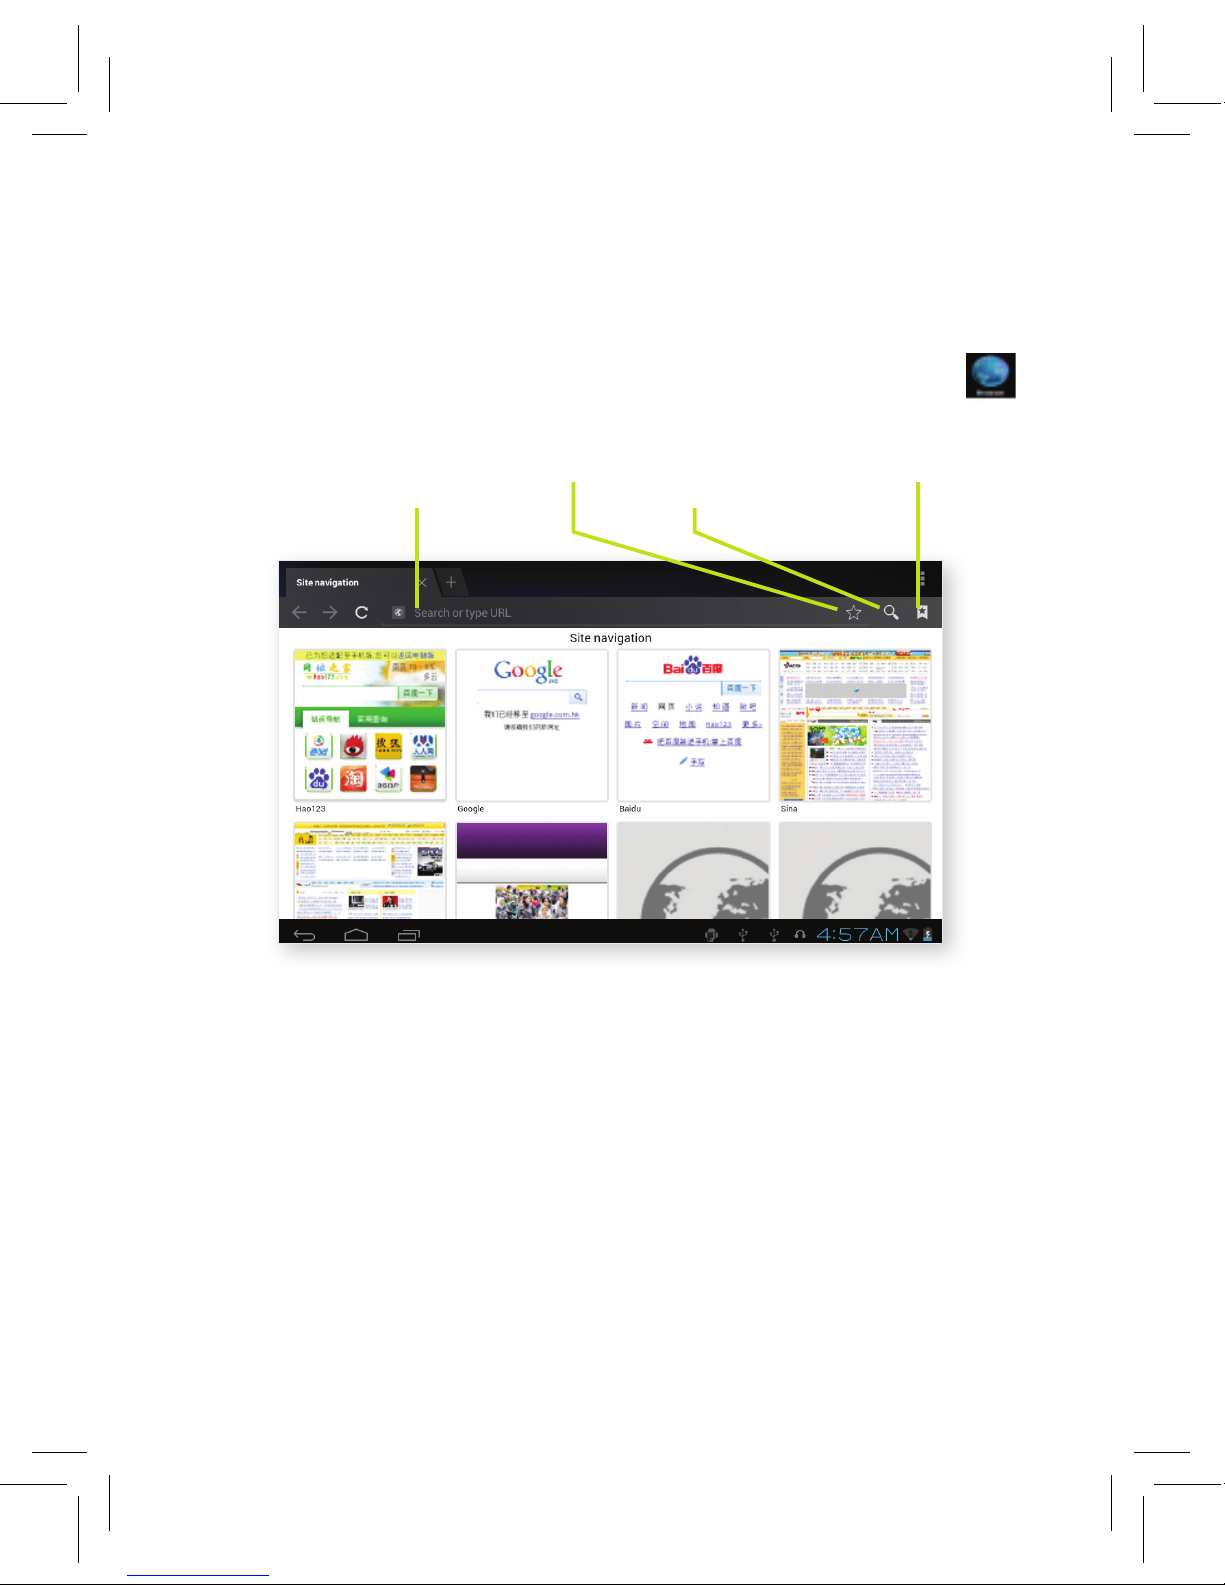
Where you are connected to a Wi-Fi or mobile internet network
(Please refer to Chapter 4.1 for wireless and internet setting), click
IE browser in the main menu or desktop to enter the browser interface,
as in Picture 7.1
7.1
View bookmark
and historyAddress bar
Save
bookmark Search
Page 44
42
7.1 Browser continued
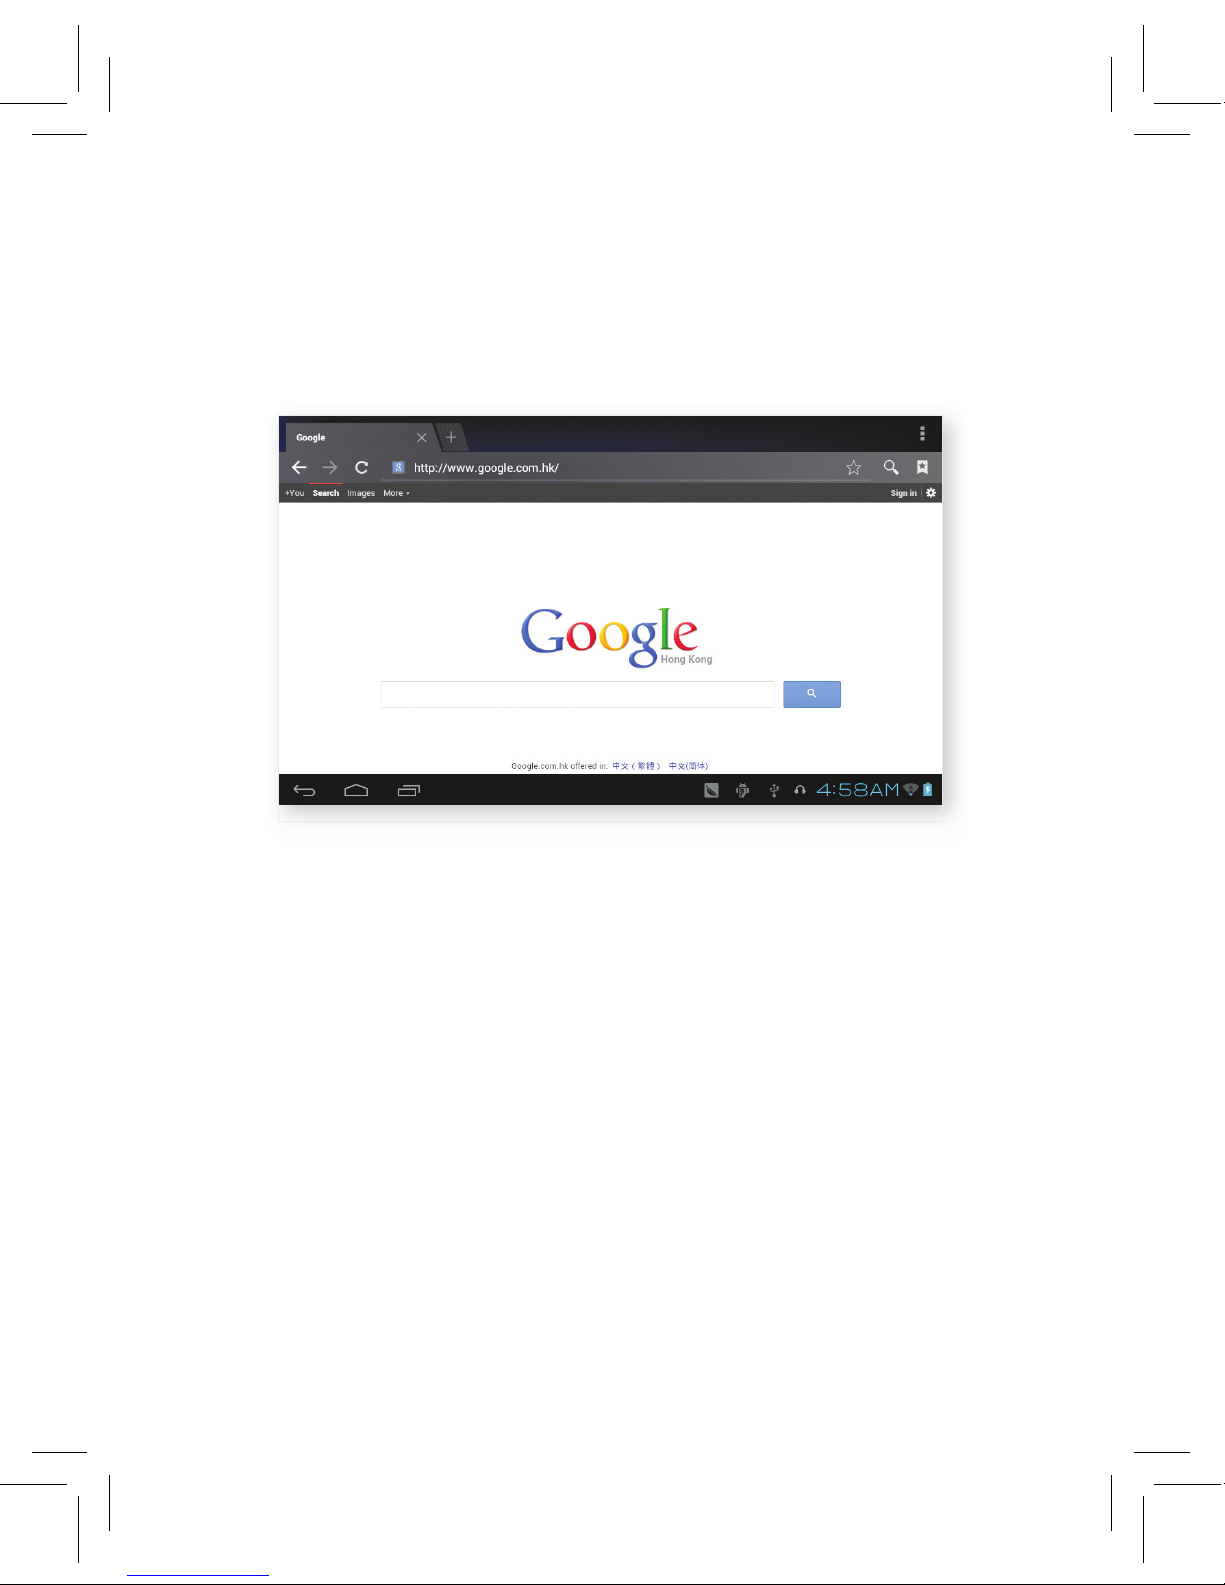
Click the address bar to enter the desired website. Click start, enter into
related webpage, then you can browse the website information, as in
Picture 7.2
7.2
Page 45
43
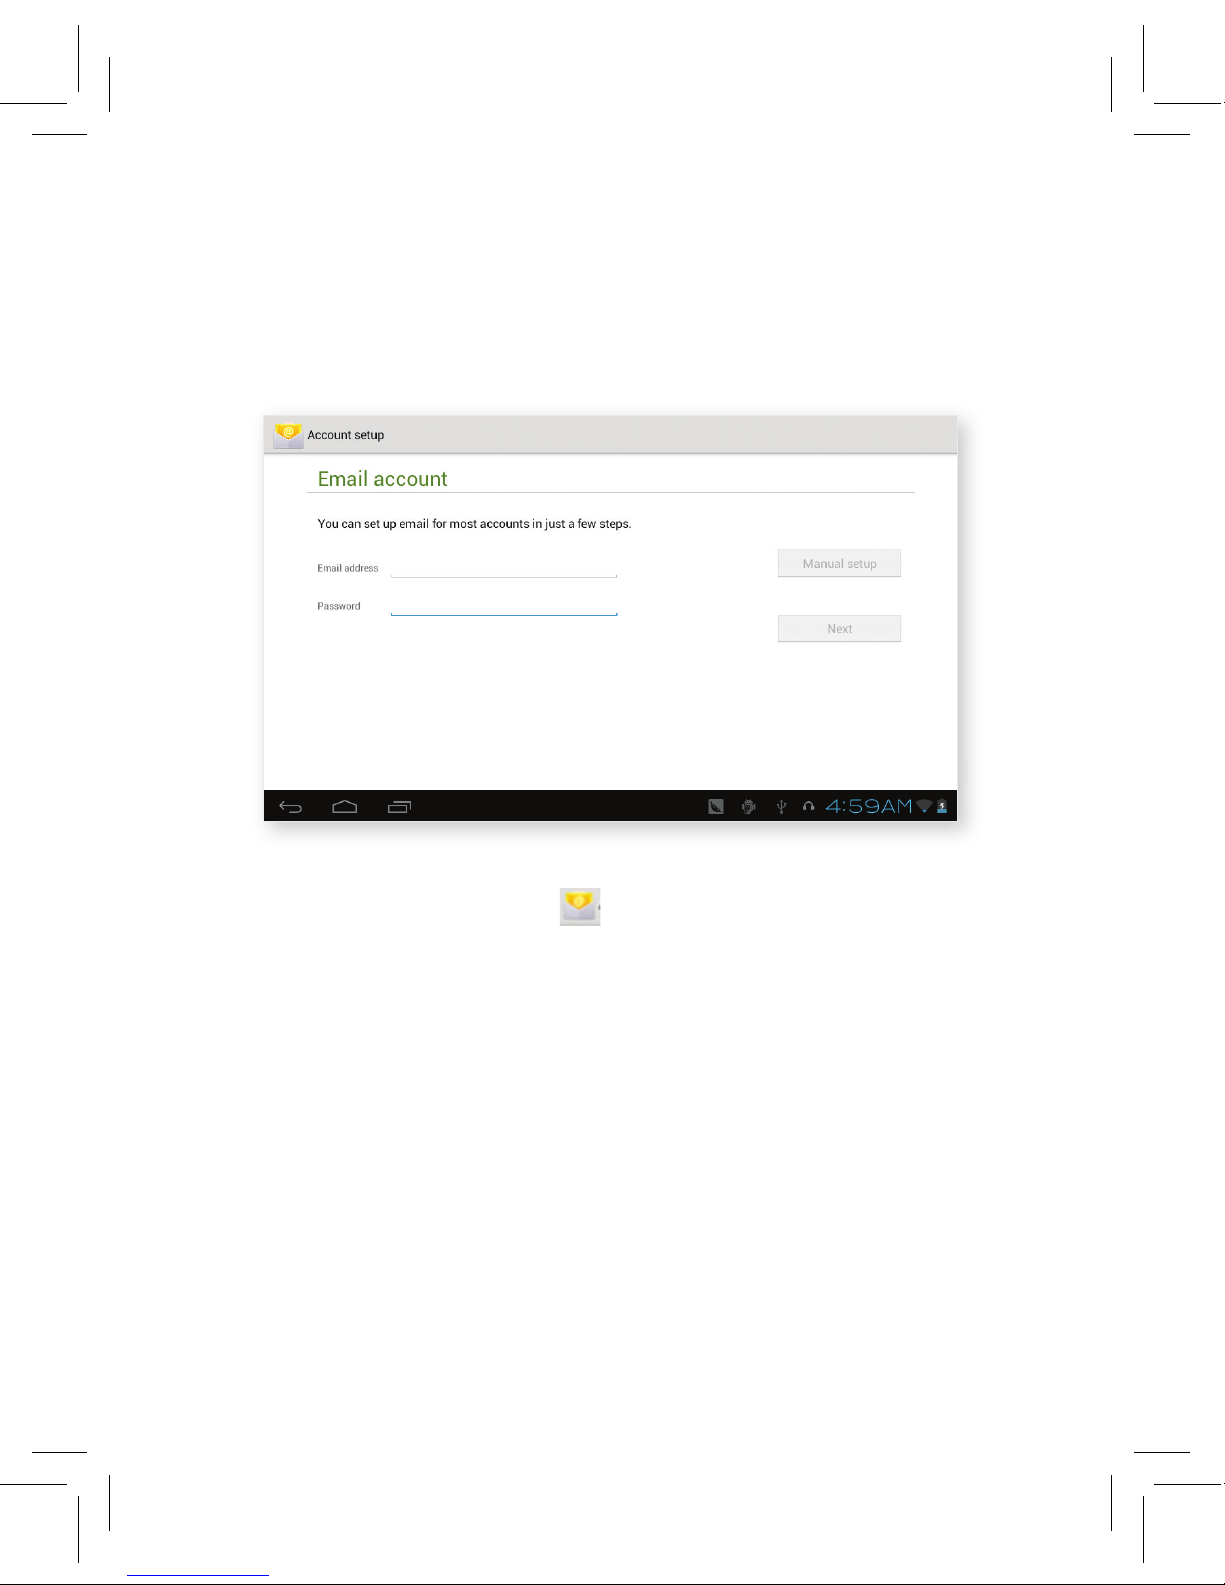
a. email setting
1. After you click the email icon you will see the email setting guide,
which will guide you.
2. Enter your email address and password.
3. Click next step button, choose your email type (POP3 or IMAP).
4. Click next step button to test whether the email service provider can
receive or send emails.
5. Enter the email account and click finish.
6. If the email account is available, it will take you to your mail box
automatically.
b. delete the email account
You can delete previously set POP3 or IMAP email accounts.
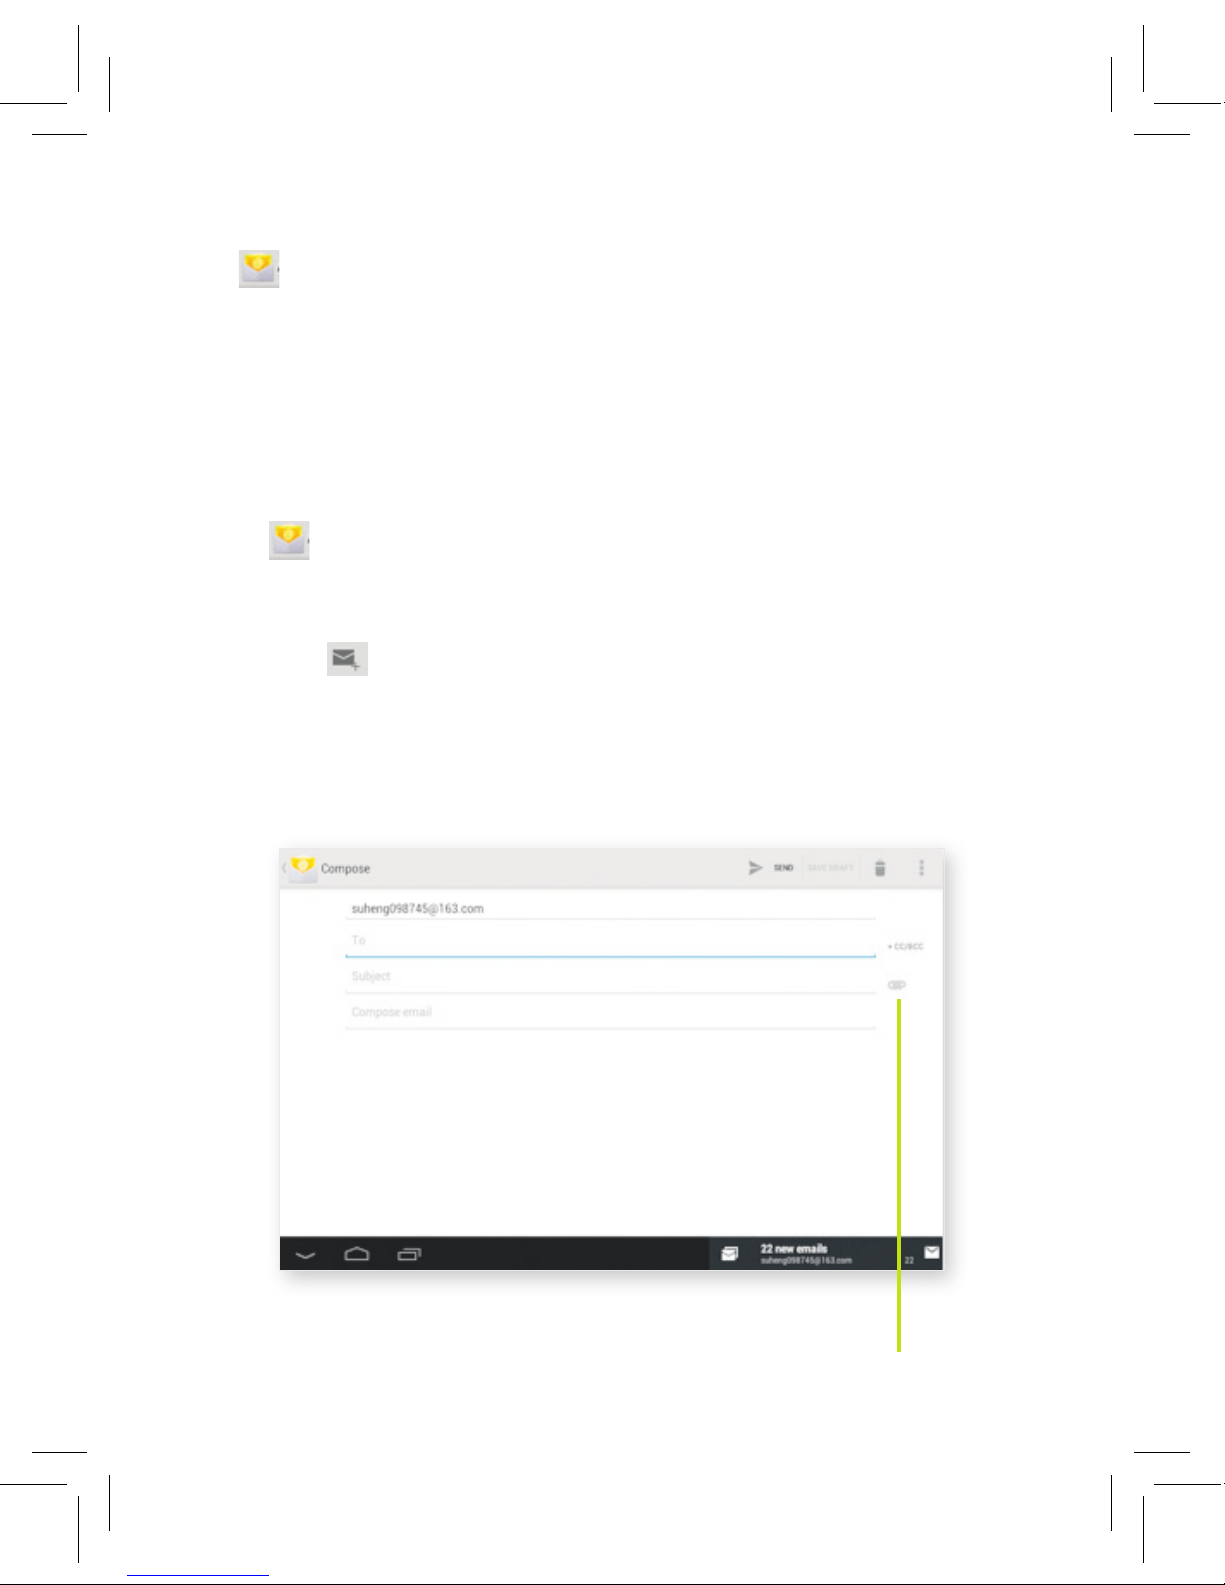
7.2 Email
Email application procedure contains the email setting guide. You
can add external POP3 OR IMAP email accounts of other web email
service providers (For instance, Webmail, Yahoo, Gmail, Hotmail etc).
See diagram below.
7.3
Page 46
44
7.4
Add attachment
7.2 Email continued
Click
1. Enter into your mail account.
2. Press menu key.
3. Click account.
4. Press the account you want to delete.
5. Click confirm to remove.
c. send e-mail
1. Click to display your mail box.
2. Click the inbox and it will refresh all new emails automatically.
3. Click each message to read new email.
4. Press menu key. Menus will pop-up.
5. Click edit icon to enter into new email editing interface.
6. Input the receiver’s email address.
7. Enter the subject and email content.
8. If you want to add attachment, click menu key, the menu will pop up.
9. Click add attachment (pictures, video).
10. Click send to send the email out.
Page 47
45
8 GPS Function
8.1 GPS Navigation
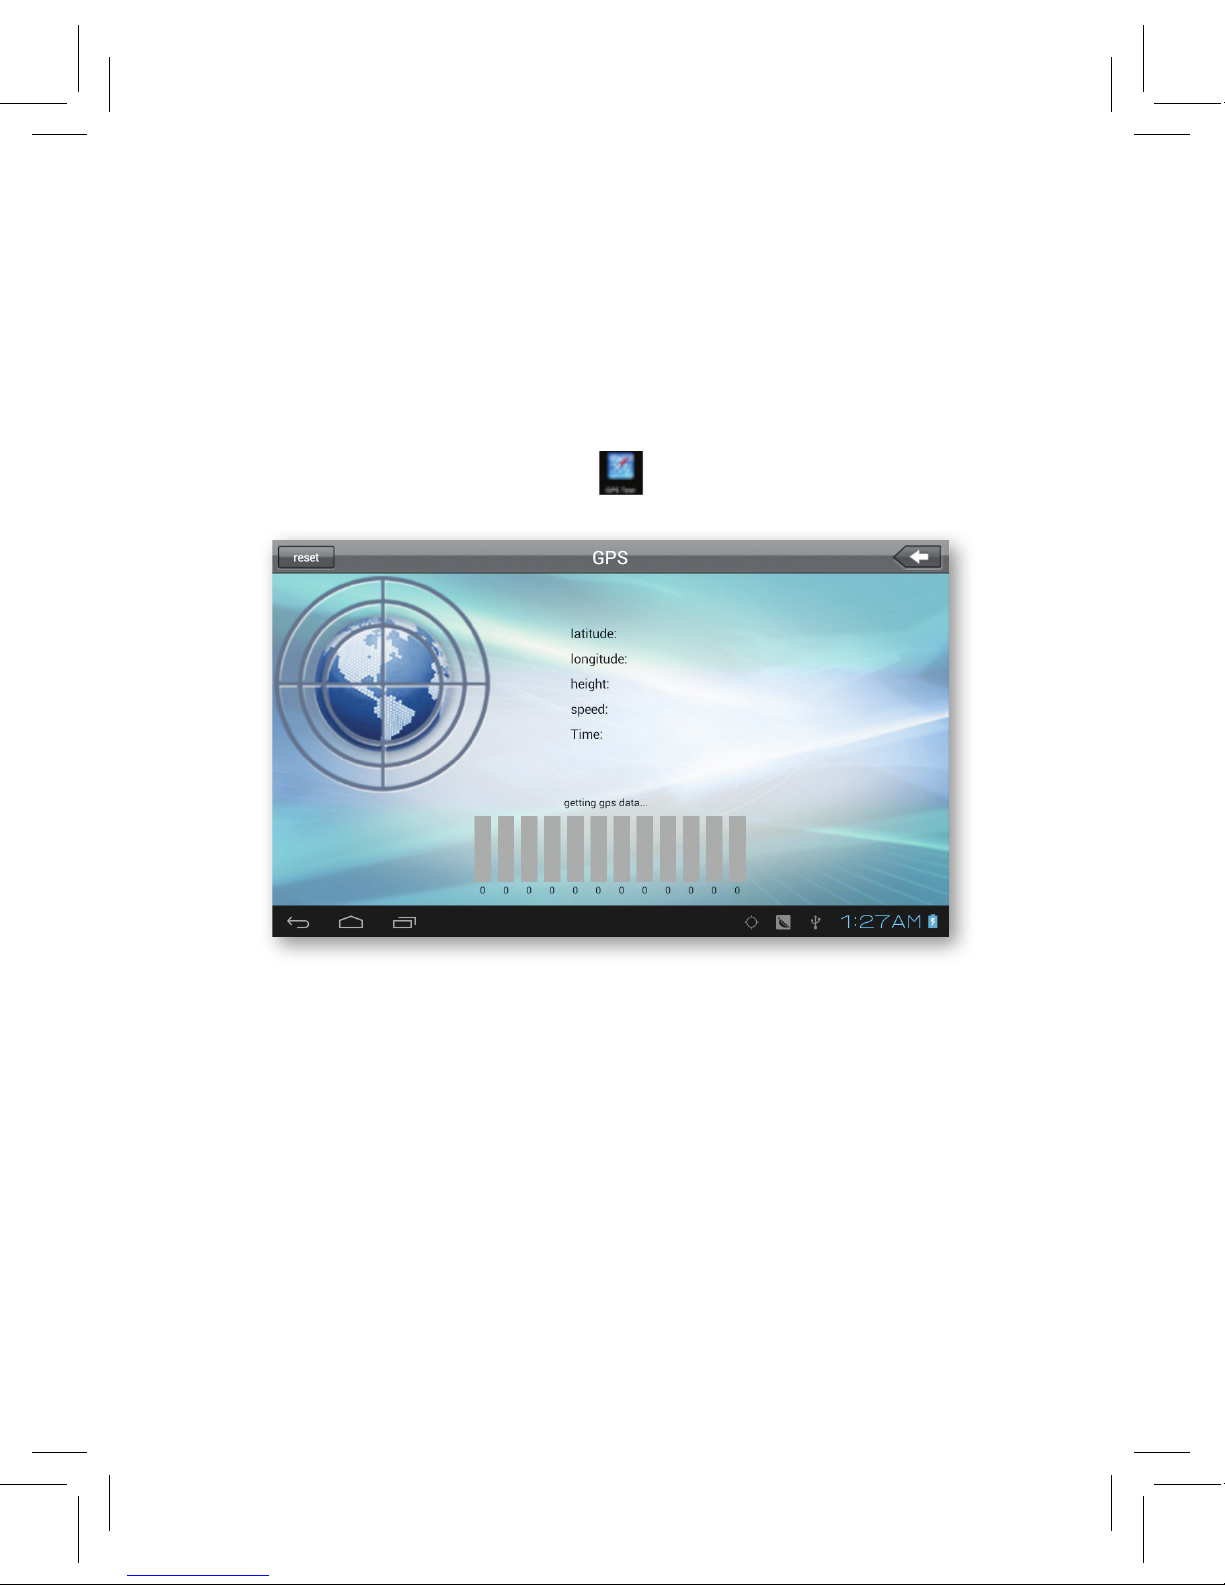
1. Map of the third parties is required for tablet’s internal GPS satellite
signal receiver positioning, after installation the device can accurately
implement traffic real-time navigation, and meet the needs of outdoor
navigation.
2. Enter into setting interface, click icon, enter into below picture 8.1
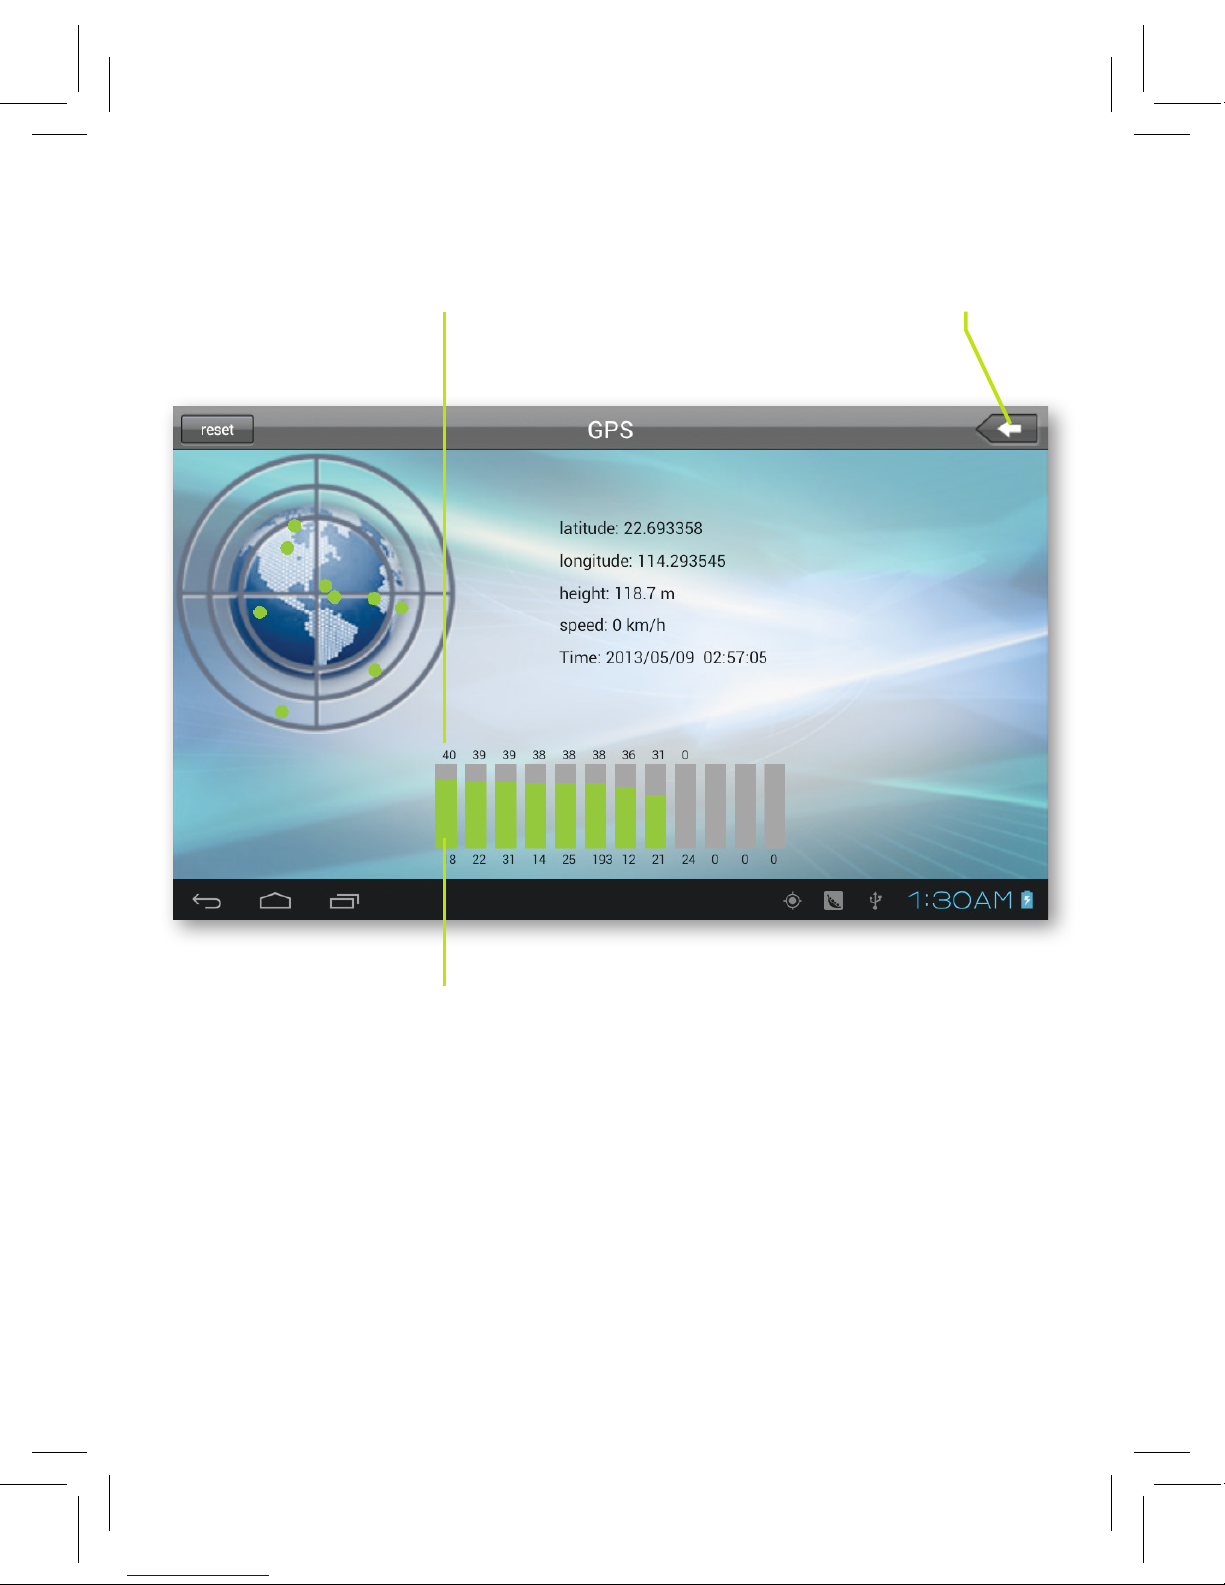
Note: When positioning successfully, the blue parts will turn to green
color, and it shows the latitude, longitude, height, speed, and the time of
your location. As Picture 8.2
8.1
Page 48
46
Note: The value indicates the signal strength, the positioning time is
relavant to time zone in your setting, if the time is not inconsistent with real
time in your location, please check if the time zone in your setting is correct
or not.
8.2
ReturnValue
Signal
8.1 GPS Navigation continued
Page 49
47
9 Other Application Procedures
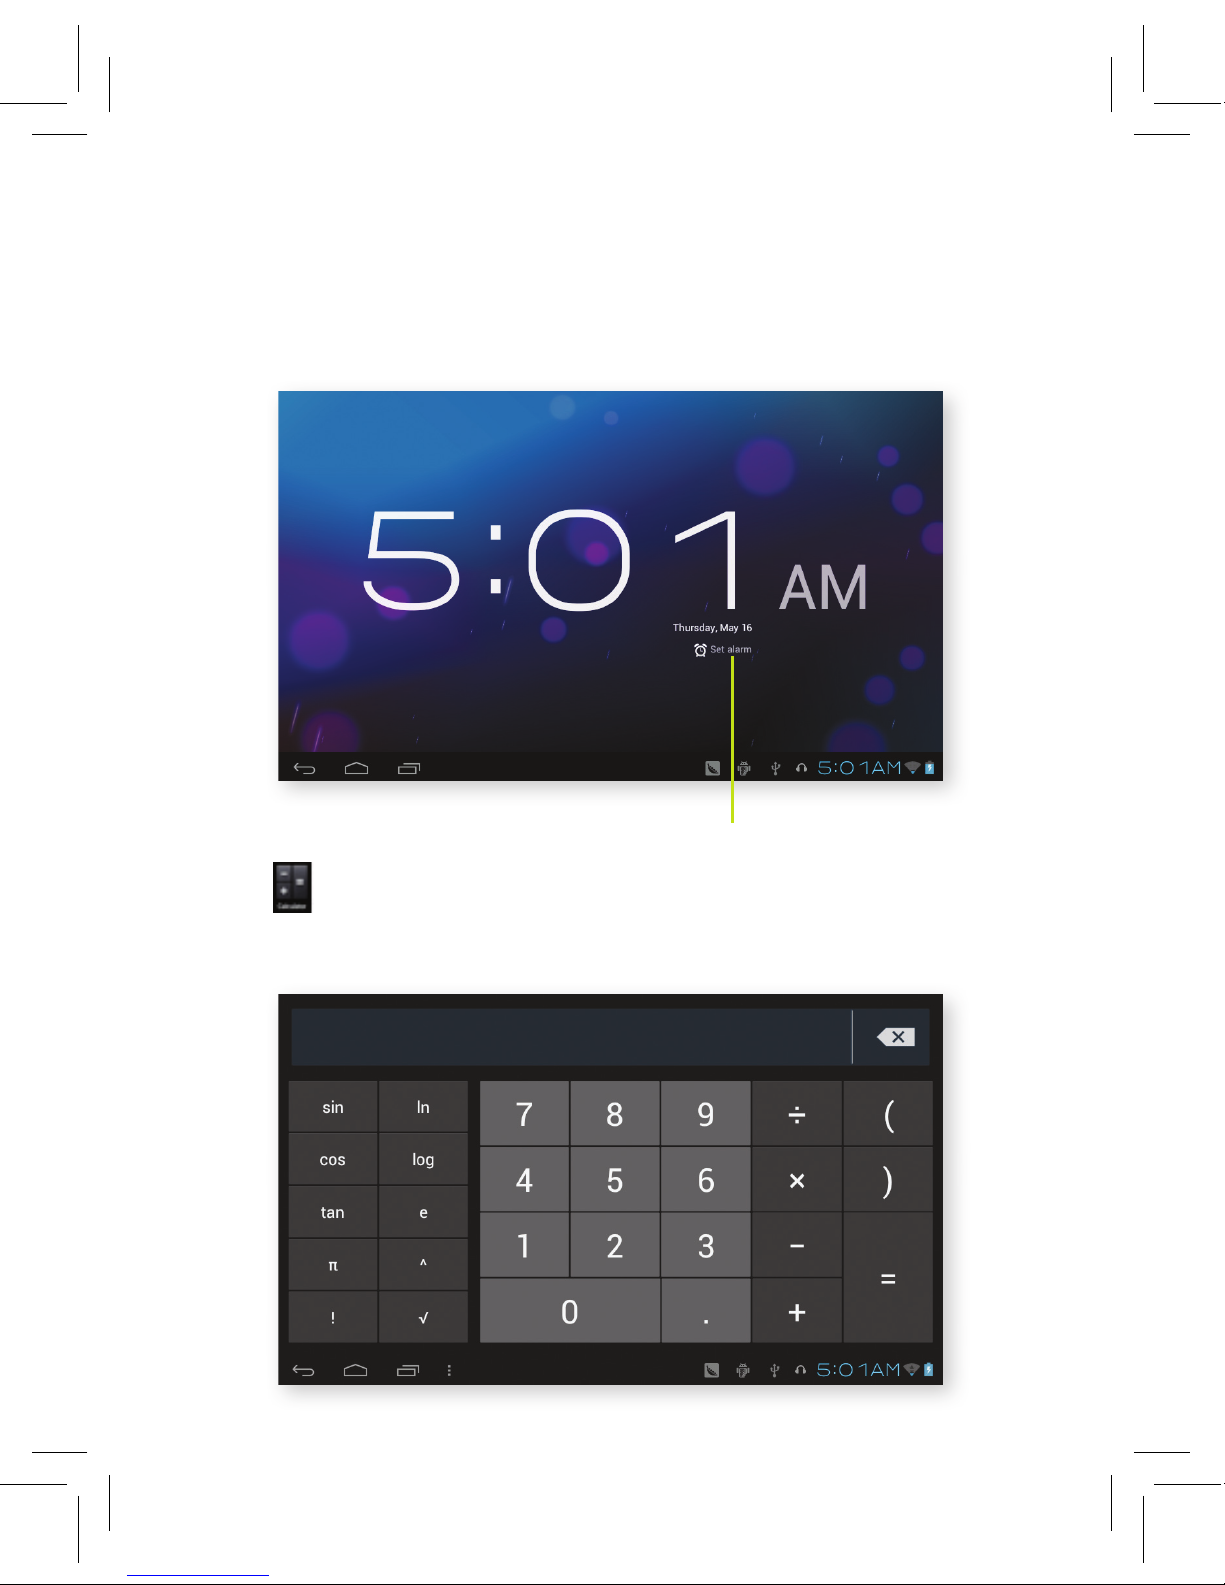
9.1 Clock
Click clock application and enter into interface as seen below.
9.2 Calculator
1. Click
2. Enter into the basic board of the calculator.
3. Touch the numbers in calulator mode to calculate.
9.1
9.2
Set alarm
Page 50
48
9.3 File Manager
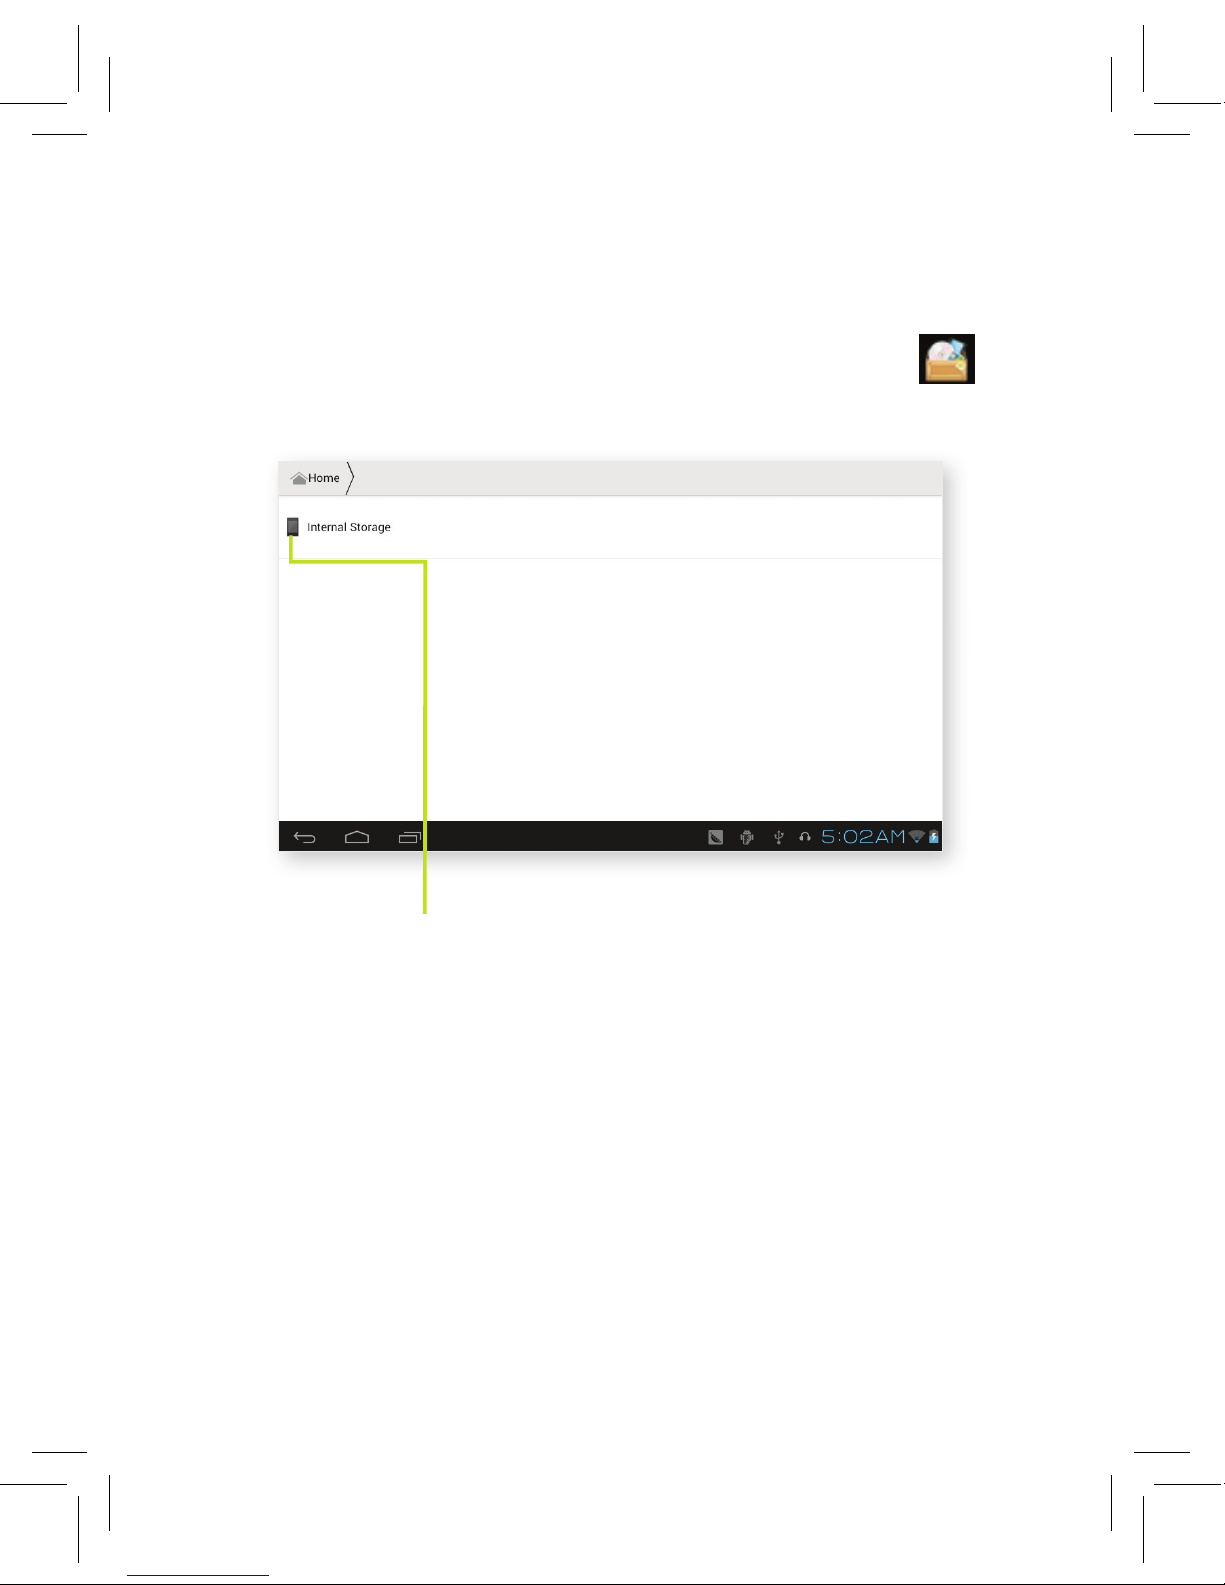
File manager will copy, cut, delete, rename the documents or the folder in
the external memory card. It will also share the files, install apps etc.
In the main menu or desktop, click the document manager icon to
enter into documents manager.
9.3
Internal storage
Page 51
49
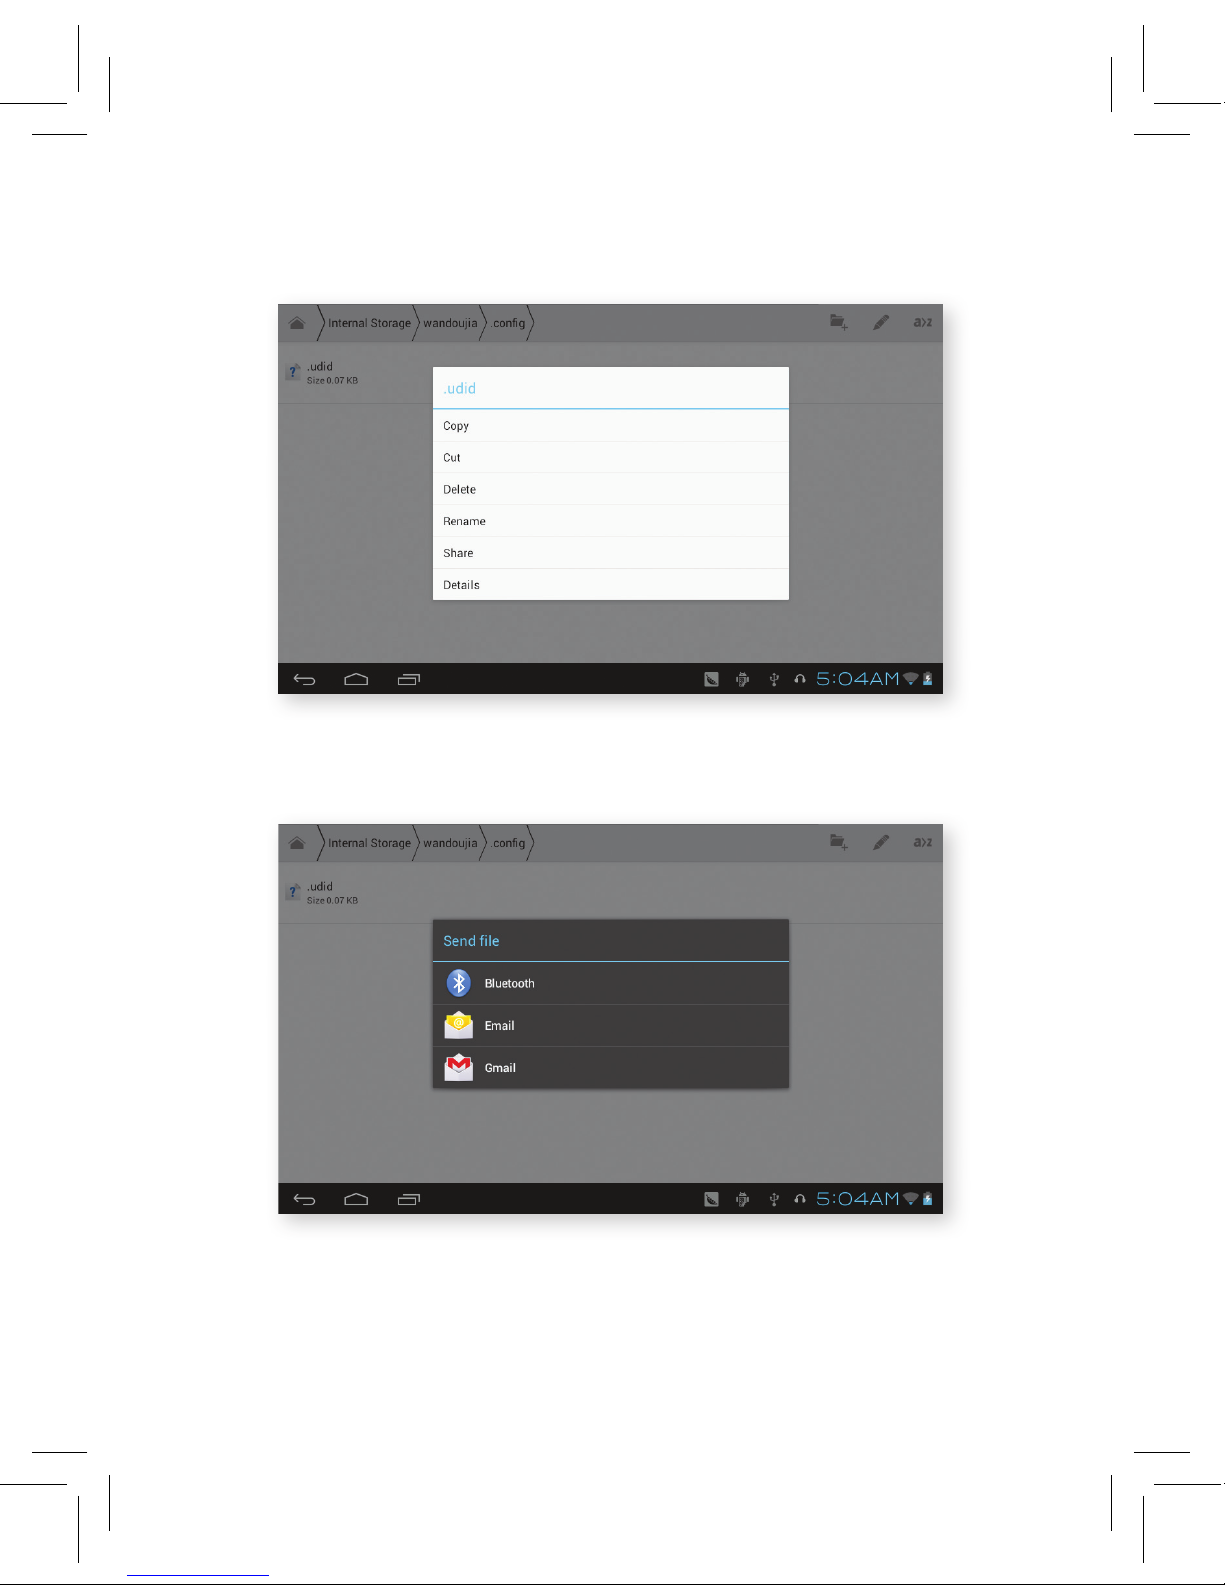
A. To copy, cut, delete, rename the files and folder: Choose the file or
folder, press the file or folder to enter into the interface in diagram
below.
B. Choose any file and press it. A pop up will appear with share options
on how you want to send the file. See screen shot below:
C. Install Apk file: Choose the file suffixed with “.apk” in the file manager,
you can now install the third part software.
D. Add new folder: Choose the menu you want to add the file to, click
menu key, choose new folder.
9.4
9.5
Page 52
50
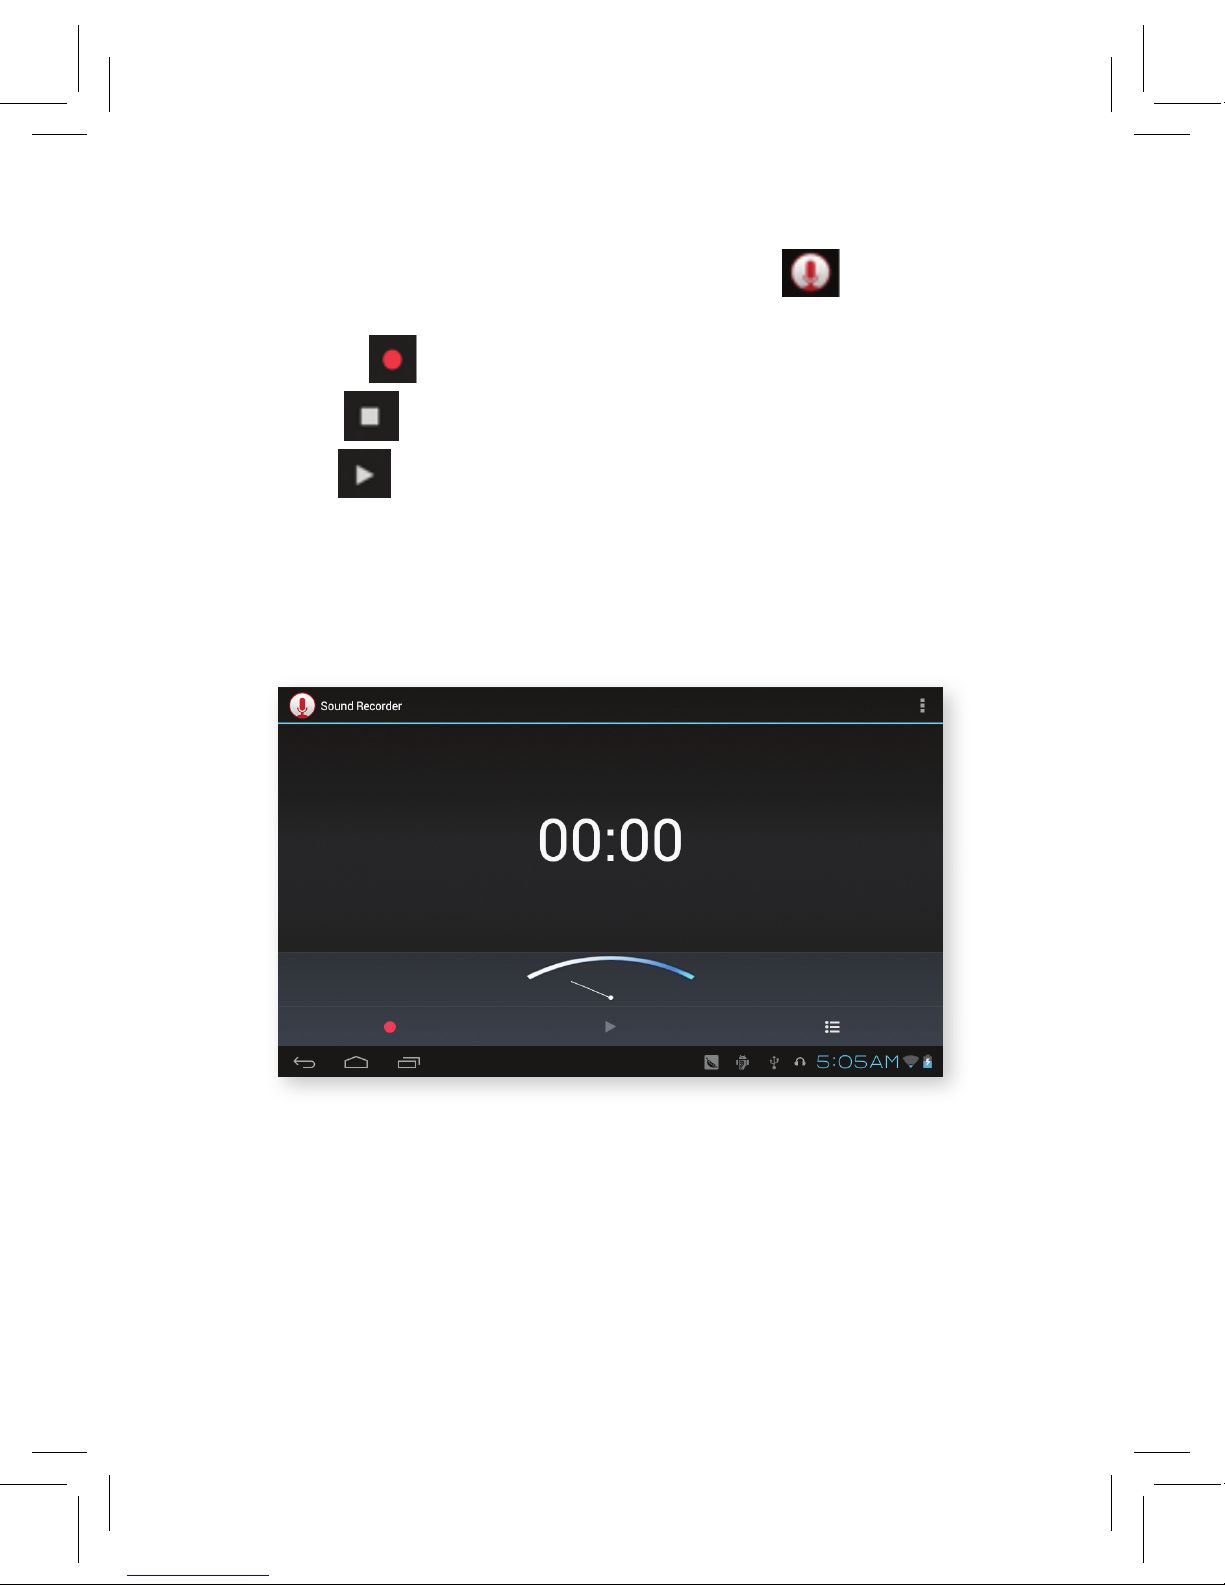
9.6
9.4 Recorder
In the main interface or desktop, click recorder icon to enter into
record interface.
Click record key to start a recording.
Click Stop key to stop recording.
Click Play key to play the recorded sound. Note that you will be
required to choose if you would like to use or abandon the recording.
Play the record: Choose the video player to play the recorded sound.
Choose the recorded sound in the source manager, and click on it to play.
Page 53

51
10 Installation of Applications
10.1 Installation
install the third party application procedure
You can obtain third party applications from the Google Play Store or the
internet, and install it yourself on the tablet. Copy the application into an
SD card, and insert in the tablet.
1. Click file manager and choose the application you would like to install.
2. Press on the application you want to install.
3. On pop-up window, click install apk.
4. Finish the installation and enter to operate.
Note: The third party apps used on the system are all suffixed with .apk.
10.2 Uninstall
uninstall application
1. Click settings.
2. Click manage applications.
3. Click the APK you want to uninstall, click uninstall.
4. Click confirm to finish uninstallation.
Note: The procedure manager installed by system has many convinent
methods to uninstall, after opening procedure manager, click uninstall, it
will list all the applications installed on the tablet.
10.3 Update Path
update the application
1. Download the latest application version.
2. You will be asked if you want to replace the old version with the newer
version. Select your desired option.
Page 54

52
11 System Upgrade
11.1 Preparation for System upgrade
download the upgrade procedure
You can download the software upgrade pack from website, then use the
upgrade pack to upgrade the system version of tablet.
preapration for system upgrade:
1. Download the system upgrade pack to your computer from related
website.
2. Ensure you back up useful data in the external memory.
11.2 Restore Factory Setting
If you tablet encounters a software issue or where unlock passwords are
forgotten, you can use the ‘restore factory setting’ to return to factory
status. Restoring the factory setting will delete all data such as exisiting
applications and user’s customized settings. Do remember to backup your
data.
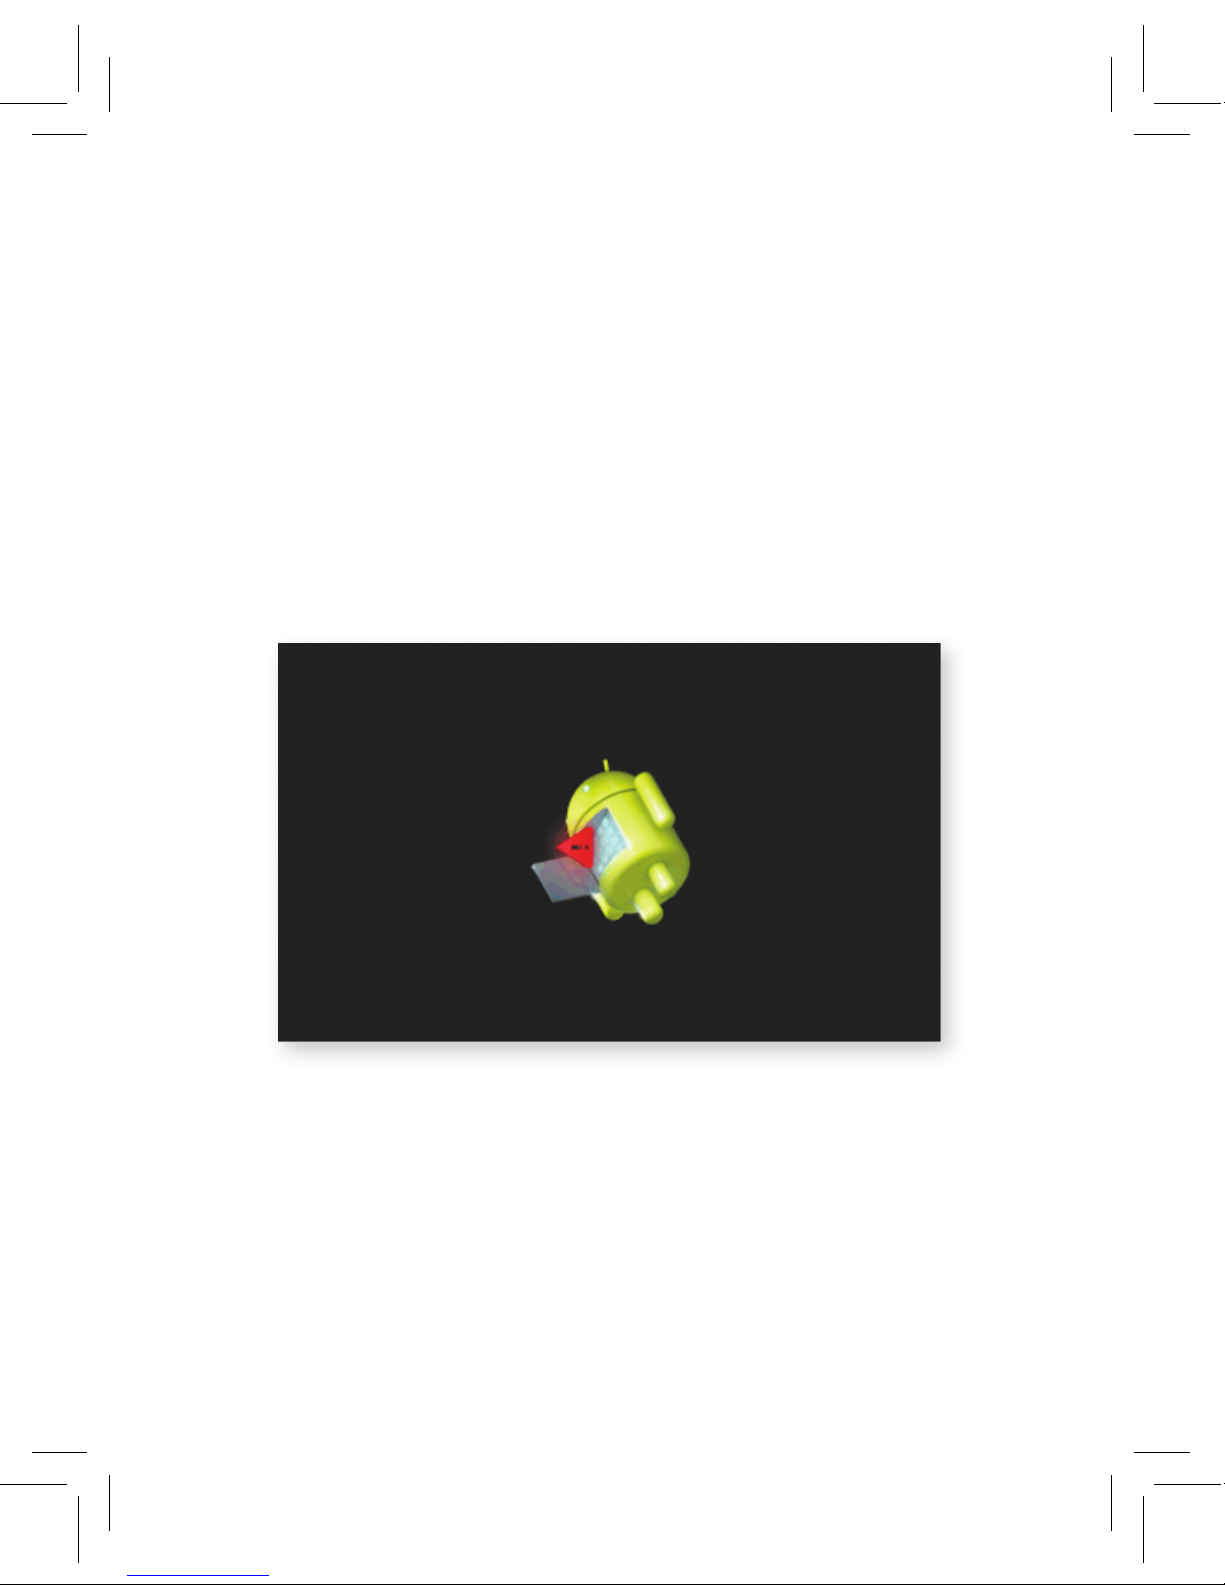
1. When the device is in shutdown state, press the volume-up key and
power key simultaneously.
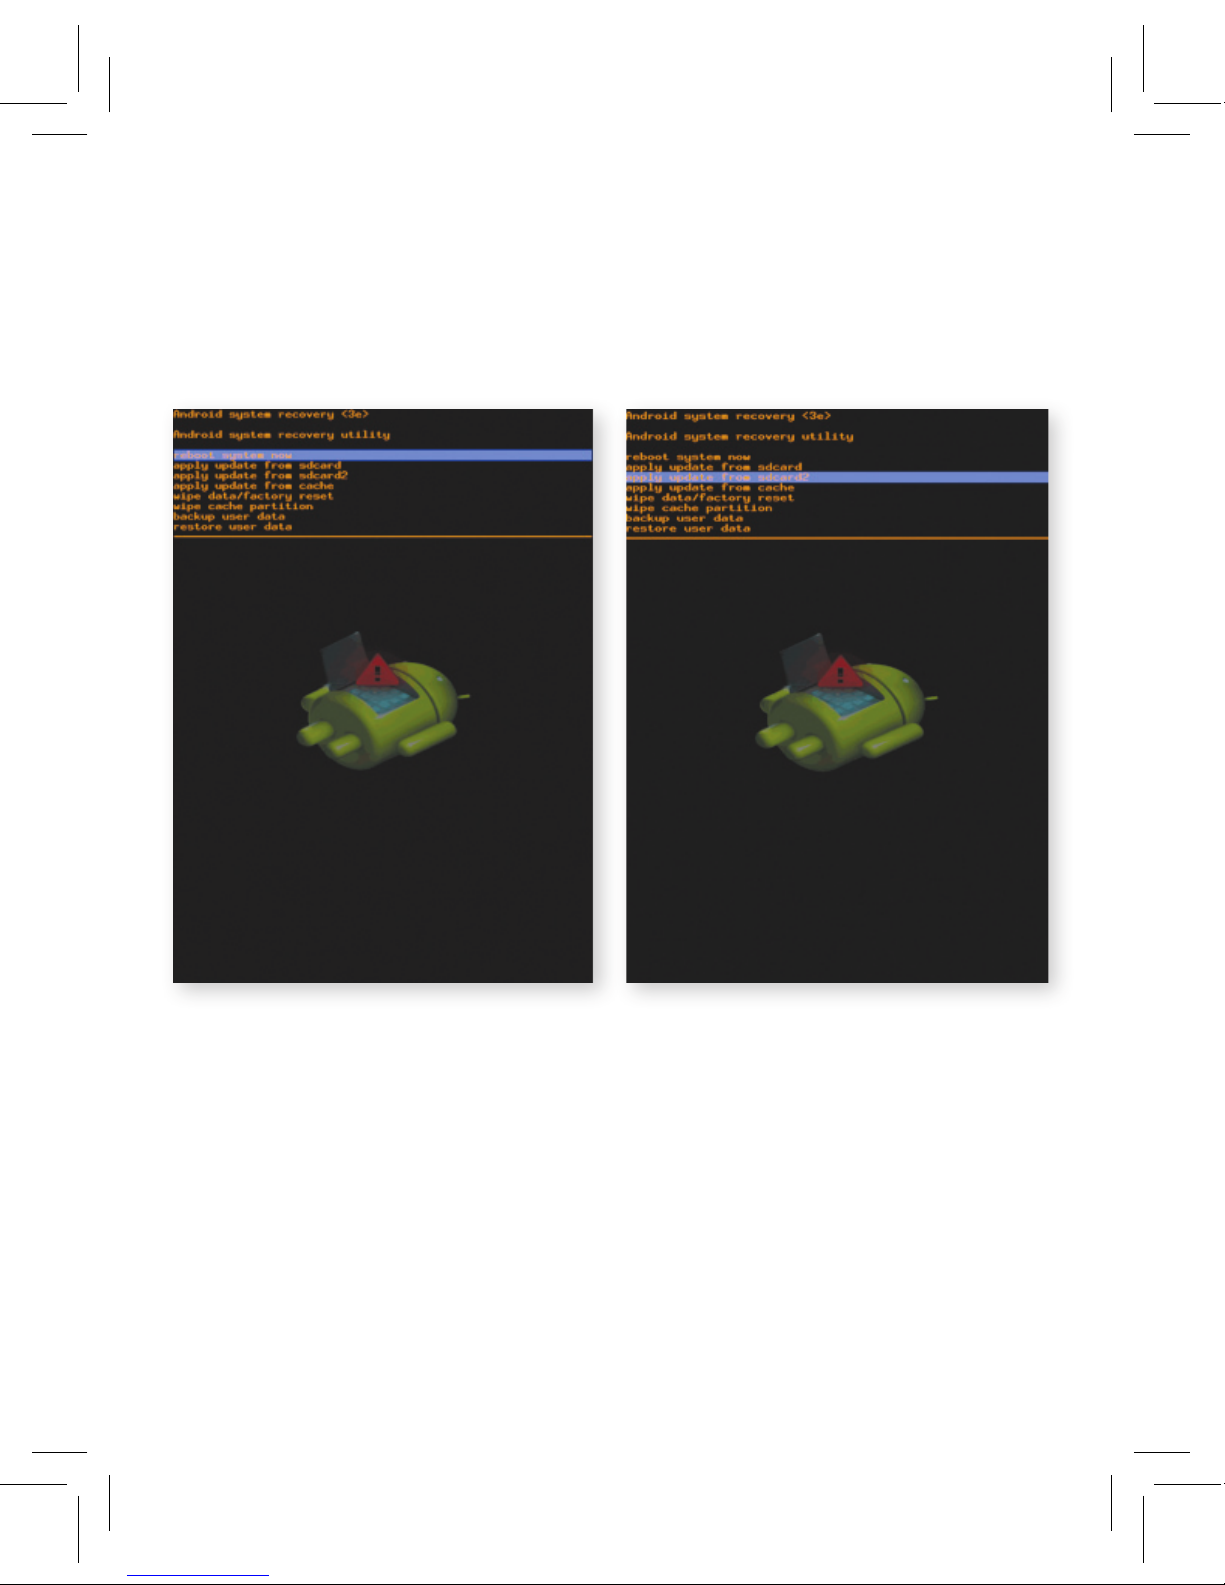
2. A screen page with a triangle and exclamation mark will appear.(As
Picture 11-1)
3. Click power key when you see the triangle.
4. The system enter into another picture, recovery status, there are eight
options (As in Picture 11-2)
5. The first option: Restart the system. The second option: System
upgrade from SD2. The third option: System upgrade from external
SD card. The forth option: Wipe caching data. The sixth option: Wipe
data/ factory reset. The seventh option: Backup user’s data. The eighth
option: Recover user’s data.
6. Use the volume key to move up and down. Press menu key to execute.
7. Choose wipe data/factory reset to execute.
8. Enter into confirmation interface, click yes to restore factory setting,
click no to exit the confirmation interface.
Page 55
53
11.3 System Upgrade
Note: Before upgrading, please confirm the battery level of your tablet.
You must have more than 30% battery charge to execute an upgrade or
factory settings restoration. Also ensure you backup your important data,
such as application procedures, emails, etc.
upgrade steps:
Insert the SD card with update zip package into device or put this package
in the root directory of the device.)
1 . C l i c k volume up key, then press power key to enter into recovery mode,
as Picture 11.1:
11.1
Page 56
54
11.2 11.3
11.3 System Upgrade continued
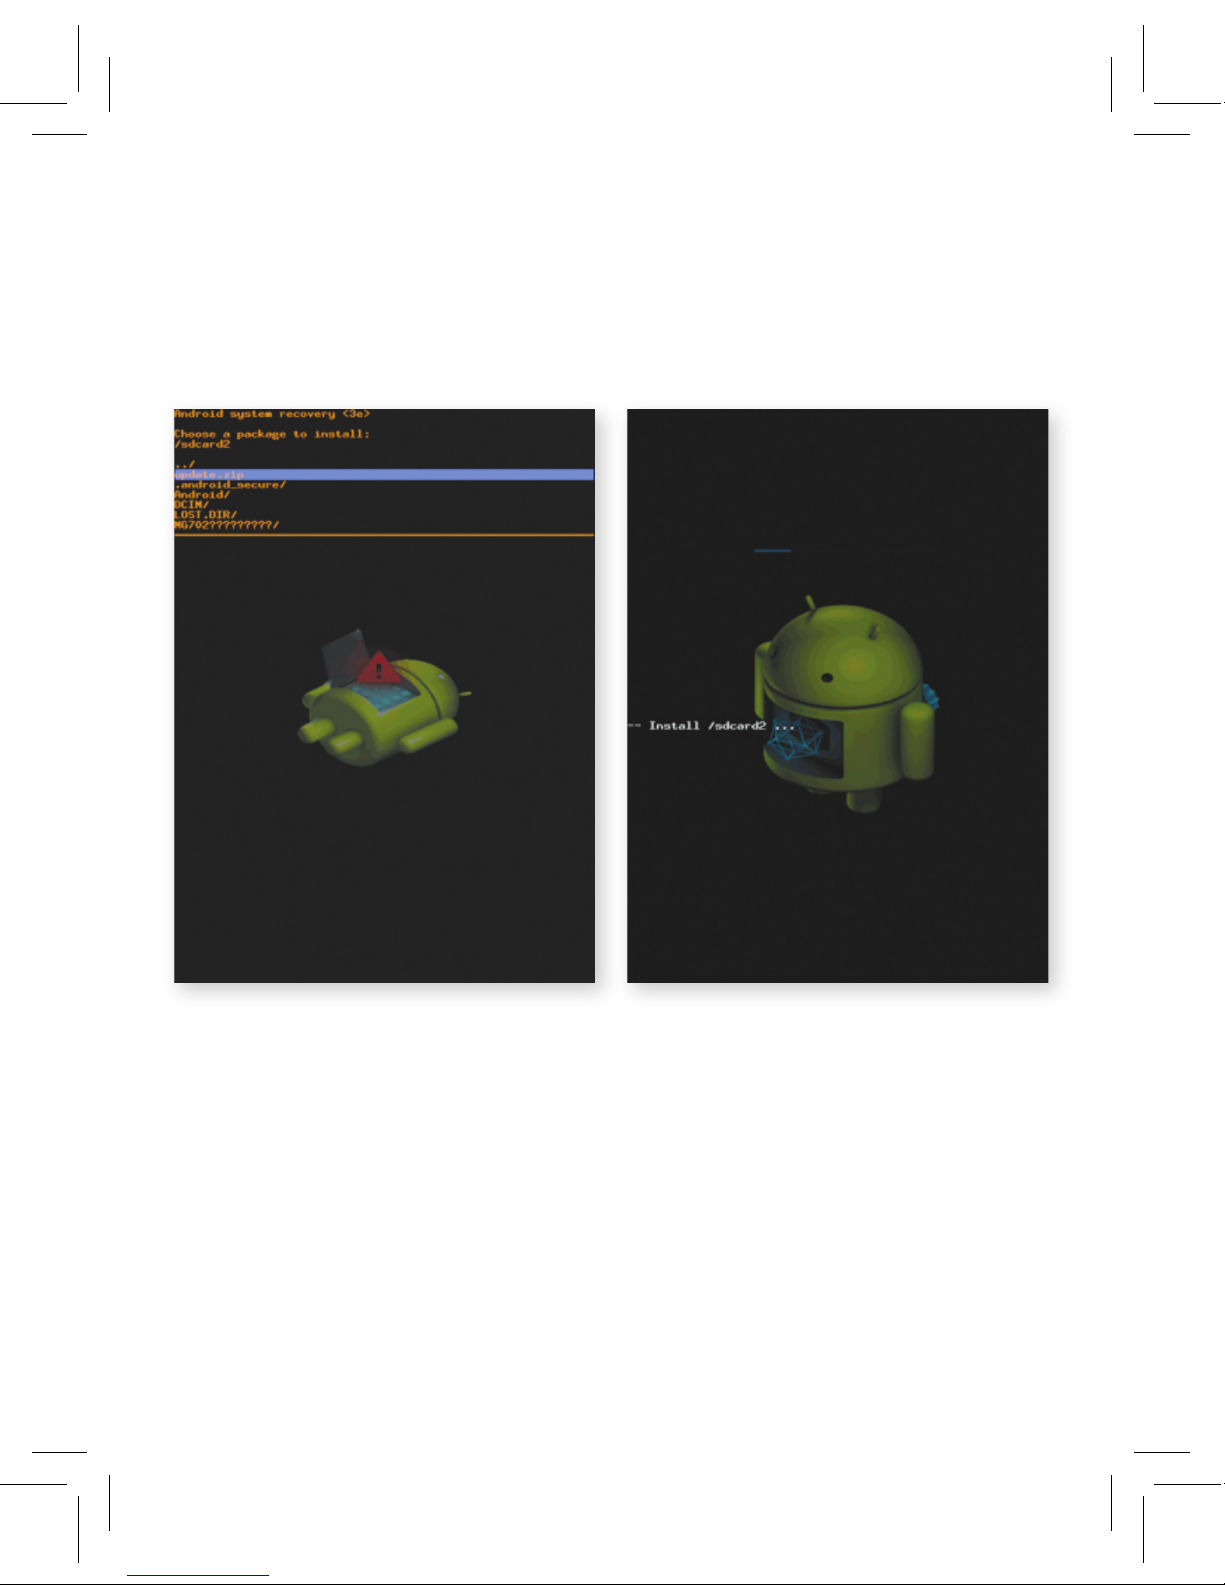
2. Click power key to enter
into main menu interface, as
Picture 11.2
3. Move the cursor with volume
down key, choose apply update
from SD card, as Picture 11.3
Page 57
55
11.4 11.5
4. Click volume up key enter into
this menu, click update.zip, as
Picture 11.4
5. Click volume up key to upgrade,
as Picture 11.5
Page 58
56
11.6
11.3 System Upgrade continued
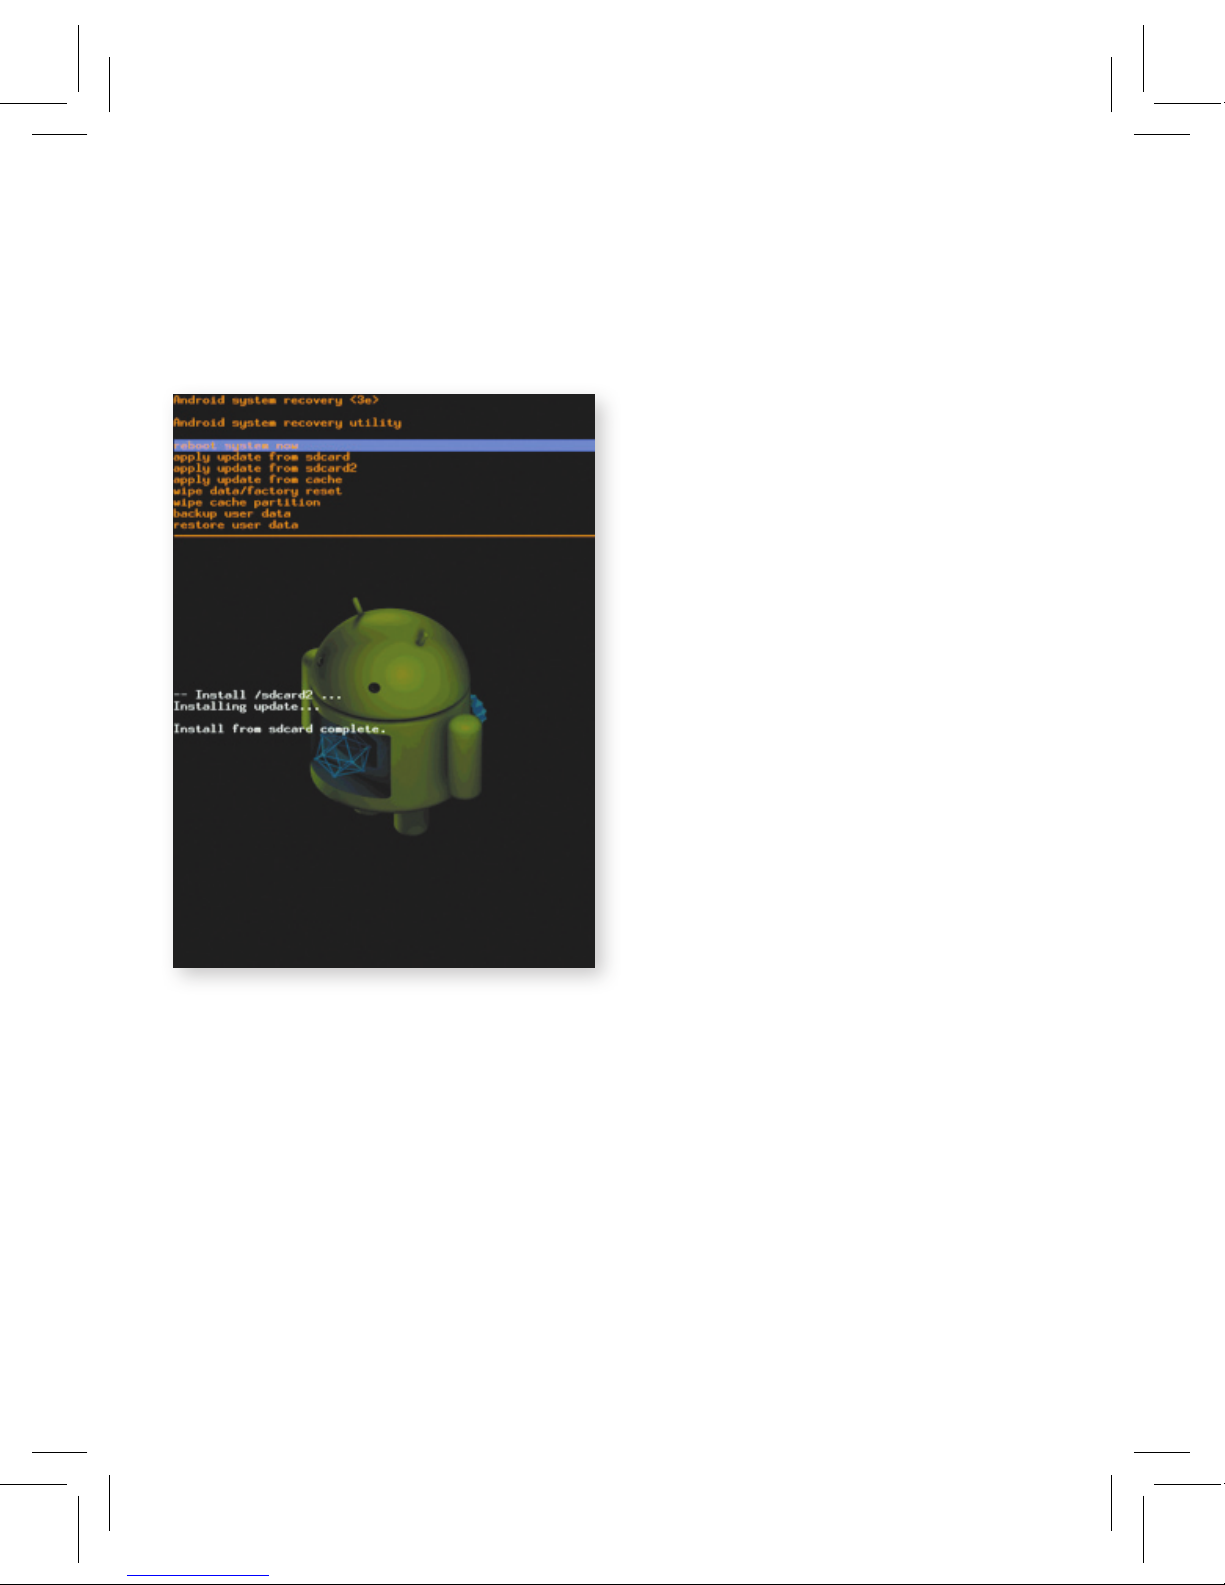
6. When the upgrade is finished, it
will return to the main interface
automatically, as Picture 11.6.
7. Short press volume up key to
exit upgrade mode, MID will
enter into restart the system
automatically.
Page 59

57
12 Trouble-Shooting
1. the first startup of device is slow
After the device has been upgraded, the first startup will need to re-
install the pre-installed applications. It usually requires 2-3 minutes.
The startup af terwards will be much quicker.
2. Device can’t connect wi-fi
- Make sure the wireless router of internet service works normally.
- Ensure the device and wireless router within the required distance.
Ensure there are no barriers (eg no wall) between router and device.
- Ensure the user name and password are both correct.
3. device feels hot
When many application procedures are running and the screen is set
to very bright mode or even when charging, device may feel warm.
This is normal.
4. email can’t be sent
- Ensure your internet is well connected.
- Make sure your email settings are correct.
- Keep your system time and local time consitent.
5. the system is behaving erratically
When you install some third party application procedure, it may cause
abnormal device behaviour. Press the reset key (next to power port) to
reset the system.
6. the webpage can’t be opened
- Please ensure you are within the required distance between router
and device.
- Ensure you are recieving data from your internet service provider
- Please restart WIFI and try again.
7. device is slower than normal
Please turn off any applications you don’t need in advanced task
management, or uninstall some third party application to release more
system resources.
Page 60

58
Appendix
items details description
Basic
Parameters
Device Model No. D700
CPU MediaTek 8377
CPU Frequency 1GHz
DDR-RAM 1G
NAND FLASH 16G
Operation System Android 4.0
Internet Mode GSM
Data Service GPRS/EDGE
MH z 2G GSM900/1800;
3G WCDMA850/1900/2100
Camera Built-in double camera, primary camera is
2Mega, secondary camera is 0.3Mega.
USB port MINI
Battery 3100mAh
AC adaptor Input voltage DC 5V,current 2A
Memory card Micro SD card, Maximum storage 32G
Main screen 7.0 inch Hi-fi TFT display screen, with
resolution of 1024*600
Basic
Functions
GPS Navigation Built-in GPS satellite signal receiver can
search the fixed position accurately.
GSM Communication Built-in 2G,3G modules, you can achieve
wireless communication function through
SIM card.
Page 61

59
items details description
Basic
Functions
(continued)
Bluetooth Built-in Bluetooth module Support FTP file
delivery, you can share various fascinating
documents in vicinity.
G-sensor Switch from crosswise and erect screen
freely and support all kinds of gravityreacted games, which can experience real
game enjoyments.
FM transmission/
receiver
Unique FM transmitter function. The
product can transmit navigation voice to
FM receiving device through FM, and then
play by car speaker; you can enjoy perfect
acoustic fun. FM can bring many channels
for your option.
Mobile TV Built-in TV module, receive Analog TV
signal.
Application
procedure
Video play Support 3GP, MP4 format, with maximum
resolution of 720*576
Music play Built-in music player, support MP3/AAC/
AMR/WAV format.
Games Support installation of Android third
party games.
Input method Android keyboard, Google Pinyin input
method.
Picture view Support JPG、BMP、PNG、GIF format pictures
view.
OFFICE software Support office (word、excel read and edit),
support PDF viewer.
Page 62

60
Contact
for enquiries about your tablet:
www.bamboo.com.ng
facebook.com/bambootab
@bambootablet
youtube.com/bambootab
Page 63

61
Page 64

 Loading...