

Baloran THE River User Manual
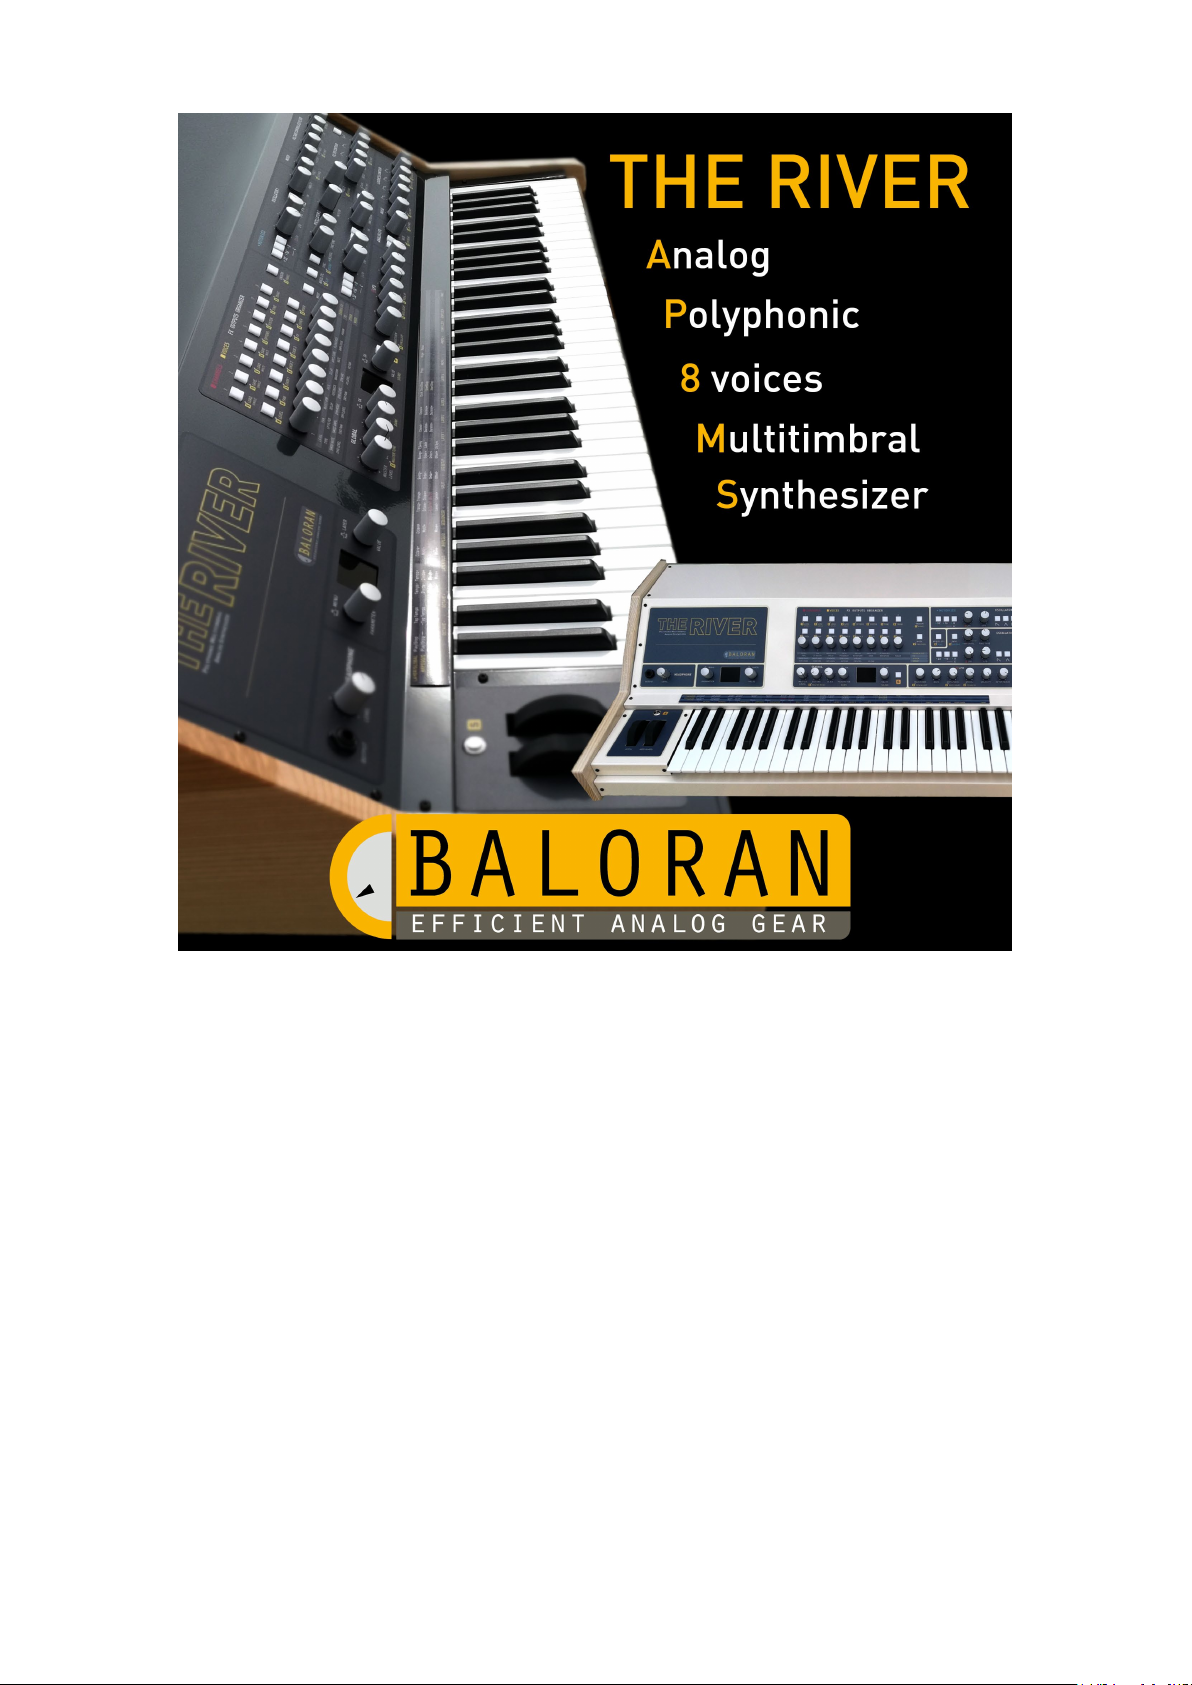
Version 2.0, November 2018
User's Manual

I. Welcome
Welcome to the community of users of The River and thank you for your vote of confidence.
The River is the result of 4 years of work. This project would not have been possible without the unconditional
support and the unwavering patience of my family who have all my gratitude. I would also like to thank our
online community, especially the members of Anafrog and Audiofanzine, for their precious encouragements
and their relevant suggestions.
I hope you will enjoy The River as much as I did while creating it and now using it.
Baloran SAS is a small and young enterprise. I have started a forum and a wiki to bring together a FAQ, support,
discussions and news about The River.
http://forum.baloran.com
http://wiki.baloran.com
All this could greatly benefit from your collaboration.
Kind regards,
-Laurent Lecatelier
Baloran SAS
Hardware, software, design : Laurent Lecatelier
Sound design : Laurent Lecatelier, Stéphane Garganigo, Laurent Pelletier
User's Manual : Eric Inglebert, Laurent Lecatelier
The River, User’s Manual PAGE 1

II. Safety Warning
PLEASE READ CAREFULLY ALL INSTRUCTIONS BEFORE USING THIS APPLIANCE. KEEP THIS INSTRUCTION
MANUAL FOR FURTHER REFERENCE. THE SAFETY INSTRUCTIONS MENTIONED IN THIS USER'S GUIDE CAN'T
COVER ALL POSSIBLE CONDITIONS AND SITUATIONS. USERS SHOULD BE VERY CAREFUL WHEN USING THIS
APPLIANCE.
The above symbols warn the users of potential danger in case of misuse of electrical appliances. The symbol of
a thunderbolt in a triangle shows that there is danger of electrocution.
Do not open the appliance under any circumstances. Do not try to repair or to make any modifications (except
when your users' manual gives you specific instructions to do so). Contact the manufacturer or your nearest
reseller for all repairs or alterations. When disposing of the appliance at the end of its usable life, The River
should be recycled through an electronic recycling scheme.
INSTALLATION INSTRUCTIONS
THIS APPLIANCE MUST BE EARTHED.
Do not remove the protection offered by the earthed or polarised connectors. A polarised power plug has one
pin bigger than the other. An earthed power plug has a receptacle for an equipotential link. If the connector
you received does not fit your power point in the wall, have one installed by a qualified electrician according to
the local regulations.
Use only the power cable received with The River and do not use that cable with any other appliance.
Take good care of the power cord. Do not let it become twisted, do not walk on it and do not put other things
on it. A damaged cord could easily cause electrocution or a fire!
Before using the appliance overseas, check with your reseller, an approved repair centre or the manufacturer
for compatibility with the local standards.
Do not use or store the appliance in extreme temperatures (in direct sunlight, near heating devices) or humid
conditions (bathrooms, floodable cellars etc.). Do not expose the appliance to rain, dust or strong vibrations.
Take care to always put the appliance on a flat and stable surface. Do not ever install it in unstable positions.
Do not ever install the appliance on feet, supports or racks other than those indicated by the manufacturer. If
using in a rack, avoid rocking it while moving it. Do not obstruct the ventilation holes.
Do not let any foreign objects (flammables, paper clips, pins etc.) or liquids (water, soda, alcohol, cleaning
products) get inside the appliance.
If there is a risk of thunderstorms or if not using the product for a longer period of time, unplug the appliance
from the wall.
This appliance, used alone, with an amplifier or with earphones, can produce sound levels which could provoke
terminal loss of hearing. Never use it at high levels for long periods of time or in any circumstance where the
listening could become uncomfortable. In case of loss of hearing, consult a specialist immediately.
Only use the accessories advised by the manufacturer.
The River, User’s Manual PAGE 2

IMPORTANT
Unplug immediately the appliance and contact your reseller, an authorised repair centre or the manufacturer
in the following situations:
The power cable or its plug have been damaged;
Smoke or unusual odours come out of the appliance;
Foreign objects or liquids have accidentally come in contact with the appliance;
The appliance has been exposed to rain or excessive humidity;
The appliance seems to not function properly or its performance is diminished.
The manufacturer's legal warranty does not cover the costs of repairs or replacement in case of improper or
incorrect use. These costs are not covered by the manufacturer warranty and therefore will be supported by
the owner of the appliance.
The River, User’s Manual PAGE 3

III. SUMMARY
I. WELCOME __________________________________________________________________ 1
II. SAFETY WARNING _____________________________________________________________ 2
IV. DISCOVERING THE RIVER _______________________________________________________ 6
1. The control panel set up .......................................................................................................................6
a. The Shift button ________________________________________________________________________________ 6
b. Channels, voices, outputs and FX organiser __________________________________________________________ 7
c. General commands _____________________________________________________________________________ 7
d. Synthesis commands. ___________________________________________________________________________ 8
e. The Riverkey, manager of play inputs/outputs _______________________________________________________ 8
1. Discovering the Sounds banks ............................................................................................................ 10
2. Discovering the Multis ....................................................................................................................... 10
3. MULTIs and Sounds Models ............................................................................................................... 10
a. Les modèles de Multis, Templates ________________________________________________________________ 11
b. Sounds models _______________________________________________________________________________ 11
V. MORE ADVANCED TUTORIALS __________________________________________________ 12
1. Split, Mode, Level and Pan ................................................................................................................. 12
2. Layers and connecting with a sequencer software ............................................................................. 12
3. Split, arpeggios and sequences ........................................................................................................... 13
4. Detune and Unison............................................................................................................................. 14
5. Propagating the commands in All and Redirection ............................................................................. 14
6. MPE .................................................................................................................................................... 14
7. External Clock..................................................................................................................................... 15
8. Synchronising the digital LFO (DLFO) .................................................................................................. 15
9. Compare Function .............................................................................................................................. 16
VI. REFERENCES ________________________________________________________________ 17
1. Allocation of channels and voices, MODE and UNISON buttons ......................................................... 17
2. Loading SINGLEs and FXs .................................................................................................................... 18
3. Saving a SINGLE .................................................................................................................................. 18
4. Loading MULTIs .................................................................................................................................. 19
5. Saving a MULTI ................................................................................................................................... 19
6. Sound Options .................................................................................................................................... 19
7. System Settings .................................................................................................................................. 20
8. Tune ................................................................................................................................................... 22
9. Level Page .......................................................................................................................................... 22
10. Page Pan ............................................................................................................................................ 22
11. Chorus 1..3 Page ................................................................................................................................. 23
The River, User’s Manual PAGE 4

12. FX Page .............................................................................................................................................. 24
13. Other Page ......................................................................................................................................... 25
14. Mixer Page ......................................................................................................................................... 26
15. TRANS Page and RDIR Page ................................................................................................................ 26
VII. SYNTHESIS PARAMETERS ______________________________________________________ 27
1. OSCILLATOR 1 / 2 ............................................................................................................................... 27
a. Parameters Identical for VCO 1 and VCO 2 _________________________________________________________ 27
b. Parameters found only in VCO2 __________________________________________________________________ 28
c. Common parameters __________________________________________________________________________ 28
2. MIXER ................................................................................................................................................ 29
3. VOLTAGE CONTROLLED FILTER - FILTER CONTOUR ............................................................................. 30
4. LOUDNESS CONTOUR ......................................................................................................................... 31
5. ANALOG LFO ...................................................................................................................................... 32
6. DLFO (DIGITAL LFO) ............................................................................................................................ 33
7. MOTION SEQ ...................................................................................................................................... 34
a. Enregistrer une séquence _______________________________________________________________________ 34
b. Ending a recording _____________________________________________________________________________ 34
c. Starting the sequence __________________________________________________________________________ 35
VIII. GLOBAL SECTION COMMANDS __________________________________________________ 35
IX. THE RIVERKEY _______________________________________________________________ 36
1. GLOBAL Setup Parameters ................................................................................................................. 36
2. LAYER Setup Parameters .................................................................................................................... 38
3. ARP Setup parameters ....................................................................................................................... 40
4. SEQ Setup Parameters ........................................................................................................................ 40
5. LFO Setup Parameters ........................................................................................................................ 41
6. SPLIT setting ....................................................................................................................................... 42
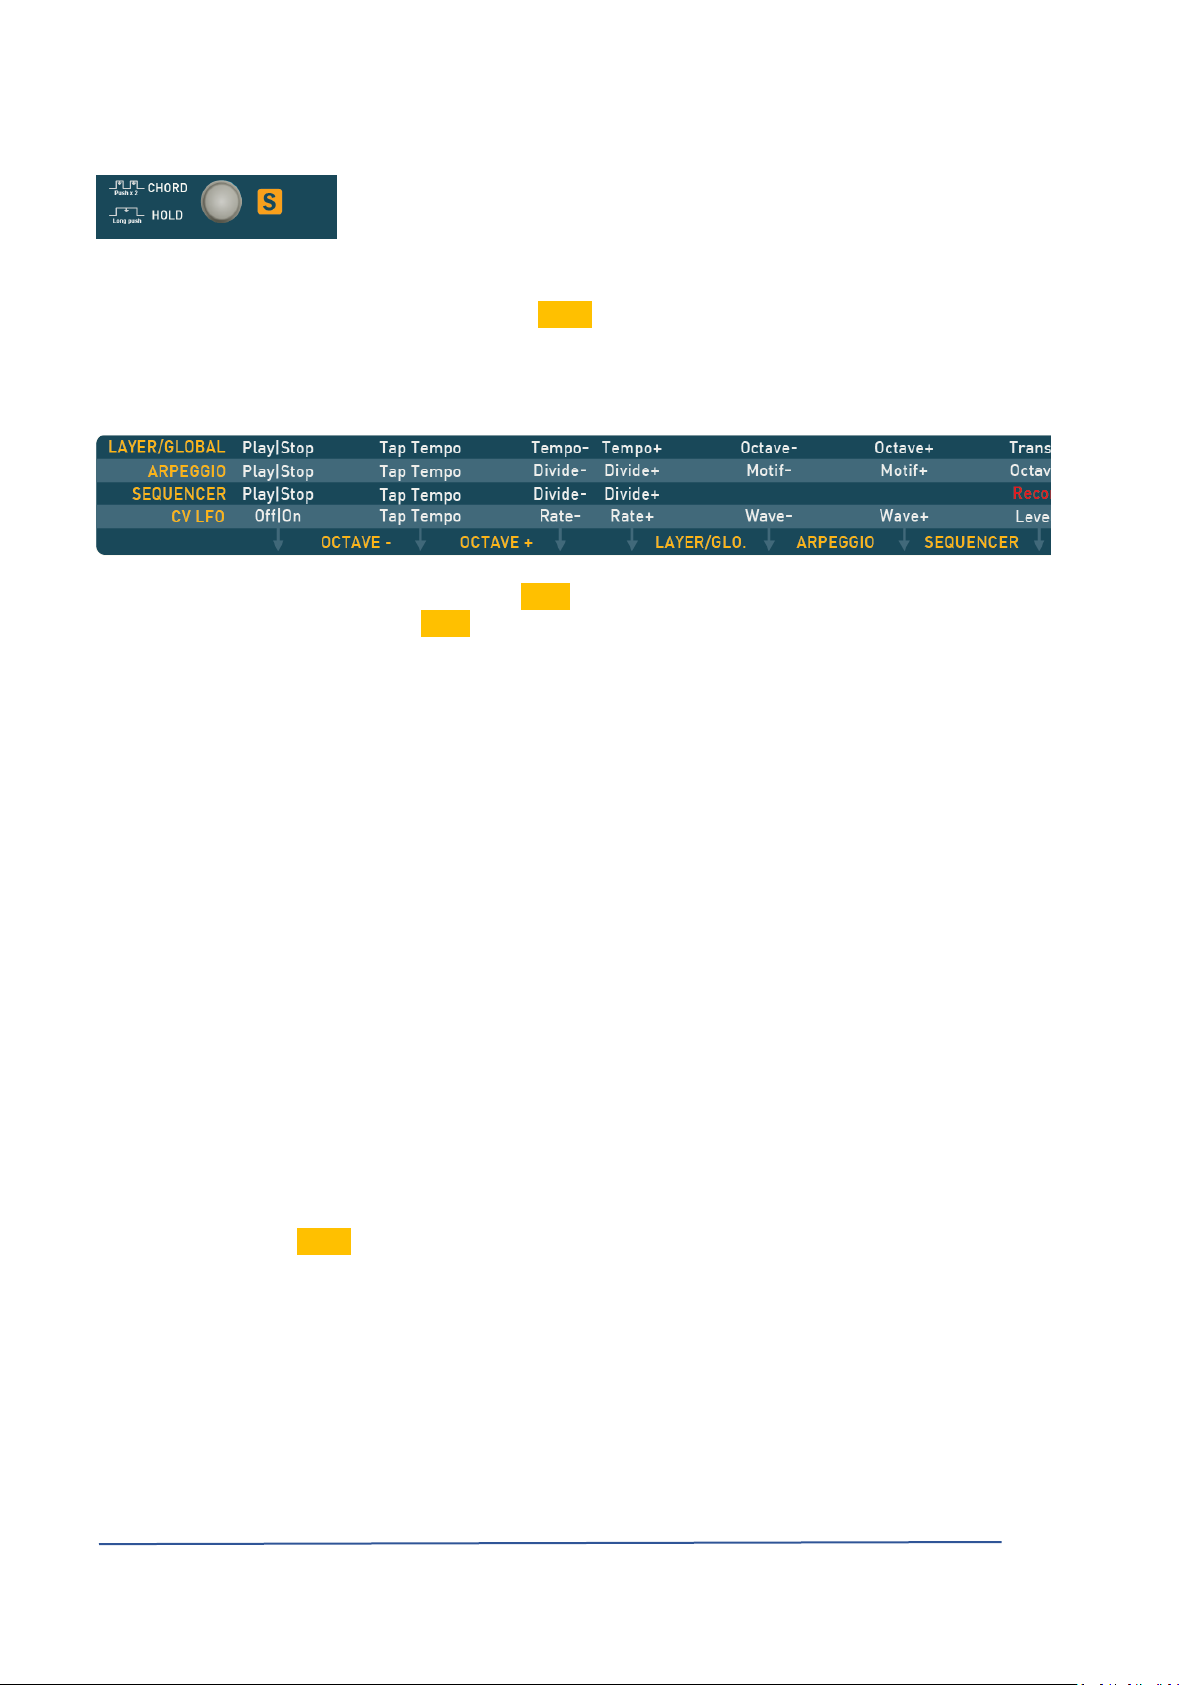
7. CHORD and HOLD Modes ................................................................................................................... 42
8. Autres commandes ............................................................................................................................ 43
9. Calibration of the physical controllers ................................................................................................ 43
X. THE BACK PANEL ____________________________________________________________ 44
1. Inputs / Outputs ................................................................................................................................. 44
2. Energy supply, start/stop switch and fuses. ....................................................................................... 46
XI. ANNEXES __________________________________________________________________ 47
The River, User’s Manual PAGE 5
IV. Discovering The River
The River brings together several interactive elements:
• A polyphonic analog synthesizer with 8 voices, multitimbral with 8 channels (see the general diagram in
the appendix).
• An effects module formed by an analog triple chorus / flanger and a two channels digital module for
echo / reverberation. The analog path of the signal is preserved throughout. The resulting space and
richness are unanimously appreciated (see the general diagram in the appendix).
• An Inputs / Outputs management tool called in this document The Riverkey. Four independent layers
(called Layer in this document) allow each one to define the input (integrated keyboard, MIDI and/or
USB, pedals), the output (The River, MIDI and/or USB, CV + Gates) and the transformation of events
(sequence/arpeggio, transposition, filtering, channels, type of CV/Gates, etc.).
All the parameters can be saved in The River. A Single contains the information of a sound and of effects, a
Profile contains the configuration of The Riverkey, a Multi contains the complete configuration of the machine
(sounds of each channel/voice, tuning of multitimbrality, effects and all the adjustments of The Riverkey).
An optional function Autosave saves continuously the state of your instrument. This way, when you plug it in,
you find your environment as you left it at the last switch off.
1. The control panel set up
a. The Shift button
Une commande (bouton, pote A command (button, potentiometer, encoder) can have several functions, the
secondary function is written in "yellow-orange" under the command, preceded by the symbol *S+ . To get
access to this function, press the button *S , on the right hand side of the most central screen (Panel Screen).
As long as the button *S blinks, it is active. Therefore you don't need to keep this button pressed
continuously to get access to the secondary function.
Double click on the S button allows to lock the *S function while a new click unlocks it.
From now on in this document, *S LOAD SINGLE means either:
Press the *S button then, while holding it, press the button LOAD SINGLE, then release the *S button
or
Press the *S button then release it and press the LOAD SINGLE button before *S stops blinking.
The River, User’s Manual PAGE 6
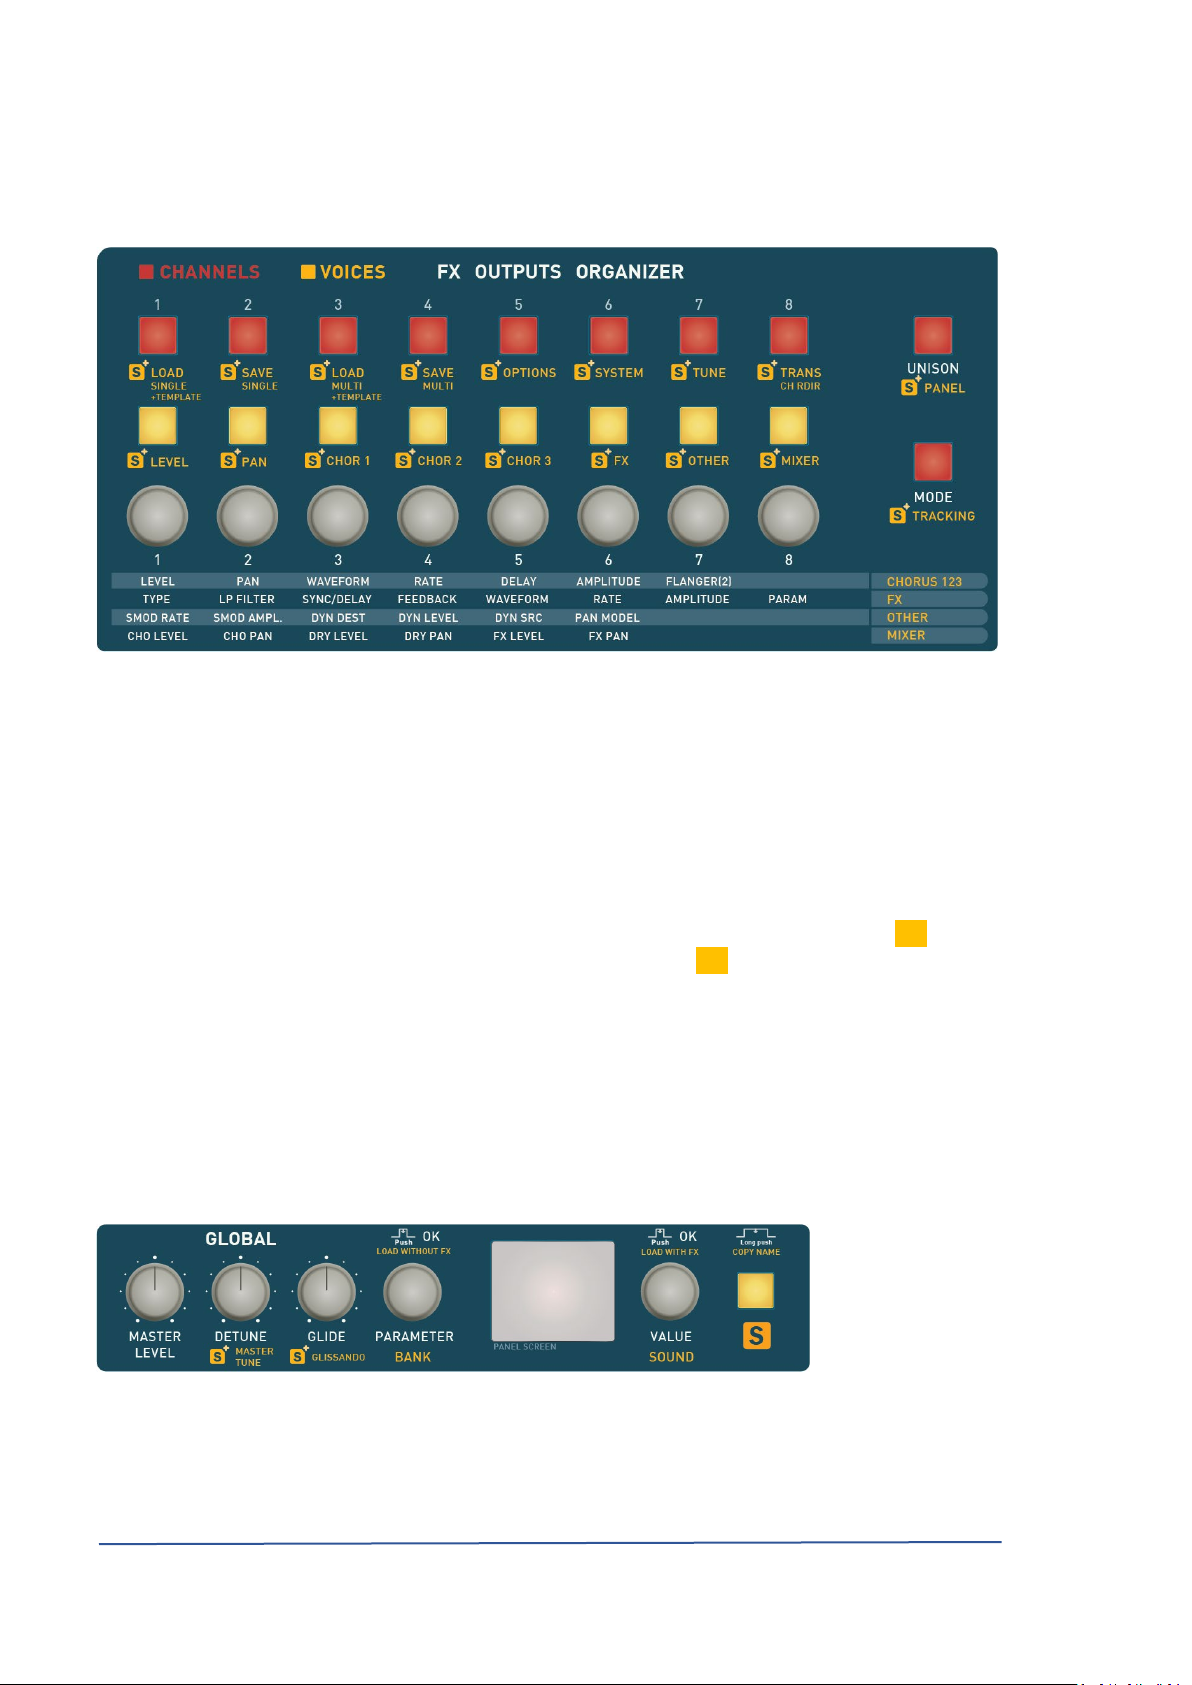
b. Channels, voices, outputs and FX organiser
This section of the panel allows to manage the allocation of voices to channels as well as the access to the main
menus of The River and the adjustment of outputs and the effects.
The first row of 8 buttons (red) allows to choose the active channel. The secondary function of these buttons
allows you to access the main menus of The River.
The second row of 8 buttons (yellow) allows to select the voices allocated to the channel. The secondary
function of these buttons (as well as the last button, channel 8) is to select the page in which the 8 encoders
are active: level, panoramic, chorus, effects and mixing, transposition of voice and channels redirection.
Under the lit buttons there are 8 encoders (1 to 8) which allow to modify the parameters of the page selected.
Each encoder's role is mentioned under each encoder at the bottom of the panel. For example: on the FX
page, encoder 1 allows to change the type of effect. To select the FX page, you press the *S button and the
sixth voice button (yellow). To go into the System menu, press the *S button and the sixth channel button
(red).
When you record a Multi, all the settings of this section of the panel are included in the Multi.
c. General commands
This section of the panel assigns the volume settings, the Detune of voices and the global tuning, as well as
Glide / Glissando which is a parameter connected to the sound.
Two encoders on each side of the screen allow to select either the bank (left encoder) and the sound index
(right encoder) in this bank, or the parameter to be modified (left encoder) and its value (right encoder).
These two encoders can be pressed. The corresponding function is written above each.
The River, User’s Manual PAGE 7
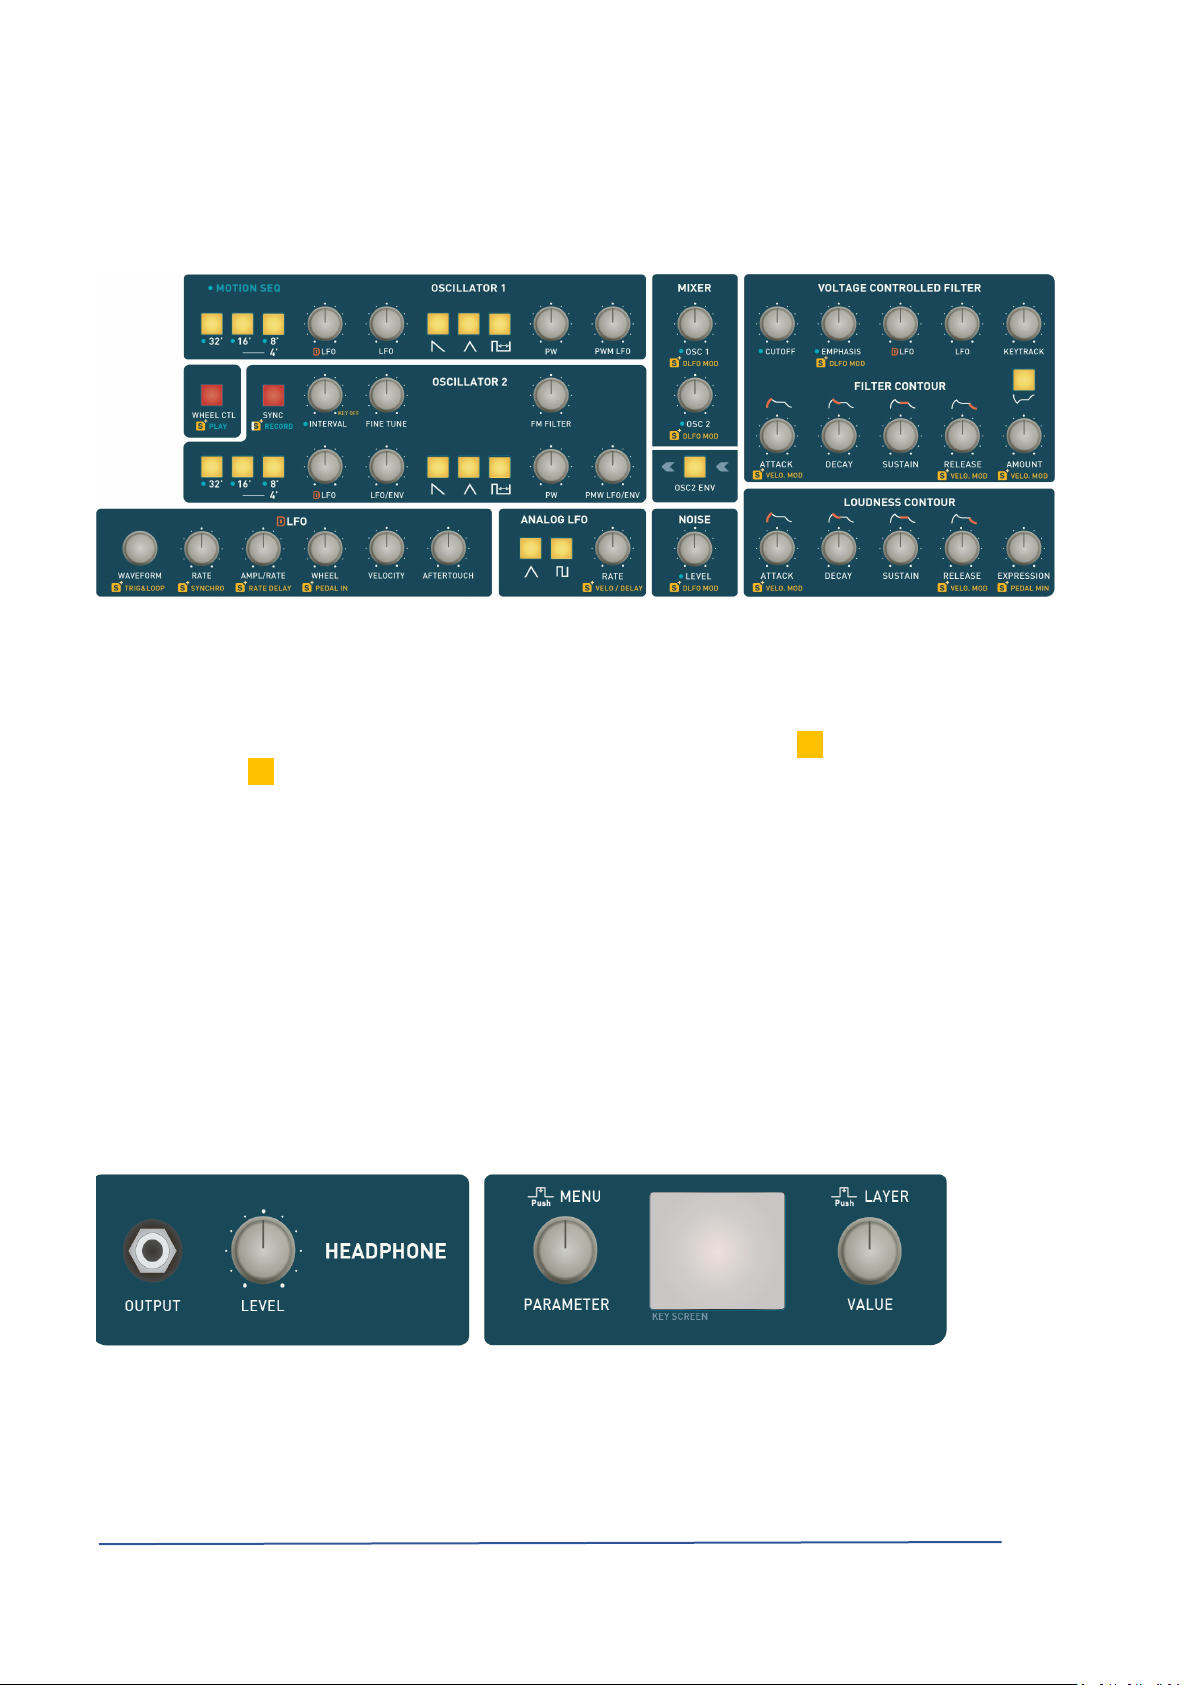
d. Synthesis commands.
This section of the panel brings together all the commands allocated to the sound synthesis. These commands
are active for the selected channel (see above) or optionally for all the channels if the ALL mode is selected or if
a redirection channel is defined (see Propagating the commands in All and Redirection).
When you modify a parameter, the screen shows the new value and the original value. This allows you to go
back to the old setting easily.
Some commands allow to set two parameters (Example: EMPHASIS and Modulation of EMPHASIS through
DLFO). In this case, the second function is indicated under the command after *S . To access the secondary
function, use the*S button (see Shift button). If the command is active, the Shift mode is extended as long as
needed.
For the oscillators row and the wave forms, the buttons are single-use: it is pointless to try to have two wave
forms at the output of an oscillator
To access Row 4' of the oscillators, press twice row 8'. In this case, the buttons of rows 16' and 8' light up,
showing the choice of row 4' .
.
e. The Riverkey, manager of play inputs/outputs
The left side of The River is reserved to the earphone socket and its control level . On the right, the screen of
The Riverkey is flanked by its two encoders.
Practically all the settings can be done with these two encoders.
The River, User’s Manual PAGE 8
But for all the playing functions there is a simpler and quicker way. Above the
knobs, the Key Shift button allows to use the keyboard as a controller.
When you press this button, the notes are not played. They are interpreted as setting commands of The River
key. From this point on, this button will be called S KEY.
A magnetic reminder has been placed on your instrument. The word OCTAVE must be centred above the first
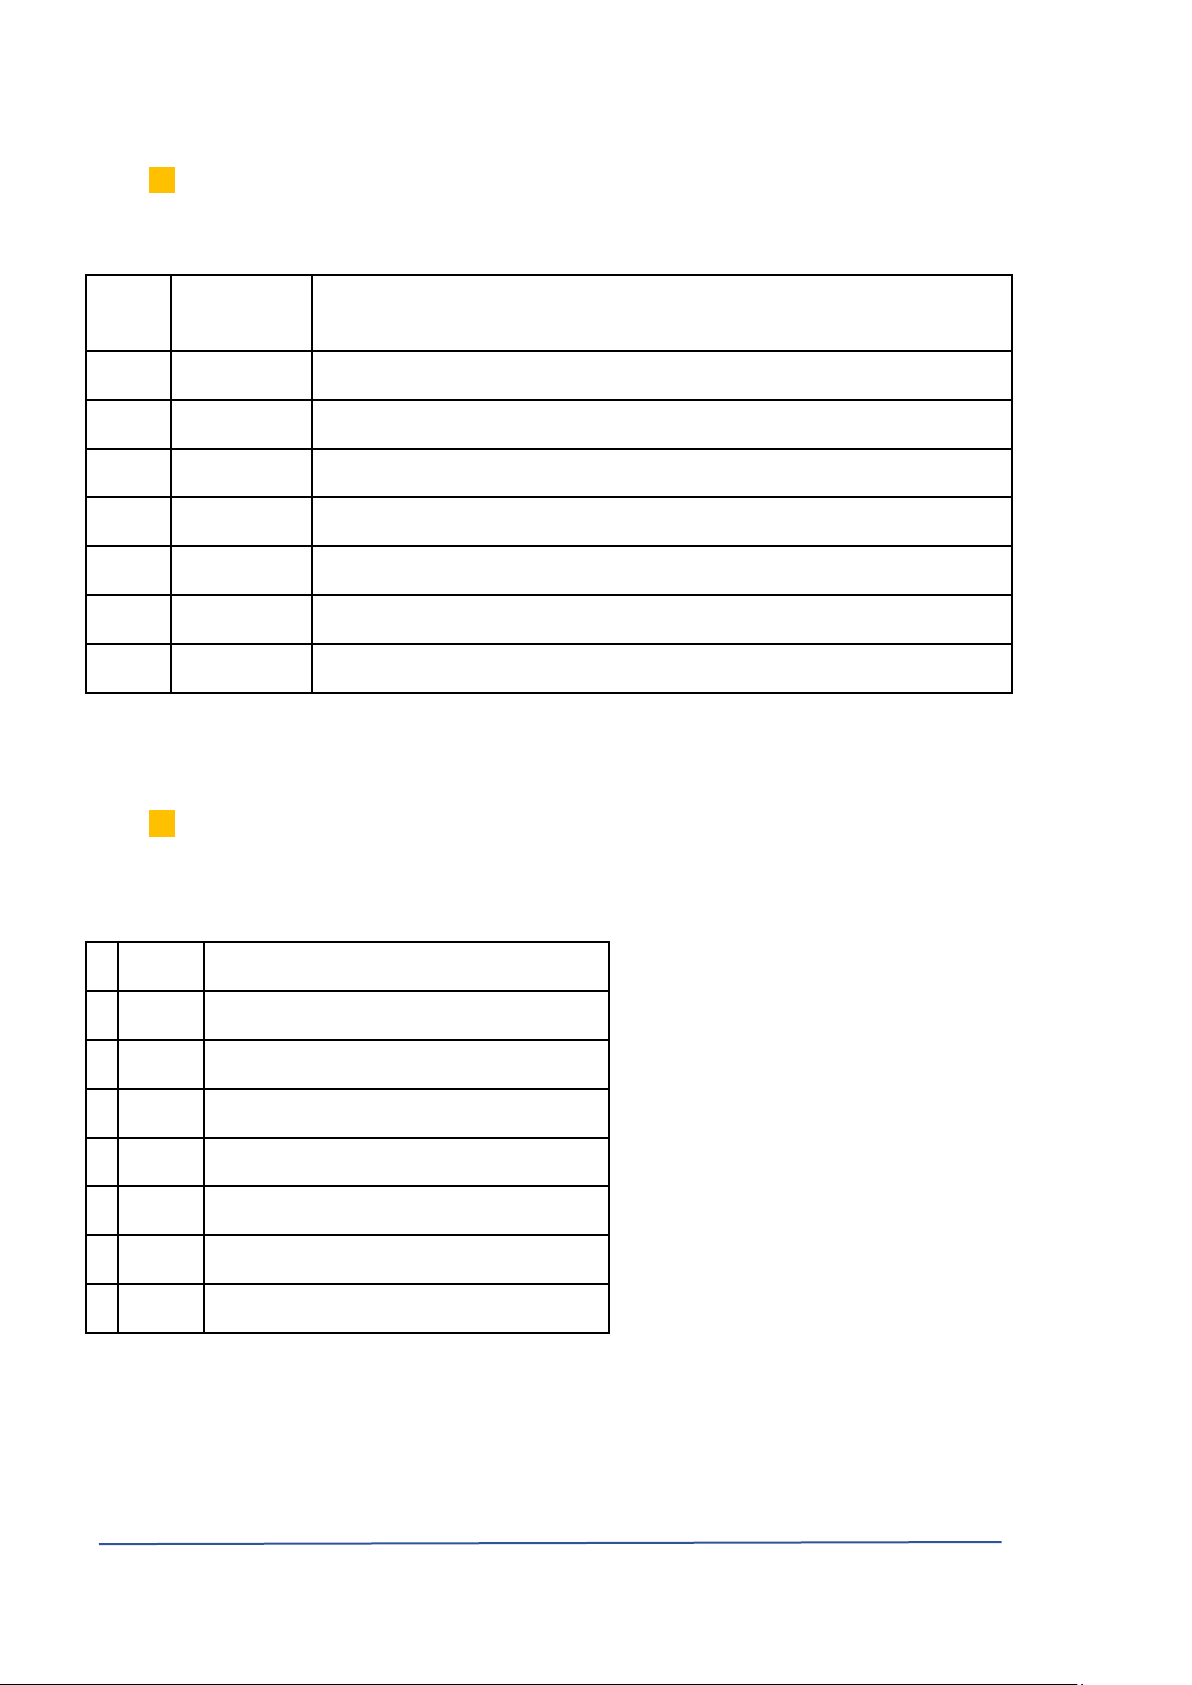
black C#3, Off/On and Tap Tempo respectively above C3 and D3.
Example: to access Tap Tempo, push down the S KEY button and without releasing it press several times on D3
to give the tempo. Then release the S KEY button.
Functionally it could be said that The Riverkey is the internal and external traffic controller of the performance
data. In order to achieve this, it has a clock which gives you a common tempo to all the controls of The River, as
well as a management system of the inputs and outputs of four layers. Each defines an input (integrated
keyboard, MIDI and/or USB socket, pedals, etc.), an output (TheRiver, MIDI and/or USB socket, CV + Gates) and
one or more processing between the two.
Examples of layer definitions:
As source the integrated keyboard, as destination the Channel 1 of The River, a range from A0 to C8, no
transposition.
As source the MIDI socket in, as destination a monophonic high priority CV + Gate, a range from C3 to B5,
transposition of -12 semitons and arpeggio motif 5 on 2 octaves.
To create a Split, all you have to do is to create two layers which juxtapose (see Split). But the layers range can
also be superimposed.
The destination of each of these layers can be different so that two different sounds can be driven by areas of
the keyboard but can also be identical having as objective, for example, to be able to sequence a section of the
keyboard and to allow a normal play on another section.
A set of controls for playing using The Riverkey is called a profile: it is completely defining the four layers. The
Profile Editor software allows to configure up to 10 profiles which can be stored permanently on The River and
recalled with a simple S KEY shortcut.
The Riverkey has also an Autosave function. All your settings are automatically recorded in order to be
available at the next power up of your instrument.
When you record a Multi, all the settings of The Riverkey are included.
The River, User’s Manual PAGE 9

1. Discovering the Sounds banks
The time has come to hear The River in action. We will start by reconfiguring The River in its simplest mode by
loading the template 1L RIVER: 1 layer, 1 channel of 8 voices.
Press *S LOAD MULTI then immediately press the button Voice 1 before the blinking stops.
Menu LOAD SINGLE is automatically selected. If not (old firmwares), press *S LOAD SINGLE to activate it.
Check that channel 1 is active (channel 1 button is lit).
Select the bank (1 to 8) by turning the left encoder.
Select the sound (1 to 20) by turning the right encoder.
Push the right encoder to load the sound with its effects or the left encoder to load the sound without effects.
You can now play on the keyboard and manipulate the synthesis commands to discover the musicality of The
River.
The two last banks (FX01 and FX02) contain only the settings for the effects (chorus, echo/reverberation,
mixing).
2. Discovering the Multis
Press *S LOAD MULTI to activate the menu Loading Multi.
Turn the encoder on the left of the Panel screen to select the BANK (1 to 2).
Turn the encoder on the right of the Panel screen to select the MULTI (1 to 20). The ALLINIT multis are virgin.
Press on the right or left encoder to load the MULTI.
Once the loading is finished, press S KEY C3 to start the arpeggios and sequences of all the layers and ... happy
discovery
3. MULTIs and Sounds Models
To make using The River more efficiently, we have set up easily accessible models for sounds and for the
multis. From now on we will call template a model of multi.
A multi is a complete "image" of the machine, including the management of channels and voices, the edited
sounds of each channel, the settings of The Riverkey including the sequences and arpeggios, the settings of
levels/panoramics as well as the tunings of the effects. When you select a multi or a multi model, this action
reconfigures completely your machine.
The River, User’s Manual PAGE 10
a. Les modèles de Multis, Templates
1
1L RIVER
1 layer, 1 channel 8 voices, the basis for exploring the sound banks, for
example
2
2L RIVER
2 layers, 1 splits, 2 channel of 4 voices
3
3L RIVER
3 layers, 2 splits
4
4L RIVER
4 layers, 2 splits, layers 3 and 4 have the same keyboard range
5
2L SPLIT
2 layers, 1 channel 8 voices
6
2L UNISS
2 layers, 1 channel 3 voices in unison + Detune, 1 channel 5 "normal" voices
7
1L ALL
1 layer, 2 channels of 4 voices, mode ALL
8
1L MPE
1 layer MPE, 1 channel MPE 8 voices
1
INIT
Basic Init sound
2
LEAD
"Moog" type sound with cover on the filter
3
EKEY
"Electric Piano" sound type
4
BRASS
"Brass" type sound, Wheel very active
5
STRING
"String" type sound
6
VOX
"Voice" type sound
7
FM
"FM Bell" type sound + echo
8
MPE
MPE sound with Osc 2 in Y and Cutoff on Z
Press *S LOAD MULTI. All voice buttons should be blinking. Press the voice button of your choice before the
blinking stops. For the template 2L SPLIT for example, it is the yellow key above encoder 5.
b. Sounds models
Press *S LOAD SINGLE. All voice buttons blink. Press the voice button of your choice before the blinking stops.
For the sound type EKEY for example, it is the button voice 3. The sound model is allocated to the voices of the
selected channel.
The River, User’s Manual PAGE 11

V. More Advanced Tutorials
1. Split, Mode, Level and Pan
Load template 2. You will notice on the Riverkey screen two layers which correspond respectively to channels 1
and 2, and 4 voices allocated to each channel. The sound LEAD is on the left side of the keyboard up to B4,
channel 1. The EKEY sound from C5 to C8, channel 2. The mode of the template is MIDI (second icon on the
right hand side of the central screen), which means that the addressing of channels is respected: each layer
drives the designated channel.
Push the Mode button. The mode changes to Select. Play to the left and to the right of the keyboard. You will
notice that, independent of the defined areas in the two layers, the sound is the same on the whole range of
the keyboard. In this mode, you play the sound of the selected channel. If you push the channel 2 button, you
will hear EKEY everywhere on the keyboard, if you push channel 1, you will hear LEAD everywhere on the
keyboard.
Push once more on the Mode button. The mode changes to All, the indicator becomes red. Play to the left and
to the right of the keyboard. You will notice that independent of the defined areas in the two layers the sound
is the same on the whole range of the keyboard: you are playing the two sounds (Channel 1 and 2)
simultaneously .
The level of channel 1 (LEAD) is too high compared to the level of channel 2 (EKEY) and the sum of the two
channels saturates the circuits, you will certainly hear a little bit of static. We will change that. Press *S LEVEL.
The orange rectangle on the screen indicates LEV. The 8 encoders allow to adjust the level of each voice. You
can for example lower to -14dB the first four voices and to -2dB the following four. The balance will be better
and the resulting level adjusted. A shortcut allows to modify simultaneously the level of all the voices of a
channel: check that the orange square still indicates LEV and press *S while turning the encoder number 1.
"Channel 1 level" indicates that you modify all the voices of channel 1 (LEAD), select -20dB for example. Press
*S while turning the encoder number 2. "Channel 2 level" indicates that you modify all the voices of channel 2
(EKEY), select -4dB for example.
The same logic applies to the voices panoramic. Press *S PAN. The orange rectangle of the screen indicates
PAN. The 8 encoders allow to set the position of each voice. Test the action of each one, while playing on the
keyboard. A short cut allows to modify simultaneously the panoramic of all the voices of a channel: check that
the orange square still indicates PAN and press *S while turning the encoder 1. "Channel 1 pan" indicates that
you modify the panoramic of all the voices of channel 1 (LEAD), put for example all the voices of LEAD a little to
the left. Press *S while turning encoder 2. "Channel 2 pan" shows that you modify the level of all the voices of
channel 2 (EKEY), move a little the voices on the right. ;)
2. Layers and connecting with a sequencer software
Load template 4. You should see on the screen Riverkey four layers, each going to a channel of The River. The
ranges of layers 3 and 4 are overlapping. So if you play on the keyboard a C5, it will go to channel 3 and channel
4. A single voice is allocated to channel 1 and another to channel 2. Channels 3 and 4 receive three voices each.
Play on the keyboard to test this template and each area. The first two areas are monodic and will happily
receive an arpeggio and/or a sequence. The third is bi-timbral polyphonic 6 voices but a maximum of three
notes can be played simultaneously ;)
Layer 4 is transposed by -1 octave compared with the others to lower the note of the FM bell. To modify the
transposition of layer 4, press S KEY C5 "Layer 4" to select it then S KEY D#3 "Octave+" or S KEY C#3 "Octave". To transpose by a semitone, use S KEY B3 "Trans-" and S KEY C4 "Transp-".
The River, User’s Manual PAGE 12

To continue the exercise, we are going to deactivate layer 4. If it is not selected, press S KEY C5 "Layer 4". With
the left encoder of Riverkey, select the option Active and with the right encoder the option No. Now layer 4 is
not active anymore. Next we are going to recover its voices for layer 3. On the panel, press channel 3 button
then turn on the voices 6, 7, and 8.
Let's connect The River to your computer with a USB cable.
Choose the PANEL socket. It is the best suited to give you complete control when using a software program.
Start you favourite software program. Check that PANEL@THERIVER is available in MIDI source and
destination. On The River, you have to check also that USB mirroring is active. Press *S System, select the
option Dump to USB using the left encoder and, if necessary, choose YES using the right encoder.
Put your software program in recording mode and play on the keyboard. Your sequencer will receive the MIDI
events. Stop the recording. If you look in list mode at the events recorded in your software program, you will
notice that the MIDI channel transmitted is the one selected in The River independently of your definitions in
The Riverkey. Why? The panel is always active on the channel selected and this allows you to record in your
software program all the actions on the panel ;) It is therefore more logical to select the mode Select when you
work with your computer using a profile. Press once the Mode button to switch to Select mode.
Delete the previous recording, select channel 1 on the panel; while playing you hear the sound 1 (LEAD). Put
your sequencer in recording and play a bass line fiddling with the CUTOFF, EMPHASIS and the knob. Stop the
recording. If you listen to the recording and if you look at the recorded events in list mode in your software
program, you notice that not only the notes but all the events of the panel have been transmitted.
Add a MIDI track in your software program, set it for recording. On The River, select channel 2 (its MPE) and
record.
Add a MIDI track in your software program, set it for recording. On The River, select channel 3 (its STRING) and
record.
All you have to do now is listen to the aggregate result.
3. Split, arpeggios and sequences
Load template 5. You see on the Riverkey screen two layers going to the same channel 1, to which are allocated
the eight voices. What is the advantage of having two layers going to the same channel rather than a simple
layer?
Let's not forget that the Layers can be configurable: transposition, arpeggio/sequence etc. We define a SPLIT:
A0 -> B4 and C5 -> C8.
So all the keyboard from A0 -> C8 goes to channel 1. Also, thanks to the two layers, we will be able to define an
arpeggio or a sequence on the bass part of the keyboard and leave the high part free or put there another
arpeggio / sequence.
Select layer 1: S KEY F#4 “Layer 1”.
Select/start arpeggiator: S KEY G#3 “Arpeggio” and play a chord. The arpeggio is started. You will notice that
the keys from C0 to B4 allow to transpose (if you only play one note) or to redefine the arpeggio (if you play
several notes).
The keys from C5 to C8 do not affect the arpeggio because they are in layer 2. You can therefore play freely on
the keyboard (for more information on the arpeggios, see "The arpeggios").
But you can also define an arpeggio or a sequence on this layer. For a sequence:
The River, User’s Manual PAGE 13

Select layer 1: S KEY G#4 “Layer 2”.²
Select the sequencer: S KEY A#3 “Sequencer”.
Activate the recording step by step: S KEY B3 "Record". Enter the steps of the sequence. To end the recording,
you can either start the sequence: S KEY C3 "Play|Stop" or go again S KEY A#3 "Sequencer" (for more
information on the sequences, see "The sequences").
Ainsi, vous obtenez simultanément un arpège et une séquence sur un canal de 8 voix.
4. Detune and Unison
Load template 6. You notice on the Riverkey screen two layers, each allocated to a channel. Channel 1 receives
three voices in Unison mode with a marked Detune. It is therefore monodic, but the sound is pretty heavy. The
second channel is a 5 voices polyphonic classic.
Check that channel 1 is selected and press the UNISON button. This switches the channel to polyphonic mode
but if you play you will notice that it is not quite in tune. The Detune of the Unison is always active. Bring the
Detune to zero, this would sound much better.
5. Propagating the commands in All and Redirection
Load template 7. You notice on the Riverkey screen one layer sent to channel 1, VOX sound, which has four
voices allocated. Channel 2, FM sound, receives also four voices. The MODE button is red, you are on All mode.
You are reminded of this in the second small square to the right of the screen. The All mode assures that all the
commands received by the keyboard are sent to all the channels simultaneously. Therefore when you play a
note, you hear VOX and FM simultaneously. Even if channel 2 does not have a dedicated layer, in All mode it
receives the commands.
Press S SYSTEM and select the parameter Propagate Cross All/RDir using the left encoder, then select Yes
using the right encoder then play with the potentiometer CUTOFF and/or EMPHASIS. You will notice that the
two sounds VOX and FM are modified simultaneously.
Now select No from the right encoder then play with the potentiometers. You can select in turns channel 1 and
2. You will notice that only the sound from the channel you selected is modified. The commands do not
propagate to all channels anymore.
Instead of using the mode All to play all the channels simultaneously, you can redirect channel 2 to channel 1.
This way, even in Midi or Select mode, all messages intended to channel 1 will be received by channel 2 as well.
Choose S TRANS and again TRANS without releasing S . The orange square shows RDIR. The 8 encoders will
allow you to set the channels redirection. Use encoder 2 to redirect channel 2 to channel 1 Channel 2 to ... 1
and play a few notes on the keyboard. You can see that regardless of the channel you choose, channel 2 plays
the same thing as channel 1. As was the case in All, if the option System Propagate Cross All.RDir is set to Yes,
and if channel 1 is selected on the panel, the actions of this channel will be propagated to channel 2. CUTOFF
for example will be implemented on both sounds. There is a small difference compared to All setting: if channel
2 is selected, the actions on the panel will not be propagated to 1 because 2 receives the commands from
channel 1 but not vice versa...
Are you with me ?
6. MPE
There are not many MPE compatible peripherals but we consider this standard so important we decided The
River should implement them. Load template 8. At first glance it seems there is only a single standard layer. But
in the Global menu of The Riverkey the MPE option is activated. Because this mode gives a totally different role
The River, User’s Manual PAGE 14

to the MIDI channels, each note has its channel and, as a result, The Riverkey in MPE mode functions
differently. You can use the other layers just for external communications MIDI, USB and/or CV + Gate.
The River has one channel with 8 voices. This is a simple configuration. With the ROLI keyboard, the user must
choose to limit the polyphony to 8 voices as by default it goes up to 16. On the Linnstrument, the user can
simply choose in PerNOteCha channels 2 to 9 to limit the polyphony to 8 voices.
Connect your MIDI MPE keyboard to The River would be through the MIDI socket, The simplest solution. You
could also connect to the USB port through an external USB Host (like iConnectivity) or using your computer as
a bridge. The configuration of the MPE sound is like this: the Y dimension sets the level of Oscillator 2 which
functions like a Sub, and the Z dimension plays on the CUTOFF. By default the Y dimension controls the
resonance and the Z dimension the CUTOFF. We will leave you the pleasure to discover in the S OPTION the
possible choices for MPE Z and MPE Y ;)
MPE supporte la MPE supports two-voice multitimbrality. If you define two channels of four voices and your
MPE keyboard supports it (like the Linnstrument), you have to define on the a "Left" with the control channel 1
and for voice channels 2,3,4,5 and a "Right" with the control channel 16 and the voice 6,7,8,9. It's not easy, it's
MPE, but it works so well ;)
7. External Clock
The River is capable of receiving external commands and marching in step
Connect a peripheral which generates a clock on the MIDI In or USB KEY sockets and make sure that it is
configured to send the MIDI clock messages.
Press the sur S KEY and the last G G7 on the right side of the keyboard. On the screen of The Riverkey appears
the option Ext. Clock. If option On is not selected, press once more on G7 and choose again the TUTO Template
5, Split, Arpeggios and Sequences. The River recognises the commands MIDI Start, Stop and Continue. Execute
the commands Play, Stop and Pause on your external equipment and modify its Tempo to test the behaviour of
the synchro on the arpeggios and sequences of The River.
If another MIDI instrument is connected to The River through the MIDI socket or USB KEY, it can also receive
clock data. Check that The River screen displays GLOBAL setup or LAYER setup. If not, go S KEY F#3
"LAYER/GLO". If necessary press several times the S KEY B4 "Clock" in order to select Clock = MID, USB or M/U.
Now your external equipment should receive The River clock which should be itself in sync with the external
equipment.
If another MIDI instrument is connected to The River through the MIDI socket or USB KEY, it can also receive
clock data. Check that The River screen displays GLOBAL setup or LAYER setup. If not, go S KEY F#3
"LAYER/GLO". If necessary press several times the S KEY B4 "Clock" in order to select Clock = MID, USB or
M/U. Now your external equipment should receive The River clock which should be itself in sync with the
external equipment.
8. Synchronising the digital LFO (DLFO)
The River's DLFO can now be synchronised with The River's clock (and by extension with an external clock if this
option is selected, see the previous tutorial).
For this demo, we will start with a simple configuration. Load template 1 ( S LOAD MULTI+ button voice 1)
then load a sound less "hard" than Init, like LEAD, for example ( S LOAD SINGLE + button voice 2).
The River, User’s Manual PAGE 15
 Loading...