

Page 1

DSM S--Series
Integrated Stepper Motor / Driver
Installation Manual
04/07 MN1940
Page 2

Page 3

Contents
1 General Information 1-1.................................
2 Introduction 2-1........................................
2.1 DSM S-Series integrated motor and driver 2-1.................
2.1.1 Option availability 2-2..............................................
2.2 Receiving and inspection 2-3................................
2.2.1 Identifying the catalog number 2-3....................................
2.3 Units and abbreviations 2-4..................................
3 Basic Installation 3-1....................................
3.1 Introduction 3-1............................................
3.1.1 Location requirements 3-1..........................................
3.1.2 Mounting the DSM 3-2.............................................
3.1.3 Other requirements for installation 3-6................................
4 Input / Output 4-1......................................
4.1 Introduction 4-1............................................
4.1.1 Basic connections 4-1..............................................
4.2 Motor power input 4-2.......................................
4.2.1 Wire sizes 4-3....................................................
4.3 Logic inputs 4-4............................................
4.3.1 Logic input descriptions 4-4.........................................
4.3.2 Input timing 4-5...................................................
4.3.3 Sinking / sourcing input configuration 4-6..............................
4.4 SPI interface 4-8...........................................
4.4.1 SPI connector 4-8.................................................
4.4.2 SPI signal descriptions 4-9..........................................
4.5 Connection summary - minimum system wiring 4-10.............
5 Operation 5-1..........................................
5.1 Introduction 5-1............................................
5.1.1 Connecting the DSM to the PC 5-1...................................
5.1.2 Installing the USB driver 5-1.........................................
5.1.3 Installing the virtual COM port driver 5-1...............................
5.1.4 Determining the virtual COM port number 5-2..........................
5.1.5 Installing Baldor SPI Interface 5-2....................................
5.1.6 Starting the controller and DSM 5-3...................................
MN1940
Contents i
Page 4

5.2 Baldor SPI Interface 5-4.....................................
5.2.1 Starting Baldor SPI Interface 5-4.....................................
5.2.2 Configuration parameters 5-4........................................
6 Troubleshooting 6-1....................................
6.1 Introduction 6-1............................................
6.1.1 Problem diagnosis 6-1..............................................
6.1.2 Further support 6-1................................................
6.1.3 Communication problems 6-1........................................
6.1.4 Motor control problems 6-2..........................................
7 Specifications 7-1......................................
7.1 Introduction 7-1............................................
7.1.1 Input power 7-1...................................................
7.1.2 Motor speed & torque - DSMS17 7-2.................................
7.1.3 Motor speed & torque - DSMS23 7-4.................................
7.1.4 Motor speed & torque - DSMS34 7-6.................................
7.1.5 Digital inputs 7-9..................................................
ii Contents
MN1940
Page 5

AustralianBaldorPtyLt
d
1 General Information
LT0227A02 Copyright Baldor (c) 2007. All rights reserved.
This manual is copyrighted and all rights are reserved. This document or attached software may not,
in whole or in part, be copied or reproduced in any form without the prior written consent of BALDOR.
BALDOR makes no representations or warranties with respect to the contents hereof and specifically
disclaims any implied warranties of fitness for any particular purpose. The information in this
document is subject to change without notice.
BALDOR assumes no responsibility for any errors that may appear in this document.
Mintt is a registered trademark of Baldor.
Windows 95, Windows 98, Windows ME, Windows NT , Windows 2000 and Windows XP are
registered trademarks of the Microsoft Corporation.
Limited Warranty:
For a period of two (2) years from the date of original purchase, BALDOR will repair or replace without
charge controls and accessories which our examination proves to be defective in material or
workmanship. This warranty is valid if the unit has not been tampered with by unauthorized persons,
misused, abused, or improperly installed and has been used in accordance with the instructions and/or
ratings supplied. This warranty is in lieu of any other warranty or guarantee expressed or implied.
BALDOR shall not be held responsible for any expense (including installation and removal),
inconvenience, or consequential damage, including injury to any person or property caused by items of
our manufacture or sale. (Some countries and U.S. states do not allow exclusion or limitation of
incidental or consequential damages, so the above exclusion may not apply.) In any event,
BALDOR’s total liability, under all circumstances, shall not exceed the full purchase price of the
control. Claims for purchase price refunds, repairs, or replacements must be referred to BALDOR with
all pertinent data as to the defect, the date purchased, the task performed by the control, and the
problem encountered. No liability is assumed for expendable items such as fuses. Goods may be
returned only with written notification including a BALDOR Return Authorization Number and any
return shipments must be prepaid.
Baldor UK Ltd
Mint Motion Centre
6 Bristol Distribution Park
Hawkley Drive
Bristol, BS32 0BF
Telephone: +44 (0) 1454 850000
Fax: +44 (0) 1454 850001
Email: technical.support@baldor.co.uk
Web site: www.baldor.co.uk
Baldor Electric Company
Telephone: +1 479 646 4711
Fax: +1 479 648 5792
Email: sales@baldor.com
Web site: www.baldor.com
Baldor ASR GmbH
Telephone: +49 (0) 89 90508-0
Fax: +49 (0) 89 90508-491
Baldor ASR AG
Telephone: +41 (0) 52 647 4700
Fax: +41 (0) 52 659 2394
Email: technical.support@baldor.ch
Australian Baldor Pty Ltd
Telephone: +61 2 9674 5455
Fax: +61 2 9674 2495
Baldor Electric (F.E.) Pte Ltd
Telephone: +65 744 2572
Fax: +65 747 1708
www.baldormotion.com
1
Baldor Italia S.R.L
Telephone: +39 (0) 11 56 24 440
Fax: +39 (0) 11 56 25 660
General Information 1-1MN1940
Page 6
www.baldormotion.com
Safety Notice
Only qualified personnel should attempt the start-up procedure or troubleshoot this equipment.
This equipment may be connected to other machines that have rotating parts or parts that are
controlled by this equipment. Improper use can cause serious or fatal injury.
Precautions
Do not touch any circuit board, power device or electrical connection before you first
ensure that no high voltage is present at this equipment or other equipment to which it is
WARNING
WARNING
CAUTION
CAUTION
CAUTION
CAUTION
NOTICE
NOTICE
NOTICE
NOTICE
connected. Electrical shock can cause serious or fatal injury. Only qualified personnel
should attempt to start-up, program or troubleshoot this equipment.
Be sure that you are completely familiar with the safe operation and programming of this
equipment. This equipment may be connected to other machines that have rotating parts
or parts that are controlled by this equipment. Improper use can cause serious or fatal
injury.
The stop input to this equipment should not be used as the single means of achieving a
safety critical stop. Drive disable, motor disconnect, motor brake and other means should
be used as appropriate.
Improper operation or programming may cause violent motion of the motor shaft and
driven equipment. Be certain that unexpected motor shaft movement will not cause injury
to personnel or damage to equipment.
Be sure all wiring complies with the National Electrical Code and all regional and local
codes. Improper wiring may result in unsafe conditions.
The DSM has components which are sensitive to Electrostatic Discharge (ESD). All
handling should be done at an ESD protected workstation.
To prevent equipment damage, be certain that input and output signals are powered and
referenced correctly.
To ensure reliable performance of this equipment be certain that all signals to/from the DSM
are shielded correctly.
Avoid locating the DSM immediately above or beside heat generating equipment, or directly
below water steam pipes.
Avoid locating the DSM in the vicinity of corrosive substances or vapors, metal particles and
dust.
1-2 General Information MN1940
Page 7
www.baldormotion.com
2 Introduction
2.1 DSM S-Series integrated motor and driver
The DSM S-Series high-torque integrated motor and driver is ideal for designers who want the
simplicity of a motor with on-board electronics. The DSM allows the system designer to decide
the best method of control. The drive’s integrated electronics eliminates the need to run the
motor cabling through the machine, reducing the potential for problems due to electrical noise.
The DSM is a small, powerful and inexpensive solution that will reduce system cost, design
and assembly time for a large range of stepping motor applications.
The DSM family use a NEMA17, NEMA23 or NEMA34 1.8° high torque motor combined with a
microstepping drive, and accept up to 14 resolution settings from 1/2 to 256 microsteps per
step. Setup parameters can be changed ‘on-the-fly’ or downloaded and stored in non-volatile
memory with the use of a simple user interface program which is provided, eliminating the
need for external switches or resistors. The versatile, compact DSM is available in multiple
configurations to fit various system needs.
2
Features include:
H Integrated microstepping drive/NEMA high torque motor.
H Available in various stack lengths from 13 to 47 (model dependent).
H +12 to +75 VDC input voltage (+12 to +48 VDC on DSMS17).
H Optically isolated +5 to +24 VDC inputs, sourcing or sinking.
H Automatic current reduction.
H Automatic communication configuration.
H Rear knob for manual positioning (option M).
H Interfacing by 30 cm (12 in) flying leads (optional 7-pin terminal block on DSMS17/23).
H Graphical User Interface (GUI) for easy parameter setup.
H Extremely compact.
Introduction 2-1MN1940
Page 8

www.baldormotion.com
fly
inglead
r
t
rol
knob
A “Baldor Motion Toolkit CD” is available. This contains the Baldor SPI Interface software,
used for communicating and configuring the DSM.
This manual is intended to guide you through the installation of the DSM. The chapters should
be read in sequence.
The Basic Installation section describes the mechanical installation of the DSM.
The following sections require knowledge of the low level input/output requirements of the
device that will control the DSM, and an understanding of computer software installation. If you
are not qualified in these areas you should seek assistance before proceeding.
Note: You can check that you have the latest releases by visiting the website
www.baldormotion.com/supportme.
2.1.1 Option availability
Model
DSMS
17
DSMS
23
DSMS
34
‘F’
option
Yes
All models
Yes
All models
Yes
All models
s
‘P’
connecto
option
Yes
All
models
Yes
All
models
No Yes
‘M’
con
option
Yes
All
models
Yes
All
models
All
models
2-2 Introduction MN1940
Page 9

www.baldormotion.com
2.2 Receiving and inspection
When you receive your DSM, there are several things you should do immediately:
1. Check the condition of the packaging and report any damage immediately to the carrier
that delivered your DSM.
2. Remove the DSM from the shipping container and remove all packing material. The container
and packing materials may be retained for future shipment.
3. Verify that the catalog number of the DSM you received is the same as the catalog
number listed on your purchase order. The catalog/part number is described in the next
section.
4. Inspect the DSM for external damage during shipment and report any damage to the
carrier that delivered it.
5. If the DSM is to be stored for several weeks before use, be sure that it is stored in a
location that conforms to the storage humidity and temperature specifications shown in
section 3.1.1.
2.2.1 Identifying the catalog number
Different models of DSM are available. As a reminder of which product has been installed, it is
a good idea to write the catalog number in the space provided below.
DSM catalog number:
Installed in: ________________________
A description of a catalog number is shown here, using the example DSMS34F-3B-M:
Meaning Alternatives
DSMS DSM S-series family -
34 NEMA 34 frame size
F Flying lead connections P=7-pin terminal block
3 Large stack size
Supply voltage 12 - 75 VDC
B
(DSMS23 / DSMS34 only)
M (Optional) Manual control knob -
DSMS______-______-__
Date: ______
17=NEMA 17;
23=NEMA 23
1=Small stack size;
2=Medium stack size
A=Supply voltage 12 - 48 VDC
Introduction 2-3MN1940
Page 10

2.3 Units and abbreviations
The following units and abbreviations may appear in this manual:
V Volt (also VAC and VDC)...............
WWatt..............
A Ampere...............
Ω Ohm...............
mΩ milliohm.............
μF microfarad..............
pF picofarad..............
mH millihenry.............
Φ phase...............
ms millisecond..............
μs microsecond..............
ns nanosecond..............
mm millimeter.............
m meter...............
in inch...............
ft feet...............
lb·in pound inch (torque).............
N·m Newton meter (torque).............
ADC Analog to Digital Converter............
ASCII American Standard Code for Information Interchange...........
AWG American Wire Gauge............
CDROM Compact Disc Read Only Memory.........
CTRL+E on the PC keyboard, press Ctrl then E at the same time..........
DAC Digital to Analog Converter............
EMC Electromagnetic Compatibility............
HMI Human Machine Interface.............
ISO International Standards Organization.............
Kbaud kilobaud (the same as Kbit/s in most applications)...........
MB megabytes.............
Mbps megabits/s...........
(NC) Not Connected............
NEMA National Electrical Manufacturers Association...........
RF Radio Frequency..............
SPI Serial Peripheral Interface.............
www.baldormotion.com
2-4 Introduction MN1940
Page 11

3 Basic Installation
3.1 Introduction
You should read all the sections in Basic Installation.
It is important that the correct steps are followed when installing the DSM.
This section describes the mechanical installation of the DSM.
3.1.1 Location requirements
Ensure you have read and understood the warnings and cautions in section 1.
The safe operation of this equipment depends upon its use in the appropriate environment.
The following points must be considered:
H The DSM is designed to be mounted indoors, permanently fixed and located.
H The DSM must be secured by the holes in the faceplate.
Because the DSM consists of two core components, a drive and a motor, attention must be
paid to the thermal specifications of both the motor and the electronics. The following
maximum temperatures apply to the DSM:
H The DSM heat sink temperature must not exceed 85 °C (185 °F).
H The DSM motor temperature must not exceed 100 °C (212 °F).
www.baldormotion.com
3
Basic Installation 3-1MN1940
Page 12
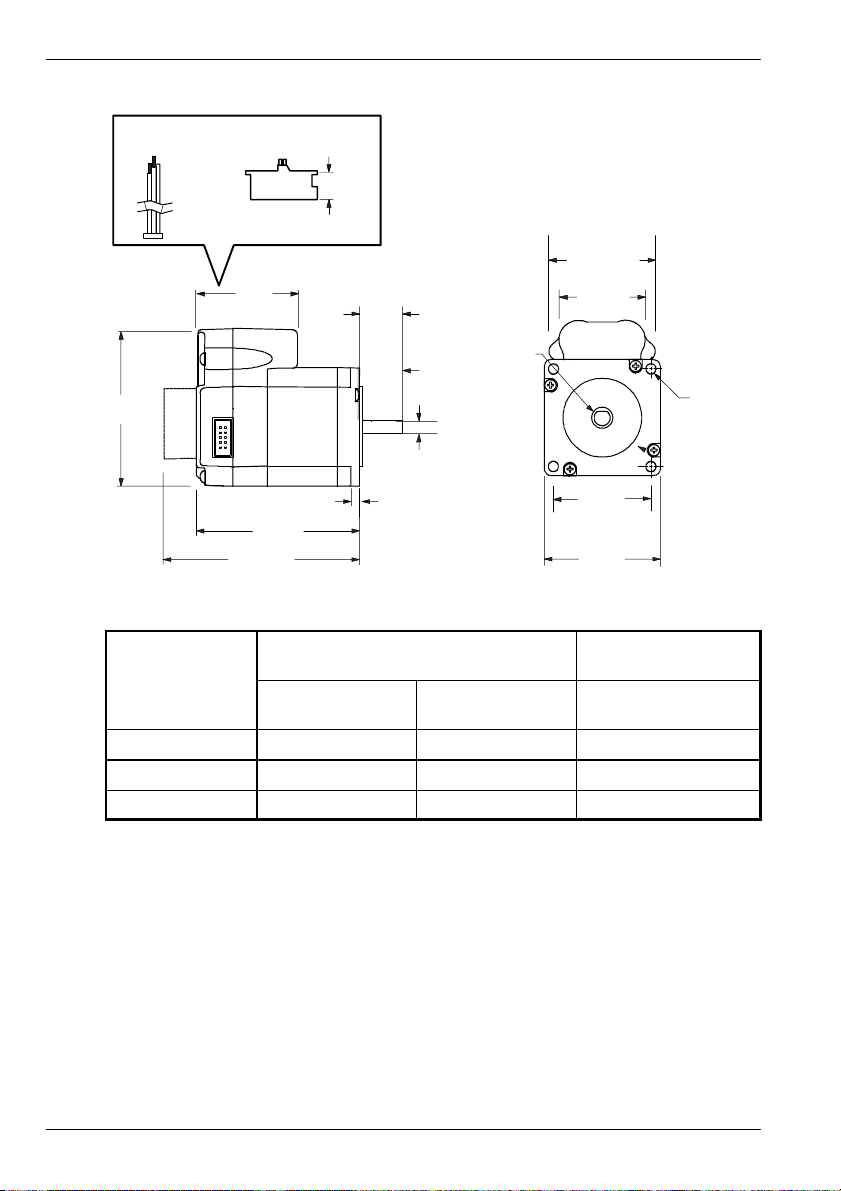
3.1.2 Mounting the DSM
Ensure you have read and understood the location requirements in section 3.1.1. Mount the
DSM by the four holes in the faceplate. M5 bolts or screws are recommended.
3.1.2.1 Dimensions - DSMS17
www.baldormotion.com
Flying leads
305 (12)
58.3
(2.3)
DSM
Model
‘P’ connector option
30.2
(1.19)
P1
P2
L
MAX
L
MAX2
11. 2 (0.44)
2
(0.08)
L
MAX
24
(0.94)
15
(0.59)
4.5
(0.18)
Dimensions
(mm / inches)
(with control knob)
Ø5
(0.2)
L
MAX2
All dimensions shown as
mm (inches)
31 (1.22)
Square
42.7 (1.68)
Square
4xØM3x0.5 thread
x 3.8 (0.15) deep
Ø22 (0.87)
Weight
DSMS17x-1A 55.9 (2.20) 70.9 (2.79) 277.8 (9.8)
DSMS17x-2A 61.7 (2.43) 76.7 (3.02) 297.7 (10.5)
DSMS17x-3A 70.4 (2.77) 85.6 (3.37) 428.1 (15.1)
g/oz
Figure 1 - Package dimensions - DSMS17
Use care when installing the mounting screws on all DSMS17 models. The
mounting holes on the flange are not drilled through, so the maximum length for
CAUTION
screw threads into the motor flange is 3.5 mm (0.14 in). See Figure 2. The
maximum torque for the M3x0.5 screw is 9 kg·cm (7.8 lb-in).
3-2 Basic Installation MN1940
Page 13
Maximum length of
screw threads into
the motor housing is
3.5 mm (0.14 in)
DSMS17
Figure 2 - Screw thread limitation - DSMS17
www.baldormotion.com
Customer’s
mounting flange
M3 x 0.5 screw
Basic Installation 3-3MN1940
Page 14
3.1.2.2 Dimensions - DSMS23
Flying leads
305 (12)
75.2
(2.96)
‘P’ connector option
48.3
(1.9)
P1
P2
L
MAX2
L
MAX
11. 2 (0.44)
4.9
(0.19)
(0.81)
(0.59)
5.8
(0.23)
20.6
15
All dimensions shown as
mm (inches)
51.2
(2.02)
41.4
(1.63)
Ø6.35
(0.25)
47.14
(1.86)
Square
56.4
(2.22)
Square
www.baldormotion.com
4xØ5 (0.2)
DSMS
Model
L
MAX
Dimensions
(mm / inches)
(with control knob)
L
MAX2
Weight
kg / lb
DSMS23x-1B 67.31 (2.65) 85.34 (3.36) 0.61 (1.35)
DSMS23x-2B 76.71 (3.02) 94.74 (3.73) 0.75 (1.65)
DSMS23x-3B 98.55 (3.88) 116.6 (4.59) 1.11 (2.45)
Figure 3 - Package dimensions - DSMS23
3-4 Basic Installation MN1940
Page 15

3.1.2.3 Dimensions - DSMS34
Flying leads
305 (12)
www.baldormotion.com
4xØ5.5 (0.22)
37 (1.46)
25 (0.98)
13 (0.51)
Ø14
(0.55)
Ø73
(2.87)
L
MAX2
(with control knob)
94.7
(3.73)
Motor
Stack
18.6 (0.73)
L
MAX
L
MAX2
2 (0.08)
31.8 (1.25)
All dimensions shown as
Dimensions
(mm / inches)
L
MAX
10 (0.39)
mm (inches)
DSMS34F-1B 94.2 (3.71) 112.3 (4.42) 1.9 (4.19)
DSMS34F-2B 114.3 (4.50) 132.3 (5.21) 2.5 (5.5)
DSMS34F-3B 154.2 (6.07) 172.2 (6.78) 4.0 (8.8)
Figure 4 - Package dimensions - DSMS34
69.6 (2.74)
86.1 (3.39)
Weight
kg / lb
3.1.2.4 Securing DSM cables
Some applications may require that the DSM moves with the axis motion. If this is a
requirement of your application, the motor leads must be properly anchored. Secure the flying
leads to the motor body using adhesive cable clamps. This will prevent flexing and tugging
which can cause damage at critical connection points in the DSM electronics.
Do not bundle the logic leads together with the DSM power leads.
Basic Installation 3-5MN1940
Page 16

www.baldormotion.com
3.1.3 Other requirements for installation
H The DSM requires a power supply as described in section 4.2.
H A PC that fulfills the following specification:
Minimum specification Recommended specification
Processor Intel Pentium 133 MHz Intel PentiumII 400 MHz or faster
RAM 32MB 128 MB
Hard disk space 40 MB 60 MB
CD-ROM ACD-ROMdrive
USB port USB port
Screen 800 x 600, 256 colors 1024 x 768, 16-bit color
Mouse A mouse or similar pointing device
Operating
system
H A USB-SPI cable (connected as shown in section 4.4.1). Part CBL055-501 is recommended.
H Your PC operating system user manual might be useful if you are not familiar with Windows.
Windows 95, Windows NT Windows 98, Windows ME,
Windows NT, Windows 2000 SP1
or Windows XP
3-6 Basic Installation MN1940
Page 17

4 Input / Output
www.baldormotion.com
4.1 Introduction
This section describes the input and output connections of the DSM.
Logic level cables must not run parallel to power cables. Power cables will introduce noise into
the logic level cables and make the system unreliable. Logic level cables must be shielded to
reduce the chance of induced noise. The shield needs to be grounded at the signal source to
AC ground; the other end of the shield must not be connected. This allows the shield to act as
adrain.
Do not connect or disconnect any wiring when power is applied! Disconnect the
AC power side to power down the DC power supply. For battery operated
CAUTION
4.1.1 Basic connections
Flying
leads
systems, connect a transient suppressor across the power switch to prevent arcs
and high voltage spikes.
Color Description Pin
White +5 VDC Optocoupler reference 1..
(NC)
Orange Step Cloc k input 3..... ........
Blue CW/CCW Direction input 4... ....
Brown Enable/Disable input 5.... ......
Black Motor power GND 6..... .......
Red Motor power 7......... ..........
(12-48 VDC or 12-75 VDC)
4
‘P’ connector
Models with ‘P’
connector option
(DSMS17P... /
DSMS23P... only)
SPI interface
(NC)
1
3
(NC)
5
GND +5 V Out
Master Out /
Slave In
(NC)
7
9
2
(NC)
Chip Select
4
6
8
Clock
Master In /
10
Slave Out
Figure 5 - Basic connection summary
Input / Output 4-1MN1940
Page 18

4.2 Motor power input
The DSM requires an unregulated DC power supply. The power supply current will depend
upon voltage and load, but will not exceed 2 A (DSMS17 / DSMS23) or 4 A (DSMS34).
www.baldormotion.com
Location
Input voltage
Flying leads (red and black), ‘P’ connector
+12 to +48 VDC (DSMS17)
range
+12 to +75 VDC (DSMS23, DSMS34)
Volta ge ripple ±10%
Input current 2 A maximum (DSMS17 / DSMS23)
4 A maximum (DSMS34)
The maximum input voltage of the DSM includes motor back EMF, power supply
ripple and high line.
CAUTION
A characteristic of all motors is back EMF. Back EMF is a source of current that can push the
output of a power supply beyond the maximum operating voltage of the driver. As a result,
damage to the stepper driver could occur over a period of time. Care should be taken so that
the back EMF does not exceed the maximum input voltage rating of the DSM.
Cable length, wire gauge and power conditioning devices play a major role in the performance
of the DSM. The length of the DC power supply cable to a DSM should not exceed 15 m
(50 ft). If cabling of 15 m (50 ft) or longer is required, the additional length may be gained by
adding an AC power supply cable (see Figures 6 and 7). Power supply leads to the DSM need
to be twisted. If more than one DSM is to be connected to the same power supply, run
separate power and ground leads from the supply to each driver.
From
DC S uppl y
+24 V
0V
500 μF
per
Amp
Cable length up to 15 m
Shielded
twisted
pair
Connect shield to
earth ground at
supply end onl y
Ferrite
sleeve
Pi type
RFI filter
flying lead
+
-
flying lead
To
DSM
Red
Black
Figure 6 - Power supply connections, cable length less than 15 m
From
AC
Supply
Transformer:
0-28VACRMSfor
48 VDC systems.
20 - 48 VAC RMS for
75 VDC systems
Full wave
bridge
rectifier
Pi type
RFI filter
500 μF
per
Amp
Cable length up to 15 m
Shielded
twisted
pair
Connect shield to
earth ground at
supply end onl y
Ferrite
sleeve
Pi type
RFI filter
flying lead
+
-
flying lead
To
DSM
Red
Black
Figure 7 - Power supply connections, cable length more than 15 m
4-2 Input / Output MN1940
Page 19

www.baldormotion.com
()(
)
p
p
p
p
4.2.1 Wire sizes
Table 1 describes the wire sizes to provide optimal protection against EMI and RFI. Correct
wire size is determined by the current requirement and the cable length. The actual cable type,
wire gauge, shield type and filtering devices used are dependent on the customer’s application
and system. Always use shielded twisted pairs for AC and DC supply cables. For logic wiring
(see section 4.3) AWG22 wire is recommended.
Supply current
1 A peak
2 A peak
3 A peak
4 A peak
Cable length
(meters)
3 10 20 0.5
8 25 20 0.5
15 50 18 1.0
23 75 18 1.0
30 100 16 1.3
3 10 20 0.5
8 25 18 1.0
15 50 16 1.3
23 75 14 2.0
30 100 14 2.0
3 10 18 1.0
8 25 16 1.3
15 50 14 2.0
23 75 12 3.3
30 100 12 3.3
3 10 18 1.0
8 25 16 1.3
15 50 14 2.0
23 75 12 3.3
30 100 12 3.3
Cable length
(feet)
Minimum
Wire Gauge
AWG mm
2
Table1-Powerwireratings
Input / Output 4-3MN1940
Page 20

www.baldormotion.com
4.3 Logic inputs
The DSM has three optically isolated logic inputs. These inputs are isolated to minimize or
eliminate electrical noise coupled onto the drive control signals, and are over-voltage
protected. The inputs may be configured as either sinking inputs or sourcing inputs (model
dependent, see section 4.3.3), with the Optocoupler Reference (white) lead as the reference.
This allows the DSM to be interfaced to a variety of controllers.
DSM
Optocoupler
reference
Step clock
input
Direction
input
Enable input
470R
470R
750R
HCPL0630
HCPL0630
PS2701-1
Figure 8 - Opto-isolated digital input circuit (sinking only)
4.3.1 Logic input descriptions
4.3.1.1 Step clock (orange flying lead)
The step clock input is where the motion clock from the control circuitry will be connected. The
motor will advance one microstep in the plus or minus direction (based upon the state of the
direction input) on the step clock edge that causes the opto-isolator to be active. The size of
this increment or decrement will depend on the microstep resolution setting. The maximum
frequency on the step clock input is 2.0 MHz, with a minimum pulse width of 400 ns.
4.3.1.2 Direction (blue flying lead)
The direction input controls the CW/CCW direction of the motor. A logic high (default,
unconnected) will cause the motor to rotate in the CW direction (seen while looking at the face
of the motor). A logic low on the input will cause the motor to rotate in the CCW direction. This
input is synchronized to the positive going edge of the step clock input. The direction input
may be connected by means of a switch.
4.3.1.3 Enable (brown flying lead)
This input can be used to enable or disable the driver output circuitry. A logic high (when the
enable switch is open, see Figures 9 and 10), causes the driver outputs to be enabled and
step clock pulses will cause the motor to advance. A logic low (when the input switch is
4-4 Input / Output MN1940
Page 21

www.baldormotion.com
closed) will cause the driver output circuitry to be disabled. Note that the internal sine/cosine
position generator will continue to increment or decrement as long as step clock pulses are
being received by the DSM. The enable input is not synchronized to any other input and may
be changed at any time.
4.3.2 Input timing
The direction input and the microstep resolution inputs are internally synchronized to the
positive going edge of the step clock input. When a step clock transitions from low to high on
the positive going edge, the state of the direction input and microstep resolution settings are
latched. Any changes made to the direction and/or microstep resolution will occur on the rising
edge of the step clock pulse following this change. Run Current and Hold Current changes
are updated immediately (see section 5.2.2).
Input / Output 4-5MN1940
Page 22

www.baldormotion.com
4.3.3 Sinking / sourcing input configuration
All DSMS17, 23 and 34 models can be wired to create sinking inputs, where a reference
voltage between +5 and +24 VDC is connected to the Optocoupler Reference (white) lead.
The isolated inputs are then interfaced to a sinking output (which utilizes the same supply as
the opto coupler reference input) such as a switch, open collector, or PLC output. T o maintain
isolation, the input power source should not be connected to the motor power source.
+5 to +24 VDC
(see warning)
Optocoupler reference
(white)
R
LIMIT
INPUT
+5 to +24 VDC
(see warning)
Optocoupler reference
Controller
output
(white)
R
LIMIT
INPUT
Figure 9 - Sinking input configurations
Alternatively, sourcing inputs may be used where the Optocoupler Reference (White) lead is
connected to ground. The isolated inputs are then sourced to between +5 to +24 VDC from a
switch, open collector, or PLC output.
+5 to +24 VDC+5 to +24 VDC
R
Optocoupler reference
(white)
LIMIT
INPUT
Controller
output
Optocoupler reference
(white)
R
LIMIT
INPUT
Figure 10 - Sourcing input configurations
4-6 Input / Output MN1940
Page 23

www.baldormotion.com
NextMove ESB
(models NSB003-501 / NSB003-502 only)
+5 V
Step
Output
GND
Direction
Output
GND
Enable
74AHCT244
74AHCT244
ULN2003
ULN2003
+5 V
+5 V
STEP0
DIR0
DGND
REL COM
REL NC
‘X2’
4
1k*
3
1k*
5
1
‘X12’
7
8
DSM
Optocoupler
reference
Step clock
input
Direction
input
Enable input
Figure 11 - Sourcing input connections from a typical controller
(e.g. NextMove ESB models NSB003-501/502)
Note: * The 1kΩ pull up resistors are optional, but can help prevent noise affecting the
DSM’s inputs.
Input / Output 4-7MN1940
Page 24

www.baldormotion.com
4.4 SPI interface
DSM setup parameters are changed via an SPI (Serial Peripheral Interface) port. This port
uses a 10-pin IDC header, and connects to a USB port on your PC. The recommended
method of connecting the SPI port to the PC is by using parameter setup cable CBL055-501.
The PC requires a standard USB port.
4.4.1 SPI connector
1
3
5
7
9
CAUTION
Location 10-pin IDC header (DSMS17... / DSMS23...)
2
4
6
8
10
Additional flying leads (DSMS34...)
Typical mating connector: AMPMODU MT (Amp 102398-3)
Pin Name Description
1 (NC)
2 (NC)
3 (NC)
4 CS Chip select
5 GND Communication ground
6 +5V out +5 VDC output
7 MOSI Master Out / Slave In
8 CLK Clock
9 (NC)
10 MISO Master In / Slave Out
The +5 VDC output on the SPI connector is used for the setup cable only. This
output is not designed to power external devices.
5-GND
7-MOSI
CS
46 - +5 V out
8-Clock
10 - MISO
CBL055-501
USB/SPI interface electronics
USB cable
to PC
Figure 12 - SPI interface wiring
4-8 Input / Output MN1940
Page 25

www.baldormotion.com
4.4.2 SPI signal descriptions
4.4.2.1 +5 V out
This output is a voltage supply for the setup cable only. It is not designed to power any
external devices
4.4.2.2 CLK
The clock is driven by the master and regulates the flow of the data bits. The master may
transmit data at a variety of baud rates. The clock cycles once for each bit that is transferred.
4.4.2.3 MISO
Carries output data from the DSM back to the SPI master. Only one DSM can transmit data
during any particular transfer.
4.4.2.4 CS
This signal is used to turn multiple DSMs on or off.
4.4.2.5 MOSI
Carries output data from the SPI Master to the DSM.
Input / Output 4-9MN1940
Page 26

www.baldormotion.com
4.5 Connection summary - minimum system wiring
As a guide, Figure 13 shows an example of the typical minimum wiring required to operate the
DSM in conjunction with a NextMove ESB controller.
Motor
power
X12
REL COM
REL NC
X2
supply
Red - 12-48 VDC / 12-75 VDC
Black - 0 V
Ferrite & filter
not shown.
DSM
NextMove ESB
DIR0+
+5V
STEP0
(NC)
DGND
Note: For simplicity, the NextMove ESB’s 24 V
power suppl y on connector X1 is not shown.
Figure 13 - Example minimum system wiring (flying leads)
Blue - Direction
White - Optocoupler reference
Orange - Step cl ock
Brown - Enable
CBL055-501
PC USB port > SPI connec tion
(required only during setup)
PC
4-10 Input / Output MN1940
Page 27

www.baldormotion.com
5 Operation
5.1 Introduction
The motor interface is accessed through the Baldor SPI Interface software, which is an easy
to install and easy to use program used to set the DSM’s parameters. The Baldor SPI
Interface is included on the Baldor Motion Toolkit CD.
5.1.1 Connecting the DSM to the PC
The DSM is connected to the PC using a standard USB port. It is recommended to use the
optional CBL055-501 parameter setup cable (see section 4.4).
5.1.2 Installing the USB driver
When the parameter setup cable (CBL055-501) is connected to the PC, Windows XP will
automatically detect it and display the Found New Hardware Wizard. It is now necessary to
install the drivers, which are provided on the CD supplied with the cable. Alternatively, the driver
files can be downloaded from www.baldormotion.com/supportme
folder on the PC.
1. Choose the No, not this time option and click Next >.
2. Choose the Install from a list or specific location (Advanced) option and click Next >.
3. Check the Include this location in the search option. Click Browse and locate the drivers
folder on the CD. For downloaded files, locate the temporary folder containing the extracted
files. Click Next >.
4. When Windows finds the required driver files, a dialog will warn that they have not passed
‘Windows Logo testing’. This is normal for the parameter setup cable’s USB driver, so click
Continue Anyway to continue with the installation.
5. When the Completing the Found New Hardware Wizard message appears, click Finish.
After a few moments, the Found New Hardware Wizard will appear a second time, ready to
install the virtual COM port driver.
and placed in a temporary
5
5.1.3 Installing the virtual COM port driver
As soon as the USB driver has been installed, the PC starts to communicate with the parameter
setup cable’s interface. This immediately reveals the other part of the interface’s hardware, the
virtual communications port (VCP), which provides communication with the DSM motor. The
VCP also requires drivers to be installed, which is why the Found New Hardware Wizard appears
a second time.
1. Choose the No, not this time option and click Next >.
2. Choose the Install from a list or specific location (Advanced) option and click Next >.
3. Check the Include this location in the search option. The previously used location should
already be selected, but if not click Browse and locate the required folder. Click Next >.
Operation 5-1MN1940
Page 28

www.baldormotion.com
4. When Windows finds the required VCP driver files, a dialog will warn that they have not
passed ‘Windows Logo testing’. This is normal for the parameter setup cable’s VCP driver,
so click Continue Anyway to continue with the installation.
5. When the Completing the Found New Hardware Wizard message appears, click Finish.
A final Found New Hardware message will appear on the task bar to inform you that the
hardware is now ready to use.
Note: If the MotiFlex e100 is later connected to a different USB port on the host computer,
Windows may report that it has found new hardware. Either install the driver files
again for the new USB port, or connect the MotiFlex e100 to the original USB port
where it will be recognized in the usual way.
5.1.4 Determining the virtual COM port number
The parameter setup cable’s virtual COM port appears as a normal COM (serial) port in
Windows, and is automatically allocated a COM port number. The Baldor SPI Interface software
normally auto-detects the motor regardless of the allocated COM port. If for any reason the
Baldor SPI Interface software fails to auto-detect the motor (section 5.2.1), it may be necessary
to manually select this COM port.
1. In Windows, right-click the My Computer icon and choose Properties.
2. Choose the Hardware tab and click Device Manager.
3. Expand the Ports (COM & LPT) item.
4. Look for the entry named Baldor USB to SPI ParameterSetup Cable (COM...). The value that
appears after COM is the port number. Make a note of this number.
5.1.5 Installing Baldor SPI Interface
You will need to install the Baldor SPI Interface software to configure the DSM.
1. Insert the CD into the drive.
2. After a few seconds the setup wizard should start automatically. If the setup wizard does not
appear, select Run... from the Windows Start menu and type
d:\Baldor_SPI_Interface.exe
where d represents the drive letter of the CD device.
Follow the on-screen instructions to install the software. The setup Wizard will copy the files
to appropriate folders on the hard drive.
5-2 Operation MN1940
Page 29

www.baldormotion.com
5.1.6 Starting the controller and DSM
If you have followed the instructions in the previous sections, you should have now connected
power sources, inputs and outputs, and the USB cable linking the PC with the DSM. Before
you apply power for the first time, it is very important to verify the following:
H Inspect all power connections for accuracy, workmanship and tightness.
H Verify that all wiring conforms to applicable codes.
H Check all signal wiring for accuracy.
1. Turn on the controller (e.g. NextMove ESB, if connected).
2. Turn on the motor power supply.
Operation 5-3MN1940
Page 30

www.baldormotion.com
5.2 Baldor SPI Interface
The Baldor SPI Interface is a simple application for configuring all aspects of the DSM.
5.2.1 Starting Baldor SPI Interface
On the Windows Start menu, select Programs, BALDOR SPI Interface, BALDOR SPI Interface.
The software will immediately try to establish communication with the DSM. If this step fails, the
word “Disconnected” will appear in red. Check that the DSM is powered and that the cable is
connected, then choose the Port menu item. Select the appropriate USB port from the list of
USB/Serial port options (this is the COM port number found in Windows Device Manager - see
sectio n 5.1.4).
5.2.2 Configuration parameters
These parameters may all be changed ‘on-the-fly’. To select different views, choose the View
menu item.
5.2.2.1 Motion settings view
The motion settings view shows the main configuration parameters for the DSM:
Click in the boxes or use
the arrow buttons to
adjust values.
To revert to default settings,
click Factory, followed by Set.
Parameter Name Range Units Default
MSEL Microstep resolution 1 - 256 microsteps
MRC Motor run current 1 - 100 % 25
HCDT Motor hold current delay time 0 - 65000 ms 500
MHC Motor hold current 0 - 100 % 5
DIR Motor direction override CW or CCW CW
To send the changes to
the DSM, click Set.
256
per step
5-4 Operation MN1940
Page 31

www.baldormotion.com
Microstep Resolution Select (MSEL)
The MSEL parameter specifies the microstep resolution of the DSM. The following table lists
valid MSEL parameter settings:
MSEL value:
Steps per revolution MSEL value: Steps per revolution
1 200
64 12800
2 400 100 20000
4 800 108 21600
(1 microstep = 1 arc minute)
5 1000 125 25000
8 1600 127 25400
(1 microstep = 0.001 mm)
10 2000 128 25600
16 3200 180 36000 (1 microstep = 0.01°)
25 5000 200 40000
32 6400 250 50000
50 10000 256 51200
Motor Run Current (MRC)
The Motor Run Current (MRC) parameter sets the motor run current to a percentage of the full
output current of the DSM driver section.
Hold Current Delay Time (HCDT)
The HCDT parameter sets the delay time between the last c lock pulse and the application of
the holding current.
Motor Hold Current (MHC)
The MHC parameter sets the motor hold current as a percentage of the full output current of
the driver. If the hold current is set to 0, the output circuitry of the driver section will disable
when the hold current setting becomes active. Following the last step clock pulse, the hold
current setting becomes active after the period specified by HCDT.
Direction Override (DIR)
The DIR parameter changes the motor direction relative to the direction input signal, adapting
the direction of the DSM to operate as your system requires.
Factory button
The Factory button resets each parameter in the software to factory default values. Click Set
to apply these values.
Recall! and Upgrade! menu options
The Recall! option uploads the existing parameter settings from the DSM.
The Upgrade! option (if present) must not be used! It currently has no purpose and will
erase the firmware on the DSM, leaving it inoperable. If you have accidentally selected the
Upgrade! option, please contact Baldor customer support.
Operation 5-5MN1940
Page 32

www.baldormotion.com
5.2.2.2 I/O settings view
The I/O settings view shows two additional parameters for the DSM:
Clock Type
The Clock Type parameter configures the step and direction inputs for the type of input signals
being supplied to the motor.
H Step/Dir is the default setting. A waveform supplied to the step
input causes the motor to advance one step for each rising
edge. The direction input is held either high or low to determine
the direction of motion.
H Quadrature requires a pair of waveforms, such as those
typically produced by an incremental encoder. The two
waveforms are at the same frequency but approximately 90° out
of phase (i.e. ‘in quadrature’). One is supplied to the step input,
the other to the direction input. Each edge causes the motor to
Step
Dir
Step
(CHA)
Dir
(CHB)
advance one step, with the direction being determined by the
relative timing of the waveforms. For example, if the rising edge on the step input waveform
is received before the rising edge on the direction input waveform, the motor will turn in one
direction. If the rising edge on the direction input is received first, the motor will turn in the
opposite direction.
H Up / Down requires a waveform to be supplied to either the step
input or the direction input. If the waveform is supplied to the
Step
step input, the motor will turn in one direction. If the waveform
is supplied to the direction input, the motor will turn in the
Dir
opposite direction.
Clock IOF
The Clock IOF parameter sets the frequency of the clock input filter. Values in the range 50 ns
to 12.9 μs (10 MHz to 38.8 kHz) are available.
5-6 Operation MN1940
Page 33

6 Troubleshooting
6.1 Introduction
This section explains common problems and their solutions.
6.1.1 Problem diagnosis
If you have followed all the instructions in this manual in sequence, you should have few
problems installing the DSM. If you do have a problem, read this section first.
6.1.2 Further support
If you need to contact Baldor technical support by telephone or fax, contact details are
provided at the front of this manual. Please have the following information ready:
H The model number or serial number of your DSM (if known).
H A clear description of what you are trying to do.
H A clear description of the symptoms that you can observe.
H The type of motion generated in the motor shaft.
H Give a list of any parameters that you have setup.
www.baldormotion.com
6
6.1.3 Communication problems
If the problem is not listed below please contact Baldor technical support.
Symptom
Baldor SPI interface
cannot detect the
DSM
Check
Check that the DSM is powered.
Check that the SPI interface cable is properly connected. If you
have made your own SPI cable, check that it is wired correctly and
properly connected.
Troubleshooting 6-1MN1940
Page 34

6.1.4 Motor control problems
Symptom Check
Controller outputs
appears to be
working, but will not
cause DSM to turn.
Controller reports
that the DSM is not
moving and drops
the enable line.
Check that the DSM is powered.
Check that the logic connections between motor and controller are
correct.
Confirm that the sense of the enable input is correct to enable the
motor (section 4.3.1.3).
If the controller is expecting a feedback signal but does not receive
one, it may assume the DSM is not turning. This could cause the
controller to report a following error, to disable the DSM, or both.
www.baldormotion.com
6-2 Troubleshooting MN1940
Page 35

7.1 Introduction
This section provides technical specifications of all DSM models.
7.1.1 Input power
Description DSMS17... DSMS23... DSMS34...
Required supply type Unregulated DC
Ripple voltage ±10%
Minimum supply voltage +12VDC +12VDC +12VDC
Maximum supply voltage +48VDC +75VDC +75VDC
Input current (maximum) 2A 1.5A 4A
The maximum input voltage of the DSM includes motor back EMF, power supply
ripple and high line.
CAUTION
7 Specifications
www.baldormotion.com
7
Specifications 7-1MN1940
Page 36

7.1.2 Motor speed & torque - DSMS17
7.1.2.1 DSMS17x-1A...
60
50
40
30
20
Torque (oz·in)
10
0
Description Val ue
Holding torque 22.6 N·cm (32 oz·in)
Detent torque 1.17 N·cm (1.66 oz·in)
Rotor inertia 0.038 kg·cm2(0.00053 oz·in·s2)
7.1.2.2 DSMS17x-2A...
60
50
40
30
20
Torque (oz·in)
10
0
0 1000 2000 3000 4000 5000 6000 7000
0 1000 2000 3000 4000 5000 6000 7000
24 VDC
48 VDC
(300) (600) (900) (1200) (1500) (1800) (2100)
Speed in full steps per second (RPM)
24 VDC
48 VDC
(300)
(600) (900) (1200) (1500) (1800) (2100)
www.baldormotion.com
42
35
Torque·(N cm)
28
21
14
7
42
35
Torque (N·cm)
28
21
14
7
Speed in full steps per second (RPM)
Description Val ue
Holding torque 42.4 N·cm (60 oz·in)
Detent torque 1.47 N·cm (2.08 oz·in)
Rotor inertia 0.057 kg·cm2(0.00080 oz·in·s2)
7-2 Specifications MN1940
Page 37

7.1.2.3 DSMS17x-3A...
60
50
40
30
20
Torque (oz·in)
10
0
0
Description Val ue
Holding torque 52.9 N·cm (74.9 oz·in)
Detent torque 2.45 N·cm (3.47 oz·in)
Rotor inertia 0.082 kg·cm2(0.00116 oz·in·s2)
24 VDC
48 VDC
1000
(300)
2000 3000 4000
(600) (900) (1200) (1500) (1800) (2100)
Speed in full steps per second (RPM)
www.baldormotion.com
5000 6000 7000
42
35
Torque (N·cm)
28
21
14
7
Specifications 7-3MN1940
Page 38

7.1.3 Motor speed & torque - DSMS23
)
2
2
7.1.3.1 DSMS23x-1B...
225
200
175
150
125
100
75
Torque (oz·in)
50
25
0
0
1000
2000
(600)
3000
(900)
(300)
Speed in full steps per second (RPM)
Description Val ue
Holding torque 64 N·cm (90 oz·in)
Detent torque 2.7 N·cm (3.9 oz·in)
Rotor inertia 0.18 kg·cm2(0.0025 oz·in·s2)
4000
(1200)
5000
(1500)
24 VDC
45 VDC
75 VDC
(1800)
6000
www.baldormotion.com
159
141
124
106
Torque (N·cm)
88
71
53
35
18
7000
(2100)
7.1.3.2 DSMS23x-2B...
Torque (oz·in)
200
175
150
125
100
5
75
50
25
0
0
1000
2000
3000
(300)
(600)
(900)
4000
(1200)
5000
(1500)
24 VDC
45 VDC
75 VDC
(1800)
6000
7000
(2100)
Speed in full stepsper second(RPM
Description Val ue
Holding torque 102 N·cm (144 oz·in)
Detent torque 3.92 N·cm (5.6 oz·in)
Rotor inertia 0.26 kg·cm2(0.0037 oz·in·s2)
7-4 Specifications MN1940
159
141
124
106
88
71
53
35
18
Torque (N·cm)
Page 39

7.1.3.3 DSMS23x-3B...
225
200
175
150
125
100
75
Torque (oz·in)
50
25
0
Description Val ue
Holding torque 169 N·cm (239 oz·in)
Detent torque 6.86 N·cm (9.7 oz·in)
Rotor inertia 0.46 kg·cm2(0.0065 oz·in·s2)
www.baldormotion.com
7000
(2100)
159
141
124
106
88
71
53
35
18
Torque (N·cm)
24 VDC
45 VDC
75 VDC
0
1000
(300)
2000
(600)
3000
(900)
4000
(1200)
5000
(1500)
6000
(1800)
Speed in full steps per second (RPM)
Specifications 7-5MN1940
Page 40

7.1.4 Motor speed & torque - DSMS34
7.1.4.1 DSMS34x-1B...
1000
900
800
700
600
500
400
Torque (oz·in)
300
200
100
0
0
1000
2000
(600)
3000
(900)
(300)
Speed in full steps per second (RPM)
Description Val ue
Holding torque 269 N·cm (381 oz·in)
Detent torque 7.7 N·cm (10.9 oz·in)
Rotor inertia 1.0 kg·cm2(0.01416 oz·in·s2)
4000
(1200)
5000
(1500)
24 VDC
45 VDC
75 VDC
6000
(1800)
www.baldormotion.com
706
635
465
Torque (N·cm)
494
423
353
282
211
140
71
7000
(2100)
7-6 Specifications MN1940
Page 41

7.1.4.2 DSMS34x-2B...
1000
900
800
700
600
500
400
Torque (oz·in)
300
200
100
0
0 1000
Description Val ue
Holding torque 406 N·cm (575 oz·in)
Detent torque 10.0 N·cm (14.16 oz·in)
Rotor inertia 1.6 kg·cm2(0.02266 oz·in·s2)
(300)
2000
(600)
3000
(900)
Speed in full steps per second (RPM)
4000
(1200)
5000
(1500)
www.baldormotion.com
24 VDC
45 VDC
75 VDC
6000
(1800)
7000
(2100)
706
635
465
494
423
353
282
211
140
71
Torque (N·cm)
Specifications 7-7MN1940
Page 42

7.1.4.3 DSMS34x-3B...
1000
900
800
700
600
500
400
Torque (oz·in)
300
200
100
0
Description Val ue
Holding torque 749 N·cm (1061 oz·in)
Detent torque 14.0 N·cm (19.83 oz·in)
Rotor inertia 3.4 kg·cm2(0.04815 oz·in·s2)
0 1000
(300)
2000
(600)
3000
(900)
4000
(1200)
5000
(1500)
Speed in full steps per second (RPM)
www.baldormotion.com
24 VDC
45 VDC
75 VDC
6000
(1800)
7000
(2100)
706
635
465
494
423
353
282
211
140
71
Torque (N·cm)
7-8 Specifications MN1940
Page 43

7.1.5 Digital inputs
Description Unit Value
Type Opto-isolated
Supply voltage
Input forward voltage (max)
Input current (typical, 5V)
Input current (maximum allowable)
Maximum input frequency MHz 2.0
Maximum
Minimum
Step clock / Direction
Enable
Step clock / Direction
Enable
Step clock / Direction
Enable
www.baldormotion.com
VDC
24
5
VDC
1.7
1.4
mA
10.6
6.7
mA
15
9.4
Specifications 7-9MN1940
Page 44

www.baldormotion.com
7-10 Specifications MN1940
Page 45

Index
A
Abbreviations, 2-4
B
Baldor SPI Interface, 5-4
clock IOF, 5-6
clock type, 5-6
configuration parameters, 5-4
DIR (direction override), 5-5
direction override (DIR), 5-5
HCDT (hold current delay time), 5-5
hold current delay time (HCDT), 5-5
MHC (motor holding current), 5-5
microstep resolution select (MSEL), 5-5
motor holding current (MHC), 5-5
motor run current (MRC), 5-5
MRC (motor run current), 5-5
starting, 5-4
Basic Installation, 3-1
location requirements, 3-1
mounting, 3-2
securing DSM cables, 3-5
C
Catalog number, identifying, 2-3
Clock IOF, 5-6
Clock Type, 5-6
Connections
basic, 4-1
connector P2, 4-8
direction, 4-4
enable, 4-4
logic inputs, 4-4
motor power, 4-2
step clock, 4-4
D
Dimensions
DSMS17, 3-2
DSMS23, 3-4
DSMS34, 3-5
DIR (direction override), 5-5
Direction input, 4-4
E
Enable input, 4-4
Environmental, 1-2, 3-1
F
Features, 2-1
H
Hardware requirements, 3-6
HCDT (hold current delay time), 5-5
I
Input / Output, 4-1
basic connections, 4-1
connection summary, 4-10
Input timing, 4-5
Installation, 3-1
Baldor SPI Interface, 5-2
USB driver, 5-1
virtual COM port driver, 5-1
virtual COM port number, determining, 5-2
L
Logic inputs, 4-4
direction input, 4-4
enable input, 4-4
sinking / sourcing, 4-6
step clock input, 4-4
timing, 4-5
MN1940
Index
Page 46

M
MHC (motor holding current), 5-5
Mounting, 3-2
DSMS17, 3-2
DSMS23, 3-4
DSMS34, 3-5
securing DSM cables, 3-5
MRC (motor run current), 5-5
O
Operation, 5-1
connecting to the PC, 5-1
installing Baldor SPI interface, 5-2
installing the USB driver, 5-1
installing the virtual COM port driver, 5-1
starting, 5-3
Options, availability, 2-2
input power, 7-1
motor output - DSMS17x-1A, 7-2
motor output - DSMS17x-2A, 7-2
motor output - DSMS17x-3A, 7-3
motor output - DSMS23x-1B, 7-4
motor output - DSMS23x-2B, 7-4
motor output - DSMS23x-3B, 7-5
motor output - DSMS34x-1B, 7-6
motor output - DSMS34x-2B, 7-7
motor output - DSMS34x-3B, 7-8
SPI interface, 4-8
CLK signal, 4-9
CS signal, 4-9
MISO signal, 4-9
MOSI signal, 4-9
signal descriptions, 4-9
SPI connector, 4-8
Step clock input, 4-4
P
Power
connections, 4-2
sources, 7-1
Precautions, 1-2
R
Receiving and Inspection, 2-3
S
Safety Notice, 1-2
Setup, 5-1
Sinking / sourcing configuration, 4-6
Specifications, 7-1
digital inputs, 7-9
T
Troubleshooting, 6-1
U
Units and abbreviations, 2-4
USB, installing the driver, 5-1
V
Virtual COM port (VCP)
installing the driver, 5-1
number, determining, 5-2
W
Wire sizes, 4-3
Index
MN1940
Page 47

Comments
If you have any suggestions for improvements to this manual, please let us know. Write your
comments in the space provided below, remove this page from the manual and mail it to:
Manuals
Baldor UK Ltd
Mint Motion Centre
6 Bristol Distribution Park
Hawkley Drive
Bristol
BS32 0BF
United Kingdom.
Alternatively, you can e-mail your comments to:
manuals@baldor.co.uk
Comment:
continued...
CommentsMN1940
Page 48

Thank you for taking the time to help us.
Comments MN1940
Page 49

Page 50

Baldor UK Ltd
Mint Motion Centre
6 Bristol Distribution Park
Hawkley Drive, Bristol
BS32 0BF
United Kingdom
Visit www.baldormotion.com/supportme for the latest documentation and software releases.
Australia
Australian Baldor PTY Ltd
Tel: +61 2 9674 5455
Fax: +61 2 9674 2495
Europe
Baldor ASR GmbH, Germany
Tel: +49 (0) 89 905 080
Fax: +49 (0) 89 905 08491
Europe (Southern)
Baldor ASR AG, Switzerland
Tel: +41 52 647 4700
Fax: +41 52 659 2394
Japan
Baldor Japan Corporation
Tel: +81 45 412 4506
Fax: +81 45 412 4507
L T0227A02
Mexico
Baldor de Mexico
Tel: +52 477 761 2030
Fax: +52 477 761 2010
Singapore
Baldor Electric PTE Ltd
Tel: +65 744 2572
Fax: +65 747 1708
United Kingdom
Baldor UK Ltd
Tel: +44 1454 850000
Fax: +44 1454 859001
U.S.A. (Headquarters)
Baldor Electric Company
Tel: +1 479 646 4711
Fax: +1 479 648 5792
For additional office locations visit www.baldor.com
PrintedinUK
E Baldor UK Ltd
 Loading...