

Page 1

LINEAR DRIVE
Servo Control
Installation & Operating Manual
Lin+Drive
10/00 MN1851
Page 2

Table of Contents
Section 1
General Information 1-1. . . . . . . . . . . . . . . . . . . . . . . . . . . . . . . . . . . . . . . . . . . . . . . . . . . . . . . . . . . . . .
CE Compliance 1-1. . . . . . . . . . . . . . . . . . . . . . . . . . . . . . . . . . . . . . . . . . . . . . . . . . . . . . . . . . . . . . .
Limited Warranty 1-1. . . . . . . . . . . . . . . . . . . . . . . . . . . . . . . . . . . . . . . . . . . . . . . . . . . . . . . . . . . . . .
Product Notice 1-2. . . . . . . . . . . . . . . . . . . . . . . . . . . . . . . . . . . . . . . . . . . . . . . . . . . . . . . . . . . . . . . .
Safety Notice 1-2. . . . . . . . . . . . . . . . . . . . . . . . . . . . . . . . . . . . . . . . . . . . . . . . . . . . . . . . . . . . . . . . .
Section 2
Product Overview 2-1. . . . . . . . . . . . . . . . . . . . . . . . . . . . . . . . . . . . . . . . . . . . . . . . . . . . . . . . . . . . . . . .
Section 3
Receiving and Installation 3-1. . . . . . . . . . . . . . . . . . . . . . . . . . . . . . . . . . . . . . . . . . . . . . . . . . . . . . . .
Receiving & Inspection 3-1. . . . . . . . . . . . . . . . . . . . . . . . . . . . . . . . . . . . . . . . . . . . . . . . . . . . . . . .
Location Considerations 3-1. . . . . . . . . . . . . . . . . . . . . . . . . . . . . . . . . . . . . . . . . . . . . . . . . . . . . . .
Mechanical Installation 3-1. . . . . . . . . . . . . . . . . . . . . . . . . . . . . . . . . . . . . . . . . . . . . . . . . . . . . . . .
Electrical Installation 3-2. . . . . . . . . . . . . . . . . . . . . . . . . . . . . . . . . . . . . . . . . . . . . . . . . . . . . . . . . .
System Grounding 3-2. . . . . . . . . . . . . . . . . . . . . . . . . . . . . . . . . . . . . . . . . . . . . . . . . . . . . . . .
Power Disconnect 3-4. . . . . . . . . . . . . . . . . . . . . . . . . . . . . . . . . . . . . . . . . . . . . . . . . . . . . . . .
Protection Devices 3-4. . . . . . . . . . . . . . . . . . . . . . . . . . . . . . . . . . . . . . . . . . . . . . . . . . . . . . . .
X1 Power Connections 3-5. . . . . . . . . . . . . . . . . . . . . . . . . . . . . . . . . . . . . . . . . . . . . . . . . . . .
X1 Motor Connections 3-10. . . . . . . . . . . . . . . . . . . . . . . . . . . . . . . . . . . . . . . . . . . . . . . . . . . . .
M-Contactor 3-10. . . . . . . . . . . . . . . . . . . . . . . . . . . . . . . . . . . . . . . . . . . . . . . . . . . . . . . . . . . . .
Motor Thermostat 3-11. . . . . . . . . . . . . . . . . . . . . . . . . . . . . . . . . . . . . . . . . . . . . . . . . . . . . . . . .
X1 Dynamic Brake Resistor 3-11. . . . . . . . . . . . . . . . . . . . . . . . . . . . . . . . . . . . . . . . . . . . . . . .
X1 +24VDC Logic Supply 3-12. . . . . . . . . . . . . . . . . . . . . . . . . . . . . . . . . . . . . . . . . . . . . . . . . .
X3 Control Inputs & Digital I/O Connections 3-12. . . . . . . . . . . . . . . . . . . . . . . . . . . . . . . . . .
X6 RS232 / 485 Connections 3-16. . . . . . . . . . . . . . . . . . . . . . . . . . . . . . . . . . . . . . . . . . . . . . .
X7 Encoder Output 3-19. . . . . . . . . . . . . . . . . . . . . . . . . . . . . . . . . . . . . . . . . . . . . . . . . . . . . . .
X9 Encoder and Hall Feedback 3-20. . . . . . . . . . . . . . . . . . . . . . . . . . . . . . . . . . . . . . . . . . . . .
Section 4
Switch Setting and Start-Up 4-1. . . . . . . . . . . . . . . . . . . . . . . . . . . . . . . . . . . . . . . . . . . . . . . . . . . . . . .
Switch AS1 Settings 4-1. . . . . . . . . . . . . . . . . . . . . . . . . . . . . . . . . . . . . . . . . . . . . . . . . . . . . . . . . . .
Start-Up Procedure 4-3. . . . . . . . . . . . . . . . . . . . . . . . . . . . . . . . . . . . . . . . . . . . . . . . . . . . . . . . . . .
Power Off Checks 4-3. . . . . . . . . . . . . . . . . . . . . . . . . . . . . . . . . . . . . . . . . . . . . . . . . . . . . . . .
Power On Checks 4-3. . . . . . . . . . . . . . . . . . . . . . . . . . . . . . . . . . . . . . . . . . . . . . . . . . . . . . . .
Table of Contents iMN1851
Page 3

Section 5
Operation 5-1. . . . . . . . . . . . . . . . . . . . . . . . . . . . . . . . . . . . . . . . . . . . . . . . . . . . . . . . . . . . . . . . . . . . . . . .
Installing Software on your PC 5-1. . . . . . . . . . . . . . . . . . . . . . . . . . . . . . . . . . . . . . . . . . . . . . . . . .
Minimum system requirements 5-1. . . . . . . . . . . . . . . . . . . . . . . . . . . . . . . . . . . . . . . . . . . . .
Installation 5-1. . . . . . . . . . . . . . . . . . . . . . . . . . . . . . . . . . . . . . . . . . . . . . . . . . . . . . . . . . . . . . .
Host Communications Setup 5-1. . . . . . . . . . . . . . . . . . . . . . . . . . . . . . . . . . . . . . . . . . . . . . . . . . .
Using The Setup Wizard 5-3. . . . . . . . . . . . . . . . . . . . . . . . . . . . . . . . . . . . . . . . . . . . . . . . . . . . . . .
Set up Software 5-5. . . . . . . . . . . . . . . . . . . . . . . . . . . . . . . . . . . . . . . . . . . . . . . . . . . . . . . . . . . . . .
Motor 5-6. . . . . . . . . . . . . . . . . . . . . . . . . . . . . . . . . . . . . . . . . . . . . . . . . . . . . . . . . . . . . . . . . . .
Control 5-6. . . . . . . . . . . . . . . . . . . . . . . . . . . . . . . . . . . . . . . . . . . . . . . . . . . . . . . . . . . . . . . . . .
Operating Mode 5-8. . . . . . . . . . . . . . . . . . . . . . . . . . . . . . . . . . . . . . . . . . . . . . . . . . . . . . . . . .
Current Parameter 5-9. . . . . . . . . . . . . . . . . . . . . . . . . . . . . . . . . . . . . . . . . . . . . . . . . . . . . . . .
Velocity Parameter 5-9. . . . . . . . . . . . . . . . . . . . . . . . . . . . . . . . . . . . . . . . . . . . . . . . . . . . . . . .
Positioning 5-10. . . . . . . . . . . . . . . . . . . . . . . . . . . . . . . . . . . . . . . . . . . . . . . . . . . . . . . . . . . . . . . . . . .
Software Triggered 5-10. . . . . . . . . . . . . . . . . . . . . . . . . . . . . . . . . . . . . . . . . . . . . . . . . . . . . . .
Hardware Triggered 5-10. . . . . . . . . . . . . . . . . . . . . . . . . . . . . . . . . . . . . . . . . . . . . . . . . . . . . . .
Initialize Buffers 5-10. . . . . . . . . . . . . . . . . . . . . . . . . . . . . . . . . . . . . . . . . . . . . . . . . . . . . . . . . .
Home 5-11. . . . . . . . . . . . . . . . . . . . . . . . . . . . . . . . . . . . . . . . . . . . . . . . . . . . . . . . . . . . . . . . . . . . . . .
Limit Switches 5-11. . . . . . . . . . . . . . . . . . . . . . . . . . . . . . . . . . . . . . . . . . . . . . . . . . . . . . . . . . . . . . . .
Drift 5-12. . . . . . . . . . . . . . . . . . . . . . . . . . . . . . . . . . . . . . . . . . . . . . . . . . . . . . . . . . . . . . . . . . . . .
Autotune 5-12. . . . . . . . . . . . . . . . . . . . . . . . . . . . . . . . . . . . . . . . . . . . . . . . . . . . . . . . . . . . . . . .
Main Menu Choice Descriptions 5-13. . . . . . . . . . . . . . . . . . . . . . . . . . . . . . . . . . . . . . . . . . . . . . . .
File 5-13. . . . . . . . . . . . . . . . . . . . . . . . . . . . . . . . . . . . . . . . . . . . . . . . . . . . . . . . . . . . . . . . . . . . .
Edit 5-13. . . . . . . . . . . . . . . . . . . . . . . . . . . . . . . . . . . . . . . . . . . . . . . . . . . . . . . . . . . . . . . . . . . . .
Setup 5-13. . . . . . . . . . . . . . . . . . . . . . . . . . . . . . . . . . . . . . . . . . . . . . . . . . . . . . . . . . . . . . . . . . .
Tuning 5-14. . . . . . . . . . . . . . . . . . . . . . . . . . . . . . . . . . . . . . . . . . . . . . . . . . . . . . . . . . . . . . . . . .
Watch 5-14. . . . . . . . . . . . . . . . . . . . . . . . . . . . . . . . . . . . . . . . . . . . . . . . . . . . . . . . . . . . . . . . . . .
Functions 5-14. . . . . . . . . . . . . . . . . . . . . . . . . . . . . . . . . . . . . . . . . . . . . . . . . . . . . . . . . . . . . . . .
Motion 5-14. . . . . . . . . . . . . . . . . . . . . . . . . . . . . . . . . . . . . . . . . . . . . . . . . . . . . . . . . . . . . . . . . .
Terminal 5-14. . . . . . . . . . . . . . . . . . . . . . . . . . . . . . . . . . . . . . . . . . . . . . . . . . . . . . . . . . . . . . . . .
Windows 5-14. . . . . . . . . . . . . . . . . . . . . . . . . . . . . . . . . . . . . . . . . . . . . . . . . . . . . . . . . . . . . . . .
Help 5-15. . . . . . . . . . . . . . . . . . . . . . . . . . . . . . . . . . . . . . . . . . . . . . . . . . . . . . . . . . . . . . . . . . . .
PLC Program 5-15. . . . . . . . . . . . . . . . . . . . . . . . . . . . . . . . . . . . . . . . . . . . . . . . . . . . . . . . . . . . . . . . .
Velocity Parameters 5-16. . . . . . . . . . . . . . . . . . . . . . . . . . . . . . . . . . . . . . . . . . . . . . . . . . . . . . . . . .
Section 6
Troubleshooting 6-1. . . . . . . . . . . . . . . . . . . . . . . . . . . . . . . . . . . . . . . . . . . . . . . . . . . . . . . . . . . . . . . . .
ii Table of Contents MN1851
Page 4

Section 7
Specifications & Product Data 7-1. . . . . . . . . . . . . . . . . . . . . . . . . . . . . . . . . . . . . . . . . . . . . . . . . . . .
Identification 7-1. . . . . . . . . . . . . . . . . . . . . . . . . . . . . . . . . . . . . . . . . . . . . . . . . . . . . . . . . . . . . . . . .
Specifications 7-2. . . . . . . . . . . . . . . . . . . . . . . . . . . . . . . . . . . . . . . . . . . . . . . . . . . . . . . . . . . . . . . .
24VDC Logic Power Input 7-4. . . . . . . . . . . . . . . . . . . . . . . . . . . . . . . . . . . . . . . . . . . . . . . . .
Velocity Control 7-4. . . . . . . . . . . . . . . . . . . . . . . . . . . . . . . . . . . . . . . . . . . . . . . . . . . . . . . . . .
Simulated Encoder Output 7-4. . . . . . . . . . . . . . . . . . . . . . . . . . . . . . . . . . . . . . . . . . . . . . . . .
Encoder Input 7-5. . . . . . . . . . . . . . . . . . . . . . . . . . . . . . . . . . . . . . . . . . . . . . . . . . . . . . . . . . . .
Serial Interface 7-5. . . . . . . . . . . . . . . . . . . . . . . . . . . . . . . . . . . . . . . . . . . . . . . . . . . . . . . . . . .
Optional Interface 7-5. . . . . . . . . . . . . . . . . . . . . . . . . . . . . . . . . . . . . . . . . . . . . . . . . . . . . . . . .
Regeneration 7-5. . . . . . . . . . . . . . . . . . . . . . . . . . . . . . . . . . . . . . . . . . . . . . . . . . . . . . . . . . . .
Dimensions 7-6. . . . . . . . . . . . . . . . . . . . . . . . . . . . . . . . . . . . . . . . . . . . . . . . . . . . . . . . . . . . . . . . . .
Section 8
CE Guidelines 8-1. . . . . . . . . . . . . . . . . . . . . . . . . . . . . . . . . . . . . . . . . . . . . . . . . . . . . . . . . . . . . . . . . . .
CE Declaration of Conformity 8-1. . . . . . . . . . . . . . . . . . . . . . . . . . . . . . . . . . . . . . . . . . . . . . . . . . .
EMC – Conformity and CE – Marking 8-1. . . . . . . . . . . . . . . . . . . . . . . . . . . . . . . . . . . . . . . . . . . .
EMC Installation Instructions 8-3. . . . . . . . . . . . . . . . . . . . . . . . . . . . . . . . . . . . . . . . . . . . . . . . . .
Section 9
Accessories and Options 9-1. . . . . . . . . . . . . . . . . . . . . . . . . . . . . . . . . . . . . . . . . . . . . . . . . . . . . . . . .
Cables 9-1. . . . . . . . . . . . . . . . . . . . . . . . . . . . . . . . . . . . . . . . . . . . . . . . . . . . . . . . . . . . . . . . . . . . . .
Connectors 9-1. . . . . . . . . . . . . . . . . . . . . . . . . . . . . . . . . . . . . . . . . . . . . . . . . . . . . . . . . . . . . . . . . .
EMC AC Mains Filter 9-1. . . . . . . . . . . . . . . . . . . . . . . . . . . . . . . . . . . . . . . . . . . . . . . . . . . . . . . . . .
Regeneration Resistor 9-3. . . . . . . . . . . . . . . . . . . . . . . . . . . . . . . . . . . . . . . . . . . . . . . . . . . . . . . . .
Appendix A
Manual Tuning A-1. . . . . . . . . . . . . . . . . . . . . . . . . . . . . . . . . . . . . . . . . . . . . . . . . . . . . . . . . . . . . . . . . . .
Motor A-2. . . . . . . . . . . . . . . . . . . . . . . . . . . . . . . . . . . . . . . . . . . . . . . . . . . . . . . . . . . . . . . . . . . . . . . .
Control A-2. . . . . . . . . . . . . . . . . . . . . . . . . . . . . . . . . . . . . . . . . . . . . . . . . . . . . . . . . . . . . . . . . . . . . .
Operating Mode A-4. . . . . . . . . . . . . . . . . . . . . . . . . . . . . . . . . . . . . . . . . . . . . . . . . . . . . . . . . . . . . .
Current Parameter A-4. . . . . . . . . . . . . . . . . . . . . . . . . . . . . . . . . . . . . . . . . . . . . . . . . . . . . . . . . . . .
Velocity Parameter A-5. . . . . . . . . . . . . . . . . . . . . . . . . . . . . . . . . . . . . . . . . . . . . . . . . . . . . . . . . . . .
Drift A-5. . . . . . . . . . . . . . . . . . . . . . . . . . . . . . . . . . . . . . . . . . . . . . . . . . . . . . . . . . . . . . . . . . . . . . . . .
Manual Tuning A-6. . . . . . . . . . . . . . . . . . . . . . . . . . . . . . . . . . . . . . . . . . . . . . . . . . . . . . . . . . . . . . .
Plotting of Move A-10. . . . . . . . . . . . . . . . . . . . . . . . . . . . . . . . . . . . . . . . . . . . . . . . . . . . . . . . . . . . . .
Appendix B
Command Set B-1. . . . . . . . . . . . . . . . . . . . . . . . . . . . . . . . . . . . . . . . . . . . . . . . . . . . . . . . . . . . . . . . . . . .
Table of Contents iiiMN1851
Page 5

iv Table of Contents MN1851
Page 6

Section 1
General Information
Copyright Baldor 1999, 2000. All rights reserved.
This manual is copyrighted and all rights are reserved. This document may not, in
whole or in part, be copied or reproduced in any form without the prior written
consent of Baldor.
Baldor makes no representations or warranties with respect to the contents hereof
and specifically disclaims any implied warranties of fitness for any particular
purpose. The information in this document is subject to change without notice.
Baldor assumes no responsibility for any errors that may appear in this document.
Microsoft and MS–DOS are registered trademarks, and Windows is a trademark of
Microsoft Corporation.
UL and cUL are registered trademarks of Underwriters Laboratories.
CE Compliance
A custom unit may be required, contact Baldor. Compliance to Directive
89/336/EEC is the responsibility of the system integrator. A control, motor and all
system components must have proper shielding, grounding, and filtering as
described in MN1383. Please refer to MN1383 for installation techniques for CE
compliance. For additional information, refer to Sections 3 and 8 of this manual.
Limited Warranty
For a period of two (2) years from the date of original purchase, BALDOR will repair or
replace without charge controls and accessories which our examination proves to be
defective in material or workmanship. This warranty is valid if the unit has not been
tampered with by unauthorized persons, misused, abused, or improperly installed and
has been used in accordance with the instructions and/or ratings supplied. This warranty
is in lieu of any other warranty or guarantee expressed or implied. BALDOR shall not be
held responsible for any expense (including installation and removal), inconvenience, or
consequential damage, including injury to any person or property caused by items of our
manufacture or sale. (Some states do not allow exclusion or limitation of incidental or
consequential damages, so the above exclusion may not apply.) In any event, BALDOR’s
total liability, under all circumstances, shall not exceed the full purchase price of the
control. Claims for purchase price refunds, repairs, or replacements must be referred to
BALDOR with all pertinent data as to the defect, the date purchased, the task performed
by the control, and the problem encountered. No liability is assumed for expendable items
such as fuses.
Goods may be returned only with written notification including a BALDOR Return
Authorization Number and any return shipments must be prepaid.
General Information 1-1MN1851
Page 7

Product Notice Intended use:
These drives are intended for use in stationary ground based applications in
industrial power installations according to the standards EN60204 and VDE0160.
They are designed for machine applications that require variable speed controlled
three phase brushless AC motors.
These drives are not intended for use in applications such as:
– Home appliances
– Mobile vehicles
– Ships
– Airplanes
Unless otherwise specified, this drive is intended for installation in a suitable
enclosure. The enclosure must protect the control from exposure to excessive or
corrosive moisture, dust and dirt or abnormal ambient temperatures. The exact
operating specifications are found in Section 7 of this manual.
The installation, connection and control of drives is a skilled operation,
disassembly or repair must not be attempted.
In the event that a control fails to operate correctly, contact the place of purchase
for return instructions.
Safety Notice: This equipment contains high voltages. Electrical shock can cause serious or fatal
injury. Only qualified personnel should attempt the start–up procedure or
troubleshoot this equipment.
This equipment may be connected to other machines that have rotating parts or
parts that are driven by this equipment. Improper use can cause serious or fatal
injury. Only qualified personnel should attempt the start–up procedure or
troubleshoot this equipment.
– System documentation must be available at all times.
– Keep non-qualified personnel at a safe distance from this equipment.
– Only qualified personnel familiar with the safe installation, operation and
maintenance of this device should attempt start-up or operating
procedures.
– Always remove power before making or removing any connections to
this control.
PRECAUTIONS: Classifications of cautionary statements.
WARNING: Indicates a potentially hazardous situation which, if not avoided,
could result in injury or death.
Caution: Indicates a potentially hazardous situation which, if not avoided,
could result in damage to property.
1-2 General Information MN1851
Page 8

PRECAUTIONS:
WARNING: Do not touch any circuit board, power device or electrical
WARNING: Be sure that you are completely familiar with the safe operation
WARNING: Be sure all wiring complies with the National Electrical Code and
WARNING: Be sure the system is properly grounded before applying power.
WARNING: Do not remove cover for at least five (5) minutes after AC power
WARNING: Improper operation of control may cause violent motion of the
WARNING: Motor circuit may have high voltage present whenever AC power
WARNING: If a motor is driven mechanically, it may generate hazardous
WARNING: A DB Resistor may generate enough heat to ignite combustible
WARNING: The user must provide an external hard-wired emergency stop
connection before you first ensure that power has been
disconnected and there is no high voltage present from this
equipment or other equipment to which it is connected.
Electrical shock can cause serious or fatal injury.
of this equipment. This equipment may be connected to other
machines that have rotating parts or parts that are controlled by
this equipment. Improper use can cause serious or fatal injury.
all regional and local codes or CE Compliance. Improper wiring
may cause a hazardous condition.
Do not apply AC power before you ensure that grounds are
connected. Electrical shock can cause serious or fatal injury.
is disconnected to allow capacitors to discharge. Electrical
shock can cause serious or fatal injury.
motor and driven equipment. Be certain that unexpected
movement will not cause injury to personnel or damage to
equipment. Peak torque of several times the rated motor torque
can occur during control failure.
is applied, even when motor is not moving. Electrical shock can
cause serious or fatal injury.
voltages that are conducted to its power input terminals. The
enclosure must be grounded to prevent a possible shock hazard.
materials. To avoid fire hazard, keep all combustible materials
and flammable vapors away from brake resistors.
circuit to disable the control in the event of an emergency.
Continued on next page.
General Information 1-3MN1851
Page 9

Section 1
General Information
Caution: Suitable for use on a circuit capable of delivering not more than the RMS
Caution: To prevent equipment damage, be certain that the input power has
Caution: Avoid locating the control immediately above or beside heat generating
Caution: Avoid locating the control in the vicinity of corrosive substances or
Caution: Do not connect AC power to the control terminals U, V and W. Connecting
Caution: Baldor recommends not using “Grounded Leg Delta” transformer power
Caution: Logic signals are interruptible signals; these signals are removed when
Caution: Controls are intended to be connected to a permanent main power source,
Caution: The safe integration of the drive into a machine system is the
Caution: Controls must be installed inside an electrical cabinet that provides
Caution: Do not tin (solder) exposed wires. Solder contracts over time and may
Caution: Electrical components can be damaged by static electricity. Use ESD
Caution: Ensure that encoder wires are properly connected. Incorrect installation
Caution: The holes in the top and bottom of the enclosure are for cable clamps. Be
symmetrical short circuit amperes listed here at rated voltage.
Horsepower
1–50 5,000
correctly sized protective devices installed as well as a power disconnect.
equipment, or directly below water or steam pipes.
vapors, metal particles and dust.
AC power to these terminals may result in damage to the control.
leads that may create ground loops and degrade system performance.
Instead, we recommend using a four wire Wye.
power is removed from the drive.
not a portable power source. Suitable fusing and circuit protection devices
are required.
responsibility of the machine designer. Be sure to comply with the local
safety requirements at the place where the machine is to be used. In
Europe this is the Machinery Directive, the ElectroMagnetic Compatibility
Directive and the Low Voltage Directive. In the United States this is the
National Electrical code and local codes.
environmental control and protection. Installation information for the drive
is provided in this manual. Motors and controlling devices that connect to
the drive should have specifications compatible to the drive.
cause loose connections.
(electro-static discharge) procedures when handling this control.
may result in improper rotation or incorrect commutation.
sure to use an M4 bolt 12mm in length. Longer bolts may short circuit the
electrical components inside the control.
rms Symmetrical Amperes
1-4 General Information MN1851
Page 10

Section 2
Product Overview
Overview The Lin+Drive product is designed to serve the needs of machine designers and
manufacturers. Baldor products have both UL and CE approvals. The Lin+Drive
is a “flexible” versatile compact control for linear brushless motors. This digital
servo control can be tailored to suit many applications. It can accept 0–10VDC
input, standard ±10VDC input, current loop input or 15 preset point to point moves.
Some options are CAN bus interface, internal or external regen, or with customer
provided 24VDC to maintain logic power.
The Lin+Drive can be integrated with Baldors’ motion controllers or to any industry
standard motion controller.
Motors Baldor servo controls are compatible with many motors from Baldor and other
manufacturers. Motor parameters are provided with the PC software making the
setup easy. Baldor compatible motors include:
LMBL Series
LMCF Series
Contact your local Baldor distributor or sales representative for assistance with
motor sizing and compatibility. Custom motors or motors not manufactured by
Baldor may be used. Please contact your local Baldor distributor or sales
representative for assistance.
Command Source
In the analog mode (current or velocity), the control requires a variable 0-10VDC
or ±10VDC external analog signal. Suitable sources can be a PLC or motion
controller.
Positioning Mode
In the positioning mode, up to 15 preset repeatable positions (moves) may be
defined in software. These moves may either be incremental, absolute or mixed.
A specific “preset” position is selected using the switch inputs (machine inputs
1–4) and a “trigger” input activates the move. A home position could also be set if
desired.
Serial Communications Interface
A serial port allows external communication. This means that the Lin+Drive can
interface to a PC (for configuration and control) or to other user–supplied
equipment such as:
Host computers
PLC’s
PC’s
Motion controllers
The serial communication interface supports:
RS232 and the four wire RS–485 communication standards
Baud rate: 9600
Product Overview 2-1MN1851
Page 11

Control Inputs Opto isolated inputs are single ended, user selectable and active high or low:
Enable Machine Input 1
Quit Machine Input 2
Fault Reset Machine Input 3
Home Flag Machine Input 4
Trigger
Note: Machine Inputs 1–4 allow up to 16 digital preset point to point positions.
Control Outputs
One normally closed relay contact provides a dedicated “Drive Ready” output.
Two opto isolated outputs are single ended, active low and are current sinking.
Either output can be assigned to one of the following:
In Position Machine Input 1
CW Warning Machine Input 2
CCW Warning Machine Input 3
Following Error Flag Machine Input 4
Following Error Warning I
2
t Warning
Drive Over Temperature
Encoder Output
The motor encoder signals are available at this output connector (1 to 1).
2-2 Product Overview MN1851
Page 12

Section 3
Receiving and Installation
Receiving & Inspection Baldor Controls are thoroughly tested at the factory and carefully
packaged for shipment. When you receive your control, there are several things
you should do immediately.
1. Observe the condition of the shipping container and report any damage
immediately to the commercial carrier that delivered your control.
2. Remove the control from the shipping container and remove all packing
materials. The container and packing materials may be retained for
future shipment.
3. Verify that the part number of the control you received is the same as the
part number listed on your purchase order.
4. Inspect the control for external physical damage that may have been
sustained during shipment and report any damage immediately to the
commercial carrier that delivered your control.
5. If the control is to be stored for several weeks before use, be sure that it
is stored in a location that conforms to published storage humidity and
temperature specifications stated in this manual.
Location Considerations The location of the control is important. Installation should be in an area
that is protected from direct sunlight, corrosives, harmful gases or liquids, dust,
metallic particles, and vibration. Exposure to these can reduce the operating life
and degrade performance of the control.
Several other factors should be carefully evaluated when selecting a location for
installation:
1. For effective cooling and maintenance, the control should be mounted
on a smooth, non-flammable vertical surface.
2. At least 0.6 inches (15mm) top and bottom clearance must be provided
for air flow. At least 0.4 inches (10mm) clearance is required between
controls (each side).
3. Altitude derating. Up to 3300 feet (1000 meters) no derating required.
Derate the continuous and peak output current by 1.1% for each 330
feet (100 meters) above 3300 feet.
4. Temperature derating. From 0°C to 40°C ambient no derating
required. Above 40°C, derate the continuous and peak output current by
2.5% per °C above 40°C. Maximum ambient is 50°C.
Mechanical Installation
Mount the control to the mounting surface. The control must be securely fastened
to the mounting surface by the control mounting holes. The location of the
mounting holes is shown in Section 7 of this manual.
Receiving & Installation 3-1MN1851
Page 13
Electrical InstallationAll interconnection wires between the control, AC power source, motor, host
control and any operator interface stations should be in metal conduits. Use listed
closed loop connectors that are of appropriate size for wire gauge being used.
Connectors are to be installed using crimp tool specified by the manufacturer of
the connector. Only class 1 wiring should be used.
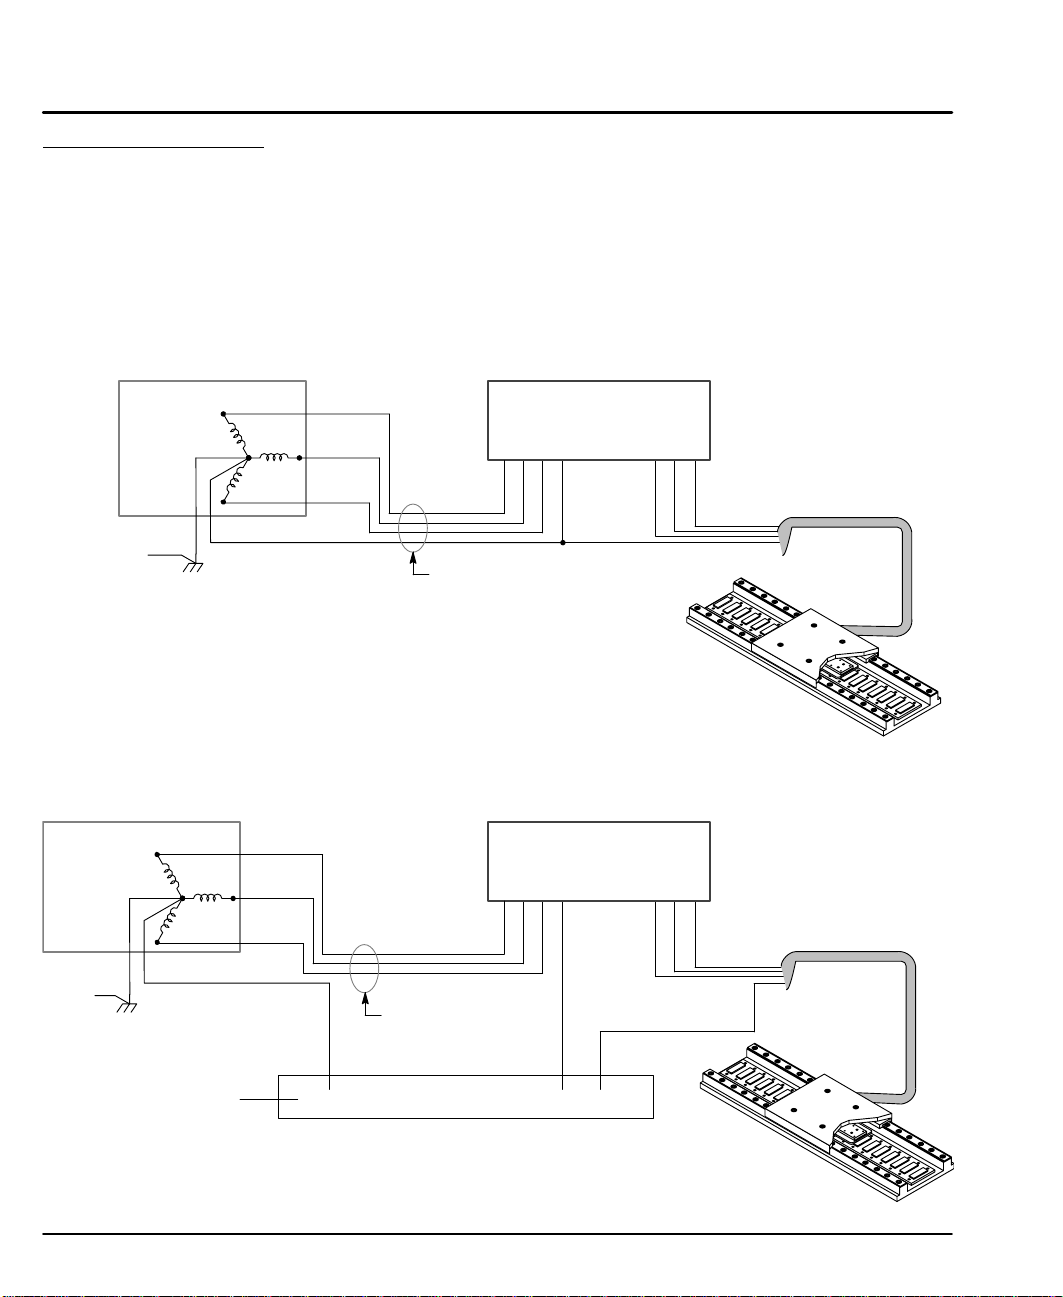
System Grounding Baldor controls are designed to be powered from standard single and three
phase lines that are electrically symmetrical with respect to ground. System
grounding is an important step in the overall installation to prevent problems. The
recommended grounding method is shown in Figure 3-1 and 3-3 for UL compliant
systems (Figure 3-2 and 3-4 for CE compliant systems).
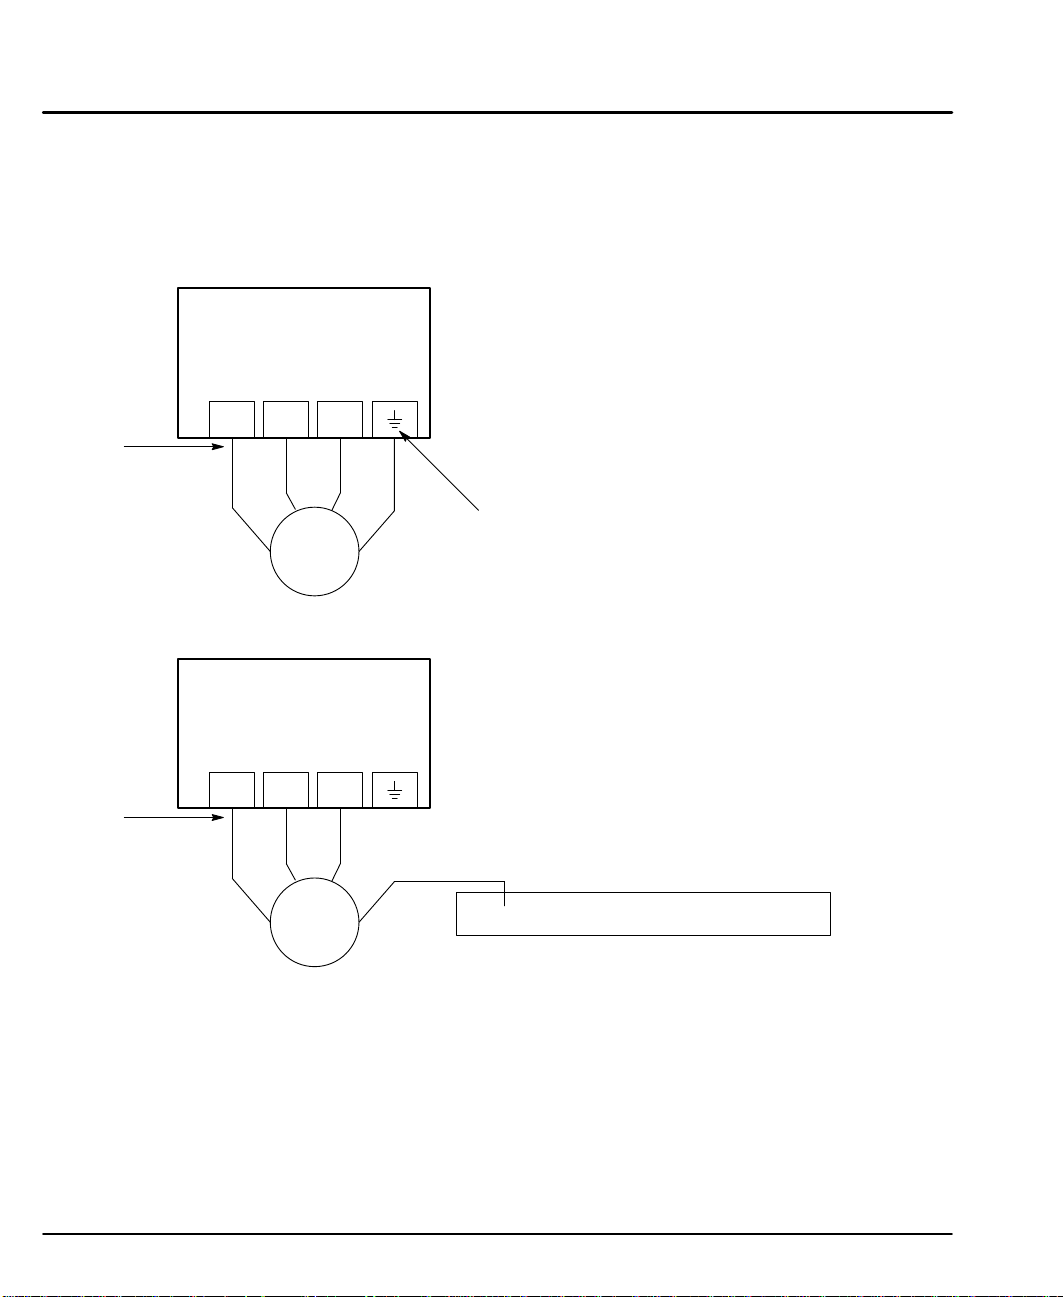
Figure 3-1 Recommended System Grounding (3 phase) for UL
AC Main
Supply
L1
L2
L3
Control
L2 L3 UW
PE
VL1
Note:
Wiring shown for clarity of
grounding method only.
Not representative of actual
terminal block location.
Safety
Ground
Driven Earth
Ground Rod
(Plant Ground)
Note: Use shielded cable for control signal wires. Route
control signal wires in conduit. These wires must be
kept separate from power and motor wires.
Earth
Four Wire
“Wye”
Route all power wires L1, L2, L3 and Earth
(Ground) together in conduit or cable.
Figure 3-2 Recommended System Grounding (3 phase) for CE
AC Main
Supply
Four Wire
“Wye”
Safety
Ground
PE
All shields
L1
L2
L3
Route all power wires
L1, L2, L3 and Earth
(Ground) together in
conduit or cable.
Enclosure Backplane (see Section 8)
Ground per NEC and Local codes.
Control
L2 L3 UW
PE
VL1
Note:
Wiring shown for clarity of
grounding method only.
Not representative of actual
terminal block location.
Motor
GND
Note: Use shielded cable for control signal wires. Route
control signal wires in conduit. These wires must be
kept separate from power and motor wires.
3-2 Receiving & Installation MN1851
Page 14
AC Main
Supply
Figure 3-3 Recommended System Grounding (1 phase) for UL
L
Control
N
N UW
VL
Note:
Wiring shown for clarity of grounding
method only. Not representative of
actual terminal block location.
Safety
Ground
Driven Earth
Ground Rod
(Plant Ground)
Note: Use shielded cable for control signal wires. Route
control signal wires in conduit. These wires must be
kept separate from power and motor wires.
Earth
Route all 3 wires L, N, and Earth
(Ground) together in conduit or cable.
Figure 3-4 Recommended System Grounding (1 phase) for CE
AC Main
Supply
Four Wire
“Wye”
Safety
Ground
PE
All shields
L1
L2
L3
Neutral
Enclosure Backplane (see Section 8)
Route all power wires
together in conduit or
cable.
Ground per NEC and Local codes.
Control
LN
VUW
Note:
Wiring shown for clarity of
grounding method only.
Not representative of actual
terminal block location.
Motor
GND
Note: Use shielded cable for control signal wires. Route
control signal wires in conduit. These wires must be
kept separate from power and motor wires.
Receiving & Installation 3-3MN1851
Page 15

System Grounding
Continued
Ungrounded Distribution System
With an ungrounded power distribution system it is possible to have a continuous
current path to ground through the MOV devices. To avoid equipment damage, an
isolation transformer with a grounded secondary is recommended. This provides
three phase AC power that is symmetrical with respect to ground.
Input Power Conditioning
Baldor controls are designed for direct connection to standard single and three
phase lines that are electrically symmetrical with respect to ground. Certain power
line conditions must be avoided. An AC line reactor or an isolation transformer
may be required for some power conditions.
• If the feeder or branch circuit that provides power to the control has
permanently connected power factor correction capacitors, an input AC
line reactor or an isolation transformer must be connected between the
power factor correction capacitors and the control.
• If the feeder or branch circuit that provides power to the control has
power factor correction capacitors that are switched on line and off line,
the capacitors must not be switched while the control is connected to the
AC power line. If the capacitors are switched on line while the control is
still connected to the AC power line, additional protection is required.
TVSS (Transient Voltage Surge Suppressor) of the proper rating must be
installed between the AC line reactor or an isolation transformer and the
AC input to the control.
Power Disconnect A power disconnect should be installed between the input power service
and the control for a fail–safe method to disconnect power. The control will remain
in a powered-up condition until all input power is removed from the control and the
internal bus voltage is depleted.
Protection Devices The control must have a suitable input power protection device installed.
Input and output wire size is based on the use of copper conductor wire rated at
75 °C. Table 3-1 and 3-2 describes the wire size to be used for power connections
and the ratings of the protection devices. Use the recommended circuit breaker or
fuse types as follows:
Circuit Breaker: 1 phase, thermal magnetic.
Equal to GE type THQ or TEB for 115 or 230 VAC
3 phase, thermal magnetic.
Equal to GE type THQ or TEB for 230 VAC or
GE type TED for 460 VAC.
Time Delay Fuses: Buss FRN on 230 VAC or
Buss FRS on 460 VAC or equivalent.
Recommended fuse sizes are based on the following:
UL 508C suggests a fuse size of four times the continuous output
current of the control.
Dual element, time delay fuses should be used to avoid nuisance trips
due to inrush current when power is first applied.
For European installations, you may want to consider the following fast acting
fuse: Gould Shawmut Cat. No. ATMR15 for up to 15 amperes.
3-4 Receiving & Installation MN1851
Page 16

Table 3-1 Wire Size and Protection Devices (for units with Power Supply)
Catalog Number Incoming Power
Input
Input
Fuse
Time
Delay (A)
AWG
(USA)
LP1A02SR-EXXX
LP2A02SR-EXXX
LP1A02TR-EXXX
LP2A02TR-EXXX
LP4A02TB-EXXX
LP1A05SR-EXXX
LP1A05SR-EXXX
LP1A05TR-EXXX
LP2A05TR-EXXX
LP4A05TB-EXXX
LP1A07TR-EXXX
LP2A07TR-EXXX
LP4A07TR-EXXX
LP1A10SR-EXXX
LP2A10SR-EXXX
LP1A15SR-EXXX
LP2A15SR-EXXX
LP4A15TR-EXXX
LP4A20TR-EXXX
Nominal Input
Nominal Input
Voltage
115V (1f)
230V (3f)
115V (1f)
230V (1f)
400/460V (3f)
115V (1f)
230V (3f)
115V (1f)
230V (1f)
400/460V (3f)
115V (1f)
230V (1f)
400/460V (3f)
115V (1f)
230V (3f)
115V (1f)
230V (3f)
400/460V (3f)
400/460V (3f)
Continuous Input
Output
(RMS)
Amps
2.0A 8 8 14 2.5
2.5A 10 10 14 2.5
2.0A 8 8 14 2.5
2.5A 10 10 14 2.5
2.5A 10 10 14 2.5
5A 20 20 14 2.5
5A 20 20 14 2.5
5A 20 20 14 2.5
5A 20 20 14 2.5
5A 20 20 14 2.5
7.5A 30 30 14 2.5
7.5A 30 30 14 2.5
7.5A 30 30 14 2.5
10A 40 40 14 2.5
10A 40 40 14 2.5
15A 60 60 12 2.5
15A 60 60 12 2.5
15A 60 60 12 2.5
20A 60 60 12 2.5
Breaker
(A)
Wire Gauge
(Europe)
mm
2
Table 3-2 Wire Size (for units without Power Supply)
Catalog Number
LP1A02PO-EXXX 160VDC 2.0A 14 2.5
LP2A02PO-EXXX 300VDC 2.5A 14 2.5
LP1A05PO-EXXX 160VDC 5.0A 14 2.5
LP2A05PO-EXXX 300VDC 5.0A 14 2.5
LP1A10PO-EXXX 160VDC 10.0A 12 2.5
LP2A10PO-EXXX 300VDC 10.0A 12 2.5
LP1A15PO-EXXX 160VDC 15.0A 10 2.5
LP2A15PO-EXXX 300VDC 15.0A 10 2.5
Bus
Voltage
Continuous
Continuous
Output
Amps
Note: All wire sizes are based on 75°C copper wire. Higher temperature smaller gauge wire may
be used per NEC and local codes. Recommended fuses/breakers are based on 25°C
ambient, maximum continuous control output current and no harmonic current.
X1 Power Connections
Power connections are shown in Figures 3-5 through 3-8.
Wire Gauge
AWG
(USA)
2
mm
(Europe)
Receiving & Installation 3-5MN1851
Page 17
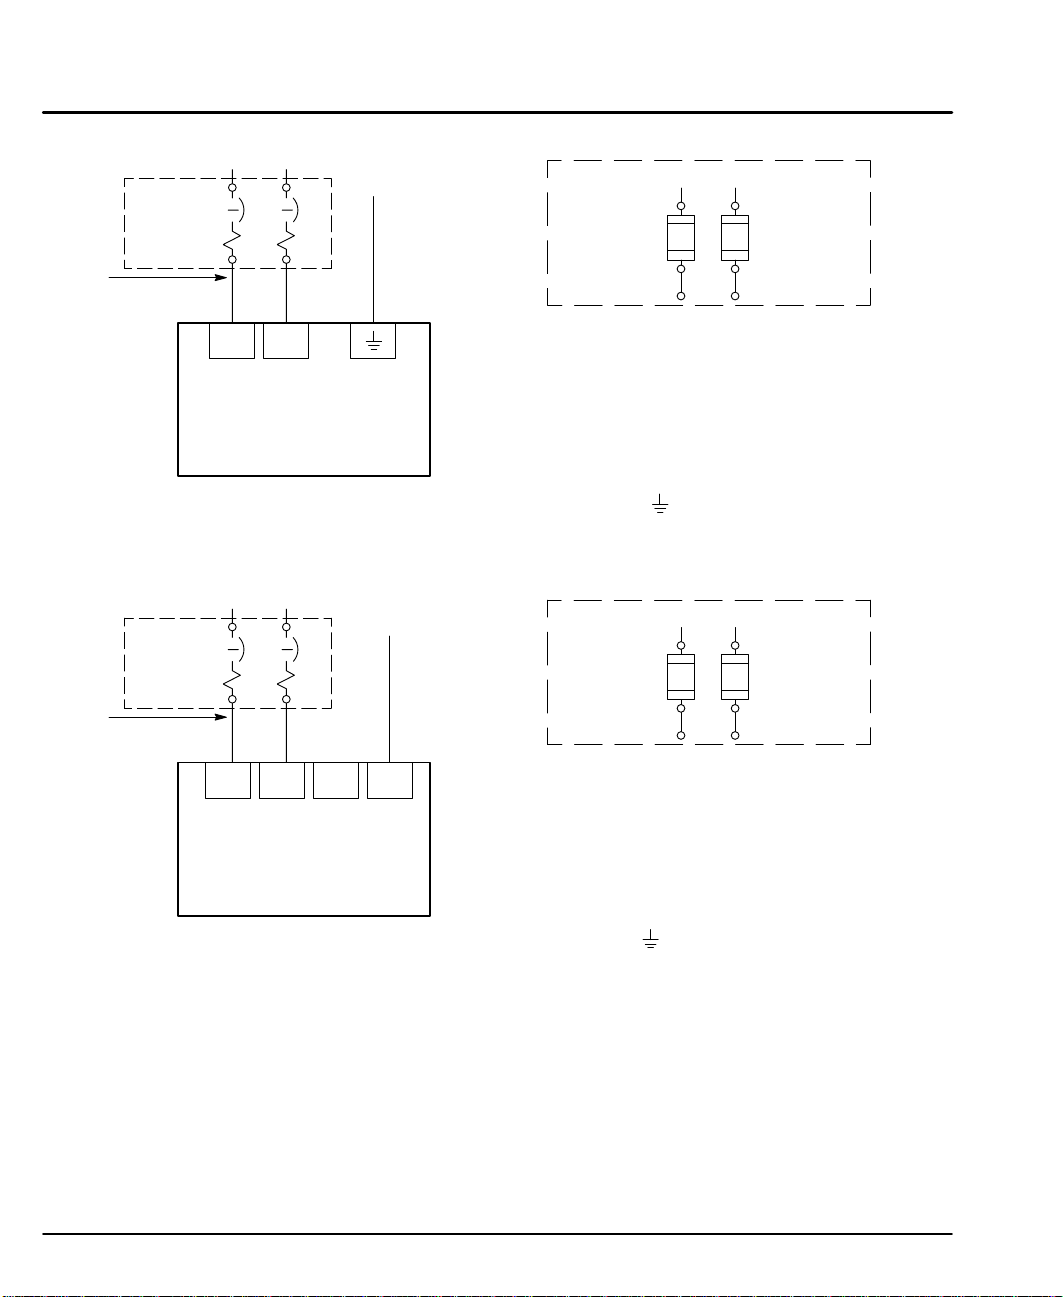
Figure 3-5 Single Phase AC Power Connections (LP1AxxT & LP2AxxT only)
Note 1
Note 2
* Circuit
Breaker
L1 L2
Earth
Note 3 & 4
Alternate *
Fuse
Connection
L1 L2
Note 1
LN
Baldor
Control
For CE Compliance, refer to Section 8 of this manual.
Figure 3-6 Single Phase AC Power Connections (LP1AxxS only)
L1 L2
Earth
Note 1
Note 2
For CE Compliance, refer to Section 8 of this manual.
* Circuit
Breaker
L1 L2 L3
Baldor
Control
Note 3 & 4
PE
* Components not provided with Control.
Notes:
1. See “Protection Devices” described in this section.
2. Metal conduit or shielded cable should be used. Connect
conduits so the use of a Reactor or RC Device does not
interrupt EMI/RFI shielding.
3. Use same gauge wire for Earth ground as is used for L and N.
(VDE (Germany) requires 10mm
Compliance, connect to the backplane of the enclosure.
4. Reference EMC wiring in Section 8.
2
minimum, 6AWG). For CE
L1 L2
Alternate *
Fuse
Note 1
Connection
* Components not provided with Control.
Notes:
1. See “Protection Devices” described in this section.
2. Metal conduit or shielded cable should be used. Connect
conduits so the use of a Reactor or RC Device does not
interrupt EMI/RFI shielding.
3. Use same gauge wire for Earth ground as is used for L and N.
(VDE (Germany) requires 10mm
Compliance, connect to the backplane of the enclosure.
4. Reference EMC wiring in Section 8.
2
minimum, 6AWG). For CE
Note: These Lin+Drive versions are not designed for use with 400/460VAC
connections.
3-6 Receiving & Installation MN1851
Page 18
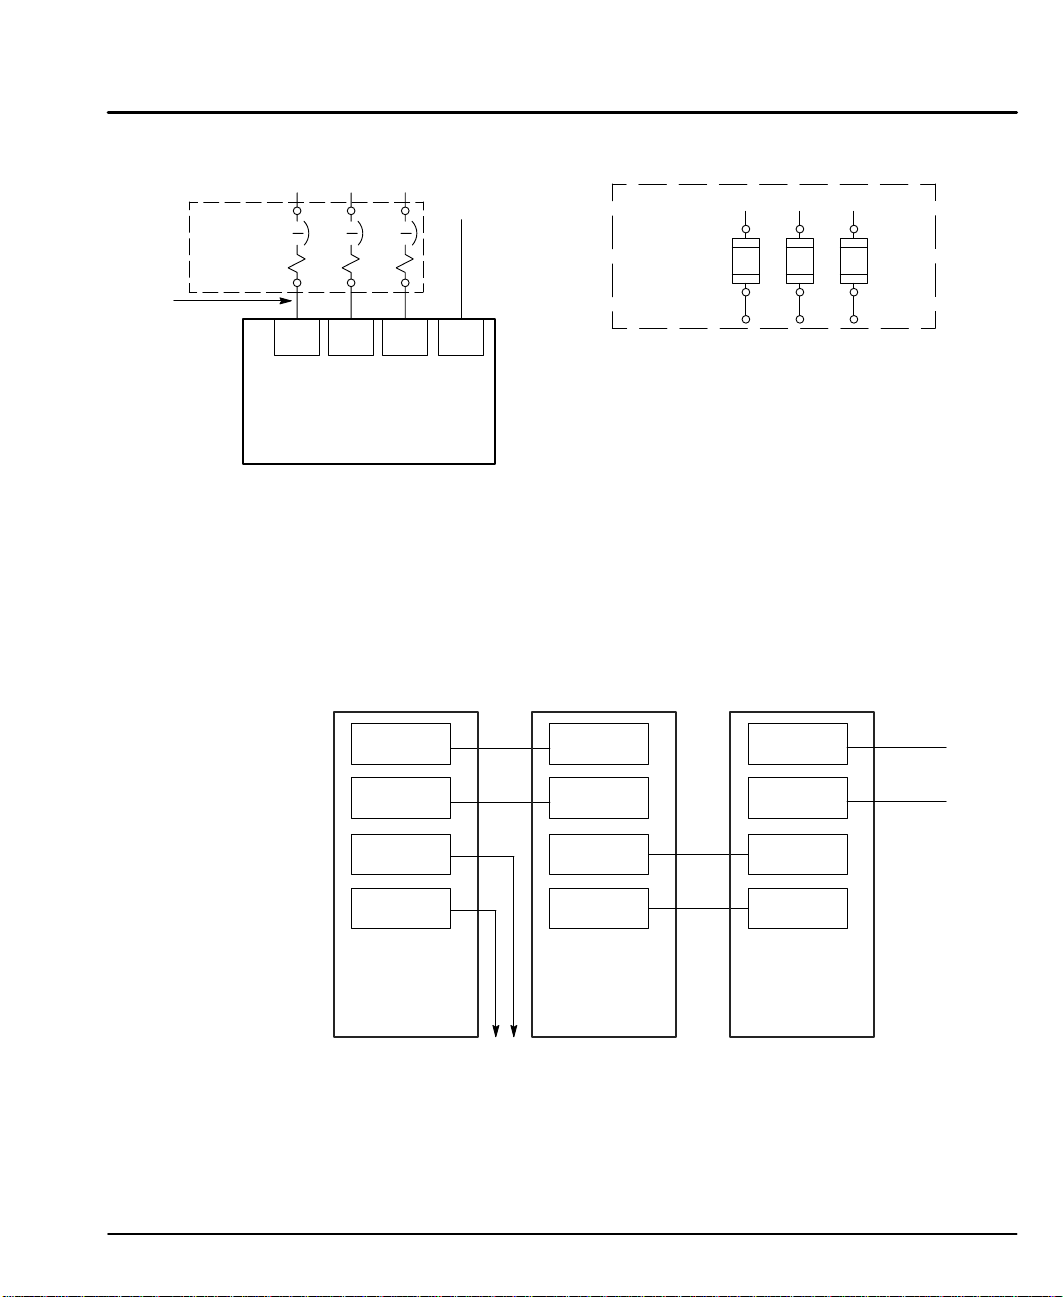
Figure 3-7 3 Phase Power Connections (LP2AxxS & LP4AxxT only)
L1 L2 L3
Earth
Note 1
* Circuit
Breaker
Note 2
L1 L2 L3
PE
Baldor
Control
For CE Compliance, refer to Section 8 of this manual.
A shared supply configuration is shown in Figure 3-8. The first drive must have an
internal power supply such as an Option “S” control.
Figure 3-8 Shared Supply Power Connections
L1 L2 L3
Note 3 & 4
Notes:
1. See Protection Device description in this section.
2. Metal conduit or shielded cable should be used. Connect
conduits so the use of a Reactor or RC Device does not interrupt
EMI/RFI shielding.
3. Use the same gauge wire for Earth as used for L1, L2, L3
connections.
3. Use same gauge wire for Earth ground as is used for L and N.
(VDE (Germany) requires 10mm
compliance, connect “PE” to the backplane of the enclosure.
4. Reference EMC wiring in Section 8.
Alternate *
Fuse
Connection
A1 B1 C1
Note 1
* Components not provided with Control.
2
minimum, 6AWG). For CE
VCC+
VCC-
R1
R2
Baldor
Option S
Control
To
Regen
Resistor
VCC+
VCC-
VCC+
VCC-
Baldor
Option P
Control
VCC+
VCC-
VCC+
VCC-
Baldor
Option P
Control
Receiving & Installation 3-7MN1851
Page 19
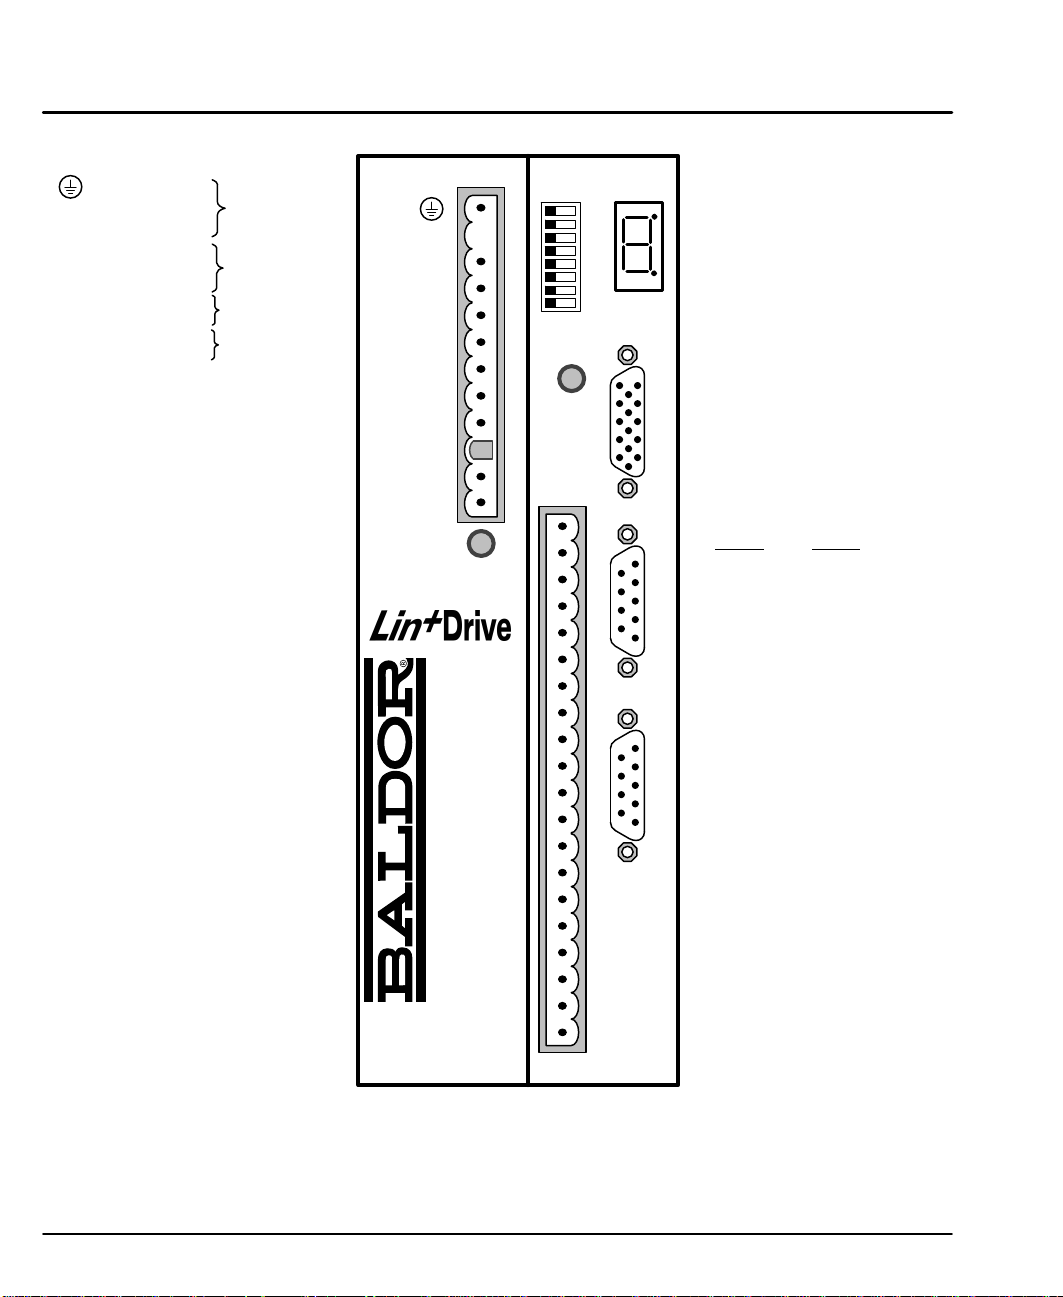
X1 - Power Connector
Figure 3-9 Connector Locations (Single Phase Controls)
Earth
L AC Line
N Neutral
U Motor lead “U”
V Motor lead “V”
W Motor lead “W”
R1 Dynamic Brake
R2 Dynamic Brake
+24V Customer
0V Provided
Terminal tightening torque is
0.5 lb-in (0.6Nm)
X3 - Control Signals & Digital I/O
1 CMD+
2 CMD3 AGND
4 Fault Relay+
5 Fault Relay6CIV
7 CREF
8 CGND
9 Enable
10 MaI3
11 MaI4
12 Quit
13 Fault Reset
14 Home Flag
15 Trigger
16 MaI1
17 MaI2
18 MaO1
19 MaO2
20 DrOK
Input Power
Motor
Dynamic Brake
(Regen Resistor)
LPxAxxxx-xxx3
only
NC
L
N
U
V
W
R1
R2
+24V
0V
DB On
X1
AS1
Off/On
Ready
Monitor
1
2
3
4
5
6
7
8
The holes in the top and
bottom of the enclosure
are for cable clamps. Be
sure to use an M4 bolt
12mm in length. Longer
bolts may short circuit the
electrical components
inside the control.
X9 - Encoder Input
1 CHA+ 9 Hall 3+
2 CHB+ 10 Hall 2+
3 CHC+ 11 +5VDC
4 Hall 1+ 12 Reserved
5 Hall 1– 13 DGND
6 CHA- 14 Hall 3–
7 CHB- 15 Hall 2–
Encoder In X9RS232 / 485 X6Encoder Out X7
8 CHC-
X6 - RS232 / 485
RS232
1 Reserved 1 TX-
2R
x
3T
Data 3 RX+
x
4 DTR 4 RX5 DGND 5 DGND
6 DSR 6 RTS7 RTS 7 RTS+
8 CTS 8 CTS+
9 +5V 9 CTS-
1 CHA+ 6 CHA–
2 CHB+ 7 CHB–
3 CHC+ 8 CHC–
4 Reserved 9 Reserved
5 DGND
RS485
Data 2 TX+
X7 - Encoder Output
Note: Reserved means no
Important:
X3
LPxAxxxx-xxx3 only.
A separate 24VDC supply to the “Logic Power” input is required for
connection is required and
no connection should be
made to this terminal. It is
reserved for future use.
operation. An LPxAxxxx-xxx3 control will not operate without 24VDC
on this input.
3-8 Receiving & Installation MN1851
Page 20
X1 - Power Connector
PE Earth
L1 Phase 1 Input
L2 Phase 2 Input
L3 Phase 3 Input
U Motor lead “U”
V Motor lead “V”
W Motor lead “W”
R1 Dynamic Brake
R2 Dynamic Brake
+24V Customer
0V Provided
Figure 3-10 Connector Locations (Three Phase Controls)
The holes in the top and bottom of the
enclosure are for cable clamps. Be sure
to use an M4 bolt 12mm in length.
Input Power
Motor
Dynamic Brake
(Regen Resistor)
LPxAxxxx-xxx3
only
Longer bolts may short circuit the
electrical components inside the control.
Terminal tightening torque is
0.5 lb-in (0.6Nm)
X3 - Control Signals & Digital I/O
1 CMD+
2 CMD3 AGND
4 Fault Relay+
5 Fault Relay6CIV
7 CREF
8 CGND
9 Enable
10 MaI3
11 MaI4
12 Hold
13 Fault Reset
14 Home Flag
15 Trigger
16 MaI1
17 MaI2
18 MaO1
19 MaO2
20 DrOK
X9 - Encoder Input
1 CHA+ 9 Hall 3+
2 CHB+ 10 Hall 2+
3 CHC+ 11 +5VDC
4 Hall 1+ 12 Reserved
5 Hall 1– 13 DGND
6 CHA- 14 Hall 3–
7 CHB- 15 Hall 2–
8 CHC-
X6 - RS232 / 485
RS232 RS485
1 Reserved 1 TX2R
Data 2 TX+
x
3T
Data 3 RX+
x
4 DTR 4 RX5 DGND 5 DGND
6 DSR 6 RTS7 RTS 7 RTS+
8 CTS 8 CTS+
9 +5V 9 CTS-
X7 - Encoder Output
1 CHA+ 6 CHA–
2 CHB+ 7 CHB–
3 CHC+ 8 CHC–
4 Reserved 9 Reserved
5 DGND
Note: Reserved means no connection is required
and no connection should be made to this
Important:
terminal. It is reserved for future use.
LPxAxxxx-xxx3 only.
A separate 24VDC supply to the “Logic Power” input is required for
operation. An LPxAxxxx-xxx3 control will not operate without 24VDC on this input.
Receiving & Installation 3-9MN1851
Page 21
X1 Motor Connections Motor connections are shown in Figures 3-11 and 3-12.
It is important to connect the motor leads U, V and W correctly at the X1 connector
of the control. Incorrect wiring can cause erratic operation including moves at
peak force until the overcurrent limit trips. This will result in a display of “7” and a
“6” on the monitor. If erratic movement of the motor occurs, turn off power
immediately and check the connections of the motor, hall sensors and encoder.
Figure 3-11 Motor Connections for UL
Notes:
Baldor
Control
UVW
Note 1
1. Metal conduit or shielded cable should be used. Connect
conduits so the use of Load Reactor* or RC Device* does not
interrupt EMI/RFI shielding.
2. Use same gauge wire for Earth ground as is used for L and N.
(VDE (Germany) requires 10mm2 minimum, 6AWG).
3. Reference EMC wiring in Section 8.
4. Motor and encoder are phase sensitive. Connect only as
instructed.
* Linear Motor
VW
U
Note 2
G
For three phase controls, this is labeled “PE”.
* Optional components not provided with control.
Figure 3-12 Motor Connections for CE
Notes:
Baldor
Control
UVW
Note 1
VW
U
* Linear Motor
Note 2
G
Note: For CE compliant installations, connect unused leads within the motor cable
to “PE” on both ends of the cable.
M-Contactor If required by local codes or for safety reasons, an M-Contactor (motor circuit
contactor) may be installed. However, incorrect installation or failure of the
M-contactor or wiring may damage the control. If an M-Contactor is installed, the
control must be disabled for at least 20msec before the M-Contactor is opened or
the control may be damaged. M-Contactor connections are shown in Figure 3-13.
1. Metal conduit or shielded cable should be used. Connect
conduits so the use of Load Reactor* or RC Device* does not
interrupt EMI/RFI shielding.
2. Use same gauge wire for Earth ground as is used for L and N.
(VDE (Germany) requires 10mm2 minimum, 6AWG). For CE
compliance, connect motor ground to the backplane of the
enclosure.
3. Reference EMC wiring in Section 8.
4. Motor and encoder are phase sensitive. Connect only as
instructed.
Enclosure Backplane (see Section 8)
* Optional components not provided with control.
3-10 Receiving & Installation MN1851
Page 22
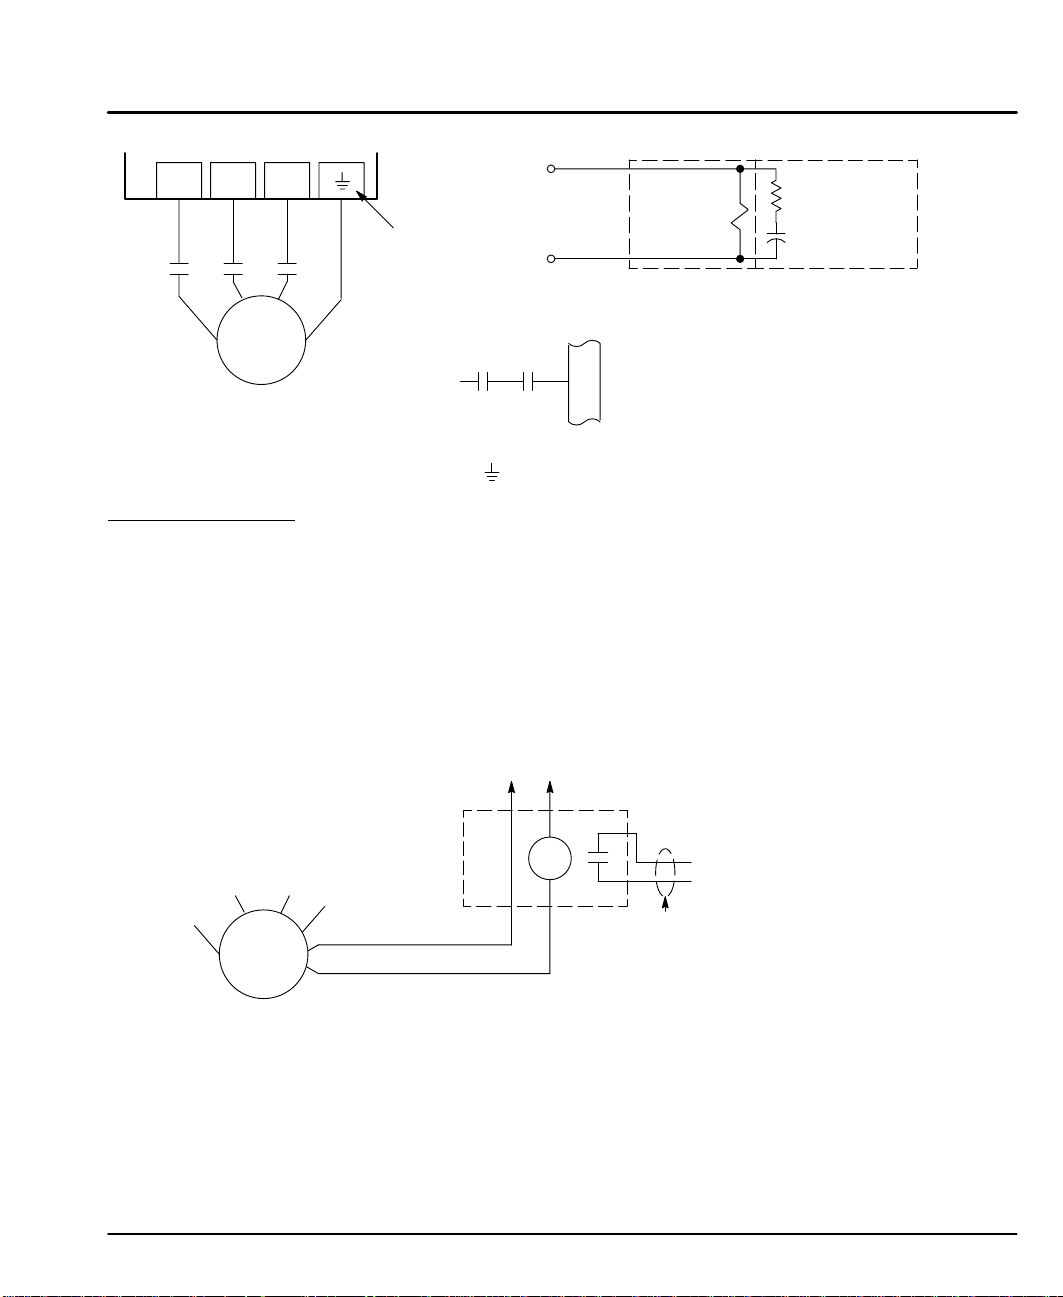
Figure 3-13 Optional M-Contactor Connections
UVW
To Power Source
(Rated Coil Voltage)
Note 1
Note 2
For three phase
controls, this is
labeled “PE”.
M Enable
* Optional components not provided with control.
*
*
MMM
VW
U
G
* Motor
M=Contacts of optional M-Contactor
Notes:
1. Use same gauge wire for Earth ground as is used for L and N. (VDE (Germany) requires10mm2 minimum, 6AWG).
2. For UL installations, connect motor ground to of the control as shown.
For CE installations, connect motor ground to the enclosure backplane (see Figure 3-12).
* M-Contactor
X3
Note: Close “Enable”
9
after “M” contact closure.
* RC Device
Electrocube
RG1781-3
Motor Thermostat A relay contact can be used to isolate the motor thermostat leads for use with
other devices, shown in Figure 3-14. The thermostat or overload relay should be a
dry contact type with no power available from the contact. The optional relay
(CR1) shown provides the isolation required and the N.O. contact is open when
power is applied to the relay and the motor is cold. If the motor thermostat is
tripped, CR1 is de-energized and the N.O. contact closes.
Connect the External Trip Input wires (N.O. relay contact) to a PLC or other
device. Note that a machine input may be used and the PLC software of the
Lin+Drive can define the thermal protection. Do not place these wires in the same
conduit as the motor power leads.
Figure 3-14 Motor Temperature Relay
Customer Provided
Source Voltage
Note: Add appropriately rated protective
device for AC relay (snubber)
or DC relay (diode).
*
CR1
W
V
G
U
Motor Thermostat Leads
* Linear Motor
Do not run these wires in same conduit
as motor leads or AC power wiring.
*
External Trip
Optional, customer provided hardware.
X1 Dynamic Brake Resistor An external DB (dynamic brake or regen resistor) resistor may be
required to dissipate excess power from the DC bus during motor deceleration
operations. Some controls have an internal resistor. For selection of the DB
resistor, refer to the specifications located in Section 7 and the regeneration
resistor specifications in Section 9 of this manual. DB hardware is connected at
R1 and R2 terminals of the X1 connector, Figure 3-9 and 3-10.
Receiving & Installation 3-11MN1851
Page 23
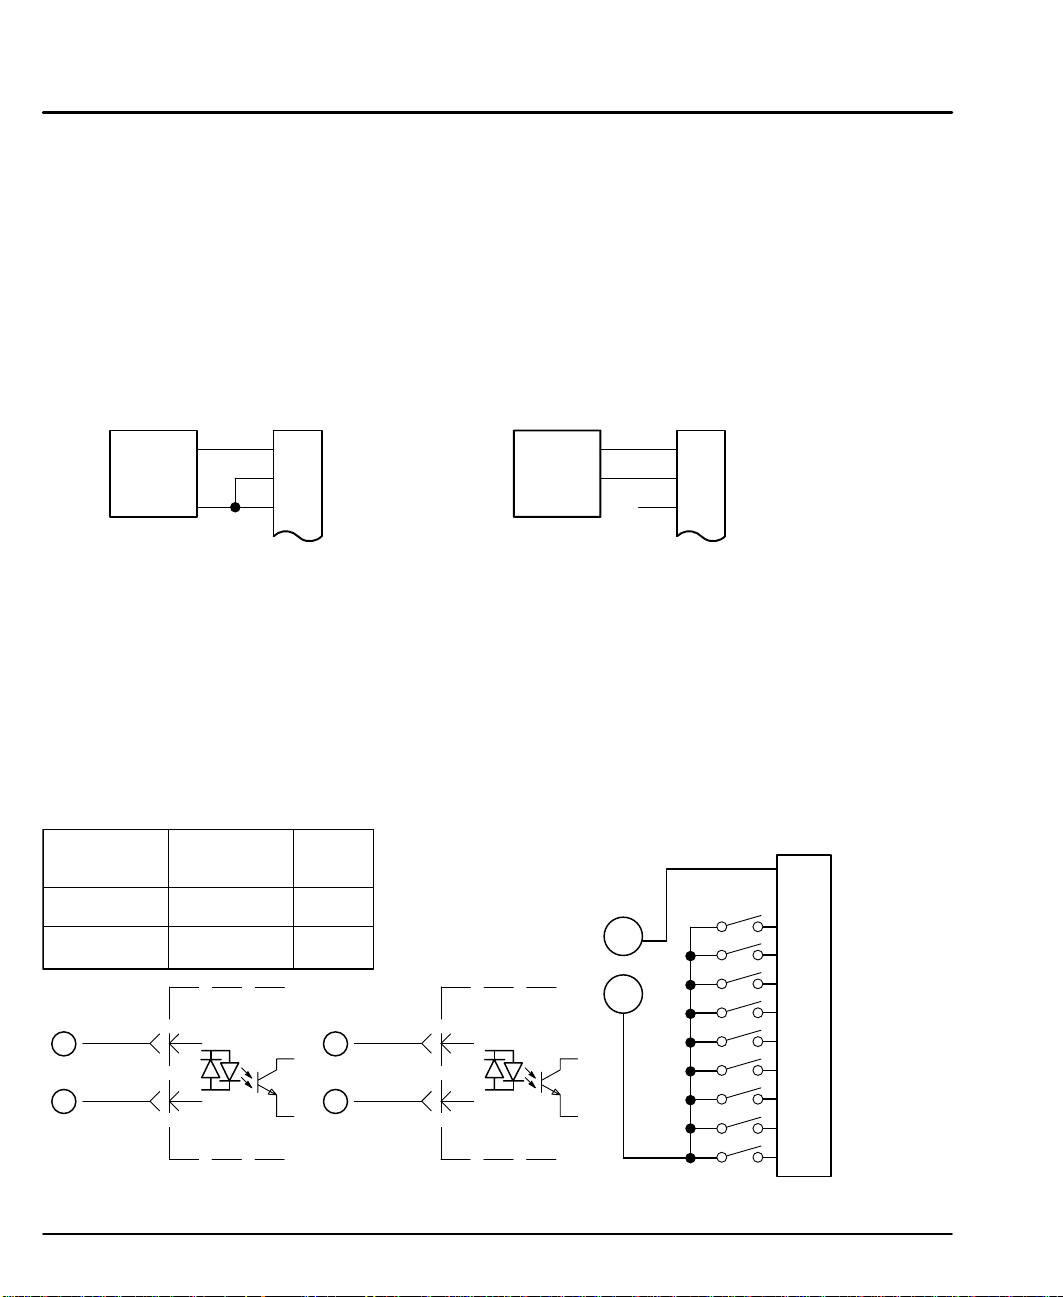
X1 +24VDC Logic Supply For LPxAxxxx-xxx3 only. A separate 24VDC supply to the “Logic
Power” input is required for operation. An external 24 VDC power source must be
used. If bus power is lost, the logic circuits are still active if the 24VDC is present.
This is important to maintain position reference, for example.
If the control was not ordered with this option, do not connect any voltage to these
pins.
X3 Control Inputs & Digital I/O Connections
Control Inputs X3 pins 1 and 2 allows connection of an external analog command input. This
input can accept a 0-10VDC or ±10VDC signal and can be wired as a single
ended or differential input, shown in Figure 3-15.
Figure 3-15 Control Input Wiring
Single Ended Connection Differential Connection
Signal
Source
X3
1
2
3
CMD+
CMDAGND
Signal
Source
X3
1
2
3
CMD+
CMDAGND
X3 Digital Inputs - Opto Isolated Inputs (uses CREF, X3-7)
Active High (Sourcing) - If pin X3-7 is grounded, an input is active when it is
at +24VDC (+12VDC to +30VDC).
Active Low (Sinking) - If pin X3-7 is at +24VDC (+12VDC to +30VDC), an
input is active when it is grounded.
Logic input connections are made at terminal strip X3. Input connections can be
wired as active High or active Low as shown in Figure 3-16. X3 pin 7 is the
Control Reference point (CREF) for the Opto Isolated Input signals.
Note: An internal 24VDC power supply connection is not available from the control
to power the Opto Input circuits. A customer provided external power
source must be used as indicated in Figure 3-16.
Figure 3-16 Active HIGH /LOW Relationship
Active Low
(Sink)
+24VDC
GND
+24VDC
B
GND
A
Source
Active High
Input
Note: All Opto inputs are referenced to
(Source)
GND
+24VDC
20mA 20mA
9 - 17
7
Typical
Control
A
B
B
A
GND
+24VDC
Sink
CREF, X3-7.
Input
A
B
9 - 17
7
Typical
Control
X3
7
8
9
10
11
12
13
14
15
16
17
CREF
CGND
ENABLE
CW-ENABLE
CCW-ENABLE
QUIT
FAULT RESET
HOME FLAG
TRIGGER
MAI1
MAI2
3-12 Receiving & Installation MN1851
Page 24

X3 Digital Inputs Continued
Table 3-3 Opto Input Signal Conditions
Pin
Number
X3-9 Enable Drive enabled. Drive disabled.
X3-10 MaI3 Machine Input 3 = Logical 1 Machine Input 3 = Logical 0
X3-11 MaI4 Machine Input 4 = Logical 1 Machine Input 4 = Logical 0
X3-12 Quit Stop positioning mode operation Positioning mode is operating
X3-13 Fault Reset Fault Reset is active (reset control). Fault Reset is not active.
X3-14 Home Flag Home flag = closing (rising) edge Home flag = opening (falling) edge
X3-15 Trigger Trigger = closing (rising) edge Trigger = opening (trailing) edge
X3-16 MaI1 Machine Input 1 = Logical 1 Machine Input 1 = Logical 0
X3-17 MaI2 Machine Input 2 = Logical 1 Machine Input 2 = Logical 0
Signal
Name
Switch = Closed (active) Switch = Open (not active)
Signal Name Opto Input Signal Definition
Enable CLOSED allows normal operation.
OPEN disables the control and motor coasts to a stop.
Quit CLOSED cancels any move in progress and the motor will decelerate (at
parameter MOT.ACC) to rest. This input is edge triggered.
OPEN allows position mode operation.
Fault Reset CLOSED allows the control to be cleared or “Reset” for any of the following four
fault conditions (provided that the cause of the fault has been removed):
• Overvoltage • Electronic Fusing
• Undervoltage • Resolver Fault
OPEN allows normal operation.
Home Flag Edge triggered input that is used to sense the “Home Position”.
Trigger Rising edge triggered input that initiates a “point-to-point move”. The move is
defined by the machine inputs MaI1 - 4.
MaI1,2,3,& 4 Four machine inputs are provided. These may be used with the internal PLC
software program. The internal PLC software can cause an event to occur based
on the presence of these inputs.
However, more often these inputs are used to define up to 15 preset positions or
point to point moves. The 16th move is always home. With this method, it is not
possible to use hardware limits (CW and CCW). Therefore, software limits must
be used. Software limits are only active after a homing routine has completed.
Note: Hardware limit switches may be wired in series with the “Enable” input
X3–9. Then if a limit is reached, the control will be disabled.
Receiving & Installation 3-13MN1851
Page 25
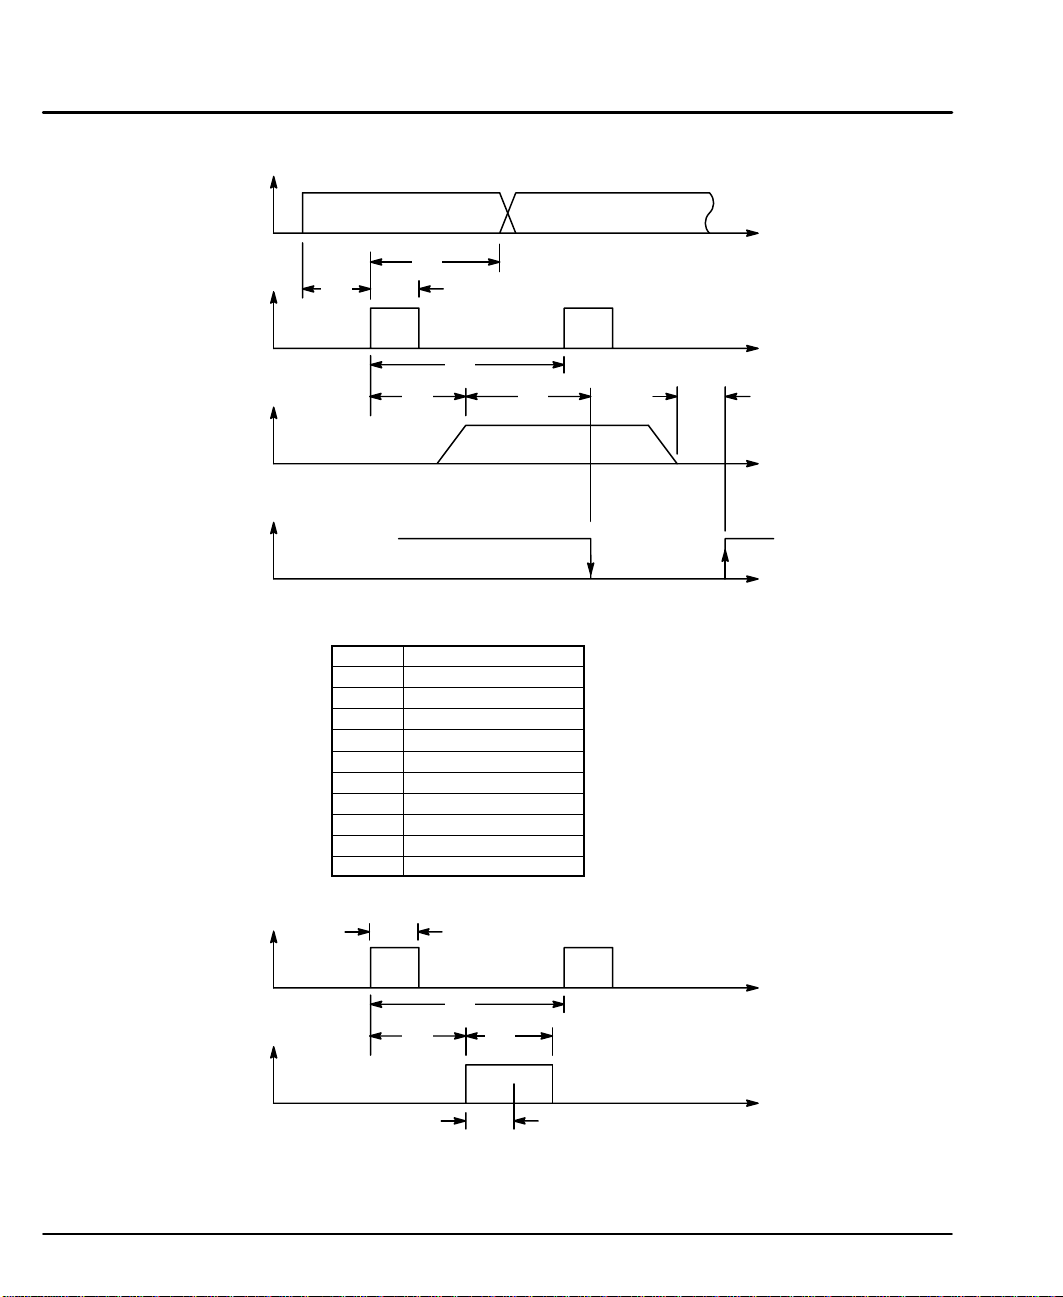
X3 Digital Inputs Continued
Figure 3-17 Positioning Mode Timing Diagram
See Table 3-4.
Motion in Process
MaI1 - 4
Trigger
Trajectory
Motion Ready =
T3
T2
T1
T4
T5 T6
Table 3-4 Process Duration
Time Required Duration
T1 ≥2ms
T2 ≥1ms
T3 ≥14ms
T4 ≥14ms
T5 ≤14ms
T6 ≤14ms
T7 ≤14ms
T8 ≥100ms
T9 ≥2ms
T10 ≥2ms
Time
Time
T7
Time
Time
Figure 3-18 Homing Process Timing Diagram
T2
Trigger
T4
T8 T9
Trajectory
See Table 3-4.
T10
Recognition Time (T10)
3-14 Receiving & Installation MN1851
Time
Time
Page 26
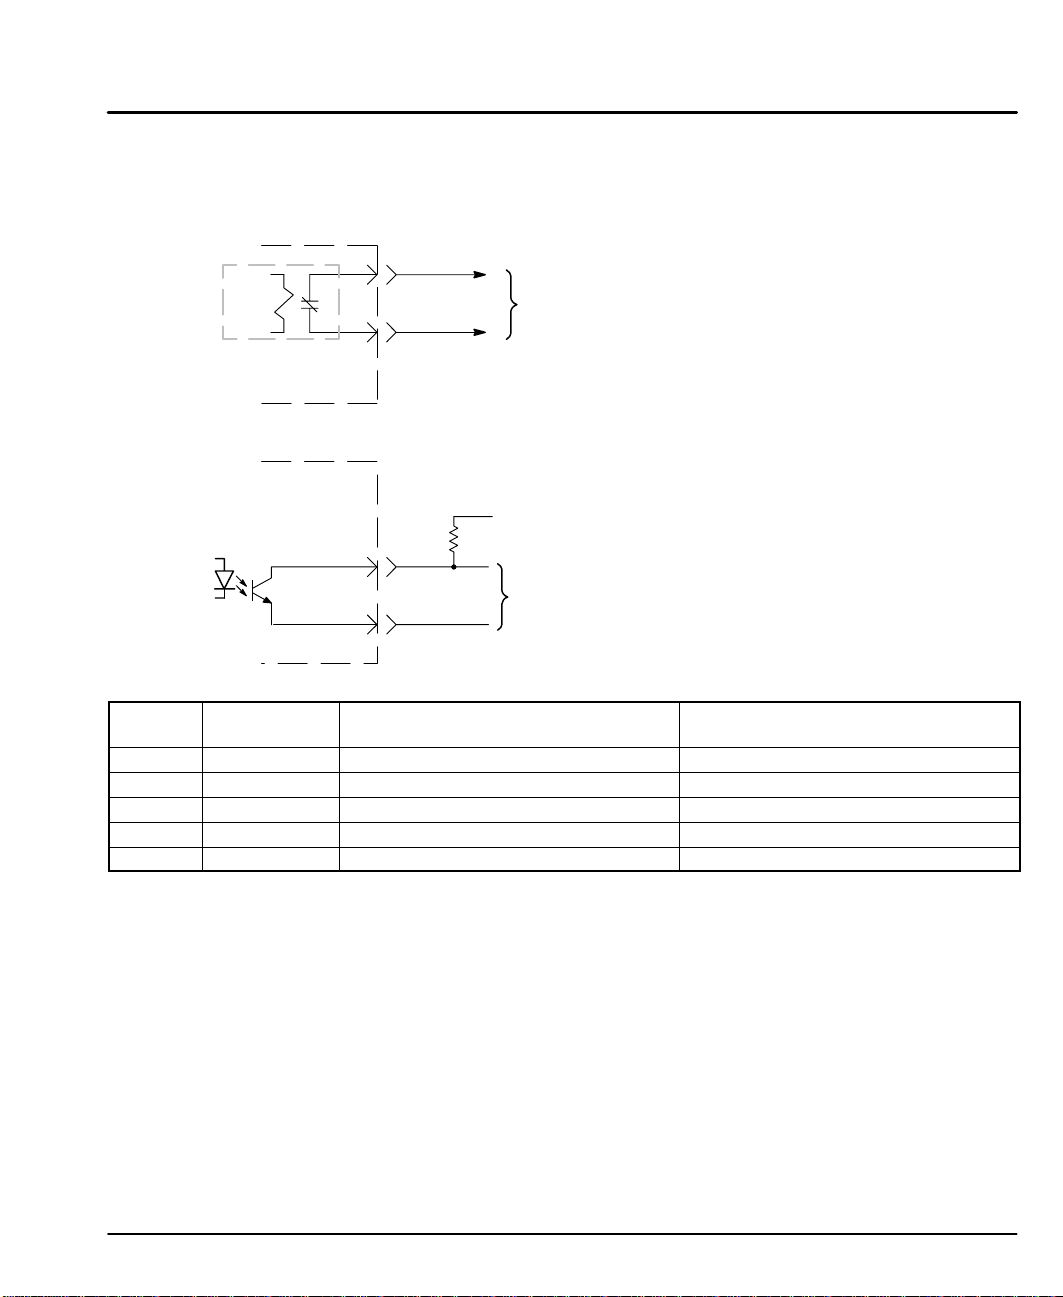
X3 Digital Outputs
The control outputs are located on the X3 connector. A customer provided,
external power supply must be used if digital outputs are to be used. The opto
outputs provide status information and are not required for operation, Table 3-5.
Relay
Contact is closed when power is on
and no faults are present.
Control
Figure 3-19 Fault Relay Connections
4
5
Customer Provided Interface Circuit
Customer provided external power source: and Non-Inductive Load
110VAC @ 0.3A maximum or
24VDC @ 0.8A maximum
Figure 3-20 Opto Output Connections
35mA Maximum
Typical
18, 19, 20
8
Control Customer Provided Interface Circuit
CGND
Customer Interface Voltage (+12VDC to +30VDC)
(2.2K typical @ 24VDC)
R
L
Output Signal + Common
Output Signal is only available if
Customer Interface Voltage is present.
Table 3-5 Opto Output Signal Conditions
Pin
Number
X3-4 Fault + Drive OK - no faults detected Fault is detected
X3-5 Fault - Drive OK - no faults detected Fault is detected
X3-18 MAO1 Machine Output 1 = Logical 1 Machine Output 1 = Logical 0
X3-19 MAO2 Machine Output 2 = Logical 1 Machine Output 2 = Logical 0
X3-20 DrOK Drive OK - no faults detected Fault is detected
Fault Relay A normally closed relay contact that opens if a fault occurs. The contact is rated:
MaO1 & 2 Two machine outputs are provided. Either output can be set to one of the
DrOK This output is active when the control is ready for operation.
Signal
Name
Switch = Closed (active) Switch = Open (not active)
24VDC @ 0.8A maximum or 110VAC @ 0.3A maximum.
following conditions: CW Warning, CCW Warning, In Position, Error Flag,
Following Error Warning, MAI1-2, Drive Overtemperature or I
Each output is rated 30VDC @ 35mA maximum.
This output is rated 30VDC @ 35mA maximum.
2
T Warning.
Receiving & Installation 3-15MN1851
Page 27
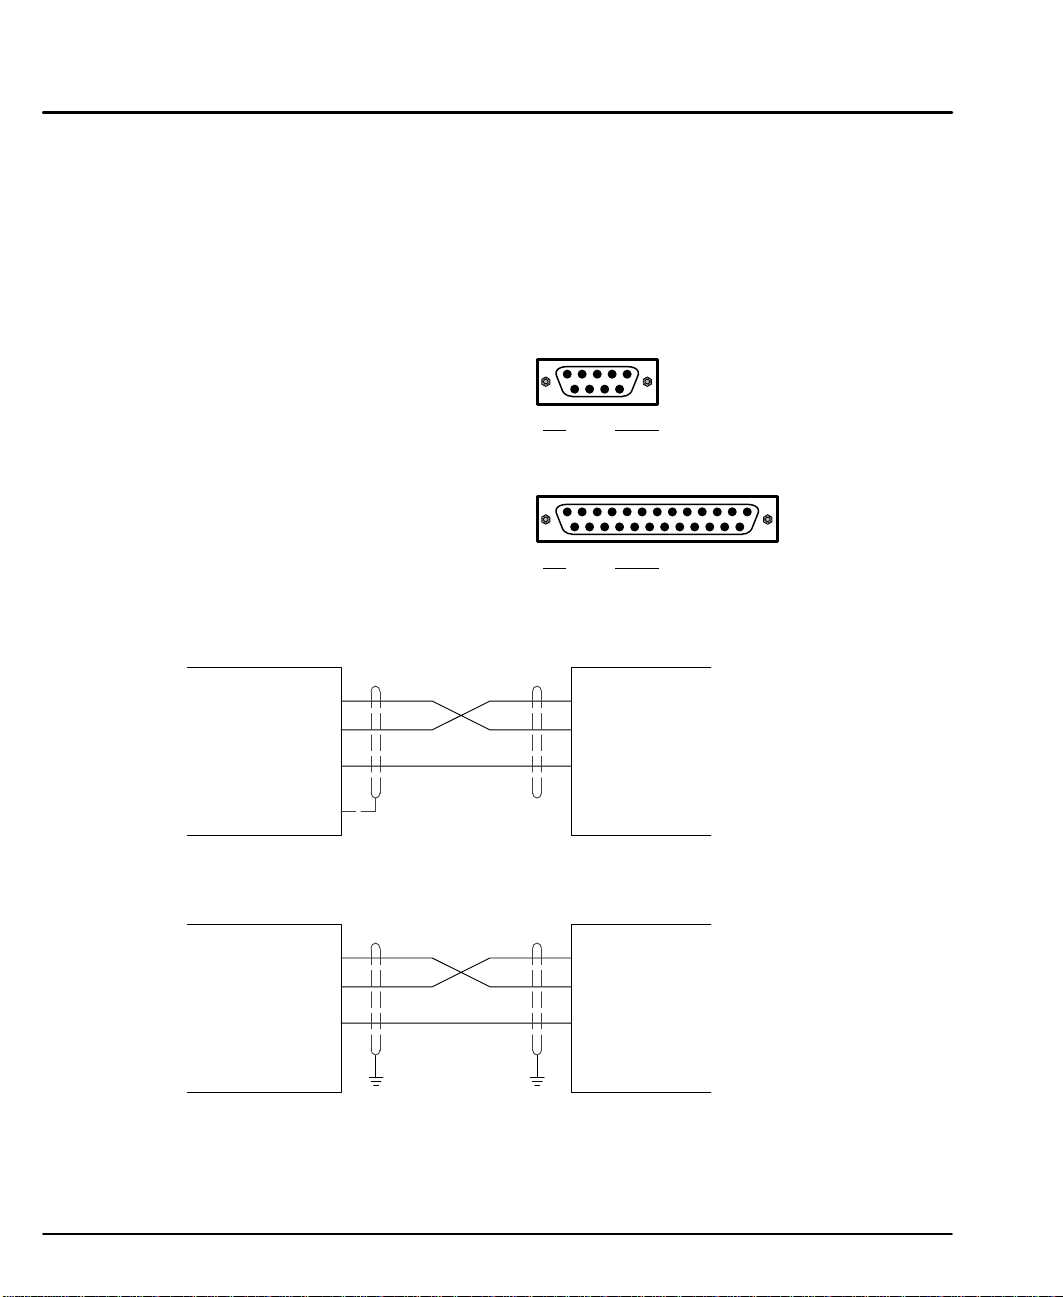
X6 RS232 / 485 Connections
RS232
A null modem cable (also called a modem eliminator cable) must be used to
connect the control and the computer COM port. This will ensure that the transmit
and receive lines are properly connected. Either a 9 pin or a 25 pin connector
can be used at the computer, Figure 3-21. Maximum recommended length for
RS232 cable is 3 ft. (1 meter).
Figure 3-21 9 & 25 Pin RS-232 Cable Connections for UL Installations
9 Pin Connector
RXD
TXD
GND
Signal
25 Pin Connector
Signal
Computer
COM
Port
(DTE)
Control
(DCE)
X6
RXD
TXD
GND
Chassis
Pin
2 RXD
3 TXD
5 GND
Pin
2 RXD
3 TXD
7 GND
Null Modem Cable Connections
Figure 3-22 9 & 25 Pin RS-232 Cable Connections for CE Installations
Null Modem Cable Connections
X6
Control
(DCE)
RXD
TXD
GND
PE PE
RXD
TXD
GND
Computer
COM
Port
(DTE)
Note: For CE installations, connect the overall shield at each end of the cable to PE. The
voltage potential between the PE points at each end of the cable must be Zero Volts.
3-16 Receiving & Installation MN1851
Page 28
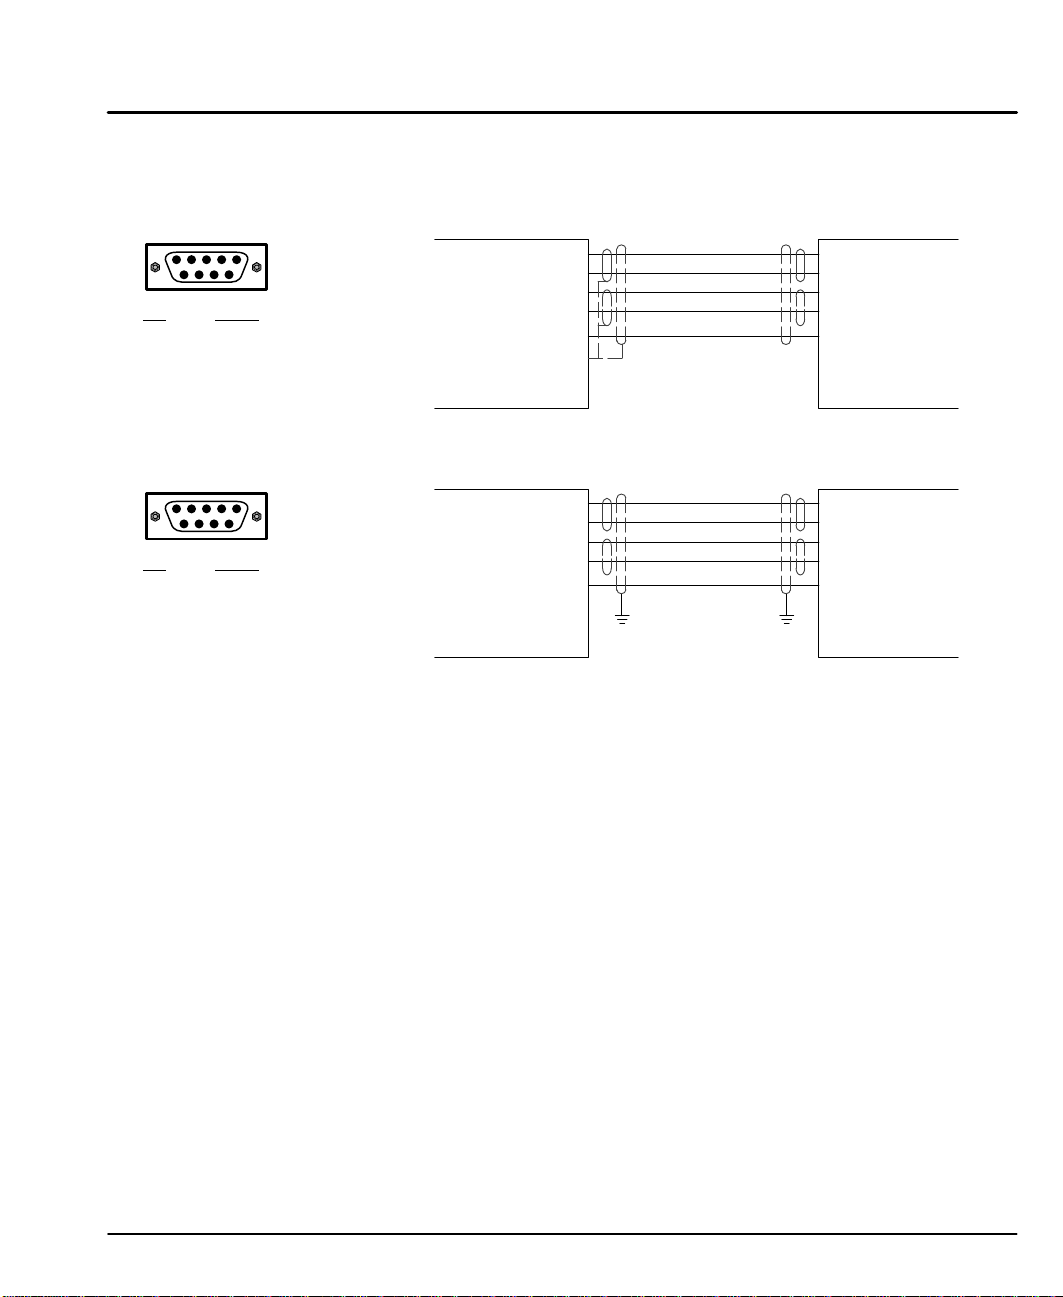
Figure 3-23 9 Pin RS-485 Cable Connections For UL Installations
Pin
1 TX2 TX+
3 RX+
4 RX5 DGND
Signal
RS485
Standard RS485 connections are shown in Figures 3-23 and 3-24. Maximum
cable length is 3280 ft (1000M).
X6
9 Pin Connector
Control
(DCE)
RX+
RX–
TX+
TX-
DGND
Chassis
TX+
TX–
RX+
RX-
DGND
Computer
COM
Port
(DTE)
Figure 3-24 9 Pin RS-485 Cable Connections For CE Installations
Pin
1 TX2 TX+
3 RX+
4 RX5 DGND
Signal
Note: For CE installations, connect the overall shield at each end of the cable to PE. The
voltage potential between the PE points at each end of the cable must be Zero Volts.
X6
9 Pin Connector
Control
(DCE)
RX+
RX–
TX+
TX-
DGND
Chassis
PE PE
TX+
TX–
RX+
RX-
DGND
Computer
COM
Port
(DTE)
RS485 Multi-Drop Connections
What does termination or a termination resistor do?
Termination resistance is used to match the impedance of the load to the
impedance of the transmission line (cable) being used. Unmatched impedance
causes the transmitted signal to not be fully absorbed by the load. This causes a
portion of the signal to be reflected back into the transmission line (noise). If the
Source impedance, Transmission Line impedance, and Load impedance are all
equal, these reflections (noise) are eliminated.
Termination does increase load current and sometimes changes the bias
requirements and increases the complexity of the system.
What is a termination resistor?
A resistor that is added in parallel with the receiver input to match the impedance
of the cable being used. Typically, the resistor value that is used is 100 ohm or
120 ohm. Resistors with 90 ohms or less should never be used.
Where are these resistors placed?
Terminators or Termination resistors are placed in parallel with the receiver at both
ends of a transmission line. This means that you should never have more than
two terminators in the system (unless repeaters are being used).
How many resistors should my system have?
Terminators or Termination resistors are placed in parallel with the receiver at both
ends of a transmission line. This means that you should never have more than
two terminators in the system (unless repeaters are being used).
Receiving & Installation 3-17MN1851
Page 29
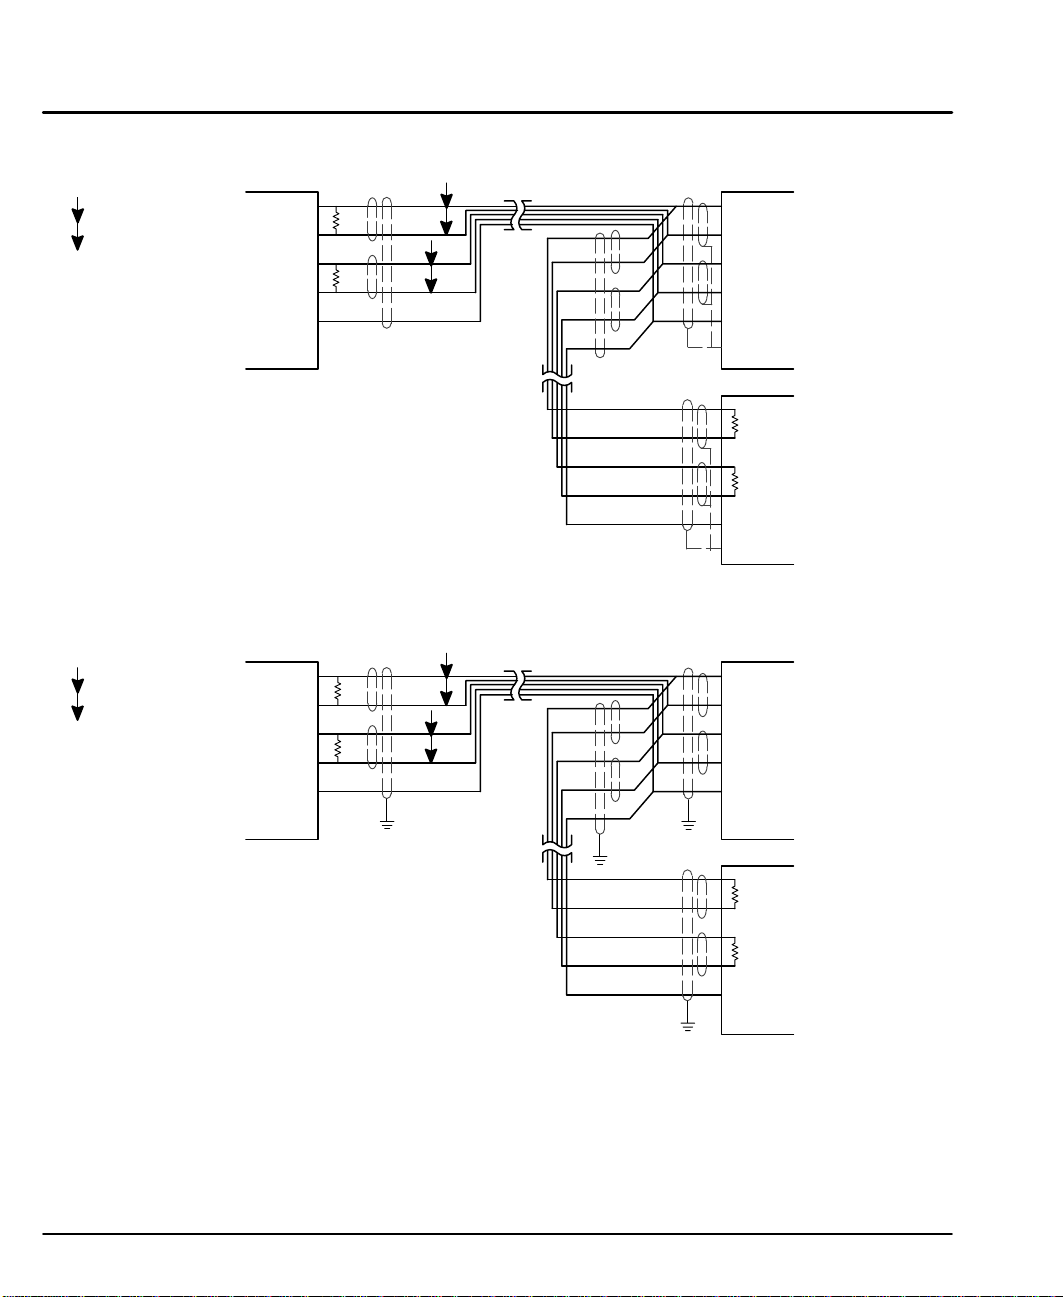
Figure 3-25 RS485 4 Wire Multi-Drop for UL Installations
Host
P
= Twisted Pair
Computer
RX+
RX–
TX+
TX-
DGND
GND
*
T
R
*
T
R
Use twisted pair shielded cable
with an overall shield.
* Terminating resistor TR is 120 W typical value.
Only the PC and last control are terminated.
P
P
Shields
Shields
*
*
T
R
T
R
X6
TX+
TX–
RX+
RX-
DGND
GND
X6
TX+
TX–
RX+
RX-
DGND
GND
Figure 3-26 RS485 4 Wire Multi-Drop for CE Installations
Host
Computer
P
= Twisted Pair
RX+
RX–
TX+
TX-
DGND
GND
Use twisted pair shielded cable
with an overall shield.
* Terminating resistor TR is 120 W typical value.
Only the PC and last control are terminated.
Note: For CE installations, connect the overall shield at each end of the cable to PE. The
voltage potential between the PE points at each end of the cable must be Zero Volts.
See Section 4 of this manual for the description of switch “AS1-1 to AS1-4” for
address settings for multi-drop applications.
*
T
R
*
T
R
P
P
PE
PE
PE
PE
*
*
T
R
T
R
X6
TX+
TX–
RX+
RX-
DGND
GND
X6
TX+
TX–
RX+
RX-
DGND
GND
3-18 Receiving & Installation MN1851
Page 30

X7 Encoder Output
The control provides a buffered encoder output at connector X7. This output may
be used by external hardware to monitor the encoder signals. It is recommended
that this output only drive one circuit load (RS422 interface – 28LS31 device).
Refer to Table 3-6.
Table 3-6 Buffered Encoder Output at X7 Connector
* For UL Installations ONLY. For CE Installations, connect the outer shield on
each end of the cable to the enclosure backplane “PE”.
X7 Pin Signal Name
1 A+
2 B+
3 C+
4 Reserved
5 DGND
6 A–
7 B–
8 C–
9 Reserved
Shell * Chassis (Cable Shield)
Receiving & Installation 3-19MN1851
Page 31

X9 Encoder and Hall Feedback (LPxAxxxx-Exxx)
Twisted pair shielded wire with an overall shield should be used. Figure 3-27
shows the electrical connections between the encoder and the encoder connector.
Figure 3-27 Encoder and Hall Feedback Connections for UL Installations
X9
1
A+
6
Encoder
Hall
Feedback
A–
2
B+
7
B–
C+
3
C–
8
11
+5V
DGND
13
4
Hall 1+
5
Hall 1–
9
Hall 3+
14
Hall 3–
Hall 2+
10
Hall 2–
15
12 Not Used
Shell (Chassis)
Figure 3-28 Encoder and Hall Feedback Connections for CE Installations
X9
1
A+
6
11
13
A–
2
B+
7
B–
3
C+
8
C–
+5V
DGND
Encoder
4
Hall 1+
5
Hall 1–
9
Hall
Feedback
Hall 3+
14
Hall 3–
10
Hall 2+
15
Hall 2–
12
Not Used
Shell (Chassis)
3-20 Receiving & Installation MN1851
Page 32

Section 4
Switch Setting and Start-Up
Switch AS1 Settings
AS1
Off / On
Monitor
1
2
3
4
5
6
7
8
AS1 switches are located on the front panel
between X1 and the “Monitor” LED.
Note: AS1–8 is shown in the “ON” position (Drive
Enabled). All other switches are shown in
the “OFF” position.
Address Setting, AS1-1 to AS1-4 (for Multi-Drop Applications)
Each control address can be set using switches AS1-1 to AS1-4 of each control.
Each control must have a unique address. Refer to Table 4-1.
Table 4-1 Control Address Setting
AS1-1 AS1-2 AS1-3 AS1-4 Control Address (Hexadecimal)
OFF OFF OFF OFF 0 (Factory Setting)
ON OFF OFF OFF 1
OFF ON OFF OFF 2
ON ON OFF OFF 3
OFF OFF ON OFF 4
ON OFF ON OFF 5
OFF ON ON OFF 6
ON ON ON OFF 7
OFF OFF OFF ON 8
ON OFF OFF ON 9
OFF ON OFF ON A
ON ON OFF ON B
OFF OFF ON ON C
ON OFF ON ON D
OFF ON ON ON E
ON ON ON ON F
Switch Setting & Start-Up 4-1MN1851
Page 33

Setting of switches AS1-5 to AS1-8
The function of switches AS1-5 to AS1-8 are described in Table 4-2.
Table 4-2 AS1-5 to AS1-8 Description
Switch Function ON OFF
AS1-5 Not Used
AS1-6 Hold-Position Hold-Position is active. Hold-Position is not active
AS1-7 Offset Tuning Automatic Offset Tuning is
active.
AS1-8 Enable Control is enabled
(Enable is active)
Hold-Position OFF allows normal operation.
ON causes the motor to quickly decelerate to stop and maintain a constant
position (in current or velocity modes). (Time to max velocity = 0 with the Hold
function.)
Offset Tuning OFF allows normal operation.
ON causes Offset Tuning to automatically start the next time Enable is changed
from ON to OFF. The purpose of Offset Tuning is to remove DC offset voltages (on
the command input X3-1 and X3-2) and achieve a stationary motor shaft with
0VDC at the command input. Leave this switch OFF when not in use. See Figure
4-1 for additional information.
Enable OFF disables the control and the motor coasts to a stop.
ON allows normal operation.
Note: AS1-8 and X3-9 must both be enabled to allow control operation.
Automatic Offset Tuning is not
active.
Control is disabled
(Enable is not active)
Figure 4-1 Automatic Offset Tuning Timing Diagram
Main
Power
Enable
Switch AS1-8
Offset Tuning
Switch AS1-7
Automatic
Offset Tuning
4-2 Switch Setting & Start-Up MN1851
On
Off
On
On or Off On
Off
On
Off
On
Off
On or Off On
Start
Offset
Tuning
Offset
Tuning
Done
Note: It is important that you set the analog command to 0VDC before the
Automatic Offset Tuning is started.
Time
Time
Time
Time
Page 34

Start-Up Procedure
Power Off Checks
Before you apply power, it is very important to verify the following:
Power On Checks
When power is first applied, the “Monitor” LED display will show four indications if
there is no failure found.
Procedure:
1. Disconnect the load from the motor shaft until instructed to apply a load.
If this cannot be done, disconnect the motor wires at X1-U, V and W.
2. Verify that switches AS1-5 to AS1-8 are set to OFF.
3. Verify the AC line voltage at the source matches the control rated
voltage.
4. Inspect all power connections for accuracy, workmanship and tightness.
5. Verify that all wiring conforms to applicable codes.
6. Verify that the control and motor are properly grounded to earth ground.
7. Check all signal wiring for accuracy.
8. All segments and decimal point are on.
0 Display test.
1 Option number of test (1, 2 etc.).
d Final display with no decimal point (control disabled because
AS1-8 = OFF).
1. Apply AC power.
2. Apply logic power (only if your control is equipped with this option).
3. Verify the Monitor LED power on sequence. If “d” is displayed, continue
otherwise disconnect AC power and refer to the Troubleshooting
procedure.
4. Disconnect AC power.
5. Connect the load to the motor shaft (or connect the motor wires at X1).
6. Apply Logic Power (24VDC) if option is present.
7. Apply AC power.
8. Set switches AS1-7 and AS1-8 to ON.
9. Set switch AS1-8 to OFF (initiate offset tuning).
10. Set switch AS1-7 to OFF.
11. Configure the control using the Setup Software provided.
Refer to Section 5 of this manual.
12. Set switch AS1-8 to ON (drive enabled).
13. Perform System Tuning.
The drive is now ready for use.
Note: To protect the internal fuse, allow at least 1 minute after power down before
turning power on (power Off/On cycle).
Switch Setting & Start-Up 4-3MN1851
Page 35

4-4 Switch Setting & Start-Up MN1851
Page 36

Section 5
Operation
Installing Software on your PC
The setup software is Windows–based. The servo control connects to a serial port
on your PC. The setup wizard will guide you through the necessary steps to
set–up your servo control. Online–help to each topic is available.
Minimum system requirements
Hardware requirements (minimum):
Processor: Intel 80486 / 33 MHz
RAM: 8 MB
Hard Disk Space: 50 MB
Screen: 600 x 480 (minimum)
Recommended: Intel Pentium, 16 MB RAM, 133 MHz, 100 MB Free Space
Software requirements:
Operating system: Windows 3.1x (minimum)
Recommended: Win95 or Windows NT
Installation The following procedure will install the setup software on your computer’s hard
disk:
1. Start Windows. Make sure that no other programs are running during
this installation.
2. Place installation Disk #1 in your computer’s floppy drive.
3. Run A:\Setup.exe (if A:\ is your floppy drive) or double click the file
Setup.exe from My computer, 3.5 inch Floppy (A:).
4. Follow the instructions and insert the other installation disks as required.
After the installation process is finished, a program manager group for Lin+ with a
Lin+ progman icon is created. Double clicking this icon will start the setup
program.
A file “Readme.txt” is included in the master directory of the software. This file
contains installation instructions, change notices from previous revisions and
information that became available after this manual was printed.
Host Communications Setup
Be sure the communications port of the PC is correctly set for communications
with the Drive software. The following examples assume COM1 of the PC is used.
If you are using COM2 – 4, substitute the correct COM port number in the
example.
Windows 3.1 Terminal Emulation
1. Power up the Host and start Windows software.
2. In the “Windows Accessories Group” select “Terminal” ICON.
3. Select “Communications” from the Settings pull down menu within
Terminal program.
4. Set the communications settings for:
9600 Baud rate
8 Data Bits
1 Stop Bit
No Parity
Xon/Xoff Flow Control
COM1
Operation 5-1MN1851
Page 37

5. Select “Binary Transfers” from the Settings pull down menu within
Terminal program.
6. Set the Binary Transfer protocol to XModem/CRC.
7. Close menu and save the settings.
8. Terminal Communications settings are now complete.
Windows 95
1. Power up the Host and start Windows software.
2. In “Control Panel” select and open “System”.
3. Open “Ports”, select the COM port you are using then click “properties”.
Figure 5-2
4. Be sure the port settings are as: Bits per second=9600, Data bits=8,
Parity=none, Stop bits=1 and Flow control=Xon/Xoff.
Windows NT
1. Power up the Host and start Windows software.
2. In “Control Panel”, select and open “Ports” then click “Settings”.
Figure 5-3
3. Be sure the port settings are as: Bits per second=9600, Data bits=8,
Parity=none, Stop bits=1 and Flow control=Xon/Xoff.
5-2 Operation MN1851
Page 38

Using The Setup Wizard
The setup software wizard guides you through each step to set the basic
parameters. This wizard is activated automatically after each start-up of the
software. This automatic start of the Wizard can be turned off. It can be activated
(and reset to automatic start) by Help " Wizard.
Figure 5-1 shows the flowchart of the Setup Wizard.
All parameters can be stored in a file. These saved values can be restored at any
time. To save the configuration, select Setup " Save Configuration. To restore
these parameter values or to configure several controls with the same parameter
sets, select the Setup " Restore Configuration.
Operation 5-3MN1851
Page 39

Figure 5-1 Flowchart of the Setup Wizard
Setup Wizard
Skip
Skip
Sequence 1:
Motor and Control
– App. Bus Voltage
–Enc. Output
– Select the motor
– Control is selected
automatically
Sequence 2:
Operating Mode
– Current
– Velocity
– Positioning
General:
Motor:
Control:
Download
General:
Download
Skip
Skip
Sequence 4:
Velocity Parameters
– Max. Velocity
– Time to
Max. Velocity
– Min. Velocity
– Scaling Factor
Sequence 5:
Auto
Tune
Sequence 6:
Auto tuning
General:
Download
Drift Offset
Offset
Value
(mV)
Download
Close
Skip
Sequence 3:
Current Parameters
General:
– App. Peak Amps
–App. Nom. Amps
–BEMF Compensation
–Scaling Factor
Sequence 4:
Auto Tuning
Procedure
Done
5-4 Operation MN1851
Page 40

Set up Software Opening menu. If you have previously set up the motor and control parameters
and saved them to a file, click FINISH then load the parameter file using the File
" Open selection. If you are setting up parameters for the first time, click NEXT
to go to the Set up Software.
The General menu appears first. If you are using a stock Baldor linear motor, click the Motor tab to
select the motor from the list and these parameters will be entered automatically for you. For a custom
motor or a motor from another maker, the parameters must be entered manually on the General menu.
First, click on “Motor” and then select “User Models” in the Library menu. Then, click “General” to
return to this menu and enter all parameter values.
Operation 5-5MN1851
Page 41

There are 7 parts to the setup procedure:
Motor First, select the “Motor Type”. Then select your specific “Motor ID”. All of the
parameters will be entered if your motor is on the list. If your motor is not on the
list, you must define a motor and all of its parameters. If your motor is not listed,
select “User Models” in the Library menu and Then click the General tab and enter
the motor parameters. Click “Download” when finished.
Figure 5-2 Motor Selection Screen
Control The “Control ID” is automatically selected. All of the parameters will be entered if
your control is on the list. Click “Download” when finished.
Figure 5-3 Control Selection Screen
5-6 Operation MN1851
Page 42

After the motor and control are selected, click the General menu and note that the values are filled in.
Confirm that the Bus Voltage is correct. Enter the Encoder Feedback value for your encoder (see
Table 5-1). Click “Download” when finished.
Table 5-1 Encoder Feedback
Encoder Feedback Encoder Resolution
LMBLxx–A or
LMBLxx–B
not available 1143 762 20 50,000 50
1143 2286 1524 10 100,000 100
2286 4572 3048 5 200,000 200
5715 11430 7620 2 500,000 500
11430 14 bits maximum 15240 1 1,000,000 1,000
LMBLxx–E LMCF (All) micron counts / meter counts / mm
For encoders other than those listed in Table 5-1, calculate the encoder resolution
as follows: (An example of a 5 micron encoder with an LMCF motor is given).
Encoder Feedback +
motor pitch (mm)
1
ǒ
ǒ
counts per mm
Ǔ
x4
Ǔ
+
60.96
1
ǒ
(
200
Ǔ
x4
)
+ 3048
Where:
motor pitch = 45.72 mm (LMBLxx–A or B series)
motor pitch = 91.44 mm (LMBLxx–E series)
motor pitch = 60.96 mm (LMCF cog free motors)
Operation 5-7MN1851
Page 43

Operating Mode
Select the operating mode of the control. Choices are:
1. Current Mode
2. Velocity Mode
3. Positioning Mode (15 preset point to point moves)
Click “Download” when finished.
Figure 5-4 Operating Mode Selection Screen
5-8 Operation MN1851
Page 44

Current Parameter
Nominal and peak current values are automatically entered for the motor type.
For manual tuning only, set the control current limit value to a percentage of the
continuous current rating. For example, if your control is rated for 5A continuous
current and you desire to limit the output current to 4A, enter 80%. If you wish to
use the full output power of the control, enter 100%. Click “Download” when
finished.
Figure 5-5 Current Parameter Screen
Velocity Parameter (Refer to Help→“Unit Conversion from Linear to Rotary” for more information)
Set the velocity parameters of the control:
Refer to “Velocity Parameters (RPM → m/s)” at the end of this section.
1. Scale factor - ratio of the input voltage to output speed.
2. Minimum velocity
3. Time to maximum velocity
Click “Download” when finished.
Figure 5-6 Velocity Parameter Screen
Operation 5-9MN1851
Page 45

Positioning There are two ways to start a move: Software triggered or Hardware triggered.
Software Triggered
1. From the Main menu select “Setup ⇒ Operation Mode”.
2. Click on “Positioning Tab” and set Command Source to “Software”.
3. Set Motion Trigger to “Immediate” then click “Download” and “Close”.
4. From the Main menu select “Motion ⇒ Positioning”.
5. Set Motion Type to “INC” = Incremental or “ABS” = Absolute.
6. Set “Dwell Time” as desired (the wait time before the next move starts).
7. Set Motion Trigger to “Immediate”.
Note: The Motion Trigger must be set to identical values in both of these
positioning menus. Otherwise, problems will occur.
8. For Direct move, enter the position, velocity and acceleration parameters.
9. For Buffered move, select “Buffered Move” then select the buffer line number 1–15.
10. Click the Start button to begin (Quit button to stop).
1
65536
Rev
1
65536
Rev
Hardware Triggered
1. From the Main menu select “Setup ⇒ Operation Mode”.
2. Click on “Positioning Tab” and set Command Source to “Digital I/O’s”.
3. Set Motion Trigger to “HW Trig.” then click “Download” and “Close”.
4. From the Main menu select “Motion ⇒ Positioning”.
5. Set Motion Type to “INC” = Incremental or “ABS” = Absolute.
6. Set “Dwell Time” as desired (the wait time before the next move starts).
7. Set Motion Trigger to “HW Trig.”.
Note: The Motion Trigger must be set to identical values in both of these
positioning menus. Otherwise, problems will occur.
8. For a Direct move, enter position, velocity and acceleration parameters.
9. To start a direct move, the external trigger must be present at input X3
pin 15.
10.For a buffered move, the buffer line must be selected by MAI1–4.
11.After the buffer line is selected, the external trigger must be present at
input X3 pin 15 to start the move.
Buffer
0
1
2
etc.
MAI4
Open
Open
Open
Initialize Buffers
1. From the Main menu select “Motion ⇒ Positioning”.
2. Select “Edit Buffer”.
3. Set Motion Type, Dwell and Motion Trigger. (Software or
Hardware Triggered).
4. If you want to see the buffer contents, click on “Show Buffer”.
5. Define up to 15 moves by selecting the Buffer Line number,
then enter the position, velocity and acceleration for that move.
6. If you want the present absolute position to be stored in a
buffer, select the buffer line number, then click “Learn”.
7. In the box “Edit Buffer” select the “Buffer Type”
(INC = incremental, ABS = absolute or Mixed = absolute +
incremental). Mixed is a combination of absolute and
incremental. The position value in line 0 is an absolute position and is the reference position for the other buffer lines.
Example:
The position values in the buffer lines 2 .. 15 are incremental values.
e.g. Position value in Buffer line 1=1000, Buffer line 2=10.
If you start a move with buffer line one, the control stops the move when the position 1000 is reached.
If you start a move with buffer line two the control stops the move if the position 10 reached.
If you start an incremental move with buffer line 1, then buffer line 2 the control stops the move at position 1010.
1
65536
Rev
Dwell
Time
MAI3
Open
Open
Open
MAI2
Open
Open
Closed
Motion
Trigger
MAI1
Open
Closed
Open
5-10 Operation MN1851
Page 46

Home Starts a search for the machines absolute zero position. When home is found, the
control will hold the position at absolute zero. There are three Homing types:
Index channel, Capture and Actual Position.
Index Channel causes the motor shaft to rotate to a predefined
home position. The motor may rotate CW or CCW as specified
by the user. Home is located when a machine mounted switch is
activated, then the motor direction is reversed and continues until
the “0” position of the resolver is detected (or the “C” channel of
an encoder). The actual position of “Zero” relative to this point
can be set by the user by changing the offset value.
If home flag is active, clear absolute revolution counter at position
C. Set C (+ HOME.OFFSET) = Zero Position.
Brake with HOME.ACC to zero velocity. Move to Zero.
Capture is a more accurate way to define home position.
The home flag captures the closure of the machine mounted
switch. This captured position (+ HOME.OFFSET) = Zero
Position.
Brake with HOME.ACC to zero velocity. Move back to Zero.
Actual position sets the Zero position to the current position.
No movement required.
Procedure to define home position.
1. Be sure the machine mounted switch (Home position) is connected to X3 pin 14.
2. Select “Homing” from the Motion menu.
3. Choose the desired homing type.
4. Choose the desired capture edge (rising or falling).
5. Choose the desired home direction, CW or CCW.
6. Choose the desired home velocity, acceleration and offset parameters.
7. Click Download.
8. Click the Start button to begin the homing definition (Quit button to stop).
9. To start homing by hardware, buffer line 0 must be selected by MAI1–4.
10. To begin the home move, the external trigger must be present at input X3 pin 15.
Capture
1
65536
Rev
Limit Switches After Homing is set, the limit switches can be activated and set as desired. If the
inputs at X3–10 and X3–11 are used for machine inputs, software limits can be
used to sense when a position limit has been reached.
1. From the Main menu select “Setup ⇒ Limit Switches”.
2. Set “Hardware Limit Switches” as limits switches or as machine inputs.
3. Set the Software Limit Switches, “Active” to Yes or No. Yes activates a software
switch when the position exceeds a predefined limit. No deactivates the software
limit switch feature.
4. If software limit switches are set to Active = Yes, enter a position for the CW limit
and a position for the CW limit.
If you want to take the current absolute position as CW limit or CCW limit, click on
“Learn CW” or “Learn CCW”. The ”Learn” function only works after a successful
homing sequence.
5. Click ”Download” to send the parameters to the control.
Note: The value for the CW limit must be greater than the CCW limit value.
1
Rev
65536
1
Rev
65536
Operation 5-11MN1851
Page 47

Drift If you know the input offset value of the control, you may enter the value manually.
Otherwise, you may initiate automatic offset tuning and let the control measure
and set this value. Click “Download” when finished.
Figure 5-7 Drift Parameter Screen
Autotune You may manually tune the control (see appendix) or use autotune to allow the
control to tune itself. Click “Download” when finished.
Figure 5-8 Autotune Screen
5-12 Operation MN1851
Page 48

Main Menu Choice Descriptions
File
Open a new editor window.
Open an existing editor window.
Close the active editor window.
Close all editor windows.
Save the active editor window to a file.
Save the active editor window to a new file name .
Save all editor windows.
Print the contents of the active editor window.
Exit and close the Set up software.
Edit
Cut the selected text in the active editor window to the clipboard.
Copy the selected text in the active editor window to the clipboard.
Paste text from the clipboard at the cursor location in the active editor window.
Erase the contents of the active window.
Select everything in the active window.
Save the active editor window to a new file name .
Setup
Allows selection of the motor being used.
Allows selection of Current, Velocity or Positioning modes.
Allows PC to read the control configuration and save the parameters to a file.
Allows PC to read a configuration file and download parameters to the control.
Save the present motion buffer to a file (*.buf).
Send a saved motion buffer file (*.buf) to the control.
Select a control for communication (8 maximum in daisy chain).
Setup or read the value of the IMAS “Multi–Resolver Absolute Position Feedback”.
Enable or disable the controls second analog input.
Set CW and CCW inputs to MAI3 and MAI4 respectively.
Operation 5-13MN1851
Page 49

Tuning
Watch
Functions
Allows manual or automatic tuning to remove offset drift.
Allows manual or automatic tuning of velocity control parameters.
Show or hide the “symbols list bar”.
Show or hide the “system parameters bar”.
Show or hide the “system status bar”.
Gather and plot motor data for two variables.
View the error log.
View the available options for the selected control.
Enable the control.
Disable the control – Active: Motor decels to stop then control disables.
Passive: Motor coasts to stop.
Cause motor to stop and maintain position.
Not available for this control.
Allow you to Jog the position of the motor.
Define up to 12 PLC statements (logical association of input / output conditions).
Motion
Search for the systems absolute zero position and hold that position.
Start a direct or buffered move.
Terminal
Allows communication with selected control using command set (see Appendix B).
Configure PC COM port 1, 2, 3 or 4 to communicate with the selected control.
Windows
Cascade display of all open software windows.
Tile display of all open software windows.
5-14 Operation MN1851
Page 50

Help
Alphabetic glossary listing of keywords.
Search for help based on a keyword.
Get help for a specific topic.
Open the help contents.
Convert between linear and rotary motor units.
Starts the setup wizard to configure a motor and control.
Software version and release information.
PLC Program At the main menu, select “Functions” then “PLC”. See Figure 5-9.
1. Determine which event (listed under the THEN column) you wish to use.
2. Next, click in the IF column on the same ROW as the desired event. For
example, If you are to use the MAO1 output, click in row 1 in the IF
column as shown.
3. Choose the condition for the desired event.
4. Set other event conditions as desired.
5. Activate the PLC by selecting “Enable” on PLC Status.
6. Select “Download” to update the parameter values in the control.
7. Select “Close” when finished.
Note: To reset all IF conditions to False, select “Clear” located just below the
Download selection. This will clear all condition choices.
Figure 5-9 PLC Program Menu
Operation 5-15MN1851
Page 51

Velocity Parameters (RPM " m/s)
The velocity parameters require parameter values to be entered in RPM.
Therefore, you must convert the meters/second value for the linear motor to the
RPM value for the parameter entry.
Velocity Parameter Screen
Determine the RPM parameter value for your application from the following table.
Linear Motor
LMBL08E–HW Iron Core Brushless 1 0.00006
LMBL17E–HW Iron Core Brushless 1 0.00006
All other LMBL Iron Core Brushless 1 0.00003
Cog Free Brushless 1 0.001016
5-16 Operation MN1851
RPM meters/second
Page 52

Section 6
Troubleshooting
Overview
The system troubleshooting procedures involve observing the status of the
“Ready” LED, the “DB On” LED and the “Monitor” 7 segment display. The tables
in this section provide information related to the indications provided by these
devices.
Note: The “Ready” LED can display RED, YELLOW or GREEN color.
Table 6-1 Operating Mode Indications
Ready Monitor Status Cause
OFF OFF Control Disabled No Fault.
Green Decimal
Point
Red 1 Over-voltage fault (DC Bus) Missing, damaged or wrong REGEN resistor.
Red 3 Over-current fault.
Red 4 Over or Under-voltage fault. Internal 15VDC supply fault.
Red 5 Encoder fault (or encoder fault). Encoder or cable short circuit or encoder not
Red 6 Electronic fusing
Red 7 I2t limit reached. After a fault is detected,
Red 9 User defined fault (see PLC).
Red 0 Processor “Watchdog” timeout Reset control (turn off AC power, wait 1
Green
Green -l CW Enable switch activated. CW limit reached. Check X3-10 input.
Green l- CCW Enable switch activated. CCW limit reached. Check X3-11 input.
Control Enabled Normal operating mode. No Fault.
Input voltage too high.
(More than 2X peak current)
(also see fault 7)
control will run at nominal output current for
2.5 seconds then stop. The control is disabled
and the Monitor will first display “7” fault then
the “6” fault.
Control Over-Temperature
Move Command not accepted. More than two move commands have been
Motor leads shorted or control failure.
Load exceeds motor rating (too much
current).
Accel time set too short.
connected (open circuit).
Control current over-load detected by
software.
Cycle time between Acceleration and
Deceleration is too short.
Control should be relocated to cooler area.
Add fans or air conditioning to control
cabinet.
minute then turn power on).
sent to the control. To return to normal
status, send a “Quit” or a new move
command to the control.
A non-initialized buffer line has been called
by the Machine inputs. To return to normal
status, call an initialized buffer line by
MA1-4 or send a “Quit” to the control.
Note: To protect the internal fuse, allow at least 1 minute after power down before
turning power on (power Off/On cycle).
Troubleshooting 6-1MN1851
Page 53

Table 6-1 Operating Mode Indications Continued
Ready Monitor Status Cause
Red A EEPROM checksum error. The personality must be downloaded to
Red c Velocity data in the EEPROM failed. The velocity data must be downloaded to
Green C CAN bus problem detected. (“C” blinking) A communication error on the
Red C CAN bus problem detected. (“C” blinking) A communication error on the
Green d Control Disabled. Disable mode activated by hardware or
Green E Following Error. The following error exceeded the user
Green F Fatal Following Error. The following error exceeded the user
Green H Hold-Position mode. Hold mode activated by hardware or
Green J Jog mode. Jog mode activated by hardware or software.
Red L Both limit switches active. Defective or missing limit switch or wiring.
Green P In Position. The following error is less than the user
Red U EPROM version fault. The personality must be downloaded to
Red u EEPROM version fault. The personality must be downloaded to
EEPROM and reset the control. If problem
remains, contact Baldor.
EEPROM and reset the control. If problem
remains, contact Baldor.
CAN bus exists. The control is still
connected to the CAN bus.
CAN bus exists. The control will attempt
resynchronization to establish the CAN bus.
software.
defined value of the Following Error Band.
This error is not stored and goes away when
the following error is reduced to within limits.
defined value of the Fatal Following Error.
The following error preset level is
“Operation Mode → Pulse Follower”
This error is stored and must be cleared by
the operator, but operation continues as
long as the error is less than ±2
software.
defined preset value.
EEPROM and reset the control.
EEPROM and reset the control.
15
(±32768).
It is important to connect the motor leads U, V and W correctly at the X1 connector
of the control. Incorrect wiring can cause erratic operation including moves at
peak force until the overcurrent limit trips. This will result in a display of “7” and a
“6” on the monitor. If erratic movement of the motor occurs, turn off power
immediately and check the connections of the motor, hall sensors and encoder.
6-2 Troubleshooting MN1851
Page 54

Section 7
Specifications & Product Data
Identification
X
Servo Control
LP
AX
X
X X
–E
4
C
3
Lin+ Drive
Input Voltage
1=115VAC
2=230VAC
4=460/400VAC
Continuous Current Rating
A02 = 2 / 2.5 Amps
A05 = 5 Amps
A07 = 7.5 Amps
A10 = 10 Amps
A15 = 15 Amps
A20 = 20 Amps
Enclosure Type
T= Panel Mount w/internal power supply
P= Panel Mount w/external power supply
S = Panel Mount w/internal power supply
(suitable for sharing with other controls).
Braking (Option)
R = Requires external regen resistor
B = Built-in regen resistor
O = No internal regen capability
Logic Supply (Option)
0 = Internal 24VDC Supply
3 = External customer provided
24VDC required
Serial Port Type (Option)
2 = RS232
4 = RS485
Bus (Option)
N = None *
Feedback Device (Option)
E= Encoder
* Note: CAN bus is not available for use with
encoder feedback devices.
Specifications & Product Data 7-1MN1851
Page 55

Specifications
Description Unit LPx
Input Voltage Range Nominal
VAC 115
A02T
Minimum
Maximum
LPx
A05T
92
132
LPx
A07T
LPx
A02S
LPx
A05S
230
184
265
LPx
A010S
LPx
A015S
Input Frequency Hz 50/60 ±5%
Nominal Output Bus Nominal
(@ 115 / 230 input) Minimum
Maximum
Nominal Phase Current (±10%) A
Peak Phase Current (±10%); for
VDC 160
88
180
2.5 5.0 7.5 2.0 5.0 10 15
5 10 15 4 10 20 30
A
RMS
RMS
320
176
360
2.4sec (+0.5s/–0sec) maximum
Nominal Output Power KVA 1.01 2.17 2.99 0.87 2.17 4.33 5.2
Output Frequency Hz 0 – 500
Efficiency % >95
Nominal Switching Frequency KHz 8.5
Current Loop Bandwidth Hz 1200
Velocity Loop Bandwidth Hz 10 to 200 (software selectable)
Mounting – Panel
Package Size – A B C E E E E
Operating Altitude Feet
(Meters)
To 3300 feet (1000 meters). Derate the continuous and
peak output current by 1.1% for each 330 feet (100
meters) above 3300 feet.
Operating Temperature °C
+0 to 40. Above 40°C, derate the continuous and peak
output current by 2.5% per °C above 40°C. Maximum
ambient is 50°C.
Rated Storage Temperature °C –25 to +70
Humidity % 10% to 90% non-condensing
Class of Protection (Enclosure) IP20
Shock 10G (according to DIN IEC 68–2–6/29)
Vibration 1G @ 10 – 150 Hz (according to DIN IEC 68–2–6/29)
Valid for zero current initial condition.
These specifications also apply to model LPxAxxP except it has DC input (no AC input).
All values at ambient temperature of 25°C unless otherwise stated.
For safe operation, allow a clearance distance between each control and on all sides of each control.
7-2 Specifications & Product Data MN1851
Page 56

Specifications Continued
Description Unit LP4 A02TB LP4 A05TB LP4 A07TR
Input Voltage Range Nominal
Minimum
Maximum
Input Frequency Hz 50/60 ±5%
Nominal Output Bus Nominal
(@ 400 / 460 input) Minimum
Maximum
Nominal Phase Current (±10%) A
Peak Phase Current (±10%);
2.4s +0.5s/–0s
Nominal Output Power KVA 1.9 3.7 5.6 11.2 14.9
Output Frequency Hz 0 – 500
Efficiency % >95
Nominal Switching Frequency KHz 8.0
Current Loop Bandwidth Hz 1200
Velocity Loop Bandwidth Hz 10 to 200 (software selectable)
Mounting – Panel
Package Size – G G G H H
Operating Altitude Feet
VAC 460 @ 60Hz / 400 @ 50Hz
VDC 565 / 678
2.5 5 7.5 15 20
5 10 15 30 40
A
RMS
RMS
400 / 360
528 / 480
509 / –
– / 744
To 3300 feet (1000 meters). Derate the continuous and
(Meters)
peak output current by 1.1% for each 330 feet (100
LP4 A15TR LP4 A20TR
meters) above 3300 feet.
Operating Temperature °C
+0 to 40. Above 40°C, derate the continuous and peak
output current by 2.5% per °C above 40°C. Maximum
ambient is 50°C.
Rated Storage Temperature °C –25 to +70
Humidity % 10% to 90% non-condensing
Class of Protection (Enclosure) IP20
Shock 10G (according to DIN IEC 68–2–6/29)
Vibration 1G @ 10 – 150 Hz (according to DIN IEC 68–2–6/29)
Valid for zero current initial condition.
All values at ambient temperature of 25°C unless otherwise stated.
For safe operation, allow a clearance distance between each control and on all sides of each control.
Specifications & Product Data 7-3MN1851
Page 57

24VDC Logic Power Input (Option LPxAxxxx–xxx3 ONLY)
Description Unit LPx
A02T
LPx
A05T
LPx
A07T
LPx
A02S
LPx
A05S
LPx
A10S
LPx
A15S
Input Voltage (maximum ripple = ±10%) VDC 20 – 30
Input Current @ 24VDC A
Power On surge current (24VDC 100msec) A
RMS
RMS
0.55 – 0.8
4.0 2.5
1.4
Depends on installed options.
24VDC Logic Power Input Continued (Option LP4Axxxx–xxx3 ONLY)
Description Unit LP4 A02 LP4 A05 LP4 A10 LP4 A15
Input Voltage (maximum ripple = ±10%) VDC 20 – 30
Input Current @ 24VDC A
Power On surge current (24VDC 100msec) A
RMS
RMS
0.8 1.0 1.0 1.4
4.0 4.0 4.0 4.0
Velocity Control
Description Unit All
Command Input VDC 0 to 10; or ±10
Command Signal Resolution bit 12
Update Rate
msec
500
Simulated Encoder Output
Description Unit All
Signal RS422
Encoder Resolution counts 1 : 1 (input to output)
7-4 Specifications & Product Data MN1851
Page 58

Encoder Input (Feedback)
Description Unit All
Signal Type RS422
Operating Mode A / B Quadrature
Maximum Input Frequency kHz 400
Cycle Time msec 1
Serial Interface (Option LPxAXXXX–XX2X)
Description Unit All
Communication Type RS232C (not galvanically isolated)
Transmission Rate Baud 9600 (not adjustable)
Optional Interface (Option LPxAXXXX–XX4X)
Communication Type RS485 (not galvanically isolated)
Transmission Rate Baud 9600 (not adjustable)
Regeneration (115 / 230VAC)
Description Unit LPx
A02T
Switching Threshold
115VAC
230VAC
Nominal / Peak Power (10% Duty Cycle) kW 0.25 / 2.7
Maximum Regeneration Switching Current A 10
Maximum Load Inductance
VDC
mH
ON: OFF:
188 - 195 183 - 188
373 - 383 362 - 372
LPx
A05T
LPx
A07T
LPx
A02S
ON: OFF:
180 200
388 375
100
LPx
A05S
LPx
A10S
LPx
A15S
Regeneration (400 / 460VAC)
Description Unit LP4 A02 LP4 A05 LP4 A07 LP4 A15 LP4 A20
Switching Threshold 400/460VAC VDC ON: 794 OFF: 764
Nominal / Peak Power (10% Duty Cycle) kW 0.94 / 9.4 2.9 / 29
Maximum Regeneration Switching Current A 15 45
Maximum Load Inductance
mH
100
Specifications & Product Data 7-5MN1851
Page 59

Dimensions
Size A, B and C
Size E, G and H
A
7.70″
(195.5mm)
0.12 (3.0)
Clearance Requirements (all sizes):
0.06″ (15mm) top and bottom
0.04″ (10mm) left and right side
1.57″
(40mm)
W
6.81″
(173mm)
0.2 (5.2) Dia.
4 Places
A
W
15.75
(400)
15.14
(385)
14.05
(357)
Depth
Size A, B, C = 6.0 (152)
0.374 (9.5)
X
Package
Size
A
B
C
E
G
H
0.59 (15)
0.90 (23)
0.90 (23)
1.08 (27.5)
1.28 (32.5)
2.6 (65)
Dimensions in (mm)
WA
3.3 (84)
4.3 (109)
4.3 (109)
2.17 (55)
2.6 (65)
5.3(130)
X
–
–
–
1.42 (36)
1.81 (46)
4.37 (111)
0.3
(8.0)
Weight lb (kg)
2.73 (1.24)
4.69 (2.13)
4.8 (2.19)
11 (5)
10.1 (4.6)
20.9 (9.5)
Depth
Size E, G and H = 10.4 (265)
0.25 (6.5) Dia. 3 Places
For safe operation, allow a clearance distance between each control and on all sides of each control.
7-6 Specifications & Product Data MN1851
Page 60

Section 8
CE Guidelines
CE Declaration of Conformity
Baldor indicates that the products are only components and not ready for
immediate or instant use within the meaning of “Safety law of appliance”, “EMC
Law” or “Machine directive”.
The final mode of operation is defined only after installation into the user’s
equipment. It is the responsibility of the user to verify compliance.
The product conforms with the following standards:
DIN VDE 0160 / 05.88 Electronic equipment for use in electrical power
DIN VDE 0100 Erection of power installations with nominal
DIN IEC 326 Teil 1 / 10.90 Design and use of printed boards
DIN VDE 0110Teil 1-2 / 01.89 Dimensioning of clearance and creepage
DIN VDE 0110Teil 20 / 08.90 distances
EN 60529 / 10.91 Degrees of protection provided by enclosures
EMC – Conformity and CE – Marking
The information contained herein is for your guidance only and does not
guarantee that the installation will meet the requirements of the council directive
89/336/EEC.
The purpose of the EEC directives is to state a minimum technical requirement
common to all the member states within the European Union. In turn, these
minimum technical requirements are intended to enhance the levels of safety both
directly and indirectly.
Council directive 89/336/EEC relating to Electro Magnetic Compliance (EMC)
indicates that it is the responsibility of the system integrator to ensure that the
entire system complies with all relative directives at the time of installing into
service.
Motors and controls are used as components of a system, per the EMC directive.
Hence all components, installation of the components, interconnection between
components, and shielding and grounding of the system as a whole determines
EMC compliance.
The CE mark does not inform the purchaser which directive the product complies
with. It rests upon the manufacturer or his authorized representative to ensure the
item in question complies fully with all the relative directives in force at the time of
installing into service, in the same way as the system integrator previously
mentioned. Remember, it is the instructions of installation and use, coupled with
the product, that comply with the directive.
installations
voltages up to 1000V
Wiring of Shielded (Screened) Cables
Remove the outer insulation
to expose the overall screen.
Conductive
Clamp
CE Guidelines 8-1MN1851
Page 61

Using CE approved components will not guarantee a CE compliant system!
1. The components used in the drive, installation methods used, materials
selected for interconnection of components are important.
2. The installation methods, interconnection materials, shielding, filtering
and grounding of the system as a whole will determine CE compliance.
3. The responsibility of CE mark compliance rests entirely with the party
who offers the end system for sale (such as an OEM or system
integrator).
Baldor products which meet the EMC directive requirements are indicated with a
“CE” mark. A duly signed CE declaration of conformity is available from Baldor.
EMC Wiring Technique
1 CABINET
The drawing shows an electroplated zinc coated enclosure,
Capacitor
Y
which is connected to ground.
This enclosure has the following advantages:
– All parts mounted on the back plane are connected to ground.
– All shield (screen) connections are connected to ground.
Within the cabinet there should be a spatial separation between
power wiring (motor and AC power cables) and control wiring.
2 SCREEN CONNECTIONS
All connections between components must use shielded cables.
The cable shields must be connected to the enclosure. Use
conductive clamps to ensure good ground connection. With this
technique, a good ground shield can be achieved.
3 EMC – FILTER
The EMI or main filter should be mounted next to the power
supply (here BPS). For the connection to and from the main
filter screened cables should be used. The cable screens should
be connected to screen clamps on both sides. (Exception:
Analog Command Signal).
4 Grounding (Earth)
For safety reasons (VDE0160), all BALDOR components must
be connected to ground with a separate wire. The diameter of
the wire must be at minimum AWG#6 (10mm). Ground
connections (dashed lines) must be made from the central
ground to the regen resistor enclosure and from the central
ground to the Shared Power Supply.
5 Y–CAPACITOR
The connection of the regeneration resistor can cause RFI (radio
frequency interference) to be very high. To minimize RFI, a
Y–capacitor is used. The capacitor should only be connected
between the dynamic brake resistor housing and terminal pin R1
(lead from Lin).
Recommendation: 0,1µF / 250VAC Type: PME265
BALDOR–Ordering–No.: ASR27104
8-2 CE Guidelines MN1851
Page 62

EMC Installation Instructions
To ensure electromagnetic compatibility (EMC), the following installation
instructions should be completed. These steps help to reduce interference.
Consider the following:
• Grounding of all system elements to a central ground point
• Shielding of all cables and signal wires
• Filtering of power lines
A proper enclosure should have the following characteristics:
A) All metal conducting parts of the enclosure must be electrically
connected to the back plane. These connections should be made with a
grounding strap from each element to a central grounding point .
B) Keep the power wiring (motor and power cable) and control wiring
separated. If these wires must cross, be sure they cross at 90 degrees to
minimize noise due to induction.
C) The shield connections of the signal and power cables should be
connected to the screen rails or clamps. The screen rails or clamps
should be conductive clamps fastened to the cabinet.
D) The cable to the regeneration resistor must be shielded. The shield must
be connected to ground at both ends.
E) The location of the AC mains filter has to be situated close to the drive
so the AC power wires are as short as possible.
F) Wires inside the enclosure should be placed as close as possible to
conducting metal, cabinet walls and plates. It is advised to terminate
unused wires to chassis ground.
G) To reduce ground current, use at least a 10mm
ground connections.
Grounding in general describes all metal parts which can be connected to a protective
conductor, e.g. housing of cabinet, motor housing, etc. to a central ground point. This
central ground point is then connected to the main plant (or building) ground.
Or run as twisted pair at minimum.
2
(6 AWG) solid wire for
Cable Screens Grounding
Cable (Twisted Pair Conductors)
Conductive Clamp – Must contact bare cable shield
and be secured to metal backplane.
CE Guidelines 8-3MN1851
Page 63

Control
X3
1
2
3
7
9
10
11
Input Signal Cable Grounding
Cable
Control
X7
11
13
Encoder
1
6
2
7
3
8
Feedback
Hall
Simulated Encoder Output Cable Grounding
Cable
Encoder Input Cable Grounding
Control
X9
1
A+
6
A–
2
B+
7
B–
C+
3
C–
8
11
+5V
DGND
13
4
Hall 1+
5
Hall 1–
9
Hall 3+
14
Hall 3–
Hall 2+
10
Hall 2–
15
12 Not Used
Shell (Chassis)
To
Controller
8-4 CE Guidelines MN1851
Page 64

Section 9
Accessories and Options
Cables Shielded (Screened) cable provides EMI / RFI shielding and are required for
compliance to CE regulations. All connectors and other components used must
be compatible with this shielded cable.
Connectors
Mating Connector by connector number (for spare parts)
X1 – #ASR29714 (9 pin, Female) Phoenix Part No. MVSTBW2,5/9–ST
X1 – #ASR29715 (2 pin, Female) Phoenix Part No. MVSTBW2,5/2–ST
X3 – #ASR16000 (20 pin, Female) Phoenix Part No. MVSTBR2,5/20–ST
X6 – #ASR16215 (9 pin, Male)
X7 – #ASR16215 (9 pin, Male)
X8 – #ASR23345 (9 pin, Female)
X9 – #ASR25828A (15 pin, Male)
EMC AC Mains Filter AC filters remove high frequency noise to protect the control. These filters
also prevent high frequency signals from being transmitted back onto the power
lines and help meet CE requirements. To select the proper filter, you must know
the voltage and current used by the drive and the impedance of the AC line.
For package size A, B and C (Model T – 1 Phase)
Rated
Filter Type Rated Volts
FN 2070 - 12 250 12 0.4 1.61 (0.73) 30548
Amps
@ 40°C
Leakage
Current mA
Weight
lbs (kg)
Baldor No.
For package size E, G and H (Model S – 3 Phase)
Rated
Filter Type Rated Volts
FN 351 - 8 - 29 440 8 16 8.0 3.97 (1.8) ASR24667
FN 351 - 16 - 29 440 16 16 9.0 3.97 (1.8) ASR24668
FN 351 - 25 - 33 440 25 170 9.0 6.61 (3.0) ASR24669
FN 351 - 36 - 33 440 36 170 10.5 6.61 (3.0) ASR24670
FN 351 - 50 - 33 440 50 190 12.5 6.83 (3.1) ASR24671
Amps
@ 40°C
Leakage
Current mA
Power
Losses
Watts
Weight
lbs (kg)
Baldor No.
For package size E, G and H (Model T – 3 Phase Required for LP4xx)
Rated
Filter Type Rated Volts
FN 3258 - 30 - 47 480 30 184.7 2.64 (1.2) ASR30521
FN 3258 - 7 - 45 480 7 172.4 0.11 (0.5) ASR30522
Amps
@ 40°C
Leakage
Current mA
Weight
lbs (kg)
Baldor No.
Accessories & Options 9-1MN1851
Page 65

AC Filter Dimensions Continued
Dim. For For Filters: FN 351 -
FN350 8 Ć 29 16 Ć 29 25 Ć 33 36 Ć 33 50 Ć 33
A 5.4 8.6 9.45 9.84
(139) (220) (240) (250)
B 3.9 7.1 7.87 7.87
(99) (180) (200) (200)
C 4.2 4.5 5.9 5.9
(105) (115) (150) (150
D 3.32 3.35 4.7 4.72
(84.5) (85) (119.5) (120)
E 3.73 3.93 5.31 5.31
(95) (100) (135) (135)
F 2.24 2.36 2.55 2.55
(57) (60) (65) (65)
G 0.39 0.39 0.39 0.78
(10) (10) (10) (20)
H 1.74 0.76 1.22 0.83
(19) (19.5) (31) (21)
AC Filter Dimensions Continued
Dim. For Filters:
FN3358-7-45 FN3358-30-47
A 7.48 10.63
(190) (270)
B 6.29 9.45
(160) (240)
C 7.08 10.04
(180) (255)
D 0.79 1.18
(20) (30)
E 0.18 0.21
(4.5) (5.4)
F 2.75 3.35
(70) (85)
G 1.57 1.97
(40) (50)
Depth = F
G
G
H
M6
F
M5
D
E
G
4.53 (115)
D
C E
B
A
B
A
C
9-2 Accessories & Options MN1851
Page 66

Regeneration Resistor
A regeneration resistor should be installed to dissipate energy during braking if a
Fault “1” (over-voltage) occurs.
Baldor Catalog Number
Control
Control
Rated
Amps
Package
Size
2.5 A RG27 44 RG56 44
5 B RG27 44 RG56 44
7.5 C RG22 100 RG39 100
2.5 G * RG68 320
5 G * RG68 320
7.5 G RG68 320
15 H RG27A 320
22.5 H RG23 640
2 E RG4.7 320 RG10 320
5 E RG4.7 320 RG10 320
10 E RG4.7 320 RG10 320
15 E RG4.7 320 RG10 320
* These controls have a 200 ohm, 50 watt resistor installed (internal).
115VAC Controls 230VAC Controls 400/460VAC Controls
Resistor
Catalog
No.
Resistor
Watts
Resistor
Catalog
No.
Resistor
Watts
Resistor
Catalog
No.
An RG68 resistor can be installed in parallel for additional capability.
Resistor
Watts
1.7 (45)
3.9
(100)
3.54
(90)
L
5.5 (140) for 44 watt
L =
8.9 (228) for 100 watt
13.2 (337) for 320/640 watt
M4
Clearance Requirements (all sizes):
2″ (51mm) top and bottom
1″ (26mm) left and right side
2.6 (65)
For safe operation, allow a clearance distance between each control and on all sides of each control.
Accessories & Options 9-3MN1851
Page 67

9-4 Accessories & Options MN1851
Page 68

Appendix A
Manual Tuning
TUNING This appendix presents guidelines for manually tuning the Control. Tuning is
necessary as load mass and friction will affect the drive response. Response may
be defined as the time required for the drive to reach speed. Various software
“tools” are available to make tuning easier, such as:
Internal libraries (easy definition of parameters),
pole placement (the software calculates a “no–overshoot” response),
plotting routine (the drive response is displayed on a screen).
This information is as a guide only. The exact response is entirely up to the
individual performing the tuning.
TUNING GUIDELINES
The Lin+ control is easily tuned using a laptop computer and Lin+ software.
The autotuning procedure provides a stable and responsive drive, by adjusting the
parameter values for velocity loop tuning. The autotuning procedure will work for
most applications. Manual tuning however may be desirable when very tight
response is required. These autotune values provide a basic reference starting
point for any additional adjustments.
General Tuning Rules
Tune the velocity loop first. Then tune the position loop. The velocity loop should
always be tuned before the position loop, as velocity loop tuning affects the
position loop response.
Manual Tuning
Manual tuning may be used to adjust the response of the control. Two types of
manual tuning are possible: velocity tuning and position tuning (for a system which
has been set up to operate in the pulse/direction mode).
Initial Settings Required
Before manual tuning can begin, the motor, control, and operating mode must be
set. Make sure that these parameters have been selected and downloaded.
Manual Tuning A-1MN1851
Page 69

There are 7 parts to the setup procedure:
Motor Select your motor from the library. First, select the general motor type. Then
select your specific motor. All of the parameters will be entered if your motor is
on the list. If your motor is not on the list, you may define a motor and all of its
parameters. Click “Download” when finished.
Figure A-10 Motor Selection Screen
Control The “Control ID” is automatically selected. All of the parameters will be entered if
your control is on the list. Click “Download” when finished.
Figure A-11 Control Selection Screen
A-2 Manual Tuning MN1851
Page 70

After the motor and control are selected, click the General menu and note that the values are filed in.
Encoder Feedback Encoder Resolution
LMBLxx–A or
LMBLxx–B
1143 2286 1524 10 100,000 100
2286 4572 3048 5 200,000 200
5715 11430 7620 2 500,000 500
11430 15240 1 1,000,000 1,000
LMBLxx–E LMCF (All) micron counts / meter counts / mm
1143 762 20 50,000 50
0.5 2,000,000 2,000
0.1 10,000,000 10,000
For encoders other than those listed, calculate the encoder resolution as follows:
(An example of a 5 micron encoder with an LMCF motor is given).
Encoder Feedback +
motor pitch (mm)
1
ǒ
ǒ
counts per mm
Ǔ
x4
Ǔ
+
60.96
1
ǒ
(
200
Ǔ
x4
)
+ 3048
Where:
motor pitch = 45.72 mm (LMBLxx–A or B series)
motor pitch = 91.44 mm (LMBLxx–E series)
motor pitch = 60.96 mm (LMCF cog free motors)
Manual Tuning A-3MN1851
Page 71

Operating Mode Select the operating mode of the control. Choices are:
1. Current Mode
2. Velocity Mode
3. Positioning Mode (15 preset point to point moves)
Click “Download” when finished.
Figure A-12 Operating Mode Selection Screen
Current Parameter
Nominal and peak current values are automatically entered for the motor type.
For manual tuning only, set the control current limit value to a percentage of the
continuous current rating. For example, if your control is rated for 5A continuous
current and you desire to limit the output current to 4A, enter 80%. If you wish to
use the full output power of the control, enter 100%. Click “Download” when
finished.
Figure A-13 Current Parameter Screen
A-4 Manual Tuning MN1851
Page 72

Velocity Parameter (Refer to Help→“Unit Conversion from Linear to Rotary” for more information)
Set the velocity parameters of the control:
Refer to “Velocity Parameters (RPM → m/s)” at the end of this section.
1. Scale factor - ratio of the input voltage to output speed.
2. Minimum velocity
3. Time to maximum velocity
Click “Download” when finished.
Figure A-14 Velocity Parameter Screen
Drift If you know the input offset value of the control, you may enter the value manually.
Otherwise, you may initiate automatic offset tuning and let the control measure
and set this value. Click “Download” when finished.
Figure A-15 Drift Parameter Screen
Manual Tuning A-5MN1851
Page 73

Manual Tuning The first six steps of the manual tuning process are shown in Figure A-16.
Figure A-16 Select Manual Tuning
1
Select
Tuning
2
Select Manual
Tuning
3
Select OK
6
Enter a value
for Bandwidth
7
Click on
Download
If “Pole Placement” method of adjustment is selected, you would enter values for
“inertia” or “inertia ratio”. Enter either one, and the other value will automatically
be entered. This is the easiest and recommended method of adjustment.
If “PI” method of adjustment is selected, you would enter values for GV–gain and
GVI–gain. This is an advanced method of adjustment, and is more difficult.
Both methods of adjustment provide identical results. PI method is described
later in this section.
POLE PLACEMENT
Pole placement provides a “no–overshoot response” when tuned for the correct
inertia. This is the easiest and recommended method of adjustment.
Inertia Click in the “Load” block and enter the value in Kg–cm
0 to 133 Kg–cm2. Pole placement tuning requires conversion of load mass
(weight) and motor mass (weight) values to inertia in Kg–cm
Kg * cm
2
polepitch2x(motorlbs.) load lbs)
ǒ
+
4p
2
Where: pole pitch (mm) LMBL=45.72; LMBLH=91.44; and LMCF=60.96.
If the inertia is under–estimated, the system will be stable. If the inertia is
over–estimated, the system will vibrate or oscillate due to too much system gain.
If the load inertia is unknown, estimate low. It is recommended to start with “load
inertia = 0.2”, which represents a stable condition.
If you entered the “inertia ratio”, you should enter a value representing the ratio of
reflected load inertia to motor inertia. The range is from 0 to 100.
4
2
. The range is from
2
.
Ǔ
100
Select Pole
Placement
5
Enter either Inertia
or Inertia Ratio
(the other value is
automatically
entered).
A-6 Manual Tuning MN1851
Page 74

Response Move to the “Response” block and place the cursor in the “bandwidth” window,
and click on it.
The “bandwidth” is a measure of the range over which the system can respond. It
is expressed in frequency or Hertz. This parameter controls the “rise time” of the
system. It does not effect overshoot.
It is recommended that bandwidth is increased only if higher dynamic response is
required. Increase the bandwidth and observe (go to plotting of move) the
“velocity” and “command current”, until current reaches maximum value, then back
off to 80%. The range is from 10–200.
The next step, would be to verify that the value you entered, provides for adequate
system response. You can check this out, by having the software move the
equipment and plot the response. Proceed to “Plotting of Move”.
Over–Estimated Under–Estimated
1500
1000
500
Velocity
0
–500
Velocity Command / Velocity
Time
Tracking factor
The tracking factor parameter controls the amount of tracking versus overshoot.
The range is 0 to 200. A “tracking factor” of “0” generates no overshoot. A
“tracking factor” of 200 results in a PI equivalent control (i.e. with overshoot).
The next step, would be to verify that the values you entered, provides for
adequate system response. You can check this out, by having the software move
the equipment and plot the response. Proceed to “Plotting of Move”.
Click in the “Tracking” block and enter the desired adjustment value. This
adjustment is used for applications that require improved tracking (or following)
capability, to improve (or reduce) following error.
Figure A-17 Inertia and Load Response Examples
1500
1000
500
Velocity
0
–500
Velocity Command / Velocity
Time
1500
1000
500
Velocity
0
–500
Velocity Command / Velocity
Good Response
Time
Manual Tuning A-7MN1851
Page 75

PI COMPENSATION
PI method of adjustment allows adjustment of the acceleration ramp time and
overshoot values. If “PI” Compensation is selected, you would enter values for
GV–gain and GVI–gain. Select PI Compensation instead of Pole Placement on
the menu shown in Figure A-16.
This is an advanced method of adjustment for use by servo engineers. The “pole
placement” method is easier to use for most applications and is recommended.
Figure A-18 PI Compensation Menu
GVI–Gain The “Integral Gain (GVI)” is the “integral gain” of the velocity loop. It controls 1)
the stiffness (the ability to reject load disturbances), and 2) the amount of offset, or
following error, during steady state conditions (velocity command or load does not
change). The adjustable range is from 0 to 32767.
1. Click on the “Integral Gain (GVI)” box and enter a value. You may want
to begin with the default values – click on the “default” button and
answer “yes. To increase stiffness, increase the GVI–gain setting. It
rejects load disturbance and compensates for system friction.
To reduce following error, or offset, during steady state running
conditions, increase the GVI–gain setting. To reduce the overshoot,
reduce the GVI–gain setting.
Note: As you increase the value for GVI, the system will become unstable, i.e.
oscillate. You may hear an audible noise. Decrease the GVI value
immediately. Continue to decrease the value until the noise is no longer
heard, then decrease it another 10%.
2. Next, verify that the value you entered provides adequate system
response. To verify, have the software move the equipment and plot the
response. Proceed to “Plotting of Move”.
A-8 Manual Tuning MN1851
Page 76

GV–Gain This is the “proportional gain” of the velocity loop. It controls the gain of the
velocity loop by adjusting the controls response to the error. The error is the
difference between the commanded and actual velocity. The higher the gain, the
smaller the difference (or error). The adjustable range is from 0 to 32767.
1. Click in the “Proportional Gain (GV)” box. Enter a value for GV. You
may want to begin with the default values – click on the “default” button
and answer “yes”.
Note: The default values may not be best for all applications, it may be too high. If
the system is noisy (displays an audible noise) decrease this value
immediately.
To obtain a faster rise time, increase the GV–gain setting. The ramp up
time (to operating speed) will be faster. As you increase the value for
GV, the system may have very large overshoots and become unstable.
Decrease the GV value immediately. Then decrease it another 10%.
2. Next, verify that the value you entered provides adequate system
response. You can check this out, by having the software move the
equipment and plot the response. Proceed to “Plotting of Move”.
Manual Tuning A-9MN1851
Page 77

Plotting of Move
Control Window
At any time after the setup parameters are downloaded to the control, you may
proceed to the plotting routine. Plot allows you to verify that the parameter values
you entered provide adequate system response.
In this section, you will inform the software what move to perform. You will enter
time (for the move), direction (CW or CCW) and speed. It is recommended that
you start with low speeds and short time periods (i.e. 0.5 sec) until you get a feel
for your system.
Enter the parameter values using the Pole Placement menu and click the
“Download” button. Refer to Figure A-16 for details.
Figure A-19 Record & Plot Menu
1.0
0.8
0.6
0.4
Velocity
0.2
0
0.04 0.08 0.13 0.17 0.21 0.25 0.29 0.33 0.38 0.42
Graphic Screen
Jog Block
Initiate Move
2 Select 1P variable
Overshoot
Good Response
(Constant Acceleration)
3 Select 2P variable
Time (sec)
1
Click Record
4
Enter
Jog
values
5
Click on CW or CCW
Click on the “Record” button to activate a graphic screen.
Move the cursor to the “plot variable” window (1P and 2P windows = 1
st
and 2
nd
Plot windows) and choose one or two variables which will be drawn on the plot
(such as velocity, velocity command, etc.).
Click on “velocity” in the Jog window. Enter a value to run the motor. A low speed
is recommended.
Click on “duration” in the Jog window. Choose a duration time (range is 0.01 to 32
seconds). Recommend that you use a short time period (i.e. 0.5 sec).
Click on either the “CW” or “CCW“ button. This selects the direction of movement
and the software will plot the variables you selected. Observe the performance
plot. If it meets your expectations, you are finished. If you wish to alter
parameters and view another plot, repeat the above procedure.
A-10 Manual Tuning MN1851
Page 78

Appendix B
Command Set
Lin – ASCII – Command – Set
General
Lin controls use the RS232 communication port (optional RS485) as the Interface.
This document describes existing LinDrive/Lin+Drive ASCII terminal commands
for setup and control of the servo drive.
There are three types of ASCII commands:
1. Parameters. Without parameters, these commands are handled as
2. Variables or system constants. System variables are internally updated
3. Methods support control of the system. Methods may or may not require
Syntax
General structure of the ASCII command
Each ASCII command is structured in principle according to “Mnemonic”
“Delimiter” “Parameter List”. Syntax allows multiple commands in the same string
separated by blank space delimiter. Each command string is terminated by a
carriage return. i.e. generally, a command string looks like:
“Mnemonic1” “Delimiter” “Parameter List1”... “MnemonicN” “Delimiter” “Parameter ListN” [CR]
Up to 80 characters are allowed at the command prompt.
For each correct command the control returns a “>” sign (ASCII 3E hex) as an
acknowledge. If a command is not accepted, the reason for the command revision
is sent instead of the acknowledge.
Mnemonics
The mnemonics are not case sensitive. Most of the ASCII commands are grouped
into functional groups. The Mnemonics of the commands of parameters, variables
and methods of these function groups have a prefix, which indicate the function
and, separated by the dot, the command identifier. The general structure of
Function Group Commands is as follows:
“Functional Group”.“Command Identifier” “Delimiter”“Parameter list” [CR].
e.g.SYS.MOD 1
All prefixed commands are drive parameters. The delimiter between mnemonic
and parameter of these commands is either blank space or equal sign (one of both
is mandatory). To query all parameters and variables of a function group, the
function group prefix followed by dot and asterisk can be used:
“Functional Group”.*
e.g.SYS.*
queries. To modify the value of a parameter, the value to be set is added
to the command. Some parameters may only be modified under special
drive conditions. Query is not restricted to special drive conditions.
in the control, and can not be changed by the user. System constants
are fixed (e.g. by hardware) system properties. Query of variables or
constants is not restricted to special drive conditions.
a parameter. Commanding a method to be executed is in some cases
also restricted to special drive conditions. Each command is defined as
a special mnemonic, which is used for query of parameters, variables
and constants as well as for parameter less methods. Modifying a
parameter respectively commanding a parameterized method is done by
simply adding the parameter value to the mnemonic.
Command Set B-1MN1851
Page 79

Upon receiving a command, the controller answers by sending the function
parameter and variable list. General purpose commands are not prefixed. These
commands only consist of the command identifier and therefore need the general
structure
“Command Identifier” [“Delimiter”]“Parameter list” [CR]
With the non–prefixed commands, no delimiter is mandatory, but the blank space
can be inserted optional.
Parameters and Units
The parameters used within the ASCII commands are integers of different sizes:
INTEGER:
16 bit value ranged 8000.. 7FFF hex ( –215.. +215–1 dec. )
UNSIGNED INT: 16 bit value ranged 0.. FFFF hex (0..216–1 dec.)
LONG: 32 bit value ranged 80000000.. 7FFFFFFF hex ( –231.. +231–1 dec.)
UNSIGNED LONG: 32 bit value ranged 0.. FFFFFFFF hex ( 0.. +232–1 dec.)
STRINGS: Strings of ASCII characters (0 .. FF hex).
A string parameter is preceded and terminated with double quote character (″)!
Commands, which accept or require more than one parameter, use parameter lists
which are composed of the sequence of parameters necessary, with the delimiters
blank space or comma between.
The number of the parameter can be given as decimal value or as hexadecimal
value. Hexadecimal values are preceded by one or more 0–character (30 hex),
while decimal values are taken as default without indicator.
The ASCII command set description below, also shows the units of the parameters
respectively indicate parameters with no units. For best resolution within the
accepted range, the units of the parameters are not chosen according to SI, but
most of the units used are SI units multiplied with potentials of 10.
In some cases, units are related to system properties and can therefore not be
same for all applications. The following is an example of how to calculate Counts
and Limits, used with positioning and homing:
Encoder
Pulses/rev. Resolution Limits
1000 4000 225–1
1500 6000 226–1
2000 8000 226–1
2500 10000 227–1
5000 20000 228–1
6000 24000 228–1
The resolution of all linear encoders is between ± 213 and ± 214.
B-2 Command Set MN1851
Page 80

Start–up with Terminal Communication and Command Examples
1. Select the correct COM port NR. and set the following at your PC:
– Baud Rate: 9600
– Protocol (Hardware, Xon/Xoff, None): OFF
– Data Length: 8 Bit
–Stop Bit: 1
–Parity: NONE
2. Set the control address. The address is set by switch AS1-1 to AS1-4.
To locate a control, type “A” then the control address, e.g. A3 (searches
for a control with address 3). If a drive with address “3” is running and
connected to the PC COM, this drive answers with the prompt sign “>” to
indicate that communication to the drive is established. Additional
command may be sent to the A3 control.
Entering an address command with another address number, will
terminate communication with control A3. If more than one drive is
connected to the PC COM port, typing the address of another drive
connected, will change communication path to this one.
3. Communication is now established and the ASCII commands may be
used.
Note: If more than one drive is connected to the PC port, correct communication
can only be established if all drives have different addresses.
4. Error messages (from the control)
If the syntax and the values of the ASCII command string are correct, the
control accepts the command and answers by sending “<” as
acknowledge. If any error within the transferred command was found,
the control rejects the command by sending a correlated error string.
There are following terminal–reported errors :
– SYNTAX ERROR: invalid character;
– EXECUTION ERROR: invalid command;
– RANGE ERROR: invalid parameter value;
– INVALID EXE CONTEXT: invalid command or operation mode;
– control DESIGN FAILURE: invalid control design;
– INPUT BUFFER OVERFLOW: command line exceeded 80 char.;
– TOO MANY PARAMETERS: too many parameters;
– REQ. PARAMETER MISSED: not enough parameters;
In case of an error, the event protocol will return a NAK ( negative
acknowledge ) to a user. The error check can only provide a syntax and
range check for each command. Error checking will not check a wrong
parameter value that may degrade system performance.
Command Set B-3MN1851
Page 81

General Settings
System Constants
Command Description Range Common Lev I LevII
SYS.POWER Queries dip switch ID, (see DRV.ID) X
SYS.FBACK Queries system feedback
SYS.INFO
(SYS.VER)
SYS.LEVEL Queries level version 1 : 2
SYS.OPT Queries ALTERA option(s)X 0 : 7 X
SYS.STTS
(COM.ADDR)
(encoder / resolver)as defined by ALTERA
Queries firmware version with naming and
version number as ASCII string
Most Significant–Word of SYS.STTS gives
control address of (LS–Word s. below).
Control Address is set per Dip Switch
Firmware versions RES–1.xx, ENC–1.xx SYS.VER is equal to
0:1 X
ASCII letters
(MS-Word of
SYS.STTS)
X
X
SYS.INFO , downward versions: answer to SYS.VER is unsigned integer
version number only
Firmware versions RES–1.xx, ENC–1.xx only (no version)
Basic System Parameters
Motor Parameters (MTR. prefixed)
Command Description Units Range Default E2 / Par. set
MTR.IDX D3S/LinDrive/Lin+Drive Setup library
MTR.IND Motor inductance 0.01 H 1 : 65535 E / P
MTR.INOM Motor nominal current 0.1 A 1 : 65535 E / P
MTR.IPEAK Motor peak 0.1 A 1 : 65535 E / P
MTR.JM Motor Inertia 0.01 Kg-cm21 : 65535 E / P
MTR.MPLS Motor number of poles 1 : 65535 E / P
MTR.RES Motor resistance 0.01 Ohm 1 : 65535 E / P
MTR.KT Motor torque constant (torque to RMS
MTR.KV Motor bemf constant V/1000RPM 1 : 65535 E / P
MTR.NAME Motor string name in ASCII characters ASCII char. E / P
defined Motor Index
0.001 Nm/A 1 : 65535 E / P
phase current)
Unsign Int. E / P
Drive Parameters (typical DRV. prefixed)
Command Description Units Range Default E2 / Par. set
DRV.BUSAPP Application bus voltage V Unsign. Int. E / P
DRV.BUSOV Application bus over voltage V Unsign. Int. E / P
DRV.BUSV Drive Bus voltage V Unsign. Int. E / P
DRV.I2T I2t warning time 0.01 s 100 : 300 E / P
DRV.ID Drive ID (EEPROM value) to be checked
against power ID ( dip switch ) in case of
Version Error ( “U” )
DRV.IDX LinDrive/Lin+Drive Setup library index Unsign. Int. E / P
DRV.INOM Drive nominal current 0.1 A Unsign. Int. E / P
DRV.IPEAK Drivepeak current 0.1 A Unsign. Int. E / P
Unsign. Int. E / P
B-4 Command Set MN1851
Page 82

Additional System parameters (mostly SYS.* prefixed)
Velocity Feedback Parameters:
Command Description Units Range Default E2 / Par. set
MTR.RPLS Resolver number of poles – 1 : 65535 E / P
SYS.ENCRES Queries / updates encoder feedback
resolution for encoder motors (in pulses
per revolution, i.e. before quadrature)
SYS.ENCTBL Queries encoder motor hall table type. – 0 : 2 E / P
pulses/rev. 1 : 16384 E / P
Firmware versions RES–1.xx, ENC–1.xx only Encoder Simulation Output Parameter:
Command Description Units Range Default E2 / Par. set
SYS.ENC Encoder simulation resolution. Range de-
pends on maximum velocity (VEL.MXRPM)
Up to 1500 RPM: 512 :4096; above 1500
RPM: 512 only. Downward versions to
80112d1000, (incl.) also provide the decimal values.
Puls/Rev. 512 : 1024
(2048 : 4096)
(500, 1000
1250, 1500)
E /
Software Limit Switches Parameters:
Command Description Units Range Default E2 / Par. set
LIM.CCW Absolute Position of Software Limit Switch
CCW (related to1 Home, activated after
Homing only)
LIM.CW Absolute Position of Software Limit Switch
CW (related to1 Home, activated after
Homing only)
LIM.ON Deactivate / activate Software Limit
Switches (independent from Hardware
Limit Switches)
1 Counts and Limits depend on Resolver and Encoder
resolution
Counts 1 –Limit:Limit 1 0 E /
Counts 1 –Limit:Limit 1 0 E /
– 0 (off)
1 (on)
0 E /
Variables: NONE
Software Limit Switches Methods:
Command Description Parameter Units Range
LIM.LRN Take actual position as software limit for CW respectively
CCW
0: CW
1: CCW
– 0 : 1
Command Set B-5MN1851
Page 83

PLC Parameters:
Command Description Units Range Default E2 / Par. set
PLC.LINE Defines PLC statement :IF [input]=TRUE,
THEN [action] set/started, with syntax
PLC.LINE [num] [action] [input] [num]
[action] – PLC line number, and string
parameter for PLC action, fixed to line
number:
0 “ENABLE” (PLC enable)
1 “MAO1” (Digital Input MAO1)
2 “MAO2” (Digital Input MAO2)
3 “MAO3” (Digital Input MAO3, if available)
4 “MAO4” (Digital Input MAO4, if available)
5 “RELAY” (
6 “USRERR” (Error “9”)
7 “FRST” (Fault Reset)
8 “DISA” (Disable active, s. 0)
9 “DISP” (Disable active, s. 0)
10 “HOLD” (Hold–status, s. 0)
11 “JOG” (JOG function, s. 0)
12 “GEAR”
[input] – string parameter with enumerated
values:
“FALSE”: Always false, i.e. switched off
“CW”, “CCW”: Hardware or Software
Limit Switches
“MAI1”, “MAI2 ”: Digital Inputs
“MAI3”, “MAI4”: Digital Inputs (if
available)
“DRVOT”,“MTROT”: Drive respectively
motor overtemperature
“I2tWRN”: I
“TRUE”: Always true, i.e. switched ON
“INPOS”, “FEWRN”, “FEFAT”: Flags of
Position Controller in position,
following error warning, following error
limit (s. 0)
BADMOV: Not initialized motion buffer
line commanded (s. 0)
“MOTRDY”, “MOTNRDY”: Positioning
finished respectively in process
2
T–warning (error “7”)
num: 0 : 12
action: s. left
lines:
input: s. left
lines:
PLC disabled,
all lines:
input = false
E / P
Note: Choice of Inputs and Outputs is not completely available in all configurations
Variables: NONE
PLC Methods:
Command Description Parameter Units Range
PLC Enables (“on”) / disables (“off”) / clears and disables (“clr”)
PLC. PLC on and off command is stored in PLC buffer line
0.
“on”, (“off”), “clr”
B-6 Command Set MN1851
Page 84

OCI Interface Parameters:
Command Description Units Range Default
CAN.BD (The range check is: Invalid execute
context.) It should be: “Range error”
CAN.ID (The range check is: Invalid execute
context.)
Hz 10 : 1000 OK
– 1 : 127 OK
Significant
E2 / Par. set
Digital Interface Parameters:
Command Description Units Range Default E2 / Par. set
MOT.INCCW Defines digital Input CCW/MAI4 as CCW
(0) or as MAI4 (1) for positioning
MOT.INCW Defines digital Input CW/MAI3 as CW (0)
or as MAI3 for positioning
– 0 : 1 0 E / P
– 0 : 1 0 E / P
Analog Interface Parameters:
Command Description Units Range Default E2 / Par. set
SYS.RFOFS
(RFOFS)
Query / updates system reference offset of
the analog input, with analog input range
±10V (RFOFS only supports query)
mV –100000 :
100000
0 E / –
Note: Scaling of the analog input command is offered with firmware versions
RES–1.xx, ENC–1.xx. Because scaling parameters are different for current
mode and velocity mode, these parameters are described under 0 (current
command scaling) respectively 0 (velocity command scaling).
Command Set B-7MN1851
Page 85

System Variables
General Variables:
Command Description Units Range Default E2 / Par. set
DRV.LIFE Drive life time. Hrs Unsign.Word E / –
SYS.STTS Queries system status as a double word,
where Word High word is drive address
(set by Dip switches)
Low word: bit array “OR”ed with system
status:
0x0001: Disable SW
0x0002: Disable HW
0x0004: CW
0x0008: CCW
0x0010: Fault exists
0x0020: Warning exits
0x0040: Hold mode
0x0080: Burn in Status
0x0100: Jog Status
0x0200: Enable
0x0400: Jog Non Zero Velocity
0x0800: n/a
0x1000: HW source for Disable HW:
0x2000: PLC active
– Long Word – / –
Queries / modifications of Fault Listing Variables:
Command Description Units Range Default E2 / Par. set
FAULT Gets system fault string list, response is
multiple string X1
FLT Gets system fault string list, response is
error numberX1
LOG, LG Gets system fault log list X1 – X1 – / –
LG Gets system fault log number list X1 – – / –
WRN Gets system warning list as multiple strings – – / –
SYS.FAULT Queries system fault as ID of the most
significant fault
SYS.WRN Queries system warnings. The most
important warning will be reported as ID
– – / –
– X1 – / –
– – / –
– – / –
X1 Possible Faults
X1 Fault
1 “USER ERROR” PLC user generated error. Displays ’9’.
2 “OVERCURRENT” over current. Displays ’3’.
3 “OVERVOLTAGE” 3– bus over voltage. Displays ’1’.
4 “FEEDBACK” resolver/encoder position feedback error. Displays ’5’.
5 “POWER_FAIL” power fail. Displays ’2’.
6 “BPS” BPS fail. Displays ’2’.
7 “OVER_15_VOLTAGE” ±15v over voltage. +15v line is more then 17v or –15v line is
8 “UNDER_15_VOLTAGE” ±15v under voltage. +15v line is less then 12v or –15v line is
9 “EEPROM_ERROR” N.I
10 “EPROM_ERROR” N.I
11 “RAM_ERROR” RAM integrity error. Displays ’9’.
Display Description
more than –17v. Displays ’4’.
less than –12v. Displays ’4’.
B-8 Command Set MN1851
Page 86

X1 Possible Faults – Continued
X1 Fault
12 “FAULT_RELAY” when fault relay is closed. Displays ’9’.
13 “EAF” N.I
14 “MISSING INT” N.I
15 “POWER_ID” DRV.ID != SYS.POWER. Displays small ’u’.
16 “CW_CCW” Both limit switches are on. Displays ’L’.
17 “DESIGN_FAILURE” Control design fail. Displays small ’c’.
18 “EE_CLEARED” EEPROM header stamp was not detected.
19 “EE_INTEGRITY” EEPROM footer stamp was not detected. Displays big ’A’.
20 “EAF Drive Temp” EAF drive over temperature error. Displays ’6’.
21 “EAF Motor Temp” EAF motor over temperature error. Displays ’6’.
22 “EAF Drive I2T” EAF drive I2T error. Displays ’6’.
23 “EAF Motor I2T” EAF motor I2T error. Displays ’6’.
Display Description
Displays big ’U’
Methods:
Command Description Parameter Units Range
FRST Resets system faults if allowed. Reset is not allowed, if
error is still pending.
LOGRST Resets system fault log – – –
– – –
Communication Settings
Parameter:
Command Description Units Range Default E2 / Par. set
ECHO Disable / enable echoing for input
characters
PROMPT Enables / disables terminal prompt – “ON/OFF “ON” – / –
TALK Enables / Disables terminal error
notification
– “ON/OFF “ON” – / –
– “ON/OFF “ON” – / –
Variable:
Command Description Units Range Default E2 / Par. set
COM.STTS Queries the most recent communication
handler error
– 0:65535 – / –
Methods:
Command Description Parameter Units Range
B Opens communication to the drive, called by its address
(the addresses a constant, which can be queried by
COM.ADDR or SYS.STTS)
Address – 0 : 7
Command Set B-9MN1851
Page 87

Queries of System Variables, Status, Faults
Single Values:
Command Description Units Range Default E2 / Par. set
ACTU
CUR.ACTU
ACTV
CUR.ACTV
ANAIN
SYS.ANAIN
POS,
RPOS,
SYS.POS
POS.POS
VEL
VEL.VEL
Query for actual current U 0.01 A – / –
Query for actual current V 0.01 A – / –
Query for analog input mV – / –
Queries motor position – / –
Resolver bits / encoder counts – / –
Query feedback velocity RPM
Data Record ( REC. prefixed ) Parameters:
Command Description Units Range Default E2 / Par. set
REC.GAP Specify gap between recording samples in
REC.TIME Specify recording time 0.5 ms 1:65535 1000 – / –
REC.VAR1,
REC.VAR2
number of servo loops (0.5 ms)
Specify recording variable: “POS”: position,
“REF”: velocity command, “VEL”: velocity,
“CUR”: current command, “ACTU”: current
U, “ACTV”: current V, “FE”: position
following error.
– 0 : 65535 1 E / –
– s. left “POS”
“VEL”
– / –
Data Record ( REC. prefixed ) Variable:
Command Description Units Range Default E2 / Par. set
REC.VFREE1 Specify recording address for REC.VAR1 – Unsign.Long – / –
REC.VFREE1 Specify recording address for REC.VAR2 – Unsign.Long – / –
Methods:
Command Description Parameter Units Range
GETD Gets data from recording buffer in decimal form. – – –
GETX Gets data from recording buffer in hex form, data buffer is
cleared afterwards
REC Starts(“on”) / stops (“off”) recording process start / stop – “on”, “off”
– – –
B-10 Command Set MN1851
Page 88

Memory related methods (Queries / modifications):
RAM related:
Command Description Parameter Range
BDUMP Gets hexadecimal memory dump in bytes Memory
BMEMH Query / Update memory byte in hex Memory
BMEMD Query / Update memory byte in dec Memory
WDUMP Get hexadecimal memory dump in words Memory
WMEMH Query / update hexadecimal word memory
location
WMEMD Query / update decimal word memory Memory
address
address
address
address
Memory
address
address
Unsign.Int.
Unsign.Int.
Unsign.Int.
Unsign.Int.
Unsign.Int.
Unsign.Int.
EEPROM related:
Command Description Parameter Range
CLEAR Clear EEPROM content and drive life time
EEDUMP Display all EEPROM data (256 words).
UP Uploads EEPROM data to terminal
variable by filling it with 0xFFFF (except
code for Level I/II; Baldor/HD)
(ASCII file)
Operation Mode Control
Normal Modes Parameters:
Command Description Units Range Default E2 / Par. set
SYS.MOD Queries / updates system operating mode – 0 : 3 1 E / P
MODE Where 0 – current, 1 – velocity,
2 – position
Normal Modes Variables:
Command Description Units Range Default E2 / Par. set
STATUS Queries drive status: DIS_HW, DIS_SW,
ENABLE, BURN_IN, FAULT
– – / –
Normal Modes Methods:
Command Description Parameter Units Range
DIS Disables drive passively
DISA Disables drive actively, brake to stop, then disable control
ENA Enables drive
HOLD Stops drive and maintains position after stop
QUIT Stops drive and maintains position after stop
STOP Stops drive and maintains position after stop
CONT Continues interrupted move (interrupted by STOP)
(CONT will resume the interrupted move)
Note: In velocity and current mode, braking is with acceleration = zero, in
positioning mode (SYS.MOD 3), braking is with acceleration = MOT.ACC.
Command Set B-11MN1851
Page 89

Sys.mod 0:
Current mode Parameters:
Command Description Units Range Default E2 / Par. set
CUR.BEMF Back EMF voltage compensation, in
percentage of nominal motor value Ke.
CUR.IPEAK Queries / updates application peak current
in percentage of DRV.IPEAK
CUR.INOM Queries / updates application nominal
current in percentage of DRV.IPEAK
CUR.TOFR Queries / updates mantissa of Torque
Optimizer: Phase Advance or BEMF
Compensation
CUR.TOSH Queries / updates Torque Optimizer Shift
coefficient
CUR.SCAL Corresponding current value to analog
input voltage CUR.VOLT for setting of
analog input scaling
CUR.VOLT Corresponding analog input voltage to
current value CUR.SCAL for setting of
analog input scaling
% 80 : 120 100 E / P
% 0 : 1000 100 E / P
% 0 : 500 50 E / P
0x0f00 :
0x1100
16 E / P
0.1 % of
CUR.IP
0.1 VEAK 1 : 100 100 E / P
100 : 10000 1000 E / P
E / P
Current mode Variables:
Command Description Units Range Default E2 / Par. set
CUR.CUR Query for actual current command 0 : 65535 E / –
CUR
Current mode Methods:
Command Description Parameter Units Range
CALC Calculate current control parameters from MTR.*, DRV.* and
CUR.* parameters.
T Commanding digital current command (torque equivalent)
TS Stops current commanded motion (started by T“command”)
torque
equivalent
mV –10000 :
10000
B-12 Command Set MN1851
Page 90

Sys.mod 1 & Sys.mod 3
Velocity mode Parameters:
Command Description Units Range Default E2 / Par. set
VEL.ACC Queries /updates velocity acceleration
limits ( time to max. velocity ).
VEL.ADZON Queries / updates min. velocity in RPM RPM 0 : Max_RPM E / P
VEL.BW Queries / updates velocity control band
width
VEL.CTRL Queries / updates velocity control type 0, 2 E / P
VEL.GV Queries / updates velocity control
proportional gain
VEL.GVI Queries / updates velocity control integral
gain
VEL.INRT Load inertial, set in % of motor inertia
MTR.JM
VEL.LPFA Bandwidth of single velocity control filter. Hz 20 : 800 500 E / P
VEL.LPFB Second Bandwidth of double velocity
control filter (First s. VEL.LPFA).
VEL.LPFMOD Type of velocity control filter (0: no filter, 1:
filter with bandwidth VEL.LPFA, 2: double
filter with bandwidths VEL.LPFA and
VEL.LPFB
VEL.TRKFCT Queries / updates velocity control tracking
factor
VEL.MXRPM Queries / updates velocity control MAX
RPM value. The limit for this value is
internally calculated by the Application Bus
Voltage and the Motor Voltage Constant.
Absolute limit for velocity is 7500 RPM.
VEL.SCAL Corresponding velocity value to analog
input voltage VEL.VOLT for setting of
analog input scaling.
VEL.VOLT Corresponding analog input voltage to
velocity value VEL.SCAL for setting of
analog input scaling
RPM/ms 0 : 7500 E / P
Hz 10 : 200 E / P
0 : 32767 E / P
0 : 32767 E / P
% 0 : 10000 E / P
Hz 20 : 800 500 E / P
– 0 : 20 0 E / P
–32768 : 32767 E / P
RPM 1000 : (7500) E / P
RPM 100 : 32767 E / P
0.1 V 1 : 100 E / P
Velocity mode Variables:
Command Description Units Range Default E2 / Par. set
VEL.VREF Queries velocity reference, commanded at
analog input
VREF – / –
RPM – / –
Velocity mode Methods:
Command Description Parameter Units Range
VCRST Velocity controller parameters reset to default values: Pole
Placement controller: BW = 20 Hz, TRFCT = 0 , INRT = 0;
PI controller: GV, GVI equivalent to Bandwidth 20 Hz
Command Set B-13MN1851
Page 91

Jog
Parameters:
Command Description Units Range Default E2 / Par. set
JOG.TIME Jog time in milliseconds ms 3432448 E / –
JOG.TYPE 0 – continuous, 1 – step, 2 – square wave – 0 : 2 E / –
JOG.VEL Jog velocity in RPM, limited to maximum
velocity VEL.MXRPM.
VEL.MXRPM E / –
Methods:
Command Description Parameter Units Range
JOG Commanding a Jog according to JOG.* parameters, with Direction – “+”, “–”
JS Stops jog and returns to previous operation mode – – –
B-14 Command Set MN1851
Page 92

Position Controller
Position Controller Parameters:
Command Description Units Range Default E2 / Par. set
POS.FFA Queries/updates acceleration FF factor
unsigned integer ranged 0..100
POS.FFTYPE Queries / updates FF type with position
controller redesign 0 – FF none, 1 –
velocity FF, 2 – acceleration FF
POS.FFV Queries / updates velocity FF factor
unsigned integer ranged within 0..100
POS.KP Queries / updates position gain unsigned
integer ranged within 25.. 200
POS.FEWRN Queries / updates FE warning limits
resolver: 1/4096 of revolution,
encoder: 1/(4*SYS. encres) of revolution
integer, > 0 (< 0: disabled)
POS.FEFAT Queries / updates FE fatal limits 1/4096 of
revolution, integer,
POS.IPOS Queries / updates FE in position limits
1/4096 of revolution, integer, > 0 (< 0:
disabled)
– 25 : 100 E / P
– 0 : 2 E / P
– 25 : 100 E / P
– 25 : 100 E / P
1/4096
(resolver)
1/(4*SYS.
encres)
encoder
1/4096 of
revolution
1/4096 of
revolution
–32768 : 32767 E / P
–32768 : 32767 E / P
–32768 : 32767 E / P
Variables:
Command Description Units Range Default E2 / Par. set
POS.MPFE Queries maximum position following error 1/4096 of rev. – / –
MPFE – / –
POS.PFE Queries position following error 1/4096 of rev. – / –
PFE – / –
PREF Queries for position reference 1/4096 of rev. – / –
POS.REF Queries position controller reference,
1/4096 of revolution
POS.FEST Returns follow error status: 0 – normal,
1 – in position, 2 –warning, 3 – error
FEST – / –
1/4096 of rev. – / –
– 0 : 3 – / –
Methods:
Command Description Parameter Units Range
PRST Resets position following error – – –
Command Set B-15MN1851
Page 93

Sys.mod 2: Pulse Follower (Handwheel respectively Pulse/Direction)
Parameters:
Command Description Units Range Default E2 / Par. set
HW.GRFX Queries/updates mantissa HW gear
HW.GRSH Queries/updates shift HW gear parameter 0 : 32767 E / P
HW.PLC GEAR Queries/ updates PLC gear ratio 0 : 65535 E / P
HW.RES Queries / updates HW resolution in pulses
HW.TYPE Queries / updates HW type: 0 – None, 1 –
parameter, negative value means negative
gear.
pulses/rev. –32768 :
per revolution (only necessary for
Pulse and Direction at connector X3, 2 – A
leads B at connector X9, 3 – B leads A
respectively, Pulse and Direction at
connector X92, 4 – A leads B at connector
X32
–32767 :
32767
32767
E / P
E / P
E / P
B-16 Command Set MN1851
Page 94

BALDOR ELECTRIC COMPANY
P.O. Box 2400
Ft. Smith, AR 72902–2400
(501) 646–4711
Fax (501) 648–5792
www.baldor.com
CH
TEL:+41 52 647 4700
FAX:+41 52 659 2394
I
TEL:+39 11 562 4440
FAX:+39 11 562 5660
D
TEL:+49 89 90 50 80
FAX:+49 89 90 50 8491
AU
TEL:+61 29674 5455
FAX:+61 29674 2495
Baldor Electric Company
MN1851
UK
TEL:+44 1454 850000
FAX:+44 1454 859001
CC
TEL:+65 744 2572
FAX:+65 747 1708
F
TEL:+33 145 10 7902
FAX:+33 145 09 0864
MX
TEL:+52 47 61 2030
FAX:+52 47 61 2010
Printed in USA
10/00 C&J 1000
Page 95

Lin+Drive Servo Control MN1851
 Loading...