

INSTALLATION
AND
OPERATING
INSTRUCTIONS
Models: VH1620E, VHVA1620E, VH1828E & VHVA1828E
COUNTERTOP MODEL
ELECTRIC CONVEYOR OVENS
INTENDED FOR OTHER THAN HOUSEHOLD USE
RETAIN THIS MANUAL FOR FUTURE REFERENCE
OVEN MUST BE KEPT CLEAR OF COMBUSTIBLES AT ALL TIMES
FOR YOUR SAFETY: Do not store or use gasoline or other flammable vapors and
liquids in the vicinity of this or any other appliance.
!!
WARNING: Improper installation, adjustment, alteration, service or maintenance can
cause property damage, injury or death. Read the Installation, Operating and
Maintenance Instructions thoroughly before installing or servicing this equipment.
Initial heating of oven may generate smoke or fumes and must be done in a well ventilated area.
Overexposure to smoke or fumes may cause nausea or dizziness.
This equipment has been engineered to provide you with year-round dependable service when used
according to the instructions in this manual and standard commercial kitchen practices.
ANSI/NSF4
P/N U4173A 12/05
BAKERS PRIDE OVEN CO., INC.
30 Pine Street
New Rochelle, NY 10801
(914)576-0200 Phone (800)431-2745 US& Canada
(914)576-0605 Fax www.bakerspride.com WebAddress
!!
1
Bakers Pride takes pride in thedesign and quality of our products. When used as intended and with proper
care and maintenance, you will experience years of reliable operation from this equipment. To ensure best
results, it is important that you carefully read and follow the instructions in this manual.
Installation and start-up should be performed by a qualified installer who has thoroughly read, understands
and follows these instructions.
If you have questions concerning the installation, operation, maintenance or service of this product, contact
our Technical Service Department at (800) 431-2745.
SAFETY PRECAUTIONS
Before installing and operating this equipment be sure everyone involved in its operation are fully trained
and are aware of all precautions.Accidents and problems can result by a failure to follow fundamental rules
and precautions.
The following words and symbols, found in this manual, alert you to hazards to the operator, service
personnel or the equipment. The wordsare defined as follows:
DANGER:
!
WARNING:
!
seriousinjuryor death.
CAUTION:
moderateinjuryorproductor property damage.
!
NOTICE:
eventhoughnot dangerous.
!
Thissymbolwarnsof imminent hazard which will result inseriousinjuryor death.
This symbol refers to a potential hazard or unsafe practice, which could result in
Thissymbol refers to a potential hazard or unsafepractice,which may result in minor or
This symbol refers to informationthat needs special attentionormust be fullyunderstood
GENERAL INFORMATION
THIS MANUAL SHOULD BE RETAINED FOR FUTURE REFERENCE
CAUTION:
positioned so the general public can use the equipment make sure that cautions, warnings, and
!
operating instructions are clearly posted near each unit so that anyone using the equipment will
useit correctly and not injure themselvesorharmtheequipment.
WARNING:
!
andfrequencylistedon the data plate. Connect only to 1or 3 phase as listedonthe data plate.
WARNING:
!
nationalelectricalcodeand/orotherlocal electrical codes.
These models are designed, built, and sold for commercial use. If these models are
Checkthe data plate on thisunit before installation.Connect the unit onlyto the voltage
Electrical and grounding connections must comply with the applicable portions of the
!
!
!
!
!
!
!
WARNING:
!
powerplug,indicatingthatyou are working on thecircuit.
WARNING:
strongly recommend having a competent professional install the equipment.Alicensed electrician
should make the electrical connections and connect power to the unit. Local codes should always
!
be used when connecting these units to electrical power. In the absence of local codes, use the
latestversionof the National Electrical Code.
WARNING:
codes, or in the absence of local codes, with the National Electrical code, ANSI/NFPA 70, Latest
Edition to protect the user from electrical shock. It requires a grounded system and a dedicated
!
circuit, protected by a fuse or circuit breaker of proper size and rating. Canadian installation must
complywiththe CanadianElectricalCode, CSAC22.2,asapplicable
Disconnect device from electrical power supply and place a Tag Out-Lockout on the
Installper the spacing requirements listed in the installationsection of this manual. We
This device should be safely and adequately grounded in accordance with local
2
!
!
!
WARNING:
!
maintenanceorrepair, contact Bakers Pride.
Afactoryauthorizedagentshouldhandle all maintenance and repair. Before doing any
!
WARNING:
!
surface.
WARNING:
installationandfromthereto an independent earth connection.
!
NOTICE:
the absence of local codes, with the national electrical code ANSI/NFPA70- latest edition.
!
Canadian installation must comply with CSA-STANDARD C.22.2 Number 0 M1982 General
Requirements-CanadianElectrical Code PartII,109-M1981-CommercialCookingAppliances.
WARNING: -
!
equipment.
NOTICE:
!
NOTICE:
Fire ProtectionAssociation, Inc. states in its NFPA96 latest edition that local codes are Authority
Having Jurisdiction when it comes to requirements for installation of equipment. Therefore,
!
installationshouldcomplywithalllocalcodes.
Never clean any electrical unit by immersing it in water. Turn off before cleaning
An earthing cable must connect the appliance to all other units in the complete
The unit when installed, must be electrically groundedand comply with local codes, or in
SHOCK HAZARD
Thisproductis intended for commercial use only.Notforhouseholduse.
Local codes regarding installation vary greatly from one area to another. The National
De-energize all power to equipment before cleaning the
IMPORTANT FOR FUTURE REFERENCE
!
!
!
!
!
!
Notes:
Please complete this information and retain this manual for the life of the equipment. For
Warranty Service and/or Parts, this information is required.
Model Number Serial Number Date Purchased
3

TABLE OF CONTENTS
SECTION ITEM PAGE
1 Receiving 5
2 Location & Minimum Clearances 5
3 Installation 5
4 Stacking 6
5 Electrical Connections 6
6 System Check 8
7 Initial Start-Up 10
8 Shutdown 11
9 Special Features 11
10 Cleaning 12
11 Operator Maintenance 13
12 Rating Plate 14
13 Conveyor Removal 15
14 Conveyor Installation 15
15 Conveyor Belt Speed Calibration 16
16 Troubleshooting Guide 18
17 Temperature Control Conversion Chart 23
18 Solid State Relay Identification 24
19 Electrical Schematics & Wiring Diagrams 26
A.
VHVA1620E Schematic, 208, 220 or 240VAC, 1 Phase 26
B.
VHVA 1620E Wiring Diagram, 208, 220 or 240VAC, 1 Phase 27
C. 3
VHVA1620E Schematic, 208, 220 or 240VAC, Phase 28
D. VHVA 1620E Wiring Diagram, 208, 220 or 240VAC, 3 Phase 29
E. VH 1620E Schematic, 208, 220 or 240VAC, 1 Phase 30
F. VH 1620E Wiring Diagram, 208, 220 or 240VAC, 1 Phase 31
G. VH 1620E Schematic, 208, 220 or 240VAC, 3 Phase 32
H. VH 1620E Wiring Diagram, 208, 220 or 240VAC, 3 Phase 33
I. VHVA 1828E Schematic, 208, 220, or 240, 1 Phase 34
J. VHVA 1828E Wiring Diagram, 208, 220, or 240, 1 Phase 35
K. VHVA 1828E Schematic, 208, 220, or 240, 3 Phase 36
L. VHVA 1828E Wiring Diagram, 208, 220, or 240, 3 Phase 37
M. VH 1828E Schematic, 208, 220, or 240, 1 Phase 38
N. VH 1828E Wiring Diagram, 208, 220, or 240, 1 Phase 39
O. VH 1828E Schematic, 208, 220, or 240, 3 Phase 40
P. VH 1828E Wiring Diagram, 208, 220, or 240, 3 Phase 41
20 Parts Lists & Exploded Views 42
A. External Covers 42
B. Conveyor Assembly 42
C. Blower Motor Cover Assembly 43
D. Blower Assembly 43
E. VH Series Only 43
F. Plenum “Finger” Assembly 43
G. Main Power Control Box 44
H. Electric Control Box 45
I. Cool Down Thermostat, Elements, Switch & Probe 46
21 Warranty 47
4

I. INSTALLATION INSTRUCTIONS
MODELS COVERED TOTAL KW PHASE
VH1620E 6.4 1 or 3
VHVA1620E 6.4 1 or 3
VH1828E 12.4 1 or 3
VHVA1828E 12.4 1 or 3
1. RECEIVING
Read the notice on the outside carton regarding damage in transit. "CONCEALED DAMAGE", damage
discovered after opening the crate(s), MUST be reported immediately to the carrier. The carrier will perform
an inspection of the damage and furnish forms for the consignee's claim against the carrier. Retain ALL
packaging material - including outer carton, until the inspection hasbeen completed.
Proper and secure storage facilities should be arranged for the conveyor oven(s) if necessary to protect it
from outdoor or damp conditions at all times prior toinstallation.
2. LOCATION AND MINIMUM CLEARANCES
Adequate air space must be provided for the proper venting of the rear exhaust air and provision made for
venting of cooking vapors. The ConveyorOven must be installed in awell-ventilated area.
NOTE:
Attached rear rubber bumpers must not be removedand can contact a rear wallif present.
Conveyor Ovens can be installed with "ZERO" clearances (back and sides) from combustible and noncombustible materials. (Rear rubber bumpers are the “Zero” clearance points on theback of the unit.) S e e
rating plate attached to the control box doorpanel.
The Conveyor Oven is intended for countertop mounting if mounted on the 4" legs provided. The Oven is
NOT approved for mounting on any floor. Keep the area around your conveyor oven free and clear of all
combustible materials.
3. INSTALLATION
Place the conveyor oven and parts as close to the area of final installation before uncrating. Your conveyor
oven is packed sitting on its bottom. Leave it this way until unpacked. The pallet may be left under the
conveyor oven for convenience in further handling. Unpack carefully to avoid damage to the unit. If
concealed damage is discovered, follow the instructions detailed in Section1 above.
DO NOT LIFT EXCESSIVE WEIGHT
A. Legs are shipped unattached. Make sure each leg is attached and tightened before placing the
conveyor oven in place. Each leg isadjustable to accommodate variationsin the mounting surface.
B. Using sufficient help (2 or more people), lift the conveyor oven upward and place on the countertop
surface. Lift the conveyor oven by gripping the bottom of the unit. THE FOLLOWING ITEMS ARE
NOT TO BE USED AS LIFTING "HANDLES": Side-mounted control boxes (2), removable front door
(with handles), the conveyor belt assembly, the rear fan housing assembly.
C.
THE CONVEYOR BELT ASSEMBLY IS MOUNTED BACKWARDS FOR SHIPPING. THE
CONVEYOR BELT ASSEMBLY MUST BE REMOVED AND REVERSED PRIOR TO OPERATION.
See Section 6a, b for further instructions.
D. Position the conveyor oven in its final location, maintaining the minimum clearances specified in
Section 2 above.
5
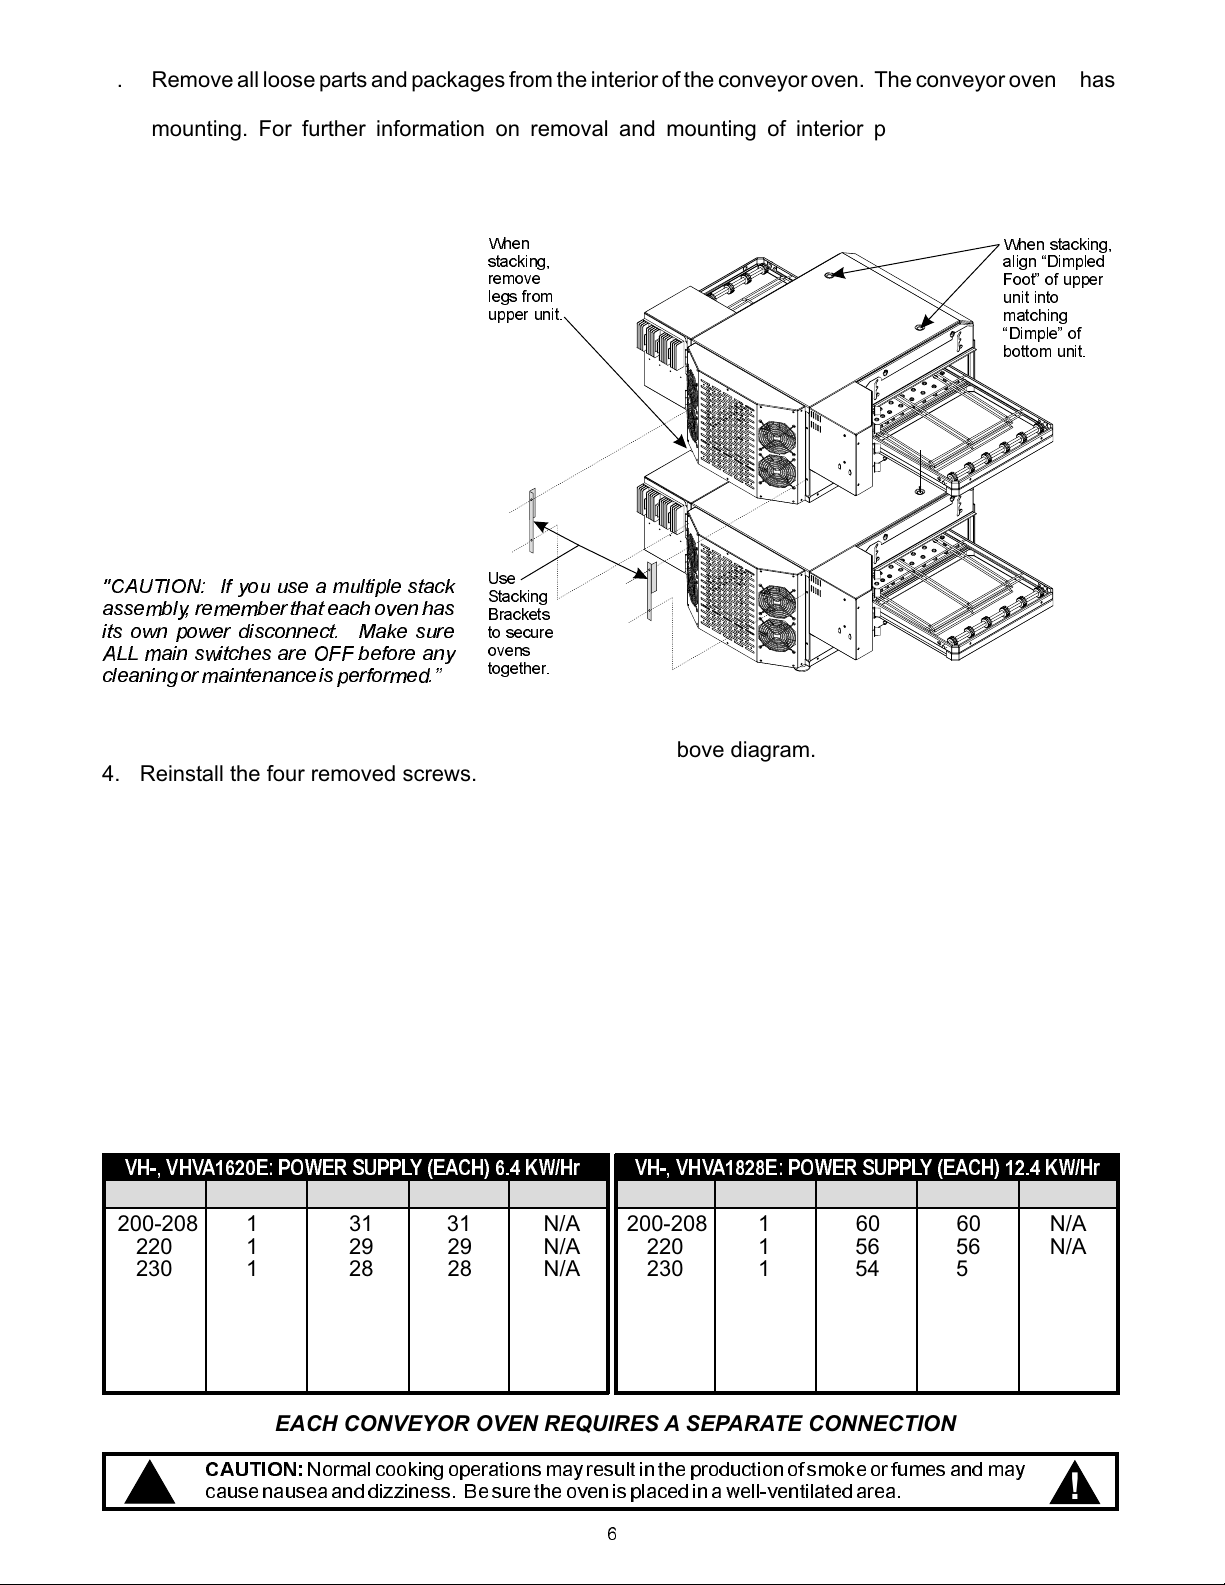
E. Remove all loose parts and packages from the interior of the conveyor oven. The conveyor oven has
(4) air-directing "plenum fingers" in the interior cooking chamber. Check these items for proper
mounting. For further information on removal and mounting of interior panels, see Section 10,
cleaning.
4. STACKING
Your conveyor oven(s) can be
stacked up to (3) high. Each unit is
built exactly the same, so it does not
matter in which order they are
When
stacking,
remove
legs from
upper unit.
stacked. For stacking of (2) units,
remove the legs from the second
(upper) unit prior to mounting on top
of the bottom unit. For stacking of (3)
units, it is preferable to use a
"stacking kit", which allows all
conveyor ovens to be supported by
an external framework, such as a
table, with each conveyor oven
having all legs removed.
"CAUTION: If you use a multiple stack
assembly, remember that each ovenhas
its own power disconnect. Make sure
ALL main switches are OFF before any
cleaningormaintenanceisperformed.
Use
Stacking
Brackets
to secure
ovens
together.
1. Remove two bottom screws from the top oven rear panel.
2. Remove two top screws from the bottom oven rear panel.
3. Install the right and left stacking brackets as shown in above diagram.
4. Reinstall the four removed screws.
When stacking,
align Dimpled
Foot of upper
unit into
matching
Dimple of
bottom unit.
5. ELECTRICAL CONNECTIONS
General Instructions
a
) Only use copper conductor wires rated at 90°C suitably sized for the electric current drawn.
b) Dual Air Model 1828E ovens are constructed for permanent connections - no power cord is supplied.
c) Dual Air Model 1620E ovens are supplied with a flexible power cord and plug.
d) Make sure the electrical supply corresponds with that specified on the rating plate.
e) Only a licensed electrician should make the electrical connections.
f) Proper connections are shown on the wiring diagrams as well as the rating plate.
g) Wiring diagrams are located in the control box containing the Main Switch (green rocker).
h) When installed, the unit must be electrically grounded in accordance with the local codes and/or the
latest edition of the national Electrical Code ANSI/NFPA No. 70 in the USA or Canadian Electrical
Code, CSA Standard C22.1, Part 1 in Canada.
VH-, VHVA1620E: POWER SUPPLY (EACH) 6.4 KW/Hr VH-, VHVA1828E: POWER SUPPLY (EACH) 12.4 KW/Hr
Volts Phase L1 L2 L3 Volts Phase L1 L2 L3
200-208 1 31 31 N/A 200-208 1 60 60 N/A
220 1 29 29 N/A 220 1 56 56 N/A
230 1 28 28 N/A 230 1 54 54 N/A
240 1 27 27 N/A 240 1 52 52 N/A
200-208 3 14 21 19 200-208 3 27 40 38
220 3 13 18 17 220 3 25 38 36
230 3 12 17 16 230 3 24 36 34
240 3 12 18 17 240 3 23 35 33
EACH CONVEYOR OVEN REQUIRES A SEPARATE CONNECTION
CAUTION:
!
causenauseaanddizziness. Besure the oven is placedina well-ventilatedarea.
Normalcooking operations may resultin the productionof smoke or fumes and may
!
6
Field Connections
NOTE: VERIFY THAT INPUT POWER MATCHES THE OVEN POWER REQUIREMENTS STATED
ON THE RATING PLATE, WHICH IS LOCATED ON THE POWER CONTROL BOX.
IF INPUT VOLTAGE DOES NOT MATCH OVEN VOLTAGE REQUIREMENTS, THE CORRECT
CONVEYOR OVEN MUST BE INSTALLED. THE CONVEYOR OVEN CANNOT BE MODIFIED IN THE
FIELD TO MATCH INPUT POWER.
CAUTION: VERIFY VOLTAGE OF EACH LEG. IF ANY LEG HAS A
FOR 3 PHASE UNITS ONLY:
VOLTAGE GREATER THAN 240V THIS LEG MUST BE CONNECTED TO L-3 ON THE POWER
DISTRIBUTION BLOCK.
FOR DUAL AIR MODELS VH1620E, VHVA1620E:
These units are supplied with a flexible power cord, according to the specification placed with the
original order, which specified either single-phase or three-phase operation. No internal field
connection is necessary. All internal connections are complete. Connect the power cord to the
proper power receptacle. (see diagram below).
Note: If a different power cord is required than supplied, the correct power cord must be obtained
from a factory authorized service agent. Only an authorized service agent is to replace a power
cord.
FOR DUAL AIR MODELS VH1828E, VHVA1828E:
a)
Remove the cover from the Power Distribution Box Panel ( on right side when
under the control box
facing front of unit).
b)
Locate the 4-pole Power Distribution Terminal Block mounted in the Power Distribution Box.
c)
Install the proper strain relief for the utilizing the knock-out hole
PERMANENT CONNECTION
provided. The strain relief should be securely fastened.
d)
Supply the proper conduit to the conveyor oven and connect through the strain relief. Connect
properly-sized, copper-only conductorwires (rated 90°C) to the Power DistributionTerminal Block in
accordance with the schematic shown on the rating plate, as well as the wiring diagram provided.
NOTE: For three-phase connections, if any “High Voltage Leg” conductor is present, it be
mounted to L3 Replace thecover and fasten securely with removedscrews.
ONLY.
MUST
SINGLE-PHASE CONNECTION
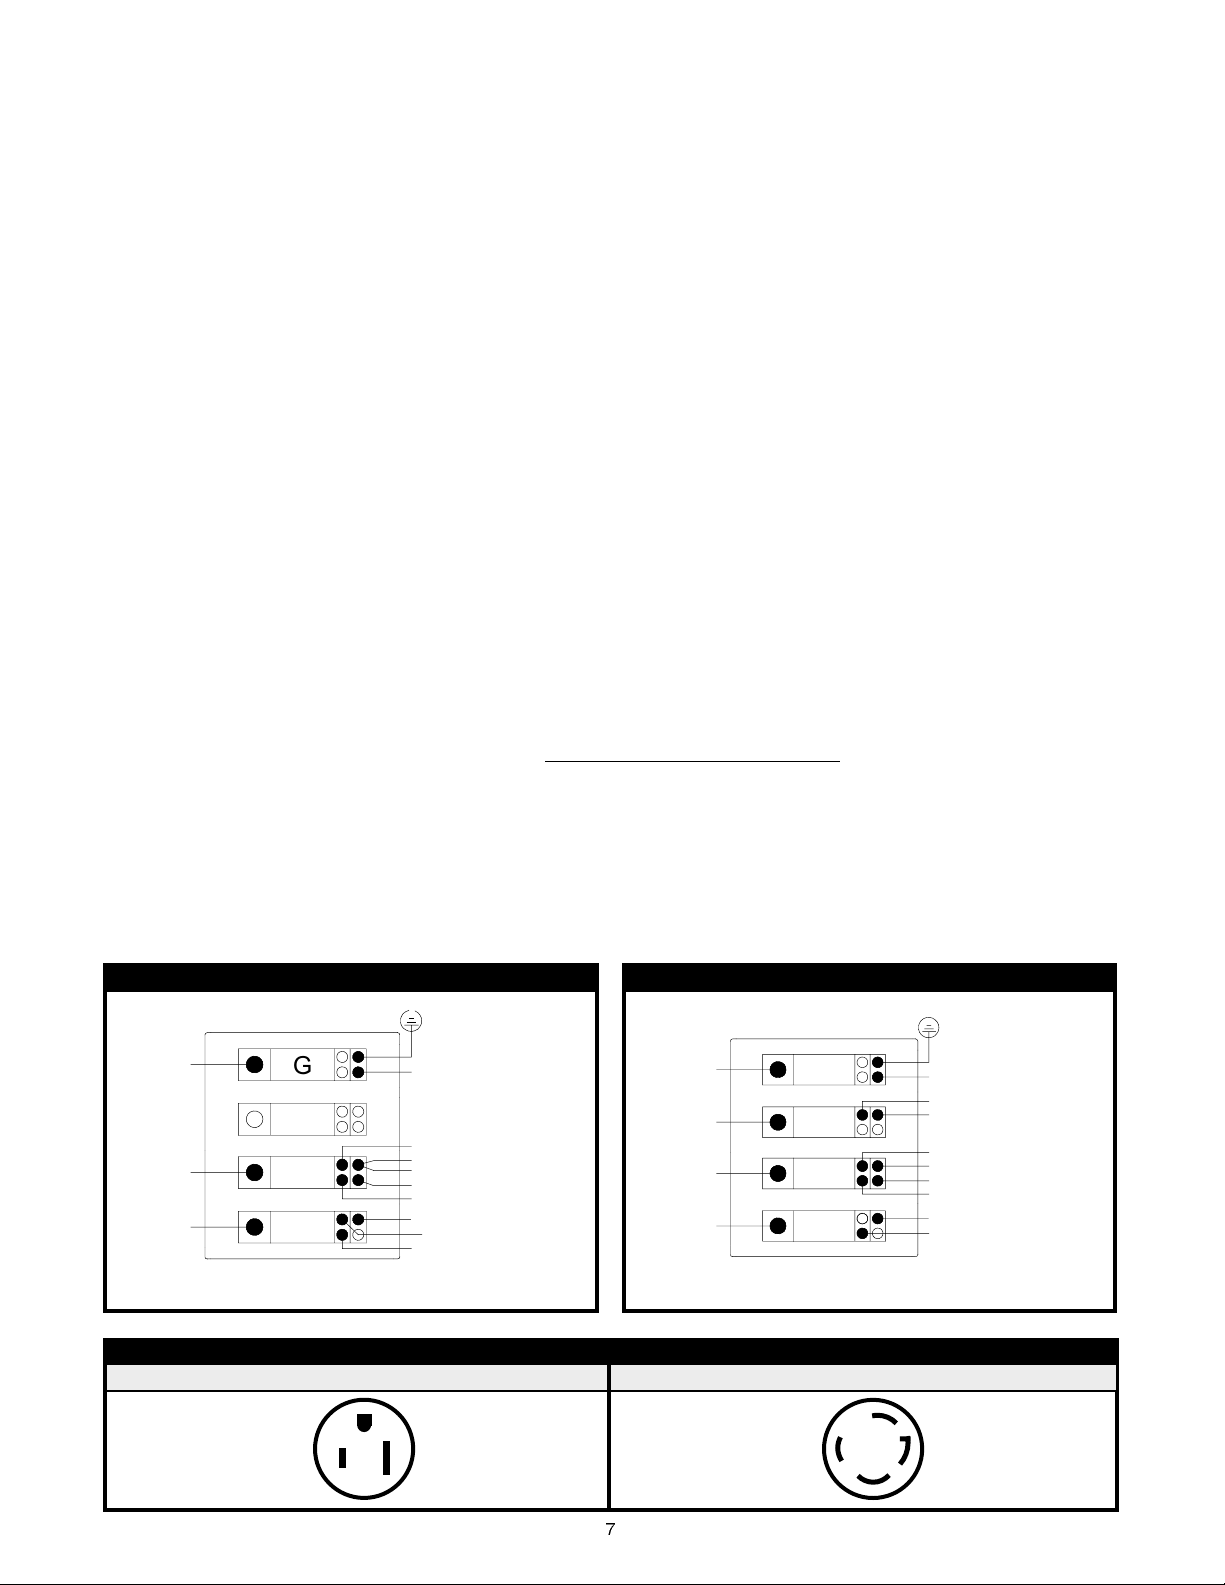
G
G4
L3
L2
5
R (BROWN)
L2
L2
4
A
FIELD WIRING
L2
L1
SERVICE CONNECTIONS
6-50P
E(BROWN)
FACTORY WIRING
TO INTERNAL CIRCUITS
NEMA SPECS.
7
THREE PHASE CONNECTION
FIELD WIRING
G
L3
L2
L1
G4
E(BROWN)
R (BROWN)
L2
5
L2
L2
4
A
SERVICE CONNECTIONS
1620E 3 PHASE1620E 1 PHASE
L15-30P
FACTORY WIRING
TO INTERNAL CIRCUITS
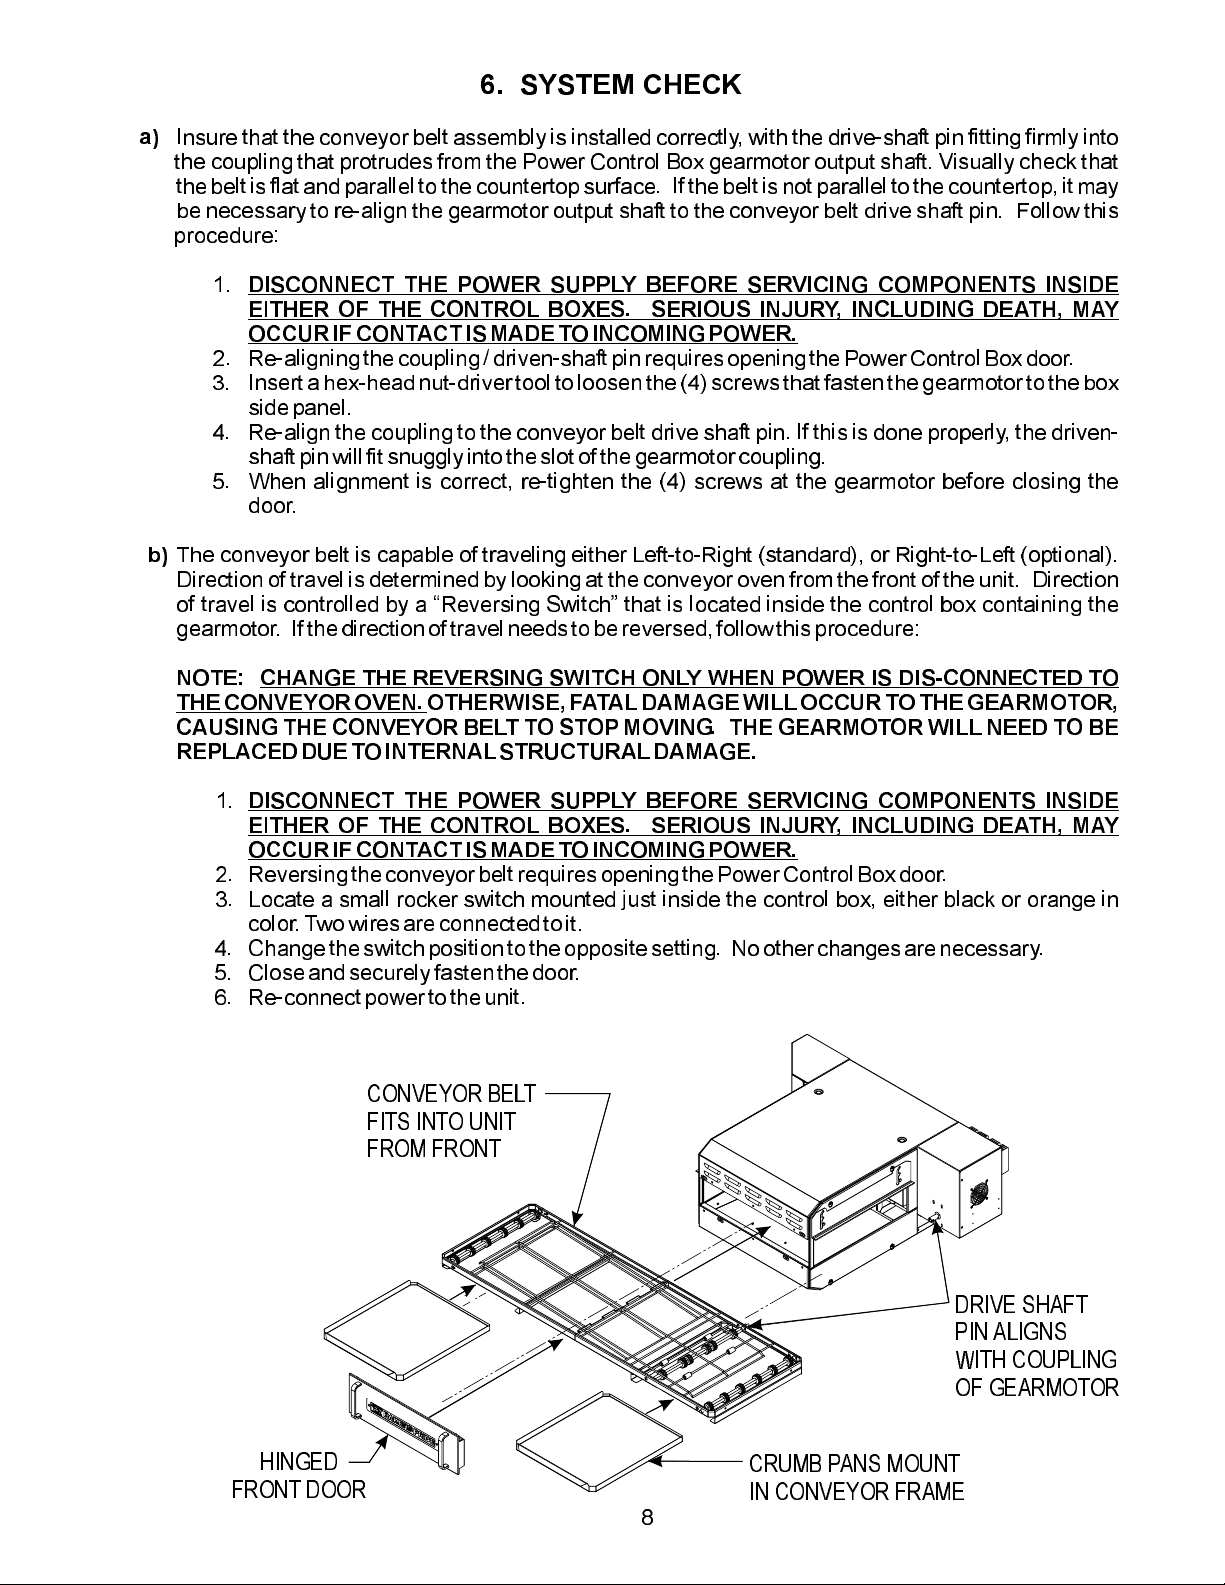
6. SYSTEM CHECK
a)
Insure that the conveyor belt assembly is installed correctly, with the drive-shaft pin fitting firmly into
the coupling that protrudes from the Power Control Box gearmotor output shaft. Visually check that
the belt is flatand parallelto thecountertop surface. If the beltis not parallel to the countertop, it may
be necessary to re-align the gearmotor output shaft to the conveyor belt drive shaft pin. Follow this
procedure:
DISCONNECT THE POWER SUPPLY BEFORE SERVICING COMPONENTS INSIDE
1.
EITHER OF THE CONTROL BOXES. SERIOUS INJURY, INCLUDING DEATH, MAY
OCCURIF CONTACTIS MADE TOINCOMING POWER.
2. Re-aligningthe coupling/ driven-shaft pin requiresopening thePower Control Boxdoor.
3. Inserta hex-head nut-drivertool to loosen the (4) screws that fasten the gearmotorto the box
sidepanel.
4. Re-align the coupling to the conveyor belt drive shaft pin. If this is done properly, the driven-
shaftpin will fit snuggly intothe slot of the gearmotorcoupling.
5. When alignment is correct, re-tighten the (4) screws at the gearmotor before closing the
door.
b)
The conveyor belt is capable of traveling either Left-to-Right (standard), or Right-to-Left (optional).
Direction of travel is determined by looking at the conveyor oven from the front of the unit. Direction
of travel is controlled by a Reversing Switch that is located inside the control box containing the
gearmotor. If the directionof travel needsto bereversed, follow thisprocedure:
NOTE:
THE CONVEYOR OVEN.
CAUSING THE CONVEYOR BELT TO STOP MOVING. THE GEARMOTOR WILL NEED TO BE
REPLACEDDUE TO INTERNALSTRUCTURAL DAMAGE.
CHANGE THE REVERSING SWITCH ONLY WHEN POWER IS DIS-CONNECTED TO
OTHERWISE,FATALDAMAGE WILL OCCUR TO THE GEARMOTOR,
DISCONNECT THE POWER SUPPLY BEFORE SERVICING COMPONENTS INSIDE
1.
EITHER OF THE CONTROL BOXES. SERIOUS INJURY, INCLUDING DEATH, MAY
OCCURIF CONTACTIS MADE TOINCOMING POWER.
2. Reversing theconveyor belt requiresopening the PowerControl Boxdoor.
3. Locate a small rocker switch mounted just inside the control box, either black or orange in
color. Twowires areconnected to it.
4. Changethe switch positionto theopposite setting. No other changesare necessary.
5. Close and securelyfasten the door.
6. Re-connectpower to theunit.
CONVEYOR BELT
FITS INTO UNIT
FROM FRONT
HINGED
FRONT DOOR
DRIVE SHAFT
PIN ALIGNS
WITH COUPLING
OF GEARMOTOR
CRUMB PANS MOUNT
IN CONVEYOR FRAME
8
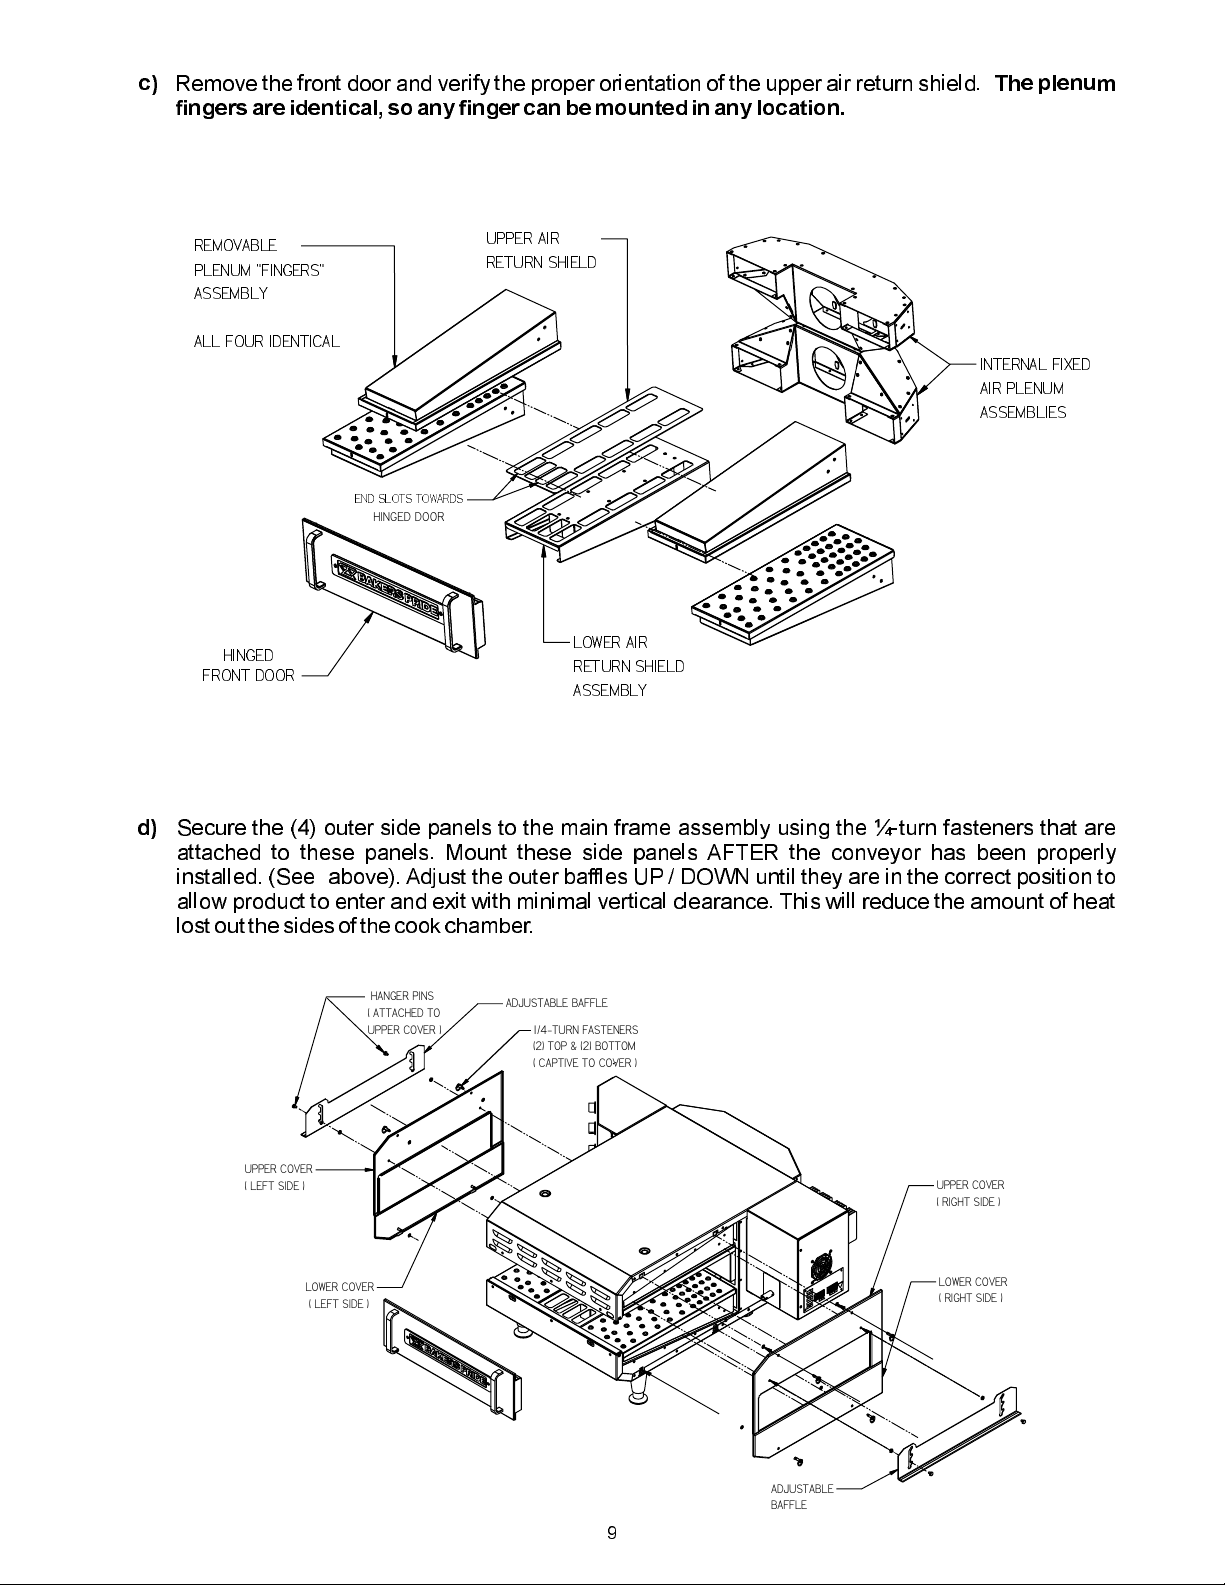
Remove the front door and verify the proper orientation of the upper air return shield.
c) The plenum
fingersare identical,so any fingercan be mountedin anylocation.
REMOVABLE
PLENUM "FINGERS"
ASSEMBLY
ALL FOUR IDENTICAL
HINGED
FRONT DOOR
UPPER AIR
RETURN SHIELD
INTERNAL FIXED
AIR PLENUM
ASSEMBLIES
END SLOTS TOWARDS
HINGED DOOR
LOWER AIR
RETURN SHIELD
ASSEMBLY
d)
Secure the (4) outer side panels to the main frame assembly using the ¼-turn fasteners that are
attached to these panels. Mount these side panels AFTER the conveyor has been properly
installed. (See above).Adjust the outer baffles UP / DOWN until they are in the correct position to
allow product to enter and exit with minimal vertical clearance. This will reduce the amount of heat
lostout thesides of the cook chamber.
HANGER PINS
(ATTACHEDTO
UPPER COVER )
UPPER COVER
(LEFTSIDE)
LOWER COVER
(LEFTSIDE)
ADJUSTABLE BAFFLE
1/4-TURN FASTENERS
(2) TOP & (2) BOTTOM
( CAPTIVE T O COVER )
UPPER COVER
( RIGHT SIDE )
LOWER COVER
( RIGHT SIDE )
ADJUSTABLE
BAFFLE
9
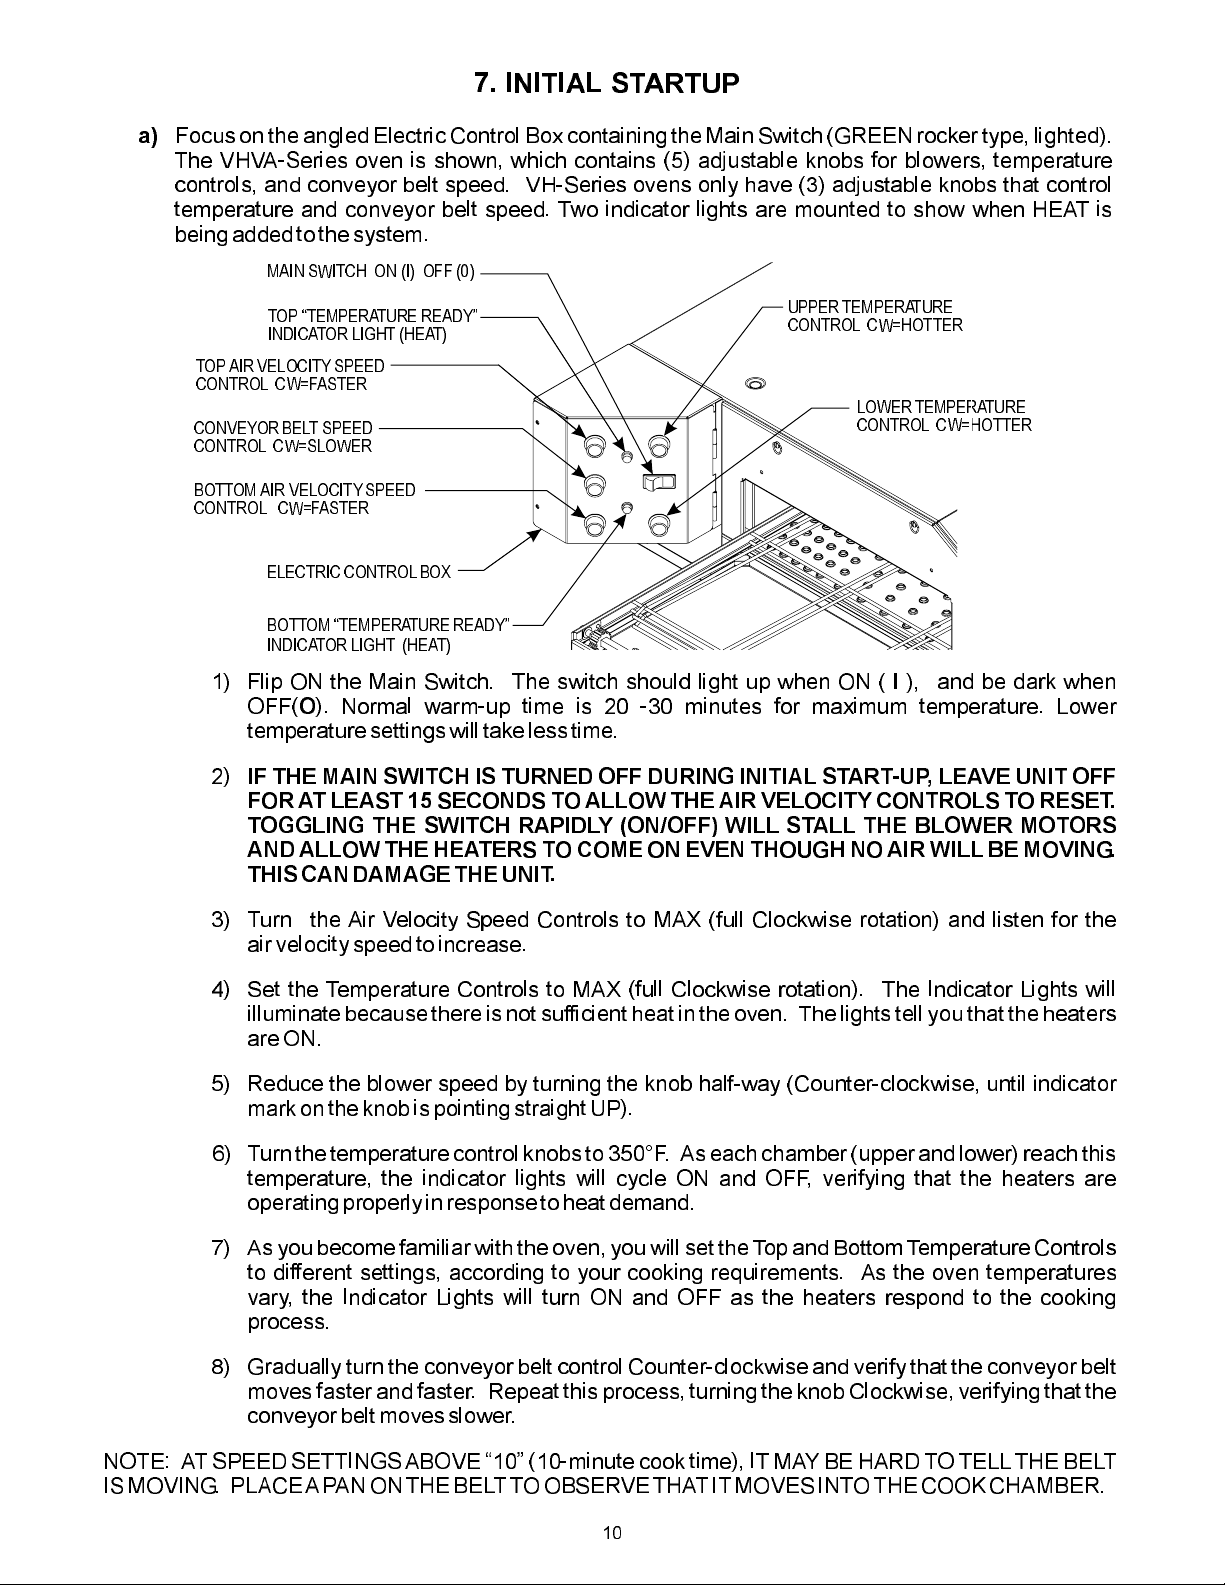
7. INITIAL STARTUP
a)
Focus on the angled Electric Control Box containingthe Main Switch (GREEN rocker type, lighted).
The VHVA-Series oven is shown, which contains (5) adjustable knobs for blowers, temperature
controls, and conveyor belt speed. VH-Series ovens only have (3) adjustable knobs that control
temperature and conveyor belt speed. Two indicator lights are mounted to show when HEAT is
beingadded tothe system.
MAIN SWITCH ON (I) OFF (0)
TOP TEMPERATURE READY
INDICATOR LIGHT (HEAT)
TOPAIR VELOCITY SPEED
CONTROL CW=FASTER
CONVEYOR BELTSPEED
CONTROL CW=SLOWER
BOTTOMAIR VELOCITYSPEED
CONTROL CW=FASTER
ELECTRIC CONTROLBOX
BOTTOM TEMPERATURE READY
INDICATOR LIGHT (HEAT)
1) Flip ON the Main Switch. The switch should light up when ON ( ), and be dark when
O
OFF( ). Normal warm-up time is 20 -30 minutes for maximum temperature. Lower
UPPER TEMPERATURE
CONTROL CW=HOTTER
LOWER TEMPERATURE
CONTROL CW=HOTTER
I
temperaturesettings will takeless time.
IF THE MAIN SWITCH IS TURNED OFF DURING INITIAL START-UP, LEAVE UNIT OFF
2)
FOR AT LEAST 15 SECONDS TOALLOW THE AIR VELOCITY CONTROLS TO RESET.
TOGGLING THE SWITCH RAPIDLY (ON/OFF) WILL STALL THE BLOWER MOTORS
AND ALLOW THE HEATERS TO COME ON EVEN THOUGH NO AIR WILL BE MOVING.
THISCAN DAMAGETHE UNIT.
3) Turn the Air Velocity Speed Controls to MAX (full Clockwise rotation) and listen for the
airvelocity speedto increase.
4) Set the Temperature Controls to MAX (full Clockwise rotation). The Indicator Lights will
illuminate because there is not sufficient heat in the oven. The lights tell you that the heaters
are ON.
5) Reduce the blower speed by turning the knob half-way (Counter-clockwise, until indicator
markon theknob is pointingstraight UP).
6) Turnthe temperature control knobs to 350°F. Aseach chamber (upper andlower) reachthis
temperature, the indicator lights will cycle ON and OFF, verifying that the heaters are
operatingproperly in responseto heatdemand.
7) As you become familiar with the oven, you will set the Topand BottomTemperature Controls
to different settings, according to your cooking requirements. As the oven temperatures
vary, the Indicator Lights will turn ON and OFF as the heaters respond to the cooking
process.
) Gradually turn the conveyor belt control Counter-clockwise and verify that the conveyor belt
8
moves faster and faster. Repeat this process, turning the knob Clockwise, verifying that the
conveyorbelt moves slower.
NOTE: AT SPEED SETTINGSABOVE 10 (10-minute cook time), IT MAYBE HARD TOTELL THE BELT
IS MOVING. PLACEAPAN ONTHEBELTTOOBSERVETHAT IT MOVESINTOTHE COOK CHAMBER.
10
8. SHUTDOWN
The conveyor oven is supplied with a special that helps cool the oven quickly
once the unit has been shut OFF. This feature performs the following functions when the Main Switch is
turnedOFF atthe end of the day:
a) Theblowers keeprunning to re-circulateair through theair chambers
b) Theheaters shutOFF.
c) The conveyorbelt stopsmoving.
d) Once the oven has cooled down to a factory pre-set temperature,the blowersshut OFF. The
ovenis nowcompletely OFF.
NOTE: TO ACCELERATE THE COOLING OF THE OVEN, OPEN THE FRONT DOOR TO ALLOW
COOLERAIR INTOTHE SYSTEM.
NOTE: IF THE MAIN SWITCH IS TURNED BACK ON WHILE THE UNIT IS COOLING DOWN, THE
HEATERS AND CONVEYOR BELT WILL RE-ENGAGE TO BEGIN STANDARD COOKING
OPERATION. THIS IS NORMAL AND WILL NOT DAMAGE THE OVEN. HOWEVER, THE UNIT WILL
NEVERGET HOT ENOUGHTO COOK IFTHE FRONTDOOR IS OPEN.
COOL-DOWN CIRCUIT
NOTE:This pre-settemperatureis notadjustable.
9. SPECIAL FEATURES
Your new conveyor oven has been built with numerous enhancementsto add flexibility and simplicity to
yourcooking operation. The conveyor ovensare built in two versions:
VARIABLE HEAT/VARIABLE AIR
VARIABLE HEAT/FIXED AIR
Thefollowing special features :
A. INDEPENDENT TOP AND BOTTOM HEAT. Different temperature settings can be set for
bothtop andbottom heat zones.
B. VARIABLE-SPEEDCONVEYOR BELT
C. FIELD-REVERSIBLECONVEYOR BELTTRAVEL
D. FRONT-REMOVABLECONVEYOR BELT. No need toslide thebelt assembly outthe side.
E. INDEPENDENTTOPAND BOTTOMOUTER SIDE COVERS. Makes it possible to remove
conveyorbelt from the front.
F. SYMMETRICAL OUTER COVERS (DUAL AIR 1828E ONLY). Top and bottom outer side
coverscan mounton either side.
G. EASE IN CLEANING. This is accomplished by easily removable components for access to
thecook chamber, air plenumfingers, and conveyorbelt assembly.
AREFOUND IN BOTH VERSIONS
VARIABLE HEAT/VARIABLE AIR
The unithas this additionalfeature.
VARIABLE-SPEED TOP AND BOTTOM AIR VELOCITY. This allows for maximum flexibility in
controllingthe cooking environment,as some food products require lesstop airthan others.
11

10. CLEANING
CAUTION: THE CONVEYOROVEN CONTAINS ELECTRICALCOMPONENTS. TURN OFFTHE OVEN
ANDDISCONNECT THE POWERBEFORE CLEANING BEGINS.
DONOT CLEANTHE CONVEYOR OVENWITHAWATER JET.
WEEKLYCLEANING:
Oven Exterior: CLEAN ONLY WHEN THE OVEN IS COLD.
of stainless steel.
Deposits of baked-on splatter and grease, or discoloration may be removed by using any commercial
cleaner recommended for stainless steel. Always rub with the grains and apply very light pressure.
Rinsewith aMOIST,NOT SOAKING, cloth.
Oven Interior: CLEAN ONLY WHEN THE OVEN IS COLD.
(cookchamber) is of aluminized steel,and requires carenot toover-clean and scratchthe surface.
CAUTION: DO NOT USE OVEN CLEANERS, CAUSTIC SOLUTIONS OR MECHANICAL MEANS
BECAUSETHESE WILLDAMAGE THE ALUMINIZEDSURFACES
and cleaners that meet national and/or local codes. Clean the walls of the cook chamber with a mild
soapand watersolution.
To clean the interior of the conveyor oven, it is necessary to remove the front door, the (4) outer sides
panels,the conveyor beltassembly, andthe (4) air plenum fingers.(See page 9.)
ConveyorBeltAssembly
1. Remove crumb pans.
2. Remove plenum fingerassembliesand disassemblefor cleaning.
Removeconveyor belt assembly.
Useonly adamp cloth.
Standard constructionof the exterioris
Standard construction of the interior
. Use only thedetergent solutions
1. CONVEYOR BELT STILL MOUNTED IN OVEN:
NOTE: USE CARE IF CLEANING THE CONVEYOR BELT WHILE IT IS STILL MOUNTED IN
THE OVEN. EXCESSIVE FORCE MAY PRODUCE AN OVERLOAD CONDITION THAT
COULD DAMAGE THE GEARMOTOR AND CAUSE THE OVEN TO BE RENDERED UN-
USABLE.
Using a plastic abrasive pad, wipe the conveyor belt in a back-and-forth motion to remove
baked-on product. Wipe clean with a hot, damp cloth.
2. CONVEYOR BELT REMOVED FROM OVEN:
Using a plastic abrasive pad, wipe the conveyor belt in a back-and-forth motion to remove
baked-on product. Wipe clean with a hot, damp cloth.
NOTE: IT IS NOT NECESSARY TO REMOVE THE BELT FROM THE FRAME ASSEMBLY FOR
CLEANING.
3. Check the belt links for any sign of damage. If any links are bent, use a needle-nose pliers to
repairprior to re-installationinto the unit.
Plenum Fingers
The conveyor oven contains (4) plenum fingers that direct air onto the product surface while
cooking. This 3-piece assemblycomes apart forcleaning, as shownbelow:
12
AIR PLENUM FINGER ASSEMBLY
Outer Perforated
Panel
(Stainless Steel)
Although symmetrical
in design, inner panel
must have flanges
facing up as shown
Main Panel
(Aluminized Steel)
Inner Perforated
Screen
(Stainless Steel)
The Outer Perforated panel is locked into place through a friction fit to the Main panel. This method
of fastening also captures the Inner panel, holding it in place. The Outer panel slides off the Main
panel, exposing the perforated Inner panel. The Inner panel is symmetrical in design, and may be
placed in either direction, as long as the outer flanges are pointing as shown in the figure
UPWARD
above.
The Inner and Outer panels are made of stainless steel, and therefore may be exposed to strong
cleaners to remove baked-on grease, etc. Overnight soaking in a hot cleaning solution will improve
thecleaning process.
The Main panel is made of aluminized steel like the main cook chamber, and thus requires the same
level of care to retain its integrity. Follow the same precautions as mentioned above for the main
cookchamber.
11. OPERATOR MAINTENANCE
WARNING DANGER DISCONNECT THE POWER SUPPLY BEFORE SERVICING OR CLEANING
THE OVEN. SERIOUS INJURY, INCLUDING DEATH, MAY OCCUR IF CONTACT IS MADE WITH
INCOMINGPOWER.
Duringnormal operation of the oven,lubrication is notrequired.
To achieve maximum efficiency,keep the oven clean. How you maintainyour oven will determine how long
it lasts.
If the ovenfails to operate, perform thefollowing inspections BEFOREcallingan authorizedservice agent:
:
13
1. Check to see ifthe maincircuit breaker isON atthe breaker panel.
.
2. Check the (2) 5-amp fuses located in the bottom of the Power Control Box
IF FUSES ARE BAD, REPLACE ONLY WITH IDENTICAL FUSES. DO NOT
SUBSTITUTE HIGHER VALUE FUSES, AS THIS MAY NULLIFY NEEDED PROTECTION
FORTHE INTERNALELECTRICAL COMPONENTS.
3. Check that the Main Switch is ON. If operating properly, the rocker switch will be lighted
whenON.
4. Check the setting of the temperature control thermostats (knobs). If operating properly,they
will activate theamber indicatorlightsas youturn theknobs backand forth, calling for heat. It
is very unlikelythat the lightwill burnout.
5. If there is noair blowing,check the following:
i. RESET
ii.
DUALAIR MODELVHVA-SERIES
for at east15 seconds and then turning it back ON. This resets the blower speed
controls. If this is not successful, turn off the wall circuit breaker for one minute and
thenturn iton again.
DUAL AIR MODEL VH-SERIES WARNING
section, open the Power Control Box and locate the overload relay (above
gearmotor). . TrytheMain Switchagain.
1. NOTE:
PUSHIN THERESET BUTTON
The Overload Relay is both a current limiting and a thermal
device
overload relay shuts the motor(s) OFF if there is excessive current going to
the motor(s), or if excessive heat builds up in the overload relay due to an
overload condition. Because it takes time for the relay to cool down, do not
assume that there is another problem IF pushing the RESET button doesn't
accomplish the task Both settings,
notoverheated
, meaning that if one or both of the blower motors get jammed, the
, must becorrect for properoperation.
: theunit by turningthe MainSwitch OFF
: Observing the at the beginning of this
RESET button pushed IN & overload
CAUTION
:
If the conveyor belt does not move, check to see that the coupling setscrew is tight on the
6.
gearmotoroutput shaft.
If the oven still does not operate, turn OFF the Main Switch and disconnect the power supply to the
unit(if possible). Contactthe factory, factory representative,or an authorized serviceagency.
ALL SERVICING SHOULD BE PERFORMED ONLY BY A FACTORY AUTHORIZED SERVICE
TECHNICIANORAGENT
.
12. RATING PLATE
A copy of the rating plate is shown here for reference.
MODEL VH-SERIES MODEL VHVA-SERIES
14
13. CONVEYOR REMOVAL
Extensive Engineering went into designing your oven for ease of cleaning. One SPECIAL
FEATURE is the ability to remove the conveyor belt assembly straight out the font of the oven.
Followthis procedure,usingthe diagramprovided: (See drawingbelow)
a) Remove any extension trays present, rotating them upwards to clear the conveyor frame.
Flangeson thetrays hook aroundthe ends of the frame.
b) Remove thetwo crumb pans.
c) Remove the upper outer side covers, which have the adjustable baffles attached with pins.
The covers are held in place with hand-twist fasteners. Turn these fasteners 90°
counterclockwiseto loosen, and90° clockwiseto tighten.
d) It isnot necessaryto remove theouter lower sidecovers.
NOTE:
On Dual Air Models VH-, VHVA Series ovens, the outer upper and lower covers
1828E
aresymmetrical, and can be mountedon either sideof theoven.
e) Open thefront hinged door.
f) Carefully supporting both right and left sides of the conveyor, lift the front edge slightly and
pulltowards you,watching as thedrive shaft pullsout ofthe gearmotor coupling.
14. CONVEYOR INSTALLATION
Installingthe conveyorbelt assemblyis done in exact reverse order to its removal. The MOST IMPORTANT
POINT is to properly align the drive shaft pin with the gearmotor coupling. If the drive shaft pin must be
wedged into place for installation, the coupling location needs to be adjusted. See Section 6a for this
procedure.
DONOT FORCETHE DRIVE PININTO THE COUPLINGIF THEY DO NOTALIGN.
IF EXTENSION TRAYSARE
IF EXTENSION TRAYSARE
PRESENT, ROTATE THEM
UPWARDSTO REMOVE FROM
CONVEYOR FRAME
UPPER OUTER SIDE
COVER WITH
ADJUSTABLE BAFFLE
PRESENT, ROTATE THEM
UPWARDSTO REMOVE FROM
CONVEYOR FRAME
UPPER OUTER SIDE
COVER WITH
ADJUSTABLE
BAFFLE
15

15. CONVEYOR BELT SPEED CALIBRATION
The conveyor belt requires calibration to properly align the speed control knob on the Electric Control Box.
Calibration is done by timing the belt as it passes between two timing marks located on the conveyor frame.
This method will work regardless of belt travel direction. Follow the instructions below.
Idler Shaft
Belt Travel
(Standard)
Timing Marks
on Conveyor Frame
Conveyor Frame
A. Remove the adjustment knob of the conveyor belt speed control (see page 10) using a small,
standard screwdriver to loosen the setscrew.
B. Locate the two timing marks as shown above. For the Dual Air VH-, VHVA1620E series, the marks
are 5 inches apart; for the Dual Air VH-, VHVA1828E the marks are 7 inches apart. IF the timing
marks are NOT present, use ablack markingpen to mark the frame in the same manner.
C. These distances represent exactly ¼ of the distance of the cook chamber: ¼ x 20” cook chamber
(DualAir 1620E) = 5”; ¼ x28” cook chamber (DualAir 1828E)= 7”.
D. With this 1:4 ratio,it is possible to calibrate the belt speed. For example:
1. For a cook time of 1 minute, the time required to pass between timing marks would be: 60
seconds / 4 = 15 seconds. If the belt passes from one mark to the next in 15 seconds, this is
exactly the same as a 1-minute cook time.
2. For a cook time of 6 minutes, the required time to pass between timing marks would be: 6
minutes x 60 seconds / 4. This equals 360 seconds / 4 = 90 seconds between marks. The
belt needs to take 90 seconds (1-1/2 minutes) to move from one mark to the next to equal a
6-minute cook time.
E. Using a black marking pen, mark any belt link near the outer edge. Using a stopwatch, check the
time it takes for this link to move between the timing marks. Repeat this procedure several times
until the distance is traveled in 90 seconds (recommended calibration interval), which equals a 6minute cook time.
F. Now that the belt is moving at this calibrated speed, CAREFULLY re-mount the adjustment knob
onto the belt conveyor speed control shaft, and tighten the setscrew so that the KNOB indicating
mark is pointing at the number “6” on the surrounding label.
G. The conveyor belt is now calibrated for ALL ranges as indicated on the label. The label numbers are
COOK TIME in MINUTES. Simply point the knob indicating line to the desired cook time.
NOTE:
timing results using the method described.
H Cook/Bake Time is not the same as time of delivery. is the actual time required
for the first item, leading edge to trailing edge. is leading edge to leading
edge. For example, the for a 16” pizza with a 6 minute (using the
DualAir 1828 conveyor) is 9.4 minutes.
The label COOK TIME marks are close approximates, and may vary slightly from actual
Time of Delivery Bake/Cook Time
5” (1620E), or 7” (1828E)
Time of Delivery
Cook/Bake Time
16

Time will be the same for any size product.
Time of delivery will be different for
different sizes of products.
Bake Time
Leading Edge of Product
Time of Delivery (TOD) = X (Bake Chamber Length + Product Diameter)
Bake Time
Bake Chamber Length
Trailing Edge of Product
Time of Delivery
Example 1:
Bakers Pride , 6 Minute Bake Time, 16” pizza (time required for the 1st item):
Dual Air Model 1620
(TOD) = X (20 + 16) = 10.8 Minutes
6 Minutes
20”
Example 2:
Dual Air Model 1828Bakers Pride , 6 Minute Bake Time, 16” pizza (time required for the 1st item):
(TOD) = X (28 + 16) = 9.4 Minutes
6 Minutes
28”
I. To calculate production capacity per conveyor, per hour use the following formula.
Oven Capacity/Hour (OCH) =X
Bake Chamber Length X Bake Chamber Depth 60 Min/Hr
Product Diameter Bake Time
2
Example 1:
Dual Air Model 1620Bakers Pride , 6 Minute Pizza, 16” Pizza
OCH = X = 12.5
(20 X 16)
2
16
60
6
Example 2:
Dual Air Model 1828Bakers Pride , 6 Minute Pizza, 16” Pizza
OCH = X = 19.7
(28 X 18)
2
16
60
6
17

16. TROUBLESHOOTING GUIDE
THE PROBLEM THE CAUSE THE SOLUTION
Oven doesn't start
Conveyor belt
doesn't move, or it
moves unevenly.
Unexpected speed
changes.
Blown fuse(s)
Main Switch OFF Turn ON
Main Switch broken
Main circuit breaker OFF
Power cord disconnected (1620E only)
Power connections broken
Conveyor belt running backwards
Belt loose. Drive sprockets not engaging
belt links.
Belt master link(s) missing, broken, or
installed incorrectly.
Conveyor belt installed backwards or
upside down
Speed setting very high (long cook time)
Speed knob loose
Conveyor drive shaft not engaged to
coupling
Drive coupling loose
Drive coupling missing
Conveyor belt jammed
Drive shaft pin missing
Drive sprockets worn out, missing, or mis-
aligned
Conveyor gearmotor failed
Replace fuse with identical type - 5 amp
Replace
Turn ON
Plug cord in (1620E only)
Check power distribution terminal block
below Power Control Box
CAUTION: TURN OFF POWER
Power Control Box, and flip Reversing
Switch to opposite position.
Tighten conveyor belt using adjustable
tensioner at one end of belt frame.
Verify that all sprockets are tight and
properly aligned with belt "segments".
If belt still too loose, remove one belt link.
Install master link(s) properly
Proper belt orientation is for outer belt
loops to be facing in oppositie direction of
travel, and the outer loops to be on top of
the trailing link.
Adjust speed to FAST to verify if knob is
tight and potentiometer working correctly
Tighten setscrew in knob on pot shaft.
NOTE:
mark on label to indicate cook time in
minutes. This may require calibration of
belt movement using timing marks on
conveyor frame.
Section 15.
Align and engage shaft pin to slot in drive
coupling
Tighten setscrew to gearmotor output
shaft (shaft is "flatted" for setscrew grip)
Properly re-attach and tighten to
gearmotor output shaft
Remove belt assembly to identify
obstruction to belt movement. Remedy
problem. Straighten bent belt links
Locate and re-install or replace
Replace sprockets or entire drive shaft
assembly. Tighten sprockets to shaft.
CAUTION: THE FOLLOWING TESTS
ARE PERFORMED WITH LIVE POWER
WITH CONTROL BOX OPEN. THESE
TESTS TO BE PERFORMED ONLY BY
Mark on knob should line up with
For CALIBRATION, see
, open
18
1. Test by disconnecting conveyor belt. If
no shaft rotation or motor noise when
power applied, test power supply.
2. Test power supply input connections @
3. Remove cover from power supply
enclosure and verify integrity of internal

THE PROBLEM THE CAUSE THE SOLUTION
Conveyor belt
doesn't move, or it
moves unevenly.
Unexpected speed
changes.
(Continued)
No air or not
enough air coming
from blower(s)
Conveyor gearmotor failed
(Continued)
Blower motor(s) "stalled" (not running
when Main Switch ON)
Blower motor(s) "jammed"
4. Verify wire connectors from power
supply to gearmotor (2 wires
w/connectors). If power supply doesn't
5. Verify potentiomter connections to
gearmotor (3 wires w/connectors). If
speed doesn't change when knob is
turned, test with spare pot before replacing
original pot.
If all previous tests verify power and
control to gearmotor, replace gearmotor.
Turn Main Switch OFF for at least 15
seconds, then turn it ON again. This
resets speed controls. If this doesnt help,
turn OFF Main Circuit Breaker for
Minute
Remove source(s) of obstruction.
CAUTION: TURN OFF MAIN CIRCUIT
BREAKER BEFORE REACHING INTO
BLOWER WHEEL COMPARTMENT.
SERIOUS INJURY COULD RESULT
OTHERWISE!!
, then turn it ON again.
1
Blower speed control(s) at minimum or low-
speed setting (model VHVA-Series only)
No sound or noise coming from blower(s)
Blower(s) turning backwards.
(Applies to models VH-, VHVA Threephase units, and VHVA Single-phase
units. Does NOT apply to VH Singlephase units.)
Turn speed knob(s) clockwise to increase
air flow
Turn both blower speed controls to
minimum, then adjust each one separately
to hear for sound changes which indicate
air movement. (model VHVA-Series only)
Verify correct rotation - counterclockwise
when standing in front of machine.
Remove the front door, the conveyor belt
assembly, and both upper and lower air
return shilelds. Turn the Main Switch ON
and OFF one time to start the blowers, and
observe the rotation as the blowers slow
down to stop. If rotation is incorrect, (threephase motors only), then two of the three
power wires need to be swapped @ the
terminal block to reverse direction of
rotation. Re-check with same method.
19

THE PROBLEM THE CAUSE THE SOLUTION
No air or not
enough air coming
from blower(s)
(Continued)
Wire connections broken or loose between
speed controls and blower motor(s)
(model VHVA-Series only)
Wire connections broken or loose between
blower motor(s) and terminal block.
Wire connections broken or loose between
potentiometer and speed control
CAUTION: THE FOLLOWING TESTS 14 ARE PERFORMED WITH LIVE POWER
WITH CONTROL BOX OPEN, OR REAR
MOTOR COVER REMOVED. THESE
TESTS TO BE PERFORMED ONLY BY
AN AUTHORIZED SERVICE AGENT.
1. Speed control wire connections are
labeled U, V, and W. Insure connectors
are tight.
2. Insure these (3) wires are tight on
terminal block located in blower motor
compartment.
3. Tighten wires from pot to speed control
at the header terminal on speed control
board.
4. One pot wire contains a 15K ohm
resistor at the pot body. Verify this solder
connection is good.
Blower speed control(s) failed
Blower motor(s) failed
5. Blower(s) can stop if speed controls
have not been reset (model VHVA-Series
only). If yellow "FAULT" light on speed
control circuit board is ON, first turn OFF
main Switch for 15 seconds to rest
control(s). If yellow "FAULT" light remains
ON, disconnect main power cord or circuit
breaker for 1 minute. If "FAULT" light
persists, and all previous tests show
normal, speed control can be tested in the
following manner: swap motor wires from
"good" speed control to "bad" control, and
see if blower motor works. If YES, then
"FAULTY" control is bad and needs
replacing. If NO, then "FAULTY" control is
OK, and motor may need replacing.
6. Test potentiometer by swapping "bad"
pot to "good" speed control. If motor then
works properly, pot is OK, and other speed
control needs testing. (model VHVA-Series
only).
7. If all previous tests are normal, then
blower motor has failed. Replace.
20

THE PROBLEM THE CAUSE THE SOLUTION
Oven not hot
enough
Temperature setting too low
Cooking too soon
Temperature control not working properly
Turn temperature control knob to right
(clockwise)
Oven takes 30-40 minutes to get up to
stabilized operating temperature.
Turn temperature knobs back and forth.
Do both lights go ON & OFF? If YES, then
temperature controls are OK. If NO, then
malfunctioning light indicates which control
needs further investigation. Use the
following steps to check.
CAUTION: THE FOLLOWING TESTS
ARE PERFORMED WITH LIVE POWER
WITH CONTROL BOX OPEN. THESE
TESTS TO BE PERFORMED ONLY BY
AN AUTHORIZED SERVICE AGENT.
1. Locate the two temperature contols
mounted on the hinged door, near the
cooling fan. Verify that ALL connections
and connectors are properly fastened and
tight. Power should be connected to
terminals labeled 240 & VAC COM.
2. Locate the two wires from each of the
temperature sensors (top left terminals
labeled PROBE). These have braided
insulation. Verify their integrity.
3. If necessary to test, disconnect one
sensor at a time, and use voltmeter to
measure resistance at sensor wires.
Compare to resistance chart in back of this
manual. If sensors show INFINITE
resistance, sensor is bad. Replace.
4. If resistance reads value within range of
chart, sensor is good, control needs further
investigation. Re-connect sensor wire
leads. (See diagram at back of manual for
proper identification of controls).
NOTE: temperature sensor lead wires
are NOT polarity sensitive, since sensor
is an RTD-type.
5. If both sensors are good, swap sensor
leads between controls. Turn temperature
knobs ON & OFF. Whichever light works
properly, the
Replace.
OPPOSITE
control is bad.

Notes:
22

17. TEMPERATURE CONTROL CONVERSION CHART
The temperature sensor (probe) that is supplied with this conveyor oven is an RTD type, which yields an
output based on Ohms of resistance. This particular RTD device has a linear resistance curve that
produces a very predictable amount of resistance that can be converted to degrees Fahrenheit. This
particular device produces a resistance increase of 2 Ohms per every 1 degree F. The baseline value is
approx. 1000 ohms at 32 °F (0°C).
Ohms
1002
1004
1017
1025
1038
1046
1059
1067
1080
1088
1101
1109
1122
1130
1143
1151
1164
1172
1184
1193
1205
1214
1226
1234
1247
1255
1267
1276
1288
1286
1309
1317
1329
1338
1350
°F
32
34
40
44
50
54
60
64
70
74
80
84
90
94
100
104
110
114
120
124
130
134
140
144
150
154
160
164
170
174
180
184
190
194
200
Ohms
1358
1370
1379
1391
1399
1411
1420
1432
1440
1452
1460
1473
1481
1493
1501
1513
1521
1533
1541
1554
1562
1574
1582
1594
1602
1614
1622
1634
1642
1654
1662
1674
1682
1694
1702
°F
204
210
214
220
224
230
234
240
244
250
254
260
264
270
274
280
284
290
294
300
304
310
314
320
324
330
334
340
344
350
354
360
364
370
374
Ohms
1714
1722
1734
1742
1753
1761
1773
1781
1793
1801
1813
1821
1832
1844
1852
1860
1872
1879
1891
1899
1911
1918
1930
1938
1950
1957
1969
1977
1988
1996
2008
2027
2035
2046
°F
380
384
390
394
400
404
410
414
420
424
430
434
440
446
450
454
460
464
470
474
480
484
490
494
500
504
510
514
520
524
530
540
544
550
23

18. Solid State Relay Labeling I.D. - Models VH-, VHVA1620E Conveyor Ovens
UPPER ELEMENTS
POWER BLOCK
WIRING - SINGLE
PHASE
G
L2
L1
POWER BLOCK
WIRING - THREE
PHASE
G
L3
L2
L1
GREEN 10 GA ( GRND )
GREEN 14 GA ( G4 )
WHITE 14 GA ( L2 )
BROWN
14GA (R)
WHITE 14 GA ( L2 )
WHITE 14 GA ( L2 )
BLACK 18 GA ( #4 )
BROWN 10 GA ( E )
BLACK 10 GA ( A )
GREEN 10 GA ( GRND )
GREEN 14 GA ( G4 )
BROWN 14 GA(R)
BROWN 10 GA ( E )
BROWN 10 GA ( E )
WHITE 14 GA ( L2 )
WHITE 18 GA ( #5 )
WHITE 14 GA ( L2 )
WHITE 14 GA ( L2 )
BLACK 18 GA ( #4 )
BLACK 10 GA ( A )
WHITE 18 GA
(#5)
WIRE DESIGNATIONS
(LETTERSOR#s)
A
C
SSR 1 SSR 2 SSR 3
30 29 3430 29 29
PROBE
B
DE F
PROBE
UPPERTEMPCONTROL LOWERTEMPCONTROL
VAC
COM
240
VAC
VAC
COM
240
VAC
CONTROL BOX DOOR
LOWER
ELEMENTS
Solid State Relay
RESISTANCE VALUES OF VARIOUS CIRCUITS
Dual Air Models: VH-, VHVA1620E Conveyor Ovens
NOTE: Fuses removed; (4) elements @ 1.5kw = 6.0kw; Ohms = Volts x Volts / Watts
Single Phase Units
Circuit Leads 208 Volt 240 Volt
Between C & L2 Ohms 38.9 Ohms28.3
Between D & L2 Ohms 38.9 Ohms28.3
Between C & D 56.2 Ohms 77.6 Ohms
Between C & F 42.5 Ohms 58.1 Ohms
Between D & F 42.3 Ohms 58.1 Ohms
Between F & L2 14.5 Ohms 19.5 Ohms
Three Phase Units
Circuit Leads 208 Volt 240 Volt
Between C & L3 28.3 Ohms 38.9 Ohms
Between D & L2 28.3 Ohms 38.9 Ohms
Between C & D 1.2M Ohms 1.3M Ohms
Between C & F 1.2M Ohms 1.3M Ohms
Between D & F 42.3 Ohms 58.1 Ohms
Between F & L2 14.5 Ohms 19.5 Ohms
24

Solid State Relay Labeling I.D. - Models VH-, VHVA1828E Conveyor Ovens
UPPER ELEMENTS
POWER BLOCK
WIRING - SINGLE
PHASE
G
L2
L1
POWER BLOCK
WIRING - THREE
PHASE
G
L3
L2
L1
GREEN 10 GA ( GRND )
GREEN 14 GA ( G4 )
WHITE 1 4 GA ( L2 )
R14GA
WHITE 14 GA ( L2 )
WHITE 1 4 GA ( L2 )
BLACK 18 GA ( #4 )
BROWN 10 GA ( E )
BLACK 10 GA ( A )
GREEN 10 GA ( GRND )
GREEN 14 GA ( G4 )
R14GA
BROWN 10 GA ( E )
BROWN 10 GA ( E )
WHITE 1 4 GA ( L2 )
WHITE 18 GA ( #5 )
WHITE 14 GA ( L2 )
WHITE 1 4 GA ( L2 )
BLACK 18 GA ( #4 )
BLACK 10 GA ( A )
WHITE 1 8 GA
(#5)
WIRE DESIGNATIONS
(LETTERSOR#s)
B
A
C
DE F
SSR 1 SSR 2 SSR 3
30 29 3430 29 29
PROBE
PROBE
UPPERTEMPCONTROL LOWERTEMPCONTROL
VAC
COM
240
VAC
VAC
COM
240
VAC
CONTROL BOX DOOR
LOWER
ELEMENTS
Solid State Relay
RESISTANCE VALUES OF VARIOUS CIRCUITS
Dual Air Models: VH, VHVA1828E Conveyor Ovens
NOTE: Fuses removed; (4) elements @ 3kw = 12kw; Ohms = Volts x Volts / Watts
Single Phase Units
Circuit Leads 208 Volt 240 Volt
Between C & L2 14.3 Ohms 18.2 Ohms
Between D & L2 14.3 Ohms 18.2 Ohms
Between C & D 28.5 Ohms 36.2 Ohms
Between C & F 21.4 Ohms 27.3 Ohms
Between D & F 21.4 Ohms 27.2 Ohms
Between F & L2 7.3 Ohms 9.3 Ohms
Element Resistance Chart - VH-,VHVA-Series Conveyor Oven
VH-,VHVHA1620E
VH-,VHVHA1828E
1500
3000
Three Phase Units
Circuit Leads 208 Volt 240 Volt
Between C & L3 14.5 Ohms 18.2 Ohms
Between D & L2 14.3 Ohms 18.2 Ohms
Between C & D 4.7M Ohms 3.4M Ohms
Between C & F 4.7M Ohms 3.4M Ohms
Between D & F 21.4 Ohms 27.2 Ohms
Between F & L2 7.2 Ohms 9.4 Ohms
208 VOLTS 220 VOLTS 240 VOLTSELEMENT WATTAGEMODEL
28.8 ohms 32.3 ohms 38.4 ohms
14.4 ohms
25
16.1 ohms
19.2 ohms

19. ELECTRICAL SCHEMATICS & WIRING DIAGRAMS
VHVA1620E Schematic 208, 220 or 240VAC, 50/60Hz, 1 Phase
POWER BLOCK
FUSE
1
MAIN SWITCH MAIN SWITCH
12
14
BROWN
C
16
N.O.
BROWN
18
BROWN
48
VACUUM SWITCHES.
CLOSE ON BL OWER V ACUUM
20
BROWN
50
ELEMENT CONTACTOR
UPPER
TEMPERATURE
ADJUST MENT
POTENTIOMETER
LOWER
TEMPERATURE
ADJUST MENT
POTENTIOMETER
BROWN
R
FAN
RELAY
COOL-DOWN THERMOSTATS.
E
CLOSEON TEMPERATURE RISE.
15 KOHM
RESI STOR
15 KOHM
RESI STOR
D
44
C1
10
A
40
A
42
UPPER BLOWER
MOTOR SPEED
CONTROL AND
POTENTIOMETER
LOWER B LOWER
MOTOR SPEED
CONTROL AND
POTENT IOMETER
BRN S 3
BLK S 2
BRN S3
BLK S 2
38
10 GA. BLACK
E
SSR 3
BLACK
SSR 1
B
SSR 2
BLACK
E2
E1
S1
S2
S3
DIR
RED
S1
BLOWE R MOTO R
SPEE D CO NTROL S
1~ IN; 1 or 3~ OUT
E2
E1
S1
S2
S3
DIR
RED
S1
BROWN
20
INPUT OUTPUT
GEARMOTOR
POWER SUPPLY
BLUE
43
BROWN
PURPLE
YELLOW o r BLUE
ORANGE
RTD SE NSOR
PURPLE
YELLOW o r BLUE
ORANGE
RTD SE NSOR
5AMPS
468
10 GA. BROWN
F
C
D
24
21
-
-
+
+
+
L1 L2 G
1500 WATTS EACH
G
1500 WATTS EACH
TOP ELEMENTS
A1
A2
A3
22
B1
B2
B3
WHITE
41
39
46
GEARMOTOR
REVERSING
SWITCH
UPPER
TEMPERATURE
CONTROL
3
1
2
5
4
3
1
2
5
4
LOWER
TEMPERATURE
CONTROL
BOTTOM ELEMENTS
BLACK
BLACK
BLACK
BLACK
BLACK
BLACK
19
BLACK ( 2 )
RED
+
11
10
9
8
7
6
11
10
9
8
7
6
23
BLACK
BLACK
BLACK
WHITE
123
26
J
BRN
J
28
WHITE
37
25
32
BLUE
FUSE 2
5AMPS
5
I
RIGHT
J
LEFT
H
RIGHT
K
LEFT
REAR E XHAUST FAN S
YELLOW
YELLOW
YELLOW
YELLOW
YELLOW
YELLOW
G2
A
Y
A
R
G
BROWN
G3
27
GRN / YLW
29
GRAY
36
34
COOLI NG FAN
IN CONTROL
BOX DOOR
79
19
COOLI NG FAN
IN CONTROL
BOX
14 GA WHITE
M
N
Q
P
BLACK
BLACK
ORANGE
YELLOW
GREEN
33
GRY
A
BROWN
WHITE
C1
C1
C1
C1
35
GRAY
G1
18 GA. GREEN/ YE LLOWS TRIPE
11
14 GA WHITE
14 G A BRO WN
R
BLACK
T1
3~
T2
CCW
T3
UPPER BLOWER
MOTOR
T1T1
3~
T2
CCW
T3
LOWER BLOWER
MOTOR
BLUE
GREEN / YELLOW STRI PE
J
30
J
BROWN
J
BLUE
10 GA. GREEN/ YELLOW STRIPE
19
14 G A WHI TE
GRN
GEARMOTOR
AND S PEED
POT
BLUE
C
O
I
L
C
O
I
L
C
O
I
L
GRN
15
BLUE
WHITE
ND
G
G2
13
G4
GREEN
17
18 GA. GREEN / YELLOW STRIPE
BLUE
G
25
G2
31
SSR 1
SSR 2
SSR 3
U4160Q
26

27
MAIN
SWITCH
l
(ON)
13
12
TERMINAL
O
10
11
UPPER
LOWER
18 GA.BLUE
BLOCK #4
18 GA.BLACK
18GA. WHITE
GRAY
A
GRAY
GRAY
A
GRAY
18 GA BLU
15
18 GA. BROW N
18 GA.BROWN
14
16
COOL-DOW N RELAY
COOLING FAN
(AIRPULLEDINTOCONTROLBOX)
N.O.
C
(OFF)
18 GA.BROWN
ITEMS LO CATED IN ANGL ED CONTROL BOX
VHVA1620E Wiring Diagram 208, 220 or 240VAC, 50/60Hz, 1 Phase
WHITE 18 GA.23
UPPER
BLOWER
MOTOR
SPEED
CONTROL
1~ INPUT
3~ OUTPUT
BROWN 2 2G A. TO S3
BLACK 22GA. TO S2
RED 22GA. TO S1
17
18
PURPL E
YELLOWorBLUE
ORANGE
PURPLE
YELLOWorBLUE
ORANGE
20
15K OHMR ESISTOR
LOWER
BLOWER
MOTOR
SPEED
CONTROL
1~ INPUT
3~ OUTPUT
15K OHM RESI STOR
BLACK 22 GA. ( 2 PLCS )
-
46
GEARMOTOR
POWER
SUPPLY
3
2
1
REVERSING
SWITCH
FROM
POWER
SUPPLY
BROWN 22GA. TO S3
BLACK 2 2 GA. TO S2
RED 22GA. TO S1
BLK
+
WHT
22 GA.
CONVEYOR
GEARMOTOR
GREEN 22 GA.
ORANGE 22 GA.
DISTRIBU TION
GREEN G
WHIT E L2
BLACK L1
RED 22 GA.
POWER
BLOCK
SPEED POT
SPEED P OT
8
18 GA.BLACK
18 GA. WHIT E
9
TO
32
TEMP
CONTROLS
33
36
TO
TERMINAL
35
BLOCK #2
18 GA. BLUE
48
18 GA. BROWN
18 GA.BROWN
18 GA. BROWN
BLACK
BLACK
UPPER
TEMPERATURE
CONTROL PO TS
VACUUM SWIT CHES
LOWER
50
18 GA. BROW N
CONVEYOR
SPEED POT
---+++
~
BLACK 18 GA.
A1
A2
BLACK 18 GA.
A3
BLACK 18 GA.
E2E1S1 S2 S3 DIR
J
21
TE
I
H
W
B1
BLACK 18 GA.
B2
BLACK 18 GA.
B3
BLACK 18 GA.
E2E1 S1S2 S3 DIR
J
39
41
44
RED 22 GA.
24VDC
OUTPUT
RED
37
+
RED
BLACK
YELLOW
22 GA.
GROUND
SCREW
G
Y
R
E
E
L
E
L
N
O
GREEN 10 GA.
/
W
G1
G
L2
L1
G2
A
(L1 )
O
R
B
ELEMENT CONTACTOR
18 GA.
N
W
BLACK 22 GA.
43
BLUE 18 GA.
TO TERM.
BLOCK 3
18 GA.
22
19
18GA. BROWN
20
18 GA.BLACK
18 GA. WHIT E
18 GA. BLUE
18 GA.BROWN
BLUE
BROWN
Q
WHITE
P
WHIT E
N
WHITE 14 GA.
WHITE 14 GA.
BROWN 14 GA.
WHITE L2 14 GA .
BROWN 14 GA.
R
L2
L2
18
M
WHITE 14 GA.
WHITE L2 1 4GA .
L2
WHITE 18 GA.
WHITE
WHITE L2 1 4GA .
TO TERM.
BLOCK 3
BLACK F1 1 8G A.
WHITE F2 18 GA.
WHIT E L 2 18 G A.
BLUE 18 GA.31
14 G A. H IGH
TEMP
17
WHITE
TERMI NAL
BLOCK #1
6
7
5
5
9
BROWN
BLUE
H
K
J
I
9
BLACK
8
8
38
ITEMS LOCATEDIN CONTROL BOX ENCLOSURE
25 26
4
BLACK L1 18 GA.
4
38
F1
5
AMP
F2
5
AMP
PROBE
H
J
BROWN L1 10 G A.
BLACK L1 10 GA.
BLACK 18 GA.24
42
C
COOL-DOWN
THERMOSTAT
D
UPPER
H
40
14 GA . HI-T EMP
I
K
C
PROBE
A
E
18 GA. BROWN
18 GA.BLUE
TERMINAL
BLOCK #4
E
A
G4
ELEMENTS
COOL-DOWN
THERMOSTAT
LOWER
ELEMENTS
G
G
F
C
B
SSR 1 SSR 2
BLUE J
BROWN JUMPER
ORG
PUR
910
J
26
BROWN
25
18 GA. GRAY
G2
14 GA . HI-T EMP
14 GA . HI-T EMP
14 GA . HI-T EMP
14GA. HI-TEMP
14GA. HI-TEMP
D
BLUE
JUMPER
TO
REMOTE
POT
YEL
LOWE R TEMP C ONTROL
678
11
GREEN / YELLOW - GROUND
F
14GA. HI-TEMP
A
30
TO
REMOTE
POT
45213
UPPER TEMP CONTROL
18 GA.BROWN
67 8
30
18 GA. GRAY
32
TO
36
18 GA. GR EEN / YELLOW - GR OUND
CONTROL BOX
COOLING FAN
( AIR PULLED INTO CONTROLBOX )
ITEMS LOCATEDON MAIN CONTROL BOX DOOR
18 GA. GRE EN / YEL LOW ( MO TOR GROUND )
E
SSR 3
5213
4
J
28
BLUE
PURPLE
BLACK
F
18 GA.BLUE
910
27
BLACK
ORANGE
18GA. BROWN
YELLOW
11
G3
K
J
K
D
34
29
BLUE
29
34
14GA. HI-TEMPJUMPER
REAR EXHAUST FANS
(AIRPUSHEDOUTOFOVEN)
SPLICES
BLACK
BLACK
BLACK
BLACK
SPLICES
TO TERMINAL
BLOCK #4
GREEN (GROUND)
GREEN ( GROUND)
G
UPPER
BLOWER
MOTOR
LOWER
BLOWER
MOTOR
CLOCKWIS E ROTATION
WHEN LOOKING AT
BACK OF MO TOR
ITEMS LOC ATED IN BLOWE R COMPARTMENT
T1 YEL
T2 YEL
T3 YEL
G
T3 YEL
33
35
T1 YEL
T2 YEL
18GA.
GRAY
18GA.
GRAY
TERMINAL
BLOCK #2
TERMINAL
BLOCK #3
42
24
23
31
A1
A2
A3 BLK
B1
B2
B3 BLK
TO UPPER
BLOWE R
MOTOR
SPEED
CONTROL
TO LOWER
BLOWER
MOTOR
SPEED
CONTROL
GREEN /
YELLOW GROUND
G4
G4
G
U4160Q

VHVA1620E Schematic 208, 220 or 240VAC, 50/60Hz, 3 Phase
CAUT ION: L1 & L2 INP UTS MUS T BE 1 00-125 VOL T PO TEN TIAL.
IF A "HIGH- VOLTA GE LEG" GREAT ER THAN 125 V OLTS
IS PRESENT, IT MUST CONNECT TO L3.
MAIN SWITCH MAIN SWITCH
12
14
BROWN
C
16
N.O.
FAN
RELAY
10
38
A
10 GA. BLACK
E
BROWN
SSR 3
18
BROWN
48
VACUUM SWITCHES.
CLOSE ON BLOWER VACUUM
BROWN
50
UPPER
TEMPERATURE
ADJUSTMENT
POTENTIOMETER
LOWER
TEMPERATURE
ADJUSTMENT
POTENTIOMETER
40
COOL-DOWN THERMOSTATS.
CLOSE ON TEMPERATURE RISE.
42
BROWN
20
15 K OHM
RESISTOR
15 K OHM
RESISTOR
D
E
R
44
C1
ELEMENT CONTACTOR
BLACK
A
UPPER BLOWER
MOTOR SPEED
CONTROL AND
POTENTIOMETER
BRN S3
BLK S2
RED
S1
LOWERBLOWER
MOTOR SPEED
CONTROL AND
POTENTIOMETER
BRN S3
BLK S2
RED
S1
INPUT
PURPL E
YELLOW
YELLOWorBLUE
ORANGE
PURPL E
YELLOWorBLUE
YELLOW
ORANGE
20
B
BLACK
E2
E1
S1
S2
S3
DIR
BLOWER MOTOR
SPEED CONTROLS
1~ IN; 1 or 3~OUT
E2
E1
S1
S2
S3
DIR
BROWN
GEARMOTOR
POWER SUPPLY
43
BLUE
BROWN
RTD SENSOR
RTD SENSOR
SSR 1
SSR 2
OUTPUT
FUSE
1
5AMPS
468
10 GA. BROWN
F
C
D
24
21
-
-
-
+
+
+
POWER BLOCK
L1 L2 L3 G
1500 WATTS EACH
G
1500 WATTS EACH
TOP ELEMENTS
A1
A2
A3
22
B1
B2
B3
WHITE
41
39
RED
46
GEARMOTOR
REVERSI NG
SWITCH
UPPER
TEMPERATURE
CONTROL
3
1
2
5
4
3
1
2
5
4
LOWER
TEMPERATURE
CONTROL
BOTTOM ELEMENTS
BLACK
BLACK
23
WHITE
BLACK
BLACK
BLACK
BLACK
BLACK
BLACK
19
BLACK
BLACK ( 2 )
37
+
WHITE
123
26
11
10
9
8
32
J
7
6
28
BRN
11
10
9
8
J
7
6
FUSE 2
5AMPS
5
I
RIGHT
J
LEFT
H
RIGHT
K
LEFT
REAR EXHAUST FANS
YELLOW
YELLOW
YELLOW
YELLOW
YELLOW
YELLOW
25
G2
Y
A
R
G
27
BLUE
GRN / YLW
GRAY
COOLING FAN
IN CONTROL
BOX DOOR
BROWN
G3
79
19
COOLING FAN
IN CONTROL
BOX
14 GA WHITE
M
N
Q
P
BLACK
BLACK
ORANGE
YELLOW
GREEN
33
GRY
A
29
36
BROWN
34
WHITE
C1
C1
C1
C1
35
GRAY
A
G1
18 GA. GREEN / YELLOW STRIPE
11
14 GA WHITE
14 GA BROWN
R
BLACK
T1
T2
3~
CCW
T3
UPPER BLOWER
MOTOR
T1T1
T2
3~
CCW
T3
LOWER BLOWER
MOTOR
BLUE
GREEN / YELLOW STRIPE
J
30
J
BROWN
J
BLUE
10 GA. GREEN / YELLOW S TRIPE
19
14 GA WHITE
GEARMOTOR
AND SPEED
POT
BLUE
C
O
I
L
C
O
I
L
C
O
I
L
GRN
GRN
15
BLUE
WHITE
13
ND
G
G2
G4
GREEN
17
18 GA. GREEN / YELLOW STRIPE
BLUE
G
25
G2
31
SSR 1
SSR 2
SSR 3
U4162Q
28

29
MAIN
SWITCH
l
(ON)
(OFF)
13
12
TERMINAL
O
BLOCK #4
10
18 GA.BLACK
11
18 GA. W HITE
GRAY
UPPER
A
GRAY
GRAY
LOWER
A
GRAY
18 GA.BLUE
18 GA.BROWN
18 GABLU
15
N.O.
18 GA.BROWN
18 GA.BROWN
C
14
16
COOL-DO WN RELAY
COOLING FA N
( AIR PULLED INTO CONTROLBOX )
ITEMS LOCATED IN ANGLEDCONTROLBOX
VHVA1620E Wiring Diagram 208, 220 or 240VAC, 50/60Hz, 3 Phase
WHITE 18 GA.
23
UPPER
BLOWER
MOTOR
SPEED
CONTROL
1~ INPUT
3~ OUTPUT
BROWN 22 GA. TO S3
BLACK 22 GA. TO S 2
RED 2 2 G A. TO S1
17
PURPLE
YELLOW
YELLOW o r BLUE
ORANGE
YELLOW
YELLOW orBLUE
ORANGE
15K O HM RESI STOR
LOWER
BLOWER
MOTOR
SPEED
CONTROL
1~ INPUT
3~ OUTPUT
BROWN 22 GA. TO S3
BLACK 22 GA. TO S2
RED 22 GA. TO S1
15K OHMRESISTOR
BLACK 22 GA. ( 2 PLCS )
-
46
GEARMOTOR
18
POWER
SUPPLY
20
3
BLK
2
RED 22 GA.
1
+
WHT
REVERSING
22 GA .
SWITCH
PURPL E
CONVEYOR
GEARMOTOR
GREEN 22 GA.
ORANGE 2 2 GA.
SPEED POT
SPEED POT
8
18G A.BLACK
18 GA. WHI TE
9
TO
32
TEMP
CONTROLS
33
36
TO
TERMINAL
35
BLOCK #2
18 GA. BLUE
48
18 GA.BROWN
18 GA. BR OWN
18 GA. BROWN
BLACK
BLACK
UPPER
TEMPERATURE
CONTROL P OTS
VACUUM SW ITCHES
LOWER
50
18 GA. BR OWN
CONVEYOR
SPEED POT
DISTRIBUTION
GREEN G
FROM
RED L3
POWER
WHITE L2
SUPPLY
BLACK L1
41
---+++
~
POWER
BLOCK
L3
L2
L1
39
24VD C
OUTPUT
RED
+
YELLO W
22 GA.
G
E2E1 S1 S2 S3DIR
J
E2 E1S1 S2 S3 DIR
J
RED
BLACK
A1
A2
A3
B1
B2
B3
BLACK 18 GA.
BLACK 18 GA.
BLACK 18 GA.
BLACK 18 GA.
BLACK 18 GA.
BLACK 18 GA.
44
GREEN 10 GA.
G1
RED 22 GA.
GROUND
SCREW
Y
E
L
A
(L1 )
TO TERM.
BLOCK 3
18 GA.
18 GA.
21
22
E
N
W
WHIT
O
R
B
19
18 GA.BROWN
20
18 GA. BLA CK
18 GA.WHITE
18 GA.BLUE
18 GA.BROWN
BLACK 22 G A.
43
BLUE
37
BROWN
Q
WHITE
P
WHITE
N
BLUE 18 GA.
18
M
WHITE 18 GA.
TO TERM.
BLOCK 3
WHITE
BLUE 18 GA.
31
14 GA. HIGH
TEMP
8
9
17
BROWN
BLUE
H
K
J
I
9
WHITE
8
BLACK
38
WHITE 14 GA.
WHITE 14 GA.
WHIT E 1 4 G A.
BROWN 14 GA.
TERMINAL
BLOCK #1
ELEMEN T CONTACTOR
G
R
E
E
L
N
O
/
W
BROWN 14 GA.
G2
R
L2
6
BLACK F1 18 GA.
WHITE F2 18 GA.
7
E (L3 )
WHITE L2 18 GA.
5
5
WHITE L2 14 GA.
WHITE L2 14 GA.
WHITE L2 14 GA.
L2
L2
ITEMS L OCATED IN CON TROL BOX ENCL OSURE
BLACK 18 GA.
24
42
C
PROBE
H
38
J
C
PROBE
A
E
26
25
F1
4
5
AMP
F2
5
AMP
BLACK L1 1 8 GA.
BROWN L 3 10 GA.
4
BLACK L 1 1 0 GA.
A
COOL -DOWN
THERMOSTAT
H
40
COOL -DOWN
THERMOSTAT
14GA. HI-TEMP
G
F
I
K
14 GA.HI-TEMP
A
SSR 1 SSR 2
30
BROWN JUMPER
TO
REMOTE
POT
452
UPP ER TE MP CON TROL LO WER TE MP CON TROL
18 GA.BROWN
67 8
30
18 GA. BR OWN
18 GA.BLUE
18 GA. GRAY
32
TO
TERMINAL
36
BLOCK #4
18 GA. G REEN / YEL LOW - G ROUND
E
CONTROL BO X
COOLING FA N
( AIR PULLED INTO CONTR OL BOX )
ITEMS LOCATED ON MAIN CONTROL BOXD OOR
18 GA. GREEN / YELLOW ( MOTOR GROUN D)
G4
UPPER
ELEMENTS
K
LOWER
ELEMENTS
G
14 GA.HI-TEMP
14 GA.HI-TEMP
14 GA.HI-TEMP
14 GA.HI-TEMP
F
14 GA.HI-TEMP
C
B
D
E
SSR 3
BLUE
BLUE J
JUMPER
TO
REMOTE
POT
PURPLE
YEL
ORG
PUR
JJ
26
18 GA.GRAY
52 1 3
1 34
91011 67 891011
28
BROWN
25
BLUE
G2
GREEN / YELLOW - G ROUND
BLACK
F
18 GA.BLUE
ORANG E
27
BLACK
18G A.BROWN
YELLOW
G3
J
34
29
BLUE
29
34
D
REAR EXHAUST FANS
( AIR PU SHED OUT OF OVE N )
K
D
ITEMSLOCATED IN BLOWER COMPARTMENT
SPLICES
UPPER
BLOWER
MOTOR
G
LOWER
BLOWER
MOTOR
CLOCKWI SE ROTATIO N
WHEN LOOKING AT
BACK O F MOTO R
14 GA.HI-TEMPJUMPER
BLACK
BLACK
BLACK
BLAC K
SPLI C E S
33
35
TO TERMINAL
BLOCK #4
GREEN (GROUND)
GREEN (GROUND)
G
T1 YEL
T2 Y EL
T3 YEL
T1 YEL
T2 Y EL
T3 Y EL
18GA.
GRAY
18GA.
GRAY
TERMINAL
BLOCK #2
TERMINAL
BLOCK #3
42
24
23
TO UPPER
BLOWER
MOTOR
SPEED
CONTROL
GREEN /
YELLOWGROUND
G
A1
A2
A3 BLK
TO LOWER
BLOWER
MOTOR
SPEED
CONTROL
B1
B2
B3 BL K
U4162Q
31
G4
G4

VH1620E Schematic 208, 220 or 240VAC, 50/60Hz, 1 Phase
48
50
POWER BLOCK
FUSE
1
MAIN SWITCH MAIN SWITCH
12
14
BROWN
C
16
N.O.
FAN
RELAY
10
38
A
5AMPS
10 GA. BLACK
E
SSR 3
SSR 1
B
SSR 2
CONTACTOR
BROWN
VACUUMSWITCHES.
BROWN
BROWN
18
CLOSE ON BLOWERVACUUM
COOL-DOWN THERMOSTATS.
BROWN
20
TO TERMINAL
1
BLOCK
TO POWER
BLOCK
40
BLACK
A
CLOSE ON TEMPERATURE RISE.
42
24
BLACK
L2
WHITE
BLACK
L1
468
10 GA. BROWN
F
G
C
D
OVERLOAD
RELAY
L1 L2 G
BOTTOM ELEMENTS
1500 WATTS EACH
1500 WATTS EACH
TOP ELEMENTS
BLACK
BLACK
21
22
BLACK
FUSE2
5AMPS
5
RIGHT
REAR EXHAUST FANS
WHITE
23
4
WHITE
4
2
WHITE
19
I
J
LEFT
H
RIGHT
K
LEFT
2
GREY
GREY
7
19
COOLING FAN
IN CONTROL
BOX
14 GA WHITE
M
N
Q
P
BLACK
BLACK
GREY
GREY
1
GREY
9
WHITE
C1
C1
C1
C1
GREY
3
GREY
G1
18 GA. GREEN / YELLOW STRIPE
11
14 GA WHITE
14 GA BROWN
R
BLACK
1~
CAP
CCW
3
GREY
1
1~
CAP
CCW
10 GA. GREEN / YELLOW S TRIPE
19
14 GA WHITE
UPPER
BLOWER
MOTOR
LOWER
BLOWER
MOTOR
15
BLUE
WHITE
ND
G
G2
13
G4
GREEN
17
18 GA. GR EEN / YELLOW STRIPE
BLUE
G
GRN
GREEN
R
UPPER
TEMPERATURE
ADJUSTMENT
POTENTIOMETER
LOWER
TEMPERATURE
ADJUSTMENT
POTENTIOMETER
INPUT OUTPUT
E
D
44
C1
GEARMOTOR
POWER SUPPLY
43
PURPLE
YELLOW
YELLOW o r BLUE
ORANGE
RTD SENSOR
PURPLE
YELLOW o r BLUE
YELLOW
ORANGE
RTD SENSOR
BLUE
BROWN
-
-
-
+
+
+
GEARMOTOR
UPPER
TEMPERATURE
CONTROL
3
1
2
5
4
3
1
2
5
4
LOWER
TEMPERATURE
CONTROL
41
BLACK ( 2 )
39
RED
46
REVERSING
SWITCH
BLACK
37
+
BLUE
GREEN / YELLOW STRIPE
J
30
J
BROWN
J
BLUE
GEARMOTOR
AND SPEED
POT
BLUE
C
O
I
L
C
O
I
L
C
O
I
L
25
G2
31
SSR 1
SSR 2
SSR 3
G2
Y
A
G3
GRN / YLW
GRAY
COOLING FAN
IN CONTROL
BOX DOOR
A
BROWN
29
34
ORANGE
36
YELLOW
GREEN
33
GRY
35
GRAY
A
BROWN
WHITE
123
25
26
11
10
9
8
7
6
11
10
9
8
7
6
R
G
32
J
27
28
BRN
BLUE
J
U4161Q
30

31
MAIN
SWITCH
l
(ON)
(OFF)
13
12
TERMINAL
O
BLOCK #3
10
18 GA. BLACK
11
18 G A. WHI TE
GRAY
UPPER
A
GRAY
GRAY
LOWER
A
GRAY
18 GA.BLUE
18 GA.BROWN
18 GABLU
15
N.O.
18GA. BROWN
18 GA.BROWN
C
14
16
COOL-DO WN RELAY
COOLIN G FAN
(AIRPULLEDINTOCONTROLBOX)
ITEMS L OCATED IN ANG LED CO NTROL BOX
VH1620E Wiring Diagram 208, 220 or 240VAC, 50/60Hz, 1 Phase
WHITE 18 GA.
G1
OVER LOA D
RELAY
44
RED 22 GA.
Y
GREEN 10 GA.
A
37
BLACK 22 GA.
GROUND
SCREW
G
R
E
L
L
O
W
(L1 )
23
BLUE 18 GA.
BLUE 18 GA.
31
31
38
26
F1
5
AMP
F2
5
AMP
PROBE
H
J
BROWN L1 10 GA.
BLAC K L1 10 G A.
42
C
COO L-DOW N
THERMOSTAT
D
UPPER
ELEMENTS
H
COO L-DOW N
40
THERMOSTAT
14 GA.HI-TEMP
LOWER
K
ELEMENTS
G
G
F
I
K
C
PROBE
14 GA.HI-TEMP
A
A
E
18 G A. BRO WN
18 GA.BLUE
E
A
G4
SSR1 SSR2
30
TO
REMOTE
POT
452
UPPERTEMPCONTROL LOWERTEMPCONTROL
18 GA.BROWN
67 8
30
18 GA. GRAY
32
TO
TERMINAL
36
BLOCK #4
18GA. GREEN /YELLOW -GROUND
CONTROL B OX
COOLIN G FAN
( AIR PULL ED INTO CONTR OL BOX )
ITEMS L OCATED ON MA IN CONTROL BO X DOOR
18 GA. GREEN / YELLOW ( MOTOR GROUND )
14 GA.HI-TEMP
14 GA.HI-TEMP
14 GA.HI-TEMP
14 GA.HI-TEMP
F
14 GA.HI-TEMP
C
D
B
E
SSR 3
BLUE
BLUE J
BROWN JUMPER
JJ
26
JUMPER
TO
REMOTE
POT
PURPLE
YEL
ORG
PUR
52 1 3
1 34
91011 67 891011
BROWN
25
28
BLUE
F
18 GA. BLUE
ORANGE
27
18 GA. BROWN
YELLOW
J
K
34
29
BLUE
29
34
18 GA. GRAY
GREEN / YELLO W - G ROUND
G2
G3
BLACK
BLACK
D
TO
TERMINAL
WHITE 18 GA.
19
21
22
WHITE 18 GA.
BLACK 18 GA.
BLOCK #2
BLOWER
MOTORS
L1
L2
18 GA . BLACK
18 GA.WHITE
18 GA. BLUE
18 GA.BROWN
43
BLUE
BROWN
Q
L2
WHITE
P
WHITE
N
BLUE 18 GA.
14 GA. HIGH
TEMP
8
9
17
18
BROWN
BLUE
H
K
M
WHITE
J
I
9
WHITE
8
BLACK
38
WHIT E 14 G A.
WHIT E 14 G A.
WHITE 14 GA.
WHITE L2 14 G A.
L2
WHITE L2 14GA.
L2
WHITE F2 18 GA.
WHITE L2 14GA.
WHITE L2 18 GA.
TERMINAL
BLOCK #1
6
BLACK F1 18 GA.
7
25
4
BLACK L1 1 8 GA.
5
5
4
BROWN 14 GA.
ELEMENT CONTACTOR
E
E
N
/
BROWN 14 GA.
G2
R
L2
L1
BLAC K 18 GA.
24
18 GA. BROWN
20
CONTAC TOR
BLACK 18 G A.
WHITE 18 GA.
L1
L2
8
9
TO
32
TEMP
CONTROLS
33
36
TO
TERMINAL
35
BLOCK #2
48
18 GA.BROWN
BLACK
BLACK
UPPER
TEMPERATURE
CONTROL P OTS
VACUUM SWITCH ES
LOWER
50
18 GA . BROW N
CONVEYOR
SPEED POT
17
18
PURPLE
YELLOW
YELLOW or BLUE
ORANGE
PURPL E
YELLOW
YELLOW orBLUE
ORANGE
20
BLACK22 GA. ( 2 PLCS)
-
46
GEARMOTOR
POWER
SUPPLY
3
2
1
REVERSI NG
SWITCH
BLK
WHT
CONVEYOR
GEARMOTOR
+
22 G A.
GREEN 22 G A.
ORANGE 22 GA.
41
---+++
~
RED 22 GA.
POWER
24VD C
OUTPUT
RED
+
YELLO W
22 G A.
39
RED
BLACK
DISTRIBUTION
BLOCK
FROM
POWER
SUPPLY
GREEN G
WHITE L2
BLACK L1
G
L2
L1
ITEMS L OCATED IN C ONTR OL BOX ENCLOSU RE
14 GA. HI-TE MP JUM PER
REAR EXHAUST FANS
(AIRPUSHEDOUTOFOVEN)
SPLICES
BLACK
BLACK
TO TERMINAL
BLOCK #3
G
UPPER
BLOWER
MOTOR
G
LOWER
BLOWER
MOTOR
CLOCKWIS E ROTATI ON
WHEN LOOKING AT
BACK OF MOTOR
ITEMS LOCATEDIN BLOWER COMPARTMENT
GREEN (GRO UND)
GREEN (GR OUND)
4
2
4
2
1
4
2
3
1
BLACK
SPLICES 4X
B
LACK
18GA.
33
GRAY
18GA.
35
GRAY
3
G
TERMINAL
BLOCK #2
42
21
WHITE 18 GA.
BLACK 18 GA.
22
OVER LOAD
24
24
GREEN /
YEL LOW GROUND
TO
RELAY
23
31
23
31
G4
U4161Q

VH1620E Schematic 208, 220 or 240VAC, 50/60Hz, 3 Phase
CAUTION: L1 & L2 INPUTS MUST BE 120-125 VOLT POTENTIAL.
IF A "HIGH-VOLTAGE LEG" GREATER THAN 125 VOLTS
IS PRESENT,IT MUST CONNECT TO L3.
MAIN SWITCH MAIN SWITCH
12
14
BROWN
C
16
N.O.
FAN
RELAY
10
38
A
10 GA. BLACK
E
BROWN
18
40
BROWN
48
COOL-DOWN THERMOSTATS.
CLOSE ON TEMPERATURE RISE.
BLACK
A
42
BROWN
VACUUM SWITCHES.
20
CLOSE ON BLOWERVACUUM
TO TERMINAL
BLOCK
BROWN
TO POWER
50
BLOCK
24
B
L
AC
K
1
L2
WHITE
BLACK
L1
SSR 3
SSR 1
B
SSR 2
CONTACTOR
FUSE
1
5AMPS
468
10 GA. BROWN
F
C
D
OVERLOAD
RELAY
POWER BLOCK
L1 L2 L3 G
1500 WATTS EACH
G
1500 WATTS EACH
TOP ELEMENTS
BOTTOM ELEMENTS
BLACK
BLACK
WHITE
23
21
WHITE
22
BLACK
2
WHITE
19
FUSE 2
5AMPS
5
COOLING FAN
IN CONTROL
BOX
14 GA WHITE
I
RIGHT
J
LEFT
H
RIGHT
K
LEFT
BLACK
REAR EXHAUST FANS
BLACK
4
2
GREY
4
GREY
M
N
Q
P
GREY
GREY
GREY
G1
10 GA. GREEN / YELLOW STR IPE
18 GA. GREEN / YELLOW STRIPE
7
9
11
WHITE
19
13
ND
G
G2
15
BLUE
C1
14 GA WHITE
C1
14 GA BROWN
C1
R
C1
BLACK
1~
CAP
CCW
GREY
3
GREY
1
1~
CAP
GREY
CCW
3
1
19
WHITE
14 GA WHITE
UPPER
BLOWER
MOTOR
LOWER
BLOWER
MOTOR
17
BLUE
GRN
GREEN
G4
GREEN
G
18 GA. G RE EN / YELL OW ST RIP E
R
ELEMENT CONTACTOR
UPPER
TEMPERATURE
ADJUSTMENT
POTENTIOMETER
LOWER
TEMPERATURE
ADJUSTMENT
POTENTIOMETER
INPUT OUTPUT
D
E
44
C1
GEARMOTOR
POWER SUPPLY
43
PURP LE
YELLOW
YELLOWor BLUE
ORANGE
RTD S ENSOR
PURP LE
YELLOWor BLUE
YELLOW
ORANGE
RTD S ENSOR
BLUE
BROWN
-
-
-
+
+
+
GEARMOTOR
REVERSING
UPPER
TEMPERATURE
CONTROL
3
1
2
5
4
3
1
2
5
4
LOWER
TEMPERATURE
CONTROL
41
39
46
SWITCH
BLACK ( 2 )
RED
+
11
10
9
8
7
6
11
10
9
8
7
6
BLACK
WHITE
123
26
26
J
BRN
J
28
32
37
BLUE
GREEN / YELLOW STRIPE
J
30
J
BROWN
J
BLUE
GEARMOTOR
AND SPEED
POT
BLUE
C
O
I
L
C
O
I
L
C
O
I
L
25
G2
31
SSR 1
SSR 2
SSR 3
ORANGE
YELLOW
GREEN
25
G2
Y
A
R
G
27
BLUE
A
BROWN
G3
GRN / YLW
29
GRAY
36
34
COOLING FAN
IN CONTROL
BOX DOOR
33
GRY
35
GRAY
A
BROWN
U4163Q
32

33
MAIN
SWITCH
l
(ON)
(OFF)
13
12
TERMINAL
O
BLOCK #3
10
18 G A. BL ACK
11
18 GA . WHI TE
GRAY
UPPER
A
GRAY
GRAY
LOWER
A
GRAY
18 GA. BLUE
18 GA. BROWN
18 GABLU
15
N.O.
18GA. BROWN
18 GA.BROWN
C
14
16
COOL-DOWN RELA Y
COOLIN G FAN
( AIR PULLED INTOCONTROL BOX)
ITEMS LOCATE D IN ANGLED CONTROL BOX
VH1620E Wiring Diagram 208. 220 or 240VAC, 50/60Hz, 3 Phase
WHI TE 18 G A.
OVERLOAD
RELAY
L1
44
37
RED 22 GA.
BLACK 22 GA.
GROUND
SCREW
G
Y
R
E
E
L
E
L
N
O
/
W
GREEN 10 GA.
G1 G2
A
(L1)
23
19
L1
L2
WHI TE 18 G A.
L2
ELEMENT CONTACTOR
21
22
43
BLUE 18 GA.
WHI TE 18 G A.
BLACK 18 GA.
Q
BROWN 14 GA.
BROWN 14 GA.
R
L2
18 GA.BLACK
18 GA. WHITE
18 G A. BL UE
18 GA. BROWN
BLUE
BROWN
WHITE
P
WHITE 14 GA.
L2
WHITE 14 GA.
WHIT E L 2 1 4 GA.
WHITE
N
L2
18
M
WHITE 14 GA.
WHITE L2 14 GA.
TERMINAL
BLOCK #2
WHITE
WHITE F2 18 GA .
WHITE L2 14 GA.
E (L3 )
WHITE L2 18 GA.
31
31
TO
BLOWER
MOTORS
17
TERMINAL
BLOCK #1
6
BLACK F1 18GA.
7
BLUE 18 GA.
BLUE 18 GA.
14 GA. HIGH
TEMP
5
5
9
BROWN
BLUE
H
K
J
I
WHITE
BLACK
42
C
PROBE
H
8
38
J
C
PROBE
A
9
8
38
26
25
F1
4
5
AMP
F2
5
AMP
BLACK L1 18 GA.
BROWN L3 10 GA.
4
BLAC K L1 10 GA.
A
COOL-DOWN
THERMOST AT
H
40
COOL-DOWN
THERMOST AT
14 GA. HI-T EMP
G
F
I
K
14 GA. HI-TE MP
A
E
18 GA. BROWN
18 GA . BLUE
E
G4
SSR 1 SSR 2
30
BROWN JUMPER
TO
REMOTE
POT
452 1 345
UPPER TEMP CONTROL
18 GA. BROWN
67 891011 67 891011
30
18 GA. GRA Y
32
TO
TERMINAL
36
BLOCK #4
18 GA. GREEN / YELLOW- GROUND
CONTROL BOX
COOLIN G FAN
(AIRPULLEDINTOCONTROLBOX)
ITEMS LOCATED ON MAIN CONTROL BOX DOOR
18 GA. GREEN / YELLOW ( MOTOR GROUND )
UPPER
ELEMENTS
LOWER
ELEMENTS
G
F
C
B
BLUE J
YEL
PUR
ORG
J
26
BROWN
25
18 GA.GRAY
G2
14 GA.HI-TEMP
14 GA.HI-TEMP
14 GA.HI-TEMP
14 GA.HI-TEMP
14 GA. HI-TE MP
D
E
SSR 3
BLUE
JUMPER
TO
REMOTE
POT
2 1
LOWER TEMP CONTROL
J
28
BLUE
GREEN / Y ELLOW - GROUND
BLACK
18 GA . BLU E
PURPLE
27
BLACK
F
ORANGE
18 GA.BROWN
YELLOW
3
G3
D
K
J
K
REAR EXHAUST FANS
(AIRPUSHEDOUTOFOVEN)
D
34
29
BLUE
29
34
CLOCKWISE ROTATION
ITEMS LOCATEDIN BLOWER COMPARTMENT
SPLICES
G
UPPER
BLOWER
MOTOR
G
LOWER
BLOWER
MOTOR
WHEN LOOKING AT
BACK OF MOTOR
14 GA. HI-TE MP JUM PER
BLACK
BLACK
TO TERMINAL
BLOCK #3
GREEN (GRO UND)
GREEN (GR OUND)
4
2
4
1
4
2
3
1
33
35
2
3
BLACK
SPLICES 4X
BLA
CK
18GA.
GRAY
18GA.
GRAY
TERMINAL
BLOCK #2
G
24
BLACK18 GA.
20
18 GA.BROWN
CONTACTOR
BLACK 18 GA.
WHITE 18 GA.
L1
L2
8
18 GA. BLACK
18 GA . WHI TE
9
TO
32
TEMP
CONTROLS
33
36
TO
TERMINAL
35
BLOCK #2
18 GA . BLU E
48
18 GA . BROW N
18 GA . BROW N
18 GA.BROWN
BLACK
BLACK
UPPER
TEMPERATURE
CONTROL POTS
VACUUM SWITCH ES
LOWER
50
18 GA . BRO WN
CONVEYOR
SPEED POT
17
18
PURPLE
YELLOW
YELLOWor BLUE
ORANGE
PURPL E
YELLOW
YELLOWor BLUE
ORANGE
20
BLACK 22 GA. ( 2 PLCS )
-
46
GEARMOTOR
POWER
SUPPLY
3
2
1
REVERSING
SWITCH
BLK
WHT
CONVEYOR
GEARMOTOR
+
22 GA.
GREEN 22 GA.
ORANGE 22 GA.
---+++
~
RED 22 GA .
POWER
3941
24VDC
OUTPU T
RED
+
YELLOW
22 GA.
RED
BLACK
DISTRIB UTION
BLOCK
FROM
POWER
SUPPLY
GREEN G
RED L3
WHITE L2
BLACK L1
G
L3
L2
L1
ITEMS LOCAT ED IN CONT ROL BOX ENC LOSURE
24
42
24
21
WHITE 18 GA.
BLAC K 18 GA.
22
OVERLOAD
GREEN /
YELLOW GROU ND
TO
RELAY
23
31
23
31
G4
U4163U

VHVA1828E Schematic 208, 220 or 240VAC, 50/60Hz, 1 Phase
JUNCTION
BLOCK
L1 L2 G
BLACK WHITE GREEN
18
BROWN
48
VACUUM SWITCHES.
BROWN
50
UPPER
TEMPERATURE
ADJUSTMENT
POTENTIOMETER
LOWER
TEMPERATURE
ADJUSTMENT
POTENTIOMETER
12
14
BROWN
C
16
N.O.
BROWN
CLOSE ON BLOWER VACUUM
10
FAN
A
RELAY
COOL
-
DOWN
T/STATS.
40
CLOSE
ON TEMP
RISE.
A
42
UPPER BLOWER
MOTOR SPEED
CONTROLAND
POTENTIOMETER
15 K OHM
RESISTOR
LOWER BLOWER
MOTORSPEED
CONTROL AND
POTENTIOMETER
15 K OHM
RESISTOR
RED
44
C1
ELEMENT CONTACTOR
FUSE
5AMPS
86 4
38
30 AMP
10 GA. BLACK
30 AMP
10 GA. BROWN
E
SSR 3
BLACK
SSR 1
B
SSR 2
BLACK
BRN S 3
E2
E1
S1
BLK S2
S2
S3
DIR
RED
S1
BLOWER MOTOR
SPEED CONT ROL S
1~ IN; 1 or 3~OUT
BRNS3
E2
E1
S1
BLK S2
S2
S3
DIR
RED
S1
BROWN
20
GEARMOTOR
POWER SUPPLY
43
BLUE
OUTPUT
-
-
-
+
+
+
INPUT
BROWN
PURPLE
YELLOW or BLUE
ORANGE
RTDSENSOR
PURPLE
YELLOW or BLUE
ORANGE
RTDSENSOR
POWER
BLOCK
1
24
21
F
C
D
L1 L2 G
BOTTOM ELEMENTS
3000 WATTS EACH
G
3000 WATTS EACH
TOP ELEMENTS
BLACK
BLACK
A1
A2
A3
22
B1
B2
B3
19
WHITE
41
BLACK ( 2 )
39
46
RED
+
GEARMOTOR
REVERSING
SWITCH
UPPER
TEMPERATURE
CONTROL
11
3
10
1
9
8
2
7
5
4
6
11
3
10
1
9
8
2
7
5
4
6
LOWER
TEMPERATURE
CONTROL
23
BLACK
BLACK
BLACK
BLACK
BLACK
BLACK
BLACK
WHITE
123
26
J
J
WHITE
37
25
32
28
BRN
FUSE2
5AMPS
5
20A
I
2
RIGHT
20A
J2
LEFT
20A
H2
RIGHT
20A
K2
LEFT
REAR EXHAUSTFANS
YELLOW
YELLOW
YELLOW
YELLOW
YELLOW
YELLOW
G2
Y
A
R
G
BROWN
G3
27
BLUE
GRN / YLW
GRAY
COOLING FAN
IN CONTROL
BOX DOOR
COOLING FAN
IN CONTROL
BOX
BLACK
BLACK
ORANGE
YELLOW
GREEN
33
GRY
A
29
36
34
19
14 GA. WHITE
BROWN
97
WHITE
M
N
Q
P
35
GRAY
A
G1
18 GA. GREEN/ YELLOW STRIPE
11
C1
C1
14 GA WHITE
C1
R
C1
BLACK
T1
3~
T2
CCW
T3
UPPER BLOWER
MOTOR
T1T1
T2
3~
CCW
T3
LOWER BLOWER
MOTOR
BLUE
GREEN / YELLOW STRIPE
J
30
J
BROWN
J
BLUE
10 GA. GREEN / YELLOWSTRIPE
MAINSWITCHMAIN SWITCH
19
14 GA BROWN
14 GA WHITE
GRN
GEARMOTOR
AND SPEED
POT
BLUE
C
O
I
L
C
O
I
L
C
O
I
L
ND
G
G2
13
15
BLUE
WHITE
G4
GREEN
17
18 G A. GREE N / YEL LOW STR IP E
BLUE
G
GRN
25
G2
31
SSR 1
SSR 2
SSR 3
U4164Q
34

35
MAIN
SWITCH
O
l
(ON)
(OFF)
13
18 GA.BLUE
18 GA.BROWN
12
ITEMS LOCATED IN ANGL ED CONTROL BOX
10
18 GA.BLACK
11
18 GA.WHITE
GRAY
UPPER
A
GRAY
GRAY
LOWER
A
GRAY
18 GA. BROWN
18 GA.BROWN
14
16
(AIRPULLEDINTOCONTROLBOX)
TERMINAL
BLOCK #4
18 GABLU
15
N.O.
C
COOL-DO WN RELAY
COOLING FAN
VHVA1828E Wiring Diagram 208. 220 or 240VAC, 50/60Hz, 1 Phase
WHITE 18 GA.
23
SPEED POT
SPEED POT
8
18 GA.BLACK
18 GA. WH ITE
9
TO
32
TEMP
CONTROLS
33
36
TO
TERMINAL
35
BLOCK #2
17
18 GA. BLUE
48
18 GA. BROW N
18 GA. BROW N
18 GA.BROWN
BLACK
BLACK
UPPER
TEMPERATURE
CONTROL POT S
VACUUM SWITCHES
LOWER
50
18 GA. BRO WN
CONVEYOR
SPEED POT
ITEMS LOCATED IN J UNCTION BOX
18
20
PURPLE
YELLOW o r BLUE
ORANGE
PURPL E
YELLOWorBLUE
ORANGE
UPPER
BLOWER
MOTOR
SPEED
CONTROL
1~ INPUT
3~ OUTPUT
BROWN 22 GA. TO S3
BLACK 22 G A. TO S 2
RED 22 GA. TO S1
15K O HM RESI STOR
LOWER
BLOWER
MOTOR
SPEED
CONTROL
1~ INPUT
3~ OUTPUT
15K OHMRESISTOR
BLACK 22 GA. ( 2 PLCS )
-
46
GEARMOTOR
POWER
SUPPLY
3
2
1
REVERSING
SWITCH
10 GA. GREEN G
10 GA. WHITE L2
10 GA. BLACK L1
BROWN 22 GA. TO S3
BLACK 22 GA. TO S2
RED 22 GA. TO S1
BLK
+
WHT
22 GA .
CONVEYOR
GEARMOTOR
GREEN 22 GA.
ORAN GE 22 GA .
DISTRIBUTION
A1
BLACK 18 GA.
A2
BLACK 18 GA.
A3
BLACK 18 GA.
E2 E1 S 1 S2 S3 DIR
J
21
E
T
WHI
B
B1
BLACK 18 GA.
B2
BLACK 18 GA.
B3
BLACK18 GA.
E2E1 S1 S2S3 DIR
J
39
41
44
RED 22 GA.
24VDC
OUTPUT
---+++
~
RED 22 GA.
POWER
BLOCK
RED
+
YELLO W
22 GA .
G
RED
BLACK
37
GROUND
SCREW
G
Y
R
E
E
L
E
L
N
O
GREEN10GA.
/
W
G1
G2
L2
L1
ITEMS LOCATED IN C ONTROL BOX ENCLOSURE
18 GA.
W
O
R
ELEMENT CONTACTOR
22
N
BLACK 22 GA.
BLUE
43
BROWN
Q
BLUE 18 GA.
BROWN 14 GA.
BROWN 14 GA.
R
L2
18 GA.
19
18GA. BROWN
20
18 GA. BL ACK
18 GA.WHITE
18 GA.BLUE
18 GA. BROW N
WHIT E
P
WHITE 14 GA.
WHITE 14 GA.
WHITE L2 14 GA.
WHITE
L2
TO TERM.
BLOCK 3
WHITE 18 GA.
TO TERM.
BLOCK 3
18
N
M
WHITE
WHITE 14 GA.
WHITE F2 18 GA.
WHITE L2 14 GA.
WHITE L2 14 GA.
WHITE L2 18 GA.
L2
BROWN L1 10 GA.
BLUE 18 GA.
31
14 GA. HIGH
TEMP
17
TERMINAL
BLOCK #1
6
BLACK F1 18 GA.
7
BLACK L1 10 GA.
5
5
9
BROWN
BLUE
H
K
J
I
9
WHITE
BLACK
8
8
38
25
BLACK 18 GA.
24
42
C
PROBE
H2
20 AMP
FUSE
38
20 AMP
I2
FUSE
C
PROBE
A
E
26
F1
4
5
AMP
F2
5
AMP
BLACK L1 1 8G A.
30 AMP
FUSE
4
30 AMP
FUSE
E
A
COOL-DOWN
THERMOSTAT
H
COOL -DOWN
40
THERMOSTAT
14 GA . HI-T EMP
G
F
I
J2
K2
14 GA.HI-TEMP
A
B
SSR 1
30
BROWN JUMPER
TO
REMOTE
POT
452 1 345
UPPERTEMPCONTROL LOWERTEMPCONTROL
18 GA. BROWN
67 8
30
18GA. BROWN
18 GA.BLUE
18GA. GRAY
32
TO
TERMINAL
36
BLOCK #4
18 GA. GREEN / YELLOW -G ROUND
CONTROL BO X
COOLING FAN
( AIR PULLED INTO CONTROL BOX )
ITEMS LOCATED ONMAIN CONTROL BOX DOOR
18 GA. GREEN / YELLOW ( MOTOR G ROUND )
G4
UPPER
ELEMENTS
LOWER
ELEMENTS
G
14 GA.HI-TEMP
14 GA.HI-TEMP
14 GA.HI-TEMP
14 GA.HI-TEMP
F
14 GA.HI-TEMP
C
D
SSR 2
BLUE
BLUE J
JUMPER
TO
REMOTE
POT
YEL
PUR
ORG
91011 67 891011
J
26
BROWN
25
18 GA.GRAY
GREEN/ YELLOW - GROUND
G2
20 AM P
FUSE
D
K
20
AMP
FUSE
J
K2
REAR EXHAUST FANS
( AIR PU SHED OUT OF OVEN )
D
F
E
SSR 3
18 GA.BROWN
34
18 GA.BLUE
29
BLUE
PURP LE
YELLOW
ORANGE
2 1
3
J
28
29
27
BLUE
34
G3
BLACK
BLACK
ITEMSLOCATEDIN BLOWERCOMPARTMENT
SPLICES
UPPER
BLOWER
MOTOR
G
LOWER
BLOWER
MOTOR
CLOCKWI SE ROTATIO N
WHE N LO OKING AT
BACK OF M OTOR
14 GA.HI-TEMPJUMPER
BLACK
BLACK
BLACK
BLACK
SPLICES
33
35
TO TERMINAL
BLOCK #4
GREEN (GROUND)
GREEN (GROUND)
G
T1 YEL
T2 YE L
T3 YEL
T1 YEL
T2 YE L
T3 YEL
18GA.
GRAY
18GA.
GRAY
TERMINAL
BLOCK #2
TERMINAL
BLOCK #3
42
24
23
31
TO UPPER
BLOWER
MOTOR
SPEED
CONTROL
GREEN /
YELLOW GROUND
G4
G
A1
A2
A3 BLK
TO L OWER
BLOWE R
MOTOR
SPEED
CONTROL
B1
B2
B3 BL K
G4
U4164Q

VHVA1828E Schematic 208, 220 or 240VAC, 50/60Hz, 3 Phase
JUNCTION
BLOCK
CAUTION: L1 & L2 INPUTS MUST BE 200-250 VOLT POTENTIAL.
IF A "HIGH-V OLTAGE L EG" GREAT ER THAN 25 0 VOLTS
IS PRESENT, IT MUST CONNECT TO L3.
10
12
14
8
6
38
BROWN
FAN
RELAY
A
C
N.O.
16
10 GA. BLACK
E
B
E2
E1
S1
S2
S3
DIR
BLOWER MOTOR
SPEED CONTROLS
1~ IN; 1 or 3~OUT
E2
E1
S1
S2
S3
DIR
BROWN
20
GEARMOTOR
POWER SUPPLY
BLUE
43
BROWN
RTD SENSOR
RTD SENSOR
SSR 3
SSR 1
SSR 2
BLACK
OUTPUT
18
BROWN
48
VACUUM SWITCHES.
BROWN
50
UPPER
TEMPERATURE
ADJUSTMENT
POTENTIOMETER
LOWER
TEMPERATURE
ADJUSTMENT
POTENTIOMETER
BROWN
CLOSE ON BLOWER VACUUM
RED
ELEMENT CONTACTOR
COOL
DOWN
T/STATS.
CLOSE
ON TEMP
RISE.
15 K OHM
RESISTOR
15 K OHM
RESISTOR
-
C1
40
42
44
BLACK
A
UPPER BLOWER
MOTOR SPEED
CONTROL AND
POTENTIOMETER
BRN S3
BLK S2
RED
S1
LOWER BLOWER
MOTOR SPEED
CONTROL AND
POTENTIOMETER
BRN S3
BLKS2
RED
S1
INPUT
PURPL E
YELL OW
YELL OWorBLUE
ORANGE
PURPL E
YELL OW
YELL OWorBLUE
ORANGE
L1 L2 L3 G
BLACK WH I TE RED GREEN
POWER
BLOCK
FUSE
1
L1 L2 L3 G
5AMPS
4
10 GA. BROWN
F
G
C
D
24
A1
A2
A3
21
22
B1
B2
B3
19
WHITE
41
-
-
-
+
+
+
BLACK ( 2 )
39
RED
46
GEARMOTOR
REVERSIN G
SWITCH
UPPER
TEMPERATURE
CONTROL
3
1
2
5
4
3
1
2
5
4
LOWER
TEMPERATURE
CONTROL
10
10
BOTTOM ELEMENTS
3000 WATTS EACH
3000 WATTS EACH
TOP ELEMENTS
BLACK
BLACK
23
WHITE
BLACK
BLACK
BLACK
BLACK
BLACK
BLACK
BLACK
37
+
WHITE
123
25
26
11
9
8
32
J
7
6
28
BRN
11
9
8
J
7
6
FUSE 2
5AMPS
5
I
RIGHT
J
LEFT
H
RIGHT
K
LEFT
REAR EXHAUST FANS
YELLOW
YELLOW
YELLOW
YELLOW
YELLOW
YELLOW
G2
Y
A
R
G
BROWN
G3
27
BLUE
GRN / YLW
GRAY
COOLING FAN
IN CONTROL
BOX DOOR
7
19
COOLING FAN
IN CONTROL
BOX
14 GA. WHITE
BLACK
BLACK
ORANGE
YELLOW
GREEN
33
GRY
A
29
36
34
M
N
Q
P
GRAY
A
BROWN
9
WHITE
C1
C1
C1
C1
T1
T2
T3
T1T1
T2
T3
35
30
G1
18 GA . GRE EN / YE LLO W ST RIPE
MAINSWITCHMAIN SWITCH
11
14 GA WHITE
14 GA BROWN
R
BLACK
3~
CCW
UPPER BLOWER
MOTOR
3~
CCW
LOWER BLOWER
MOTOR
GEARMOTOR
AND SPEED
POT
BLUE
GREEN / YELLOW STRIPE
J
J
BROWN
J
BLUE
10 GA. GREEN / YELLOWSTRIPE
13
15
BLUE
19
WHI TE
14 GA WHITE
GRN
GRN
25
BLUE
C
O
I
L
C
O
I
L
C
O
I
L
NDG
17
31
SSR 1
SSR 2
SSR 3
G2
G4
GREEN
18 GA . GRE EN / YE LLO W S TRIPE
BLUE
G
G2
U4166Q
36

37
MAIN
SWITCH
O
l
(ON)
(OFF)
13
18 GA.BLUE
12
18 GA.BROWN
ITEMS L OCATED IN ANG LED CONTROL B OX
10
18 GA.BLACK
11
18 GA. WH ITE
GRAY
UPPER
A
GRAY
GRAY
LOWER
A
GRAY
15
18 GA.BROWN
18 GA.BROWN
14
16
(AIRPULLEDINTOCONTROLBOX)
TERMINAL
BLOCK #4
18 GABLU
N.O.
C
COOL-DO WN RELAY
COOLING FA N
VHVA1828E Wiring Diagram 208, 220 or 240VAC, 50/60Hz, 3 Phase
WHITE 18 GA.
23
SPEED POT
SPEED POT
8
18GA. BLACK
18 GA. WHI TE
9
TO
32
TEMP
CONTROLS
33
36
TO
TERMINAL
35
BLOCK #2
17
18 GA. BLUE
48
18 GA.BROWN
18 GA. BR OWN
18 GA.BROWN
BLACK
BLACK
UPPER
PURPLE
YELLOW
YELLOW o r BLUE
ORANGE
TEMPERATURE
CONTROL POTS
YELLOW
YELLOW orBLUE
LOWER
CONVEYOR
SPEED P OT
ORANGE
VACUUM S WITCHE S
50
18 GA. BR OWN
G
L3
L2
L1
ITEMS LOC ATED IN JUNC TION BOX
UPPER
BLOWER
MOTOR
SPEED
CONTROL
1~ INPUT
3~ OUTPUT
BROWN 22 GA. TO S3
BLACK 22 G A. T O S2
RED 2 2 G A. T O S 1
15K O HM RESI STOR
LOWER
BLOWER
MOTOR
SPEED
CONTROL
1~ INPUT
3~ OUTPUT
BROWN 22 GA. TO S3
BLACK 22 GA. TO S2
RED 22 GA. TO S1
15K OHM RESISTOR
BLACK 22 GA. ( 2 PLCS )
-
46
GEARMOTOR
18
POWER
SUPPLY
20
3
BLK
2
1
RED 22 GA.
+
WHT
REVERSING
22 GA .
SWITCH
PURPL E
CONVEYOR
GEARMOTOR
GREEN 22 GA.
ORANGE 2 2 GA.
POWER
DISTRIBUTION
10 GA. GREEN G
10 GA. RED L3
10 GA. WHITE L2
10 GA. BLACK L1
BLOCK
BLACK 18 GA.
A1
A2
BLACK 18 GA.
A3
BLACK 18 GA.
E2E1 S1 S2 S3DIR
J
21
WHITE
B1
BLACK 18 GA.
B2
BLACK 18 GA.
B3
BLACK 18 GA.
E2E1 S1S2 S3DIR
J
39
41
44
RED 22 GA.
24VD C
OUTPUT
RED
+
---+++
~
RED
BLACK
37
B
18 GA.
N
W
O
R
43
22
BLACK 22 G A.
BLUE
BROWN
Q
BLUE 18 GA.
18 GA.
19
18 GA.BROWN
20
18 GA. BLA CK
18 GA.WHITE
18 GA.BLUE
18 GA.BROWN
WHITE
P
WHITE
N
18
M
TO TERM.
BLOCK 3
WHITE 18 GA.
TO TERM.
BLOCK 3
WHITE
BLUE 18 GA.
31
14 GA. HIGH
TEMP
8
9
17
BROWN
BLUE
H
K
J
I
9
WHITE
8
BLACK
38
WHITE 14 GA.
WHITE 14 GA.
WHIT E 1 4 GA.
BROWN 14 GA.
TERMINAL
BLOCK #1
YELLOW
22 GA.
G
L3
L2
L1
ELEMENT CONTACTOR
GROUND
SCREW
G
Y
R
E
E
L
E
L
N
O
GREEN 10 GA.
/
W
G1
BROWN 14 GA.
G2
R
L2
A
(L1 )
6
BLACK F1 18 GA.
WHITE F2 18 GA.
7
E (L3 )
WHITE L2 18 GA.
5
5
WHITE L2 14 GA.
WHITE L2 14 GA.
WHITE L2 14 GA.
L2
L2
ITEM S LOC ATED IN C ONTROL BOX EN CLOSU RE
BLACK 18 GA.
24
42
C
PROBE
H
38
I
C
PROBE
A
E
26
25
F1
4
5
AMP
F2
5
AMP
BLACK L1 18 GA.
BROWN L3 10 GA.
4
BLACK L 1 10 GA.
A
COOL -DOWN
THERMOSTAT
40
COOL -DOWN
THERMOSTAT
14GA. HI-TEMP
G
F
J
K
14 GA.HI-TEMP
A
SSR 1 SSR 2
30
BROWN JUMPER
TO
REMOTE
POT
452
UPP ER TE MP CON TROL LOW ER TE MP CON TROL
18 GA.BROWN
67 8
30
18 GA. BRO WN
18 GA.BLUE
18 GA. GRAY
32
TO
TERMINAL
36
BLOCK #4
18GA. GREEN /YELLOW- GROUND
E
G4
CONTROL BO X
COOLING FA N
( AIR PULLED INTO CONTROLBOX )
ITEMS L OCATED ON MAIN CONTROL BOX D OOR
18 G A. GRE EN / Y ELLO W ( MO TOR GROU ND )
UPPER
ELEMENTS
K
LOWER
ELEMENTS
G
14 GA.HI-TEMP
14 GA.HI-TEMP
14 GA.HI-TEMP
14 GA.HI-TEMP
F
14 GA.HI-TEMP
C
D
B
E
SSR 3
BLUE
BLUE J
JUMPER
TO
REMOTE
POT
YEL
ORG
PUR
JJ
26
18 GA.GRAY
52 1 3
1 34
91011 67 891011
28
BROWN
25
BLUE
GREEN / YELLOW - G ROUND
G2
BLACK
18 GA.BLUE
PURPLE
BLACK
F
ORAN GE
27
18G A.BROWN
YELLOW
G3
J
34
29
BLUE
29
34
D
REAR EXHAUST FANS
(AIRPUSHEDOUTOFOVEN)
SPLICES
K
D
CLOCKWI SE ROTATIO N
ITEMSLOCATED IN BLOWER COMPARTMENT
UPPER
BLOWER
MOTOR
G
LOWER
BLOWER
MOTOR
WHEN LOOKING AT
BACK OF MOTOR
14 GA.HI-TEMPJUMPER
BLACK
BLACK
BLACK
BLAC K
SPLI C E S
TO TERMINAL
BLOCK #4
GREEN (GROUND)
GREEN (GROUND)
G
T1 YEL
T2 Y EL
T3 YEL
T1 YEL
T2 Y EL
T3 Y EL
18GA.
33
GRAY
18GA.
35
GRAY
TERMINAL
BLOCK #2
TERMINAL
BLOCK #3
42
24
23
31
TO UPPER
BLOWER
MOTOR
SPEED
CONTROL
GREEN /
YELLOWGROUND
G4
G
A1
A2
A3 BLK
TO LOWER
BLOWER
MOTOR
SPEED
CONTROL
B1
B2
B3 BL K
G4
U4166Q

VH1828E Schematic 208, 220 or 240VAC, 50/60Hz, 1 Phase
JUNCTION
BLOCK
L1 L2 G
BLACK WHITE GREEN
POWER BLOCK
POWER
BLOCK
FUSE
1
L1 L2 G
6
30 AMP
30 AMP
B
E
SSR 3
SSR 1
SSR 2
5AMPS
4
10 GA. BLACK
10 GA. BROWN
F
C
D
OVERLOAD
RELAY
G
BOTTOM ELEMENTS
3000 WATTS EACH
3000 WATTS EACH
TOP ELEMENTS
BLACK
BLACK
21
22
BLACK
8
FAN
RELAY
COOL
DOWN
T/STATS.
CLOSE
ON TEMP
RISE.
10
38
A
-
40
BLACK
A
12
14
BROWN
C
N.O.
16
BROWN
18
BROWN
48
42
BROWN
VACUUM SWITCHES.
20
CLOSE ON BLOWER VACUUM
TO TERMINAL
BLOCK
BROWN
TO POWER
50
BLOCK
24
B
L
A
C
K
CONTACTOR
1
L2
WHITE
BLACK
L1
23
19
WHITE
WHITE
2
WHITE
FUSE 2
5AMPS
5
COOLING FAN
IN CONTROL
BOX
20A
I
2
RIGHT
20A
J2
LEFT
20A
H2
RIGHT
20A
K2
LEFT
REAR EXHAUST FANS
4
2
GREY
4
GREY
7
19
14 GA. WHITE
BLACK
BLACK
GREY
GREY
1
GREY
WHITE
M
N
Q
P
GREY
3
GREY
18 GA . GRE EN / YE LLO W ST RIPE
9
C1
C1
C1
R
C1
BLACK
CAP
3
1
CAP
G1
11
14 GA WHITE
GREY
1~
CCW
1~
CCW
MAINSWITCHMAIN SWITCH
14 GA BROWN
10 GA. GREEN / YELLOWSTRIPE
13
15
BLUE
19
WHI TE
14 GA WHITE
UPPER
BLOWER
MOTOR
LOWER
BLOWER
MOTOR
G
17
ND
BLUE
GRN
GREEN
G2
G4
GREEN
G
18 GA . GRE EN / YE LLO W S TRIPE
RED
ELEMENT CONTACTOR
UPPER
TEMPERATURE
ADJUSTMENT
POTENTIOMETER
LOWER
TEMPERATURE
ADJUSTMENT
POTENTIOMETER
44
C1
INPUT
GEARMOTOR
POWER SUPPLY
43
PURPL E
YELL OW
YELLOWo r BLUE
ORANGE
RTD SENSOR
PURPL E
YELLOWo r BLUE
YELL OW
ORANGE
RTD SENSOR
BLUE
BROWN
OUTPUT
-
-
-
+
+
+
41
BLACK ( 2 )
39
RED
46
GEARMOTOR
REVERSIN G
SWITCH
UPPER
TEMPERATURE
CONTROL
3
1
2
5
4
3
1
2
5
4
LOWER
TEMPERATURE
CONTROL
BLACK
37
+
BLUE
GREEN / YELLOW STRIPE
J
30
J
BROWN
J
BLUE
GEARMOTOR
AND SPEED
POT
BLUE
C
O
I
L
C
O
I
L
C
O
I
L
25
G2
31
SSR 1
SSR 2
SSR 3
U4165Q
G2
Y
A
G3
GRN / YLW
GRAY
COOLING FAN
IN CONTROL
BOX DOOR
A
BROWN
29
36
34
ORANGE
YELLOW
GREEN
33
GRY
35
GRAY
A
BROWN
WHITE
123
25
26
11
10
9
8
7
6
11
10
9
8
7
6
R
G
32
J
27
28
BRN
BLUE
J
38

39
MAIN
SWITCH
l
(ON)
(OFF)
13
12
TERMINAL
O
BLOCK #4
10
18 GA. BLACK
11
18 G A. WHI TE
GRAY
UPPER
A
GRAY
GRAY
LOWER
A
GRAY
18 GA.BLUE
18 GA.BROWN
18 GABLU
15
N.O.
18GA. BROWN
18 GA.BROWN
C
14
16
COOL-DO WN RELAY
COOLIN G FAN
( AIR PULLED INTO CONTROLBOX )
ITEMS LOCATED IN ANGLED CONTROL BOX
VH1828E Wiring Diagram 208, 220 or 240VAC, 50/60Hz, 1 Phase
WHITE 18 GA.
G1
OVER LOA D
RELAY
44
RED 22 GA.
GROUND
SCREW
Y
E
GREEN 10 GA.
23
BLUE 18 GA.
BLUE 18 GA.
31
31
21
22
WHITE 18 GA.
19
BLACK 18 GA.
BLOCK #2
BLOWER
MOTORS
TO
TERMINAL
WHITE 18 GA.
L1
L2
18 GA . BLACK
18 GA.WHITE
18 GA. BLUE
18 GA.BROWN
37
43
BLUE
BROWN
Q
L2
WHITE
BLACK 22 GA.
P
WHITE
N
BLUE 18 GA.
14 GA. HIGH
TEMP
8
9
17
18
BROWN
BLUE
H
K
M
WHITE
J
I
9
WHITE
8
BLACK
38
WHIT E 14 G A.
WHIT E 14 G A.
WHITE 14 GA.
WHITE L2 14 G A.
L2
WHITE L2 14 GA.
WHITE L2 14 GA.
L2
TERMINAL
BLOCK #1
BLACK F1 18 GA.
WHITE F2 18 GA.
WHITE L2 18 GA.
25
6
4
7
BLACK L1 18 GA.
5
5
4
BLACK L1 10 GA.BROWN L1 10 GA.
BROWN 14 GA.
ELEMENT CONTACTOR
G
R
E
L
E
L
N
O
/
W
BROWN 14 GA.
G2
R
L2
L1
42
C
PROBE
H2
20 AMP
FUSE
38
20 AMP
I2
FUSE
C
PROBE
A
26
F1
5
AMP
F2
5
AMP
BLACK L1 10 GA.
30 AMP
FUSE
A
30 AMP
FUSE
COO L-DOW N
THERMOSTAT
H
40
COO L-DOW N
THERMOSTAT
14 GA.HI-TEMP
G
F
I
J2
K2
14 GA.HI-TEMP
A
E
18 G A. BRO WN
18 GA.BLUE
BROWN L1 10 GA.
E
G4
SSR 1 SSR 2
30
BROWN JUMPER
TO
REMOTE
POT
452
UPPERTEMPCONTROL LOWERTEMPCONTROL
18 GA.BROWN
67 8
30
18 GA. GRAY
32
TO
TERMINAL
36
BLOCK #4
18GA. GREEN /YELLOW -GROUND
CONTROL B OX
COOLIN G FAN
(AIRPULLED INTOCONTROLBOX)
ITEMS LOCATED ON MAIN CONTROL BOX DOOR
18 GA. GREEN / YELLOW ( MOTOR GROUND )
D
UPPER
ELEMENTS
K
20
AMP
FUSE
LOWER
ELEMENTS
G
14 GA.HI-TEMP
14 GA.HI-TEMP
14 GA.HI-TEMP
14 GA.HI-TEMP
F
C
B
BLUE J
TO
REMOTE
POT
YEL
ORG
PUR
1 34
91011 67 891011
JJ
26
BROWN
25
18 GA. GRAY
GREEN / YELLO W - G ROUND
G2
14 GA.HI-TEMP
D
BLUE
JUMPER
52 1 3
BLUE
E
SSR 3
28
18 GA. BLUE
PURPLE
BLACK
BLACK
F
27
20 AM P
FUSE
ORANGE
18 GA. BROWN
YELLOW
G3
J
K2
D
34
29
BLUE
29
34
8
18 GA. BLACK
18 GA . WHI TE
9
TO
32
TEMP
CONTROLS
33
36
TO
TERMINAL
35
BLOCK #2
17
18 GA . BLUE
BLACK
48
BLACK
18 GA . BROW N
18 GA.BROWN
VACUUM SWIT CHES
50
18 GA.BROWN
18 GA . BROW N
UPPER
TEMPERATURE
CONTROL POTS
LOWER
CONVEYOR
SPEED POT
18
PURPLE
YELLOW
YELLOW or BLUE
ORANGE
PURPL E
YELLOW
YELLOW orBLUE
ORANGE
G
L2
L1
ITEM S LOC ATED I N JUN CTION BOX
20
20
18 GA. BROWN
BLACK 22 GA. ( 2 PLCS )
-
46
GEARMOTOR
POWER
SUPPLY
3
2
1
REVERSI NG
SWITCH
CONVEYOR
GEARMOTOR
10 GA. GREEN G
10 GA. WHITE L2
10 GA. BLACK L1
BLACK 18 GA.
WHITE 18 GA.
L1
L2
BLK
RED 22 GA.
+
WHT
22 G A.
GREEN 22 GA.
ORANGE 22 GA.
POWER
DISTRIBUTION
BLOCK
BLACK 18 GA.
24
CONTAC TOR
39
41
24VD C
OUTPUT
RED
+
---+++
~
RED
BLACK
YELLO W
22 G A.
G
L2
L1
ITEM S LOC ATED IN C ONTROL BOX E NCLOSU RE
14 GA. HI-TEMP J UMPER
REAR EXHAUST FANS
(AIRPUSHEDOUTOFOVEN)
SPLICES
BLACK
BLACK
TO TERMINAL
BLOCK #3
G
4
UPPER
BLOWER
MOTOR
LOWER
BLOWER
MOTOR
CLOCKWIS E ROTATI ON
WHEN LOOKING AT
BACK OF MOTOR
2
4
G
2
3
ITEMS LOCATEDIN BLOWER COMPARTMENT
GREEN (GRO UND)
GREEN (GR OUND)
4
2
1
1
BLACK
SPLICES 4X
B
LACK
18GA.
GRAY
33
18GA.
35
GRAY
3
G
TERMINAL
BLOCK #2
24
42
24
21
WHITE 18 GA.
BLACK 18 GA.
22
OVER LOAD
RELAY
23
GREEN /
YEL LOW GROUND
TO
23
31
31
G4
U4165Q

VH1828E Schematic 208, 220 or 240VAC, 50/60Hz, 3 Phase
JUNCTION
BLOCK
CAUTION: L1 & L2 INPUTS MUST BE 200-250 VOLT POTENTIAL.
IF A "HIGH-VOLTAGELEG" GREATERTHAN250 VOLTS
IS PRESENT, IT MUST CONNECT TO L3.
MAIN SWITCH MAIN SWITCH
12
14
BROWN
FAN
C
N.O.
16
RELAY
8
10
6
38
A
10 GA. BLACK
E
BROWN
COOL
DOWN
T/STATS.
CLOSE
ON TEMP
RISE.
-
40
BLACK
A
18
BROWN
48
42
BROWN
VACUUM SWITCHES.
20
CLOSE ON BLOWER VACUUM
TO TERMINAL
BLOCK
BROWN
TO POWER
50
BLOCK
24
B
L
A
C
K
1
L2
WHITE
BLACK
L1
SSR 3
SSR 1
B
SSR 2
CONTACTOR
L1 L2 L3 G
BLACK WHI TE RED GREEN
POWER
BLOCK
FUSE
1
L1 L2 L3 G
5AMPS
4
10 GA. BROWN
F
G
3000 WATTS EACH
C
D
OVERLOAD
RELAY
3000 WATTS EACH
BOTTOM ELEMENTS
TOP ELEMENTS
BLACK
BLACK
WHITE
23
21
WHITE
22
BLACK
19
WHITE
FUSE 2
5AMPS
5
RIGHT
LEFT
RIGHT
REAR EXHAUST FANS
4
4
2
LEFT
I
J
H
K
2
GREY
GREY
7
19
COOLING FAN
IN CONTROL
BOX
14 GA. WHITE
M
N
Q
P
BLACK
BLACK
GREY
GREY
1
GREY
9
WHITE
GREY
3
3
GREY
G1
18 GA . GRE EN / YE LLO W ST RIP E
11
C1
C1
14 GA WHITE
C1
R
C1
BLACK
1~
CAP
CCW
GREY
1
1~
CAP
CCW
10 GA. GREEN / YELLOWSTRIPE
19
14 GA BROWN
14 GA WHITE
UPPER
BLOWER
MOTOR
LOWER
BLOWER
MOTOR
15
BLUE
WHI TE
G
ND
G2
13
G4
GREEN
17
BLUE
G
GRN
GREEN
18 GA . GRE EN / YE LLO W S TRIP E
RED
UPPER
TEMPERATURE
ADJUSTMENT
POTENTIOMETER
LOWER
TEMPERATURE
ADJUSTMENT
POTENTIOMETER
44
C1
INPUT
GEARMOTOR
POWER SUPPLY
43
PURPL E
YELL OW
YELL OWorBLUE
ORANGE
RTD SENSOR
PURPL E
YELL OW
YELL OWorBLUE
ORANGE
RTD SENSOR
BLUE
BROWN
OUTPUT
-
-
-
+
+
+
BLACK ( 2 )
41
39
RED
46
GEARMOTOR
REVERSIN G
SWITCH
UPPER
TEMPERATURE
CONTROL
3
1
2
5
4
3
1
2
5
4
LOWER
TEMPERATURE
CONTROL
BLACK
37
+
BLUE
GREEN / YELLOW STRIPE
J
30
J
BROWN
J
BLUE
GEARMOTOR
AND SPEED
POT
BLUE
C
O
I
L
C
O
I
L
C
O
I
L
25
G2
31
SSR 1
SSR 2
SSR 3
U4167Q
G2
Y
A
G3
GRN / YLW
GRAY
COOLING FAN
IN CONTROL
BOX DOOR
A
BROWN
29
36
34
ORANGE
YELLOW
GREEN
33
GRY
35
GRAY
A
BROWN
WHITE
123
25
26
11
10
9
8
7
6
11
10
9
8
7
6
R
G
32
J
27
28
BRN
BLUE
J
40

41
MAIN
SWITCH
O
l
(ON)
(OFF)
13
18 GA.BLUE
12
18 GA.BROWN
ITEMS LOCATED IN ANGLED CONTRO LB OX
10
18 GA. BLACK
11
18 G A. WHIT E
GRAY
UPPER
A
GRAY
GRAY
LOWER
A
GRAY
18GA. BROWN
18 GA.BROWN
14
16
(AIRPULLEDINTOCONTROLBOX)
TERMINAL
BLOCK #4
18 GABLU
15
N.O.
C
COOL-DO WN RELAY
COOLING F AN
VH1828E Wiring Diagram 208, 220 or 240VAC, 50/60Hz, 3 Phase
WHITE 18 GA.
G1
OVER LOAD
RELAY
44
RED 22 GA.
GREEN 10 GA.
A
GROUND
SCREW
Y
E
L
L
23
BLUE 18 GA.
BLUE 18 GA.
31
31
38
26
F1
5
AMP
F2
5
AMP
PROBE
BROWN L3 10 GA.
BLACK L 1 10 GA.
42
C
COOL -DOWN
THERMOSTAT
D
UPPER
H
40
14GA. HI-TEMP
I
J
K
C
PROBE
A
E
18 G A. BRO WN
18 GA.BLUE
TERMINAL
BLOCK #4
E
A
G4
ELEMENTS
COOL -DOWN
THERMOSTAT
LOWER
ELEMENTS
G
G
F
14 GA.HI-TEMP
A
30
TO
REMOTE
POT
452
UPP ER TE MP CON TROL LO WER TE MP CON TROL
18 GA.BROWN
67 8
30
18 GA. GRAY
32
TO
36
18 GA. GREEN / YELLOW - GROUND
CONTROL BO X
COOLING F AN
( AIR PULLED INTO CONTR OL BOX )
ITEMS LOCATED ON MAIN CONTROL BOX D OOR
18 GA. GREEN / YELLOW ( MOTOR G ROUND)
14 GA.HI-TEMP
14 GA.HI-TEMP
14 GA.HI-TEMP
14 GA.HI-TEMP
F
14 GA.HI-TEMP
C
D
B
SSR 1 SSR 2
BLUE
BLUE J
BROWN JUMPER
JJ
26
JUMPER
TO
REMOTE
POT
YEL
ORG
PUR
1 34
91011 67 891011
BROWN
25
BLUE
18 GA.GRAY
GREEN / YELLOW - GROUND
G2
F
E
SSR 3
18 GA.BLUE
PURPLE
52 1 3
28
27
BLACK
BLACK
ORANGE
18G A.BROWN
YELLOW
G3
K
J
K
D
34
29
BLUE
29
34
ITEMSLOCATED IN BLOWER COMPARTMENT
21
22
WHITE 18 GA.
19
BLACK 18 GA.
BLOCK #2
BLOWER
MOTORS
TO
TERMINAL
WHITE 18 GA.
L1
L2
18 GA. BLA CK
18 GA.WHITE
18 GA.BLUE
18 GA.BROWN
37
43
BLUE
BROWN
Q
L2
WHITE
BLACK 22 GA.
P
WHITE
N
BLUE 18 GA.
14 GA. HIGH
TEMP
8
9
17
18
BROWN
BLUE
H
K
M
WHITE
J
I
9
WHITE
8
BLACK
38
WHIT E 1 4 GA.
WHIT E 1 4 GA.
WHITE 14 GA.
BROWN 14 GA.
ELEMENT CONTACTOR
G
R
E
E
N
O
/
W
BROWN 14 GA.
G2
R
L2
L1
(L1 )
TERMINAL
BLOCK #1
25
6
BLACK F1 18 GA .
WHITE F2 18 GA.
WHITE L2 14 GA.
WHITE L2 14 GA.
WHITE L2 14 GA.
E (L3 )
L2
L2
WHITE L2 18 G A.
4
7
5
BLACK L1 1 8 GA.
5
4
8
18G A. BLACK
18 GA. WHI TE
9
TO
32
TEMP
CONTROLS
33
36
TO
TERMINAL
35
BLOCK #2
17
18 GA. BLU E
48
18 GA.BROWN
18 GA. BR OWN
18 GA.BROWN
BLACK
BLACK
UPPER
PURPLE
YELLOW
YELLOW or BLUE
ORANGE
TEMPERATURE
CONTROL POTS
YELLOW
YELLOW orBLUE
LOWER
CONVEYOR
SPEED POT
ORANGE
VACUUM SWITCHES
50
18 GA. BR OWN
G
L3
L2
L1
ITEMS LOCATED I N JUNCTION BOX
BLACK 18 GA.
24
18G A.BROWN
20
CONTAC TOR
BLACK 18 G A.
WHITE 18 GA.
L1
L2
39
41
BLACK22 GA. ( 2 PLCS )
-
46
GEARMOTOR
18
POWER
SUPPLY
20
3
BLK
2
1
WHT
REVERSING
SWITCH
PURPL E
CONVEYOR
GEARMOTOR
+
22 GA .
GREEN 22 GA.
ORAN GE 22 G A.
---+++
~
RED 22 GA.
24VD C
OUTPUT
RED
+
YELLO W
22 GA.
RED
BLACK
POWER
DISTRIBUTION
10 GA. GREEN G
10 GA. RED L3
10 GA. WHITE L2
10 GA. BLACK L1
BLOCK
G
L3
L2
L1
ITEMS L OCATED IN CON TROL BOX ENCL OSURE
REAR EXHAUST FANS
(AIRPUSHEDOUTOFOVEN)
SPLICES
UPPER
BLOWER
MOTOR
LOWER
BLOWER
MOTOR
CLOCKWIS E ROTATION
WHEN LOOKING AT
BACK OF MOTOR
14 GA. HI- TEMP JUM PER
TO TERMINAL
BLOCK #3
G
G
BLACK
BLACK
GREEN (GROUND)
GREEN (GR OUND)
4
2
4
1
4
2
3
1
33
35
2
3
BLACK
SPLICES 4X
B
LACK
18GA.
GRAY
18GA.
GRAY
TERMINAL
BLOCK #2
23
24
31
42
24
23
31
G4
GREEN /
G
YELL OW GROUND
21
WHITE 18 GA.
BLACK18 GA.
22
TO
OVER LOAD
RELAY
U4167Q

20. PARTS LISTS & EXPLODED VIEWS
42
Figure A External Covers
Figure B Conveyor Assembly
2
7
6
5
7
9
4
6
8
5
4
9
3
2
10
3
12
1
10
11
2
1
11
Item Part Number
1620E 1828E
1 S3255A S3255A Hanger Pin (For Item #2) 4
2 B6539K B6051K Adjustable Baffle 2
3 Q1499A Q1499A Lock Nut (For Item #1) 4
4 B6535U B6037U Outer Lower Cover, Right 1
5 Q4043A Q4043A 1/4 Turn Fastener 8
6 B6536U B6038U Outer Upper Cover, Right 1
7 Q4044A Q4044A Retaining Ring (For Item #5) 8
8 B6538U B6038U Outer Upper Cover, Left 1
9 B6537U B6037U Outer Lower Cover, Left 1
10 B6584T B6260T Hinged Door Assy 1
11 S3256A S3256A Door Handle 2
Description
Quan
Item Part Number
1620E 1828E
1 B6546T B7227T
2 S3268U S3266U
3 B6068U B6068U Bearing clip assy 6
4 S3254A S3254A Plastic bearing 6
5 Q4045A Q4045A Drive pin in drive shaft 1
6 S3269U S3267U
7 S3252A S3253A Complete wire belt assembly 1
8 S3258A S3259A Wire belt master link (not shown) 2
9 S3270A S3270A Drive sprocket (metal) 6
10 S3250A S3250A Idler sprocket (plastic) 12
11 B6569U B6087U Discharge Extension Tray 1
12 B6571U B6089U Infeed Extension Tray 1
Description
Complete conveyor assy with wire belt
Idler shaft assy (complete w/sprockets)
Drive shaft assy (complete w/sprockets)
Quan
1
2
1

Figure C Blower Motor Cover Assembly
Figure D Blower Assembly
1
3
4
Item Part Number
1620E 1828E
1 B6565U B6219U Rear Blower Motor Cover 1
2 M1504A M1504A Fan Guard 4
3 M1532A M1532A Large Axial Fan 220/240V 4
4 P6470A P6470A Fan Cord Assy 2
5 S1392A S1392A Rubber Bumper (Rear Exterior) 4
43
Description
Figure E VH Series Ovens Only
1
5
Quan
3
4
5
6
2
2
1
Item Part Number
1620E 1828E
1 M1541U M1537U Complete Blower Assy, VH, 1 or 3 Ph 1
2
M1542U M1511U Complete Blower Assy, VHVA, 1 or 3 Ph 1
3
M1515A M1510A Main Blower Wheel 1
4
S3260A S3260A Minor Wheel (Heat Slinger) 2
5
M1548A M1548A Blower Motor, 1/4 HP, VH, 1 or 3 Ph 2
6
M1511A M1511A Blower Motor, 1/4 HP, VHVA, 1 or 3 Ph 2
Description
All Components Shown
Quan
Figure F Plenum Finger Assembly
3
2
1
4
3
Item Part Number
1620E 1828E
1 B6086U B6086U Mount Bracket Assy 1
2 P1150A P1150A DN Rail 1
3 M1378A M1378A Contactor 1
4 M1379A M1379A Overload Relay
2
Description
Quan
1
4
Item Part Number
1620E 1828E
1 B6529T B6221T Complete Plenum "Finger" Assy (Items 2, 3 & 4) 4
2 B6531K B6225K Outer "Perforated" Panel 4
3 B6532K B6226K Inner Perforated Panel 4
4 B6530U B6222U Main Body Panel 4
Description
Quan

Figure G Main Power Control Box
Item Part Number
1620E 1828E
1 B6562T
2 B6562U
3 B6564T
4 B6564U
5 S3262A
6 B6074U
7 S3263A
8 M1501A
9 P1175A
10 M1538A
11 P1064A
12 P1190A
13 M1307A
14 B6079K
15 P1170A
16 M1517A
17 M1525A
18 M1500A
19 M1235A
20 M1521A
21 M1524A
22 M1378A
23 U1061A
24 B6073U
25 M1529A
26 M1513A
27 N/A
28 N/A
29 N/A
30 N/A
31 P6486A
32 P6469A
33 P1172A
B6071T
B6071U
B6072T
B6072U
S3262A
B6074U
S3263A
M1501A
P1175A
M1538A
P1064A
P1190A
M1307A
B6079K
P1170A
M1517A
M1525A
M1500A
M1235A
M1521A
M1524A
M1378A
U1060A
B6073U
M1529A
M1513A
P1008A
P1007A
B6250K
B6251K
N/A
N/A
N/A
Not Shown
Description
Main Control Box Assy (Complete w/items 5-15 & 22)
Main Control Box Only (Bare)
Hinged Door Assy (Complete w/items 16-21 & 23)
Hinged Door Only (Bare)
Gearmotor Coupling
Gearmotor Adjustment Plate
Gearmotor Adapter Plate
Gearmotor - Belt Conveyor Drive
Power Distribution Terminal Block (1620 Uses 1, 1828 Uses 2)
Gearmotor Power Supply
Fuseholder w/Cap
Fuse SC-5 Amp
Gearmotor Reversing Switch
Reversing Switch Mounting Bracket
Terminal Block
Solid State Relay
Thermal Pad
Temperature Control
Cooling Fan
Heat Sink
Fan Guard
Contactor
Rating Plate
Air Speed Control Mount Bracket Assy (VHVA Only)
Air Blower Speed Control (208V Only) (VHVA Only)
Air Blower Speed Control (240V Only) (VHVA Only)
Fuse SC-20 Amp (1828 Single-phase Only)
Fuseholder w/Cap (1828 Single-phase Only)
Junction Box (1828 Only)
Cover, Junction Box (1828 Only)
Power Cord Assembly, Single-phase (Not Shown)
Power Cord Assembly, Three-phase (Not Shown)
Strain Relief
Quan
1
1
1
1
1
1
1
1
1or2
1
2
2
1
1
1
3
3
2
1
1
1
1
1
1
2
2
2
2
1
1
1
1
1
44

Figure H Electric Control Box
3
5
2
6
9
19
8
7
4
18
13
1
Item Part Number
208 Volt 240 Volt VH VHVA
1 M1352A
2 P1171A
3 S1205A
4 M1519A
5 M1531A
6 M1505A
7 M1533A
8 P1170A
9 M1524A
10 M1235A
11 B6237T
12 B6237U
13 B6236U
14 U1370A
15 U1366A
16 U1369A
17 U1365A
18 N/A
19 N/A
M1352A
P1171A
S1205A
M1519A
M1531A
M1505A
M1535A
P1170A
M1524A
M1235A
B6237T
B6237U
B6236U
U1370A
U1366A
U1369A
U1365A
P1008A
P1007A
14
10
15
16
17
Description
Main Switch
Indicator Light (On for Heat Demand)
Knob
Potentiometer (Conveyor Belt Speed Adjust)
Potentiometer (Air Blower Speed Adjust)
Potentiometer (Air Temperature Control)
Relay
Terminal Block
Fan Guard
Cooling Fan
Electric Control Box (w/items 8, 9, 11, & 12)
Electric Control Box Only
Hinged Door Assy
Door Label (VH1620E)
Door Label (VH1828E)
Door Label (VHVA1620E)
Door Label (VHVA1828E)
Fuse SC-20A (1828 Single-phase Only)
Fuseholder w/Cap (1828 Single-phase Only)
11
12
Quan
1
2
3
1
0
2
1
1
2
1
1
1
1
1
1
0
0
2
2
1
2
5
1
2
2
1
1
2
1
1
1
1
0
0
1
1
2
2
45

Figure I Cool-Down Thermostat, Elements, Switch & Probe
4
3
2
3
4
1
Item
Model 1620E Model 1828E
208V 220V 230V 240V 208V 220V 230V 240V
1 M1518A M1518A M1518A M1518A M1518A M1518A M1518A M1518A TemperatureSensor Probe 2
L1181A L1189A L1207A L1183A L1185A L1191A L1209A L1187A Heating Element, Left Hand 2
2
L1182A L1190A L1208A L1184A L1186A L1192A L1210A L1188A Heating Element, Right Hand 2
3
M1534A M1534A M1534A M1534A M1534A M1534A M1534A M1534A Cool-Down Thermostat 2
4
Part Number
Description
2
Quan
46

BAKERS PRIDE LIMITED WARRANTY
21.
914 / 576 - 0200 US & Canada: 1 - 800 - 431 - 2745 fax 914 / 576 - 0605
30 Pine Street New Rochelle, New York 10801
WHATIS COVERED This warranty covers defects in material and workmanship under normal use, and applies only to the original purchaser
WHO IS COVERED This warranty is extended to the original purchaser and applies only to equipment purchased for use in the U.S.A.
COVERAGE PERIOD Cyclone Convection Ovens:
WARRANTY
COVERAGE for all
EXCEPTIONS All removable parts in BAKERS PRIDE Char-broilers, including but not limited to: Burners, Grates, Radiants, Stones and
EXCLUSIONS
Negligence or acts of God,
Thermostat calibrations after (30) days from equipment
installation date,
Air and Gas adjustments,
Light bulbs,
Glass doors and door adjustments,
Fuses,
Char-broiler work decks and cutting boards,
Tightening of conveyor chains,
Adjustments to burner flames and cleaning of pilot burners,
Tightening of screws or fasteners,
providing that:
The equipment has not been accidentally or intentionally damaged, altered or misused;
!
The equipment is properly installed, adjusted, operated and maintained in accordance with National and local
!
codes, and in accordance with the installation instruction providedwith the product;
The serial number rating plate affixed to the equipment hasnot been defaced or removed.
!
and labor; CO11 Models:
All Other Products:One (1) Yearlimited parts and labor.
Warranty period begins the date of dealer invoice to customer or ninety (90) days after shipment date from BAKERS PRIDE -
whichever comes first.
This warranty covers on-site labor, parts and reasonable travel time and travel expenses of the authorized service
representative up to (100) miles, round trip, and (2) hours travel time. The purchaser, however, shall be responsible
expenses related to travel, including time, mileage and shipping expenses on smaller counter models that may be carried into
a Factory Authorized Service Center, including the following models: PX-14, PX-16, P18, P22S, P24S, PD-4, PDC, WS
Series and BK-18.
Valves,are covered for a period of SIX MONTHS.
All Ceramic Baking Decks are covered for a period of THREE MONTHS. The installation of these replacement decks is the
responsibility of the purchaser.
The extended Cyclone door warranty years 3 through 5 is a parts only warranty and does not include labor, travel, milage or
any other charges.
BCO Models: One (1) Year limited parts and labor; GDCO Models: Two (2) Year limited parts
Two (2) Year limited parts and labor; (5) Yearlimited door warranty.
Failures caused by erratic voltages or gas supplies,
Unauthorized repair by anyone other than a BAKERS PRIDE
Factory Authorized Service Center,
Damage in shipment,
Alteration, misuse or improper installation,
Thermostats and safety valves with broken capillary tubes,
Accessories spatulas, forks, steak turners, grate lifters,
oven brushes, scrapers, peels, etc.,
Freight other than normal UPS charges,
Ordinary wear and tear.
INSTALLATION Leveling and installation of decks, as well as proper installation and check out of all new equipment per appropriate
REPLACEMENT BAKERS PRIDE genuine Factory OEM parts receive a (90) day materials warranty effective from the date of
PARTS BAKERSPRIDE FactoryAuthorized Service Center.
This Warranty is in lieu of all other warranties, expressed or implied, and all other obligations or liabilities on the manufacturers part. BAKERS PRIDE
shall in no event be liable for any special, indirect or consequential damages, or in any event for damages in excess of the purchase price of the unit. The
repair or replacement of proven defective parts shall constitute a fulfillment of all obligations under the terms of this warranty.
installation and use materials is the responsibility of the dealer or installer,not the manufacturer.
installation by a
1/03
4/02
47

F.
BAKERS
PRIDE
BAKERS PRIDE OVEN CO., INC
30 Pine Street
New Rochelle, NY 10801
(914) 576-0200 Phone (800) 431-2745 US & Canada
(914) 576-0605 Fax www.bakerspride.com Web Address
48
.
 Loading...