

Page 1
INSTALLATIONANDOPERATINGINSTRUCTIONS
COUNTERTOPMODEL
ELECTRICPIZZA OVEN
Model: EP-2-2828
INTENDEDFOROTHERTHANHOUSEHOLDUSE
RETAINTHISMANUALFORFUTUREREFERENCE
OVENMUSTBEKEPTCLEAROFCOMBUSTIBLESATALLTIMES
ForYourSafety: Donotstoreoruseflammableliquidsorvaporsinthevicinityofthis
!
oranyotherappliance.
!
Warning: Improperinstallation,adjustment,alteration,serviceormaintenancecan
!
Initialheatingofthisovenmaygeneratesmokeorfumesandmustbedoneinawellventilatedarea.
Overexposuretosmokeorfumesmaycausenauseaordizziness.
Thisequipmenthasbeenengineeredtoprovideyouwithyearrounddependableservicewhenused
accordingtotheinstructionsinthismanualandstandardcommercialkitchenpractices.
+1(914)576-0200Phone(800)431-2745US&Canada
+1(914)576-0605Faxwww.bakerspride.comWebAddress
causepropertydamage,injuryordeath.ReadtheInstallation,Operatingand
Maintenanceinstructionsthoroughlybeforeinstallingorservicingthisequipment.
ANSI/NSF4
Form#U4186A5/05
BAKERSPRIDEOVENCO.,INC.
30PineStreet
NewRochelle,NY10801
info@bakerspride.come-mail
1
!
Page 2

TABLEOFCONTENTS
SECTIONITEMPAGE
1Dimensions&Specifications3
2Installation4
Counter-TopInstallation4
FloorInstallation4
OptionalOpenBaseFeature5
DoubleStackedOvens6
3ElectricalConnections6
4ExplanationOfControls7
5UsageRecommendations8
6Troubleshooting8
7Cleaning9
ExteriorCleaning9
InteriorCleaning9
8Maintenance9
ReplacementParts9
WiringDiagrams9
9PartsLists&ExplodedViews10
10WiringDiagrams13
11Warranty16
Periodicinspectionsbyyourdealeroraqualifiedserviceagentisrecommended.Whencorresponding
withthefactoryoryourserviceagentregardingserviceproblemsorreplacementparts,besuretoreferto
theovenbythecorrectmodelnumber(includingtheprefixandsuffixlettersandnumbersandthewarranty
serialnumber.Theratingplateaffixedtotheovencontainsthisinformation.
IMPORTANTFORFUTUREREFERENCE
Pleasecompletethisinformationandretainthismanualforthelifeoftheequipment.For
WarrantyServiceand/orParts,thisinformationisrequired.
ModelNumberSerialNumberDatePurchased
2
Page 3
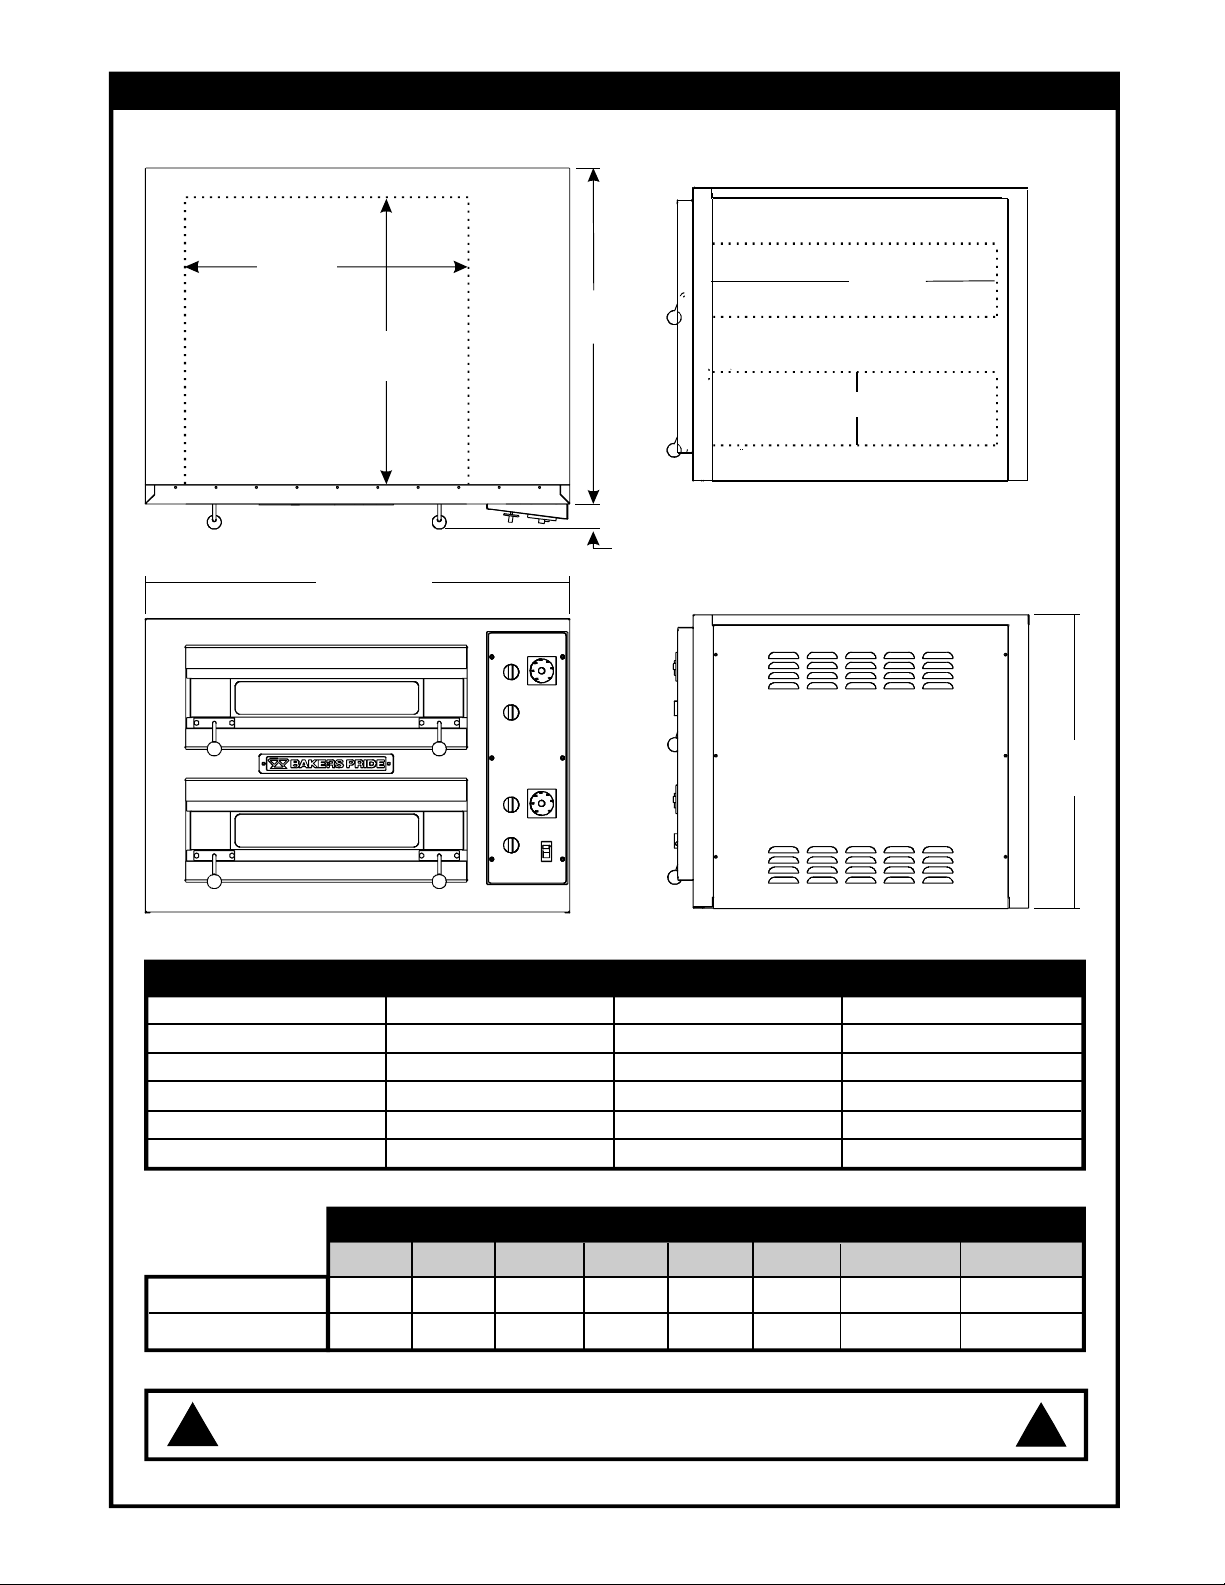
1.DIMENSIONS&SPECIFICATIONS
28”
(711mm)
(1067mm)
28”
(711mm)
42”
33.25”
(845mm)
2.5”(64mm)
28”
(711mm)
5.25”(133mm)
29”
(737mm)
VoltsAmpereskWNominalAmperes
208-1449.544
208-3259.530/31/32
230-1399.539
240-1389.538
240-3229.522/23/23
400-3139.513/12/13
InteriorDimensionsExteriorDimensionsWeightSize
WHDWHDlbs(cuft)
Single285.252842293345823.26
Double42583391646.50
NOTE: Eachovenrequiresitsownsupplyconnectiontomains.
!
Ovensareshippedindividually.
3
!
Page 4
2.INSTALLATION
Itistheresponsibilityofthepurchasertoinsuretheovenisproperlyinstalledinamannerthatmeetsall
applicablecodes.Intheabsenceoflocalcodesrefertoapplicablenationalcodes.Inthecaseofany
discrepancybetweenthisdocumentandanylocalcodesitisrecommendedyouconsultyourlocal
inspector.
Usersarecautionedthatmaintenanceandrepairsshallbeperformedbyauthorizedserviceagentsor
licensedprofessionals.BakersPridewillhavenoobligationwithrespecttoproductsthatarenotproperly
installed,adjusted,operatedormaintained.
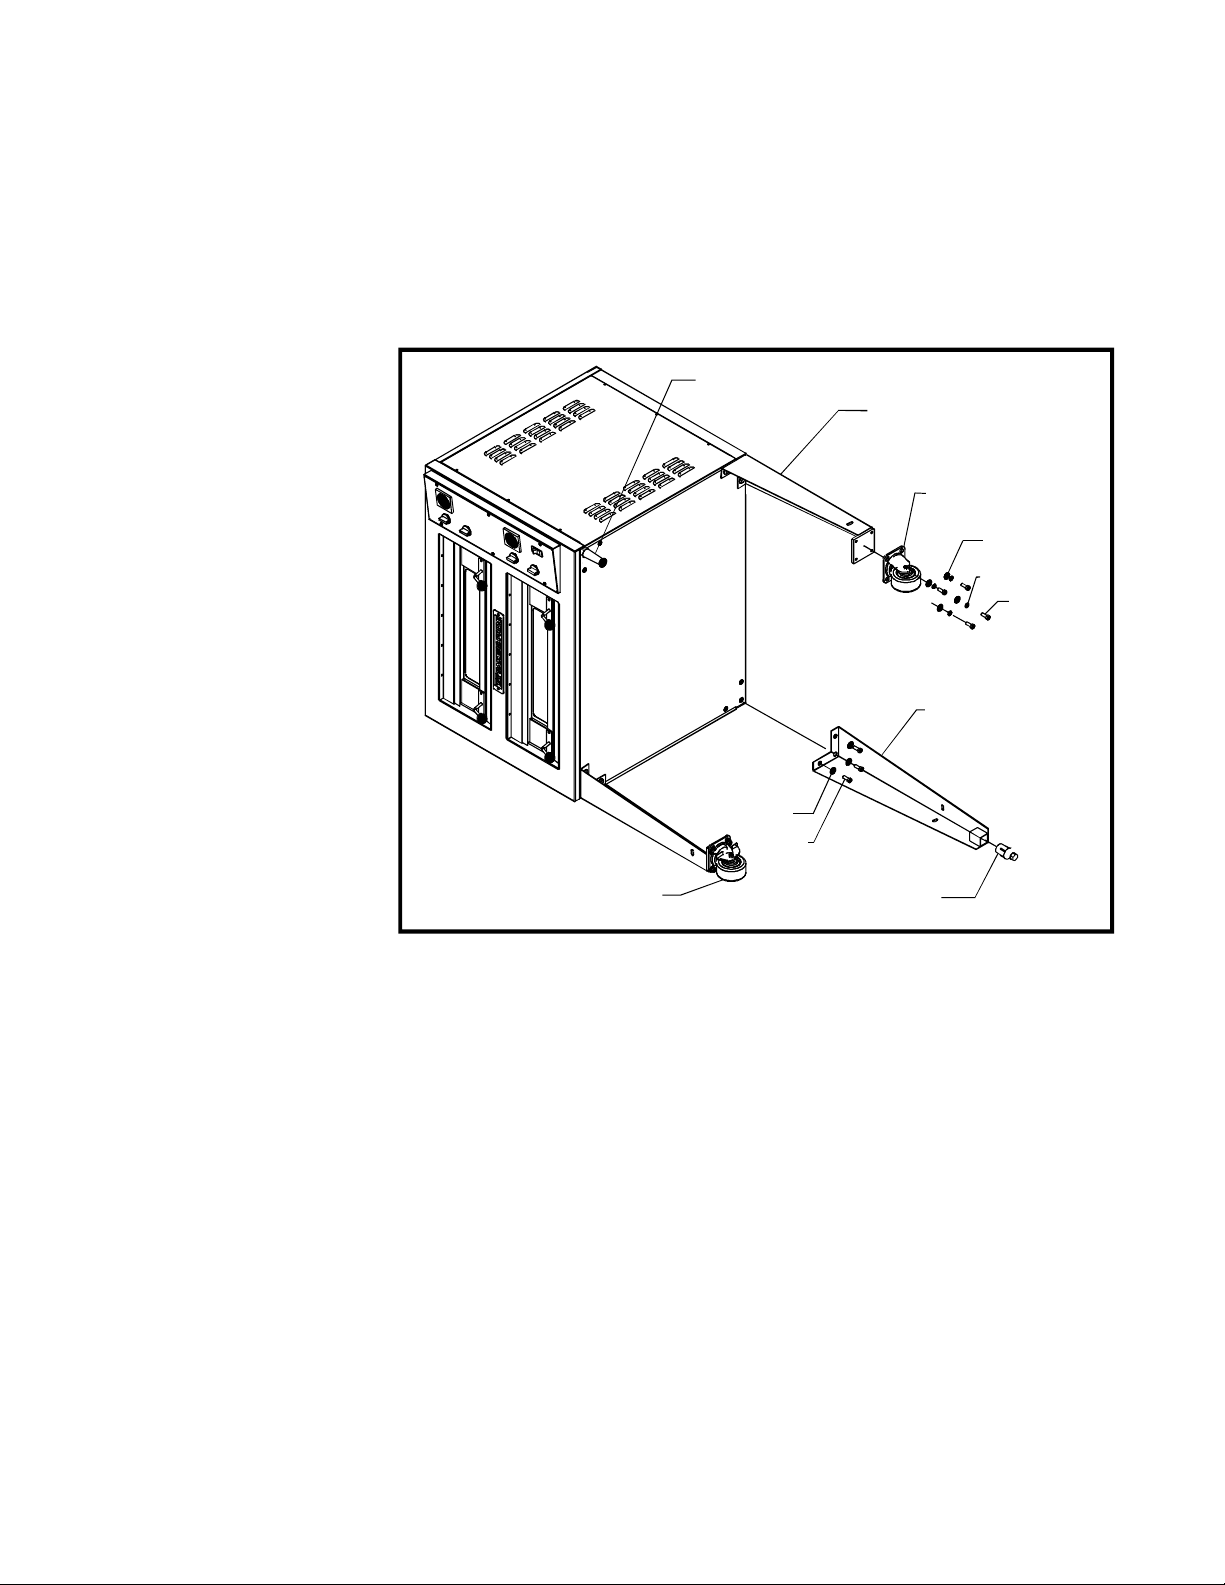
Counter-topInstallation
Theovenmaybeinstalled
4inchCOUNTERTOPLEG(4)
LEGWITHCASTERPLATE(4)
directlyonacounterorstand
manufacturedofnonflammablematerials. The
ovenmustbeinstalledona
surfacethatisatleastas
largeastheouter
dimensionsoftheoven.The
ovenmustbeinstalledwith
CASTERWITHOUTLOCK(2)
MOUNTINREAR
FLATWASHER(16)
LOCKWASHER(16)
BOLT(16)
adequateclearanceto
combustibleandnoncombustiblewalls.Iflegsare
notusedtheovenmustbe
LEGWITHFOOTINSERT(4)
sealedtothecountertopwith
anNSFapprovedsealant.
Minimumoperating
clearancestocombustible
surfacesis1inch[25mm].It
isrecommendedtheovenbe
atleast1inchfromany
CASTERWITHLOCK(2)
MOUNTINFRONT
FLATWASHER(12)
BOLT(12)
BULLETFOOTINSERT(4)
adjacentcookingappliance.
Eachovenshallbeinstalledwithrespecttobuildingconstructionandotherequipmenttopermitaccessto
theoven.Suchclearancemaybenecessaryforservicingandcleaning.
BakersPriderecommendsthemountingsurfaceforasingleovenbeapproximately26inches[660mm]
fromthefloorsotheovendecksareataconvenientworkingheight.
NOTE:
Refertoillustrationforallthreelegconfigurations.
A.CounterTop-ShortLegs-4”
B.FloorModel-30”
C.Floor/DoubleStack-16”
CounterTopLegs
1.Turntheovenoverontoitsleftsidesoyoucaneasilyreachtheboltmountinglocationsinthebase.
2.Usingthefourcornermostholesinthebottomoftheoveninsertandtightenthefourcountertop
legs.
3.Carefullyturntheovenupright.Insurethetwolegsthattouchthefloorfirstwhenyouraisetheoven
areblockedsotheydonotslipaway.
FloorInstallation
1.Atthefloorendofeachleginstallthebulletfootinsertorcasterasrequired.
4
Page 5
Thefitoftheinserttothelegisintendedtobesnug,youshouldexpecttotapthemlightlyinplace
withamalletorrubberhammer.Usingyourfingersscrewtheendsofthebulletfeetintotheleg
clockwiseuntiltheyareattheirshortestlength.
OR
Castersmounttothebottomofthecasterplatewithfoureach:3/8-16boltsinsertedintoasplitring
lockwasherandflatwasher.
2.Turntheovenoverontoitsleftsidesoyoucaneasilyreachtheboltmountinglocationsinthebase.
3.Thethreeholesinthetopofeachlegwillmatchtheboltlocationsateachcorneroftheovenbase.
4.Youwillneedthree3/8-16hexheadboltsandthree3/8”flatwasherstomounteachleg.Alignthe
legtooneofthematchingboltholesonthebaseandinsertaboltandwasher.Installtheotherbolts
andfingertightenintoplacebeforeusingawrenchtofullytightenthemall.
5.Besuretotightenallboltsforeachleg.Wheninstallingcasters,makesurethetwocasterswith
brakesareinstalledatthefrontoftheoven.
6.Carefullystanduptheoven.Insurethetwolegs/castersthattouchthefloorfirstwhenyouraisethe
ovenareblockedandchockedsotheydonotslipaway.
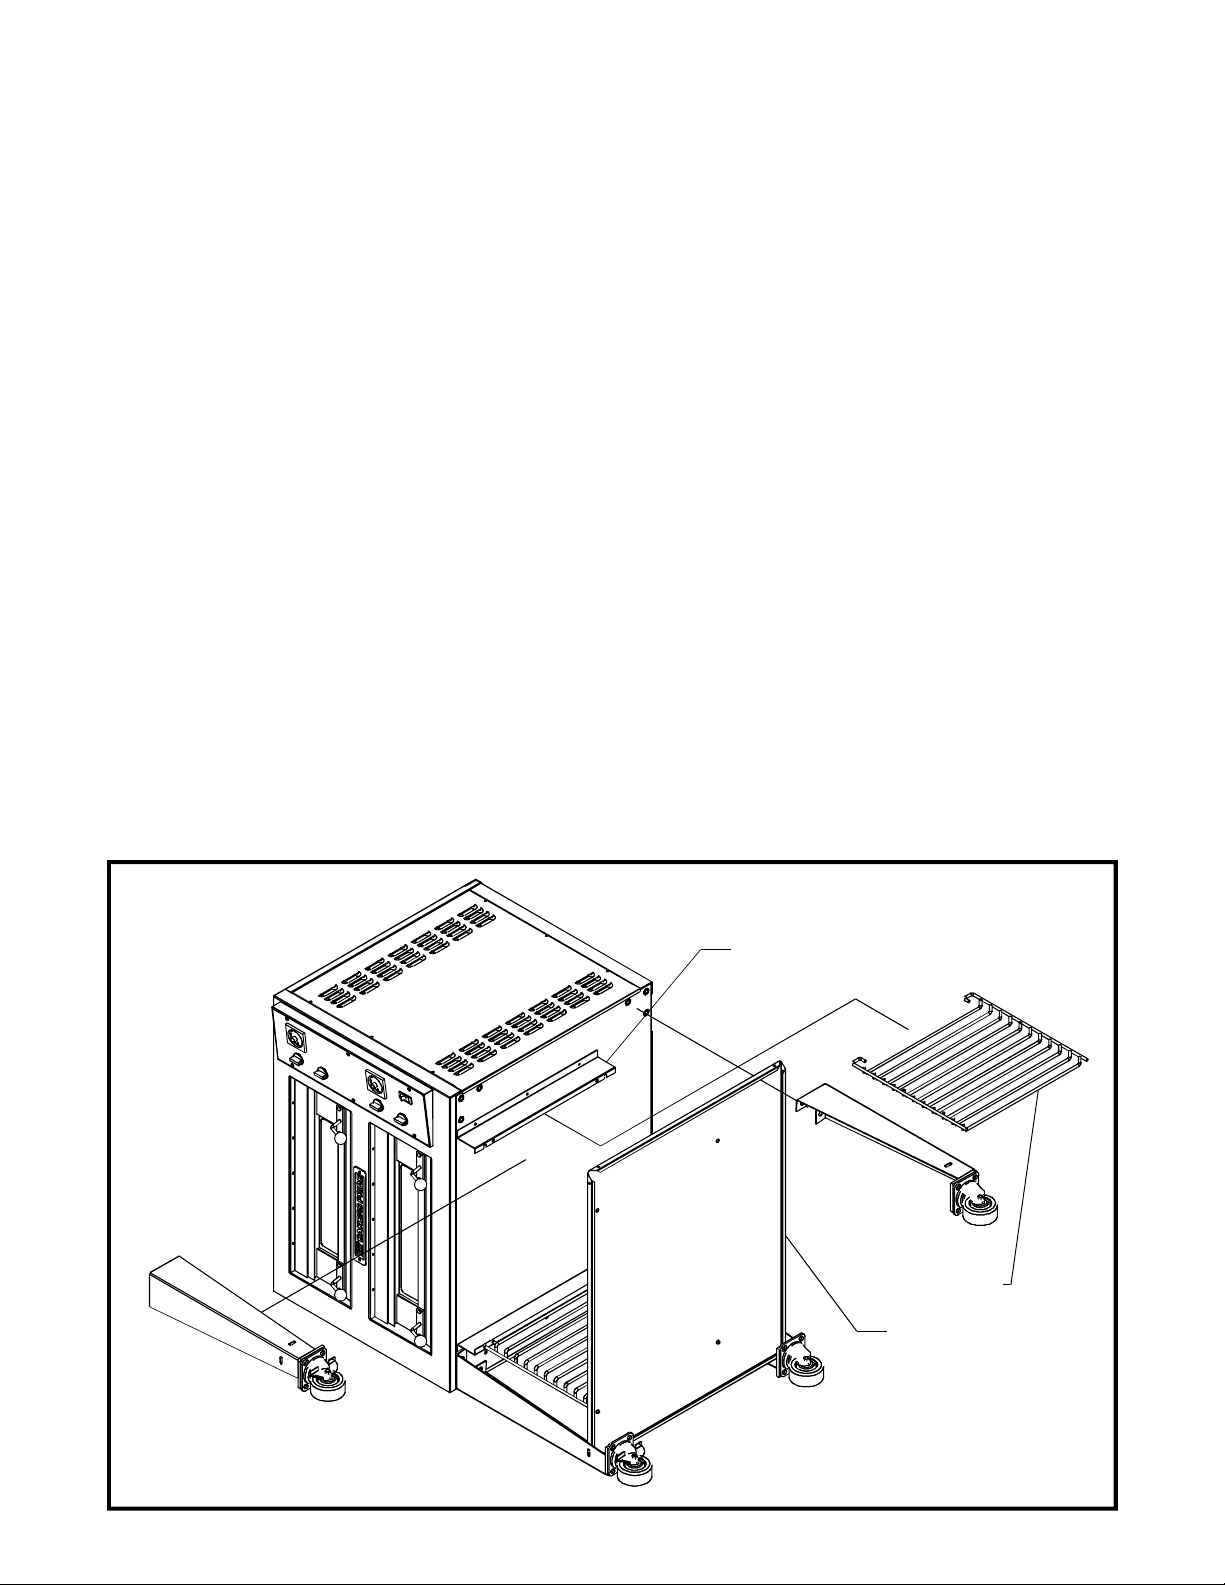
OptionalOpenBaseFeature:
1.Installbottomshelfandrackguidebracketswheninstallinglegs-whileovenisonit’sside.
RefertoleginstructionsinInstallation/Manual.
Operation
2.Attachtworacksupportbracketstobaseofovenwiththreescrewseachbracket.
3.Installtwolegstolower(left)sideofoven.Alignandattachbottomshelftotheselegswithaboltand
lockingnut-Oneeachinthefrontandback.
4.Attachlasttwolegs.
5.Attachbottomshelftoremainingtwolegswithtwoboltsandlockingnuts-Oneeachinthefrontand
back.
6.Whentheovenisstoodup,beforemovingittoit’sfinallocation,installfourremainingboltsand
lockingnutstothelegs-Twoonleftside,twoonrightside.Tightenall.
7.Installtworackguides.Alignthebottompegstoholesinthebottomshelf.Aligntophookstocutoutsinuppersupportbracket.Lowerintoposition.
8.Alignovenracks(orderseparately)totheshelfheightsdesiredandslideintoplace.
UpperSupportBracket(2)
RackGuide(2)
BottomShelf
5
Page 6

DoubleStacked
Ovens
YourEP-2-2828maybe
stackedtwoovensontopof
oneanother.Inorderto
insuretheovenstonotslide
orseparate,thereisa
stackingbracketkitrequired
forinstallationattherearof
theovens.Twobrackets
areinstalled,oneateach
endoftheovensecuringthe
upperoventothebottom
oven.Refertotheadjacent
illustration.
3.ELECTRICALCONNECTIONS
STACKING
C5057XBRACKET(2)
#10SHEETMETAL
SCREW(8)
WARNING: Riskofelectricalshock.Appliancemustbesecuredtobuildingstructure.
!
1Installationmustbeperformedbyalicensedelectrician.
2Aseparateelectricalconnectiontothemainsmustbeprovidedforeachoven.
3Anallpoledisconnectmustbeprovidedbytheinstaller.
4Connectiontotheelectricalservicemustbegroundedinaccordancewithlocalcodes.Inthe
absenceoflocalcodesrefertotheNationalElectricCode,ANSI/NFPA70ortheCanadianElectric
Code,CSAC22.2asapplicable.
5Onlybarecopperconductorswithaminimuminsulationtemperatureratingof90ºCtobeused.
6Theinstallermustsupplyaproperlysizedstrainreliefbushingforthemainsconnectionthatmeets
allcodes.
7Theovenshallbeinstalledusingflexibleconduit.
8Therestraintcordmustbesecurelyattachedtotherearoftheovenandtothebuildingstructureto
preventtransmittingunnecessarystresstotheflexibleconduit.
Caution: Disconnectallovensfromelectricalsupplybeforeservicing.
!
Awiringdiagramisaffixedtotheinnersidecoveroftheovenandincludedintherearofthisbooklet.
Theinputconnectionisaccessedberemovingtherightsidecover.Fieldconnectionsarelocatedatthe
lowerrearcornerofthecontrolcompartment.
!
!
6
Page 7

HOOKUP
L1
L2
L3
CONTROLPANEL
4.EXPLAINATIONOFCONTROLS
Theovenhasamainpowerswitchatthebottom
portionofthecontrolpanel.Thisswitchmustbe
onfortheoventooperate.Whenswitchedtothe
ONpositionthelampsineachcavitylight.
Eachcavityhasseparatetemperaturecontrols.
Thethermostatdialmaybeadjustedfrom200°F
(
100ºC)to700°F(370ºC).
Eachcavityhastopandbottominfinitecontrol
switches.Turningthedialoftheinfinitecontrolto
“0”willturnofftheheatforthatportionoftheoven
cavity.Theproportionofheatdecreasesasthe
dialisadjustedfromamaximumof“10”toa
minimumof“1”.
Bychangingtheadjustmentoftheinfinitecontrol
switchesanoperatorcanvarytheheatinthe
cavityformoreorlesstopheat,moreorless
bottomheatorequalheattopandbottom.
7
Page 8

Eachcavityhasatimerthatmaybeusedwhencookingproduct.ThetimerDOESNOTcontroltheoven.
Tosetacooktimeturnthedialclockwisetothedesiredsetting.Thetimerwillcountdownuntilthetime
expires.Abuzzerwillsoundcontinuouslyuntilthedialisturnedtothe“OFF”positionslightlytotheleftof
“0”.
5.USAGERECOMMENDATIONS
1.Pre-heattheoventhoroughlybeforeuse.Allowonehourandfifteenminutesforpre-heat.
2.Pre-heatovens@75°F(24°C)desiredcook/baketemperature.
3.Donotmovebakinglocationinthemiddleofabake,butspinningisokay.
4.Keepdeckscleanofflour,cheese,etcusingadeck/scraperbrush.
5.Duringidleperiods,reduceheatby75°F(24°C).
6.Minimizewatercontentofproductsforfastercook/baketimes.
7.Forlarger&thickproducts,reducetemperature&increasebake/cooktime.
8.Cookingtimesandtemperatureswillvarydependinguponsuchfactorsassizeoftheload,
temperature,mixtureofproducts(particularlymoisture)anddensityofproducts.
9.Keeparecordofthetimes,temperatureandloadsizesyouestablishforvariousproducts.
Onceyouhavedeterminedthese,theywillbesimilarforsucceedingloads.
10.Whenpractical,startcookingthelowesttemperatureproductfirstandgraduallyworkuptothe
highertemperatures.
11.Whenloadingtheoven,workasquicklyaspossibletopreventlossofheat.
12.Ovenwillcontinuetoheateventhoughthetimergoesoff.Productshouldberemovedfromthe
ovenassoonaspossibletoavoidovercooking.
13.Whenbaking,weighormeasuretheproductineachpantoassureevencooking.
14.Onlybreadandpizzamaybeplaceddirectlyonastonebakinghearth.
BELOW
6.TroubleShooting
Therearenouserserviceablecomponentsunderthecovers.Contactyourserviceagent.
PROBLEMCAUSETOINVESTIGATE
Nopoweron-lightsdonot
comeon,ovendoesnotheat-up
Nocavityheat-ovenlights
comeon,elementsdonotheatup
Unevenheat
Ovenwon'treachtemperature
Nopowertooven-checksupplyvoltage
Circuitbreakertripped-resetandcheckovenforfaultcondition
Hightemperaturethermostattripped-resetandcheckovenfor
faultcondition
Circuitbreakertripped-resetandcheckovenforfaultcondition
Thermostatfaulty-replace
Contactorfaulty-replace
Badelement-replace
Infinitecontrolthermostatfaulty-replace
Badelement-replace
Thermostatfaulty-replace
8
Page 9

7.CLEANING
!
Whentheovenisnew,operateitforatleastonehouratasettingofatleast500°F(250ºC).Duetonormal
manufacturingprocesses,asmallamountofsteamand/orsmokewillexittheovenfrommoistureandoils
ontheovencomponents.Shutoffandallowtheoventocool.
Aftercoolingwipedowntheinterioroftheovenwithacleandampcloth.Brushingofthebakinghearthis
recommended.
ExteriorCleaning
Itisrecommendedthataregularcleaningschedulebemaintainedtokeepyourovenoperatingandlooking
itsbest.Spillsshouldbecleanedimmediately.
Theovenshouldalwaysbeallowedtocoolsufficientlybeforecleaning.Exteriorsurfacesshouldbewiped
withasoftclothandmilddetergent.Stubbornstainsmaybecleanedwithalightweight,non-metallic
cleaningpad.Applyonlylightpressureandrubinthedirectionofthesurfacegrain.
Thecontrolpanelsurfaceiseasilycleanedwithasoftclothandmilddetergent.Donotuseabrasives,
solventcleanersormetallicscouringpadsonthecontrolpanel.Theymayscratchordamagethelabel
surface.
Neverspraysteamorwaterdirectlyontoorintotheoven.Thiscouldadverselyaffecttheceramic
cookinghearthand/orelectricalcomponents.
Caution: Disconnectallovensfromelectricalsupplybeforeservicing.
!
InteriorCleaning
Internalmetallicsurfacesshouldbeallowedtocoolbeforecleaning.Wipeinteriorsurfaceswithawetcloth
orlightweightscouringpad.
Foodparticlesorspillsthataccumulateonthebakinghearthmaybebrushedoffwithanormalovenbrush.
Stubbornspillsshouldbeheatedtoamaximumtemperatureforapproximatelyonehourtoburnthespillso
itwillcrumbleandeasilybrushoutafterwards.
Donotuseovencleaners,causticsolutionsormechanicalmeansthatmaydamagetheinteriorofyour
oven.
8.MAINTENANCE
Usersarecautionedthatmaintenanceandadjustmentsshouldonlybeperformedbyauthorizedservice
agentsusingBaker'sPridereplacementparts.
Minorperiodicmaintenancetoyourovenshouldprovidemanyyearsofusefulservicetoyou.Anytimethe
unitisserviceditisrecommendedallcomponentsbecheckedandtheirperformanceverified.Atleast
onceeachyearyourovenshouldbeinspectedbyaqualifiedserviceprovidertoinsureyourovenis
operatingatitspeakperformance.
ReplacementParts
Enclosedinthisbookletarediagramsoflikelyreplacementpartsthatmayberequiredfornormal
maintenance.Specificationsaresubjecttochangewithoutnotice.Besuretoverifythecurrent
specificationwithyourqualifiedserviceproviderorBakersPridebeforeorderingreplacementparts.
WiringDiagrams
Thecurrentwiringdiagramatthedateofyouroven'smanufacturewasaffixedtotheunitforreference.
Copiesoftheproperwiringdiagramseffectiveonthedatethisbookletisprintedareenclosed.
Specificationsaresubjecttochangewithoutnotice.Ifthereisanyuncertaintyordiscrepancybetweenthe
wiringdiagramandyourovenrefertoBakersPrideTechnicalServiceforclarification.
9
Page 10

ITEM
1
2
3
4
5
6
7
8
9.PARTSLISTS&EXPLODEDVIEWSEP-2-2828
PARTNO
L1194X
L1197X
L1200X
L1193X
L1196X
L1199X
L1195X
L1198X
L1201X
P1045X
P1098X
P1025X
P1074X
T1287X
C5035X
FIGURE1MAINBODY
DESCRIPTION
UpperElement-230V500W
UpperElement-208V500W
UpperElement-240V500W
LowerElement-230V750W
LowerElement-208V750W
LowerElement-240V750W
FrontElement-230V750W
FrontElement-208V750W
FrontElement-240V750W
SnapBushing
TerminalBlock
GroundLug
WireClamp
StoneHearth
SteelHearth
QTY
6
6
6
6
6
6
2
2
2
2
1
2
3
2
2
USAGEDATES
FROM TO
Apr04
Sep04
Sep04
Apr04
Sep04
Sep04
Apr04
Sep04
Sep04
Apr04
Apr04
Apr04
Apr04
Apr04
Sep04
ITEM
1
2
3
4
5
6
7
8
ITEM
1
2
3
4
5
6
7
8
PARTNO
P1194X
P1195X
S3271X
C5050X
C5041X
C5040X
C5055X
S1403X
S6064X
PARTNO
C5029X
C5058X
U1382X
U1395X
U1383X
M1367X
M1368X
S1306X
M1481X
M1352X
M1382X
M1384X
S1311S
FIGURE2DOORS
DESCRIPTION
Lamp-Halogen
Lens-58mm
DoorHingeBushing
DoorHingeAssembly
DoorAssembly-Window
DoorAssembly-Solid
DoorHandleAssembly
Knob-1-1/4
DoorSeal
FIGURE3CONTROLPANEL
DESCRIPTION
ControlPanelw/oTimer
ControlPanelw/Timer
Overlay-NoTimer
Overlay-15MinuteTimer
Overlay-60MinuteTimer
InfiniteSwitch-208V
InfiniteSwitch-230V&240V
Knob
Thermostat
Switch
Timer-60Minute
Timer-15Minute
Knob
QTY
2
2
3
3
2
2
4
4
4
QTY
1
1
1
1
1
4
4
4
2
1
2
2
2
USAGEDATES
FROM TO
Apr04
Apr04
Apr04
Apr04
Apr04
Apr04
Apr04
Apr04
Apr04
USAGEDATES
FROM
Apr04
Sep04
Apr04
Sep04
Sep04
Sep04
Apr04
Apr04
Apr04
Apr04
Sep04
Sep04
Sep04
TO
10
Page 11

DOORS
SEEFIG2
1
2
FIGURE1MAINBODY
3
9
4
5
6
8
7
ELECTRICAL
CONTROLPANEL
SEEFIG3
FIGURE2DOORS
1
2
DOOR
HARDWARE
SEEFIG4
FIGURE3CONTROLPANEL
COMPONENTS
SEEFIG5
5
4
3
3
1
2
4
8
6
5
7
8
6
11
7
Page 12

ITEM
1
2
3
4
5
6
7
8
9
10
ITEM
PARTNO
P1018X
C4075X
S3007X
S3004X
Q3019X
Q2301X
C5056X
Q2111X
Q2001X
C5027X
PARTNO
FIGURE4DOORHARDWARE
DESCRIPTION
SnapBushing
SpringAdjustmentBracket
SpringBushing
Spring
Washer
ShoulderBolt
DoorStopBracket
1/4-20HexBolt
1/4-20HexNut
DoorStopBracket
FIGURE5ELECTRICCOMPONENTS
DESCRIPTION
QTY
4
2
4
2
4
4
2
2
2
2
QTY
USAGEDATES
FROM TO
Apr04
Apr04
Apr04
Apr04
Apr04
Apr04
Apr04
Apr04
Apr04
Apr04
USAGEDATES
FROM
TO
1
2
3
4
5
6
7
8
9
C5025X
P1003X
P1207X
M1371X
M1372X
M1482X
M1360X
P1018X
P1192X
P1208X
P1201X
ComponentBracket
TerminalBlock-3pos
DinRail
Contactor-208V
Contactor-230V&240V
Thermostat
Transformer
SnapBushing
CircuitBreaker-3P10A230/400V
CircuitBreaker-3P25A208/240V
CircuitBreaker-1P10A
FIGURE4DOORHARDWARE
8
5
1
1
2
4
4
2
1
1
2
2
1
Apr04
Apr04
Apr04
Sep04
Apr04
Apr04
Apr04
Apr04
Apr04
Sep04
Apr04
FIGURE5ELECTRICCOMPONENTS
5
7
6
10
8
4
1
9
9
7
1
2
6
3
2
3
3
4
5
6
12
Page 13

13
Page 14

14
Page 15

15
Page 16

BAKERSPRIDELIMITEDWARRANTY
914/576-0200•US&Canada:1-800-431-2745•fax914/576-0605
30PineStreetNewRochelle,NewYork10801
WHATISCOVEREDThiswarrantycoversdefectsinmaterialandworkmanshipundernormaluse,andappliesonlytotheoriginalpurchaser
WHOISCOVEREDThiswarrantyisextendedtotheoriginalpurchaserandappliesonlytoequipmentpurchasedforuseintheU.S.A.
COVERAGEPERIODCycloneConvectionOvens:
WARRANTY
COVERAGEforall
EXCEPTIONSAllremovablepartsinBAKERSPRIDEChar-broilers,includingbutnotlimitedto:Burners,Grates,Radiants,Stonesand
EXCLUSIONS
NegligenceoractsofGod,
Thermostatcalibrationsafter(30)daysfromequipment
installationdate,
AirandGasadjustments,
Lightbulbs,
Glassdoorsanddooradjustments,
Fuses,
Char-broilerworkdecksandcuttingboards,
Tighteningofconveyorchains,
Adjustmentstoburnerflamesandcleaningofpilotburners,
Tighteningofscrewsorfasteners,
providingthat:
Theequipmenthasnotbeenaccidentallyorintentionallydamaged,alteredormisused;
!
Theequipmentisproperlyinstalled,adjusted,operatedandmaintainedinaccordancewithNationalandlocal
!
codes,andinaccordancewiththeinstallationinstructionprovidedwiththeproduct;
Theserialnumberratingplateaffixedtotheequipmenthasnotbeendefacedorremoved.
!
GDCOModels:Two(2)Yearlimitedpartsandlabor;(2)Yearlimiteddoorwarranty.
CO11Models:
AllOtherProducts:One(1)Yearlimitedpartsandlabor.Warrantyperiodbeginsthedateofdealerinvoicetocustomeror
ninety(90)daysaftershipmentdatefromBAKERSPRIDE-whichevercomesfirst.
Thiswarrantycoverson-sitelabor,partsandreasonabletraveltimeandtravelexpensesoftheauthorizedservice
representativeupto(100)miles,roundtrip,and(2)hourstraveltime.Thepurchaser,however,shallberesponsible
expensesrelatedtotravel,includingtime,mileageandshippingexpensesonsmallercountermodelsthatmaybecarriedinto
aFactoryAuthorizedServiceCenter,includingthefollowingmodels:PX-14,PX-16,P18,P22S,P24S,PD-4,PDC,WS
SeriesandBK-18.
Valves,arecoveredforaperiodofSIXMONTHS.
AllCeramicBakingDecksarecoveredforaperiodofTHREEMONTHS.Theinstallationofthesereplacementdecksisthe
responsibilityofthepurchaser.
TheextendedCyclonedoorwarrantyyears3through5isapartsonlywarrantyanddoesnotincludelabor,travel,milageor
anyothercharges.
Two(2)Yearlimitedpartsandlabor;(5)Yearlimiteddoorwarranty.
BCOModels:One(1)Yearlimitedpartsandlabor;(1)Yearlimiteddoorwarranty.
Failurescausedbyerraticvoltagesorgassupplies,
Unauthorizedrepairby anyoneotherthanaBAKERSPRIDE
FactoryAuthorizedServiceCenter,
Damageinshipment,
Alteration,misuseorimproperinstallation,
Thermostatsandsafetyvalveswithbrokencapillarytubes,
Accessories—spatulas,forks,steakturners,gratelifters,
ovenbrushes,scrapers,peels,etc.,
Freight—otherthannormalUPScharges,
Ordinarywearandtear.
INSTALLATIONLevelingandinstallationofdecks,aswellasproperinstallationandcheckoutofallnewequipment—perappropriate
REPLACEMENTBAKERSPRIDEgenuineFactoryOEM partsreceivea(90)daymaterialswarrantyeffectivefromthedateof
PARTSBAKERSPRIDEFactoryAuthorizedServiceCenter.
ThisWarrantyisinlieuofallotherwarranties,expressedorimplied,andallotherobligationsorliabilitiesonthemanufacturerspart.BAKERSPRIDE
shallinnoeventbeliableforanyspecial,indirectorconsequentialdamages,orinanyeventfordamagesinexcessofthepurchasepriceoftheunit.The
repairorreplacementofprovendefectivepartsshallconstituteafulfillmentofallobligationsunderthetermsofthiswarranty.
installationandusematerials—istheresponsibilityofthedealerorinstaller,notthemanufacturer.
installationbya
Form#U4177A3/04
16
 Loading...