

Page 1
HOT FOOD DISPLAY CABINETS
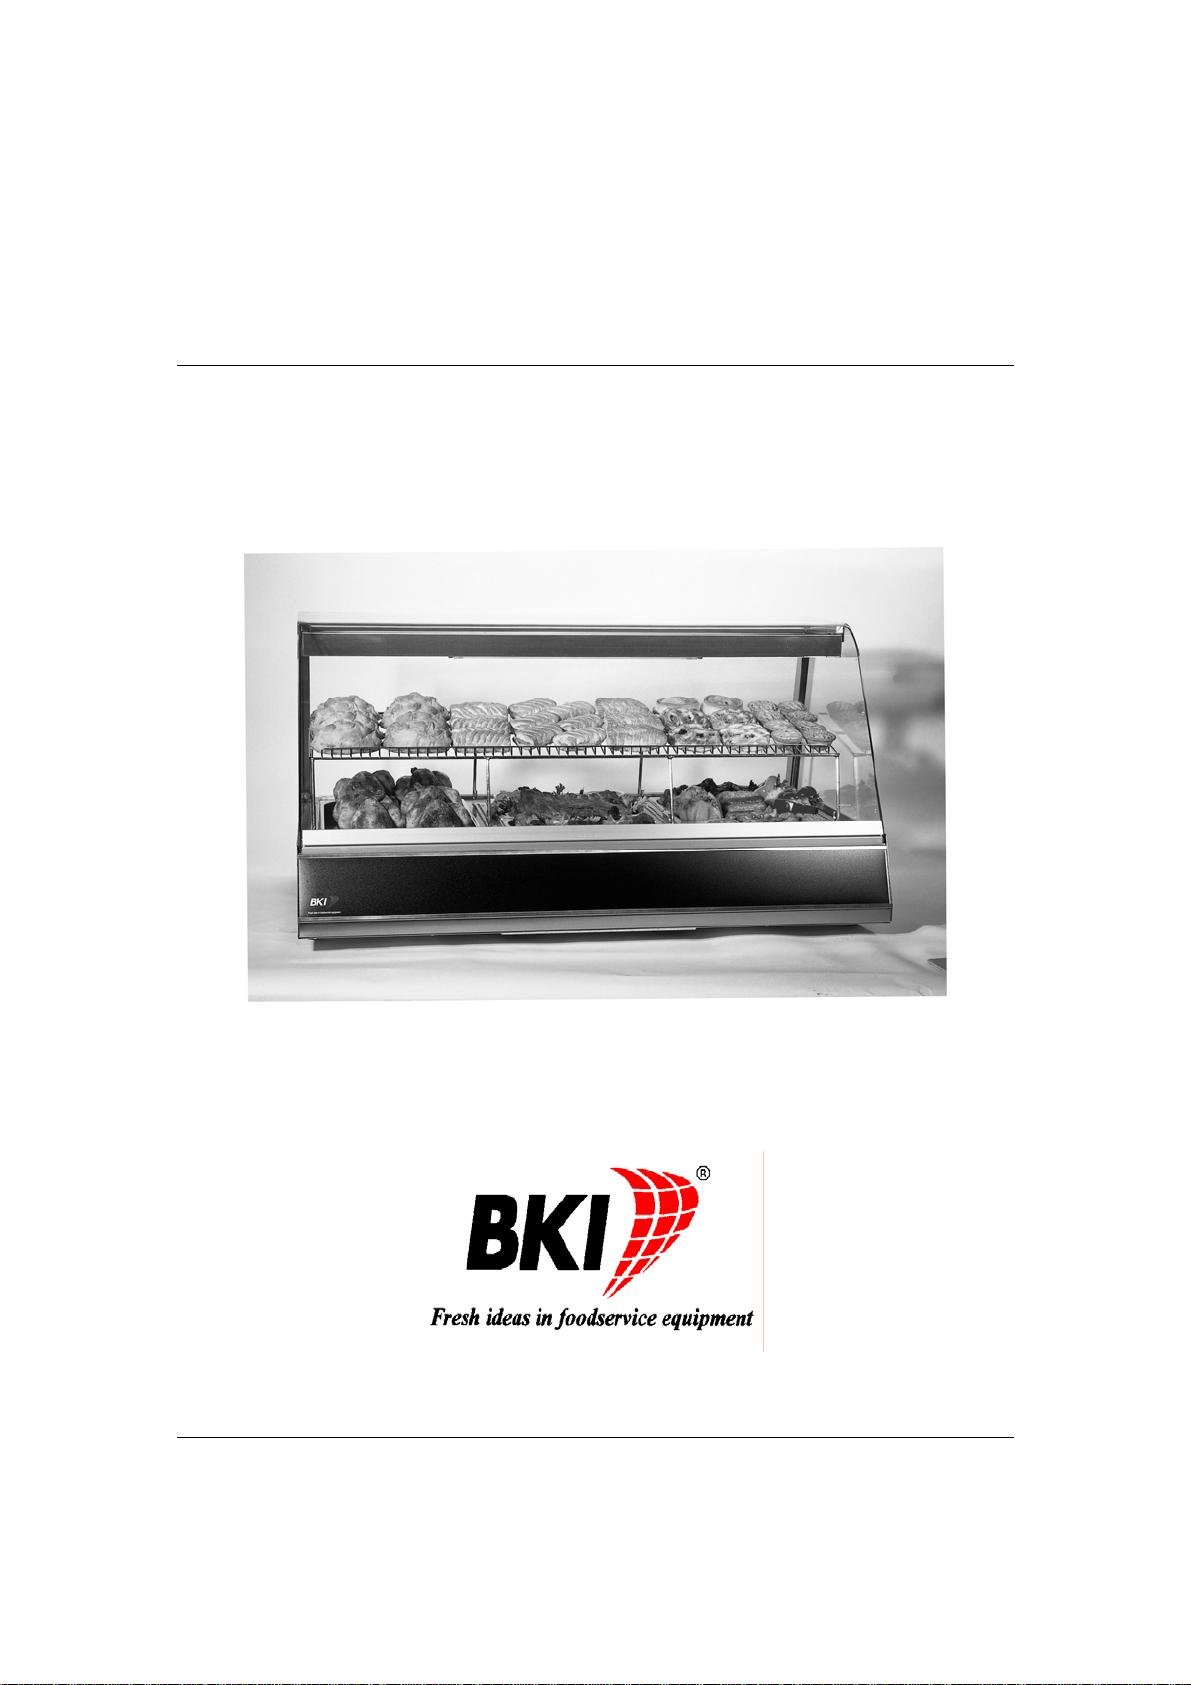
MODELS:- CHS/1N, CHS/2N,CHS/3N
OPERATING INSTRUCTIONS
Page 2

CONTENTS
SECTION
PAGE
WARRANTY 2
INTRODUCTION 3
GENERAL NOTES 3
KNOW YOUR “HOT SHOP” 4-5
OPERATING 6-7
HOLDING TIMES 7
CLEANING & MAINTENANCE 8
GLASS & LAMPS 8-9
TROUBLE-SHOOTING 10
GASTRONORM PANS & SPARE PARTS 11
BKI ‘HOT FOOD DISPLAY’ CABINETS ARE MANUFACTURED
ACCORDING TO THE FOLLOWING STANDARD:-
BS EN 60 335-2-2.50:1992
1
Page 3

WARRANTY
Each appliance is despatched with a pre-paid warranty registration card, this card
should be filled in at the time of installation.
Please Note:- No warranty is given on glass/bulbs or quartz tubes.
All BKI equipment is supplied to the following Warranty from Standex International
Ltd T/A BKI - Europe (hereinafter called “the Manufacturer”)
1. Subject to the other terms of this Warranty the Manufacturer will provide free
replacement of detective materials and other components within a period of 12
months from delivery, where any defective part or component is reasonably
attributable to faulty materials or workmanship and provided that the equipment or
alleged defective part is forwarded pre-paid to the manufacturer. Except for
quartz and halogen lamps, bulbs and glass doors which are not covered by
warranty.
2. The Manufacturer shall not be under any liability under this warranty if the
equipment or any part thereof shall have been altered in any way or operated from
the incorrect voltage circuit or used in a manner inconsistent with the
Manufacturer’s instructions or otherwise neglected or misused or if any parts not
supplied or approved by the Manufacturer shall be fitted to the equipment.
3. The Manufacturer’s liability is limited to the terms of this Warranty which is
given in consideration of the Purchaser’s agreeing that it shall be so limited and
that the Manufacturer shall be under no liability for any direct or consequential
loss or for any personal injury or damage to property caused by any defect in the
equipment or any part thereof howsoever the same may occur and whether or not
the same is due to the negligence of the Manufacturer. Except for the foregoing
no warranty or condition whether express or implied by common law statue or
otherwise shall apply to any BKI equipment.
4. This warranty shall be construed in accordance with English Law.
2
Page 4

OPERATING INSTRUCTIONS
INTRODUCTION
Thank you for deciding to purchase a “Hotshop” food display cabinet from BKI.
Your “Hot Shop” food display has been designed for the modern caterer and serves
the following needs:-
•
As a Merchandiser : It will attract customers, enhance the appearance of the
food and act as a “silent salesman” to help sell your
Product.
•
For Health & Safety: It will maintain hot food at the correct temperature to
meet statutory requirements.
•
For The Operator: It is designed for safety, is user friendly and easy to
Maintain.
Please read these instructions carefully and if you follow them faithfully you will
have years of trouble free use.
GENERAL NOTES & INFORMATION
Your “Hot Shop” food display cabinet has been completely assembled and tested
before despatch.
It has been packed for safe shipment to your premises, any accessories against the
delivery note.
•
This appliance requires a 220/240v,50Hz single phase power supply.
•
It is recommended that this appliance is installed by a qualified electrician.
•
Check that the voltage shown on the data rating plate conforms with your power
supply.
Warning – This appliance must be earthed
Important:- Read the installation & operating instructions thoroughly and ensure all
Packaging has been removed before connecting to the power supply.
3
Page 5

Sliding doors
Controls
Serial Number
Water Drawer
Rubber Feet
Know your “Hot Shop”
Operator Control View
Data rating
plate
Controls
Temperature Controller Heater “ON” Main Power Switch
Light (Illuminated)
4
Page 6

CONTROLS
Mains Power Switch :- Controls the light, fans and supplies
power to the heating elements via the
temperature controller.
Temperature Controller :- (Simmerstat) Regulates cabinet
temperature by switching the heat
elements on/off
Heater “ON” Light :- Indicates Simmerstat` on (heating) or
`off``
Water Drawer :- Provide humidity to help prevent hot
FOOD CONTAINERS
foods drying out.
“Hot Shop” food display cabinets are supplied with a mezzanine shelf and 65mm deep
1/1 gastronorm pans fitted with wire inserts as standard.
Wet Foods :- Chicken, cooked meats etc, should be placed in the gastonorm
pans, on the wire inserts to allow for drainage.
Pies, Pastries :- Should be placed above on the mezzanine shelf.
The gastronorm pan section can be split up using the various sizes available in the
gastronorm pan range, to a maximum depth of 65mm see page 11 (spare parts) for full
listing.
5
Page 7

OPERATING
In order to comply with the Food Safety Act 1990 and the Food Safety (General Food
Hygiene) regulations 1995, hot food must be kept at a temperature of at least 63.5oc.
Follow these instructions carefully to ensure compliance.
• Fill water drawer to level marked with fresh clean cold water,
Water drawer holds approximately: 4 Ltrs (CHS2/3)
2 Ltrs (CHS1)
Do not overfill !
Water – Level
Fill to top of baffle
• Turn mains switch “ON”, interior heat lamp & fan will operate.
• Set the Simmerstat to number 3 and allow 25-30mins for the cabinet to pre-heat
before loading with freshly cooked products.
• Ensure that all cabinet doors are closed to retain heat during Pre-heat & Operation.
• Do Not set Simmerstat to “full” as this will cause the water to boil and fill
cabinet with steam.
• Check Product temperatures every hour using a digital thermometer and adjust
the Simmerstat to maintain a minimum product internal temperature of 63.50C.
• Check Water level every 2-3 hours.
• Do Not allow the water drawer to boil dry as serious damage to the cabinet
could occur.
6
Page 8

OPERATING
•
IMPORTANT:- Always allow time for the cabinet to pre-heat before loading any
food items.
Keep sliding doors closed to retain heat after loading or unloading.
•
Check water drawer every 2-3 hours, carefully add fresh water to maintain correct
level, Do Not Over Fill.
HOLDING TIMES
Many factors will affect the length of holding time possible with the variety of
foods available in todays market place.
In order to comply with the current Food Hygiene & Safety Regulations we offer the
following advice.
• The “Hot Shop” display cabinet is intended for display and holding of hot food
direct from cooking or re-heating.
• Microwaved or re-heated foods will generally have a shorter storage life than
freshly cooked foods.
• Do not over cook or overheat food items that are to be held hot, (overcooking will
result in excessive moisture loss that will not be re-gained, even in a humidified
cabinet).
• Always serve food products from the cabinet in strict rotation ie: first in –first out.
• Keep sliding doors closed after loading or unloading.
• Keep water drawer full to level indicated at all times.
• Take regular product internal temperatures using a digital thermometer, any
products found below 63.5oc must be removed and blast chilled or wasted.
• Adjust temperature controller according to ambient conditions, set to the lowest
possible setting that will maintain a safe product internal temperature.
• Keep your “Hot Shop” display cabinet clean.
Important:- The “Hot Shop” display cabinet must not be used to re-heat
foods.
7
Page 9

CLEANING & MAINTENANCE
IMPORTANT:- This cabinet should be cleaned at the end of each working day.
Always disconnect the cabinet from the power supply before
the start of any cleaning or maintenance.
• Remove any food items left at the end of business.
• Turn mains switch “off”, disconnect from power supply and allow cabinet to
cool.
• Remove sliding doors by first lifting upwards to release bottom runner from
track, then out and down from top runner.
• Remove mezzanine shelf & gastronorm food pans, allow to soak in a hot cleaning
solution.
• Open front curved glass, support glass & clean using a bactericidal detergent
sanitiser then a clear liquid glass cleaner.
• Remove water drawer, empty old water, refill with mild cleaning solution, rinse
and wipe clean.
• Wipe over cabinet interior with a mild solution of warm water and bactericidal
detergent cleaner using a damp cloth, avoid getting excess water into the cabinet
interior or over the control panel section.
• Do not attempt to clean the elements or lamp.
• Do not use a water jet or steam cleaner.
• Do not use abrasive or corrosive cleaners.
GLASS
All flat and curved glass panels fitted to “Hot Shop” holding cabinets are
manufactured from toughened or tempered safety glass.
IMPORTANT:- Take care when cleaning or handling glass, allow glass
to cool before cleaning, for best results use a clear liquid
smear free glass cleaner.
Do not use abrasive cleaners or scouring pads on glass panels.
8
Page 10

The Front Curved glass and Side glass panels can be removed for maintenance or
cleaning as follows:
CURVED GLASS
• Lift front curved glass section forwards from the top.
(The front glass section is attached to the cabinet at the bottom by the aluminium
strip).
Hold the glass in the forward position for cleaning or tilt forwards and lift out of
track for complete removal
IMPORTANT:- Do not leave the front curved glass section unsupported in the
open position.
• Slide the side panels our from the front
• Replace in reverse order
LAMPS
The “Hot Shop” display cabinets are illuminated with T5 Fluorescent lamps fitted
with a protective over tube.
Replace failed lamps as soon as possible as follows:-
• Remove any food items from the cabinet, then switch “off”.
• Disconnect the cabinet from the power supply, allow to cool.
• Remove sliding doors.
• Remove mezzanine shelf and any food pans.
• Remove lamp, grip lamp through lamp cover & twist ¼ turn clockwise towards
front of cabinet to release ends.
• Replace with a new lamp of the correct voltage and rated input.
Important:- Do Not forget to refit lamp cover. Replace cover if damaged.
Important:- In the event of a glass breaking whilst the
cabinet is in use, any food items held at that time must
be wasted.
The cabinet must be thoroughly inspected and cleaned before future use.
9
Page 11

TROUBLE-SHOOTING
1. Read and understand the Operating Instructions.
2. Clean the unit each day.
3. Refer to the troubleshooting guide if the unit does not operate properly.
4. Have only an authorised serviceman check and repair unit when needed
PROBLEM CORRECTIVE ACTION
Unit fails to operate
1. No Power 1. Assure that power supply is sound
2. Circuit breaker is off 2. Rest circuit breaker
No Heat
1. Circuit breaker is off 1. Check circuit breaker
2. Defective heating element 2. Replace heating element
3. Defective Simmerstat 3. Replace Simmerstat
4. Loose wire or bad connection 4. Repair
Holding Temperature not Adequate
1. Door is open 1. Keep doors closed when not in use
2. Food temperature is too low 2. Food under cooked / over cooked or
held too long (See Holding Times)
3. Cabinet temperature too low 3. Adjust Simmerstat, allow time for
cabinet to pre-heat before loading
products.
Cabinet too hot or steamed up
1. Food temperature is too high 1. Adjust Simmerstat, check water level
2. Food items drying out 2. Food over cooked or held too long,
Simmerstat set to high, water drawer
empty.
3. Cabinet steamed up 3. Hot water used when cabinet
switched on from cold.
Hot food loaded before cabinet has been
preheated.
Simmerstat set to Full
10
Page 12

GASTRONORM PANS & SPARE PARTS
Contact your distributor or the spares department at BKI for spare gastronorm pans or
replacement lamps, quoting the following code numbers, check the appliance rating
plate for model type
GASTRONORM
CONTAINER SIZE DEPTH CAPACITY (Ltrs) CODE
GN 1/1 40mm 5 PN001
GN 1/1 65mm 9 PN006
WIRE GRID (1/1) TY013
GN 2/3 40mm 3 PN012
GN 2/3 65mm 5.5 PN010
GN 1 /2 40mm 2 PN013
GN 1 /2 65mm 4 PN009
GN 1 /3 40mm 1.5 PN014
GN 1 /3 65mm 2.5 PN008
Spare Parts List
PART CODE DESCRIPTION
CA 069 Element, 2500 W (CHS/N2)
CA 070 Element, 2000 W (CHS/N3)
CO 009 Schrack relay, 25A (RM 805730) (CHS/N3)
FA 010 Fan
GL 060 Curved Glass (CHS/N2)
GL 069 Curved Glass (CHS/N3)
GL 121 Side Glass (All models)
LI 023 Fluorescent lamp, T5, 535mm, F13W / White
LI 026 Lamp over-tube
LI 024 T5 lamp holder, ¼ turn, snap-in
LI 025 Ballast 13W, screw terminal
LI 027 Fluorescent starter, glow type, 4 – 80W
LI 028 Starter holder
LI 012 Neon indicator, amber, round
SI 001 Simmerstat c/w knob
SW 019 Switch, rocker c/w neon
11
 Loading...