

Convection Oven
MODEL MT-200
Service Manual
2812 Grandview Dr. Simpsonville, S.C. 29680, USA
864-963-3471 http://www.bkideas.com

Warranty Information
LIMITED ONE YEAR WARRANTY
BKI (The "Company") warrants to the original purchaser that at time of shipment from the
Company factory, this equipment will be free from defect in materials and workmanship. Written
notice of a claim under this warranty must be received by the Company within ONE YEAR from
the date of installation, but no longer than ONE YEAR AND THREE MONTHS from date of
shipment from the factory. Defective conditions caused by abnormal use or misuse, lack of or
improper maintenance, damage by third parties, alterations by unauthorized personnel, acts of
God, failure to follow installation and/or operating instructions, or any other events beyond the
reasonable control of the Company will NOT be covered under this warranty. The obligation of
the Company under this warranty shall be limited to repairing or replacing (at the option of the
Company) any part, with the exception of lamps, fuses, and glass (which are not covered under
warranty), which is found defective in the reasonable opinion of the Company. Any part found
defective by the Company will be repaired or replaced without charge F.O.B. factory,
Simpsonville, South Carolina or F.O.B. authorized BKI Distributor. The Company and/or its
authorized representatives will assume the normal replacement labor expense for the defective
part for the period of the warranty as stated above, excluding travel and/or other expenses
incidental to the replacement of the defective part, where replacement work is performed during
standard business hours and not subject to overtime, holiday rates, and/or any additional fees. IN
NO EVENT SHALL THE COMPANY BE LIABLE FOR LOSS OF USE, LOSS OF REVENUE OR
LOSS OF PRODUCT OR PROFIT OR FOR INDIRECT OR CONSEQUENTIAL DAMAGES
INCLUDING BUT NOT LIMITED TO, FOOD SPOILAGE OR PRODUCT LOSS. WARRANTY
DOES NOT COVER GLASS BREAKAGE. THE ABOVE WARRANTY IS EXCLUSIVE AND ALL
OTHER WARRANTIES, EXPRESS OR IMPLIED, ARE EXCLUDED INCLUDING THE IMPLIED
WARRANTIES OF MERCHANTABILITY AND FITNESS FOR A PARTICULAR PURPOSE.
REPLACEMENT PARTS
Any appliance replacement part, with the exception of lamps, fuses, and glass, which proves to
be defective in material or workmanship within ninety (90) days of installation will be replaced
without charge F.O.B. Factory, Simpsonville, SC or F.O.B. authorized BKI Distributor. The user
shall have the responsibility and expense of removing and returning the defective part to the
Company as well as the cost of reinstalling the replacement or repaired part.
2812 Grandview Dr. Simpsonville, S.C. 29680, USA
864-963-3471 http://www.bkideas.com

Convection Oven Table of Contents
Table of Contents
Table of Contents........................................................................................................................................1
Introduction .................................................................................................................................................2
Safety Precautions....................................................................................................................................2
Safety Signs and Messages.................................................................................................................2
Safety Standards..................................................................................................................................3
Data Plate.................................................................................................................................................3
Power Supply Terminal Board..................................................................................................................3
Technical Data..........................................................................................................................................3
Operation .....................................................................................................................................................4
General Instructions for Use.....................................................................................................................4
Controls and Indicators.............................................................................................................................4
Start-Up and Use......................................................................................................................................5
Switching Off.............................................................................................................................................5
Installation ...................................................................................................................................................6
Safety Standards ......................................................................................................................................6
Environmental Standards .........................................................................................................................6
Transport and Unpacking .........................................................................................................................6
Installation Instructions.............................................................................................................................7
Electrical Connections ..............................................................................................................................8
Automatic Safety and Control Devices of the Oven...............................................................................10
Protection of the Auxiliary Electrical Circuit........................................................................................10
Protection of the Chamber Fan..........................................................................................................10
Oven Chamber Safety Thermostat.....................................................................................................10
Maintenance ..............................................................................................................................................11
Routine Maintenance..............................................................................................................................11
Oven Chamber Cleaning....................................................................................................................12
Cleaning the Door Glass....................................................................................................................13
Cleaning the Fan................................................................................................................................13
What to Do In Case of a Breakdown or Long Periods of Inactivity.........................................................14
Troubleshooting......................................................................................................................................14
Repair Procedures..................................................................................................................................15
Replacement of Motors......................................................................................................................15
Outer Coverings .................................................................................................................................16
Bulb, Heating Element and Motor Fan...............................................................................................16
30W Motor..........................................................................................................................................16
Heating Elements...............................................................................................................................16
Electro-Mechanical Controls ..............................................................................................................17
Chamber Face Gasket.......................................................................................................................17
Replacement of Chamber Light and Glass Gasket............................................................................17
Replacement Parts....................................................................................................................................18
Wiring Diagrams........................................................................................................................................20
Notes ..........................................................................................................................................................21
1
Convection Oven Introduction
Introduction
Thank you for purchasing our convection oven. We feel certain that the oven you have purchased will
meet your expectations, and will be a trustworthy assistant in your work for a long time to come, providing
performance of the highest levels. You will also receive efficient and timely after-sales technical and
operational service. Your oven is quick and easy to install. Nonetheless, please CAREFULLY read this
manual, and keep it for future use. We hope you enjoy your work!
PLEASE READ THIS ENTIRE MANUAL BEFORE OPERATING THE UNIT. If
you have any questions, please contact your BKI Distributor. If they are unable to
answer your questions, contact the BKI Technical Service Department, toll free:
1-800-927-6887. Outside the U.S., call 1-864-963-3471.
Safety Precautions
Always follow recommended safety precautions listed in this manual. Below is the safety alert symbol.
When you see this symbol on your equipment, be alert to the potential for personal injury or property
damage.
Safety Signs and Messages
The following Safety signs and messages are placed in this manual to provide instructions and identify
specific areas where potential hazards exist and special precautions should be taken. Know a nd
understand the meaning of these instructions, signs, and messages . Damage to the equipment, death or
serious injury to you or other persons may result if these messages are not followed.
This message indicates an imminently hazardous situation which, if not avoided,
will result in death or serious injury.
This message indicates a potentially hazardous situation, which, if not avoided,
could result in death or serious injury.
This message indicates a potentially hazardous situation, which, if not avoided,
may result in minor or moderate injury. It may also be used to alert against unsafe
practices.
This message is used when special information, instructions or identification are
required relating to procedures, equipment, tools, capacities and other spe cial
data.
2
Convection Oven Introduction
Safety Standards
This manual is part of the documentation provided with the oven and contains all required
information for proper use and maintenance of the convection oven.
Carefully read the user’s instructions contained in this manual before turning the oven on.
Special attention must be given to the standards concerning the automatic safety and control
devices (see page 10).
The user must carefully read the instructions in it and keep it where it is accessible to all
authorized users
The oven is of a professional type and must be used only by qualified personnel, cooking foods
in food service facilities.
Always turn off the main electrical switch after using the oven, especially during maintenance and
repair or in the event of long periods of disuse.
It is advisable to have the oven checked on a yearly basis by an authorized technical service
center.
The owner of the oven must periodically train their staff on the use of the machines and provide
them with safety instructions.
During cooking, the external parts of the oven (e.g. door glass) may get hot. Be careful when
touching them.
Data Plate
The data plate containing the oven characteristics is glued to the back.
Power Supply Terminal Board
The power supply terminal block is inside the right side of the oven. A small data plate positioned near the
terminal block states the types of connections which are possible.
Technical Data
Dimensions No. of Pans or Racks Power Supply Power
External dimensions:
27”x21 3/4”x25 1/4”
Internal dimensions:
21 1/2”x14 1/2”x16 1/8”
Rack dimensions:
1/2 size
4
1Phase, 15
Amp, 240V or
208V,
60Hz,
Plug NEMA
6-20P standard
Kw 3.2
3
Convection Oven Operation
Operation
General Instructions for Use
The oven may be used to bake creams, cookies, cakes, sauces and pizza, for au gratin coo king
and for defrosting frozen food convection ovens.
Avoid adding salt to foods in the cooking chamber.
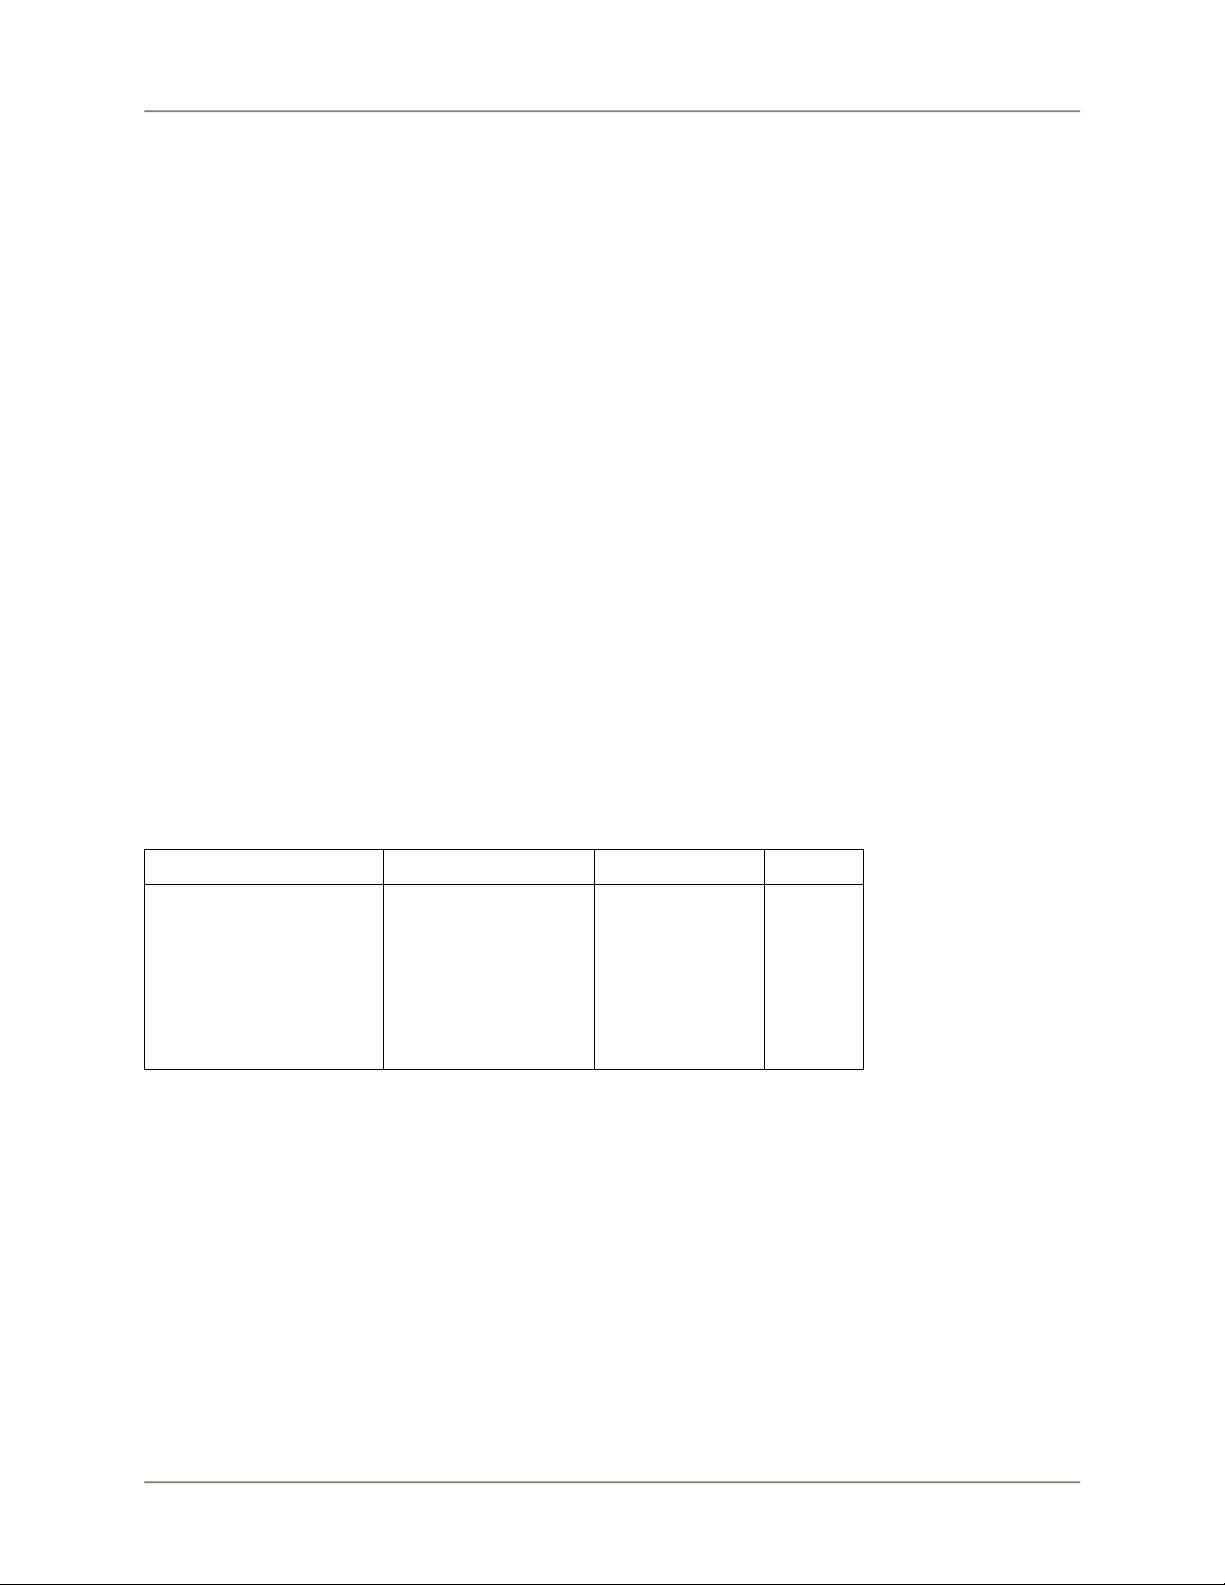
Try to distribute foods evenly in the pans, avoiding accumulations.
Between one level and the next there must be a space of at least 1 1/2”. Hot air must be able to
circulate both above and below the food in order for it.
Do not use pans with sides that are higher than necessary. The sides create a barrier to air
circulation.
When using the oven for the first time, it is advisable to run it empty at maximum temperature for
about an hour. This will eliminate any unpleasant odors from protective lubricants used in the
factory.
Leave room between dishes on the same level.
Preheat the oven. It is always better to place the food in a pre-heated oven.
During cooking, racks and pans reach very high temperatures. Use caution to prevent burns.
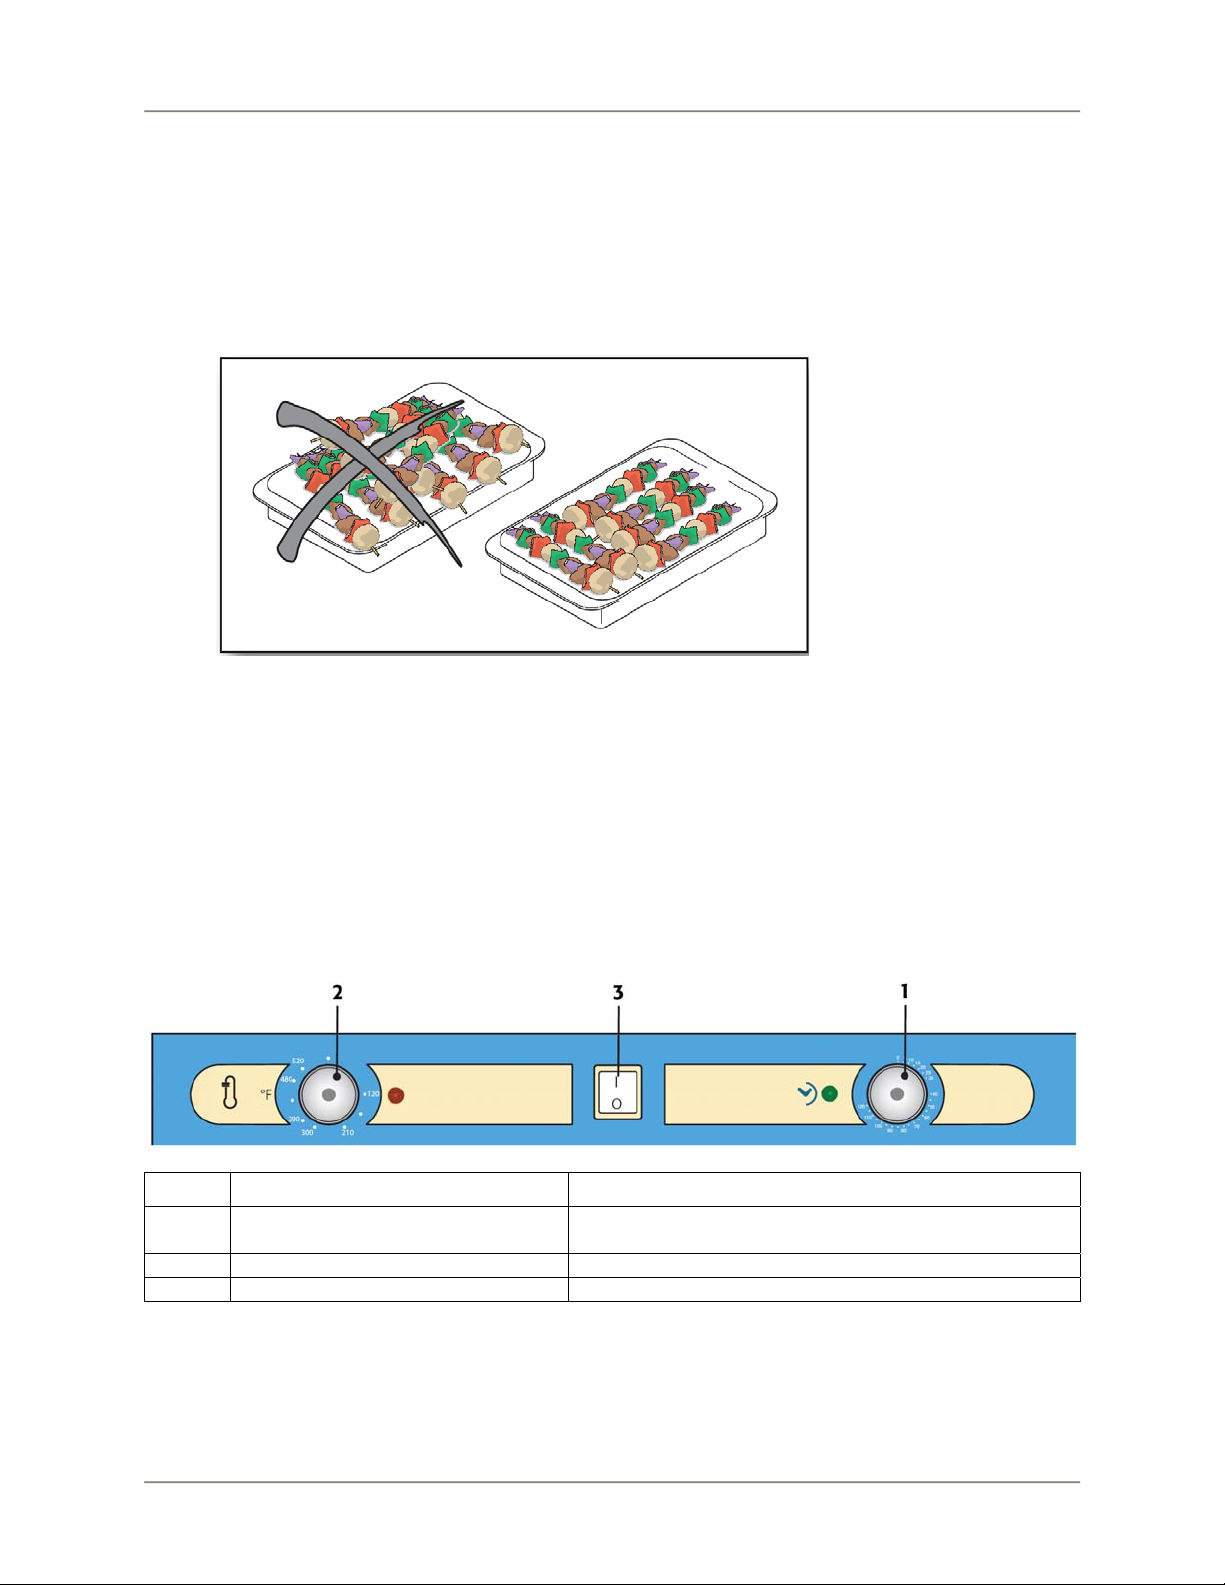
Controls and Indicators
Key # Control Description
1 TIME SETTING KNOB Sets cooking time from 0 - 120 minutes or to
continuous operation.
2 TEMPERATURE SETTING KNOB Sets chamber temperature from 50 to 520°F.
3 ON/OFF MAIN SWITCH Energizes/de-energizes the oven.
4

Convection Oven Operation
Start-Up and Use
1. To start the oven, press the main switch (3) ON/OFF.
2. Set the cooking time by turning the time setting knob (1).
3. Then use knob (2) to set the desired cooking temperature. If knob (2) is left in position ‘0’, only
the light and fan will operate, and the oven chamber will not heat up.
Switching Off
1. Cooking ends automatically when the cooking time set on knob (1) has expired.
2. Nonetheless, turn all knobs to “O” and turn off the main switch (3) ON/OFF.
5
Convection Oven Installation
Installation
Safety Standards
The installer must read this booklet carefully before installing the convection
oven.
Installation and subsequent maintenance, cleaning, inspection and repairs must
be carried out with the electrical power supply disconnected.
Installation of the oven must be in compliance with current standards in the
country of use, otherwise BKI shall not honor the warranty in the event of direct
or indirect damage.
Installation, adjustment and assistance are to be carried out by qualified
personnel in compliance with current accident prevention legislation in the
country of use. The installer must also check for any fire prevention regulations.
BKI shall not be held liable for any damage arising from improper use of the
convection oven, unauthorized modifications and anything not covered by this
manual.
Environmental Standards
All materials used for packaging are compatible with environmental protection standards. They may be
stored without any hazard, or disposed of in accordance with current laws in the country of use. Do not
leave the plastic coverings within reach of children or animals as they are potentially hazardous. The
plastic components which can be disposed of and recycled are marked as follows:
POLYETHYLENE: packaging outer film, instructions bag, etc.
POLYPROPYLENE: clips, etc.
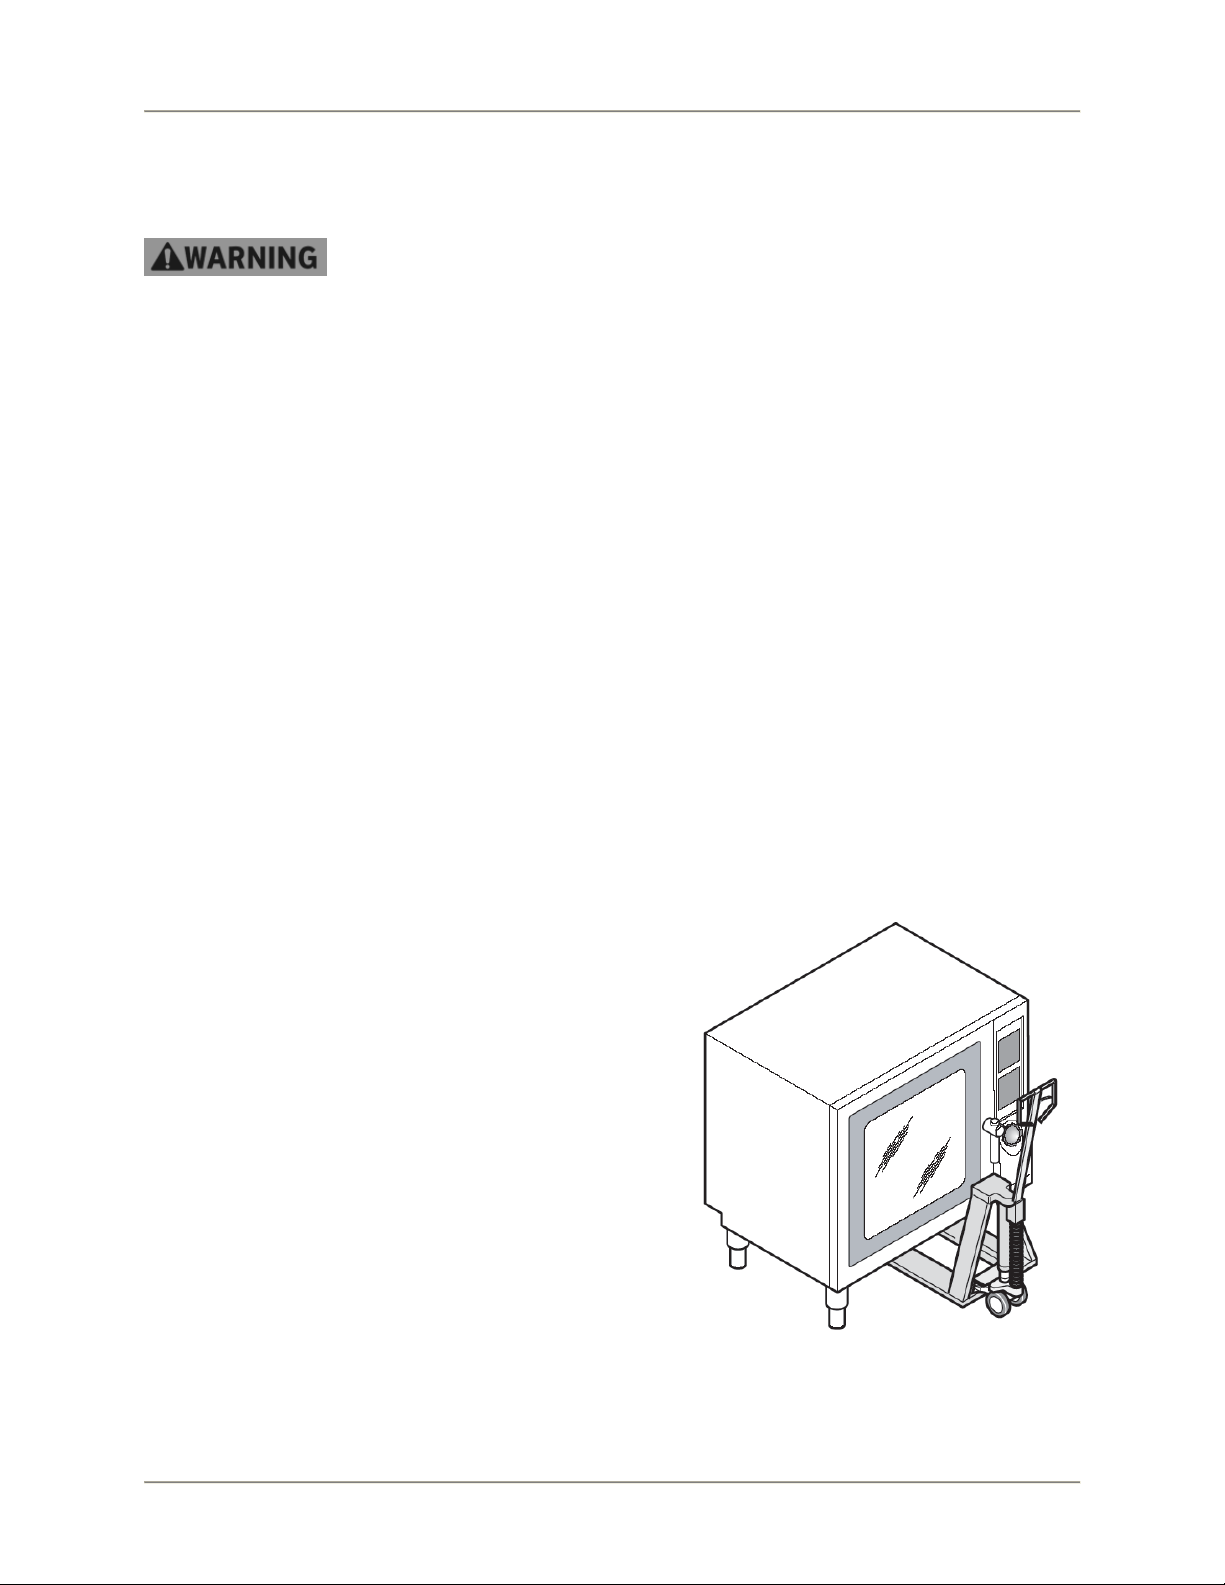
Transport and Unpacking
Any movement of the oven must be carried out by
suitable means such as a forklift or pallet loader.
These must be at least half as large as the convection
oven. If it is necessary to store the oven temporarily,
keep it in a covered, ventilated place at a temperature
from 14°F to 122°F, with humidity no higher than 95%.
Use protective gloves and remove the packaging. Lift
the oven with a forklift, remove the base and place it
in its intended location. After removing the packaging,
immediately check the condition of the oven. If in
doubt, do not use the oven. Contact an authorized
retailer.
6

Convection Oven Installation
Installation Instructions
1. Place the machine in its place of intended use in compliance with the following instructions:
Check that there is enough space (minimum 8”) from any walls or obstacles which may
prevent proper air flow.
Check that maintenance can be performed with a certain freedom of movement.
Avoid placing the oven in places with poor air circulation, in places exposed to sunlight,
where there are high temperatures, near heat sources or in windy locations.
Ambient air temperature must not exceed 89°F. Above that temperature, proper operation of
the oven cannot be ensured.
Always install the oven under a properly operating aspiration hood for the extraction of
vapors.
2. Remove the film which covers some parts of the oven before starting to use it.
7

Convection Oven Installation
3. Clean all substances, including glue residue. Do not use abrasive substances.
4. Position the machine so that it is perfectly level and set the height by means of the leveling feet.
Electrical Connections
The oven is setup for operation at the voltage set forth on the technical data plate. All ovens are provided
with a power cord.
The flexible cable for connection to the electrical mains must not have characteristics which are less than
those of a type with rubber insulation mod. H07RN F and it must have a section which corresponds with
that set forth in the section “Technical Data” of the oven. The cable must also be anchored to the frame
with the cable clamp, the screw of which can be reached through a hole in the frame. It must in any case
8

Convection Oven Installation
be positioned in such a way that at no point does it reach a temperature which is 122°F greater than the
ambient temperature. It must be type SJTO plug 20A 250V P section 3xAWG12.
The connection to the electrical line must be made by placing an automatic switch of sufficient capacity
(see “Technical data” of the oven) and with an opening distance between contacts of at least 3 mm.
Also, during operation of the oven, the power supply must not vary from the nominal voltage value by
±10%.
The oven MUST be earthed by means of the terminal which carries the earth symbol on the connection
board.
It must also be inserted in an equipotential system (the efficiency of which must be checked in
accordance with current standards) using the terminal with the equipotential symbol. It is located near the
electrical cable entry on the panel of the oven bottom.
The manufacturer will not be held liable if this accident prevention standard is not adhered to.
9

Convection Oven Installation
Automatic Safety and Control Devices of the Oven
Protection of the Auxiliary Electrical Circuit
It is checked by the fuses positioned on a terminal block at the line entry.
Protection of the Chamber Fan
A remote switch stops the fan motor in the event of a malfunction or overload. It is located behind the
oven and must be reset manually. When it cuts in, it stops the motor and shuts off the heating elements.
Oven Chamber Safety Thermostat
The safety thermostat disconnects the heating elements if the temperature in the oven chamber is too
high (644°F). It must be reset manually. If it activates, technical service must be notified. All components
are protected by the following type of fuse: CLASS CC,G 600V 20A.
10

Convection Oven Maintenance
Maintenance
Failure to comply with the maintenance below could result in a serious accident.
Electrocution, equipment failure or property damage could result if an unlicensed
electrician performs electrical repair. Ensure that a licensed electrician performs
electrical repair.
Routine Maintenance
Before performing maintenance, unplug the oven.
During cleaning, use protective gloves, mask and garments as required by
standards.
At the end of each workday clean the inside of the oven with appropriate
convection ovens following the suggestions of your supplier. Do not use
corrosive or acidic convection ovens, or convection ovens which are not suitable
for this type of cleaning.
To make cleaning easier, remove the lateral diffusers by lifting them slightly so
they are free of the holding pegs.
Clean the stainless steel parts daily with lukewarm soapy water, and rinse
thoroughly. Then dry.
Absolutely do not clean the stainless steel with steel wool or common steel
brushes, since they may leave ferrous particles which may oxidize, thus causing
rust spots.
Stainless steel wool can be used in the direction of the satin finish.
If the oven is not used for long periods, use a cotton ball to lay a coat of
petroleum jelly on all surfaces; also regularly ventilate the rooms.
11

Convection Oven Maintenance
Oven Chamber Cleaning
Remove any food and/or fat residues from the oven chamber after each cooking cycle. The
combination of fat, heat and forced circulation dirties the oven. Only by cleaning the oven daily is
it possible to avoid difficult cleaning operations.
To clean the oven, use a suitable de-greasing convection oven (non-foaming) as suggested by
your detergent retailer. A spray is preferable to reach behind the protection shield. Do not use
abrasive or corrosive substances, scrapers or steel wool.
To make cleaning the oven chamber easier, it is possible to remove the door completely in a few
simple steps as shown in figure 13. Follow the sequence in reverse order to re-in stall the doo r.
12

Convection Oven Maintenance
Adhere to safety instructions included with cleaning convection ovens for the protection of skin
and eyes. When cleaning, proceed as follows:
1. Heat the oven chamber to approx.158 - 176°F and clean it using the de-greasing detergent in
the recommended quantities.
2. Close the oven and heat it.
3. Let the cleansing convection oven act for 20-30 minutes and then turn the oven off.
4. Slowly open the oven with care to avoid eye and skin damage.
5. Remove the racks or pans from the oven, remove the rack supports attached to the side and
shield, remove the shield by loosening the fastening screws. Wash sep arately (they can also
be placed in the dishwasher).
6. Clean and rinse the oven and fan with water.
7. Re-install the shield and the rack supports.
8. Dry the oven by turning the CONVECTION cycle on.
Cleaning the Door Glass
To reach the inside glass of the oven door, use the lower latch “A”, open outer glass “B” raising it from the
bottom upwards. This will make it possible to get inside the glass for normal cleaning. Upon completion,
lose the external glass by pushing it slowly downwards until the click is heard of insertion in
component “A”.
Cleaning the Fan
Periodically check the condition of the fan. Make sure that there is not too much grease on the blades
since it may slow motor rotation (which in turn may lead to overheating) and uneven heat distribution
(resulting in uneven cooking).
13

Convection Oven Maintenance
What to Do In Case of a Breakdown or Long Periods of Inactivity
1. Switch off the main electrical switch.
2. Set all control panel knobs to zero.
3. Inform technical assistance (only in case of a malfunction).
4. Clean the oven inside and out.
Troubleshooting
Refer to the table below for troubleshooting information.
PROBLEM
PROBABLE
CAUSE
Unit unplugged Check the plug connection and reconnect if necessary
Fuses Check the fuses and replace them if necessary
REMEDY
Oven does not
turn on
Oven does not
warm up
Lights not lit Switch/lights Check the switch and the lights and replace if necessary
Motors do not
work
Oven suddenly
stops
Cables/terminal
block
Switch
Safety thermostat Che ck the safety thermostat and push the red button
Resistor contactor
Heating element
burn out
Motor
contactor/Motor
Safety thermostat Push the red button on the thermostat
Short circuit
Check the cables connection for loose wire and reconnect
if necessary
Check the switch and the voltage at the inlet and outlet.
Replace switch if necessary
Check the voltage at the inlet and outlet of the contactor
and replace if necessary
Replace the heating element
Check the temperature with a manual thermometer and if
necessary replace the thermostat
Check the voltage at the inlet and outlet of the contactor. Check the motor and replace the
contactor or the motor
if necessary
Check the fuses and replace them if necessary, if the
failure persists check all parts with an appropriate tester in
order to find which is the part to replace
14

Convection Oven Maintenance
Repair Procedures
Replacement of spare parts must be performed exclusively by qualified and
AUTHORIZED personnel.
Turn the main switch OFF and unplug the convection oven before carrying out
any spare parts replacement.
Replacement of Motors
It is necessary to remove the back by removing the 4 fastening screws “A” and the 4 screws “B” that
support them.
15

Convection Oven Maintenance
Outer Coverings
Remove the 4 rear fastening screws “C”.
Bulb, Heating Element and Motor Fan
It is necessary to access the inside of the oven, first removing pans, racks and related supports, and then
the conveyor.
30W Motor
Remove the fan by following the procedure outlined above, disconnect the motor from the electrical
system, loosen the 4 screws and replace the motor. Before re-installing the fan, check that there is no
friction between the motor shaft and the ring nut located inside the oven. If there is, loosen the fixing
screws of the ring nut and re-tighten them after eliminating the friction and having centered the ring nut on
the motor shaft.
Heating Elements
Disconnect the heating element connections outside the oven chamber. Loosen the heating elements
from inside the oven chamber and replace them.
16

Convection Oven Maintenance
Electro-Mechanical Controls
All the electric components are visible. To replace them it is necessary to disconnect the attachments,
remove the knobs, unscrew the fastening screws or nuts and replace them.
For the adjustable thermostat, safety thermostat and thermometer, unscrew the
guard and the supports and remove the bulbs. Once they have been replaced use
high-temperature resistant silicone to seal the holes. After replacement, reseal the
holes for the passage of the capillaries with high temperature silicone.
Chamber Face Gasket
It is simply pressed in. Pull to remove it. NB: Before removing it, note its position carefully so as to place
the new one in the same position.
Replacement of Chamber Light and Glass Gasket
Check and replace the glass gasket and any lights in the oven chamber.
17

Convection Oven Replacement Parts
Replacement Parts
Use the information in this section to identify replacement parts. To order replacement parts, call your
local BKI sales and service representative. Before calling, please note the serial number on the rating tag
affixed to the unit.
18

Convection Oven Replacement Parts
POS. CODE BKI # DESCRIPTION
96U
51C
10 I
136 10306 MT0018 Chamber Lamp Frame
6AH I
71A
93AH
27G
144Q
88H
92AS
7Z I
153E
47C
143Q
45I
79G
33E
38A
39P
2AA I 163
24
40G
50D
94AU 35374
1F I 14
37A
94AT 35373
11Q
35D
44
11P
13
129A
146AG
69AA
95
35350
471
35,003,001
10304
10305
35365
10024
35355
12167
35360
15203.01
10586
0364A
16754AF0
10339
10338
14075
616
35370
15062
15021
10342
617
166
10353
12
596
50
20045
20
35379
10951
MT0029
MT0022
MT0015
MT0016
MT0017
MT0024
MT0006
MT0033
MT0034
MT0035
MT0013
MT0021
MT0023
MT0028
MT0011
MT0010
MT0009
MT0007
MT0031
MT0002
MT0039
MT0030
MT0019
MT0014
MT0037
MT0038
MT0001
MT0040
MT0008
MT0036
MT0038
MT0005
MT0020
MT0012
MT0003
MT0004
MT0026
MT0027
MT0032
MT0025
Back side
Cable Lock
Chamber Lamp 15W
Chamber Lamp Gasket
Chamber Lamp Glass
Complete Door
Contactor
Conveyor
Conveyor Pin
Cover
Door glass
Flexible cord 3X12AWG SJTO
Foot
Front Panel
Fuseholder 2x20A
Fuses 20A 10,3x38 600V
Gasket
Green Light 250V
Handle
Heating Element 1500W 240V 60Hz
Heating Element 1500W 208V
Hinge
Knob
Lampholder
Profile, Front, Left
Profile Fixings
Motor 21W 240V 60Hz
Motor 21W 208V
Red Light 250V
Profile, Front, Right
Profile Fixings
Safety Thermostat 340°C (High Limit)
Switch
Terminal block
Thermostat 520°F
Timer 120min
Tray
Trayholder
Vent hole
Wiring
19

Convection Oven Wiring Diagrams
Wiring Diagrams
20

Convection Oven Notes
Notes
21

P.O. Box 80400, Simpsonville, S.C. 29680-0400, USA
864-963-3471
http://www.bkideas.com
Made and printed in the U.S.A
LI0131/0808
2812 Grandview Dr. Simpsonville, S.C. 29680, USA
864-963-3471 http://www.bkideas.com
 Loading...