

Page 1
INSTRUCTION MANUAL
BMSM30, BMSM40, BMSM50,
BMSM60, BMSM70, BMSM80,
BMSM120 SPIRAL MIXER
Please fully read this manual before installing
machine or attempting to use. Failure to do so may
result in injury and may also void all warranty!
Page 2

Page 3

Feature
2
Safety Precautions
2
Specifications
3
Installation Diagram
4
Installation
5
Cleaning
5
Electrical Connections
5
Electric Parts Diagram & Main Circuit
6
Technical Notes
6
Moving The Mixer
7
Control
8-9
Troubleshooting After Mixing
10
Electric Wiring Diagram
10
CONTENTS
1. FEATURES
• Heavy-duty, stainless steel spiral agitator and bowl, designed to Baking Industry Sanitation Standards.
• Instant termination of operation if safety guard is lifted. Operation is possible only when safety guard is in
place.
• Minimal-Maintenance, high-power motor. Speed is altered without shifting gear.
• High-efficiency, 2-speed mixing achieves through blending ingredients to achieve desired results consistently
within 7-10 minutes.
• Accurate timers automatically control mixing time. Machine is still operational even if timer is interrupted.
• New, dual-direction mixing technology, speed is synchronized with reverse-rotating bowl to mix ingredients
and blend dough hydraulically downward. This keeps dough cooler, and achieves desired results more
efficiently.
• Powerful spiral mixing increase water absorption by dough, thus increasing volume and assuring uniform
texture.
• Instant-response servo-limit switch for safety.
• Bowl may be set to rotate either forward or backward.
2. SAFETY PRECAUTIONS
WHEN USING THIS MACHINE, ALWAYS MAKE SURE THE FOLLOWING CONDITIONS OR
OPERATIONS ARE IN EFFECT. FAILURE TO DO SO MAY CAUSE ACCIDENTS.
• KEEP HAND, CLOTHING & RIGID OBJECTS AWAY FROM BOWL AND HUB
ATTACHMENTS WHEN IN OPERATION.
• DO NOT USE THIS MACHINE FOR ANY APPLICATIONS OTHER THAN FOOD PROCESSING.
• USE THE MACHINE ONLY WITH THE ELECTRICAL SERVICE SPECIFIED ON ITS
NAMEPLATE.
• DISCONNECT THE MACHINE FROM ITS POWER SOURCE BEFORE CARRYING OUT ANY
MAINTENANCE.
• DO NOT DISABLE OR REMOVE THE SAFETY MECHANISMS INCLUDED WITH THE
MACHINE.
• DO NOT LEAVE THE MACHINE IN OPERATION UNATTENDED.
• OBSERVE MAINTENANCE AND SAFETY INSPECTION SCHEDULES.
Page 4

3. SPECIFICATIONS
ELECTRICAL
200V/60HZ, three phase.
220V/60HZ, three phase.
380V/50HZ, three phase.
415V/50HZ, three phase.
440V/60HZ three phase.
TRANSMISSION
Pulley drive to special fiber belt
TIMER
2 standard 60 MIN. Timer. (BMSM30 &BMSM40 ARE OPTIONAL.)
SAFETY GUARD
Stainless steel safety guard is standard. Instant termination of operation to protect operator if
safety guard is lifted
SPEED
60 Hz
50 HZ
Model No.
Low
High
Low
High
BMSM30
131
262
110
220
BMSM40
131
262
110
220
BMSM50
131
262
110
220
BMSM70
131
262
110
220
BMSM80
131
262
110
220
BMSM120
131
262
110
220
Model No.
Flour
(kg)
Dough
(Kg)
Bowl
(Liter)
Packing Size
(cm)
Net
Weight
(Kg)
Gross Weight
(kg)
Motor (HP)
Agitator
Bowl
BMSM30
15
30
50
95*60*120
150
200 2 0.5
BMSM40
25
40
70
100*65*130
180
230
2.5
0.5
BMSM50
30
50
80
121*70*138
400
500 3 1
BMSM70
45
70
100
114*55*104
450
550 4 1.5
BMSM80
50
80
120
133*88*152
520
620 5 2
BMSM120
80
120
180
140*97*159
550
650
8.5
3 Model
MOTOR ______________ Three phase motor. Bowl and spiral agitator are driven by separate motors
Page 5
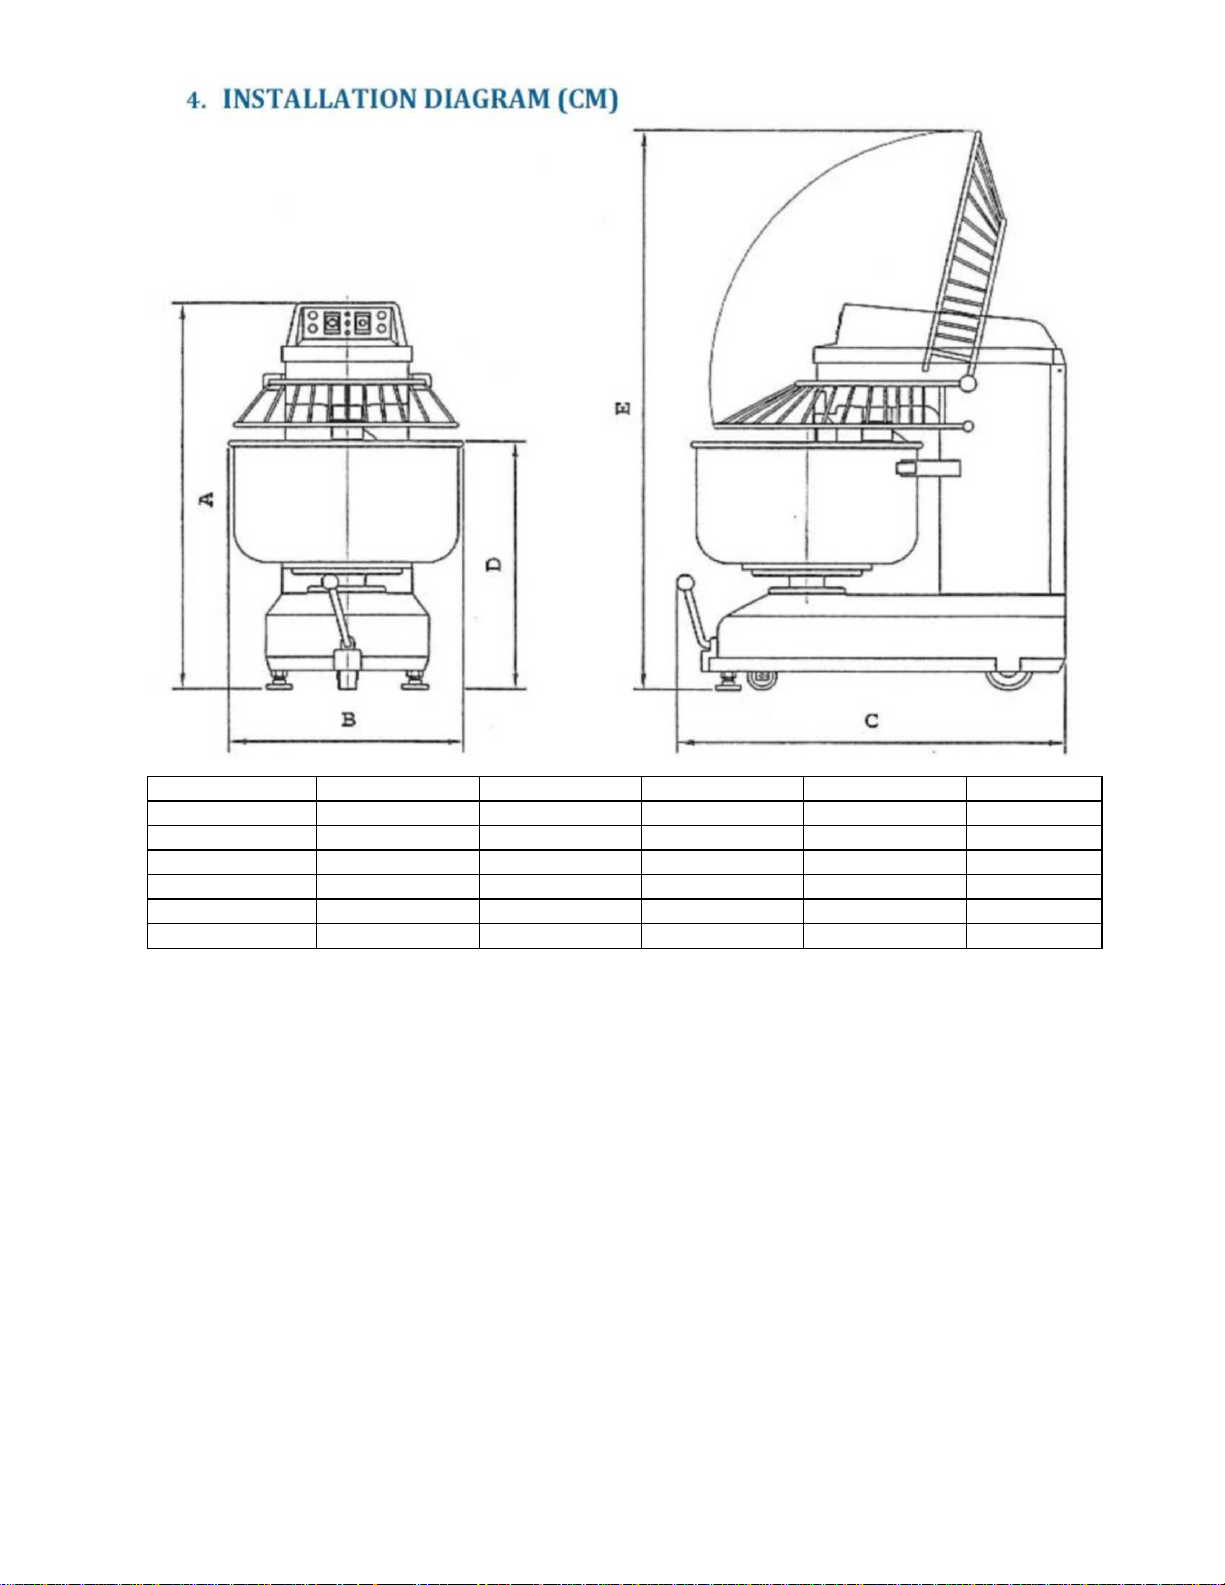
A B C D E
BMSM30
99
54
88
57
134
BMSM40
105
54
88
67
140
BMSM50
1 14
55
104
78
147
BMSM70
1 14
66
104
8 1
152
BMSM80
120
71
114
8 1
170
BMSM120
130
8 1
122
8 6
180
5. INSTALLATION
Your BAKEMAX® SPIRAL MIXER is shipped fully assembled, and ready for installation. The machine must be
installed on a horizontally-level floor. It should be placed in a location that is convenient for both operation and
maintenance. The machine's safety features make it possible to stand close to the machine during operation.
6. CLEANING
WARNING - UNPLUG MACHINE BEFORE CLEANING OR SERVICING.
• After each day's use, wash the mixer bowl and agitator thoroughly with hot water and a mild soap solution and rinse
with either a mild soda or vinegar solution, rinse thoroughly with a clean damp cloth.
• Clean under machine occasionally. Disconnect power cord, raise stabilizing feet and move machine.
Page 6
7. ELECTRICAL CONNECTIONS
WARNING: BEFORE CONNECTING YOUR MACHINE TO ANY SOURCE OF ELECTRICAL POWER, READ
THE SPECIFICATIONS ON THE MACHINES NAME PLATE CAREFULLY AND BE SURE THEY COINCIDE
WITH THOSE OF YOUR POWER
SOURCE.
• Electrical connections should be made by qualified personnel in accordance with applicable codes and regulations.
• Appropriate fuse must be installed to provide adequate protection in case of a short circuit.
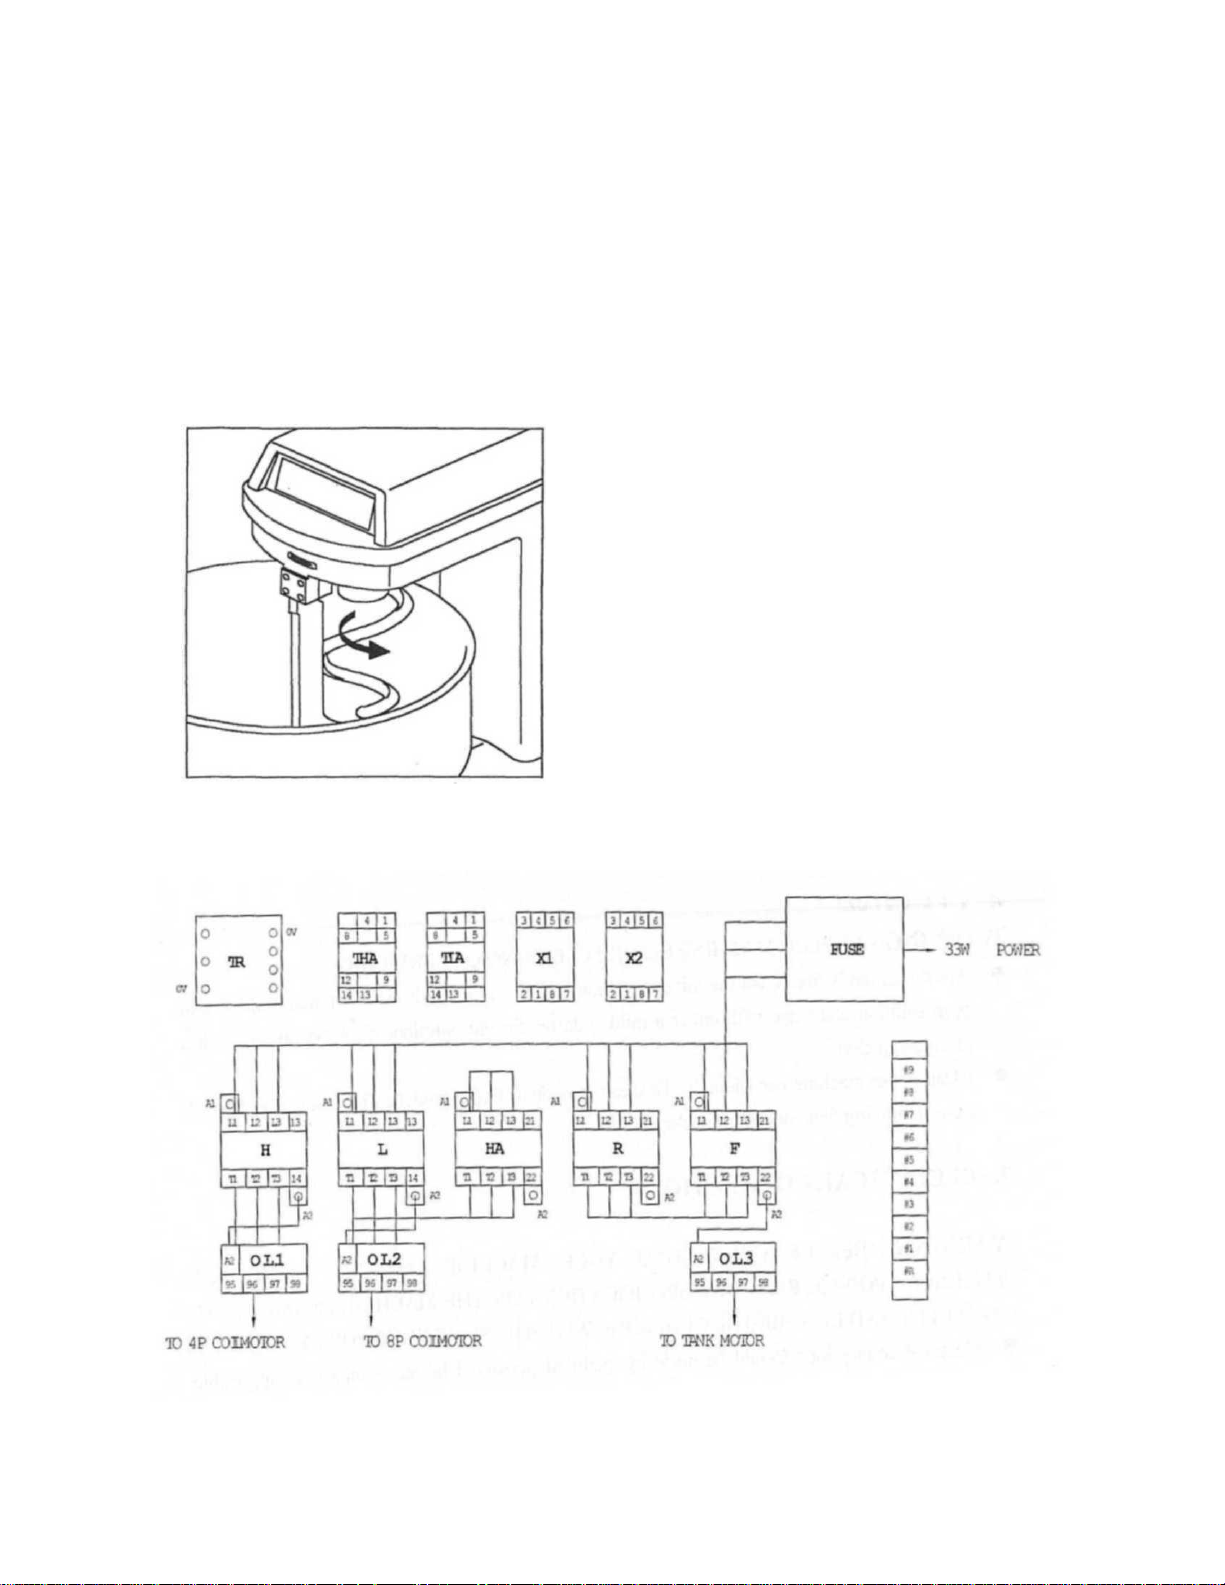
• Special attention should be given to making the correct electrical connection regarding the direction of rotation of
the spiral agitator. The direction of rotation is indicated by an arrow on the front of mixer.
8. ELECTRIC PARTS DIAGRAM & MAIN CIRCUIT (EXCEPT SIMPLE TYPE)
Page 7
9. TECHNICAL NOTES
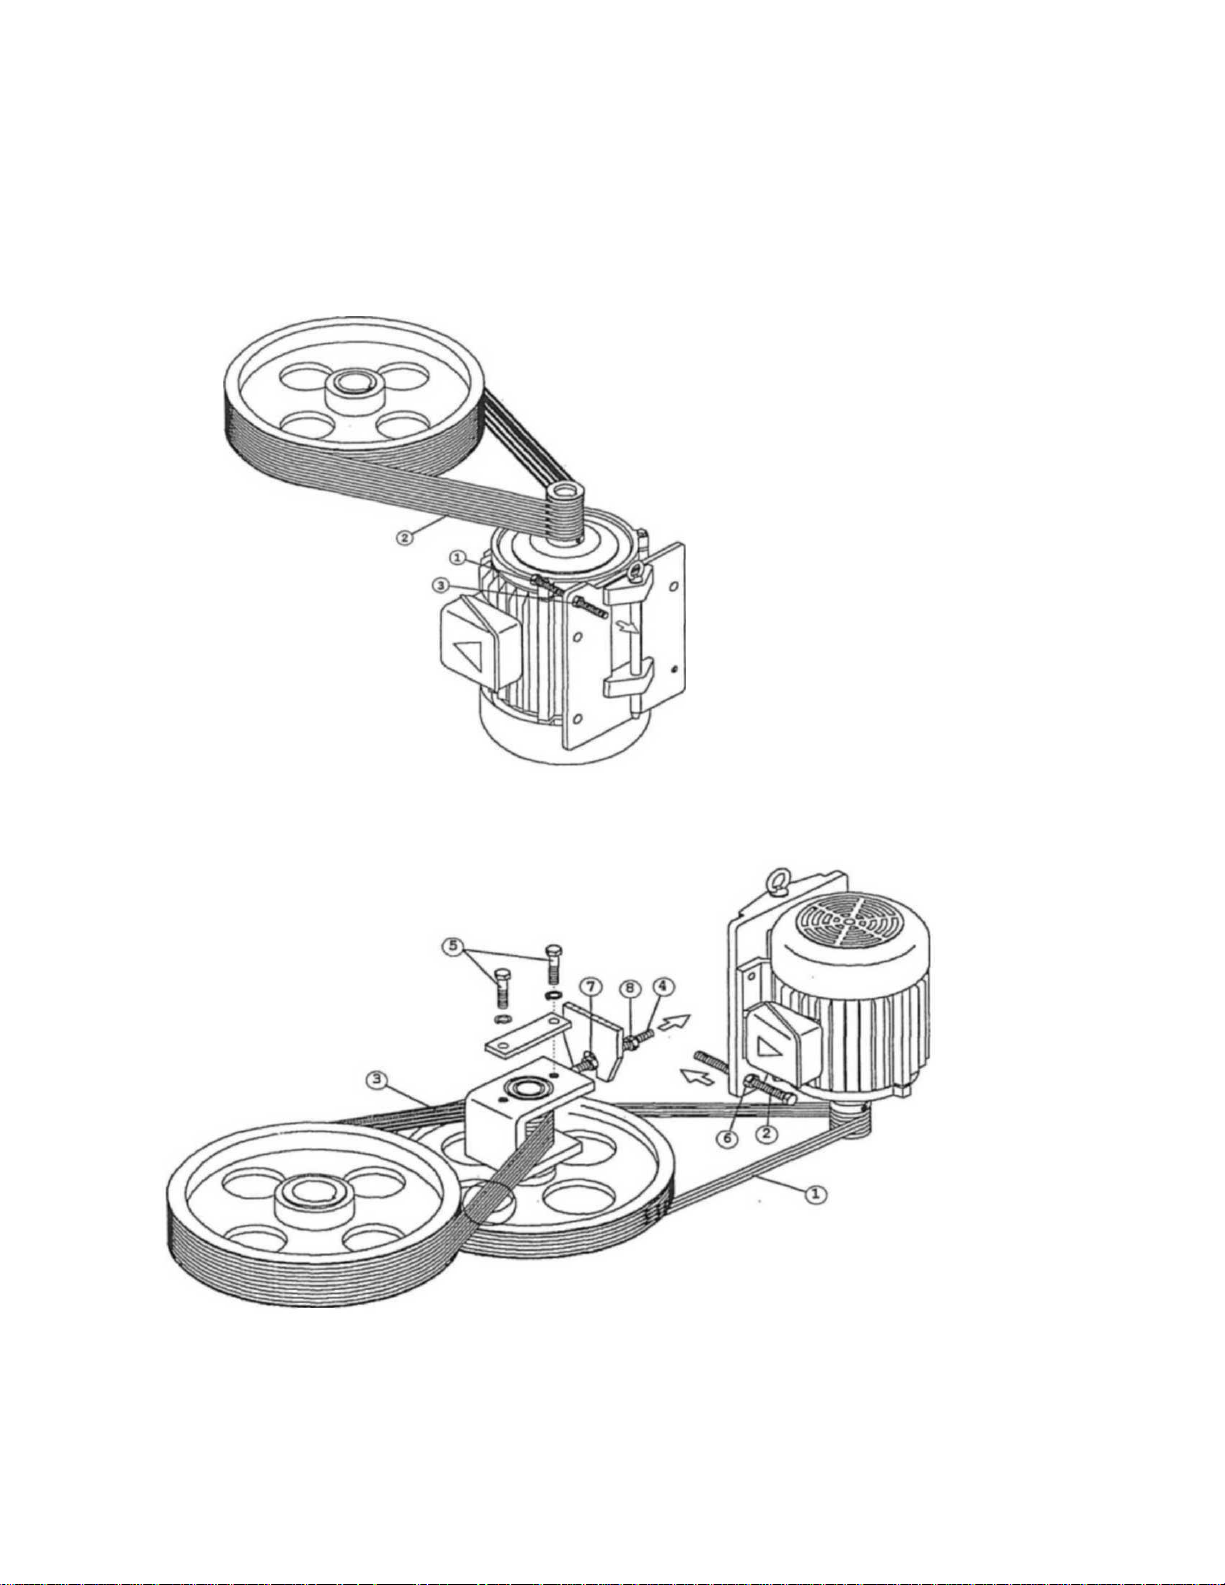
DRIVEN BELT
• The drive belt should be installed with sufficient tension to avoid excessive slack.
• Agitator drive belts may be adjusted by means of a screw No. 1 on motor support plate.
• Bowl drive belts may be adjusted by adjusting the screw nut No. 7 & 8.
• Drive belts for the bowl drive motor may be adjusted by means of the screw No. 2 on lower motor support plate.
Page 8
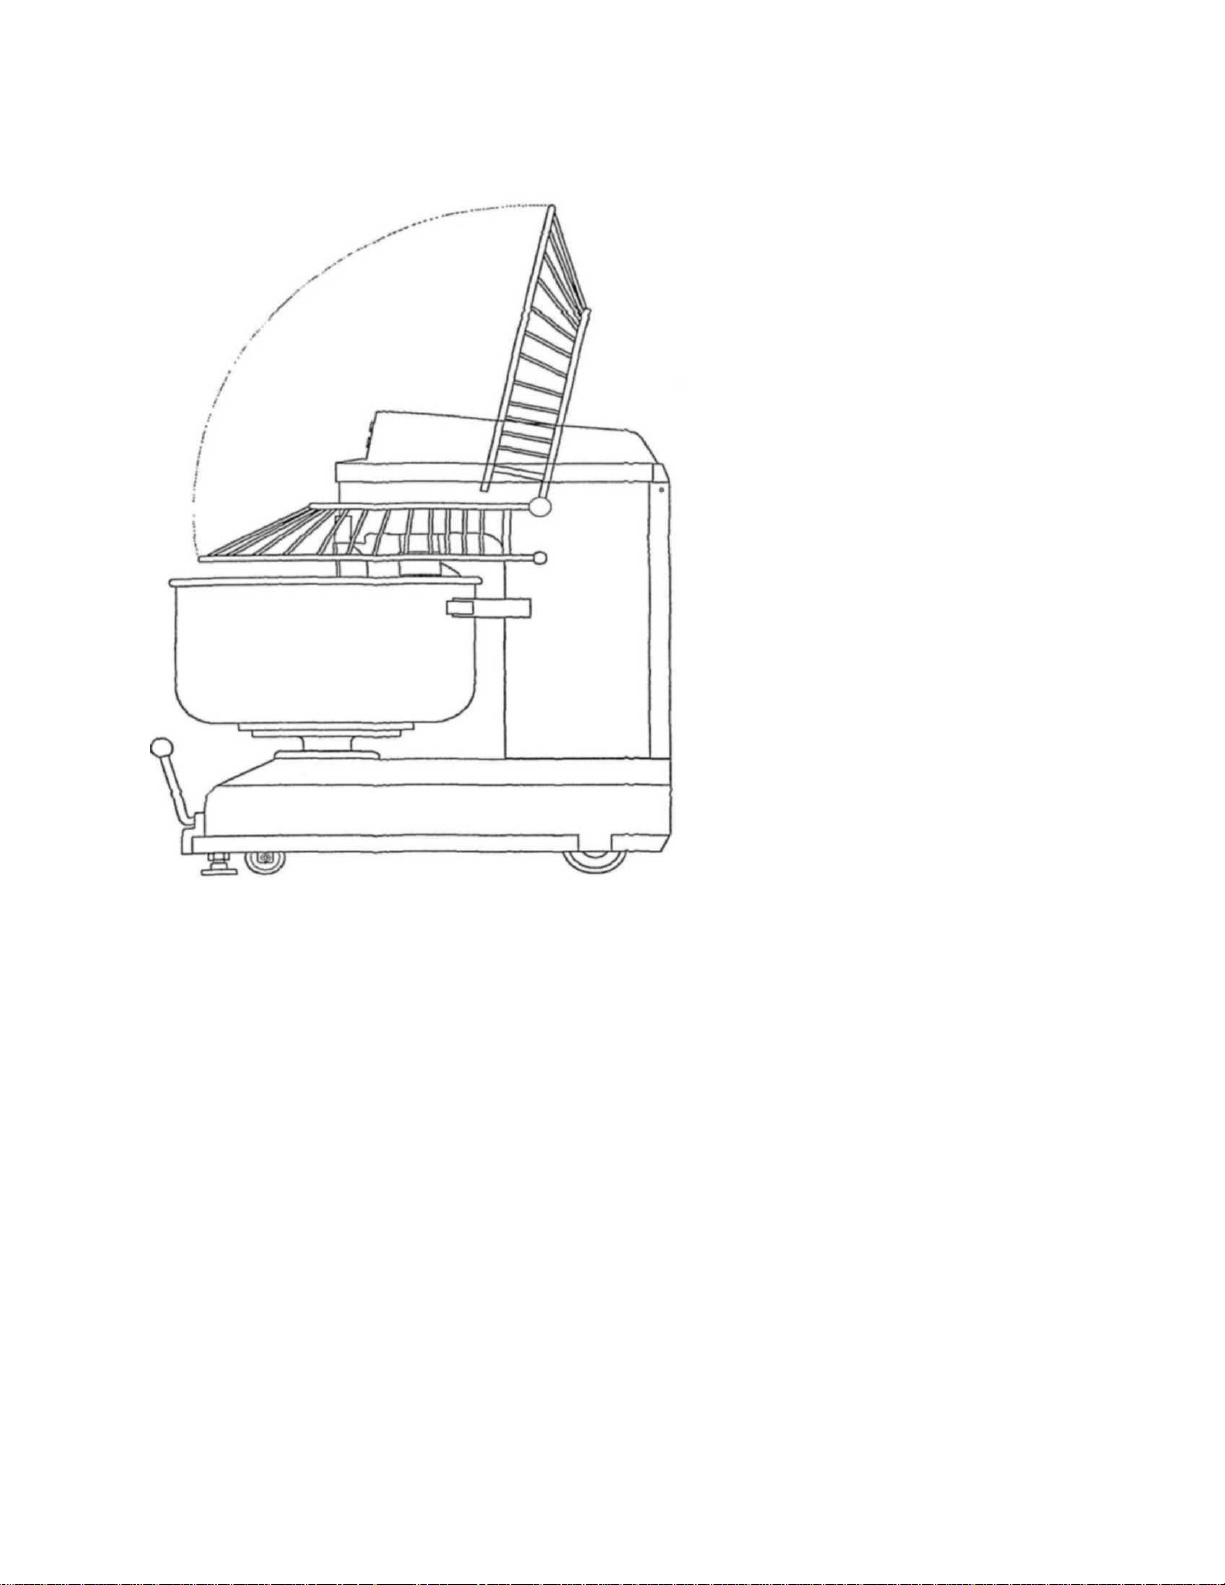
10.MOVING THE MIXER
To move the mixer, push down the ball-knob lever until the front wheel touches the front so that the mixer may be
moved.
To retract the front wheel once the mixer has been moved, push the ball-knob lever up until the front of the mixer
rests on the front foot plate.
NOTE:
BMSM50
BMSM70
BMSM80 &
BMSM120
ONLY
Page 9
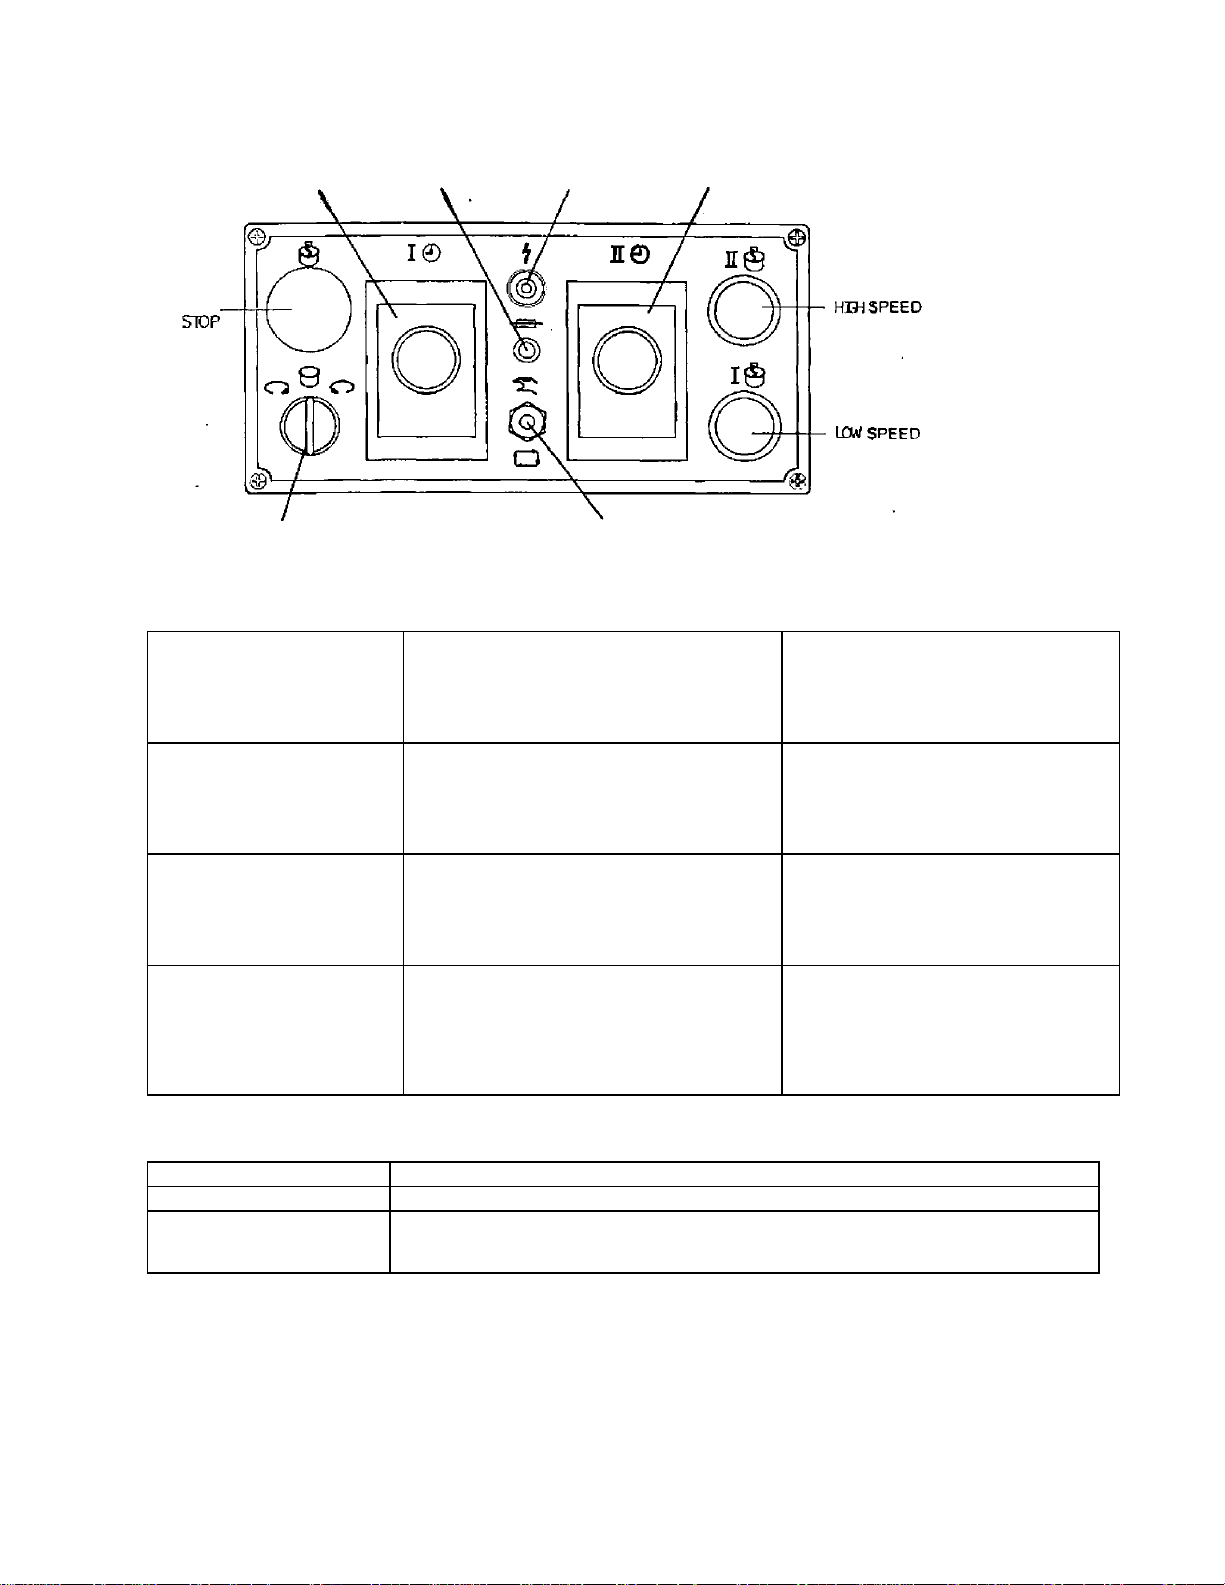
FUNCTION DESIRED
Manual (Continuous) Mixing
INSTRUCTION
Turn TOGGLE SWITCH Manual Press LOW
SPEED BUTTON or Press HIGH SPEED
BUTTON Press STOP to PAUSE
RESULT
Manual control Starts low speed mixing.
Starts high speed mixing. Mixing paused.
Timed Mixing at Low Speed
1.Turn TOGGLE SWITCH Auto 2.Set Timer
(LEFT) to desired time 3. Set Timer (RIGHT)
to to ZERO 4.Press LOW SPEED BUTTON
5.Press STOP to PAUSE
Will automatically mix at low speed until
timer reaches zero. STOP will pause
mixing. To continue mixing, reset timer
and press LOW SPEED.
Timed Mixing at high Speed
1.Turn TOGGLE SWITCH Auto 2.Set Timer
(RIGHT) to desired time. 3.Set Timer(LEFT)
to ZERO 4.Press HIGH SPEED BUTTON.
5.Press STOP to PAUSE
Will automatically mix at high speed
until timer reaches zero. STOP will pause
mixing. To continue mixing, reset timer
and press HIGH SPEED.
Timed Mixing at Two speed
1.Turn TOGGLE SWITCH to Auto 2.Set
both timers LOW SPEED (left)
and HIGH SPEED (right) to desired timer.
3.Press LOW SPEED BUTTON. 4.Press
STOP to PAUSE
Will mix at low speed until timer reaches
zero, will switch to high speed until high
speed timer reaches zero and stops.
STOP will pause mixing.
PROBLEM
POSSIBLE CAUSE
Mixer will not start
Check to see that bowl guard is in lower position. If the POWER
LAMP is not on,
Check electric supply at breaker (fuse), check electric cord to see if it is plugged into
receptacle. Check electrical box.
DJREODN OF ROTATDN OF BOWL OR
ll.CONTROL (EXCEPT SIMPLE TYPE)
THER(lCW SPEED) FUSE PCWER IMP TEERlftlH SPEED)
12. TROUBLESHOOTING AFTER MIXING
Page 10
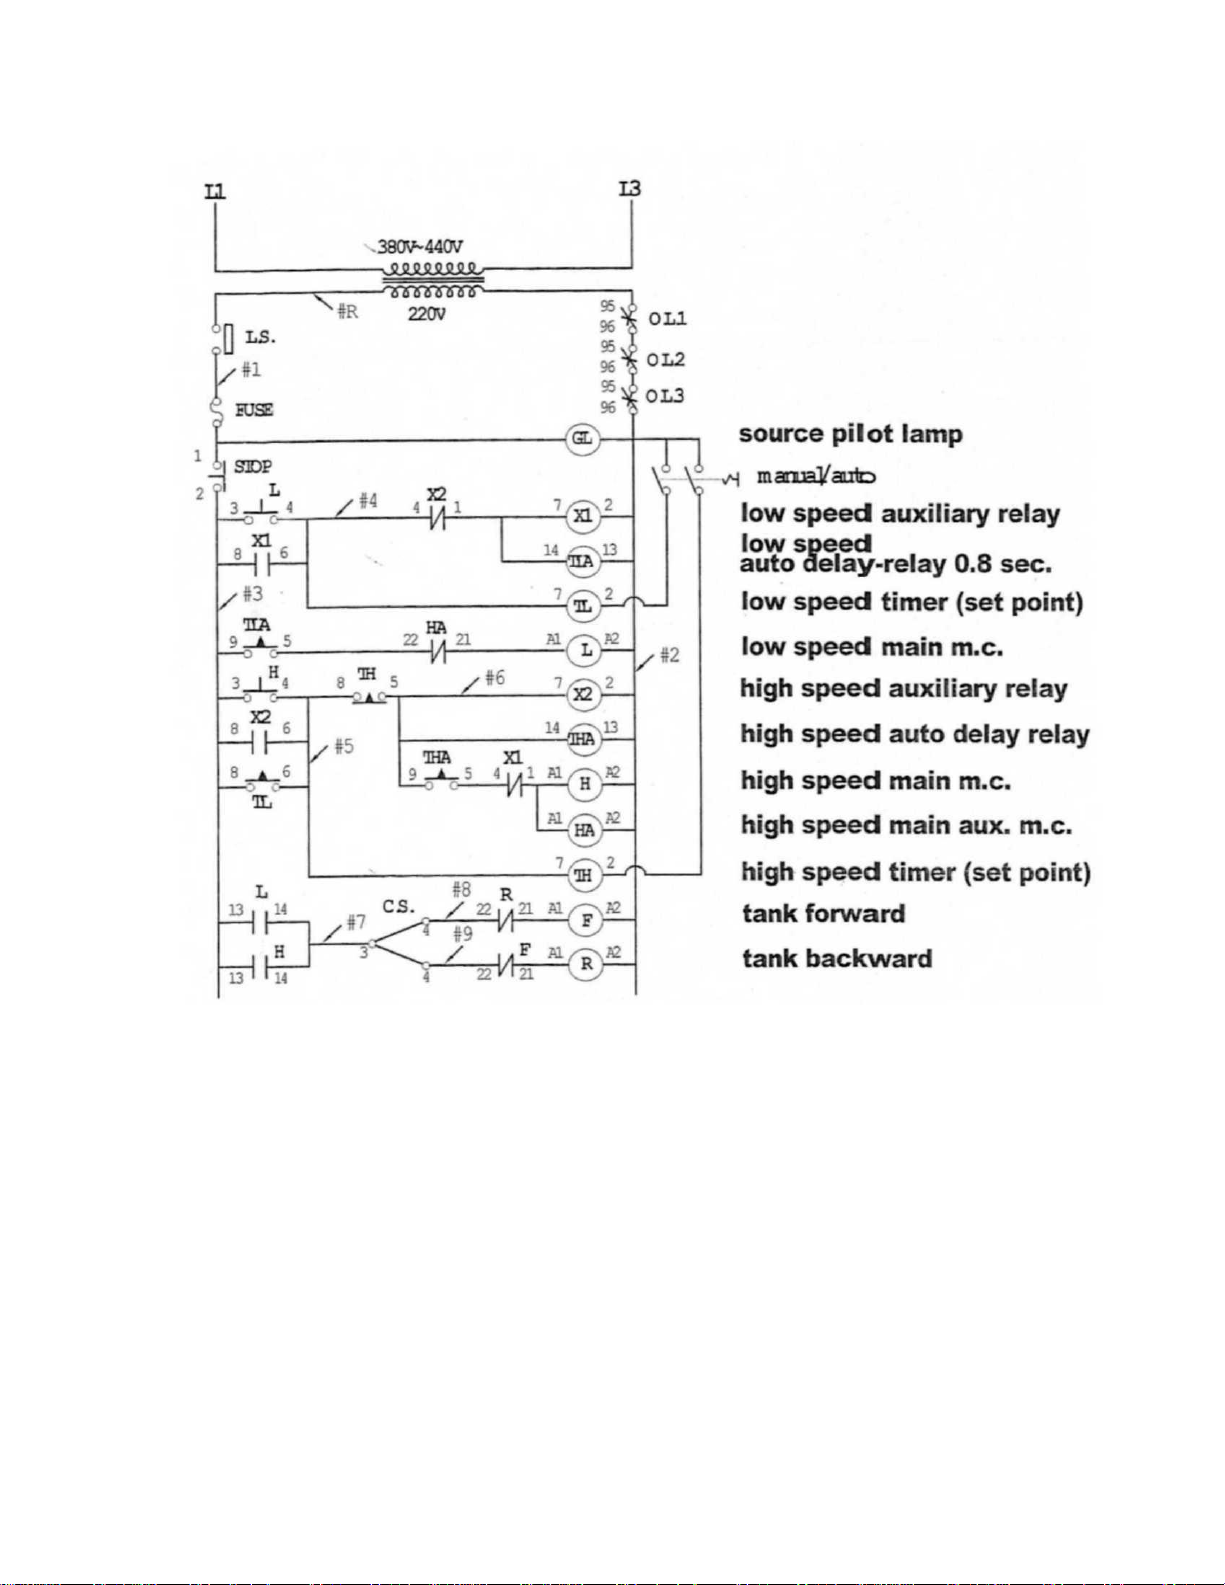
13. ELECTRICAL WIRING DIAGRAM
Page 11

Page 12

 Loading...