

Page 1
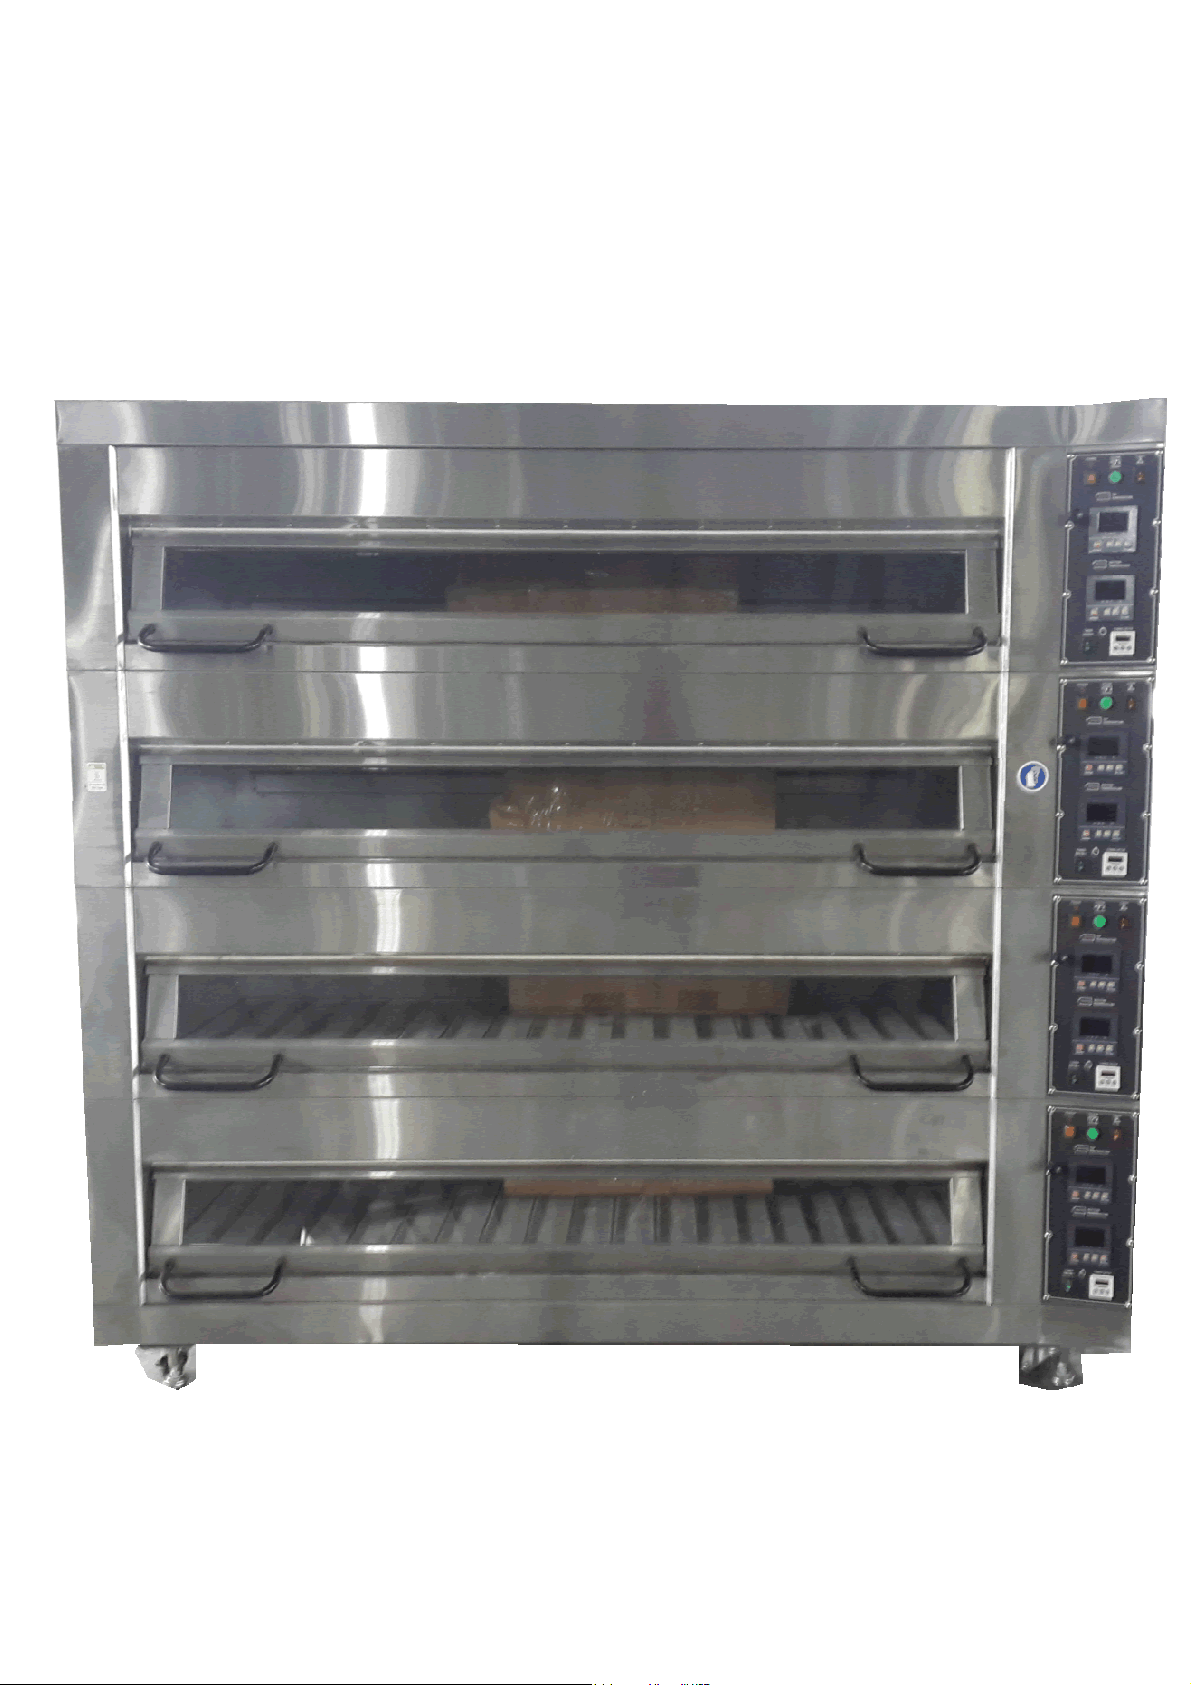
Electric Deck Oven
Instruction Manual
Installation, Operation, & Maintenance
For your safety and continued enjoyment of this product, always read the
instruction book carefully before using.
1
Page 2
2
DANGER!
DANGER POTENTIALLY HAZARDOUS SITUATION WHICH, IF NOTAVOIDED, COULD
RESULT IN DEATH.
WARNING POTENTIALLY HAZARDOUS SITUATION WHICH, IF NOT AVOIDED, COULD
RESULT IN DEATH OR SERIOUS INJURY.
CAUTION POTENTIALLY HAZARDOUS SITUATION WHICH, IF NOT AVOIDED, MAY
RESULT IN MINOR OR MODERATE INJURY.
NOTICE Helpful operation and installation instructions and tips are present.
DANGER!
FOR YOUR SAFETY
DO NOT STORE OR USE GASOLINE OR OTHER FLAMMABLE
VAPORS AND LIQUIDS IN THE VICINITY OF THIS OR ANY OTHER
APPLIANCE.
WARNING: IMPROPER INSTALLATION, ADJUSTMENT, ALTERATION,
SERVICE OR MAINTENANCE CAN CAUSE PROPERTY DAMAGE,
INJURY OR DEATH. READ THE INSTALLATION, OPERATING AND
MAINTENANCE INSTRUCTIONS THOROUGHLY BEFORE
INSTALLING OR SERVICING THIS EQUIPMENT.
Model #: Serial #:
Date Purchased: Date Installed:
Purchased From: Location:
Purchase Order #: For Service,
Call:
Page 3

A. IMPORTANT READ FIRST IMPORTANT __________________________ 4
B. SAFETY PROCEEDURES _______________________________________ 6
1. Lockout Procedure ________________________________________ 6
2. Safety Precautions ________________________________________ 6
3. Safety Considerations ______________________________________ 6
C. EQUIPMENT DESCRIPTION ____________________________________ 7
1. Large Supervising Window _________________________________ 7
2. Exterior and Interior _______________________________________ 7
3. Top and Bottom Heating Elements ___________________________ 7
4. Heat Isolation and Retention ________________________________ 8
5. Digital Temperature Control ________________________________ 8
6. Comprehensive Control Functions ____________________________ 8
7. Energy Saving ___________________________________________ 8
8. Control Panel ____________________________________________ 9
9. Temperature Setting ______________________________________ 10
D. UNPACKING _________________________________________________ 11
1. Receiving the Oven ______________________________________ 11
2. Location _______________________________________________ 11
3. Un-crating ______________________________________________ 11
E. INSTALLATION ______________________________________________ 12
1. ELECTRICAL CONNECTION _____________________________ 13
2. VENTILATION AND CLEARANCES ______________________ 13
3. STEAM HOSE CONNECTION ____________________________ 14
1. INITIAL START UP ________________________________________ 14
F. OPERATION _________________________________________________ 15
1. GENERAL _____________________________________________ 15
2. BAKING/COOKING _____________________________________ 15
3. STEAM _______________________________________________ 16
4. Under-built proofer (Optional) ______________________________ 16
G. MAINTENANCE & CLEANING _________________________________ 17
1. DAILY CLEANING _____________________________________ 17
2. WEEKLY CLEANING ___________________________________ 17
3. CLEANING THE DECK __________________________________ 17
4. CHANGING LIGHTS ____________________________________ 18
H. TROUBLESHOOTING _________________________________________ 18
1. Symptoms ______________________________________________ 18
2. TESTS ________________________________________________ 19
3
Page 4
4
A.IMPORTANT READ FIRST IMPORTANT
CAUTION THE OVEN WEIGHS OVER HUNDRED LBS/KILOGRAM. FOR SAFE
HANDLING, INSTALLER SHOULD OBTAIN HELP AS NEEDED, OR EMPLOY
APPROPRIATE MATERIALS HANDLING EQUIPMENT (SUCH AS A FORKLIFT,
DOLLY, OR PALLET JACK) TO REMOVE THE UNIT FROM THE SKID AND MOVE
IT TO THE PLACE OF INSTALLATION.
CAUTION ANY STAND, COUNTER OR OTHER DEVICE ON WHICH OVEN WILL BE
LOCATED MUST BE DESIGNED TO SUPPORT THE WEIGHT OF THE OVEN.
CAUTION SHIPPING STRAPS ARE UNDER TENSION AND CAN SNAP BACK WHEN
CUT.
DANGER!
DANGER THIS APPLIANCE MUST BE GROUNDED AT THE TERMINAL PROVIDED.
FAILURE TO GROUND THE APPLIANCE COULD RESULT IN ELECTROCUTION
AND DEATH.
WARNING INSTALLATION OF THE UNIT MUST BE DONE BY PERSONNEL QUALIFIED
TO WORK WITH ELECTRICITY AND PLUMBING. IMPROPER INSTALLATION CAN
CAUSE INJURY TO PERSONNEL AND/OR DAMAGE TO EQUIPMENT. UNIT MUST
BE INSTALLED IN ACCORDANCE WITH ALL APPLICABLE CODES.
NOTICE The data plate is located on left side of the oven and inside control panel. The
oven voltage, wattage, serial number, specifications are on the data plate. This
information should be carefully read and understood before proceeding with the
installation.
Page 5
NOTICE The installation of any components such as a vent hood, grease extractors, fire
extinguisher systems, must conform to their applicable National, State and
locally recognized installation standards.
NOTICE During the first few hours of operation you may notice a small amount of smoke
coming from the oven, and a faint odor from the smoke. This is normal for a new
oven and will disappear after the first few hours of use.
CAUTION ALWAYS KEEP THE AREA NEAR THE APPLIANCE FREE FROM
COMBUSTIBLE MATERIALS.
CAUTION KEEP FLOOR IN FRONT OF EQUIPMENT CLEAN AND DRY. IF SPILLS
OCCUR, CLEAN IMMEDIATELY, TO AVOID THE DANGER OF SLIPS OR FALLS.
WARNING KEEP WATER AND SOLUTIONS OUT OF CONTROLS. NEVER SPRAY OR
HOSE CONTROL CONSOLE, ELECTRICAL CONNECTIONS, ETC.
CAUTION MOST CLEANERS ARE HARMFUL TO THE SKIN, EYES, MUCOUS
MEMBRANES AND CLOTHING. PRECAUTIONS SHOULD BE TAKEN TO WEAR
RUBBER GLOVES, GOGGLES OR FACE SHIELD AND PROTECTIVE CLOTHING.
CAREFULLY READ THE WARNING AND FOLLOW THE DIRECTIONS ON THE
LABEL OF THE CLEANER TO BE USED.
NOTICE Service on this, or any other, JENDAH appliances must be performed by
qualified personnel only. Consult your authorized service station for the service
station nearest you.
WARNING BOTH HIGH AND LOW VOLTAGES ARE PRESENT INSIDE THIS APPLIANCE
WHEN THE UNIT IS PLUGGED/WIRED INTO A LIVE RECEPTACLE. BEFORE
REPLACING ANY PARTS, DISCONNECT THE UNIT FROM THE ELECTRIC
POWER SUPPLY.
5
Page 6

6
CAUTION USE OF ANY REPLACEMENT PARTS OTHER THAN THOSE SUPPLIED BY
JENDAH OR THEIR AUTHORIZED DISTRIBUTORS CAN CAUSE BODILY INJURY
TO THE OPERATOR AND DAMAGE TO THE EQUIPMENT AND WILL VOID ALL
WARRANTIES.
B.SAFETY PROCEEDURES
1. Lockout Procedure
1. Announce lockout to other personnel.
2. Turn both heat and control power off at main panel.
3. Clear unit of all personnel.
4. Test lockout by turning power switch on and observing if power indicator comes on. Check heater
circuit with voltmeter.
5. Perform necessary repairs or tests.
6. Clear unit of personnel before restarting.
7. Turn power on at main panel.
8. Announce unit is “on” to other personnel.
2. Safety Precautions
The Manufacturer, JENDAH FOOD MACHINERY CO., LTD, hereby disclaims any and all
responsibility for injury, damage, loss or other claim that may occur to person or property form
improper alteration, modification, addition, operation, maintenance or service, whether it be
mechanical, electrical, fuel, operator motor or otherwise, which may occur from such improper
alteration, modification, addition, operation, maintenance or service to this piece of equipment.
3. Safety Considerations
The oven is manufactured to rigid standards. The presence of safety equipment control and
interlocks on an appliance and attendant components of installation cannot in and of themselves,
assure absolute safety of operation. Diligent, capable, well trained operators and maintenance
personnel, as well as proper programs of operation and maintenance, are essential to the safe and
reliable operation of this appliance.
A. The responsibility of the manufacturer is to supply suitable, comprehensive instructions and
recommendations for the operation and maintenance of the appliance.
B. Trained qualified and factory-authorized personnel must perform all operation, maintenance and
Page 7

repair of these appliances. It is the responsibility of the owner / operator to ensure that this happens.
C. A regular periodic program of cleaning, inspection and maintenance must be established and
comprehensive maintenance records maintained. It is the sole responsibility of the user to establish,
schedule and enforce the frequency and scope of these programs in keeping with recommended
practice and with due consideration given to actual operating conditions.
D. The appliance must be operated within the limits, which will not exceed the working limits of any
component within the appliance as a whole.
C.EQUIPMENT DESCRIPTION
Model: T-series
Transparent-type Deck Oven
1. Large Supervising Window
Its door is equipped with a large window of tempered glass. This not only makes it easy to supervise
the baking, but also let operators or even customers see the baking food in the oven.
2. Exterior and Interior
Front covers are made of heavy-gauge, 1.2mm(1/8") type 430 stainless steel with HL finish. The
bruised finish creates a strong contrast look for the oven and prevents scratches caused by working
or clearing (The left, right, back stainless steel enclosures are also optional to further enhance
appearance and protect the oven.) The chamber is manufactured of 1.2mm(1/8") high-heat resistant
steel.
3. Top and Bottom Heating Elements
Independent, operator controlled top & bottom heating elements provide an optimal heat distribution
over the entire chamber. The resulting optimal thermal condition of the chamber uniformly transfers
the heat to the products. The bottom set of electric heating elements attaches to the underside of the
hearth, and the top set attaches to the ceiling of the chamber. Top and bottom digital thermostats
control each set of heating elements, allowing operators to determine the ratio of top vs. bottom heat
and offer infinite possibilities to adjust the oven for the baking of every conceivable product.
7
Page 8

8
4. Heat Isolation and Retention
Rock wool of low thermal conductivity is fully insulated between the chamber and enclosure. This
makes for cooler outer temperatures and consistent interior temperatures.
5. Digital Temperature Control
The temperature control device is composed of a digital controller with LED temperature display and
a stainless k-type sensor. Both the controller with 0.1 resolution capacity and the swiftly detecting
sensor give operators precise temperature control competence.
6. Comprehensive Control Functions
The moisture control damper, oven chamber light, and digital timer with continuous-ring, audible
alarm and manual shut-off are standard to offer comprehensive control functions
7. Energy Saving
Because of low-thermal-conductivity insulation and precise digital temperature control, heat retention
of the oven is excellent and over heating is eliminated. The heaters do not have to work all the time,
and high heat retention makes the oven to reach desired temperature in the short time. These
features greatly reduce unnecessary energy wasting, saving money for the owner.
Page 9
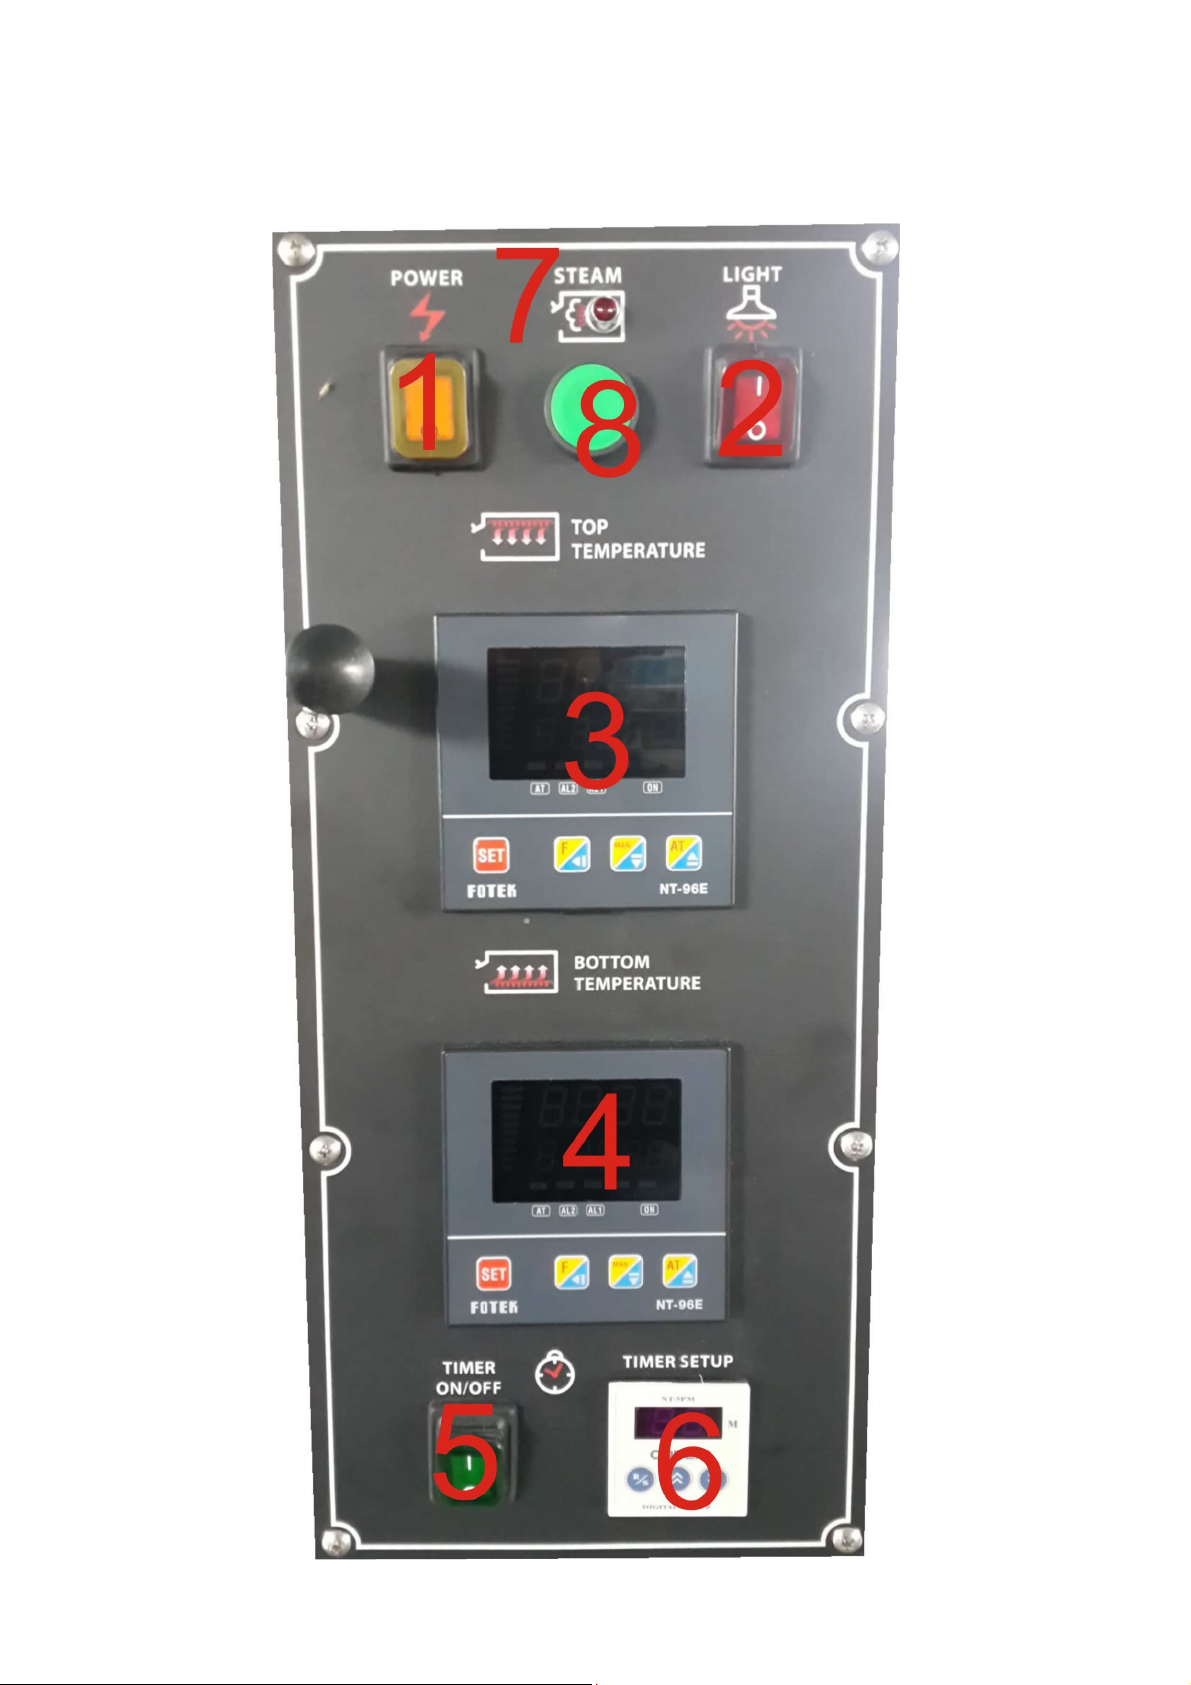
8. Control Panel
9
Page 10

1. Power Switch: Turn off/on the power of the deck.
2. Chamber light switch: Turn off/on the chamber light.
3. Top temperature controller: setup the desired ceiling side
temperature of the chamber.
4. Bottom temperature controller: setup the desired floor
side temperature of the chamber.
5. Timer switch: Turn off/on the Timer.
6. Digital timer: setup desired duration to notify the operator.
(The timer is only for notification! There is no control function
to oven baking)
Range: 1~99 minutes
Increase minute decrease minute R/S Reset/Start
Steam function (optional)
7. Steam Ready Indicator: Indicate if steam push button is
working while the chamber temperature has reached to
steam generating high temperature that is controlled by
the thermostat inside the control cabinet at left side of the
oven. Suggested parameters (temperature>150C duration: 3 seconds)
ON>the chamber temperature is ready and Steam push button is working.
OFF>the chamber temperature has not reach to required temperature. To press steam push
button is not working.
8. Steam push button: press to generate steam when the
steam ready indicator is “ON/
9. Temperature Setting
1. Press「SET」key to enter the temperature setting mode.
2. Press「<」key to select the digit
10
Page 11

3. Press「▲」key to increase the temperature ; Press「▼」
to decrease the temperature
4. Press「SET」to input the temperature.
5. press「▼」key for 3 seconds to turn off the control mode.
D.UNPACKING
1. Receiving the Oven
Upon receipt, check for freight damage, both visible and concealed. Visible damage should be noted
on the freight bill at the time of delivery and signed by the carrier's agent. Concealed loss or damage
means loss or damage, which does not become apparent until the merchandise has been unpacked.
If concealed loss or damage is discovered upon unpacking, make a written request for inspection by
the carrier's agent within 15 days of delivery. All packing material should be kept for inspection and
file your claim with the carrier.
2. Location
Prior to un-crating, move the oven as near its intended location as practical. The crating will help
protect the unit from the physical damage normally associated with moving it through hallways and
doorways.
3. Un-crating
The oven will arrive completely assembled inside a wood frame covered by PP bag and strapped to a
skid. Remove the PP bag, cut the straps and remove the wood frame.
CAUTION THE OVEN WEIGHS OVEN HUNDREDS LBS/KILOGRAM. FOR SAFE
HANDLING, INSTALLER SHOULD OBTAIN HELP AS NEEDED, OR EMPLOY
APPROPRIATE MATERIALS HANDLING EQUIPMENT (SUCH AS A FORKLIFT,
DOLLY, OR PALLET JACK) TO REMOVE THE UNIT FROM THE SKID AND MOVE
IT TO THE PLACE OF INSTALLATION.
11
Page 12
CAUTION ANY STAND, COUNTER OR OTHER DEVICE ON WHICH OVEN WILL BE
LOCATED MUST BE DESIGNED TO SUPPORT THE WEIGHT OF THE OVEN (850
LBS.).
CAUTION SHIPPING STRAPS ARE UNDER TENSION AND CAN SNAP BACK WHEN
CUT.
The oven may now be removed from the skid.
E. INSTALLATION
DANGER!
DANGER THIS APPLIANCE MUST BE GROUNDED AT THE TERMINAL PROVIDED.
FAILURE TO GROUND THE APPLIANCE COULD RESULT IN ELECTROCUTION
AND DEATH.
WARNING INSTALLATION OF THE UNIT MUST BE DONE BY PERSONNEL QUALIFIED
TO WORK WITH ELECTRICITY AND PLUMBING. IMPROPER INSTALLATION CAN
CAUSE INJURY TO PERSONNEL AND/OR DAMAGE TO EQUIPMENT. UNIT MUST
BE INSTALLED IN ACCORDANCE WITH ALL APPLICABLE CODES.
NOTICE The data plate is located on left side of the oven and in the control panel. The
oven voltage, wattage, serial number, specifications are on the data plate. This
information should be carefully read and understood before proceeding with the
installation.
NOTICE The installation of any components such as a vent hood, grease extractors,
fire extinguisher systems, must conform to their applicable National, State
and locally recognized installation standards.
12
Page 13
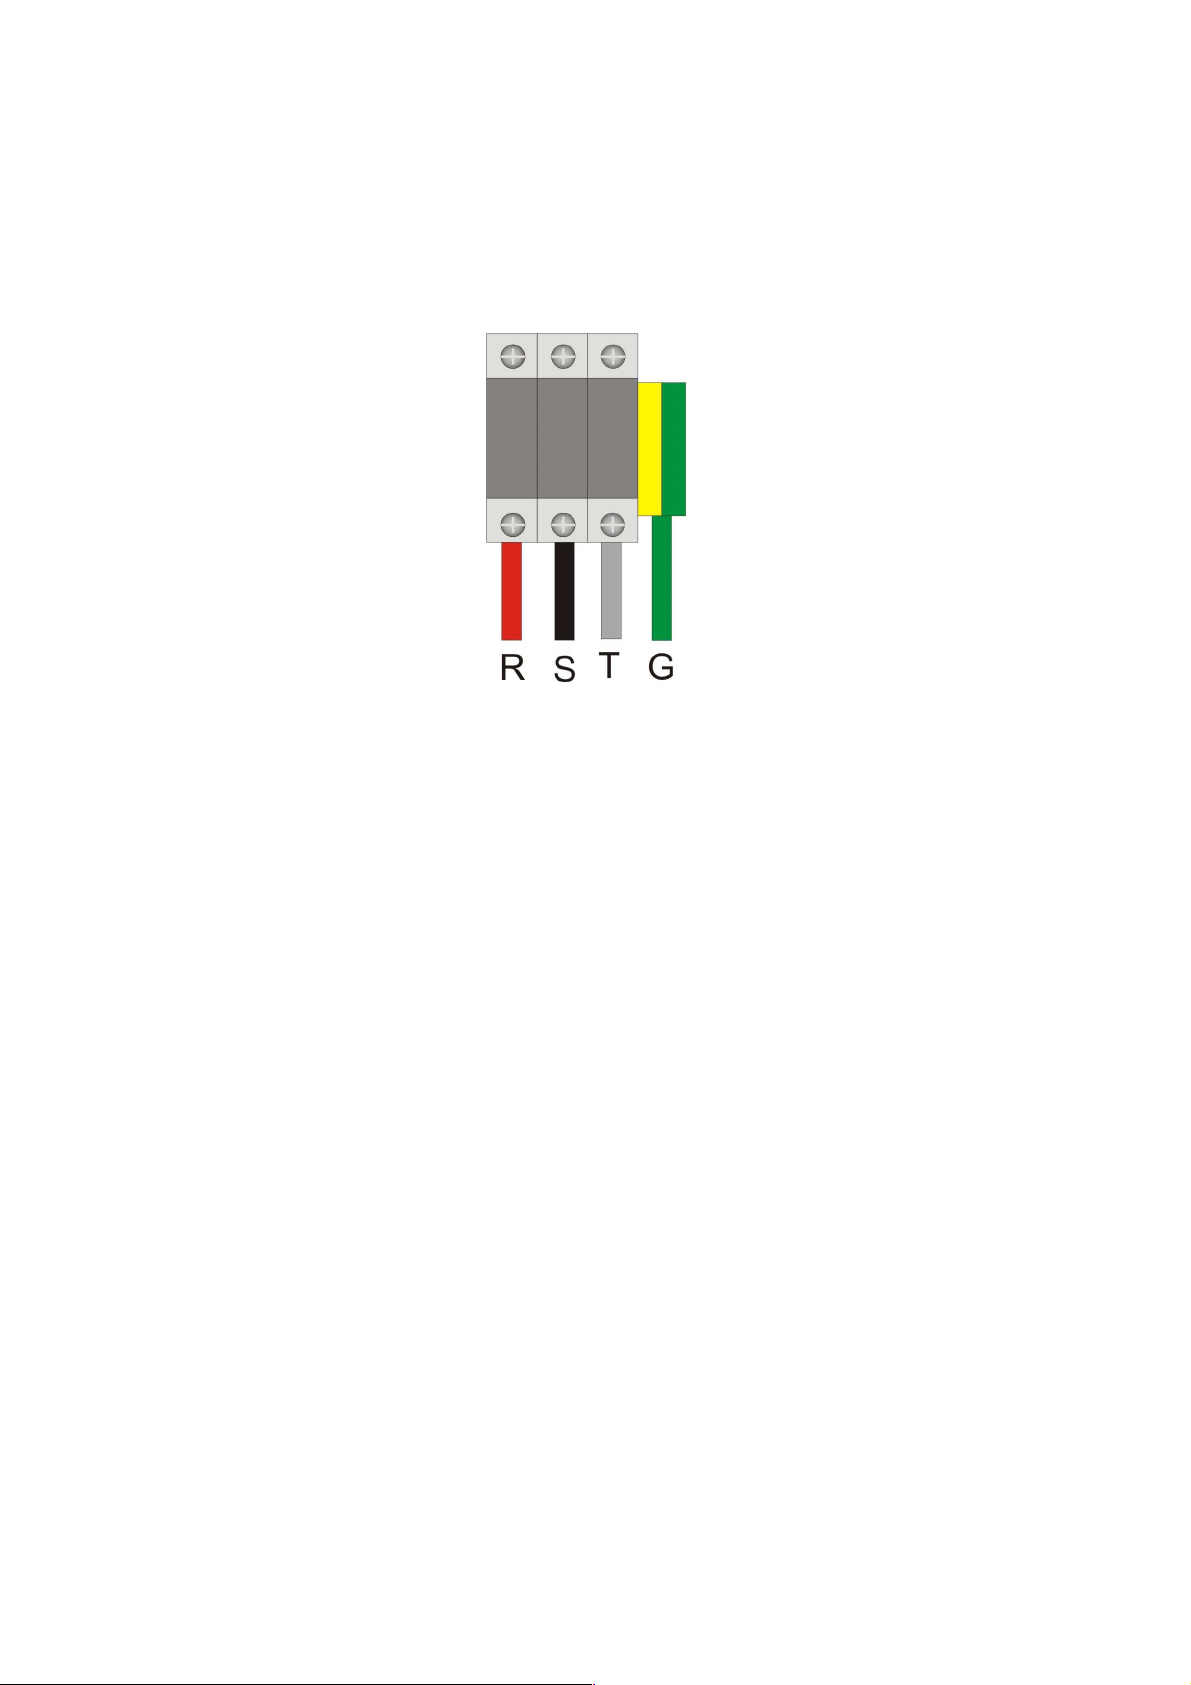
1. ELECTRICAL CONNECTION
1. Remove the control cabinet door attached to the right side of oven in the middle deck.
2. Insert the power wires into power terminal joints with terminals in the middle of the oven control
box. (See the following figure)
It must follow the local regulations and technical
requirements to connect the power cable per the oven
maximum power composition.
3. Connect the other side of the cable with a breaker
2. VENTILATION AND CLEARANCES
1. Standard minimum clearance from combustible construction is as follows:
10cm/4” from side
10cm/4” from back
15cm/6” from floor
2. These ovens may be set directly, without legs, on a curbed base or non-combustible floor. If the
oven is set without legs on a non-combustible floor or a curbed base, maintain a 10cm/4 back
clearance.
3. If the oven is set directly against a non-combustible back wall, maintain a 6-inch clearance to the
floor.
4. Do not install the oven closer than 10cm/4” from another oven on the right hand side (control
panel side).
5. Do not install the oven closer than 30cm/12” from an uncontrolled heat source (charbroiler etc.) on
the right side.
6. Keep the appliance area free and clear of combustible material and do not obstruct the flow of
combustion or ventilation air.
7. The installation of any components such as a vent hood, grease extractors, and/or fire
extinguisher systems, must conform to the applicable nationally recognized installation standards.
13
Page 14

3. STEAM HOSE CONNECTION
WARNING ENSURE THE WATER PRESSURE IS 1.5KG/CM^2(22PSI OR LB/IN) AND
MAKE SURE THE WATER PRESSURE IS CONSTANT DURING DAY&NIGHT AND
WORKING&NON-WORKING HOURS.
!EXCESSIVE WATER PRESSURE RESULTS IN WATER LEAKAGE OR PIPE
EXPLODING.
!INSUFFIENT WATER PRESSURE RESULTS IN INSUFFIENT STEAM VOLUME.
Water requirement
1⁄2" FNPT. Cold water @ 20 psi. Water supply must have the proper hardness, pH and chloride
concentration. The recommended water hardness range is 8-16 grains per liter(2-4 grains
per gallon). The recommended pH range is 7.0 to 8.5. The acceptable range for chloride
concentration is 0-30 ppm. Ensure that your water supply meets these minimum water
quality specifications:
––Alkalinity: 22 ppm
––Aluminum: 17 ppm
––Calcium: 3.3 ppm
––Free chlorine residual: 0.6 ppm
––Magnesium: 0.65 ppm
––PH range: 8.5 s.u.
––Sodium: 8.5 ppm
––Total Hardness: 11.9 ppm
1. Ensure water is clean. (It is highly recommended to install a water filter for steam water)
2. Ensure there is no material in the steam hose and external connection hose.
3. Connect the steam hose with the external connection hose.
3. Turn on water to make sure if there is water leakage.
1. INITIAL START UP
NOTICE During the first few hours of operation you may notice a small amount of smoke
coming from the oven, and a faint odor from the smoke. This is normal for a new
oven and will disappear after the first few hours of use.
Each oven is preheated, tested and calibrated at the factory before shipment. However, due to
temperature and climate changes during shipment the oven can absorb moisture and should be dried
14
Page 15

out before attempting to bake. Prior to putting any oven into full time operation at normal cooking
temperatures, it must be thoroughly "seasoned" or dried out. Moisture absorption in the closed
spaces, in the insulation and even inside the heating elements can cause future trouble if not
properly treated. Before the initial use of the oven, the element must be thoroughly allowed to dry out.
This is done by setting the top and bottom oven switches to the “low” position, and setting the
thermostat to 200°C (400°F) Allow the oven/ovens to saturate until all vapor and condensation has
been eliminated. For best operating results allow the ovens to thoroughly dry out. Allow 8 to 12 hours
for this process. If the unit is out of use for three or more days, a one-hour preheat schedule should
be used, especially when exposed to high humidity and/or cool temperatures.
F. OPERATION
CAUTION ALWAYS KEEP THE AREA NEAR THE APPLIANCE FREE FROM
COMBUSTIBLE MATERIALS.
CAUTION KEEP FLOOR IN FRONT OF EQUIPMENT CLEAN AND DRY. IF SPILLS
OCCUR, CLEAN IMMEDIATELY, TO AVOID THE DANGER OF SLIPS OR FALLS.
1. GENERAL
This oven is designed to give well regulated, even heat. It should be thoroughly preheated before
being used. It is advantageous from the operating cost standpoint, to operate with the thermostat set
at the lowest possible position that will satisfactory perform the baking and with the door shut during
preheat and slack business periods. The ovens may, of course, be preheated with the lower desired
temperature, but the time required will be proportionally longer. After preheating, set the top and
bottom temperature controllers for proper ratio of "top" and "bottom" heat to suit the product to be
baked or roasted.
2. BAKING/COOKING
Even heat in the oven is important for proper baking results. It is best to allow the oven to preheat
about fifty minutes to 260°C ( 500°F) before baking. Set the top and bottom heat controller to obtain
the proper ratio of top and bottom heat to suit your product. (See suggested temperature and control
settings). Equal baking results will be obtained with the door open or closed. The door is provided to
15
Page 16

conserve energy during preheat or slow periods.
To select the balance of top and bottom heat follow these directions:
1. If product is overdone on the bottom, turn the bottom controller down or the top controller up.
2. If product is over done on the top, turn top controller down or bottom controller up.
To select the correct temperature, follow these procedures.
1. If a product is taking too long to bake, turn the controller knobs to increase temperature.
2. If a product is not done inside, turn the controller knobs to decrease temperature and increases
baking time.
Normally, baking ingredients will not have to be moved or rotated during baking; however, various
dough mixes, excessive draft conditions, the quantity and type of toppings, and other variables may
require the baking ingredients to be shifted or rotated for a more even bake. Also during very busy
periods, repeatedly placing a baking ingredients in the same spot would cause the deck temperature
to drop somewhat while the heat remains constant. This results in an under done crust or a burnt top.
To remedy this condition try not to load baking ingredients after baking ingredients in exactly the
same location. Allow a two minute rest for each section of the oven at least once every half hour.
3. STEAM
1. Ensure water is turned on. (It is highly recommended to install a water filter for the steam water)
2. The steam generating temperature and water injection time can be setup by adjusting the
thermostat and timer. Suggested parameters (temperature>150C Time: 3 seconds)
3. When the steam temperature ready indicator is “ON/ luminant ”. Press the steam bottom to
generate steam.
4. Observe if the steam is generated.
CAUTION Do not fill water over the water pan and ensure there is fresh water during
fermentation process.
4. Under-built proofer (Optional)
1. Ensure no dirty/used water in the water pan (in the center of fermentation room). If there is
dirty/used water, pour out the water to secure hygiene.
2. Fill fresh water into the water pan.
3. Setup desired fermentation temperature by rotating the temperature setup knob. (The suggested
fermentation temperature is 38 °C)。
4. Check if there is moisture by looking the room or using hands to feel moisture density.
16
Page 17

G. MAINTENANCE & CLEANING
WARNING KEEP WATER AND SOLUTIONS OUT OF CONTROLS. NEVER SPRAY OR
HOSE CONTROL CONSOLE, ELECTRICAL CONNECTIONS, ETC.
CAUTION MOST CLEANERS ARE HARMFUL TO THE SKIN, EYES, MUCOUS
MEMBRANES AND CLOTHING. PRECAUTIONS SHOULD BE TAKEN TO WEAR
RUBBER GLOVES, GOGGLES OR FACE SHIELD AND PROTECTIVE CLOTHING.
CAREFULLY READ THE WARNING AND FOLLOW THE DIRECTIONS ON THE
LABEL OF THE CLEANER TO BE USED.
1. DAILY CLEANING
1. Remove, empty and clean the crumb tray located on the bottom of the oven. Clean the area under
the crumb tray with a vacuum cleaner. The crumb trays must be installed in the oven when in use.
2. The oven should be thoroughly cleaned once a day to insure against accumulation of foreign
material.
• Always start with a cold oven.
• The stainless exterior can be cleaned using stainless steel cleaner.
• Always follow the cleaner manufacturer's instructions when using any cleaner.
• Care should be taken to prevent caustic cleaning compounds from coming in contact with the
heating elements and temperature sensors.
• Always apply these cleaners when the oven is cold and rub in the direction of the metal's grain.
2. WEEKLY CLEANING
Any foreign material such as corn meal, flour, crust, and topping should be vacuumed from beneath
the crumb catchers weekly.
3. CLEANING THE DECK
The deck may be cleaned during usage with a brush and scraper. Periodically, the decks should be
turned over. This produces a pyroletic or self-cleaning action to the underside of the deck. Thusly,
17
Page 18

any spillage will be burnt off and upon returning, your deck will be clean. Remove the deck by using
two flat bladed screwdrivers to “walk up” the front edge of the right deck. When deck is high enough,
grasp it firmly and pull over the top of other deck. Remove from the front of the oven.
4. CHANGING LIGHTS
1. Turn circuit breakers off.
2. Open the hinged door attached to the right side of oven.
3. Two screws hold the light guards in place.
4. Remove these screws and pull lamp guard out of the oven.
5. The oven lamp may now be unscrewed for replacement.
H.TROUBLESHOOTING
1. Symptoms
What follows is a chart of Symptoms, Possible Causes, and Remedy’s to aid in diagnosing faults with
the oven. Refer to the Symptoms column to locate the type of failure then to the Possible Cause for
the items to be checked. On the following pages is a chart with the possible causes and the test to
properly identify the problem.
SYMPTOM POSSIBLE CAUSE
Oven will not heat • No power to Oven
Product is burning • Product is cooked too
long
Product under done • Product is not
cooking long enough
• Defective power switch
• Defective thermostat
• Defective contactor
• Defective oven element
• Defective Thermostat
• Failed Thermostat
• Defective contactor
• Thermostat out of calibration
• Failed thermostat
• Defective contactor
NOTICE Service on this, or any other, the appliance must be performed by qualified
personnel only. Consult your authorized service station directory.
18
Page 19

WARNING BOTH HIGH AND LOW VOLTAGES ARE PRESENT INSIDE THIS APPLIANCE
WHEN THE UNIT IS PLUGGED/WIRED INTO A LIVE RECEPTACLE. BEFORE
REPLACING ANY PARTS, DISCONNECT THE UNIT FROM THE ELECTRIC
POWER SUPPLY.
CAUTION USE OF ANY REPLACEMENT PARTS OTHER THAN THOSE SUPPLIED BY
JENDAH OR THEIR AUTHORIZED DISTRIBUTORS CAN CAUSE BODILY INJURY
TO THE OPERATOR AND DAMAGE TO THE EQUIPMENT AND WILL VOID ALL
WARRANTIES.
2. TESTS
Possible Cause TEST
Failed thermostat
Failed Contactor
Failed element
• Replace if necessary*
• Verify that coil has correct voltage*
• Verify that coil has continuity*
• Verify that contactor points move
Remove the wires and check for continuity
across the element*
Product is not baking properly •
Verify thermostat*
* A factory authorized service representative should perform this work.
19
 Loading...