

Page 1
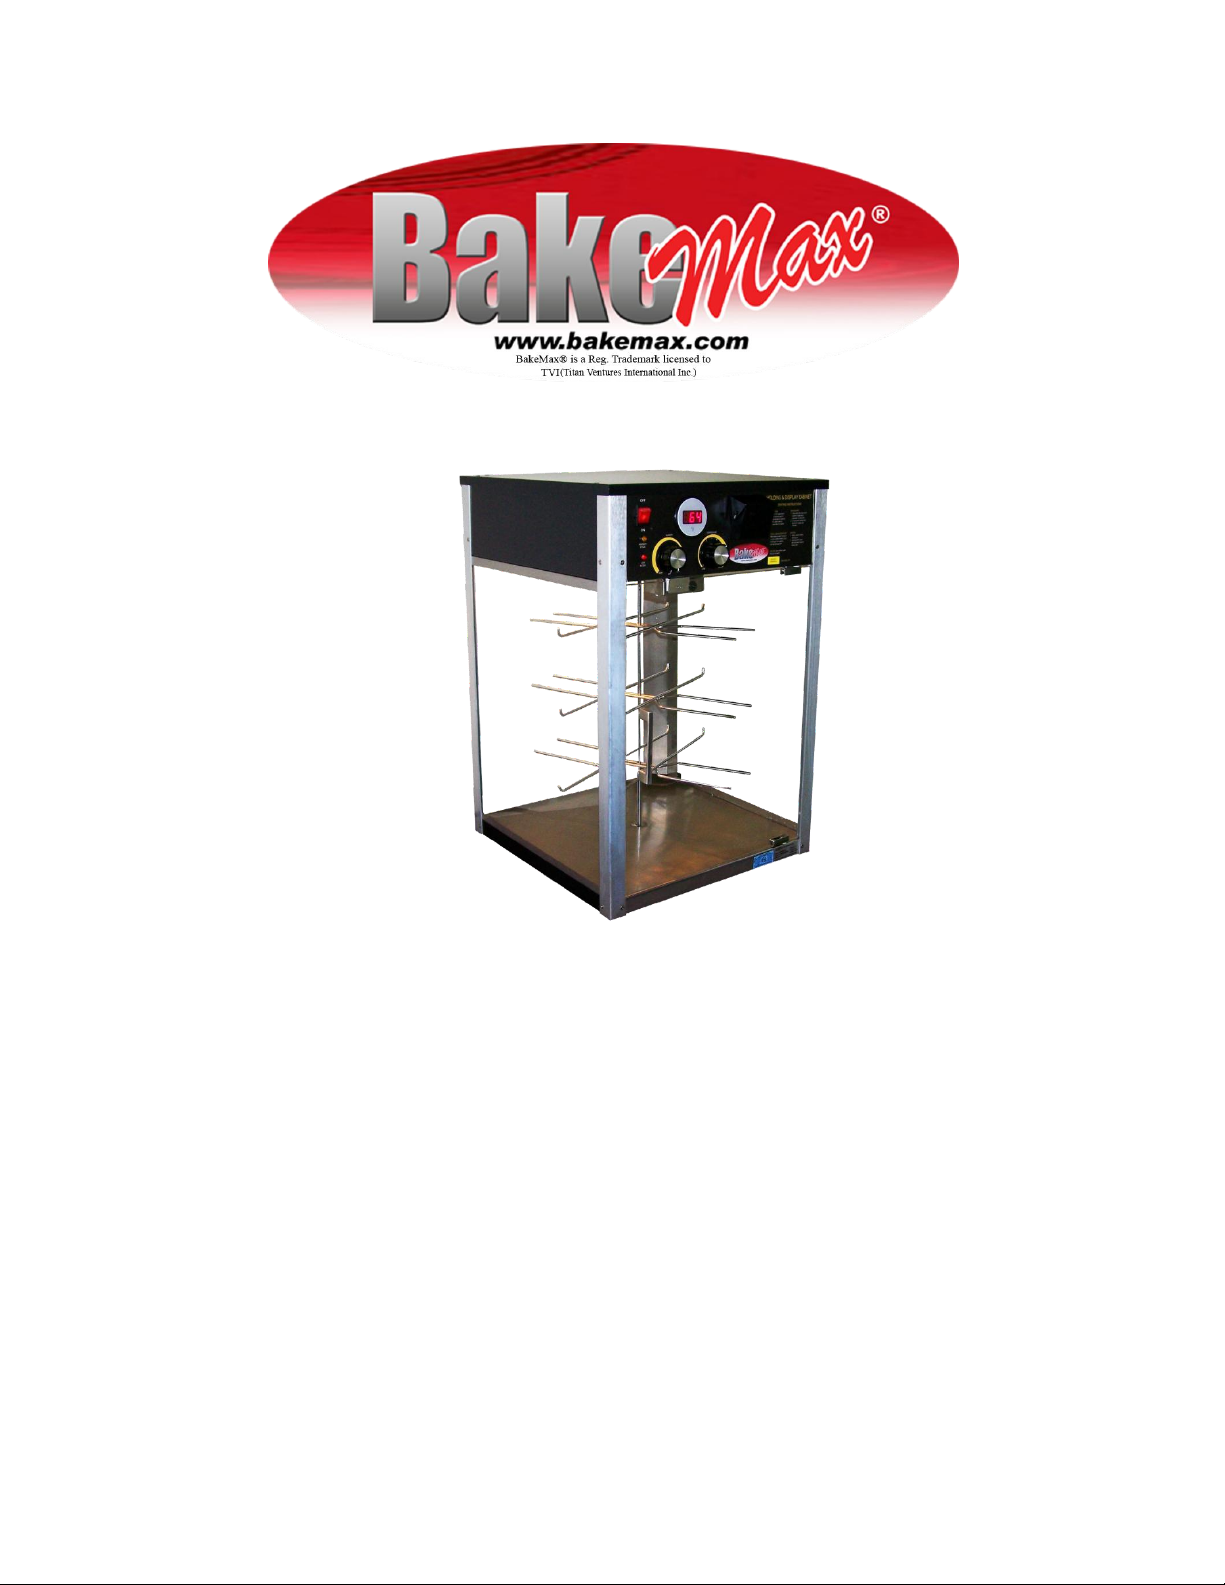
Pizza Warmer
BMPWR20, BMPWR16, BMPWP16,
BMPWR13
Installation & Operating Manual
Page 2

Page 3

BakeMax Pizza Warmers is designed to hold prepared foods for a period of time while maintaining a fresh quality.
BakeMax Pizza Warmers provide the best environment for food products by offering both heat and humidity. The
use of controlled heat and humidity maintains serving temperature and food texture longer than conventional
dry heating cases.
The air flow is designed to keep a consistent temperature without drying out the pizza. The combination of heat
and humidity creates a reliable heat effect around the food. The air flow enables the cabinet to recover
temperature quickly after opening and closing the door.
Additional information can be found by visiting our web site at www.BakeMax.com
IMPORTANT! Read the following important safety information to avoid personal injury or death, and to avoid
damage to the equipment or property.
WARNINGS To prevent electric shock or injury, turn the power switch OFF, unplug the unit from the power
source and allow cooling completely before performing any maintenance or cleaning.
- Plug unit into a properly grounded electrical outlet of the correct voltage, size and plug configuration. If the
plug and receptacle do not match, contact a qualified electrician to determine the proper voltage and size
and install the proper electrical outlet.
- Overfilling can cause electrical shock. Stop filling when LO H20 light stops flashing.
- Turn the power OFF to the unit and allow cooling before draining.
- Discontinue use if power cord is frayed or worn.
- Do not pull unit by power cord.
- The unit must only be serviced by qualified personnel.
- Only light bulbs which meet or exceed NSF standards, specifically designed for food holding areas may be
used.
- the Display Cabinet must be located 2" (51 mm) from combustible walls and materials.
- Holding food at temperatures less than 140°F (60°C) may be dangerous.
- BakeMax is not responsible for the actual food product serving temperature.
- If service is required on this unit, contact your local BakeMax Dealer or BakeMax directly at 1.800.565.2253.
- BakeMax Replacement Parts must be used when repairing BakeMax equipment.
CAUTION - Some exterior surfaces on the Display Cabinet will get hot. Use caution when touching these
areas to avoid injury.
- Display Cabinet at the proper counter height, in an area that is convenient for use.
- For safe and proper operation locate the unit indoors where the ambient air temperature is a minimum of
70°F(21°C).
- The unit must be transported in an upright position. Before moving or tipping the unit secure all glass
surfaces with tape. The water must also be drained from the unit. Failure to do so may result in damage to
the unit or personal injury.
Page 4

SPECIFICATIONS
Model
Voltage
Hertz
Watts
Amps
Plug Configuration
Shipping Weight
BMPWR20
120
60
1420
11.8
NEMA5-15P
80 lbs.
(36 kg)
Model
Width
Depth
Height
BMPWR20
19-3/8"
(492 mm)
20-7/8"
(530 mm)
28-5/8"
(727 mm)
Cabinet Opening: 15-3/4"Wx 19-3/4"H (400 x 502 mm)
PLUG CONFIGURATIONS
Units are supplied from the factory with an electrical cord and plug installed. Plugs are supplied
according to the applications.
WARNING plug unit into a properly grounded electrical outlet of the correct voltage,
size and plug configuration. If the plug and receptacle do not match, contact a qualified electrician to
determine the proper voltage and size and install the proper electrical outlet.
ELECTRICAL RATING CHART
UNPACKING
BMPWR20 is shipped with most components installed and ready for operation. The following installation
instructions must be performed before plugging in and operating the cabinet.
1. Remove unit from box.
2. Remove tape and protective packaging from all surfaces of unit.
Floor Sheet
The stainless steel floor in all units is protected during shipping with a sheet of corrugated cardboard. This
protection must be removed prior to cabinet operation.
Display Racks
The display racks have packing material and cardboard attached for protection during shipping. This protection
must be removed prior to cabinet operation.
Legs
The cabinets are shipped with four 1" (25 mm) metal screw-type feet attached to the bottom of the unit. If you
received the cabinet with the optional 4" (102 mm) Adjustable Legs, see ACCESSORIES for installation instructions.
Glass Panels
NOTE: If installing 4" (102 mm) legs, do not remove glass protection until leg installation is complete. See
ACCESSORIES.
Page 5

OPERATION
GENERAL
1. Plug the BMPWR20 into a properly grounded electrical outlet of the correct voltage, size and plug
configuration.
2. Place the power switch in the ON position. The display will alternately flash "LO" - "H20" (4) times and then
flash the temperature. It will continue to alternate this way until the water reservoir is filled. Once the
reservoir is full it will display the cabinet temperature.
NOTICE Water Quality Requirements - Incoming water in excess of 3.0 grains of hardness per gallon (GPG)
(.75 grains of hardness per liter) must be treated and softened before being used. Water containing over 3.0
GPG (.75 GPL) will decrease the efficiency and reduce the operating life of the unit.
NOTE: Product failure caused by liming or sediment build-up is not covered under warranty.
3. Fill the water reservoir with softened or distilled
water. To fill the reservoir, lift up the fill cup cover
and pull forward. Slowly pour the water into the cup until LO H20 stops flashing.
NOTE: To assure proper operation when using distilled water, add one teaspoon of salt to the water reservoir
during the initial manual fill only.
WARNING Overfilling can cause electrical shock, filling when LO H20 light stops flashing.
Use of softened or distilled water is recommended to preserve the life of the electrical and mechanical
components in the reservoir. Do not use de-ionized water. If "hard" water is used, the reservoir will require
periodic cleaning and de-liming. See MAINTENANCE for de-liming instructions.
NOTICE
Do not use de-ionized water. De-ionized water will greatly shorten the life of the
water reservoir and heating element.
NOTE: Product failure caused by de-ionized water is not covered by warranty
NOTE: On the initial fill the water reservoir capacity is 80 ounces or 2-1/2 quarts (2.3 litres).
4. Set the humidity selector to the desired level. Set the temperature selector to the desired temperature. See the
FOOD HOLDING GUIDE for recommendations.
Setting Temperature:
1. Press Temperature to enter temperature mode (tsp will be displayed).
2. Press Temperature again to display current temperature setting.
3. Arrow Up or Down to desired temperature. Temperature range is 80°-195°F (27°-91°C) in single degree
increments. See Food Holding Guide for recommendations.
After desired temperature is set - Wait 15 seconds without pushing any buttons, for controller to automatically
return to operational mode.
Page 6

Setting Humidity Level:
A CAUTION
Some exterior surfaces on the Display Cabinet will get hot. Use caution when touching
these areas to avoid injury.
A WARNING To prevent any injury discontinue use if power cord is frayed or worn.
A WARNING To prevent any injury or damage to the unit do not pull unit by power
cord.
A WARNING BakeMax Corporation is not responsible for the actual food product
serving temperature. It is the responsibility of the user to assure that the food product
is held and served at a safe temperature.
A WARNING Holding food at temperatures less than 140°F (60°C) may be dangerous.
Temperatures under 140°F (60°C) promote the growth of harmful bacteria and toxins in
some foods.
1. Press Humidity to enter Humidity mode (hsp will be displayed).
2. Press Humidity again to display current humidity level.
3. Arrow Up or Down to desired Humidity Level. Humidity range is 1 through 5 (1 is the
lowest amount of humidity and 5 is the highest). See Food Holding Guide for
recommendations.
4. After desired Humidity Level is set - Wait 15 seconds without pushing any buttons, for
controller to automatically return to operational mode.
NOTE: Temperature and humidity settings may vary depending upon product make-up
and consistency. The temperature indicator displays the lowest temperature point
inside the cabinet, not the product temperature.
Allow 20 minutes to preheat a full reservoir of water. The warmer is then ready to hold
foods at the humidity and temperature selected.
The reservoir capacity permits uninterrupted operation for approximately 3-6 hours,
depending on the settings and how frequently the door is opened.
When the LO H20 is flashing, add water to the reservoir. The water reservoir refill
capacity is approximately 64 ounces, or two (2) quarts (1.9 litres).
Page 7
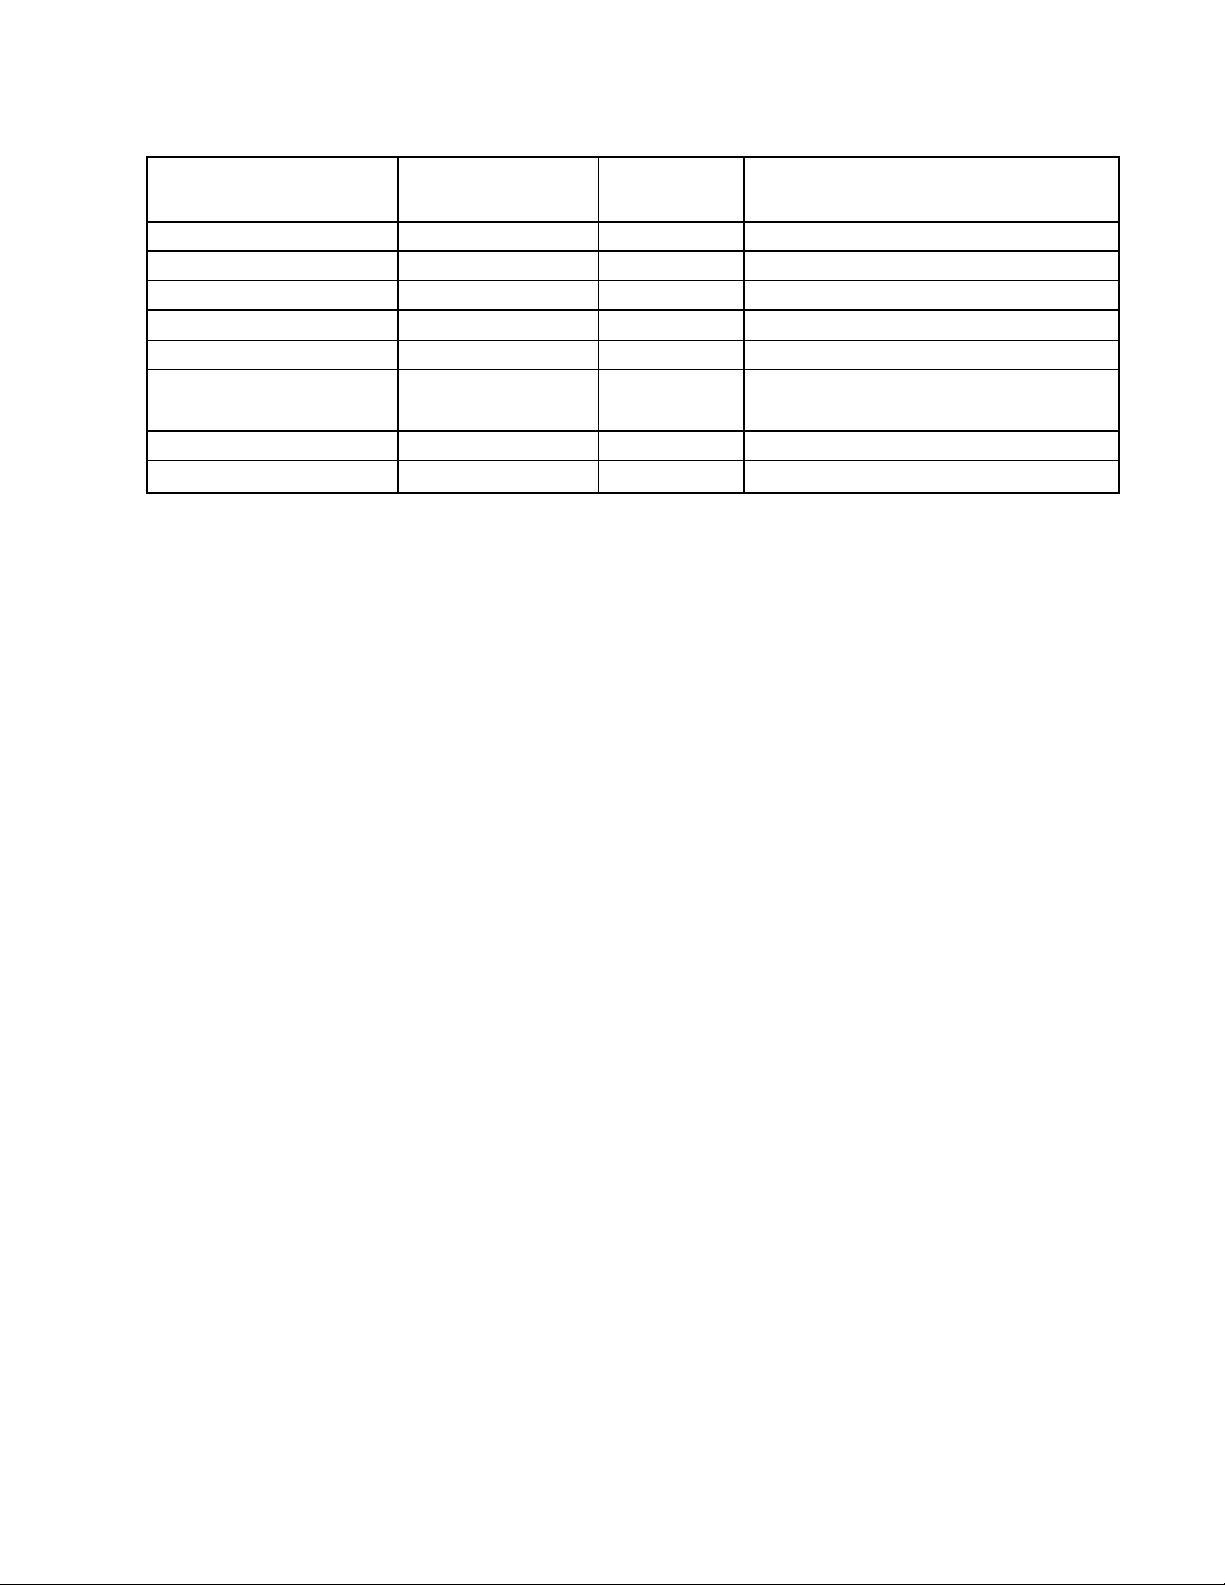
FOOD HOLDING GUIDE
Type of Food
Maximum
Holding Time
Humidity
Setting
Temperature ^
Biscuits
4 Hours
4
130 55
Chicken Pieces (Fried)
4 Hours
5
175 80
Croissants
4 Hours
1
140 60
Fruit Pies
3-1/2 Hours
4
140 60
Onion Rings
1/2 to 1 Hour
1
175 80
Pizza - Thick Crust Thin Crust
1 Hour
1 Hour
4 5 185 85
180 82
Pretzels
3 Hours
4
140 60
^Wrapped Sandwiches
2 Hours
4
180 82 J
NOTE: All times and settings are recommendations only and may vary depending on
product preparation, cooking time and internal food temperature.
MAINTENANCE
GENERAL
The BakeMax units are designed for maximum durability and performance, with minimum
maintenance.
Page 8

CLEANING
A WARNING To prevent electric shock or injury, turn the power switch OFF, unplug the unit
from the power source and allow to cool completely before performing any maintenance or
cleaning.
A WARNING To prevent any injury discontinue use if power cord is frayed or worn.
BakeMax cabinets are made of stainless steel and aluminum. To preserve the bright finish, it is
recommended that the exterior and interior surfaces be wiped daily with a damp cloth. Food
pans should be removed and washed. Stubborn stains may be removed with a good stainless
steel cleaner or a non-abrasive cleaner.
NOTICE Use only non-abrasive cleaners. Abrasive cleaners could scratch the finish of your
BakeMax Pizza Warmer marring its appearance and making it susceptible to soil accumulation.
Clean the glass sides using a common glass cleaner. For hard-to-clean stains, removal of the glass
is suggested.
To Remove The Glass:
1. Lift the glass to be cleaned from the bottom of the cabinet.
2. Pull the lower edge away from the cabinet.
3. Carefully lower the glass until the top clears the cabinet.
To Replace The Glass:
1. Position the glass with the top edge under the cabinet lip and raise the glass until it clears the
bottom channel of the cabinet.
2. Move the bottom of the glass towards the cabinet until the glass rests against the cabinet
frame.
3. Carefully lower the glass until it rests in the bottom channel of the cabinet.
To Remove The Rotating Rack For Cleaning (Models BMPWR20 and BMPWR20):
1. Open the front access door.
2. Remove the two (2) pins from the rotating rack coupling located at the top of the rack inside the cabinet. (See
Figure 10.)
3. Lower the connecting coupling until it is free of the motor shaft and remove the rack from the cabinet.
To Replace The Rotating Rack:
1. Insert the rack into the cabinet through the access door and place and rack bottom point in the dimple located at
the center of the cabinet floor.
2. Slide the rack coupling up onto the motor shaft and align the coupling holes.
3. Insert the two (2) pins through the coupling and through the shafts.
Page 9

DRAINING THE RESERVOIR
A WARNING To avoid any injury, turn the power OFF to the unit and allow to cool
before draining.
It is recommended that the water reservoir be drained prior to moving the cabinet and after removing
lime or mineral deposits from the water reservoir.
To drain reservoir, locate valve on underside of the ceiling sheet. Position a 1 gallon (4 liters) container
under valve. Turn the valve handle from the Horizontal position (closed) to the Vertical position (open).
Once reservoir is empty return handle to the closed position.
The BakeMax Pizza Warmers are designed for maximum durability and performance, with minimum
maintenance. The rack motor and blower motor are permanently lubricated and require no
maintenance.
NOTE: If the water used has an excessive amount of lime or mineral content, follow the instructions for
periodic cleaning and deliming of the water reservoir.
NOTICE Water Quality Requirements - Incoming water in excess of 3.0 grains of hardness per gallon
(GPG) (.75 grains of hardness per litre) must be treated and softened before being used. Water
containing over 3.0 GPG (.75 GPL) will decrease the efficiency and reduce the operating life of the
unit.
NOTE: Product failure caused by liming or sediment build-up is not covered under warranty.
REMOVING LIME & MINERAL DEPOSITS
1. Turn the power switch off and unplug the unit from its power source.
2. After the unit has cooled down, drain all remaining water out of the unit.
3. Fill the unit with a mixture of 75% water and 25% off-the-shelf vinegar.
4. Plug unit into the correct power source and turn the unit ON.
5. With both the humidity and heat settings on high, allow the unit to run for 30 minutes.
6. After the deliming period, turn the unit off, unplug from the power source, and allow it to cool
7. Drain the solution from the unit. (See DRAINING THE RESERVOIR.)
8. Continue to fill and drain the unit with water only until the discharge is clear and all de-liming
solution has been removed and rinsed.
9. Plug the cabinet power cord into its power source and fill the unit as usual for daily operation.
NOTE: How often this procedure must be performed depends on the lime and mineral content of the
water used for daily operation.
NOTE: It is recommended that this procedure be performed when the unit will not be used for a period of
time, such as the end of the day.
Page 10

MAINTENANCE
DISPLAY LIGHT BULB REPLACEMENT
The display light is an incandescent bulb which illuminates the warming area. This bulb has a special
coating to guard against injury and food contamination in the event of breakage.
To replace a bulb, disconnect the power supply and wait until the unit has cooled. Display lamps
have a threaded base. Unscrew the bulb from the unit and replace it with a new specially coated
incandescent bulb. BakeMax shatter-resistant bulbs meet NSF standards for food holding and
display areas.
A WARNING Only light bulbs which meet or exceed NSF standards, specifically designed for food
holding areas may be used. Breakage of light bulbs not specially coated could result in personal
injury and/or food contamination.
A WARNING If service is required on this unit, contact your Authorized BakeMax Service Agent, or
contact the BakeMax Service Department at 800-565-2253 or 506-858-8990; fax 506-859-6929.
A WARNING This product has no "user" serviceable parts. To avoid damage to the unit or injury to
personnel, use only Authorized BakeMax Service Agents and Genuine BakeMax Parts when service
is required.
A WARNING Genuine BakeMax Replacement Parts are specified to operate safely in the
environments in which they are used. Some aftermarket or generic replacement parts do not have
the characteristics that will allow them to operate safely in BakeMax equipment. It is essential to
use BakeMax Replacement Parts when repairing BakeMax equipment. Failure to use BakeMax
Replacement Parts may subject operators of the equipment to hazardous electrical voltage,
resulting in electrical shock or burn.
Page 11
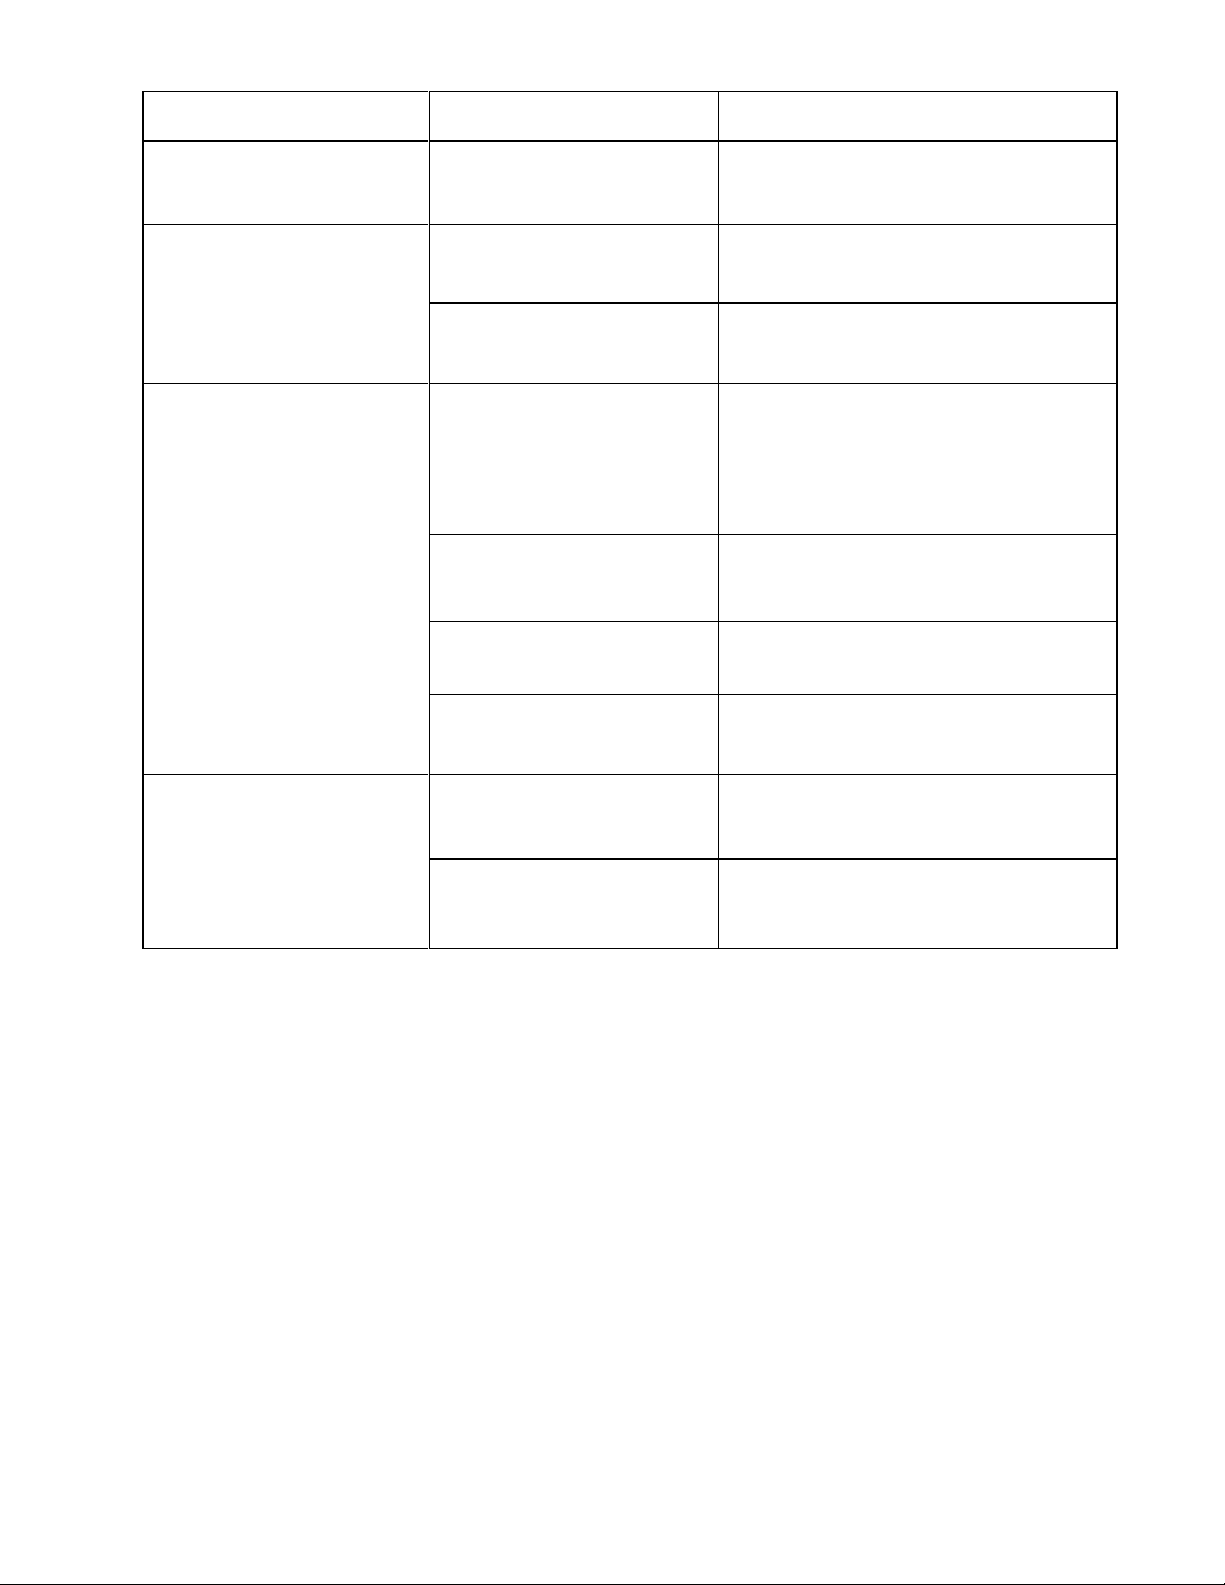
SYMPTOM
PROBABLE CAUSE
CORRECTIVE ACTION
Unit is energized, but display
lights do not work.
Light bulb is burnt out or
loose.
Check light bulb; if burnt out, replace. If
loose, tighten.
Unit operates, but is not
circulating air inside cabinet.
Blower wires are loose or
disconnected.
Contact Authorized Service Agent or
BakeMax for assistance.
The correct voltage may not
be supplied to blower.
Contact Authorized Service Agent or
BakeMax for assistance.
Unit is plugged in, however
nothing works.
No power to unit.
Check electrical receptacle and verify that
power supply matches specifications on
unit. If receptacle is not working, check
circuit breaker and reset or plug unit into
a different known working receptacle.
Power cord connections are
loose or disconnected.
Contact Authorized Service Agent or
BakeMax for assistance.
Power cord is damaged.
Contact Authorized Service Agent or
BakeMax for assistance.
Defective On/Off switch.
Contact Authorized Service Agent or
BakeMax for assistance.
Unit is operational, but
revolving rack (if so
equipped) does not turn.
Incorrect voltage is supplied to
rack motor.
Contact Authorized Service Agent or
BakeMax for assistance.
Proximity magnet or proximity
switch not working properly.
Contact Authorized Service Agent or
BakeMax for assistance.
Page 12

PROBABLE CAUSE
CORRECTIVE ACTION
Unit is not producing any
"hot air" inside cabinet.
Safety high-limit is tripped or
open.
Contact Authorized Service Agent or
BakeMax for assistance.
Incorrect voltage supplied to
heating element.
Contact Authorized Service Agent or
BakeMax for assistance.
Blower motor is not working.
Check blower motor - refer to Symptom
"Unit operates, but is not circulating air
inside cabinet."
Unit is heating, but is not
producing humidity inside
cabinet. Low water light is off,
and unit is full of water.
Incorrect voltage supplied to
water heating element or
heating element is defective.
Contact Authorized Service Agent or
BakeMax for assistance.
Unit is heating, but is not
producing humidity inside
cabinet. Low water light is on
and unit is full of water.
When using distilled water, no
minerals are being sensed by
low water probe.
On initial fill, add one teaspoon of salt to
the water reservoir.
Low water protection system is
malfunctioning.
Contact Authorized Service Agent or
BakeMax for assistance.
Page 13
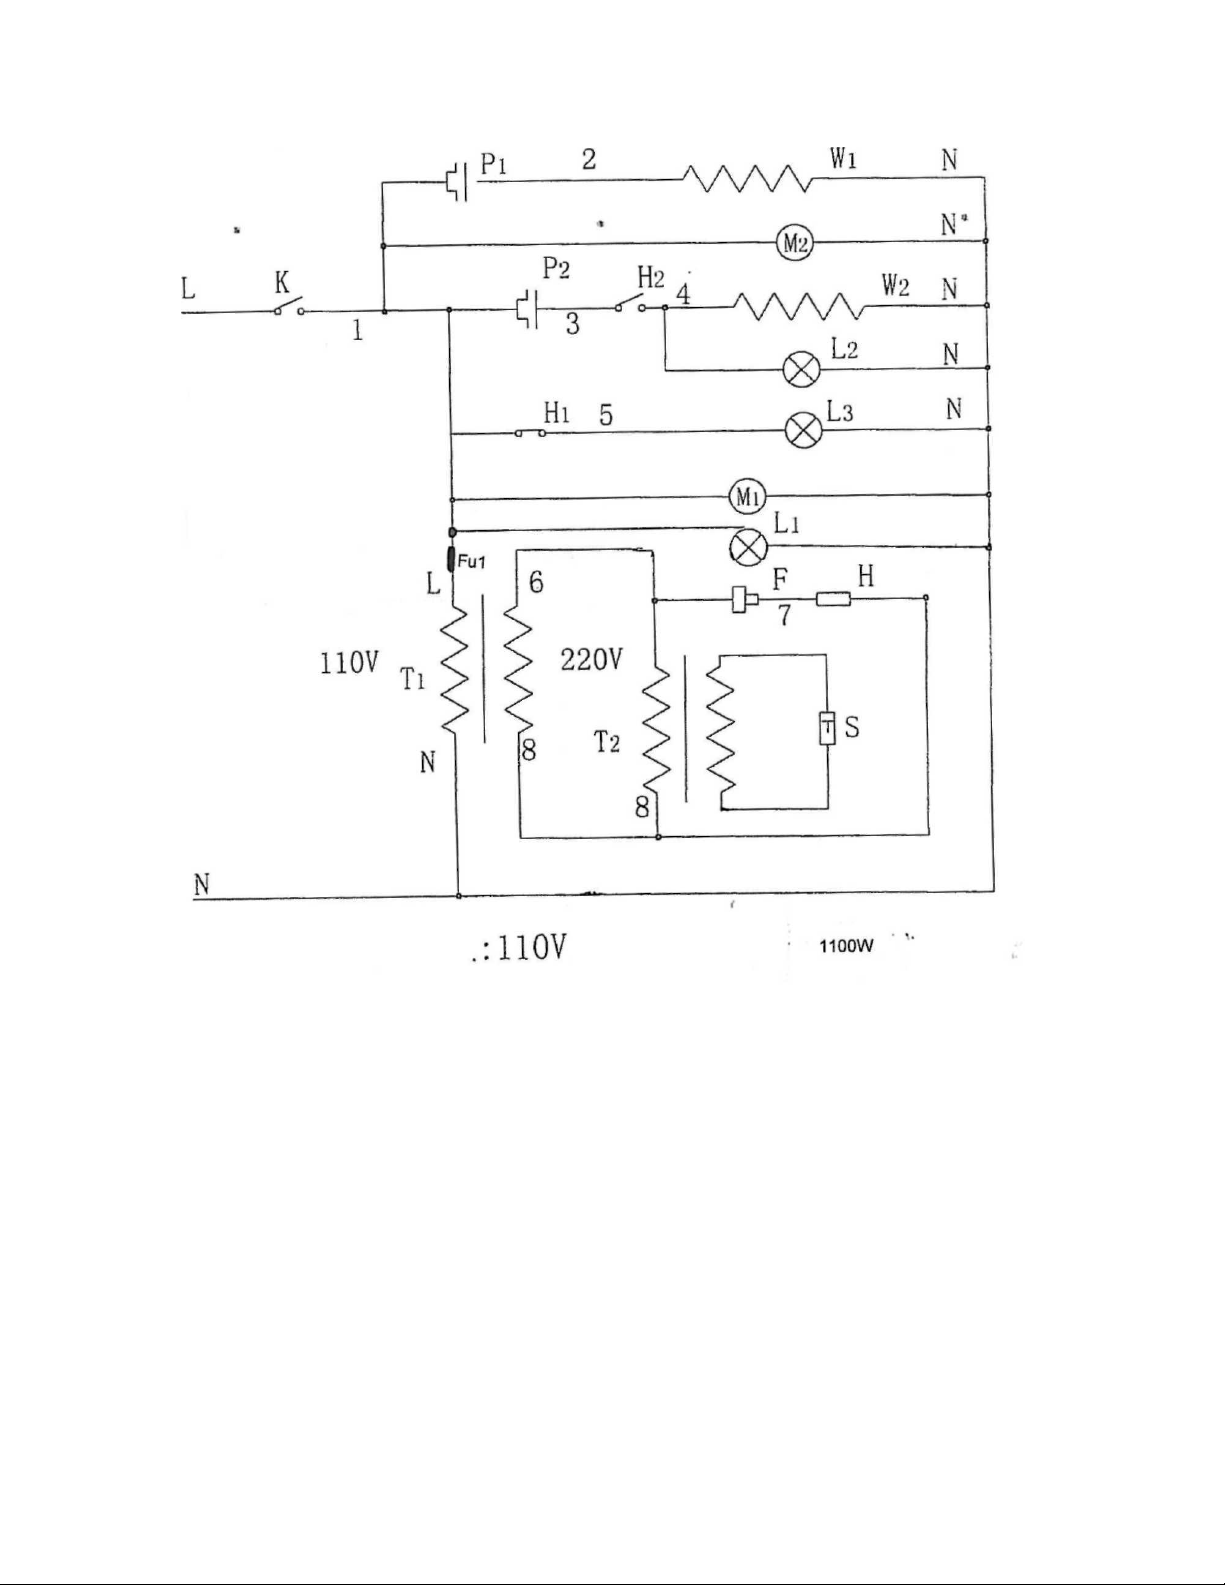
L - Line (hot) N - Neutral
K - Power switch
P1, P2 - Thermostat
W1- Dry element
W2 - Wet element
M1 - Motor (optional)
H2 - Contact (relay)
L1 - Light Fluorescent
L2, L3 - Pilot light
Fu1 - Fuse
T1 - 110v to 220v Transformer
T2 - 220v to 12v Transformer
M2 - Motor Fan
H - Relay
H1 - Contact (relay)
S - Temperature display
F - Float switch
Page 14
 Loading...