

Page 1
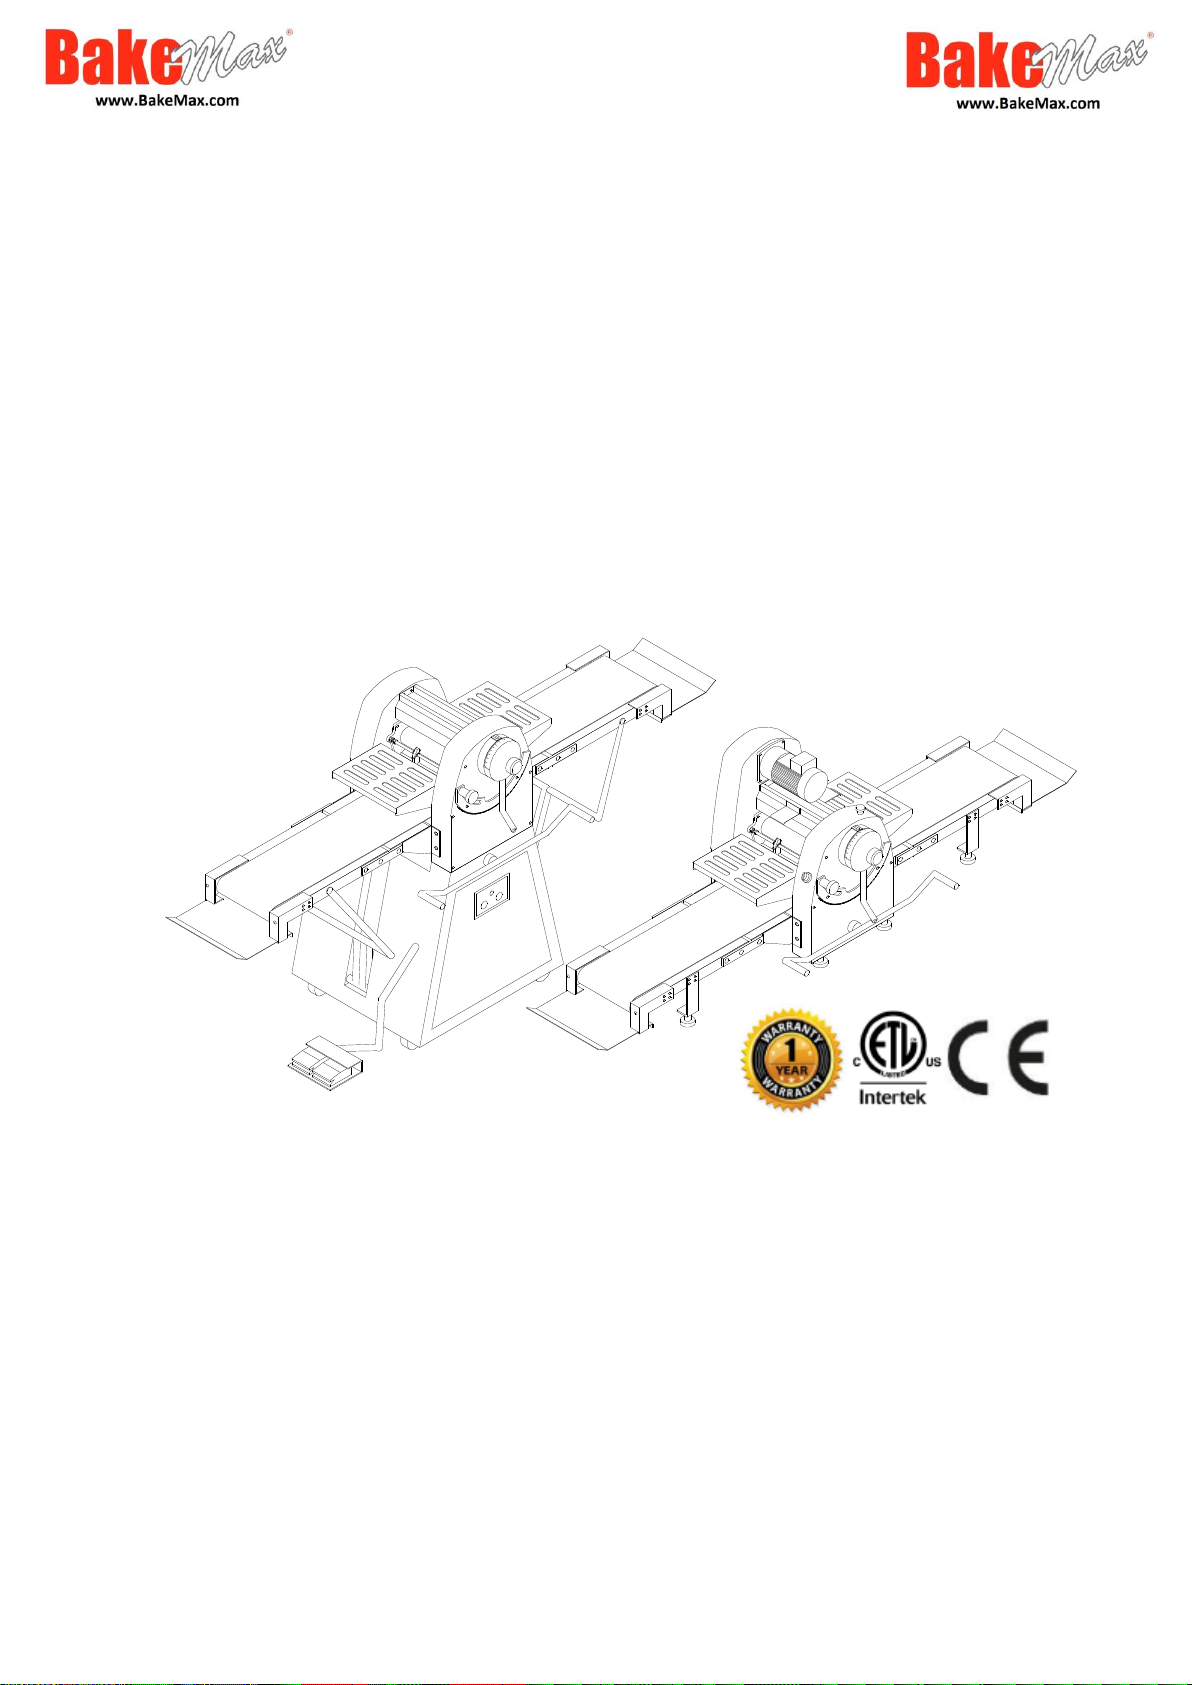
BMCRS01-02 Countertop Model Dough Sheeter Manual
1
BMCRS01, BMCRS02
Countertop Dough Sheeter
Operations Manual
The most widely used reversible sheeter, designed to code of baking industry
standard, suitable for sheeting and stretching various kinds of the dough,
such as: puff pastry, Danish, donut dough, croissant dough, pie dough,
cookie dough, strudel, marzipan, and other special dough.
GENERAL FEATURES AND APPLICATION
* The machine uses heavy duty and long life sanitary conveyor belts.
* Protective safety guards on both side of rollers, preventing hands to be
caught by rollers.
* Automatic overload prevents motor from damage.
* Both side conveyor table are easily folded up in seconds to save space.
* Each guard is equipped with a limit switch to shut off power
immediately to protect operator.
Page 2

BMCRS01-02 Countertop Model Dough Sheeter Manual
2
WARNINGS
* To warn against risks inherent in use of the machine due to failure to
observe the safety regulations.
* The machine must be used only for the purpose for which it has been
designed. All other uses are considered inappropriate and therefore
unreasonable.
TRANSPORTATION INSTRUCTIONS
* Loading and unloading from the vehicle can be performed.
* In particular the machine must not be placed on top of other materials
and vice versa either during transport or storage.
* During transport the machine must be positioned so that it cannot be
knocked by other materials loaded on the same vehicle.
* During unloading, place the machine carefully on the ground to
prevent it being knocked.
PRODUCT DIMENSIONS
MODEL
DIMENSION
W x D x H(Inches)
CRATED
DIMENSIONS
W x D × H( Inches)
Net Weight
(lbs.)
Crated Weight
(lbs.)
BMCRS01
70.9” x 31.9” x 23.6”
38.2” x 32.3” x 39.4”
260.1
363.8
BMCRS02
70.9” x 35.8” x 23.6”
41.7” x 32.3” x 39.4”
273.4
377
Page 3
BMCRS01-02 Countertop Model Dough Sheeter Manual
3
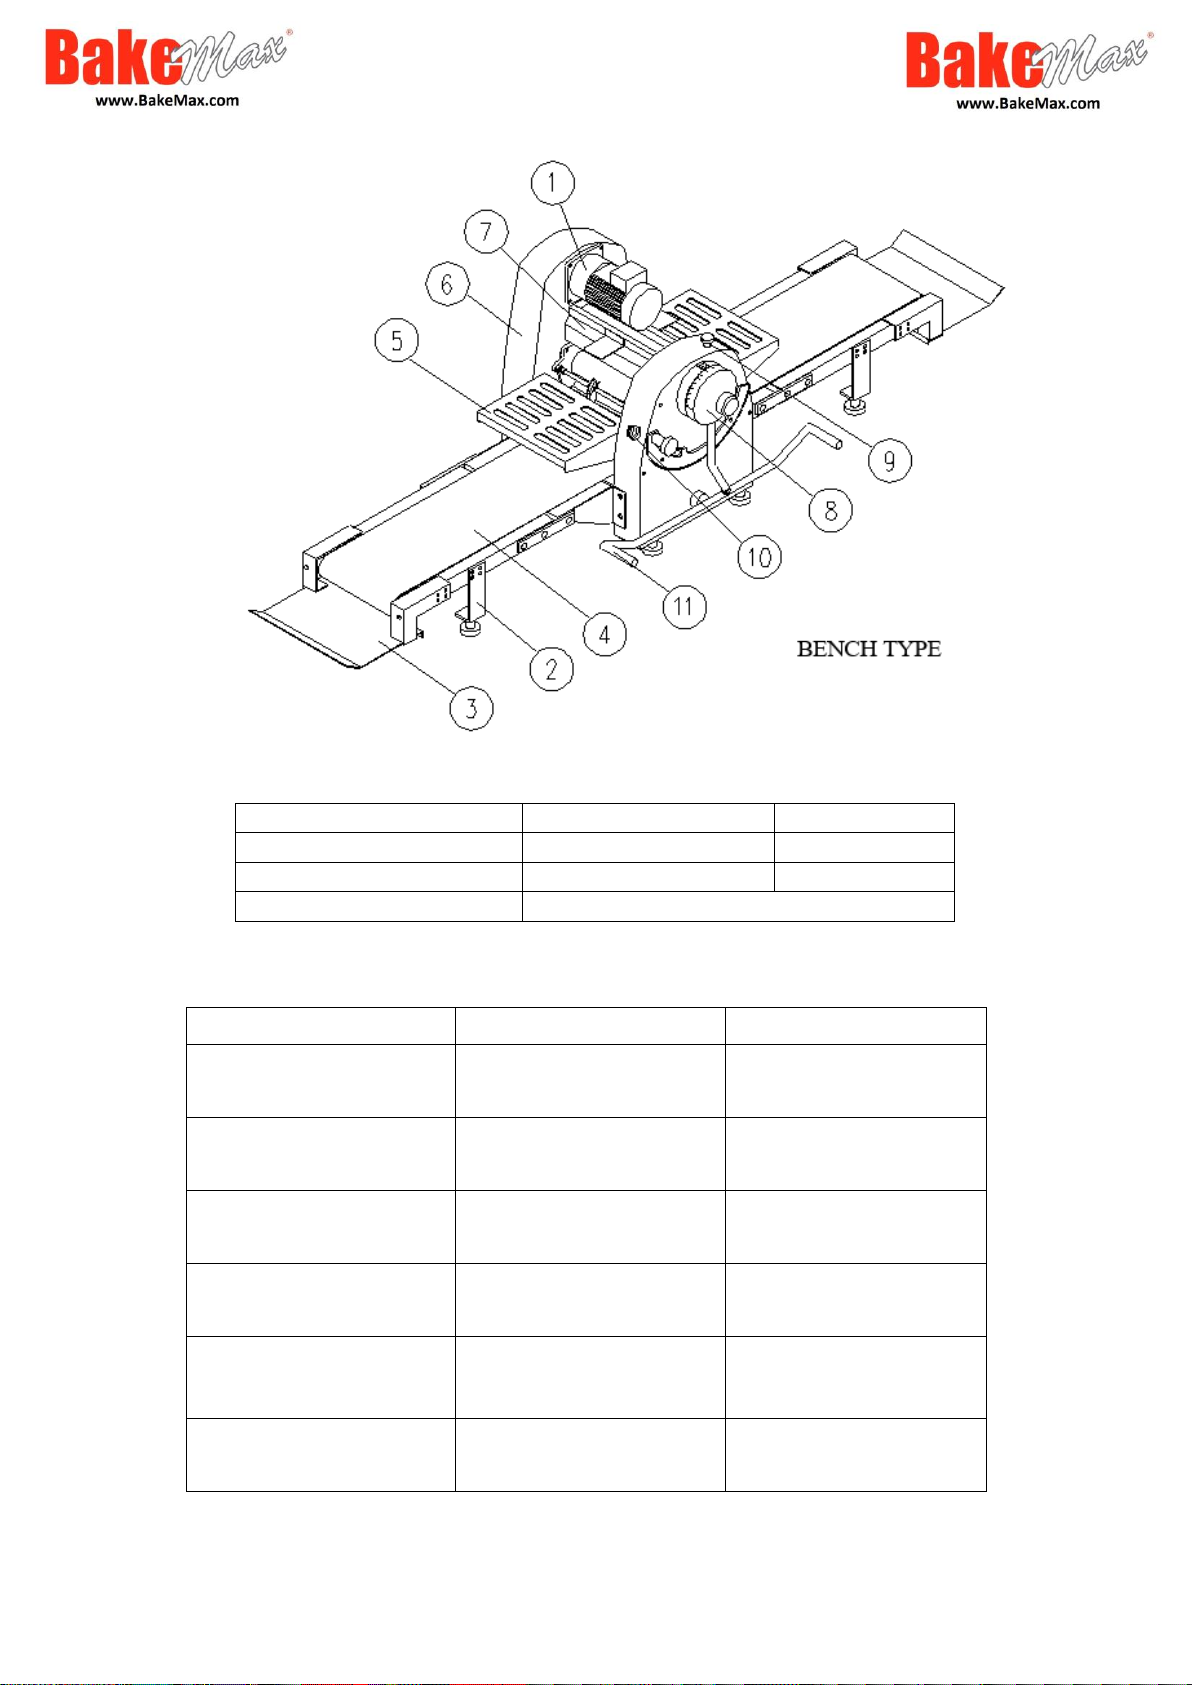
1. Motor
2. Table Frame
3. Catch Tray
4. Conveyor Belt
5. Safety Guard
6. Rear Panel
7. Flour Tray
8. Thickness Handle
9. Stop Button
10. On/Off Switch
11. Movement Control Lever
MODEL
BMCRS01
BMCRS02
Belt width
(Inches)
17.72”
20.47”
Motor power
(HP)
1/2 HP / 375W
1/2 HP / 375W
Voltage
(V)
110V
110V
Net Weight /
Crated Weight (lbs.)
260.1lbs. / 363.8lbs.
273.4lbs. / 377lbs.
Machine Dimensions
W x D x H (Inches)
70.9” x 35.8” x 23.6”
70.9” x 31.9” x 23.6”
Folded Dimensions
W x D x H (Inches)
27.6 x 35.8” x 31.5”
27.6” x 31.9” x 31.5”
Page 4

BMCRS01-02 Countertop Model Dough Sheeter Manual
4
INSTALLATION OF MACHINE
The machine must be installed on a horizontally-level floor. It should be
pleased in a location that is convenient for both operation and maintenance.
The machine safety features make it possible to stand close to the
machine during operation. The room must be provided with adequate lighting
and ventilation.
CONNECTING TO POWER SOURCE
* Qualified personnel in accordance with applicable codes and
regulations should make electrical connections.
*The machine is provided with one single electrical connection with
connection cable at the rear.
*Check that the rating plate voltage corresponds to the mains voltage.
* The machine must be connected to a manual control voltage
disconnection device fitted in an easily accessible position so that the
machine electrical equipment can be separated from the mains when
necessary.
* In particular, the system must be installed by a technically and
professionally qualified electrician listed in the appropriate register. The
installer is obliged to provide the customer with a declaration of
conformity. Old systems should be checked & adapted to the
latest safety regulations.
Page 5

BMCRS01-02 Countertop Model Dough Sheeter Manual
5
OPERATION OF THE MACHINE
1. Put an appropriate amount of dough on the conveyor and press the
dough flat by hand.
2. By operating handle to adjust the gap between upper roller and
lower roller as large as possible according to dough measure. Then
during the following rolling process gradually adjust the gap
smaller and smaller, until sheet dough reaches the desired thickness.
In the beginning, repeat spraying oil, folding, and rolling for a few
times, until sheet oil and sheet dough are evenly folded in layers.
3. Turn on the electric power.
4. The conveyor belts convey the dough to be rolled through the calibration
cylinders from right to left and vice versa. This right-left direction
variation is determined by the control lever as follows: When the lever
is turned to the left, movement is from right to left whereas if it is turned
to the right, movement will be from left to right.
NOTE: To Lower the Guards once they have been lifted & locked into
place. Push the Guard towards the back of the machine and that will allow
you to lower the Guards.
Note: You can also operate the direction of belts by use of the included Foot
Pedal.
Page 6
BMCRS01-02 Countertop Model Dough Sheeter Manual
6
CONTROLS
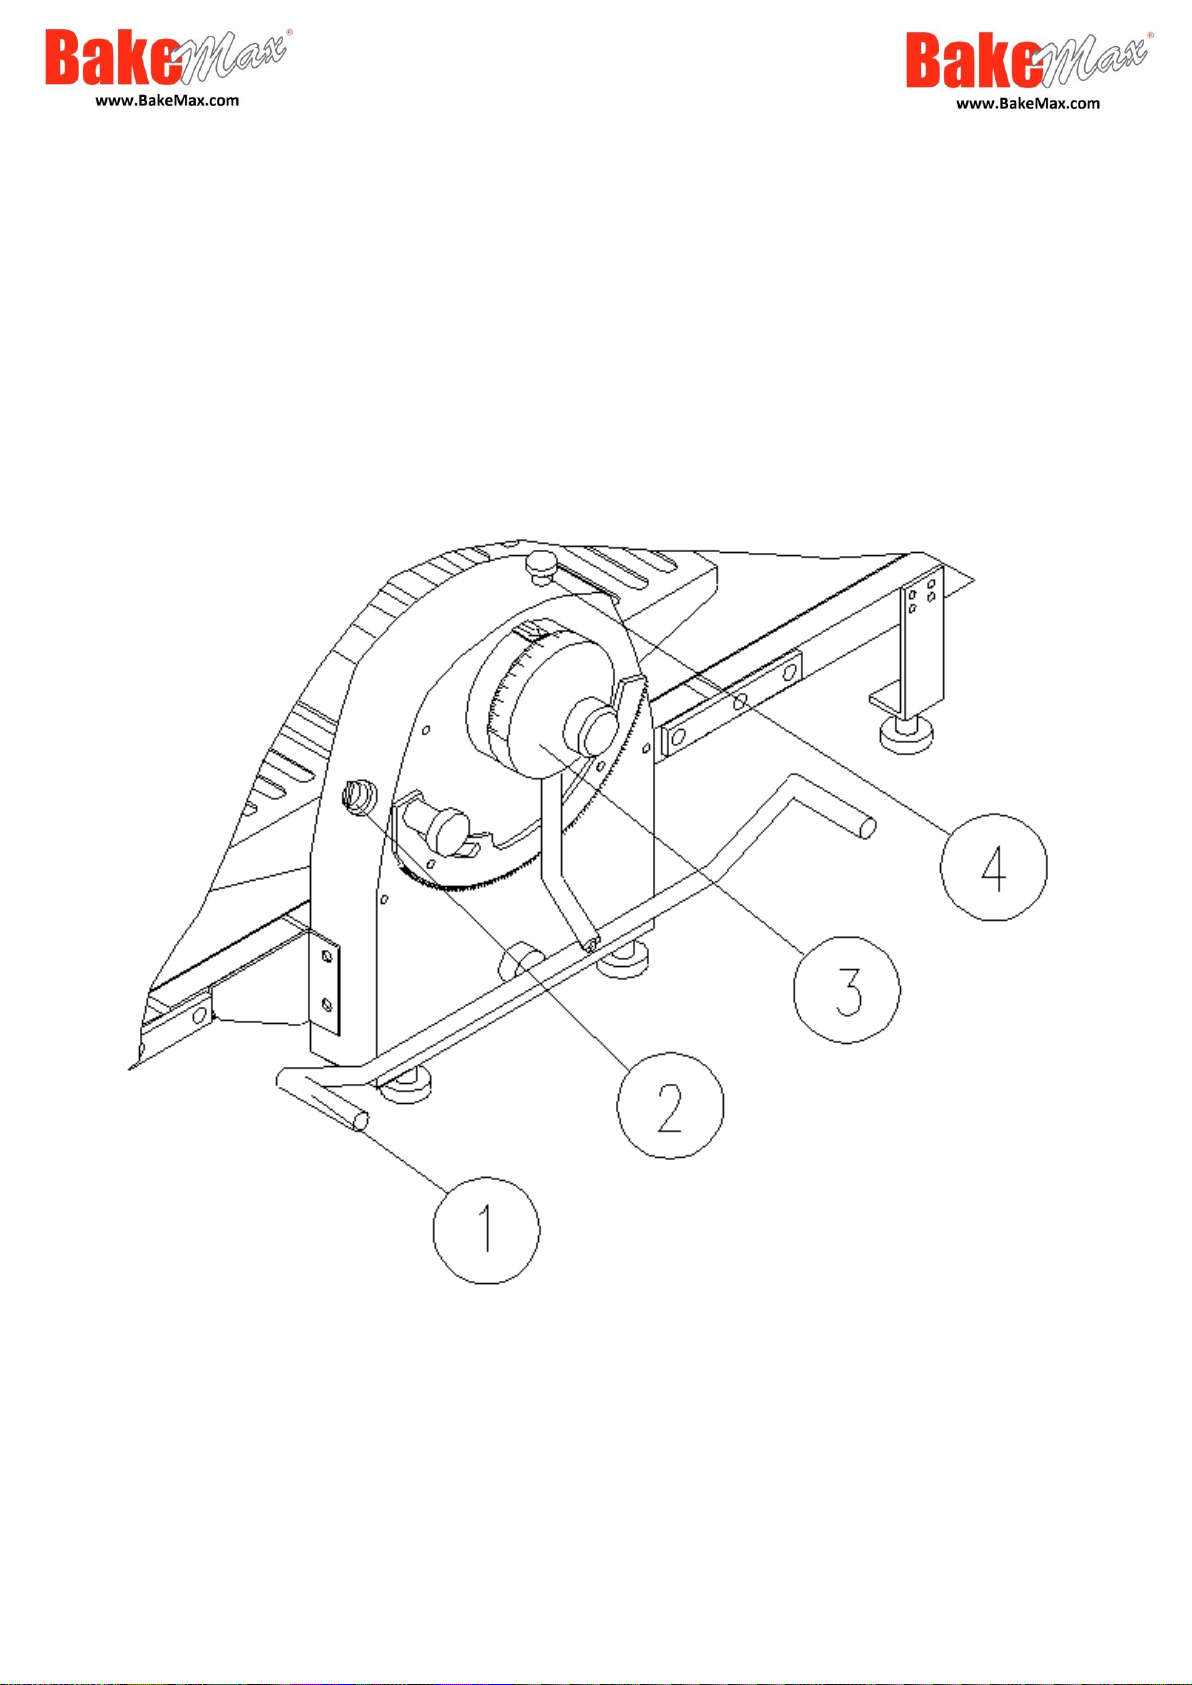
1.Movement control lever…Lever for rolling forth or back by hand control
2. Power switch…................Start & Stop switch
3. Handle………………Adjust the gap between upper and lower rollers
4. Stop switch……………...Emergency Stop
Page 7

BMCRS01-02 Countertop Model Dough Sheeter Manual
7
CLEANING
WARNING: UNPLUG MACHINE BEFORE CLEANING OR
SERVICING
* After each day’s use, clean the conveyor, flour pan and surface thoroughly
with hot water and a mild soap solution and rinse with either a mild
soda or vinegar solution. Rinse thoroughly with a clean damp cloth.
* After cleaning the dough scrapers, use vegetable oil or mineral oil to keep
the scrapers operating smoothly and noise-free.
* Clean under machine occasionally.
REMOVAL OF UPPER SCRAPERS:
To remove the Upper Scrapers (V-Shaped) take and Pull the Chrome Rod # 59 outwards
and the Scraper should drop down. Take ahold of Scraper so as when dropping down
you do not damage the Teflon Edge.
Wipe down the Scraper and apply a light coating of either Vegetable/ Cooking/ Mineral
Oil to Scraper. While you have Scraper off you could apply a thin coat of Oil to Upper
Rollers, this will prevent the Scrappers from being dry. Dry Scrappers can cause loud
squeaking squawking noises.
NOTE: Do not pull Chrome Rod out too far as this will stretch the Tension Springs, just
enough so Scrapper can be removed
When done pull outwards the Chrome Rod again and reinstall the Upper Scrappers.
Page 8

BMCRS01-02 Countertop Model Dough Sheeter Manual
8
REMOVAL OF LOWER SCRAPPERS:
For Lower Scrappers, Lift Outfeed Tables all the way up.
Underneath (on each side) and you will see a Ring (Key Ring) with a Spring attached
which holds the Scrapper in place.
Take hold of Ring and Pull Down Slightly (1/4") and slip off over Tab on Bar. Do Not
Pull Down Too Far as this will Stretch and weaken Spring.
Lower Outfeed Tables, reach under where Lower Scrapper is and Push Upwards and
Scrapper should come out of Mounting Brackets.
Wipe down the same as Upper Scrapers and wipe down with a thin film of Oil as
specified above.
Reinstall Scrapers making sure to install in Round Notched Mounting Brackets.
Grab rings from underneath the Sheeter and reinstall on Metal Tabs. Loop on Spring
itself go on over Tabs, not Key Ring.
NOTE: If you get dirt or stain Belt apply some Flour on Belt and Rub into Belt. You
could also try a Mild Detergent or Vinegar.
When lowering the tables do best to center the belt as best you can. Check alignment of
Belt on a regular basis. If the Belt seems to travel to the Right or Left adjust the Roller
at the End of the Table. This is done with an Allen Key. There are (2) Black Round
Headed Allen Key Screws at the End of the Outfeed Table (one on each side). Make
small adjustments, if necessary, about 1/4 of a Turn at a time. If the Belt is travelling to
the Right loosen Right Screw or Tighten the Left Screw, vice versa if the Belt is
Traveling to Left. Try tightening rather than loosening because the belts can stretch over
time.
If the Belt starts to slip, firmly grip the Belt (with a clean hand) at the end roller while
the belt is travelling. When you can’t hold the belt from moving with your hand
pressure that is a good tension. You do not wish to over tighten as this will stretch the
belt which may cause improper alignment.
Page 9
BMCRS01-02 Countertop Model Dough Sheeter Manual
9
How to replace Micro Switch on Dough Sheeter
1. Unplug the machine from power.
2. Remove the Handle Cover (either by unscrewing (Old Style) or by using a small
flat-head screwdriver to gently pry & pop the Convex Bolt Cover off. (New Style)
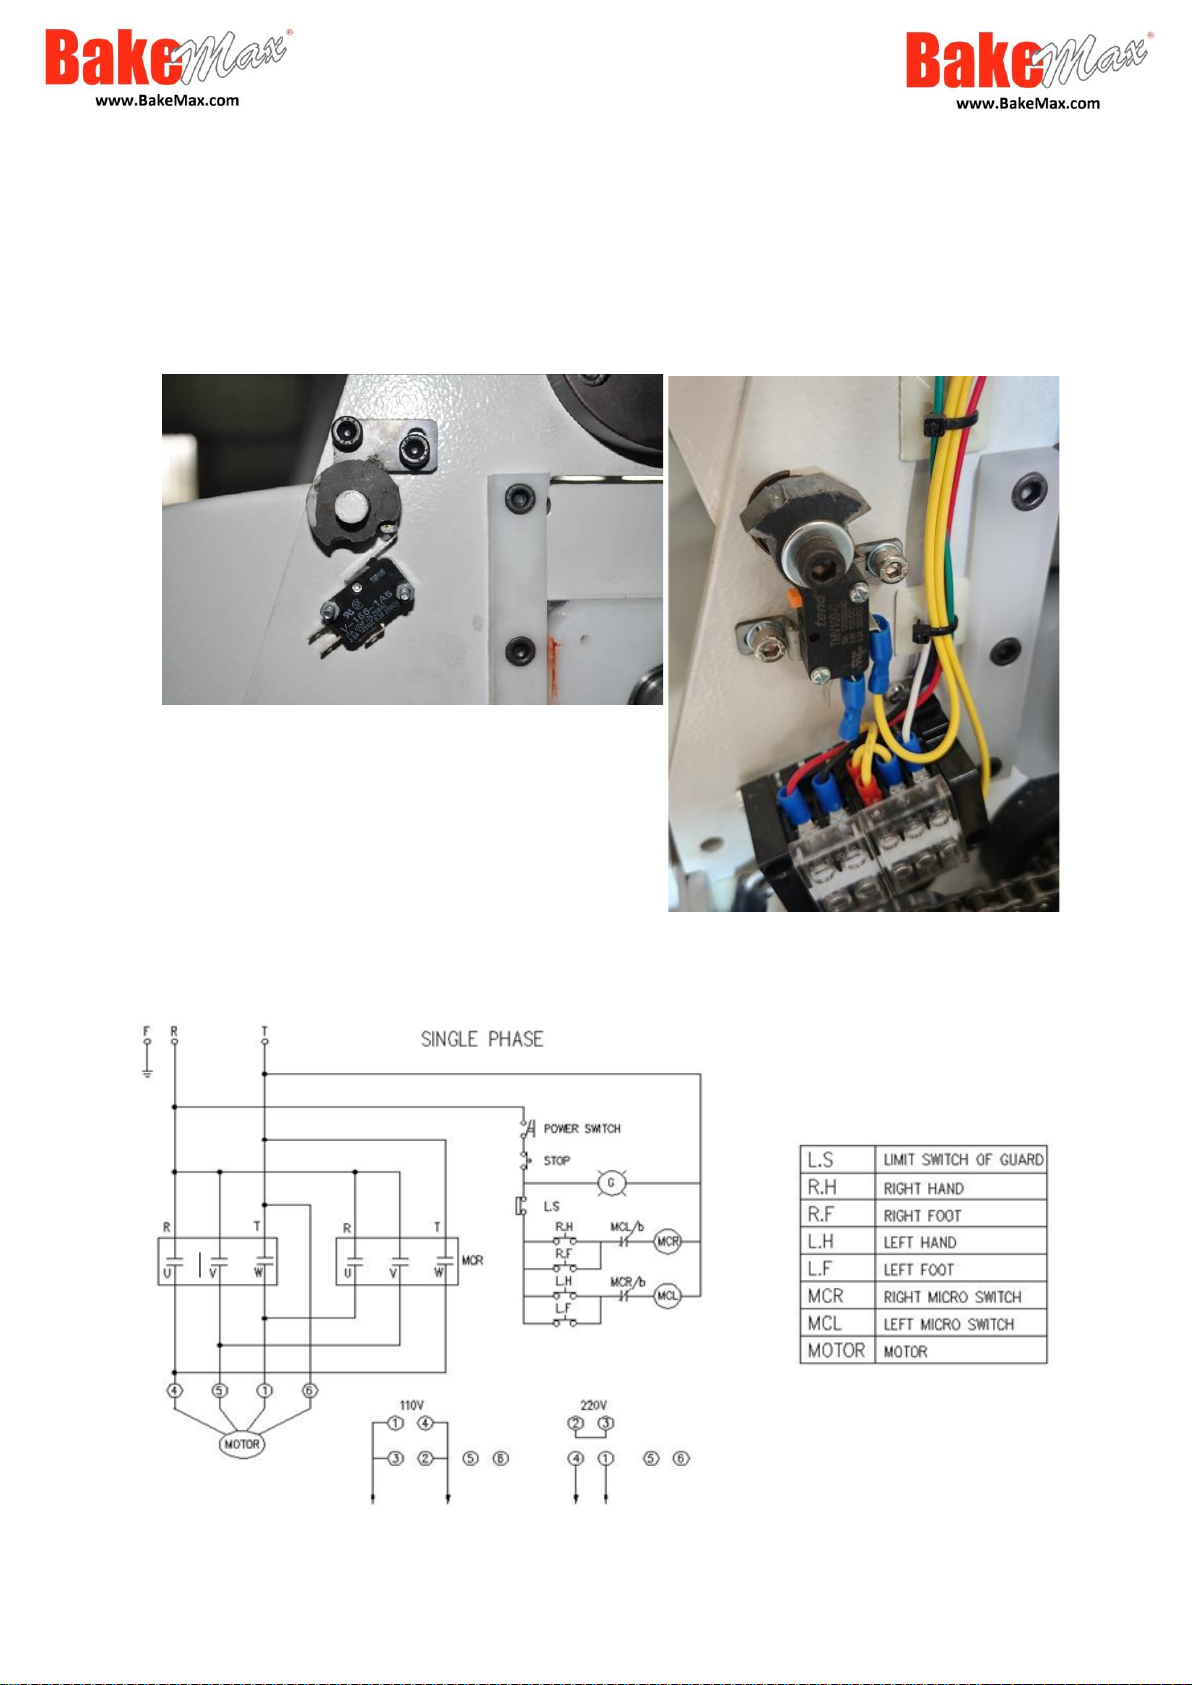
3. Once the Bolt Cover is removed, loosen the (6) Allen Key Screws, not completely
out but almost all the way. Remove (3) Bolts out of the (6) completely and Screw
these (3) Bolts into the (3) Empty Threaded Holes in the Front part of the
Assembly. When you Screw the (3) Screws into the Threaded Holes these 2 parts
separate, allowing the handle to be removed.
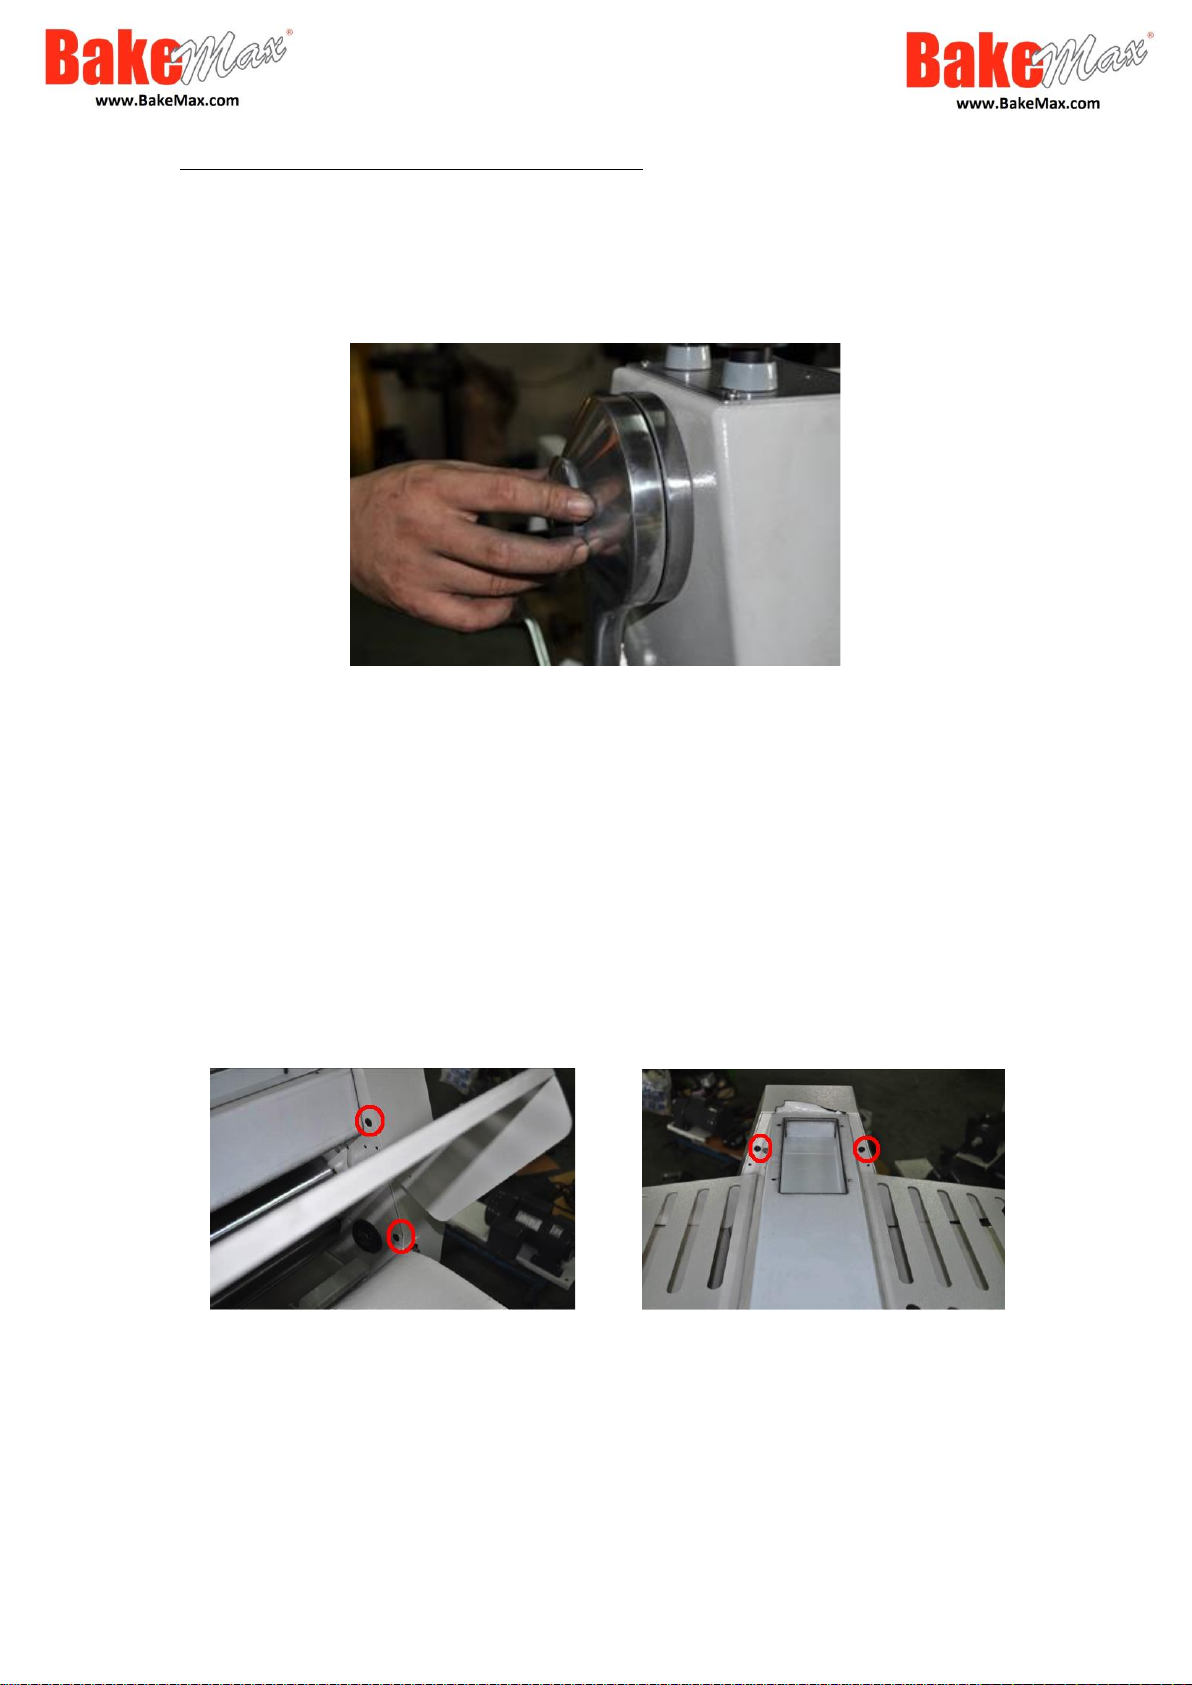
4. To remove the Front Panel after the Thickness Handle has been removed, there are
(4) 5/16” Black Countersunk Allen Head Screws which must be removed. They
are located at the Ends of the Main Rollers. There are (2) Screws above the Guard
and (2) Screws down next to the Belts. See photos below for screw locations.
5. Once the (4) Screws holding the Front Panel have been removed, slide the Front
Panel away from the Sheeter (use flathead screwdriver if needed to gently pry the
Panel apart from the frame). Be cautious while removing the Front Panel as there
are wire connections that go to the Mico Switches.
6. Remove the Screws (2 per Switch) that hold Micro Switch.
Page 10
BMCRS01-02 Countertop Model Dough Sheeter Manual
10
NOTE: Check where Wires are located on the Terminals on the Switch or
otherwise the Switches will not work properly. Take pictures as needed
NOTE: When installing or replacing Switches DO NOT Overtighten the Screws
holding the Microswitch.
WIRING DIAGRAM
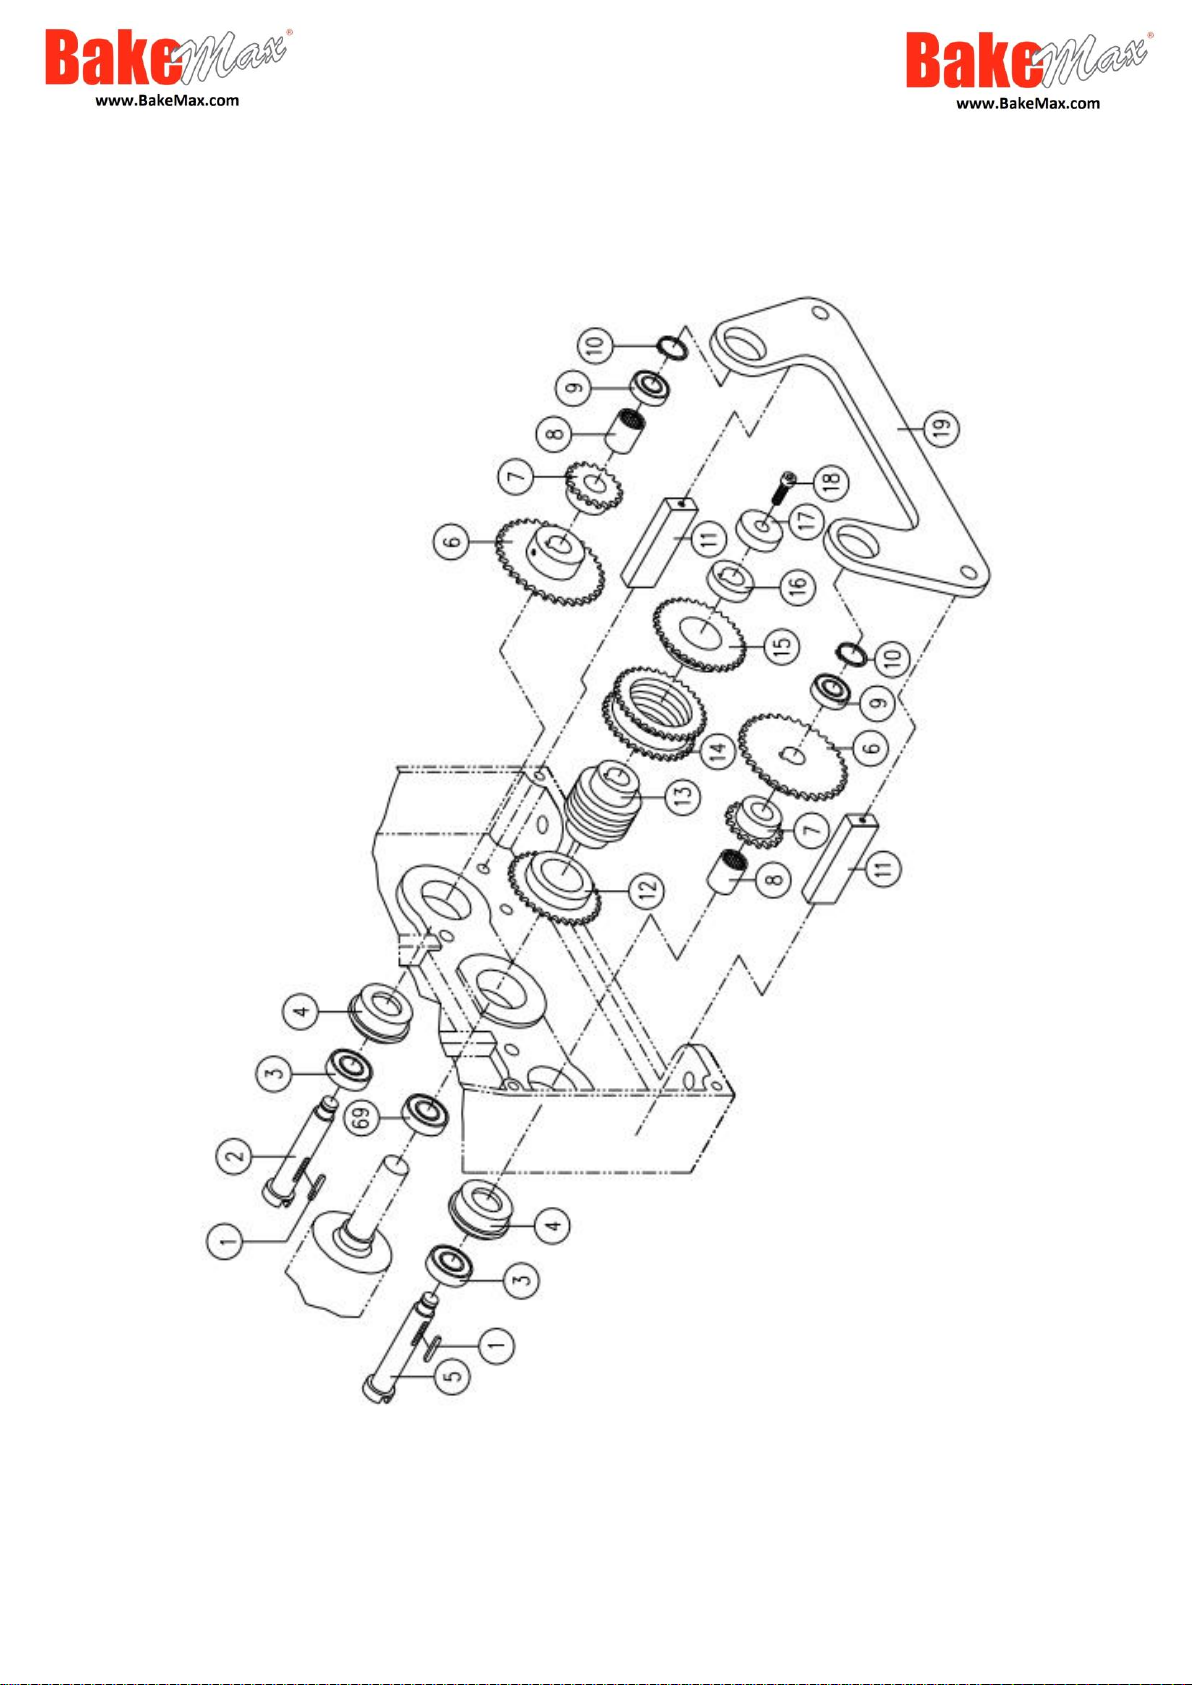
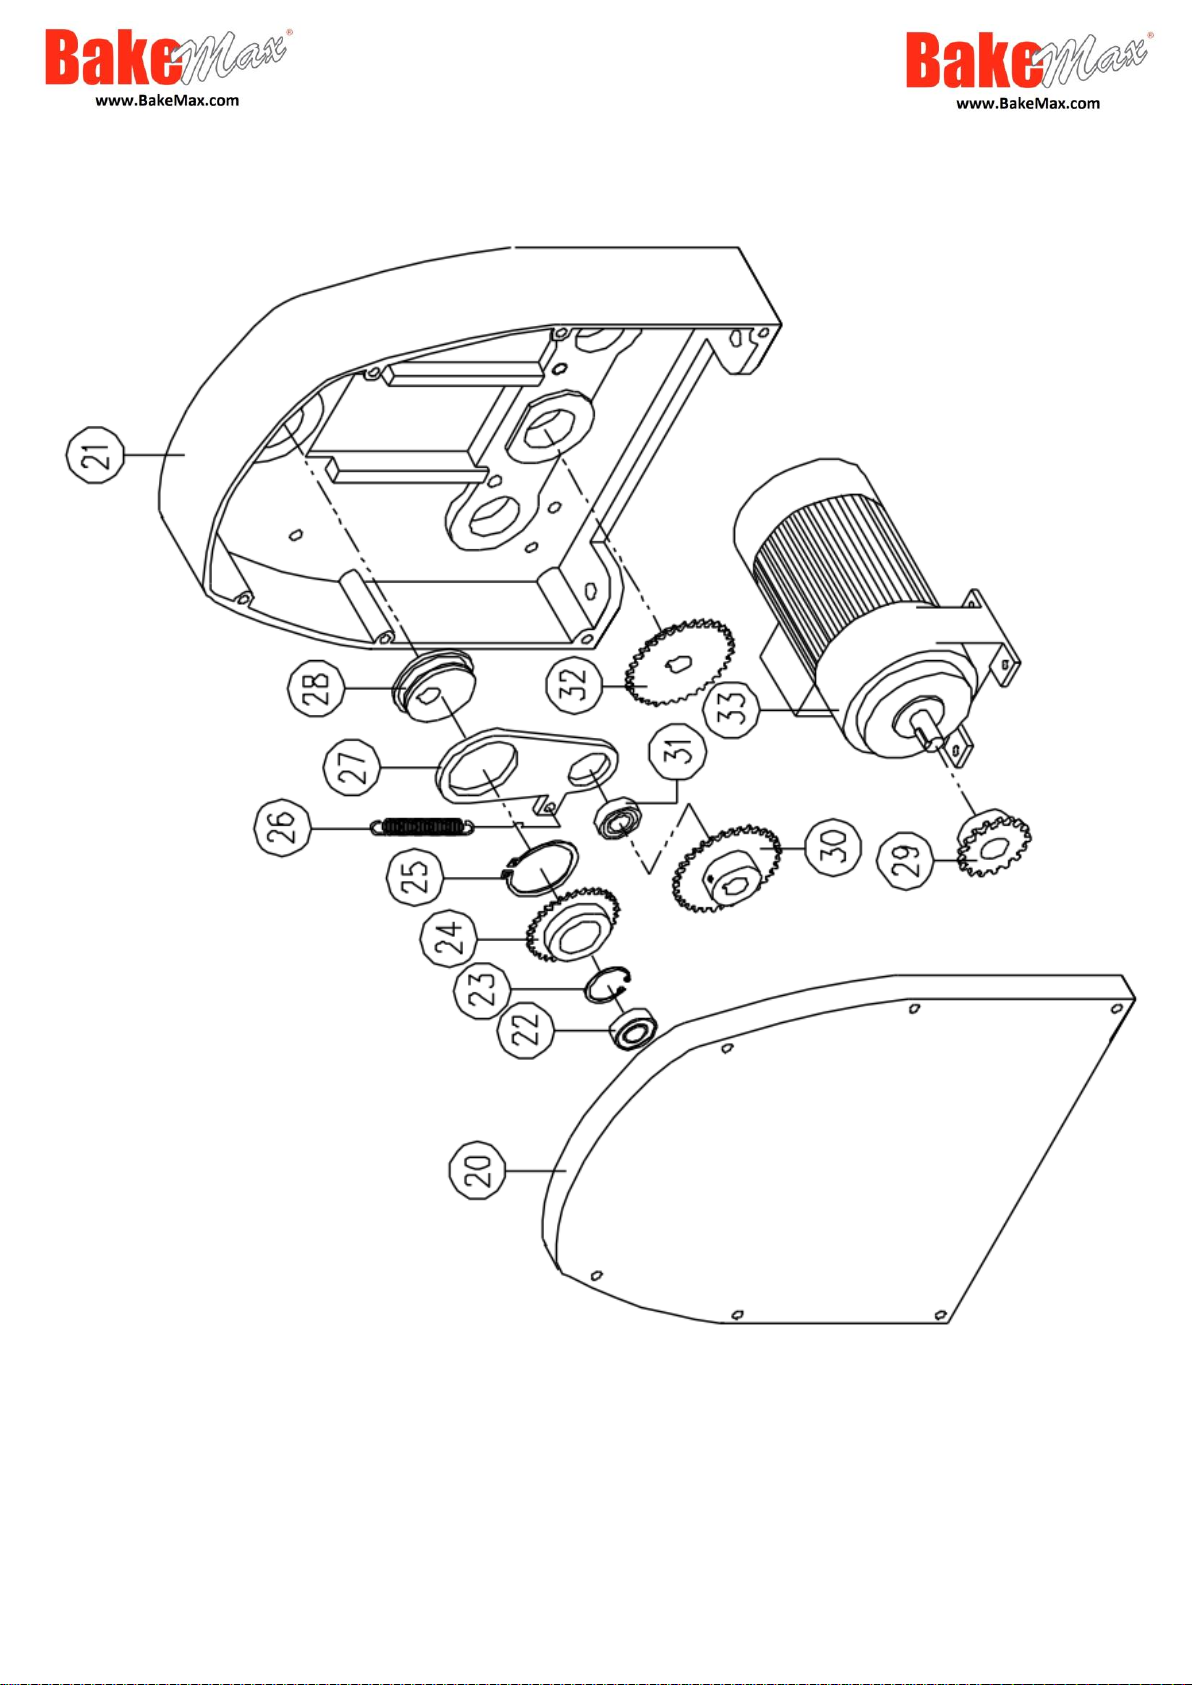
PARTS LIST & BREAKDOWN
Page 11

BMCRS01-02 Countertop Model Dough Sheeter Manual
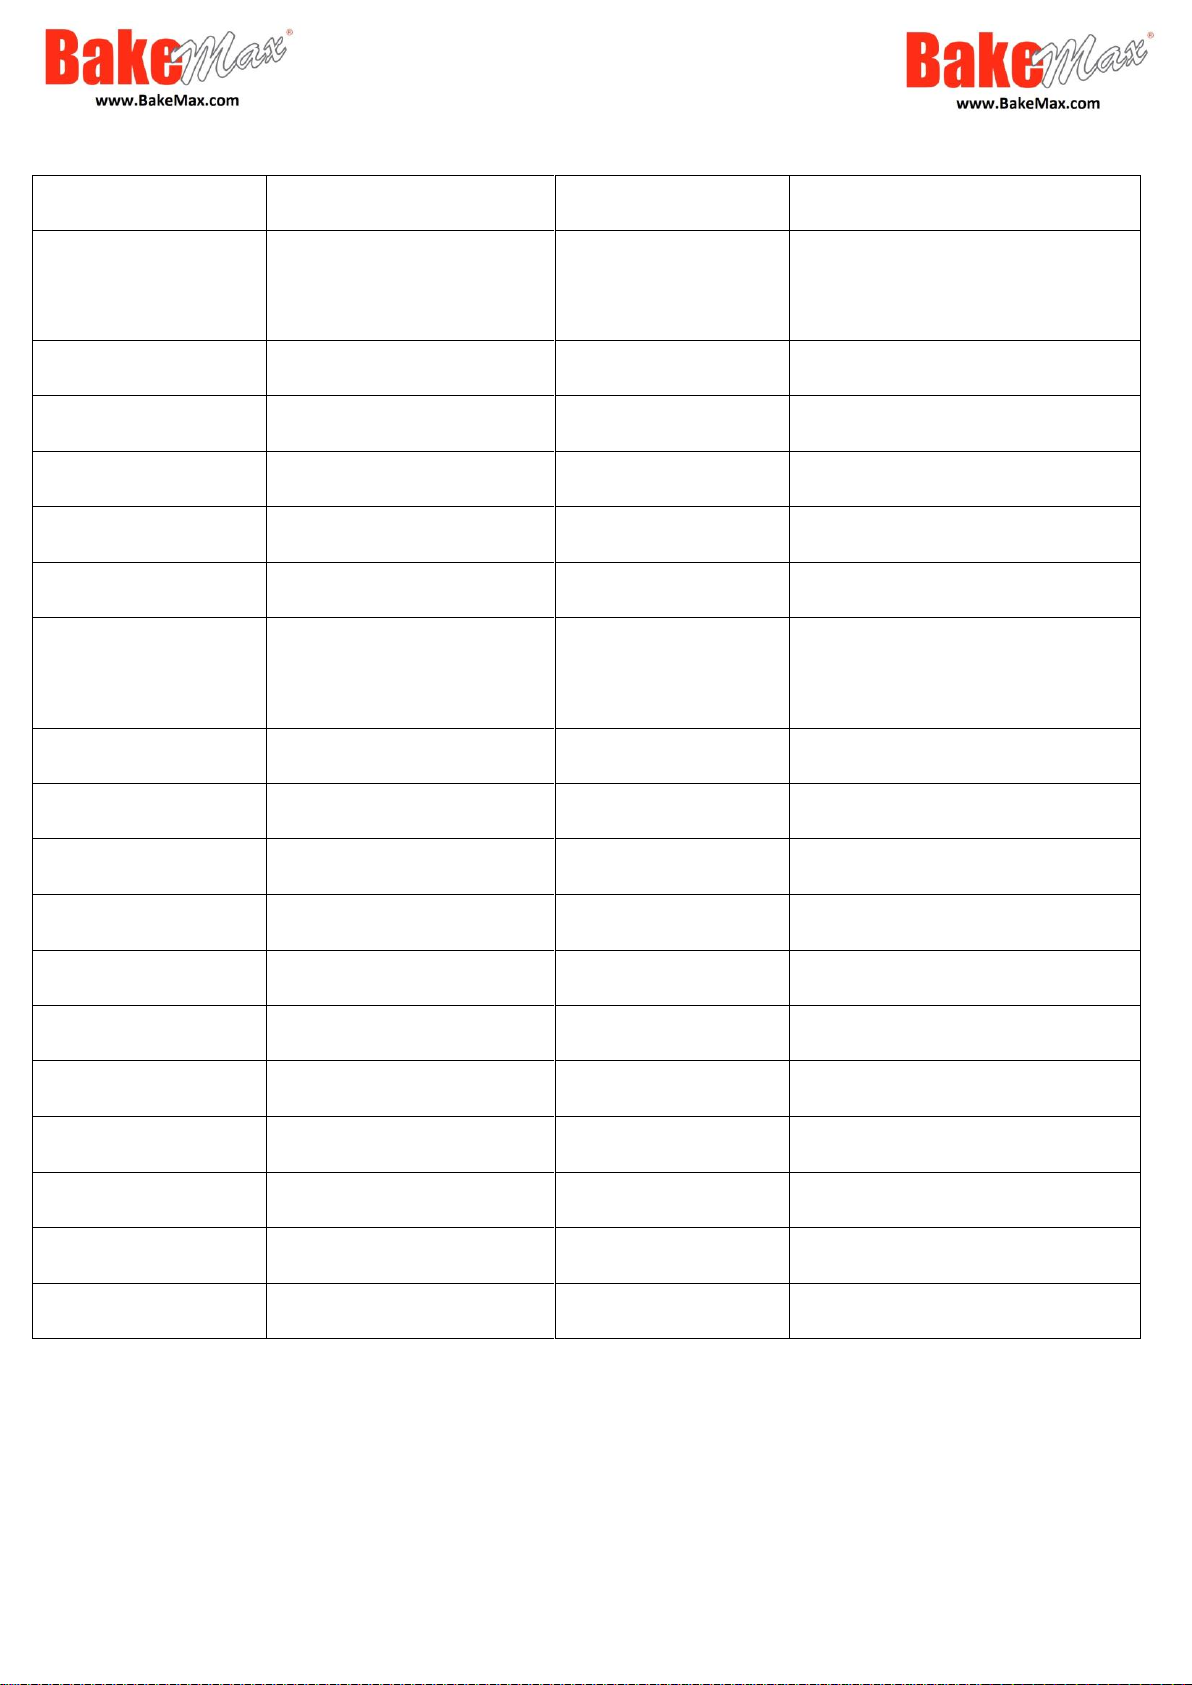
11
BakeMax Part #
Part Description
BakeMax Part #
Part Description
1 - CRS01/06/001
Key
2 - CRS01/06/002
Right Drive Shaft
3 - CRS01/06/003
Bearing 6004ZZ
4 - CRS01/06/004
Bearing Block
5 - CRS01/06/005
Left Drive Shaft
6 - CRS01/06/006
Sprocket 26T
7 - CRS01/06/007
Sprocket 15T
8 - CRS01/06/008
Locking Bearing FC-20
9 - CRS01/06/009
Bearing 6002ZZ
10 - CRS01/06/010
C. Retainer Ring S-15
11 - CRS01/06/011
Stay
12 - CRS01/06/012
Sprocket 23T
13 - CRS01/06/013
Worm Spline
14 - CRS01/06/014
Double Worm Gear 24T
15 - CRS01/06/015
Sprocket 23T
16 - CRS01/06/016
Spacer
17 - CRS01/06/017
Washer
18 - CRS01/06/018
Bolt
19 - CRS01/06/019
Support bracket
20 - CRS01/06/020
Rear Panel
21 - CRS01/06/021
Rear Frame
22 - CRS01/06/022
Bearing 6205ZZ
23 - CRS01/06/023
C. Retainer ring R-52
24 - CRS01/06/024
Up Roller Sprocket
25 - CRS01/06/025
C. Retainer ring S-70
26 - CRS01/06/026
Up Roller Tension Spring
27 - CRS01/06/027
Connecting Board
28 - CRS01/06/028
Up Roller Cam
29 - CRS01/06/029
Motor Sprocket
30 - CRS01/06/030
Sprocket
31 - CRS01/06/022
Bearing 6205ZZ
32 - CRS01/06/032
Sprocket
33 - CRS01/06/033
CRS01/06/033A
CRS01/06/033B
CRS01/CAP/STA
CRS01/CAP/RUN
Motor (110/220V)
Centrifugal Governor
Centrifugal Switch
Start Capacitor
Run Capacitor
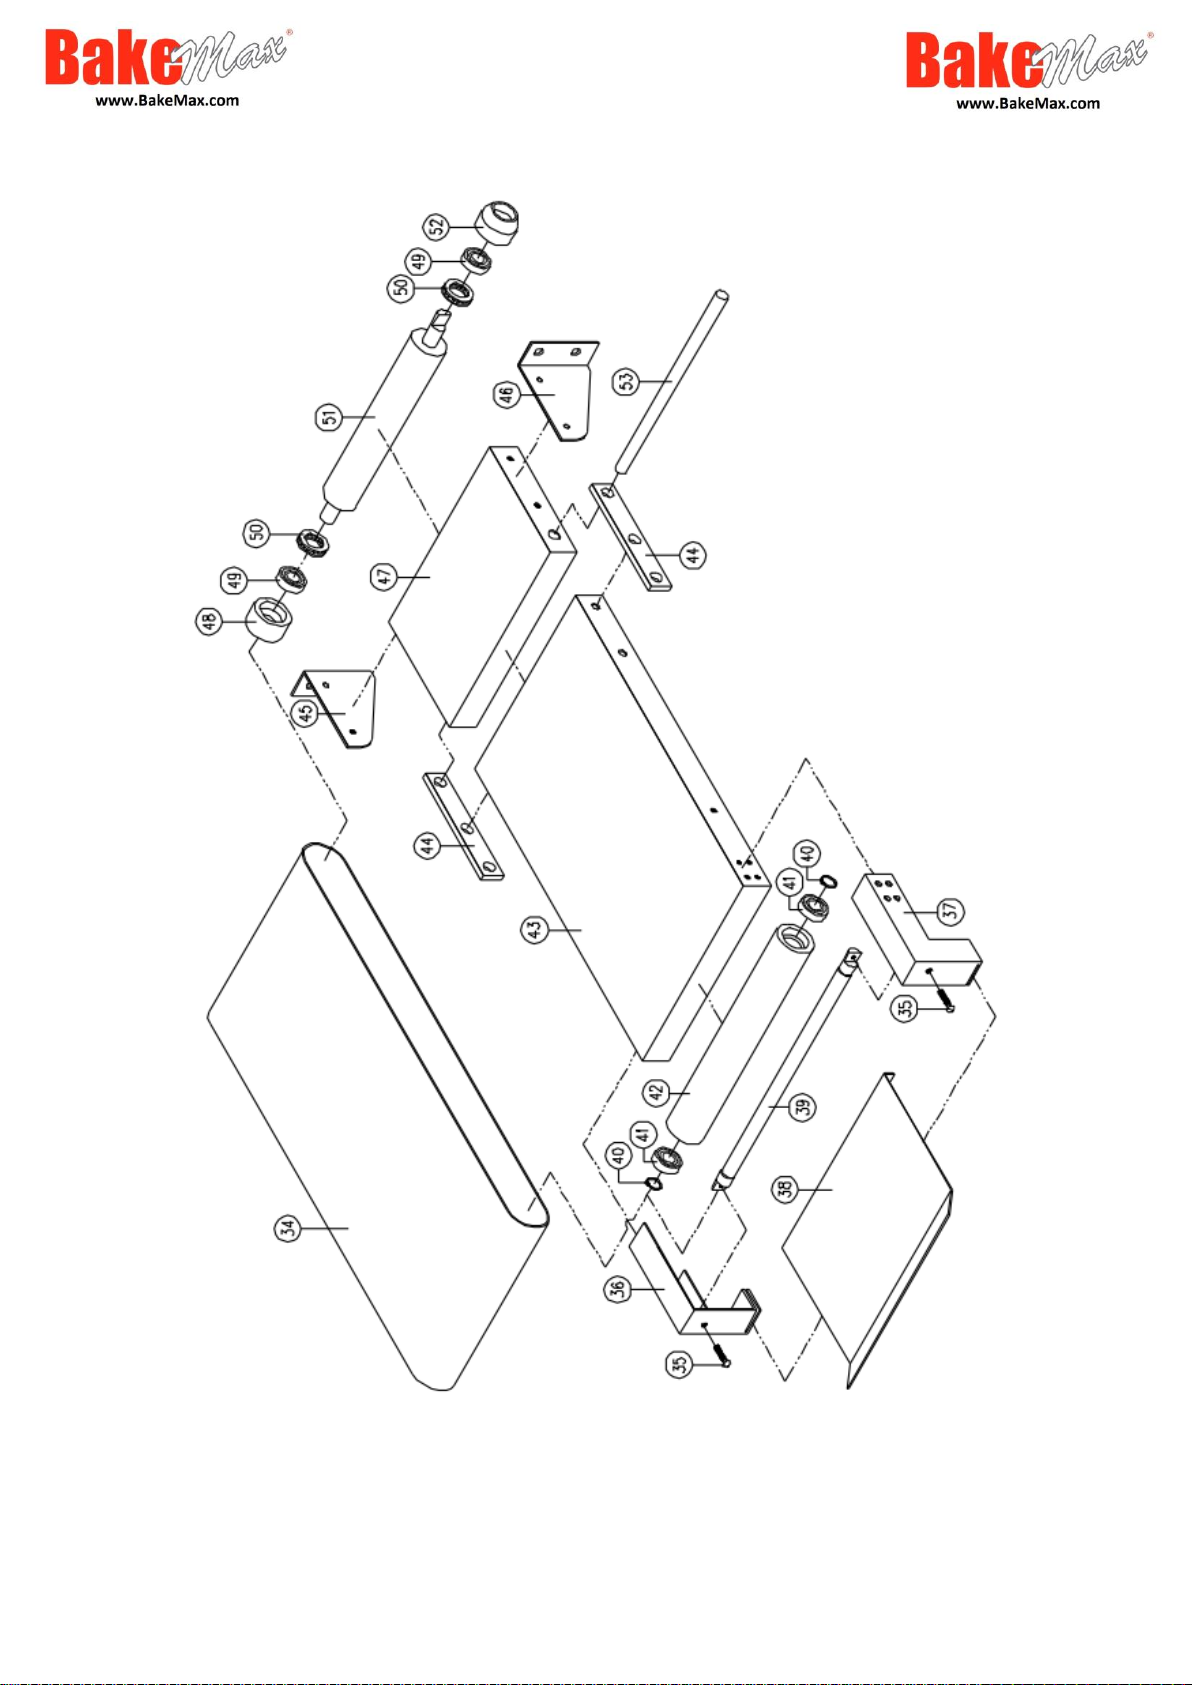
34 – Conveyor Belt
CRS01/02/034A
CRS01/02/034B
CRS02/02/034A
CRS02/02/034B
Conveyor Belt
Conveyor Belt (Flat)
Conveyor Belt (Ridges)
Conveyor Belt (Flat)
Conveyor Belt (Ridges)
CRS01/06/035
Tension Screw
CRS01/06/036
Left Support Bracket
CRS01/06/037
Right Support Bracket
CRS01/06/038
Extension Catch Tray
Page 12

BMCRS01-02 Countertop Model Dough Sheeter Manual
12
Part #
Part Description
Part #
Part Description
39 – CRS01/06/039
39 – CRS02/06/039
End Roller Complete
End Roller Complete
40 – CRS01/06/040
C. Retainer Ring S-20
41 – CRS01/06/041
Bearing 6004ZZ
42 – See #39
Roller Shaft - N/A
43 – CRS01/06/043
Outfeed Table
44 – CRS01/06/044
Connecting Rod
45 – CRS01/06/045
Left Support Bracket
46 – CRS01/06/046
Right Support Bracket
47 – CRS01/06/047
Base
48 – CRS01/06/048
Bearing Block
49 – CRS01/06/049
Bearing 6003ZZ
50 – CRS01/06/050
Thrust Bearing 51203
51 – CRS01/06/051
51 – CRS02/06/051
Drive Roller BMCRS01
Drive Roller BMCR02
52 – CRS01/06/052A
52 – CRS01/06/052B
Bearing Block (Flat Belt)
Bearing Block (Ridge Belt)
53 – CRS01/06/053
Support Axle
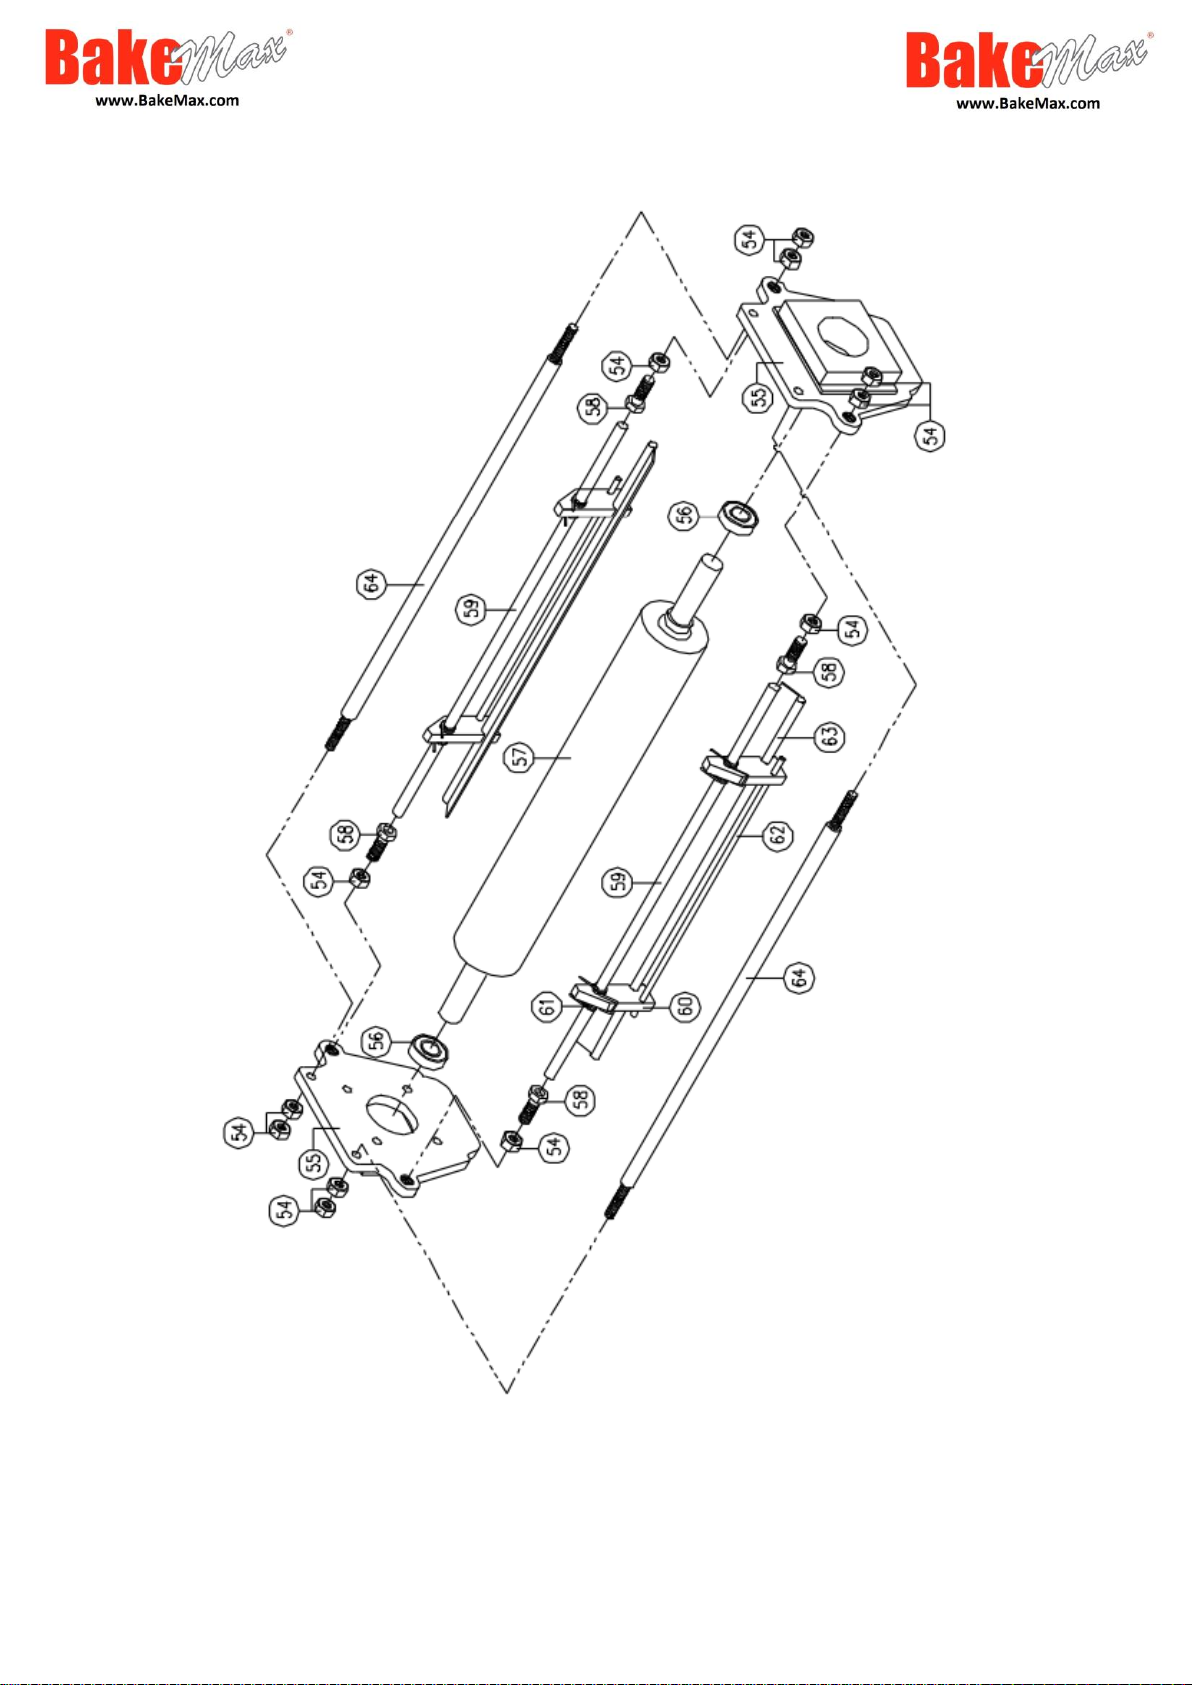
54 – CRS01/06/054
Nut
55 – CRS01/06/055
Sliding Seat
56 – CRS01/06/022
Bearing 6205ZZ
57 – CRS01/06/057
Up roller
58 – CRS01/06/058
Bolt
59 – CRS01/06/059
Double Scraper Rod
60 – CRS01/06/060
Link Mass
61 – CRS01/06/061
Torsion Spring (Scraper)
62 – CRS01/06/062
Double Scraper Bar
63 – CRS01/06/063
63 – CRS02/06/063
Upper Double Scraper
Upper Double Scraper
64 – CRS01/06/064
64 – CRS02/06/064
Double Scraper Bar
Double Scraper Bar
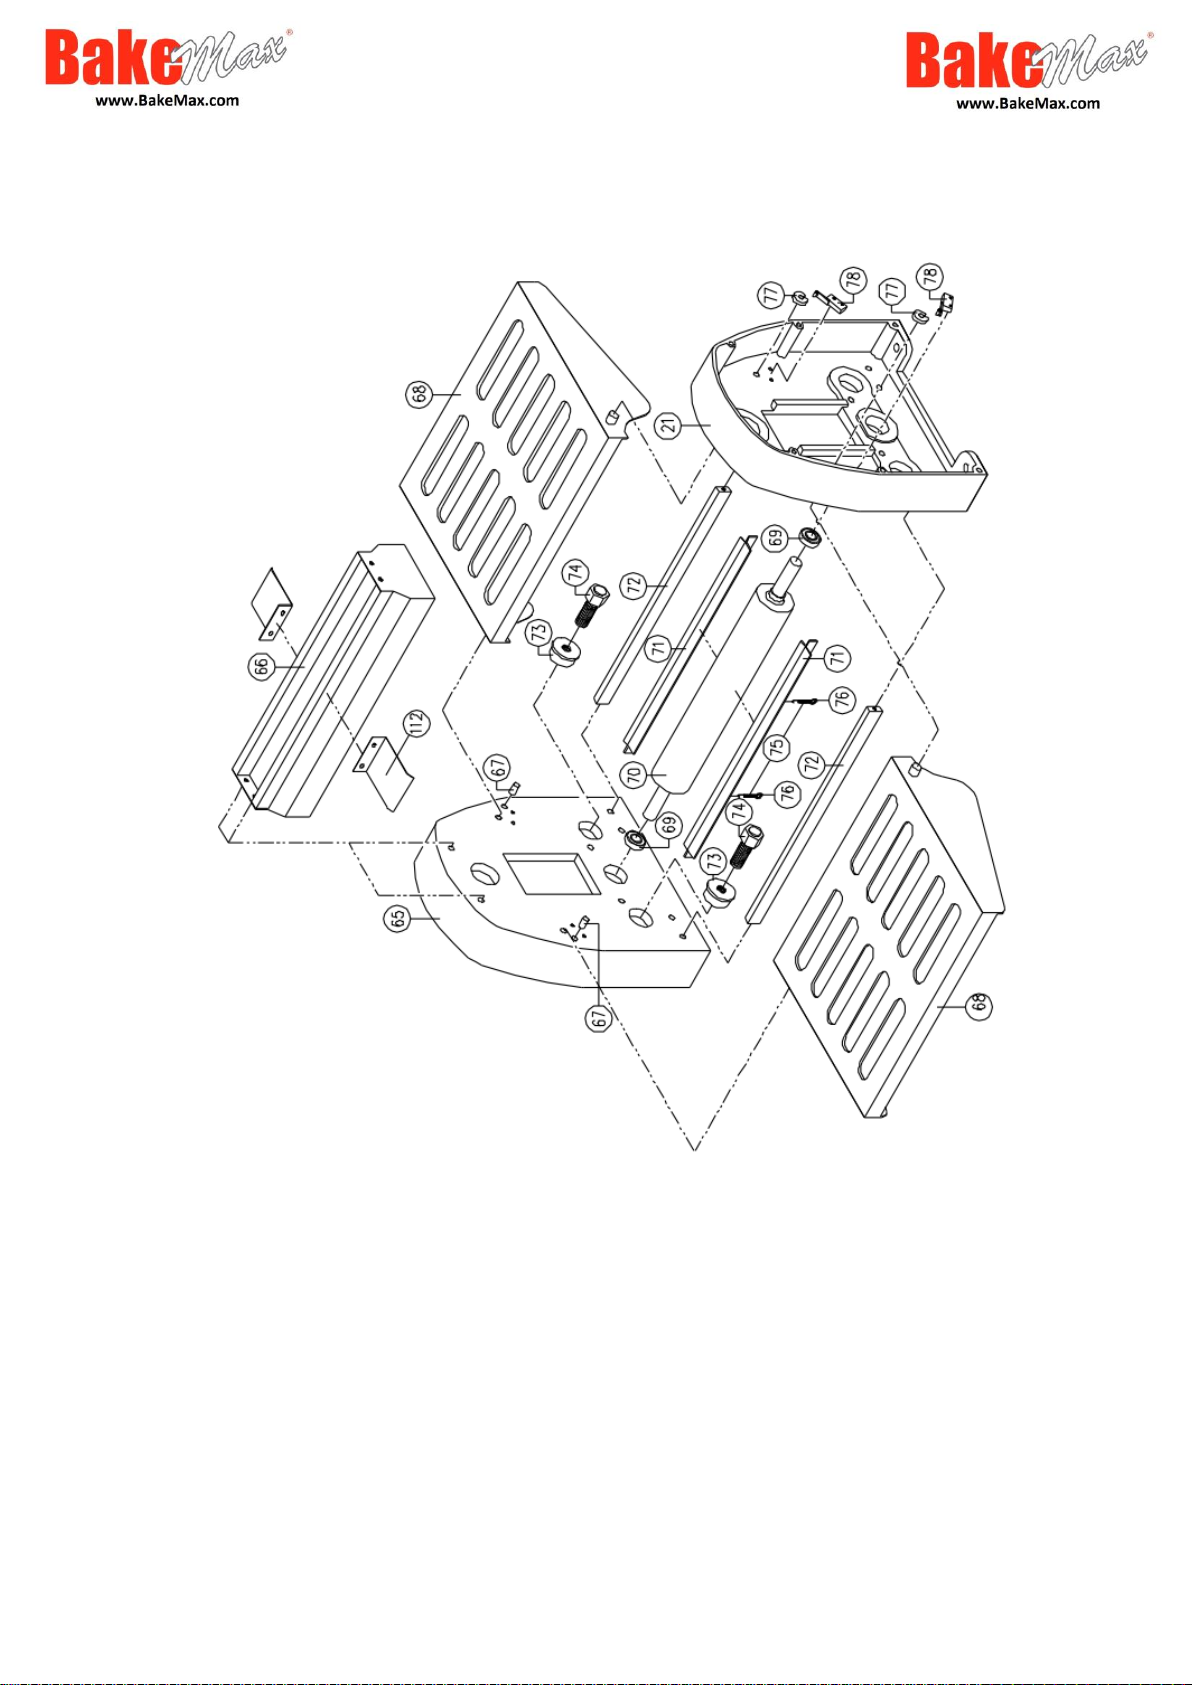
65 – CRS01/06/065
Front Frame
66 – CRS01/06/066
Roller Head Housing
67 – N/A
Stop Pin – N/A – Welded
*Use Long Bolt/Screw
68 – CRS01/06/068
68 – CRS02/06/068
Safety Guard CRS01
Safety Guard CRS02
69 – CRS01/06/022
Bearing 6205ZZ
70 – CRS01/06/070
Down Roller
71 – CRS01/06/071
71 – CRS02/06/071
Lower Scraper CRS01
Lower Scraper CRS02
72 – CRS01/06/072
72 – CRS02/06/072
Bolt Support CRS01
Bolt Support CRS02
73 – CRS01/06/073
Anchor Block
74 – CRS01/06/074
Drive Roller Tension Bolt
75 – CRS01/06/075
Expansion Spring Lower Scraper
76 – CRS01/06/076
Scraper Ring
Page 13
BMCRS01-02 Countertop Model Dough Sheeter Manual
13
BakeMax Part #
Part Description
BakeMax Part #
Part Description
77 – CRS01/06/077L
Microswitch Trigger Left
Microswitch Trigger Right
78 – CRS01/06/078A
78 – CRS01/06/078B
Microswitch (Lever Type)
Microswitch (Roller Type)
79 – CRS01/06/079
Bolt
80 – CRS01/06/080
Lock Washer
81 – CRS01/06/081
Washer
82 – CRS01/06/077
Trigger – See # 77
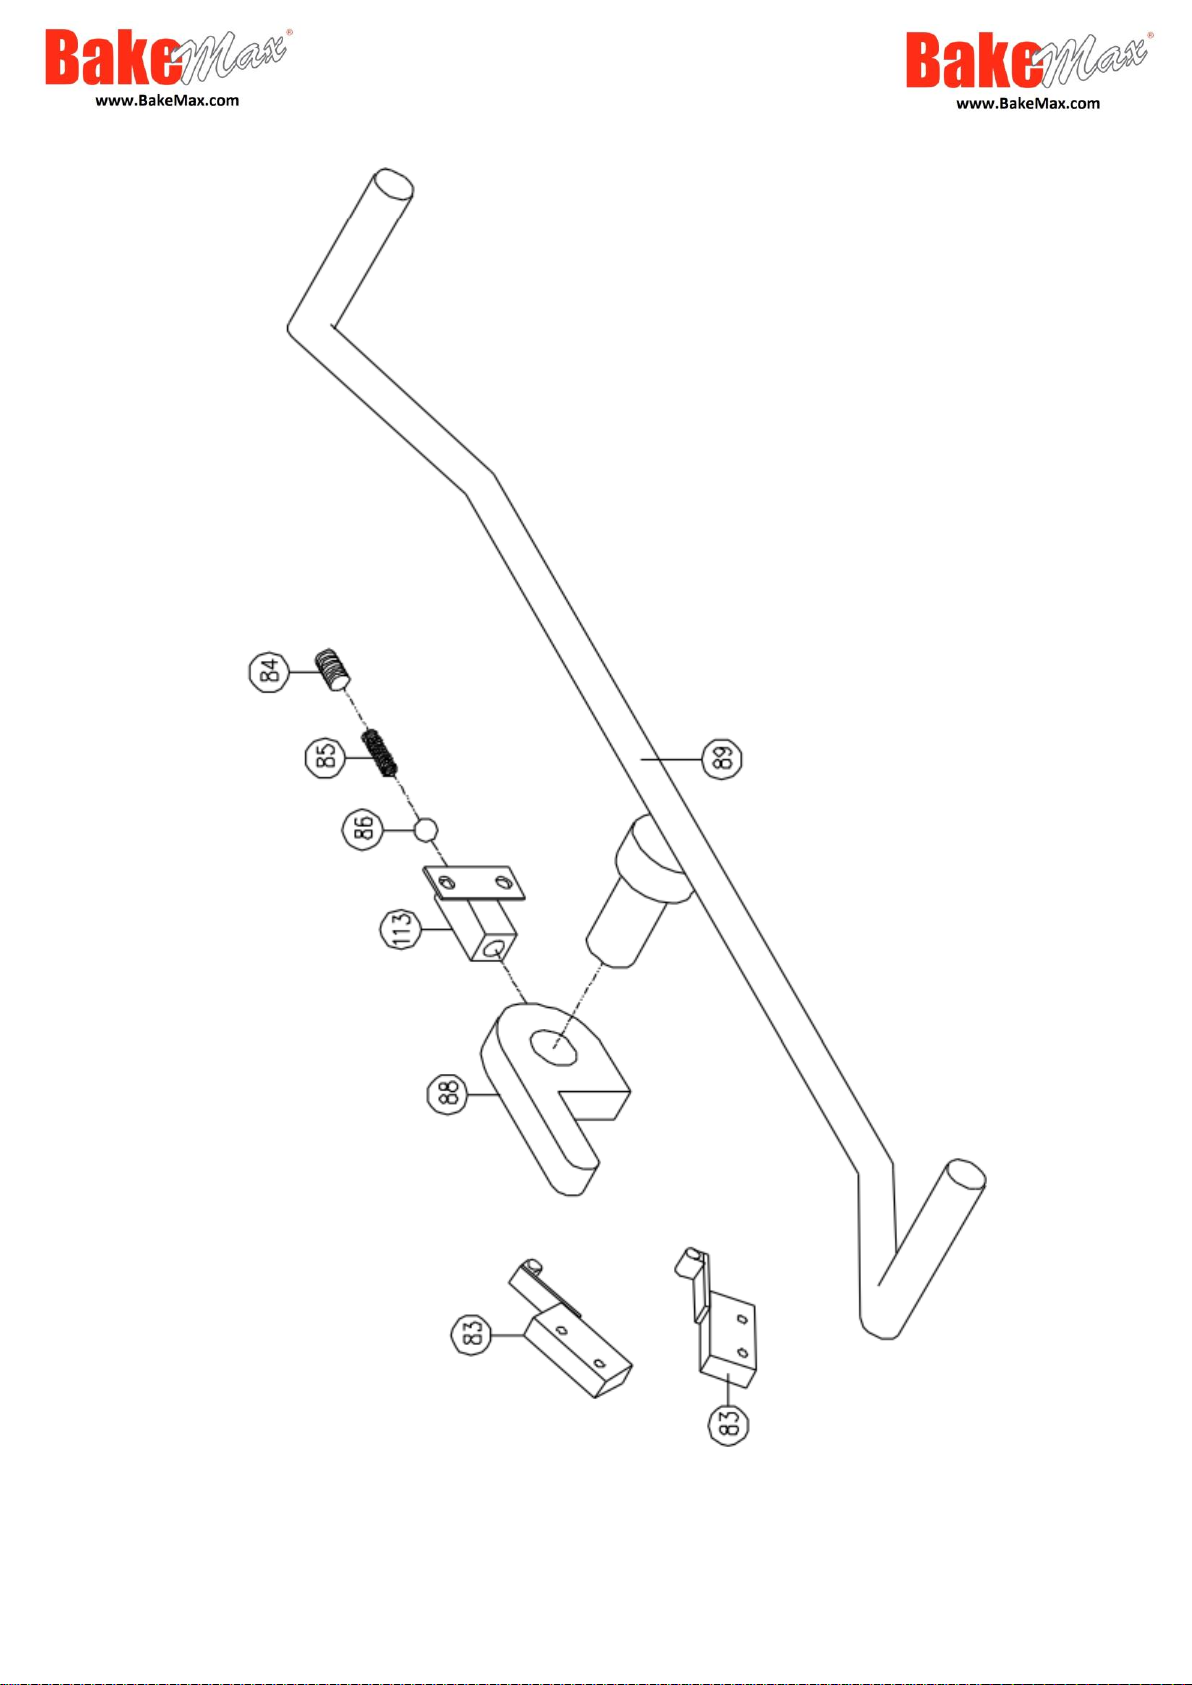
83 – CRS01/06/083
Microswitch (Lever Type)
84 – CRS01/06/084
Bolt
85 – CRS01/06/085
Compression Spring
86 – CRS01/06/086
Ball
87 – CRS01/06/087
Fixed Support
88 – CRS01/06/088
Locating Mass
89 – CRS01/06/089
Movement Control Lever
90 – CRS01/06/090
90 – CRS02/06/090
Thickness Handle Shaft CRS01
Thickness Handle Shaft CRS02
91 – CRS01/06/091
C. Retainer ring S-25
92 – CRS01/06/092
Connecting Board
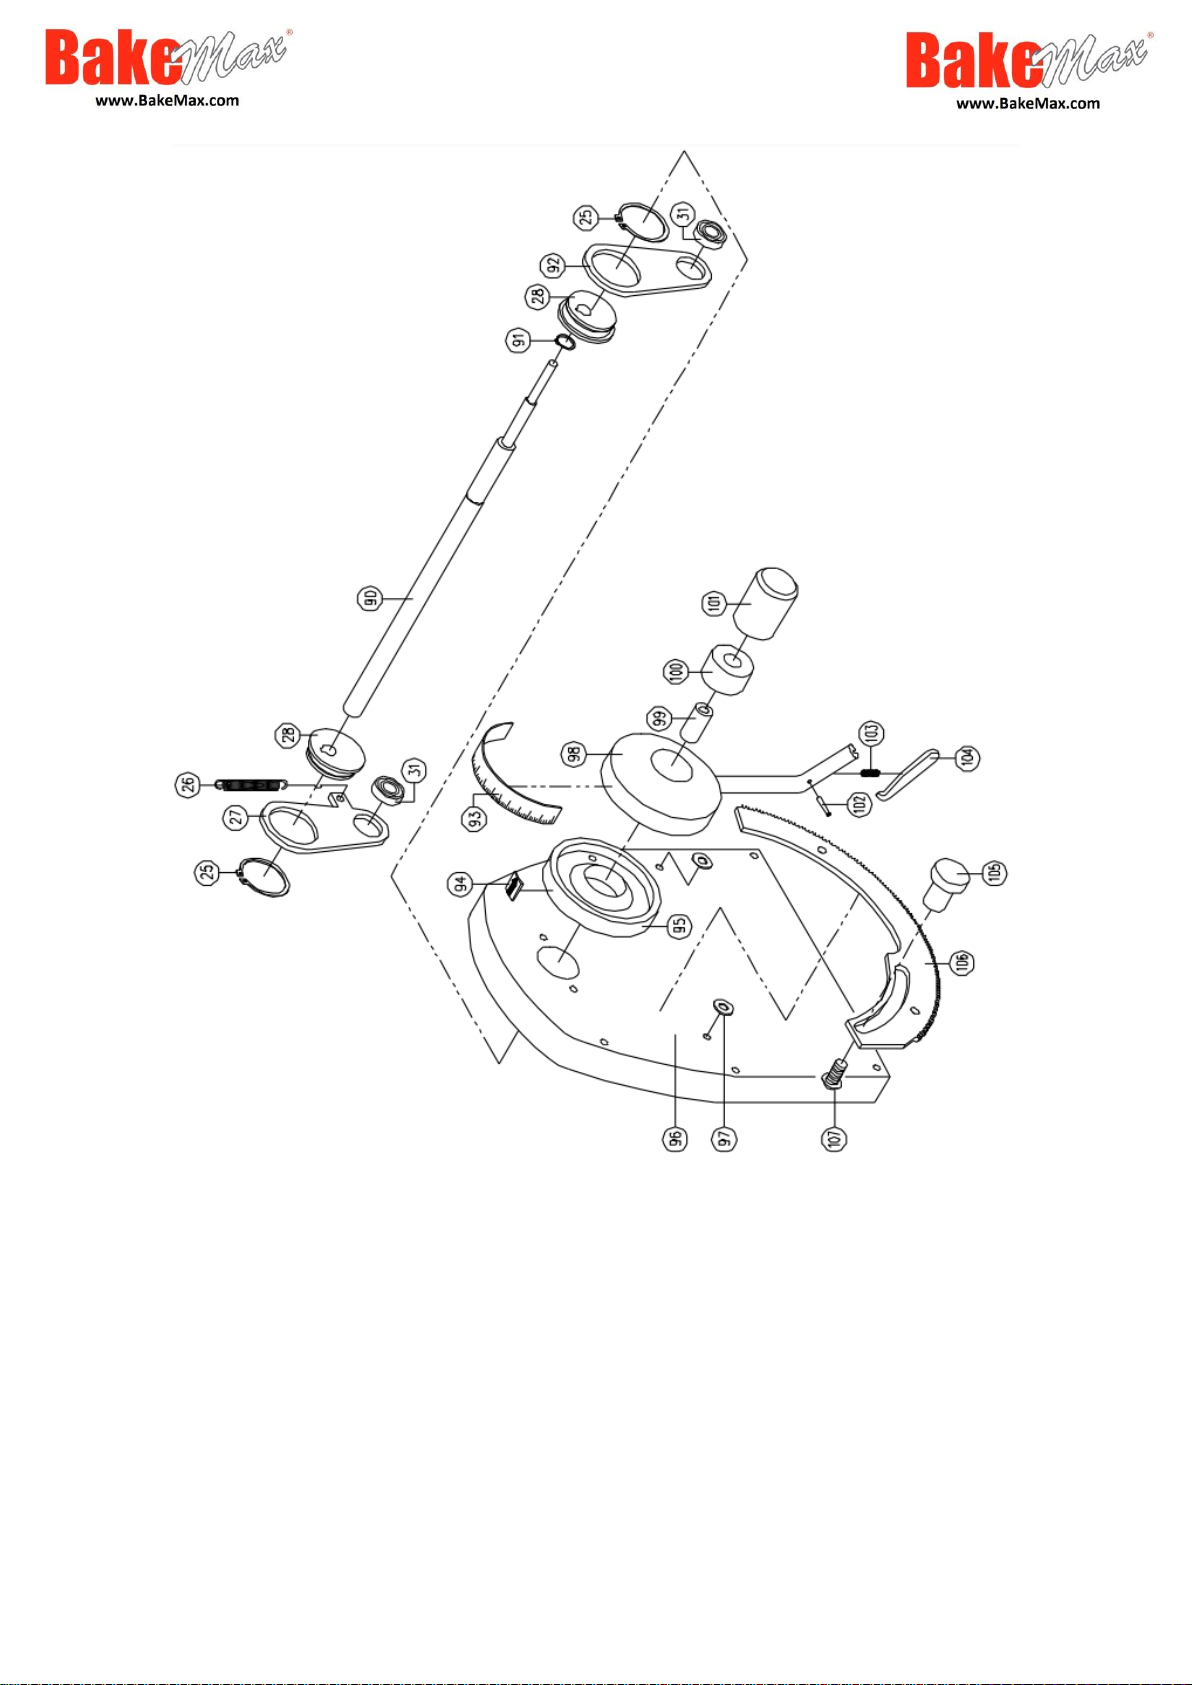
93 – CRS01/06/093
Graduated Scale
94 – CRS01/06/094
Arrow
95 – CRS01/06/095
Handle Base
96 – CRS01/06/096
Front Panel
97 – CRS01/06/097
Teflon Spacer
98 – CRS01/06/098
Thickness Adjustment Handle
98 – CRS01/06/098A
Handle O-Ring
101 – CRS01/06/101
Bolt Cover
102 – CRS01/06/102
Trigger Pin
103 – CRS01/06/103
Compression Spring
104 – CRS01/06/104
Trigger Locking Lever
105 – CRS01/06/105
Knob
106 – CRS01/06/106
Rail Rest
107 – CRS01/06/107
Bolt
109 – CRS01/06/109
Internal Half of Handle
110 – CRS01/06/110
External Half of Handle
111 – CRS01/06/111
Cap Screw M6
112 – CRS01/06/112
Handle Locking Assembly
113 – CRS01/06/113
Locating Mass
Page 14
BMCRS01-02 Countertop Model Dough Sheeter Manual
14
Page 15
BMCRS01-02 Countertop Model Dough Sheeter Manual
15
Page 16
BMCRS01-02 Countertop Model Dough Sheeter Manual
16
Page 17
BMCRS01-02 Countertop Model Dough Sheeter Manual
17
Page 18
BMCRS01-02 Countertop Model Dough Sheeter Manual
18
Page 19
BMCRS01-02 Countertop Model Dough Sheeter Manual
19
Page 20
BMCRS01-02 Countertop Model Dough Sheeter Manual
20
Page 21

BMCRS01-02 Countertop Model Dough Sheeter Manual
21
BakeMax provides a 1-Year Limited Parts and Labor warranty on most items, there are select items which carry a Limited 2-Year Warranty.
Extended Warranty is available on some products. Please contact us for details. The Warranty is not transferable and is limited to original
installation of equipment sold by BakeMax for the original user.
For all Warranty Claims, Proof of Purchase and/or Serial Number is required. Once the machine is approved, BakeMax will provide our
customers with on-site Warranty Coverage on all equipment more than 100lbs. BakeMax assumes no responsibility for downtime or loss of
product. Repairs must be Pre-Authorized by BakeMax and have a Service Authorization Number issued prior to commencing Warranty
Service.
Warranty begins 10-Days after shipping from warehouse; delays in installation which would extend the Warranty must be Approved. All
equipment must be installed and connected by Qualified Professionals in accordance with the Manual Specification. Products shipped are
to be inspected at time of delivery, the receiver is responsible for inspection.
Any abuse or improper use of the equipment will void the warranty. This includes failure to follow all cleaning instructions, improper
installation, improper maintenance, failure to follow capacity charts, improperly wired electrical connections. The Warranty does not apply to
abuse, willful or accidental damage, or to products used for other than their intended purpose. Normal wear parts such as Accessories,
Attachments, or Electrical Components such as Fuses
Bulbs, Elements, and Switches carry a 90-Day Warranty only.
Bench Warranty (Machines Weighing 100 lb. or less)
Once the machine is Approved for Warranty Service, if the machine requires Warranty work in less than 30 days of purchase date,
BakeMax will pay all shipping charges. Once the machine is received and repaired it will be returned to the user at BakeMax expense.
Freight Damages during return shipping is the responsibility of the owner of the machine.
The following is not covered under the BakeMax Warranty:
1. Overtime Labor Rates are not covered by BakeMax.
2. All parts will be shipped via Ground Courier only; If Express Shipping is required, it will be the responsibility of the Customer or Dealer.
3. Travel for Warranty Service is covered up to 100 Miles /160 Km Roundtrip, any further milage will be the responsibility of the Customer or
Dealer.
4. There is no on-site Warranty Service for Residential Addresses or addresses outside of the contiguous United States (Lower 48) or
Canada.
**BakeMax machines sold outside of the contiguous United States (Lower 48), or Canada will carry 1-Year Parts Warranty only.
Terms & Conditions
Terms
Net 15 days subject to Credit Approval. All past due Accounts are subject to 2% per month Service Charge as per Credit Application. We
accept Visa, MasterCard, and Discover Credit Cards. We also accept E-Transfer & Wire Transfer, additional fees may apply.
Pricing
All prices are subject to change without notice. All prices are Sales Tax Extra, should you be claiming Tax Exemption, Tax Exempt Forms
must accompany your Purchase Order. BakeMax products are sold in Canadian and US Dollars. BakeMax is not responsible for
specifications errors or printing errors.
Shipping
Free shipping to Canada and the U.S. Minimum order $6,000 for BakeMax and $10,000 for BakeMax America Cooking Line. Tailgate
Delivery is $90.00 minimum. All checks made Payable to Titan Ventures International Inc. BakeMax is not responsible for goods damaged
during shipping. BakeMax is not responsible for any delays in delivery once product has left our Warehouse and is in the carrier’s
possession. Products shipped are to be inspected at time of delivery, the receiver is responsible for inspection. Damaged Freight Claims are
to be claimed with the carrier. BakeMax assumes no responsibility for Damaged Freight. Shipping Insurance available by request. By
signing your name on the delivery receipt without noting any damages, you are stating that you have received your shipment in Acceptable
Condition.
Return Policy
Returns will not be Approved unless in Writing. Returns must be made within 30-Days of Purchase and must have a Return Authorization
Number issued before returning. The purchase order number, reason for return, and the serial number(s) of the unit are required for the
Return Authorization Number. Minimum return amount of $100.00.
Returns are subject to a minimum restocking fee of 30%. The cost of any repairs or re-crating required will be charged back to the dealer. If
there is a manufacturer’s defect BakeMax® will pay standard freight returned and prepaid shipping back to the customer.
Special Order Items, Clearance / Discontinued Equipment, Parts, Refurbished/Demo Equipment, or Non-Standard items are not Returnable.
Ordering Information
Send purchase orders to BakeMax via e-mail [email protected] or Fax (506-859-6929). Use Model or Part number when ordering
including Voltage Requirements, and Product Description. Please include the Dealer, Name, Address, terms, special delivery, or instructions
required or attention names to be applied to packaging. Please notify BakeMax should you need order confirmation or tracking numbers, by
calling 1-800-565-2253 or email [email protected].
Special Terms and Conditions
BakeMax reserves the right to make improvements or equipment changes without prior permission. Setup and Installation are the end user’s
Responsibility. Failure to properly Install or Maintain Equipment may Void Warranty.
Catalog, Spec Sheets and Website
BakeMax is not liable for incorrect information found in our Catalog, Spec Sheets or Website. Please contact us to confirm specifications.
Pictures and specifications are for general purposes only. Product may not be exactly as shown. Prices and availability may change at any
time without notice. Dimensions shown may change at any time without notice.
Warranty & Service
 Loading...