

BACK-BONE RIBCAGE YI 4K Installation Manual
RIBCAGE: YI 4K
Back-Bone
V1.1
Installation Guide

RIBCAGE: YI 4K INSTALLATION GUIDE
Contents
Before You Get Started ................................................................................................................................. 2
Tools You Will Need: ................................................................................................................................. 2
CAUTION! .................................................................................................................................................. 3
Helpful Tips: .............................................................................................................................................. 3
Section 1: Teardown ..................................................................................................................................... 4
1-2 Remove Accessories ........................................................................................................................... 4
1-3 Remove the Faceplate ........................................................................................................................ 4
1-4 Remove the Board Assembly .............................................................................................................. 5
1-5 Disconnect the Speaker Mount .......................................................................................................... 7
1-6 Remove the Image Sensor & WIFI Module ......................................................................................... 7
1-8 Detach the Main Board ....................................................................................................................... 9
1-9 Remove the Lens assembly ................................................................................................................. 9
Section 2: Assembly .................................................................................................................................... 10
2-1 Your Ribcage Kit ................................................................................................................................ 10
2-2 Clip the Speaker Harness .................................................................................................................. 10
2-3 Attach the Sensor Mount.................................................................................................................. 11
2-4 Mount the Main Board ..................................................................................................................... 12
2-5 Mount the CMOS Sensor .................................................................................................................. 13
2-6 Connect the Wi-Fi Module ................................................................................................................ 16
2-7 Mount the Speaker ........................................................................................................................... 17
2-8 Place the Assembly Back in the Housing .......................................................................................... 18
2-9 Functionality Test .............................................................................................................................. 21
2-10 Add Protective Cap ......................................................................................................................... 21
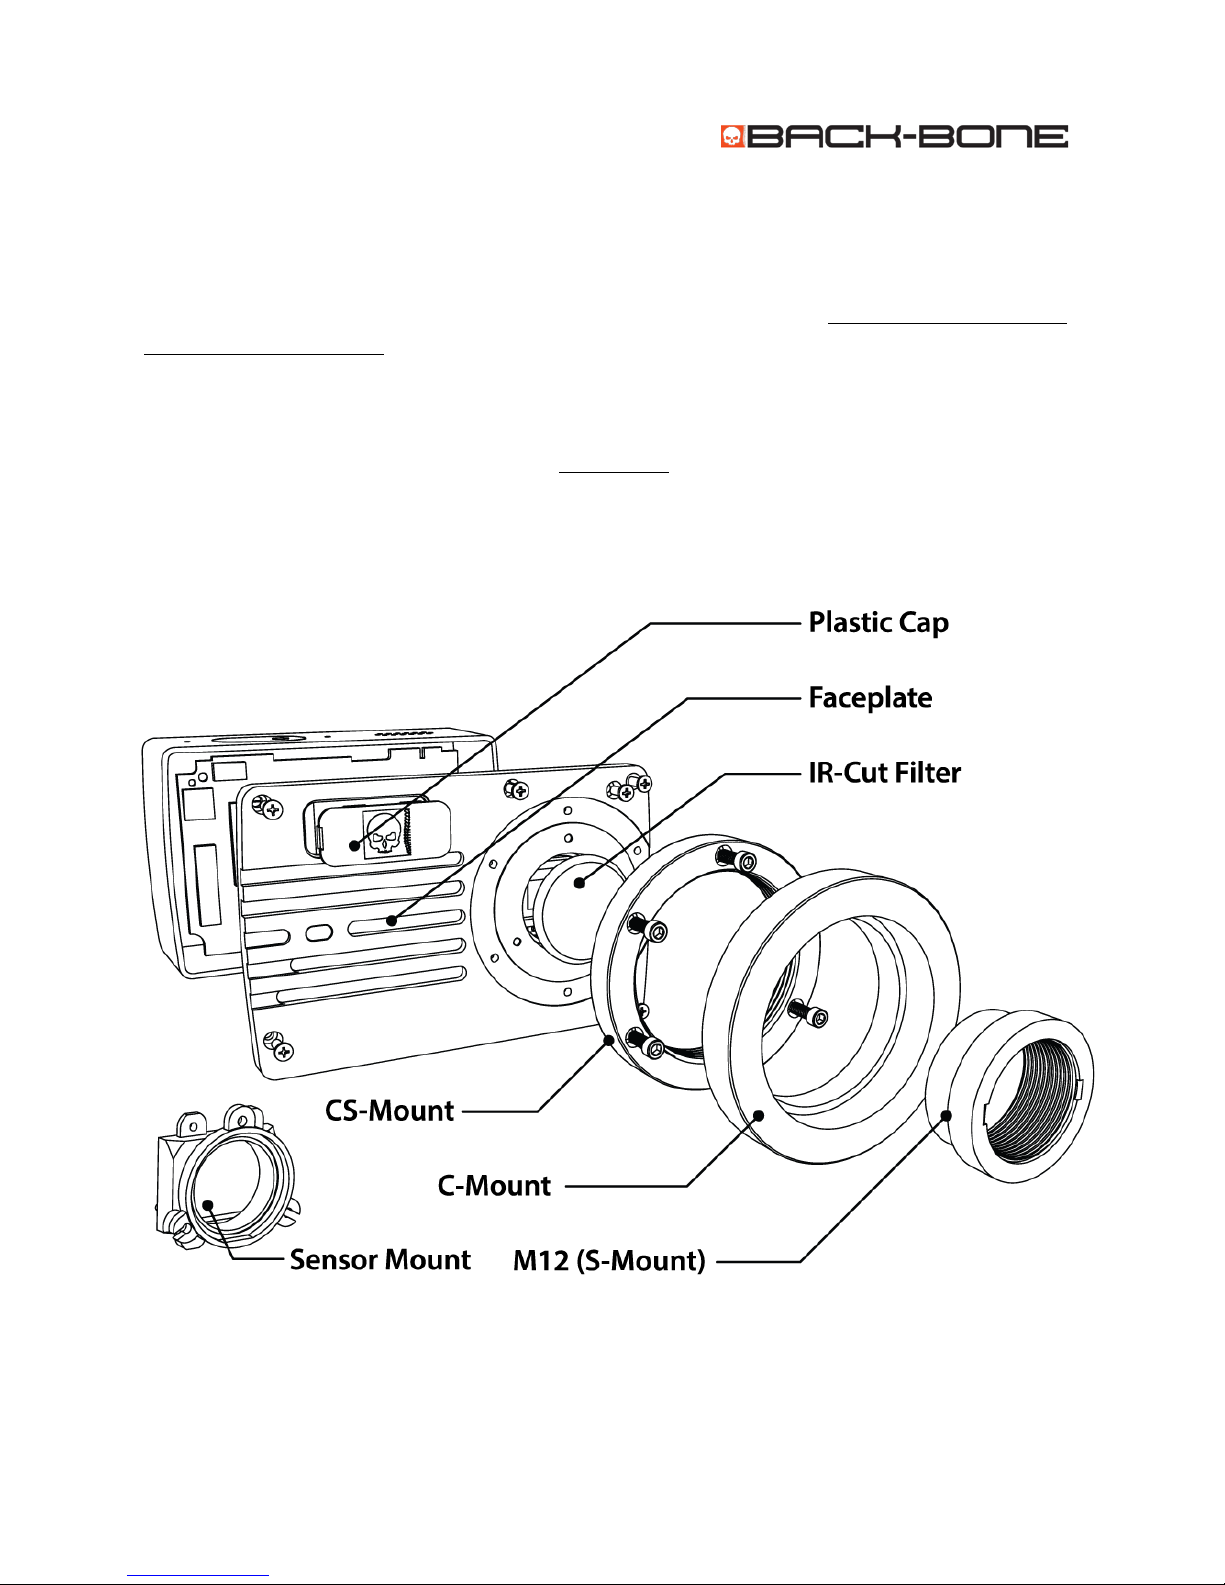
2-11 M12 Lens mounting ........................................................................................................................ 22
2-12 Add the CS Mounting Ring .............................................................................................................. 23
2-12 Mount the IR-Cut filter ................................................................................................................... 24
2-13 Add the C-Mount Ring .................................................................................................................... 25
2-14 ALL DONE! ....................................................................................................................................... 25
2-15 (OPTIONAL) LENS PREP ................................................................................................................... 26
TROUBLESHOOTING .................................................................................................................................... 27
www.back-bone.ca | support@back-bone.ca
1
RIBCAGE: YI 4K INSTALLATION GUIDE
Before You Get Started
It is important to set up a clean workspace that’s well-lit and free from dust. Any screws removed from
the camera must be saved as they will be re-used. We recommend taking the time to keep the different
screw sets separate and labeled during your project.
Tools You Will Need:
1. A set of precision screw drivers with a Philips #000 and a small slot (flathead) screwdriver
2. A small pair of wire cutters
3. Optional: plastic spudger
4. Optional: Lens cleaning kit
5. Optional but Recommended: LensPen MiniPro, Air Puffer
www.back-bone.ca | support@back-bone.ca
2
RIBCAGE: YI 4K INSTALLATION GUIDE
CAUTION!
1. Read all our documentation thoroughly before beginning your installation
2. This kit is for the YI 4K Action Camera only. No other models are supported.
3. Make sure to charge your battery before beginning the installation.
4. NEVER force or exert force on any components. IF YOU FEEL THE NEED TO USE FORCE THAN
YOU’RE DOING SOMETHING WRONG.
5. The Ribcage DIY kit consists of highly machined parts and fine threaded through holes. NEVER
FORCE any screws as this can strip the fine threads on the through holes. Instead check your
assembly and registration and try again. All parts are highly accurate and DO NOT require force
to assemble.
6. Ensure your work area is clean, well-lit and free from dust.
7. We recommend inspecting and removing any dust or debris from the parts before you begin.
8. Never overtighten any of the small screws, especially on the faceplate and tripod mount.
Excessive force or overtightening can result in stripped threads on the aluminum parts. Always
loosely fit all screws in place before screwing them in until seated. Additional tightening is not
required.
9. By applying this or any modifications to your YI 4K camera you will void the original
manufacturer’s warranty.
10. Back-Bone takes no responsibility in your ability to use this modification
11. The Ribcage DIY kit is provided “as is” and without warranty
12. Disclaimer: Ribcage Mod Kits are a product of Back-Bone Gear Inc., and are not manufactured,
distributed or endorsed by YI Technology.
Helpful Tips:
• A clean and well-lit work space is a must.
• It may seem like a small thing but don’t work at the edge of your table or desk. Move the parts
farther back so that small parts and screws are less likely to drop onto the floor and get lost.
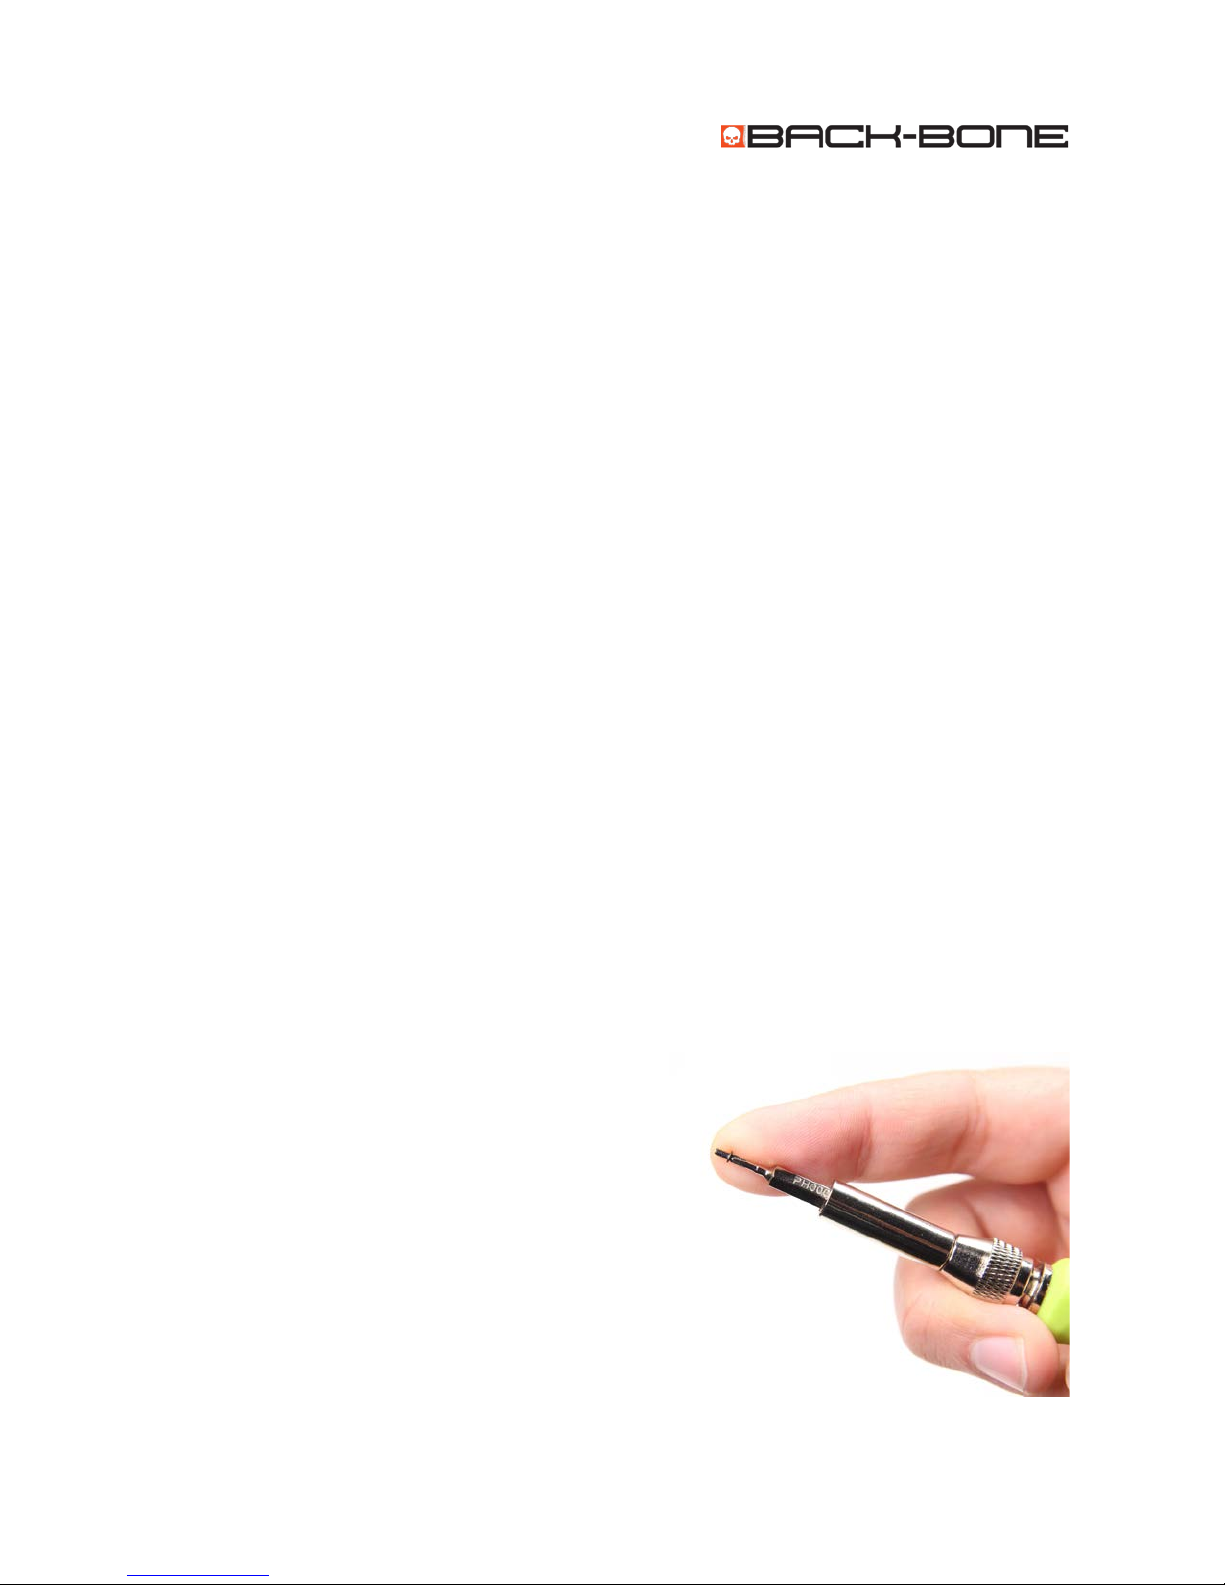
• When inserting tiny screws, it may help to put
them on the tip of the screw driver first and
hold them in place with your finger. You can
always use your other hand to steady and guide
the screw into place. A magnetic screw driver
also helps.
• Never force any of the components. If you are
using undue force to do any of the steps you are
doing something wrong and risk doing damage.
• When removing the screws, make sure you save
them all for use later as there are no extras for
the ones taken from the camera.
www.back-bone.ca | support@back-bone.ca
3
RIBCAGE: YI 4K INSTALLATION GUIDE
Section 1: Teardown
1-1 Update and Functionality Check
Before opening the camera, we recommend that you perform a full functionality check to make sure it’s
working properly. Perform any firmware updates using the smartphone app. Make sure you have a fully
charged battery.
1-2 Remove Accessories
Remove any accessories, the battery and the SD card.
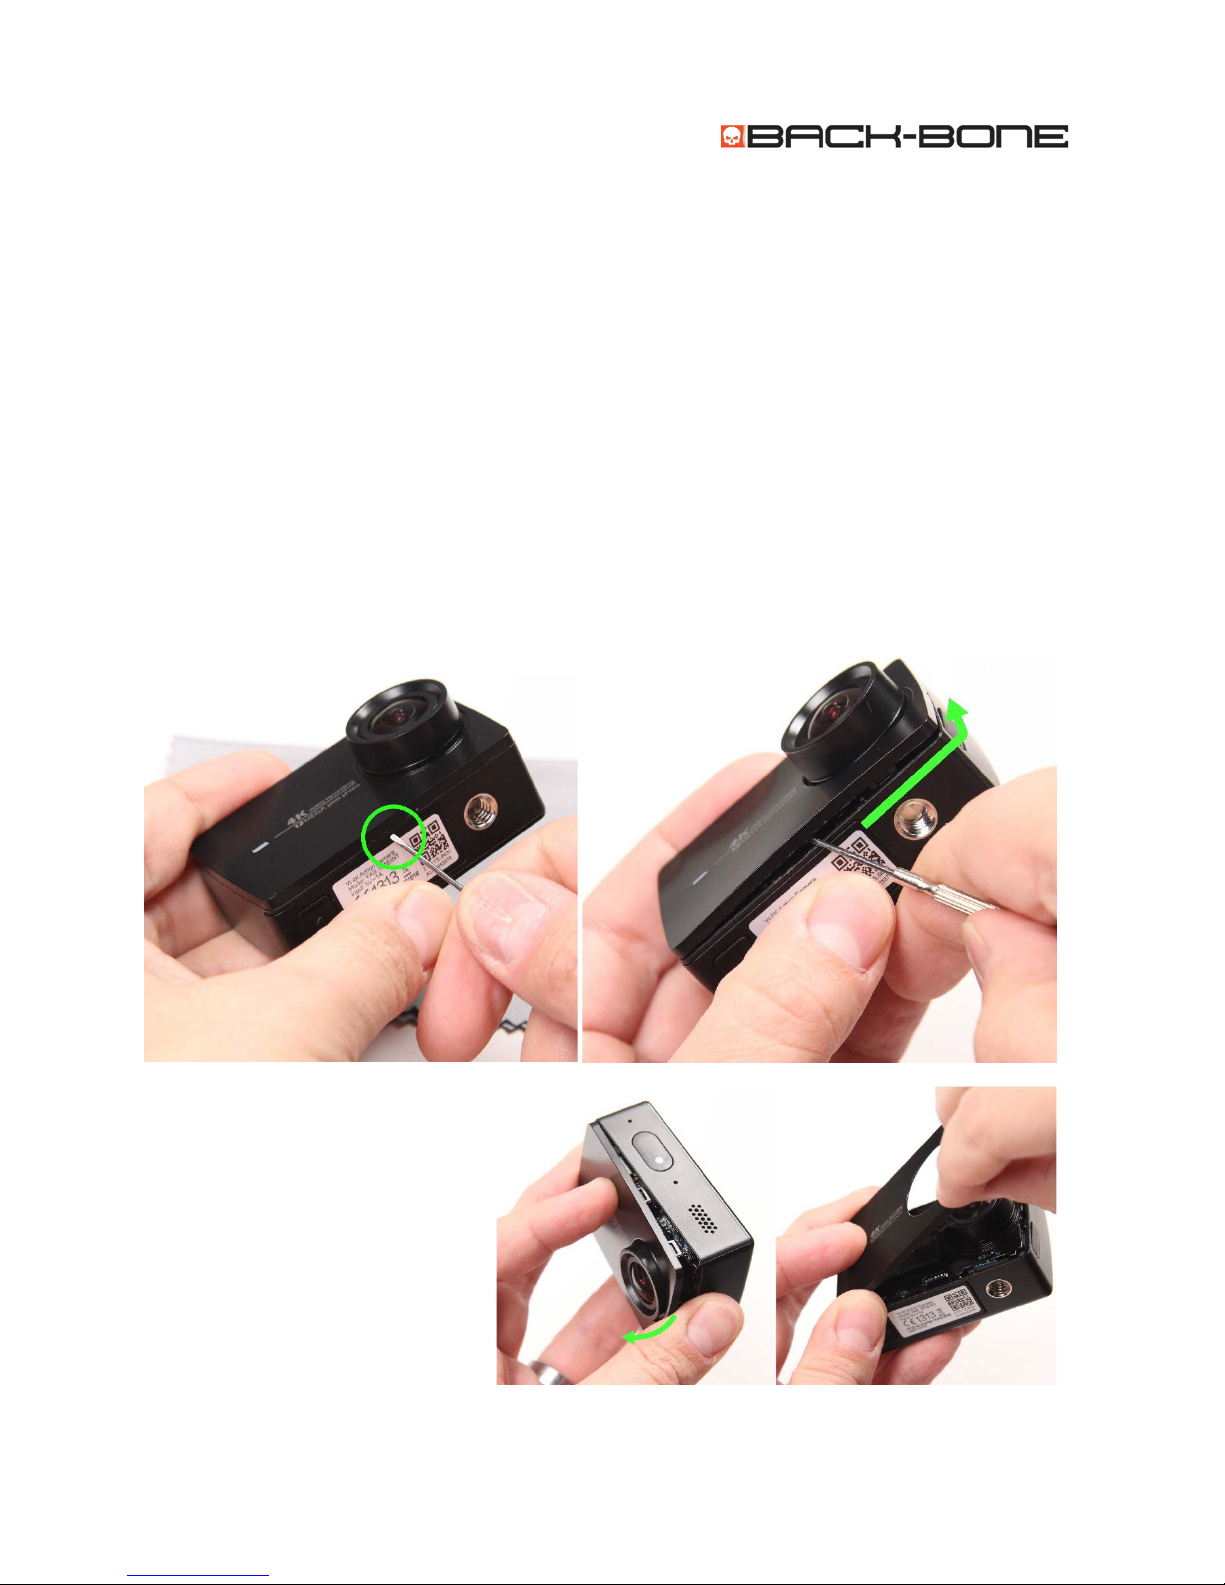
1-3 Remove the Faceplate
The front plate is snapped on securely with tabs on all sides. There is also some double-sided tape
located near the LED light on the front. It can take a fair bit of pressure to pop out the first snap tab but
once you do it gets much easier. It’s best to start on the bottom next to the battery compartment. Insert
a tool such as a small flat head screw driver between the body and the faceplate.
Work the tool in slightly and push
the faceplate away from the camera
body. Work it right, toward the lens.
The first tab is located directly below
the lens but use caution as there are
some exposed electronics under it.
Once you’ve popped out that tab
work your way around the camera
counterclockwise to remove the rest.
Once you have popped a couple of
www.back-bone.ca | support@back-bone.ca
4
RIBCAGE: YI 4K INSTALLATION GUIDE
the tabs out it’s easiest to use your fingers to pop the rest free. Use slow steady pressure to release the
double-sided tape and pull the cover off from right to left. Set it aside.
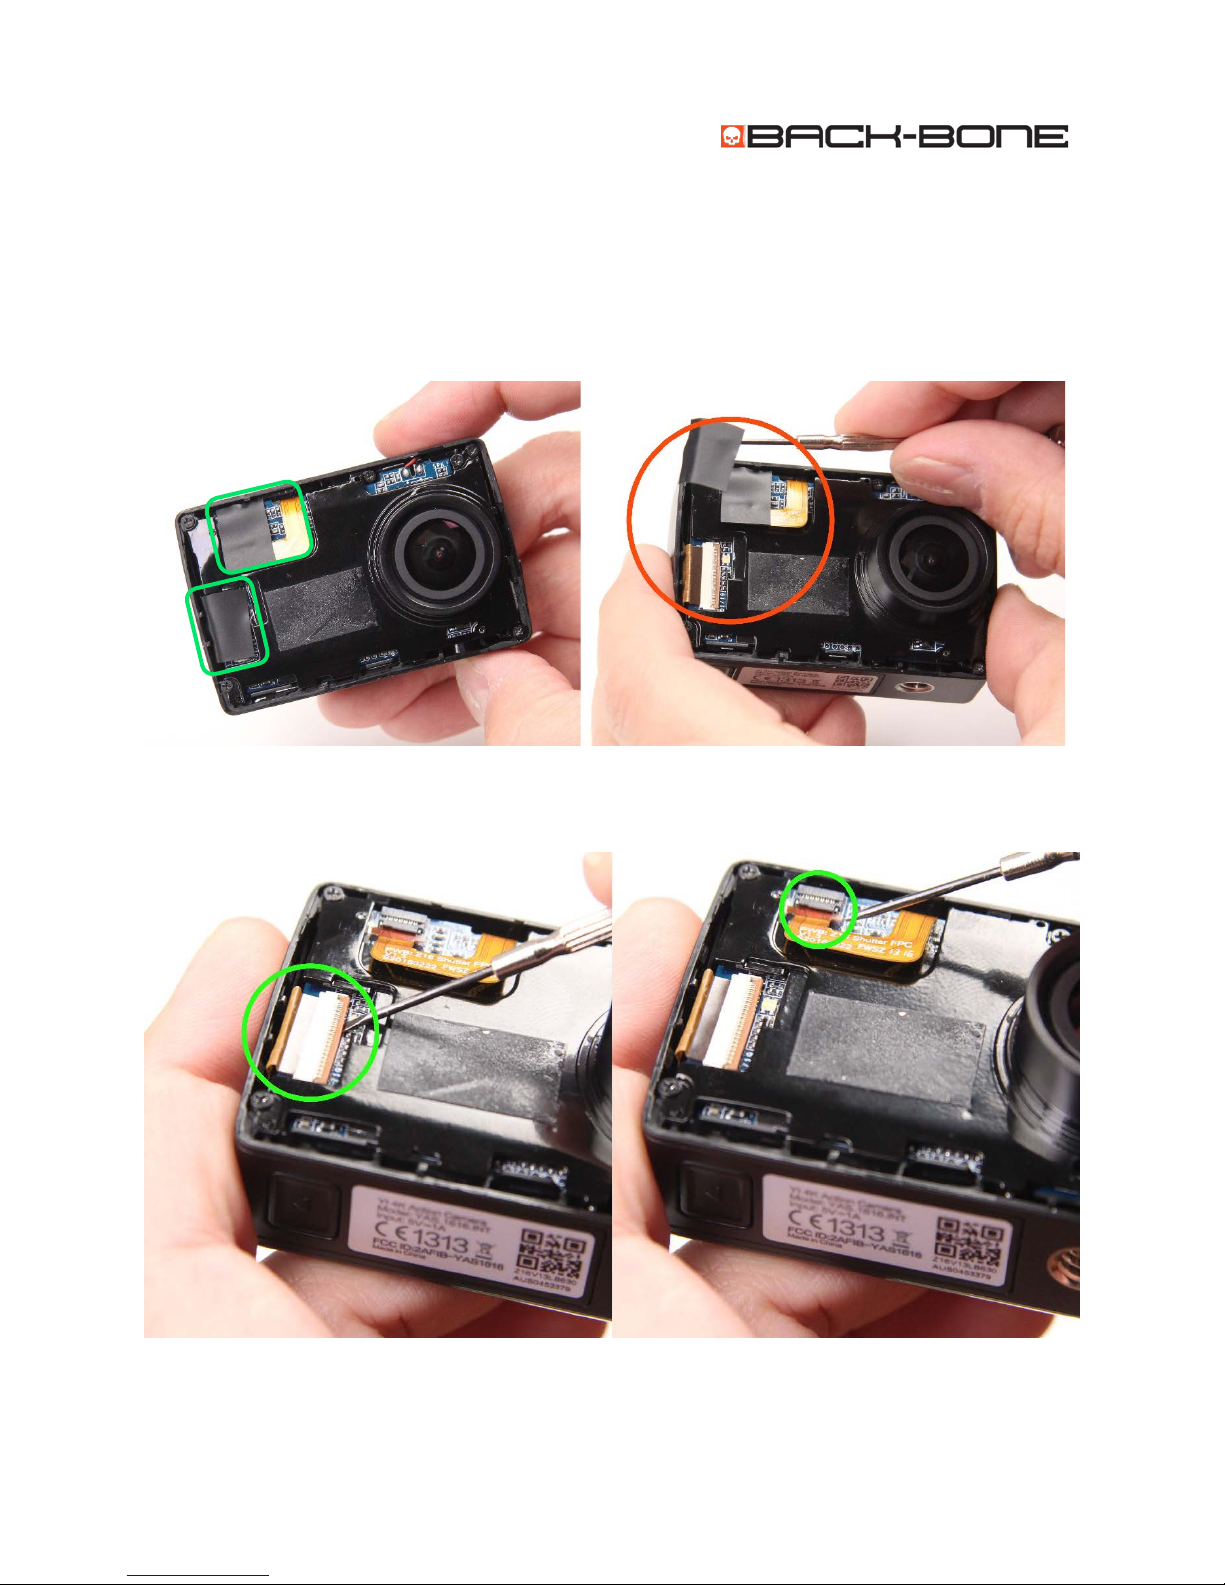
1-4 Remove the Board Assembly
Carefully remove the protective black tape covering the connectors on the left. Slowly and gently peel it
off being mindful of the delicate ribbons and locking tabs underneath.
Pop up the two ribbon locking tabs with your small flat screw driver being mindful not to damage the
ribbon. Leave the side ribbon in place for now but pop out the ribbon on the top.
www.back-bone.ca | support@back-bone.ca
5

RIBCAGE: YI 4K INSTALLATION GUIDE
Use your screw driver to peel off the tamper seal located on the lower right. Use a Philips #000 to
remove the four screws located in the corners. Be sure to save them for use later. (SCREW TYPE ‘A’)
Now let’s pull out the assembly. Pop the USB port out on the right side and pivot the assembly out as
pictured.
Take note that the ribbon is still in place on the left side of the assembly. Verify that the locking tab is
still up and gently pull the ribbon free.
www.back-bone.ca | support@back-bone.ca
6
RIBCAGE: YI 4K INSTALLATION GUIDE
1-5 Disconnect the Speaker Mount
Use Philips #000 to remove the two screws holding the speaker mount over the lens. Put them aside
with the four corner screws you just removed for use later (SCREW TYPE ‘A’). Pull out speaker and move
it forward. Take care not to break the solder points where the speaker attaches to the main board. They
are easily soldered back in place should that happen.
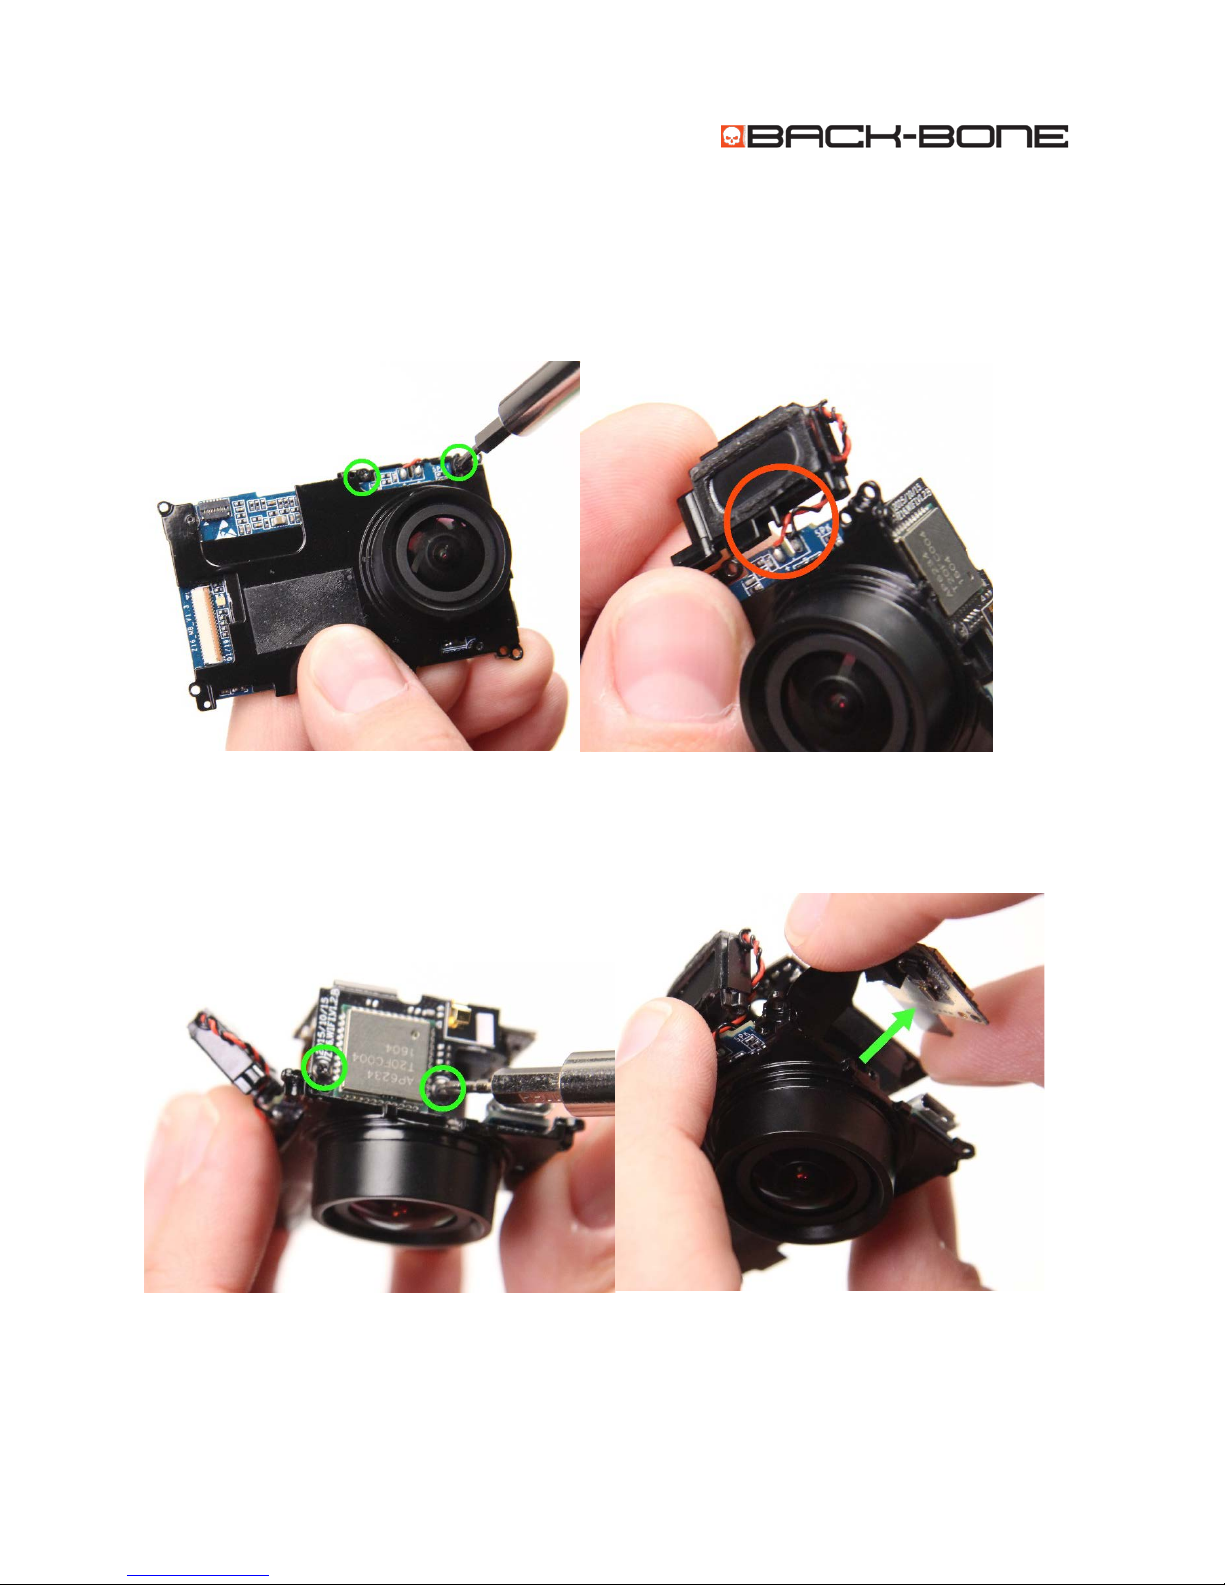
1-6 Remove the Image Sensor & WIFI Module
Remove the two screws holding the small WIFI board on the side. Put the screws aside for use later
(SCREW TYPE ‘B’). Pull the board out slightly but don’t disconnect it yet.
www.back-bone.ca | support@back-bone.ca
7
RIBCAGE: YI 4K INSTALLATION GUIDE
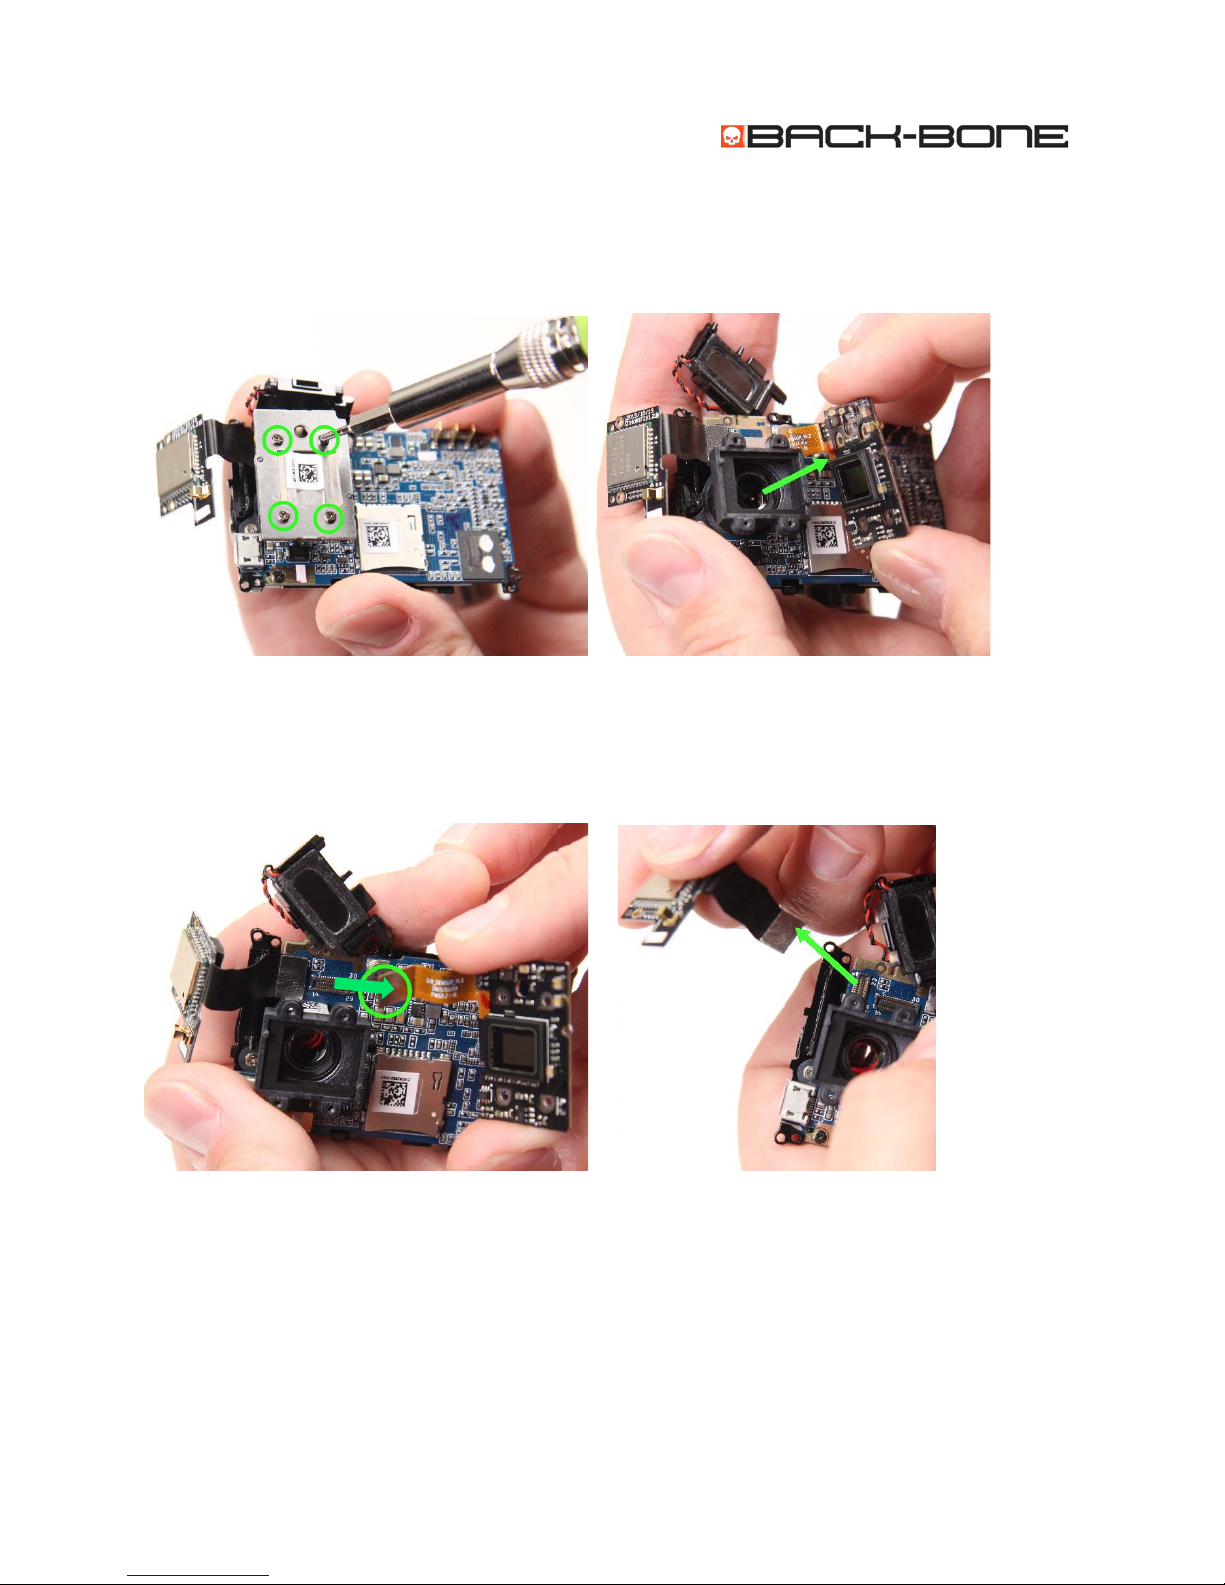
Remove the 4 screws on the rear of the CMOS sensor and put them aside for use later (SCREW TYPE ‘C’).
Remove the rubber gasket around the glass of the sensor.
Gently pop the connector off the main board with a small flat head screw driver taking care not to
scratch or damage any of the board components. It will unsnap and come free. Take special care not to
bend or twist the ribbon in a rough manner. Next use your small screw driver to gently pop the WIFI
module connector off the board.
www.back-bone.ca | support@back-bone.ca
8
 Loading...