

Bacharach 7-08-1234-40-0, 6-02-6001-42-0, 6-01-6001-23-1, 6-02-6001-17-0, 6-02-6001-41-1 User manual
...Page 1

ACT
SOFTWAR
IVATE
E UPDATES
BEFORE F IRST TEST
Find Quality Products Online at: sales@GlobalTestSupply.com
www.GlobalTestSupply.com
Page 2

Manual Part Number:
-
40-0
Manual File:
Page II
LEGEND SERIES
REFRIGERANT ANALYZER
OPERATION MANUAL
HFC
5-06-7000-81-1, 7-08-1234
Find Quality Products Online at: sales@GlobalTestSupply.com
www.GlobalTestSupply.com
069706 Rev. A
Page 3

Manual Part Number:
-
40-0
Manual File:
Page IV
Table of Contents
TABLE OF CONTENTS IV
FOR YOUR SAFETY/ANALYZER WARNINGS V
GENERAL CAUTIONS VI
WELCOME VII
1 INTRODUCTION AND OVERVIEW 1-8
1 GENERAL 1-8
1.1 FEATURES 1-9
1.2 Legend Series™ HFC COMPONENTS 1-10
Legend Series™ HFC Base Unit 1-10
Legend Vapor Sample Hose 1-10
¼” Flare Coupler 1-11
Sample Hose Extensions 1-11
Liquid Sample Trap 1-11
Liquid Sample Hose 1-12
AC Power Adapter 1-12
Control Panel 1-13
Back Panel Connections 1-13
Hard Shell Storage/Carrying Case 1-14
2 LEGEND SERIESTM HFC OPERATION 2-15
2.1 FIRST USE 2-15
2.2 POWER ON THE ANALYZER 2-15 2
.3 CALIBRATION 2-16
2.4 TESTING THE REFRIGERANT 2-17
2.5 VIEWING THE TEST RESULTS 2-17
2.6 UNDERSTANDING THE TEST RESULTS 2-18
3 MAINTENANCE & TROUBLESHOOTING 3-22
3.1 REPLACING THE SAMPLE HOSE ASSEMBLY 3-22
3.2 INFORMATION SCREENS 3-22
3.3 SOFTWARE UPDATES 3-23
3.4 SETTINGS 3-23
3.5 ERROR MESSAGES 3-24
APPENDICES 4-25
4.1 SPARE PARTS LIST 4-25
4.2 SPECIFICATIONS 4-25
4.3 WARRANTY 4-26
5-06-7000-81-1, 7-08-1234
Find Quality Products Online at: sales@GlobalTestSupply.com
www.GlobalTestSupply.com
069706 Rev. A
Page 4

Manual Part Number:
-
40-0
Manual File:
Page V
For Your Safety:
PLEASE READ THIS MANUAL IN ITS ENTIRETY BEFORE ATTEMPTING
INSTALLATION OR OPERATION! Attempting to operate this tool without fully
understanding its features and functions may result in unsafe conditions.
Analyzer Warnings
o REFRIGERANT BLEND WARNING: This refrigerant analyzer is approved
or specific refrigerant testing and should not be used with substances
f
outside the scope of the device. Cross-contamination with other refrigerant
types causes severe damage to the A/C system, to service tools, and
equipment. Do NOT attempt to adapt the unit for another refrigerant. D
T mix refrigerant types in a system or in the same container.
NO
o SAMPLE HOSE WARNING: Replace the sample hose AS SOON AS
LIQUID, OIL OR RED SPOTS (DISCOLORATION) BEGIN TO APPEAR
ON THE INSIDE DIAMETER OF THE SAMPLE HOSE OR WHITE FI LTER
ELEMENT. Failure to properly maintain and replace the sample hose will
result in severe damage or inaccurate results.
o FLAMMABILITY WARNING: Some systems may contain flammable
re
frigerants such as hydrocarbons. Failure to follow the manual can result
in serious injury or death. Less than 2 grams of refrigerant are vented wit
h sample. This analyzer is designed with sealed heat sources an
eac
without sparking components.
o SAMPLE INPUT WARNING: DO NOT attempt to introduce liquid or
samples heavily laden with oil into the vapor sampling hose configuration.
Damage caused to the instrument due to the use of the wrong hose
configuration on the wrong port will void the warranty!
o BATTERY CHARGING WARNING: When charging the internal battery wit
t
he supplied power supply, the power supply may become warm. If th
er supply becomes warm, unplug the cord immediately! Whe
pow
charging multiple analyzers, allow the charger to cool between each
ttery.
ba
o AIR SENSOR WARNING: The air detection sensor is a chemical fuel cell
sensor that will eventually expire. The user must return the unit to an
approved vendor in order to replace the air detection sensor whenever th
instrument indicates as such. Failure to replace the air detection sensor will
result in non-functionality of the instrument.
POWER SOURCE WARNING: Connection to power sources greater than
o
13VDC could cause “out of warranty” damage.
o OPPERATIONAL WARNING: If the equipment is used in a manner not
specified by the manufacturer, the protection by the equipment may
mpaired.
i
o
h
d
h
e
n
e
be
5-06-7000-81-1, 7-08-1234
Find Quality Products Online at: sales@GlobalTestSupply.com
www.GlobalTestSupply.com
069706 Rev. A
Page 5

Manual Part Number:
-
40-0
Manual File:
page VI
General Cautions
• ALWAY S wear eye and skin protection when working with refrigerants.
Escaping refrigerant vapors will present a freezing danger. Do NOT direct
refrigerant escaping from the sample hose toward exposed skin or toward
the face.
• ALWAYS turn the compressor or power source OFF before connecting t
nstrument to an HVA C / R system.
i
• ALWAY S inspect the sample hose before each use. Replace the hose if
it appears cracked, frayed, obstructed or fouled with oil.
• DO NOT direct refrigerant vapors venting from hoses towards the skin.
he
• DO
• ALWAYS place the analyzer on a flat and sturdy surface.
• To reduce the risk of electrical shock, do NOT disassemble the instrument;
• Some systems may contain hydrocarbons or flammable refrigerants. This
• DO NOT breathe refrigerant and lubricant vapor or mist. Exposure may
• DO NOT utilize any hose(s) other than those supplied with the instrument.
• ALWAY S verify that the refrigerant does not contain or will not emit heavy
NOT disassemble the instrument. There are no serviceable components
internal to the instrument and disassembly will void the warranty.
do not use the instrument in wet or damp areas.
analyzer is designed with sealed heat sources and without sparki
c
omponents. Ensure adequate ventilation and always take proper
precautions when working with refrigerants.
irritate eyes, nose, and throat. If accidental system discharge occurs,
immediately ventilate the work area. There must be adequate ventilation
when operating this device.
The use of other hose types will introduce errors into the refrigerant analysis
and instrument calibration.
loads of oil or liquid.
ng
• NEVER admit any sample into the instrument at pressures in excess of 500
p
.
sig
• NEVER obstruct the air intake, sample exhaust or case vent ports of the
i
nstrument during use.
• DO NOT utilize the coupler supplied on the service end of the Sample Hoses
for any application other than with this instrument. The coupler supplied is a
modified version that does not contain a check valve and is not suitable for
any other refrigerant application.
5-06-7000-81-1, 7-08-1234
Find Quality Products Online at: sales@GlobalTestSupply.com
www.GlobalTestSupply.com
069706 Rev. A
Page 6

Manual Part Number:
-
40-0
Manual File:
Page VII
WELCOME
Thank you for purchasing the Legend SeriesTM Refrigerant Analyzer.
The Legend Series™ Refrigerant Analyzer is designed for determining the purity of common gaseous
refrigerants. It has many features to offer the user, which will be described in this manual. We
recommend that all personnel who use this instrument read this manual to become more familiar with
its proper operation.
For further information regarding the application, operation, or spare parts, please contact the
Bacharach Inc. Customer Service Department. If you have questions or comments, we would like to
hear from you.
Copyright ©2020 Bacharach Inc.
This work is protected under Title 17 of the US Code and is the sole property of Bacharach Inc. No part of this
document may be copied or otherwise reproduced, or stored in any electronic information retrieval system, except as
specifically permitted under US copyright law, without the prior written consent of Bacharach Inc.
5-06-7000-81-1, 7-08-1234
Find Quality Products Online at: sales@GlobalTestSupply.com
www.GlobalTestSupply.com
069706 Rev. A
Page 7

Manual Part Number:
-
40-0
Manual File:
A
Page 1-8
1 INTRODUCTION AND OVERVIEW
General
Contamination of refrigerants either in storage cylinders or HVAC/R system can lead to component
corrosion, elevated head pressures and system failures when utilized by unsuspecting technicians.
The ability of the technician to determine refrigerant type and purity is severely hampered by the
presence of air when attempting to utilize temperature-pressure relations. The development of
various substitute refrigerants further complicates the ability of a technician to identify refrigerant
purity based upon temperature-pressure relationships.
acharach Legend Series™ HFC Refrigerant Analyzer will provide a fast, easy and accurate
The B
means to determine refrigerant purity in refrigerant storage cylinders or directly in an HVAC/R
system. The instrument utilizes non-dispersive infrared (NDIR) technology to determine the weight
concentration of many common refrigerants.
The instrument is supplied complete with a ¼” Flare Vapor Sampling Hose, ¼” Flare Liquid Sample
Hose, Hose Extensions for ease of connection, a High-Pressure Liquid Sample Trap Assembly, a
100-240 VAC power transformer, built in rechargeable Lithium-Ion battery, thermal printer, and all
required plumbing housed within a rugged, portable, storage case.
Sample gas is admitted into the instrument through the supplied sample hose and presented to the
sensing device. The instrument provides the user with a digital display of refrigerant purity or
identified refrigerant. The instrument only considers the weights of the refrigerant and contaminates
in the total mixture. Air is measured, and displayed, separately. Other contents such as refrigerant
oil, moisture and dye are not considered contaminants.
The instrument interfaces with the user via a full color graphic LCD, audio indications and soft key
command buttons. Alarm indications are provided to alert of instrument fault conditions or
contaminated refrigerant presence.
5-06-7000-81-1, 7-08-1234
069706 Rev.
Find Quality Products Online at: sales@GlobalTestSupply.com
www.GlobalTestSupply.com
Page 8

Manual Part Number:
-
40-0
Manual File:
Page 1-9
1.1 Features
The Legend Series™ HFC Refrigerant Analyzer is the most precise portable instrument ever
manufactured for field applications to determine the purity of gaseous refrigerants in the HVAC/R
market.
Features Include:
• Quickly and accurately determines refrigerant purity
• Advanced ergonomic design
• Analyzes percentage purity
• Identifies specific refrigerants
• Displays percentage AIR independent of the refrigerant sampled
• Multiple Languages:
o English, German, Spanish, French, Italian, Portuguese, Chinese, Japanese,
Korean and Russian
• Vapor or Liquid Sampling
• Easily prints test results with built-in printer
• Uses Standard 2.25” (57 mm) thermal paper
• Improved oil resistance with user replaceable hose assembly
• Full Color Graphic LCD with on-screen instructions
• Ultra-fast test time
• Internal, rechargeable Lithium-Ion battery for cordless operation in any location
• USB Port for test data storage and software updates (USB Drive not included)
• All accessories stored in hard shell carry/storage case
5-06-7000-81-1, 7-08-1234
Find Quality Products Online at: sales@GlobalTestSupply.com
www.GlobalTestSupply.com
069706 Rev. A
Page 9

Manual Part Number:
08-1234-40-0
Manual File:
Page 1-10
1.2 Legend SeriesTM HFC Components
Control Panel
Analyzer End
Service End
Legend SeriesTM HFC Base Unit
The Legend Series™ HFC unit houses the Full Color Graphic LCD, Infrared Bench, Electrical
Connections, and Rechargeable Battery. The device is factory calibrated and completes an air
calibration to confirm infrared signals before testing. These components require no maintenance,
therefore there are no serviceable components internal to the instrument, and disassembly
will void the warranty.
Legend V
The 6.5-foot (2 meter) Sample Hose is constructed of polyurethane ether. The hose is provided with
an instrument inlet port mating connector on one end and a brass flow restrictor on the other end.
The brass flow restrictor screws into the ¼” Flare coupler. The sample hose is considered a
consumable maintenance part. A spare Sample Hose is also provided. Maximum pressure is 500
psig (35 Bar).
5-06-7000-81-1, 7-
Find Quality Products Online at: sales@GlobalTestSupply.com
apor Sample Hose
069706 Rev. A
www.GlobalTestSupply.com
Page 10

Manual Part Number:
08-1234-40-0
Manual File:
Page 1-11
¼” Flare Coupler
The ¼” Flare coupler is designed for easy connection to a cylinder or HVAC/R system. The coupler can be used for vapor or liquid sampling. Liquid sampling will require the use of the liquid sample hose and liquid sample syringe.
S
ample Hose Extensions
The li
quid sample trap is designed as a barrier to oil or liquid refrigerant entering the analyzer.
During liquid sampling, the syringe will collect oil which may be present in the liquid sample and act
as the catalyst for refrigerant to change phases from liquid to vapor. Liquid sampling will provide a
more accurate analysis of multicomponent refrigerants.
5-06-7000-81-1, 7-
069706 Rev. A
Find Quality Products Online at: sales@GlobalTestSupply.com
www.GlobalTestSupply.com
Page 11

Manual Part Number:
08-1234-40-0
Manual File:
Page 1-12
Liquid Sample Hose
Service End
(1/4 SAE Flare Nut)
Analyzer End
Liquid Trap Assembly
Brass Sample Hose
The 6.5-foot (2 meter) Liquid Sample Hose configuration is constructed of a polyurethane tube with
an oil reservoir. A Brass Sample Hose Restrictor acts to transform Liquid refrigerant to Vapor at the
sample connection point while the Liquid Sample Trap assembly collects oil and provides a means
of expulsion after the test is complete. The syringe is provided with a magnet for attaching it to the
tank, an instrument inlet port mating connector on one end and a ¼” SAE female flare coupling nut
on the service end. The maximum pressure is 500 psig (35 Bar).
NO
TE: The analyzer will indicate “Error #5” if the analyzer does not receive a good sample due to
obstructed flow or lack of flow. If this occurs the Brass Sample Hose Restrictor may need to be
replaced.
Restrictor
C Power Adapter
A
The Legend Series™ is powered via a rechargeable Lithium-Ion battery. You can also power the
unit with the AC Power Adapter which converts a standard 100-240VAC 50/60Hz wall outlet to
12VDC, 1.6A. This AC Power Adapter will charge the battery when connected to the analyzer.
NOTE: Use of any other power source may cause damage to the unit and void the warranty.
5-06-7000-81-1, 7-
069706 Rev. A
Find Quality Products Online at: sales@GlobalTestSupply.com
www.GlobalTestSupply.com
Page 12

Manual Part Number:
08-1234-40-0
Manual File:
Page 1-13
Control Panel
Green LED
Home
Power
On/Off
Soft Keys
Buttons
Graphic
LCD
USB Port
The Control Panel serves as the main user interface. The Control Panel features three soft key
buttons. The current function for each button is displayed above the Soft Key Buttons on the full
color graphic LCD. A Home button and a Power button are also found at the top of the control
panel.
B
ack Panel Connections
The connections located on the back panel are illustrated below.
CAUTION: The sample outlet port should never be obstructed. Keep the sample outlet port
free and clear at all times. Do not operate near open flames.
5-06-7000-81-1, 7-
069706 Rev. A
Find Quality Products Online at: sales@GlobalTestSupply.com
www.GlobalTestSupply.com
Page 13

Manual Part Number:
08-1234-40-0
Manual File:
Page 1-14
Ha
Sample Inlet
Sample Outlet
Factory
rd-Shell Storage/Carrying Case
The hard-shell storage/carrying case is custom fit to the Legend Series™. It provides rugged
protection for the instrument, as well as convenient storage for all components. The enclosure is
general purpose and is not watertight.
power port
5-06-7000-81-1, 7-
Find Quality Products Online at: sales@GlobalTestSupply.com
www.GlobalTestSupply.com
069706 Rev. A
Page 14
Manual Part Number:
40-0
Manual File:
Page 2-15
2 LEGEND SERIES
Figure 1
Figure 2
HFC OPERATION
2.1 First Use
TM
The Legend Series™ HFC has a built in Lithium-Ion battery. Prior to first use charge the
battery for a minimum of 2 hours with the included AC Power Supply. The analyzer will
function and charge the battery when the AC Power Supply is connected.
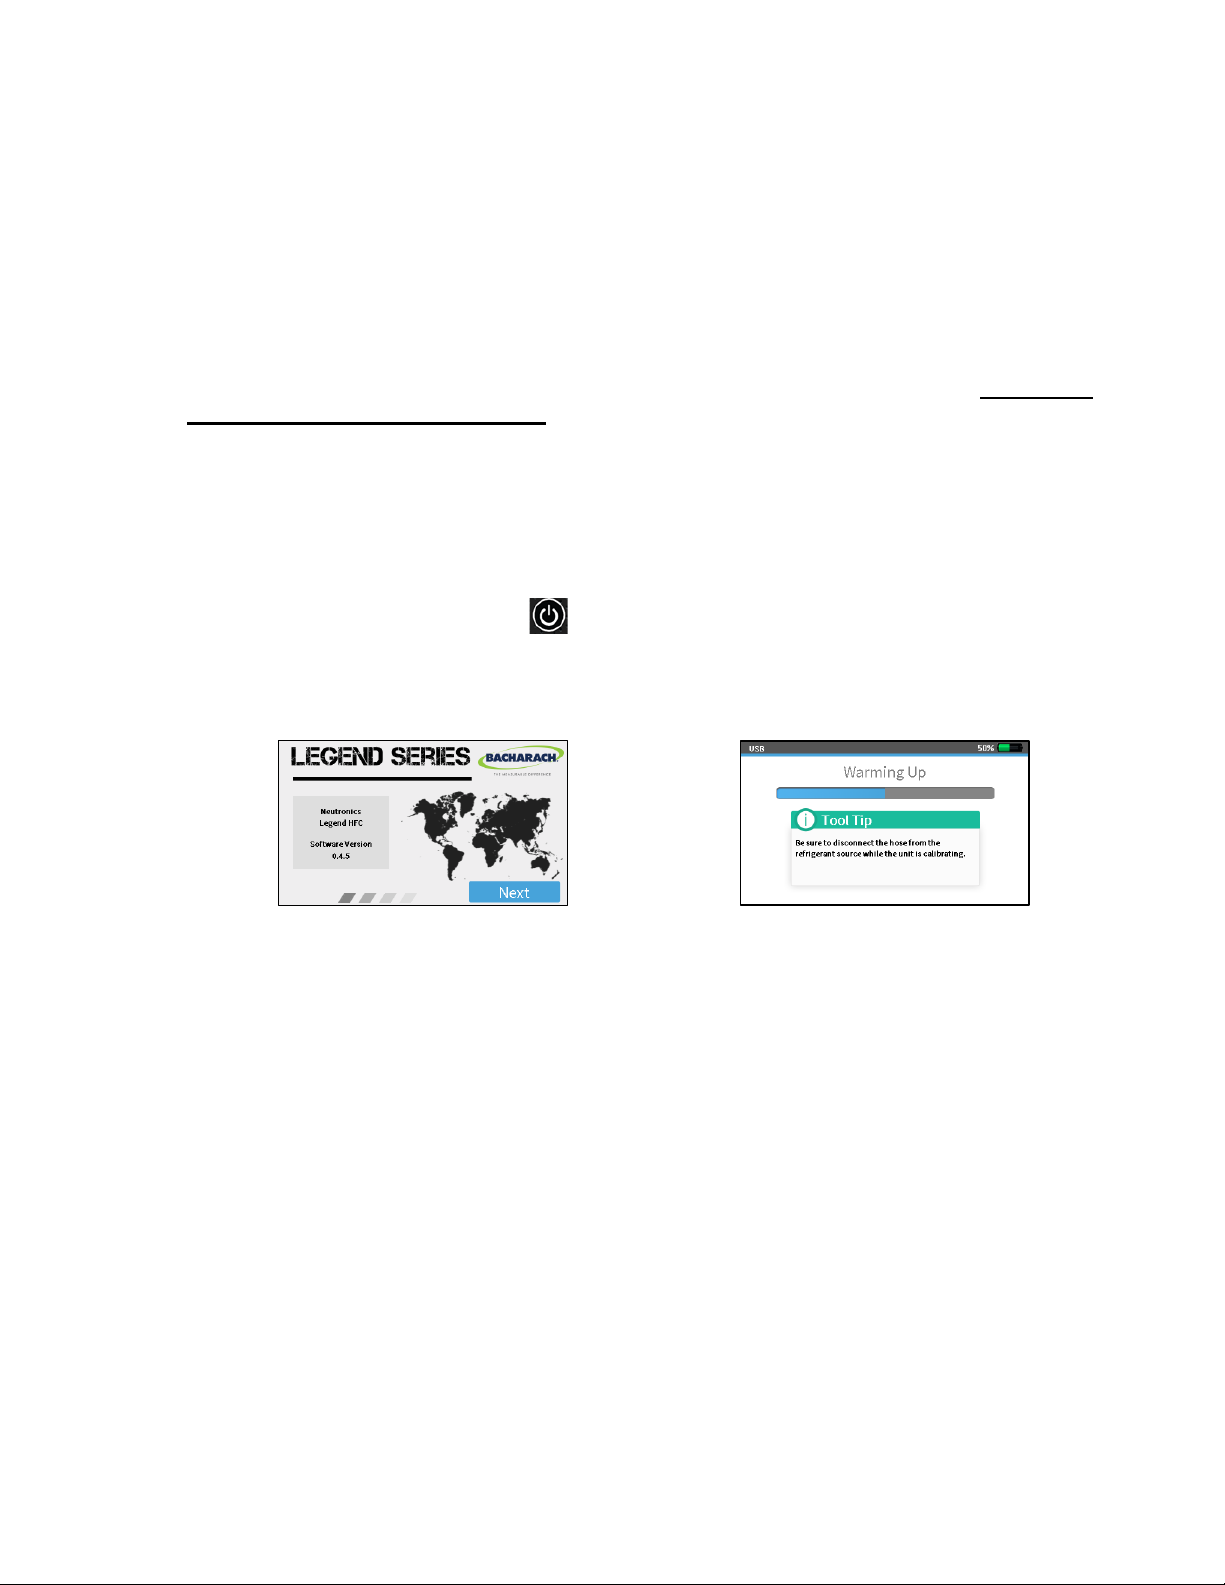
2.2 Power On the Analyzer
ess the upper right power button and the splash screen shown in (Figure 1) will appear.
Pr
Press the right soft key for ‘Next’ and the device will warm up as shown in (Figure 2). Warm
up will take approximately 30 seconds.
5-06-7000-81-1, 7-08-1234-
Find Quality Products Online at: sales@GlobalTestSupply.com
www.GlobalTestSupply.com
069706 Rev. A
Page 15

Manual Part Number:
08-1234-40-0
Manual File:
Page 2-16
Once the analyzer warms up, the screen in (Figure 3) will appear offering the option to
Figure 3
Figure 6
Figure 5
Figure 4
change settings or start an analysis. If you wish to adjust factory ‘Settings’, select the left soft
key and refer to section 3 Maintenance & Troubleshooting.
To begi
scroll through available refrigerant options and the center soft key to select the refrigerant
you wish to test (Figure 4).
n an analysis, select the right soft key to ‘Start.’ Next use the left and right soft keys to
2.3 Calibration
Each time the Legend Series™ HFC begins a new test cycle it must complete an air
calibration. The calibration takes 30 seconds and pulls fresh air into the unit via an internal
pump. This fresh air purges any excess refrigerant from the unit and ensures accurate test
results. Calibration REQUIRES the ¼” Flare Vapor sample hose be connected to the device
and disconnected from the refrigerant source.
Once the sample hose is connected to the analyzer, press ‘Start’ to begin an air calibration,
as shown in (Figure 5). This will begin the calibration process and display the Calibrating
screen shown in (Figure 6).
5-06-7000-81-1, 7-
Find Quality Products Online at: sales@GlobalTestSupply.com
www.GlobalTestSupply.com
069706 Rev. A
Page 16

Manual Part Number:
08-1234-40-0
Manual File:
Page 2-17
TIP:
and require this additional flow time before the user presses ‘Test.’
2.4 Testing the Refrigerant
Figure 8
Figure 9
Figure 10
Figure 7
After the air calibration is complete, the instrument is ready for to begin the refrigerant
analysis. The analyzer will direct you to connect the hose to a refrigerant source as shown in
(Figure 7). Open the refrigerant source valve, if equipped, and allow the refrigerant to flow
for a few seconds. Next press the ‘Test’ button to begin the test. The Testing screen shown
in (Figure 8) will display.
A refrigerant source with a pressure <30 psig (2 Bar) may require additional flow time to
generate an accurate result. Low pressure samples will take more time to fill the sample bench
2.5 Viewing the Test Results
Upon completion of analysis, the Legend Series™ HFC will display (Figure 9). Close the
refrigerant source valve if equipped, and then disconnect the coupler from the refrigerant
source. Select ‘Results,’ which will display the test results (Figure 10). The percentage
displayed for each refrigerant indicates the total purity weight of that refrigerant, equaling
100%, with air measured independently. Pressing ‘Print’ will print the test results. Pressing
‘Print Prior 5 Results’ will print the last 5 tests completed.
5-06-7000-81-1, 7-
Find Quality Products Online at: sales@GlobalTestSupply.com
www.GlobalTestSupply.com
069706 Rev. A
Page 17

Manual Part Number:
08-1234-40-0
Manual File:
Page 2-18
Verify the hose is disconnected from the refrigerant source and press ‘Exit’ to return to the
Figure 12
Figure 13
Figure 11
Figure 11a
main screen (Figure 11). When you are ready to power down the device press the power
button and the powering down screen will appear (Figure 11a).
2.6 Understanding Test Results
The Legend Series™ HFC is designed to analyze or identify a wide array of refrigerants.
Before sampling a gas, you should select the refrigerant you anticipate testing to accurately
align the calibration (Figure 12). If the wrong base refrigerant is selected the analyzer will
still provide accurate single component refrigerant outputs but may not confirm the
refrigerant matches the refrigerant selected (Figure 13).
efrigerant analyzer is designed to provide visual cues after analysis is complete. There
The r
are six possible result screens that may display. After an analysis, a user may find the
refrigerant is as EXPECTED, IMBALANCED, CONTAMINATED, DILUTED, an IDENTIFIED
refrigerant, or UNKNOWN. Explanation of each possible result is defined below.
5-06-7000-81-1, 7-
Find Quality Products Online at: sales@GlobalTestSupply.com
www.GlobalTestSupply.com
069706 Rev. A
Page 18

Manual Part Number:
08-1234-40-0
Manual File:
Page 2-19
Expected Refrigerant:
Figure 14
Figure 15
Refrigerant analyzed and found to be within an acceptable composition range of the selected
gas will define the results as that refrigerant and display a green screen (Figure 14). In this
example, R-410A is confirmed with some slight composition shift. The R-410A is still within
composition specification of AHRI Standard 700 which qualifies it as R-410A.
Imbalanced Refrigerant:
Refrigerant analyzed and found to have the required components but outside the AHRI
Standard 700 acceptable range will display as Imbalanced with a yellow screen (Figure 15).
In this example, Imbalanced R-410A is confirmed with composition shift. The R-410A has the
correct components but is too far outside the acceptable range to be considered ideal.
Contaminated Refrigerant:
Refrigerant analyzed and found to be contaminated has the expected base components, but
some other refrigerant(s) is present diluting the entire sample. This refrigerant would have a
red screen to indicate it is unacceptable and should not be recovered with pure gas or
reused (Figure 16). In this example, Imbalanced R-410A is contaminated with R-22.
5-06-7000-81-1, 7-
Find Quality Products Online at: sales@GlobalTestSupply.com
www.GlobalTestSupply.com
069706 Rev. A
Page 19

Manual Part Number:
08-1234-40-0
Manual File:
Page 2-20
Note:
Channel data should be used as a reference to help improve accuracy of Identified Refrigerants.
Diluted Refrigerant:
Figure 18
Figure 17
Figure 16
Refrigerant analyzed and found to be diluted will have the expected base components with
any level of Air present in the sample. This refrigerant would have a yellow screen to indicate
the Air has contaminated the sample (Figure 17). Air can be removed from refrigerant but
can be harmful if present inside a system. Air left in a system can alter P/T curves, lead to
moisture accumulation and acid buildup. Both will cause a system to work inefficiently and
lead to possible system failure. In this example, Diluted R-410A is contaminated with Air.
Identified Refrigerant:
Refrigerant analyzed and found to be an identified gas will not display composition of the
refrigerant. Instead, the analyzer confirms the refrigerant matches the expected identified
gas with a green screen and provides channel data to reference as a “fingerprint” model of
that gas (Figure 18). In this example, R-1234yf is Identified as R-1234yf. The channel output
provides a “fingerprint” of this gas. This channel data can be documented and used for future
cross reference to confirm the quality of the identified refrigerant.
any specific refrigerant, is not measured as a % by weight and only indicates an optical response.
5-06-7000-81-1, 7-
The channel data is representative of the IR signal detected. It is not representative of
069706 Rev. A
Find Quality Products Online at: sales@GlobalTestSupply.com
www.GlobalTestSupply.com
Page 20

Manual Part Number:
08-1234-40-0
Manual File:
Page 2-21
Unknown Refrigerant:
Figure 19
Refrigerant analyzed and found to be an Unknown gas is a gas that does not match any of
the refrigerants directly measured by the device. A yellow screen will appear to indicate
caution as the gas is unknown (Figure 19). If you believe the sampled refrigerant should be
measured by the device restart the analysis and confirm you select the appropriate
refrigerant before calibration. Unknown refrigerant should be handled with care as there is no
certainty to what refrigerant is present.
5-06-7000-81-1, 7-
Find Quality Products Online at: sales@GlobalTestSupply.com
www.GlobalTestSupply.com
069706 Rev. A
Page 21

Manual Part Number:
-
40-0
Manual File:
A
Page 3-22
3 MAINTENANCE & TROUBLESHOOTING
3.1 Replacing the Sample Hose Assembly.
In the event the analyzer displays an Error #3 or Error #5 this may be an indication the
sample hose needs replacing. This will occur when the integrated flow restrictor becomes
clogged with oil, debris, or sealant. It can also occur if there is inadequate flow of refrigerant
in a cylinder or refrigerant source. Replacement hoses for both the vapor and liquid sample
hose are provided in the kit. Additional replacements are listed on the spare parts list in
section
4 Appendices.
To replace the Sample Hose Assembly, follow the instructions below:
1) Disconnect the sample hose from the refrigerant source and Analyzer
2) Remove the brass restrictor end (with hose attached) from the coupler
and discard. Be sure to use a backing wrench as not to damage the
oupler.
c
3) Check for signs of oil and debris in the coupler.
4) If oil or debris is present, use a cleaner which ONLY contains,
Tetrachloroethylene and carbon dioxide, follow safety instructions on
the can and spray all parts of the coupler with the cleaner to remove
any oil. DO NOT soak the part for more than 60 seconds.
5) Allow coupler to dry. Check coupler for oil once again. Failure to clean
the oil out of the coupler will result in premature obstruction of the new
sample hose.
6) Install the brass end of the new sample hose assembly into the
coupler and lightly tighten, usually finger tight is sufficient.
3.2 Information Screens
An “Information” icon or ‘Help’ indication will appear at various points throughout the
testing process. This button will provide additional information or tips about the command
screens to help complete your analysis.
5-06-7000-81-1, 7-08-1234
Find Quality Products Online at: sales@GlobalTestSupply.com
www.GlobalTestSupply.com
069706 Rev.
Page 22

Manual Part Number:
08-1234-40-0
Manual File:
Page 3-23
3.3 Software Updates
Figure 19
Figure 18
Software updates may be made available to improve operating performance or add additional
features. Some updates will be provided at no charge to improve operating efficiencies while
others will be optional, paid upgrades, to add new refrigerants or functions.
The Legend Series™ HFC has a USB update port located on the Back-Panel Connections.
This port should not be used for any other purpose other than to install factory updates or
when saving test data to an external USB Drive. IF YOU DO NOT REGISTER THE
ANALYZER, WE WILL NOT BE ABLE TO INFORM YOU OF ANY SOFTWARE UPDATES!
3.4 Settings
Pressing the ‘Settings’ button as shown in (Figure 18) will provide access to various device
settings as shown in (Figure 19).
sing the ‘Next’ button, scroll to the desired setting you wish to change.
U
U
se the button to select the setting and the left button to return to the previous screen.
• Save to USB: This feature can be activated when an external USB drive is connected
in the USB port on the top of the device. With the USB drive in place, selecting ‘Sav
o USB’ will save all test data to the USB drive. The data is extracted in .txt (text file)
t
and can then be extracted for electronic file management.
• Brightness: Enhances or dims the brightness of the LCD screen.
• Language: Change the language to one of 10 available languages.
o English (default)
o German
o Spanish
o French
o Italian
o Portuguese
o Chinese
o Japanese
o Korean
o Russian
• Sound: Turns sound ON or OFF
• Printer: Information on how to load the printer paper
e
5-06-7000-81-1, 7-
Find Quality Products Online at: sales@GlobalTestSupply.com
www.GlobalTestSupply.com
069706 Rev. A
Page 23

Manual Part Number:
08-1234-40-0
Manual File:
Page 3-24
When finished adjusting the settings, press ‘Exit’ to return to the home screen.
3.5 Error Messages
In the unlikely event an Error message is displayed on the screen, follow the on-screen
prompt associated to the Error. Error messages that will appear include:
Error #1: The air or gas readings were unstable.
• Solution: Rerun test
• Solution: If problem persists contact manufacturer
Error #2: The air or gas readings were excessively high.
• Solution: Rerun test
• Solution: If problem persists contact manufacturer
Error #3: The air calibration resulted in a low sensor output.
• Solution: Prevent refrigerant from flowing into the unit through the sample inlet durin
ai
r calibration.
• Solution: Verify no oil contamination is present in sample hose or sample filter
• Solution: Verify that the air intake and the exhaust are not obstructed
• Solution: Verify that the white filter is correctly plugged into the rubber grommets.
• Solution: Allow any refrigerant in the atmosphere to dissipate before performing air
Error #4: The unit is beyond the operating temperature range.
• Solution: Move the unit to an area where the ambient temperature is within the
specified operating range.
Error #5: The refrigerant sampled has an excessively large amount of air or there was a little or no
sample flow due to a closed valve or plugged sample filter. This is the code to prompt the user to
change the brass filter. This should be considered more as a prompt than an actual error.
• Solution: Verify the refrigerant source is open and flowing.
• Solution: Verify the sample filter is not plugged with debris or oil.
• Solution: Replace brass sample filter.
Error #6: The air sensor has expired and must be replaced before the analyzer can be used.
• Solution: If problem persists contact manufacturer
Error #7: The gas pressure is out of range
g
• Solution: Verify the SAMPLE EXHAUST port is not obstructed.
If an Error message reappears, contact Bacharach or your local service department.
5-06-7000-81-1, 7-
Find Quality Products Online at: sales@GlobalTestSupply.com
www.GlobalTestSupply.com
069706 Rev. A
Page 24

Manual Part Number:
-
40-0
Manual File:
Page 4-25
4 APPENDICES
PART NUMBER
DESCRIPTION
5-06-7000-81-1
Operating Manual
6-01-6000-74-0
AC Power Supply
6-01-6001-23-1
Liquid Sample Hose
6-02-6001-17-0
Liquid Sample Trap
6-02-6001-41-1
Sample Hose Extensions
6-02-6001-42-0
Vapor Sample Hose
6-02-6001-54-0
¼” Flare Coupler
Bar) will require additional flow
Analyzed Refrigerants (displays % purity):
Non-Dispersive Infrared (NDIR)
Power Supply:
50-120oF (10-49oC)
4.1 Spare Parts List
4.2 Specifications
SAMPLE PARAMETERS: Vapor or Liquid depending on hose configuration, oil-free
PRESSURE: Max Pressure 500 psig (35 Bar)
Low Pressure samples <30 psig (2
time for accurate analysis
HFC MODEL:
SENSOR TECHNOLOGY:
REFRIGERANT SAMPLE SIZE: 2 grams per sample
POWER:
OPERATIONAL
TEMPERATURE:
5-06-7000-81-1, 7-08-1234
• R-22, R-32, R-134a, R-404A, R-407C, R-410A,
Hydrocarbons (HC) and Air
Identified Refrigerants (NO % purity):
• R-12, R-1234yf, R-408A, R-409A, R-417A,
R-421A, R-421B, R-422A, R-422B, R-422C, R-427A
Input: 90-264VAC, 50-60HZ
Output: 12VDC, 1.6 AMP
Built in Lithium-Ion Battery:
069706 Rev. A
Find Quality Products Online at: sales@GlobalTestSupply.com
www.GlobalTestSupply.com
Page 25

Manual Part Number:
-
40-0
Manual File:
Page 4-26
Note: “HC” refers to “Hydrocarbons”. Hydrocarbons are flammable contaminants such as R290, R600,
R600a, R152a etc.
4.1 Warranty
BACHARACH warrants, subject to the terms listed below, that the goods will be free from defects in
design, materials, and workmanship for a period of (1) one year from the date that the goods are
shipped to the buyer.
THE SOLE LIABILITY OF BACHARACH FOR ALL PURPOSES SHALL BE TO REPAIR OR
REPLACE, AT THE SOLE OPTION OF BACHARACH, DEFECTS APPEARING WITHIN THE (1)
ONE YEAR PERIOD. BACHARACH SHALL HAVE NO OBLIGATION FOR REPAIR OR
REPLACEMENT UNLESS BACHARACH HAS RECEIVED WRITTEN NOTICE OF THE ALLEGED
DEFECT WITHIN THE (1) ONE YEAR PERIOD AND THE DEFECTIVE GOODS ARE PROMPTLY
RETURNED BY THE BUYER, AT THEIR EXPENSE, TO BACHARACH AT: 456 CREAMERY WAY
EXTON, PA 19341 USA, AND THE DEFECT OCCURS UNDER THE CIRCUMSTANCES OF
PROPER USE IN ACCORDANCE WITH ALL INSTRUCTIONS AND MANUALS PROVIDED TO THE
BUYER. BACHARACH WILL DELIVER THE REPAIRED OR NEW GOODS TO THE BUYER AT
BACHARACH EXPENSE. IN NO EVENT WILL BACHARACH BE LIABLE FOR ANY LOSS OR
DAMAGE DIRECTLY OR INDIRECTLY ARISING FROM THE DEFECTS OR FROM THE USE OF
THE GOODS OR FROM CONSEQUENTIAL OR INCIDENTAL DAMAGES, WHETHER IN
CONTRACT, TORT, OR OTHERWISE, FOR PERSONAL INJURY OR PROPERTY DAMAGE OR
ANY FINANCIAL LOSS.
Buyer shall be responsible for ensuring that the goods are functioning properly at all times and shall
not use any goods which are not functioning properly. Buyer, therefore, agrees to indemnify
BACHARACH from and against all losses and claims to or by any person or property caused in any
manner by the goods or the use of the goods, including any expenses and attorney’s fees in
connection with all claims, demands, proceedings, or other expenses.
Any description of the goods contained in any documents to which these warranty provisions relate,
including any quotations or purchase orders relating to the goods being delivered to the buyer, are for
the sole purpose of identifying the goods, and any such description, as well as any sample or model
which may have been displayed to or seen by the buyer at any time, have not been made part of the
basis of the bargain and have not created or amounted to any express warranty that the goods would
conform to any such description or any such sample or model.
BACHARACH DOES NOT WARRANT THAT THE GOODS ARE FREE OF THE RIGHTFUL CLAIM
OF ANY THIRD PERSON BY THE WAY OF INFRINGEMENT OF PATENT OR OTHER
PROPRIETARY INFORMATION AND DISCLAIMS ANY WARRANTY AGAINST SUCH
INFRINGEMENT.
It shall be the responsibility of the buyer to read carefully and abide by all instructions provided to the
buyer in the instruction manual or elsewhere. If the buyer, or the employees of the buyer, did not abide
by such instructions, then the alleged defect shall not be deemed to have arisen under circumstances
of proper use.
The terms of these warranty provisions shall apply to all products sold by Bacharach, except filters
which are considered “consumable items,” and as such are not covered by the terms of these
warranties. No waiver, alteration or modification of the terms of these provisions shall be valid unless
in writing and signed by an executive officer of BACHARACH.
EXCEPT AS SPECIFICALLY SET FORTH AND LIMITED IN THIS PARAGRAPH, BACHARACH,
INC. MAKES NO WARRANTIES, EXPRESSED OR IMPLIED, INCLUDING WARRANTIES AS TO
MERCHANTABILITY, OR AS TO THE FITNESS OF THE GOODS FOR ANY PARTICULAR USE OR
PURPOSE, AND ANY WARRANTIES SET FORTH IN THIS PARAGRAPH ARE IN LIEU OF SUCH
IMPLIED WARRANTIES OF MERCHANTABILITY AND FITNESS FOR PARTICULAR USE OR
PURPOSE.
5-06-7000-81-1, 7-08-1234
Find Quality Products Online at: sales@GlobalTestSupply.com
www.GlobalTestSupply.com
069706 Rev. A
 Loading...