

1

2
Table of Contents
Quick Start Guide............................................................................................... 3
Important Safety Information............................................................................ 4
What is Included................................................................................................. 5
Product Overview. ............................................................................................. 6
Operating Instructions........................................................................................ 7
Troubleshooting................................................................................................ 10
Warranty Information ...................................................................................... 12
3

4
Important Safety Information:
• Strangulation Hazard – Children have been STRANGLED by electrical
cords. Please keep the cord out of reach of children. We recommend
at least 3 feet away. Never place camera or electrical cord in the
crib or playpen.
• Electrical Shock – Never use the LCD MONITOR or Camera near a
Bathtub, Shower, Sink, Wet Basement, or any area prone to water.
• Power Cords – Only use the Power Cords provided.
• Batteries – There is a battery pack located inside the camera. If you
ever need to replace the battery pack, replace only with a battery
pack of the exact same type purchased from Safe Baby Tech. There
is a risk of explosion if the battery is the wrong type.
• Supervision – This product was designed to help monitor your baby
while you’re not in the room, however we do not recommend leaving
your baby unattended.
• This product is designed and intended for Indoor Use.
• We recommended you unplug the monitor and camera from Wall
Outlets when not in use.

5
What is Included
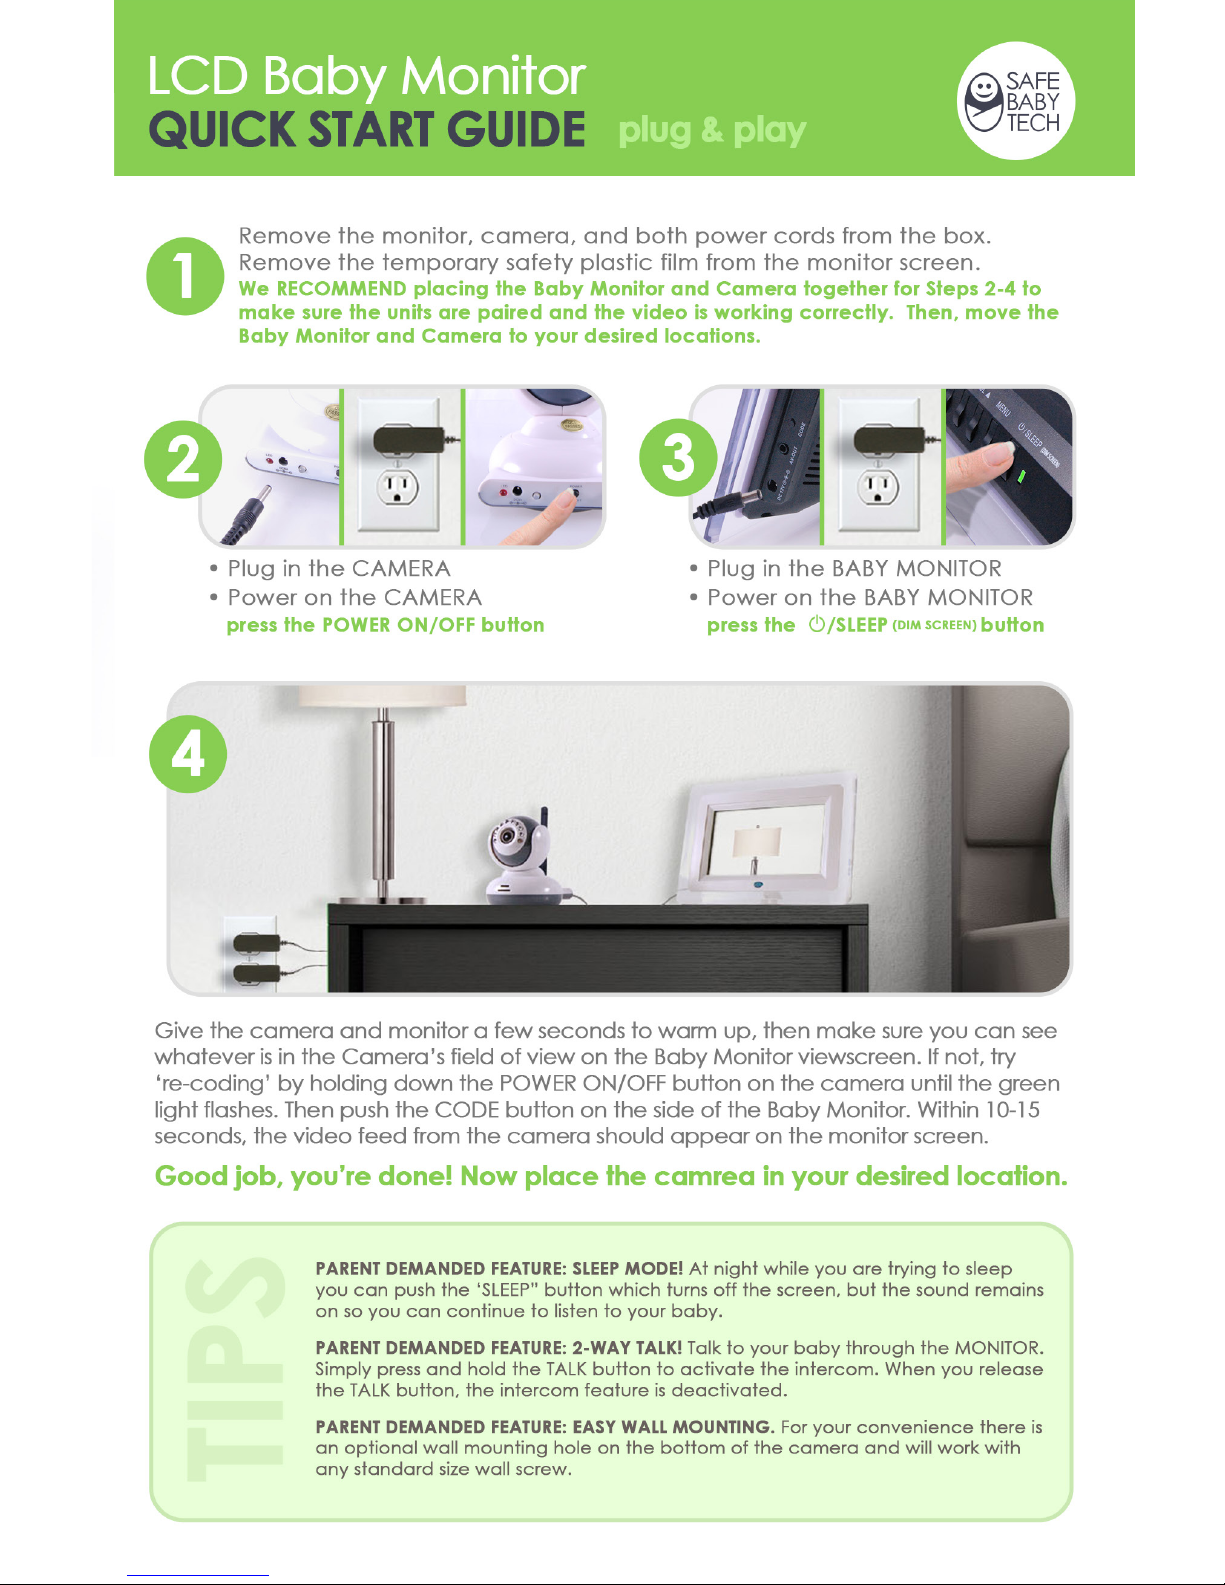
Your Safe Baby Tech LCD Baby Monitor comes with everything you need
to get started. Please take a moment to familiarize yourself with all of the
included components. Read the entire instruction manual before using
this product.
7” Color LCD Monitor
LCD Monitor Power Cord
Quick Start Guide
Camera
Camera Power Cord
Instruction Manual
6
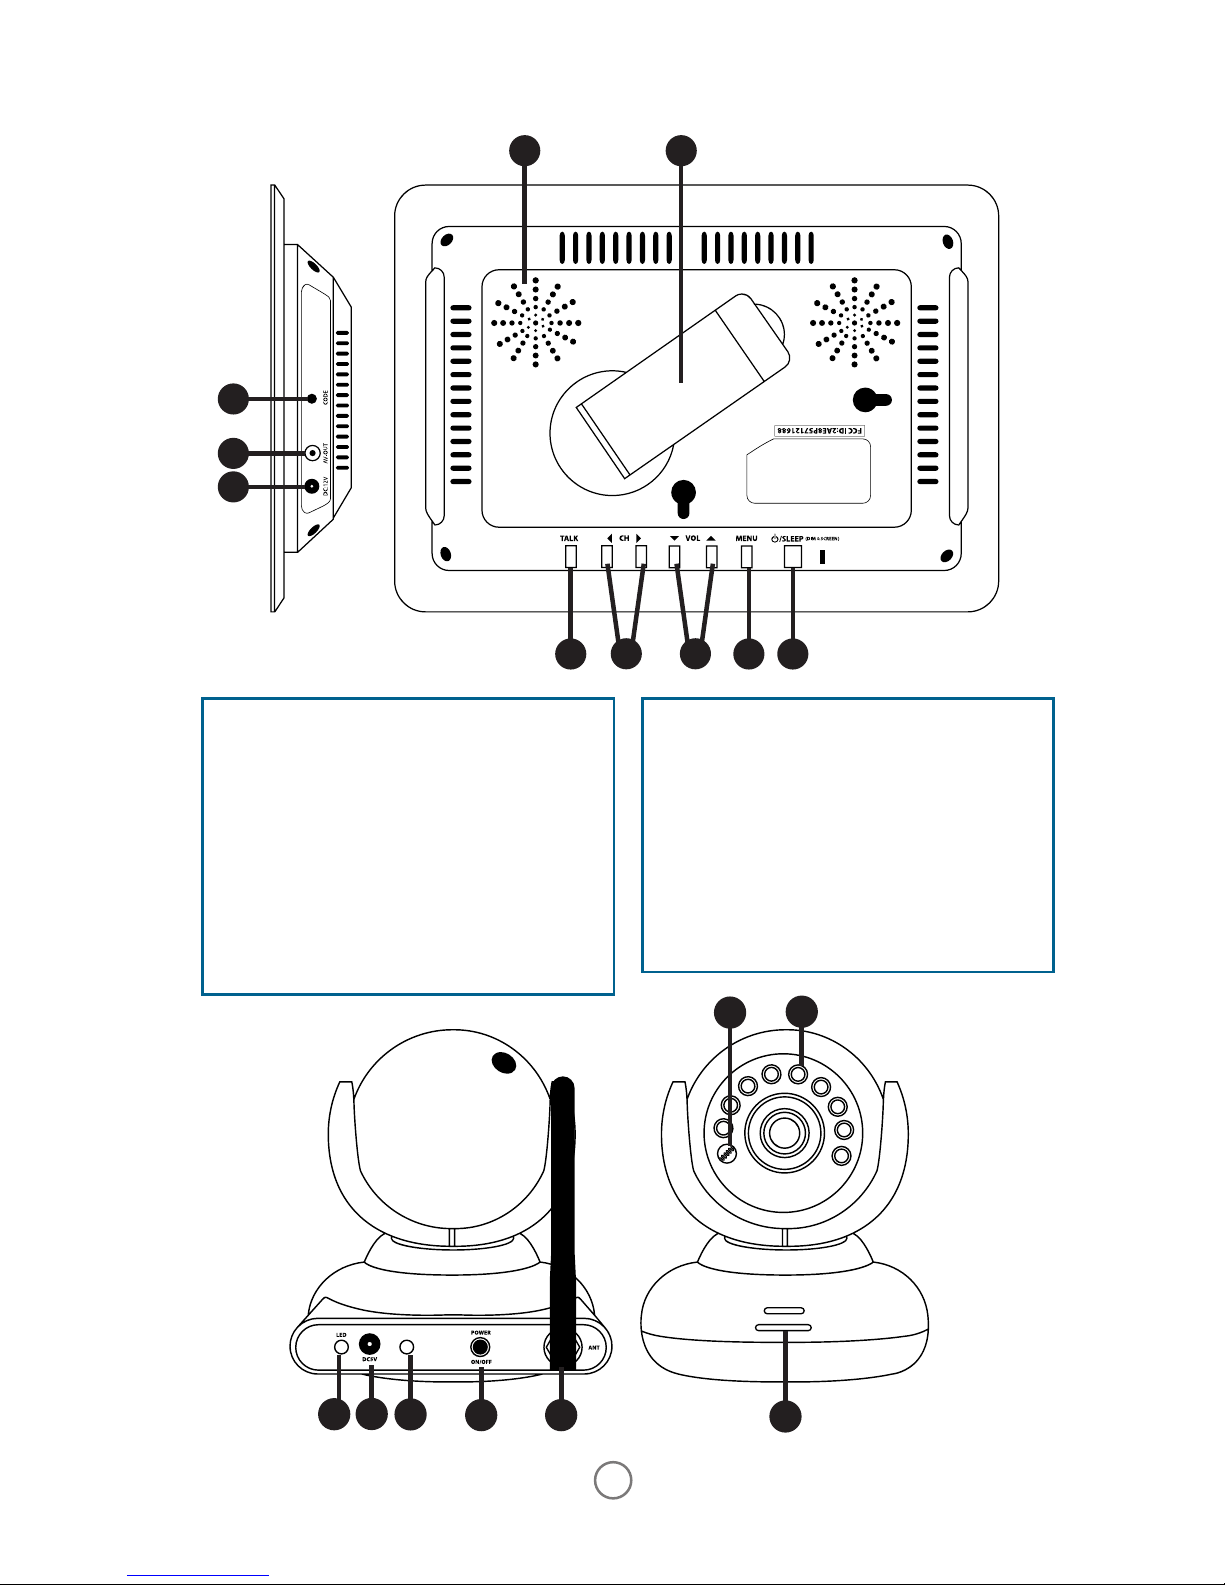
Product Overview
LCD MONITOR
1. Speaker
2. LCD Monitor Extendable Kickstand
3. TALK Button
4. CHANNEL Control Buttons
5. VOLUME Control Buttons
6. MENU Button
7. POWER/SLEEP
(DIM SCREEN)
Button
8. DC12V Power Input
9. AV-OUT
10. CODE Button
CAMERA
A. Light Sensor
B. Infrared LED’s
C. Power Indicator LED
D. DC5V Power input
E. Coding LED Indicator
F. POWER ON/OFF Button
G. Camera Antenna Connector
H. Camera Speaker Output
PULL & TWIST
1
B
3
C
D
E
F G
H
6
7
8
9
10
2
A
4 5

7
Operating Instructions
Changing the Volume on the LCD MONITOR
• You can change the volume by using the UP and DOWN arrows
located on the top of the LCD MONITOR. The LCD MONITOR screen
must be on to change the volume.
Intercom Mode (Talk to Your Baby)
• You can talk to your baby through your LCD MONITOR.
• Simply Press and hold the TALK Button on the top of the LCD MONITOR
and talk to your baby.
• When you’re done release the TALK Button to turn off the Intercom.
You are now back in the default regular LISTEN mode.
(NOTE: While the LCD MONITOR is in Intercom/Talk mode, you will not
be able to hear your baby)
Sleep Mode
• If you would like to dim the screen of the LCD Monitor, press the SLEEP
button on the MONITOR. When in sleep mode, the sound remains
on so you can continue to listen to your baby, but the screen will be
turned off.
Multiple Cameras
• You can have up to 4 cameras setup (cameras sold separately).
• Each Camera must be setup on its own specic channel.
• You can scroll through multiple channels by using the LEFT and RIGHT
arrows on the LCD MONITOR.
• To setup an additional camera go to a channel that’s unused by
using the “RIGHT” and “LEFT” arrows on the top of the LCD Monitor.
• Once you’re on the channel you’d like to use, go through the same
coding instructions located in the ‘coding’ section on page 7.

8
Operating Instructions
Menu Settings on the LCD MONITOR
By Pressing the MENU Button you’ll see Menu with customization options
for your LCD MONITOR.
o Baby Cam Setup
o Monitor Setup
o System Setup
You can scroll through these options by using the UP & DOWN ARROWS.
Select you option by pressing the “MENU” button. If at any point you need
to return to the previous Menu just press the “MENU” button.
Baby Cam Setup - To adjust the volume of the speakers on the CAMERA
when you would like to talk to your baby from the LCD MONITOR, Press the
MENU button and highlight Baby Cam Setup and press the MENU button.
Use the Left & Right Arrows to Adjust the Volume [0 Being the Lowest, 9
Being the Highest].
A
CB
LCD MONITOR
1. Signal strength
2. Item selected
3. Channel indicator

9
Menu Settings on the LCD MONITOR
Monitor Setup
This menu allows you to customize the display settings on your monitor.
Flip Vertical or Horizontal Orientation - If you’d like to ip the image
Vertically or Horizontally you can make this ad¬justment by pressing
the MENU Button on the top of the LCD MONITOR. Using the Arrow
Buttons Scroll Down to “Effect.” Highlight either FLIP VERT or FLIP HORIZ
and use the Left or Right Arrows to set the position to “ON” or “OFF.”
Contrast - Contrast is the range between the darkest object on your
screen vs the lightest. You can modify the contrast on the screen by
using the Arrow Buttons, Scroll Down to “Effect”, Scroll to “Contrast”
and use the Arrows to Adjust from [0-9].
Saturation - Saturation is used to specify how vibrant colors appear.
You can modify the contrast on the screen by using the Arrow Buttons,
Scroll Down to “Effect”, Scroll to “Saturation” and use the Arrows to
Adjust from [0-9].
System Setup
The setup menu has numerous advanced features that are very useful
Power Save - This feature will automatically turn off the display on
the LCD Monitor and will automatically when the Camera picks up a
sound in the room. There are 2 options:
Sensitivity - When using the Power Save feature, you can set the level
of noise it would take to “wake” from the Power Save Mode.
o LO - Picks up any noise above normal conversation.
o HI - Picks up any noise above a whisper.
TV Mode - Your LCD Monitor comes with 2 types of color encoding
systems that affect the visual quality of the content viewed. Each system has it’s pros and cons and the preferred encoding will vary from
person to person.
o NTSC – The standard encoding used in North America & Japan.
o PAL – Is common in Europe and Asia.

10
Troubleshooting
No Picture on the LCD MONITOR
• Conrm that the Camera and The LCD MONITOR are ON.
• Make sure you are on Channel 1 (CH 1) or whichever channel your
monitor and camera are coded to. There are 4 available channels
and you can scroll through them with the left and right arrow buttons.
• Attempt to Reset the Monitor. Power the Monitor off (Hold POWER/
SLEEP (DIM SCREEN) Button for several seconds) then Power it back on.
• Make sure the screen is not dimmed – do a quick press of the
POWER/SLEEP (DIM SCREEN) button and wait several seconds for the
picture to reappear.
• If all of the above fail, the units may have become uncoded, following the coding instructions below
Static Reception
• Battery Level on the Camera might be low, try charging the camera
by plugging it in via the Power Cord.
• Other Electrical Devices might be interfering. Microwaves, Cordless
Phones, Wireless Routers can interfere with the signal.
• The Camera and LCD MONITOR might be too far apart.
Product Does Not Switch on
• Conrm that the Camera and The LCD MONITOR are ON.
• The Camera battery may be depleted, attach the camera
power cord.
• Conrm the Power Cords are properly connected.

11
Coding Failed
• It’s possible there’s interferance on the specic channel, try changing
the channel on the LCD MONITOR by pushing the (UP) Arrow.
• The Unit might be too far away. Attempt to plug in the camera closer
to the LCD MONITOR then attempt to code it. Once the unit is coded
you can unplug the camera or the LCD MONITOR and move it to your
desired location.
Coding Monitor to the Camera(s)
• Connect the CAMERA POWER CORD to the CAMERA. (Hint: The CAMERA POWER CORD is the one with the red LED light) and plug it into a
wall outlet.
• Power on the CAMERA by pressing the POWER ON/OFF Button.
• Connect the BABY MONITOR POWER CORD to the BABY MONITOR
and plug it into a wall outlet.
• Power on the BABY MONITOR by pressing the POWER/SLEEP (DIM
SCREEN) button and holding it pressed for several seconds.
• If you want to place the Baby Monitor on a at surface, Pull and Twist
the “Monitor Stand” located on the back of the “BABY MONITOR.”
• To Code the CAMERA with the BABY MONITOR:
a. On the CAMERA press and hold the POWER ON/OFF Button for 3
seconds until you see the Green LED light ashing.
b. On the BABY MONITOR press the “Code” button on the side of
the monitor.
c. Within 10-15 seconds you should see the static on the BABY
MONITOR disappear and then see the view through the CAMERA
on the BABY MONITOR.

12
FCC Compliance
This device complies with part 15 of the FCC Rules. Operation is subject
the following conditions
1. This device must not cause harmful interference, and
2. This device must accept any interference, including interference that
may cause undesired operation.
Limited Liability
SafeBabyTech is not liable for any loss, damage, or personal injury resulting
from the use, or misuse, of the LCD Baby Monitor.
Modications of terms
SafeBabyTech reserves the right to make changes to the Terms and Conditions of the LCD Baby Monitor at any time.
Limited Lifetime Warranty
This SafeBabyTech’s LCD Baby Monitor is warranted to be free of defects
of material or workmanship for the life of the product. This warranty extends to the original purchaser with proof of purchase. If any component
of this product proves defective, repair or replacement with the same or
equivalent product will be made without charge. Warranties do not apply
when products are not used in accordance with the included instruction
manual, or in cases of misuse or abuse.

FCC WARNING
This device complies with Part 15 of the FCC Rules. Operation is subject to the following two
conditions:
(1) This device may not cause harmful interference, and
(2) this device must accept any interference received, including interference that may cause
undesired operation.
NOTE 1: Any changes or modifications to this unit not expressly approved by the party
responsible for compliance could void the user's authority to operate the equipment.
 Loading...