

BaBylissPro FX811C User Manual
Cord/Cordless Auto Voltage Professional Hair Clipper
Tondeuse rechargeable professionnelle avec
régulation automatique de la tension
Model/Modèle FX811C
BC

IMPORTANT SAFETY INSTRUCTIONS
When using an electrical appliance, basic safety precautions
should always be taken, including the following:
READ ALL INSTRUCTIONS BEFORE USING
KEEP AWAY FROM WATER
DANGER – To reduce the risk of death or injury by electric shock:
1. Do not reach for an appliance that has fallen into water.
Unplug immediately.
2. Do not use while bathing or in the shower.
3. Do not place or store appliance where it can fall or be pulled
into a tub or sink. Do not place in or drop into water or other
liquids.
4. Always unplug this appliance from the electrical outlet
immediately after using.
5. Unplug this appliance before cleaning, or putting on or taking
off parts.
WARNING – To reduce the risk of burns, electrocution, re,
electric shock, or injury to persons:
1. Do not crush, disassemble, heat above 212°F (100°C) or in‑
cinerate the appliance, due to risk of re, explosion or burns.
2. Close supervision is necessary when this appliance is used
by, on or near children or individuals with certain disabilities.
3. Use this appliance only for its intended use as described in
this manual. Do not use attachments not recommended by
the manufacturer.

4. Never operate this appliance if it has a damaged cord or
plug, if it is not working properly, if it has been dropped or
damaged, or if it has been dropped in water. Return the ap‑
pliance to Babyliss Pro for examination or repair.
5. Keep the cord away from heated surfaces.
6. Insert only recharging transformer plug into the
BaBylissPRO™ charger receptacle.
7. Do not use outdoors or operate where aerosol (spray) prod‑
ucts are being used or where oxygen is being administered.
8. Do not use this appliance with a damaged or broken comb,
nor with teeth missing from the blade, as injury may occur.
9. Always attach plug to appliance rst, then to outlet. To dis‑
connect, turn unit to OFF – 0, then remove plug from outlet.
10. Do not pull, twist, or wrap line cord around appliance.
When using the appliance with its cord, be mindful of tangles or
kinks in the cord. If the cord does become tangled during use,
turn the unit off and straighten cord before operating again.
11. Do not place appliance on any surface while it is operating.
Always avoid contact with moving blades.
12. Do not use any power cord or AC adapter other than those
provided.
SAVE THESE INSTRUCTIONS
SPECIFICATIONS
Power adapter:
Automatic voltage conversion (dual voltage)
Input: 100–240V AC 50/60Hz 0.3amp
Output: 12V DC 1 amp
Model FX811C
3
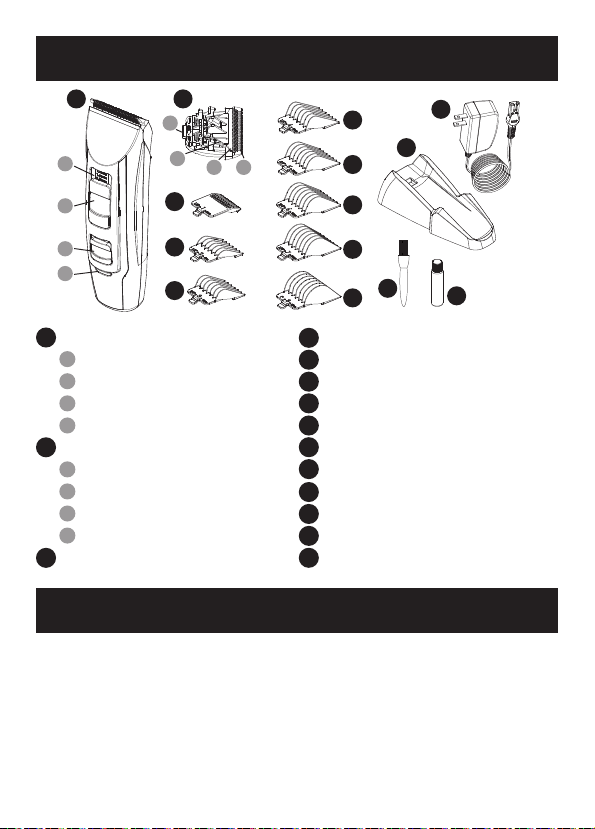
PARTS IDENTIFICATION
A
1
B
5
6
7 8
H
I
D
C
2
3
4
A
Main body
1
Trimming height indicator
2
Length adjustment
3
Power switch (ON–OFF)
4
LED indicator
Blade
B
5
Mounting tab
6
Cleaning lever
7
Moving cutter blade
8
Fixed comb blade
Charging stand
C
E
F
G
J
K
M
L
AC adapter
D
#1 cutting guide – 1/8", 3 mm
E
#2 cutting guide – ¼", 6 mm
F
#3 cutting guide – 3/8", 10 mm
G
#4 cutting guide – ½", 13 mm
H
#5 cutting guide – 5/8", 16 mm
I
#6 cutting guide – ¾", 19 mm
J
#7 cutting guide – 7/8", 22 mm
K
#8 cutting guide – 1", 25 mm
L
Cleaning brush
M
Lubricating oil
N
N
OPERATING INSTRUCTIONS
Thank you for choosing a BaBylissPRO™ Hair Clipper. Before operating
this unit, please read these instructions and precautions completely and
save them for future use.
4

IMPORTANT
BEFORE USE
This clipper is designed for professional use to trim hair and
beards. Charge it for 3 hours before use for the rst time in
order to activate the built‑in rechargeable batteries. It can be
operated on either the AC adapter or the rechargeable batteries.
Read all instructions carefully before use.
CLIPPER CHARGING PRECAUTIONS
• Do not use any power cord or AC adapter other than
those provided.
• Avoid charging the batteries at temperatures below 41°F (5°C)
or above 95°F (35°C).
• Avoid charging the batteries in direct sunlight or near a
radiating heat source.
• Even though the clipper may not be used for an extended
period, charge once a month to preserve battery life.
• The power cord cannot be replaced. If it is damaged, the AC
adapter should be discarded.
CLIPPER OPERATING PRECAUTIONS
• This clipper has a built‑in rechargeable battery. Do not
throw into re, apply heat, or charge, use, or leave in a high‑
temperature environment.
WARNING
Keep the appliance dry.
• The clipper may become warm during operation and/or
charging. This is normal.
• Check that the blades and the attachments are not damaged
before use. Replace them if they are damaged.
5

• Before each use, apply oil at the places marked with
arrows (see page 12).
• Do not allow permanent wave lotion, hair restorer or hair spray
to come into contact with the main body or the blades. Doing
so may result in cracking, discoloring or corrosion.
• Do not drop the clipper on the oor.
• Do not knock the blades and the attachments against hard objects.
• Do not use the clipper to trim the hair of a pet.
CLIPPER CLEANING PRECAUTIONS
• Clean the housing using only a cloth slightly dampened with
water or a mild soap solution.
• Never use a caustic solution.
• Never submerge the clipper in water.
GENERAL CLIPPER PRECAUTIONS
• This appliance is not intended for use by persons (including
children) with reduced physical, sensory or mental capabilities,
or lack of experience and knowledge, unless they have been
given supervision or instruction concerning use of the appli‑
ance by a person responsible for their safety. Children should be
supervised to ensure that they do not play with the appliance.
• Never tamper with moving parts.
• Avoid grabbing the clipper by the power cord, as it may be‑
come detached, causing damage or injury.
• If the clipper is not working properly, have it inspected at an
authorized service center.
6

CHARGING THE CLIPPER
1. Slide the power switch to OFF position.
2.
Connect the plug from the AC adapter to the unit. Plug adapter
into wall outlet. The LED will turn red to indicate charging.
3. Place the unit on the stand or on a counter.
• It will take approximately 3 hours for the clipper to fully charge, as
indicated by the blue LED light. This will give you approximately 3
hours or more of run time.
• Your clipper can be quick charged for approximately 1 hour,
providing about 75 minutes of run time. Note the LED light may
not change from red to blue.
• Important Note: To prolong the life of your battery, it is recom‑
mend that you wait for the ashing red LED before charging
your clipper.
.ABOUT THE LED DISPLAY
Your clipper has one LED to indicate the different modes.
Red: the unit is charging.
Blue: the unit is fully charged.
Slow Flashing Red: early warning indicates the unit will soon
need to be charged.
Rapid Flashing Red: indicates only 10 to 15 minutes more
run time.
7
AC OPERATION
You can use your clipper even when the battery capacity is low.
1. Make sure the power switch is off before connecting the adapter.
2. Connect the AC adapter in the same way as for charging. Plug
adapter into power outlet. The red charging light will come on.
3. Move the power switch to the ON position. The red charging
light will stay on for a second and then the unit will start.
4. If the clipper does not operate, charge the clipper for approxi‑
mately 1 minute.
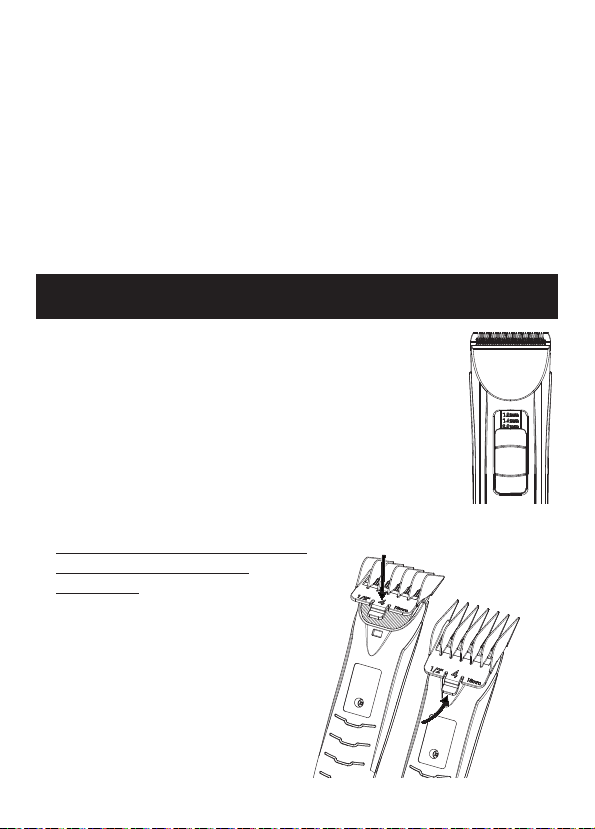
USING THE CLIPPER
Slide the taper control up or down to adjust the
moving blade to the desired height. The blade is
adjustable in four (4) stages from 0.8 mm to 2.0
mm, in 0.4 mm steps without attachments. The
actual cut length may be longer than the set length.
Using the Cutting Guide
1. Select the desired comb attachment.
Trimming height is indicated on the outside
and sides of the guides.
2. Set the taper control to 0.8 and
then mount the guide to
the clipper.
3. To attach the guide, do not press
on the tab. You must press over
the number as shown. The tab is
only for guide removal.
Press here to attach.
Push up
here
to remove.
8

Removing the Guide from the Clipper
1. Remove the attachment as illustrated.
Removing the Blade
1. Be sure to turn off the power before you
remove the blade.
2. Hold the clipper with the switch facing upward and push
the blade with your thumb while catching the blade in your
other hand.
9
 Loading...