

Babyliss C1225E User Manual [ru]
18_C1225E_IB.indd 1 16/07/18 11:30
...
Beep
beep, beep,
8
7
1 3 2 546
Fabriqué en Chine
Made in Chi na
b
c
A
1.
4.
7.
5.
8.
BABYLISS SARL
99 Avenue Aristide Briand
92120 Montrouge - France
www.babyliss.com
a
3.2.
6.
9.
18_C1225E_IB.indd 2 16/07/18 11:31
10.
11.

FRANÇAIS
Avec le Curl Secret® de BaByliss, créez en total confort de belles boucles d’une
tenue exceptionnelle. Pas de manipulation fastidieuse, pas de mouvement
à eectuer, le Curl Secret® réalise les boucles grâce à son ingénieux système
automatique.
Consulter au préalable les consignes de sécurité.
CARACTERISTIQUES DU PRODUIT
- Cylindre en revêtement Ceramic (1)
- Mise à température rapide (max. 230 °C)
- Interrupteur 0n-O (2)
- 6 niveaux de température : 180-190-200-210-220-230°C (3)
- 3 réglages de la durée de chaue (8, 10 et 12 secondes) avec signal sonore
pour créer diérents types de boucles (4)
- Réglage du sens de la boucle R/L/A (Droite / Gauche / Auto) (5)
- Technologie ionique : brillance et anti-statique
- Ecran LCD (6): indication précise des diérents réglages : température (a),
durée de chaue (b) et sens de la boucle (c)
- Arrêt automatique
- Cordon rotatif (7)
- Outil de nettoyage (8)
UTILISATION
Remarques
• A la première utilisation, il est possible que vous perceviez une odeur particulière :
ceci est fréquent et disparaîtra dès la prochaine utilisation.
• Au cours de chaque utilisation, une légère émanation de fumée est possible. Ceci
peut être dû à de l’évaporation de sébum ou d’un reste de produits capillaires
(soin sans rinçage, laque, ...) ou de l’humidité contenue dans le cheveu.
• Il est possible d’utiliser un spray de protection contre la chaleur pour une
protection optimale de la chevelure.
• Le générateur d’ions placé à l’intérieur de l’appareil libère des ions dont l’action
anti-statique rend les cheveux doux et brillants. A noter : Il est tout à fait
normal d’entendre un léger bruit semblable à un grésillement : c’est le bruit
caractéristique du générateur d’ions.
18_C1225E_IB.indd 3 16/07/18 11:31
3

• Branchez l’appareil et allumez-le.
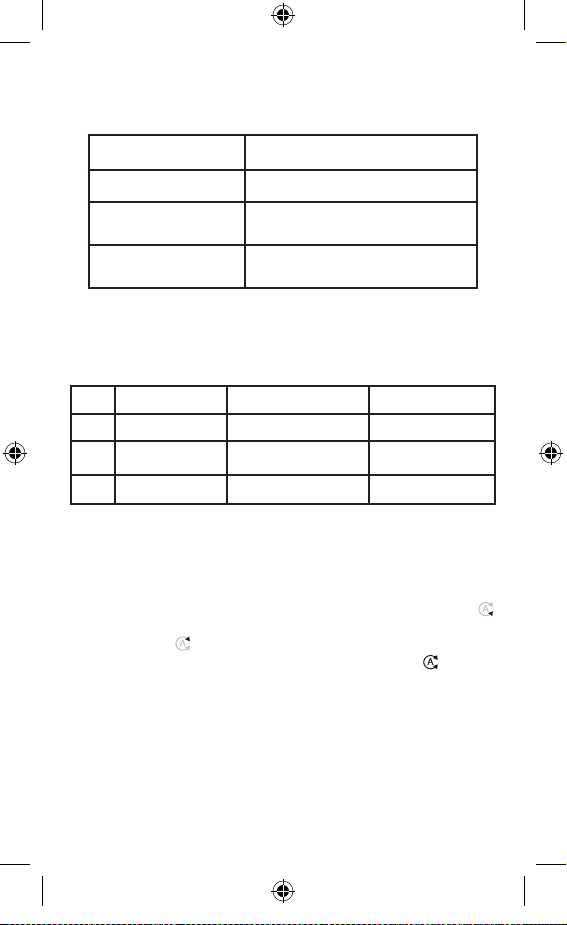
• Sélectionnez la température selon la nature de vos cheveux :
Température Type de cheveux
180°C - 190°C Cheveux ns, décolorés et/ou sensibilisés
200°C - 210°C Cheveux normaux ou colorés
220°C - 230°C Cheveux épais
• La température sélectionnée clignote sur l’écran LCD jusqu’à ce que la
température soit atteinte. L’appareil est alors prêt à l’emploi.
• Sélectionnez le réglage de la durée de chaue selon l’eet souhaité.
Pour des boucles légères, choisissez la durée de chaue minimale. Pour
des boucles plus serrées, choisissez la durée maximale. Référez-vous au
tableau ci-dessous :
Durée Signal sonore Eet souhaité
8 8 secondes 3 bips sonores Ondulations
10 10 secondes 4 bips sonores Boucles souples
12 12 secondes 5 bips sonores Boucles serrées
Attention : Chaque durée de chaue se clôture par une succession de 4
bips rapides au terme desquels la poignée peut être relâchée.
• Sélectionnez le réglage du sens de la boucle selon le résultat souhaité :
- Pour une coiure uniforme et plus sophistiquée, réglez l’appareil sur
la position pour réaliser des boucles sur le côté gauche de la tête.
Réglez ensuite l’appareil sur la position pour réaliser des boucles
sur le côté droit de la tête.
- Pour une coiure plus souple et plus naturelle, réglez l’appareil sur
la position automatique . Ce réglage permet de créer des boucles
dans un sens puis dans le sens opposé en alternance.
Précautions d’utilisation
• Assurez-vous que les cheveux sont secs.
• Relevez les cheveux du dessus avec une pince et commencez à travailler
les cheveux du dessous.
• Sélectionnez une mèche de cheveux d’une largeur de 3 cm maximum.
Démêlez-la soigneusement à l’aide d’un peigne.
18_C1225E_IB.indd 4 16/07/18 11:31
4
• Approchez l’appareil des cheveux et positionnez-le dans le bon sens :
la cavité formée par le cylindre vers le bas (FIG.1 et 2) et face à la tête.
(FIG. 3 et 4).
• Avec votre main libre, prenez la mèche par la pointe et déposez-la sur
l’ouverture en entonnoir située entre les deux poignées (FIG.5).
NB : Pour prévenir tout blocage de l’appareil, assurez-vous qu’aucun
cheveu ne déborde sur les côtés.
Veillez également à ne pas tirer sur vos cheveux avant d’actionner les
poignées (FIG. 6 et 7).
Si ces précautions ne sont pas respectées, vous risquez d’emmêler
vos cheveux dans l’appareil.
Attention : ne touchez jamais l’intérieur du cylindre lorsque l’appareil
est en chaue.
• Une fois la mèche bien en place, fermez les poignées de l’appareil pour
permettre à celui-ci d’attraper la mèche automatiquement.
• Maintenez l’appareil dans la même position jusqu’à ce que le signal
sonore retentisse (après les 3, 4 ou 5 bips consécutifs suivant le réglage
sélectionné, voir tableau ci-dessus) (FIG.8).
• Ouvrez ensuite l’appareil en relâchant les poignées puis libérez la boucle
délicatement (FIG.9). Ne tirez pas sur l’appareil pour libérer la mèche.
Celle-ci perdrait son aspect bouclé.
• Attendez que les cheveux aient refroidi avant de travailler ou de peigner
les boucles.
• Continuez le geste sur le reste de la tête jusqu’à obtention du nombre
de boucles souhaité.
• Après utilisation, éteignez et débranchez l’appareil. Laissez refroidir
avant de le ranger.
Système de protection
L’appareil est muni d’un système de protection. Si les cheveux s’emmêlent,
l’appareil émet un signal sonore, se bloque et arrête de chauer.
Si cela se produit, relâchez les poignées, assurez-vous que l’appareil et
la mèche sont correctement positionnés puis resserrez simplement les
poignées pour désactiver le système de sécurité et relancer l’appareil.
Mode veille
Si l’appareil n’est pas utilisé pendant plus de 20 minutes, la température
de l’appareil va automatiquement descendre à environ 150°C. Si
vous souhaitez utiliser à nouveau l’appareil, passé ce délai, pressez
simplement les poignées de l’appareil puis relâchez-les ; ainsi l’appareil
sera à la température que vous aviez sélectionnée.
18_C1225E_IB.indd 5 16/07/18 11:31
5
Arrêt automatique
Si l’appareil e st allumé penda nt plus de 60 minutes en co ntinu, il s’arrêtera
automatiquement.
ENTRETIEN ET NETTOYAGE
An de prévenir l’accumulation de produits coiants qui pourrait
empêcher le bon fonctionnement de l’appareil, il est important d’utiliser
l’outil de nettoyage fourni pour nettoyer régulièrement l’appareil.
• Assurez-vous que l’appareil est éteint, débranché et refroidi.
• Plongez doucement l’outil de nettoyage dans l’eau chaude mélangée à
un savon doux.
• Insérez l’outil dans la cavité formée par l’appareil et le cylindre (FIG. 10).
• Eectuez plusieurs rotations avec l’outil autour du cylindre pour ôter
toute trace de produits coiants (FIG. 11).
• Retirez ensuite l’outil de nettoyage de la cavité.
• L’appareil doit être totalement sec avant d’être utilisé à nouveau.
• L’outil de nettoyage peut être utilisé un grand nombre de fois. Il sut
simplement de retirer le tampon en feutre, de le rincer dans de l’eau
savonneuse et de le laisser sécher avant de le réutiliser.
La coque de l’appareil peut-être essuyée à l’aide d’un chion humide, une
fois l’appareil froid et débranché. S’assurer qu’il est parfaitement sec avant
de le brancher à nouveau.
18_C1225E_IB.indd 6 16/07/18 11:31
6

ENGLISH
With the BaByliss Curl Secret® styler, easily create beautiful curls with
long-lasting eect. Thanks to its clever automatic system, the Curl
Secret® makes gorgeous curls without tedious handling or movements.
Read the safety instructions rst.
PRODUCT FEATURES
- Ceramic-coated cylinder (1)
- Fast heat up (max. 230 °C)
- On/O switch (2)
- 6 temperature settings - 180-190-200-210-220-230°C (3)
- 3 timer settings (8, 10 and 12 seconds) with audio beep indicator for
various curl eects (4)
- Adjustment of the direc tion of the curl R/L /A (Right/Left/Auto) (5)
- Ion technology: glossy, non-static
- LCD screen (6): precise display of dierent settings: temperature (a),
heating duration (b) and curl direction (c)
- Automatic shut o
- Swivel cord (7)
- Cleaning tool (8)
USE
Notes
• When using the un it for the rst time, you m ight notice a distinct od our: this
is common and wil l disappear by the nex t use.
• Each time you use the appliance, you may see some steam. Do not be
concerned, this could be because of evaporation of the natural oils of
the hair, residual hair products (leave-in hair products, hairspray, etc.) or
excess moistu re evaporating from your hai r.
• A heat-protection spray can be used to provide optimal protection of the
hair.
• The ionise r within the device gives o ions w hich have an anti-static eec t,
leaving your hair nice and soft with a shine. Nb: It is quite normal to hear
a slight noise, similar to a crackle: this is the characteristic noise of the ion
generator.
18_C1225E_IB.indd 7 16/07/18 11:31
7
• Plug in the appliance and switch it on.
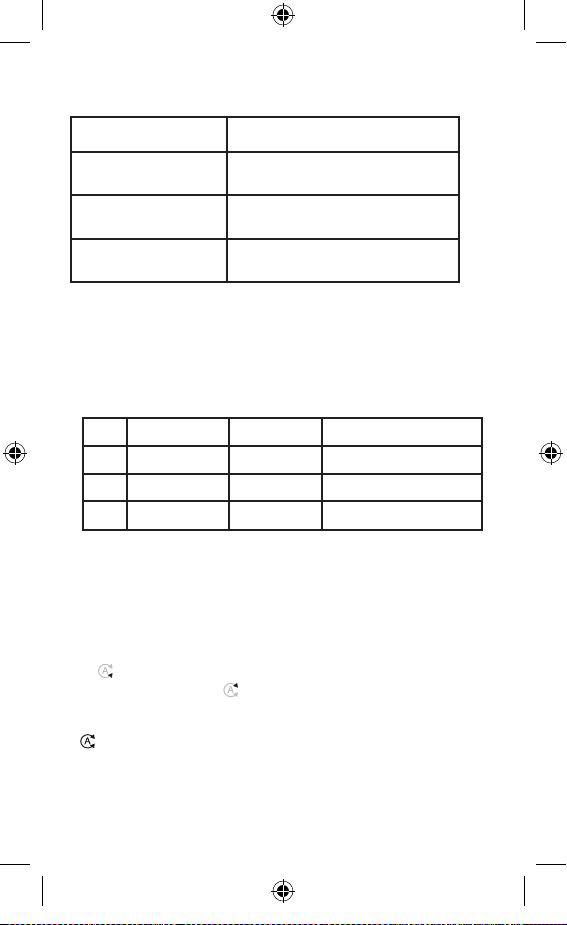
• Select the temperature according to your hair type :
Temperature Hair type
180°C - 190°C Fine, bleached and/or damaged hair
200°C - 210°C Normal or colour-treated hair
220°C - 230°C Thick hair
• The selected temperature ashes on the LCD display until the
temperature is reached. The appliance is now ready to use.
• Select the time setting depending on the desired curl eect. For loose
curls, select the minimum time setting. For tighter curls, select the
maximum time setting. Please refer to the table below:
Time Au dio beep indicator Curl eect
8 8 seconds 3 beeps Loose waves
10 10 seconds 4 beeps Soft curls
12 12 seconds 5 beeps Dened curls
Warning: Each heating session ends with a succession of 4 rapid beeps
after which the handle may be released.
• Select the adjustment of the direction of the curl, according to the
desired result:
- For an even, more sophisticated style, adjust the appliance to the
position, to create curls to the left side of the head. Then adjust the
appliance to t he position, to cre ate curls on the right sid e of the head.
- For a sof ter, more natura l style, adjust the a ppliance to the position.
This adjustment will create alternating curls, rst in one direction and
then in the opposite direction.
Precautions for use
• Ensure that hair is dry.
• Clip the upper layers to the top of your head and start working on the
layers underneath.
• Separate a section of hair no wider than 3 cm. Ensure the section is
thoroughly combed through.
8
18_C1225E_IB.indd 8 16/07/18 11:31

• Bring the appliance close to the hair and position it in the right
direction: the cavity formed by the cylinder downwards (FIG.1 and 2)
and facing the head. (FIG. 3 and 4).
• With yo ur free hand, take hold of the tip of the s ection of hair and place
it on the opening, in the funnel situated between the two handles
(FIG.5).
Note: To prevent the appliance from blocking, ensure that you have no
hair lying across the edges.
Also ensure that you are not pulling your hair before activating the
handles (FIG. 6 and 7).
If these precautions are not respected, you risk catching your hair
in the appliance.
Caution: never touch the inside of the cylinder when the appliance is
heating.
• On ce the section of ha ir is in place, close the han dles to allow the hair to
automatically enter into the appliance.
• Keep the handles closed until the beeping stops (after 3, 4 or 5 beeps
depending on the selected time setting, see the table above) (FIG.8).
• Gently release the hair from the appliance by opening the handles
(FIG.9). Don’t pull on the appliance to free the hair. If you do this you
will ruin the curl eec t.
• Allow your hair to cool before handling or combing it.
• Repeat all over the head until you have the number of curls you would
like.
• After use, switch o and unplug the appliance. Allow to cool before
storing away.
Protection system
The appli ance is tted with a pro tection syste m. If hair becomes t angled,
the appliance emits an audible signal, it blocks and stops heating.
If this occurs, release the handles, ensuring that the appliance and
sectio n of hair are correctl y positioned, the n simply re-clos e the handles
to deactivate the security system and re-start the appliance.
Sleep mode
If the appliance is not in use for more than 20 minutes, the temperature
will automatically reduce to 150°C. If you wish to continue using the
appliance after this time, simply close then release the handles and the
appliance will return to the temperature setting previously selected.
18_C1225E_IB.indd 9 16/07/18 11:31
9

Automatic shut o
If the appliance is left switched on for more than 60 minutes at a time, it
will automatically shut o.
CLEANING AND MAINTENANCE
In order to prevent build-up of residue from hair products which would
prevent the appliance from working properly, it is important to use the
cleaning tool provided to regularly clean the appliance.
• Ensure the appliance is switched o, unplugged and cool.
• Lightly dampen the cleaning tool with warm water and mild soap.
• Insert the tool fully into the cavity formed by the appliance and the
cylinder (FIG . 10).
• Rotate the tool several times around the cylinder to remove any buildup of hair products ( FI G. 11) .
• Remove the cleaning tool from the cavity.
• Ensure the appliance is completely dr y before reusing.
• The cleaning tool can be reused many times. Simply remove the felt
pad, rinse it in warm soapy water and leave to dry before reusing.
Once unplugged and cooled, the appliance housing may be wiped with
a damp cloth. Ensure the appliance is completely dr y before plugging
it in again.
18_C1225E_IB.indd 10 16/07/18 11:31
10

DEUTSCH
Mit dem Curl Secret® von BaByliss kreieren Sie mühelos schöne Locken,
die außergewöhnlich lange halten. Vergessen Sie alle aufwändigen
Techniken und Handbewegungen! Mit dem Curl Secret® gelingen Ihnen
Locken dank einer genialen Automatik.
Bitte lesen Sie vorher die Sicherheitshinweise.
EIGENSCHAFTEN DES PRODUKTS
- Zylinder mit Keramikbeschichtung (1)
- Schnelles Aufheizen (max. 230 °C)
- Ein-/Ausschalter (2)
- 6 Tempera turs tufen: 18 0-190-200-210 -220 -230 °C (3)
- 3 Einstellungen der Heizdauer (8, 10 und 12 Sekunden) mit Lautsignal
für unterschiedliche Lockenarten (4)
- Einstellung der Lockenrichtung R /L/A (Rechts / Links / Auto) (5)
- Ionic-Technologie: Glanz und antistatische Ladung
- LCD-Display (6): präzise Angabe der verschiedenen Einstellungen:
Temperatur (a), Heizdauer (b) und Lockenrichtung (c)
- Automatische Abschaltfunktion
- Drehkabel (7)
- Reinigungsinstrument (8)
GEBR AUCH
Anmerkungen
• Beim ersten Gebrauch kann es sein, dass Sie einen besonderen Geruch
wahrnehmen: D as ist normal und wird scho n bei der nächsten Anwen dung
verschwunden sein.
• Bei jedem Gebrauch kann sich etwas Dampf entwickeln. Dies kann daran
liegen, dass Talg oder Rückstände von Haarprodukten (Pegemittel,
die nicht ausgespült werden, Haarlack,...) oder die im Haar enthaltene
Feuchtigkeit verdunsten.
• Durch die zusätzliche Verwendung eines Hitzeschutzsprays können Sie Ihr
Haar optimal schonen.
• Der Ionengenerator im Inneren des Geräts setzt Ionen frei, deren
antistatische Wirkung dem Haar Geschmeidigkeit und Glanz verleihen.
Anmerkung: Wenn Sie ein leises Brummen hören, ist das ganz normal: Das
ist das charakte ristische Geräusch des Ione ngenerators.
18_C1225E_IB.indd 11 16/07/18 11:31
11
• Schließen Sie das Gerät an und schalten Sie es ein.
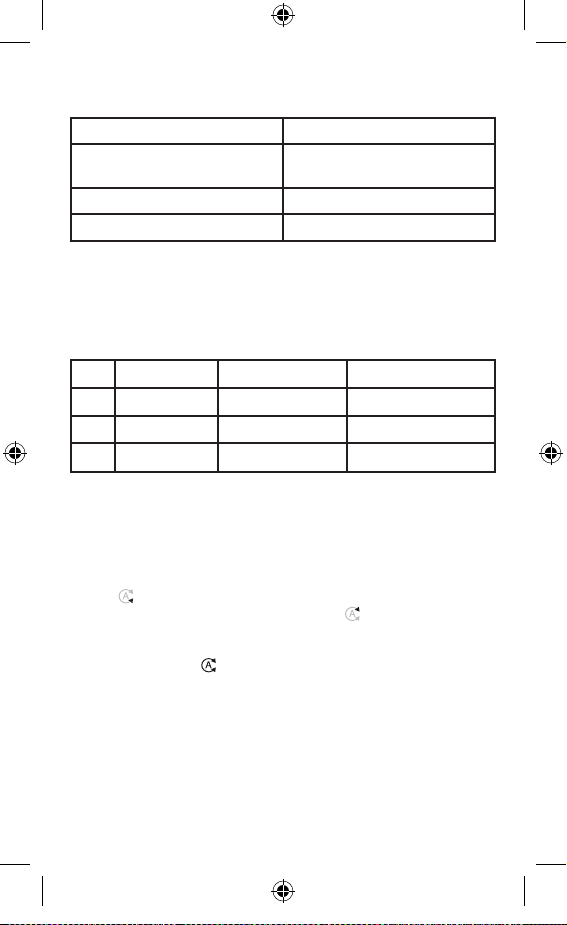
• Wählen Sie die Temperatur je nach der Beschaenheit Ihrer Haare:
Temperatur Haartyp
180 °C - 190 °C
Feines, ausgebleichtes und/oder
strapaziertes Haar
200 °C - 210 °C Normales oder gefärbtes Haar
220 °C - 230 °C Dickes Haar
• Die gewählte Temperatur blinkt auf dem LCD-Display, bis die
Temperatur erreicht ist. Das Gerät ist nun einsatzbereit.
• Wählen S ie die Einstellung für di e Heizdauer je nach dem gewünschte n
Eekt. Für leichte Locken wählen Sie die niedrigste Heizdauer. Für
stärkere Locken wählen Sie die maximale Heizdauer. Orientieren Sie
sich an der unten stehenden Tabelle:
Dauer Lautsignal Gewünschter Eekt
8 8 Sekunden 3 Pieptöne Wellen
10 10 Sekunden 4 Pieptöne Sanfte Locken
12 12 Sekunden 5 Pieptöne Starke Locken
Achtung: Das Aufheizen wird jeweils durch vier schnell
aufeinanderfolgende Pieptöne abgeschlossen. Danach kann der Gri
losgelassen werden.
• Wählen Sie die Einstellung der Lockenrichtung entsprechend dem
gewünschten Ergebnis:
- Für eine gleichmäßig denierte, ießende Frisur stellen Sie das Gerät
auf , um Locken auf der linken Kopf seite zu erzeugen. Stellen Sie das
Gerät anschließend auf , um Locken auf der rechten Kopfseite zu
erzeugen.
- Für sanf tere, natürli chere Locken ste llen Sie das Gerät a uf „automatisc h“
. Mithilfe dieser Einstellung können abwechselnd Locken in einer
Richtung und dann in der Gegenrichtung erzeugt werden.
18_C1225E_IB.indd 12 16/07/18 11:31
12

Sicherheitshinweise für den Gebrauch
• Vergewissern Sie sich, dass das Haar trocken ist.
• Stecken Sie die obere Haarschicht mit einer Klemme hoch und
beginnen Sie damit, die untere Haarschicht zu bearbeiten.
• Teilen S ie eine höchstens 3 cm b reite Haarsträh ne ab und entknoten Si e
sie mit einem Kamm.
• Führen Sie das Gerät an Ihre Haare und legen Sie es korrekt an: Der
durch den Zylinder gebildete Spalt zeigt nach unten (ABB. 1 und 2)
und zum Kopf hin. (ABB. 3 un d 4).
• Ergreifen Sie mit Ihrer f reien Hand die Spitze der Strähne und legen Sie
sie in die trichterförmige Önung zwischen den beiden Grien (ABB. 5).
Hinweis: Um Blockierungen des Geräts zu vermeiden,
vergewissern Sie sich, dass keine Haare an den Seiten überstehen.
Achten Sie auße rdem darauf, dass Sie nicht an den Haaren z iehen, bevor
Sie die Grie betätigen (ABB. 6 und 7).
Werden diese Maßnahmen nicht beachtet, kann dies dazu führen,
dass sic h Ihre Haare im Gerät verheddern.
Achtung: Niemals die Innenseite des Zylinders berühren, solange das
Gerät aufheizt.
• Wenn die Strähne ko rrekt platz iert ist, drü cken Sie die Grie zus ammen,
sodass die Strähne automatisch erfasst werden kann.
• Halten Sie das Gerät in dieser Position, bis das Lautsignal ertönt.
(Warten Sie je nach gewählter Einstellung 3, 4 oder 5 aufeinander
folgende Pieptöne ab, siehe oben stehende Tabelle.).(ABB. 8)
• Önen Sie danach das Gerät, indem Sie die Grie loslassen, und
entnehmen Sie die Locke vorsichtig (ABB. 9). Ziehen Sie nicht am
Gerät, um die Strähne freizugeben. Dabei würde der Lockeneekt
verloren gehen.
• Warten Sie vor dem weiteren Bearbeiten oder Kämmen, bis die Locke
abgekühlt ist.
• Wiederholen Sie den Vorgang mit den restlichen Strähnen, bis die
gewünschte Anzahl an Locken erreicht ist.
• Na ch Gebrauch das Ger ät ausschalten und den N etzstecker z iehen. Vor
dem Verstauen abkühlen lassen.
Schutzvorrichtung
Das Gerät ist mit einer Schutzvorrichtung versehen. Falls sich das Haar
verheddert, ertönt ein Lautsignal, das Gerät kommt zum Stillstand und
heizt nicht weiter.
Sollte dies d er Fall s ein, l ass en Sie d ie Gr i e los , verg ewis ser n Sie s ich, d ass da s
13
18_C1225E_IB.indd 13 16/07/18 11:31

Gerät und d ie Strähne ko rrek t platzi ert sin d, und drü cken Sie ansc hließe nd
die Grie einfach wieder zusammen, um das Sicherheitssystem
zu deaktivieren und das Gerät wieder in Betrieb zu nehmen.
Standby-Modus
Wenn das Gerät länger als 20 Minuten nicht verwendet wird, sinkt seine
Temperatur automatisch auf 150°C ab. Wenn Sie nach dieser Ruhephase
mit der Anwendung fortfahren möchten, drücken Sie einfach die
Grie des Geräts zusammen und lassen Sie sie wieder los. Danach erreicht
das Gerät wieder die Temperatur, die Sie gewählt haben.
Automatische Abschaltfunktion
Wenn das Gerät länger als 60 Minuten ununterbrochen eingeschaltet
bleibt, schaltet es sich automatisch aus.
REINIGEN UND PFLEGEN
Um zu vermeiden, dass sich Rückstände von Haarprodukten
ansammeln, die das einwandfreie Funktionieren des Geräts
beeinträchtigen könnten, ist es wichtig, das Gerät regelmäßig mit dem
beiliegenden Reinigungsinstrument zu säubern.
• Vergewissern Sie sich, dass das Gerät ausgeschaltet und abgekühlt ist
und der Netzstecker gezogen wurde.
• Tauchen Sie das R einigungsinstrum ent vorsichtig in heiße S eifenlauge.
• Führen Sie das Instrument in den Spalt zwischen Gerät und Zylinder ein
(AB B. 10).
• Führen Sie mit dem Instrument mehrere kreisförmige Bewegungen
um den Zylinder aus, um Rückstände von Haarprodukten vollständig
zu entfernen (A BB . 11).
• Ziehen Sie das Reinigungsinstrument danach aus dem Spalt.
• Das Gerät muss vollständig getrocknet sein, bevor es erneut in Betrieb
genommen werden kann.
• Das Reinigungsinstrument kann immer wieder verwendet werden.
Einfach den Filzbelag abnehmen, in Seifenlauge auswaschen und vor
der erneuten Verwendung trocknen lassen.
Das Gehäuse des Geräts kann mit einem feuchten Tuch abgewischt
werden, sobald das Gerät abgekühlt ist und der Netzstecker gezogen
wurde. Vergewissern Sie sich, dass es vollständig getrocknet ist, bevor
Sie es erneut an den Netzstrom anschließen.
18_C1225E_IB.indd 14 16/07/18 11:31
14

NEDERLANDS
Maak met de Cur l Secret® van BaB yliss prachtige kr ullen die uitzon derlijk
lang blijven zitten. Geen eentonige handelingen en gedraai, de Curl
Secret® maakt automatisch zelf krullen dankzij een ingenieus systeem.
Raadpleeg voor gebruik de veiligheidsinstructies.
PRODUCTEIGENSCHAPPEN
- Cilinder met Ceramic-bekleding (1)
- Snel op temperatuur (max. 230 °C)
- Aan-uitschakelaar (2)
- 6 temp erat uurni veaus : 180-19 0-200 -210-22 0-230 °C (3)
- 3 instellingen voor de verwarmingstijd met geluidssignaal (8, 10 en 12
seconden) om verschillende soorten krullen te creëren (4)
- Instelling van de krulrichting R /L/A (Rechts / Links / Auto) (5)
- Ionentechnologie: glans en antistatisch
-Lcd-scherm (6): nauwkeurige weergave van de verschillende
instellingen: temperatuur (a), verwarmingsduur (b) en krulrichting (c)
- Automatische uitschakeling
- Draaisnoer (7)
- Reinigingshulpstuk (8)
GEBRUIK
Opmerkingen
• Het is mogelijk dat u een spe cieke geur waarneemt bij het eerste gebruik:
dit komt vaak voor e n zal bij het volgende gebr uik verdwijnen.
• Tijdens elk gebruik is een lichte rookontwikkeling mogelijk. Dit kan te
wijten zijn aan de verdamping van talg of van restjes haarproducten
(leave-i n conditioner, haarlak en z.) of aan het in het haa r aanwezige vocht.
• U kunt een spray gebruiken om het haar optimaal tegen warmte te
beschermen.
• D e antistatische werking van d e ionengenerator in h et apparaat zorgt voo r
zachte en stralende krullen. NB: Het is normaal als u een zacht geluid hoort
dat lijkt o p gekraak: dat is het kenme rkende geluid van de ionen generator.
18_C1225E_IB.indd 15 16/07/18 11:31
15
• Stop de stekker in het stopcontact en zet het apparaat aan.
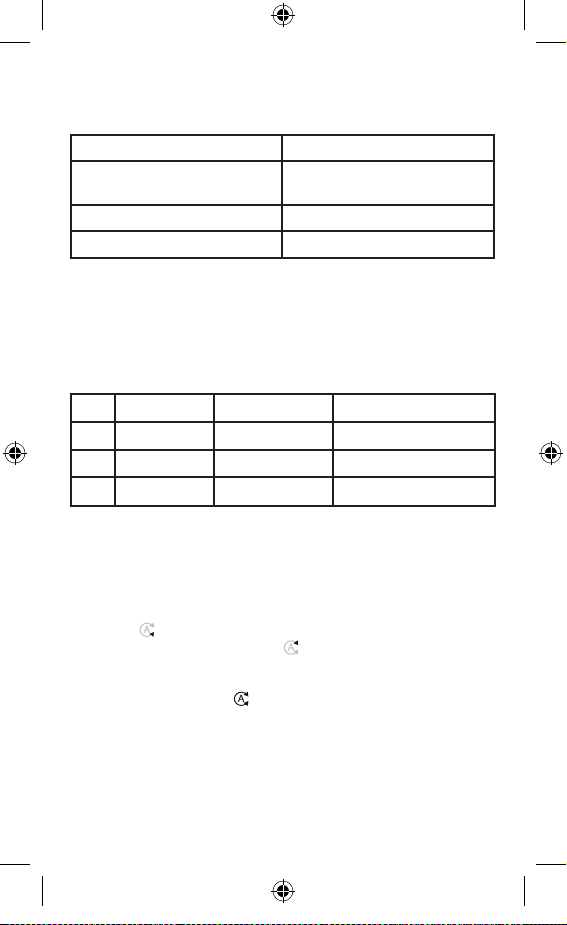
• Selecteer de temperatuur afhankelijk van uw haartype:
Temperatuur Haartype
180 °C - 190 °C Fijn, ontkleurd en/of overgevoe-
lig haar
200 °C - 210 °C Normaal of gekleurd haar
220 °C - 230 °C Dik haar
• De gekozen temperatuur knippert op het lcd-scherm totdat deze
temperatuur bereikt is. Het apparaat is nu klaar voor gebruik.
• Stel de verwarmingstijd in, al naar gelang het gewenste resultaat. Voor
luchtige krullen kiest u de minimale verwarmingstijd. Voor stevigere
krullen k ies u de maximale duur. Zie onderstaande tabel:
Tijdsduur Geluidssignaal Gewenst eect
8 8 seconden 3 geluidssignalen Golvende krullen
10 10 seconden 4 geluidssignalen Soepele, losse krullen
12 12 seconden 5 geluidssignalen Stevige krullen
Opgelet: Zodra het apparaat op temperatuur is, hoort u vier snelle,
opeenvolgende piepjes. Daarna kunt u de handgreep loslaten.
• Selecteer de instelling voor de krulrichting afhankelijk van het
gewenste resultaat:
- Voor een gelijkmatig en verjnd kapsel stelt u het apparaat in op de
stand om de krullen aan de linkerkant van het hoofd te maken.
Stel het apparaat vervolgens in op de stand om de krullen aan de
rechterkant van het hoofd te maken.
- Voor een soepeler en natuurlijker kapsel stelt u het apparaat in op de
automatische stand . Met de ze instelling kunt u af wisselend krullen
maken in de ene richting en vervolgens in de tegenovergestelde
richting.
Voorzorgsmaatregelen bij gebruik
• Zorg ervoor dat het haar droog is.
• Zet het bovenste haar vast met een clip en begin onderaan met het
krullen van het haar.
• Neem een pluk haar van maximaal 3 cm breedte. Kam de pluk
voorzichtig uit.
16
18_C1225E_IB.indd 16 16/07/18 11:31

• Breng het apparaat naar het haar toe en plaats het in de juiste richting:
de holte die gevormd wordt door de cilinder naar beneden (FIG.1 en 2)
en naar het hoofd gericht. (FIG. 3 e n 4).
• Pak met uw vrije hand de pluk bij de punt vast en leg deze op de
trechtervormige opening tussen de twee handvatten (FIG. 5).
NB: Zorg ervoor dat de haren er niet aan de zijkanten
uitsteken om te voorkomen dat het apparaat blokkeert.
Trek ook niet aan uw haren voordat u de handvatten sluit (FIG. 6 en 7).
Als deze voorzorgsmaatregelen niet worden nageleefd, loopt u het
risico dat uw haar in de war komt t e zitten in het ap paraat.
Opgelet: raak nooit de binnenkant van de cilinder aan als het apparaat
warm is.
• Als de pluk goed geplaatst is, kunt u de handgrepen van het apparaat
sluiten, waarna de lok automatisch opgerold wordt.
• Houd het apparaat in dezelfde stand totdat het geluidssignaal klinkt
(na 3, 4 of 5 opeenvolgende piepjes, afhankelijk van de gekozen
instelling, zie tabel hierboven).(FIG.8)
• Laat de handgrepen los en haal de krul er voorzichtig uit (FIG.9).
Trek niet aan het apparaat om de lok los te halen. Dan verliest de lok
namelijk zijn krul.
• Wacht tot het haar is afgekoeld voordat u de krul gaat bewerken of
doorkammen.
• Herha al deze handeling me t de rest van het haar, totdat u de ge wenste
hoeveelheid krullen heeft.
• Na gebruik het apparaat uitzetten en de stekker uit het stopcontact
halen. Laat het apparaat goed afkoelen voordat u het opbergt.
Beschermingssysteem
Het apparaat is uitgerust met een beschermingssysteem. Als de haren
in de war komen te zitten, hoort u een geluidssignaal, het apparaat
blokkeert en stopt met verwarmen.
Als dit gebeurt, dient u de handvatten los te laten en ervoor te zorgen
dat het appa raat en de haarlok go ed geplaatst zij n. Vervolgens kunt u d e
handvatten weer indrukken om het veiligheidssysteem te deactiveren
en het apparaat weer te gebruiken.
Stand-by stand
Wanneer het apparaat langer dan 20 minuten niet gebruikt is, daalt de
temperatuur automatisch naar 150 °C. Wanneer u het apparaat opnieuw
wilt gebruiken, hoeft u slechts de handgrepen dicht te knijpen en weer
los te laten om terug te keren naar de gekozen temperatuur.
17
18_C1225E_IB.indd 17 16/07/18 11:31

Automatische uitschakeling
Wanneer het apparaat langer dan 60 minuten achter elkaar aan staat,
gaat hij automatisch uit.
ONDERHOUD EN REINIGING
Om te voorkomen dat stylingproducten zich ophopen en het goed
functioneren van het apparaat verhinderen, is het belangrijk om het
meegeleverde reinigingshulpstuk te gebruiken voor regelmatige
reiniging van het apparaat.
• Zorg dat het apparaat uit staat en afgekoeld is, en dat de stekker uit
het stopcontact is.
• Doop het reinigingshulpstuk voorzichtig in een warm sopje van milde
zeep.
• Steek het reinigingshulpstuk in de holte die gevormd wordt door het
apparaat en de cilinder (FI G. 10).
• Draai het reinigingshulpstuk meerdere malen rondom de cilinder om
alle restjes van stylingproducten te verwijderen (F IG . 11).
• Haal dan het reinigingshulpstuk weer uit de holte.
• Zorg dat het apparaat helemaal droog is voordat u het opnieuw
gebruikt.
• Het r einigingshulpstuk k an vele malen gebru ikt worden. U hoef t alleen
het viltblokje te verwijderen, in zeepsop af te spoelen en te laten
drogen voordat u het opnieuw gebruikt.
De buitenkant van het apparaat kan worden afgeveegd met een
vochtig doekje, wanneer het apparaat is afgekoeld en de stekker uit het
stopcontact is. Zorg dat het apparaat helemaal droog is voordat u het
opnieuw aanzet.
18_C1225E_IB.indd 18 16/07/18 11:31
18

ITALIANO
Grazie a Curl Secret® di BaByliss, creerete, nel massimo comfort,
splendidi riccioli dalla tenuta eccezionale. Nessuna manipolazione
fastidiosa, nessun movimento da eseguire; Curl Secret® crea i riccioli
grazie all’ingegnoso sistema automatico.
Leggere prima le istruzioni di sicurezza.
CARATTERISTICHE DEL PRODOTTO
- Cilindro con rivestimento in ceramica (1)
- Temperatura raggiunta rapidamente (max. 230 °C)
- Interruttore On-O (2)
- 6 livelli di temperatura: 180-190-200-210-220-230°C (3)
- 3 regolazioni della durata di riscaldamento (8, 10 e 12 secondi) con
segnale acustico per creare diversi tipi di ricci (4)
- Regolazione della direzione del riccio R/L/A (Destra / Sinistra / Auto) (5
- Tecnologia ionica: brillantezza e anti-staticità
-Schermo LCD (6): indicazione precisa delle diverse regolazioni:
temperatura (a), durata di riscaldamento (b) e direzione del riccio (c)
- Arresto automatico
- Cavo avvolgibile (7)
- Attrezzo per la pulizia (8)
UTILIZZO
Osservazioni
• Al primo utilizzo, si potrebbe percepire un odore particolare: è normale e
scomparirà all ’utilizzo successivo.
• Durante ogni utilizzo, è possibile che fuoriesca del fumo. eventualmente
dovuta all’evaporazione del sebo, a un residuo dei prodotti per i capelli
(trattamento senza risciacquo, lacca, ...) o all’umidità contenuta nel
capello stess o.
• È possibile utilizzare uno spray protettivo contro il calore per una
protezione o ttimale della capig liatura.
• Il generatore di ioni posto all’interno dell’apparecchio libera degli ioni
la cui azione antistatica rende i capelli morbidi e brillanti. Attenzione: è
assolutamente normale sentire un leggero rumore simile a un fruscio: è
caratteristico d el generatore di ioni.
18_C1225E_IB.indd 19 16/07/18 11:31
19
• Attaccare l’apparecchio alla corrente e accendere.
• Selezionate la temperatura secondo la natura dei vostri capelli:
Temperatura Tipo di capello
180°C - 190°C Capelli sottili, decolorati e/o
sensibili
200°C - 210°C Capelli normali o colorati
220°C - 230°C Capelli spessi
• La temperatura selezionata lampeggia sullo schermo LCD no al
raggiungimento. L’apparecchio è pronto all’uso.
• Selezionare la regolazione della durata di riscaldamento in funzione
dell’eet to desiderato. Per riccio li leggeri, scegli ere la durata minima di
riscaldamento. Per riccioli più pronunciati, scegliere la durata massima.
Fare riferimento alla tabella seguente:
Durata Segnale acustico Eetto desiderato
8 8 secondi 3 bip Ondulazioni
10 10 secondi 4 bip Riccioli morbidi
12 12 secondi 5 bip Riccioli pronunciati
Attenzione: ogni durat a di riscaldamento si ch iude con una succession e
di 4 bip rapidi al termine dei quali l’impugnatura può essere rilasciata
• Selezionare la regolazione della direzione del riccio in base al risultato
desiderato:
- Pe r un’acconciatura unifo rme e più sosticat a, regolare l’app arecchio in
posizione per o ttenere dei ricci sul l ato sinistro della test a. Regolare
quindi l’apparecchio in posizione per realizzare dei ricci sul lato
destro della testa.
- Per un’acconciatura più morbida e naturale, regolare l’apparecchio
in posizione automatica e creare ricci in entrambe le direzioni,
alternandole.
Precau zioni per l’util izzo
• Accertare che i capelli siano asciutti.
• Raccogliere i capelli da sopra con una pinza e iniziare a lavorarli da
sotto.
• Selezionare una ciocca di capelli della larghezza massima di 3 cm.
20
18_C1225E_IB.indd 20 16/07/18 11:31
Districarla accuratamente con un pettine.
• Avvicinare l’apparecchio ai capelli e posizionarlo nella direzione
corretta, cioè con la cavità formata dal cilindro rivolta verso il basso
(FIG.1 e 2) e davanti alla testa. (FIG . 3 e 4).
• Con la mano libera, prendere la punta della ciocca e posizionarla
sull’apertura a imbuto situata tra le due impugnature (FIG.5).
NB: per evitare il blocco dell’apparecchio, accertare che i capelli non
fuoriescano sui lati.
Prestare inoltre attenzione a non tirare i capelli prima di azionare le
impugnature (FIG. 6 e 7).
Se tali precauzioni non sono rispettate, i capelli potrebbero
impigliarsi nell’apparecchio.
Attenzione: non toccare mai l’interno del cilindro quando l’apparecchio
è in fase di riscaldamento.
• Dopo aver posizion ato corret tamente l a ciocca, ch iudere le i mpugnatur e
dell’apparecchio in modo da agganciare automaticamente la ciocca.
• Tenere l’apparecchio nella stessa posizione no all’emissione del
segnale acustico (dopo i 3, 4 o 5 bip consecutivi che seguono la
regolazione selezionata, vedere tabella precedente ).(FIG.8)
• Aprire quindi l’apparecchio lasciando le impugnature e liberare
delicatamente il riccio (FIG.9). Non tirare l’apparecchio per liberare la
ciocca, Così facendo, infatti, la ciocca perderebbe l’arricciamento.
• Prima di trattare o pettinare i ricci, attendere che i capelli si siano
rareddati.
• Ripetere il gesto sulla parte restante dei capelli no a ottenere la
quantità di ricci desiderata.
• Dopo l’utilizzo, spegnere e staccare l’apparecchio dalla corrente.
Lasciare rareddare prima di riporre.
Sistema di protezione
L’apparecchi o è dotato di sistema di pro tezione. Se i cape lli si impigliano,
l’apparecchio emette un segnale acustico, si blocca e interrompe il
riscaldamento.
In tal caso, lasciare le impugnature, accertare che l’apparecchio
e la ciocca siano posizionati correttamente, quindi richiudere
semplicemente le impugnature per disattivare il sistema di sicurezza e
riavviare l’apparecchio.
Modalità stand-by
Se l’apparecchio resta inutilizzato per oltre 20 minuti, la temperatura
scenderà automaticamente a 150°C. Per riutilizzarlo dopo tale intervallo
21
18_C1225E_IB.indd 21 16/07/18 11:31

di tempo, premere semplicemente le impugnature e rilasciarle;
l’apparecchio sarà alla temperatura selezionata.
Spegnimento automatico
Se resta acceso ininterrottamente per oltre 60 minuti, l’apparecchio si
arresta automaticamente.
MANUTENZIONE E PULIZIA
Per prevenire l’accumulo di prodotti per i capelli che potrebbero
compromettere il corretto funzionamento, è importante pulire
regolarmente l’apparecchio utilizzando l’apposito strumento in
dotazione.
• Accertare che l’apparecchio sia spento, staccato e freddo.
• Inse rire delicatamen te l’attrezzo per la p ulizia in acqua calda me scolata
a sapone neutro.
• Inserire lo strumento nella cavità formata da apparecchio e cilindro
(FIG. 10).
• Eseguire più rotazioni con l’attrezzo attorno al cilindro per rimuovere
qualsiasi traccia di prodotti per i capelli ( FI G. 11).
• Ritirare quindi l’attrezzo per la pulizia dalla cavità.
• L’apparecchi o deve essere completa mente asciutto prim a del riutilizzo.
• Lo strumento di pulizia può essere utilizzato un elevato numero di
volte. E’ suciente rimuovere semplicemente il tampone in feltro,
risciacquarlo in acqua insaponata e lasciarlo asciugare prima del
riutilizzo.
Dopo che l’apparecchio è rareddato e staccato dalla corrente, la
struttura esterna può essere pulita con un panno umido. Prima di
riattaccarlo, vericare che sia perfettamente asciutto.
18_C1225E_IB.indd 22 16/07/18 11:31
22
 Loading...