

Page 1
Made in China
Page 2
5
6
4
2
3
1
1.
3.
5.
7.
BABYLISS SARL
99 avenue Aristide Briand
92120 Montrouge - France
www.babyliss.com
2.
4.
6.
8.
Page 3

FRANÇAIS
Avec le Curl Secret® IONIC de BaByliss, créez en total confort de belles
boucles d’une tenue exceptionnelle. Pas de manipulation fastidieuse, pas
de mouvement à e ectuer, le Curl Secret® IONIC réalise les boucles grâce
à son ingénieux système automatique.
Consulter au préalable les consignes de sécurité.
CARACTERISTIQUES DU PRODUIT
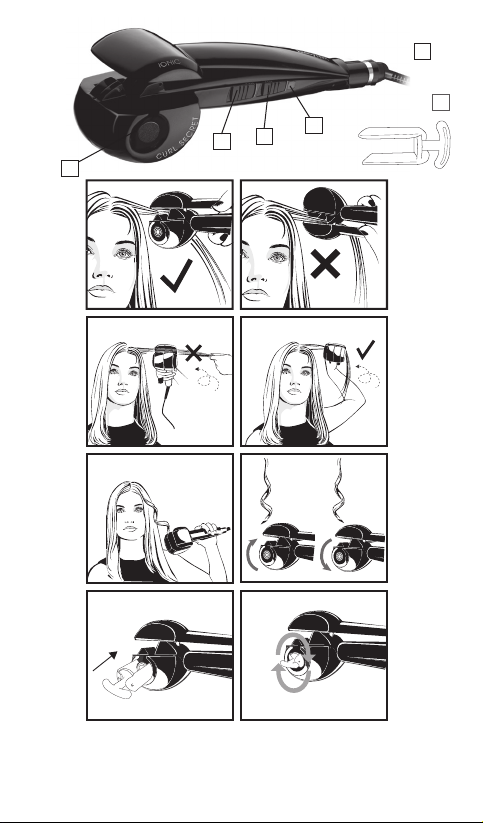
• Revêtement Ceramic (1)
• Mise à température rapide (max. 230 °C)
• Interrupteur 0-I-II : 2 niveaux de température - 210 °C (I) - 230 °C (II) (2)
• 3 réglages de la durée de chau e (8, 10 et 12 secondes) avec signal
sonore pour créer di érents types de boucles (3)
• Technologie ionique : brillance et anti-statique
• Témoin lumineux de fonctionnement (LED) (4)
• Arrêt automatique
• Cordon rotatif (5)
• Outil de nettoyage (6)
UTILISATION
Remarques
• A la première utilisation, il est possible que vous perceviez une odeur
particulière : ceci est fréquent et disparaîtra dès la prochaine utilisation.
• Au cours de chaque utilisation, une légère émanation de fumée est possible.
Ceci peut être dû à de l’évaporation de sébum ou d’un reste de produits
capillaires (soin sans rinçage, laque, ...) ou de l’humidité contenue dans le
cheveu.
• Il est possible d’utiliser un spray de protection contre la chaleur pour une
protection optimale de la chevelure.
• Le générateur d’ions placé à l’intérieur de l’appareil libère des ions dont
l’action anti-statique rend les cheveux doux et brillants. A noter : Il est tout
à fait normal d’entendre un léger bruit semblable à un grésillement : c’est le
bruit caractéristique du générateur d’ions.
• Branchez l’appareil et allumez-le en sélectionnant la température désirée
grâce à l’interrupteur 0-I-II. Voir tableau ci-dessous :
Température Type de cheveux
(I) : 210°C Cheveux ns, décolorés et/ou sensibilisés
(II) : 230°C
Cheveux normaux, épais
ondulés, frisés et/ou colorés
3
Page 4

• Le témoin lumineux s’allume et clignote.
• Le témoin lumineux cesse de clignoter quand la température
sélectionnée est atteinte. L’appareil est alors prêt à l’emploi; le témoin
reste allumé.
• Sélectionnez le réglage de la durée de chaue selon l’eet souhaité.
Pour des boucles légères, choisissez la durée de chaue minimale. Pour
des boucles plus serrées, choisissez la durée maximale. Référez-vous au
tableau ci-dessous :
Durée Signal sonore Eet souhaité
8 8 secondes 3 bips sonores Ondulations
10 10 secondes 4 bips sonores Boucles souples
12 12 secondes 5 bips sonores Boucles serrées
• Assurez-vous que les cheveux sont propres, secs et parfaitement
démêlés.
• Relevez les cheveux du dessus avec une pince et commencez à travailler
les cheveux du dessous.
• Sélectionnez une mèche de cheveux d’une largeur de 3 cm maximum.
Démêlez-la à l’aide d’un peigne.
• Positionnez l’appareil sur la mèche de cheveux, le cylindre tourné en
direction de la tête (FIG 1, 2).
• La mèche de cheveux doit être maintenue bien droite et placée au centre
de l’appareil, entre les deux poignées.
• Une fois l’appareil bien en place, fermez les poignées de l’appareil pour
permettre à celui-ci d’attraper la mèche automatiquement.
Attention : Si vous maintenez toujours la pointe de la mèche à l’aide
de votre main après avoir refermé les poignées, l’appareil s’arrêtera
et émettra un signal sonore (bip) pour vous avertir de relâcher la
tension exercée par votre main (FIG 3, 4).
Si vous avez pris une mèche de cheveux trop large (supérieure à 3
cm) ou si la mèche n’est pas correctement positionnée au centre
de l’appareil, l’appareil s’arrêtera et émettra un signal sonore (bip)
indiquant un problème. Ce système permet d’éviter que des noeuds
se forment dans vos cheveux.
• Maintenez l’appareil dans la même position jusqu’à ce que le signal
sonore retentisse (après les 3, 4 ou 5 bips consécutifs suivant le réglage
sélectionné, voir tableau ci-dessus).
• Ouvrez ensuite l’appareil en relâchant les poignées puis libérez la boucle
délicatement. Ne tirez pas sur l’appareil pour libérer la mèche. Celle-ci
perdrait son aspect bouclé (FIG 5).
4 5
Page 5

• Attendez que les cheveux aient refroidi avant de travailler ou de peigner
les boucles.
• Continuez le geste sur le reste de la tête jusqu’à obtention du nombre
de boucles souhaité.
NB : L’appareil est muni d’un système automatique créant des boucles
dans un sens puis dans le sens opposé en alternance pour un résultat
plus naturel (FIG 6).
• Après utilisation, éteignez et débranchez l’appareil. Laissez refroidir
avant de le ranger.
Mode veille
Si l’appareil n’est pas utilisé pendant plus de 20 minutes, la température
de l’appareil va automatiquement descendre à 150°C. Si vous souhaitez
utiliser à nouveau l’appareil, passé ce délai, pressez simplement les
poignées de l’appareil puis relâchez-les ; ainsi l’appareil sera à la
température que vous aviez sélec tionnée.
Arrêt automatique
Si l’appareil e st allumé penda nt plus de 60 minutes en co ntinu, il s’arrêtera
automatiquement.
ENTRETIEN ET NETTOYAGE
An de prévenir l’accumulation de produits coiants qui pourrait
empêcher le bon fonctionnement de l’appareil, il est important d’utiliser
l’outil de nettoyage fourni pour nettoyer régulièrement l’appareil.
• Assurez-vous que l’appareil est éteint, débranché et refroidi.
• Plongez doucement l’outil de nettoyage dans l’eau chaude mélangée à
un savon doux.
• Insérez l’outil dans la cavité formée par l’appareil et le cylindre (FIG 7).
• Eectuez plusieurs rotations avec l’outil autour du cylindre pour ôter
toute trace de produits coiants (FIG 8).
• Retirez ensuite l’outil de nettoyage de la cavité.
• L’appareil doit être totalement sec avant d’être utilisé à nouveau.
• L’outil de nettoyage peut être utilisé un grand nombre de fois. Il sut
simplement de retirer le tampon en feutre, de le rincer dans de l’eau
savonneuse et de le laisser sécher avant de le réutiliser.
La coque de l’appareil peut-être essuyée à l’aide d’un chion humide, une
fois l’appareil froid et débranché. S’assurer qu’il est parfaitement sec avant
de le brancher à nouveau.
5
Page 6

ENGLISH
With the BaByliss Curl Secret® IONIC styler, easily create beautiful curls
with long-lasting eect. No tedious handling, no complicated move, the
Curl Secret® IONIC makes gorgeous curls thanks to its clever automatic
system.
Read the safety instructions rst.
PRODUCT FEATURES
• Ceramic coating (1)
• Fast heat up (max. 230 °C)
• 0-I-II switch : 2 heat settings - 210 °C (I) - 230 °C (II) (2)
• 3 timer settings (8, 10 and 12 seconds) with audio beep indicator for
various curl eects (3)
• Ionic technology : shine and antistatic
• Operated indication light (LED) (4)
• Automatic shut o
• Swivel cord (5)
• Cleaning tool (6)
USE
Note:
• When using the unit for the rst time, you might notice a little smoke and a
distinct odour: this is common and will disappear in the following use.
• When using the unit, you might see some steam. Do not be concerned, this
could be because of evaporation of the sebum, some residual hair products
(leave-in hair care, hairspray, etc.) or excess water that is evaporating from
your hair.
• It is possible to use a heat protection spray for optimal protection of the
hair.
• The ionic generator inside the unit releases frizz-controlling ions on to the
hair to give a smooth, shiny nish when styling. Note: There will be a slight
buzzing sound from the styler which is from the ionic generator releasing
the ions. This is normal.
• Plug in the appliance, switch on and select the desired temperature
using the 0-I-II switch. See table below :
Temperature Hair type
(I) : 210°C Fine, lightened and/or damaged hair
(II) : 230°C Normal, thick, wavy, curly and/or coloured hair
6 7
Page 7

• The indicator light comes on and will start to ash.
• The indicator light will stop ashing when the appliance has heated
up to the selected temperature. The appliance is now ready to use; the
indicator light will stay on.
• Select the time setting depending on the desired curl eect. For loose
curls, select the minimal time setting. For more dened curls, select the
maximal time setting. Please refer to the table below :
Time Audio beep indicator Curl eect
8 8 seconds 3 beeps Loose waves
10 10 seconds 4 beeps Soft curls
12 12 seconds 5 beeps Dened curls
• Ensure the section of hair is clean, dry and perfectly combed through.
• Clip the upper laye rs to the top of your head to wor k rst with the layers
underneath.
• Separate a section of hair no bigger than 3 cm. Ensure the section is
combed through.
• The appliance must be positioned into the hair with the c ylinder facing
towards the head. (FIG 1, 2).
• The hair section must be straight and placed neatly through the centre
of the appliance, between the handles.
• Once the hair is in place, close the handles to allow the hair to be
automatically taken into the appliance.
Note : If you continue to hold the hair section after closing the
handles then the styler will stop and beep to indicate that you must
release the tension on the hair. (FIG 3, 4). If you have taken too much
hair (a section of hair bigger than 3 cm) or the hair is not neatly going
through the centre of the appliance, the styler will again stop and
beep to indicate a problem. This safety feature ensures that there will
be no tangles.
• Continue to hold the handles closed until the end of the individual beeps
(after 3, 4 or 5 beeps depending on the selected time setting, see the
table hereabove).
• Release the appliance from the hair by opening the handles fully. Do
not pull away the appliance from the hair, it will straighten the curl out
(FIG 5).
• Allow your hair to cool before handling or combing.
• Repeat around the head until you have the amount of curls desired.
Note : The styler is equipped with an alternating curl direction
automatic system for a natural nish (FIG 6).
• After use, switch o and unplug the appliance. Allow to cool before
storing away.
7
Page 8

Sleep mode
If the appliance is not used for more than 20 minutes the temperature
will automatically drop down to 150°C. If you wish to continue using the
appliance after this time, simply close then release the handles and i t will
return to the temperature setting you were using it on.
Auto shut o
If the appliance is switched on for more than 60 minutes continuously, it
will automatically switch o.
CLEANING AND MAINTENANCE
In order to prevent a build-up of residue from hair products that would
not allow the appliance to work properly, it is very important to use the
cleaning tool included to regularly clean the appliance.
• Ensure the appliance is switched o, unplugged and cool.
• Lightly dampen the cleaning tool with warm water and mild soap.
• Insert the tool fully into the cavity formed by the appliance and the
cylinder (FIG 7).
• Rotate the tool around the cylinder to remove any build-up of hair
products. (FIG 8).
• Remove the cleaning tool from the cavity.
• Ensure the appliance has dried thoroughly before re-using.
• The cleanin g tool can be used num erous times; just remo ve the felt pad,
rinse it in warm soapy water and leave to dr y before using again.
Once unplugged and cooled, the appliance housing may be wiped with
a damp cloth. Ensure the appliance is completely dry before plugging it
in again.
8 9
Page 9

DEUTSCH
Mit dem Curl Secret® IONIC von BaByliss kreieren Sie mühelos schöne
Locken, die außergewöhnlich lange halten. Vergessen Sie alle aufwändigen
Techniken und Handbewegungen, mit dem Curl Secret® IONIC
gelingen Ihnen Locken dank einer genialen Automatik.
Bitte lesen Sie vor dem Gebrauch die Sicherheitshinweise.
PRODUKTMERKMALE
• Keramikbeschichtung (1)
• Schnelles Aufheizen (max. 230 °C)
• Betriebsschalter 0-I-II: 2 Temperaturstufen - 210 °C (I) - 230 °C (II) (2)
• 3 Einstellungen der Heizdauer (8, 10 und 12 Sekunden) mit
Lautsignal für unterschiedliche Lockenarten (3)
• Ionic-Technologie: Glanz und antistatische Ladung
• Leuchtende Betriebsanzeige (LED) (4)
• Abschaltautomatik
• Drehkabel (5)
• Reinigungsinstrument (6)
GEBR AUCH
Anmerkungen :
• Beim ersten Gebrauch kann es sein, dass Sie einen besonderen Geruch
wahrnehmen: D as ist normal und wird scho n bei der nächsten Anwend ung
verschwunden sein.
• Bei jedem Gebrauch kann sich etwas Dampf entwickeln. Dies kann daran
liegen, dass Talg oder Rückstände von Haarprodukten (Pegemittel,
die nicht ausgespült werden, Haarlack,...) oder die im Haar enthaltene
Feuchtigkeit verdunsten.
• Durch die zusätzliche Verwendung eines Hitzeschutzsprays können Sie Ihr
Haar optimal schonen.
• Der Ionengenerator im Inneren des Geräts setzt Ionen frei, deren
antistatische Wirkung dem Haar Geschmeidigkeit und Glanz verleihen.
Anmerkung: Wenn Sie ein leises Brummen hören, ist das ganz normal: Das
ist das charakte ristische Geräusch des Ione ngenerators.
• Schließen Sie das Gerät an den Netzstrom an und wählen Sie mit dem
Schalter 0-I-II die gewünschte Temperatur. Orientieren Sie sich an der
unten stehenden Tabelle:
Temperatur Haartyp
(I) : 210°C Feines, ausgebleichtes und/oder strapaziertes Haar
(II) : 230°C
gewelltes, lockiges und / oder gefärbtes Haar
Normales, kräftiges,
9
Page 10

• Die Betriebsanzeige leuchtet auf und beginnt zu blinken.
• Die Betriebsanzeige hört auf zu blinken, sobald die gewählte Temperatur
erreicht ist. Das Gerät ist nun einsatzbereit, die Betriebsanzeige leuchtet
ununterbrochen.
• Wählen Sie die Einstellung für die Heizdauer je nach dem gewünschten
Eekt. Für leichte Locken wählen Sie die niedrigste Heizdauer. Für
stärkere Locken wählen Sie die maximale Heizdauer. Orientieren Sie sich
an der unten stehenden Tabelle:
Dauer Lautsignal Gewünschter Eekt
8 8 Sekunden 3 Pieptöne Wellen
10 10 Sekunden 4 Pieptöne Sanfte Locken
12 12 Sekunden 5 Pieptöne Starke Locken
• Vergewissern Sie sich, dass das Haar sauber, trocken und gut
durchgekämmt ist.
• Stecken Sie die obere Haarschicht mit einer Klemme hoch und beginnen
Sie damit, die untere Haarschicht zu bearbeiten.
• Teilen Sie eine höchstens 3 cm breite Haarsträhne ab und entknoten Sie
sie mit eine m Kamm.
• Legen Sie das Gerät auf der Haarsträhne an, sodass der Zylinder zum Kopf
zeigt (ABB. 1, 2).
• Achten Sie darauf, dass Sie die Haarsträhne richtig gerade halten, und
legen Sie sie in die Mitte des Geräts zwischen die beiden Grie.
• Wenn das Gerät korrekt platziert ist, drücken Sie die Grie zusammen,
sodass die Strähne automatisch erfass t werden kann.
Achtung: Wenn Sie das Ende der Strähne noch mit der Hand
festhalten, nachdem Sie die Grie geschlossen haben, kommt das
Gerät zum Stillstand und es ertönt ein Lautsignal (Piepton), um Sie
darauf h inzuweisen , dass Sie die Strä hne loslasse n müssen (ABB. 3, 4).
Wenn Sie eine zu breite Strähne (breiter als 3 cm) eingelegt haben
oder wenn die Strähne nicht exakt in der Mitte des Geräts liegt,
kommt das Gerät zum Stillstand und es ertönt ein Lautsignal
(Piepton), das auf ein Problem hinweist. So wird verhindert, dass
sich Knoten im Haar bilden.
• Halten Sie d as Gerät in dieser Posi tion, bis das Lauts ignal ertönt. ( Warten
Sie je nach gewählter Einstellung 3, 4 oder 5 aufeinander folgende
Pieptöne ab, siehe oben stehende Tabelle.)
• Önen Sie danach das Gerät, indem Sie die Grie loslassen, und
entnehmen Sie die Locke vorsichtig. Ziehen Sie nicht am Gerät, um die
Strähne freizugeben. Dabei würde der Lockeneekt verloren gehen
(ABB. 5).
10 11
Page 11

• Warten Sie vor dem weiteren Bearbeiten oder Kämmen, bis die Locke
abgekühlt ist.
• Wiederholen Sie den Vorgang mit den restlichen Strähnen, bis die
gewünschte Anzahl an Locken erreicht ist.
ANM.: D as Gerät verfügt über e ine Automatik , mit der abwech selnd
Locken in einer Richtung und danach in der Gegenrichtung erzeugt
werden, sodass das Ergebnis natürlicher wirkt (ABB. 6).
• Nach Gebrauch das Gerät ausschalten und den Netzstecker ziehen. Vor
dem Verstauen abkühlen lassen.
Standby-Modus
Wenn das Gerät länger als 20 Minuten nicht verwendet wird, sinkt seine
Temperatur automatisch auf 150°C ab. Wenn Sie nach dieser Ruhephase
mit der Anwendung fortfahren möchten, drücken Sie einfach die Grie
des Geräts zusammen und lassen Sie sie wieder los. Danach erreicht das
Gerät wieder die Temperatur, die Sie gewählt haben.
Abschaltautomatik
Wenn das Gerät länger als 60 Minuten ununterbrochen eingeschaltet
bleibt, schaltet es sich automatisch aus.
REINIGEN UND PFLEGEN
Um zu vermei den, dass sich Rücks tände von Haarpro dukten ansammeln ,
die das einwandfreie Funktionieren des Geräts beeinträchtigen
könnten, ist es wichtig, das Gerät regelmäßig mit dem beiliegenden
Reinigungsinstrument zu säubern.
• Vergewissern Sie sich, dass das Gerät ausgeschaltet und abgekühlt ist
und der Netzstecker gezogen wurde.
• Tauchen Sie das Reinigungsinstrument vorsichtig in heißes Wasser mit
einer milden Seife.
• Führen Sie das Instrument in den Spalt zwischen Gerät und Zylinder ein
(ABB. 7).
• Führen Sie mit dem Instrument mehrere kreisförmige Bewegungen um
den Zylinder aus, um Rückstände von Haarprodukten vollständig zu
entfernen (ABB. 8).
• Ziehen Sie das Reinigungsinstrument danach aus dem Spalt.
• Das Gerät muss vollständig getrocknet sein, bevor es erneut in Betrieb
genommen werden kann.
• Das Reinigungsinstrument kann immer wieder verwendet werden.
Einfach den Filzbelag abnehmen, in Seifenwasser auswaschen und vor
der erneuten Verwendung trocknen lassen.
Das Gehäuse des Geräts kann mit einem feuchten Tuch abgewischt
werden, sobald das Gerät abgekühlt ist und der Netzstecker gezogen
wurde. Vergewissern Sie sich, dass es vollständig getrocknet ist, bevor
Sie es erneut an den Netzstrom anschließen.
11
Page 12

NEDERLANDS
Maak met de Curl Secret® IONIC van BaByliss gemakkelijk prachtige
krullen die uitzonderlijk lang mooi blijven. Geen eentonige handelingen
en gedraai, de Curl Secret® IONIC maakt automatisch zelf krullen dankzij
een ingenieus systeem.
Lees voor gebruik de veiligheidsinstructies.
PRODUCTEIGENSCHAPPEN
• Keramische Coating (1)
• Snel op temperatuur (max. 230 °C)
• «0-I-II»-schakelaar: 2 warmtestanden, 210 °C (I) en 230 °C (II) (2)
• 3 instellingen voor de verwarmingstijd met geluidssignaal (8, 10 en
12 seconden) om verschillende soorten krullen te creëren (3)
• Ionische technologie: voor glanzend en antistatisch haar
• (LED) Indicatielampje (4)
• Automatische uitschakeling
• Meedraaiend snoer (5)
• Reinigingshulpstuk (6)
GEBRUIK
Opmerkingen
• Mogelijk ruikt u bij het eerste gebruik een bepaalde geur: dit is normaal en
die geur verdw ijnt vanzelf bij volgend geb ruik.
• Tijdens elk gebruik is een lichte rookontwikkeling mogelijk. Dit kan te
wijten zijn aan de verdamping van talg of restjes haarproduct (leave-in
conditione r, haarla k enz.) of aan in het haar aanwe zige vocht.
• U kunt een spray gebruiken om het haar optimaal tegen warmte te
beschermen.
• De antistatische werki ng van de ionengenerator in he t apparaat zorgt voor
zachte en stralende krullen. NB: Het is heel normaal dat u een zacht, zoemend
geluid hoort: dat is het karakteristieke geluid van de ionengenerator.
• Steek de stekker in het stopcontact en zet het apparaat aan op de
gewenste temperatuur met de 0-I-II-schakelaar. Zie tabel hieronder:
Temperatuur Haartype
(I) : 210°C Fijn, ontkleurd en/of overgevoelig haar
(II) : 230°C
• Het indicatielampje licht op en gaat knipperen.
golvend, krullend en/of gekleurd haar
Normaal, dik,
12 13
Page 13

• Het indicatielampje stopt met knipperen wanneer de gekozen
temperatuur bereikt is. Het apparaat is nu klaar voor gebruik; het lampje
blijft branden.
• Stel de verwarmingstijd in, al naar gelang het gewenste resultaat. Voor
luchtige krullen kiest u de minimale verwarmingstijd. Voor stevigere
krullen k ies u de maximale duur. Zie onderstaande tabel:
Tijdsduur Geluidssignaal Gewenst eect
8 8 seconden 3 geluidssignalen Slag
10 10 seconden 4 geluidssignalen Soepele, losse krullen
12 12 seconden 5 geluidssignalen Stevige krullen
• Zorg dat het haar schoon, droog en helemaal klitvrij is.
• Zet het bovenste haar vast met een clip en begin onderaan met het
krullen van het haar.
• Neem een pluk haar van maximaal 3 cm breedte. Kam de pluk uit.
• Gebruik het apparaat altijd met de open zijde gericht naar het hoofd
(cilinder zichtbaar) (FIG 1 en 2).
• De lok moet goed recht gehouden worden en in het midden van het
apparaat geplaatst worden, tussen de twee handgrepen in.
• Als het apparaat goed geplaatst is, de handgrepen van het apparaat
sluiten, waarna de lok automatisch opgerold wordt.
Let op: Wanneer u het uiteinde van de lok met uw hand blijft
vasthouden nadat de handgrepen gesloten zijn, zal het
apparaat stoppen en een geluidssignaal (piepje) afgeven om u te
waarsc huwen dat u de lok los moet lat en (FIG 3 en 4).
Wanneer u een te grote lok heeft genomen (van meer dan 3 cm) of
wannee r de lok niet goed in het midd en van het apparaat gepla atst
is, zal het apparaat ook stoppen en een geluidssignaal (piepje)
afgeven om aan te geven dat er een probleem is. Dit systeem helpt
te voorkom en dat het haar gaat klit ten.
• Houd het apparaat in dezelfde stand totdat het geluidssignaal klinkt (na
3, 4 of 5 opeenvolgende piepjes, afhankelijk van de gekozen instelling,
zie tabel hierboven).
• Laat de handgrepen los en haal de krul er voorzichtig uit. Trek niet aan
het apparaat om de lok los te halen. Dan verliest de lok namelijk zijn
krul. (FI G 5).
• Wacht tot het haar is afgekoeld voordat u de krul gaat bewerken of
doorkammen.
• Herhaal deze handeling met de rest van het haar, totdat u de gewenste
hoeveelheid krullen heeft.
NB: Het apparaat is voorzien van een automatisch systeem dat
de krullen in wisselende richtingen creëert, zodat het resultaat
natuur lijker wordt (FIG 6).
13
Page 14

• Na gebruik het apparaat uitzetten en de stekker uit het stopcontact
halen. Het apparaat goed af laten koelen alvorens op te bergen.
Slaapstand
Wanneer het apparaat langer dan 20 minuten niet gebruikt is, daalt de
temperatuur automatisch naar 150°C. Wanneer u het apparaat opnieuw
wilt gebr uiken, hoeft u sl echts de handgrep en dicht te knijpe n en weer los
te laten om teru g te keren naar de gekozen temp eratuur.
Automatische uitschakeling
Wanneer het apparaat langer dan 60 minuten aan staat, gaat het
automatisch uit.
ONDERHOUD EN REINIGING
Om te voorkomen dat stylingproducten zich ophopen en het goed
functioneren van het apparaat verhinderen, is het belangrijk om het
meegeleverde reinigingshulpstuk te gebruiken voor regelmatige
reiniging van het apparaat.
• Zorg dat het apparaat uit staat en afgekoeld is, en dat de stekker uit het
stopcontact is.
• Doop het reinigingshulpstuk voorzichtig in een warm sopje van milde
zeep.
• Steek het reinigingshulpstuk in de holte die gevormd wordt door het
apparaat en de cilinder (FIG 7).
• Draai het reinigingshulpstuk meerdere malen rondom de cilinder om
alle restjes van stylingproducten te verwijderen (FIG 8).
• Haal dan het reinigingshulpstuk weer uit de holte.
• Zorg dat het apparaat helemaal droog is voordat u het opnieuw
gebruikt.
• Het reinigingshulpstuk kan vele malen gebruikt worden. U hoeft alleen
het viltblokje te verwijderen, in zeepsop af te spoelen, en te laten
drogen voordat u het opnieuw gebruikt.
De buitenkant van het apparaat kan worden afgeveegd met een vochtig
doekje, w anneer het apparaat eenmaal is a fgekoeld en de stekker uit het
stopcontact is. Zorg dat het apparaat helemaal droog is voordat u het
opnieuw aanzet.
14 15
Page 15

ITALIANO
Grazie a Curl Secret® IONIC di BaByliss, creerete, nel massimo comfort,
splendidi riccioli dalla tenuta eccezionale. Nessuna manipolazione
fastidiosa, nessun movimento da eseguire; Curl Secret® IONIC crea i
riccioli grazie all’ingegnoso sistema automatico.
Leggere prima le istruzioni di sicurezza.
CARATTERISTICHE DEL PRODOTTO
• Rivestimento in ceramica (1)
• Raggiungimento rapido della temperatura (max. 230 °C)
• Interruttore 0-I-II: 2 livelli di temperatura – 210°C (I) – 230°C (II) (2)
• 3 regolazioni della durata di riscaldamento (8, 10 e 12 secondi), con
segnale acustico, per creare diversi tipi di riccioli (3)
• Tecnologia ionica: brillantezza e antistaticità
• Spia luminosa di funzionamento (LED) (4)
• Spegnimento automatico
• Cavo girevole (5)
• Strumento di pulizia (6)
UTILIZZO
Osservazioni
• Al primo utilizzo, è possibile notare un odore particolare: è frequente e
sparirà con il successi vo utilizzo.
• Durante ogni utiliz zo, è possibile che fuorie sca del fumo. La cosa può essere
dovuta all’evaporazione del sebo o a un residuo di prodotto per la cura dei
capelli (prodotti senza risciacquo, lacca...) oppure all’umidità contenuta nel
capello.
• È possibile u tilizzare uno spray pr otettivo contro il calore p er una protezione
ottimale della capigliatura.
• Il generatore di ion i posto all’interno dell ’apparecchio libera degl i ioni la cui
azione antistatica rende i capelli morbidi e brillanti. Attenzione: è normale
sentire un leggero rumore simile a un ronzio: è il caratteristico rumore del
generatore di ioni.
• Attaccare l’apparecchio alla corrente e accendere, selezionando la
temperatura desiderata grazie all’interruttore 0-I-II. Vedere la tabella
seguente:
Temperatura Tipo di capello
(I) : 210°C Capelli sottili, decolorati e/o sensibili
(II) : 230°C
Capelli normali, spessi
ondulati, ricci e/o colorati
15
Page 16

• La spia luminosa si accende e lampeggia.
• La spia luminosa smette di lampeggiare quando viene raggiunta la
temperatura selezionata. L’apparecchio è pronto all’uso; la spia resta
accesa.
• Selezionare la regolazione della durata di riscaldamento in funzione
dell’eetto desiderato. Per riccioli leggeri, scegliere la durata minima di
riscaldamento. Per riccioli più pronunciati, scegliere la durata massima.
Fare riferimento alla seguente tabella:
Durata Segnale acustico Eetto desiderato
8 8 secondi 3 bip Ondulazioni
10 10 secondi 4 bip Riccioli morbidi
12 12 secondi 5 bip Riccioli pronunciati
• Contro llare che i capelli s iano puliti, asciu tti e completa mente senza no di.
• Rialzare i capelli della parte superiore con una pinza, cominciando a
lavorare dai capelli della parte inferiore.
• Selezionare una ciocca di capelli della larghezza massima di 3 cm.
Districare la ciocca utilizzando un pettine.
• Posizionare l’apparecchio sulla ciocca di capelli, con il cilindro rivolto
verso la testa (FIG 1, 2).
• La ciocca di capelli deve essere mantenuta ben dritta e posizionata al
centro dell’apparecchio, fra i due manici.
• Una volta posizionato l ’apparecchio, chiu derne i manici, p er permette re
all’apparecchio stesso di aerrare automaticamente la ciocca.
Attenzione: Se si tiene sempre la punta della ciocca con la
mano dopo aver chiuso i manici, l’apparecchio interrompe il
funzionamento ed emette un segnale acustico (bip) per segnalare
che occorre alle ntare la tensio ne esercitata dalla mano (FIG 3, 4).
Se è stata presa una ciocca troppo ampia (superiore a 3 cm)
o se la ciocca non viene correttamente posizionata al centro
dell’apparecchio, quest’ultimo interrompe il funzionamento ed
emette un segnale acustico (bip), per segnalare la presenza di un
problema. Questo sistema permette di evitare che si formino nodi
nei capelli.
• Tenere l’apparecchio nella stessa posizione no a quando non viene
emesso il segnale acustico (dopo i 3, 4 o 5 bip consecutivi in funzione
della regolazione selezionata, vedere tabella precedente).
• Aprire l’apparecchio rilasciando i manici, quindi liberare delicatamente
il ricciolo. Non tirare l’apparecchio per liberare la ciocca. Così facendo,
infatti, la ciocca perderebbe l’arricciamento (FIG 5).
16 17
Page 17

• Aspettare che i capelli si rareddino prima di lavorarli o di pettinare i
riccioli.
• Continuare la procedura sul resto della testa no a ottenere il numero
di riccioli desiderato.
NB: L’apparecchio è dotato di un sistema automatico che crea
riccio li in un senso poi , alternativa mente, nel sen so opposto, per u n
risult ato più naturale (FIG 6).
• Dopo l’utiliz zo, spegnere e stacc are l’apparecchio dalla co rrente. Lasciar
rareddare prima di riporlo.
Modalità stand-by
Se l’apparecchio non viene utiliz zato per più di 20 minuti, la temperatura
si abbassa automaticamente a 150 °C. Se si desidera utilizzare
nuovamente l’apparecchio una volta trascorso questo lasso di tempo,
basta premere i manici dell’apparecchio, quindi rilasciarli; l’apparecchio
sarà alla temperatura che era stata selezionata.
Spegnimento automatico
Se resta acceso per più di 60 minuti di la, l’apparecchio si spegne
automaticamente.
MANUTENZIONE E PULIZIA
Per evitare accumuli di prodotti per l’acconciatura che potrebbero
compromettere il buon funzionamento dell’apparecchio, è importante
utilizzare lo strumento di pulizia fornito in dotazione per pulire
regolarmente l’apparecchio.
• Controllare che l’apparecchio sia spento, staccato dalla corrente e
rareddato.
• Immergere leggermente lo strumento di pulizia in acqua calda con
detergente delicato.
• Inserire l o strumento nella c avità formata da ap parecchio e cilindro (F IG 7).
• Eseguire diverse rotazioni con lo strumento attorno al cilindro, in modo
da eliminare qualsiasi traccia di prodotti per l’acconciatura (FIG 8).
• Togliere quindi lo strumento di pulizia dalla cavità.
• L’apparecchio deve essere totalmente asciutto prima di essere
riutilizzato.
• Lo strumen to di pulizia può esser e utilizzato un el evato numero di volte.
Basta togliere il rivestimento in feltro, sciacquarlo in acqua e sapone e
lasciarlo asciugare prima di riutilizzarlo.
Dopo che l’apparecchio è rareddato e staccato dalla corrente, la
struttura esterna può essere pulita con un panno umido. Controllare che
sia perfettam ente asciutto prima di attaccar lo nuovamente alla corre nte.
17
Page 18

ESPAÑOL
Con Curl Secre t® IONIC de BaBy liss podrá crear con tot al comodidad unos
rizos increíbles de una consistencia excepcional. Sin manipulaciones
molestas, sin movimientos complejos, Curl Secret® IONIC da forma a los
rizos gracias a su ingenioso sistema automático.
Consulte previamente las consignas de seguridad.
CARACTERÍSTICAS DEL PRODUCTO
• Revestimiento Ceramic (1)
• Alcanza muy rápidamente la temperatura adecuada (máx. 230 ºC)
• Interruptor 0-I-II: 2 niveles de temperatura: 210 ºC (I)-230 ºC (II) (2)
• 3 ajustes del tiempo de calentamiento (8, 10 y 12 segundos) con aviso
sonoro para crear diferentes tipos de rizos (3)
• Tecnología iónica: con brillo y sin electricidad estática
• Indicador luminoso (LED) de encendido/apagado (4)
• Parada automática
• Cable giratorio (5)
• Accesorio de limpieza (6)
UTILIZACIÓN
Observaciones
• Es posible qu e la primera vez que lo utili ce perciba un olor par ticular. Es algo
habitual qu e no volverá a ocurrir tras el prime r uso.
• Es posible que en cada uso perciba una ligera emanación de humo.
Puede tratarse de evaporación de grasa del cuero cabelludo o de restos
de productos capilares (acondicionador sin aclarado, laca, etc.) o de la
humedad que co nserva el cabello.
• Puede utilizar un producto termoprotector en aerosol para una protección
óptima del cabello.
• El generador de iones del interior del aparato libera iones contra la
electrici dad estática que deja n el cabello suave y bril lante. Nota: Oirá un leve
ruido parecido a un zumbido; es el sonido habitual del generador de iones.
• Enchufe el aparato y enciéndalo seleccionando la temperatura deseada
con el interruptor 0- I-II. Consulte la tabla siguiente:
Temperatura Tipo de cabello
(I) : 210°C Cabello no, decolorado o dañado
(II) : 230°C
Cabello normal, grueso,
ondulado, rizado o teñido
18 19
Page 19

• El indicador luminoso se enciende y parpadea.
• El indicador luminoso deja de parpadear al alcanzar la temperatura
seleccionada. El aparato está listo para su uso; el indicador se queda
encendido.
• Seleccione el tiempo de calentamiento en función del efecto
deseado. Para conseguir unos rizos poco cerrados, elija el tiempo de
calentamiento mínimo. Para conseguir unos rizos muy cerrados, elija el
tiempo máximo. Consulte la tabla siguiente:
Tiempo Aviso sonoro Efecto deseado
8 8 segundos 3 pitidos Ondas
10 10 segundos 4 pitidos Rizos poco cerrados
12 12 segundos 5 pitidos Rizos muy cerrados
• Compruebe que el cabello está limpio, seco y perfectamente
desenredado.
• Sujete los mechones de la parte superior de la cabeza con una pinza y
empiece a trabajar con los mechones de la parte inferior.
• Selecc ione un mechón de 3 cm d e ancho como máximo. U tilice un peine
para desenredarlo.
• Coloque el aparato sobre el mechón, con el cilindro orientado hacia la
cabeza (FIG 1, 2).
• El mechón debe manteners e bien recto y en el centro del aparato, entre
las dos partes del mango.
• Cuando el aparato esté bien colocado, cierre el mango para que pueda
atrapar el mechón automáticamente.
Atención: Si sigue sujetando la punta del mechón con la mano
después de cerrar el mango, el aparato se detendrá y pitará para
indicarle que debe aojar la tensión que ejerce con la mano (FIG 3, 4).
Si el mechón es demasiado grueso (más de 3 cm) o si el mechón no
está bi en colocado e n el centro de l aparato, es te se detendr á y pitará
para indicar que hay un problema. Este sistema permite evitar que
el pelo s e enrede.
• Sujete el aparato en la misma posición hasta que suene la señal sonora
(3, 4 o 5 pitidos consecutivos, en función del tiempo de calentamiento
que haya seleccionado; consulte la tabla).
• A continuación, abra el aparato soltando el mango y suelte el rizo con
cuidado. N o tire del aparato para s oltar el mechón. Si l o hace, se deshará
el rizo. (FI G 5).
• Espere a que el cabello se haya enfriado para manipular o peinar los
rizos.
19
Page 20

• Siga trabajando el resto del cabello hasta que obtenga el número de
rizos deseado.
NOTA: El aparato está provisto de un sistema automático que crea
un rizo en un sentido y el siguiente en el sentido opuesto, para
obtener un resu ltado más natural (FIG 6).
• Después de usarlo, apague y desenchufe el aparato. Espere a que se
enfríe antes de guardarlo.
Modo espera
Si no utiliza el aparato durante más de 20 minutos, la temperatura se
reducirá automáticamente a 150 ºC. Cuando quiera volver a utilizarlo
después de ese tiempo, solo tendrá que cerrar el mango y soltarlo. El
aparato volverá a la temperatura que había seleccionado previamente.
Parada automática
Si el aparato permanece encendido durante más de 60 minutos, se
detendrá automáticamente.
MANTENIMIENTO Y LIMPIEZA
Con el n de prevenir la acumulación de productos capilares que podría
impedir el correcto funcionamiento del aparato, es importante que utilice
el accesorio de limpieza que lo acompaña para limpiarlo regularmente.
• Compruebe que el aparato está apagado, desenchufado y frío.
• Sumerja delicadamente el accesorio de limpieza en agua caliente
mezclada con un jabón suave.
• Introduzc a el accesorio en la cavi dad formada por el ap arato y el cilindro
(FIG 7).
• Haga girar va rias veces el accesorio a lrededor del cilin dro para retirar los
restos de productos para el cabello (FIG 8).
• A continuación, saque el accesorio de limpiez a de la cavidad.
• Compruebe que el aparato está totalmente seco antes de utilizarlo de
nuevo.
• El accesorio de limpieza puede utilizarse muchas veces. Solo tiene que
retirar el eltro, enjuagarlo en agua jabonos a y dejar que se seque antes
de volver a utilizarlo.
Puede limpiar la carcasa exterior con un trapo húmedo, una vez que el
aparato esté frío y desenchufado. Verique que está totalmente seco
antes de enchufarlo de nuevo.
20 21
Page 21

PORTUGUÊS
Crie, com o máximo conforto, bonitos caracóis que se mantêm muito
tempo com o Curl S ecret® IONIC da B aByliss. Sem mani pulação fastidi osa,
sem qualquer movimento, o Curl Secret® IONIC realiza os caracóis graças
ao seu engenhoso sistema automático.
Consulte previamente os conselhos de segurança.
CARACTERÍSTICAS DO PRODUTO
• Revestimento Ceramic (1)
• Aquecimento rápido (max. 230 °C)
• Interruptor 0-I-II: 2 níveis de temperatura - 210°C (I) - 230°C (II) (2)
• 3 regulações do tempo de aquecimento (8, 10 e 12 segundos) com
sinal sonoro para criar diferentes tipos de caracóis (3)
• Tecnologia iónica: brilho e antiestático
• Indicador luminoso de funcionamento (LED) (4)
• Desliga-se automaticamente
• Cabo giratório (5)
• Instrumento de limpeza (6)
UTILIZAÇÃO
Obser vações
• Na primeira utilização, po derá detetar um che iro particula r. Trata-se de u ma
ocorrência f requente que irá desaparece r aquando da utilização se guinte.
• Durante cada utilização, poderá ocorrer uma ligeira emanação de fumo.
Isto deve-se à evaporação de sebo ou de restos de produtos capilares
(produtos sem e nxaguamento, laca, etc.) o u da humidade do cabelo.
• Pode usar um spray de protecção térmica para optimizar a protecção do
cabelo.
• Inserido no próprio aparelho, o gerador de iões liberta iões cuja acção
antiestática confere ao cabelo suavidade e brilho. Nota: Poderá ouvir um
ligeiro zumb ido. Essa situação deve- se ao gerador de iões e é pe rfeitamente
normal.
• Ligue o aparelho à rede eléctrica e acenda-o seleccionando a
temperatura desejada graças ao interruptor 0-I-II. Consulte o quadro
seguinte:
Temperatura Tipo de cabelo
(I) : 210°C Cabelos nos, oxigenados e/ou sensibilizados
(II) : 230°C
Cabelos normais, espessos
ondulados, frisados e/ou pintados
21
Page 22

• O indicador luminoso acende-se e ca intermitente.
• O indicador luminoso deixa de estar intermitente quando é atingida
a temperatura seleccionada. O aparelho está então pronto para ser
utilizado; o indicador permanece aceso.
• Regule o tempo de aquecimento em função do efeito desejado. Para
caracóis so ltos, escolha o tempo de aquecimento mínimo. Para caracóis
mais apertados, escolha o tempo de aquecimento máximo. Consulte o
quadro seguinte:
Tem po Sinal sonoro Efeito desejado
8 8 segundos 3 sinais sonoros Ondulações
10 10 segundos 4 sinais sonoros Caracóis soltos
12 12 segundos 5 sinais sonoros Caracóis apertados
• Certique-se de que os cabelos estão limpos, secos e perfeitamente
desembaraçados.
• Levante os cabelos de cima com uma pinça e comece a trabalhar os
cabelos de baixo.
• Seleccione uma madeixa de cabelo com 3 cm de largura, no máximo.
Desembarace-a com um pente.
• Coloque o aparelho sobre a madeixa de cabelo, com o cilindro virado
para a cabe ça (FIG 1, 2).
• A madeixa d e cabelo deve ser manti da bem direita e colo cada no centro
do aparelho, entre as duas pegas.
• Uma vez o aparelho bem posicionado, feche as pegas do aparelho para
que este prenda automaticamente a madeixa.
Atenção: Se continuar a segurar na ponta da madeixa com a mão
depois de ter fechado as pegas, o aparelho desliga-se e emite um
sinal sonoro («bip») para que deixe de exercer tensão com a mão
(FIG. 3, 4).
Se tiver apanhado uma madeixa de cabelo demasiado larga
(superior a 3 cm) ou se a madeixa não estiver correctamente
posicionada no centro do aparelho, este desliga-se e emite um sinal
sonoro («bip»), indicando um problema. Este sistema permite evitar
que se formem nós no cabelo.
• Mantenha o aparelho na mesma posição até soar o sinal sonoro (3, 4 ou
5 «bips» consecutivos consoante a regulação seleccionada, ver quadro
acima).
• A seguir, abra o ap arelho desprende ndo as pegas e solte de licadamente
o caracol. N ão puxe o aparelho par a soltar a madeixa . Se o zer, perderia
o efeito encaracolado (FIG 5).
22 23
Page 23

• Espere que o cabelo arrefeça antes de trabalhar ou pentear os caracóis.
• Proceda da mesma forma no resto da cabeça até ter obtido o número
de caracóis desejado.
N.B.: O aparelho dispõe de um sistema automático que cria caracóis
num sentido e no outro, assim sucessivamente, para criar um
result ado mais natura l (FIG. 6).
Após utilização, apague o aparelho e desligue-o da cha. Deixe-o
arrefecer antes de o guardar.
Modo Stand-by
Se o aparelh o não for utiliza do durante mais de 20 mi nutos, a tempera tura
do aparelho desce automaticamente para 150°C. Se quiser utilizar de
novo o aparelho, passado este tempo, basta pressionar as pegas do
aparelho e largá-las; deste modo, o aparelho volta para a temperatura
que tinha sido seleccionada.
Desliga-se automaticamente
Se o aparelho estiver continuamente aceso durante mais de 60 minutos,
desliga-se automaticamente.
MANUTENÇÃO E LIMPEZA
Para prevenir a acumulação de produtos capilares que poderiam
prejudicar o funcionamento do aparelho, é importante utilizar o
instrumento de limpeza fornecido para limpar regularmente o aparelho.
• Certique-se de que o aparelho está apagado, desligado e frio.
• Mergulhe cuidadosamente o instrumento de limpeza em água tépida
misturada com sabão neutro.
• Introduz a o instrumento na cav idade formada pe lo aparelho e o cilind ro
(FIG. 7).
• Rode o instrumento vá rias vezes à volta d o cilindro para ret irar quaisquer
resíduos de produtos capilares (FI G. 8).
• A seguir, retire o instrumento de limpeza da cavidade.
• O aparelho deve estar tot almente seco antes de voltar a ser utilizado.
• O instru mento de limpez a pode ser utiliz ado várias vezes. B asta remover
a placa de feltro, lavá-la em água com sabão e deixá-la secar antes de a
voltar a usar.
Utilize um pano humedecido para limpar o corpo do aparelho, quando
este estiver frio e desligado. Assegure-se de que está completamente
seco antes de o ligar de novo.
23
Page 24

DANSK
Lav smukke og meget holdbare krøller helt uden besvær med
Curl Secret ® I ONIC fra BaByli ss. Der er ingen bes værlig håndterin g, og der
skal ikke foretages bevægelser, Curl Secret® IONIC krøller håret med dets
geniale automatiske system.
Læs først sikkerhedsanvisningerne.
PRODUKTETS EGENSKABER
• Keramisk belægning (1)
• Hurtig opvarmning (maks. 230 °C)
• Afbryder 0-I-II: 2 temperaturniveauer - 210 °C (I) - 230 °C (II) (2)
• 3 indstillinger af opvarmningsvarighed (8, 10 og 12 sekunder) med
lydsignal til frembringelse af forskellige krølletyper (3)
• Ionteknologi: Giver skær og er antistatisk
• Kontrollampe, der lyser når apparatet er tændt (LED) (4)
• Automatisk stop
• Drejelig ledning (5)
• Renseredskab (6)
BRUGSANVISNING
Bemærkninger
• Ved første anvende lse kan du måske opleve en særl ig lugt: Dette sker of te og
forsvind er ved næste anvendelse.
• Ved hver anvendelse vil du muligvis se lidt damp. Dette kan skyldes
fordampning af hudtalg eller en rest af hårprodukter (balsam uden skylning,
lak, …) eller fugtighed indeholdt i håret.
• Det er muligt at anvende en spray til beskyttelse mod varme for optimal
besky ttelse af håret.
• Iongeneratoren placeret inde i apparatet frigør ioner, hvis antistatiske
handling gø r håret blødt og skin nende. Bemærk: De t er helt normalt at høre
en let vibrer ende lyd: Det er den karak teristiske lyd fra iongenerato ren.
• Tilslut appar atet, og tænd for det ve d at vælge den ønskede temperatur
på afbr yderen 0-I- II. Se nedenstående tabel:
Temperatur Hårtype
(I) : 210°C Tyndt, afbleget og/eller beskadiget hår
(II) : 230°C
Normalt hår, tykt hår,
bølget, kruset og/eller farvet hår
24 25
Page 25

• Kontrollampen tændes og blinker.
• Kontrollampen holder op med at blinke, når den valgte temperatur er
nået. Apparatet er da klar til brug, og kontrollampen forbliver tændt.
• Vælg indstilling af opvarmningsvarighed efter ønsket eekt. For lette
krøller vælges den minimale opvarmningsvarighed. For mere kompakte
krøller vælges den maksimale varighed. Se nedenstående tabel:
Varighed Lydsignal Ønsket eekt
8 8 sekunder 3 biplyde Krusning
10 10 sekunder 4 biplyde Bløde krøller
12 12 sekunder 5 biplyde Kompakte krøller
• Sørg for, at håret er rent, tør t og redt helt ud.
• Løft håret ovenfra med en klemme, og begynd at arbejde med håret
nedefra.
• Vælg en hårlok med en bredde på maksimalt 3 cm. Red den ud med
en kam.
• Anbring apparatet på hårlokken med cylinderen vendt mod hovedet
(FIG. 1, 2).
• Hårlokken skal holdes lige og anbringes midt i apparatet mellem de to
greb.
• Når app aratet er på plads , lukkes dets greb, s åledes at lokke n automatisk
fanges.
Bemærk: Hvis du stadig holder fat i enden af lokken med din hånd
efter at have lukket apparatet, vil det stoppe og udsende en biplyd
for at få dig til at løsne den spænding, du bevirker med din hånd
(FIG. 3, 4).
Hvis du har taget en for stor lok (over 3 cm), eller hvis lokken ikke
er korrekt placeret midt i apparatet, vil det stoppe og udsende en
biplyd for at angive et problem. Dette system gør det muligt at
undgå k nuder i håret.
• Hold apparatet i samme position, indtil lydsignalet lyder (efter 3, 4 eller
5 efterfølgende biplyde, alt efter den valgte indstilling, se ovenstående
tabel).
• Åbn derefter apparatet ved at slippe grebene. Frigør derefter forsigtigt
krøllen. Træk ikke i apparatet for at frigøre lokken. Krøllen ville da blive
glattet ud. (FIG . 5)
• Vent med at røre ved eller rede krøllerne, indtil håret er afkølet.
• Forsæt på samme måde på resten at hovedet, indtil du har opnået det
ønskede antal krøller.
25
Page 26

NB: Apparatet er forsynet med et automatisk system, der skiftevis
krøller håret i en retning og derefter i modsat retning for et mere
naturl igt resultat (FIG. 6).
• Sluk efter brug for apparatet, og tag stikket ud af kontakten. Lad
apparatet køle af, inden det lægges på plads.
Standby
Hvis apparatet ikke har været brugt i mere end 20 minutter, vil
temperaturen automatisk falde til 150 °C. Hvis du igen ønsker et bruge
apparatet efter den periode, skal du blot trykke på apparatets greb og
derefter slippe dem. Apparatet vil da have den temperatur, du havde
valgt.
Automatisk stop
Hvis apparatet har været tændt uafbrudt i mere end 60 minutter, vil det
automatisk slukke.
RENGØRING OG VEDLIGEHOLDELSE
For at undgå ophobning af hårprodukter, der kan forhindre apparatets
korrekte funktion, er det vigtigt, at du anvender det medfølgende
renseredskab til regelmæssig rensning af apparatet.
• Kontroller, at apparatet er slukket og afkølet, og at stikket er taget ud
af kontakten.
• Dyp forsigtigt renseredskabet i varmt vand tilsat mild sæbe.
• Sæt redskabet i hulrummet i apparatet og c ylinderen (FIG. 7).
• Foretag ere rot ationer med redskabet omkring cylinderen for at erne
ethvert spor efter hårprodukter (FI G. 8).
• Tag derefter renseredskabet ud af hulrummet.
• Apparatet skal være helt tørt, inden det anvendes igen.
• Renseredskabet kan anvendes talrige gange. Det er tilstrækkeligt, at
du blot erner lttamponen, skyller den i vand tilsat sæbe og lader den
tørre, inden du anvender den igen.
Apparate ts ydre kan tørres med e n fugtig klud, når de t er koldt og stikket
er taget ud af kontakten. Kontrollér, at apparatet er helt tørt, inden der
tændes for det igen.
26 27
Page 27

SVENSKA
Med Curl Secret® IONIC från BaByliss kan du enkelt skapa vackra lockar
som håller länge. Med Curl Secret® IONIC behövs inga komplicerade
rörelser eller långtråkig behandling, utan lockarna skapas automatiskt
tack vare apparatens smarta system.
Läs noga igenom säkerhetsanvisningarna före användning.
PRODUKTENS EGENSKAPER
• Keramisk beläggning (1)
• Snabb uppvärmning (högst 230°C)
• Strömbrytare 0-I-II: två värmeinställningar:210°C (I) och 230°C (II) (2)
• Tre tidsinställningar (8, 10 och 12 sekunder) med ljudsignal som kan
användas för att skapa olika slags lockar (3)
• Jonisk teknik: antistatisk och ger glans
• Kontrollampa (lysdiod) (4)
• Automatisk avstängning
• Vridbar sladd (5)
• Rengöringsverktyg (6)
ANVÄNDNING
Anmärkning
• Vid första användningen är det möjligt att du märker en speciell lukt: detta
är vanligt och ko mmer att försvinna v id följande användning .
• Under loppet av varje a nvändning kan det för ekomma en lätt rö kutveckling .
Detta kan bero på fettavdunstning eller rester av hårvårdsprodukter
(behandling utan spolning, spray …) eller fuktighet i håret själv.
• Du kan använda en vär meskyddsspray för opti malt skydd av håret.
• Jongene ratorn inuti apparaten f rigör joner vars antis tatiska eekt gör håret
mjukt och glansigt. Anmärkning: Det är helt normalt att du hör ett svagt
surrande ljud: d et är det karakteristiska lj udet av jongeneratorn .
• Anslut apparaten till ett eluttag och sätt på den genom at t välja önskad
värmeinställning med strömbrytaren 0-I-II. Se tabellen nedan:
Temperatur Hårtyp
(I) : 210°C Fint, blekt och/eller känsligt hår
(II) : 230°C
Normalt, tjockt, vågigt, lockigt och/eller
färgat hår
vågigt, lockigt och/eller färgat hår
27
Page 28

• Kontrollampan tänds och blinkar.
• Kontrollampan slutar blinka när den valda temperaturen uppnås, och
apparaten är då klar för användning. Lampan fortsätter att lysa.
• Välj tidsinst ällning beroende p å önskad eekt. O m du vill ha lätta lock ar
väljer du den kortaste tiden. Om du vill ha mer denierade lockar väljer
du den längsta tiden. Se efter i tabellen nedan:
Tid Signal Önskad eekt
8 8 sekunder 3 pip Vågor
10 10 sekunder 4 pip Mjuka lockar
12 12 sekunder 5 pip Denierade lockar
• Kontrollera att håret är rent och torrt, och har retts ut ordentligt.
• Lyft upp håret och sätt fast det med en hårnål och börja bearbeta håret
undertill.
• Välj ut en hårslinga som är högst 3 cm tjock. Red ut den med en kam.
• Placera apparaten på hårslingan med cylindern i riktning mot huvudet
(BILD 1 och 2).
• Hårslingan ska hållas rakt ut och placeras i mitten av apparaten, mellan
de två plattorna.
• När apparaten är på plats för du ihop plattorna så att slingan fångas
upp automatiskt.
Obs: Om du h åller kva r toppen av hårs lingan med h anden när du ha r
fört ihop plattorna stängs apparaten av och en signal hörs.Du ska
då släppa taget o m slingan med handen (BILD 3 och 4).
Om hårslingan är för tjock (mer än 3 cm) eller inte har placerats
korrekt i mitten av apparaten stängs apparaten av och en signal
hörs för att uppmärksamma dig på problemet. Tack vare det här
system et kan du undvika att knu tar bildas i håre t.
• Håll appa raten i samma läge tills s ignalen hörs (ef ter 3, 4 eller 5 pip i följd
beroende på vilken tidsinställning du valt, se tabellen ovan).
• Öppna sedan apparaten genom att lossa på plattorna och släpp sedan
försiktigt locken. Dra inte i apparaten för att släppa loss hårslingan. Då
förstörs lockarna (BI LD 5).
• Vänta tills håret har svalnat innan du bearbetar eller kammar lockarna.
• Upprepa samma steg med resten av håret tills du har fått så många
lockar du vill ha.
28 29
Page 29

Obs: App araten är utru stad med ett au tomatisk t system som ska par
locka r först i ena rik tningen oc h sedan i den and ra, vilket ge r ett mer
naturl igt resultat (BI LD 6).
• Stäng av apparaten och dra ut kontakten efter användning. Låt den
svalna innan du lägger undan den.
Viloläge
Om apparaten inte används på över 20 minuter sänks temperaturen
automatiskt till 150°C. Om du sedan vill använda apparaten igen trycker
du ihop plat torna och släpper dem igen, så s tälls temperaturen i n på den
du valde tidigare.
Automatisk avstängning
Om apparaten är påslagen i över 60 minuter i följd stängs den av
automatiskt.
UNDERHÅLL OCH RENGÖRING
För att förhindra ansamlingar av stylingprodukter som kan förhindra
att apparaten fungerar som den ska är det viktigt att rengöra apparaten
regelbundet med det medföljande rengöringsverktyget.
• Kontrollera att apparaten har stängts av och svalnat, och att kontakten
har dragits ut.
• Sänk vars amt ned rengörings verktyget i va rmt vatten blandat m ed mild
tvål.
• För in verktyget i håligheten som bildas av apparaten och cylindern
(BILD 7).
• Rotera verktyget runt cylindern era gånger så att alla spår av
stylingprodukter avlägsnas (BIL D 8).
• Ta sedan bort rengöringsverktyget från håligheten.
• Apparaten bör vara helt torr innan den används på nytt.
• Rengöringsverktyget kan användas många gånger. Det räcker med att
ta ut ltpluggen, skölja i tvålvatten och låta torka. Sedan kan verktyget
användas igen.
Apparatens hölje kan torkas av med en fuktig trasa när apparaten har
svalnat och kontakten dragits ut. Kontrollera att d en är helt torr innan du
ansluter den på nytt .
29
Page 30

NORSK
Med Curl Secret® IONIC fra BaByliss kan du skape en optimal komfort
med otte krøller med en eksepsjonell varighet. Ingen langtekkelig
håndtering, ingen spesielle bevegelser som må gjøres. Curl Secret® IONIC
lager krøller og bølger takket være sit t smarte automatiske system.
Les sikkerhetsinstruksene før du bruker apparatet.
PRODUKTEG ENSKAPER
• Keramisk belegg (1)
• Rask oppvarming (maks. 230 °C)
• Temperaturinnstilling 0-I-II: 2 temperaturnivåer - 210 °C (I) – 230 °C
(II) (2)
• 3 alternativer for tidsinnstillinger (8, 10 og 12 sekunder) med
lydsignaler for å lage forskjellige typer krøller og bølger (3)
• Ionisk teknologi gir håret mer glans og erner statisk elektrisitet
• Indikatorlampe for bruk (LED) (4)
• Automatisk stans
• Roterende ledning (5)
• Rengjøringsverktøy (6)
BRUK
Merknader:
• Ved første gangs bruk vil du mul igens kunne forne mme en spesiell luk t: Dette
skjer of te og forsvinner neste ga ng du bruker apparatet.
• Hver gang du bruker apparatet kan det oppstå en viss røykdannelse.
Det kan skyldes fordampningen av hudfett eller rester av hårprodukter
(hårpleiemidler uten skylling, hårlakk …) eller fuktighet som nnes i håret.
• Det er mulig å bruke en beskyttelsesspray mot varme for en optimal
besky ttelse av håret.
• Ionisatoren i a pparatet frigir ione r som sørger for en antistatisk e ekt, slik at
håret blir myk t og glansfullt. NB: Det er normalt å høre en svak, summende
lyd – det er den van lige lyden fra ionisatore n.
• Koble apparatet til stikkontakten og slå det på ved å velge ønsket
temperaturinnstilling med bryteren 0-I-II. Se tabellen nedenfor:
Temperatur Hårtype
(I) : 210°C Fint hår, bleket og/eller sensibelt hår
(II) : 230°C
Normalt, tykt,
krøllet, kruset og/eller farget hår
30 31
Page 31

• Indikatorlampen slås på og blinker.
• Indikatorlampen slutter å blinke når valgt temperatur er nådd. Apparatet
er nå klart til bruk, indikatorlampen forblir på.
• Velg ønsket varig het avhengig av ønsket e ekt til håret. For le tte krøller,
velg den korteste tidsinnstillingen. For markante krøller, velg den
lengste tidsinnstillingen. Se tabellen nedenfor:
Varighet Lydsignaler Ønsket eekt
8 8 sekunder 3 lydsignaler Bølger
10 10 sekunder 4 lydsignaler Lette krøller
12 12 sekunder 5 lydsignaler Markante krøller
• Sørg for at håret er rent, tørt og uten oker.
• Løft håret på toppen med klemme, og begynn å arbeide med håret på
undersiden.
• Ta en hårlokk med en bredde på maks. 3 cm. Bruk en kam for å gre ut
eventuelle oker.
• Plasser appa ratet på hårlokken , med sylinderen re ttet i retning av hod et
(FIG 1, 2).
• Hårlokken skal holdes rett og plasseres midt i apparatet, mellom de to
håndtakene.
• Når hårlokken er riktig plassert i apparatet, lukk apparatets håndtak slik
disse automatisk fanger håret.
Merk: Hvis lokken fortsatt holdes i hånden etter at apparatets
håndtak er lukket, vil apparatet utstede et lydsignal for å varsle at
du må slip pe taket (FIG 3, 4).
Hvis det er tatt en for stor hårlokk (bredere enn 3 cm), eller hvis
håret ikke plasseres korrekt midt i apparatet, vil apparatet stanse
og avgi et lydsignal for å informere om et problem. Dette systemet
gjør de t mulig å sikre at de t ikke dannes oker i håre t.
• Hold håndtakene lukket til lydsignalet stopper (etter 3, 4 eller 5
lydsignaler avhengig av valgt innstilling, se tabellen ovenfor).
• Åpne deretter apparatet og slipp opp håndtakene for å frigjøre
forsiktig. Ikke dra i apparatet for å frigjøre lokken, da kan denne bli
glattet ut (FIG 5).
• Vent til håret er nedkjølt før du begynner å arbeide med eller børste
krøllene.
• Gjenta dette så mange ganger som det er nødvendig for å lage en
ønsket mengde med krøller.
31
Page 32

Merk: Apparatet er utstyrt med et automatisk system som skaper
krøll er i en retning og d eretter i mot satt retning f or et mer naturli g
result at (FIG 6).
• Slå alltid av apparatet og dra ledningen ut av stikkontakten etter bruk.
La det kjø le seg ned før du rydder det bort.
Dvalefunksjon
Hvis apparatet ikke er i bruk på mer enn 20 minutter, vil apparatets
temperat ur automatisk senkes t il 150 °C. H vis du ønsker å bruke app aratet
igjen, trykk bare på apparatets håndtak og slipp dem; apparatet vil på
nytt øke temperaturen til ønsket temperatur.
Automatisk stans
Hvis apparatet er kontinuerlig på i mer enn 60 minutter vil det slås av
automatisk.
RENGJØRING OG VEDLIKEHOLD
For å hindre oppsamling av hårprodukter som kan forhindre skikkelig
drift av ap paratet, er det vik tig å bruke rengjø ringsverktøye t regelmessig
for å rengjøre apparatet.
• Kontroller at apparatet er av, koblet fra stikkontakten og avkjølt.
• Senk forsiktig rengjøringsverktøyet i varmt vann med mildt
rengjøringsmiddel eller såpe.
• Sett rengjøringsverktøyet inn i hulrommet dannet av apparatet og
sylinderen (FIG 7).
• Foreta ere rotasjoner med rengjøringsverktøyet rundt sylinderen for å
erne alle rester etter hårpro dukter (FIG 8).
• Fjern deretter rengjøringsverktøyet fra hulrommet.
• Apparatet må være helt tørt før du bruker det igjen.
• Rengjørings verktøyet kan brukes mange gan ger. Bare erne lten, sk yll
den i såpevann og la den tørke før du bruker den igjen.
Apparatets utside kan tørkes med en fuktig klut når det er nedkjølt og
ikke tilkoblet strømnettet. Sørg for at det er helt tørt før det kobles til
igjen.
32 33
Page 33

SUOMI
BaBylissin Curl Secret® IONIC -laitteella loihdit kauniit ja uskomattoman
kestävät kiharat täydellisen helposti. Ei monimutkaista käsittelyä,
ei kädenliikkeitä: Curl Secret® IONIC luo kiharat kekseliään
automaattijärjestelmänsä ansiosta.
Tutustu turvaohjeisiin ennen laitteen käyttöä.
TUOTTEEN OMINAISUUDET
• Ceramic-pinnoite (1)
• Nopea kuumeneminen (maks. 230 °C)
• Virtakatkaisin 0-I-II: 2 lämpötilatasoa - 210 °C (I) - 230 °C (II) (2)
• 3 lämmityksen kestotasoa (8, 10 ja 12 sekuntia) äänimerkillä
erilaisten kiharoiden luomiseksi (3)
• Ionitekniikka: kiiltoa ilman sähköisyyttä
• Käytön ilmaiseva merkkivalo (LED) (4)
• Automaattinen sammutus
• Pyörivä johto (5)
• Puhdistusväline (6)
KÄY TT Ö
Huomautukset:
• Ensimmäisellä käyttökerralla laitteesta saattaa lähteä erikoista hajua:
tämä on yleistä ja häviää seuraavaan käyttökertaan mennessä.
• Jokaisella käy ttökerralla lait teesta saattaa päästä kev yttä savua. Sii hen voi
olla syynä talin haihtuminen iholta tai hiustenhoitotuotteiden jäännökset
(hoitoaine , jota ei huuhdella pois, l akka, ...) tai hiusten kosteus.
• Voit suojata hiuksi asi kuumuudelta suojaaval la suihkeella.
• Laitteeseen sijoitettu ionigeneraattori vapauttaa ioneita, joiden
antistaattinen vaikutus tekee hiuksista pehmeät ja kiiltävät. Huomio:
Heikon surisevan äänen kuuluminen on normaalia: kyseessä on
ionigeneraattorista lähtevä ääni.
• Kytke laite sähköverkkoon ja käynnistä se valitsemalla haluamasi
lämpötilan virtakatkaisimella 0-I-II. Katso alla oleva taulukko:
Lämpötila Hiustyyppi
(I) : 210°C Ohuet, vaalennetut ja/tai haurastuneet hiukset
(II) : 230°C
aaltoilevat, kiharat ja/tai värjätyt hiukset
Normaalit, paksut,
33
Page 34

• Merkkivalo sy ttyy ja alkaa vilkkua.
• Merkkivalo lakkaa vilkkumasta, kun valittu lämpötila on saavutettu.
Laite on nyt käyttövalmis: merkkivalo palaa edelleen.
• Valitse lämmityksen kesto haluamasi lopputuloksen mukaan. Jos
haluat kevyet kiharat, valitse lyhin lämmityksen kestotaso. Jos haluat
tiukemmat kiharat, valitse pisin kestotaso. Ks. alla olevaa taulukkoa:
Kesto Äänimerkki Haluttu tulos
8 8 sekuntia 3 äänimerkkiä Aaltoilevat kiharat
10 10 sekuntia 4 äänimerkkiä Rennot kiharat
12 12 sekuntia 5 äänimerkkiä Tiukat kiharat
• Varmista, että hiuksesi ovat puhtaat, kuivat ja hyvin kammatut.
• Nosta ylemmät hiukset pinnillä ylös ja aloita kihartaminen alemmista
hiuksista.
• Erottele enintään 3 cm:n levyinen hiussuortuva. Selvitä se kammalla.
• Aseta laite suortuvalle sylinteripuoli päätä kohti (KUVAT 1, 2).
• Pidä suortuvaa kahden kahvan välissä täysin suorassa keskellä laitetta.
• Kun laite on kunnolla paikoillaan, sulje laitteen kahvat, jolloin laite
nappaa suortuvan automaattisesti sisäänsä.
Huomio: Jos pidät suortuvan latvaa edelleen kädessäsi suljettuasi
kahvat, laite sammuu ja siitä kuuluu äänimerkki (piippaus), mikä
tarkoittaa, että sinun tulee päästä irti suortuvasta (KUVAT 3, 4).
Jos olet erottanut hiuksista liian leveän suortuvan (yli 3 cm) tai
jos suortuva ei ole kunnolla laitteen keskellä, laite sammuu ja
siitä kuuluu äänimerkki (piippaus), mikä on merkki ongelmasta.
Järjestelmä ehkäisee hiusten sotkeutumista.
• Pidä laitetta samassa asennossa, kunnes kuulet äänimerkin (kuultuasi 3,
4 tai 5 perättäistä piippausta valitun lämmityk sen keston mukaan, katso
yllä oleva taulukko).
• Avaa sen jälkeen laite irrottamalla otteesi kahvoista ja vapauta kihara
varoen. Älä vedä laitteesta kiharan vapauttamiseksi. Muuten kihara
lässähtää (KUVA 5).
• Anna hiusten jäähtyä, ennen kuin muotoilet tai kampaat kiharat.
• Toista sama jäljellä olevilla hiuksilla, kunnes olet kihartanut haluamasi
hiukset.
HUOMIO: Mahdollisimman luonnollisen lopputuloksen
saavuttamiseksi laite on varustettu automaattisella järjestelmällä,
joka luo kiharat vaihdellen ensin yhdessä suunnassa ja sitten
vastakkaisessa suunnassa (KUVA 6).
34 35
Page 35

• Sammuta laite ja irrota pistoke käytön jälkeen. Anna laitteen jäähtyä
ennen sen säilyttämistä.
Valmiustila
Jos laitetta ei käytetä yli 20 minuuttiin, laitteen lämpötila laskee
automaattisesti 150 celsiusasteeseen. Jos haluat käyttää laitetta
uudelleen tämän ajan kuluttua, paina laitteen kahvoja ja vapauta ne: laite
lämpenee aiemmin valitsemaasi lämpötilaan.
Automaattinen sammutus
Jos laite on p äällä tauot ta yli 60 minu utin ajan, se sa mmuu automaat tisesti.
HUOLTO JA PUHDISTUS
Välttääksesi erilaisten hiustenhoitotuotteiden kerääntymisen, mikä
voi vaikuttaa laitteen käyttökuntoon, on tärkeää puhdistaa laite
säännöllisesti sen mukana tulevalla puhdistusvälineellä.
• Varmista, että laite on sammutettu, irti sähköverkosta ja jäähtynyt.
• Upota puhdistusväline hellävaraisesti kuumaan veteen, johon on
sekoitettu mietoa saippuaa.
• Työnnä puhdistusväline laitteen ja sylinterin muodostamaan aukkoon
(KU VA 7).
• Pyöritä puhdistusvälinettä useita kertoja sylinterin ympäri poistaaksesi
kaikki kerääntyneet hiustenhoitotuotteet (K UVA 8).
• Poista puhdistusväline aukosta.
• Laitteen tulee olla täysin kuiva ennen uudelleenkäyttöä.
• Puhdistusvälinettä voidaan käyttää useamman kerran. Muista vain
poistaa huopatuppo, huuhdella se saippuavedessä ja anna sen kuivua
ennen uudelleenkäyttöä.
Kylmän ja irti kytketyn laitteen rungon voi pyyhkäistä kostealla liinalla.
Varmista, että rauta on täysin kuiva, ennen kuin kytket sen uudelleen
verkkoon.
35
Page 36

ΕΛΛΗΝΙΚΑ
Με το Curl Secret® IONIC της BaByliss δημιουργείτε πανεύκολα όμορφες
μπούκλες με εξαιρετικό κράτημα. ∆εν χρειάζονται δύσκολοι χειρισμοί ή
παραπάνω κινήσεις, αφού το Curl Secret® IONIC δημιουργεί μπούκλες χάρη
στο έξυπ νο, αυτόματο σύστημα π ου διαθέτει.
Συμβουλ ευτείτε πρώ τα τις οδηγίες α σφαλείας.
ΧΑΡΑΚΤΗΡΙΣΤΙΚΑ ΤΟΥ ΠΡΟΪΟΝΤΟΣ
• Κεραμική επίστρωση (1)
• Ταχεία άνοδος της θερμοκρασίας (μέγιστη 230 °C)
• ∆ιακόπτης 0-I-II : 2 βαθμίδες θερμοκρασίας - 210 °C (I) - 230 °C (II) (2)
• Τρεις (3) ρυθμίσεις για τη διάρκεια θέρμανσης (8, 10 και 12 δευτερόλεπτα)
με ηχητικό σήμα για να δημιουργείτε διαφορετικούς τύπους μπούκλας (3)
• Τεχνολογία ιονισμού: μαλλιά που λάμπουν και δεν ηλεκτρίζονται
• Φωτεινή ένδειξη λειτουργίας (LED) (4)
• Αυτόματη διακοπή λειτουργίας
• Περιστρεφόμενο καλώδιο (5)
• Εργαλείο καθαρισμού (6)
ΧΡΗΣΗ
Σημειώσεις:
• Κατά την πρώτη χρήση, είναι πιθανό να παρατηρήσετε μια ιδιαίτερη οσμή: κάτι
τέτοιο είν αι συνηθισμένο και θα εξα φανιστεί με την ε πόμενη χρήση.
• Στη διάρκεια της χρήσης, είναι πιθανό να βγαίνει λίγος καπνός. Κάτι τέτοιο
μπορεί να οφεί λεται σ την εξάτμιση σμήγματος από το τριχωτό της κεφαλής ή
των υπολειμμάτων των προϊόντων περιποίησης μαλ λιών (προϊόντα περιποίησης
χωρίς ξέβγα λμα, λακ, κ.λ π.) ή της υγρασίας που έχει παρα μείνει στα μαλ λιά.
• Μπορεί τε να χρησιμοποιήσε τε κάποιο σπρέ ι προστασίας κατ ά της θερμότητας για
άριστη προ στασία των μαλ λιών.
• Η γεννήτρια ιόντων που είναι τοποθε τημένη σ το εσωτερικό της συσκευής
απελευθερώνει ιόν τα τα οποία εμποδίζουν τη δημιουργία στα τικού ηλεκτρισμού
και κάνουν τα μαλλιά απαλά και λαμπερά. Σημείωση : Αν ακούσετε έναν ελαφρύ
ήχο που μοιάζει με β ούισμα, είναι α πολύτως φυσιολογικό: εί ναι ο χαρακτηρι στικός
ήχος της γεν νήτριας ιόντων.
• Βάζετε τη συσκευή στην πρίζα και την ανάβετε επι λέγοντας τη θερμοκρασία
που επιθυ μείτε από τον διακόπτ η 0-I-II . ∆είτε τον παρακάτω πί νακα:
Θερμοκρασία Τύπος μαλλιών
(I) : 210°C Μαλλιά λεπτά, ντεκαπαρισμένα ή/και ευαίσθητα
(II) : 230°C
Μαλλιά κανονικά, χοντρά
κυματιστά, σ γουρά ή/και βαμμένα
36 37
Page 37

• Η φωτειν ή ένδειξη ανάβει και α ναβοσβήνει.
• Η φωτεινή ένδειξη σταματάει να αναβοσβήνει όταν η συσκευή φτάσει στη
θερμοκρασία που έχετε επιλέξει. Η συσκευή είναι έτοιμη για χρήση και η
ένδειξη παραμένει αναμμένη.
• Επιλέγετε τη ρύθμιση για τη διάρκεια θέρμα νσης ανάλογα με το απο τέλεσμα
που θέλετε να πετύχετε. Για ελαφριές μπούκλες, επιλέγετε την ελάχιστη
διάρκεια θέρμανσης. Για πιο σφιχτές μπούκλες, επιλέγετε τη μέγιστη
διάρκεια. Συμβουλευτείτε τον παρακάτω πίνακα:
Διάρκεια Ηχητικό σήμα Αποτέλεσμα
8 8 δευτερόλεπτα 3 ηχητικά σήματα Κυματισμοί
10 10 δευτερόλεπτα 4 ηχητικά σήματα Απαλές μπούκλες
12 12 δευτερόλεπτα 5 ηχητικά σήματα Σφιχτές μπούκλες
• Βεβαιω θείτε ότι τα μαλ λιά είναι καθαρά, σ τεγνά και χτ ενισμένα.
• Μαζεύε τε τα μαλλιά, τα π ιάνετε με ένα κ λάμερ και αρχίζε τε να δουλεύετε α πό
τα κάτω.
• Πιάνετ ε μια τούφα από τα μα λλιά πάχους το πολύ 3 εκα τοστών. Ξεμπερδ εύετε
τα μαλ λιά με τη βοήθεια μιας χ τένας.
• Τοποθετείτε τη συσκευή πάνω στην τούφα με τον κύλινδρο γυρισμένο προς
την κατεύθ υνση του κεφαλιού (Ε ΙΚ 1, 2).
• Θα πρέπει να κ ρατάτε την τούφα τ εντωμένη και ν α την περάσετε σ το κέντρο
της συσκευής, αν άμεσα στις δύο λαβέ ς.
• Μόλις η συσκε υή τοποθετηθε ί σωστά, κ λείνετε τις λαβ ές έτσι ώστε η σ υσκευή
να πιάσει αυ τομάτως την τούφα .
Προσοχ ή: Αν κρατάτε συ νεχώς την άκρη τ ης τούφας με το χέρ ι σας αφού
έχετε κ λείσει τις λαβές, τό τε η συσκευή θα σ ταματήσει ν α λειτουργεί και
θα αρχίσει να εκπέμπει ένα ηχητικό σήμα (μπιπ) για να σας ειδοποιήσει
να αφήσε τε το χέρι σας (ΕΙΚ 3, 4).
Αν έχετε πιάσει μια πολύ μεγάλη τούφα (μεγαλύτερη από 3 εκατοστά)
ή αν η τούφα δεν έχει τοποθετηθεί σωστά στο κέντρο της συσκευής,
τότε η συσκευή θα σταματήσει να λειτουργεί και θα αρχίσει να εκ πέμπει
ένα ηχητικό σήμα (μπιπ) ως ένδειξη ότι υπάρχει πρόβλημα. Με αυτό το
σύσ τημα αποφεύ γεται να δημι ουργούντα ι «κόμποι» στ α μαλλιά σας .
• Κρατήσ τε τη συσκευή στην ίδια θέση έως ότου το ηχητικό σήμα σ ταματήσει
(ύστερα από 3, 4 ή 5 συνεχόμενα μπιπ ανάλογα με τη ρύθμιση που έχετε
επιλέξ ει, βλ. παραπάνω πίνακα).
• Κατόπιν ανοίγετε τη συσκευή αφήνοντας τις λαβές και απελευθερώνετε
απαλά την μπούκλα. Μην τραβάτε τη συσκευή για να απελευθερώσετε την
τούφα, γι ατί έτσι, θα χαλά σει η μπούκλα (ΕΙΚ 5) .
• Περιμέν ετε μέχρι τα μα λλιά να κρυώσο υν πριν αρχίσετε να τα δ ουλεύετε ή να
χτενίζετε τις μπούκλες.
37
Page 38

• Συνεχίζετε με τα υπόλοιπα μαλλιά μέχρι να αποκτήσετε όσες μπούκλες
επιθυμείτε.
ΣΗΜΕΙΩΣΗ: Η συσκευή διαθέτει ένα αυτόματο σύστημα με το οποίο
δημιουργούνται μπούκλες εναλλάξ, προς μια κατεύθυνση και κατόπιν
προς την α ντίθετη , για ένα πιο φυ σικό αποτέλ εσμα (EIK 6).
• Μετά τη χρήση, σβήνετε τη συσκευή και την αποσυνδέετε από το ρεύμα.
Αφήνετε να κ ρυώσει πριν την αποθη κεύσετε.
Αναμον ή
Αν η συσκευή δε ν χρησιμοποιηθεί για περισσότερο από 20 λεπτά, η
θερμοκρασία πέφτει αυτομάτως στους 150°C. Αν θελήσετε να χρησιμοποιήσετε
πάλι τη συσκευή, αφού περάσει αυτός ο χρόνος, πιέζετε απλώς τις λαβές
της συσκευής και κατόπιν τις αφήνετε. Έτσι, η συσκευή επανέρχεται στη
θερμοκρασία την οποί α είχατε ήδη ρυθμίσει.
Αυτόματη διακοπή
Αν η συσκευή παραμένει συνεχώς αναμμένη για περισσότερο από 60 λεπτά,
τότε θα σ ταματήσει αυτομ άτως.
ΣΥΝΤΗΡΗΣΗ ΚΑΙ ΚΑΘΑΡΙΣΜΟΣ
Για να εμποδίσετε τη συσσώρευση κατάλοιπων από προϊόντα στάιλινγκ τα
οποία θα μπορ ούσαν να μπλοκάρουν τ ην καλή λειτουργία της σ υσκευής, είναι
σημαν τικό να χρησιμοποι είτε το εργαλεί ο καθαρισμού το οποίο σ ας παρέχεται
για να καθαρίζετε τακ τικά τη συσκευή .
• Βεβαιωθείτε ότι η συσκευή είναι σβησ τή, δεν είναι σ την πρίζα και ότι έχει
κρυώσει.
• Βουτήξτε απ αλά το εργαλείο καθα ρισμού σε ζεστό νε ρό όπου έχετε διαλύ σει
λίγο σαπούνι.
• Βάλτε το εργαλείο μέσα σ την κοιλότητα η οποία σχηματίζεται από τη
συσκευή κα ι τον κύλινδρο (ΕΙΚ 7).
• Γυρίσ τε πολλές φορές το εργ αλείο γύρω από τον κύλ ινδρο για να αφαιρέσε τε
κάθε ίχνο ς από τα κατάλοιπα των προ ϊόντων στάιλινγκ (Ε ΙΚ 8).
• Κατόπιν βγ άλτε το εργαλείο καθαρ ισμού από την κοιλότητα.
• Η συσκευή θ α πρέπει να είναι εν τελώς στε γνή πριν τη χρησιμ οποιήσετε πάλι .
• Το εργαλείο καθαρισμού μπορεί να χρησιμοποιηθεί πάρα πολλές φορές.
Αρκεί να βγάλετε το φίλτρο, να το ξεπλύνετε σε νερό με σαπούνι και να το
αφήσετε ν α στεγνώσε ι πριν το χρησιμοποιήσε τε πάλι.
Μπορείτε να καθαρίσετε το σώμα της συσκευής με ένα υγρό πανί όταν η
συσκευή δεν είναι σ το ρεύμα και έχει κρυώσει. Βεβαιωθείτε ότι είναι εντελώς
στε γνή πριν τη βάλε τε πάλι στην πρίζα .
38 39
Page 39

MAGYAR
A BaByliss Curl Secret® IONIC készülékkel teljes kényelemben készíthet
kivételesen tartós, gyönyörű hajfürtöket. Nincsenek unalmas műveletek,
nem kell mozgatni - a Curl Secret® IONIC a hajfürtöket egy leleményes
automatikus rendszer segítségével készíti.
Kérjük olvassa el e lőször a biztonsági ú tmutatót.
A TERMÉK JELLEMZŐI
• Kerámia bevonat (1)
• Gyors felfűtés (max. 230 °C)
• 0-I-II kapcsoló: 2 hőmérsékletszint: -210 °C (I) -230 °C (II) (2)
• 3 beállítható hőntartási idő (8, 10 és 12 másodperc) hangjelzéssel, a
különböző típusú fürtök készítéséhez. (3)
• Ionos technológia: fényes és antisztatikus
• Működést jelző lámpa (LED) (4)
• Automatikus kikapcsolás
• Forgó tápvezeték (5)
• Tisztítóeszköz (6)
HASZNÁLAT
Megjegyzések:
• Az első használat alkalmával sajátos szagot érezhet: ez gyakori, és a
következő használattól kezdve elmarad.
• Minden simítás alkalm ával előfordulhat enyhe füs tképződés. Ezt okozha tja
a hajzsírosodást okozó faggyú vagy a hajápolószer maradékok (leöblítés
nélküli term ékek, hajlakk, . ..) vagy esetleg a haj nedvess égtartalma is.
• Használhat a haj optimális védelme érdekében a hőmérséklettől védő
sprayt .
• A készülék belsejében elhelyezett iongenerátor ionokat szabadít fel,
melyeknek antisztatikus hatása a hajat puhává és fényessé teszi. Figyelem!
Tökéletesen normális, ha halk zümmögő hangot hall: ez az iongenerátor
tipikus zaja.
• Dugja be a készüléket a konnektorba, és a 0-I-II. kapcsolóval kapcsolja
be és válassza ki a kívánt hőmérsékletet. Lásd az alábbi táblázatot:
Hőmérséklet Hajtípus
(I) : 210°C Vékony szálú, szőkített és/vagy érzékeny haj
(II) : 230°C
Normál, vastag szálú haj
hullámos, göndör és/vagy festett
39
Page 40

• A jelzőlámpa kigyullad és villog.
• A jelzőlámpa villogása megszűnik, amikor a készülék a kiválasztott
hőmérsékletet elérte. A készülék ekkor használatra kész; a jelzőlámpa
tovább világít.
• Válassza ki a hőntartási idő beállítását az elérni kívánt hatásnak
megfelelően. A könnyű fürtökhöz válassza a legkisebb hőntartási időt.
Az erősebb fürtökhöz válassza a maximális időtartamot. Használja az
alábbi táblázatot:
Időtartam Hangjelzés Kívánt hatás
8 8 másodperc 3 rövid sípolás Hullámosítás
10 10 másodperc 4 rövid sípolás Laza fürtök
12 12 másodperc 5 rövid sípolás Szoros fürtök
• Győződjön me g róla, hogy a haj tiszta, száraz és teljesen ki van fésülve.
• Rögzítse a hajat csipesszel a fejtetőn, és kezdjen el dolgozni az alul lévő
hajjal.
• Válasszon k i egy maximum 3 cm szél es hajtincset. Fésülje ki egy fé sűvel.
• Helyezze rá a készüléket a hajtincsre, a henger a fej irányába nézzen
(1., 2. ÁBRA).
• A hajtincset egyenesen kell tartani és a készülék közepébe kell
beletenni, a két fogantyú közé.
• Miután a készüléket elhelyezte, zárja össze a készülék fogantyúit, hogy
az automatikusan elkaphassa a hajtincset.
Figyele m! Ha a markolato k összezárás a után tovább fog ja kezével a
hajtincs végét, a készülék leáll és hangjelzéssel gyelmezteti (rövid
sípszó), h ogy ne feszíts e tovább kezével a ti ncset (3., 4. ÁBR A).
Ha túl széles (3 cm-nél nagyobb) tincset választott, vagy ha a tincs
nem a készülék közepére került, a készülék leáll, és hangjelzéssel
(rövid sípszóval) jelzi a problémát. Ezzel a rendszerrel elkerülhető,
hogy hajában csomók alakuljanak ki.
• Tartsa a készüléket ebben a helyzetben addig, amíg a hangjelzés nem
hallatsz ik (3, 4 vagy 5 rövid sípszó ut án, beállítástól f üggően.Lásd a f enti
táblázatot).
• Engedje el a fogantyúkat, és nyissa ki készüléket, majd óvatosan
szabadítsa ki a hajfürtöt. Ne húzza meg a készüléket a hajtincs
kiszab adításához. A hajfürt így elveszíti a formáját (5. ÁBRA ).
• Várja meg, hogy a haj lehűljön, mielőtt formázza vagy kifésüli a
hajfürtöket.
40 41
Page 41

• Folytassa ezeket a mozdulatokat a haj többi részén a kívánt számú
hajfürt elkészítéséig.
Megjegyzés: A készülék automatikus rendszere a hajfürtöket
váltakozva, először egyik, majd az ellenkező irányban készíti a
természetesebb hatás érdekében (6. ÁBRA).
• Használat után kapcsolja ki a készüléket, és húzza ki a tápkábelt a
konnektorból. Mielőtt elteszi, hagyja kihűlni.
Készenléti mód
Ha a készülék 20 percet meghaladó ideig használaton kívül van,
hőmérséklete automatikusan 150°C-ra csökken. Ha ezután ismét
használni k ívánja a készülé ket, egyszerű en nyomja meg, majd ere ssze el a
készülék fogantyúit, így a készülék visszaáll a kiválasztot t hőmérsékletre.
Automatikus kikapcsolás
Ha a készülé k 60 percet meghal adó ideig folyam atosan be van kapc solva,
automatikusan kikapcsolódik .
ÁPOLÁS ÉS TISZT ÍTÁS
A készülék megfelelő működését esetleg befolyásoló hajápoló szerek
felhalmozódásának megelőzése érdekében fontos a készülék rendszeres
tisztítása a mellékelt tisz tító eszköz segítségével.
• Ellenőrizze, hogy a készülék ki van kapcsolva, ki van húzva a
konnektorból és lehűlt.
• Gyengéde n mártsa be a tis ztító eszközt k ímélő mosósze res meleg vízbe.
• Helyezze a z eszközt a készülék és a h enger által képzet t üregbe (7. ÁB RA ).
• Forgassa meg többször az eszközt a henger körül, hogy minden
hajápolószer-nyomot eltávolítson (8. ÁBRA).
• Vegye ki ezután a tisztító eszköz t az üregből.
• A készüléket csak teljesen száraz állapotban szabad újra használni.
• A tisztító eszköz sokszor felhasználható. Elég csak levenni a lc betétet,
kímélő mosószeres vízben elöblíteni, majd megszáradni hagyni az
ismételt használat előtt.
A készülék burkolatát nedves törlőruhával át lehet törölni, miután a
készülék lehűlt, és csatlakozója ki van húzva a konnektorból. Mielőtt
újra csatlakoztatná a hálózathoz, győződjön meg róla, hogy teljesen
megszáradt.
41
Page 42

POLSKI
Dzięki Curl Secret® IONIC BaByliss w przyjemny sposób uzyskasz piękne loki o
wyjątkowej trwałości. Bez monotonnych manipulacji, bez zbędnych ruchów,
lokówka Curl Secret® IONIC modeluje loki dzięki zastosowaniu wyjątkowego
systemu automatycznego lokowania.
Przed użyciem należy przeczytać zasady bezpieczeństwa.
CHARAKTERYSTYKA PRODUKTU
• Powłoka ceramiczna (1)
• Szybkie nagrzewanie (maks. 230°C)
• Przełącznik 0–I–II: 2 poziomy temperatury – 210°C (I) – 230°C (II) (2)
• Trzy ustawienia czasu nagrzewania (8, 10 i 12 sekund) z potwierdzającym
sygnałem dźwiękowym umożliwiające uzyskanie różnych rodzajów loków (3)
• Technologia jonowa: włosy nie elektryzują się i uzyskują blask
• Kontrolka pracy (LED) (4)
• Wyłączanie automatyczne
• Kabel obrotowy (5)
• Przyrząd do czyszczenia (6)
SPO SÓB UŻ YCIA
Uwagi
• Przy pierwszym użyciu może pojawić się niewielki dym lub specyczny zapach.
Jest to zjawisko n ormalne, które z nika przy kolejnyc h użyciach urządze nia.
• W trakcie każdego użycia może w ydobywać się delikatny dym. Może to
być związane z parowaniem łoju lub resztek pochodzących ze środków
pielęgnacyjnych do włosów (odżywek bez spłukiwania, lakierów itp.) lub też
znajdującej się we włosach wilgoci.
• Dla optymalnej ochrony włosów można użyć sprayu zabezpieczającego przed
wysoką temperaturą.
• Generator jonów znajdujący się wewnątrz urządzenia wytwarza jony, dzięki
którym włosy nie elektryzują się oraz nabierają gładkości i blasku. Uwaga:
Generator jonów podczas normalnej pracy w ydaje charakterystyczny dźwięk
przypominający buczenie.
• Podłącz yć urz ądzenie d o prądu, a na stępnie w łącz yć, wyb ierając o dpowie dnią
tempera turę za pomocą pr zełącznika 0 –I–II. Patr z tabela poniże j:
Temperatura Rodzaj włosów
(I) : 210°C Włosy cienkie, rozjaśniane i/lub wrażliwe
(II) : 230°C
Włosy normalne, gęste
falowane, kręcone i/lub farbowane
42 43
Page 43

• Lampka kontrolna w łącza się i miga.
• Lampka kontrolna przestaje migać po osiągnięciu wybranej temperatury.
Urządzenie jest gotowe do pracy. Lampka kontrolna pozostanie włączona.
• Należy w ybrać czas nagrzewania, w zależności od planowanego efektu. Aby
uzyskać lżejsze loki, należy wybrać minimalny czas nagrzewania. Aby uzyskać
loki bardziej zwarte, należy wybrać maksymalny czas. Zakres temperatur
podaje poniższa tabela:
Czas trwania Sygnał dźwiękow y Efekt
8 8 sekund 3 sygnały Fale
10 10 sekund 4 sygnały Loki elast yczne
12 12 sekund 5 sygnał y Loki zwarte
• Upewnij si ę, czy włosy są c zyste, suche i do kładnie rozczes ane.
• Zebrać włosy na górze głowy i spiąć spinką. Rozpocząć modelowanie od
włosów od s podu głowy.
• Oddzielić kosmyk włosów o szerokości maksymalnie 3 cm. Rozczesać go
grzebieniem.
• Umieścić urządzenie na kosmyku włosów cylindrem skierowanym do głowy
(RYS. 1, 2).
• Kosmyk włosów należy trzymać prosto i umieścić go w środku urządzenia
pomiędzy dwoma uchwytami.
• Gdy urządzenie jest w odpowiednim miejscu, należy zamknąć uchwyty
urząd zenia, aby umożliwi ć automatyczne chwyceni e kosmyka.
Uwaga: Przytrzymując ręką końcówkę kosmyka włosów, po zamknięciu
uchwytów urządzenie zatrzyma się i włączy się sygnał dźwiękowy (bip),
informujący o konieczności zwolnienia uścisku (RYS. 3, 4).
Jeżeli kosmyk włosów jest zbyt szeroki (ponad 3 cm) lub jeżeli kosmyk
jest nieprawidłowo umieszczony w środku urządzenia, urządzenie
zatrzyma się i włączy się sygnał dźwiękowy (bip) informujący o błędzie.
Mechanizm ten pozwala uniknąć splątania włosów.
• Przy trzymać urządzenie w tej samej pozycji, aż do włączenia się sygnału
dźwiękowego (po 3, 4 lub 5 sygnałach w zależności od wybranego
ustawienia, patrz tabela powyżej).
• Następnie otworzyć urządzenie, zwalniając uchwyty i delikatnie wyjąć lok z
urząd zenia. Nie ciągną ć za urządze nie, aby wyjąć pa smo. W przeciwny m razie
lok się w yprostuje (RYS. 5).
• Poczekać, a ż włosy ostygną p rzed modelowa niem i rozczesani em loków.
• Kontynuować czynność na pozostał ych włosach, aż do utworzenia
odpowiedniej liczby loków.
43
Page 44

UWAGA: Urządzenie wyposażono w mechanizm automatyczny tworzący
loki na zmianę raz w jednym kierunku, a następnie w przeciwnym, aby
uzyskać bardziej naturalny efekt (RYS. 6).
• Po użyciu należy wyłącz yć urządzenie i w yjąć wtyczkę z gniazdka
elektrycznego. Pozostawić do wystygnięcia przed schowaniem.
Tryb czuwania
Jeżeli urządzenie nie jest używane przez ponad 20 minut, temperatura
urządzenia zostanie automatycznie obniżona do 150°C. Aby ponownie użyć
urządzenie po upływie tego czasu, w ystarczy ścisnąć uchwyty urządzenia i
puścić. Urządzenie odzyska ustawioną temperaturę.
Wyłączanie automatyczne
Jeżeli urządzenie jest nieużywane przez ponad 60 minut, wyłączy się
automatycznie.
KONSERWACJA I CZYSZCZENIE
Aby zapobiec gromadzeniu się środków do pielęgnacji włosów, które
mogą zakłócać prawidłowe działanie urządzenia, należy regularnie czyścić
urządzenie dołączonym przyrządem do czyszczenia.
• Upewnić się, że urz ądzenie jest odł ączone od zasila nia i ostudzone.
• Powoli zanurzyć przyrząd do czyszczenia w ciepłej wodzie z dodatkiem
łagodn ego środka do mycia.
• Włożyć przyrząd do czyszczenia do wnęki utworzonej przez urządzenie i
cylinder (RYS. 7).
• Wykonać kilka obrotów za pomocą przyrządu do czyszczenia wokół cylindra, a
następni e zebrać wsz ystkie pozos tałości środkó w do pielęgnacj i włosów (RYS. 8).
• Następn ie wyciągnąć prz yrząd do cz yszczenia z wnę ki.
• Urząd zenie należy ca łkowicie wysusz yć przed ponow nym użyciem.
• Przyrząd d o czyszc zenia można uż ywać wi elokrotni e. Wystarc zy zdjąć lcow ą
nakładkę, wypłukać ją w wodzie z mydłem i wysuszyć przed ponownym
użyciem.
Urządzenie można umyć wilgotną szmatką po wcześniejszym odłączeniu od
zasilania i ostudzeniu. Upewnić się, że urządzenie jest zupełnie suche przed
ponownym podłączeniem do zasilania.
44 45
Page 45

ČESKY
S kulmou Curl Secret ® IONIC společnosti BaByliss si snadno vytvoříte
krásné a dlouhotrvající vlny. Díky důmyslnému automatickému systému
kulmy Curl Secret® IONIC vytvoříte vlny bez zdrouhavé manipulace a
zbytečných pohybů.
Před pou žitím si přeč těte bezpeč nostní poky ny.
VLASTNOSTI VÝROBKU
• Keramická povrchová úprava (1)
• Rychlé zahřátí (max. 230°C)
• Přepínač teploty 0-I-II: 2 teplotní stupně - 210°C (I) a 230°C (II) (2)
• 3 nastavení délky ohřevu (8, 10 a 12 sekund) se zvukovým signálem pro
vytváření různých typů vln (3)
• Iontová technologie: lesk a antistatická úprava
• Světelná kontrolka zapnutí (LED) (4)
• Automatické vypnutí
• Kabel s otočnou koncovkou (5)
• Nástroj na čištění (6)
POUŽÍVÁNÍ
Poznámky
• Při prvním p oužití se může stát, že ucítíte z vláštní zápach: je to běžn é a hned
při druhém použití zápach zmizí.
• Při každé m použití může dojít ke v zniku slabého kouř e. Tento jev je způsoben
odpařováním kožního mazu nebo zbytků vlasových přípravků (prostředky
pro péči o vlasy bez oplachování, lak atd.) nebo vlhkosti obsažené ve
vlasech.
• Pro optimální o chranu vlasů lze použít ochran ný sprej proti teplu.
• Generátor iontů umístěný v přístroji uvolňuje ionty, díky jejichž
antistatickému působení budou vlasy vláčné a lesklé. Upozornění: Je zcela
normální, kd yž slyšíte lehké bzučení: je to t ypický zvuk g enerátoru iontů.
• Přístroj z apojte do sítě a za pněte jej tak, že p omocí vypín ače 0-I-I I zvolíte
požadovanou teplotu. Viz následující tabulka:
Tep lota Ty p vlasů
(I) : 210°C Vlasy jemné, odbar vené a/nebo citlivé
(II) : 230°C
Vlasy normální, husté,
vlnité, kadeřavé a/nebo barvené
45
Page 46

• Rozsvítí se kontrolk a a bliká.
• Po dosažení zvolené teploty kontrolka přestane blikat. Přístroj je nyní
připraven k použití, kontrolka svítí trvale.
• Nastavte délku ohřevu podle požadovaného efektu. Pro volné vlny
zvolte mi nimální dobu ohřevu , pro pevnější vlny z volte maximální dob u
ohřevu (viz následující tabulka):
Doba Zvukový signál Požadovaný efekt
8 8 sekund 3 pípnutí Vlny
10 10 sekund 4 pípnutí Volné lokny
12 12 sekund 5 pípnutí Pevné lokny
• Zkontrolujte, zda máte vlas y čisté, suché a dobře rozčesané.
• Vlasy na horní části hlavy zvedněte a sepněte, abyste mohla začít
pracovat na vlasech pod nimi.
• Oddělte pramen vlasů o maximální šířce 3 cm. Rozčešte jej hřebenem.
• Přiložte p řístroj na pramen v lasů, válec je otoče n směrem k hlavě (OBR. 1, 2).
• Pramen vlasů musí být dobře napnutý a umístěný uprostřed přístroje
mezi oběma čelistmi.
• Jakmile je přístroj správně umístěn, zavřete čelisti přístroje, aby mohl
pramen automaticky uchopit.
Pozor: Budete-li po uzavření čelistí stále držet koneček pramene
rukou, přístroj se vypne a zazní zvukový signál (pípnutí), který vás
upozor ní na nutnost uvol nění tahu ruky (OBR. 3, 4).
Pokud je oddělený pramen vlasů příliš široký (více než 3 cm) nebo
není správně umístěn uprostřed přístroje, přístroj se vypne a zazní
zvukový signál (pípnutí) upozorňující na chybu. Tento systém
zajišťuje, že se vlasy nezamotají.
• Držte přístroj ve stejné p oloze, dokud nezazní zvukový signá l (3, 4 nebo
5 po sobě následujících pípnutí podle zvoleného nastavení, viz výše
uvedená tabulka).
• Poté přístroj otevřete uvolněním čelistí a vlnu lehce uvolněte. Pramen
neuvolňujte tahem za přístroj, protože by se vlna natáhla (O BR. 5).
• Před vy tvářením účesu nebo česáním vln nechte vlas y vychladnout.
• Postup opakujte ve zbývající části hlavy, dokud nezískáte požadovaný
počet vln.
POZN.: Přístroj je vybaven automatickým systémem tvořícím
střídavě lokny v jednom směru a poté v opačném směru, čímž se
docíl í přirozenějš í výsledný efe kt (OBR. 6).
46 47
Page 47

• Po použití přístroj v ypněte a vypojte ze sítě. Před uložením jej nechte
vychladnout.
Pohotovostní režim
Není-li přístroj používán déle než 20 minut, jeho teplota automaticky
klesne na 150 °C. Chcete-li po uplynutí této doby p řístroj znovu použí vat,
stačí pouze stisknout a poté uvolnit čelisti přístroje, přístroj tak bude
připraven na vámi nastavené teplotě.
Automatické vypnutí
Je-li přístroj nepřetržitě zapnutý déle než 60 minut, automaticky se
vypne.
ÚDRŽBA A ČIŠTĚNÍ
Aby se zabránilo hromadění přípravků pro úpravu účesů, k teré by mohly
narušit správné fungování přístroje, je důležité provádět pravidelné
čištění přístroje pomocí dodaného nástroje.
• Zkontrolujte, zda je přístroj vypnutý, vy pojený ze sítě a vychladlý.
• Nástroj na čištění lehce p onořte do teplé vody s jemným mýdlem.
• Vložte nástroj do ot voru mezi přístrojem a válcem (OBR . 7).
• Nástrojem několikrát otočte kolem válce, abyste odstranila všechny
stopy vlasových přípravků (OBR. 8).
• Poté nástroj na čištění z otvoru vyjměte.
• Před dalším použitím musí být přís troj zcela suchý.
• Nástroj na čištění lze používat opakovaně. Stačí pouze sejmout plstěný
potah, propláchnout jej mýdlovou vodou a před dalším použitím
nechat uschnout.
Po vychladnutí a odpojení přístroje lze otřít kryt vlhkým hadříkem. Než
přístroj znovu zapojíte do sítě, zkontrolujte, zda je zcela suchý.
47
Page 48

РУССКИЙ
Устройство Curl Secret® IONIC от BaByliss очень удобно в использовании.
Оно позволит создать красивые локоны, долго сохраняющие свой вид.
Никаких утомительных манипуляций, никаких специальных движений –
устрой ство Curl Secr et® IONIC созд ает локоны благо даря своей пре красно
продуманной автоматической системе.
Заранее ознакомьтесь с правилами техники безопасности.
ХАРАКТЕРИСТИКИ ИЗДЕЛИЯ
• Керамическое покрытие Ceramic (1)
• Быстрый нагрев (максимум 230 °C)
• Переключатель 0-I-II: 2 уровня нагрева – 210 °C (I) – 230 °C (II) (2)
• 3 варианта установки продолжительности нагрева (8, 10 и 12 секунд)
со звуковым сигналом для создания различных типов локонов (3)
• Ионная технология: придает волосам блеск и нейтрализует
статическое электричество
• Светодиодный индикатор работы (4)
• Автоматическая остановка
• Вращающийся шнур (5)
• Приспособление для очистки (6)
ПРАВИЛА ПОЛЬЗОВАНИЯ
Примечания:
• Часто при первом использовании устройства ощущается
специфический запах. Он исчезнет во время следующей процедуры
завивки.
• При каждом использовании возможно появление небольшого количества
пара. Причиной может быть испарение кожного жира или остатков
средств для ухода за волосами (средства, не требующие смывания, лак
и т.д.), либо испарение в лаги, содержащейся в во лосах.
• Чтобы оптимально защитить волосы во время завивки, воспользуйтесь
специальным теплозащитным спреем.
• Генератор в устройстве высвобождает ионы и нейтрализует
статическое электричество, придавая волосам мягкость и блеск.
Примечание: Генератор ионов во время работы обычно издает звук,
похожий на тихое жужжание: это абсолютно нормальное явление.
• Подключите устройство к сети и включите его, выбрав температуру
нагрева с помощью переключателя 0- I-II. Смотрите таблицу ниже:
Температура Тип волос
(I) : 210°C Тонкие, обесцвеченные и/или поврежденные волосы
(II) : 230°C
волнистые, вьющиеся и/или окрашенные волосы
Нормальные, гус тые,
48 49
Page 49

• Световой индикатор загорается и мигает.
• Световой индикатор прекращает мигать, когда достигнута
выбранная температура нагрева. В этот момент устройство готово к
использованию; индикатор продолжает светиться.
• Выберите продолжительность нагрева в зависимости от желаемого
эффекта. Для получения легких локонов выберите минимальную
продолжительность нагрева. Для более густых локонов выберите
максимальную продолжительность нагрева. Ориентируйтесь на
Продолжительность Звуковой сигнал
8 8 сек унд 3 звуковых сигнала
10 10 секунд 4 звуковых сигнала
12 12 секунд 5 звуковы х сигнала
приведенную ниже таблицу:
• Волосы должны быть чистыми, сухи ми и тщательно расчесанными.
• Приподнимите верхние пряди волос с помощью зажима и начните
укладку с нижних прядей.
• Отделите прядь волос шириной не более 3 см. Тщательно расчешите
ее расческой.
• Расположите ус тройство на пряд и так, чтобы цилин др был повернут п о
направлению к голове (РИС. 1, 2).
• Прядь волос должна располагаться прямо, по центру устройства,
между двумя ручками.
• Разместив устройство должным образом, закройте ручки, чтобы дать
ему возможность захватить прядь волос.
Внимание: Если Вы продолжаете удерживать рукой кончик пряди
волос после закрытия ручек, устройство остановится. Звуковой сигнал
предупредит Вас о необходимости ослабить натяжение пряди рукой
(РИС. 3, 4).
Если отделенная прядь слишком широка (более 3 см) или
неправильно размещена по отношению к центру, устройство
остановится. Звуковой сигнал оповестит о наличии проблемы.
Данная система позволяет избежать запутывания волос.
• Удерживайте устройство в выбранном положении до тех пор, пока не
раздастся звуковой сигнал (после 3, 4 или 5 следующих друг за другом
звуковых сигналов — смотрите приведенную выше таблицу).
• Затем раскройте устройство, отпустив ру чки, и аккуратно высвободите
прядь вол ос. Не тяните устр ойство, чтобы осв ободить прядь, инач е она
может распрямиться (РИС. 5).
• Подождите, пока волосы остынут, прежде чем уложить их в прическу
или расчесать пряди.
• Поступайте аналогичным образом с остальными прядями волос, пока
не получите желаемое количество локонов.
Желаемый
эффект
Укла дка
волнами
Мягкие
локоны
Крутые
локоны
49
Page 50

Примечание: Устройство оснащено автоматической системой,
поочередно укладывающей локоны в противоположных направлениях,
с целью прид ания волосам макси мально естес твенного вида (РИС. 6).
• Закончив пользоваться устройством, выключите его и отключите от
сети. Перед тем как убрать устройство в место хранения, дайте ему
остыть.
Режим ожидания
Если Вы не пользуетесь устройством более чем 20 минут, температура
его нагрева автоматически понизится до 150°C. Если вы захотите снова
воспользоваться им по истечении данного промежутка времени,
достат очно сжать ручки ус тройства и зате м отпустить их; т аким образом
оно нагреется до заданной температуры.
Автоматическая остановка
Если устройство было вк лючено без перерыва в течение 60 минут, оно
автоматически останавливае тся.
УХОД И ЧИС ТКА
Чтобы избежать скопления остатков средств для укладки волос,
которые могут помешать нормальной работе устройства, необходимо
воспользоваться приспособлением для очистки устройства, входящим
в комплект поставки.
• Убедитесь в том, что устройство отключено от сети, выключено и
осты ло.
• Аккуратно погрузите приспособление для очистки в теплый мыльный
раствор.
• Вставьте приспособление для очистки в полость между устройством и
цилиндром (РИС. 7).
• Несколько раз проверните приспособление дл я очистки вокруг цилиндра,
чтобы уда лить все следы от ср едств для ук ладки волос (РИС . 8).
• Затем изв леките приспособ ление для очист ки из полости уст ройства.
• Перед тем как вновь воспользоваться устройством, дайте ему
полностью высохнуть.
• Приспособлением для очистки можно пользоваться многократно.
Достаточно просто вынуть войлочную втулку, ополоснуть её в
мыльной воде и высушить. После этого она будет готова к повторному
использованию.
Корпус устройства можно протереть куском влажной ткани после
того, как отк люченное от сети устройство полностью остынет. Перед
повторным включением устройства в сеть убедитесь в том, что оно
полностью высохло.
Щипцы дл я укладки вол ос
Производитель: BABYLISS SARL
99 Авеню Ар истид Бриан
92120, Монруж, Фра нция
Факс 33 (0) 1 46 56 47 52
Сделан о в Китае
Дата прои зводства (неде ля, год): см. на то варе
50 51
Page 51

TÜRKÇE
BaByliss Curl Secret® IONIC ile rahatça dayanıklı bukleler oluşturun.
Gelişmiş otomatik sistemi sayesinde Curl Secret® IONIC, uzun ve sıkıcı
işlemler olmadan saçlarınızda bukleler oluşturur.
Öncelikle güvenlik talimatlarını inceleyin.
ÜRÜNÜN ÖZELLİKLERİ
• Seramik Kaplama (1)
• Hızlı ısınma (maksimum 230 °C)
• Açma kapama düğmesi 0-I-II: 2 sıcaklık seviyesi - 210 °C (I) - 230 °C (II) (2)
• Farklı şekillerde bukleler oluşturmak için sesli sinyal yayan 3 farklı
ısıtma süresi ayarı (8, 10 ve 12 saniye) (3)
• Parlak ve antistatik iyonik teknoloji
• Işıklı çalışma göstergesi (LED) (4)
• Otomatik kapanma
• Döner kablo (5)
• Temizleme aracı (6)
KULLANIM
Uyarılar
• İlk kullanımda değişik bir koku nun yayılması normaldir; bu sıkça olur ve bir
sonraki kullanımda kaybolur.
• Her kullanımda, haf bir duman çıkabilir. Bu durum saçtaki yağın veya saç
ürünlerinin (durulamadan kullanılan bakım ürünleri, cilalar…) ve saçtaki
nemin buharlaşmasından kaynaklanmaktadır.
• Saçın en iyi şek ilde korunması için ısıya kar şı koruyucu sprey kullanıl abilir.
• Cihazın içinde yer alan iyon jeneratörünün antistatik etkisi sayesinde
saçlar yumuşar ve parlaklık kazanır. Uyarı: Vızıltıya benzeyen haf bir ses
duymanız tamamen normaldir; bu iyon jeneratörünün çıkardığı kendine
özgü bir sestir.
• Cihazın şini elektrik prizine takın ve 0-I-II açma kapama düğmesi ile
arzu edilen sıcaklığı seçerek cihazı çalıştırın. Aşağıdaki tabloya bakın:
Sıcaklık Saç tipi
(I) : 210°C
(II) : 230°C
İnce, rengi açılmış ve/veya hassaslaşmış
saçlar
Normal, kalın telli, dalgalı,
kıvırcık ve/veya boyalı saçlar
51
Page 52

• Işıklı gösterge yanar ve yanıp sönmeye başlar.
• Seçilen sıcaklığa erişildiğinde ışıklı gösterge yanıp sönmeyi bırakır.
Böylece cihaz kullanıma hazırdır; ışık yanmaya devam eder.
• Arzu edilen etkiye göre ısınma süresi ayarını seçin. Haf bukleler için
minimum ısınma süresini seçin. Daha sıkı bukleler için maksimum süreyi
seçin. Aşağıdaki tablodan yararlanabilirsiniz:
Süre Sesli sinyal Arzu edilen etki
8 8 saniye 3 bip sesi Dalgalar
10 10 saniye 4 bip sesi Haf bukleler
12 12 saniye 5 bip sesi Sıkı bukleler
• Saçlarınızın temiz ve iyice taranmış olduğundan emin olun.
• Üst taraftaki saçları bir tokayla toplayın ve çalışmaya alt taraftaki saçlarla
başlayın.
• Maksimum 3 cm genişliğinde bir saç tutamı ayırın. Tutamı tarakla tarayın.
• Cihazı, silindiri başınızla aynı yönde olacak şekilde saç tutamı üzerine
yerleştirin (ŞEKİL 1, 2).
• Saç tutamının dümdüz tutulması ve cihazın ortasına, iki sapının arasına
yerleştirilmesi gerekmektedir.
• Cihaz doğru olarak yerleştirildiğinde, saç tutamını otomatik olarak
tutmasını sağlamak için cihazın saplarını kapatın.
Dikkat: Eğer cihazın saplarını kapadıktan sonra saç tutamının ucunu
elinizle tutuyorsanız cihaz otomatik olarak kapanır ve elinizle
uyguladığınız baskıyı bırakmanız konusunda sizi uyarmak için sesli
sinyal (bip) gönderir (ŞEKİL 3, 4).
Çok geniş bir saç tutamı aldıysanız (3 cm’den geniş) veya saç
tutamını cihazın ortasına doğru şekilde yerleştirmediyseniz cihaz
kapanır ve size bir sorun olduğunu bildirmek için sesli sinyal (bip)
gönderir. Bu sistem saçlarınızın dolaşmasını önler.
• Sesli sinyaller gelene kadar cihazı aynı pozisyonda tutun (seçilen ayara
göre arka arkaya 3, 4 veya 5 bip sesinin ardından, yukarıdaki tabloya
bakın).
• Daha sonra, saplarını bırakarak cihazı açın ve ardından bukleleri özenle
çıkarın. Saç tutamını çıkarmak için cihazın üzerinden çekmeyin. Çekerek
çıkarırsanız buklenin görünümü bozulur. (ŞEKİ L 5).
• Buklelere şekil vermeden veya taramadan önce saçların soğumasını
bekleyin.
52 53
Page 53

• Arzu edilen bukle sayısına ulaşana kadar kalan saçlar üzerinde aynı
harekete devam edin.
NOT: Cihazda, daha doğal bir sonuç elde etmek için bir yönde
ardından aksi yönde bukleler oluşturan otomatik bir sistem
bulunmaktadır (ŞEKİL 6).
• Kullanım sonrasında, cihazı kapatın ve şini elektrik prizinden çekin.
Kaldırmadan önce soğumasını bekleyin.
Bekleme modu
Cihaz 20 dakikadan daha uzun süre kullanılmazsa, cihazın sıcaklığı
otomatik olarak 150°C’ye inecektir. Bu süre aşıldıktan sonra cihazı yeniden
kullanmak isterseniz, cihazın saplarına bastırın ve bırakın; böylece cihaz
seçtiğiniz sıcaklığa dönecektir.
Otomatik kapanma
Cihaz 60 dakika boyunca sürekli açık bırakılırsa otomatik olarak kapanır.
BAKIM VE TEMİZLİK
Saç ürünlerinin birikerek cihazın düzgün çalışmasını engellememesi
için, ürünle birlikte verilen temizleme parçasıyla ürünü düzenli olarak
temizlemek önemlidir.
• Cihazın kapatıldığından, şinin prizden çekildiğinden ve soğuduğundan
emin olun.
• Temizleme parçasını haf bir sabunla karıştırılmış sıcak suya batırın.
• Parçayı cihaz ve silindirin oluşturduğu boşluk içerisine takın (ŞEKİL 7).
• Her türlü saç ürünü kalıntısının temizlenmesi için parçayı silindirin
etrafından birkaç kere döndürün (ŞEKİL 8).
• Ardından temizleme parçasını boşluktan çıkarın.
• Yeniden kullanmadan önce cihazın tamamen kuru olması gerekmektedir.
• Temizleme parçasını tekrar kullanabilirsiniz. Keçe tamponun çıkarılması,
sabunlu suyla yıkanması ve yeniden kullanılmadan önce kuruması
gerekir.
Cihazın dış yüzeyi, cihazın şi prizden çekilmiş ve soğuk durumdayken
nemli bir bezle silinebilir. Yeniden şe takılmadan önce cihazın tamamen
kuruduğundan emin olun.
53
Page 54

Page 55

Page 56

 Loading...