

BabyBjorn Baby Carrier Original Owner's Manual

Owners Manual
BABYBJÖRN® Baby Carrier Original
EnglishFrançaisEspañol
If you have questions or if there is anything you do not understand,
call BabySwede/BABYBJÖRN® Customer Service at 866-424-0200.
IMPORTANT!
Please read this manual carefully before use.
Keep for future reference.
www.babybjorn.com
HELPFUL HINTS
• Sit down when putting in and taking out your baby. When using the
Baby Carrier the fi rst few times limit the use of the Baby Carrier to
15 – 20 minutes at a time until both baby and parent are comfortable.
• When you take the Baby Carrier off, leave one side completely attached.
This way you will only have to connect one Sliding Buckle Clip before
putting your baby in the Baby Carrier. It doesn’t get any easier!
• To minimize the stress on your back, be sure to wear the Baby Carrier
high up on your chest. Your baby is in the correct position when you
can kiss the top of the baby’s head by just looking down.
• To nurse in privacy, sit comfortably, loosen the Straps and slide one
Strap off your shoulder. Have your hands supporting the child and the
Baby Carrier at all times. Be sure to tighten the Straps again before
standing up.
• If your Baby Carrier feels too tight for your baby:
1. Make sure that the Sliding Buckle is in the correct position
for your baby’s size.
2. Increase the length of the Straps by adjusting the Strap Buckles.
This will allow more space for you and your baby.
• When your baby has outgrown the Baby Carrier, move the Sliding Buckle
to the highest position, so that you are prepared for the next infant using
the Baby Carrier. Store this Owners Manual with the Baby Carrier.
WASHING INSTRUCTIONS
Machine wash separately in warm water, mild detergent, gentle cycle,
and drip dry (no dryer). Do not use chlorine bleach or fabric softener. Iron
only at low temperature and never iron trim. Improper care will void any
and all warranties.
3
WARNING
- FALL HAZARD
- Carefully read and follow all instructions before assembling and
using the Baby Carrier.
- Keep instructions for future use.
- This Baby Carrier is designed for use by adults while walking only.
- Only use this Baby Carrier for babies from 21" (53 cm) and 8 lb
(3,5 kg) up to 25 lb (11 kg)
- Small babies can fall through a leg opening.
- Adjust leg openings to smallest possible size.
- For babies 8–11 lb (3.5-5 kg) the Leg Straps must be used.
- Hold your baby closely at all times until correctly attached.
- Make sure baby is properly positioned with the legs straddling
the seat and both arms extending through the Armholes.
- Check that all buckles and adjustments are secure.
- Pull all straps tightly around your body.
- Baby must face you until he or she can hold head upright.
- Always make sure there is enough room around your baby’s
nose and mouth to provide a clear source of air.
- Never lie down with baby in the Baby Carrier.
- Inspect the Baby Carrier regularly for any signs of wear and tear.
2
© BABYBJÖRN AB, Box 595, SE-182 15 Danderyd, Sweden, 2005
This product and the trademark are protected by patent
and trademark rights.
US Patent No. 5, 490, 620, US Patent No. 5, 732, 861, US Patent No. 6, 736, 299.
For more information please contact info@babybjorn.com
Exclusive distributor in USA and Canada: BabySwede LLC,
5700 Lombardo Center Drive, Suite 202, Cleveland, OH 44131, (866)-424-0200
English
BABYBJÖRN®
Logo
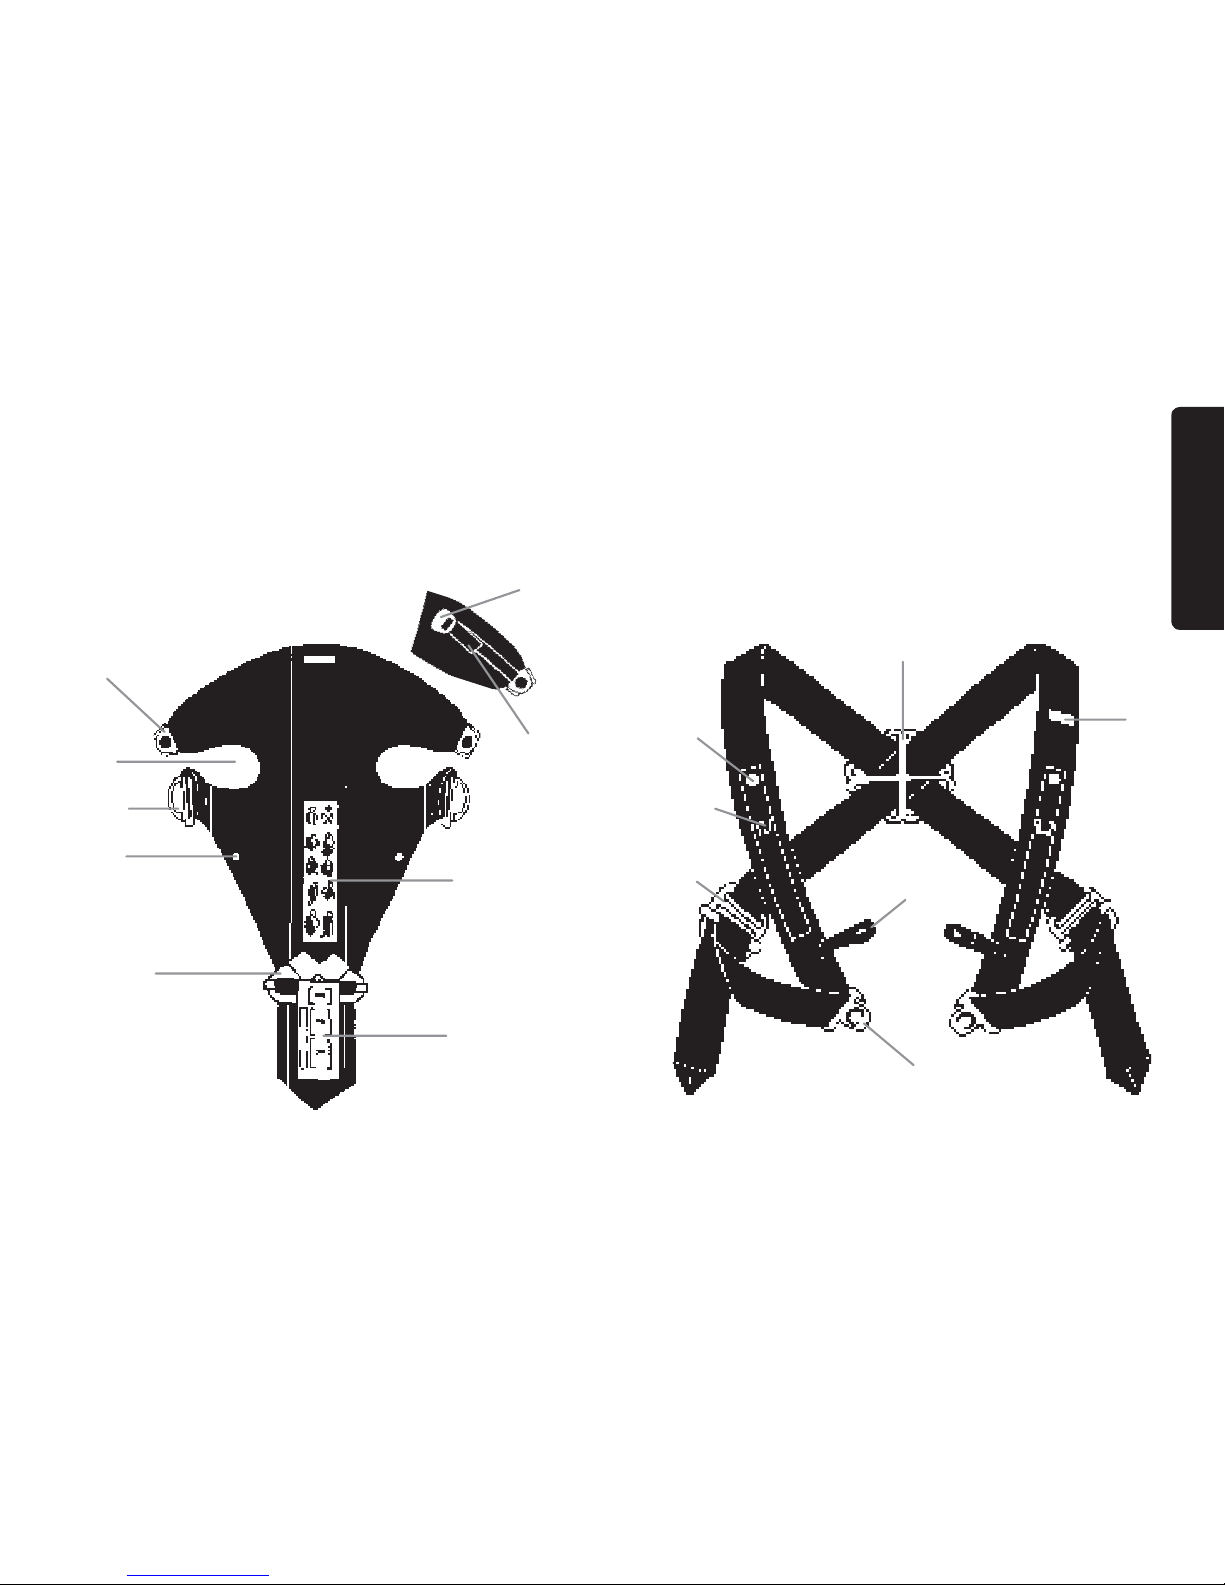
Parts of the BABYBJÖRN® Baby Carrier Original
REFER TO THESE PARTS WHEN REA DING THE INSTRUCTIONS
FRONT PIECE
STRAPS
Head
Support
Buckle
Side Latch
Leg Strap
Button
Sliding Buckle
Armhole
Instruction Label
Head
Support
Knob
Side Latch
Gro ove
Strap Buckle
Cross
Sliding Buckle Clip
Fabric Leg Strap
4 5
Adjustment Label
Head
Support
Strap
Strap
Adjuster
English
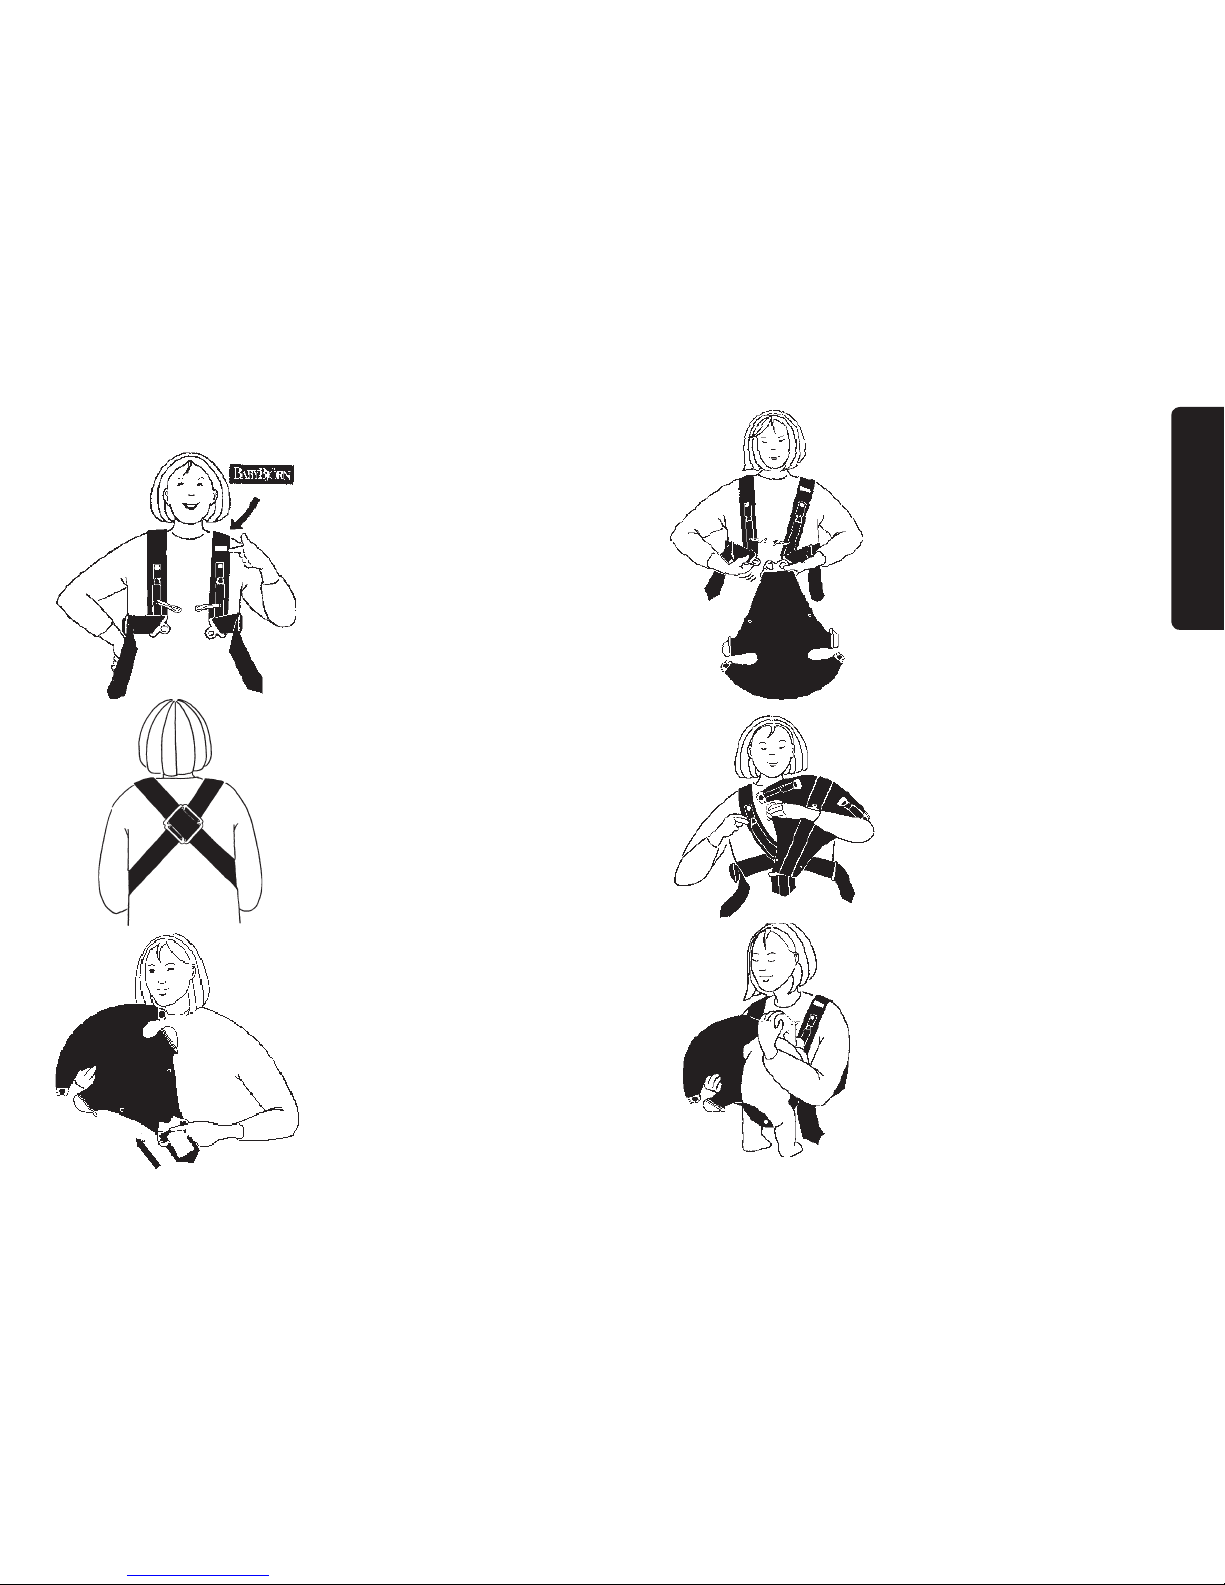
1. Put on Straps with the
B
ABYBJÖRN
®
logo on left
chest and Sliding Buckle
Clips pointing down.
FOR USE WITH AN INFANT
2. The Cross should be at
the bot tom of the shoulder
blades for maximum comfort.
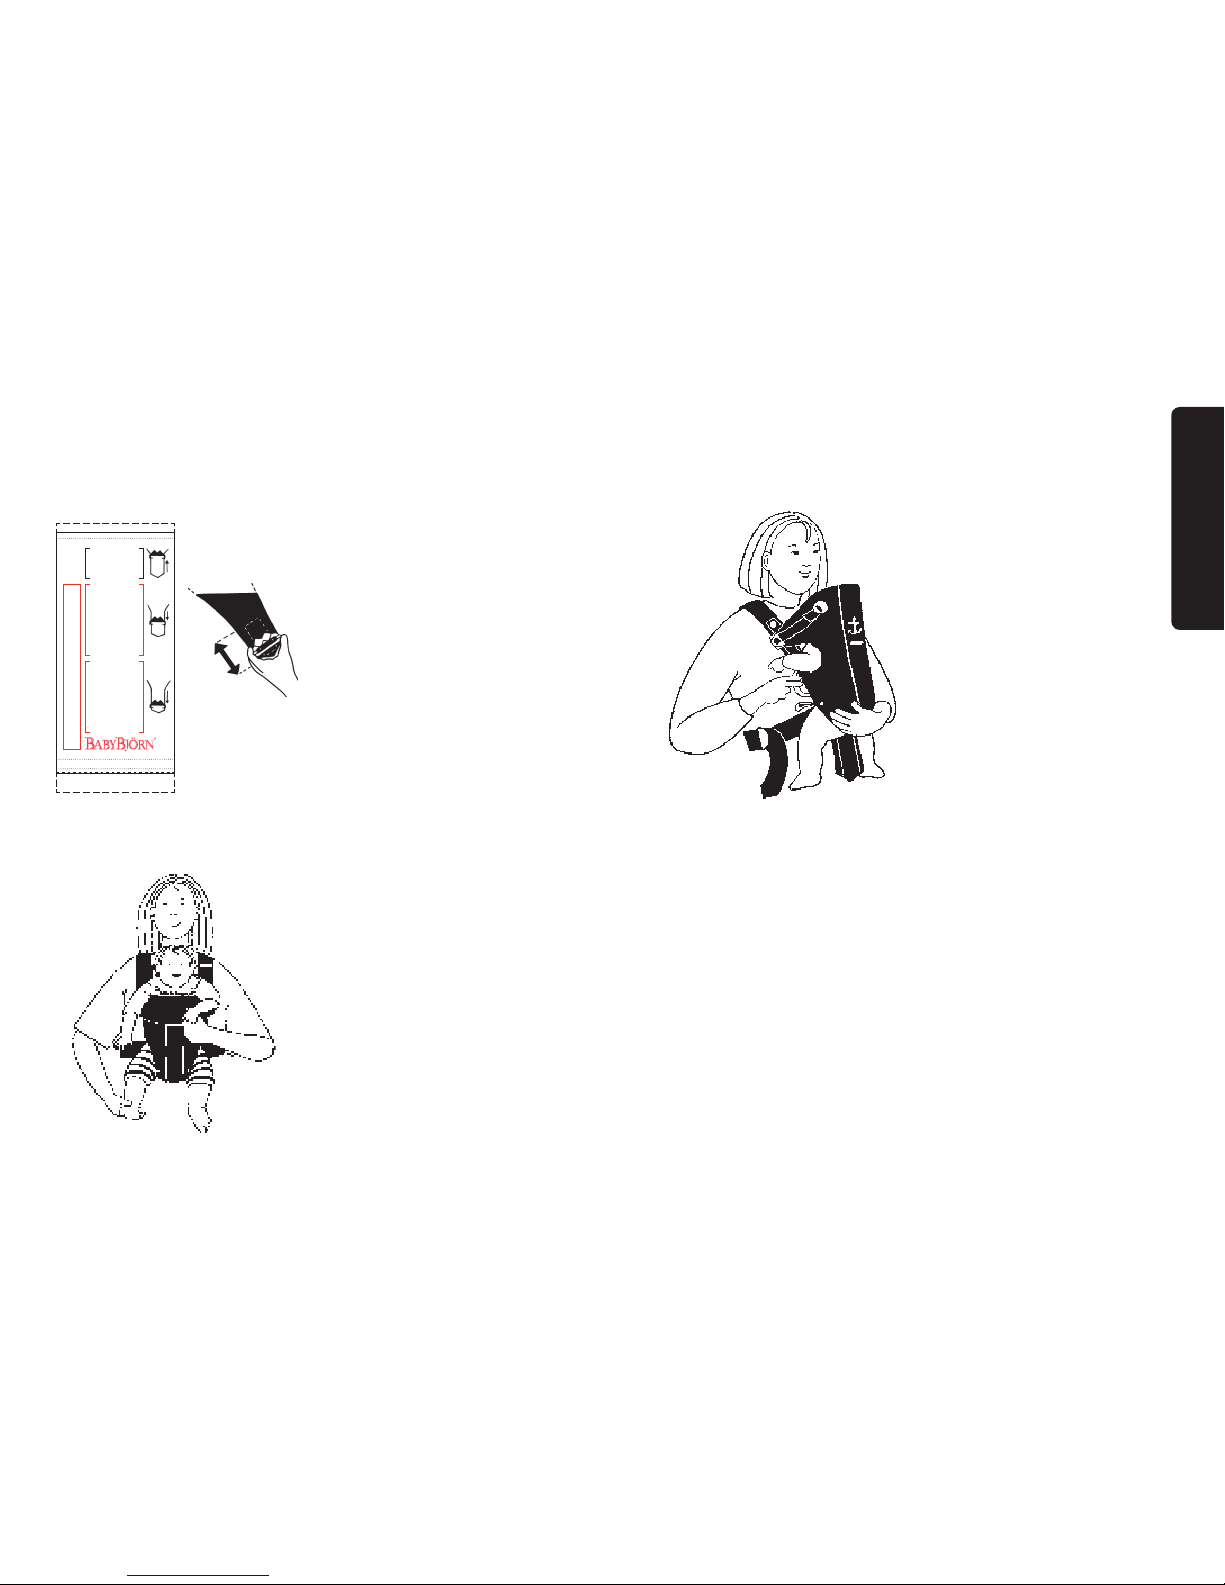
3. Wiggle the Sliding Buckle
up to the highest position
for infants 21-23.5”
(53-60 cm) in length.
6
4. Attach the Sliding Buckle Clips
on the Straps to the Sliding
Buckle on the Front Piece.
5. Starting on one side – Slide the
Side Latch all the way into the
Side Latch Groove on the Strap
(red to red, blue to blue) until
you hear a click.
6. Slide your infant into the Baby
Carrier on the open side.
HOLD YOUR INFANT CLOSELY
UNTIL THE BABY CARRIER IS
FULLY ATTACHED.
MAKE SURE THE INFANT’S
LEGS ARE STRADDLING THE
SEA T AND THAT THE ARM IS
THROUGH THE ARMHOLE.
7
English
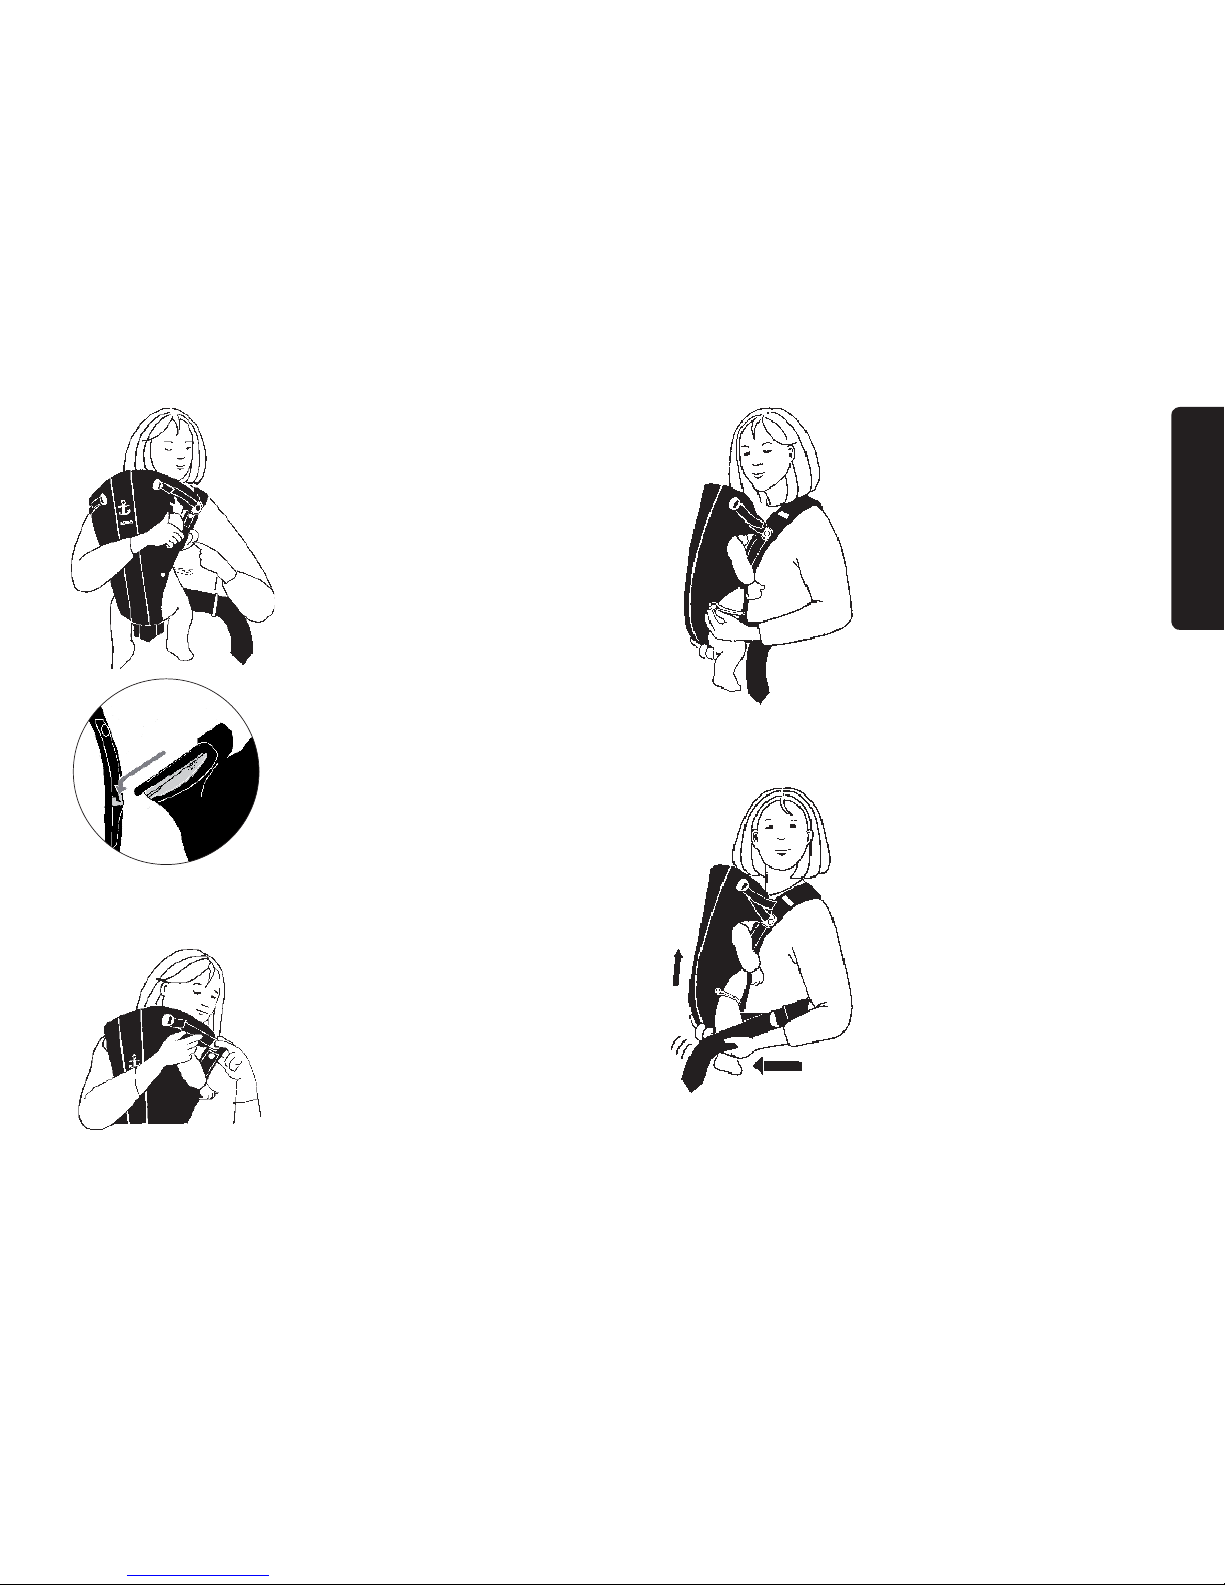
7. Slide the other Side Latch all the
way into the Side Latch Groove
on the other Strap until you hear
a click. Both arms of the infant
must be through the Armholes for
maximum safety and sup port.
10. Pull forward on the Straps,
one at a time, while lifting until
the infant is close and high
upon your chest for max i mum
safety and comfort. You
should be able to look down
and kiss your infant’s head.
8. Hold your thumb behind the
Head Support Knob on the
Strap, and attach the Head
Sup port Buckle. Adjust the size
of the Head Support by pulling
the Head Support Straps.
ALWAYS MAKE SURE
THERE IS ENOUGH ROOM
AROUND YOUR BABY’S
FACE TO PROVIDE A
CLEAR SOURCE OF AIR.
8 9
9. Attach the Fabric Leg Strap to the
Leg Strap Button (BOTH SIDES!).
Fabric Leg Straps must be used
for infants between 8-11 pounds.
HELPFUL HINT
Angle the Side Latch some,
and it will easily slide into
the Side Latch Groove.
English
1. Repeat step #1 and #2 (page 6)
2. Referring to the Adjustment
Label, wiggle the Sliding Buckle
down to the proper pla ce,
based on your baby’s length.
3. Repeat step #4 and #5 (page 7).
4. Slide your baby into the
Baby Carrier on the open side,
facing for ward.
5. Repeat step 7 (page 8).
6. Fold down the Head
Support and attach the
Head Support Buckles
to the Head Support Knobs.
The Head Support Buckle
should be turned over,
compared to when used
with a baby facing inwards.
7. The arms of the younger
baby should be through the
Armholes, while the older
baby can have their arms
above the folded head
support as shown.
Unbutton both Fabric Leg
Straps. While holding your
baby closely undo the Head
Sup port Buckle on one side.
Grip the Side Latch on one
side with your thumb as picture
shows. Press your thumb on
the target mark and lift the
Side Latch upwards.
To remove a sleeping child
repeat the above on the
opposite side, while holding
your baby closely. Allow the
Front Piece to fall forward,
still connected to the Sliding
Buckle.
FOR USE WITH AN OLDER BABY
When your baby is able to hold its head and shoulders upright,
he or she may enjoy facing forward.
TO REMOVE YOUR CHILD
FROM THE BABY CARRIER
10 11
21 - 23.5”
53 - 60 cm
23.5 - 26”
60 - 66 cm
26” +
66 cm +
Min. 8 lbs / 3,5 kg
Max. 22 lbs / 10 kg
WARNING! Buckle MUST NOT be in red area when
the infant is shorter than 23.5” / 60 cm
English
 Loading...