

Page 1
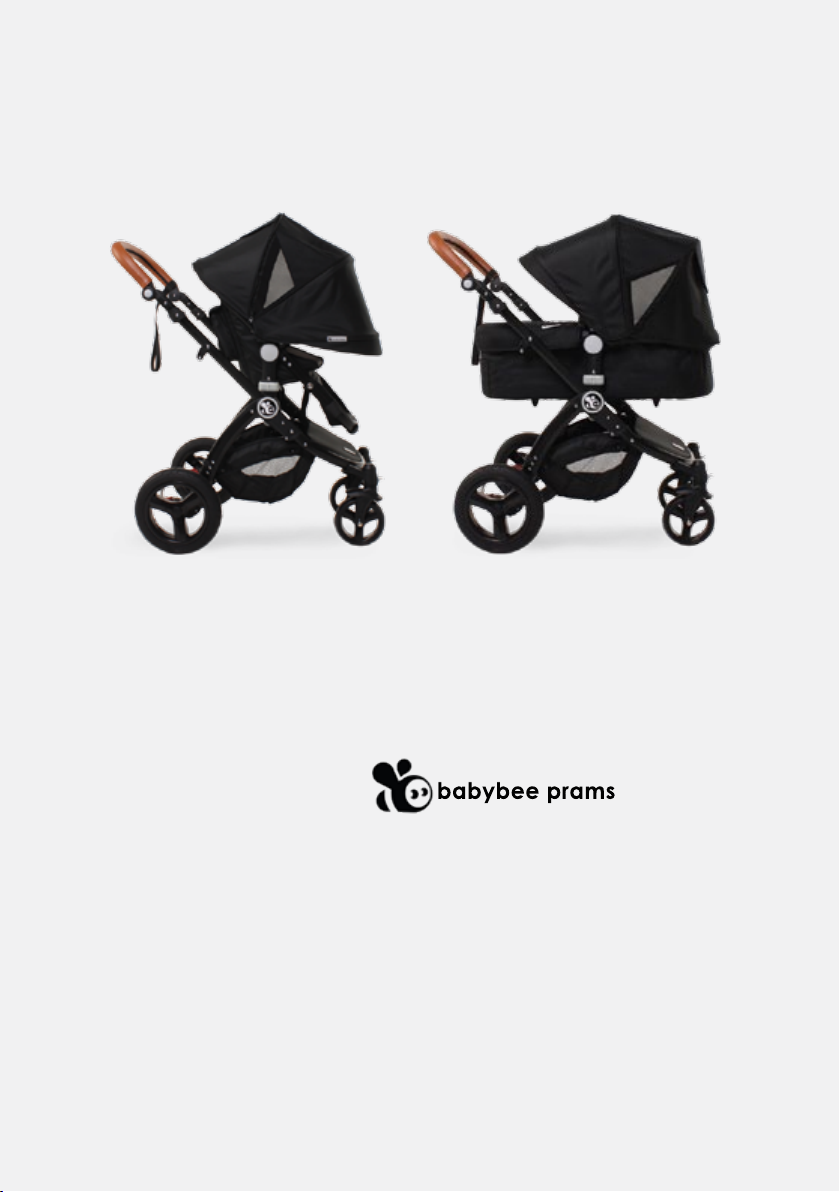
babybee prams
Comet plus
www. babybeeprams.com.au
Please keep this manual for future reference
Page 2

Hello!
Thanks for choosing the babybee Comet plus. Before you get
started, there’s a few quick things we’d like you to note:
Return Policy
babybee offers a 9 month free
return policy. A condition of this
policy is that we will only accept
returns where the product is
in its original condition (with
no signs of usage) and in all
original packaging including
box, protective plastics and
cardboard so please be mindful
of this when unboxing and
setting up your pram.
Warranty
All of our prams come with a
12 month warranty to cover
against faults in materials and
workmanship when used under
normal conditions, according
to our manuals and technical
specications. Please refer to
page 39 for further information.
Support
If at any stage you require any
assistance with setup or use,
please rst refer to our After
Sales Support page on our
website which has a variety of
instructional videos and FAQ’s.
Keep in touch
We love nothing more than
seeing our customers with the
Comet plus in action so we
hope you connect with us soon
via one of our social media
channels. And don’t forget
there are prizes to be won each
month for simply tagging your
pram photos #babybeeprams
Enjoy the ride,
From all of us at babybee
2
Page 3
Using your
Comet plus
What’s in the box 04
Get to know your Comet plus: Terminology 05
Step One: Install the brake and wheels 06
Collapsing the frame 10
Step Two: Attach the bassinet to the frame 12
Step Three: Attach the canopy 17
Rear brake, adjusting the handlebar and front swivel wheels 19
Switching from bassinet to stroller seat 22
Seat position and 5 point safety harness 27
Setting up your bassinet 30
Setting up the canopy 33
Accessories, Maintenance and Cleaning 36-38
Warranty 39
Safety warnings
40
Safety First
The safety of your family is our
number one priority. Please take
the time to carefully read this
manual before setting up and
using your Comet plus.
The Comet plus is tested to
comply with the Australian Safety
Standard: AS/NZS 20088:2013
Pram and Stroller – Safety
Requirements
WARNING:
With the exception of the
outer cardboard packaging,
to prevent injury from choking,
carefully remove and
immediately move out of reach
all protective packaging. Never
leave your child unattended
with the pram or packaging.
3
Page 4
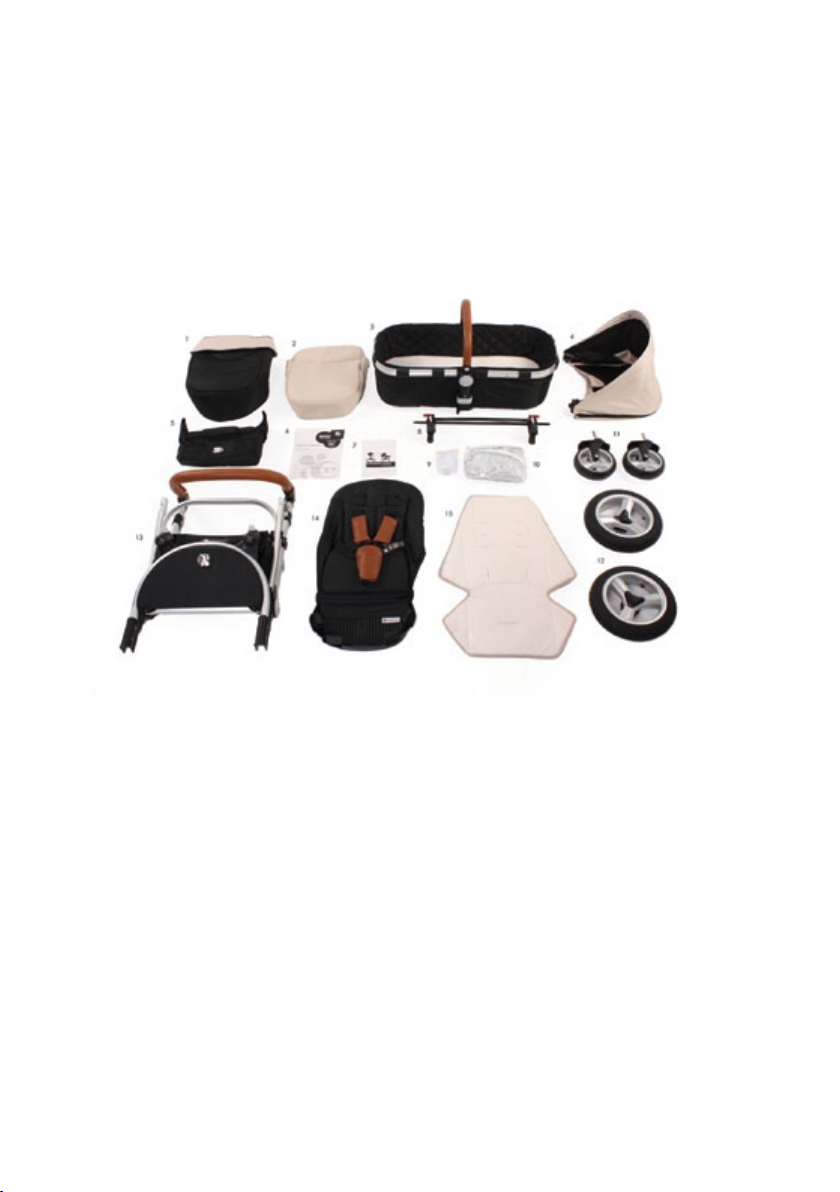
What’s in the box
1 Foot cover
2 Bassinet cover
3 Bassinet, bassinet board,
bassinet mattress and belly
bar (also the seat frame)
4 Canopy
5 Travel organiser
6 Welcome letter
PLEASE NOTE:
Depending on your order, you may receive multiple boxes.
4
7 Manual
8 Brake bar
9 Mosquito net
10 Rain cover
11 Front swivel wheels
12 Rear air tyres
13 Frame/chassis and basket
14 Stroller seat
15 Seat liner
Page 5
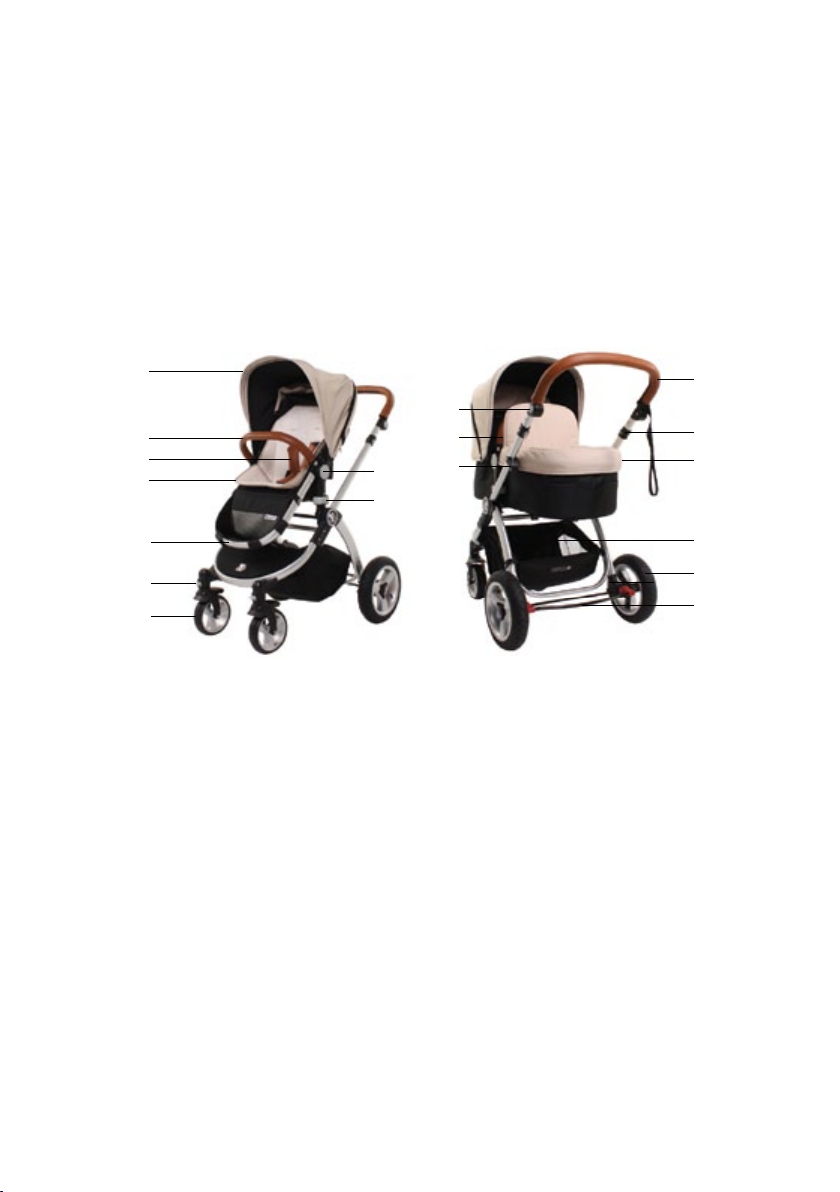
Get to know your
new Comet plus
Terminology
a
b
c
d
e
f
g
a Extendable canopy with
magnetic peekaboo
b Belly bar
c 5 point safety harness
d Seat liner
e Seat frame (same as o)
f Front swivel wheel lock
g Front swivel wheel
h Bassinet/Seat frame release
i Seat recline buttons
i
h
m
l
j
j Frame release clips (to
release from folded position)
k Handlebar
l Bassinet cover
m Handlebar height
adjustment buttons
n Frame collapse levers
o Bassinet frame (same as e)
p Shopping basket
q Rear wheels
r Brake
k
n
o
p
q
r
5
Page 6
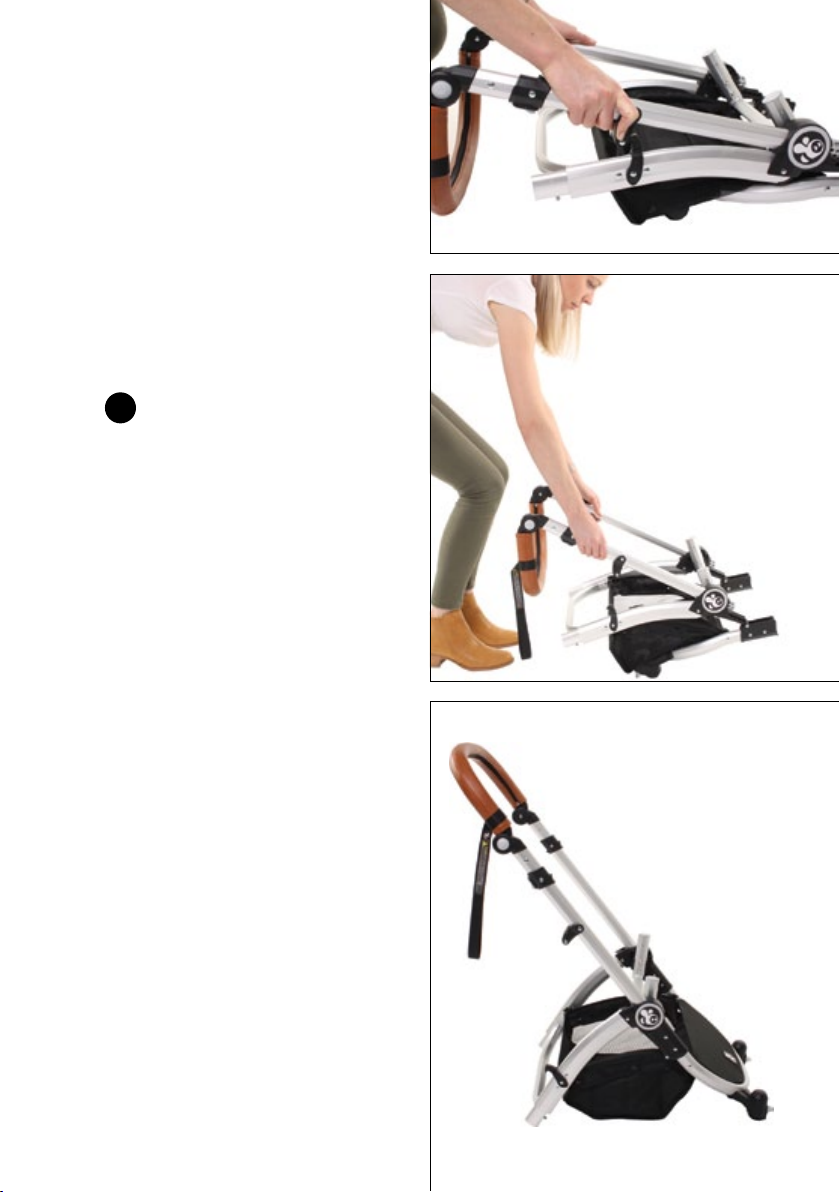
Step One
Install the brake
and wheels
To release the frame from
1
the folded position, pull
back on the black frame
release clip located on the
side of the frame and lift
open.
When the frame is fully open
you will hear a “click”.
6
Page 7
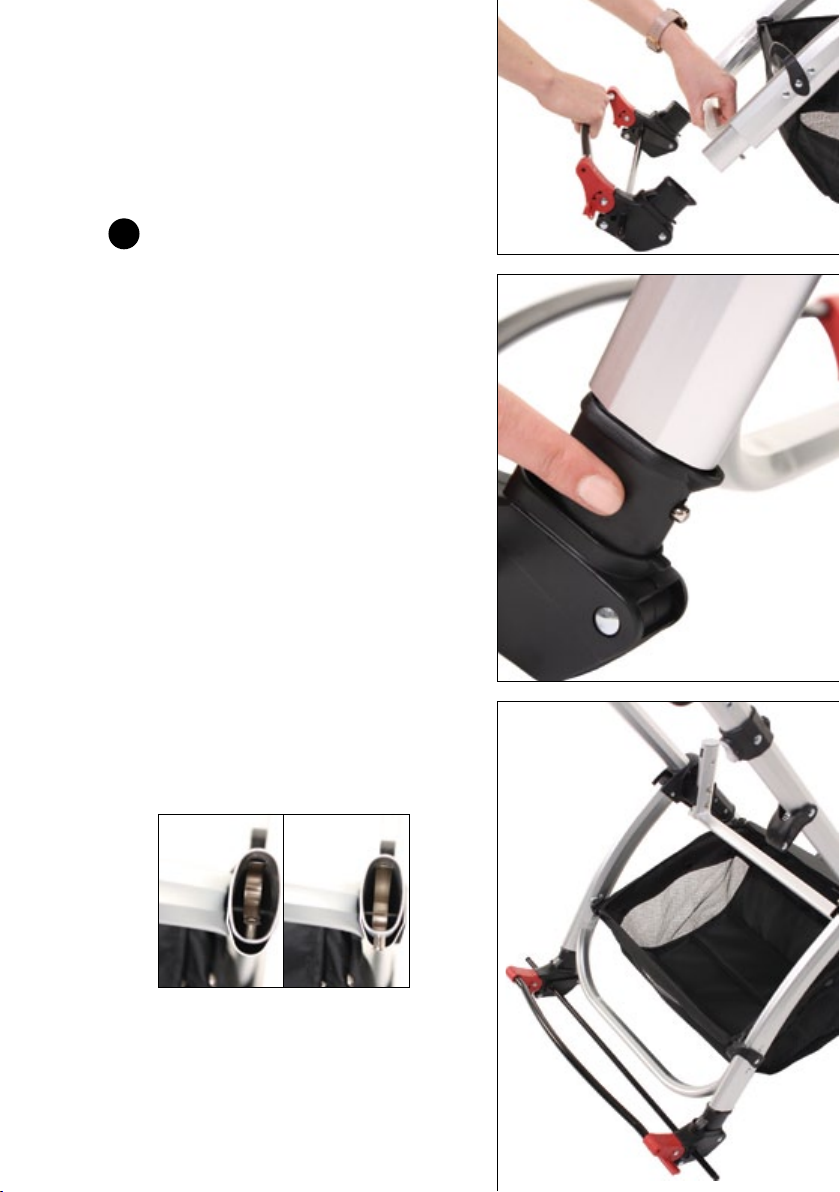
At the rear of the frame,
2
take the brake and attach
it to the frame. Push down
until you hear a ‘click’ and
when you can see the two
sliver pins lock into place.
PLEASE NOTE:
The brake should be
attached rmly onto the
pram on both sides, if either
side slips off then you need
to reset the silver pin back
into place.
To reset the silver pin reach
inside the frame with your
nger and feel for the metal
pin, pull it forward with your
nger until it pops back into
place so you can see it stick
out of the frame. You can
then continue to attach
your brake to the pram.
7
Page 8
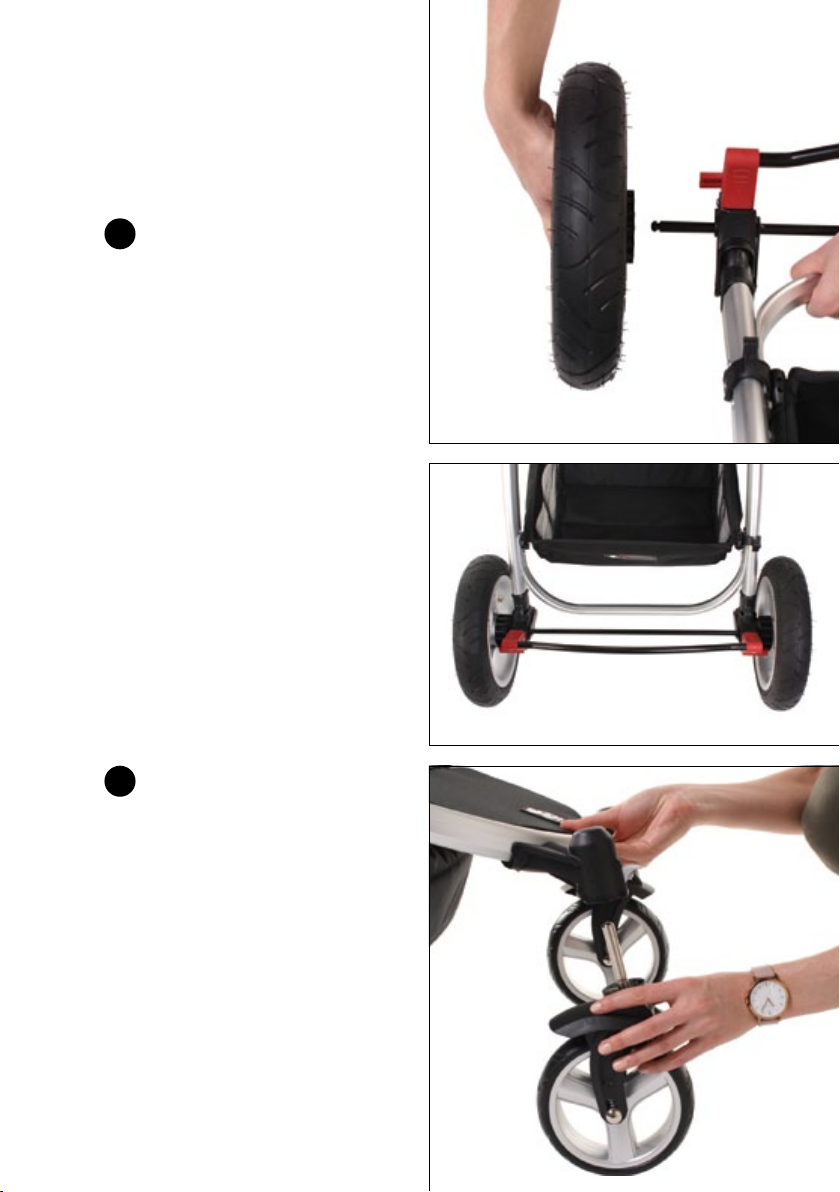
To attach the air tyres simply
3
push each wheel onto the
pin until you hear a “click”.
NOTE:
Air tyres will arrive 85%
inated. If you wish to
inate further you can use
a standard bike pump.
To repair a puncture, you
can purchase a tyre repair
kit from Kmart or similar
stores to repair the inner
tube yourself (they’re very
effective, and inexpensive).
Bike shops may be able
to repair the tyre for you.
Alternatively, the tyres are
also available for sale on
the Spare Parts page of our
website.
Move around to the front
4
and insert each front wheel
pin into the socket until you
hear a “click”.
8
Page 9
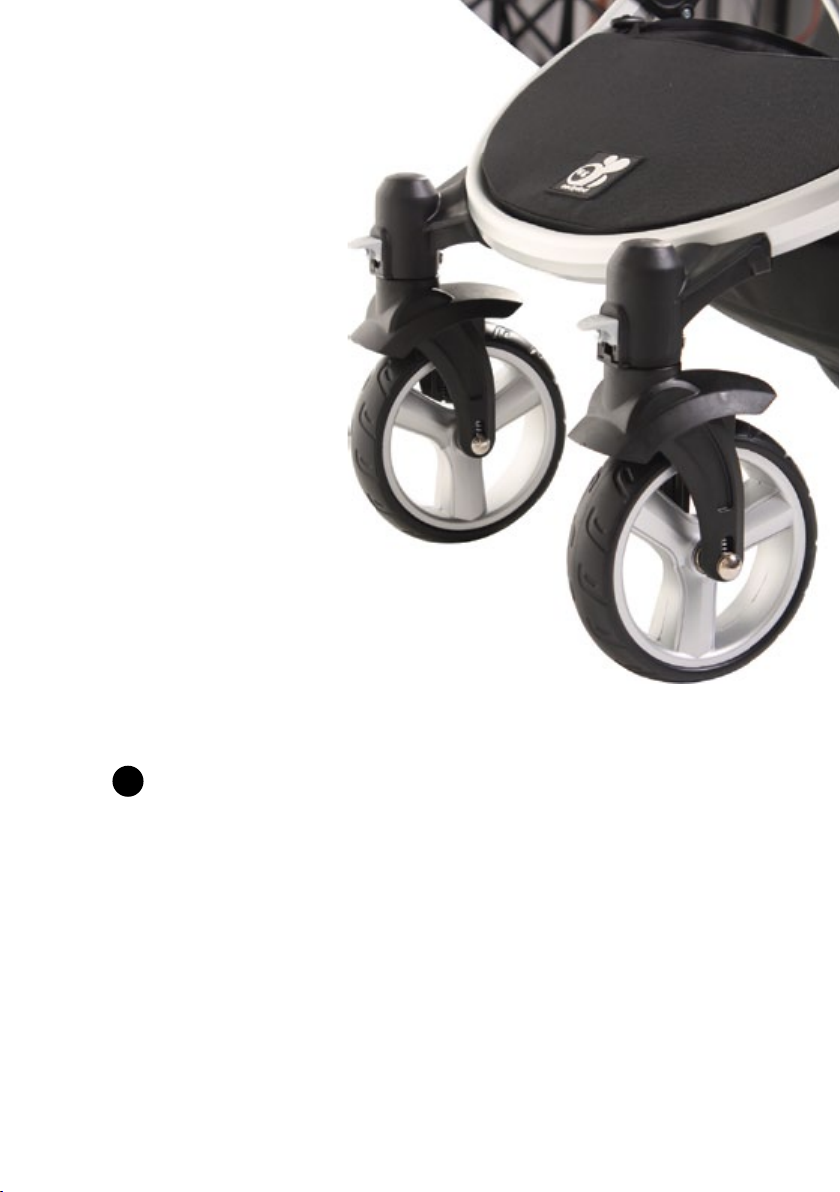
6. With all 4 wheels now
5
attached, individually pull
them just to make sure
they are all securely held
in place.
9
Page 10
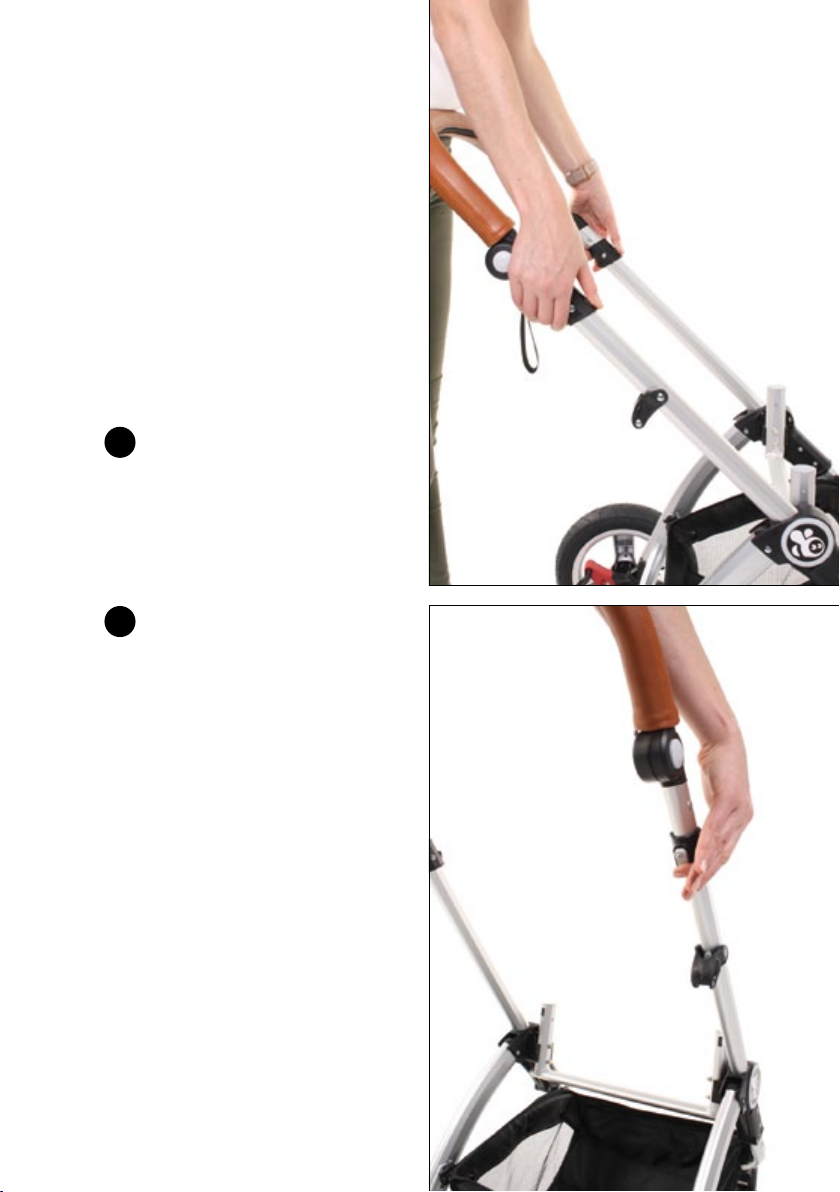
Practice
collapsing the
frame from this
position
Hold the handlebar against
1
your body for support.
To fold, press the grey
2
safety release button rmly
(underneath the right lever)
and hold while pulling both
black frame release levers
up toward you. If this grey
button is not pressed in
completely you won’t be
able to pull the lever back.
10
Page 11
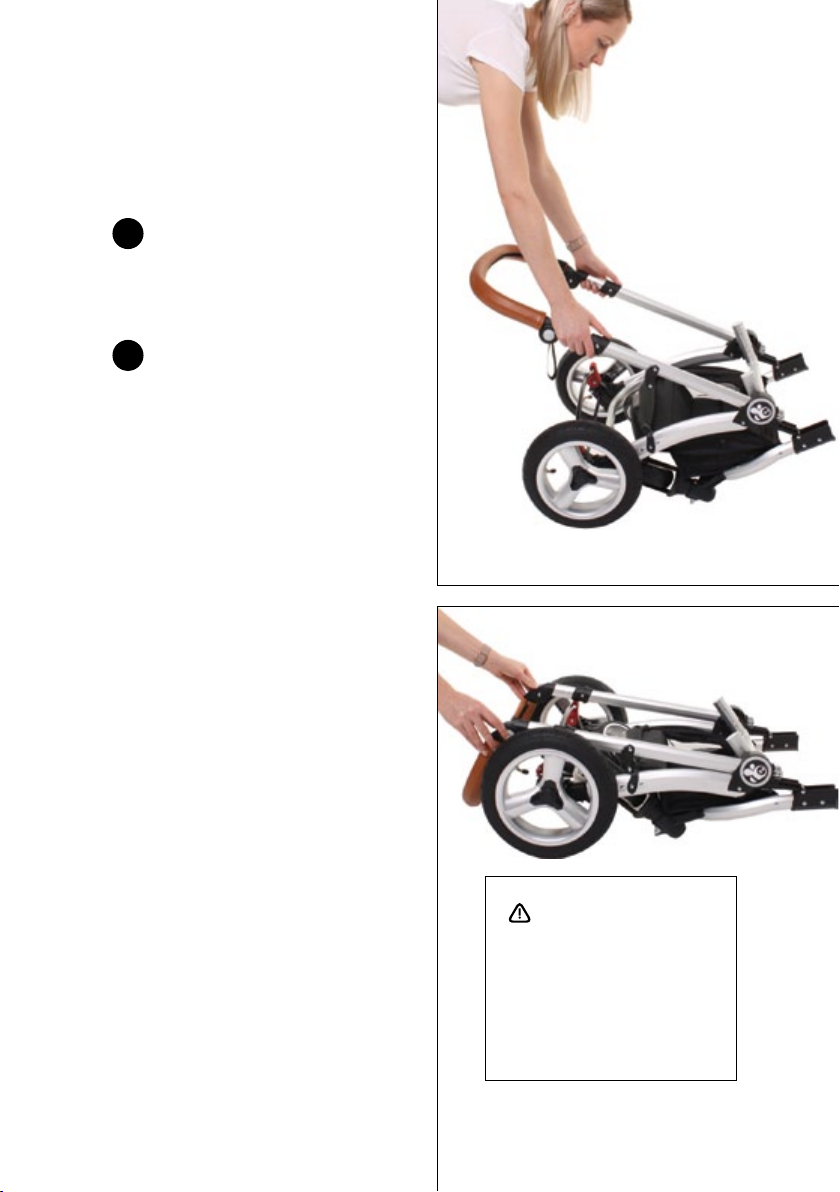
Once pulled up, press down
3
towards the oor on the
frame and it will collapse on
itself.
Make sure the black frame
4
release clip has clicked in
to place to secure it from
opening again. Carrying
the frame without the latch
secured can result in injury
caused by moving parts.
Please also bend from
the knees when lifting the
frame.
To release the pram as you
did in step one, simply pull
back on the black frame
release clip and pull the
frame up until it clicks into
place. Practice this a few
times so you’ve got the
hang of it. Don’t worry it will
become second nature in
no time!
Also note that the pram
can be collapsed with the
seat attached when in the
forward facing position,
however the bassinet will
need to be removed rst.
WARNING:
There is potential for ngers or
parts of the body to be injured
when the pram is being folded
or unfolded, due care should be
taken to avoid injury to you and
your child.
11
Page 12
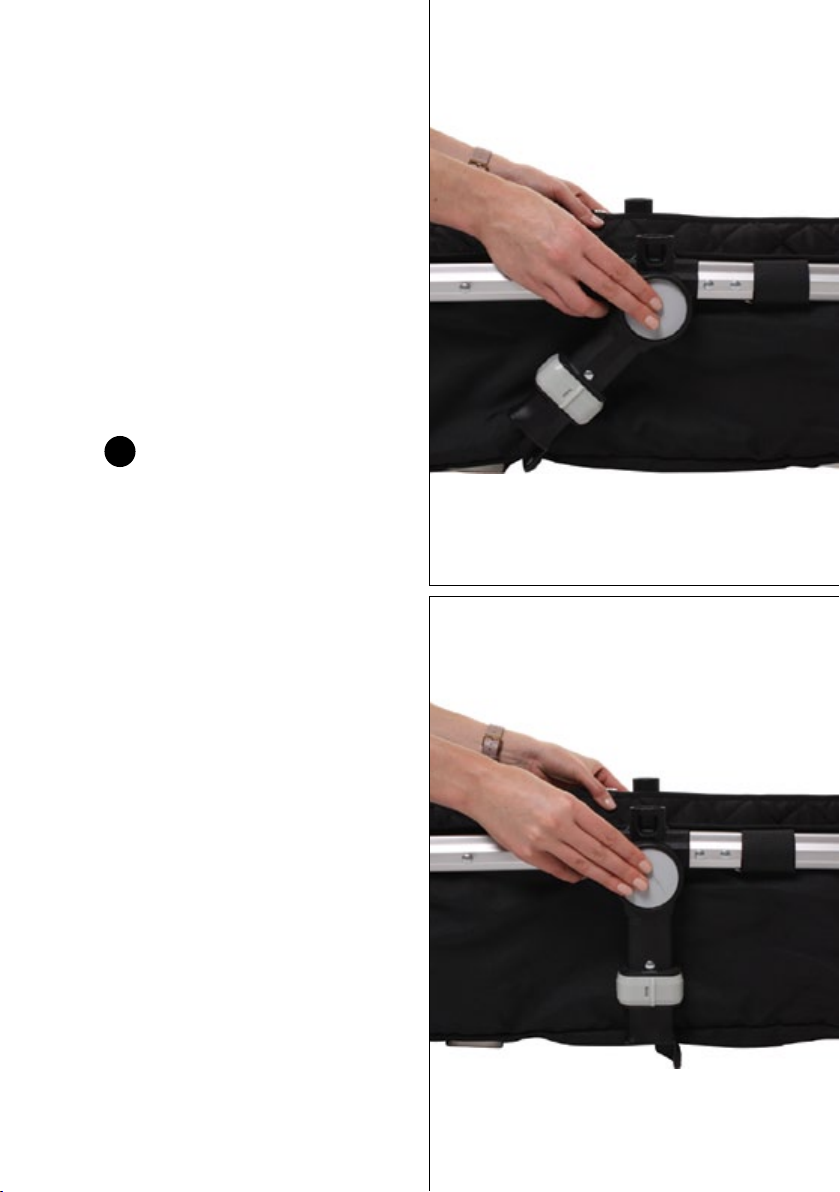
Step Two
Attach the
bassinet to the
frame
Press the grey seat recline
1
buttons on the sides of the
bassinet frame and angle
the connectors down so
that they are at a 90 degree
angle with the frame.
12
Page 13
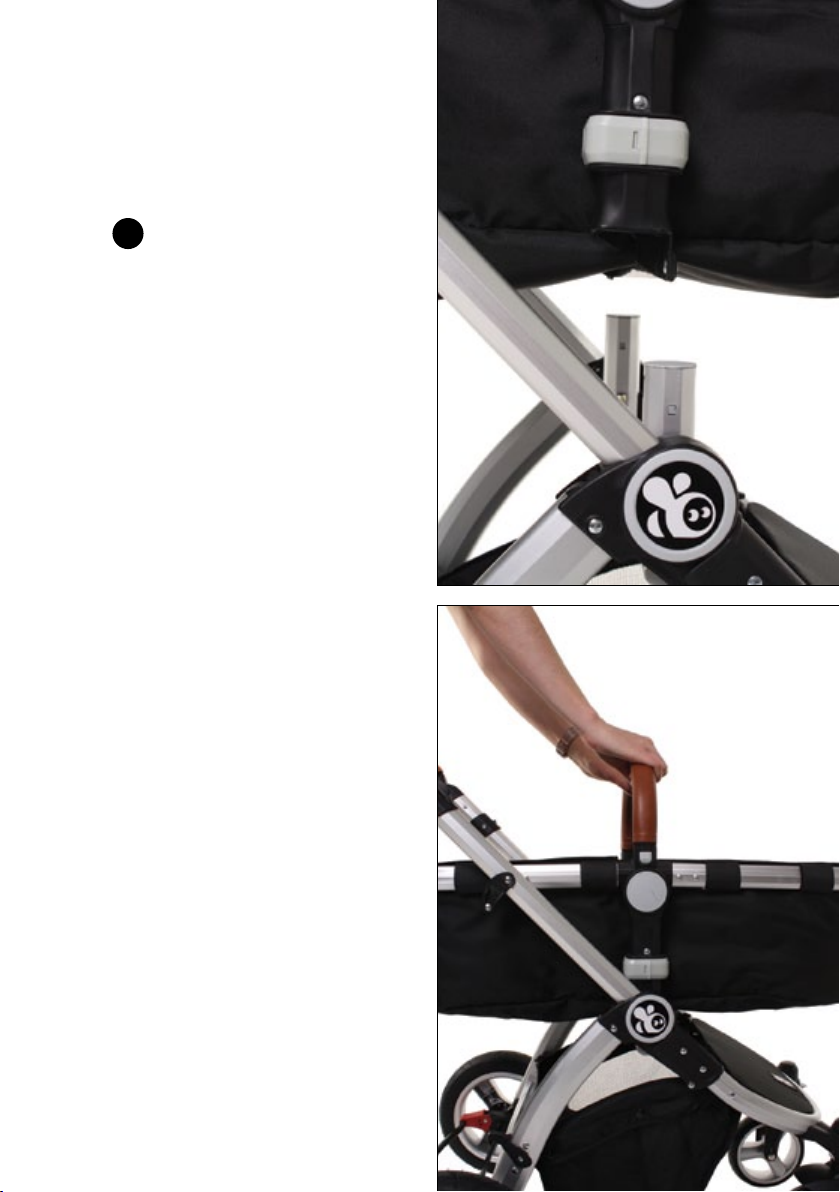
Attach the belly bar
2
ensuring you hear a ‘click’
so you know it’s securely
attached. Then select
which direction you’d like
the bassinet to face and
simply “click” it on to the
side frame connectors.
(Tip: It’s best for newborns
to face you).
13
Page 14
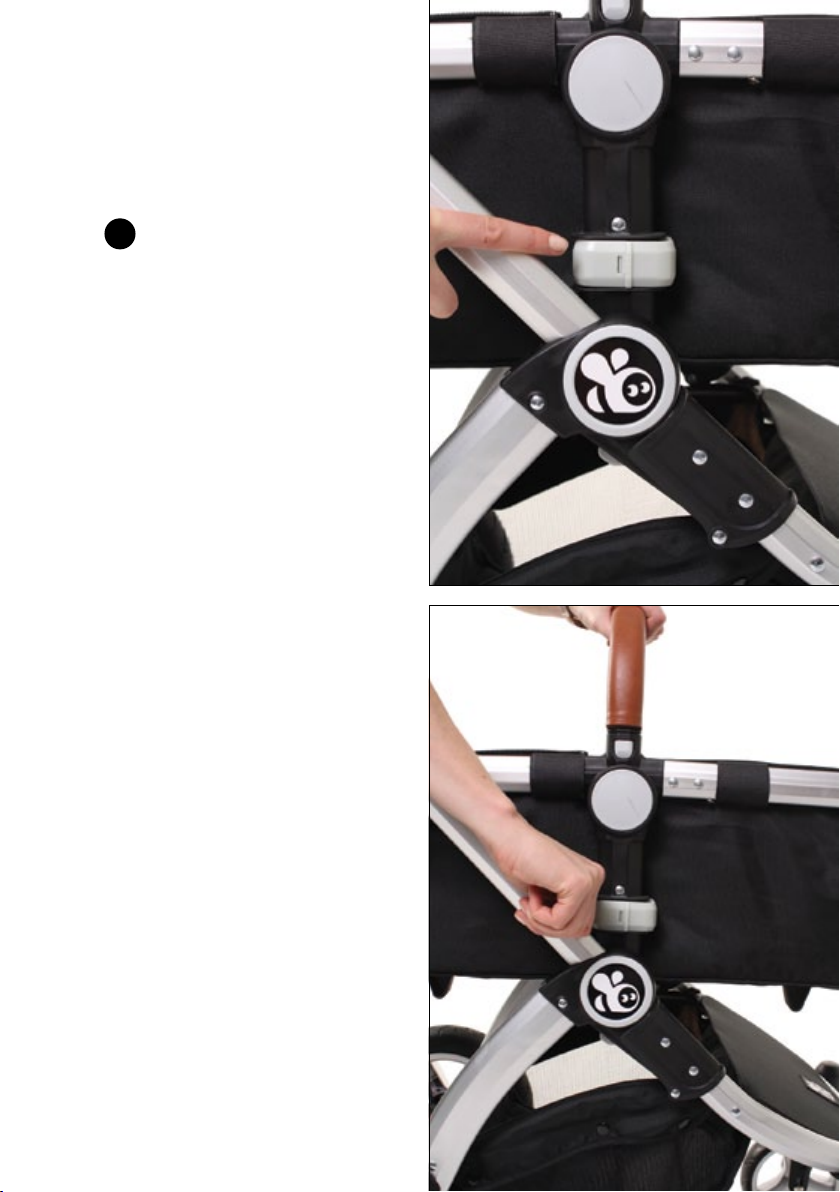
To release simply push the
3
grey bassinet frame release
buttons, in the direction of
the arrow, and off it pops!
Don’t worry if it feels tight,
this is to ensure it doesn’t
wobble too much and will
loosen over with time.
14
Page 15
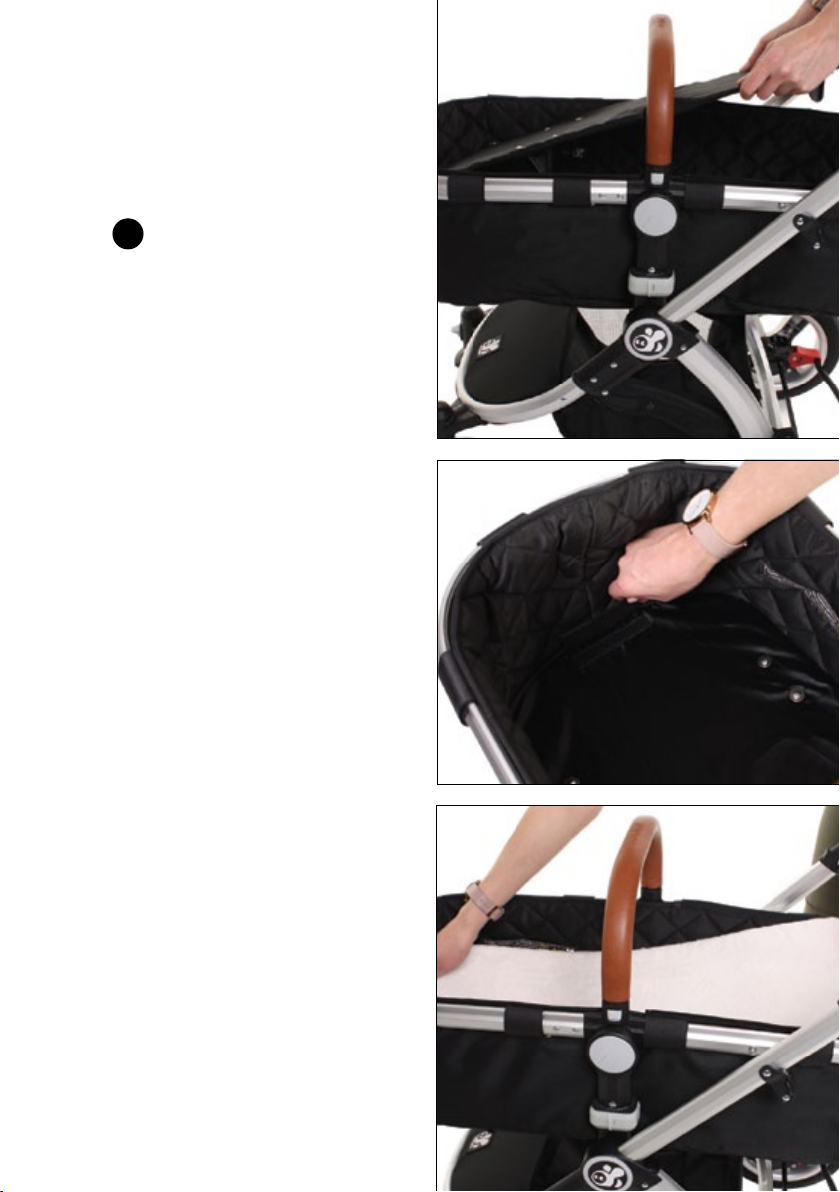
Place the bassinet base
4
board into the bottom of
the bassinet and secure
with the velcro tabs at
each end. Once secured,
place the bassinet mattress
on top.
15
Page 16
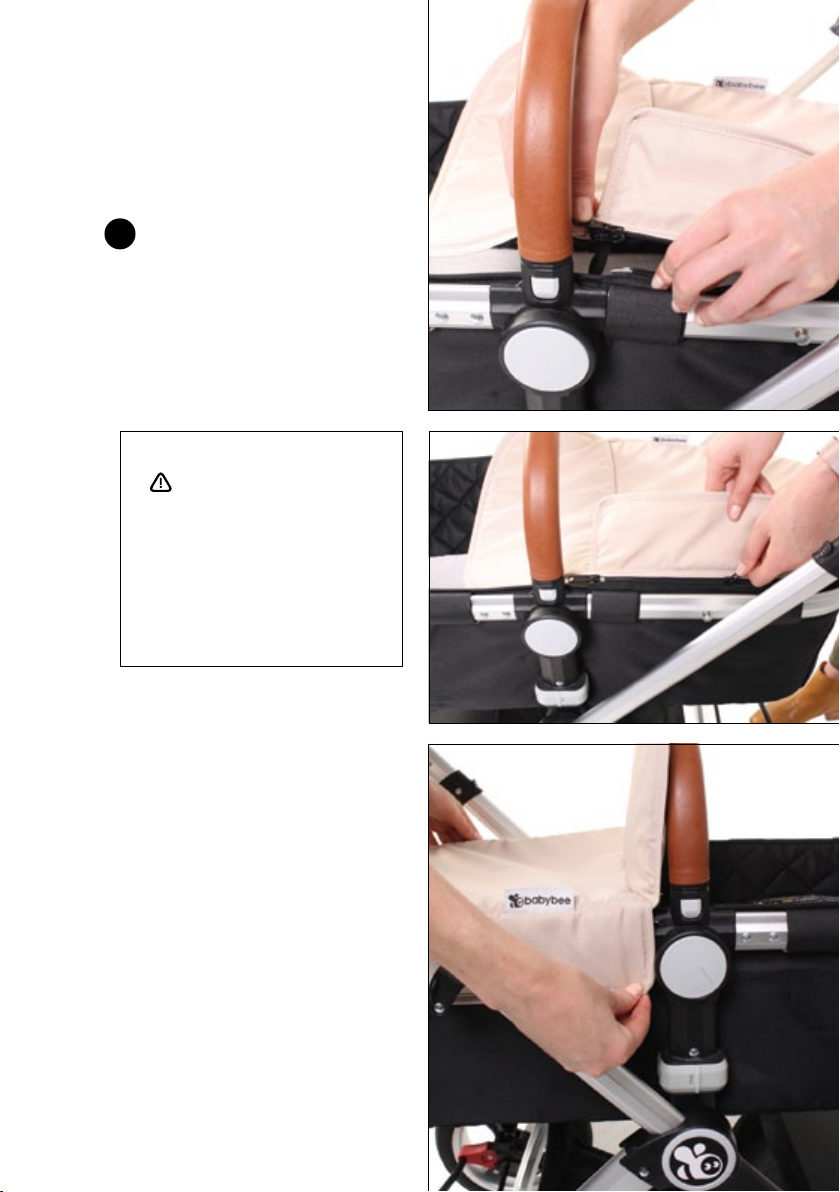
Next zip on the bassinet
5
cover and fold down the
sides.
WARNING:
When carrying your bassinet with
child, please always ensure you
have one hand under the base
of the bassinet incase the belly
bar is not securely attached and
releases.
16
Page 17
Step Three
Attach the
canopy
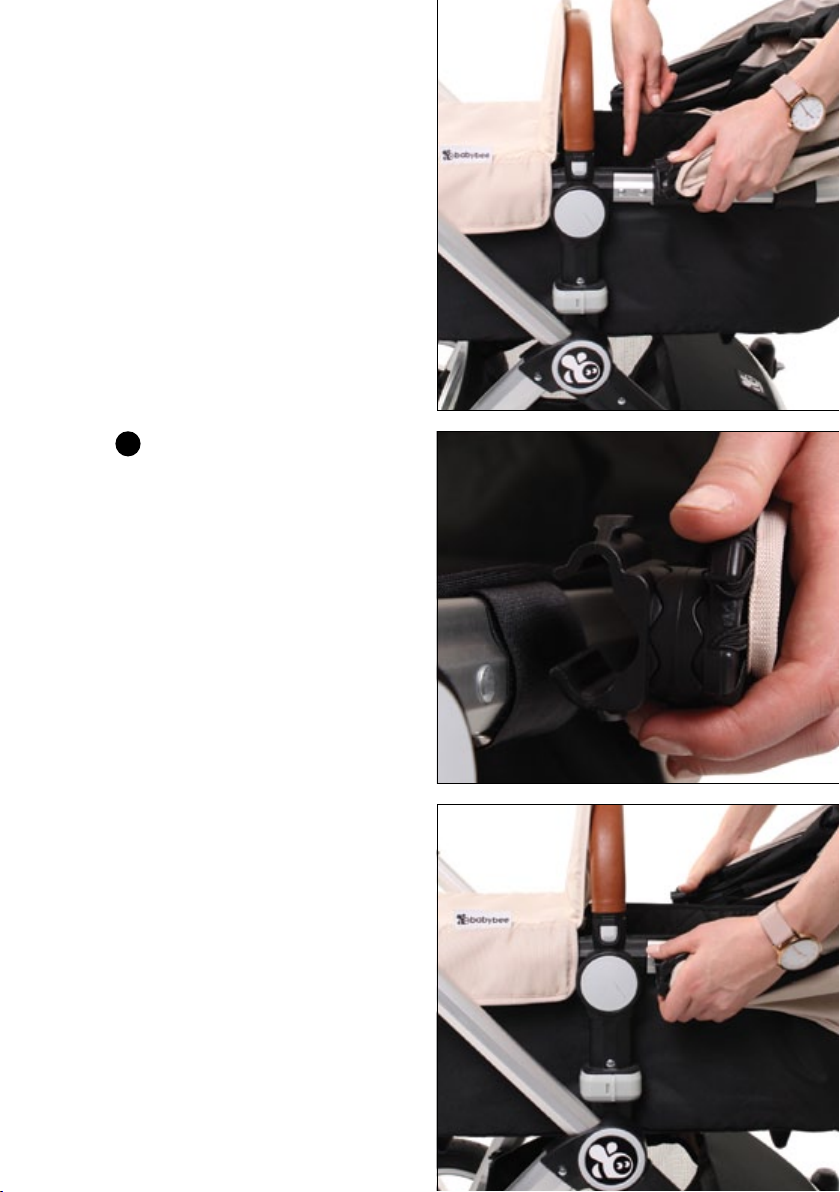
Your canopy should
1
come pre-assembled. To
attach it to the frame, rst
ensure the fabric at the
back is secured under
the back of the frame.
Next secure the bottom
side of one connector to
the frame, then pull and
clip the topside over and
into place. Repeat on the
other side. Make sure the
connectors are as close
to the belly bar as they
can be (as shown in the
pictures below, there should
be no gap between the
belly bar and the canopy
connectors).
NOTE:
It is normal for the canopy
connectors to be quite hard
to put on and take off.
This will help it keep it rm
for longer.
17
Page 18
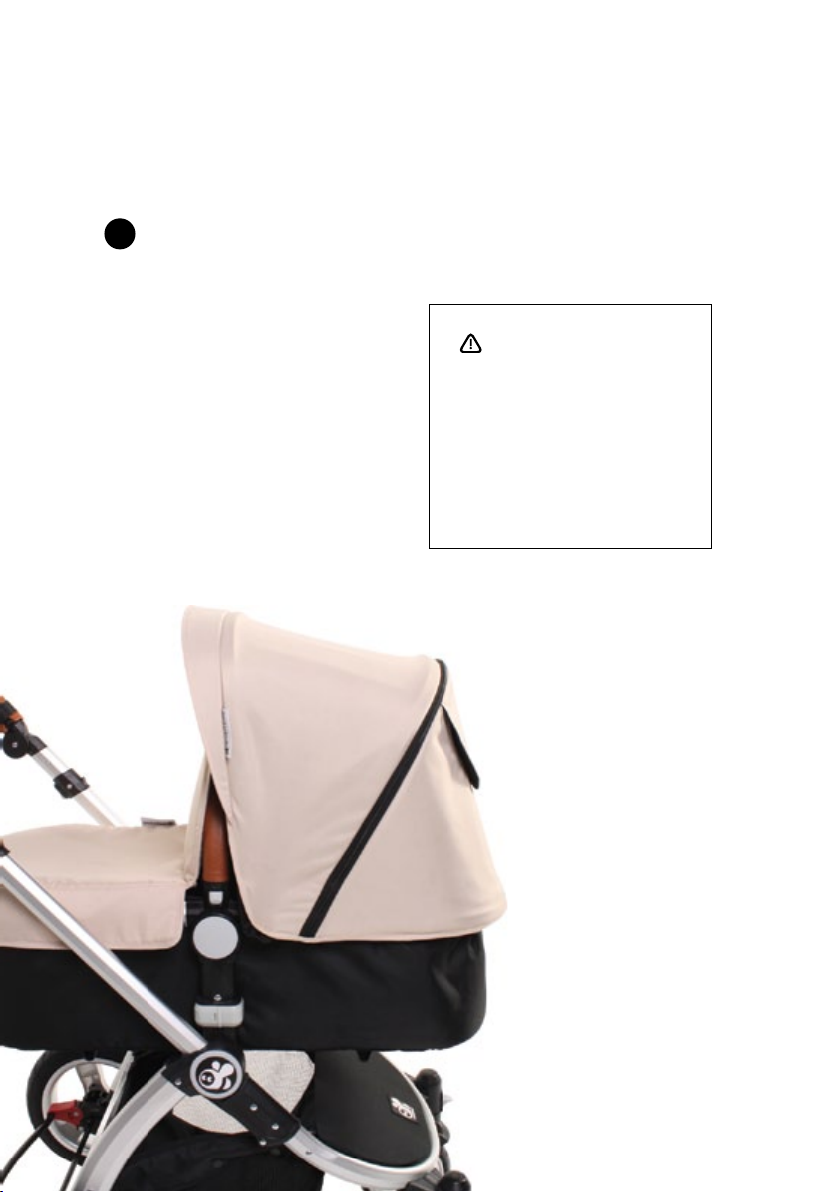
The front peak of the
2
canopy can be ipped
forward to provide a little
extra sun protection or
pushed back inside for a
better view. Treat this peak
with care to avoid warping
over time.
NOTE:
Take care when opening
and closing the canopy
using the zip to ensure that
you don’t catch the mesh
in the zip.
Your bassinet is now set up
and ready to use!
WARNING:
Only use the bassinet in a at
position. Do not recline. Babies
should not be left unsupervised
in the bassinet. Bassinet is not
suitable for over- night sleeping,
daytime naps are ne as long as
you’ve got your eye on them.
18
Page 19
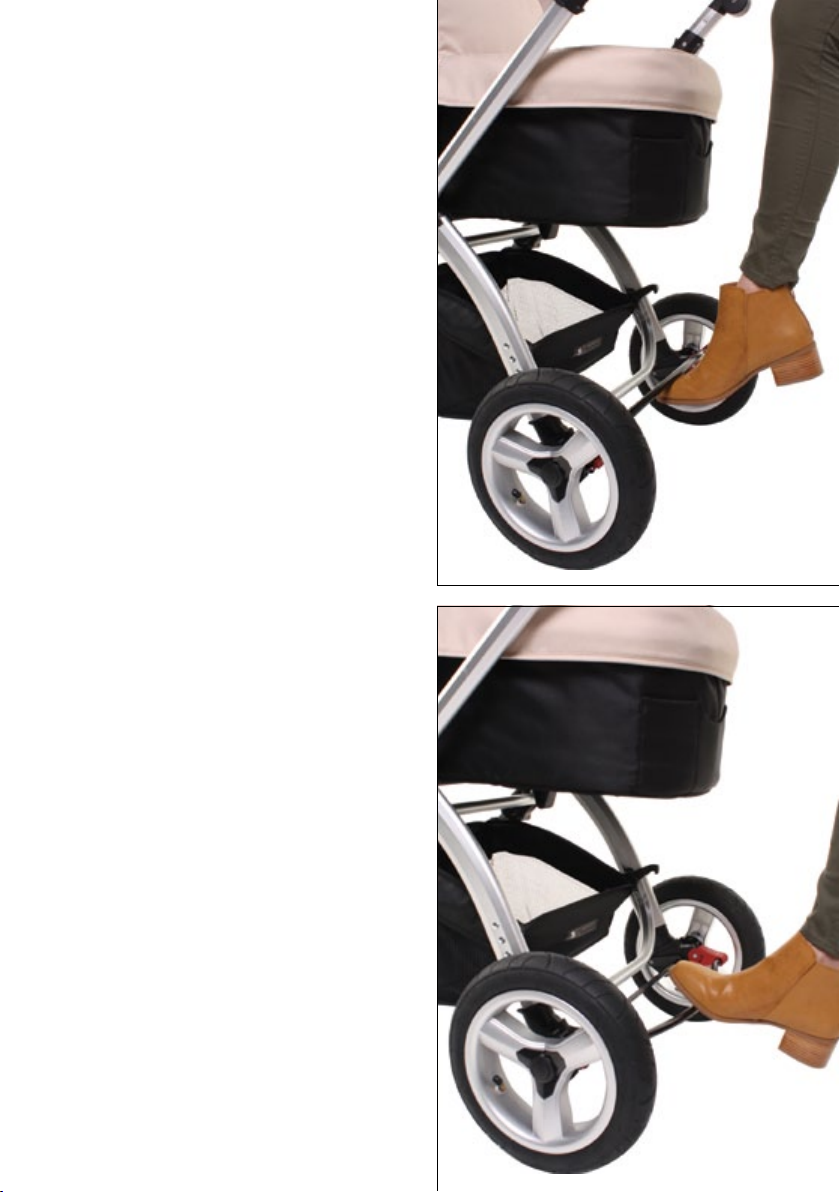
Please take note of
the following 3 features
before you get going:
Rear brake
When stopping, use the brake
at all times by pressing down
on the black bar with your foot
until you feel it click into place.
To start travelling again, lift the
bar up with your foot and off
you go!
19
Page 20
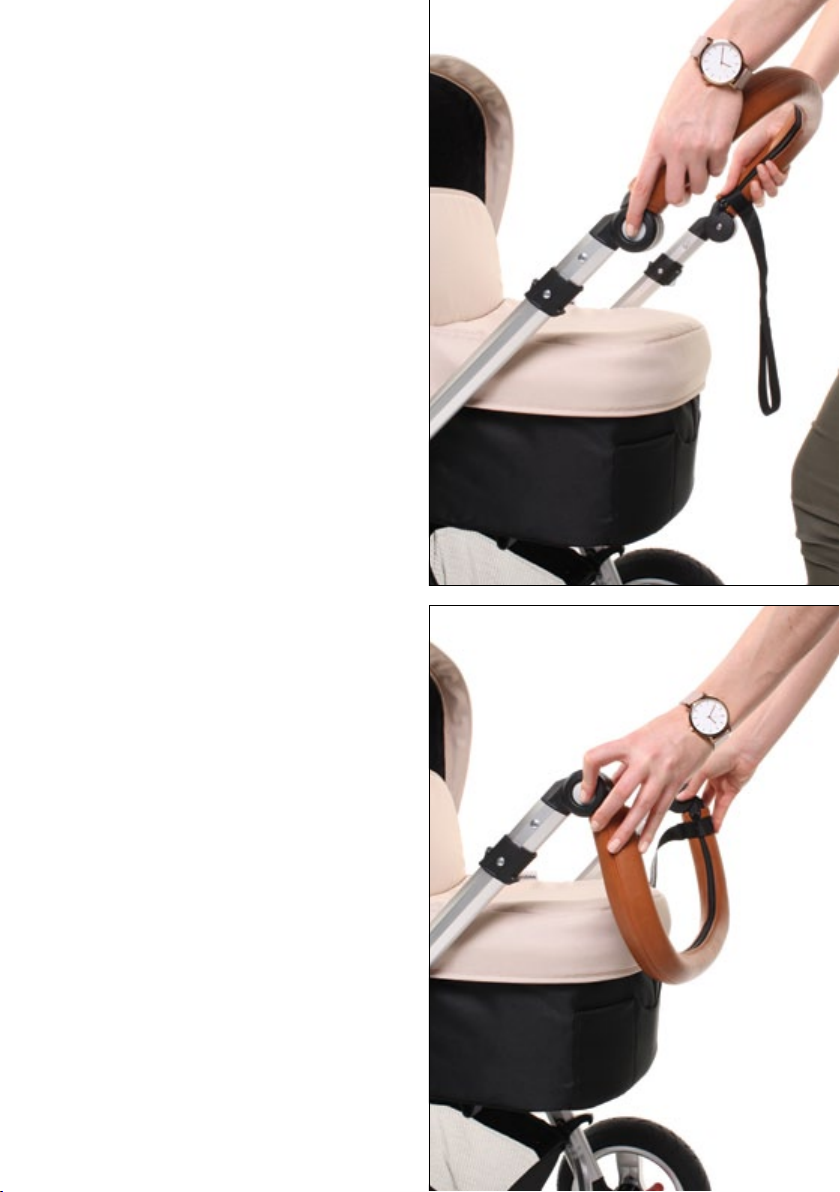
Adjusting the
handlebar height
To adjust the handlebar
height, press both of the
grey buttons at the same
time and select your height.
20
Page 21
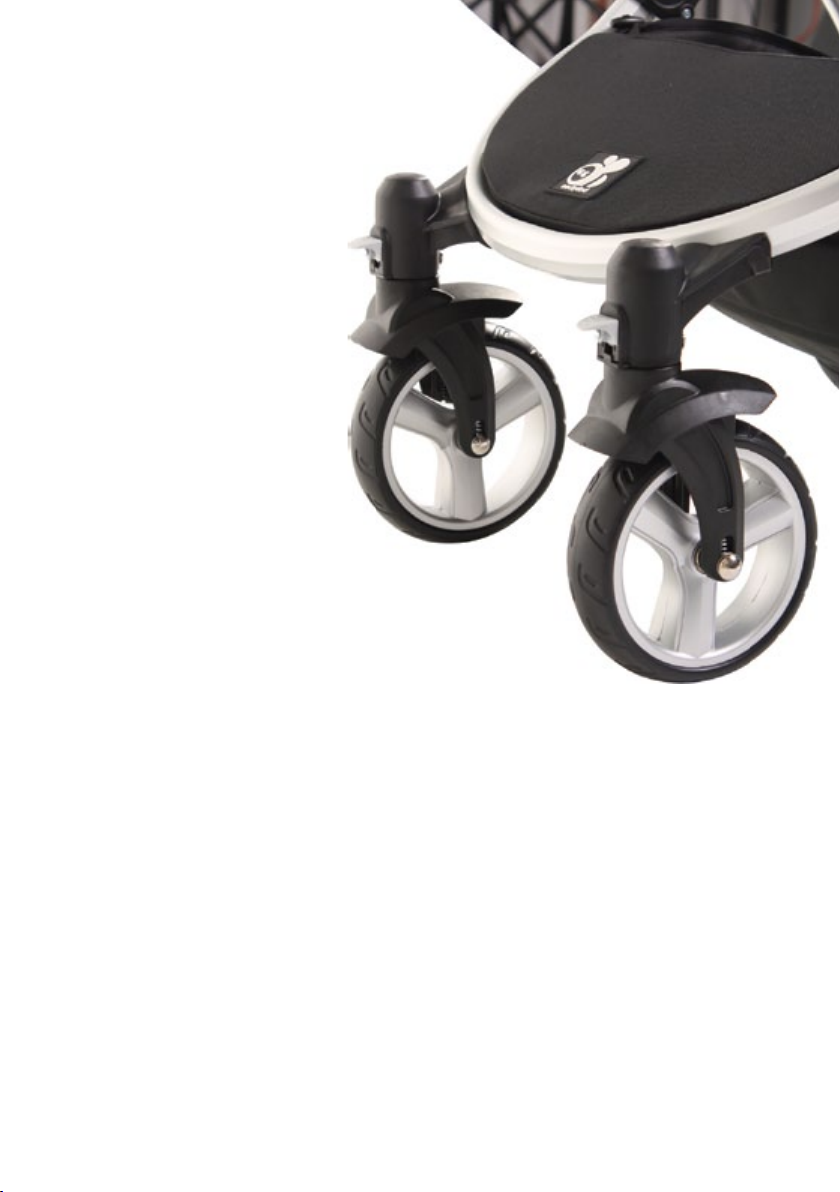
Front swivel wheels
When travelling along
straight surfaces the front
wheels may spin or cause
what’s known as “wheel
shudder”. To lock the front
swivel wheels into place
simply press down on the
grey buttons at the front
of the wheel. To go back
to 360° swivel mode simply
press the buttons up again.
21
Page 22
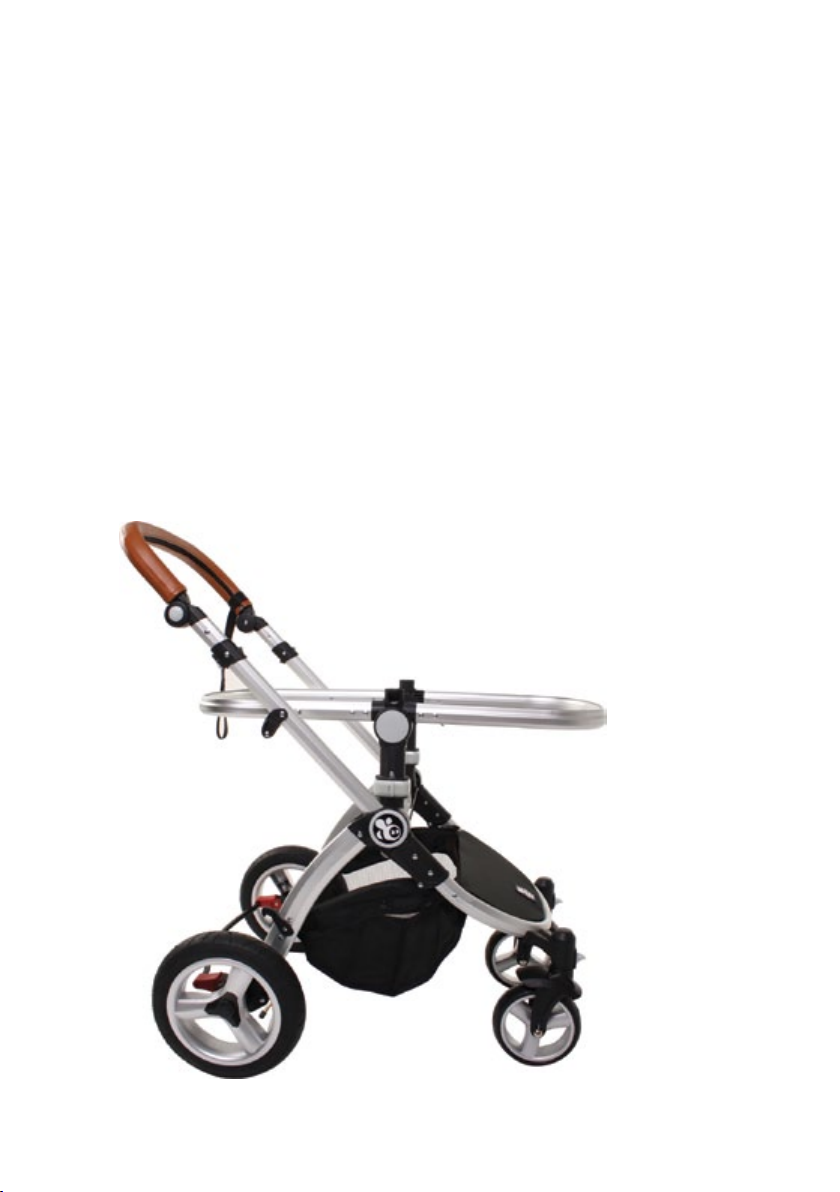
Switching from
bassinet to stroller
seat
There’s no set age when
your little one should go from
bassinet to stroller, however they
should be able to sit up unaided
(Apx. 6 months).
22
Page 23
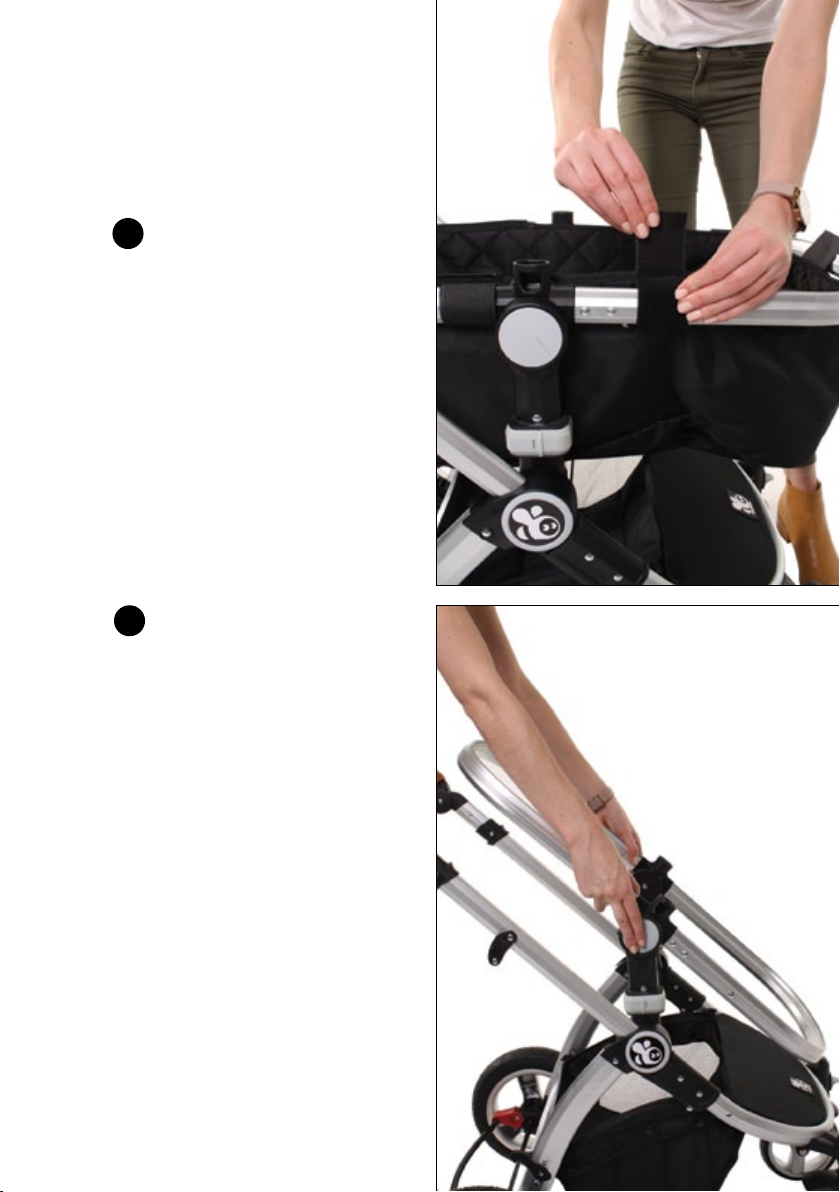
To get started, remove
1
the bassinet mattress and
board before undoing all
velcro tabs and removing
the bassinet fabric from the
frame entirely.
Push the grey seat recline
2
buttons to adjust the frame
and also note that the
metal knobs on either side
of the frame should be at
the bottom.
23
Page 24
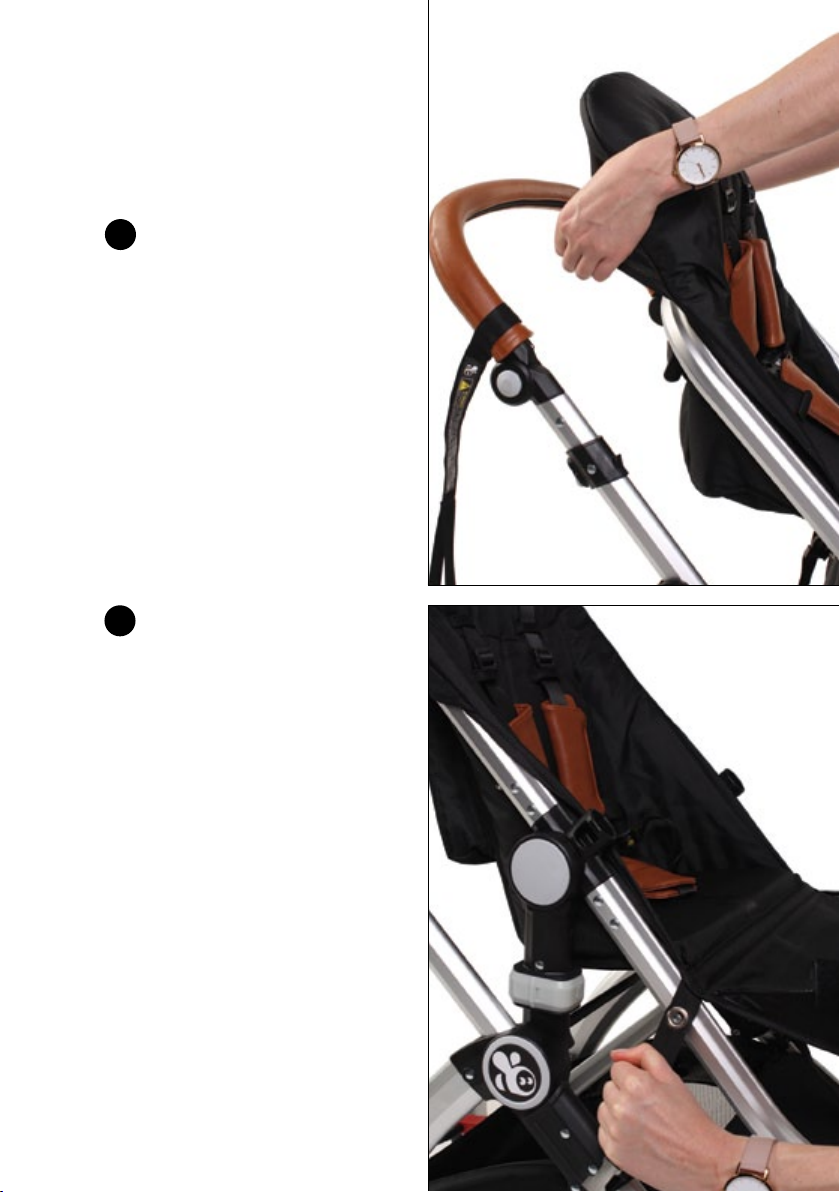
Pull the headrest section
3
over the top of the frame
and pull the rest of the seat
down rmly into place.
Next take the safety straps
4
and hook them onto the
metal knobs on the side of
the frame. Then secure the
clip behind the seat, and
pull the strap tight.
24
Page 25
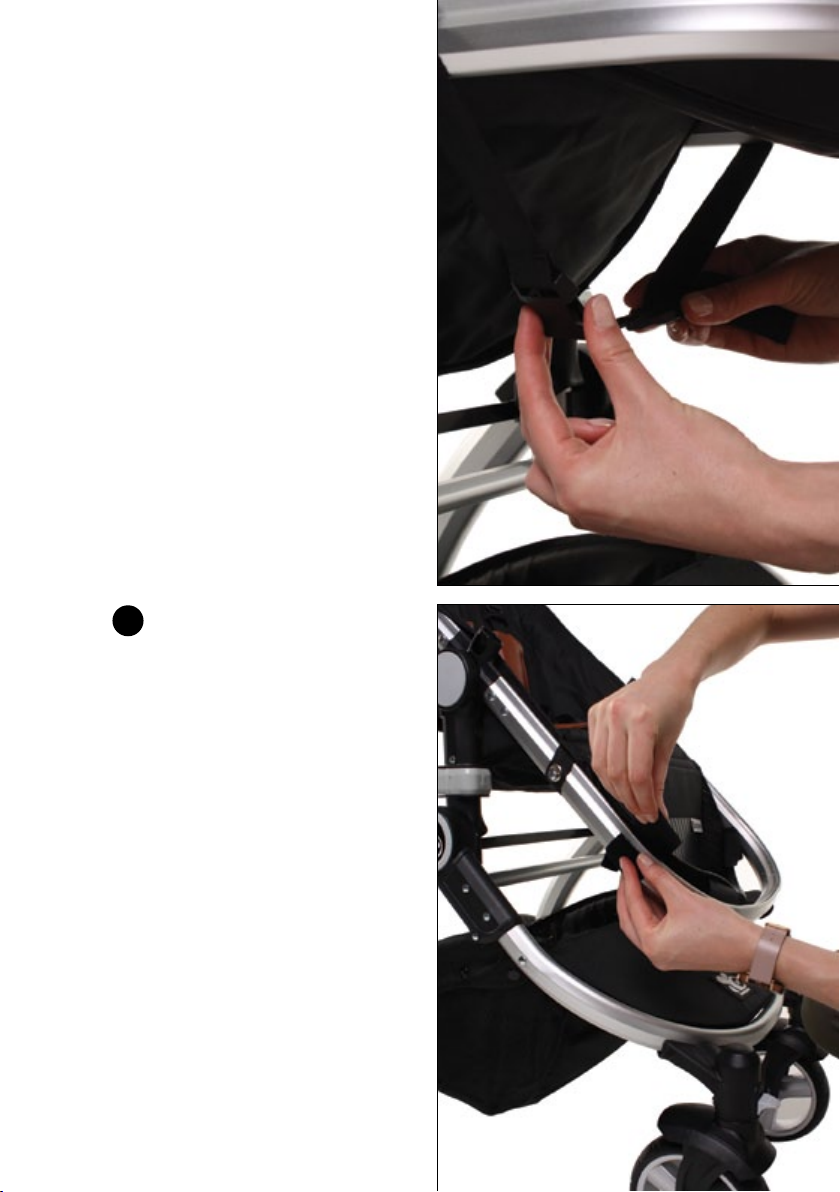
Secure the 4 velcro tabs
5
around the base of the
frame.
25
Page 26
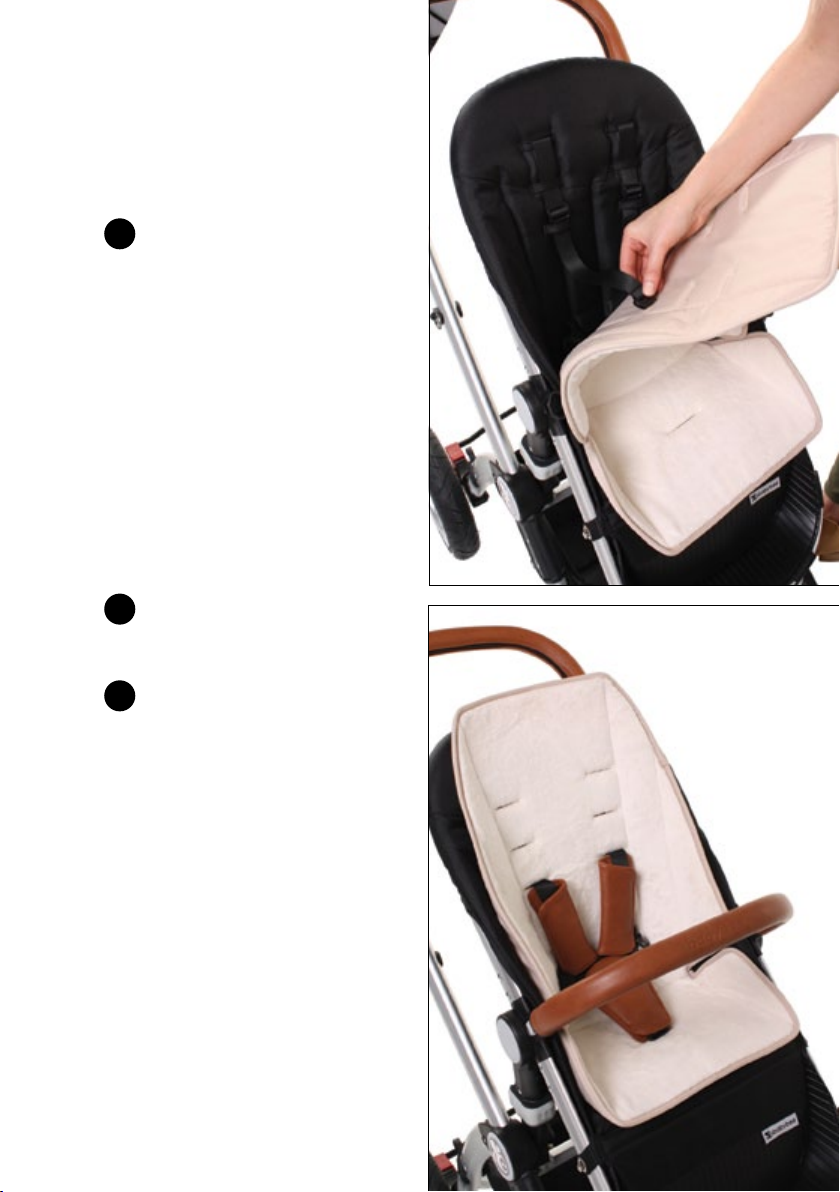
Next insert or remove the
6
seat liner (as preferred)
through the safety harness
(you will need to remove
the leatherette harness
padding rst).
7
Attach the belly bar.
Attach the canopy, in the
8
same way you did with the
bassinet (page 17).
Your stroller is now set up
and ready to use!
26
Page 27
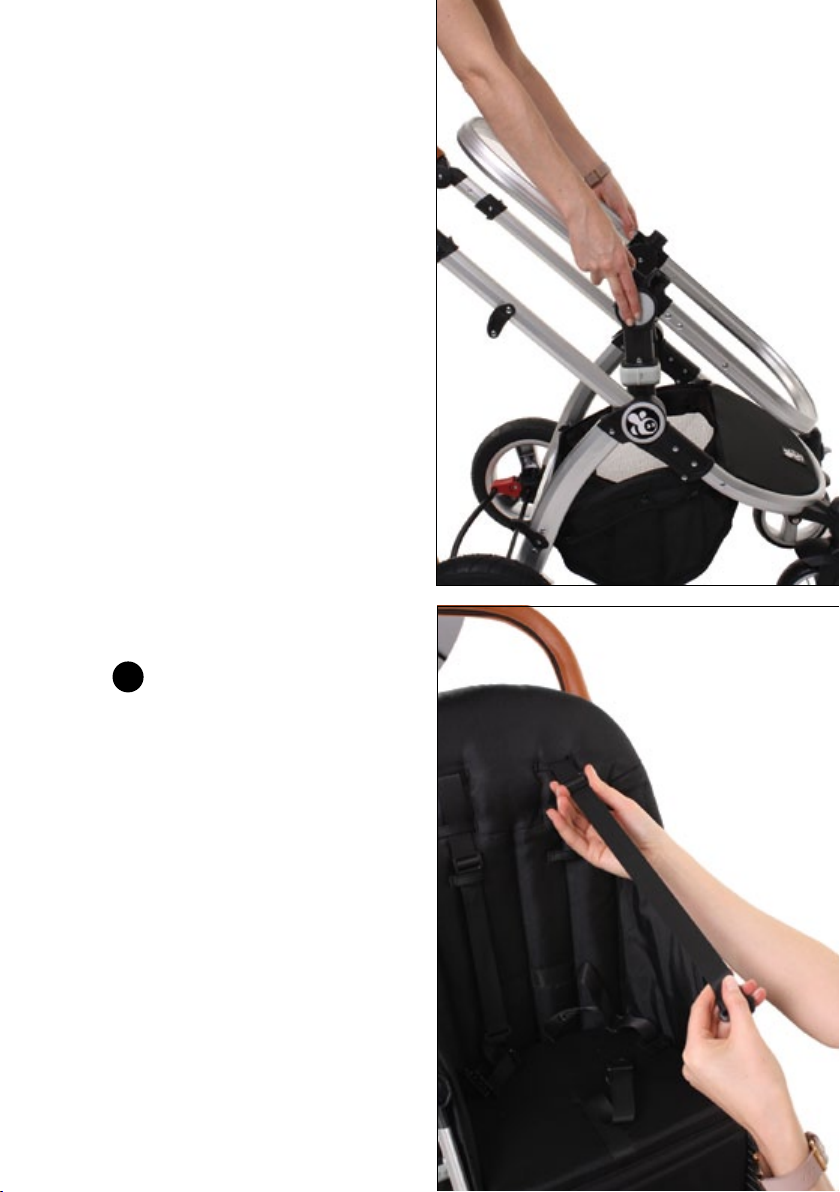
Please take note of the
following two features
before you get going:
Seat position
To adjust the seat position,
simply press and hold the
two grey seat recline buttons
simultaneously, and tilt to your
ideal position. Make sure you
hear the “click”.
5 point safety harness
Adjust the straps through
1
the appropriate seat and
seat liner slots depending
on your littles ones size
(short or tall).
27
Page 28
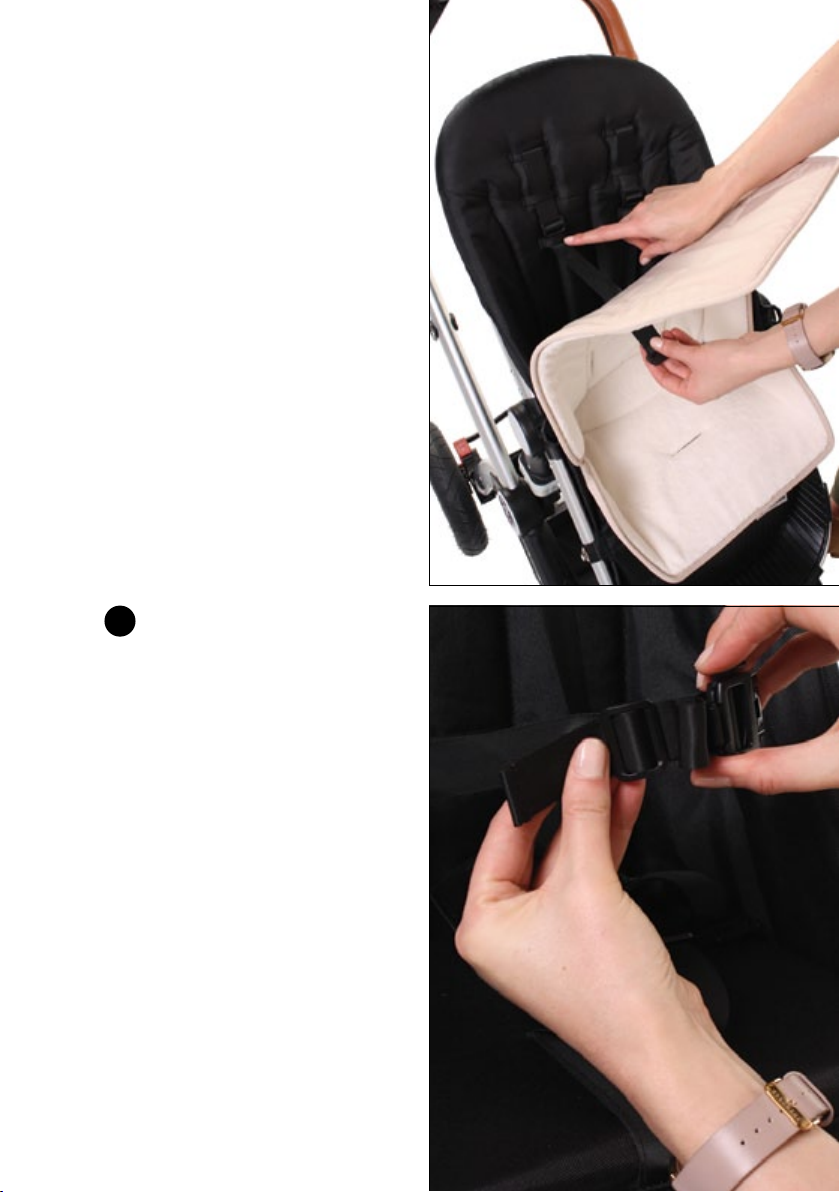
Next adjust the strap lengths
2
using the buckles to ensure
it is snug and secure.
28
Page 29
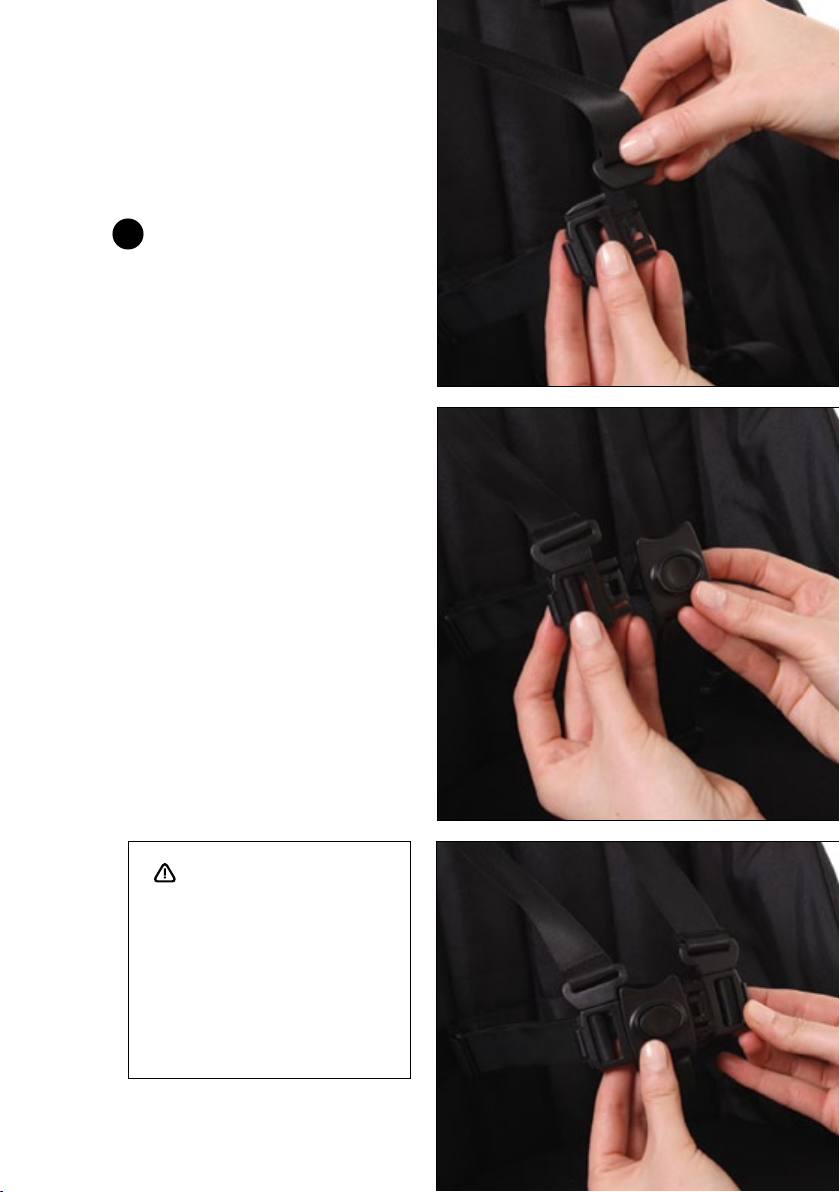
Make sure all 4 straps are
3
secured into the larger
middle clip.
Once fastened, tug the
harness to make sure it is
secure.
WARNING:
For the safety of your little one,
please ensure the harness and all
5 straps are secured at all times
when in use. Never leave the
harness buckled when not tted
to a child, doing so may cause
loops to form which may pose a
strangulation hazard.
29
Page 30
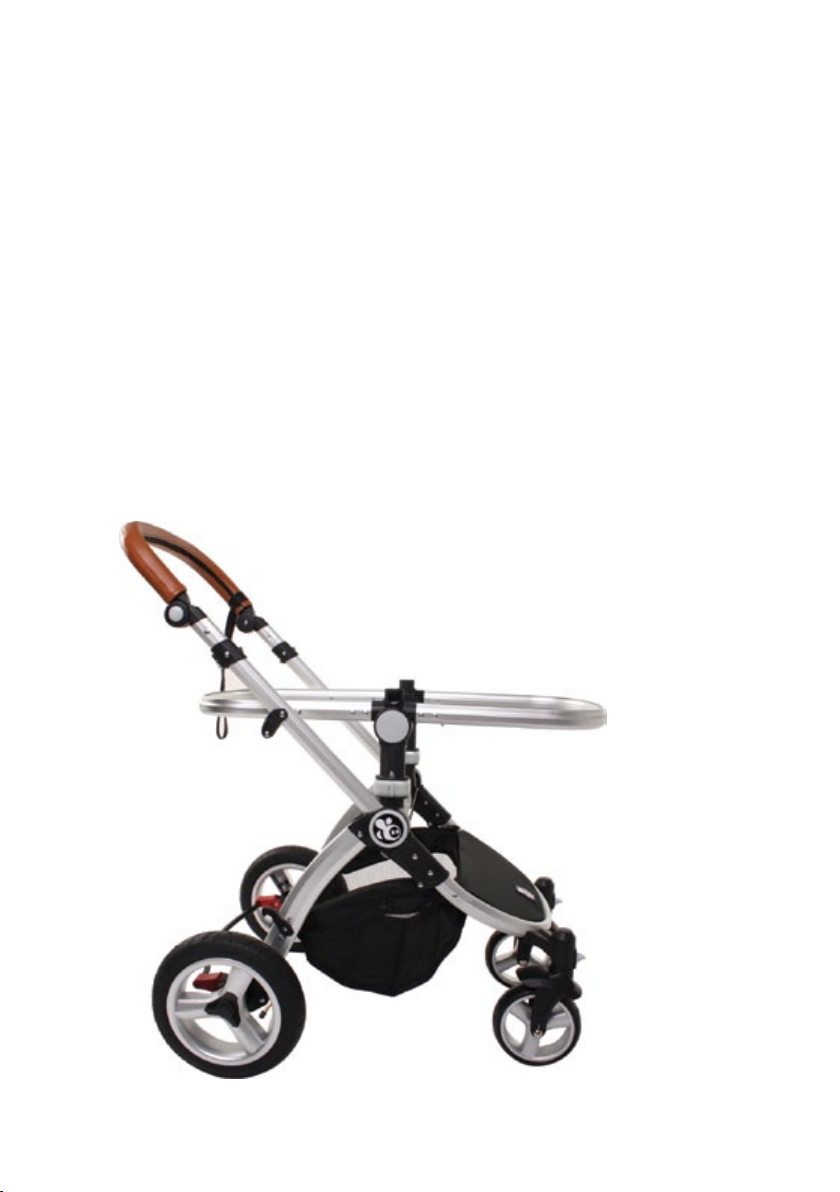
Setting up your
bassinet from scratch
NOTE:
The front of the bassinet (where
your baby’s feet will go) will be
the end of the frame with the two
small metal knobs that jut out.
The front of the bassinet fabric is
the side that has the zipper edge.
30
Page 31
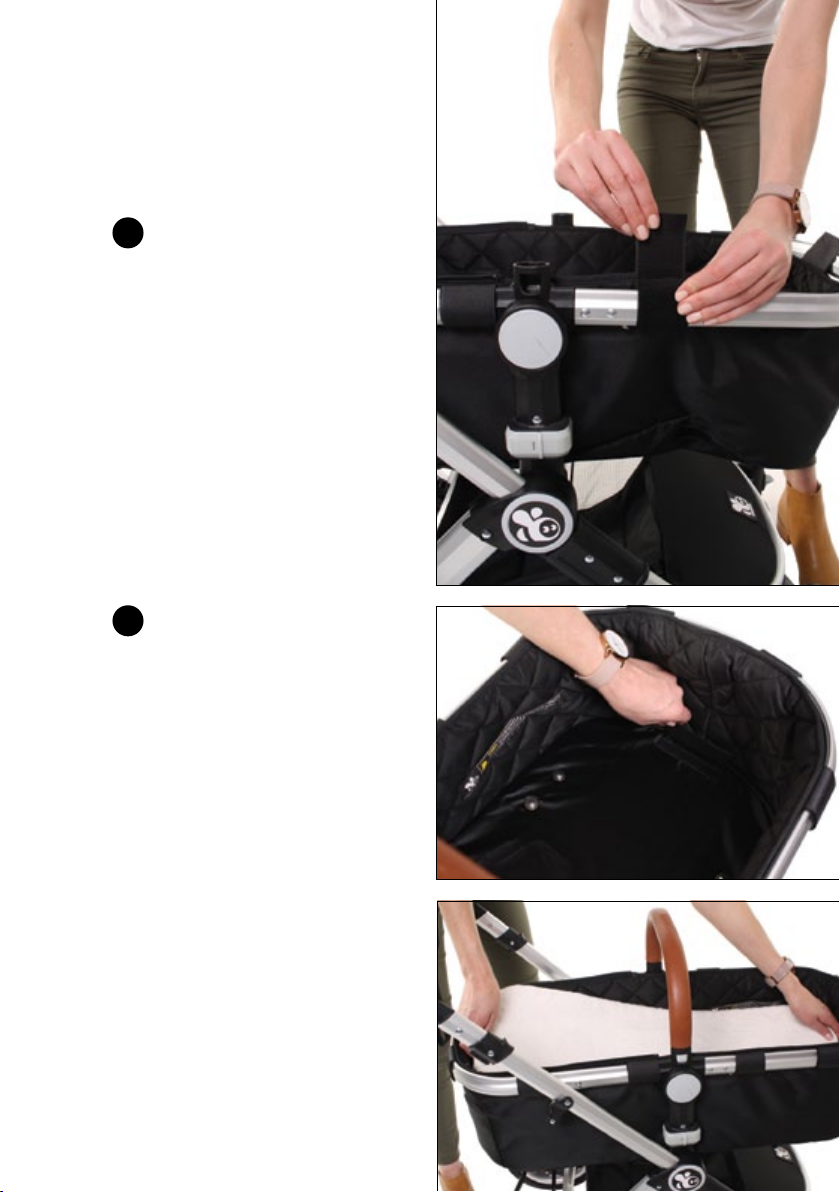
Attach all velcro tabs to
1
the frame ensuring they are
secure and tight.
2. Place the bassinet base
2
board into the bottom of
the bassinet, and secure
with the velcro tabs at each
end. Once secured, place
bassinet mattress on top.
31
Page 32
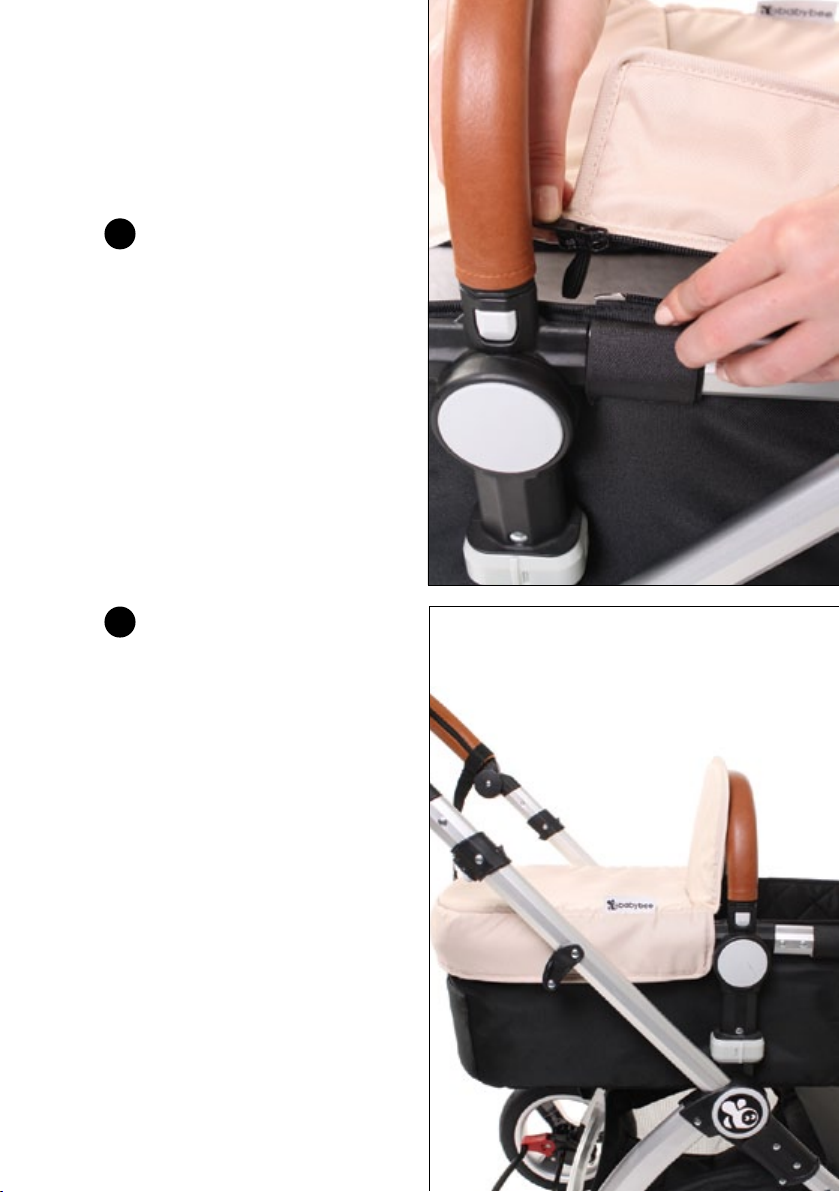
Press rmly down inside the
3
bassinet to ensure all velcro
tabs are secured.
Zip on the bassinet cover.
4
Attach the belly bar to
the bassinet. Ensure you
hear a ‘click’ so you know
it’s securely attached. To
release the belly bar, press
the release buttons located
on both sides.
Well done, that’s it!
32
Page 33
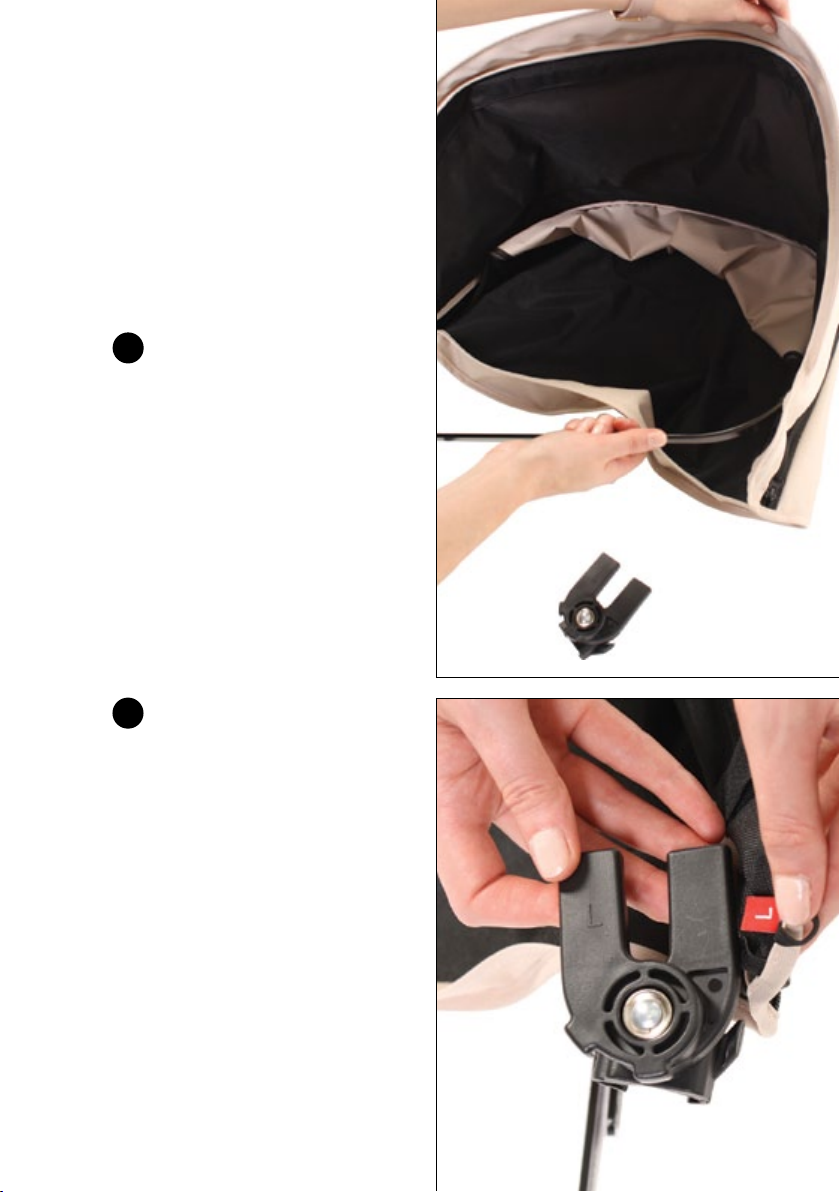
Setting up the
canopy
Thread the two canopy
1
rods through the inserts of
the canopy fabric.
Connect the canopy rods
2
to the canopy connectors.
Note the L and R marked
on the outside of each. The
L connector will go on the
side of the canopy that has
a small red tag inside also
marked L.
33
Page 34
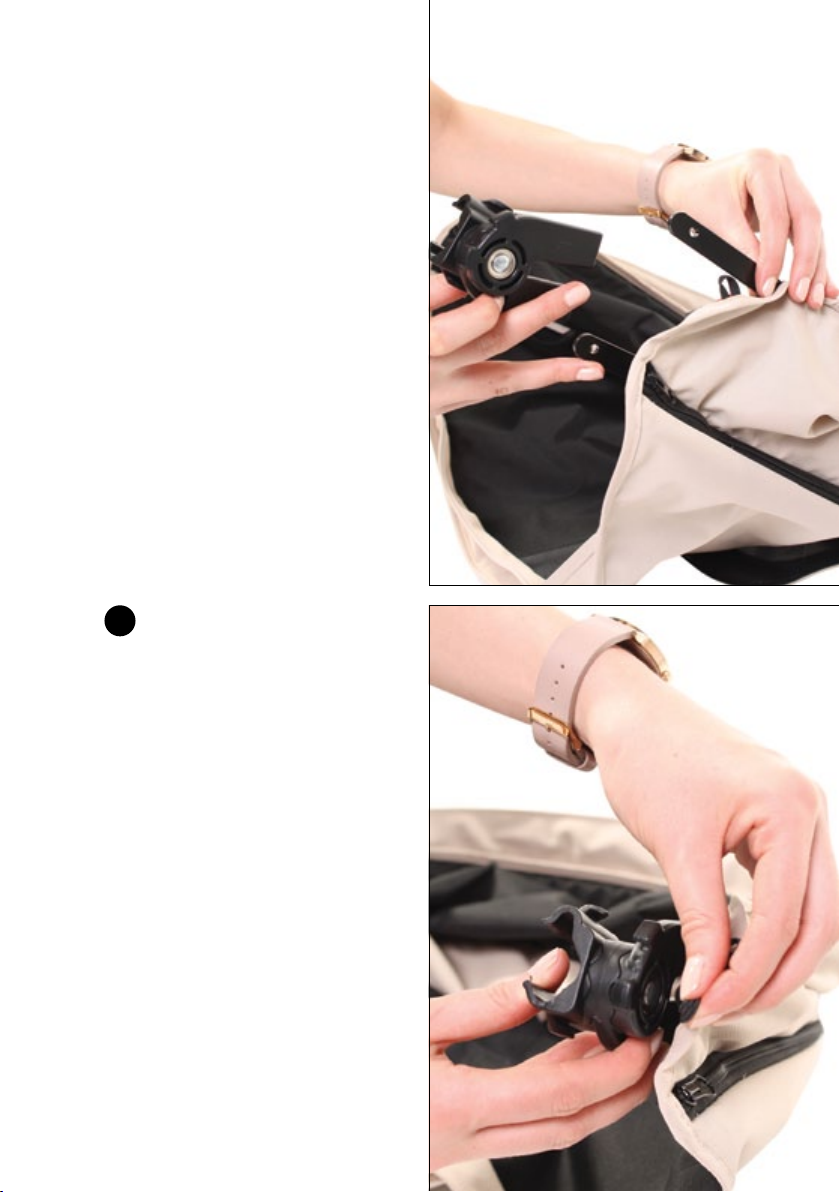
PLEASE NOTE:
If the canopy won’t extend
correctly, sits crooked or
isn’t pulled tight when
extended, the canopy
connectors are on the
wrong sides and damage
may be caused to the
canopy rods, resulting in
your canopy becoming
unusable. Please ensure
they are on the correct
sides of the pram frame.
Once the connectors are
3
on you can secure the
fabric to them using the two
elastic loops on each side.
34
Page 35
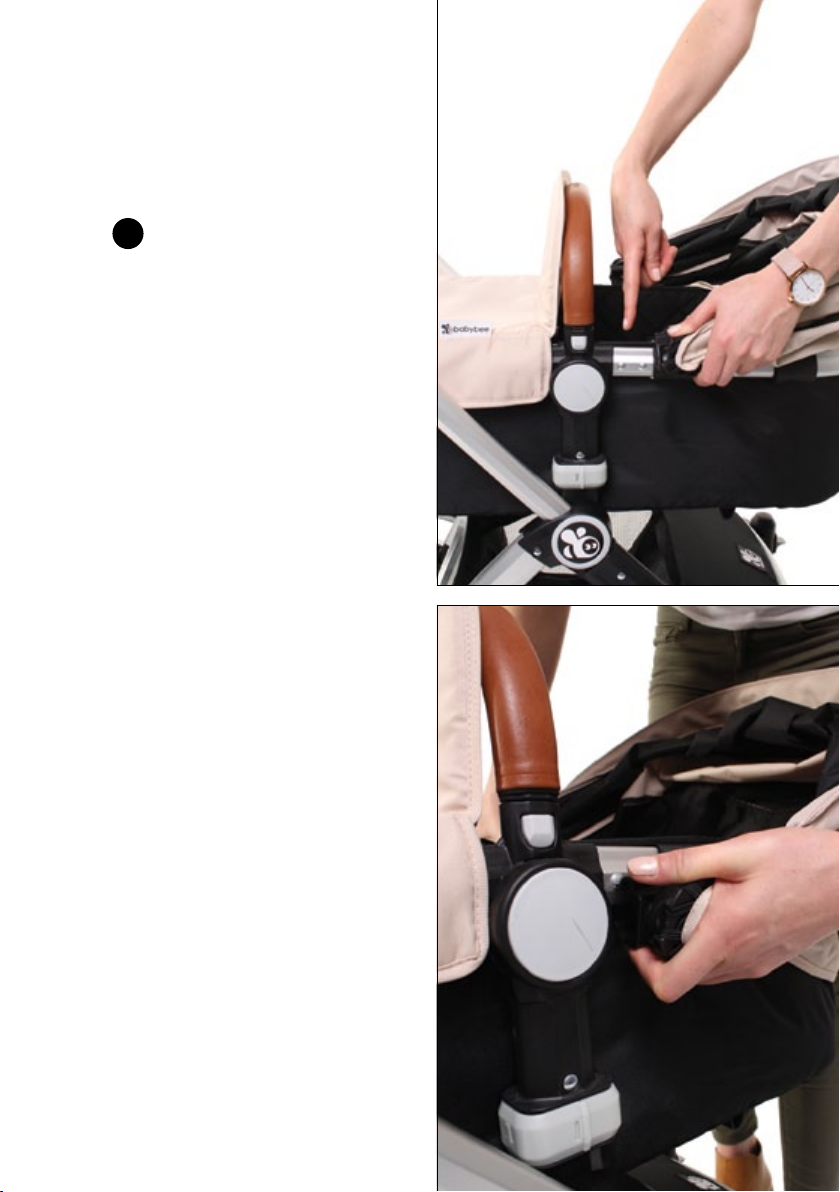
To attach it to the frame,
4
rst ensure the fabric at
the back is secured under
the back of the frame.
Next secure the bottom
side of one connector to
the frame, then pull and
clip the topside over and
into place. Repeat on
the other side. Make sure
the connectors are as
close to the belly bar as
they can be (there should
be no gap between the
belly bar and the canopy
connectors).
It is normal for the canopy
connectors to be quite
hard to put on and take
off. This will help it keep it
rm for longer.
PLEASE NOTE:
Over time you may see
some excess thread
become loose on your
canopy, all that is required
is some sharp scissors and
a little trim.
35
Page 36

Accessories
Seat liner
Your seat liner is both machine
washable and reversible. Simply
select which side you wish to
use and thread the harness
straps through the appropriate
slots (e.g. tall child will have the
straps coming through the top
slot which corresponds with the
same position on the seat.
Bassinet liner
Your bassinet liner is also
machine washable and
reversible.
Bassinet cover
The bassinet cover simply zips on
to the bassinet fabric. You can
have the top ap lying down
or up against the belly bar to
protect your little one from the
elements. Magnets hold the
sides down against the sides of
the bassinet.
Foot cover
Attach all velcro tabs on the
foot cover to the seat frame.
Next attach the elastic loops
at the top to the underside of
the canopy connectors (you’ll
notice there is a hook there).
Rain cover
Pull the rain cover over the top
of the canopy and tuck it under
the seat/bassinet frame. The air
vent window should be at the
front.
Mosquito net
The mosquito net should be
pulled over the canopy the
same way as the rain cover. Be
careful not to catch the fabric
on any velcro tabs.
Travel organizer
The travel organizer attaches to
the handle bar using the velcro
tabs. It is designed to carry a
maximum of 1kg.
36
Page 37

Tips for maintaining your pram
For longevity of your pram we
strongly recommend regular
maintenance. Regularly inspect
the locking devices, brakes,
harness, catches, joints and
xtures to ensure they are
secure and in fully working
order.
The brakes and wheels are
subject to normal wear and
should be replaced if necessary.
These can be purchased from
our website. Should any parts
of the pram become stiff or
difcult to operate, ensure that
dirt is not the cause, try a light
application of a sprayable
silicone lubricant, ensuring
that it penetrates between
the components. Take care
as excessive application may
encourage the buildup of dirt.
Regular light lubrication of
moving parts will extend the life
of your pram.
Do not use any other
lubricant other than those
specically marked as a
‘Silicone Lubricant’
(for example, DO NOT use
WD40) as doing so can
deteriorate the plastic parts
of your pram and interfere
with its structural integrity.
Do not leave the pram in
direct sunlight for prolonged
periods of time when possible.
Do not leave in cars on days
of extreme heat.
Store the pram in a dry, well-
ventilated and safe place.
After exposure to wet or damp
conditions, leave the pram
fully opened in a warm, well
ventilated environment. You
may need to dry with a soft,
lint free cloth. Left damp it will
encourage mildew or rust to
form, damaging the pram.
We recommend giving your
pram a good clean and
service (spraying joints and
levers, removing any rust etc)
every 6 months to ensure it
remains in good condition.
37
Page 38

Cleaning instructions
All plastic, fabric and metal
parts of the pram may be
sponged clean with warm
water and mild detergent.
All removable fabrics are
machine washable in cold
water. Ensure only delicate
detergent and settings
are used. Always wash
separately.
Allow all parts to dry
thoroughly before using.
Rust may occur due to
environmental factors.
Wiping down your frame
after trips to the beach or
in the rain may help reduce
the issue. At rst sight of rust
simply remove with steel
wool.
Do not immerse the seat in
water, sponge clean only
Do not clean with abrasive
surfaces or using ammonia,
bleach or spirit-based
cleaners.
Do not dry clean.
Do not tumble dry.
38
Page 39

Warranty information
All of our prams come with an
12 month warranty to cover
against faults in materials
and workmanship when your
products are used under normal
conditions, according to our
user manuals and technical
specications. Please note: this
excludes accessories.
The 12 month period starts
from the date your pram
is dispatched from our
warehouse.
To make a claim simply contact
us with a detailed description,
a video and/or photos of the
defect and a photo of the
batch number, which is located
on the bar above the basket.
The warranty is not valid in the
following cases:
Defects resulting from
improper care or use;
Normal wear and tear,
including scratches to the
frame;
Products that are
purchased second hand
or from an unauthorised
distributor;
Incorrect assembly;
Using a part or accessory
that is not compatible with
the product and/or not
manufactured by babybee
prams;
Tyre punctures;
Damage to handlebar
grips or fabrics as a result of
normal handling and daily
use;
Claims from anyone other
than the original purchaser
(i.e. no longer valid if you
give you your sibling to use
with their family)
Damage resulting from
extreme heat conditions (i.e
leaving in car on hot days)
39
Page 40

Safety Warnings
The babybee Comet plus is
designed and tested to comply
with AS/ NZS2088:2013.
The ACCC has identied several
hazards associated with prams
and strollers which could result
in serious injury or even death:
The pram or stroller
rolling away from the
carers control
We strongly advise using
parking brakes and the
tether strap at all times to
ensure the pram cannot
roll away when. Parking
the pram horizontal to
potential dangers is another
precaution you can take.
Limbandngerinjuries
If children gain access to
certain parts of the pram
they may trap and/or injure
their limbs or ngers. Ensure
children are away from the
pram prior to adjusting it.
Falls
Children not properly
restrained in a pram can
either fall out or move to
a position where the pram
or stroller can topple. This
can also occur if additional
bags or children are hung or
carried or parts of the pram
not designed to do so.
Strangulation or suffocation
Strangulation or suffocation
can occur if children
become trapped in parts
of the pram or stroller in
particular the rain cover
and safety harness.
40
Page 41

Adjusting the pram
Keep children clear of the pram
before making adjustments.
To avoid entrapment, keep your
own and your children’s ngers
clear of any folding parts.
Bassinet
Only use the bassinet in a at
position. Do not recline. Children
should not be left unsupervised
in bassinet. Bassinet is not
suitable for overnight sleeping.
Compatible with the babybee
Comet range only.
Brakes
Always engage the brakes
when the pram is stationary.
Hold onto your pram or the
tether strap at all times.
General safety
Take care when using on stairs
or escalators. Gentle sloping
surfaces may be unstable. On
steeper sloping and uneven
surfaces, there is a possibility
that the pram may tip over. Do
not use or leave the pram near
open re or exposed ame.
Never leave rain covers, hoods
and/or bassinet covers on or
over the pram indoors, in a hot
atmosphere or near a heat
source. Always supervise whilst
the pram is covered.
Do not use the pram in a
manner for which it is not
designed.
41
Page 42

Incorrect use of
the pram
Overloading, incorrect folding
and/or the use of nonapproved accessories may
damage, break or otherwise
render the pram unsafe for use.
Do not overload the pram
with additional children,
heavy packages, goods or
accessories. Bags and other
items must not be hung from
the handle bar as they may
damage the frame or otherwise
cause the pram to become
unbalanced and tip over.
Do not use replacement parts
or accessories, e.g. child seats,
bag hooks, rain covers, etc.
other than those approved or
supplied by babybee prams.
Lifting and moving the
pram safely
Do not lift or carry the pram
when occupied by your child.
Do not lift or carry the pram
when fully assembled.
Only lift and carry when folded.
Ensure that the frame release
clip is engaged when lifting or
carrying the pram. Make sure
pram is secure when being
transported in a vehicle.
Maximum weight limits:
Maximum weight for a child
in the bassinet is 9kg
Maximum weight for a child
in the seat is 20kg
Maximum weight for items in
the pockets on the back of
the seat is 1kg
42
Maximum weight for items in
the basket is 5kg
Page 43

Others using your pram
If the pram is being used by
someone unfamiliar with it (such
as grandparents) always explain
to them how the pram works
and its safety features.
Safety harness
Please ensure that your child
correctly wears the tted and
adjusted safety harness at
all times. All 5 straps must be
secured. Never leave harness
buckled when not tted to the
child in the pram. The harness
can form loops which may
cause a strangulation hazard.
Seat
Compatible with the babybee
Comet range only.
Not recommended for a child
under 6 months old.
Supervision
Never leave your child
unattended and always keep
your child in view while the
pram is in use. Do not allow your
child to climb unassisted into
the pram. The pram should only
be used under adult supervision.
Make sure children are clear of
any moving parts before you
adjust the pram.
Tether strap
Use the wrist tether strap to stop
the pram rolling away.
43
Page 44

Contact
babybee prams
babybee prams
@babybeeprams
Version: June 2017
www.babybeeprams.com.au
 Loading...