


MOBILE ENTERTAINMENT SYSTEM
INSTRUCTIONS MANUAL
MP 5712B
CAR CD/ MP3 PLAYER / RECEIVER
USB /SD /MMC /SLOT/ BLUETOOTH
www.b52audio.com
INSTRUCTIONS MANUAL 02 - 20
MANUAL DE INSTRUCCIONES 21 - 40
MANUAL DE INSTRUÇÕES 41 - 61
ENGLISH
MUTE
LOUD
MP 5712B

Installation
Additional information
General operations
Radio operations
CD/SD/MMC/USB Operations
MP3 WMA overview
Remote control layout
Specification
Before playing discs
Trouble shooting
Bluetooth
INDEX
2
03
05
06
09
11
14
15
17
18
19
20
PRECAUTIONS
Choose the moun ting location where the unit will not interfere with the normal driving function
of the driver.
Bef ore final ly installing the unit, connect the wiring tempor arily and make sure it is all
connected up properly and the unit and the system work properly.
Use only the parts included with the unit to ensure proper installation. The use of unauthorized
parts can cause mal functions.
Con sult with your nearest dealer if installation requires the drilling of holes or other
modifications of the vehicle.
Install the unit where it does not get in the driver’s way and cannot injure the passenger if there
is a sudden stop. Like an emergency stop.
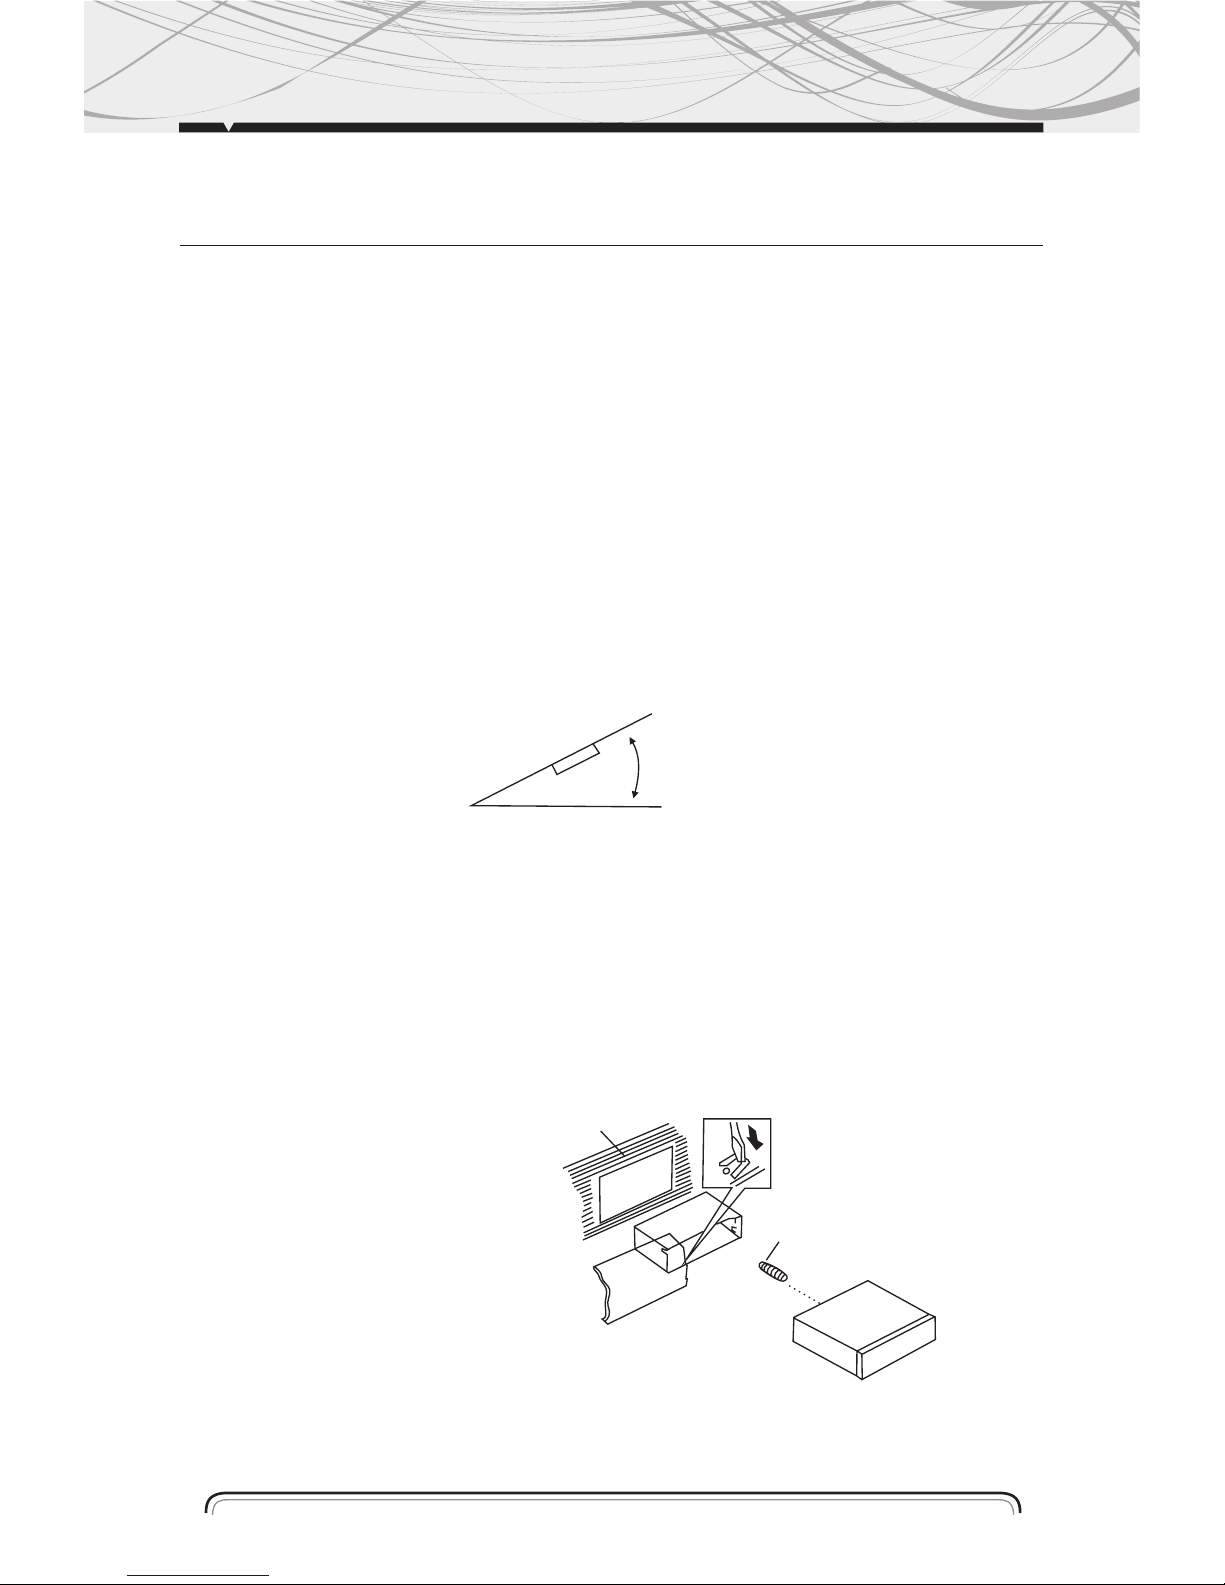
If installation angle exceeds 30 from horizontal, the unit might not give its optimum
performance.
Avoid installing the unit where it would be subject to high temperature, suchas from direct
sunlight, or from hot air, form the heater, or where it would be subject to dust, dirt or excessive
vibration. Do not expose this equipment to rain or moisture.
DIN FRON T-MOU NT (Method A)
Installing the unit
1. Dashboard
2. Holder
After inserting the holder into
the dashboard, select the
appropriate tab according to
the thickness of the dashboard
material and bend them
inwards to secure the holder in
(Fig. 1) place.
3. Screw
INSTALLATION
30
0
(Fig. 1)
1
2
3
3

1. Dashboard
2. Nut (5mm)
3. Spring Washer
4. Screw (5 x 25mm)
5. Screw
6. Strap
Be sure to use the strap to
secure the back of the unit in
place. The strap can be bent by
hand to the desired angle.
7. Plain Washer
INPUT THE SD CARD
The SD oblique angle keeps
rightward exposure, put into
the SD slot and press it again
to eject.
1. Frame
2. Insert fingers into the groove in the front
of frame and pul l out to remove the frame.
(When reatt achi ng the frame, point the
side with a Groove dow nwards and attach
it. )
3. Lever
Insert the levers supp lied with the
unit into the grooves at both sides of
the unit and shown in figure until they click.
Pulling the levers makes posible to remove
the unit from the dashboard.
DIN REAR-MOUNT (Method B)
Installation using the screw holes on
the sides of the unit.
INSTALLATION
1
2
3
4
5
6
7
(
Fig.2
)
2
1
3
(Fi g.3)
Removing the uni t
2
3
2
4
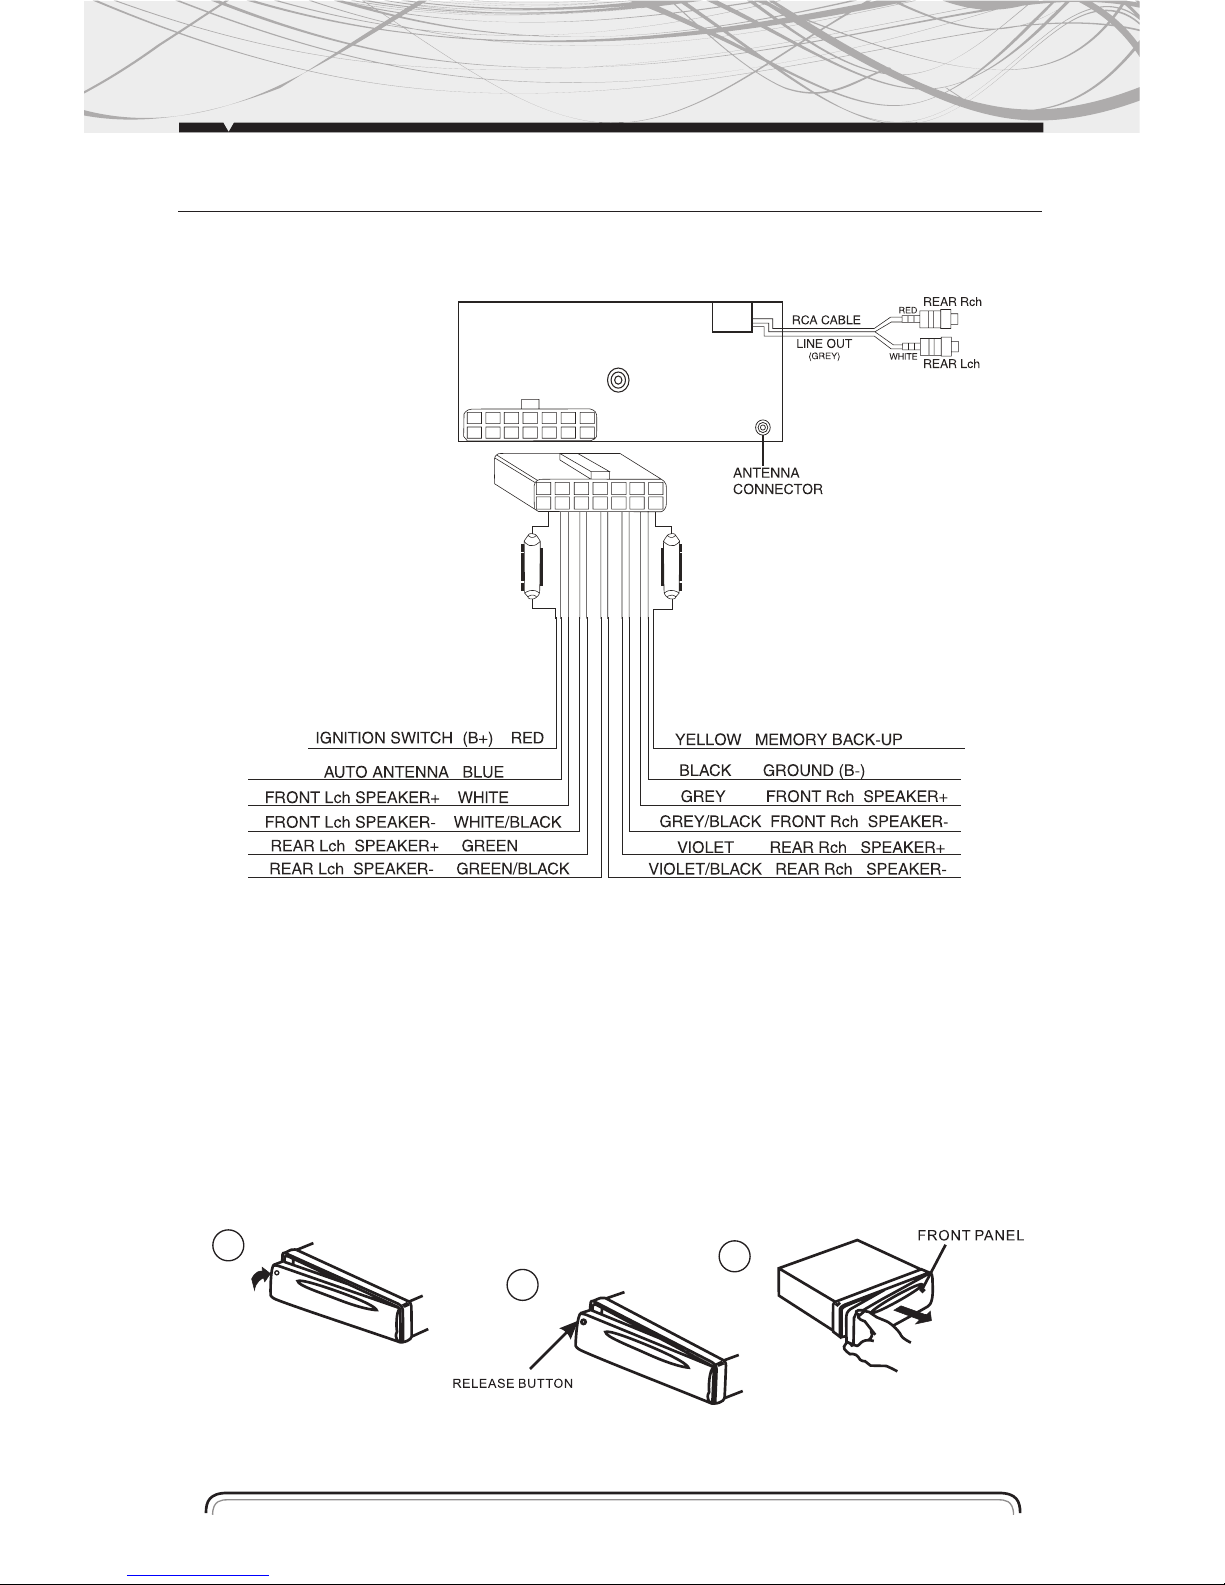
ADDITIONAL INFORMATION
SPEAKER CONNECTION
HOW TO INSTALL AND REMOVE THE FRONT PANEL
INSTALLING THE FRONT PANEL
To install the front panel, insert the panel into the housing and make sure the panel is properly
installed, otherwise, abnormalities occurs on the display or some keys will not function properly
1
2
3
5
GENERAL OPERATIONS
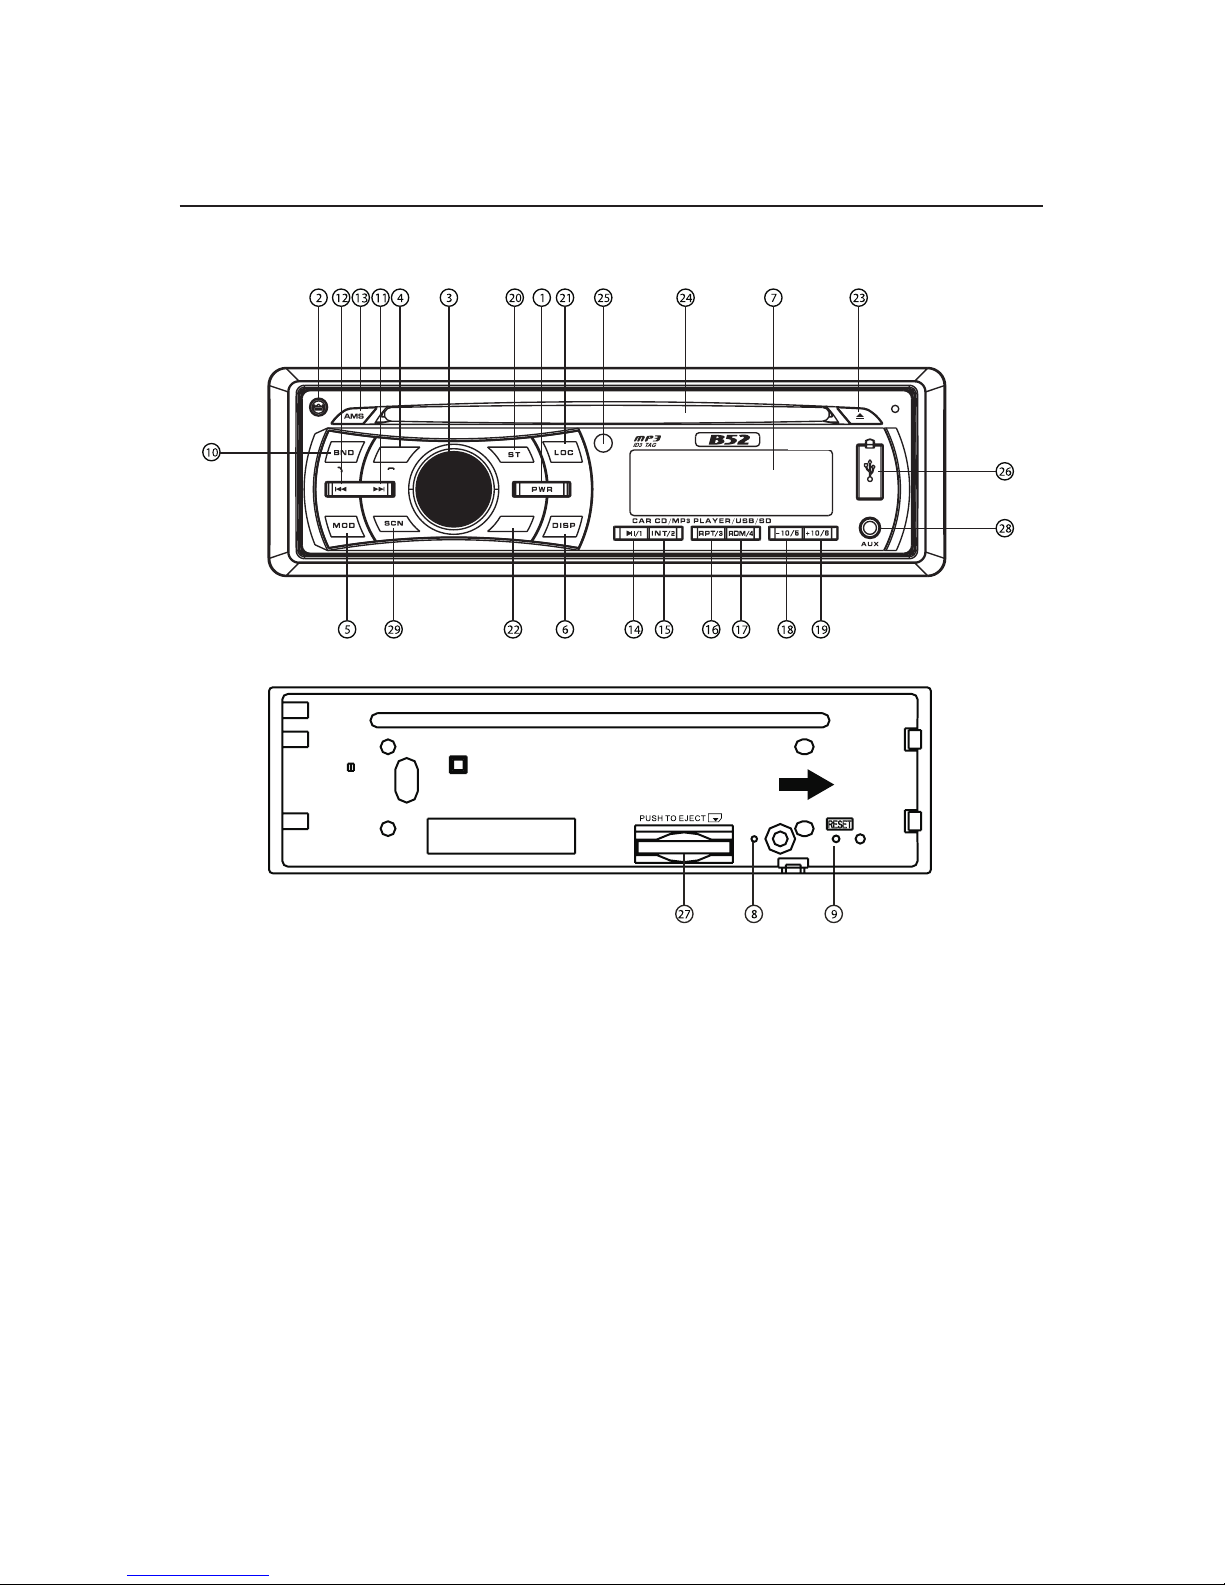
FRONT PANEL LAYOUT
1. POWER BUTTON
2. RELEASE BUTTON
3. VOLUME/ SEL BUTTON
4. MUTE BOTTON
5. MODE SWITCH
6. DISPLAY BUTTON
7. LCD DISPLAY
8. FLASHING LED
9. RESET BUTTON
10. BAND SWITCH
11. TUNE SEEK Y TRACK FORWARD BUTTON
12.TUNE SEEK Y TRACK REVERSE BUTTON
13. AUTOMATICALLY MEMORY STORING
14. PLAY/PAUSE Y PRESET BUTTON 1
15. INTRO Y PRESET BUTTON 2
16. REPEAT Y PRESET BUTTON 3
17. RANDOM Y PRESET BUTTON 4
18. PRESET BUTTON 5
19. PRESET BUTTON 6
20. ST/MO BUTTON
21. LOC/DX BUTTON
22. LOUDNESS BUTTON
23. EJECT KNOB
24. CD SLOT
25. REMOTE CONTROL SENSOR
26. USB CONNECTER
27. SD/MMC SLOT
28. AUX IN JACK
29. SCN BUTTON
6
MUTE
LOUD
MP 5712B
POWER ON/OFF
Press any button to turn the unit on. Press and hold POWER button to turn off the unit.
Note: After the unit is off, the volume level and radio current settings will be memorized, and
when you turn the unit on it will resume the stored status, which you set.
FRONT PANEL RELEASE
Press REL button (2) to detach the removable front panel
SOUND ADJUSTMENT
Turn on (3) can adjust the desired volume quality.
A).Press SEL button (3)will change in the following order.
Option:
VOLUME CONTROL /SELECT
Rotating this knob, you can adjust VOL/BASS/TREB/BAL/FAD . To select the functions, press the
VOL knob shortly until the desired functions are shown on the display.
Increase or decrease the volume by turn the VOL knob right or left. These buttons can be used
to adjust the BASS, TREBLE, BALANCE and FADER.
BASS
Press VOL/ SEL button(3) one time. Adjust bass level by using VOL/ SEL(3)Knob.
TREBLE
Press VOL/ SEL button(3) two times. Adjust treble level by using VOL/ SEL(3) Knob
BALANCE
Press VOL/ SEL button(3) three times. Adjust sound balance between left and right speakers by
using VOL/ SEL(3)Knob.
FADER
Press SEL button (3) four times. Adjust sound balance between front and rear speakers by using
VOL/ SEL(3)Knob.
MUTE
Press MUTE button (4) to mute down the sound. Press it again to release this mode and recover
previous volumen level.
OTHERS ADJUSTMENT
Press VOL/SEL button (3) for several seconds, it is activated as cyclical mode of following
functions for user´s selection.
VOL BAS TRE BAL FAD
7
(Volume) (Bass)
(Treble) (Balance) (Fader)

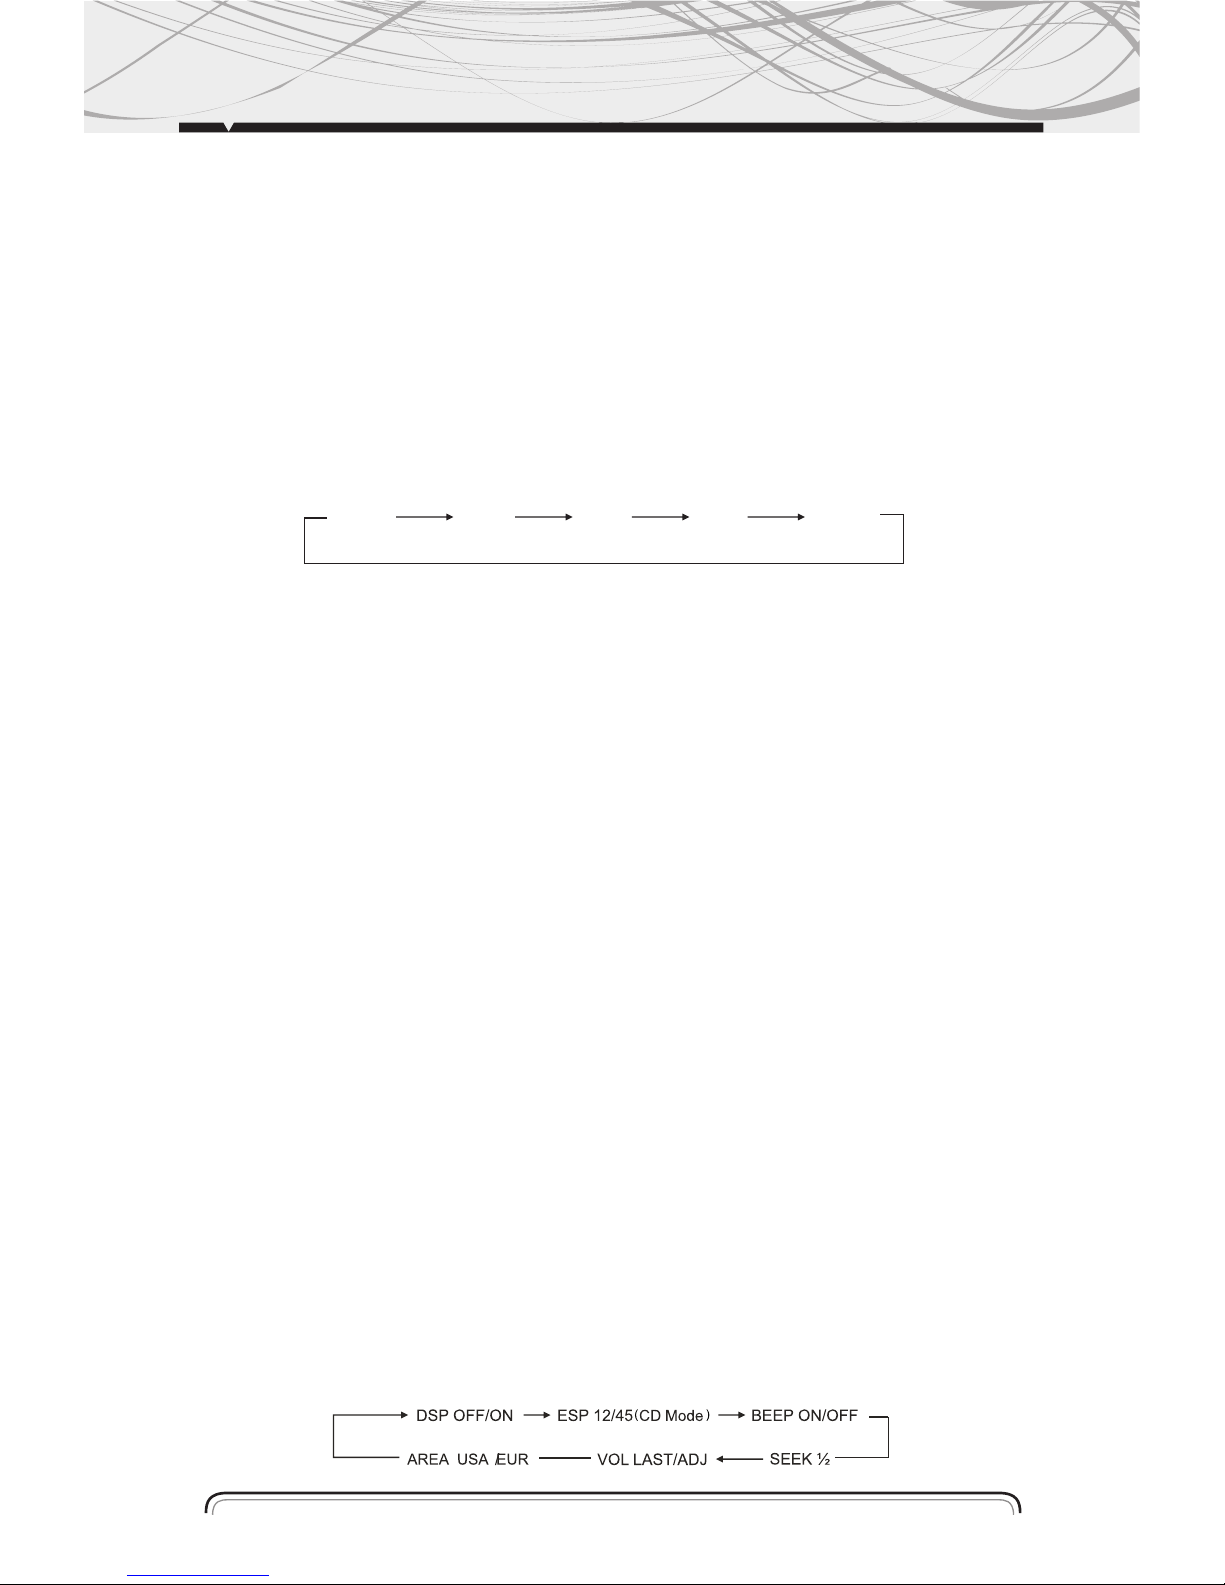
Press and hold this button will go to different modes:
Press and hold will go to DSP mode automatically:
By turning this function button to chose Flat, CLASSIC, Pop and Rock.
By press the function button to select your favoryte DSP mode.
When in the DSP mode, press the function button once will to ESP mode:
By turning the function button to choose 12 seconds ESP.
Vy press the function button to select your desire ESP seconds.
When in the DSP mode, press the function button twice will go to BEEP mode
(the key pad tone) by turning the function button to choose on or off by press
The function button to selecto n or off.
VOL LAST/ADJUST
This function allows to set the volumen level of the unit after it was turned off and the turne don
again. Choose VOL LAST if you want the volumen level to be the same as it was before turning off.
VOL ADJUST allows to choose volumen level.
SEEK MODE
SEEK 1: When SEEK 1 mode is activated, AUTO SEEK SCAN is stopped when station is detected
even user still push SEEK button.
SEEK 2: Auto SEEK SCAN is not stopped even if station is detected if user pushes SEEK button.
When releases SEEK button, the stop when station is detected.
SELECT MODE
By pressing this button(5) to go to different function mode:
- Tuner (radio)
- CD (MP3 CD) to go to this mode must be have a CD in.
- Memory Card to go to this mode must be have a Memory Card in.
- USB to go to this mode USB device must be connected.
- AUX in put
DISPLAY
Press DISP button (6) to operate as the conversion of each display mode as follow:
- Time is displayed for 5 sec when DISP key is pressed, and it returns to its previous display
(Folder, File name...) unless DISP key is pressed again.
3) From the clock mode, when DISP Key is pressed for longer than 1sec, clock mode switches to
clock Adjusting mode and the clock display begins flashing. At this time clock can be changed by
pressing ( + / - ) , or the ENCODER VOLUME.
LIQUID CRYSTAL DISPLAY
Exhibit current frequency and activated functions on the display (7).
FLASHING LED
If the front panel does not install in the main unit, the LED (8) will be flashing.
8

BAND SELECTION
At tuner mode, press BAND button (10) to select the desired band. The
reception band will change in the following order:
STATION SELECTION
Press TUNE/SEEK/TRACK FORWARD button (11) or TUNE/SEEK/TRACK REVERSE button (12)
shortly for manual tuning function.
Press for several seconds the automatic tuning mode ( SEEK
mode) is selected.
AUTOMATICALLY MEMORY STORING & PROGRAM SCANNING
- Automatically Memory Storing
Press AMS(MP3) button (13) for several seconds, the radio searches from the current frequency
and checks the signal strength until one cycle search is finished.
And then 6 strongest stations are stored into the corresponding preset number Button
- Program Scanning
Press AMS(MP3) button (13) shortly to scan preset station. When the field strength level is more
than the threshold level of stop level, the radio is holding at that preset number for several seconds
with releasing mute, then searches again.
STATION STORING
Press preset button (14~19)
1) RADIO MODE. M1 ~ M6
- PRESET MEMORY is loaded when key is pressed for less than 1 second.
- PRESET MEMORY is saved when key is pressed for longer than 1 sec.
2) CD/ MP3 / FLASH MP3 PLAY / PAUSE Press preset button (14) is activated. During a PAUSE,
DISC INDICATOR flashes.
TOP - First song will play whe n Top key is pressed for longer than 0.5sec during play.
INT
Press preset button (15): During INTRO ON, INT indicator comes on and
begins playing the first 10sec of each song, until the last song is played. It begins
playing the entire track from where INT started
MO/ST SELECTOR
Press ST (20) button to select MONO or STEREO mode.
When “ST” appears in the LCD display. During the player mode, press the button to switch left
speaker / right speaker/stereo.
RADIO OPERATIONS
9

LOC/DX SELECTOR
Press LOC (21) button to select strong or weak station reception. It is set to LOC mode when LOC
(21) button is first pressed. “LOC” appears and only local station is available. It is switched to DX
mode when LOC (21) button is pressed again. Both distance and local stations can be received.
LOUDNESS ON/OFF
Press LOU (22) button to increase the low frequency. This can improve the sensitivity of your
ears. And “LOUD” appears in the LCD when the loudness mode is activated.
SCAN
Press scan button (29) to search radio station.When a station signal strength
level more than the level to stop.The radio will playing the station for 5
seconds and the frequency blinking on the LCD at the same time.
Press and hold scan button (29) more than 3 seconds to select the station which
you desired.The radio will start play the station.
AREA USA/EUR SETUP
In Radio mode. Press SEL button for several seconds. LCD with show from DSP OFF/ON AREA USA/
EUR. At AREA USA/EUR. You can use VOL +/- to select the AREA frequency.
10
CD/SD/MMC/USB OPERATIONS
Discs for playback:
This unit can play disc types: CD/CD-R/-RW.
Compatible with formats: CDDA/MP3/WMA.
Loading and ejecting a disc
1. Turn the power on.
2. Insert the disc with the printed side facing upward into the slot.
3. Press EJECT button to eject the disc.
Multi-media card MMC/SD card slot
Support MP3/WMA ID3 format music only. Detach the front panel. Carefully insert the SD/MMC
card into the card slot on the inner panel. Attach the panel.
Unit starts playback automatically.
USB jack
Carefully connect the USB driver to the USB adapter cable and then insert it into the USB jack on
the front panel. Unit starts playback automatically.
USB/SD/MMC notes:
USB functions (flash memory type) MP3 music play.
1. SD/ MMC card support.
2. FAT 12/ FAT 16/ FAT 32 is possible
- FAT 12/16 (dir: 200 support, file:500 support),
- FAT 32 (dir: 200 support, file:500 support).
3. Filename: 32 byte/ Dir name: 32byte.
4. Tag (id3tag ver2.0)
- Title/ Artist/ Album: 32 byte support.
5. Multi card reader not support.
6. USB 2.0 support.
Note: USB format supports 2.0. Capacity: up to 4 GB.
SD cards brands: Cannon, Fuji film, Palm, Motorola, Microsoft, IBM, HP,
Compaq, Sharp, Samsung, etc. Capacity: up to 4 GB.
MMC cards brands: Ericsson, Nokia, Motorola, HP, Palm, Sanyo, Microsystems, etc.
Capacity: up to 4 GB.
Note: Because of the great variety of products with SD and MMC card slots and
their sometimes quite manufacturer-specific functions the producer can neither
guarantee that all devices will be recognized nor that all operating options that
are possible in theory will actually work.
11

ID3 TAG INFORMATION
This unit supports ID3 tag ver2.0. If an MP3/WMA file has ID3 Tag information, it will be
displayed on the LCD. If there is no ID3 Tag information, nothing will be shown on LCD. The ID3
Tag information may include File, Folder, Music, Album or Artist data.
NEXT/PREVIOUS
Press NEXT/PREVIOUS buttons to choose next or previous track. Press longer than 1 sec., to
choose forward playback or backward playback.
PLAY/PAUSE
Press PAUSE button to pause the playback, press one more time to resume the normal playback.
INTRO (Preview all Tracks)
When this button is pressed, “INT ON” indication is displayed and the first several seconds of
each track of the disc is played. Press again to stop intro and listen to track.
REPEAT
When RPT button is pressed, “PT ON” indication is displayed and playback of the selected track
will be continually repeated until the track repeat mode is cancelled by pressing RPT button
again.
RANDOM
When RDM button is pressed,”RDM ON” indication is displayed and each track of the disc is
played in random instead of normal order. To cancel RANDOM mode, press RDM button again.
TRACK DOWN/UP SELECT (In case of MP3/WMA files)
-10/5 button: 10 Track down
+10/6 button: 10 Track up
SELECTION OF MP3/WMA FILES
1.Searching Track:
•Press AMS, then searching track is activated.
•Press VOL knob, then the first digit is blinking.
•Turn VOL knob to right or left, select first digit you want.
•Press VOL knob, then the first digit is fixed and second digit is blinking.
•Turn VOL knob to right or left, select 2nd 3rd respectively.
•Then automatically the song you selected will start.
2. Searching File Name:
•Press AMS twice, then file search is activated.
•Press VOL knob, then the first directory is displayed.
12

•Turn VOL knob to right or left, you can select the directory you want.
•Press VOL knob again, then the directory is fixed and the first file name is displayed.
•Turn VOL knob to right or left, you can select the file you want.
•Press VOL knob, then the song you selected will start.
3.Searching Character:
•Press AMS 3 times, then character search mode is activated.
•Press VOL knob, then a character is displayed.
•Turn VOL knob to right or left, you can select the letter you want.
•Press VOL knob longer than 2 sec.
•The song which has same character you selected is displayed.
•Turn VOL knob to right or left, you can select the song you want.
•Press VOL knob, then the song you selected will start.
13

14
• MP3 is short for MPEG Audio Layer 3 and refers to an audio compression technology standard.
• This product allows playback of MP3 files on CD-ROM, CD-R or CD-RW discs.
• The unit can read MP3 files written in the format compliant with ISO 9660.
However it does not support the MP3 data written by the method of packet write.
• The unit can not read an MP3 file that has a file extension other than “mp3”.
• If you play a non- MP3 file that has the “mp3” extension, you may hear some noise.
• In this manual, we refer to what are called “MP3 file” and “ folder” in PC terminologyas “ track
and album”, respectively.
• Maximum number of directory level is 8, including the root directory. Maximum number of files
and folders per disc is 256.
• The unit may not play tracks in the order of Track numbers.
• The unit plays only the audio tracks if a disc contains both audio tracks and MP3 files.
• When playing a disc of 8 kbps or “VBR”, the elapsed playing time in the display window will
not be correct and also the intro play may not function properly.
“VBR”: Variable Bit Rate.
• The unit supports the playback of WMA files. The playback of ID3 tags for WMA format is not
guaranteed, it depends on versions and availability of Cyrillic alphabet.
• WMA (Windows Media Audio) music data compression format, created by Microsoft
Corporation. This format uses coding algorithm for compression of initial audio-record, greatly
decreasing the file size, but, saving the good sound quality even when the bit rate is low (for
example, 64 Kbit/s).
• Remember that the unit may not play the tracks in order they are written on disc.
Notes on creating your own CD-R or CD-RW containing MP3 files:
• To enjoy high quality sound, we recommend converting to MP3 files with a sampling frequency
of 44.1kHz and a fixed bit rate of 128 kbps.
• DO NOT store more than 256 MP3 files per disc.
• For ISO 9660 - compliant format, the maximum allowable depth of nested folders is 8,
including the root directory (folder).
• When CD-R disc is used, playback is possible only for discs, which have been finalized.
• Make sure that when MP3 CD-R or CD-RW is burned that it is formatted as a data disc and
NOT as an audio disc.
• You should not write non-MP3 files or unneeded folders along with MP3 files on the disc
otherwise it takes a long time until the unit starts to play MP3 files.
• With some CD-R or CD-RW media, data may not be properly written depending on its
manufacturing quality. In this case, data may not be reproduced correctly.
High quality CD-R or CD-RW disc is recommended.
• Up to 16 characters are displayed for the name of an Album or a Track. ID3TAG version 1x is
required.
• Note that the unit may not play Tracks in the order that you wrote them to the disc.
MP3/WMA OVERVIEW
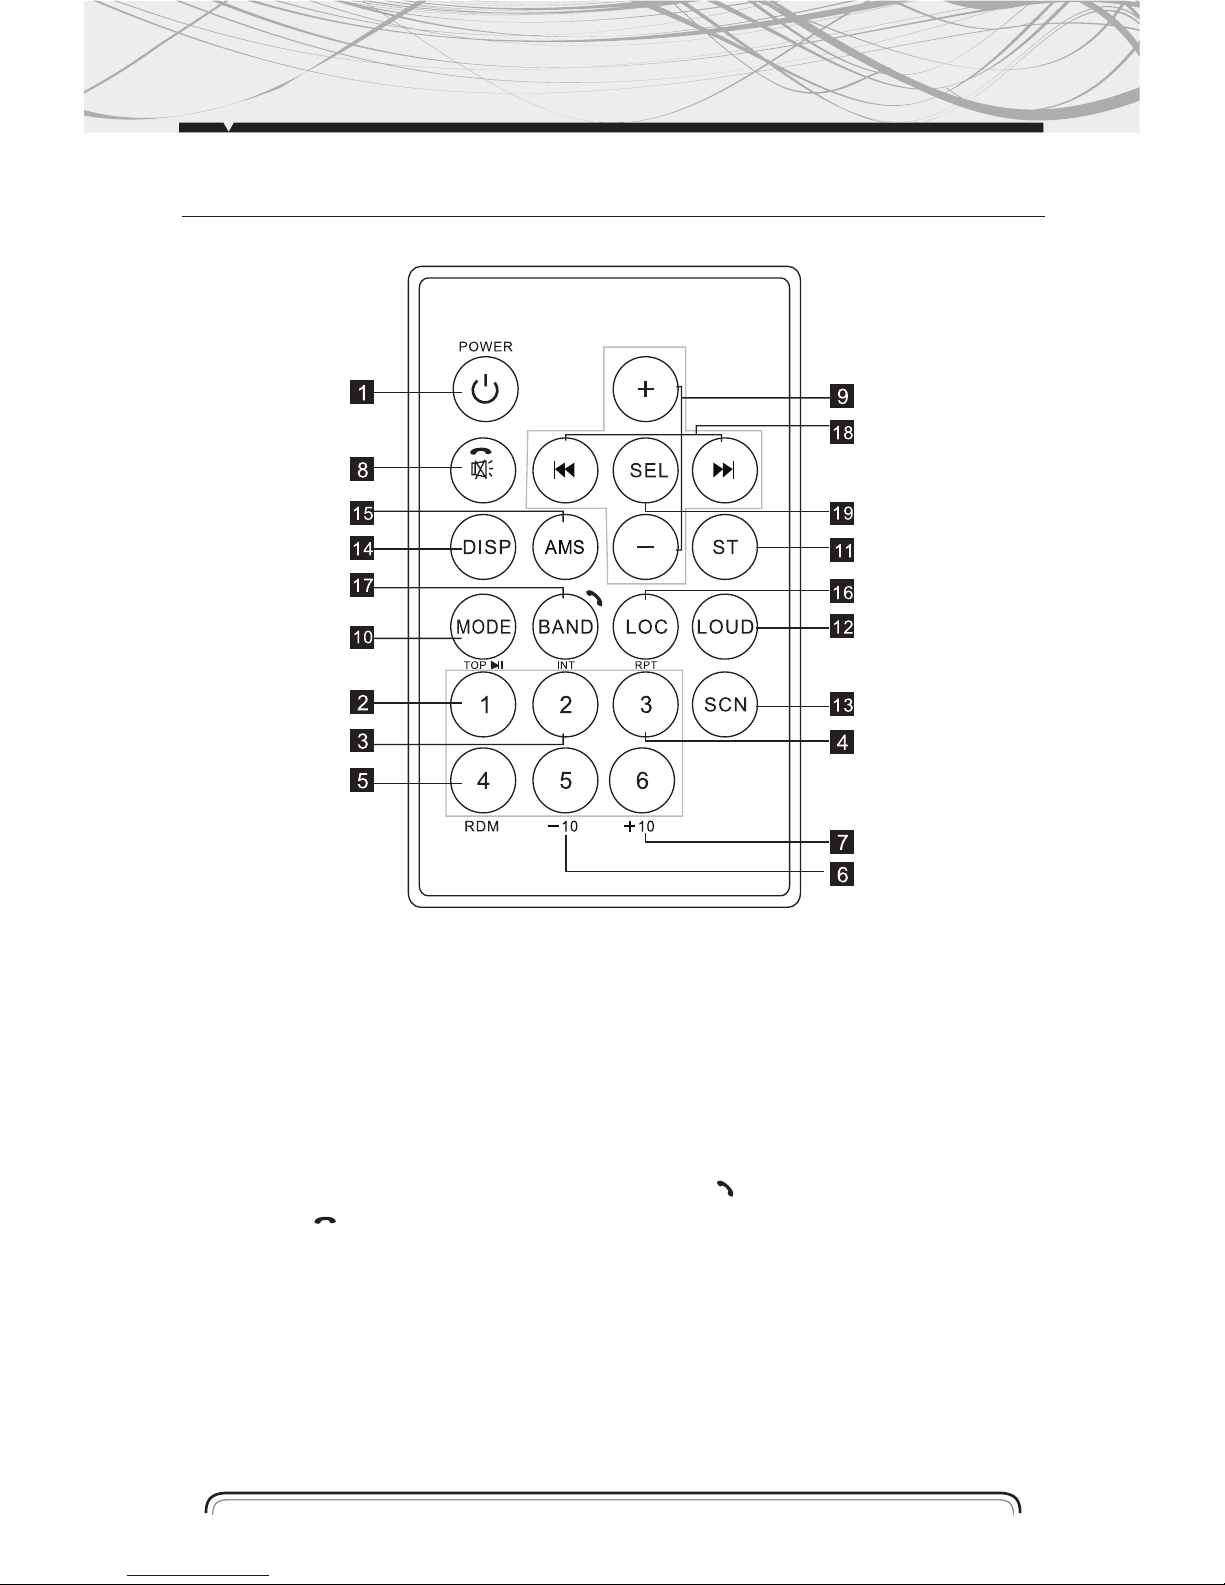
REMOTE CONTROL LAYOUT
1. Power Button
2. Pause/ Play/ Preset Button1
3. Intro/ Preset Button2
4. Repeat Playing/ Preset Button3
5. Random/ Preset Button4
6. Preset Button5
7. Preset Button6
8. Mute/ Button
9. Volume Control
10. Mode Switch
11. ST/MO Button
12. Loudness Button
13. Scan Button
14. Display Button
15. APS/ AMS Button
16. LOC/DX Button
17. Band/ Switch
18. Tuning/ Selecting Tracks/ F.F / F.R
19. Select Button
15
16
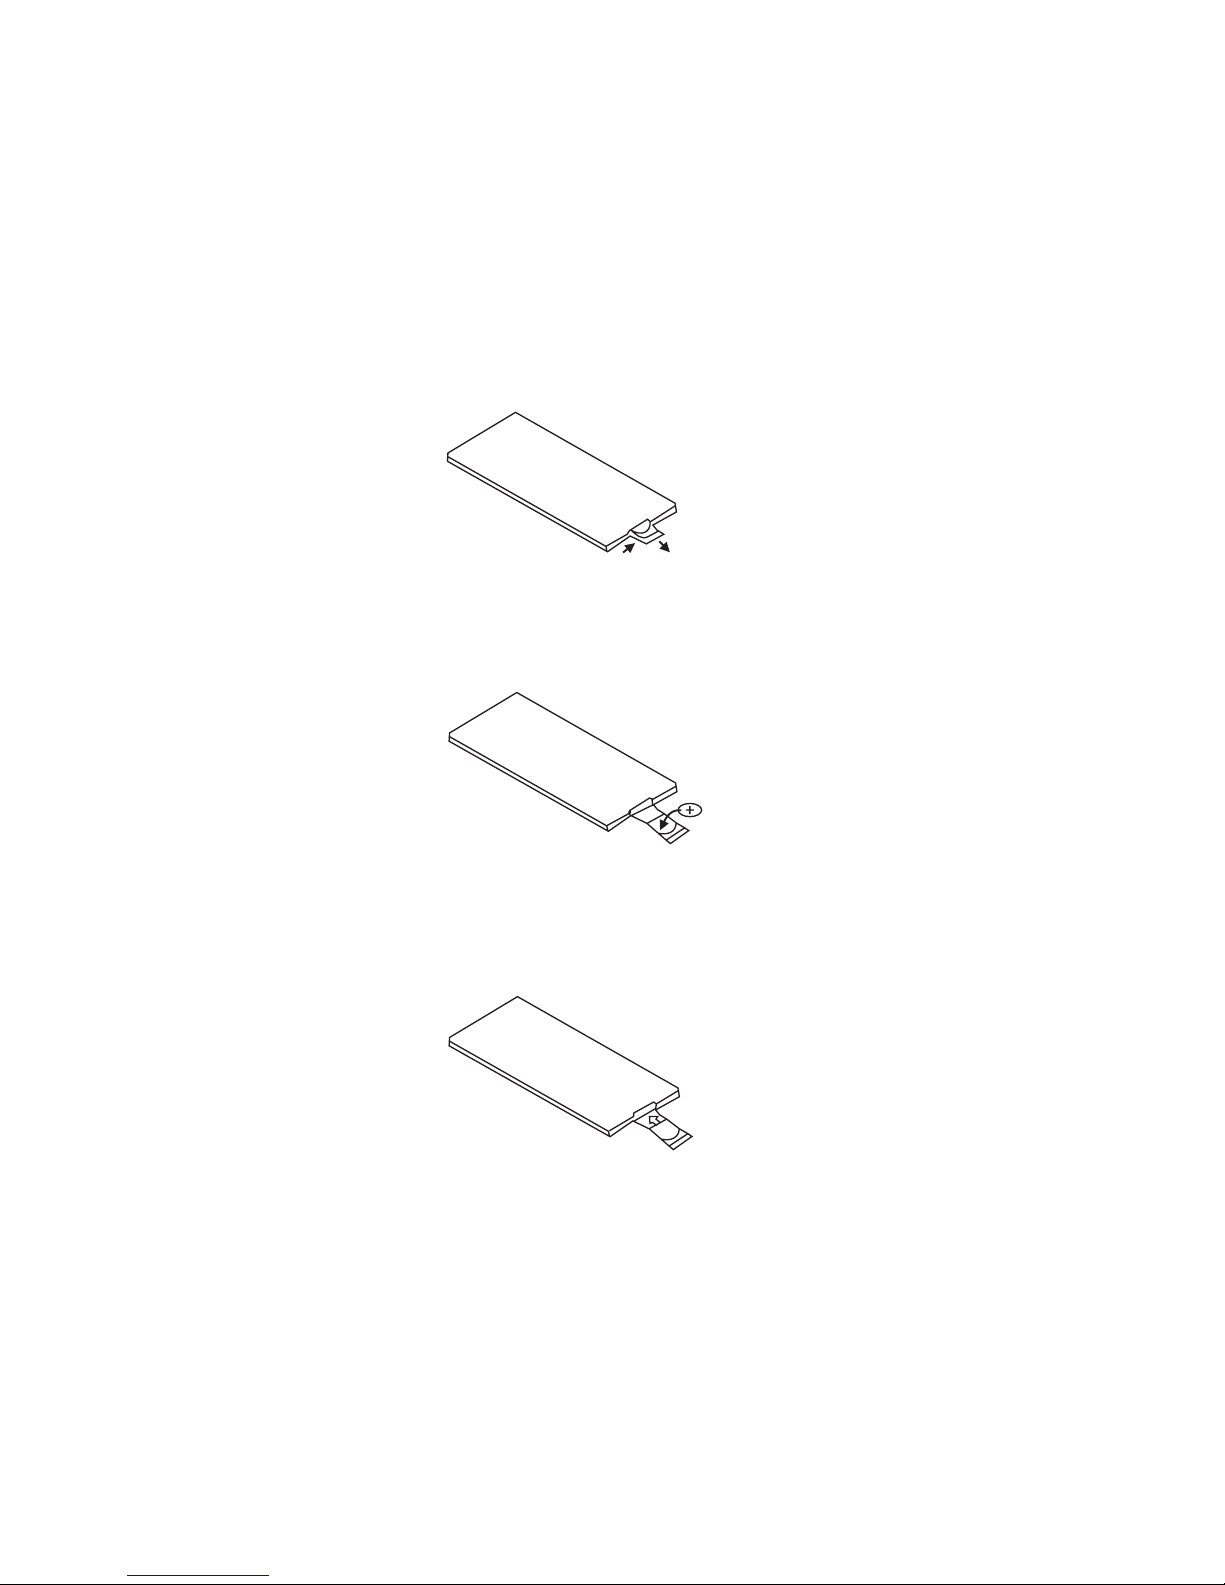
REPLACING THE BATTERY
When the operational range of the remote control becomes short or non functions while operating. Replace a new CR2025 battery. Make sure the battery polarity before replacement.
1. Pull out Battery Holder while pressing the stopper
2. Put the button type battery( + )mark upward into the Battery Holder.
3. Insert the Battery Holder into the Remote control.

GENERAL
Power Supply Requirements: “DC 14.4V ” Negative Ground
Maximum Output Power: 50W x 4 CH
Chassis Dimensions: 178 x 163x 50mm (W x D x H)
TONE CONTROLS
Bass (at 100Hz): + 10dB / -10dB
Treble (at 10K): +10dB / -10dB
Current Drain: 10A
CD PLAYER
Signal to Noise Ratio: More than 60dB
Channel Separation: More than 60dB
Frequency Response: 20H z - 20KHz
FM RADIO
Frequency Coverage (MHz): 87.5 - 107.9 MHz (U.S.A.)
IF: 10.7 MHz
Sensitivity (S/N-30dB): 12 dBu
Stereo Separation: > 30dB
AM RADIO
Frequency Coverage 530 - 1710KHz (U.S.A.)
IF: 450KHz
Sensitivity (S/N-20dB): 42 dBu
Load Impedance: 4 ohms
Remarks:
Specifications subject to change without notice
SPECIFICATION
17
18
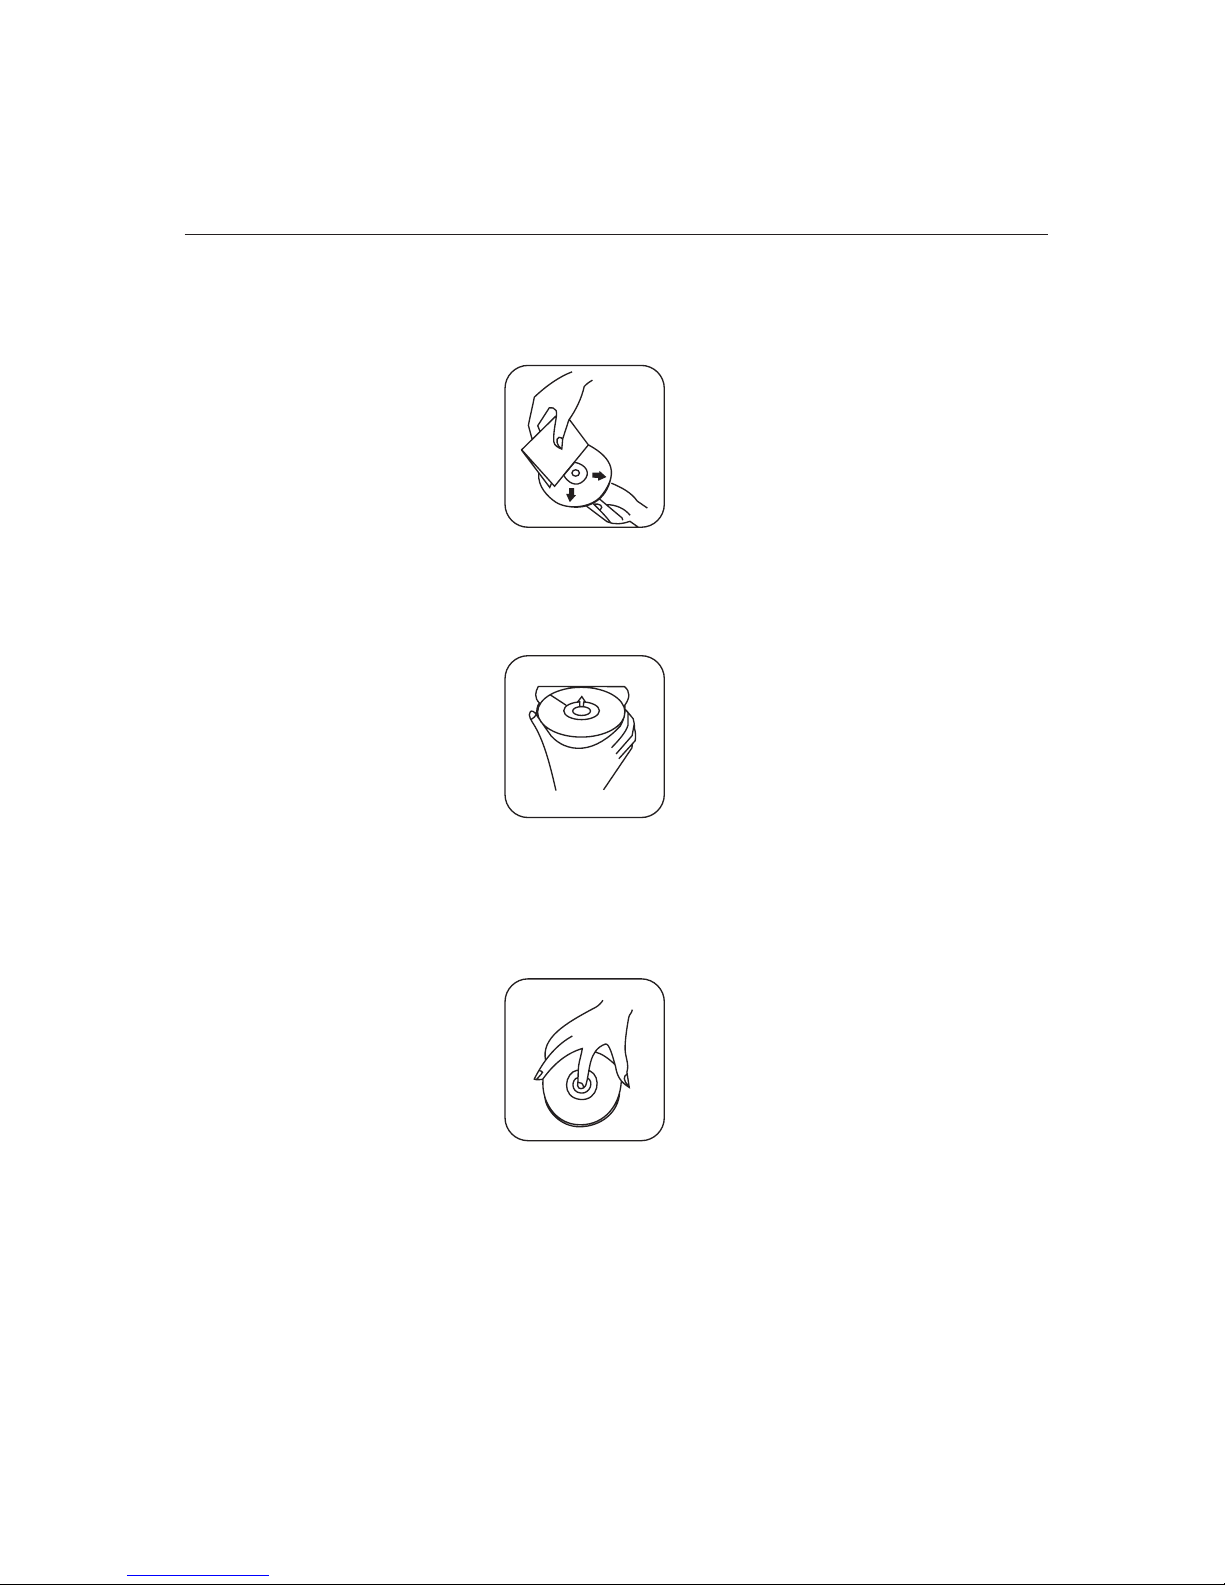
Cleaning the CD
Before playing a CD, wipe it off with a clean, dust-free cleaning cloth.
Wipe the disc in the direction of the arrow.
Always insert the CD with the label side facing upwards.
If the CD is inserted with the printed side facing downwards, the device
may be damaged.
Note: If there is already a CD in the CD slot , do not try to insert a second CD. This may damage
the device.
Always hold CDs by the edge. In order to keep the CD clean do not touch the surface. Pull out
the CD as follows.
Do not attach any sticker or adhesive tape on the CD.
Do not expose the CD to direct sunlight or sources of heating.
Do not leave CDs in a car if it parked in direct sunlight as that will lead to a considerable rise in
the temperature inside the car.
Note: Do not use any solvents such as petrol or thinning agents. Commercially available cleaning
substances of antistatic spray will damage the device.
BEFORE PLAYING DISCS
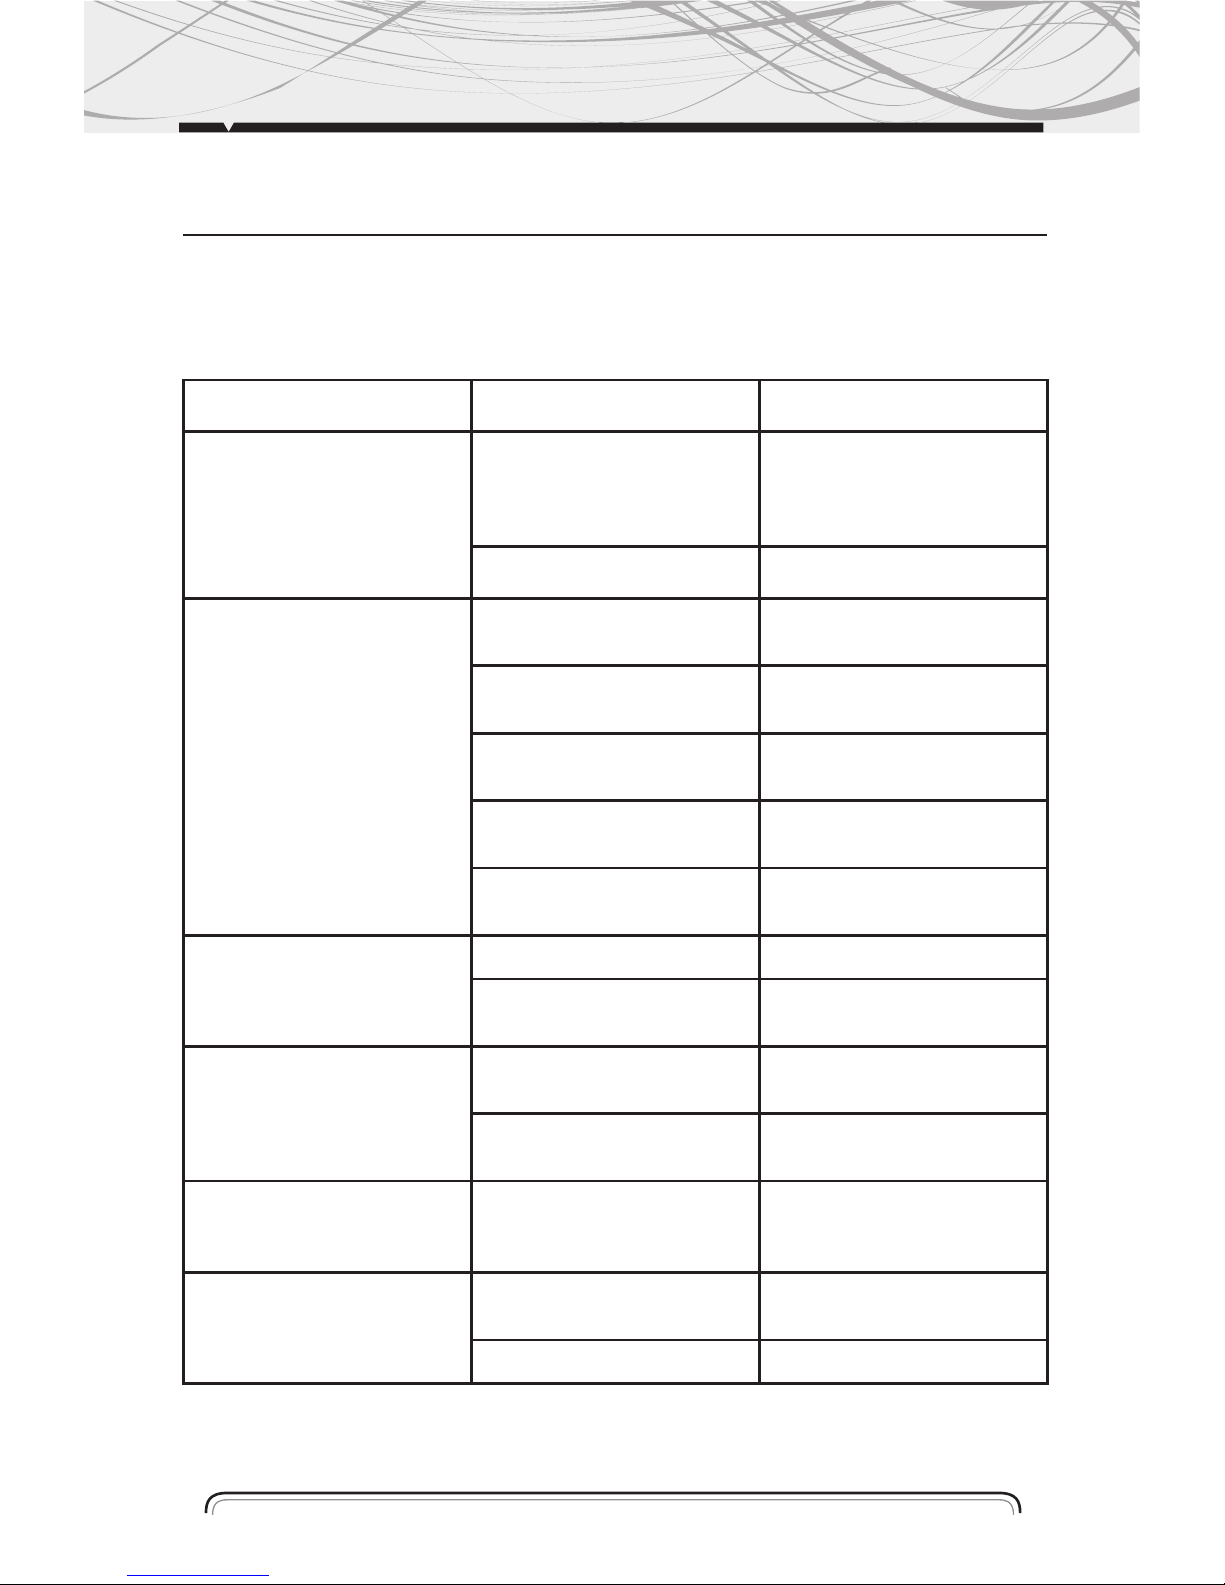
TROUBLESHOOTING
Before going through the check list, check wiring connection. If any of the problems persist after
checklist has been made, consult your nearest service dealer.
Symptom Causes Solution
No Power The car ignition key
not been switched on
If the power supply is properly
connected to the car accessory
terminal, switch the ignition
key to ACC
The fuse is blown Replace a new fuse
CD Cannot Be
Loaded or Ejected
A CD is already inside
the player slot
Remove the CD from the player
and insert the new one
Inserting the CD in reverse
direction
Insert the CD with the label
facing up
The CD is extremely dirty or
defected
Clean the CD or try to play a
new one
Temperature inside the car is
too high
Cool off until the ambient
temperature return to normal
Condensation Leave the player off for an
hour or so and try again
No Sound Volume is at minimum Adjust volume to desired level
Wiring is not properly
connected
Check wiring connection
Sound Skipping The installation angle is more
than 30º
Adjust the installation angle to
less than 30º
CD is extremely dirty or
Defected
Clean the CD or try to play a
new one a new one
The Operation Keys
Do Not Work
The built-in microcomputer is
not operating properly due to
Interference
Press the RESET button
or reinstall the front panel
properly
The Radio or Automatic
Selection Does Not Work
The antenna cable is not
connected correctly
Connect the antenna cable
correctly
The signals are too weak Select the station manually
19

20
1. Pairing connect.
Turn on car unit, put your mobile near the unit, activate your mobile bluetooth function.Soon
the phone will find the new bluetooth device "CAR AUDIO". Input the pairing password “8888”
and clik OK. The phone will prompt the matching successful.When the pairing connect is
successful,on the LCD, it shows BT ON, and the bluetooth logo “ ” will stop blinking .Then
you may perform the bluetooth operation. REMARK: depend on bluetooth mobile, the bluetooth
system support “HSP” “HFP” “A2DP” and AVRCP bluetooth profile.
2. Handsfree phone service
If your mobile phone have matched with the unit. You can dial calls out through your mobile
phone. It will turn to unit automatically when calling come in and the calling phone number will
indicat on the LCD screen.
-Press the “BAND” button shortly to accept the call .Then you can talk with the
other party through the mic on the panel.
-Press “MUTE” button shortly to reject the call when calling come in.
-Press “MUTE” button shortly to hang up after you finish the talk.
3. Advance Audio distributing profile(A2DP) playing.
Through mobile and unit A2DP connected, the music playing in mobile can turn to the unit audio
system play. Press button “ ”and “ ” in the panel can select the music track.
-Press “ ” button shortly to pause the music playing.
-Press “BAND”(mode) longly to temporarily discommect the bluetooth.
-Press “BAND”(mode) button longly again to reconnect the bluetooth.
4.Phone number book.
This bluetooth system can automatically store incoming call numbers, up to 10 phone numbers.
-Press “MUTE”(mode) button longly to enter the phone number book and press VOL button to
look up the phone number.
-Press “BAND” button once can call out you desired phone number.
5. Interrupt bluetooth connection/reconnection.
Pressing the “BAND” button shortly to interrupt the bluetooth connection when you are talking a
call and the voice can turn to mobile speaker.
Press “BAND” button again to reconnection.
NOTE:Different mobile phone have different responses.We do not guarantee all the operation of
connectable devices.
6. How to delete stored phone number? You just t can store ten number of missed ,rejected and
ANS under separately, and the first number will auto deleted when the 11th number calling.
7. How to use “Missed”,”Rejected””Auto ANS” Functions.
Press MUTE button for 3 seconds to enter into REVIEVED /MISSED/REJECTED/ ANTO .ANS.
Turn VOL button for choosing the telephone number.
BLUETOOTH

MOBILE ENTERTAINMENT SYSTEM
MANUAL DE INSTRUCCIONES
MP 5712B
REPRODUCTOR DIGITAL
CD/MP3/USB/SD/MMC/BLUETOOTH
FRENTE DESMONTABLE
AM/FM RADIO
INSTRUCTIONS MANUAL 02 - 19
MANUAL DE INSTRUCCIONES 21 - 39
MANUAL DE INSTRUÇÕES 40 - 58
ESPAÑOL
MUTE
LOUD
MP 5712B
21

Instalación
Información adicional
Funciones generales
Funciones de radio
Funciones de CD/ SD/ MMC/ USB
Funciones de MP3 WMA
Control Remoto
Especificaciones
Antes de reproducir discos
Solución de problemas
Bluetooth
INDICE
22
23
25
26
29
31
34
35
37
38
39
40

PRECAUCIONES
• Elija el lugar donde se va a instalar el equipo cuidadosamente para que la unidad no interfiera
con la conducción del vehículo.
• Antes se instalar la unidad, conecte el cableado temporalmente y asegúrese de que esté todo
conectado correctamente y que la unidad y el sistema funcionen de manera adecuada.
• Para una instalación segura utilice únicamente el equipo y accesorios suministrados. El uso de
partes no autorizadas puede causar un mal funcionamiento.
• Consulte al distribuidor más cercano si la instalación requiere la perforación de agujeros u
otras modificaciones al vehículo.
• Instale la unidad en un lugar donde no interfiera con el conductor y que pueda lastimar al
pasajero en caso de una frenada brusca como por ejemplo una parada de emergencia.
• Si el ángulo de instalación excede los 30º, es posible que el equipo no alcance un rendimiento
óptimo
Evite la instalación del equipo en lugares en donde pueda exponerse a altas temperaturas como,
por ejemplo, la luz directa del sol, o de aire caliente, o del calefactor, o donde el equipo pudiera
estar expuesto al polvo, la suciedad o vibraciones excesivas.
MONTAJE FRONTAL DIN (Método A)
Instalación de la unidad
1-Tablero
2-Soporte
Después de insertar el soporte en el
tablero, seleccione la lengüeta adecuada
para el grosor del material del tablero y
dóblela hacia adentro para ajustar el
soporte. (Fig.1)
3- Tornillo
INSTALACION
30
0
(Fig. 1)
1
2
3
23

INSTALACION
1-Marco
2-Inserte los dedos en la ranura en la parte
delantera del marco y tire para remover el
marco. (Cuando lo vuelva a colocar, coloque
el lado con la ranura hacia abajo y ajústelo)
3- Palanca
Inserte las palancas provistas en las ranuras
a ambos lados de la unidad y como se
muestra en la figura hasta que ajusten con
un clic. Al tirar de las palancas es posible
remover la unidad del tablero.
Ajuste de la unidad al soporte de montaje de
radio provisto por la fábrica:
1- Seleccione la posición donde los agujeros
de los tornillos del soporte y los agujeros de
la unidad se encuentren alineados y ajuste
los tornillos en dos lugares en cada lado.
Utilice tornillos de 5x5 mm. o de 4x5 mm.
2-Tornillo
3-Tablero o consola
MONTAJE TRASERO DIN (Método B)
Instalación utilizando los agujeros a ambos
lados de la unidad.
1
2
3
4
5
6
7
(
Fig.2
)
2
1
3
(Fi g.3)
2
3
2
Remover la unidad
1-Tablero
2-Tuerca (5mm)
3- Arandela
4-Tornillo (5x25 mm)
5-Tornillo
6-Correa
Asegúrese de utilizar la correa para
ajustar la parte trasera de la unidad en su
lugar. Se puede doblar la correa con la
mano hasta obtener el ángulo deseado.
7- Arandela plana.
ENTRADA DE TARJETA SD
El ángulo oblicuo SD mantiene la
exposición hacia arriba. Colóquela dentro
de la ranura SD y presione nuevamente
para retirar.
24

INFORMACION ADICIONAL
CONEXIÓN DEL PARLANTE
CÓMO INSTALAR Y REMOVER EL PANEL DELANTERO
INSTALACIÓN DEL PANEL FRONTAL
Para instalar el panel delantero, inserte el panel en la carcasa y asegúrese de instalarlo
correctamente. Sino, se pueden producir anormalidades en el display o algunas teclas pueden
no funcionar correctamente.
1
2
3
25
PANEL DELANTERO
BOTON SOLTAR

26
FUNCIONES GENERALES
PANEL DELANTERO
1- Botón de encendido
2- Botón soltar
3- Botón volumen/ selección
4- Botón mudo
5- Botón modo
6- Botón display
7- Display LCD
8- Led intermitente
9- Botón reset
10- Botón de banda
11- Botón de búsqueda hacia delante de
tonos y pistas
12- Botón de búsqueda hacia atrás de tonos
y pistas
13- Almacenamiento automático de memoria
14- Botón de encendido/ pausa y
preseleccionado 1
15- Botón intro y preseleccionado 2
16- Botón repetir y preseleccionado 3
17- Botón al azar y preseleccionado 4
18- Botón preseleccionado 5
19- Botón preseleccionado 6
20- Botón ST/MO
21- Botón LOC/DX
22- Botón Loudness
23- Perilla de expulsión
24- Ranura de CD
25- Sensor de control remoto
26- Conector USB
27- Ranura SD/MMC
28- Jack de entrada AUX
29- Botón SCN
MUTE
LOUD
MP 5712B

VOL BAS TRE BAL FAD
(Volume) (Bass)
(Treble) (Balance) (Fader)
ENCENDIDO/ APAGADO
Presione cualquier botón para encender la unidad. Presione y mantenga presionado el botón
para apagar la unidad.
Nota: Después de que la unidad sea apagada, el nivel del volumen y las configuraciones de la
radio actuales serán memorizadas y cuando encienda la unidad nuevamente volverá al estado
almacenado.
PARA SOLTAR EL PANEL DELANTERO
Presione el botón REL (2) y se destrabará el panel delantero desmontable.
AJUSTE DE SONIDO
Gire la tecla (3) para ajustar la calidad de volumen deseada.
A) Presione el botón SEL (3) para cambiar en el siguiente orden. Opción:
CONTROL DE VOLUMEN/ SELECCIÓN
Gire esta perilla para ajustar VOL/ BASS/ TREB/ FAD. Para seleccionar las funciones, presione la
perilla VOL hasta que se muestren las funciones deseadas en el display.
Aumente o disminuya el volumen girando la perilla VOL hacia la derecha o izquierda. Estos
botones se pueden utilizar para ajustar BASS, TREBLE, BALANCE y FADER.
BASS
Presione el botón VOL/ SEL (3) una vez. Ajuste el nivel de bajos utilizando la perilla VOL/ SEL (3).
TREBLE
Presione el botón VOL/ SEL (3) dos veces. Ajuste el nivel de agudos utilizando la perilla VOL/ SEL (3).
BALANCE
Presione el botón VOL/ SEL (3) tres veces. Ajuste el balance de sonidos entre los parlantes
izquierdo y derecho utilizando la perilla VOL/ SEL (3).
FADER
Presione el botón SEL (3) cuatro veces. Ajuste el balance de sonidos entre los parlantes
delantero y trasero utilizando la perilla VOL/ SEL (3).
MUDO
Presione el botón MUDO (4) para anular el volumen. Presiónelo nuevamente para soltar este
modo y volver al nivel de volumen previo.
OTROS AJUSTES
Presione el botón VOL/ SEL (3) por varios segundos. Se activará de modo cíclico para que el
usuario seleccione las siguientes funciones:
27

Presione y mantenga este botón apretado para ingresar los siguientes modos diferentes:
Presione y mantenga presionado para ingresar en el modo DSP de manera automática: Girando este
botón de función podrá elegir Flat, CLASSIC, Pop y Rock.
Presionando este botón de función seleccionará su modo DSP favorito.
En modo DSP, presione el botón de función una vez para pasar a modo ESP.
Girando el botón de función podrá elegir ESP de 12 segundos o 45 segundos.
Presionando el botón Función puede seleccionar los segundos ESP deseados.
En modo DSP, presione el botón Función dos veces para pasar al modo BEEP (el tono del teclado) giran-
do el botón de función para encender o apagar y presionándolo para seleccionar encendido o apagado.
AJUSTE DE SONIDO
Esta función le permite configurar el nivel de volumen de la unidad después de haber sido apagado
y encendido nuevamente. Elija VOL LAST si desea que el nivel de volumen sea el mismo que antes
de apagar la unidad.
VOL ADJUST le permite elegir el nivel de volumen deseado.
MODO BÚSQUEDA
SEEK 1: Cuando se activa el modo de búsqueda SEEK1, la búsqueda automática (AUTO SEEK SCAN)
se detiene al detectar una estación aún cuando el usuario continúe presionando el botón SEEK.
SEEK 2: La búsqueda (SEEK SCAN) no se detiene aún cuando se detecte una estación si el usuario
presiona el botón SEEK. Después de soltar este botón de búsqueda (SEEK), la búsqueda se detiene
cuando se encuentra una estación.
1. SELECTOR DE MODO (MODE)
Al presionar esta tecla (5), el usuario puede seleccionar los diferentes modos de función:
- RADIO
- CD (CD MP3): Para pasar a este modo debe haber un CD dentro.
- Tarjeta e memoria: Para ingresar a este modo, debe estar la tarjeta de memoria dentro.
- USB: Para ingresar a este modo, debe estar conectado a un dispositivo USB.
- Entrada AUX
DISPLAY
Presione el botón DISP (6) para que funcione como modo de conversión de cada modo display de la
siguiente manera:
Cuando se presione la tecla DISP, el tiempo se mostrará por 5 segundos y luego volverá al display
previo (Carpeta, Nombre de archivo…) a menos que se presione nuevamente la tecla DISP.
3) Desde el modo reloj, cuando se presione la tecla DISP por más de 1 segundo, el modo reloj
cambiará a modo de ajuste de reloj y comenzará a titilar el display del reloj. En este punto, se
puede cambiar el horario del reloj, utilizando las teclas (+/-) o el VOLUMEN.
DISPLAY DE CRISTAL LÍQUIDO
El visor de cristal líquido mostrará la frecuencia actual y las funciones activadas (7).
LED INTERMITENTE
Si el panel delantero no se conecta a la unidad principal, el LED (8) se encenderá y apagará de
manera intermitente.
28

SELECTOR DE BANDA (BAND)
En modo Radio, presione el botón BAND (10) para seleccionar la banda deseada. La banda de
recepción cambiará de la siguiente manera:
SELECCIÓN DE ESTACIÓN
Presione el botón TUNE/ SEEK/ TRACK FORWARD (11) o TUNE/ SEEK/ TRACK REVERSE (12)
para sintonizar la estación de manera manual.
Presione dichos botones por varios segundos para sintonizar las estaciones de manera au-
tomática (modo SEEK).
ALMACENAMIENTO AUTOMÁTICO Y BÚSQUEDA PROGRAMADA
Almacenamiento de memoria automático
Presione el botón AMS (MP3) (13) por varios segundos, la radio busca entre las frecuencias
actuales y verifica la intensidad de señal hasta finalizar un ciclo de búsqueda.
Luego, las 6 estaciones más potentes se almacenarán en el botón numérico preseleccionado.
Búsqueda programada
Presione el botón AMS (MP3) (13) para escanear la estación preprogramada. Cuando el nivel de
potencia del campo sea mayor al nivel de detención, la radio mantendrá este número preseleccionado por varios segundos y luego iniciará la búsqueda nuevamente.
ALMACENAMIENTO DE ESTACIONES
Presione el botón preprogramable (14-19)
1) MODO RADIO
M1-M6
MEMORIA PREPROGRAMABLE se carga cuando se presiona la tecla por menos de un segundo.
MEMORIA PREPROGRAMABLE se guarda cuando se presiona la tecla por más de un segundo.
2) CD/ MP3/ FLASH MP3
REPRODUCCIÓN/ PAUSA
Presione el botón preprogramable (14). Durante el modo PAUSE, el INDICADOR DE DISCO
flasheará.
TOP: Se reproducirá la primera canción cuando se presione la tecla TOP por más de 0,5 segun-
dos durante la reproducción.
INT
Presione el botón preprogramable (15). Durante el modo INTRO encendido, el indicador INT se
activará y comenzará a reproducir los diez primeros segundos de cada canción hasta reproducir
la última canción. Comienza reproduciendo la pista completa a partir de donde comenzó INT.
SELECTOR MO/ST
Presione el botón ST (20) para seleccionar entre el modo MONO o ESTEREO.
Cuando aparezca ST en el display LCD durante el modo de recepción FM, presione el botón para
cambiar entre mono o estéreo.
FUNCIONES DE RADIO / CD
29

Botón LOC/ DX (LOCAL/ DISTANTE)
Presione el botón LOC (21) para seleccionar la recepción de estaciones de radio con señales
fuertes o débiles. Configure el modo LOC presionando el botón LOC (21) una vez. Se mostrará
LOC en el display y sólo estarán disponibles las estaciones locales. Se cambia a modo DX
(DISTANTE) al presionar nuevamente el botón LOC (21). Se pueden recibir estaciones distantes o
locales.
ENCENDIDO/ APAGADO LOUDNESS
Presione el botón LOU (22) para aumentar la frecuencia de bajos. Esto puede mejorar la
sensibilidad de sus oídos. Y aparecerá la palabra LOUD en el LCD cuando este modo esté
activado.
ESCANEO
Presione el botón de escaneo (29) para buscar la estación de radio. Se detendrá cuando la
señal de la estación sea mayor al del nivel de detención. La radio reproducirá la estación por 5
segundos y la frecuencia titilará en el LCD al mismo tiempo.
Presione y mantenga presionado el botón SCAN (29) por más de 3 segundos para seleccionar la
estación deseada. La radio comenzará a reproducir la estación.
CONFIGURACIÓN AREA USA/ EUR
En el modo Radio, presione el botón SEL por varios segundos. El LCD mostrará DSP OFF/ON –
AREA USA/ EUR. En AREA USA/ EUR puede utilizar VOL +/- para seleccionar la frecuencia de
AREA.
30

FUNCIONES CD/ SD/ MMC/ USB
DISCOS PARA REPRODUCCIÓN:
Esta unidad puede reproducir discos de tipo: CD/ CD-R/ RW
Compatible con formatos: CDDA/ MP3/ WMA
PARA CARGAR Y RETIRAR UN DISCO
1- Encienda el equipo.
2- Inserte un disco con el lado impreso hacia arriba en la ranura.
3- Presione el botón EJECT (Expulsar) para expulsar el disco.
TARJETA MULTI-MEDIA MMC/ RANURA PARA TARJETA SD
Soporta únicamente música de formato MP3/ WMA ID3. Retire el panel frontal. Cuidadosamente
inserte la tarjeta SD/ MMC en la ranura en el panel interno. Coloque el panel nuevamente. La
unidad comenzará la reproducción de manera automática.
JACK USB
Cuidadosamente conecte el driver USB al cable adaptador USB y luego insértelo en el jack USB
en el panel frontal. La unidad comenzará a reproducir de manera automática.
NOTAS ACERCA DEL USB/ SD/ MMC:
1- Acepta tarjetas SD/ MMC.
2- FAT 12/ FAT 16/ FAT 32 es posible.
FAT 12/ 16 (dir: soporta 200, archivo: soporta 500)
FAT 32 (dir: soporta 200, archive: soporta 500)
3-Nombre de archive: 32 byte/ Nombre de dir: 32 byte.
4-Tag (tag id3 ver 2.0)
Título/ artista/ álbum: soporta 32 byte.
5-No acepta lector de tarjeta múltiple.
6-Acepta USB 2.0.
NOTA: El formato USB soporta 2.0. Capacidad: Hasta 4 GB.
Tarjetas SD: Cannon, FujiFilm, Palm, Motorota, Microsoft, IBM, HP,
Compaq, Sharp, Samsung, etc. Capacidad: hasta 4 GB.
Marcas de tarjetas MMC: Ericsson, Nokia, Motorota, HP, Palm, Sanyo,
Microsystems, etc. Capacidad: Hasta 4GB.
NOTA: Debido a la gran variedad de productos con ranuras para tarjetas SD y MMC,
los fabricantes no pueden garantizar que todos los dispositivos sean reconocidos
ni que todas las funciones en teoría funcionen realmente.
31

INFORMACIÓN DE ID3 TAG
Esta unidad soporta ID3 TAG ver 2.0. Si un archivo MP3/ WMA posee información ID3 TAG, se
mostrará en el LCD. Si no hay información ID3, no aparecerá nada en el LCD. La información
ID3 puede incluir Archivo, carpeta, música, álbum o datos del artista.
SIGUIENTE/ PREVIA
Presione los botones SIGUIENTE/ PREVIO para elegir la pista siguiente o la anterior. Presione por
más de 1 segundo para elegir entre la reproducción hacia delante o hacia atrás.
REPRODUCIR/ PAUSA
Presione el botón PAUSA para hacer una pausa en la reproducción, presione una vez más para
volver al modo normal de reproducción.
INTRO (Introduce todas las pistas)
Cuando se presiona este botón, aparecerá “INT ON” en el display y se reproducirán los primeros
segundos de cada pista del disco. Presione nuevamente para detener el modo INTRO y escuchar
la pista.
REPETIR
Cuando presione el botón RPT, aparecerá “PT ON” en el display y se reproducirá la pista
seleccionada repetidamente y de manera continua hasta que el modo repetir sea cancelado
presionando el botón RPT nuevamente.
RANDOM
Cuando presione el botón RDM, aparecerá “RDM ON” en el display y cada pista del disco se
reproducirá al azar en vez de en su orden normal. Para cancelar el modo AL AZAR, presione el
botón RDM nuevamente.
SELECCIÓN DE PISTA HACIA ABAJO/ ARRIBA (En caso de archivos MP3/ WMA)
Botón -10/5: 10 pistas hacia abajo
Botón +10/6: 10 pistas hacia arriba
SELECCIÓN DE ARCHIVOS MP3/ WMA
1- Búsqueda de pista:
Presione AMS y se activará la búsqueda de pistas.
Presione la perilla VOL y el primer dígito titilará.
Gire la perilla VOL hacia la derecha o izquierda y seleccione el primer dígito que desea.
Presione la perilla VOL y el primer dígito se habrá fijado y el segundo comenzará a titilar.
Gire la perilla VOL hacia la derecha o izquierda y seleccione el segundo y tercer dígito
respectivamente.
Luego comenzará automáticamente la canción que ha seleccionado.
32

2- Búsqueda de nombre de archivo:
Presione AMS dos veces, luego se activará la búsqueda de archivos.
Presione la perilla VOL y se mostrará el primer directorio.
Gire la perilla VOL hacia la derecha o izquierda para seleccionar el directorio que desea.
Presione la perilla VOL nuevamente y se fijará el directorio. Se mostrará el primer nombre de
archivo.
Gire la perilla VOL hacia la derecha o izquierda para seleccionar el archivo deseado.
Presione la perilla VOL y comenzará la canción que ha seleccionado.
3- Búsqueda de caracteres:
Presione AMS 3 veces y se activará el modo de búsqueda de caracteres.
Presione la perilla VOL y se mostrará un carácter A?.
Gire la perilla VOL hacia la derecha o izquierda para seleccionar la letra que desee.
Presione la perilla VOL por más de 2 segundos.
Se mostrará la canción que tenga el mismo carácter que el seleccionado.
Gire la perilla VOL hacia la derecha o izquierda para seleccionar la canción deseada.
Presione la perilla VOL y comenzará la canción que ha seleccionado.
33

• El MP3 es corto para MPEG AUDIO LAYER3 y se refiere a unos parámetros de tecnología de
compresión.
• Este producto permite la reproducción de archivos MP3 en discos CD-ROM, CD-R o CD-RW.
• La unidad puede leer archivos MP3 escritos en el formato de acuerdo a ISO 9669.
Sin embargo, no soporta la información MP3 escritos por el método de PACKET WRITE.
• La unidad no puede leer archivos MP3 que tengan una extensión diferente a *mp3.
• Si reproduce un archivo no- MP3 que tenga la extensión *mp3, puede escuchar algún ruido.
• En este manual, nos referimos a los que son llamados “Archivos MP3” y “Carpetas” en
terminología de PC como “pista” y “álbum” respectivamente.
• El máximo número del nivel de directorio es 8, incluyendo el directorio raíz. El número máximo
de archivos y carpetas por disco es 256.
• La unidad puede no reproducir pistas en el orden de números de pistas.
• La unidad reproduce sólo las pistas de audio si un disco contiene archivos de audio y MP3.
• Cuando reproduzca un disco de 8 kbps o VBR, el tiempo de reproducción transcurrido en el
display no será correcto y el modo de reproducción INTRO puede no funcionar
adecuadamente.
*VBR: Indice de Bit variable.
• La unidad soporta la reproducción de archivos WMA. No se garantiza la reproducción de ID3
tags para formato WMA. Depende DE las versiones y disponibilidad del alfabeto Cirílico.
• WMA (Windows Media Audio)- formato de compresión de datos de música, creado por
Microsoft corporation. Este formato utiliza algoritmos codificados para la compresión de
grabación de audio inicial, disminuyendo enormemente el tamaño del archivo pero
conservando la buena calidad de sonido aún cuando el índice bit sea bajo (por ejemplo, 64
Kbit/s).
• Recuerde que la unidad puede no reproducir las pistas en el orden en el que fueron escritas
en el disco.
Notas acerca de la creación de su propio CD-R o CR-RW con archivos MP3
• Para disfrutar una alta calidad de sonido, se recomienda convertir a archivos MP3 con una
frecuencia de 44.1Hz y un índice bit de 128 kbps.
• NO ALMACENE más de 256 archivos MP3 por disco.
• Para el formato de acuerdo a ISO 9660, la profundidad máxima de carpetas permitida es 8
incluyendo el directorio raíz (carpeta).
• Cuando se utiliza un disco CD-R, la reproducción sólo es posible para discos que han sido
finalizados.
• Asegúrese de que cuando se grabe un disco MP3 CD-R o CD-RW, el mismo se formatee
como disco de datos y NO como un disco de audio.
• No debe escribir archivos no-MP3 o carpetas innecesarias junto con los archivos MP3 en el
disco. Sino, tardará un largo tiempo en comenzar la reproducción de los archivos MP3.
• Con algunos medios CD-R O CD-RW, los datos pueden no reproducirse correctamente. Se
recomiendan discos CD-R o CD-RW de alta calidad.
• Se muestran hasta 16 caracteres para el nombre de un Album o Pista. Se requiere la versión
ID3 TAG versión 1.x.
• Recuerde que la unidad puede no reproducir las pistas en el orden en que han sido grabadas
en el disco.
MP3/WMA
34

CONTROL REMOTO
1- Botón de encendido
2- Pausa/ Reproducir-
Botón preprogramable 1
3- Intro/ Botón preprogramable 2
4- Repetir reproducción/ Botón pre
programable 3
5- Random/ Botón preprogramable 4
6- Botón preprogramable 5
7- Botón preprogramable 6
8- Botón MUDO
9- Control de volumen
10- Botón de modo
11- Botón ST/ MO
12- Botón Loudness
13- Botón SCAN
14- Botón DISPLAY
15- Botón APS/ AMS
16- Botón LOC/ DX
17- Botón de banda
18- Selección y sintonización de
pistas/ F.F./ F.R.
19- Botón Seleccionar
35

CAMBIO DE BATERÍA
Cuando el rango de funcionamiento del control remoto sea corto o no funcione,
cambie la batería CR2025 por una nueva. Verifique la polaridad de la batería
antes del reemplazo.
1- Tire la tapa del compartimento presionando la traba.
2- Coloque la batería de tipo botón con la marca (+) hacia arriba en el compartimento para batería.
3- Inserte el compartimento para batería en el control remoto.
36

ESPECIFICACIONES
GENERAL
Requisitos de la fuente de Alimentación DC 14.4V Negativo a tierra
Impedancia de carga: 4 ohms
Potencia máxima de Salida: 50W x 4 (CH)
Medidas del chasis: 178 x 163 x 50 mm (Ancho x Profundidad x Alto)
Consumo de corriente: 10A
CONTROL DE TONOS
Bass (bajos): (a 100 Hz) +10dB /-10dB
Treble (agudos): (a 10K) + 10dB/-10dB
REPRODUCTOR DE CD
Índice Señal/ Ruido: + 60dB
Separación de Canal: + 60dB
Respuesta de Frecuencia: 20Hz-20kHz
RADIO FM
Rango de Frecuencia (MHz): 87.5 - 107.9 MHz (E.E.U.U.)
IF 10.7 MHz
Sensibilidad (S/R- 30dB): 12dBU
Separación Estéreo: >30dB
RADIO AM
Rango de Frecuencia (khZ): 530 - 1710KHZ (E.E.U.U.)
IF 450 kHz
Sensibilidad (S/R- 20dB): <42dBu
NOTA: Las especificaciones se encuentran sujetas a posibles cambios sin previo aviso.
37

ANTES DE REPRODUCIR DISCOS
Limpieza de CD
Antes de reproducir un disco CD, límpielo con un paño limpio libre de polvo. Limpie el CD en el
sentido que muestran las flechas a continuación.
Siempre introduzca un CD con el lado de la etiqueta hacia arriba. Si el CD se pone al revés, con
el lado impreso hacia abajo, se puede dañar el dispositivo.
Nota: Si ya hay un CD en la ranura de CD, no intente insertar un segundo CD ya que esto puede
dañar el equipo.
Siempre agarre los CDs de los bordes. Para mantener el CD limpio, no toque su superficie.
Retírelo de la siguiente manera:
No coloque ningún sticker ni cinta adhesiva en el CD.
No exponga el CD a la luz directa del sol o a fuentes de calor.
No deje CDs en un automóvil estacionado a la luz directa del sol ya que dicha exposición causará
un aumento importante en la temperatura dentro del automóvil.
Nota: No utilice solventes tales como petróleo o agentes especiales. Las sustancias químicas
comerciales tales como aerosoles antiestáticos dañan el equipo.
38

Antes de verificar la siguiente lista, controle las conexiones del cableado. Si alguno de
los problemas continúa después de haber llevado a cabo estas verificaciones, consulte al
distribuidor más cercano.
Síntoma Causa Solución
No hay tensión La llave de encendido
del automóvil no ha sido
encendida.
Si la fuente de tensión está
correctamente conectada
a la terminal accesoria del
automóvil, encienda la llave de
encendido a ACC.
El fusible está quemado. Cambie el fusible.
No se puede cargar ni expulsar
un CD.
Ya hay un CD en la ranura del
equipo.
Retire el CD del reproductor e
inserte el nuevo.
Está insertando un CD al revés. Inserte el CD con la etiqueta
hacia arriba.
El CD está extremadamente
sucio o defectuoso.
Limpie el CD o intente
reproducir uno nuevo.
La temperatura dentro del
automóvil es demasiado alta.
Deje que baje la temperatura
ambiente y vuelva al normal
funcionamiento.
Condensación Apague el reproductor por una
hora e intente nuevamente.
No hay sonido. El volumen se encuentra en
mínimo.
Ajuste el volumen al nivel
deseado.
No está bien conectado el
cableado.
Verifique la conexión del
cableado.
El sonido Salta El ángulo de instalación es de
más de 30º.
Ajuste el ángulo de instalación
a menos de 30º.
El CD se encuentra extremadamente sucio o defectuoso.
Limpie el CD o intente
reproducir uno nuevo.
No funcionan las teclas de
operación
El microcomputador incorporado
no funciona correctamente por
interferencias.
Presione el botón RESET o
reinstale el panel delantero
correctamente.
La radio o selección
automática no funciona.
El cable de antena no está
conectado adecuadamente.
Conecte el cable de antena
correctamente.
Las señales son demasiado
débiles.
Seleccione la estación de
manera manual.
SOLUCION DE PROBLEMAS
39

40
1.Conexión de sincronización
Encienda la unidad del auto, poner el móvil cerca de la unidad, activar la función del Bluetooth
móvil. Pronto el teléfono encontrará el nuevo dispositivo Bluetooth "AUDIO CAR". Introduzca la
contraseña de emparejamiento "8888" y clik en Aceptar. El teléfono le pedirá la sincronización
adecuada. Cuando la conexión de sincronización se realiza correctamente, en la pantalla LCD,
muestra BT ON, y el logo de Bluetooth " " deja de parpadear. Entonces usted puede llevar a
cabo la operación de Bluetooth. NOTA: depende del móvil del Bluetooth, el sistema bluetooth es
compatible con "HSP" "HFP" "A2DP" y el perfil AVRCP del bluetooth.
2. Servicio telefónico de Manos libres
Si su teléfono móvil se ha emparejado con la unidad, puede realizar llamadas a través de su
teléfono móvil. Que a su vez a la unidad de forma automática cuando la llamada entra y el
número de teléfono será indicado en la pantalla LCD.
-Pulse el botón "BAND" brevemente para aceptar la llamada. Entonces usted podra hablar con
la otra parte a través del micrófono en el panel.
-Pulse "MUTE" brevemente para rechazar la llamada cuando entre
-Pulse "MUTE" brevemente para colgar la llamada después de que termine de hablar
3.Perfil avanzado de Audio distribución (A2DP) de reproducción.
A través del móvil y la unidad A2DP conectada, la reproducción de la música en el móvil puede
convertirse a la unidad del sistema de audio. Pulse el botón " " y " " en el panel se puede
seleccionar la pista de música.
-Pulse el botón " " brevemente para pausar la reproducción de la música.
-Pulse "BAND" (modo) manténgalo presionado para desconectar temporalmente el bluetooth.
-Pulse "BAND" (modo) manténgalo presionado de nuevo para volver a conectar el bluetooth
4.Guía Telefónica
Este sistema bluetooth puede almacenar automáticamente los números de llamadas entrantes,
hasta 10 números de teléfono.
-Pulse "MUTE" (modo) mantenga presionado el botón para ingresar en la guía y oprima VOL
para buscar el número de teléfono.
-Pulse "BAND" una vez y puede llamar al numero de telefono deseado.
5. Interrupción de la conexión bluetooth / reconexión.
Al pulsar el botón "BAND" brevemente para interrumpir la conexión Bluetooth cuando esta
hablando, la llamada y la voz pueden volcarse al altavoz del móvil.
Pulse el botón "BAND" de nuevo para la reconexión.
NOTA: teléfonos móviles diferentes tienen diferentes respuestas. Nosotros no garantizamos el
funcionamiento de todos los dispositivos conectables.
6. Cómo borrar el número de teléfono almacenado?
Usted puede almacenar diez números de llamadas perdidas, rechazadas y en ANS por separado, y el primer número se auto eliminara cuando ingrese la llamada número 11
7. Cómo utilizar las funciones "Perdidas", "Rechazadas", "AUTO ANS" .
Presione el botón MUTE durante 3 segundos para ingresar en recibidas / perdidas / rechazadas /
AUTO. ANS. Gire el botón VOL para elegir el número de teléfono.
BLUETOOTH

41
MOBILE ENTERTAINMENT SYSTEM
MANUAL DE INSTRUÇOES
MP 5712B
REPRODUTOR DIGITAL
CD/MP3/USB/SD/MMC/BLUETOOTH
FRENTE DESMONTÁVEL
RÁDIO AM/FM
INSTRUCTIONS MANUAL 02 - 20
MANUAL DE INSTRUCCIONES 21 - 40
MANUAL DE INSTRUÇÕES 41 - 61
PORTUGUÊS
~
MUTE
LOUD
MP 5712B

42
Instalação
Informação adicional
Funções gerais
Funções de rádio
Funções de CD/ SD/ MMC/ USB
Funções de MP3 WMA
Controle Remoto
Especificações
Antes de reproduzir discos
Solução de problemas
Bluetooth
INDICE
43
44
45
48
50
53
54
56
57
58
59

43
PRECAUÇÕES
Escolha cuidadosamente o lugar onde será instalado o aparelho para não interferir na direção do
veículo.
Antes de instalar o dispositivo, ou ligar temporariamente a fiação, verifique se tudo está
conectado corretamente e se o aparelho e o sistema funcionam de forma adequada.
Para uma instalação segura, utilize somente os equipamentos e acessórios fornecidos. A
utilização de peças não autorizadas pode causar mal funcionamento.
Consulte seu distribuidor mais próximo se a instalação demanda a realização de orifícios ou
outras modificações no veículo.
Instale o aparelho em locais onde não interfira com o motorista ou possa ferir os passageiros
durante freadas bruscas, como por exemplo uma parada de emergência.
O dispositivo pode não ter um ótimo rendimento se o ângulo de instalação superar os 30º.
Evite a instalação do aparelho em locais com altas temperaturas, luz direta do sol ou ar
quente de aquecedores, ou na presença de pó, sujeira ou vibrações excessivas. Não expor o
equipamento a chuva ou umidade.
MONTAGEM FRONTAL DIN (Método A)
Instalação do dispositivo
1-Painel
2-Suporte
Após inserir o suporte no painel,
selecione a lingueta adequada à
espessura do material do painel e
dobre-a para dentro, para ajustar
o suporte. (Fig.1)
3- Aparafusar
INSTALAÇAO
30
0
(Fig. 1)
1
2
3

43
1-Painel
2-Porca (5mm)
3- Arruela
4- Parafuso (5x25 mm)
5- Parafuso
6- Correia
Utilizar a correia para ajustar a parte
traseira do dispositivo. É possível
dobrar a correia com a mão até
alcançar o ângulo desejado.
7- Arruela plana
ENTRADA PARA CARTÃO SD
O ângulo oblíquo SD mantém a
exposição para cima. Colocar o cartão
dentro da ranhura SD e pressionar
novamente para retirar.
1- Quadro
2- Inserir os dedos na ranhura na parte
frontal do quadro, e puxar para retirar o
quadro. (Ao colocá-lo novamente, faça isso
com o lado da ranhura para abaixo e ajustar).
3- Alavanca
Inserir as alavancas fornecidas nas ranhuras,
a ambos lados do dispositivo, até ouvir o
“clique” do ajuste, conforme apresenta-se
na figura. O dispositivo do painel pode ser
retirado só puxando das alavancas.
Ajuste do dispositivo no suporte de
montagem de rádio fornecido pela fábrica:
1- Selecionar a posição onde os orifícios
dos parafusos do suporte e os do dispositivo
fiquem alinhados, e ajustar os parafusos em
dois lugares a cada lado. Utilizar parafusos
de 5x5 mm ou 4x5 mm.
2- Parafuso
3- Painel ou consola
MONTAGEM TRASEIRA DIN (Método A)
Instalação utilizando os orifícios a ambos
lados do dispositivo.
1
2
3
4
5
6
7
(
Fig.2
)
2
1
3
(Fi g.3)
Removing the uni t
2
3
2
INSTALAÇAO

44
INFORMAÇAO ADICIONAL
CONEXÃO DO ALTO-FALANTE
COMO INSTALAR E RETIRAR O PAINEL FRONTAL
INSTALAÇÃO DO PAINEL FRONTAL
Para instalar o painel frontal, inserir o painel na carcaça comprovando sua correta colocação. Se
não estiver adequadamente instalado podem acontecer anomalias no display, ou algumas teclas
não funcionarão corretamente.
1
2
3
RCA CABO
VERMELHO
BRANCO
SAÍDA DO CABO
(CINZA)
CONECTOR
DO ANTENA
TRASEIRO DEREITO
ESQUERDA TRASEIRO
AMARELLO RECUPERAÇÃO DA MEMORIA
IGNIÇÃO VERMELHO (B+)
ANTENA VEICULO AZUL
PRETO TERRA (B-)
CINZA ALTO FALANTE+ CANAL DO FRENTE DEREITO
CINZA/PRETO ALTO-FALANTE- CANAL DO FRENTE DEREITO
VIOLETA ALTO-FALANTE + CANAL TRASEIRO DEREITO
VIOLETA/PRETO ALTO-FALANTE - CANAL TRASEIRO DEREITO
ALTO-FALANTE + CANAL O BRANCO
ALTO-FALANTE - CANAL ESQUERDO DEREITO BRANCO/PRETO
ALTO-FALANTE + CANAL ESQUERDO TRASEIRO VERDE
ALTO-FALANTE - CANAL ESQUERDO TRASEIRO VERDE/PRETO
SOLTE O BOTÃO
PAINEL DA FRENTE

45
FUNÇOES GERAIS
PAINEL FRONTAL
1- Botão Liga/Desliga
2- Botão Soltar
3- Botão Volume/Seleção
4- Botão Mudo
5- Botão Modo
6- Botão Display
7- Display LCD
8- LED intermitente
9- Botão RESET
10- Botão Banda
11- Botão de busca posterior de Tons e Faixas
12- Botão de busca anterior de Tons e Faixas
13- Armazenagem automática de memória
14- Botão de liga-desliga/pausa &
preselecionado 1
15- Botão Intro & pré-selecionado 2
16- Botão Repetir & pré-selecionado 3
17- Botão aleatório & pré-selecionado 4
18- Botão pré-selecionado 5
19- Botão pré-selecionado 6
20- Botão ST/ MO
21- Botão LOC/ DX
22- Botão LOUDNESS
23- Botão para retirada do disco
24- Ranhura de CD
25- Sensor de controle remoto
26- Conector USB
27- Ranhura SD/MMC
28- Jack para entrada AUX
29- Botão SCN
¨
MUTE
LOUD
MP 5712B

46
LIGA/DESLIGA
Pressione qualquer botão para ligar o equipamento. Pressione e mantenha pressionado o botão
para desligar o dispositivo.
Nota: Após desligar o aparelho, o nível do volume e as configurações atuais do rádio serão
memorizadas e quando ligar novamente o aparelho retornará ao estado armazenado.
PARA SOLTAR O PAINEL FRONTAL
Pressione o botão REL (2) para desbloquear o painel frontal desmontável.
AJUSTE DE SOM
Vire a tecla (3) para ajustar a qualidade do volume.
A) Pressione o botão SEL (3) para trocar na ordem abaixo. Opção:
CONTROLE DE VOLUME/SELEÇÃO
Vire a chave para ajustar VOL/BASS/TREB/FAD. Para selecionar as funções, pressione a chave
VOL até que aparecerem as funções no display.
Aumente ou diminua o volume girando a chave VOL à direita ou à esquerda. Esses botões
podem ser utilizados para ajustar BASS, TREBLE, BALANCE e FADER.
BASS
Pressione uma vez o botão VOL/ SEL (3). Ajuste o nível de baixos utilizando a chave VOL/ SEL (3).
TREBLE
Pressione duas vezes o botão VOL/ SEL (3). Ajuste o nível de agudos utilizando a chave VOL/
SEL (3).
BALANCE
Pressione três vezes o botão VOL/ SEL (3). Ajuste o balance dos sons entre os alto-falantes
esquerdo e direito utilizando a chave VOL/ SEL (3).
FADER
Pressione quatro vezes o botão SEL (3). Ajuste o balance dos sons entre os alto-falantes frontal
e traseiro utilizando a chave VOL/ SEL (3).
MUDO
Pressione o botão MUDO (4) para cancelar o volume. Pressione-o novamente para deixar este
modo e voltar ao nível de volume prévio.
OUTROS AJUSTES
Pressione durante vários segundos o botão VOL/ SEL (3). Ativa-se de modo cíclico, para que o
usuário possa selecionar as funções abaixo:
VOL BAS TRE BAL FAD
(Volume) (Bass)
(Treble) (Balance) (Fader)

47
Pressionar e manter esse botão apertado para ingressar nos diferentes modos a seguir:
Pressionar e manter pressionado para ingressar no modo DSP de forma automática:
Girando esse botão de função pode selecionar Flat, CLASSIC, Pop e Rock.
Ao pressionar este botão de função selecionará seu modo DSP preferido.
No modo DSP, pressionar o botão de função uma vez para passar ao modo ESP.
Girando o botão de função pode escolher ESP de 12 ou 45 segundos.
Pressionando o botão Função pode selecionar os segundos ESP.
No modo DSP, pressione duas vezes o botão Função para passar ao modo BEEP (o tom do teclado)
girando o botão Função para ligar ou desligar e pressione-o para selecionar liga ou desliga.
ÚLTIMO VOL/AJUSTE
Esta função permite configurar o nível de volume do dispositivo após desligá-lo e ligá-lo novamente. Selecionar VOL LAST se deseja que o nível do volume seja o anterior a desligar a unidade.
VOL ADJUST permite escolher o nível de volume.
MODO BUSCA
SEEK 1: Ao ser ativado o modo de busca SEEK 1, a busca automática (AUTO SEEK SCAN) para ao
detectar uma estação, mesmo que o usuário continue pressionando o botão SEEK.
SEEK 2: A busca (SEEK SCAN) não parará mesmo que uma estação for detectada se o usuário
pressiona o botão SEEK. Após soltar este botão de busca (SEEK), a busca para se uma estação é
encontrada.
SELETOR DE MODO (MODE)
O usuário pode selecionar diferentes modos de função pressionando esta tecla (5):
- RÁDIO
- CD (CD MP3): É preciso inserir um CD no dispositivo para entrar neste modo.
Cartão de memória: O cartão de memória deve estar inserido no dispositivo para entrar neste modo.
-USB: Deve existir uma conexão com um dispositivo USB para entrar neste modo.
- Entrada AUX
DISPLAY
Pressione o botão DISP (6) para que o dispositivo funcione no modo de conversão de cada modo
display da seguinte maneira:
Ao pressionar a tecla DISP o tempo será visualizado durante 5 segundos e depois retornará ao
display prévio (pasta, nome de arquivo…) exceto que a tecla DISP seja novamente pressionada.
3) No modo relógio, ao pressionar mais de 1 segundo a tecla DISP, este modo passará ao modo
de ajuste de relógio e o display do relógio brilhará. Nesse ponto, é possível mudar a hora do relógio
utilizando as teclas (+/-) ou VOLUME.
DISPLAY DE CRISTAL LÍQUIDO
O visor de cristal líquido apresentará a frequência atual e as funções ativadas (7).
LED INTERMITENTE
Caso o painel frontal não esteja conectado com a unidade principal, o LED (8) retornará e deixará
de funcionar de forma intermitente.

48
SELETOR DE BANDA (BAND)
Pressione o botão BAND (10) no modo Rádio para selecionar a banda. A banda de recepção
mudará da seguinte forma:
SELEÇÃO DE ESTAÇÃO
Pressione o botão TUNE/ SEEK/ TRACK FORWARD (11) ou TUNE/ SEEK/ TRACK REVERSE (12)
para sintonizar manualmente a estação.
Pressione esses botões durante vários segundos para sintonizar automaticamente as estações
(modo SEEK).
ARMAZENAMENTO AUTOMÁTICO E BUSCA PROGRAMADA
- Armazenagem automática de memória
Pressione durante vários segundos o botão AMS (MP3) (13). O rádio procurará entre as frequências atuais e verificará a intensidade do sinal até finalizar um ciclo de busca.
Depois, as 6 estações mais potentes serão armazenadas no botão numérico pré-selecionado.
- Busca programada
Pressione o botão AMS (MP3) (13) para escanear a estação pré-programada. Se o nível de
potência do campo for maior que o nível de parada, o rádio conservará durante vários segundos
esse número pré-selecionado e iniciará novamente a busca.
ARMAZENAMENTO DE ESTAÇÕES
Pressione o botão pré-programável (14-19)
1) MODO RÁDIO
M1-M6
A MEMÓRIA PRÉ-PROGRAMÁVEL funciona ao pressionar a tecla durante menos de um segundo.
A MEMÓRIA PRÉ-PROGRAMÁVEL é salva no dispositivo ao pressionar a tecla durante mais de
um segundo.
2) CD/ MP3/ FLASH MP3
REPRODUÇÃO / PAUSA
Pressione o botão pré-programável (14). Durante o modo PAUSE brilhará o INDICADOR DE
DISCO.
TOP: A primeira música será reproduzida ao pressionar a tecla TOP durantte mais de 0,5 segundos durante a reprodução.
INT
Pressione o botão pré-programável (15). Durante o funcionamento do modo INTRO, o indicador
INT se acenderá e iniciará a reprodução dos dez primeiros segundos de cada música até a
última canção. Primeiro reproduz a faixa completa a partir do início INT.
FUNÇOES DE RADIO / CD
¨ ´

49
MONO/ESTEREO
Pressione o botão ST (20) para selecionar o modo MONO ou ESTÉREO.
Quando aparecer ST no display LCD, durante o modo de recepção FM, pressione o botão para
mudar entre os modos mono ou estéreo.
Botão LOC/ DX (LOCAL/ DISTANTE)
Pressione o botão LOC (21) para selecionar a recepção de estações de rádio com sinais de maior
ou menor potência. Configure o modo LOC pressionando uma vez o botão LOC (21). Aparecerá
LOC no display e só estarão disponíveis as estações locais. Ao pressionar novamente o botão
LOC (21) ingressará no modo DX (DISTANTE). É possível receber estações locais e distantes.
LIGA/DESLIGA LOUDNESS
Pressione o botão LOU (22) para aumentar a frequência de baixos. Isso pode melhorar a sensibi-
lidade de seus ouvidos. Quando estiver em modo aparecerá a palavra LOUD no LCD.
ESCANEIO
Pressione o botão de escaneio (29) para procurar uma estação de rádio. A busca parará quando
o sinal da estação for maior que o do nível de parada. O rádio reproduzirá a estação durante 5
segundos e a frequência brilhará no LCD ao mesmo tempo.
Pressione e mantenha apertado o botão SCAN (29) durante mais de 3 segundos para selecionar
a estação. O rádio começará a reproduzir a estação.
CONFIGURAÇÃO ÁREA USA/EUR
No modo Radio, pressione o botão SEL durante vários segundos. O LCD mostrará DSP OFF/ON –
AREA USA/ EUR. Na AREA USA/ EUR pode utilizar VOL +/- para selecionar a frequência de AREA.

50
FUNÇOES CD/ SD/ MMC/ USB
DISCOS PARA REPRODUÇÃO:
Este dispositivo pode reproduzir os seguintes discos: CD/ CD-R/ RW
Compatível com os formatos: CDDA/ MP3/ WMA
PARA INSERIR E RETIRAR UM DISCO
1- Ligue o aparelho.
2- Insira um disco na ranhura com o lado impresso para cima.
3- Pressione o botão EJECT (Expulsar) para retirar o disco.
CARTÃO MULTIMÍDIA MMC/ RANHURA PARA CARTÃO SD
Aceita somente música em formatos MP3/ WMA ID3. Retire o painel frontal. Insira com cuidado
o cartão SD/ MMC na ranhura, no painel interior. Coloque novamente o painel. A unidade
começará automaticamente a reprodução.
JACK USB
Conecte cuidadosamente o driver USB no cabo adaptador USB e depois insira-o no jack USB do
painel frontal. A unidade iniciará automaticamente a reprodução.
NOTAS SOBRE USB/ SD/ MMC:
1- Aceita cartões SD/ MMC.
2- FAT 12/ FAT 16/ FAT 32 é possível.
FAT 12/16 (dir: suporta 200, arquivo: suporta 500)
FAT 32 (dir: suporta 200, arquivo: suporta 500)
3- Nome de arquivo: 32 byte/ Nome de dir: 32 byte.
4-Tag (tag id3 ver 2.0)
Título/ Artista/Álbum: suporta 32 byte.
5- Não aceita leitor multicartões.
6- Aceita USB 2.0
NOTA: O formato USB suporta 2.0. Capacidade: Até 4 GB.
Cartões SD: Cannon, FujiFilm, Palm, Motorota, Microsoft, IBM, HP, Compaq,
Sharp, Samsung, etc. Capacidade: até 4 GB.
Marcas de cartões MMC: Ericsson, Nokia, Motorota, HP, Palm, Sanyo,
Microsystems, etc. Capacidade: Até 4GB.
Nota: Devido à grande variedade de produtos com ranhuras para cartões SD e
MMC, os fabricantes não podem garantir que todos os dispositivos sejam
reconhecidos ou que todas as funções, em teoria, funcionem realmente.
¨

51
INFORMAÇÃO DE ID3 TAG
Este dispositivo aceita ID3 tag ver 2.0. Se um arquivo MP3/WMA contém informação ID3 TAG,
o dispositivo a apresentará no LCD. Se não há informação ID3, nada aparecerá no LCD. A
informação ID3 pode incluir arquivo, pasta, música, álbum ou dados do artista.
POSTERIOR/ANTERIOR
Pressione os botões POSTERIOR/ANTERIOR para escolher as faixas seguintes ou anteriores.
Pressione-o mais durante um segundo para escolher a reprodução para frente ou para trás.
REPRODUÇÃO / PAUSA
Pressione o botão PAUSA para pausar a reprodução, pressione mais uma vez para retornar ao
modo normal de reprodução.
INTRO (Introduz todas as faixas)
Ao pressionar este botão aparecerá no display “INT ON”, que reproduzirá os primeiros segundos
de cada faixa do disco. Pressione novamente para deter o modo INTRO e escutar a faixa.
REPETIR
Ao pressionar o botão RPT aparecerá “PT ON” no display e reproduzirá a faixa selecionada
repetidamente e de maneira contínua, até que o modo Repetir seja cancelado pressionando
novamente o botão RPT.
RANDOM
Ao pressionar o botão RDM aparecerá RDM ON no display e cada faixa do disco será
reproduzida aleatoriamente ao invés da ordem normal. Pressione novamente o botão RDM para
cancelar o modo RANDOM.
SELEÇÃO DE FAIXAS ABAIXO/ACIMA (Em caso de arquivos MP3/ WMA)
Botão -10/5: 10 faixas para baixo
Botão +10/6: 10 faixas para cima
SELEÇÃO DE ARQUIVOS MP3/ WMA
1- Busca de faixa:
• Pressione AMS para ativar a busca de faixas.
• Pressione a chave “VOL” e o primeiro dígito brilhará.
• Vire a chave VOL à direita ou à esquerda e selecione o primeiro dígito desejado.
• Pressione a chave VOL e o primeiro dígito será fixado e o segundo brilhará.
• Vire a chave VOL à direita ou à esquerda e selecione o segundo e terceiro dígito,
respectivamente.
• Depois, a música selecionada começará automaticamente.
2-Busca de nome de arquivo:
• Pressione AMS duas vezes para ativar a busca de arquivos.

52
• Pressione a chave VOL e aparecerá o primeiro diretório.
• Vire a chave VOL à direita ou à esquerda para selecionar o diretório.
• Pressione novamente a chave VOL e para fixar o diretório. Apresenta-se o primeiro nome de
arquivo.
• Vire a chave VOL à direita ou à esquerda para selecionar o arquivo desejado.
• Pressione a chave VOL e começará a canção selecionada.
3- Busca de caracteres:
• Pressione AMS 3 vezes para ativar o modo de busca de caracteres.
• Pressione a chave VOL e aparecerá o caractere A?
• Vire a chave VOL à direita ou à esquerda para selecionar a letra desejada.
• Pressione a chave VOL durante 2 segundos.
• Aparecerá a música que possua o mesmo caractere selecionado.
• Vire a chave VOL à direita ou à esquerda para selecionar a música desejada.
•Pressione a chave VOL e começará a canção selecionada.

53
• O MP3 é curto para MPEG AUDIO LAYER3 e refere-se a parâmetros de tecnologia de
compressão.
• Este produto permite reproduzir arquivos MP3 em discos CD-ROM, CD-R ou CD-RW.
• O dispositivo pode ler arquivos MP3 escritos no formato correspondente às normas ISO 9669.
Contudo, não suporta informação MP3 escrita no método PACKET WRITE.
• O dispositivo não pode ler arquivos MP3 com extensão diferente a *mp3.
• Se for reproduzido um arquivo não MP3 e com extensão *mp3 é possível escutar alguns
ruídos.
• Neste manual são mencionados os denominados “ARQUIVOS MP3” e “Pastas” em
terminologia de PC como “faixa” e “álbum”, respectivamente.
• O número máximo para o nível de diretório é de 8, incluindo o diretório raiz. O número máximo
de arquivos e pastas por disco é de 256.
• A unidade pode não reproduzir faixas na ordem de números de faixas.
• O dispositivo só reproduz as faixas de áudio se um disco contém arquivos de áudio MP3.
• Ao reproduzir um disco de 8 kbps ou VBR, o tempo decorrido de reprodução no display não
será o correto e o modo de reprodução INTRO pode não funcionar corretamente.
*VBR: Índice de Bit variável.
• O dispositivo aceita a reprodução de arquivos WMA. Não há garantia na reprodução de ID3
tags para formato WMA. Depende das versões e da disponibilidade do alfabeto cirílico.
• WMA (Windows Media Audio)- formato de compressão de dados de música, criado pela
Microsoft Corporation. Este formato utiliza algoritmos codificados para compressão de gravado
de áudio inicial, diminuindo muito o tamanho do arquivo mas conservando uma boa qualidade
de som ainda se o índice bit for baixo (64Kbit/s por exemplo)
• Lembre que o dispositivo pode não reproduzir as faixas na ordem escrita no disco.
Notas sobre a criação de seu próprio CD-R ou CR-RW com arquivos MP3.
• Para desfrutar de uma alta qualidade de som, recomenda-se converter a arquivos MP3 com
uma frequência de 44.1 kHz e um índice bit de 128 kbps.
• Não armazenar mais de 256 arquivos MP3 por disco.
• Para o formato correspondente à ISO 9660, a profundidade máxima permitida das pastas é 8,
incluindo o diretório raiz (pasta).
• Ao utilizar um disco CD- R, a reprodução é possível somente em discos finalizados.
No momento de gravar um disco MP3 CD-R ou CD-RW, verifique se ele está formatado como
disco de dados e NÃO como disco de áudio
• Não escrever arquivos que não MP3 ou pastas desnecessárias juntamente com os arquivos
MP3 no disco. Nesse caso, demorará um longo tempo para iniciar a reprodução dos arquivos
MP3.
• Com alguns meios CD-R ou CD-RW, os dados podem não ser reproduzidos corretamente.
Recomendam-se discos CD-R ou CD-RW de alta qualidade.
• São apresentados até 16 caracteres para o nome de um álbum ou faixa. É necessária a versão
ID3 TAG versão 1.x.
• Lembre que o dispositivo pode não reproduzir as faixas na ordem gravada no disco.
MP3/WMA

54
CONTROLE REMOTO
1- Botão Liga / Desliga
2- Pausa/ Reproduzir - Botão pré
programável 1
3- Intro/ Botão pré-programável 2
4- Repetir reprodução/ Botão pré
programável 3
5- Random/ Botão pré-programável 4
6- Botão pré-programável 5
7- Botão pré-programável 6
8- Botão MUDO
9- Controle de volume
10- Botão de modo
11- Botão ST/ MO
12- Botão Loudness
13- Botão SCAN
14- Botão DISPLAY
15- Botão APS/ AMS
16- Botão LOC/ DX
17- Botão de banda
18- Seleção e sintonização de faixas/
F.F./ F.R.
19- Botão Selecionar

55
TROCA DE BATERIA
Se os parâmetros de operação do controle remoto forem curtos ou não funcionarem, troque a
bateria CR2025 por uma nova. Comprove a polaridade da bateria antes de substitui-la.
1- Puxe a tampa do compartimento pressionando a trava.
2- Coloque a bateria do tipo botão, com a marca (+) para cima, no suporte para bateria.
3- Coloque o compartimento para a bateria no controle remoto.

56
GERAL
Requisitos da fonte de alimentação: DC 14,4V Negativo a terra
Impedância de carga: 4 ohms
Potência máxima de saída: 50W x 4 (CH)
Medidas do chassis: 178 x 163 x 50 mm (Largura / Profundidade / Altura)
O consumo de energia: 10A
CONTROLE DE TONS
Bass (baixos) (a 100 Hz): +10dB /-10dB
Treble (agudos) (a 10K): +10dB /-10dB
REPRODUTOR DE CD
Índice Sinal/ Ruído: + 60dB
Separação de canal: + 60dB
Resposta de frequência: 20Hz-20kHz
RÁDIO FM
Parâmetro de frequência (MHz): 87.5 -107.9 MHz (E.E.U.U)
IF 10.7 MHz
Sensibilidade (S/R- 30dB): 12dBU
Separação estéreo: >30dB
RÁDIO AM
Parâmetro de frequência (khZ): 530-1710 KHZ (E.E.U.U)
IF: 450 kHz
Sensibilidade (S/R- 20dB): <42dBu
NOTA: As especificações estão sujeitas a possíveis mudanças sem aviso prévio.
ESPECIFICAÇOES
¨

57
Limpeza do CD
Antes de reproduzir um disco CD, limpe-o com um pano limpo e sem pó. Limpe o CD no sentido
apresentado pelas setas na figura abaixo.
Sempre coloque o CD com o lado da etiqueta para cima. Se o CD for colocado do lado contrário,
com o lado impresso para abaixo, o dispositivo pode sofrer danos.
Nota: Se já há um CD na ranhura de CD, não tente colocar um segundo disco. Isso pode danificar o aparelho.
Sempre segure os CDs pelas extremidades. Para manter o CD limpo, não toque sua superfície.
Retire-o da seguinte maneira:
Não coloque no CD nenhum adesivo ou fita.
Não expor o CD à luz direta do sol ou a fontes de calor.
Não deixe CDs em carros estacionado sob a luz direta do sol. Essa exposição causará um
aumento importante da temperatura dentro do carro.
Nota: Não utilizar solventes, como petróleo ou agentes especiais. As substâncias químicas
comerciais, como por exemplo aerossóis antiestáticos, danificam o aparelho.
ANTES DE REPRODUZIR DISCOS

SOLUÇAO DE PROBLEMAS
Antes de verificar a lista abaixo, controle a conexão dos cabos. Se algum dos problemas ainda
persistir após estas verificações, consulte seu distribuidor mais próximo.
Sintoma Causa Solução
Não há tensão A chave de arranque do carro
não foi acionada.
Se a fonte de tensão está
conectada adequadamente no
terminal adicional do carro,
ligue a chave de arranque ao
ACC.
O fusível está queimado. Troque o fusível.
Não é possível colocar nem
retirar um disco.
Já há um CD na ranhura do
aparelho.
Retire o CD do reprodutor e
insira o novo.
O CD está extremamente sujo
ou defeituoso.
Limpe o CD ou tente reproduzir
um novo.
O CD é inserido pelo avesso. Coloque o disco com a etiqueta
para cima.
A temperatura dentro do carro
é muito alta.
Deixe que a temperatura
ambiente diminua e volte ao
funcionamento normal.
Condensação Desligue o reprodutor por uma
hora. Depois tente novamente.
Não há som. O volume está no mínimo. Ajuste o volume no nível
desejado.
A fiação não foi corretamente
conectada.
Verifique as conexões dos
cabos.
O som pula O ângulo de instalação é
superior a 30º
Ajuste o ângulo de montagem
para menos de 30°.
O CD está extremamente sujo
ou defeituoso.
Limpe o CD ou tente reproduzir
um novo.
Não funcionam as teclas de
operação
O microcomputador incorporado não funciona corretamente
por interferências.
Pressione o botão RESET ou
reinstale corretamente o painel
frontal.
O rádio ou a seleção
automática não funciona.
O cabo da antena não está
adequadamente conectado.
Conecte corretamente o cabo
da antena.
Os sinais são muito fracos. Selecione a estação de forma
manual.
~
58

59
1.Emparelhamento.
Ligue a unidade do carro, coloque o seu telefone celular perto da unidade e ative a função de
Bluetooth do seu celular. Rapidamente o telefone irá encontrar o novo dispositivo Bluetooth
"AUDIO CAR". Insira a senha de emparelhamento "8888" e clique em OK. O telefone enviará
uma mensagem de sucesso na conexão. Se a conexão for bem sucedida, aparecerá na Tela
LCD a mensagem “BT ON” e o logotipo do Bluetooth " " irá parar de piscar. Depois disto,
você poderá executar a operação Bluetooth.
OBSERVAÇÃO: o sistema Bluetooth suporta perfis de Bluetooth "HSP", "HFP","A2DP" e AVRCP,
dependendo do celular.
2.Serviço de Mãos-Livres
Se seu celular tiver sido emparelhado com a unidade você poderá fazer ligações desde seu
celular Ele irá direccionar a ligação entrante para a unidade e o número de telefone irá aparecer
na tela LCD
-Pressione o botão "BAND" brevemente para aceitar a chamada. Assim, você poderá conversar
com a outra parte através do microfone no painel.
-Aperte o botão "MUTE" brevemente para rejeitar uma chamada entrante
-Aperte o botão "MUTE" brevemente para desligar após a conversa.
3.Perfil Advance Audio Distributing Playing (A2DP)
Tendo disponível um celular e uma unidade A2DP, a música que está sendo reproduzida no
celular pode ser transmitida ao sistema de unidade de áudio.
-Aperte o botão “ ” e “ ” no painel para selecionar a música.
-Aperte o botão “ ” brevemente para pausar a reprodução da música.
-Aperte o botão “BAND”(mode) durante um tempo prolongado para desconectar o Bluetooth
temporariamente.
-Aperte novamente o botão “BAND”(mode) durante um tempo prolongado para re-conectar o
Bluetooth
4.Lista de números de telefone
Este sistema de Bluetooth pode armazenar automaticamente até 10 números de telefone.
-Aperte o botão “MUTE”(mode) durante um tempo prolongado para entrar na Lista de números
telefônicos e pressione o botão Vol para procurar o número de telefone desejado.
-Aperte o botão “BAND” uma vez que tenha escolhido o telefone desejado.
5. Interromper a Conexão / Re-conexão do Bluetooth
Apertando o botão “BAND” brevemente você poderá interromper a conexão Bluetooth quando
estiver falando e a voz estiver sendo reproduzida através do falante do celular.
Aperte novamente o botão “BAND” para re-conectar.
NOTE: Cada modelo de telefone celular tem uma resposta diferente. Não podemos garantir o
correto funcionamento de todos os recursos de conectividade.
BLUETOOTH

6. Como apagar números de telefone armazenados?
Você apenas pode armazenar 10 números perdidos, rejeitados e respondidos separadamente e
o primeiro número será apagado automaticamente quando entrar a 11ª ligação.
7. Como usar as Funções“Missed”,”Rejected”e”Auto ANS”
60

MOBILE ENTERTAINMENT SYSTEM
www.b52audio.com
 Loading...