

MOBILE ENTERTAINMENT SYSTEM
INSTRUCTIONS MANUAL
DV 8772
CAR DVD / MP4 PLAYER
BLUETOOTH
www.b52audio.com
INSTRUCTIONS MANUAL 02 - 26
MANUAL DE INSTRUCCIONES 27 - 52
MANUAL DE INSTRUÇÕES 53 - 78
ENGLISH

Notes on Installation 03
Precautions 04
Control panel layout 05
Wiring diagram 06
Basic operation 06
Radio operation 07
DVD, MPEG4, VCD, MP3, CD operation 09
BLUETOOTH operation 10
Remote control layout 12
Remote control operation 13
Setup 18
Installing the front panel 24
Detaching the front panel 24
Cleaning the connector 24
Unit installation 25
Specifications 26
INDEX
2

NOTES ON INSTALLATION
The unit is designed for 14.4v dc, negative ground operation system only. Before installing
the unit, make sure your vehicle is connected to 14.4v dc negative grounded electrical system.
The negative battery terminal must be disconnected before making connections, incorrect can
reduce damaging to the unit due to short circuit.
Be sure to connect the color coded leads correctly acording to the diagram.
Incorrect connections may cause the unit mal function or damage the vehicle´s electrical system.
Be sure to connect the speaker (-) leads to the speakers (-) terminal. Never connect the left and
right channel speaker cables each other or to the vehicle body. Do not block vents or radiator
panels. Blocking them will cause heat to build up inside and may result in fire.
After the completion of the installation and begin to operate the unit (including replacing the
battery), plase press the reset button on the front panel with pointed objets (such as ball pen)
bo set the unit to initial status.
INSTALLATION
3
Do not attemp to modify the unit, modifyng the unit may caude an accident.
Stop the vehicle before carrying out any operation that could interfere with your driving.
Do not turn on the unit if the temperature inside the vehicle is out of -20ºc to 60ºc.
This product is designed for one single video output, plase use a splitter if you would like
to connect for multiple video output.
To enjoy optimum sound and vision while playing, handle the disc. as follows:
- Handle the disc by its edge to keep the disc clean, and do not touch the surface.
- Do not use your cds with labels or stickers attached, which may leave
a sticky residue while begining to PEEL OFF.
- Clean the discs with an optiobal cleaning cloth. Wipe each disc from center out.
PRECAUTIONS
4
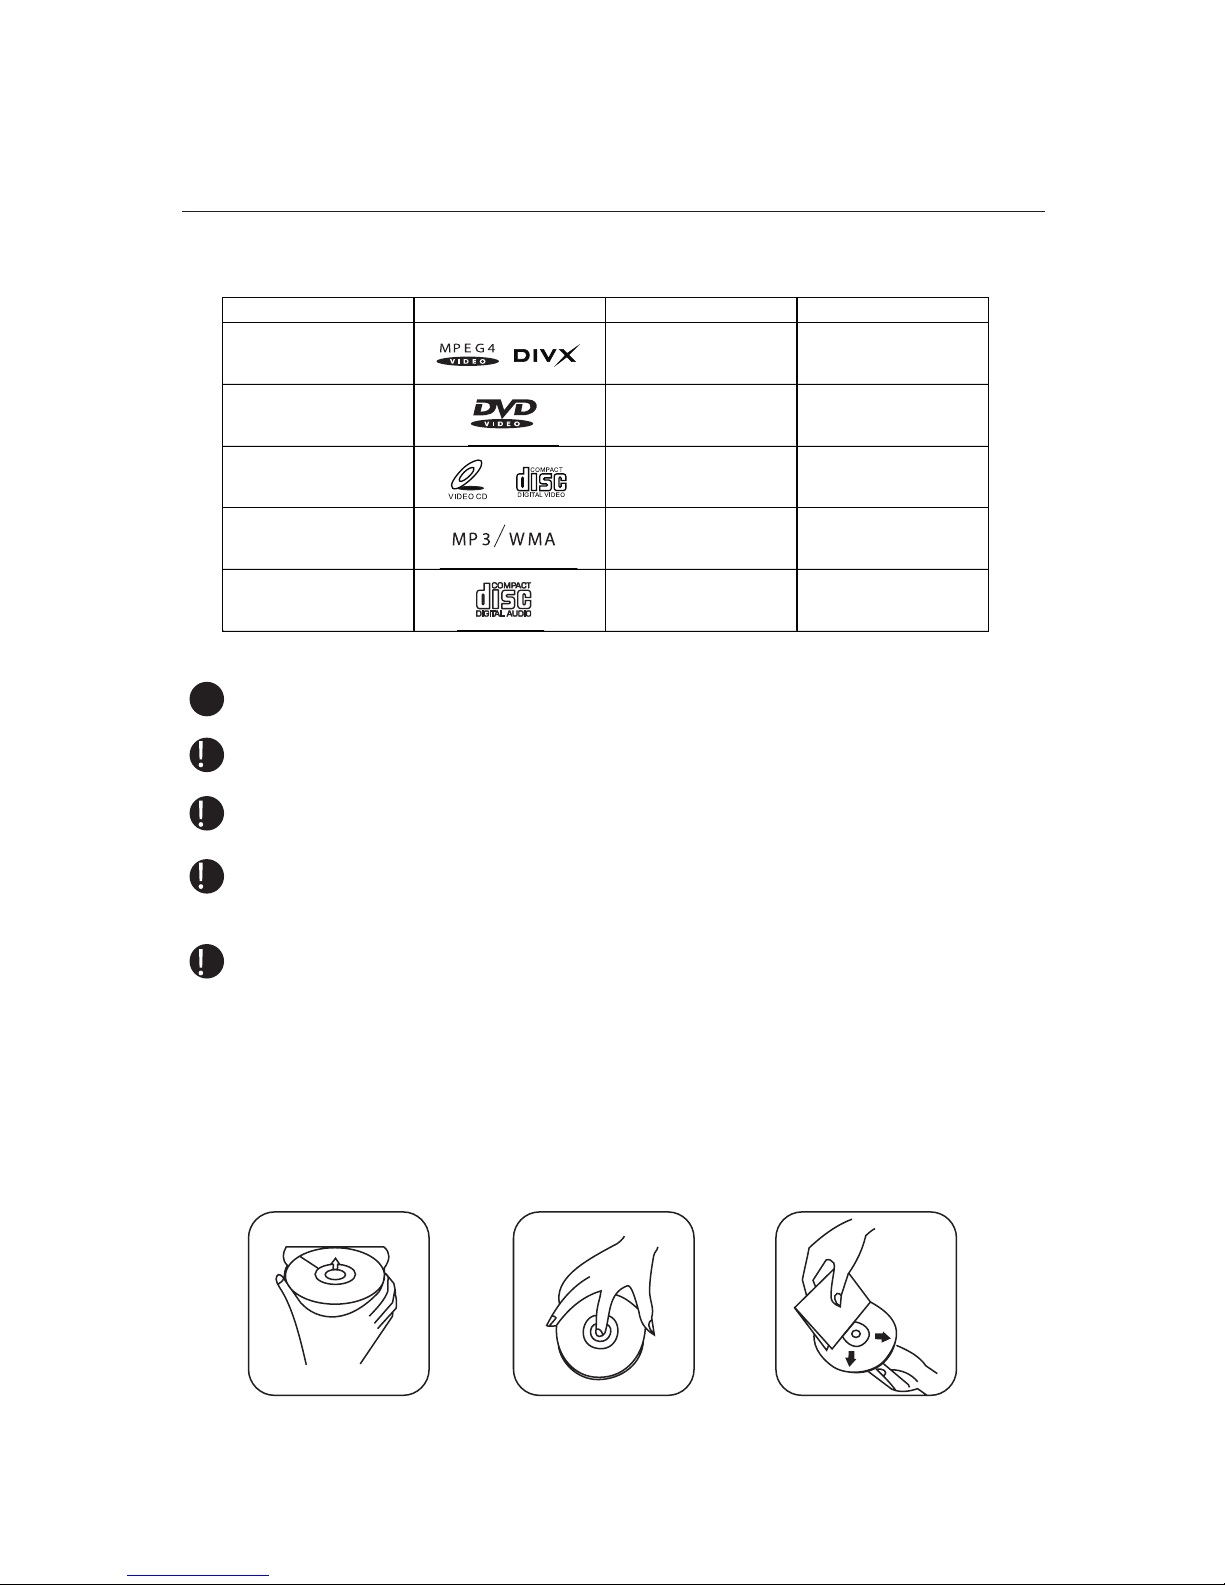
Tipo de Disco Etiqueta no disco Material gravado Tamanho do disco
MPEG4/DIVX
Som e filmes
12CM
DVD
Som e filmes
12CM
VCD
Som e filmes
12CM
MP3/ WMA
Somente som
12CM
CD
Somente som
12CM
NOTA: O dispositivo é compatível com DVD, DVD+/-R, VCD 1.0/2.0/3.0, SVCD, CD, CD-R, CD-RW e JPEG.
THIS UNIT CAN PLAY THE FOLLOW DISC ONLY
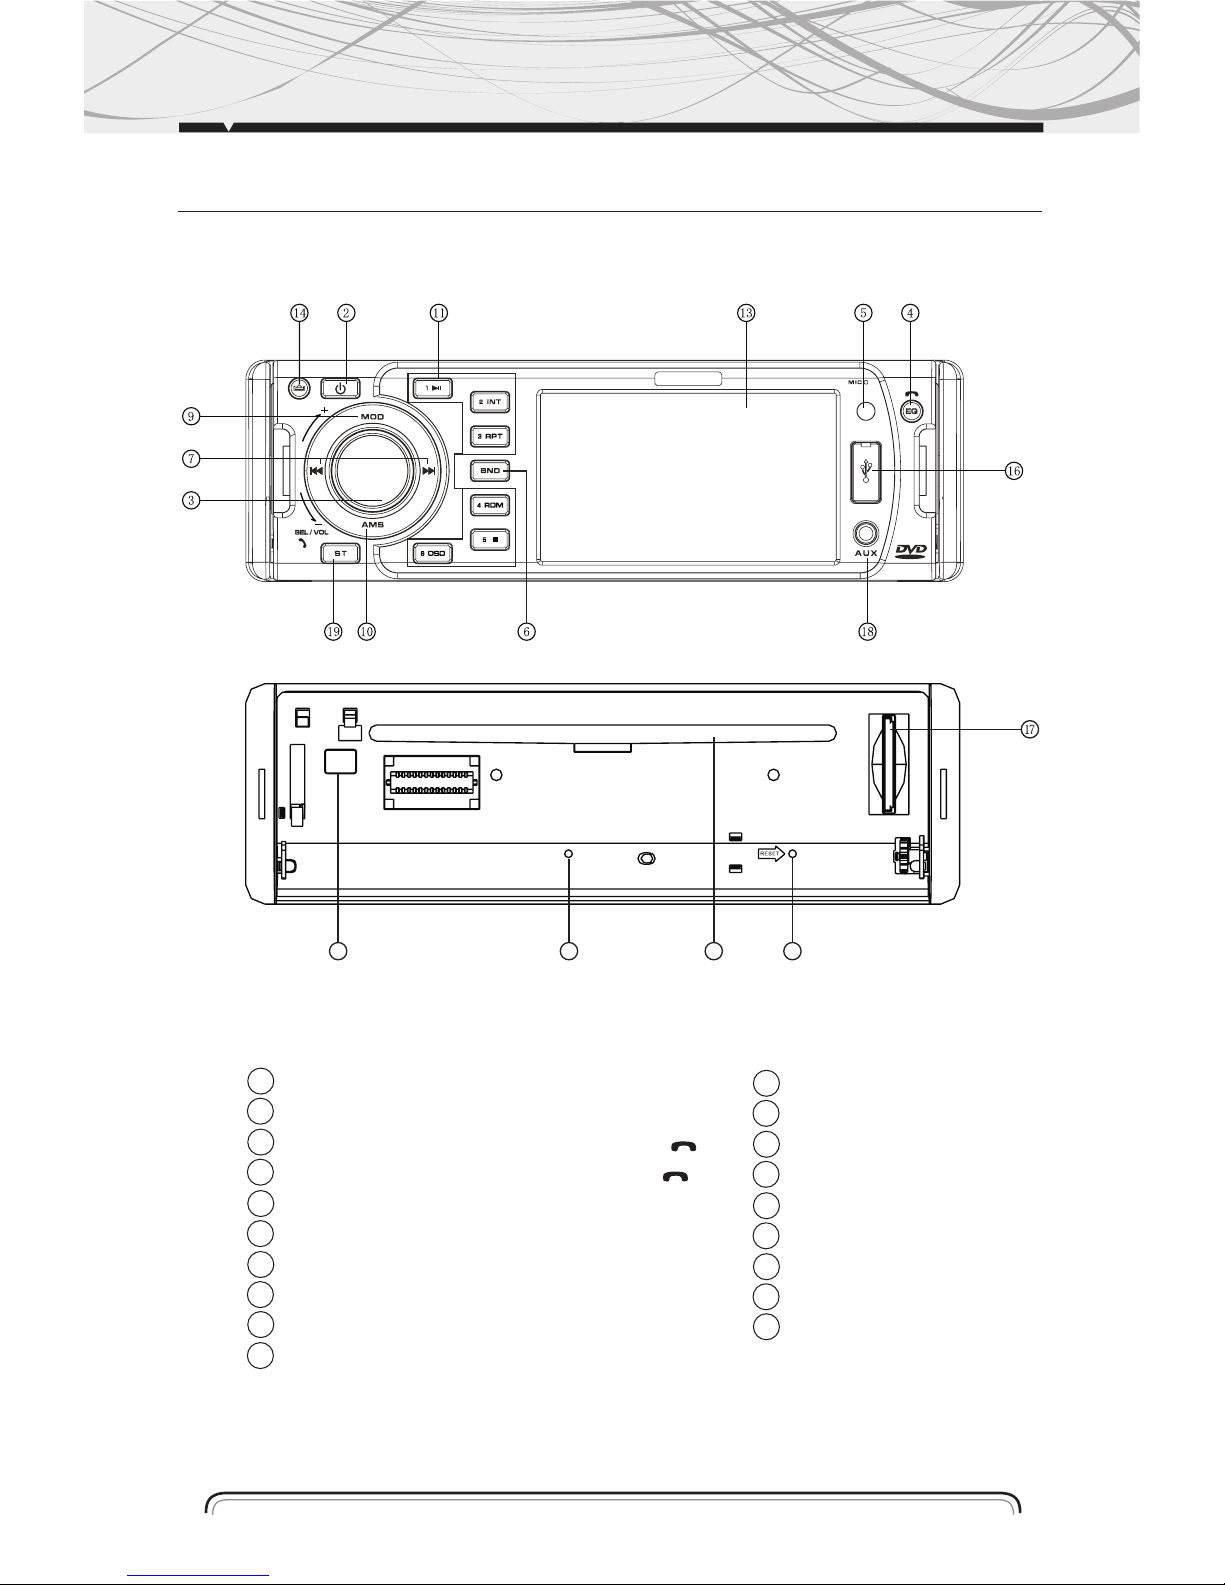
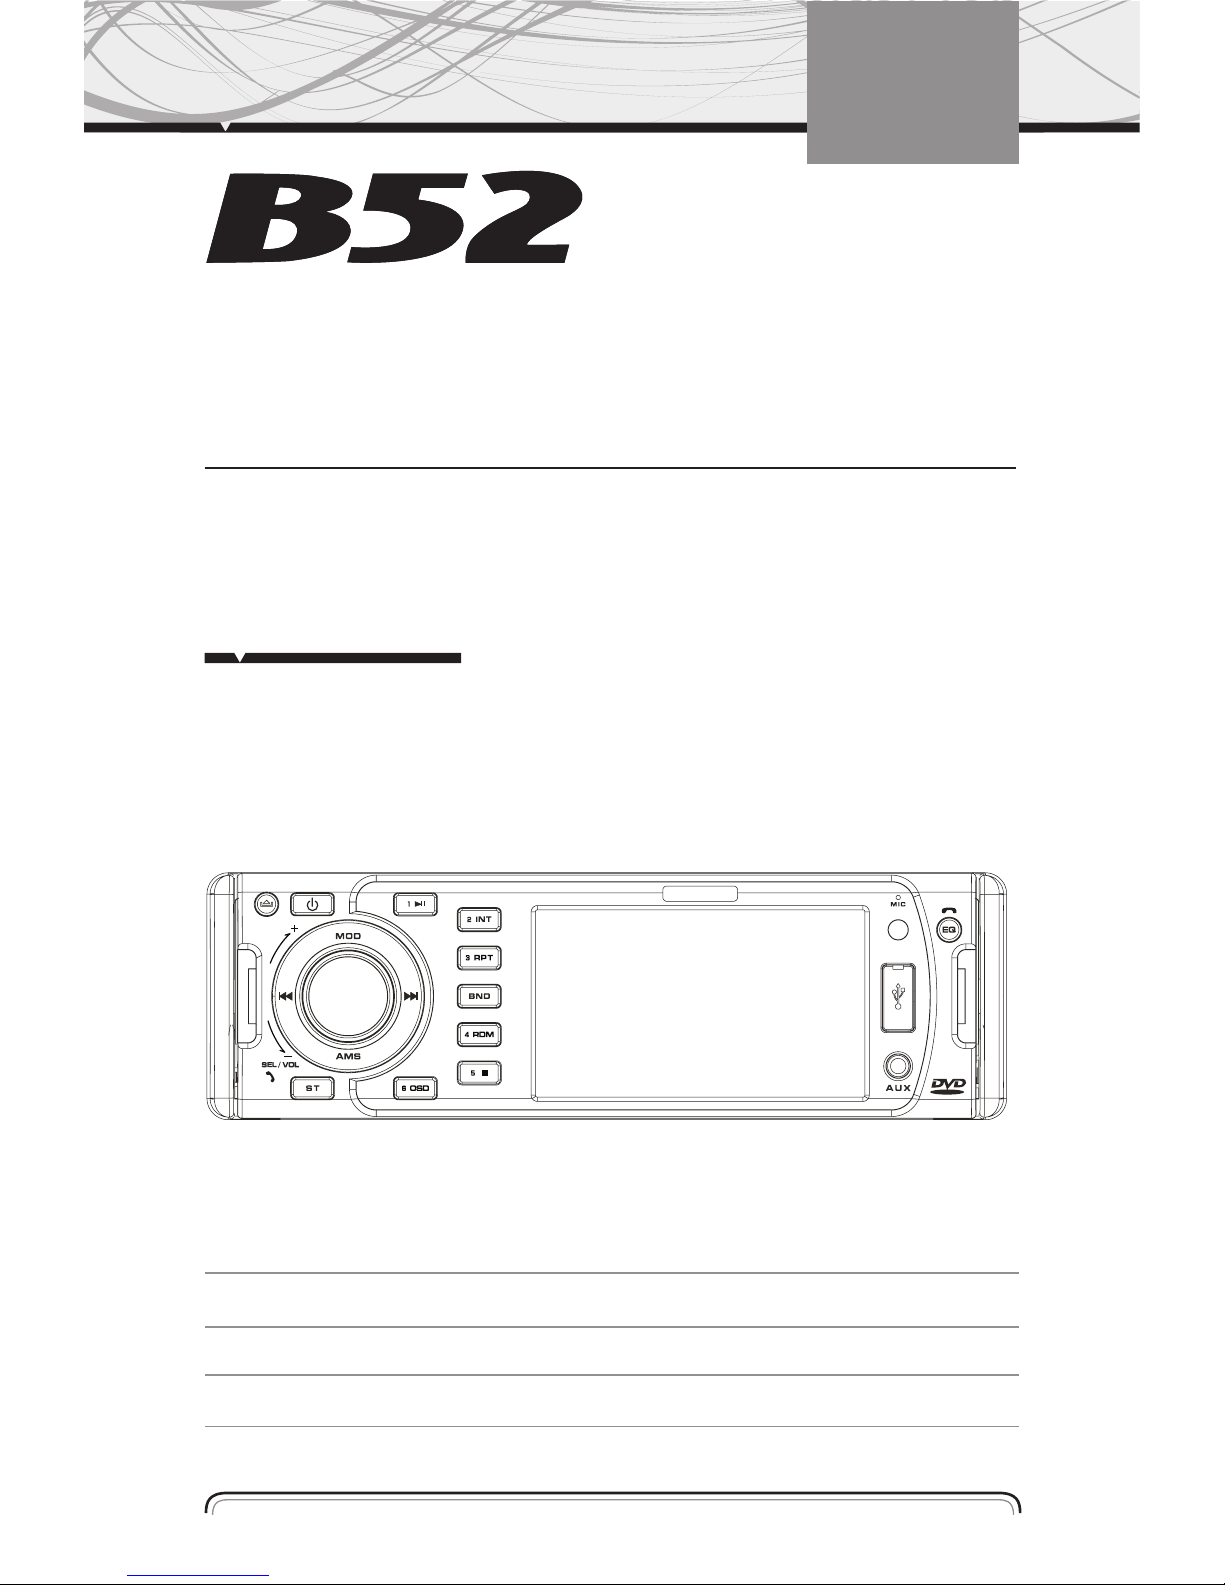
CONTROL PANEL LAYOUT
FRONT PANEL LAYOUT
5
1 RESET BUTTON
2 POWER SWITCH BUTTON
3 VOLUME/SEL (LOGO TELEFONO) BUTTON
4 PRESET EQ/ (LOGO TELEFONO) BUTTON
5 REMOTE CONTROL SENSOR
6 BAND BUTTON / ID3 SELECT
7 TUNING/SELCTING TRACKS/FW/RW
8 EJECT BUTTON
9 MODE SWITCH BUTTON
PRESET STATIONS/AMS
11 NUMBER BUTTON
12 DISC SLOT
13 TFT DISPLAY
14 RELEASE BUTTON
15 FLASHING LED
16 USB CONNECTER
17 SD/MMC SLOT
18 AUX IN
19 MO/ST SELECTOR
1
8
1215
10
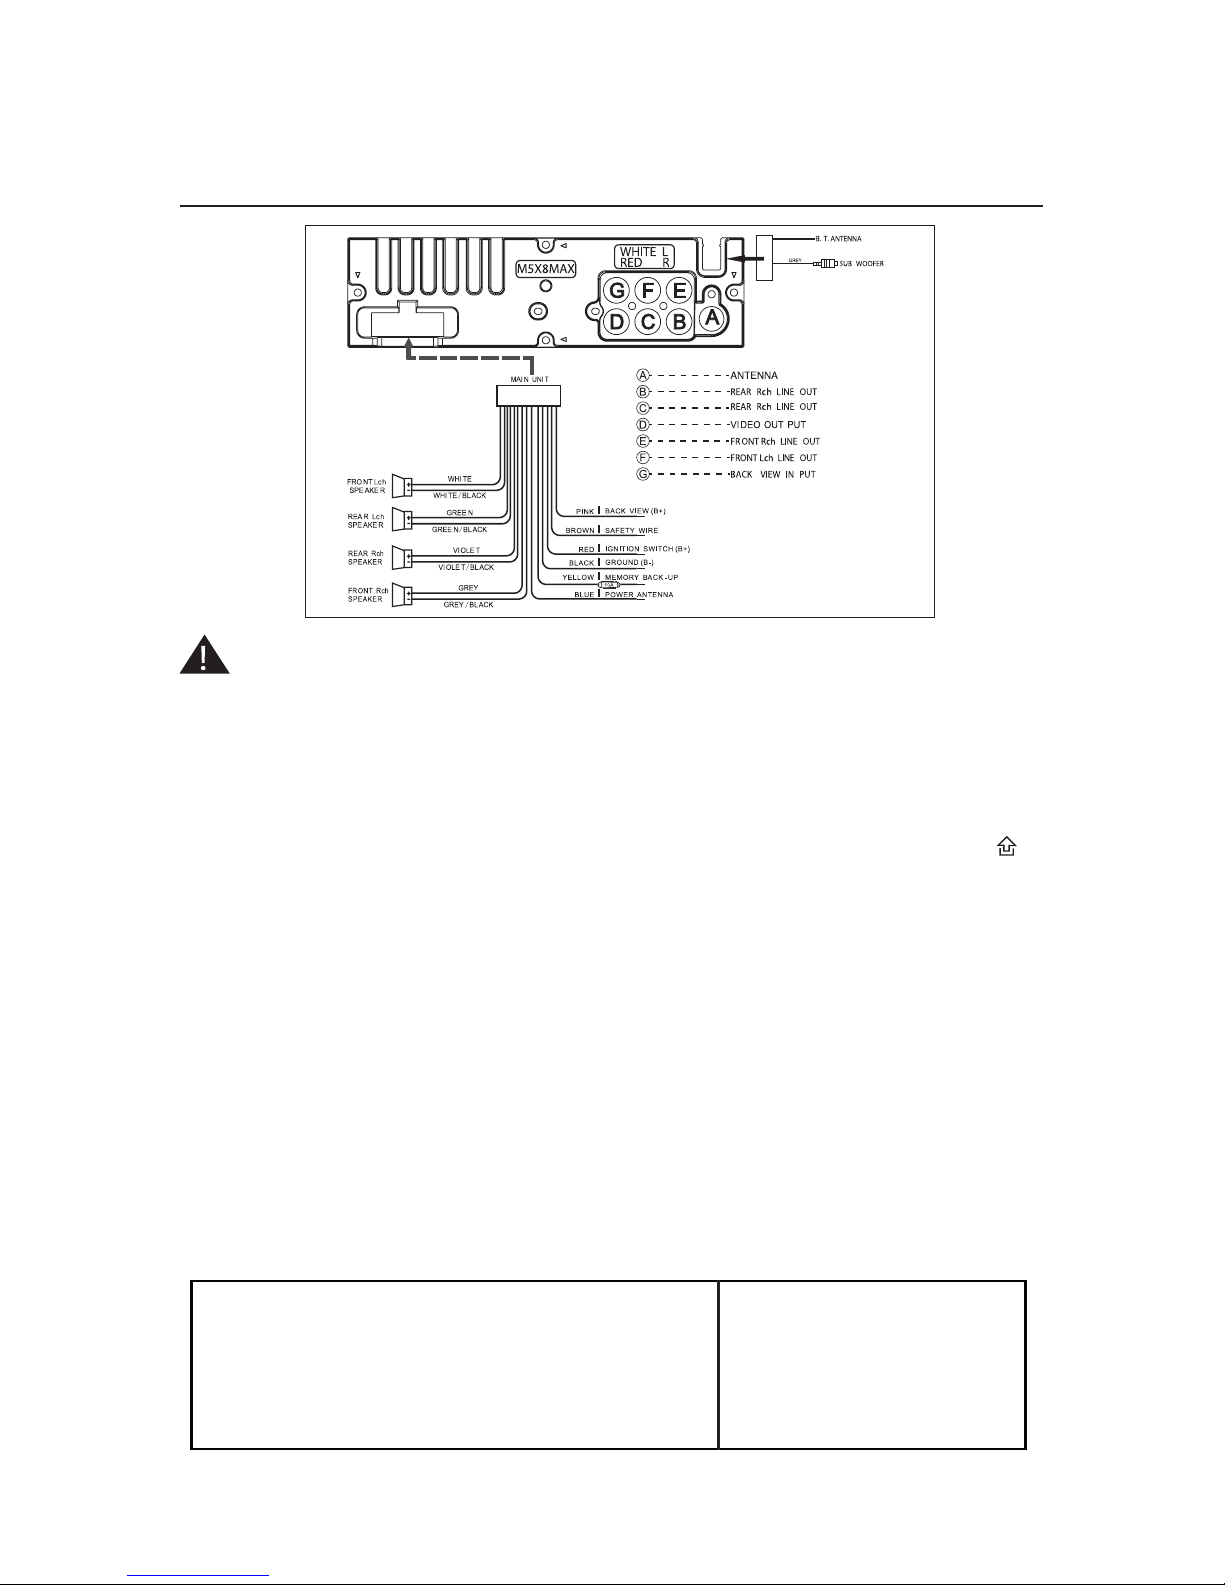
WIRING DIAGRAM
6
WARNNING
Safety wire. This wire must connet to the ground of car. Otherwise, there are no picture
on the tft screen when playing dvd disc or receiving tv program.
BASIC OPERATION
INITIAL SYSTEM START-UP
Operating the unit for the first time or after replacing the car battery, you should press (14) to
detach the front panel and led (15) will be blinking. Press (1) reset button with a pointed object
(such as a ballpoint) to set the unit initial procedure.
NOTE: When some errors occur in the lcd display, you can also press reset button to resume to normal. And it will
erase the clock setting and some memorized functions.
TURNING THE UNIT ON/OFF
Press power button the unit (3), press "vol+" to increase the sound level and press "vol-" to
decrease the sound level.
VOLUME SELECTOR
For volume button (3), press "vol+" to increase the sound level and press "vol-" yo decrease the
sound level.
BASS/TREBLE/BAL (L-R) FADE SELECTOR
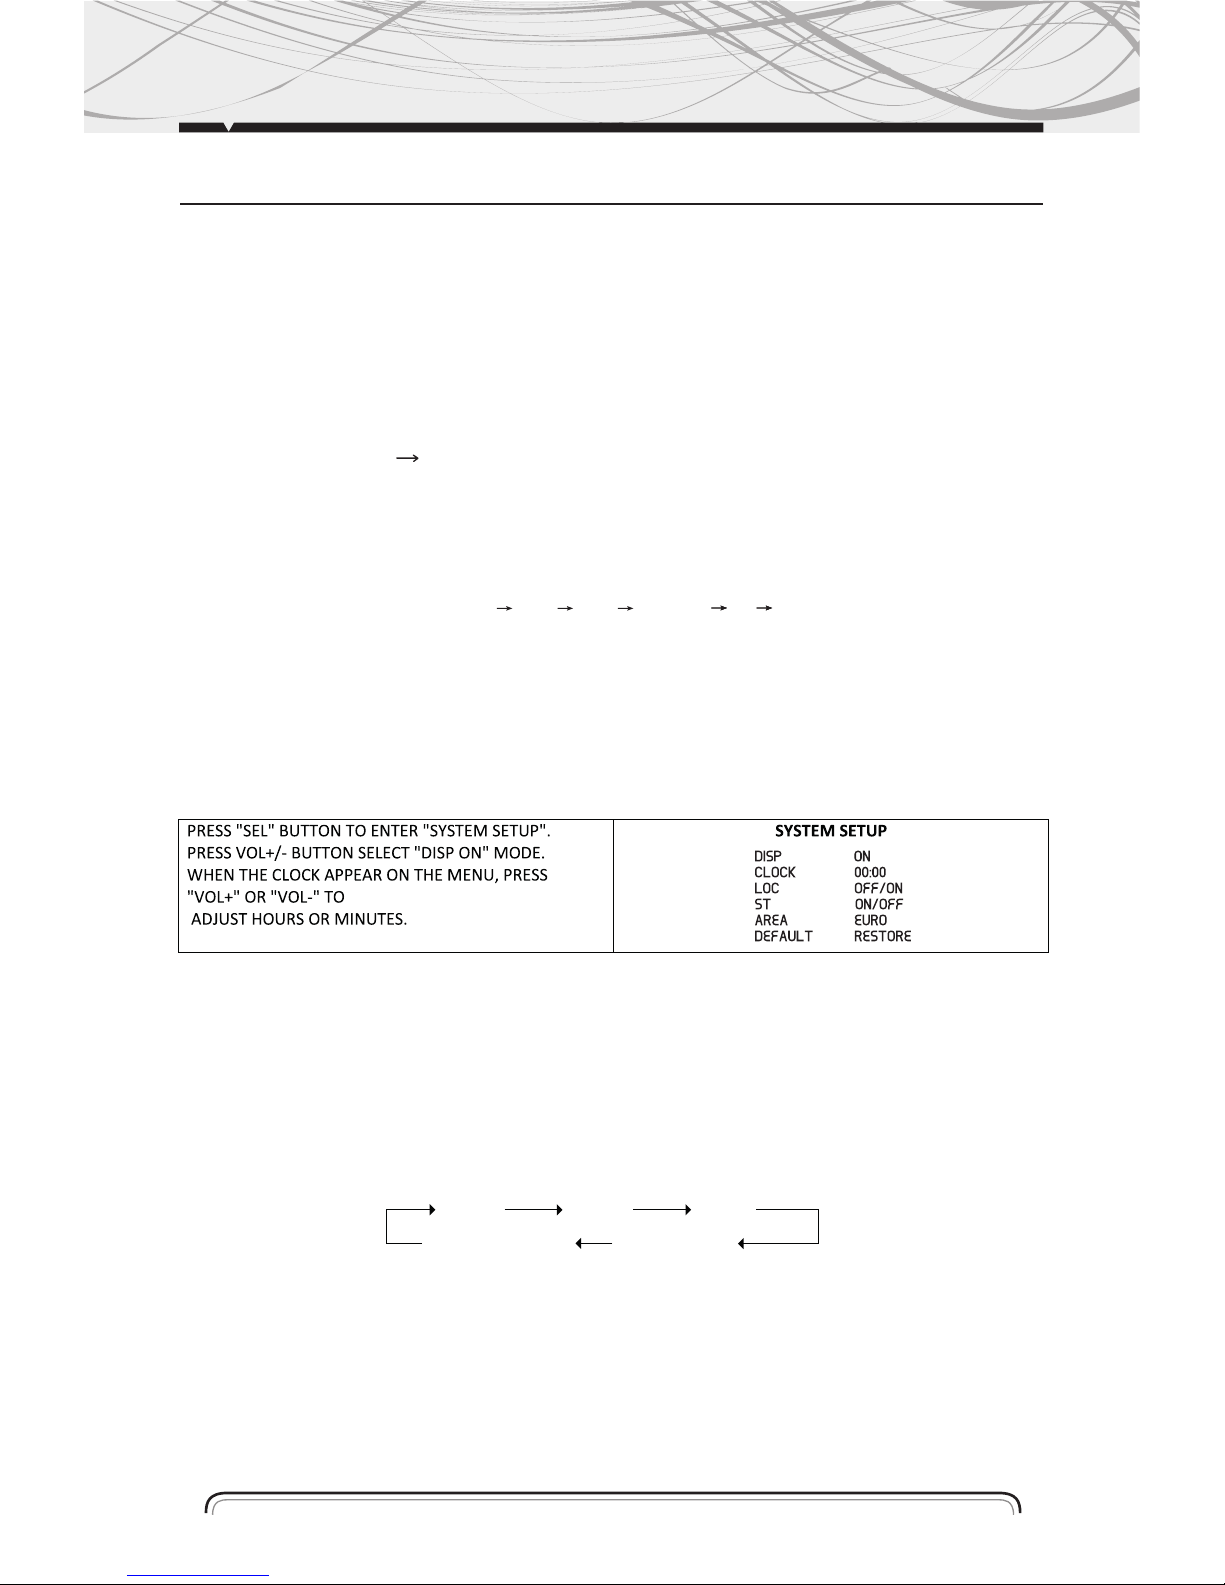
PRESS ·SEL· BUTTON ONCE TO ENTER "AUDIO SETUP" MENU.
PRESS "IMAGEN" BUTTON TO SELECT YOU DESIRED MODE. YOU CAN
ADJUST THE CURRENT LEVEL BY PRESS "VOL+" OR "VOL-" KNOB.
BASS
TREBLE
BALANCE
FADER
EQ
LOUD
+2
+2
0
0
FLAT
OFF
AUDIO SETUP
NOTE: IF YOU DON´T ADJUST THE KNOB WITHIN 5 SECONDS AFTER SELECTING THE DESIRED, THE UNIT WILL AUTOMATICALLY RETURN TO THE CURRENT MODE BEING DISPLAYED.
7
RADIO OPERATIONS
SETTING EQ
While listening music, you can set up rock music, popular, classic music or jazz pre-eq by pressing
(4) "eq" button the procedure as follows:
Pop mode is selected when the button is first press and rock indicated on LCD.
Pop mode is selected when press the button for the second tine and rock indicated on LCD.
Classic mode is selected when press the button for the third time and rock indicated on LCD.
Press the button for the forth time to select the jazz pre-eq mode, press the buttom fifth times to
turn off the p-eq system press eq button more than l second is "mute" function.
NOTE: BASS MODE AND treble mode return to initial settings when EQ is on, "bass" and "treble" DISAPPEAR.
MODE SELECTOR
Press "mod" button to select RADIO DVD USB SD card TV AUX MODE. (when the unit
whthout connect anyone function. press mode butoon the unit will skip over this function.)
SENSOR
(5) Receptor for the card remote commander.
ADJUST TIME
AREA USA/EUR SETUP
In radio mode. Press SEL button for several seconds. LCD will be show from DSP OFF/ON
AREA USA/EUR. At AREA USA/EUR. You can use VOL +/- to select the AREA frequency.
RADIO OPERATION
BAND SELECTOR
Press (6) (band) button repeatedly to select band in the following orde:
NOTE: On DVD playing mode, press (6) button to switch to AUTO PAL or NTSC SYSTEM.
MANUAL / AUTOMATIC TUNING
MANUAL TUNING: Press (7) button continuosly to select a station upward or downward respectuvely.
AUTOMATIC TUNING: Press (7) button for more than 3 seconds, the radio automatically
searches a station upward or downward respectively and plays when it find a station.
FM3FM2FM1
AM2(MW2)A M1(MW1)

8
SCANNING / MEMORIZING STATIONS AUTOMATICALLY
1. Pressing ams button shortly, the radio searches station from the lowest frequency to highest
frequency. when a station strength level is more than thershold level of the stop level. The radio will
holding the station for 5 seconds and the station frequency blinking on the lcd at the same time.
Pressing ams button once again. the radio search will stop on the station.
Pressing anyone preset number button for several seconds, the radio will save the station at the
preset number button.
2. Pressing and holding ams button more then 3 seconds. The radio searches from the lowest
frequency and check the signal strength. When the fiel strength level is more than thershold level of
the stop level. The radio storing the station at the preset number (it can store 3x6 stations for fm and
2x6 stations for am in all) after finishing a circle of search. it will stop searching on the m1.

9
DVD, MPEG, VCD, MP3, WMA, CD OPERATION
NUMBER BUTTONS
Number buttons can help you store your favorite station by pressing any one of the number
button. You can folow the steps as bellow:
Press and hold any number button (1~6) until "ch" appears in the lcd display when receiving a
station. And now the station is already stored in the corresponding number button.
18FM STATIONS AND 12 AM STATIONS CAN BE STORED
NOTE: Number button 1,2,3,4,5,6 have dual function, while radio mode, it use to store and recall preset stations,
while DVD, VCD, CD, MP3 and wma playing mode, they have other function. For detail. Please refer to corresponding
playing operation.
DVD, MPEG4, VCD, MP3, WMA, CD OPERATION
While listening to (or watching) DVD, MPEG4, DIVX, VCD, MP3, WMA and CD, just insert a disc
(with labeled side up) into the disc slot (12), the mechanism will automatically switch on. While it
is RADIO/AUX mode and a disc was loaded, press (2) mode button to play the disc.
If a ID3 disc is playing. The songs name, artist name and file name will shufft show on LCD.
SELECTING TRACKS / FW / RW
Press (7) to choose your favorite track upward or downward respectively. Press and hold (7)
button to fast forward or rewind the track upward or downeard respectively.
PLAYING TRACKS REPEATLY
Press (11) 3rpt button to perform repeat playing function when you need to repeat playing the
track you like.
Press 3rpt button for the first time, it will repeat playing the same track for CD, VCD, MP3 and
WMA, same chapter for dvd mode RPT appears.
Press 3rpt button for the second time, entire disc will be playing repeatly for VCD and CD
playing. Entire title will be playing repeatly for DVD playing, the entire directory for MP3 and
WMA playing rpt appears on the third time to stop repeat mode for CD, VCD and DVD playing
mode repeat entire disc for MP3 and WMA playing mode.
Press 3RPT button for the forth, time to stop mode for MP3 and WMA playing mode.
SCANNING TRACK AUTOMATICALLY
During CD playback, press "2int" button, to play the first 10 seconds of each track on the disc,
the display will show "int", track number and elapsed time.
Which indicates int function is already activated.
Press "2int" button once again to return to normal playback.
NOTE: Int doesn´t work during playing DVD/MP3/WMA
10
PLAYING TRACKS IN RANDOM ORDER
During playback, press "4RDM" button, end "rdm" appears on the display, which indicates RDM
function si carried out. The unit plays any track at random. Press rdm once again to return to
normal playback mode.
STOP PLAYING
During playback, press (11) 5 (stop) button stop the playback. LCD will show stop to return to
normal play mode, press 1 button again.
BLUETOOTH FUNCTION OPERATION
1. PAIRING CONNECTED
Turn on your car audio systema, put yhe mobile wich bluetooth device function close to the
car audio unit, soon. The mobile will find the new bluetooth device car audio imput the pairing
passwoed "8888" and click ok, the mobile will prompt the matching successful, when the
pairing conneted is successes, on the tft screen, bluetooth logo " " will stop blinking. The you
may perform the bluetooth operation by press the button on the panel on remote controler.
REMARK: Depend on bluetooth mobile, the bluetooth system support "HSP" "HFP" "A2DP" and AVRCP bluetooth profile.
2. HANDSFREE PHONE SERVICE FUNCTION
If your mobile have matched with the car audio system. When a phone is calling in the bluetooth
system will turn the phone´s ring to the car audio speakers automatically, and the calling phone´s
number will indicat on the tft screen.
- Press the sel/ button shortly to accept the call then you can talking with the other
party through the micphone on the front panel.
- Press eq/ button shortly to reject the call when call is comeing.
- Press eq/ button shortly to hand up after you finish the talking
3. PLAYING MUSIC BY A2DP
Throungh the A2DP connected by mobile and unit, when you activated your mobile music player
to play music, sound of the music playing in the mobile music player will turn yo the car audio
system playing, press the button " " and " " can select the music track.
BLUETOOTH
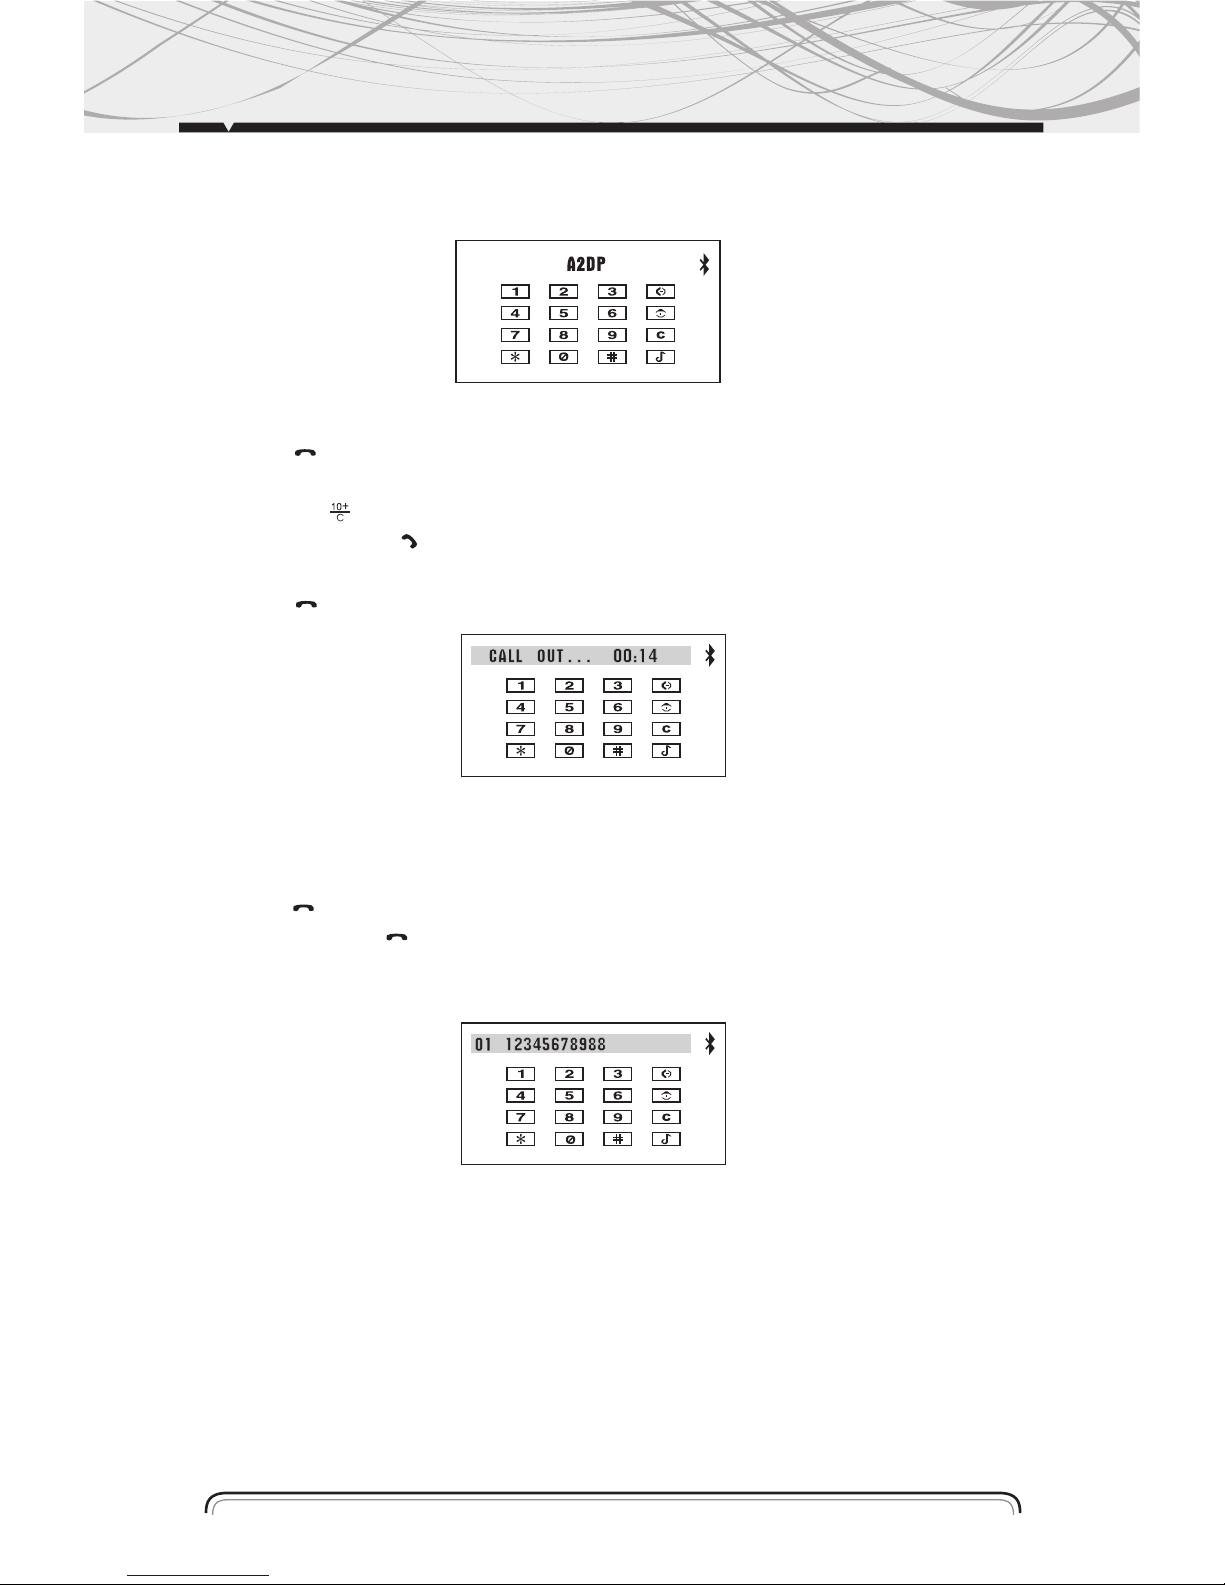
- Press ams button shortly to cancel a2dp music play.
- If you want to resum a2dp playing please activate the music player on your mobile again.
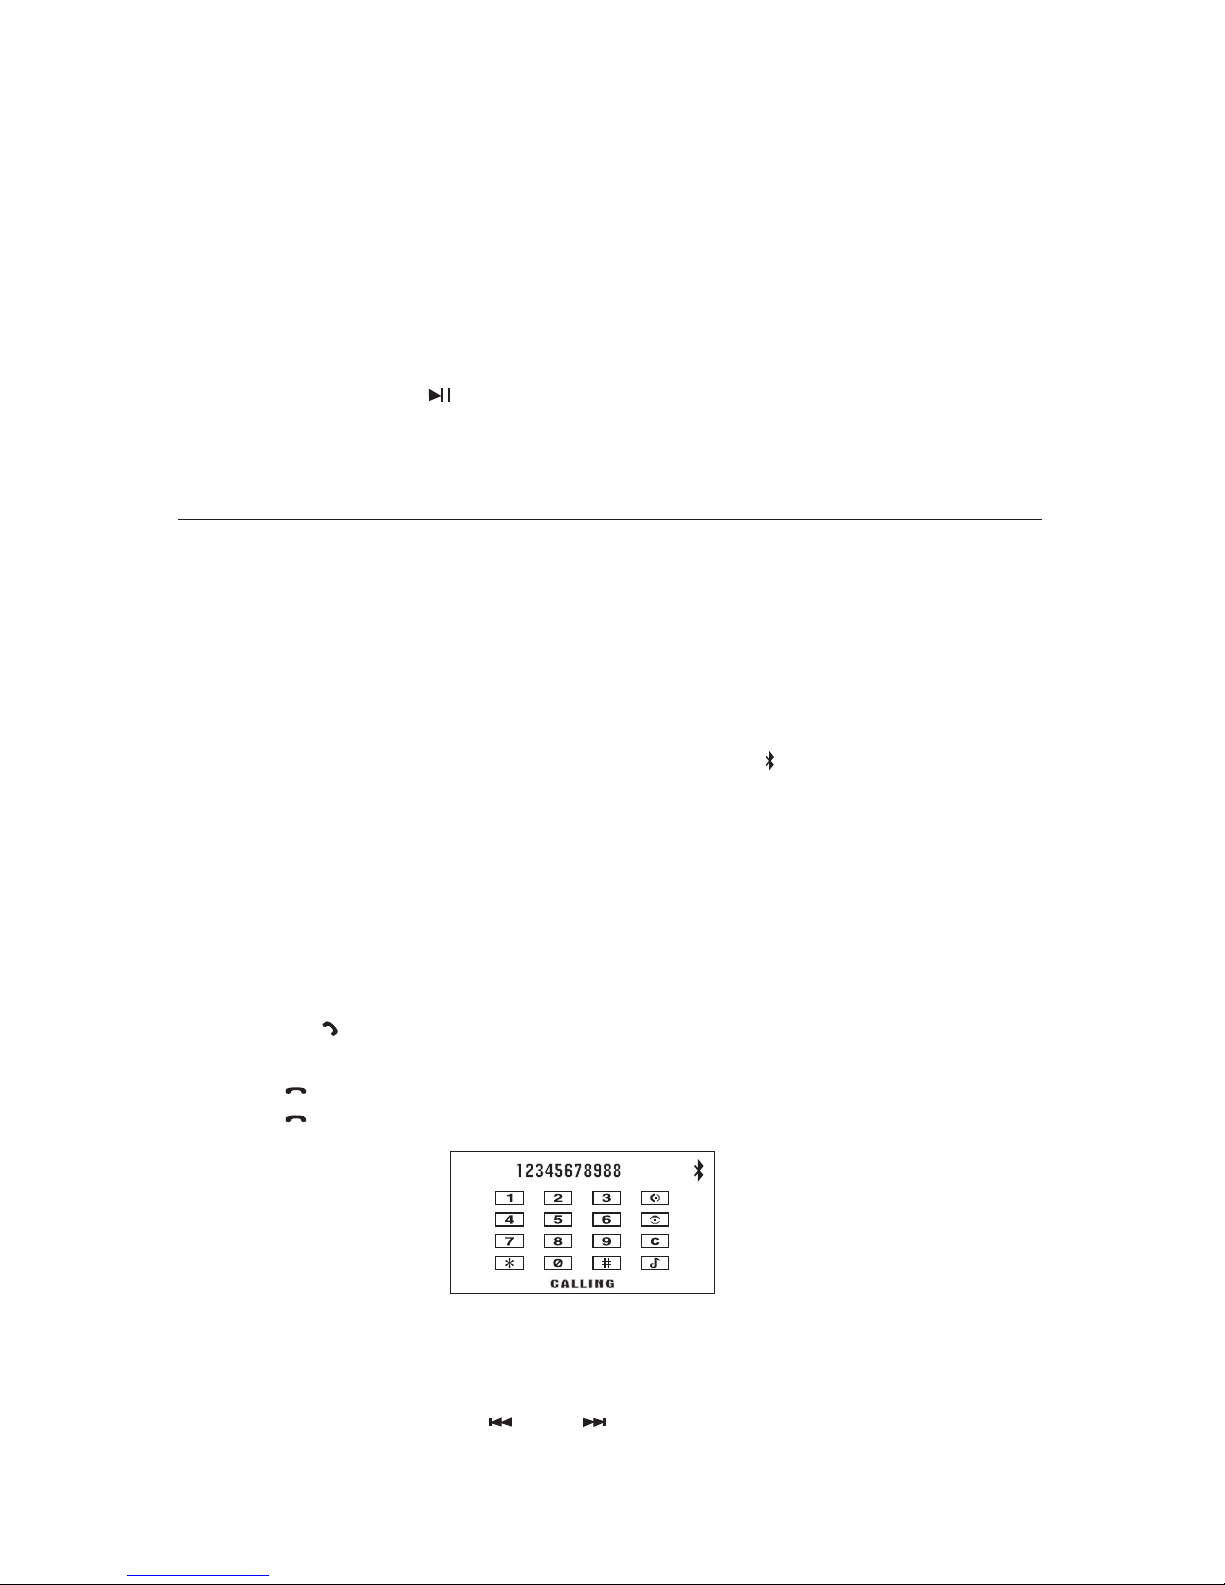
4. DIALING A CALL USE REMOTE CONTROL
- Press "eq/ " button shortly to enter the bluetooth screen, the press the number button
"0-9" and "*" "#" to select a phone number.
- Press button " " can delete the mistaken number during you dialing.
- Press the button "sel/ " to confirm and call out a phone number which you have
selected.
- Press "eq/ " to hand up after you finish your talking.
5. CALLING ON PHONE NUMBER BOOK
This bluetooth system can automatacally record the call in phone number which you have
missed (up to 10 phone number).
- Press "eq/ " button shoetly can entre the bletooth
screen the press "eq/ " button shortly, can look up
the phone numbers.
- Press number in the phone number book
6. INTERRUPT BLURTOOTH CONNECTION/RECONNECTION
Pressing the "bnd" button more than l seconds to interrupt the current blutooth connection,
when the phone at hands free or a2dp state, sounds of phone or music will turn back to mobile
speaker.
Press the "bnd" button more then l second again can reconnect the bluetooth matching (some
brand bluetooth mobile must actirate mobile bluetooth system or music player).
NOTE: Different mobile phone have different responses. We do noy guarantee all the operation of connectable devices.
11
12
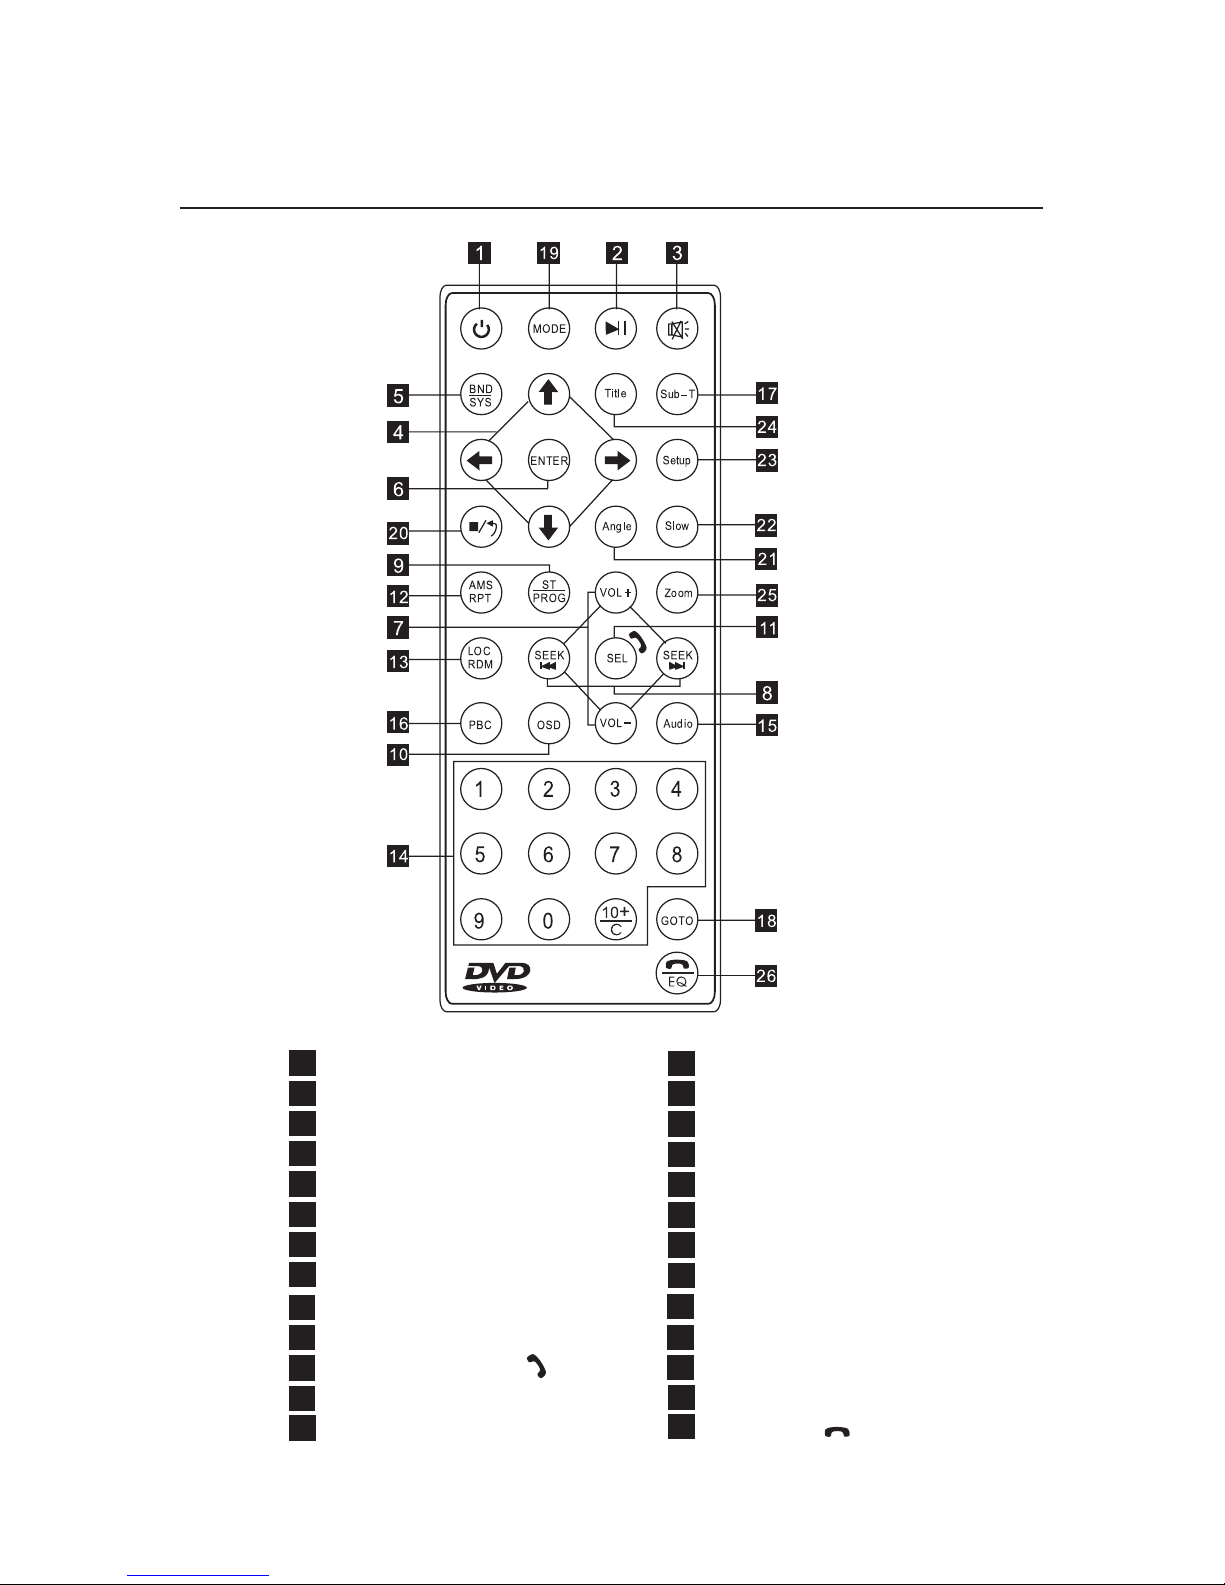
REMOTE CONTROL LAYOUT
NUMBER BUTTON
AUDIO SETTING
PBC MENU
SUBTITLE SETTING
PLAYING TIME SETTING
MODE SWITCH
STOP BUTTON
ANGLE SETTING
SLOW MOTION PLAY
SETUP MENU
MENU DISPLAY
ZOOM SETTING
EQ BUTTON
POWER BUTTON
PAUSE/PLAY BUTTON 1
MUTE BUTTON
SELECTING MENU BUTTON
BAND/SYSTEM SWITCH
ENTER BUTTON
VOLUME CONTROL
TUNING/SELECTING/FW/RW
PROGRAM PLAYING
ON-SCREEN DISPLAY
SETTING THE SOUND
REPEAT PLAYING
RANDOM PLAYING
14
15
16.
17.
18.
19.
20.
21
1
2
3
4
5
6
7
8
9
10
11
12
13
22
23
24
25
26
13
REMOTE CONTROL OPERATION
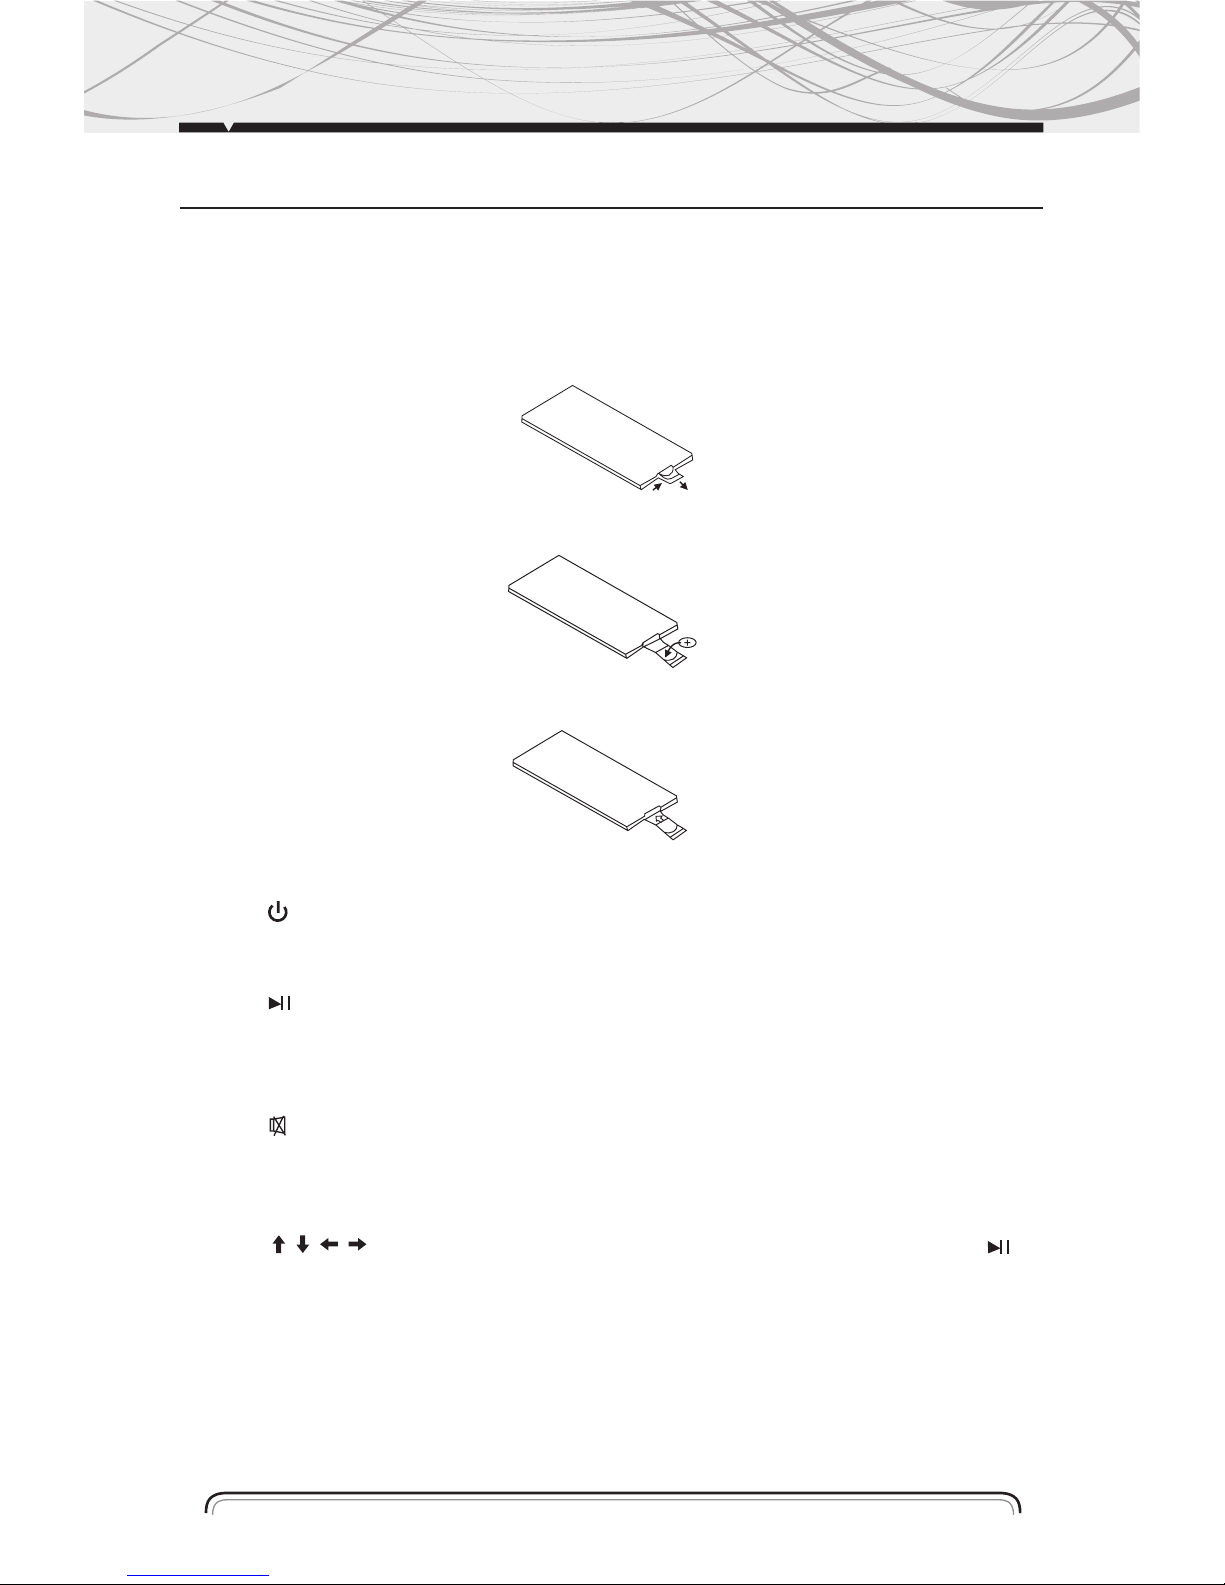
REPLACING THE BATTERY
When the operational range of the remote control becoms shorts or non functions while
operating. replace a new cr0225 battery. make sure the baterry polarity before replacement.
1.pull out battery holder while pressing the stopper imagen
2. put yhe button type battery (+) mark upward into the battery holder. imagen
3. Insert The Battery Holder Into The Remote Control Imagen
POWER BUTTON
Press (1) button to turn power ON/OFF.
PAUSE/PLAY BUTTON
Press (3) button to cut down the sound output, press it again to resume the previous sound
level.
MUTE BUTTON
Press (3) button to cut down the sound output, press it again to resume the previous sound
level.
MENU SELECTOR
Press (4) / / / to select your desired menu, then press (6) (enter) or play button (2) to
confirm.
NOTE: This function works in main menu mode only, refer to page 12.
BAND/SYSTEM SWITCH
During radio mode, press (5) (band/sys) to switch receving band.
During the player mode, press (5) (band/sys) button to switch to auto, pal or ntsc system.

14
REMOTE CONTROL OPERATION
VOLUME INCREASING/DECREASING
Press (7) (vol+ or vol-) button to increase or decrease the volume level resplectively.
TUNING/SELECTING TRACKS/FAST FORWARD/REWIND
During radio mode, continuously press (8) button to manual search a station downward or
upward respectively: if press and hold the button for more than 3 seconds. The radio will automatically search s station downward of upward respectively until it finds a station.
During the playing mode, press the (8) button to rewind or forward for you to reach your desired
track quickly. when discotinuously press (8) button, you can select your desired portion downward or upward or upward resplectively.
If press and hold the button for more tahn 3 seconds, you can select you desired portion fast
forward/rewind.
PROGRAM PLAYING/ST
During disc playing mode, press (9) prog button to enter programming page.
Press (4) button and (14) numbers button to program the racks to be played.
NOTE: St will only work on radio mode.
ON-SCREEN DISPLAY
DURING DVD, VCD, AND CD MODE, PRESS (10) (osd) button. The displayer shows tracks/
chapter. Current time.
NOTE: During MP3/WMA MODE, only show directory and tracks.
VOL/BAS/TRE/BAL/FAD SELECTOR
During DVD, VCD, and CD MOD. repeat press (11) (del) button select the desired mode in the
following order:
NOTE: After selecting your desired mode, your can adjust the current mode being displayed by (vol) button. When
p-eq mode isactivated, press sel button to select the modes, and bass/treble mode are invalid. (show as below)
REPEAT PLAYING/AMS
1. Press ams button (12), in cd/mp3/vcd mode, repeat function is: rpt1, rpt dir, rpy all, rpy off.
in dvd mode, repeat function is: prt chapter, prt title.
2. Radio mode is ams function.
TREBASVOL
FAD
BAL
FADVOL
BAL

15
RANDOM PLAYING
During the disc mode playing. Press (13) (rdm) button to play any track at random.
During the radio mode, press the button is local fucntion.
NOTE: In vcd pcb mode and some dvd discs, random playing will be work.
NUMBER BUTTONS
During radio mode, you can select one of the 6 stored stations on each band by pressing any
One of the number button (14). During the playing mode, you can select any track directly by
Using number button (14) (0~ 10+). For example, if you need the fifteenth track, you can first
Press button 10+ and press button 5, the corresponding track (15) will be played.
NOTE: When button 10+ is first pressed. It work as 10+, it work as 20+ when pressed at the second time, the
third time . . . 30+ . . . and so on.
LEFT/ RIGHT/ STEREO SELECTOR
During the playing mode, continuously press (15) (Audio) can change the sound to left/ right
Speaker or stereo mode.
PBC (Menu)
-During VCD/2. 0 mode, when press (16) (PBC) button at the first time, PBC playback starts and
The menu of entire disc appears on the TV. And then you can select your favorite track by using
Number button (14~ 10+). To cancel PBC playing, press (16) (PBC) button again.
-During DVD mode, when press (16) (PCB) button, to show all tracks title on TV screen.
SUBTITLE SELECTOR
During DVD mode, press (SUB-T) (17) button to switch the subtitle language.
SETTING DISC PLAYBACK TIME
During Disc playing mode, press (18) GO TO button can set the specific time to play. Using (4)
And (14) number button to set track/Chapter or time, and press ENTER button to play.
MODE SWITCH
Press (19) button to switch Radio, Disc Playing USB/SD/MMC or AUX mode.
PAUSE
In Disc playing mode, press (20) button to suspend the playback, press it again to stop the playback.
MULTI- ANGLE KEY
In DVD playing mode, press( 21) key, you can watch the DVD content from different angle.
If the disc supports.

16
SLOW REVERSE/ SLOW ADVANCE PLAY
During DVD/VCD playing mode, press (22) key once for ½ slow advance, twice for 1/ 3, third for
1/ 4, fourth 1/ 5, fifth for 1/ 6, sixth 1/ 7, seventh return to normal playback speed.
TITLE KEY
In DVD playing mode, press (24) key to show all tracks' title on TV screen. Then Press (14) (0~ 10+)
key or press (4) key to choose your desired track number and press (18) (ENTER) key or (2) key to start.
NOTE: No title display in MP3, WMA, CD mode.
ZOOM KEY
In DVD/VCD playing mode, press (25) key once for 2 x zoom, twice for 3 x zoom, third time for
4 x zoom, fourth time for ½ zoom, fifth time for 1/ 3 x zoom, sixth time for 1/ 4 x zoom, seventh
time to cancel the zoom mode .And you can pan the picture. By pressing the cursor keys.
NOTE: No zoom function for MP3, WMA, CD playing mode.
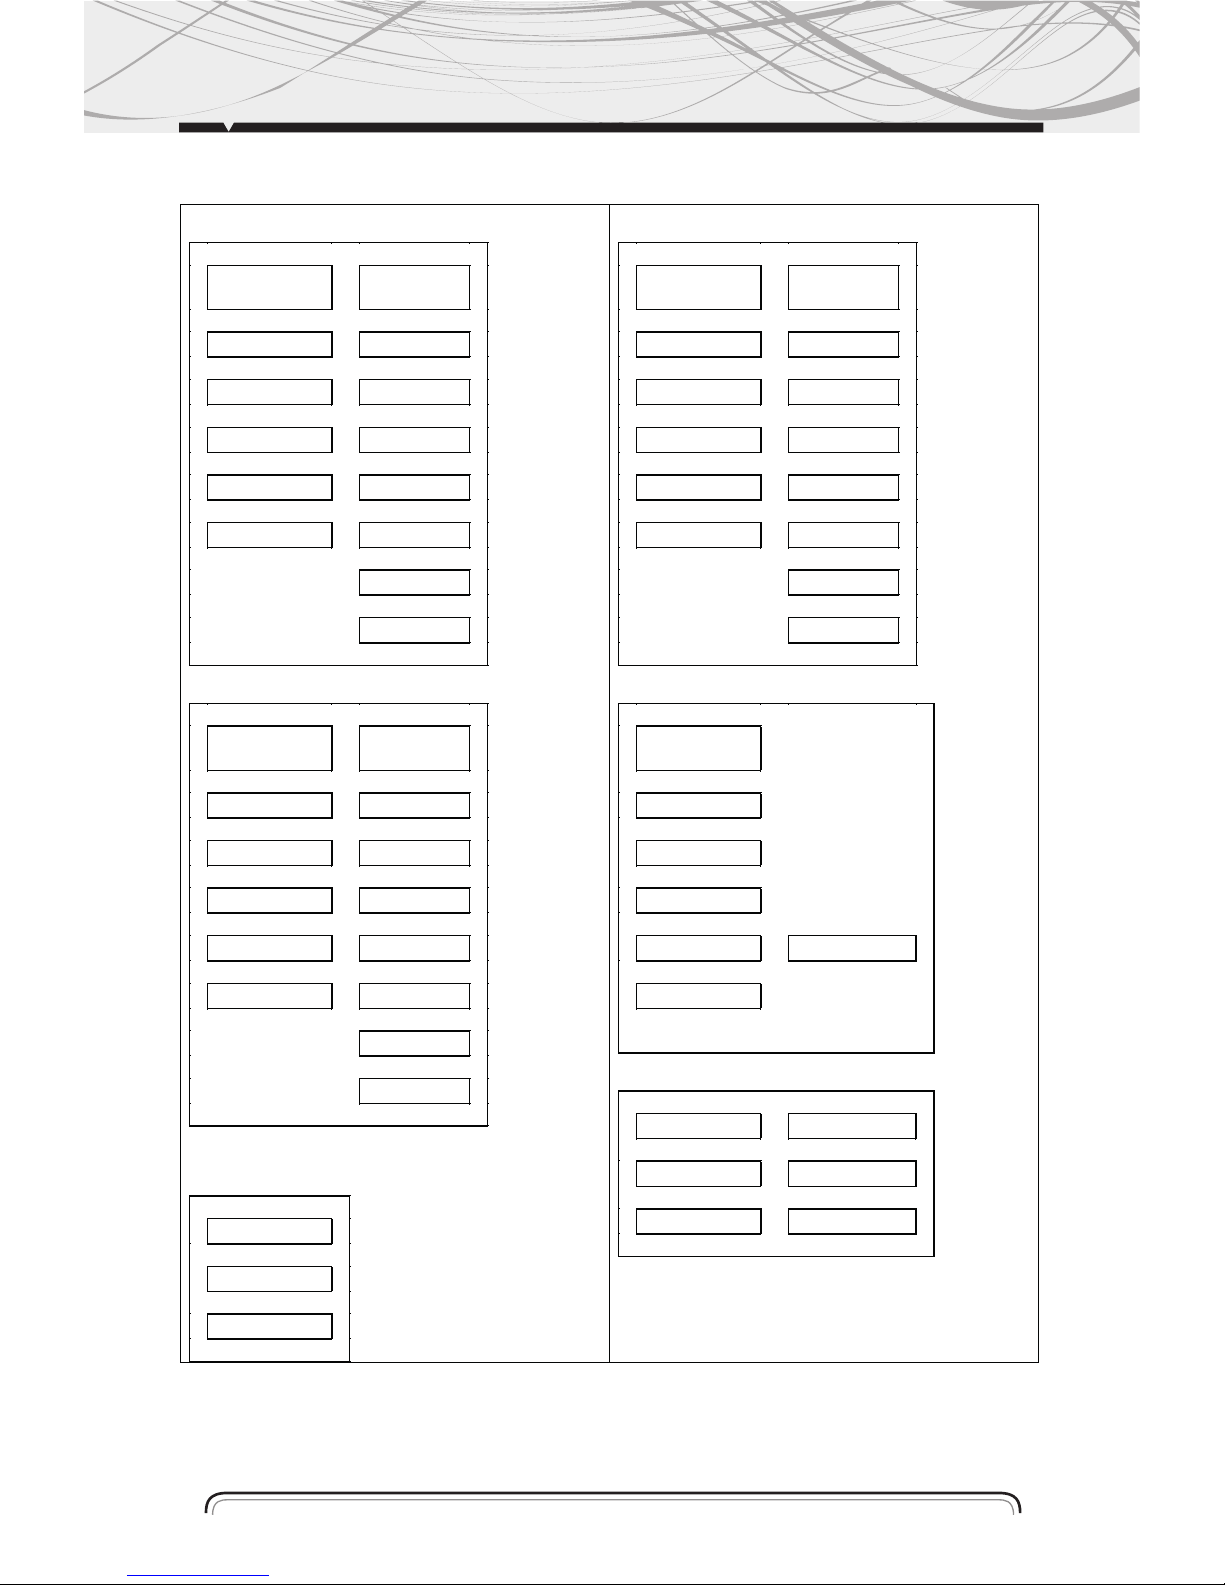
SETUP
1. Press SETUP (23) key of remote control in the stop mode.
(Press the STOP button Twice to ensure the player is under STOP mode.
2. The main page of setup menu is displayed.
3. Select the preferred item by using the (4) button.
4. Press (6) ENTER button.
A. System Setup
This setup page includes all the items of TV system, Screen saver, TV type, Password, Rating &
Default features. The detail please refer to SYSTEM SETUP MENU.
B. Language Setup
This setup page includes all the items of OSD Language, Audio Language, Subtitle Language
and Menu Language features. The detail please refer to LANGUAGE SETUP menu.
C. Audio Setup
This setup page includes all the items for AUDIO. Please to AUDIO SETUP MENU.
D.Video Setup
This setup page includes all the items for VIDEO. The details please refer to VIDEO SETUP MENU.
E. Digital setup
REMOTE CONTROL OPERATION
EQ Button
Press (26) button to select PRE-EQ:
ROCK POP JAZZ FLATE mode
MIXED FILE FORMAT DISC
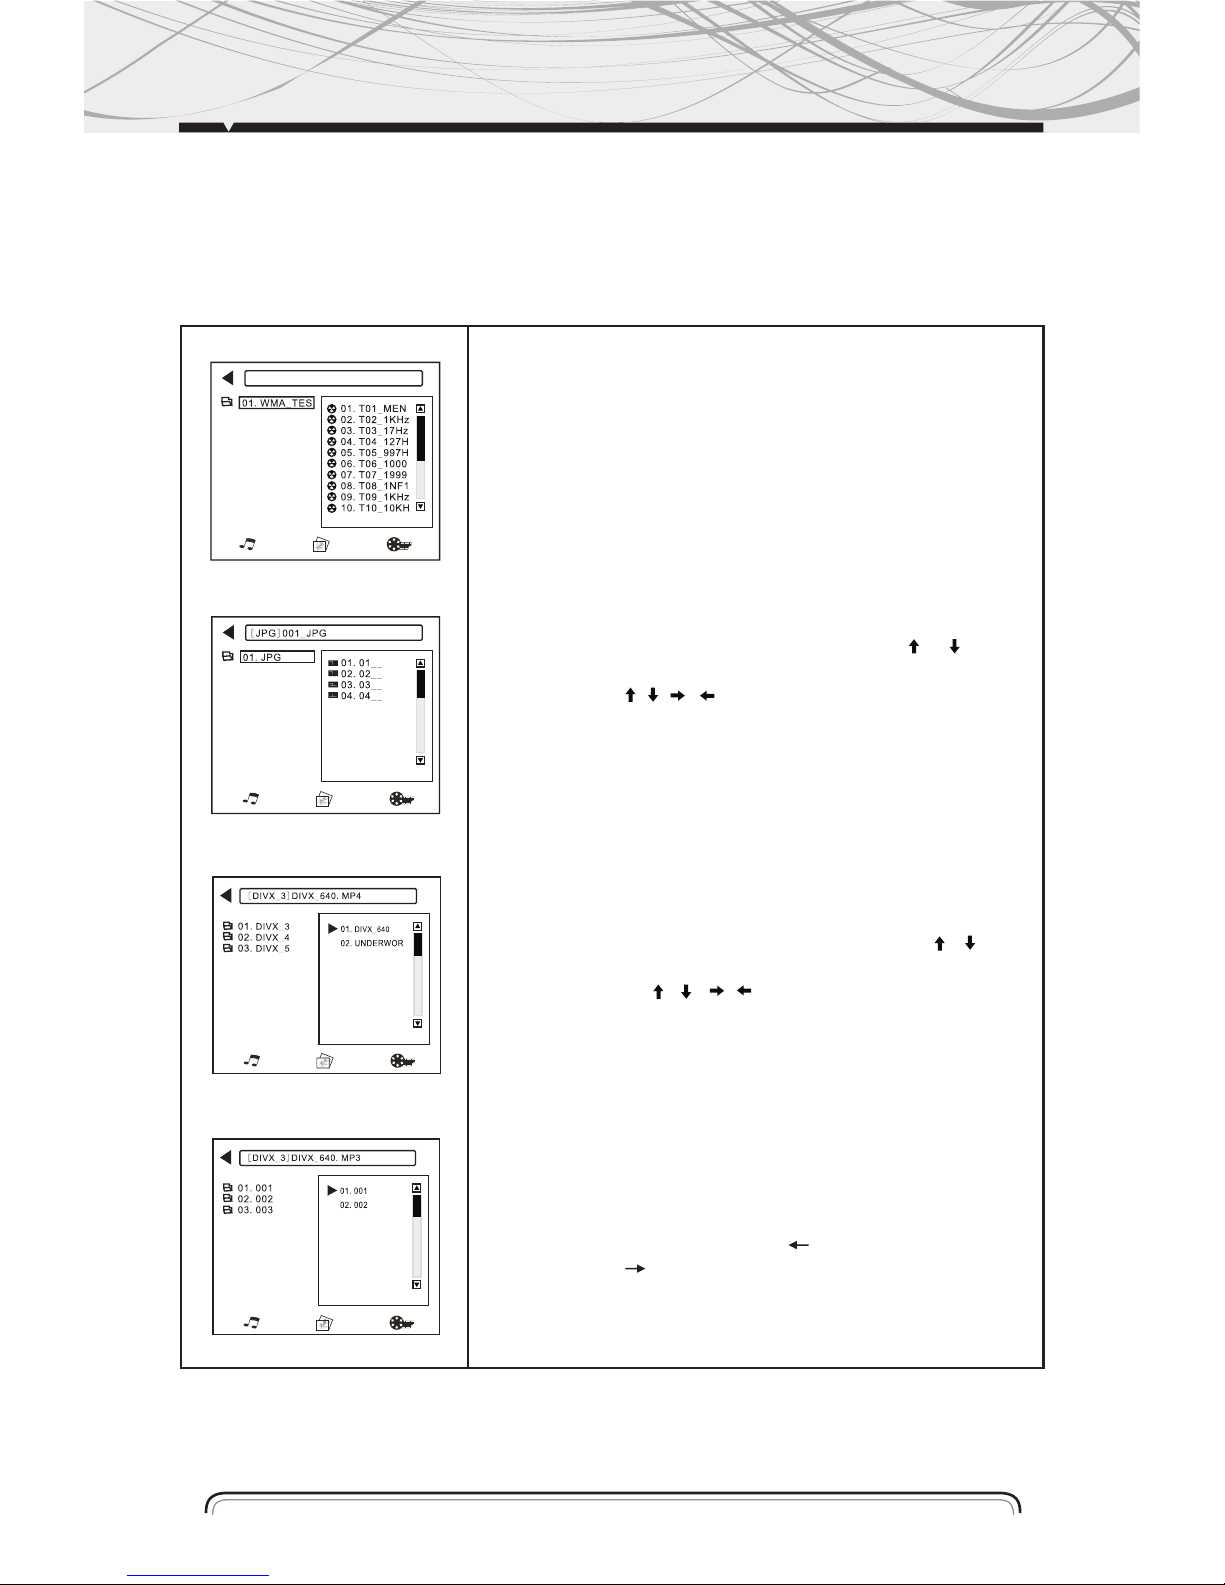
While you listen to (or watching) mixed file format disc. which os together with MP3, WMA, JPG
or MPEG4 formats, just insert the disc into the disc slot, the mechanism will automatically switch
on. for details, please refer to the following steps:
17
REPRODUCCIÓN DE ARCHIVOS DE MÚSICA
En el menú derecho, mueva la flecha o, en su pista favorita, presione el
botón ENTER o directamente presione el BOTON NUMERICO para llevar
a cabo la selección.
NOTA: Si presiona la tecla derecha, ingresará al estado de selección de reproducción de música, imagen o formato de video. Mueva la tecla izquierda/ derecha en
su archive deseado y presione el botón INGRESAR para reproducir. Si presiona la
tecla izquierda, volverá al directorio. Continúe presionando la tecla izquierda Puede
también ingresar al estado de referencia.
REPRODUCCIÓN DE ARCHIVOS DE IMAGEN
Puede presionar los botones numéricos directamente para seleccionar
sus archivos de imagen favoritos o mueva las flechas o en ese
archivo y presione el botón ENTER. Luego se mostrará la imagen en el
monitor. Presione , , , ,para ajustar los diferentes ángulos para
disfrutar mejor de la imagen. Presione el botón DETENER para volver al
ultimo estado.
NOTA: Si continua presionando la tecla derecha, ingresará al estado de selección
de archivos de música, imagen o video de reproducción, Mueva la tecla izquierda/
derecha y presione el botón ENTER.
Presione el botón REPRODUCCION para reproducir la imagen de manera automática.
REPRODUCCIÓN DE ARCHIVOS DE VIDEO
Puede presionar los botones numéricos directamente para seleccionar
sus archivos favoritos de imagen o puede mover las flechas o sobre
ese archivo y presione el botón ENTER. Se mostrará la imagen en el
monitor. Presionando , , , ,puede ajustar un ángulo diferente
para disfrutar la imagen. Presione el botón DETENER para volver a estado
previo.
Nota: Si continúa presionando la tecla derecha, ingresará al modo de selección
de reproducción de música, imagen o archivos de video. Mueva la tecla Izquierda/
Derecha sobre el archivo deseado y presione el botón INGRESAR. Presione el
botón REPRODUCIR para reproducir la imagen de manera automática.
MODO DE BUSQUEDA DE PISTAS
En modo MP3 / WMA:
- En un archivo, presione el botón (8) para seleccionar la pista.
- En varios archivos, presione el botón ( ) para seleccionar la lista, y
presione el botón ( ) para seleccionar el número deseado de canción.
Luego presione ENTER para reproducir la canción.

18
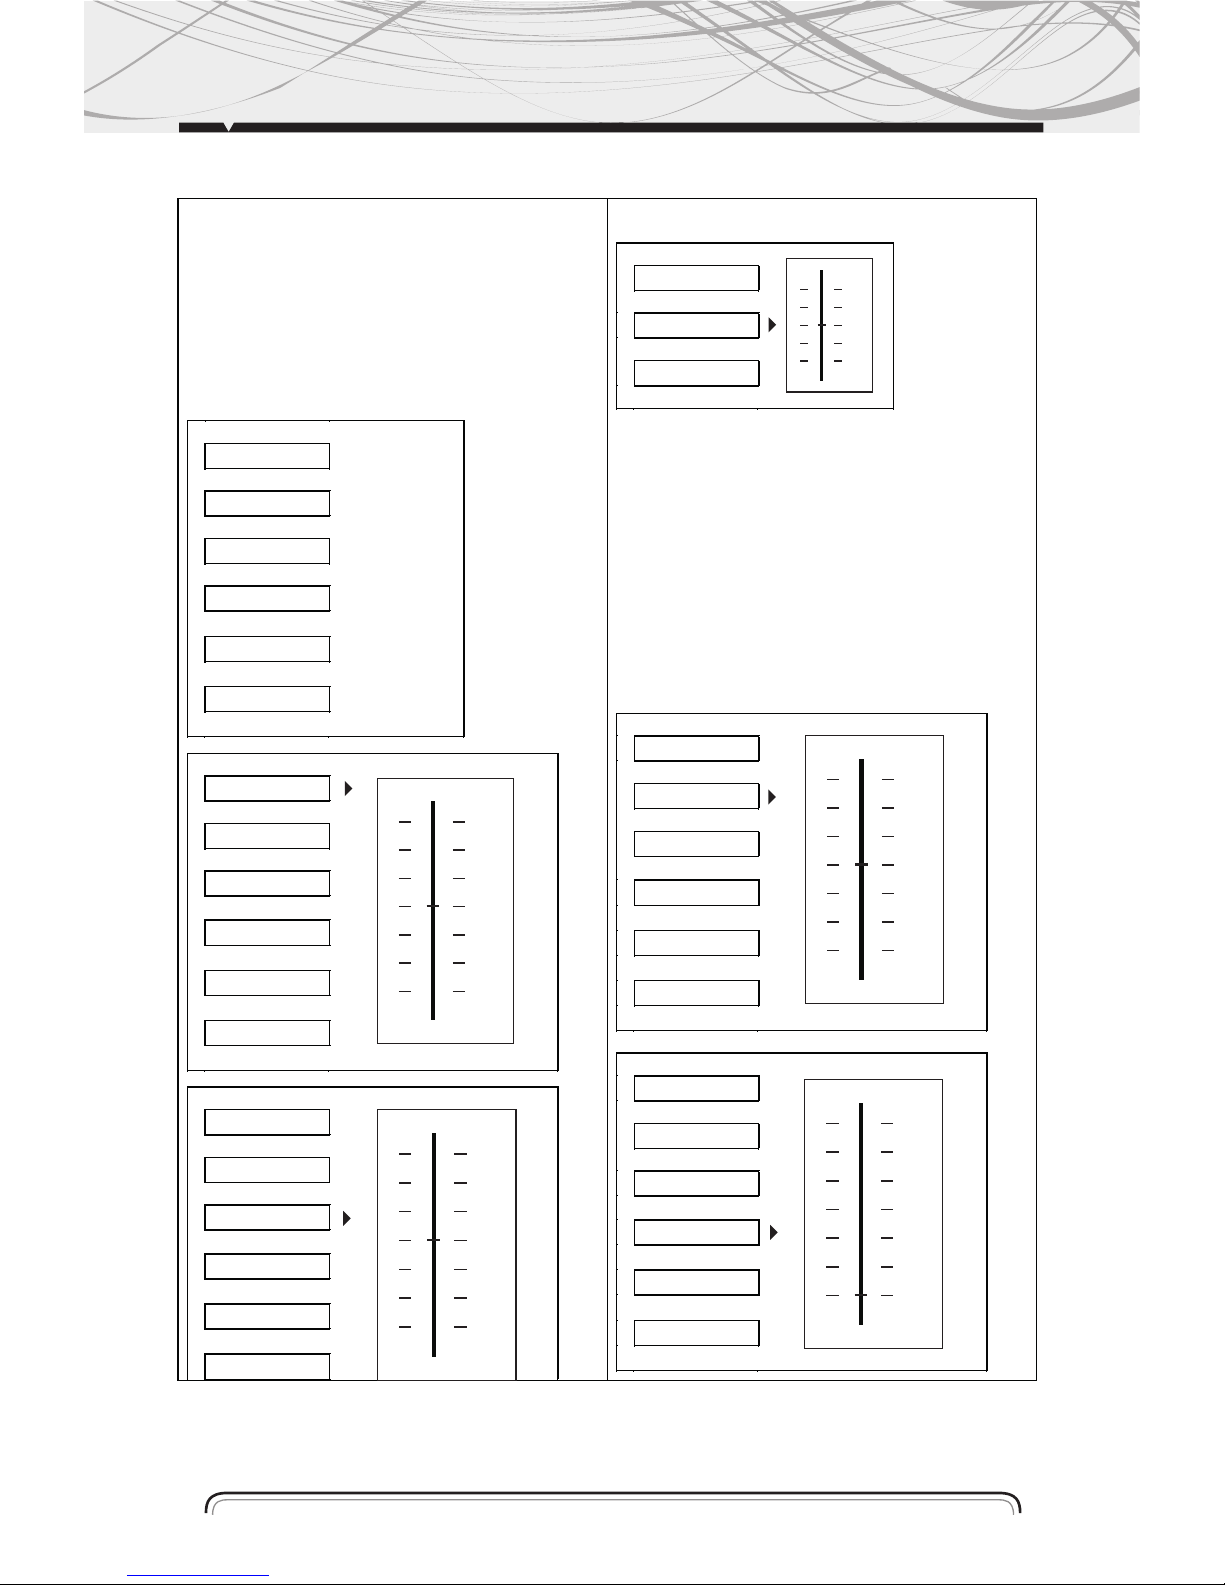
A. SYSTEM SETUP
a) TV SYSTEM b) SCREEN SAVER
c) VIDEO
SETUP
TV SYSTEM
SCREEN
SAVER
VIDEO
TV TYPE
PASSWORD
RATING
DEFAULT
EXIT SETUP
TV SYSTEM
NTSC
AUTO PLAY PAL
TV TYPE AUTO
PASSWORD
RATING
DEFAULT
EXIT SETUP
TV SYSTEM
SCREEN
SAVER ON
VIDEO OFF
TV TYPE
PASSWORD
RATING
DEDAULT
EXIT SETUP
19
d) TV TYPE e) PASSWORD
TV SYSTEM
SCREEN SAVER
VIDEO
TV TYPE 4:3 PS
PASSWORD 4:3 LB
RATING 16:09
DEFAULT
EXIT SETUP
TV SYSTEM
SCREEN SAVER
VIDEO
TV TYPE
PASSWORD _ _ _ (IMAGEN)
RATING
DEFAULT
EXIT SETUP
ENTER THE PASSWORD AND PRESS ENTER BUTTON.
TYPE THE OLD PASSWORD (THE INSTAL FACTORY CODE
IS 0000) AND KEY IN 4 CHARACTERS PASSWORD NOW
YOU WANT TO USE, AND TYPE AGAIN TO CONFIRM.
1) 4:3 PS
PLAYED BACK IN THE PAN % SCAN STYLE (IF CONNECTED
TO WIDE-SCREEN TV, THE LEFT AND RIGHT EDGES ARE
CUT OFF.)
2) 4:3 LB
PLAYED BACK IN LETTERBOX STYLE.
(IF CONNECTED TO WIDE-SCREEN TV, BLACK BANDS
APPEAR AT TOP AND BUTTON OF THE SCREEN.
3) 16:9
SELECT WHEN A WIDE-SCREEN TV SET IS CONNECTED.
20
f) RATING
SELECT SUITABLE GUIDANCE RATING BY THE CURSOR
BUTTON AND CONFIRMED BY PRESSING ENTER BUTTON.
RATING 1: (KID SAFE)
SELECT THIS WHEN THE PROGRAMS ARE SAFE TO ALL
KID VIEW.
RATING 2: (G)
SELECT THIS THAT ALLOWS ADMISSION TO PERSON OF
ALL AGES.
RATING 3 (PG)
SELECT THIS THAT NEEDS PARENTAL GUIDING THEIR
CHILDREN.
RATING 4 (PG13)
SELECT FOLLOWING WHEN CHILDREN UNDER 13 ARE
FORBIDDEN TO VIEW.
RATING 5 (PG-R)
SELECT THIS WHEN CHILDREN UNDER 17 MUST BE
GUIDE TO VIEW BY THEIR PARENTS.
RATING 8 (ADULT)
SELECT THIS, WHEN ONLY ALLOWS ADMISSION TO ALL
ADULTS.
G DEFAULT
RECOVER ACQUIESCING IN STATE WHEN LEAVING THE
FACTORY
B.LANGUAGE SETUP
SELCT THE PREFERRED OSD LANGUAGE, AUDIO
LANGUAGE, SUBTITLE LANGUAGE AND MENU
LANGUAGE BY USING THE CURSOR BUTTONS.
OSD LANGUAGE
AUDIO LANG
SUBTITLE LANG
MENU LANG
DIVX VOD
EXIT SETUP
TV SYSTEM 1 KID SAFE
SCREEN SAVER 2 G
VIDEO 3 PG
TV TYPE 4 PG 13
PASSWORD 5 PG-R
RATING 6 R
DEFAULT 7 NC 17
EXIT SETUP 8 ADULT
TV SYSTEM
SCREEN SAVER
VIDEO
TV TYPE
PASSWORD
RATING
DEFAULT
RESTORE
EXIT SETUP
a. OSD LANGUAGE
OSD LANGUAGE ENGLISH
AUDIO LANG CHINESE
SUBTITLE LANG GERMAN
MENU LANG SPANISH
DIVX VOD FRENCH
EXIT SETUP RUSSIAN
21
ENGLISH
AUDIO OUT
ENGLISH
SUBTITLE LANG
REGISTER CODE
b. AUDIO LANGUAGE
OSD
LANGUAGE CHINESE
AUDIO LANG
SUBTITLE LANG JAPAN
MENU LANG FRENCH
DIVX® VOD SPANISH
EXIT SETUP PORTUGUESE
LATIN
GERMAN
d. MENU LANGUAGE
OSD
LANGUAGE CHINESE
AUDIO LANG ENGLISH
SUBTITLE LANG JAPAN
MENU LANG FRENCH
DIVX® VOD SPANISH
EXIT SETUP PORTUGUESE
GERMAN
LATIN
C. AUDIO SETUP
SPDIF/OFF
ANALOG OR OPTICAL OUTPUT PORT ALL HAS NOT OUTPUT SIGNAL.
KEY
EXIT SETUP
c. SUBTITLE LANGUAGE
OSD
LANGUAGE CHINESE
AUDIO LANG
JAPAN
MENU LANG FRENCH
DIVX® VOD SPANISH
EXIT SETUP PORTUGUESE
GERMAN
OFF
e. DIVX(R) VOD LANGUAGE
OSD
LANGUAGE
AUDIO LANG
SUBTITLE LANG
MENU LANG
DIVX® VOD
EXIT SETUP
a. AUDIO OUT
AUDIO OUT SPDIF/OFF
KEY SPDIF/RAW
EXIT SETUP SPDIF/PCM
THIS IS TO ACTIVATE THE AUDIO OUTPUT FROM ANAL OG/OPTI CAL MODE
TO SPDIF/RAW MODE OR SPDIF/PCM MODE.
22
SPDIF/RAW
WHEN THE PLAYER IS CONNECTED WITH THE POWER AMPLIFIER BY THE
ANALOG OR OPTICAL PORT, PLEASE SELECT THIS ITEM, WHEN THE PLAYING
DISC WHICH IS RECORDED BY DOLBY DIGITAL, DTS OR MPEG RECORDING
SYSTEM, THE ANALOG OR OPTICAL OUTPUT SIGNAL OF THE UNIT WILL BE THE
SAME AS THE DIGITAL SIGNAL (RAW FORMAT) OF THE PLAYING DISC. AT THE
SAME TIME, THE POWER AMPLIFIER YOU CONNECTED MUST HAVE THE
DECODE FUNCTION OF DOLBY DIGITAL, DTS OR MPEG.
SPDIF/PCM
WHEN THE PLAYER IS CONNECTED WITH THE 2 CHANNEL, DIGITAL STEREO
AMPLIFIER, PLEASE SELECT THIS ITEM; WHEN THE PLAYING DISC WHICH IS
RECORDER BY DOLBY DIGITAL OR MPEG RECORDING SYSTEM, THE ANALOG
OR OPTICAL OUTPUT WILL BE MODULATED TO 2 CHANNEL OUTPUT BY PCM.
D.VIDEO SETUP
BRIGHTNESS
CONTRAST
HUE
SATURATION
SHARPNESS
EXIT SETUP
A. BRIGHTNESS
BRIGHTNESS
CONTRAST
HUE
IMAGEN
SATURATION
SHARPNESS
EXIT SETUP
C.HUE
BRIGHTNESS
CONTRAST
HUE
IMAGEN
SATURATION
SHARPNESS
EXIT SETUP
B.KEY
AUDIO OUT
KEY IMAGEN
EXIT SETUP
YHIS IS FOR THE USER TO SET BRIDHTNESS CONTRAST,
HUE AND SATURATION OF THE PICTURE BY PRESSING
THE ARROW LEFT/RIGHT BUTTON.
PRESS ENTER BUTTON TO CONFIRM THE CHANGE.
NOTE: ONLY ON TV/AV MODE, THE VIDEO SETUP IS
AVAILABLE.
B.CONTRAST
BRIGHTNESS
CONTRAST
HUE
IMAGEN
SATURATION
SHARPNESS
EXIT SETUP
D.SATURATION
BRIGHTNESS
CONTRAST
HUE
IMAGEN
SATURATION
SHARPNESS
EXIT SETUP
12
10
8
6
4
2
0
+6
+4
+2
0
-2
-4
-6
12
10
8
6
4
2
0
12
10
8
6
4
2
0
#
+4
+2
0
-2
-4
b
E. SHARPNESS
BRIGHTNESS
CONTRAST
HUE
IMAGEN
SATURATION
SHARPNESS
EXIT SETUP
E.DIGITAL SETUP A.OP MODE
OP MODE OP MODE LINE OUT
DYNAMIC
RANGE DYNAMIC RANGE RF REMOD
DUAL MONO DUAL MONO
EXIT SETUP EXIT SETUP
THIS IS FOR THE USE TO SET OPERATION MODE,
DYNAMIC RANGE COMPRESSION AND STEREO MODE.
TO SET THE OPERATING MODES FOR DOBLY DIGITAL
DECODER.
23
B.DYNAMIC RANGE C.DUAL MONO
OP MODE OP MODE
DYNAMIC RANGE DYNAMIC RANGE STEREO
DUAL MONO IMAGEN DUAL MONO MONO LEFT
MONO RIGHT
EXIT SETUP EXIT SETUP MIX MONO
TO SET THE DYNAMIC RANGE COMPRESSION TO SET THE STEREO MODE
6
4
2
0
6
4
2
0
88
FULL
6/ 8
4/ 8
2/ 8
OFF
24
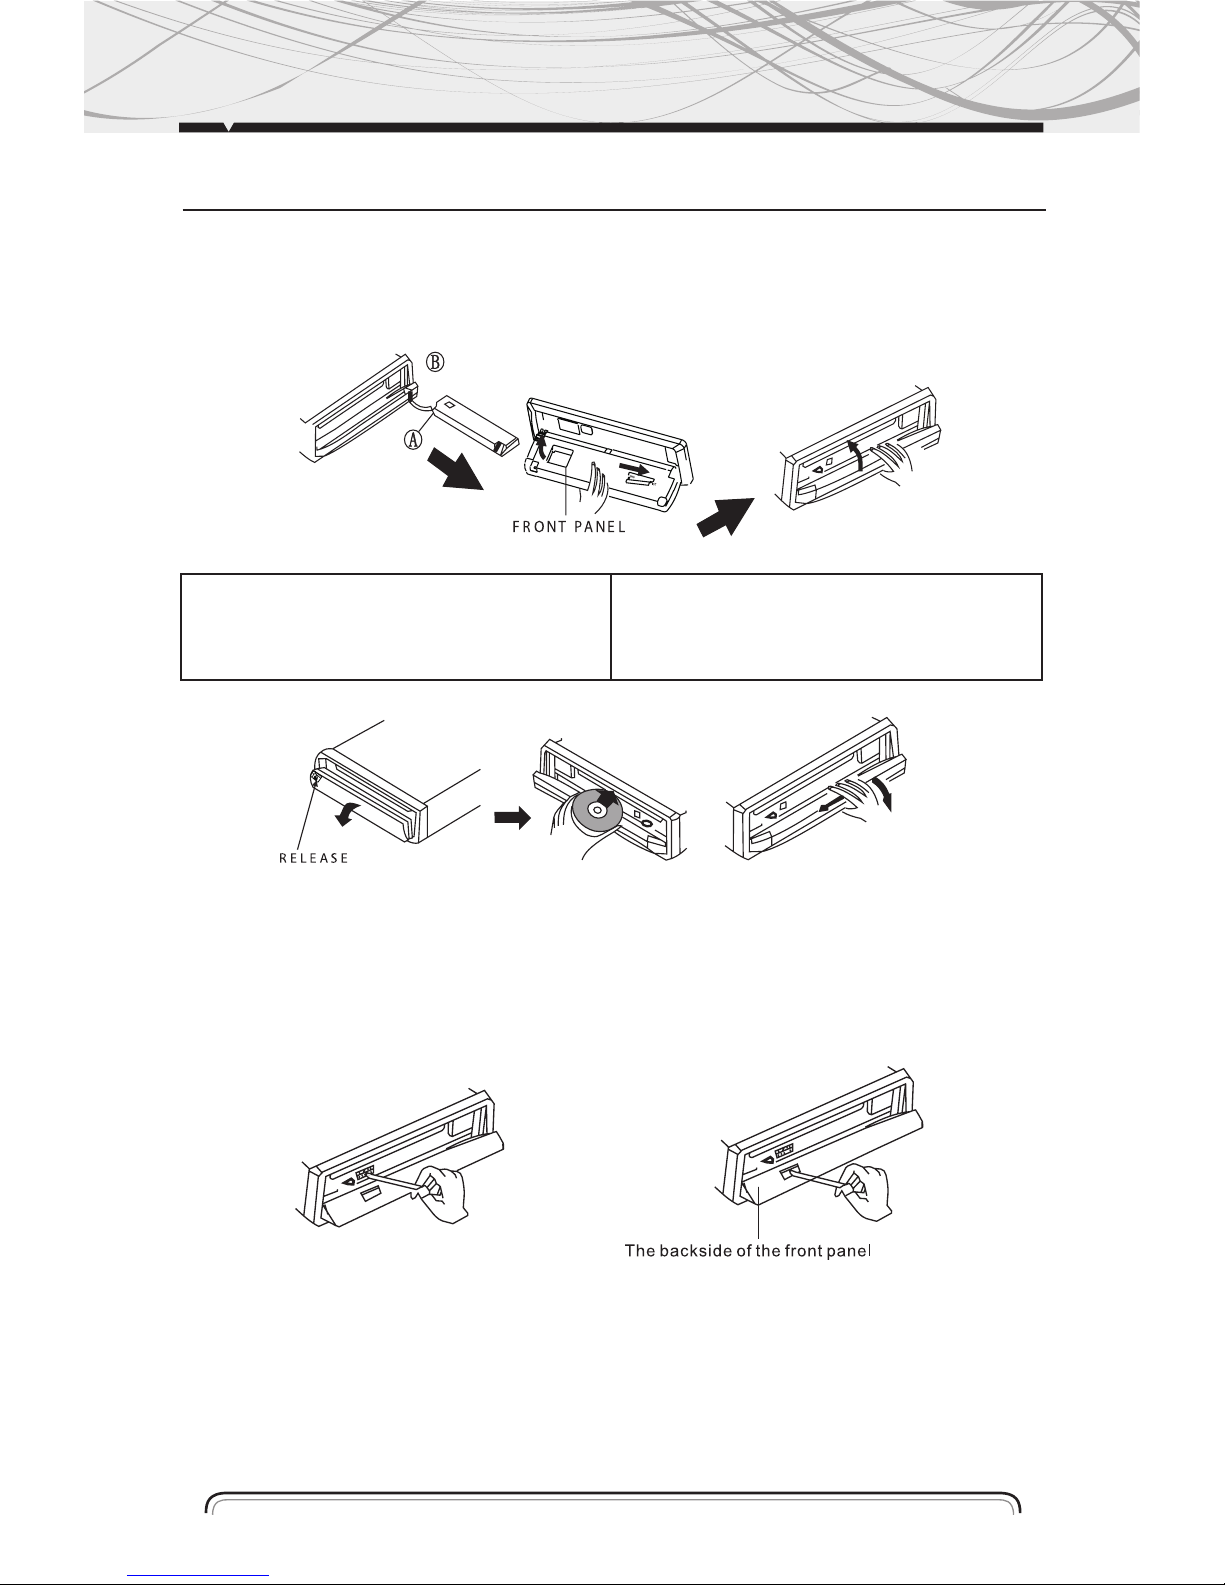
INSTALLING THE FRONT PANEL
To install the front panel, insert the panel into the housing and make sure the panle is properly
installed, otherwise, abnormalities occurs on the display or some keys will not function properly.
CLEANING THE CONNECTOR
Of the connector between the main unit and the front panel is dirty, it may result the unit in
abnormal working condition. To avoid such problem happening, please detach the front panel,
and clean the connector with an alcohol swab. Gently clean and avoid damaging.
NOTE: For safekeeping, always shut down the generator and take out key from the ignition before
cleaning. And never keep ypur finger of any metal device in touch with the connector directly.
FRONT PANEL
DETACHING THE FRONT PANEL
PRESS REL BUTTON IN THE UPPER LEFT CORNER, AND
HEN FRONT PANEL WILL NOT FUNCTION PROPERLY.
REMOVING THE FRONT PANEL
WHEN THE FRONT PANEL WAS TURNED DOWN TO A
POSITION OF 90º, HOLD AND SLIDE THE FRONT PANEL
TO LEFT, AND THEN PULL IT OUT.
 Loading...