

MOBILE ENTERTAINMENT SYSTEM
INSTRUCTIONS MANUAL
DV 8512
CAR DVD/ MP4 PLAYER
www.b52audio.com
INSTRUCTIONS MANUAL 02 - 25
MANUAL DE INSTRUCCIONES 27 - 50
MANUAL DE INSTRUÇÕES 52 - 75
ENGLISH

Notes on Installation 03
Precautions 04
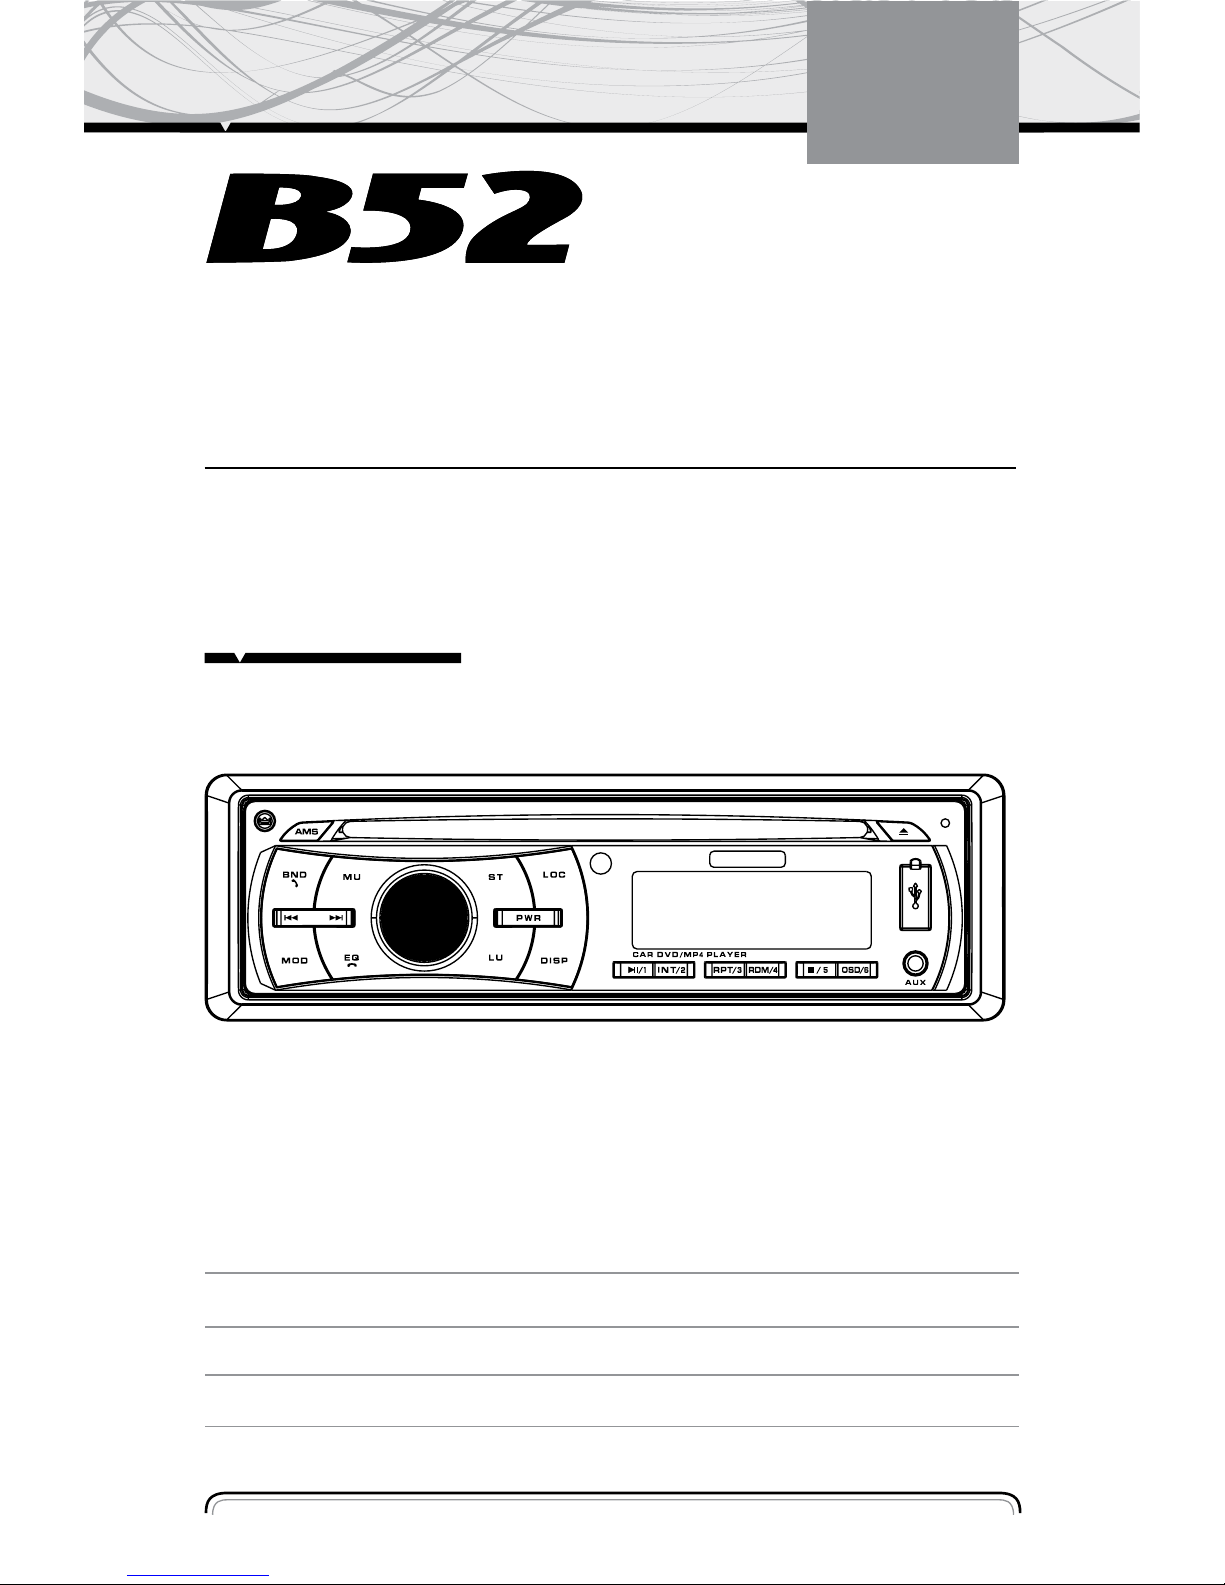
Control Panel Layout 05
Wiring Diagram 06
Basic Operation 06
Radio Operation 07
DVD, MPEG4, VCD, MP3, WMA, CD Operation 08
BLUETOOTH 10
Remote Control Layout 11
Remote Control Operation 12
Setup 17
Installing the Front Panel 20
Cleaning the Connector 20
Unit Installation 22
Specification 24
INDEX
2

Notes on Installation
The unit is designed for 14.4V DC, negative ground operation system only. Before installing
The unit, make sure your vehicle is connected to 14.4V DC negative grounded electric al system.
The negative battery terminal must be disconnected before making connections, Incorrect
can reduce damaging to the unit due to short circuit.
Be sure to connect the color coded leads correctly according to the diagram. Incorrect
connections may cause the unit malfunction or damage the vehicle's electrical system.
Be sure to connect the speaker (-) leads to the speaker (-) terminal. Never connect the left
And right channel speaker cables each other or to the vehicle body. Do not block vents or
radiator panels. Blocking them will cause heat to build up inside and may result in fire.
After the completion of the installation and begin to operate the unit (including replacing the
battery), please press the RESET button on the front panel with pointed objects (such as
ball pen) bo set the unit to initial status
INSTALLATION
3
PRECAUTIONS
4
•DO NOT ATTEMP TO MODIFY THE UNIT; MODIFYING THE UNIT MAY CAUSE AN ACCIDENT.
•STOP THE VEHICLE BEFORE CARRYING OUT ANY OPERATION THAT COULD INTERFERE
WITH YOUR DRIVING.
•DO NOT EXPOSE THIS EQUIPMENTS TO RAIN OR MOISTURE
•DO NOT TURN ON THE UNIT IF THE TEMPERATURE INSIDE THE VEHICLE IS OUT
•THIS PRODUCT IS DESIGNED FOR ONE SINGLE VIDEO OUTPUT, PLEASE USE A SPLITTER
IF YOU WOULD LIKE TO CONNECT FOR MULTIPLE VIDEO OUTPUT.
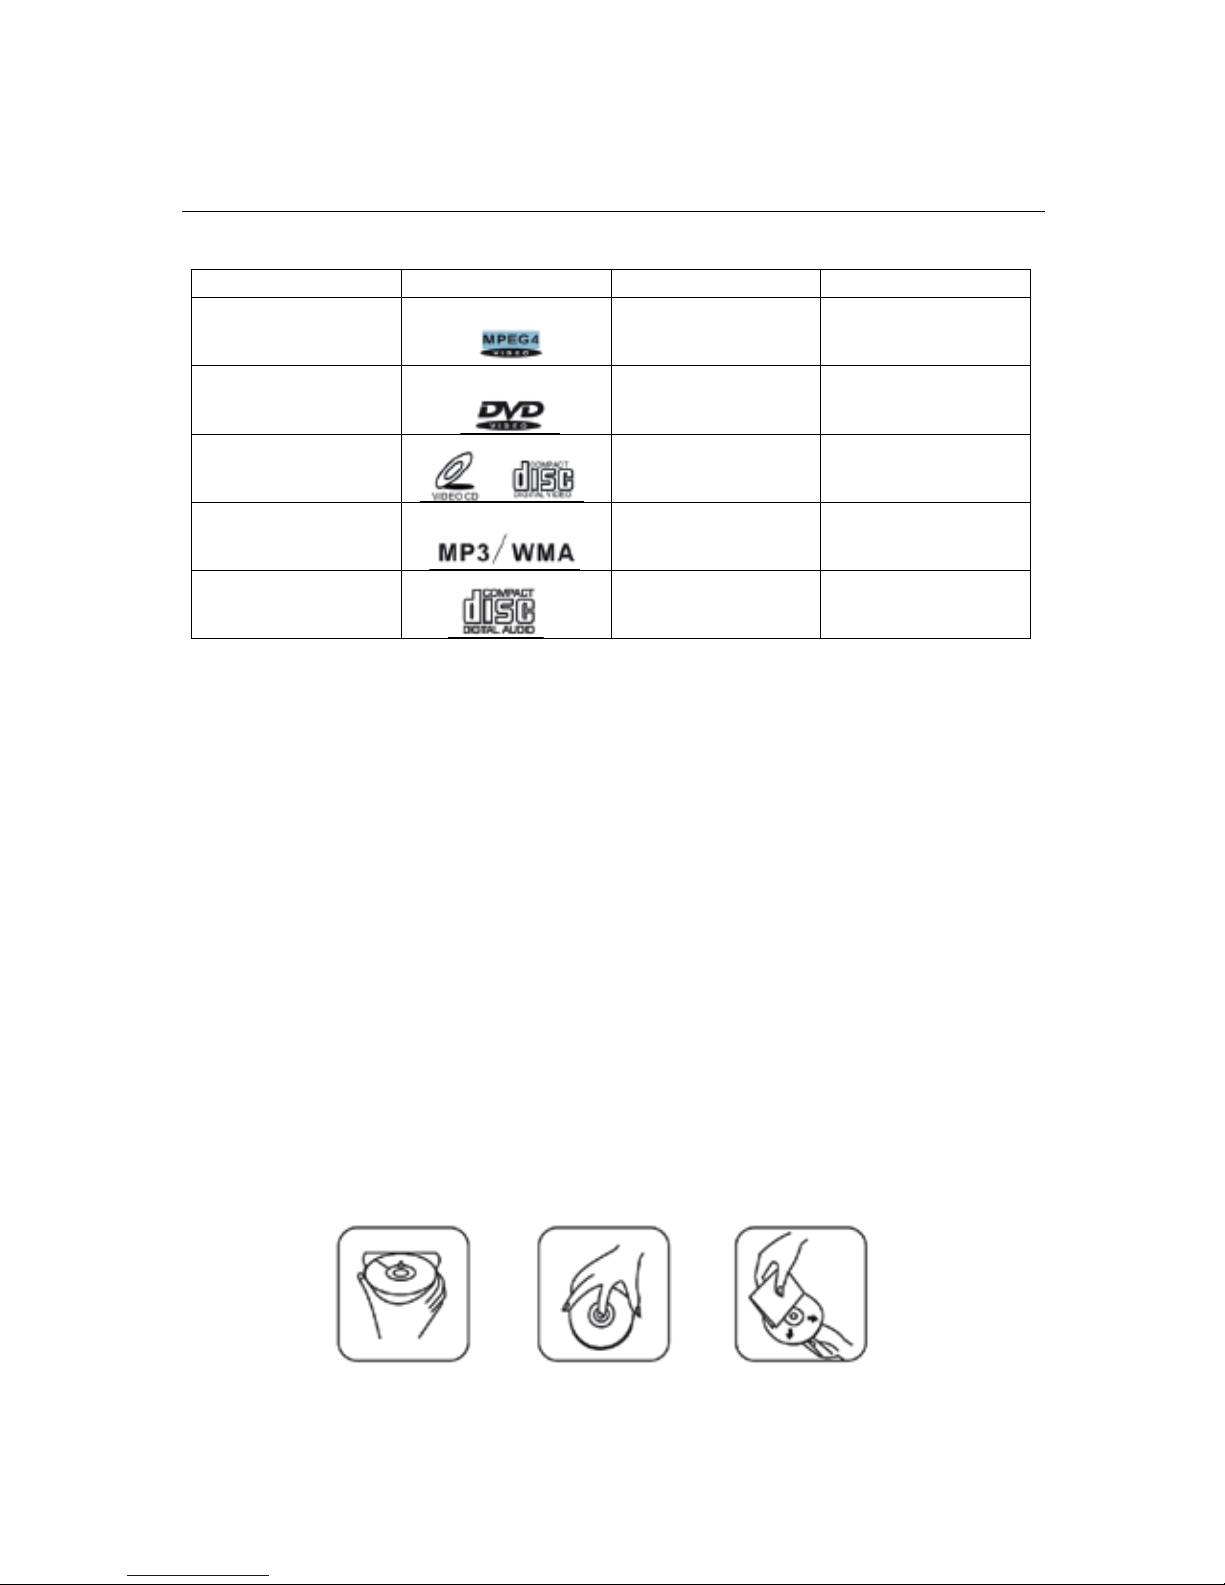
•TO ENJOY OPTIMUM SOUND AND VISION WHILE PLAYING, HANDLE THE DISC AS
FOLLOWS:
Handle the disc by its edge to keep the disc clean, and do not touch the surface.
Do not use your CDs with paste residue or ink attached.
Do not use CDs with labels or stickers attached, which may leave a sticky residue while
beginning to peel off.
Clean the discs with an optional cleaning cloth. Wipe each disc from center out
Type of Disc Label on the Disc R ecorded Material Size of Disc
MPEG4
Sound and moving
pictures
12CM
DVD
Sound and moving
pictures
12CM
VCD
Sound and moving
pictures
12CM
MP3/WMA
Sound only
12CM
CD
Sound only
12CM
NOTE: The unit is compatible with DVD, DVD+/-R,VCD 1.0/2.0/3.0,SVCD,CD,CD-R,CD-RW and JPEG
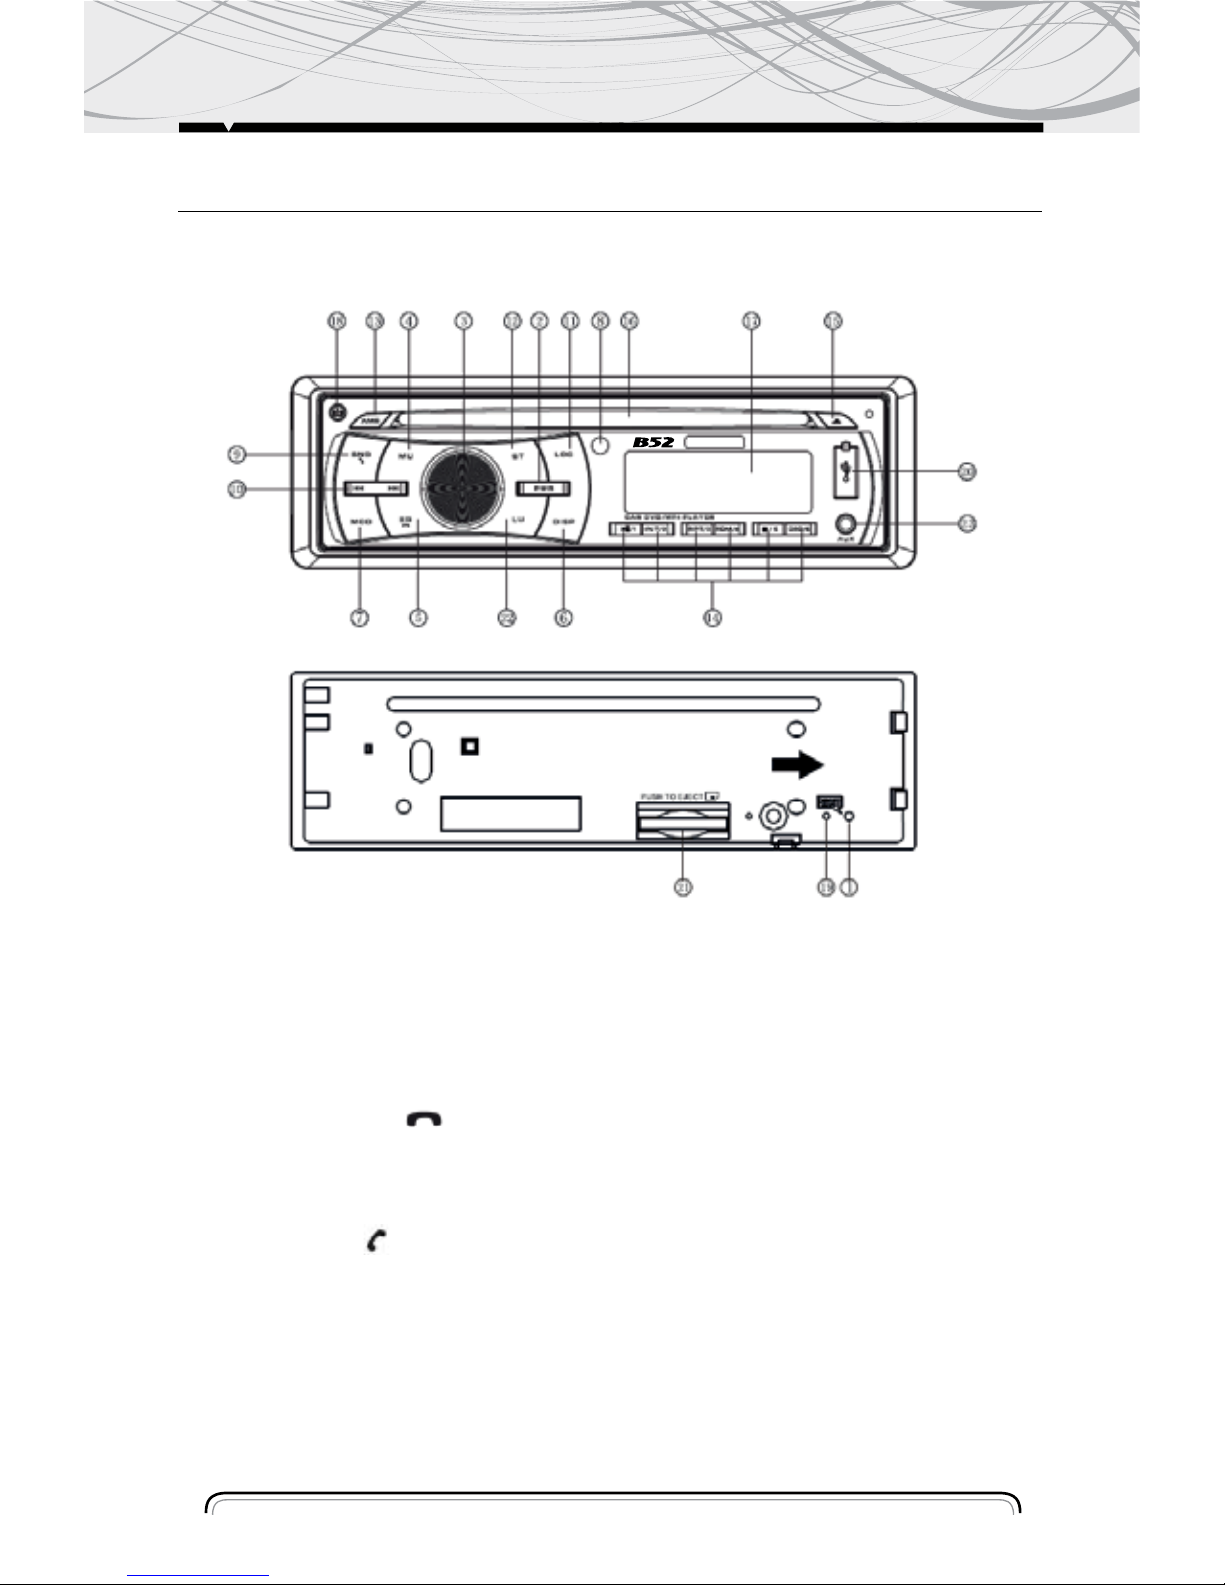
CONTROL PANEL LAYOUT
FRONT PANEL LAYOUT
5
1. Reset Button
2. Power Button
3. Volume/ Sel Button
4. Mute Button
5. Preset EQ/ Button
6. Time- Display/ Adjustment
7. Mode Switch
8. Remote Control Sensor
9. Band/ Button 20.USB socket
10. Tuning/ Selecting Tracks
11. LOC/ DX Selector
12. MO/ ST Selector
13. Preset Stations/ AMS
14. Number Button
15. Eject Button
16. DISC Slot
17. LCD Display
18. Release Button
19. Flashing LED
20. USB socket
21. SD/MMC Slot
22. Loudness Button
23. AUX IN
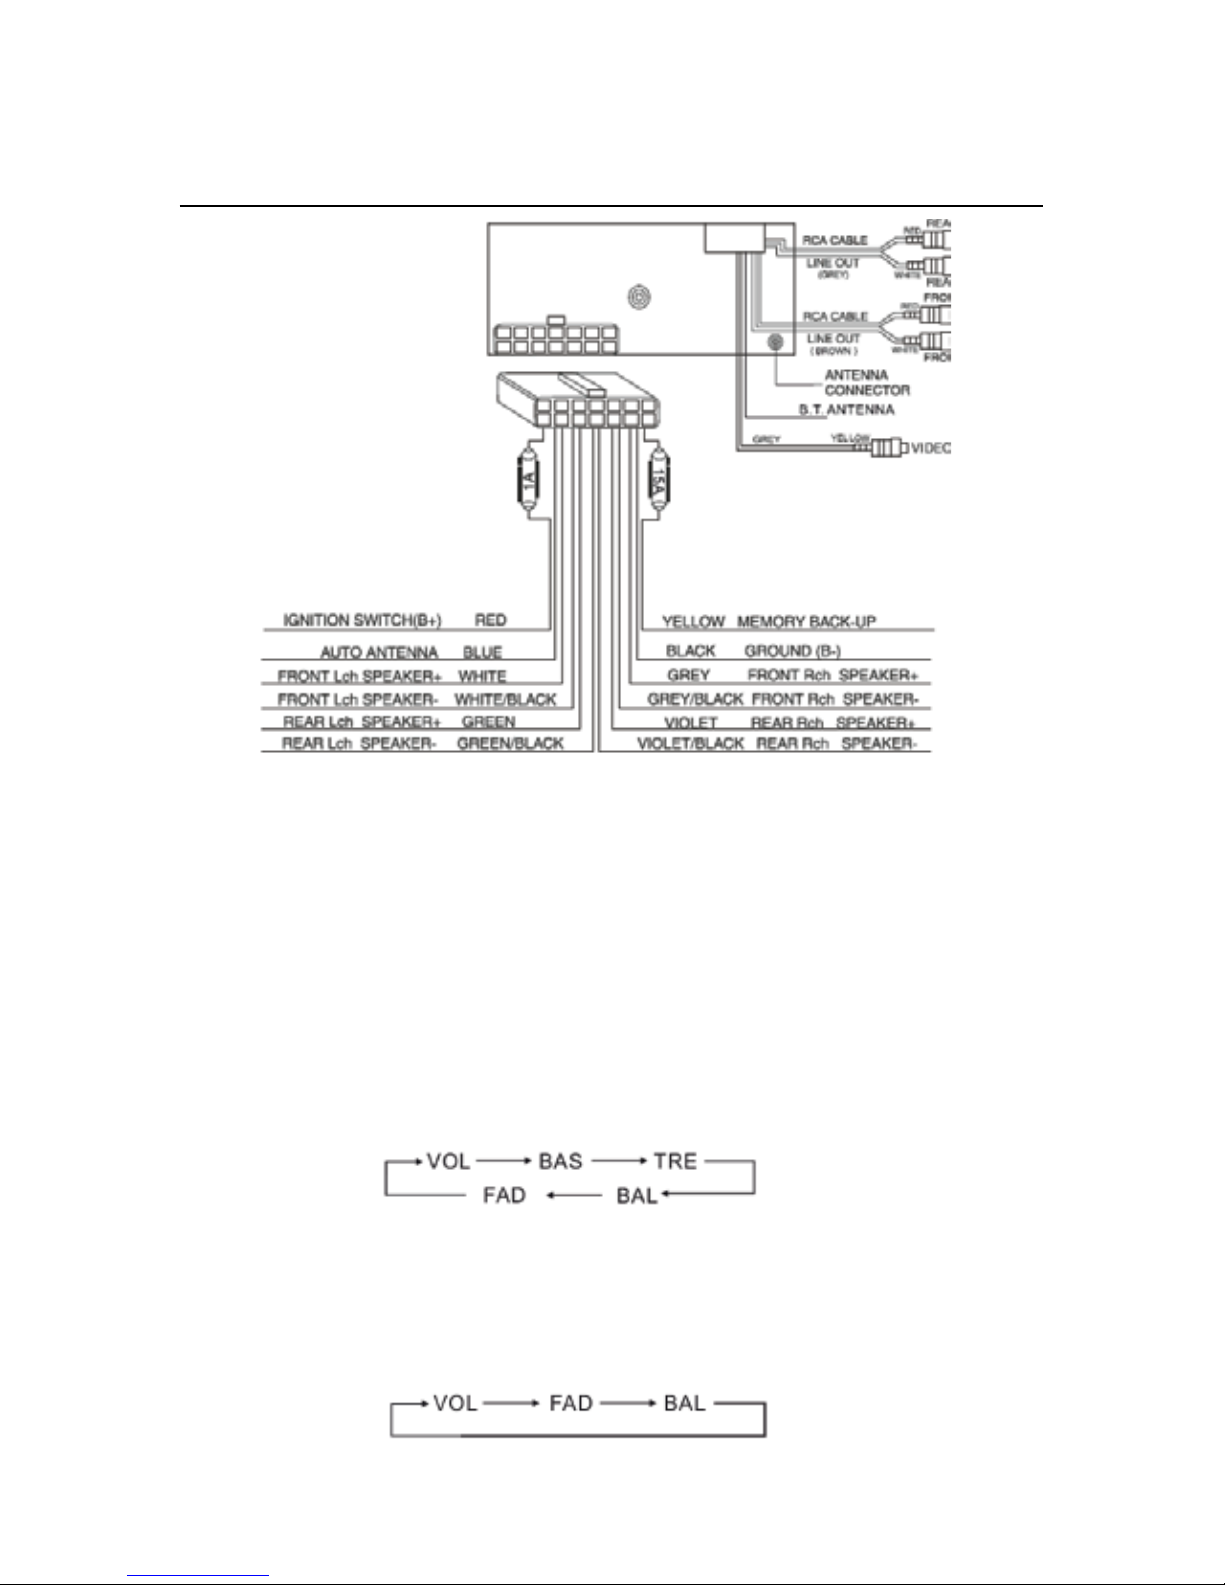
WIRING DIAGRAM
WIRE CONNECTION
6
BASIC OPERATION
Initial System Starts- up
1. Operating the unit for the first time or after replacing the car battery, you should press (18) to
detach the front panel, and LED (19) will be blinking. Press (1) Reset button with a pointed object
(such as a ballpoint) to set the unit to initial procedure.
Turning the Unit On/Off
2. Press POWER button (2) to turn on the unit.
Press it again to turn off.
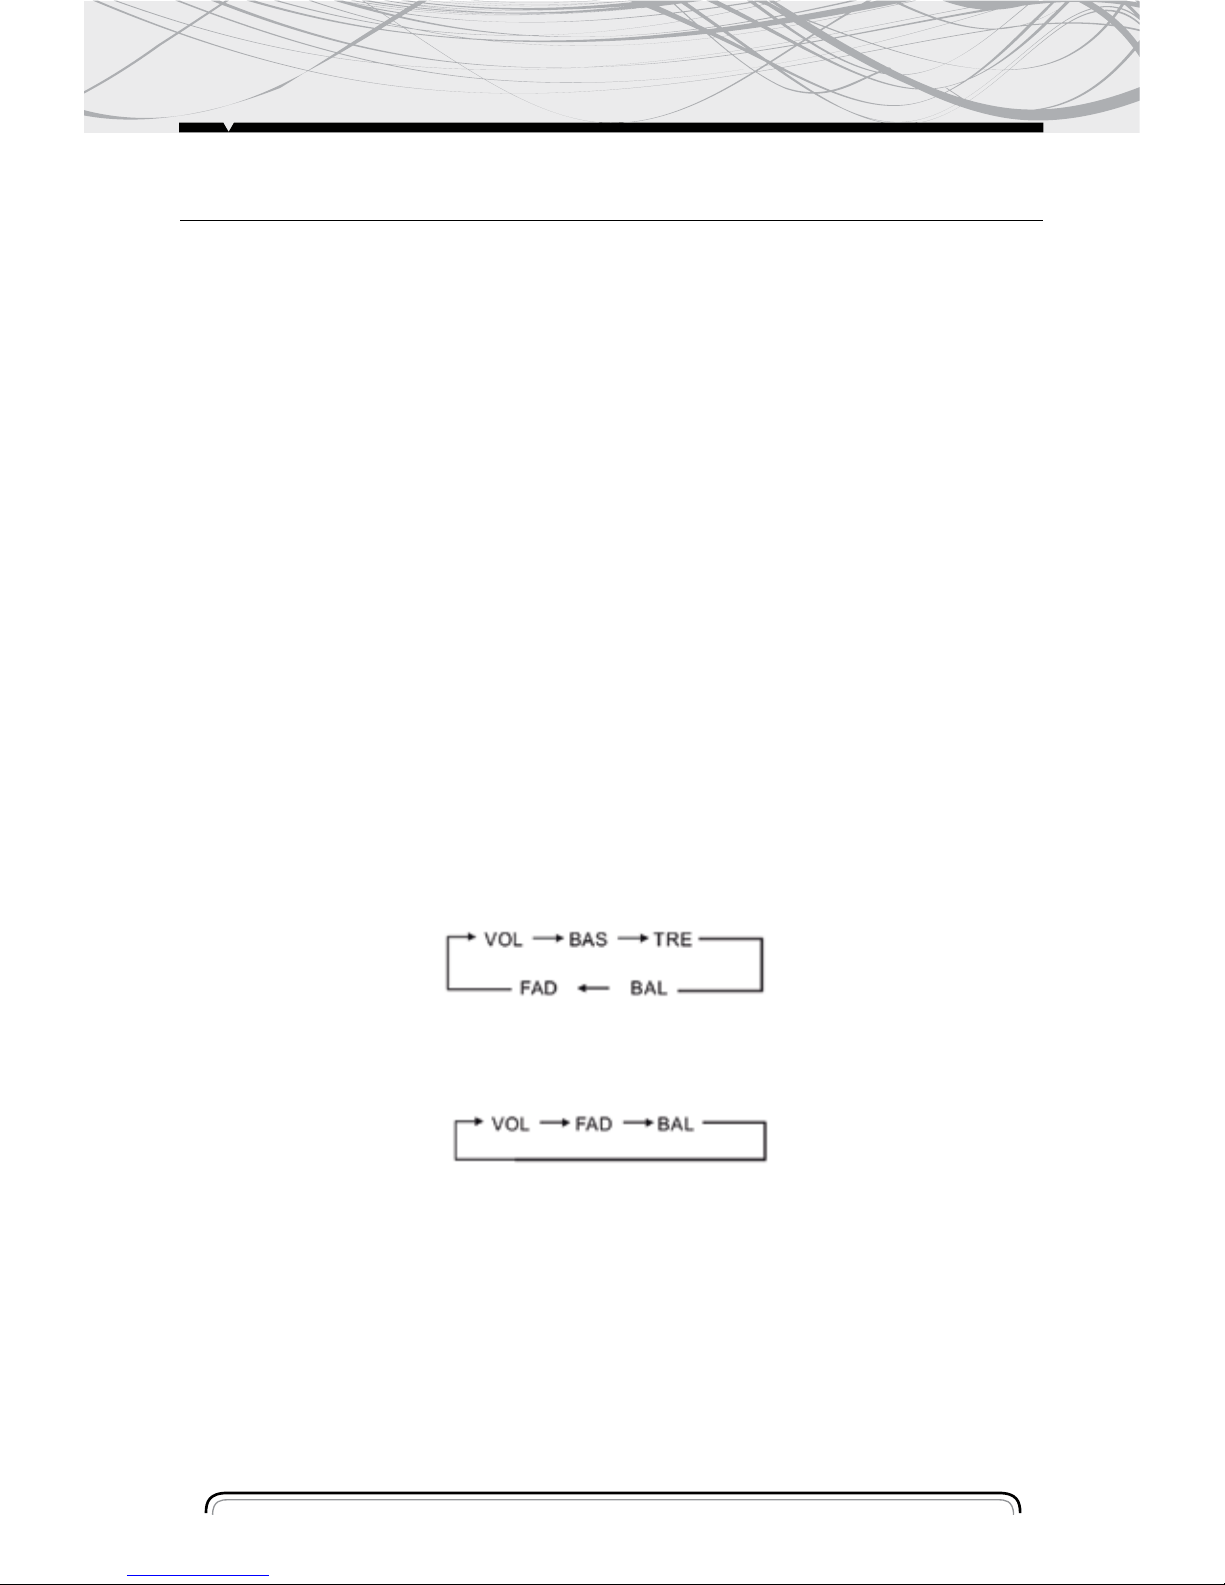
Vol/ bass/ Tre/ BAL (L- R) Selector
3. For Volume Control (3), rotate VOL knob clockwise to increase the sound level, and anticlockwise to decrease the sound level.
Repeatedly press (3), button to select the desired mode in the following order:
NOTE: After selecting the desired mode, you can adjust the current level by rotating the (3) knob.
NOTE: If you turn on Preset EQ function, the Bass and Treble cannot be adjusted. At moment,
repeatedly press the button will change the mode in following order
NOTE: If you don’t adjust the knob within 5 seconds after selecting the desired, the unit will
automatically return to the current mode being displayed.
MUTE FUNCTION
Press (4) button to cut down the sound output, "MUTE" appear in the LCD. (Press it again to
revert the previous volume level).
Setting EQ
1. While listening music, you can set up popular music, lass music and rock music by pressing
(5) “EQ”
button the procedure as follows:
POP mode is selected when the button is first press and pop indicated on LCD.
CLASSIC mode is selected when press the button for the second time and class indicated on
LCD.
ROCK mode is selected when press the button for the third time and rock indicated on LCD.
Press the button for the fourth time to turn off the P- EQ system.
NOTE: Bass mode and treble mode return to initial settings when EQ system is on, “Bass" and
“Treble" disappear
Displaying and Adjusting Time
Time Displaying: Press (6) DISP button and the current time are displayed, and it returns to
original status after 5 seconds or press the button again.
Time Adjusting: Press and hold the button until the clock stop blinking you can rotate (3) knob
to adjust hours. Then press the (3) button once, you can rotate the knob to adjust minutes. After
you finished the time adjustment, longer press (6) button to confirm the time setting.
Mode Selector
Press (7) button to select Radio, Disc, USB, SD/ MMC and AUX mode.
NOTE: You can press “MODE” button to enter USB play mode when you insert a USB can’t read
automatically, for the USB format have some different.
Sensor
(8) Receptor for the card remote commander.
RADIO OPERATION
BAND SELECTOR
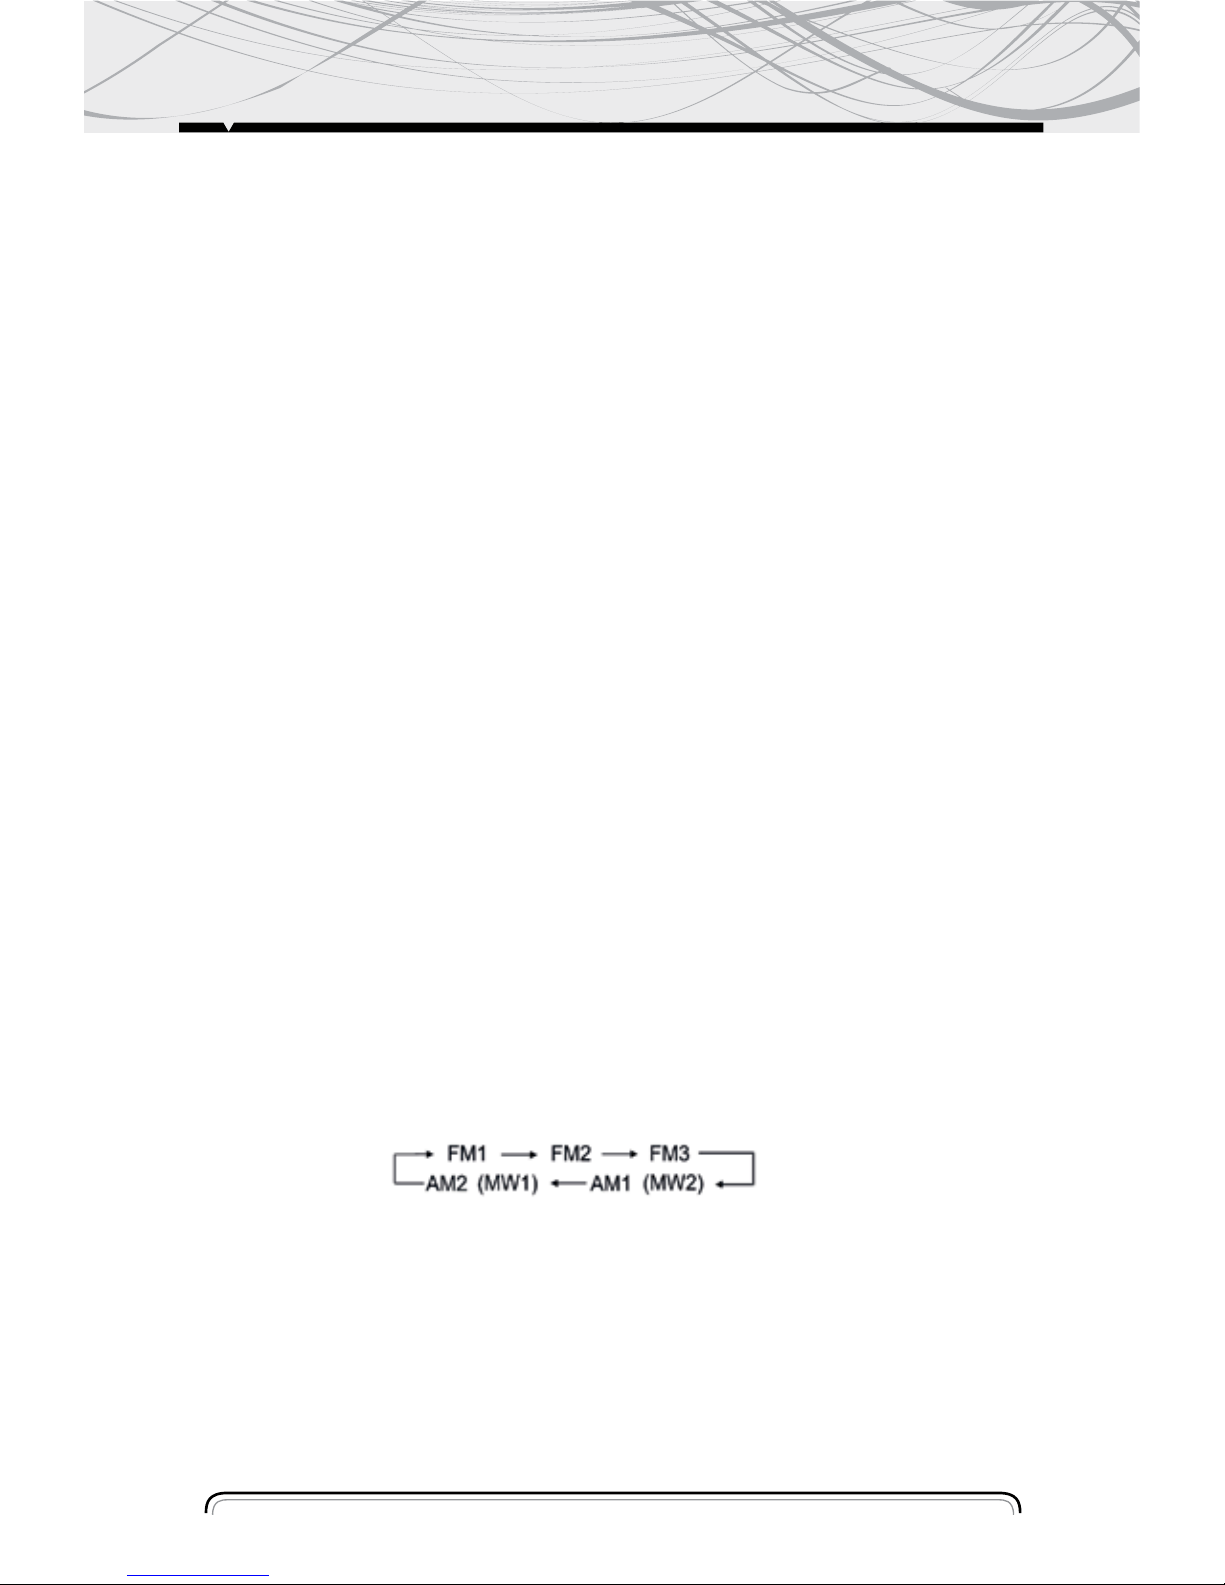
Press (9) (BAND) button repeatedly to select band in the following order: `
NOTE: On DVD playing mode, press (9) button to switch to AUTO PAL or NTSC system
Manual/Automatic Tuning
Manual Tuning: Press (10) button continuously to select a station upward or downward
respectively.
Automatic Tuning: Press and hold ( 10) button for more than 3 seconds, the radio automatically
searches a station upward or downward respectively and plays when it find a station.
7

LOC/ DX SELECTOR
Press (11) button to select strong or weak station reception.
It is set to LOC mode when (11) button is first pressed."LOC" appears and only local station is
available.
It is switched to DX mode when (11) button is pressed again. Both distance and local stations
can be received.
NOTE: (1) The initial mode is DX mode, No “DX" appears in LCD
(2) LOC is functional only is selecting stations.
LOUDNESS ON/OFF
Press LOU (22) button to increase the low frequency. This can improve the sensitivity of your
ears. And ‘’LOUD’’ appears in the LCD when the loudness mode is activated.
MO/ ST Selector
In FM mode, Press (12) button to select MONO or STEREO mode.
When “ST" and (**) appears in the LCD display. It is “STEREO" mode.
It is switch to MONO mode when “ST" disappears only.
During the player mode, press the button to switch left speaker/ right speaker/ stereo.
Scanning/Memorizing Stations Automatically
Press (13) button to scan each stored station for 5 seconds respectively which stored in (14)
(1~ 6) number buttons. When AMS mode is carrying out. “INT" appears on display. You also can
press the corresponding number button or AMS button when your desired station is changed. It
starts playing that station.
Press and hold (13) button for more than 3 seconds to activate automatically memory storing
function. The radio automatically selects a station and has it stored in any one of the number
button (14) (1~ 6).
NOTE: The unit can be stored up to 6 stations for each band. Regarding the function of number
button, refer to (14) number buttons for details.
DVD, MPEG4, VCD, MP3, WMA, CD OPERATION
While listening to ( or watching) DVD, MPEG4, VCD, MP3, WMA and CD, just insert a Disc (with
labeled side up) into the disc slot (16), the mechanism will automatically switch on. While it is
Radio /AUX mode and a Disc was loaded, press (7) button to play the Disc.
If an ID3 disc is playing. The songs name, artist name and file name will shufft show on LCD.
DVD, MPEG4, VCD, MP3, WMA, CD OPERATION
8
Selecting Tracks/ FW. / RW
Press (10) to choose your favorite track upward or downward respectively. Pres and hold (10)
button to fast forward or rewind the track upward or downward respectively.
Playing Tracks Repeatly
Press (14) “3RPT" button to perform repeat playing function when you need to repeat playing
the track you like.
Press “3RPT" button for the first time, it will repeat playing the same track for CD, VCD, MP3
and WMA or same chapter for DVD mode."RPT1" appears on LCD.
Press “3RPT" button for the second time, entire Disc will be playing repeatly for VCD and CD
playing. entire Title will be playing repeatly for DVD playing, the entire directory for MP3 and
WMA playing “RPT All" appears on the LCD display.
Press “3RPT" button for the third time to stop repeat mode for CD, VCD and DVD playing mode,
repeat entire disc for MP3and WMA playing mode.
Press “3RPT" button for the forth, time to stop repeat mode for MP3 and WMA playing mode.
Scanning Track Automatically
During CD playback, press “2INT" button, to play the first 10 seconds of each track on the disc,
the display will show “INT”, track number and elapsed time.
Which indicates INT function is already activated.
Press “2INT" button once again to return to normal playback.
NOTE: INT doesn’t' work during playing DVD/MP3/WMA
Playing Tracks in Random Order
During playback, press “4RDM" button, and "RDM" appears on the display, which indicates
RDM function is carried out. The unit plays any track at random. Press RDM once again to return
to normal playback mode.
Stop Playing
During playback, press (14) "STOP" button to stop the playback, LCD will show "STOP"
MARK stops running .To return to normal play mode, press 1 button again.
Pause the Playback
During playback, press (14) “1PLAY" button to suspend the playback
mark stops on the
LCD display and show "PAUSE" To return to normal play node, press it again, and
Eject a Disc
During Eject button (15) to eject disc, "OPEN" will appear on LCD display.
DVD, MPEG4, VCD, MP3, WMA, CD OPERATION
9

BLUETOOTH
10
PAIRING CONNECT
Turn on car unit, put your mobile near the unit, and activate your mobile Bluetooth function. Soon
the phone will find the new Bluetooth device "CAR AUDIO”.
Input the pairing password “8888” and click OK. The phone will prompt the matching success-
ful. When the pairing connect is successful, on the LCD, it shows BT ON, and the Bluetooth logo
will stop blinking .Then you may perform the Bluetooth operation.
REMARK: depend on Bluetooth mobile, the Bluetooth system support “HSP” “HFP” “A2DP” and
AVRCP Bluetooth profile.
Handsfree phone service
If your mobile phone has matched with the unit, you can dial calls out through your mobile
phone. It will turn to unit automatically when calling come in and the calling phone number will
indicate on the LCD screen.
-Press the “BAND” button shortly to accept the call .Then you can talk with the other party
through the mic on the panel.
-Press “MUTE” button shortly to reject the call when calling come in.
-Press “MUTE” button shortly to hang up after you finish the talk.
Advance Audio distributing profile (A2DP) playing.
Through mobile and unit A2DP connected, the music playing in mobile can turn to the unit audio
system play. Press button
and in the panel can select the music track.
-Press “ ” button shortly to pause the music playing.
-Press “BAND” (mode) longly to temporarily disconnect the Bluetooth.
-Press “BAND” (mode) button longly again to reconnect the Bluetooth.
-Press “ ” button shortly to pause the music playing.
-Press “BAND” (mode) longly to temporarily disconnect the Bluetooth.
-Press “BAND” (mode) button longly again to reconnect the Bluetooth.
Phone number book.
This Bluetooth system can automatically store incoming call numbers, up to 10 phone numbers.
-Press “MUTE” (mode) button longly to enter the phone number book and press VOL button to
look up the phone number.
-Press “BAND” button once can call out you desired phone number.
Interrupt Bluetooth connection/reconnection.
Pressing the “BAND” button shortly to interrupt the Bluetooth connection when you are talking a
call and the voice can turn to mobile speaker.
Press “BAND” button again to reconnection.
NOTE: Different mobile phone has different responses. We do not guarantee all the operation of
connectable devices.
How to delete stored phone number?
The unit can store ten number of missed, rejected and ANS separately,
and the first number will auto deleted when the 11th number calling
How to use “Missed”, Rejected” Auto ANS” Functions.
Press MUTE button for 3 seconds to enter into RECEIVED /MISSED/REJECTED/ AUTO .ANS .Turn
VOL button for choosing the telephone number.
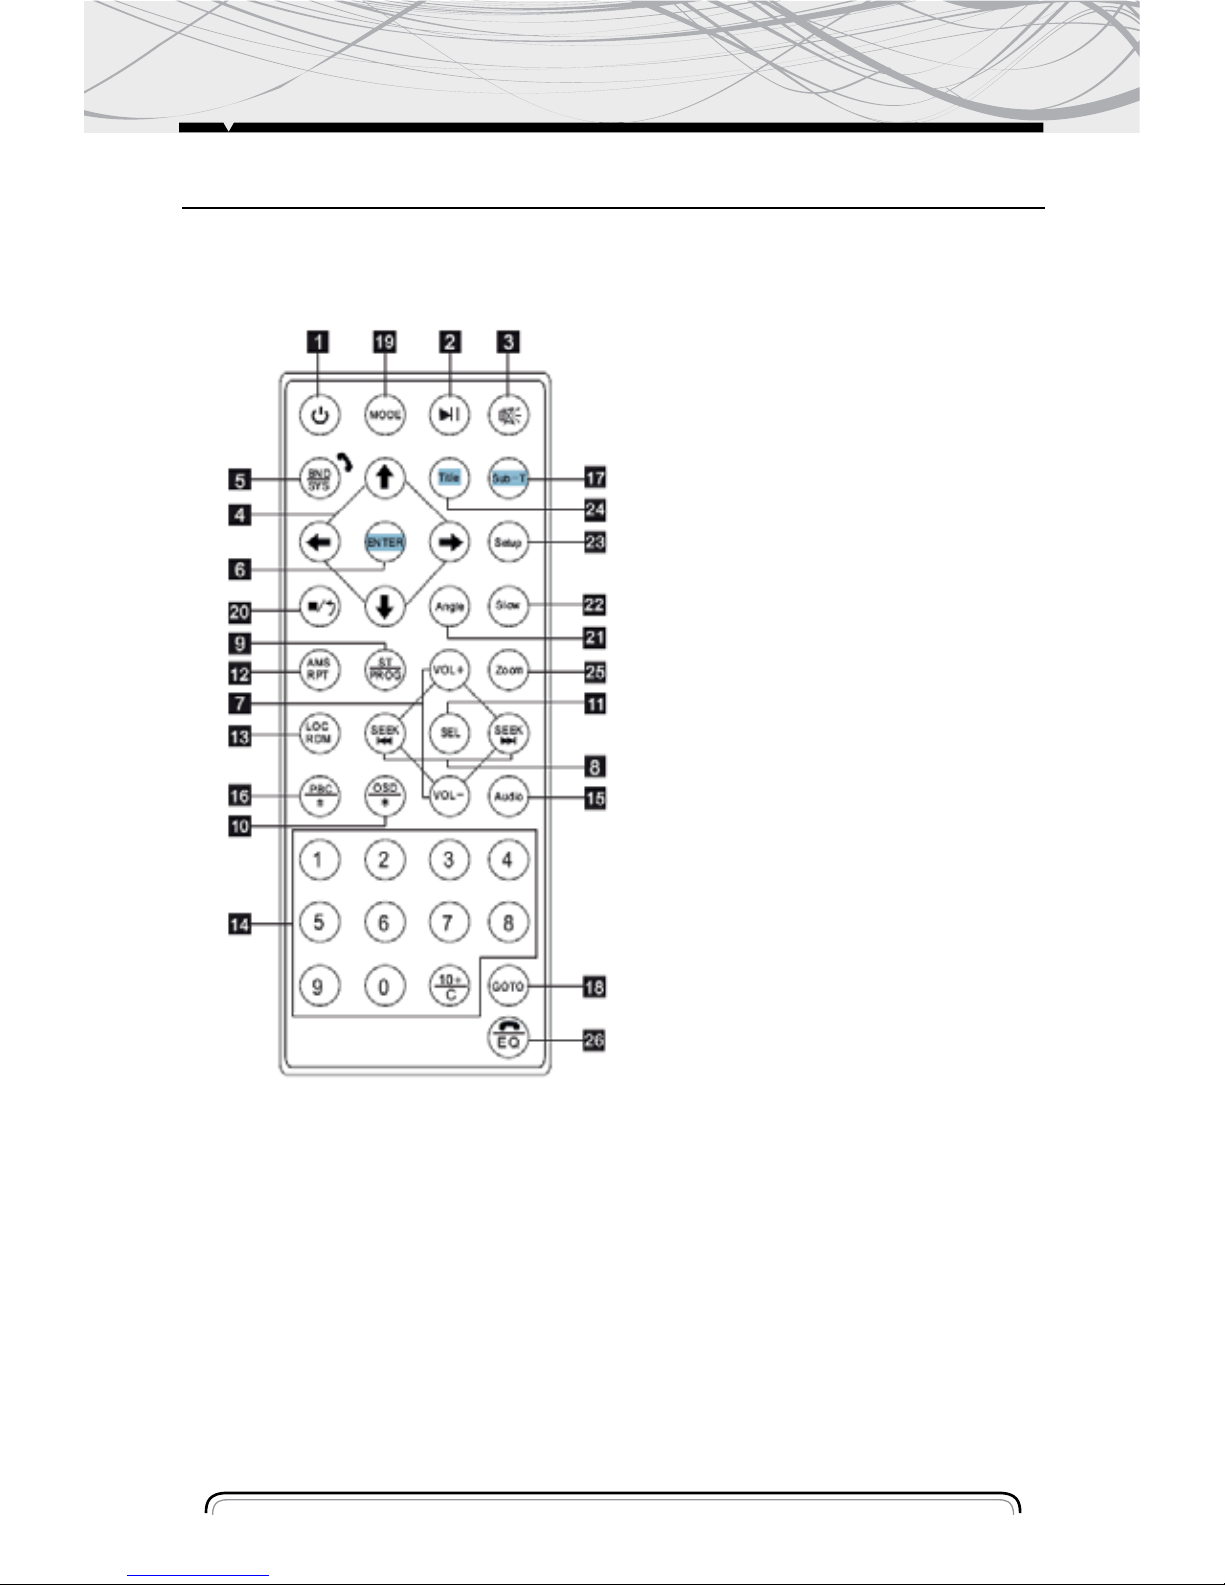
REMOTE CONTROL LAYOUT
11
1. Power Button
2. Pause/ play Button1
3. Mute Button
4. Selecting Menu Button
5. Band/ System/ Switch
6. Enter Button
7. Volume Control
8. Tuning/ Selecting/ FW/RW
9. Program Playing
10. On- Screen Display
11. Setting the Sound
12. Repeat Playing
13. Random Playing
14. Number Button
15. Audio Setting
16. PBC Menu
17. Subtitle Setting
18. Playing Time Setting
19. Mode Switch
20. Stop Button
21. Angle Setting
22. Slow Motion Play
23. Setup Menu
24. Menu Display
25. Zoom Setting
26. EQ/ Button
12
REMOTE CONTROL OPERATION
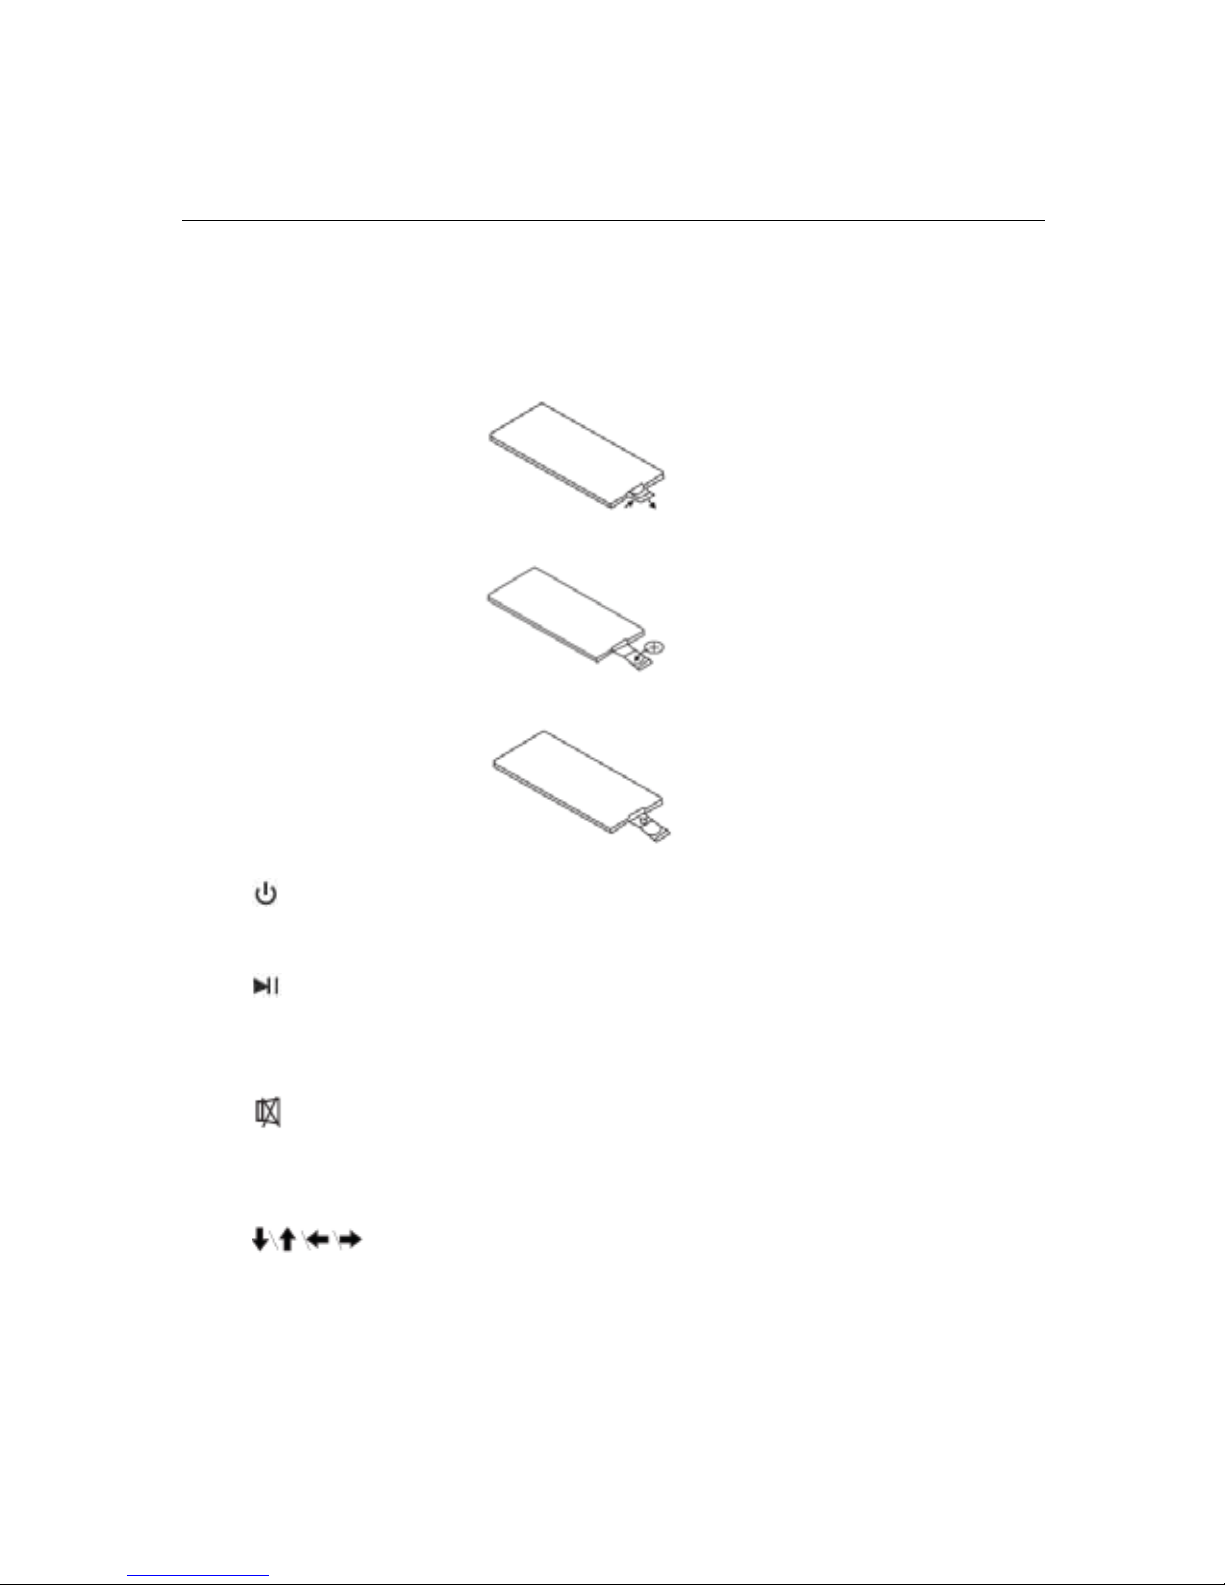
REPLACING THE BATTERY
When the operational range of the remote control becomes short or non functions while operating.
Replace a new CR2025 battery. Make sure the battery polarity before replacement.
1. Pull out Battery Holder while pressing the stopper.
2. Put the button type battery (+) mark upward into the Battery Holder.
3. Insert the Battery Holder into the Remote Control
Power Button
Press 1
button to turn power On/ Off.
Pause/ Play Button
Press 2 button to suspend the playback of CD, MP3, WMA, VCD and DVD, Press it again to
return to normal playback mode.
Mute Button
Press 3
button to cut down the sound output, press it again to resume the previous sound
level.
Menu Selector
Press 4
to select your desired menu, then press (6) (ENTER) or play button (2) to
confirm.
NOTE: This function works in main menu mode only, refer to page 12.
Band/ System Switch
During radio mode, Press 5) (BAND/ SYS) to switch receiving band.
During the player mode, press (5) (BAND/ SYS) button to switch to AUTO, PAL OR NTSC system.
13
REMOTE CONTROL OPERATION
VOLUME INCREASING/ DECREASING
Press (7) (VOL+ OR VOL-) button to increase or decrease the volume level respectively.
Tuning/ Selecting Tracks/ Fast Forward/ Rewind
During radio mode, continuously press (8) button to manual search a station downward or upward
respectively; if press and hold the button for more than 3 seconds. The radio will automatically
search a station downward of upward respectively until it finds a station.
During the playing mode press the (8) button to rewind or forward, for you to reach your desired
track quickly. When discontinuously press (8) button, you can select your desired portion downward or upward or upward respectively.
if press and hold the button for more than 3seconds, you can select you desired portion fast
forward / rewind.
Program Playing/ ST
During Disc playing mode, press (9) PROG button to enter programming page.
Press (4) button and (14) numbers button to program the tracks to be played.
NOTE: ST will only work on Radio mode.
On-Screen Display
During DVD, VCD, and CD mode, press ( 10) (OSD) button. The displayer shows Track/ Chapter,
Current Time.
NOTE: During MP3/WMA mode, only show directory and tracks.
VOL/ BAS/ TRE/ BAL/ FAD Selector
During DVD, VCD, and CD mode, Repeat press( 11) (SEL) button to select the desired mode in the
following order:
NOTE: After selecting your desired mode, you can adjust the current mode being displayed by
(VOL) button. When P-EQ mode inactivated, press SEL button to select the modes, And Bass/
Treble mode is invalid. (Show as below)
Repeat Playing/ AMS
1. Press AMS button (12),
In CD/MP3/VCD mode, repeat function is: RPT1, RPT ALL, RPT OFF.
In DVD mode, repeat function is: RPT CHAPTER, RPT TITLE.
2. Radio mode is AMS function
Random Playing
During the Disc playing mode, press (13) (RDM) button to play any track at random.
During the RADIO mode, press the button is LOCAL function.
N OTE: In VCD PCB mode and some DVD discs, Random Playing will be work.

14
NUMBER BUTTONS
During radio mode, you can select one of the 6 stored stations on each band by pressing any
one of the number button (14). During the playing mode, you can select any track directly by
Using number button (14) (0~ 10+). For example, if you need the fifteenth track, you can first
press button 10+ and press button 5, the corresponding track( 15) will be played.
NOTE: When button 10+ is first pressed. It work as 10+, it work as 20+ when pressed at the
second time, the third time. . . 30+ . . . and so on.
Left/ Right/ Stereo Selector
During the playing mode, continuously press (15) (Audio) can change the sound to left/ right
speaker or stereo mode.
PBC (Menu)
-During VCD/2. 0 mode, when press (16) (PBC) button at the first time, PBC playback starts and
the menu of entire disc appears on the TV. And then you can select your favorite track by using
number button (14~ 10+). To cancel PBC playing, press (16) (PBC) button again.
-During DVD mode, when press (16) (PCB) button, to show all tracks ‘title on TV screen.
Subtitle Selector
During DVD mode, press (SUB-T) (17) button to switch the subtitle language.
Setting Disc Playback Time
During Disc playing mode, press (18) GOTO button can set the specific time to play. Using (4)
and (14) number button to set track/Chapter or time, and press ENTER button to play.
Mode Switch
Press (19) button to switch Radio, Disc Playing USB/SD/MMC or AUX mode.
Stop the Playback
In Disc playing mode, press (20) button to suspend the playback, press it again to stop the
playback.
Multi- Angle Key
In DVD playing mode, press (21) key, you can watch the DVD content from different angle. If the
disc supports.
Slow Reverse/ Slow Advance Play
During DVD/VCD playing mode, press (22) ) key once for ½ slow advance, twice for 1/ 3, third
for 1/ 4, fourth 1/ 5, fifth for 1/ 6, sixth 1/ 7, seventh return to normal playback speed.
REMOTE CONTROL OPERATION

REMOTE CONTROL OPERATION
15
TITLE KEY
In DVD playing mode, press (24) key to show all tracks' title on TV screen. Then press (14) (0~
10+) key or press (4) key to choose your desired track number and press (18) (ENTER) key or (2)
key to start.
NOTE: No title display in MP3, WMA, CD mode.
Zoom Key
In DVD/VCD playing mode, press (25) key once for 2 x zoom, twice for 3 x zoom, third time for
4 x zoom, fourth time for 1/ 2 x zoom, fifth time for 1/ 3 x zoom, sixth time for 1/ 4 x zoom,
seventh time to cancel the zoom mode .And you can pan the picture by pressing the cursor keys.
NOTE: No zoom function for MP3, WMA, CD playing mode.
SETUP
1.Press SETUP ( 23) key of remote control in the stop mode. (Press the STOP button twice to
ensure the player is under STOP mode.
2.The main page of setup menu is displayed.
3.Select the preferred item by using the ( 4) button
4.Press (6) ENTER button
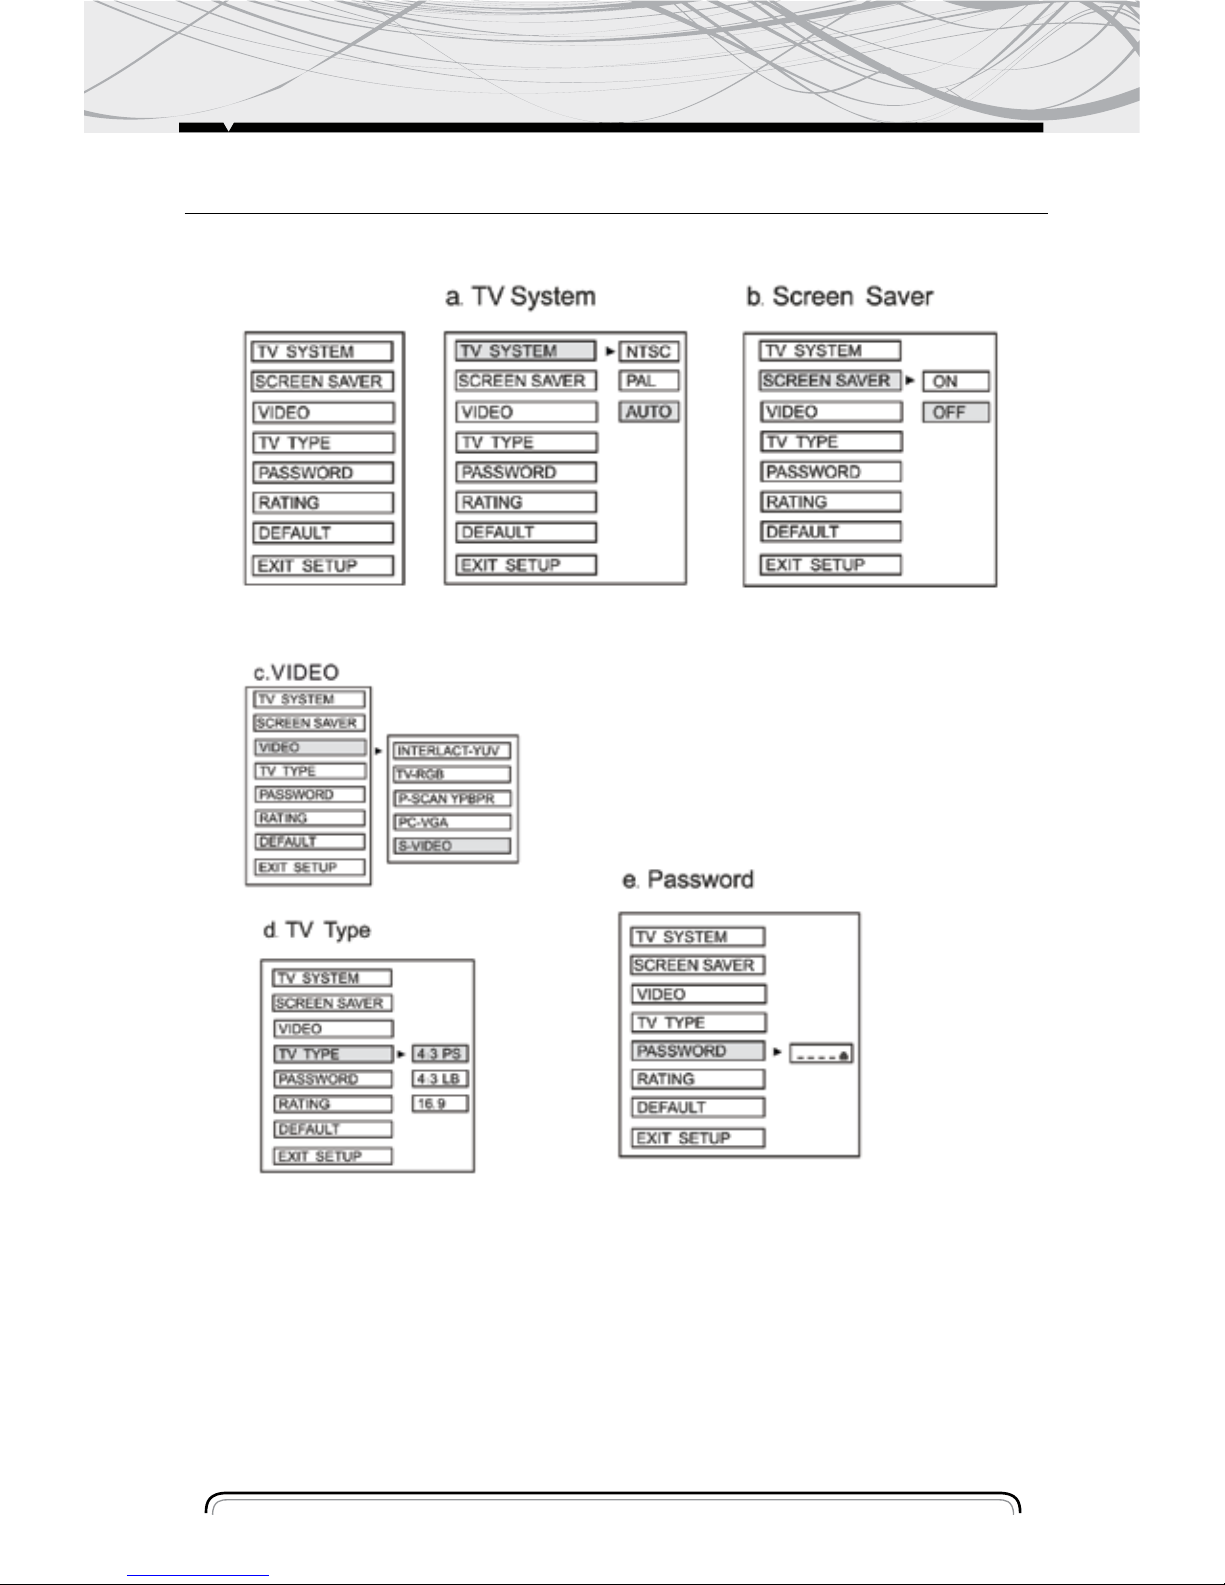
A. System Setup:
This setup page includes all the items of TV system, Screen saver ,TV type,
Password, Rating & Default features. The detail please refers to SYSTEM SETUP MENU.
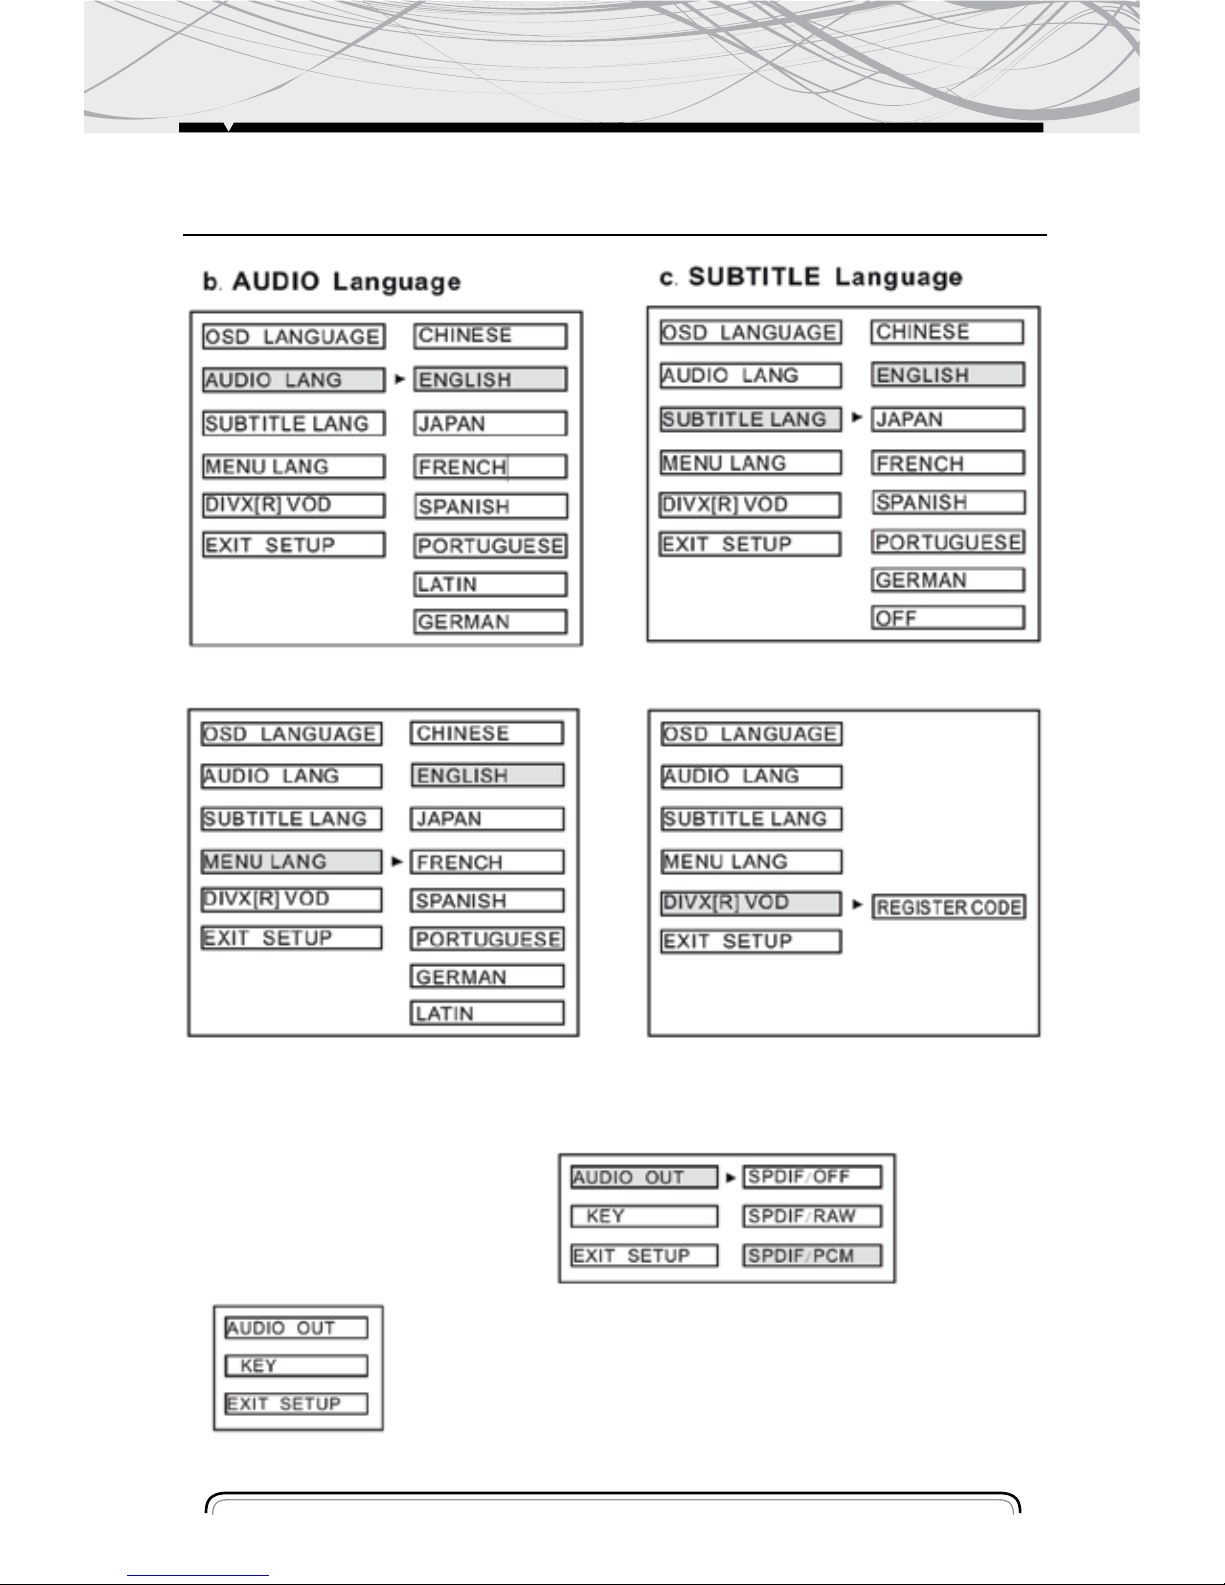
B. Language Setup:
This setup page includes all the items of OSD Language, Audio Language, Subtitle Language
and Menu Language features. The detail please refer to LANGUAGE SETUP MENU
C. Audio Setup:
This setup page includes all the items for AUDIO. Please to AUDIO SETUP MENU.
D.Video Setup:
This setup page includes all the items for VIDEO. The details please refer to VIDEO SETUP MENU.
E. Digital setup
EQ Button
Press (26) button to select PRE-EQ:
FLAT- POP - CLASS - ROCK MODE
16
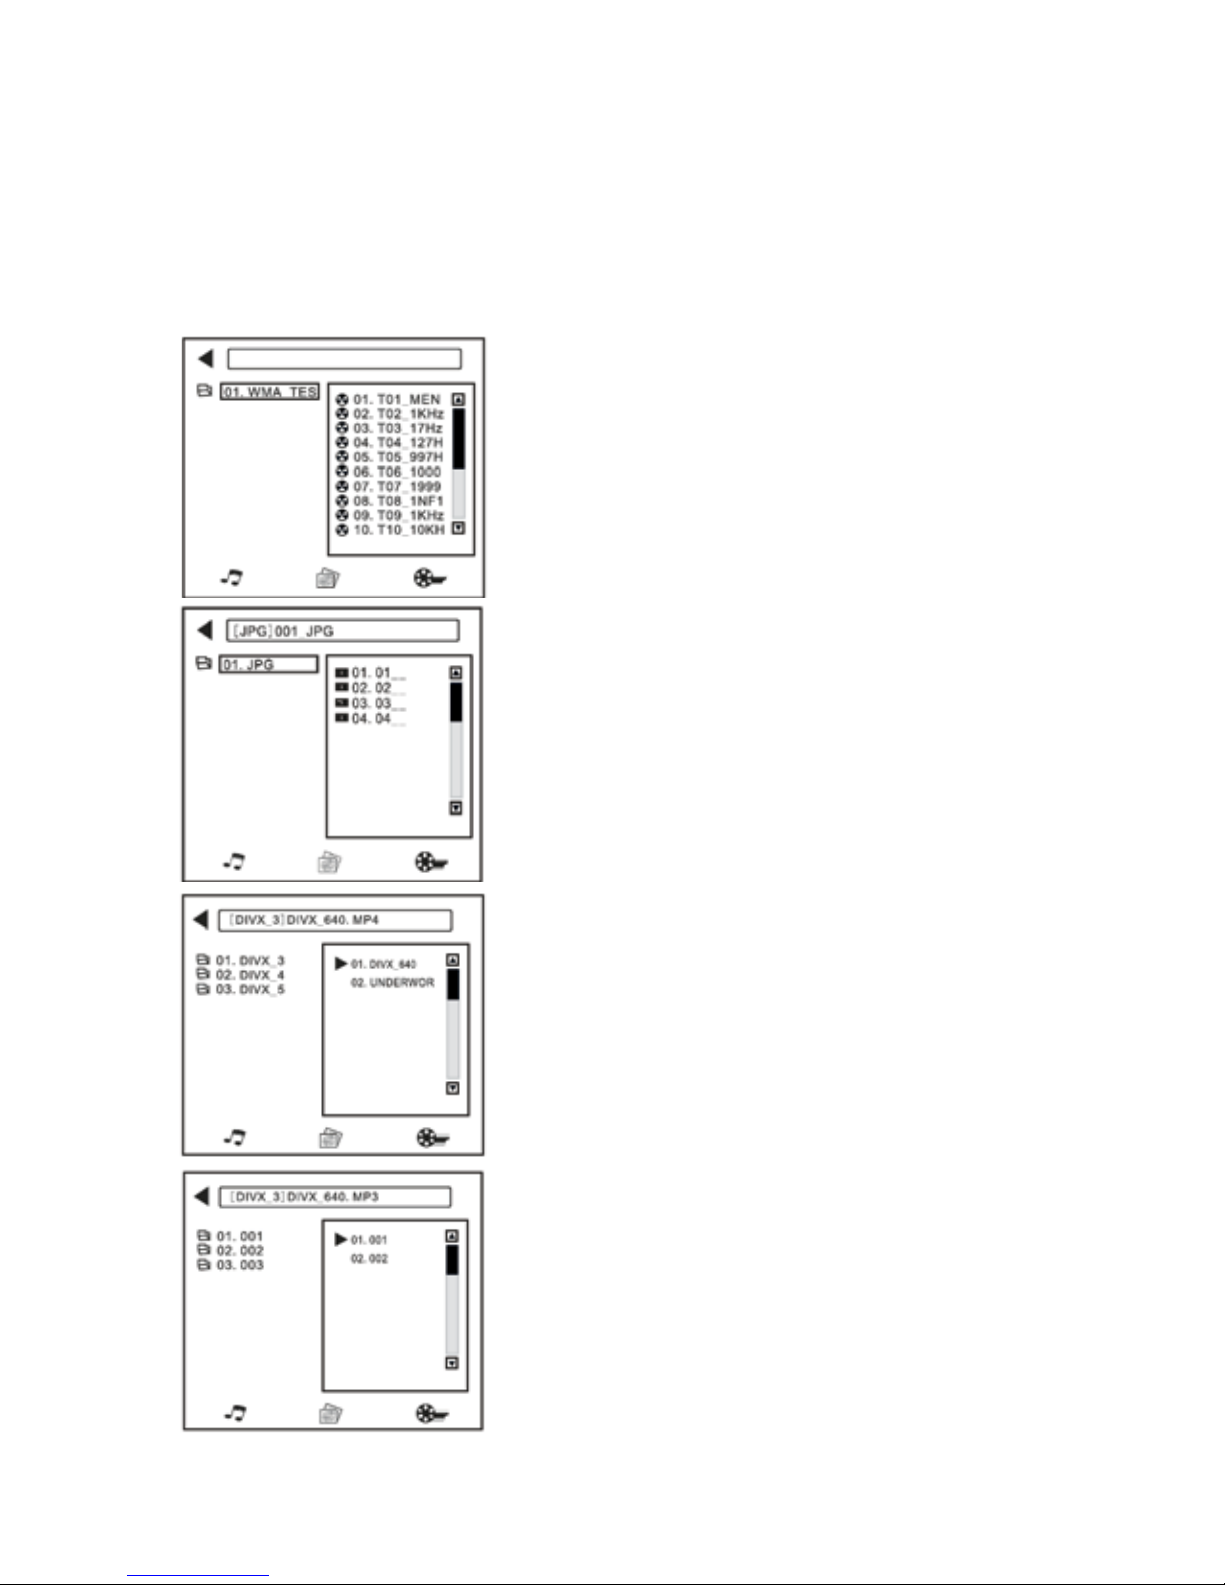
Mixed File Format Disc
While you listen to (or watching) mixed file format disc which is together with MP3, WMA, JPG or
MPEG4 formats, just insert the disc into the disc slot. The mechanism will automatically switch
on. For details, please refer to the following steps:
Playing Music Files
In the right menu, please move the arrow or on your favorite
track then press ENTER button or directly press NUMBER
BUTTONS to make the selection.
NOTE: If you press the right key, you will enter the status of selecting
playing music, picture or video format files. Move the left / right key
on your desired file and press ENTER button to play. If you press the
left key, you will return to directory. Continue pressing the left key,
you can also enter the referred status just now.
Playing Picture Files
You can press NUMBER BUTTONS directly to select your
favorite picture files or move the arrow on that file and
press ENTER button. Then the picture will be displayed on
the monitor by pressing you can adjust to different angle to
enjoy picture. Press STOP button to return to last status.
NOTE: If you continue pressing right key, you will enter the status of
selecting playing music, picture or video files. Move the left / right
key on your desired and press ENTER button.
Press the play button to playing picture automatic.
Playing Video Files
You can move the arrow on the video file that you would like
to watch, then press ENTER button or play button to confirm.
Or press the left key to return to directory to choose another
file at other directory.
Press Play button to playing picture.
TRACK SEARCH MODE
In MP3 / WMA mode:
-In one file, press button (8) select the track.
-In several files, press button to select list, and press button to select number of you desire song. Then pres ENTER to
play the song.
SETUP
17
A SYSTEM SETUP
Enter the password and press
ENTER button. Type the old
password (the install factory
code is 0000) and key in 4
characters password now you
want to use, and type again to
confirm.
1)4:3 PS Played back in the PAN & SCAN
style (If connected to wide-screen TV, the left
and right edges are cut off.)
2)4:3 LB Played in back in LETTERBOX
style. (If connected to wide-screen TV,
black bands appear at top and button of the
screen.
3)16:9 Select when a wide-screen TV set is
connected.
This player play disc recorded in either
PAL or NTSC format. Select NTSC format
when you connected to NTSC TV. Select
PAL format when you connected to PAL TV.
If You select AUTO, the unit will auto select
the format (PAL / NTSC) according to your
TV system.
Select the SREEN SAVER output ON / OFF.
18
SETUP
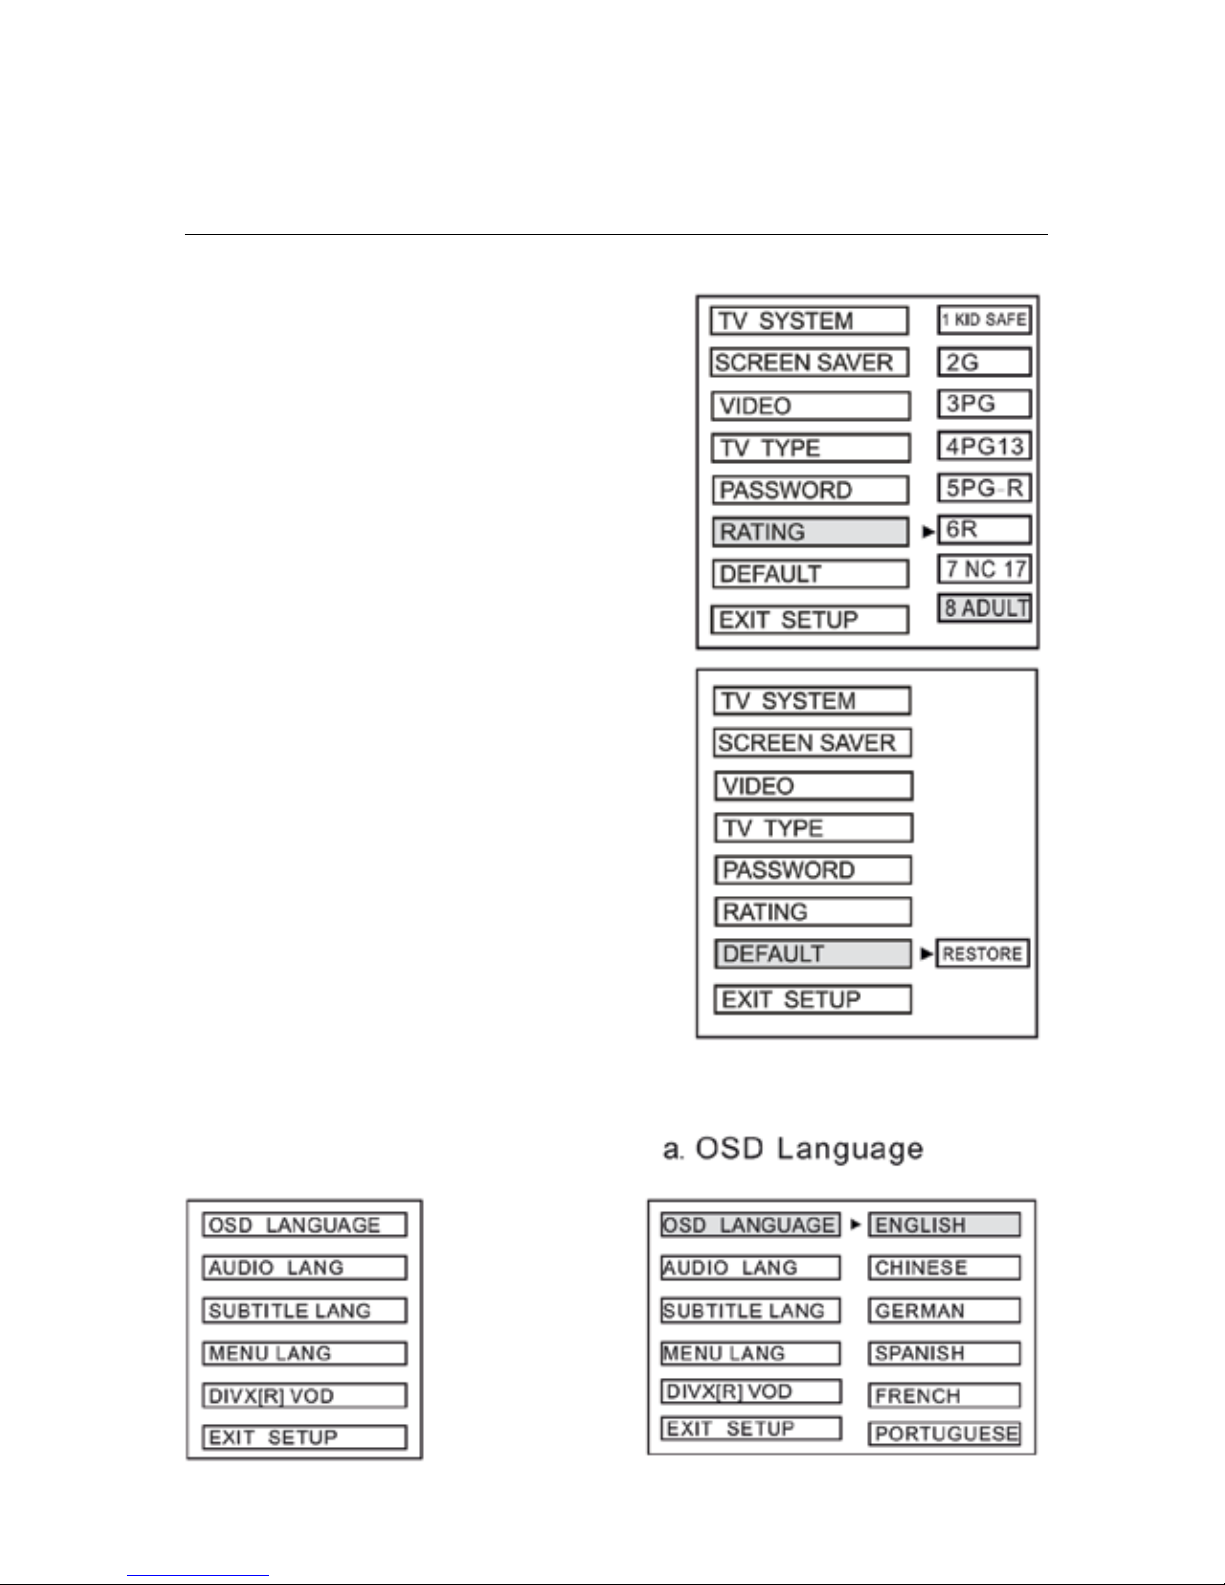
F. Rating
Select suitable guidance rating by the cursor button and
confirmed by pressing ENTER button.
Rating 1: [Kid Safe]
Select this when the programs are safe to all kid view.
Rating 2: [G]
Select this that allows admission to person of all ages.
Rating 3[PG]
Select this that needs parental guiding their children.
Rating 4[PG13]
Select following when children under 13 are forbidden
to view.
Rating 5[PG- R]
Select this when the" PG- R" was printed on the DVD
disc.
Rating 6 [R]
Select this when children under 17 must be guide to
view by their parents.
Rating 7[NC- 17]
Select this when children under 17 are forbidden to view
Rating 8[Adult]
Select this, when only allows admission to all adults.
G. Default
Recover acquiescing in state when leaving the factory
B. LANGUAGE SETUP
Select the preferred OSD Language,
Audio Language, Subtitle Language
and Menu Language by using the
cursor buttons.
19
SETUP
This is to activate the audio output from
ANALOG / OPTICAL mode to SPDIF/ RAW
mode or SPDIF/ PCM mode.
C. AUDIO SETUP
SPDIF/OFF
Analog or optical output port
all has not output signal.

20
SPDIF/ RAW:
When the player is connected with the power
amplifier by the analog or optical port, please
select this item; when the playing disc which is
recorded by Dolby Digital, DTS or MPEG
recoding system, the analog or optical output
signal of the unit will be the same as the
digital signal (RAW format) of the playing
disc. At the same time, the power amplifier
you connected must have the decode function
of Dolby Digital, DTS or MPEG.
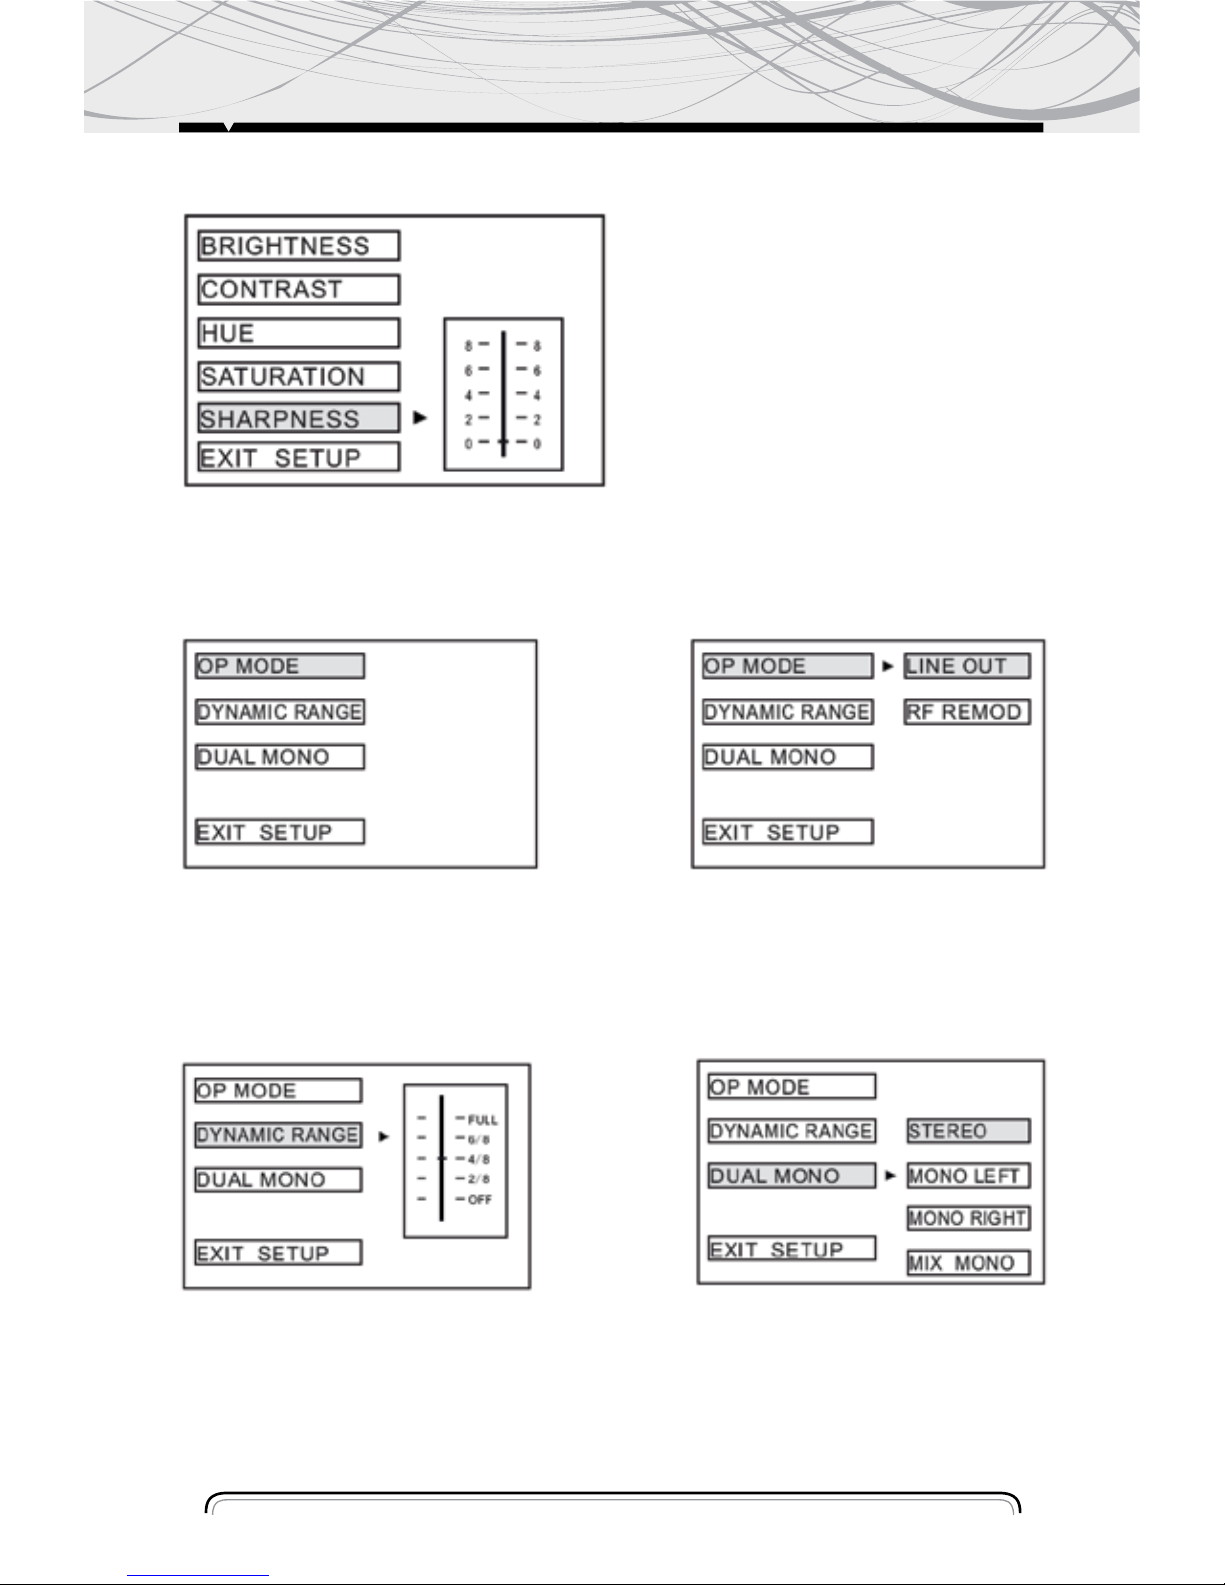
This is for the user to set Brightness Contrast,
Hue and Saturation of the picture by pressing
the arrow left/ right button.
Press Enter but ton to con firm the change.
NOTE: Only on TV/ AV mode, the video setup
is available
SPDIF/ PCM:
When the player is connected with the 2 channel, digital stereo amplifier, please select this item;
when the playing disc which is recorded by Dolby Digital or MPEG recording system, the analog
or optical output will be modulated to 2 channel output by PCM.
21
b. Dynamic Range
This is for the user to set operation mode,
dynamic range compression and stereo
mode.
To set the operating modes for Dolby
Digital decoder.
To set the stereo mode.To set the dynamic range
compression.
e. Sharpness
c. Dual Mono
a. OP Mode
E. DIGITAL SETUP
INSTALLING
22
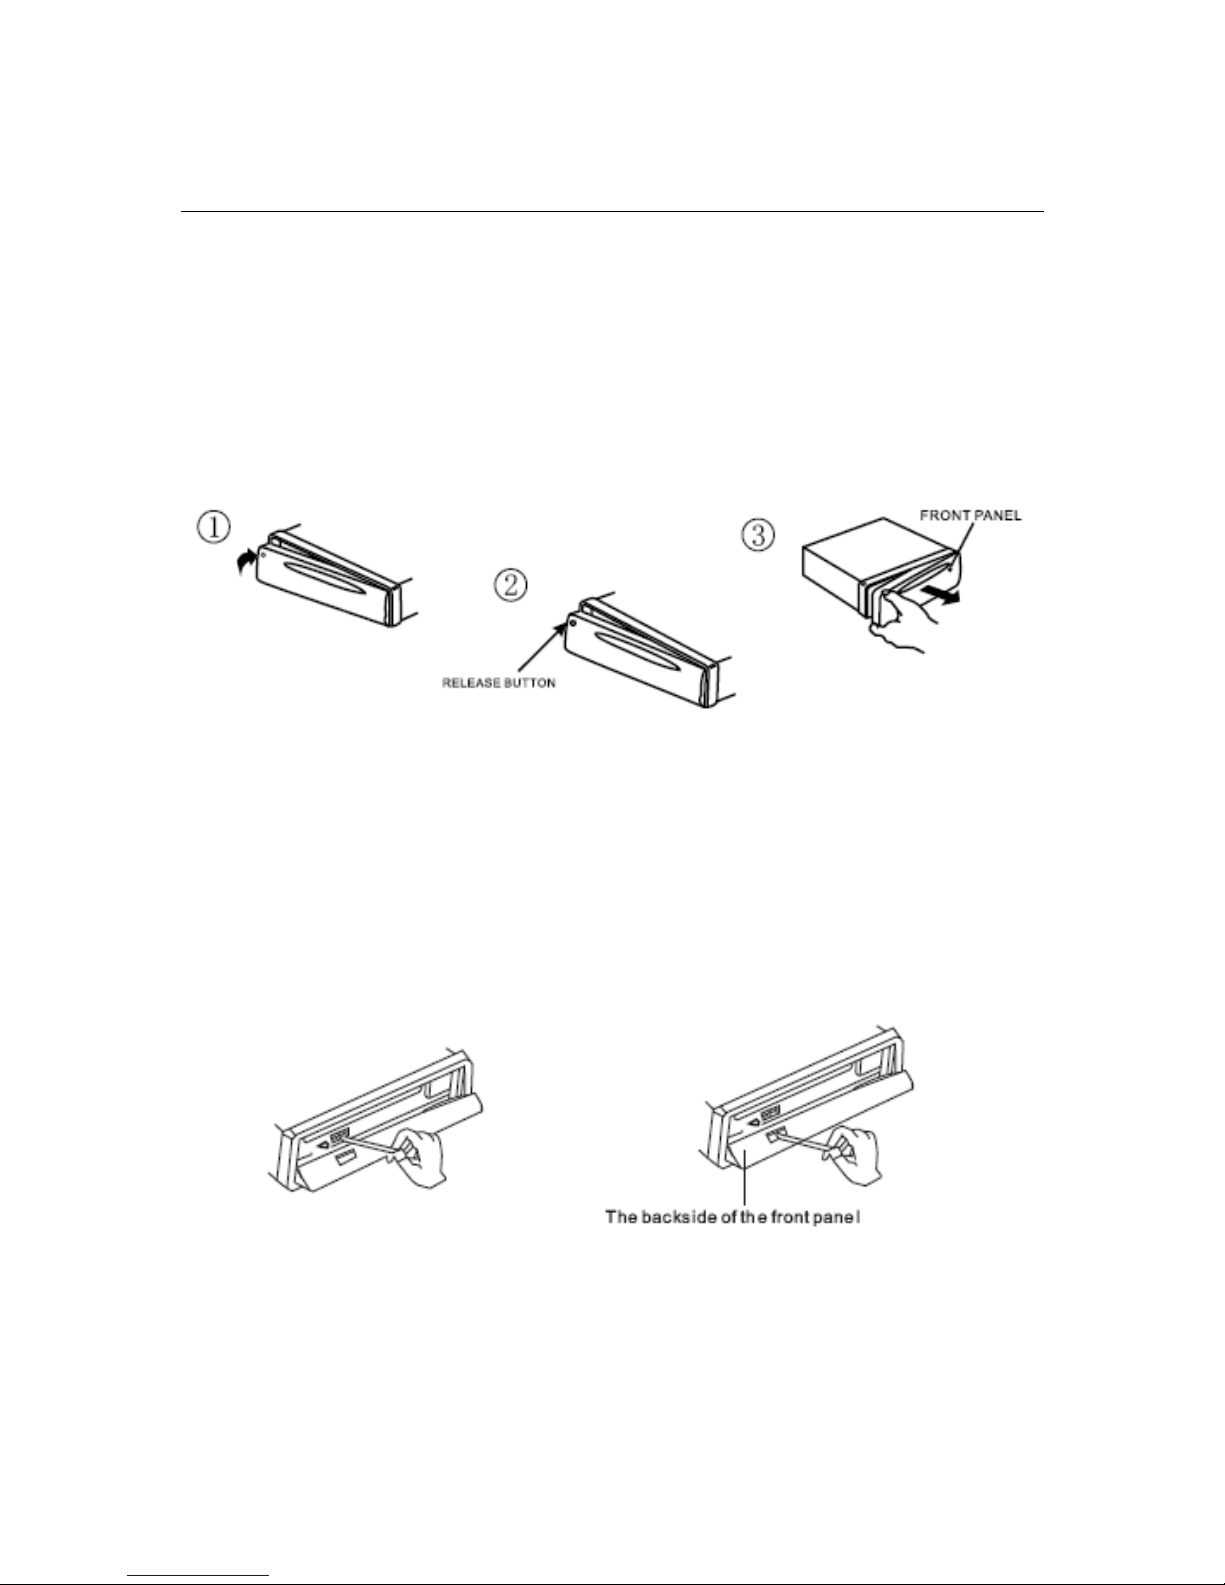
INSTALLING THE FRONT PANEL
To install the front panel, insert the panel into the housing and make sure the panel is properly
installed, otherwise, abnormalities occurs on the display or some keys will not function properly
CLEANING THE CONNECTOR
If the connector between the main unit and the front panel is dirty, it may result the unit in abnormal working condition. To avoid such problem happening, please detach the front panel, and
clean the connector with an alcohol swab. Gently clean and avoid damaging the connector.
NOTE: For safekeeping, always shut down the generator and take out the key from the ignition
before cleaning.
And never keep your finger of any metal device in touch with the connector directly.
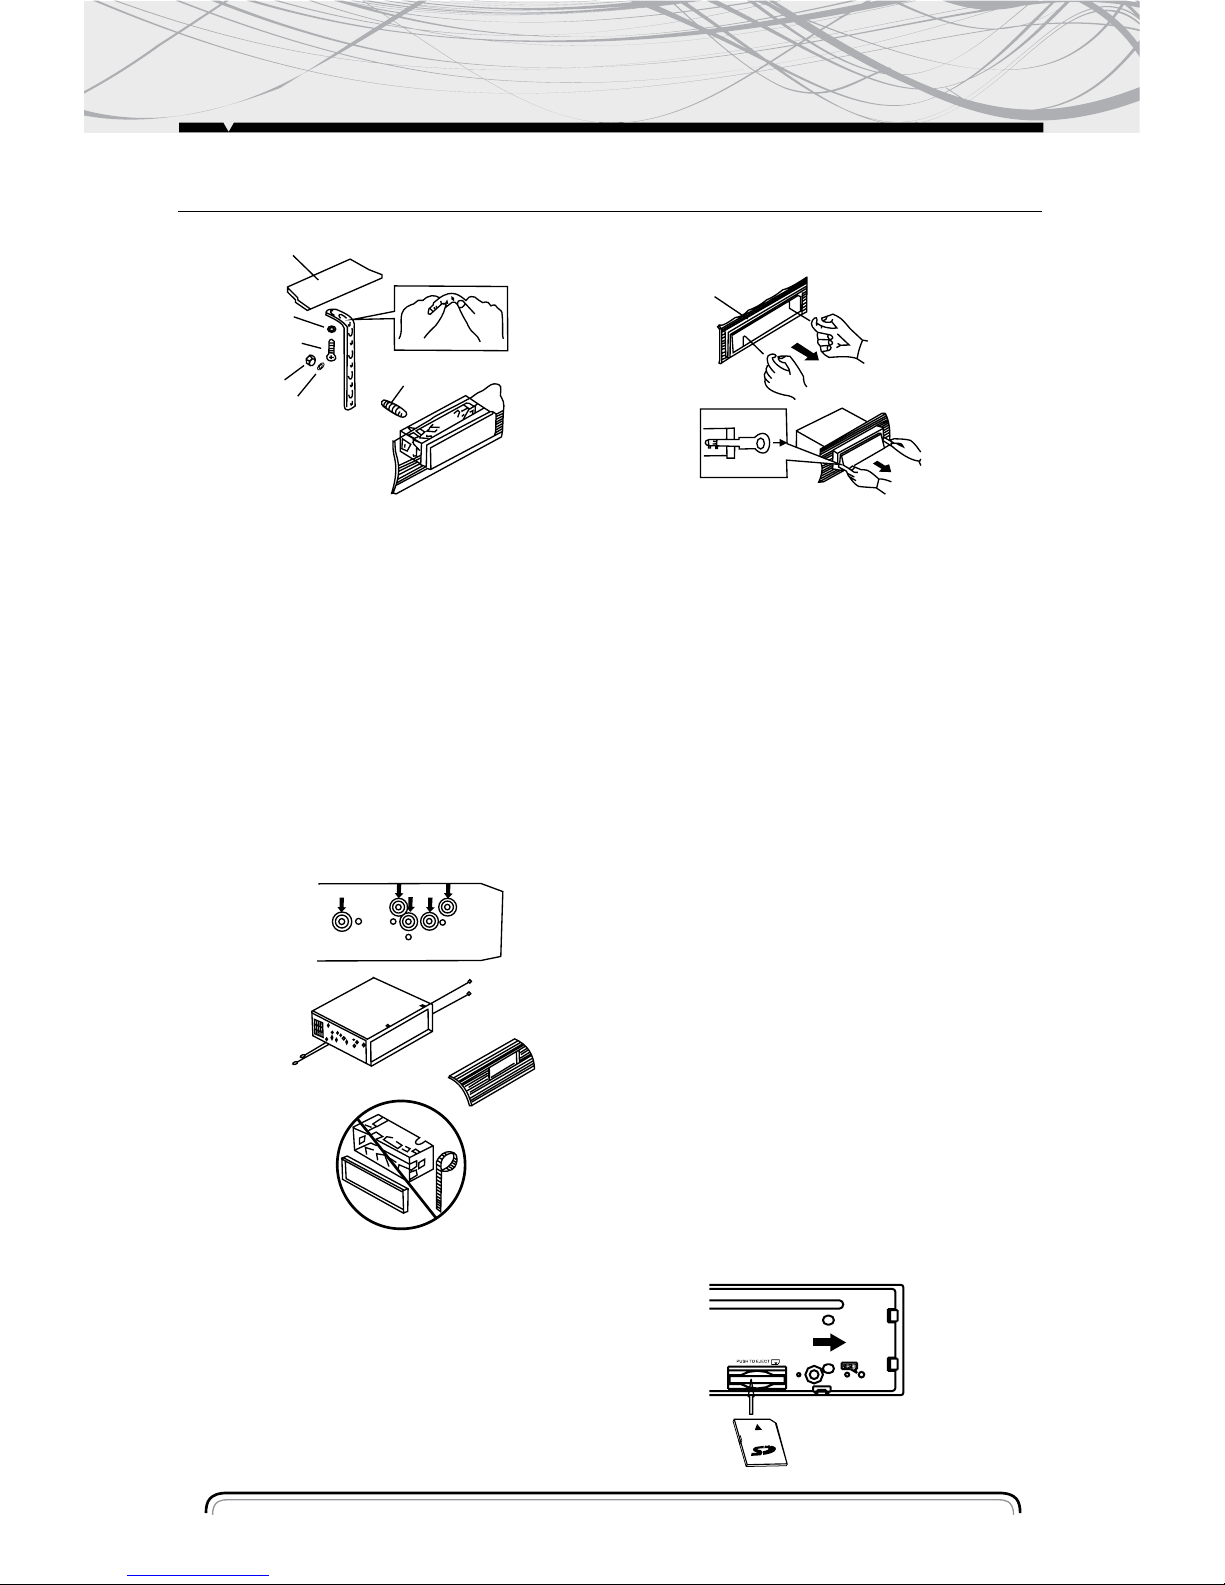
UNIT INSTALATION
1-Marco
2-Inserte los dedos en la ranura en la parte
delantera del marco y tire para remover el
marco. (Cuando lo vuelva a colocar, coloque
el lado con la ranura hacia abajo y ajústelo)
3- Palanca
Inserte las palancas provistas en las ranuras
a ambos lados de la unidad y como se
muestra en la figura hasta que ajusten con
un clic. Al tirar de las palancas es posible
remover la unidad del tablero.
Ajuste de la unidad al soporte de montaje de
radio provisto por la fábrica:
1- Seleccione la posición donde los agujeros
de los tornillos del soporte y los agujeros de
la unidad se encuentren alineados y ajuste
los tornillos en dos lugares en cada lado.
Utilice tornillos de 5x5 mm. o de 4x5 mm.
2-Tornillo
3-Tablero o consola
MONTAJE TRASERO DIN (Método B)
Instalación utilizando los agujeros a ambos
lados de la unidad.
1
2
3
4
5
6
7
(
Fig.2
)
2
1
3
(Fi g.3)
2
3
2
Remover la unidad
1-Tablero
2-Tuerca (5mm)
3- Arandela
4-Tornillo (5x25 mm)
5-Tornillo
6-Correa
Asegúrese de utilizar la correa para
ajustar la parte trasera de la unidad en su
lugar. Se puede doblar la correa con la
mano hasta obtener el ángulo deseado.
7- Arandela plana.
ENTRADA DE TARJETA SD
El ángulo oblicuo SD mantiene la
exposición hacia arriba. Colóquela dentro
de la ranura SD y presione nuevamente
para retirar.
23
 Loading...