


MR2800-W
AMR MODEM CARD
Users Manual
Version 1.2

P/N: 040-512404-121 (February 2001)

ContentsContents
Contents
ContentsContents
Preface......................................................................................... 5
1. Introducing MR2800-W .............................................................6
2. Before You Begin ........................................................................7
2.1 Minimum System Requirements.............................................7
2.2 Safety Precaution .................................................................8
2.3 Installation Notes ................................................................ 8
3. Setting Up Your Modem .............................................................9
3.1 Configuring Your Modem....................................................... 9
3.2 Installing Your Modem.......................................................... 11
3.3 Connecting Your Modem .......................................................14
4. Installing Your Modem Driver ...................................................15
4.1 Installing Your Modem Driver - For Windows® 95...................15
4.2 Installing Your Modem Driver - For Windows® 98 / 98
Second Edition ....................................................................18
4.3 Installing Your Modem Driver - For Windows® Me .................. 20
4.4 Installing Your Modem Driver - For Windows NT® 4.0 ............22
4.5 Installing Your Modem Driver - For Windows® 2000 ............... 26
5. Verifying Your Modem................................................................29
5.1 Verifying Your Modem - For Windows® 95 / 98 / 98
Second Edition / Me............................................................. 29
5.2 Verifying Your Modem - For Windows NT® 4.0 .......................31
5.3 Verifying Your Modem - For Windows® 2000 ......................... 32
6. Uninstalling Your Modem Driver ............................................... 34

Appendix A - Card Layout................................................................... 35
Appendix B - Frequently Asked Questions .........................................36
Appendix C - Troubleshooting Guide .................................................39
Appendix D - Technical Specifications ...............................................41
D.1 Main Features .....................................................................41
D.1.1 Drivers Support .......................................................... 41
D.1.2 Integrated 56000 BPS Data/Fax Modem ...................... 41
D.2 Interfaces ............................................................................ 42
D.2.1 External connectors .................................................... 42
D.3 Environmental ..................................................................... 42
D.3.1 Temperature: ............................................................. 42
D.3.2 Humidity ...................................................................42

1 — Introduction
Preface
Product warranty does not apply to damage caused by lightning, power surges or wrong voltage usage.
This manual contains the information to guide you setup your modem successfully.
Chapter 2 - Before You Begin check through with you the minimum system requirements
needed for you to install your MR2800-W modem card. It also contains the safety and
installation notes that you need to be conscious of.
Chapter 3 - Setting Up Your Modem contains 3 sub-sections, Configuring Your Modem,
Installing Your Modem and Connecting Your Modem. Please follow strictly to the
sequence of setting up.
Chapter 4 - Installing the Modem Driver contains screen shots in every installation steps
that enable you to install your modem driver easily. The operating systems that are
supported by the driver are Windows
Windows
®
2000.
Chapter 5 - Verifying Your Modem gives instructions to verify if the modem driver has been
successfully installed.
With the sections Frequently Asked Questions (FAQ) and Troubleshooting Guide, you
should be able to setup your modem in a breeze!
®
95, 98, 98 Second Edition, Me, NT®4.0 and
For further technical details on your card, you may refer to the ReadMe.txt file found in
your MR2800-W Installation CD.
○○○○○○○○○○○○○○○○○○○○○○○○○○○○○○○○○○○○○○○○○
5

Chapter 1
Introducing MR2800-W
Congratulations on your purchase of MR2800-W Modem!
With the MR2800-W alone, you can perform a comprehensive range of modemrelated functions including data communications, sending and receiving of faxes.
The intensive demands of todays Internet applications will no longer be a bottleneck.
Using MR2800-W, you can now download graphic intensive web pages, high
bandwidth audio and video files as well as large file size software programs at speeds
of up to 56Kbps.
○○○○○○○○○○○○○○○○○○○○○○○○○○○○○○○○○○○○○○○○○
6
Chapter 2
Before You Begin
This chapter contains information that you need to know before
installing your modem. It is important that you go through them.
2.1 Minimum System Requirements
• IBM PC-based computer with Intel
®
Celeron 366MHz Socket 370 processor
• 1 free AMR-Bus slot
• 1 CD-ROM drive
• 32MB RAM
• 10MB hard disk space (system files and modem drivers only)
• Windows
○○○○○○○○○○○○○○○○○○○○○○○○○○○○○○○○○○○○○○○○○
®
95 / 98 / 98 Second Edition / Me / NT®4.0 / 2000
7

2 — Before Y ou Begin
2.2 Safety Precaution
• Do not remove your card from its protective bag until you are ready to install it.
• Always try to hold your card by its edges. Avoid touching any electronic components
on your card.
• Static electricity can cause permanent damage to your card. To prevent such a
damage, you must ground yourself during the installation:
» Use a grounding strap - a coiled wire with a clip at one end and an elastic
strap at the other. Wear the strap around your wrist and attach the clip to
any non-painted metal surface of your computer chassis.
» If you do not have a grounding strap, touch any non-painted surface of your
computer chassis before you begin installation, and again every minute or so
until the installation is completed.
2.3 Installation Notes
• The graphics and screens illustrations shown in this easy start may differ from what
you see in your system, but the steps still apply.
• A screwdriver is required (to open up your computer chassis).
• The documentation for your computer should come in handy during the installation.
Have it ready by your side.
• If you have an existing non Plug-and-Play modem installed in your computer, you
must first un-install its modem driver before you remove the card. Refer to the
documentation of your existing modem for details.
If your existing modem is Plug-and-Play, you may proceed to install your new
modem.
○○○○○○○○○○○○○○○○○○○○○○○○○○○○○○○○○○○○○○○○○
8

Chapter 3
Setting Up Your Modem
This chapter contains information on how to configure, install and
connect your modem card for Internet surfing.
3.1 Configuring Your Modem
1. Static electricity can cause permanent damage to your card. You have to
ground yourself during the installation by touching any non-painted surface of the computer's chassis every minute or so.
2. It is important that you carry out the following steps to configure your
modem card BEFORE proceeding to install it.
3. Power off your computer and any connected devices before connecting
your modem card!
MR2800-W Modem Card needs to be configured as either Primary or Secondary device
before you can proceed to install the card on your PC.
To determine the choice of configuration, you need to refer to the BIOS Setup details on
your Motherboard Users Manual. Check for the presence of AC97 Audio** setting in
the BIOS Setup. (Not all motherboards will support AC97 Audio).
** your system may show AC97 Audio controller
○○○○○○○○○○○○○○○○○○○○○○○○○○○○○○○○○○○○○○○○○
9
3 — Setting Up Your Modem
a ) If AC97 Audio is present, (that is you can see it in the BIOS Setup of your
motherboard Users Manual), you may configure your card as either
Primary or
Secondary device.
i) If AC97 Audio is Enabled, you must configure your card as a
Secondary
device.
Some systems may have additional onboard audio chips. 'AC’97 Audio' and
'Onboard Audio' are two different options in the BIOS Setup. When system
is using Onboard Audio, AC'97 Audio is disabled.
ii) If AC97 Audio it Disabled, you must configure your card as a
Primary
device.
(See Figure 1.1 - Configuring MR2800-W Modem Card for Primary/Secondary Device)
b) If AC97 Audio is not present (that is you are not able to see it in the BIOS Setup
of your motherboard Users Manual), you must configure your card as
Primary
device.
(See Figure 1.1 - Configuring MR2800-W Modem Card for Primary/Secondary Device)
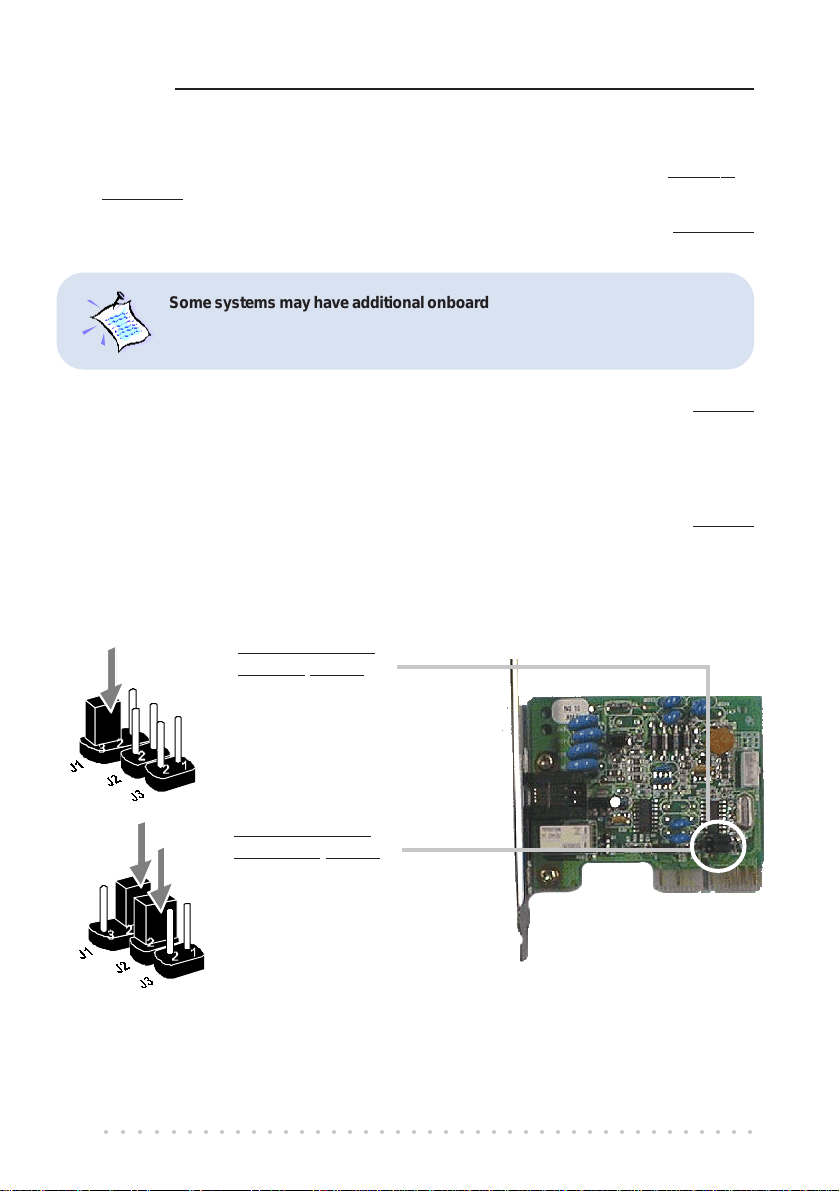
To configure as a
Primary device:
On your card, insert
the jumper onto
Pin 2 and 3 for J1.
To configure as a
Secondary device:
On your card, insert the
jumpers onto Pin 1 and
2 for both J1 and J2.
Figure 1.1 - Configuring MR2800-W Modem Card for
Primary/Secondary Device
○○○○○○○○○○○○○○○○○○○○○○○○○○○○○○○○○○○○○○○○○
10
3.2 Installing Your Modem
Power off your computer and any connected devices before installing your
modem!
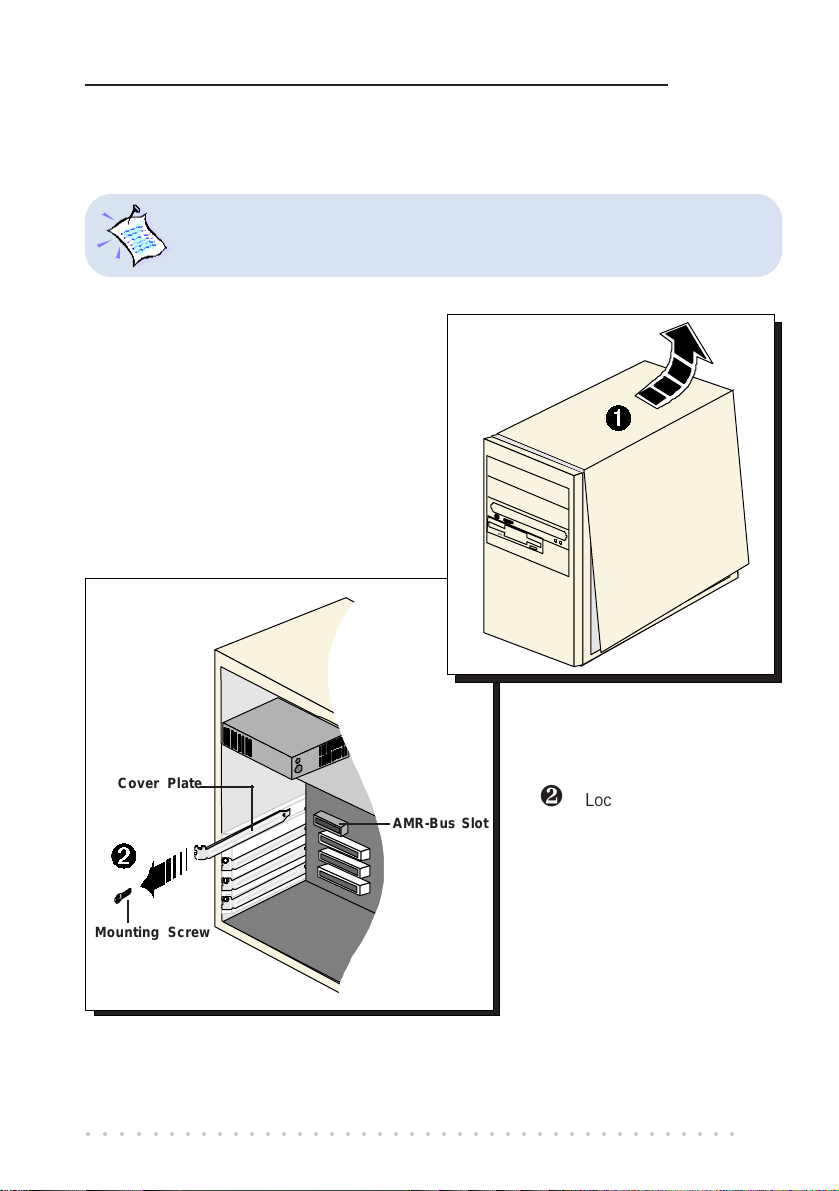
¶ Remove the cover of your computer.
3 — Setting Up Your Modem
Cover Plate
· Locate the AMR-Bus slot
AMR-Bus Slot
Mounting Screw
○○○○○○○○○○○○○○○○○○○○○○○○○○○○○○○○○○○○○○○○○
and remove its cover
plate. Keep the
mounting screw to
secure your card later.
11
3 — Setting Up Your Modem
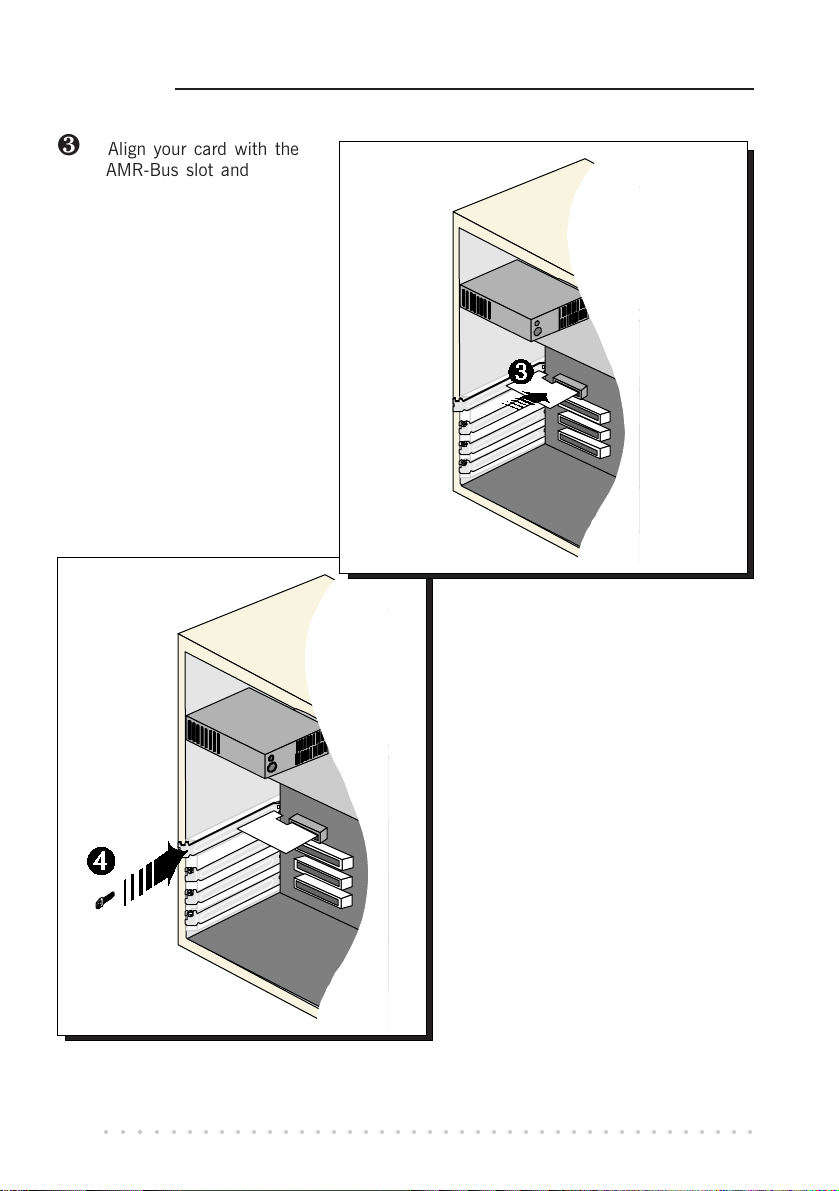
¸ Align your card with the
AMR-Bus slot and firmly
push it in. If the card
does not slide in, do not
force it. Make sure that
the card is lined up
properly and try again.
¹ Secure your card to your
computer chassis with the
mounting screw.
○○○○○○○○○○○○○○○○○○○○○○○○○○○○○○○○○○○○○○○○○
12
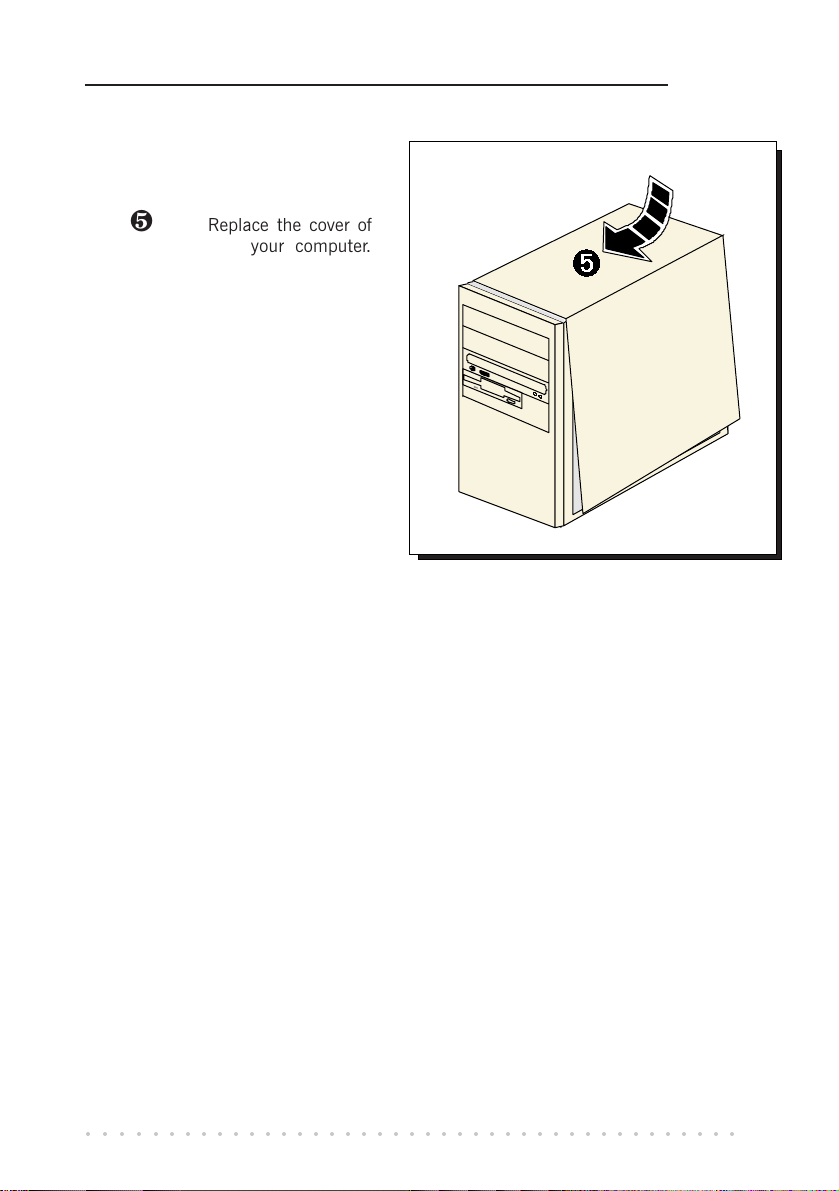
º Replace the cover of
your computer.
3 — Setting Up Your Modem
○○○○○○○○○○○○○○○○○○○○○○○○○○○○○○○○○○○○○○○○○
13

3 — Setting Up Your Modem
3.3 Connecting Your Modem
LINE - to Telephone Wall Socket
¶ Connect one end of the telephone extension cable to your modem card and the
other end to your telephone wall socket.
This completes the setting up of your modem. Please proceed to the next chapter to install
your modem driver.
○○○○○○○○○○○○○○○○○○○○○○○○○○○○○○○○○○○○○○○○○
14

Chapter 4
Installing Your
Modem Driver
This chapter contains information on how to install the
modem driver in Windows® 95, 98, 98 Second Edition, Me,
4.1 Installing Your Modem Driver -
NT®4.0 and Windows® 2000.
For Windows® 95
1
Start your Windows. Windows will
detect your newly-installed modem
and prompts for its driver.
Place the Installation CD into
CD-ROM drive and click Next.
○○○○○○○○○○○○○○○○○○○○○○○○○○○○○○○○○○○○○○○○○
15

4 — Installing Your Modem Driver
2
Click Other Locations... to specify
the driver path.
4
Click Finish to start the
installation.
Click Browse... . Navigate to
'Win9x' directory on your
Installation CD and click OK.
Click OK again to proceed.
At the Insert Disk
prompt, click OK.
3
5
○○○○○○○○○○○○○○○○○○○○○○○○○○○○○○○○○○○○○○○○○
16

Windows will start copying the files.
To ensure your modem functions in a stable condition, check the country
setting for your modem. It has to follow the country you are currently in.
7
From the Control Panel (Start > Settings), double-click on the Modem
Country Selection icon.
At the Country field, select the country that you are currently in. Click Apply,
followed by OK.
4 — Installing Your Modem Driver
6
Ensure that the path specifies
'Win9x' on your Installation CD
and click OK.
This completes the driver installation in Windows® 95. Please proceed to the next chapter
to verify your card.
○○○○○○○○○○○○○○○○○○○○○○○○○○○○○○○○○○○○○○○○○
17

4 — Installing Your Modem Driver
4.2 Installing Your Modem Driver For Windows® 98 / 98 Second Edition
Start your Windows. Windows will detect your newly-installed modem and prompts for its
driver.
1
Place the Installation CD into CDROM drive and click Next.
2
Click the option 'Search for the
best driver for your device.
(Recommended).' and click Next.
3
For the source of your driver, click
the option 'Specify a location'.
Click Browse... to navigate to
'\Win9x' directory on your
Installation CD and click OK.
Click Next.
○○○○○○○○○○○○○○○○○○○○○○○○○○○○○○○○○○○○○○○○○
18

5
A window for Country Select will
be displayed. Select the
country that you are currently in
and click OK.
4 — Installing Your Modem Driver
4
Click Next again to proceed
with the specified driver.
6
To complete the driver
installation, click Finish.
This completes the driver installation in Windows® 98 / 98 Second Edition. Please proceed
to the next chapter to verify your modem.
○○○○○○○○○○○○○○○○○○○○○○○○○○○○○○○○○○○○○○○○○
19

4 — Installing Your Modem Driver
4.3 Installing Your Modem Driver For Windows® Me
Start your Windows. Windows will detect your newly-installed modem and prompts for
its driver.
1
Place the Installation CD into
your CD-ROM drive.
Click the option 'Specify the
location of the driver
(Advanced)' and click Next.
2
Select 'Specify a location'.
Click Browse. Navigate to
'\WinMe' directory on your
Installation CD click Next.
3
Windows will prompt that it has
located the driver.
Click Next to proceed.
○○○○○○○○○○○○○○○○○○○○○○○○○○○○○○○○○○○○○○○○○
20

5
A window for Country Select will
be displayed. Select the
country that you are currently in
and click OK.
4 — Installing Your Modem Driver
4
Click Finish to complete the
driver installation.
This completes the driver installation in Windows® Me. Please proceed to the next chapter
to verify your modem card.
○○○○○○○○○○○○○○○○○○○○○○○○○○○○○○○○○○○○○○○○○
21

4 — Installing Your Modem Driver
4.4 Installing Your Modem Driver For Windows NT® 4.0
From your Windows taskbar, click Start > Run. Click Browse and navigate to
'winNT4\setup.exe' on your Installation CD and click OK.
1
Click Next to proceed with the
installation.
Select the COM Port for
2
your modem and click
Next.
3
Click Next to proceed.
○○○○○○○○○○○○○○○○○○○○○○○○○○○○○○○○○○○○○○○○○
22

5
From Manufacturers field, scroll
down the list to locate AZT.
Click on AZT and select
MR2800-W Data Fax Modem
from Models field. Click Next.
4 — Installing Your Modem Driver
4
Select the option 'Don't detect
my modem; I will select it
from a list.' and click Next.
6
Click on the COM port that you
have selected for your modem
previously on page 22.
Click Next to start the installation.
○○○○○○○○○○○○○○○○○○○○○○○○○○○○○○○○○○○○○○○○○
23

4 — Installing Your Modem Driver
7
Click Finish to complete the
driver installation.
8
Click Close.
9
Click Finish to restart your system
for changes to take effect.
○○○○○○○○○○○○○○○○○○○○○○○○○○○○○○○○○○○○○○○○○
24

10
4 — Installing Your Modem Driver
To ensure your modem functions in a stable condition, check the
country setting for your modem. It has to follow the country you are
currently in.
From the Control Panel (Start > Settings), double-click on the Modem
Country Selection icon.
At the Country field, select the country that you are currently in. Click
Apply, followed by OK.
This completes the driver installation in Windows NT
chapter to verify your modem card.
○○○○○○○○○○○○○○○○○○○○○○○○○○○○○○○○○○○○○○○○○
®
4.0. Please proceed to the next
25

4 — Installing Your Modem Driver
4.5 Installing Your Modem Driver For Windows® 2000
Power on your computer to start Windows. Windows will detect your newly-installed
modem card.
1
Place the Installation CD into
your CD-ROM Drive and click
Next.
Click the option Search for
a suitable driver for my
2
device (recommended).
and click Next.
3
For the source of your modem
driver, click Specify a location
and click Next.
○○○○○○○○○○○○○○○○○○○○○○○○○○○○○○○○○○○○○○○○○
26

4 — Installing Your Modem Driver
4
Click Browse... and navigate
to '\Win2000 directory on
your Installation CD and click
You may be prompted with Digital Signature Not Found dialog box. (This
happens when Windows detected a newer version of the modem driver .)
Click Yes to proceed.
OK.
5
Windows will prompt that it has
located the driver.
Click Next to proceed.
6
Allow some time for Windows to
copy the required files.
At the country select prompt,
select the country that you
are currently in and click OK.
○○○○○○○○○○○○○○○○○○○○○○○○○○○○○○○○○○○○○○○○○
27

4 — Installing Your Modem Driver
7
Click Finish to complete the
software installation.
This completes the driver installation in Windows® 2000. Please proceed to the next
chapter to verify your modem.
○○○○○○○○○○○○○○○○○○○○○○○○○○○○○○○○○○○○○○○○○
28

Chapter 5
Verifying Your Modem
This chapter contains information on how to test your modem card in
Windows® 95, 98, 98 Second Edition, Me, NT®4.0 and Windows® 2000.
The testing procedures for MR2800-W Modem in Windows® 95, 98, 98 Second
Edition and Windows® Me are similar. The following screen shots are based
on Windows® Me. For any dissimilarities, follow closely to the instructions as
prompted on your computer screen.
5.1 Verifying Your Modem - For Windows® 95 / 98 / 98 Second Edition / Me
From the Windows taskbar, click Start > Settings > Control Panel. Doubleclick on the Modems icon.
1
○○○○○○○○○○○○○○○○○○○○○○○○○○○○○○○○○○○○○○○○○
29

5 — V erifying Your Modem
2
3
Click on the COM port
that your modem is
attached to and click More
Click the Diagnostics tab.
Info... .
4
The More Info... window will appear,
showing a list of AT commands. This means
that your modem is now ready to run. Click
OK.
(The information listed here may differ
from what you see on your computer.)
(If your modem is not installed properly, the set of AT commands will not be listed. You
may also be prompted by an error message, stating that it was unable to open the COM
port. If this happens, re-install your modem driver. See the chapter on Uninstalling Your
Modem Driver.)
○○○○○○○○○○○○○○○○○○○○○○○○○○○○○○○○○○○○○○○○○
30

5 — Verifying Your Modem
5.2 Verifying Your Modem - For Windows NT® 4.0
From your Windows taskbar, click Start > Programs > Accessories > HyperTerminal
> HyperTerminal.
1
Key in the required information prompted by the dialog boxes.
2
Click OK after entering any telephone number in the dialog box.
3
At the next dialog box prompt, click Cancel.
4
Type AT and press <Enter>. You should see a response OK.
Your modem is now ready to run.
5
○○○○○○○○○○○○○○○○○○○○○○○○○○○○○○○○○○○○○○○○○
31

5 — V erifying Your Modem
5.3 Verifying Your Modem - For Windows® 2000
From your Windows taskbar, click Start > Settings > Control Panel. Double-
click on the Phone and Modem Options icon.
1
2
Click the Modems tab.
3
You will see the MR2800-W
Data Fax Modem listed.
Click on the modem and select
Properties.
4
Click on the Diagnostics tab.
4
○○○○○○○○○○○○○○○○○○○○○○○○○○○○○○○○○○○○○○○○○
32

5 — Verifying Your Modem
Click Query Modem.
If your modem is not installed properly, the set of AT commands will not be listed. You
may also be prompted by an error message, stating that it was unable to open the COM
Port. If this happens,
i) make sure that there is no communication software (e.g. HyperTerminal, Dial-Up
Networking, etc) running.
ii) from the Windows desktop, right-click My Computer icon. Select Properties. From
the System Properties, select the Hardware tab and click Device Manager button.
Check whether there is any yellow exclamation mark on the Modems device. If yes,
remove and re-install your modem driver. (See the chapter on Uninstalling Your
Modem Driver.)
5
You should see a list of AT
commands similar to the one
illustrated. This indicates that your
modem is successfully installed.
Click OK.
(The information listed here may
differ from what you see on your
computer.)
○○○○○○○○○○○○○○○○○○○○○○○○○○○○○○○○○○○○○○○○○
33

Chapter 6
Uninstalling Your
Modem Driver
1
2
The following procedures are applicable to all the operating systems
mentioned in this guide.
From your Windows taskbar, click Start > Settings > Control Panel. Double-
click on the Add/Remove Programs icon.
Select MR2800-W Modem and click Add/Remove.
Follow any on-screen instructions to remove the modem driver.
○○○○○○○○○○○○○○○○○○○○○○○○○○○○○○○○○○○○○○○○○
34

y
Appendix A
AUDIO allows connection to a
compatible sound card via a TAD
cable for audio input/output.
(optional)
Card Layout
J1 J2 J3
Primar
Secondaryshort Pin 1 and 2 short Pin 1 and 2 open
Table 1: Jumper Settings for Primary/Secondary Device
○○○○○○○○○○○○○○○○○○○○○○○○○○○○○○○○○○○○○○○○○
short Pin 2 and 3 open open
35

Appendix B
Frequently Asked
Questions
This chapter provides the answers to some of the commonly asked
What is V.90 ?
V.90 is a new standard approved by the International Telecommunication Union
for 56K analog modems. It is a compromise officially reached between the
two competing standards - X2 (from 3COM/USR) and K56Flex (from Rockwell/
Lucent).
How do I identify the Modem Riser card and its driver ?
The Modem Riser card has its model name printed on the serial number label
located at the rear of the card.
Alternatively, you can issue an AT13 command using any Telephony Data Terminal
application to get the driver version.
questions on your modem.
○○○○○○○○○○○○○○○○○○○○○○○○○○○○○○○○○○○○○○○○○
36

B — Frequently Asked Questions
This modem is set to V.90. But why am I getting slow connections to my ISP ?
Majority of the telephone lines and ISP are already supporting V.90 connections.
However, like all data connection, the connection is sensitive to the amount of
noise present in the phone line. Hence, only very clean phone line can get
high connection rate or throughput. You may want to check with your telephone
provider.
How do I see the resources listings ? (Not applicable for Windows NT
®
4.0)
For Windows 95/98/98 Second Edition/Me
1. From the Windows taskbar, click Start > Settings > Control Panel.
2. Double-click on the Modems icon.
3. Click the Diagnostics tab. Select your product model and click More Info...
option.
The resources used by the modem will be listed.
For Windows 2000
1. From the Windows desktop, right-click on My Computer icon. Select
Properties.
2. From the System Properties dialog box, select Hardware tab and click Device
Manager.
3. Double-click on the Modems. Select your product model. From the Device
Manager toolbar, click View > Resources by type.
The resources used by the modem will be listed.
The modem hangs up when an incoming call is received.
Disable the Call Waiting function for the Online Service, Internet Connection
and/or communications software you are using.
When I tried to dial out, the system gave me an error message No Dial Tone.
Check the Telephone Cable (PHONE) connection. If necessary, plug out the
Telephone Cable and reconnect the cable.
There are incomprehensible characters appearing on the screen.
The data, parity and stop bit settings are incorrect. Try using the default values
or check with your ISP.
○○○○○○○○○○○○○○○○○○○○○○○○○○○○○○○○○○○○○○○○○
37

B — Frequently Asked Questions
Why does my modem always connect at 33.6Kbps and not 56Kbps or V90 ?
Check with your Internet Service Provider (ISP) to ensure that they support
56Kbps or V.90 connections. For modem with Country Selection feature, please
ensure that the modem is set to your local country. To set the country select
feature, see the following question.
I am using my system with the modem card in another country. Is there any
settings that need to be changed ?
Yes. You need to ensure that the country setting for your modem card is correct
for your location. Carry out the following steps:
1. From the Windows taskbar, click Start >Settings > Control Panel. Double-
click on Modem Country Selection icon.
2. From the drop-down list, select your current local country and click OK.
○○○○○○○○○○○○○○○○○○○○○○○○○○○○○○○○○○○○○○○○○
38

Appendix C
Troubleshooting Guide
This chapter provides a step-by-step solutions to problems that you
While testing the modem, the system gave an error message saying that it
was unable to open the COM Port. (Not applicable for Windows NT
Make sure that you have closed all communication software (e.g. Hyperterminal,
Dial-up Networking, etc.) when you are doing the diagnostics test.
However, if there is no communications software running, do the following:
For Windows 95/98/98 Second Edition/Me
1. From the Windows taskbar, click Start >Settings > Control Panel. Double-
click on the System icon.
2. Click the Device Manager tab.
3. Check whether there is any yellow exclamation mark on the modem device.
If yes, remove the modem device (select the device and click Remove) and
re-install the modem driver.
For Windows 2000
1. From the Windows desktop, right-click on My Computer icon. Select
Properties.
2. From the System Properties dialog box, select Hardware tab and click Device
Manager.
3. Check whether there is any yellow exclamation mark on the modem device.
If yes, remove the modem device (right-click on the device and click Uninstall)
and re-install the modem driver.
○○○○○○○○○○○○○○○○○○○○○○○○○○○○○○○○○○○○○○○○○
may encounter when using your modem.
®
4.0)
39

C — T roubleshooting Guide
My system does not detect the modem when I boot up for the first time.
Check that:
1. Your modem is fully inserted into the AMR-Bus slot.
2. You have configured your card to either Primary or Secondary device
you install your card.
3. The jumper settings are correctly configured for the respective device.
(For details on the configuration, please refer to Chapter 3 - Setting Up Your
Modem.)
I cannot find AC97 Audio (or AC97 Audio Controller) in my system BIOS.
If the feature is not found in your system BIOS, please check with your
motherboard supplier for an updated system BIOS.
before
○○○○○○○○○○○○○○○○○○○○○○○○○○○○○○○○○○○○○○○○○
40

Appendix D
Technical Specifications
This chapter contains the technical specifications of your card. The
information may be more useful for technically inclined users.
D.1 Main Features
D.1.1 Drivers Support
a) Windows® 95 / 98 / 98 Second Edition / Me / NT®4.0 / 2000
b) TAPI compliant
D.1.2 Integrated 56000 BPS Data/Fax Modem
AMR 1.0 Compliant
V.90
K56Flex 56Kbps; V.34 (33.6Kbps); V.34 data modem; V.32 bis; V.32; V.23; V.22 bis;
V.22; V.21
Bell 212A and 103
V.42 LAPM, MNP2-4 error Correction; V.42 bis and MNP5 data compression
V.17/V.29/V.27ter and Fax Class 1 , V21 channel 2 group 3 fax mode
Auto dialing and auto answer
○○○○○○○○○○○○○○○○○○○○○○○○○○○○○○○○○○○○○○○○○
41

D — Technical Specifications
Line quality monitoring and re-train
Tone or pulse dialing
On board amplifier and analog-based buzzer
Silicon DAA line interface
Caller ID support
Digital Line guard optional
Handset exclusion optional
D.2 Interfaces
D.2.1 External connectors
1 x RJ11 Telephone socket for telephone line
D.3 Environmental
D.3.1 Temperature:
Operating : 10 to 45 degrees Celsius (50 to 113 degrees Fahrenheit)
Non-Operating : -25 to 70 degrees Celsius (-13 to 158 degrees Fahrenheit)
D.3.2 Humidity
Operating: 30% to 80% Relative Humidity (non-condensing)
Non-Operating: 10% to 95% Relative Humidity (non-condensing)
The specifications herein are subject to change without prior notification.
○○○○○○○○○○○○○○○○○○○○○○○○○○○○○○○○○○○○○○○○○
42
 Loading...