

Page 1

ADSL PCI Modem
Easy Start
Read Me First)
(
Version 1.0
Protocols Discussed:
RFC 2684 (RFC 1483)
RFC 2225 (RFC 1577)
RFC 2364
Contents
About this Easy Start2
Minimum System Requirements2
Step 1: Installing Your ADSL PCI Modem3
Step 2: Connecting Your ADSL PCI Modem4
Step 3: Installing Your ADSL PCI Modem Driver
(One-Click Installation)5
Step 4: Configuring VPI/VCI Values for Internet
Connection16
Step 5: Establishing Your Internet Connection
(For RFC 2364 only)18
Windows® 95 OSR2.1, 98, 98 Second Edition, Me, 2000 and Windows NT® 4.0 supported
Page 2
Modem Card Easy Start
Product warranty does not apply to damage caused by lightning, power surges or wrong voltage usage.
About this
Easy Start
For users who have not installed a modem card before, it is recommended that
you refer to the User Manual on the Installation CD for detailed installation
instructions. It also contains the sections on Frequently Asked Questions and
Troubleshooting Guide.
(Print out the entire User Manual for your easy reference.)
Please read the ReadMe.txt file on the Installation CD for any new updates
on the product.
This booklet contains information on setting up your ADSL
PCI Modem. It touches on the key installation procedures
and allows you to setup your modem within minutes!
Minimum System Requirements
• IBM PC-based computer with Pentium
• 1 CD-ROM drive
• 1 free PCI-Bus slot
• 32MB RAM
®
MMX 233 processor or equivalent
• 30MB free hard disk space for system files and modem driver
(Windows CD-ROM may be required during installation, depending on your system's
configurations.)
• Windows
Windows® 98
Windows® 98 Second Edition
Windows® Me
Windows® 2000 or
Windows NT® 4.0
2
®
95 OSR2.1
Page 3
Modem Card Easy Start
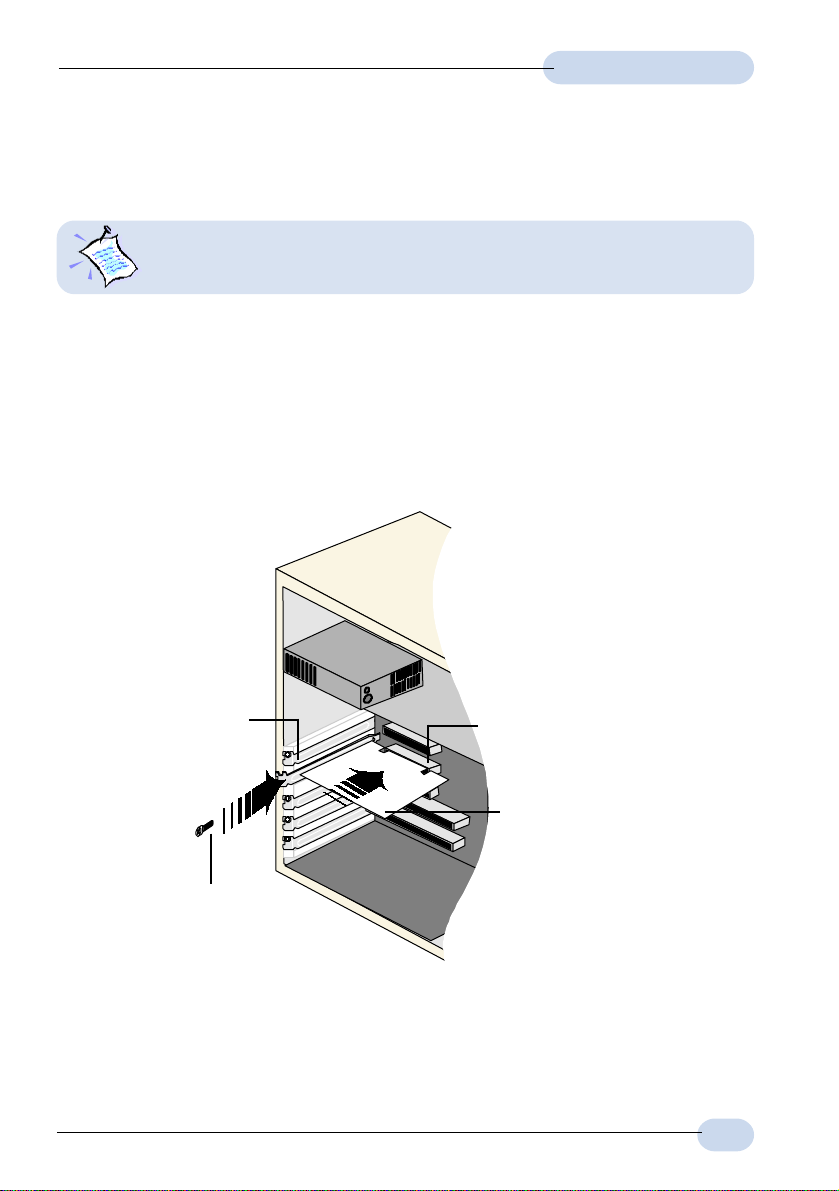
Step 1: Installing Your ADSL PCI Modem
Power off your computer and any connected devices before connecting
your modem card!
After removing the cover of your computer, locate any available PCI-Bus slot and
remove its cover plate.
Ê Insert your modem card firmly into the PCI-Bus slot.
Ë Secure the modem card with the mounting screw and replace the cover of
your computer.
Cover
Plate
Ë
Mounting Screw
PCI-bus Slot
Ê
Modem Card
3
Page 4
Modem Card Easy Start
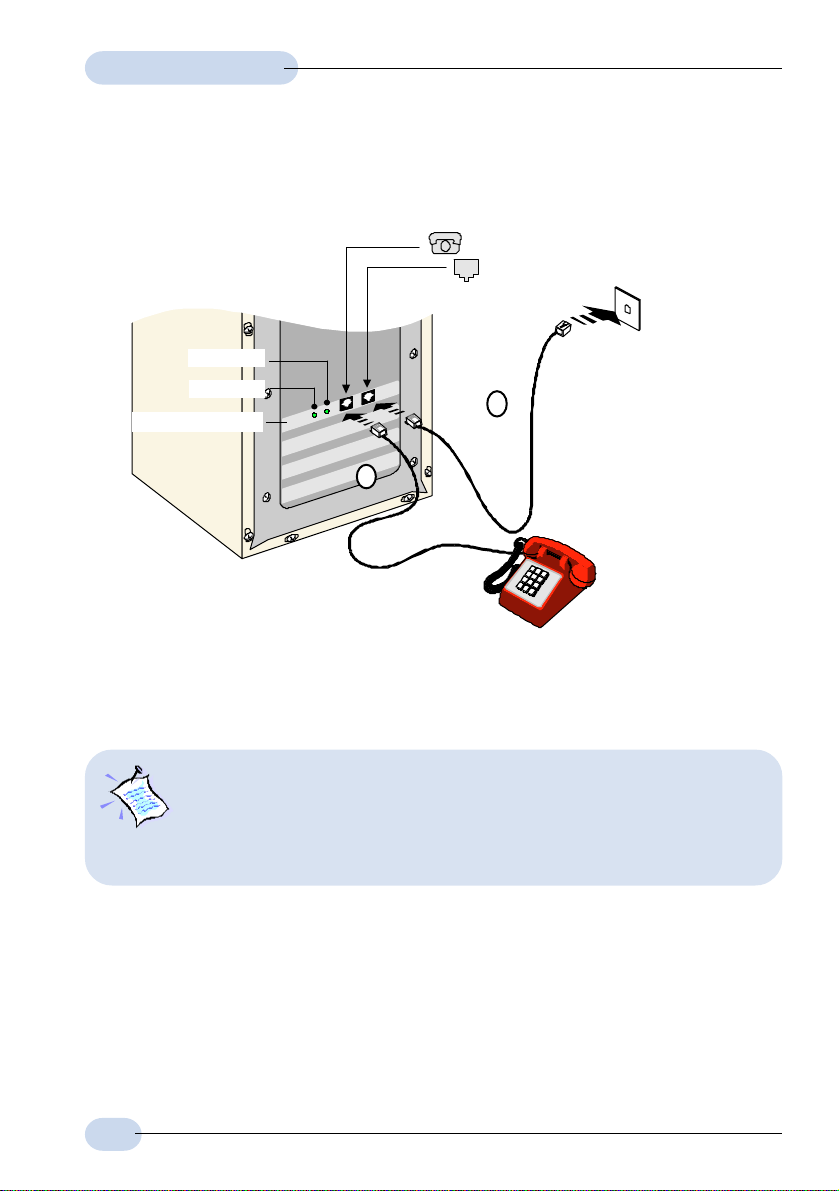
Step 2: Connecting Your ADSL PCI Modem
PHONE jack - from Telephone Set
LINE jack - to Telephone Wall Socket
Telephone
Wall Socket
Data LED
Link LED
ADSL PCI Modem
Ê
Telephone
extension cord
(ADSL Line)
Ë
Telephone set
Connect your card as illustrated above. Upon completion, please proceed with the
following section to install the card driver.
1. The connection for the Telephone set is optional. The Phone jack
provides convenience to users who need to use the phone when
accessing the computer.
2. No external Micro-Filter is required as your ADSL PCI Modem has a
built-in Micro-Filter at the Phone jack.
4
Page 5

Modem Card Easy Start
Step 3: Installing Your ADSL PCI Modem
Driver
(One-Click Installation)
This section contains the installation procedures for protocols:
- RFC 2684 (also known as RFC 1483)
- RFC 2225 (also known as RFC 1577) and
- RFC 2364
You only need to install one of the protocols as determined by your Internet Service
Provider.
The modem driver installation comes with both One-Click Installation* and Manual
Installation instructions. One-Click installation allows you to automate installation
in just a few steps whereas Manual Installation requires you to manually step
through the entire installation process.
This guide contains only the One-Click Installation* instructions. For Manual
installation, please refer to the User Manual - Installing Your ADSL PCI Modem
Driver (Manual Installation).
1. The screen shots, screens information and steps illustrated in this
booklet serve only as a guide. The exact information and steps you
see on your system may vary, depending on your system's
configurations. For any dissimilarities, follow closely to the
instructions as prompted on your PC screen.
2. System may prompt for your Windows CD-ROM during the driver
installation. Have it ready by your side.
3. For Windows NT
Please refer to the User Manual (on the Installation CD) for your
driver installation instructions.
®
4.0 users, One-Click Installation is not supported.
* One-Click Installation is not supported in Windows NT® 4.0. Please refer to the user
manual found on the Installation CD for Windows NT
®
4.0 Manual Installation.
5
Page 6
Modem Card Easy Start
3.1 One-Click Installation - For Windows® 95 OSR2.1
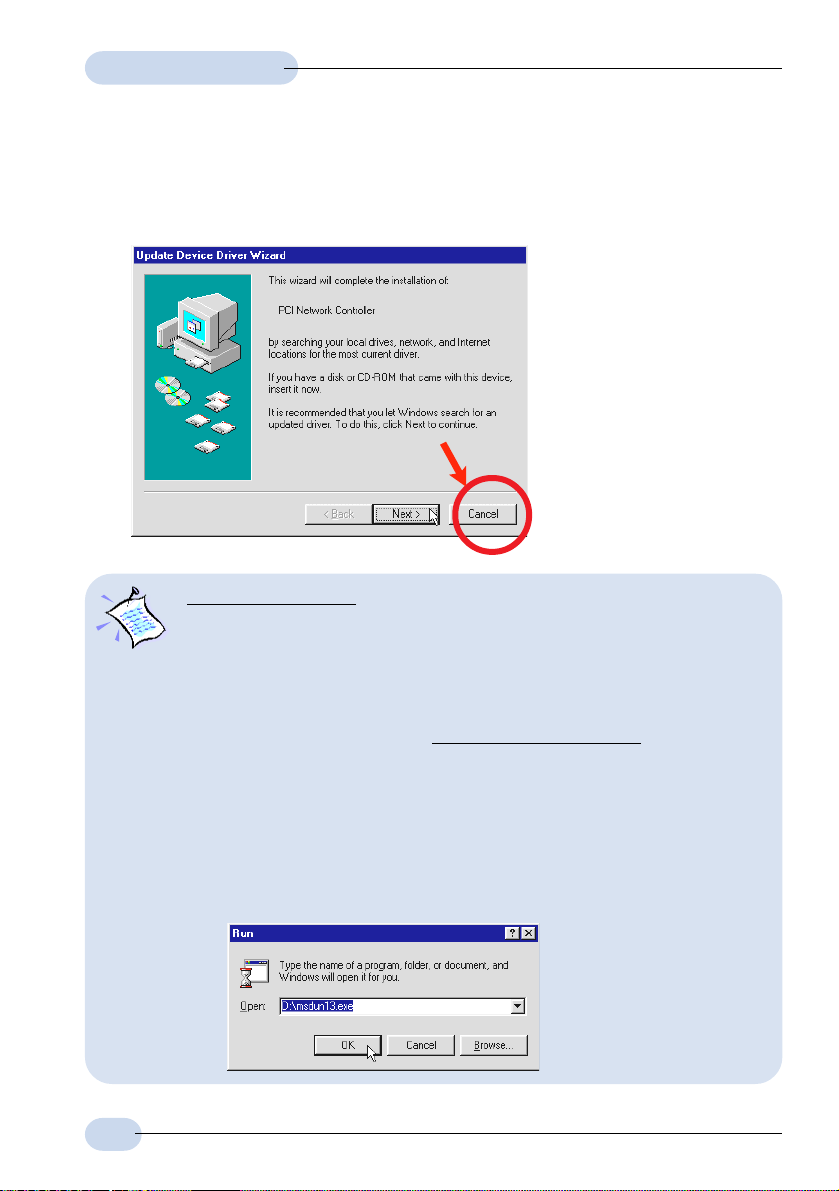
i) Power on your computer to start Windows. It will detect your newly-installed
ADSL PCI Modem and prompt for its driver. Click Cancel.
For RFC 2364 users:
You need to have Microsoft Dial-Up Networking (DUN) version 1.3 and
above, installed in your system. If you already have
please proceed with the next step.
If not,
please carry out the following steps to install the utility before proceeding
with the next step.
a) Go to Microsoft’s website:
b) In the Microsoft Search path, enter Msdun13.exe. From the results
listed, locate and select MSDUN13.EXE: Dial-Up Networking 1.3
Upgrade.
c) Click Msdun13.exe to download the file to your harddisk.
[file size is about 2.4MBytes]
d) From your Windows taskbar, click Start > Run.... Browse to the directory
where you have downloaded Msdun13.exe. Select the file and click OK.
http://www.microsoft.com.
it installed in your system,
6
Page 7

Modem Card Easy Start
Click OK again.
e) At the prompt to install Dial-Up Networking, click Yes to proceed.
f) At the Microsoft TCP/IP Networking prompt, click Ye s.
g) When prompted to restart, click OK.
ii) Place the Installation CD into your CD-ROM Drive. A Main Menu will be
prompted.
(If you do not see the Menu displayed, double-click on My Computer icon. Locate your CD-ROM
Drive icon and double-click on it. Alternatively, you may double-click on the setup.exe at the
util folder on the Installation CD.)
On the Menu, click the circle corresponding to the protocol you are installing.
Installation will commence.
iii) Depending on your systems configurations, you may be prompted for your
Windows CD-ROM for some missing files.
Replace the Installation CD in your CD-ROM drive with your Windows CD-
ROM and click OK.
If prompted for the files
location, type in your
Windows CD-ROM path in
the text box and click OK.
Allow some time for system to install and copy all required files for your
modem. See note on the following page.
7
Page 8

Modem Card Easy Start
For RFC 2684 (RFC 1483) users:
Upon files copying complete, system will automatically restart. (Rebooting
may take a while.)
You may be prompted with DHCP Client. Click No.
This completes your driver installation. Please proceed to Step 4 to configure
the VPI/VCI values.
For RFC 2364 users:
Upon files copying complete, system will automatically restart. (Rebooting
may take a while.)
If you are installing a modem in your computer for the first time, you may be
prompted for your location information. Enter the relevant information and
click Close .
This completes your driver installation. Please proceed to Step 4 to configure
the VPI/VCI values.
For RFC 2225 (RFC 1577) users:
You will be prompted with the TCP/IP & PVC Setting dialog box as shown
below.
Enter the IP Address and New
Gateway fields with the
addresses given by your
Internet Service Provider.
Overwrite the default values
with values given by your
Internet Service Provider , when
necessary .
Click OK.
At the prompt for restart, click
OK.
Please proceed to Step 4 to
configure the VPI/VCI values.
8
Page 9

Modem Card Easy Start
3.2 One-Click Installation - For Windows® 98 / 98
Second Edition
i) Power on your computer to start Windows. It will detect your newly-installed
ADSL PCI Modem and prompt for its driver. Click Cancel.
ii) Place the Installation CD into your CD-ROM Drive. A Main Menu will be
prompted.
(If you do not see the Menu displayed, double-click on My Computer icon. Locate your CD-ROM
Drive icon and double-click on it. Alternatively, you may double-click on the setup.exe at the
util folder on the Installation CD.)
On the Menu, click the circle corresponding to the protocol you are installing.
Installation will commence.
iii) Depending on your systems configurations, you may be prompted for your
Windows CD-ROM for some missing files.
Replace the Installation CD in your CD-ROM drive with your Windows CD-
ROM and click OK.
9
Page 10

Modem Card Easy Start
If prompted for the files location, type in your Windows CD-ROM path in the
text box and click OK.
Allow some time for system to install and copy all required files for your
modem.
iv) Upon completion, system will automatically restart. (Rebooting may take a
while.)
For RFC 2364 and RFC 2225 (RFC 1577) users, see the note below.
For RFC 2684 (RFC 1483) users, please proceed to Step 4 to configure the
VPI/VCI values.
For RFC 2364 users:
If you are installing a modem in your computer for the first time, you may be
prompted for your location information. Enter the relevant information and
click Close. Please proceed to Step 4 to configure the VPI/VCI values.
For RFC 2225 (RFC 1577) users:
From the TCP/IP & PVC Setting dialog box, enter the IP Address and New
Gateway fields with the addresses given by your Internet Service Provider.
10
Overwrite the default values
with values given by your
Internet Service Provider,
when necessary. Click OK.
At the prompt for restart, click
OK.
Please proceed to Step 4 to
configure the VPI/VCI values.
Page 11

Modem Card Easy Start
3.3 One-Click Installation - For Windows® Me
i) Power on your computer to start Windows. It will detect your newly-installed
ADSL PCI Modem and prompt for its driver. Click Cancel.
ii) Place the Installation CD into your CD-ROM Drive. A Main Menu will be
prompted.
(If you do not see the Menu displayed, double-click on My Computer icon. Locate your CD-ROM
Drive icon and double-click on it. Alternatively, you may double-click on the setup.exe at the
util folder on the Installation CD.)
On the Menu, click the circle corresponding to the protocol you are installing.
Installation will commence.
iii) Allow some time for your system to install and copy all the required files for
your modem. Upon completion, system will restart automatically. (Rebooting
may take a while.)
For RFC 2364 and RFC 2225 (RFC 1577) users, see the note on the
following page.
For RFC 2684 (RFC 1483) users, please proceed to Step 4 to configure the
VPI/VCI values.
11
Page 12

Modem Card Easy Start
For RFC 2364 users:
If you are installing a modem in your computer for the first time, you may be
prompted for your location information. Enter the relevant information and
click Close. Please proceed to Step 4 to configure the VPI/VCI values.
For RFC 2225 (RFC 1577) users:
You will be prompted with the dialog box shown below.
Enter the IP Address and New Gateway fields with the addresses given by
your Internet Service Provider.
Overwrite the default
values with values given by
your Internet Service
Provider, when necessary.
Click OK.
At the prompt for restart,
click OK.
Please proceed to Step 4
to configure the VPI/VCI
values.
12
Page 13

Modem Card Easy Start
3.4 One-Click Installation - For Windows® 2000
i) Power on your computer to start Windows. It will detect your newly-installed
ADSL PCI Modem and prompt for its driver. Click Cancel.
ii) Place the Installation CD into your CD-ROM Drive. A Main Menu will be
prompted.
(If you do not see the Menu displayed, double-click on My Computer icon. Locate your CD-ROM
Drive icon and double-click on it. Alternatively, you may double-click on the setup.exe at the
util folder on the Installation CD.)
Click on the circle corresponding to the protocol you are installing. Installation
will commence.
iii) You may be prompted with Digital Signature Not Found dialog box. This
occurs when Windows detected a newer version of your driver. Click Yes to
proceed.
iv) Allow some time for your system to automatically install and copy all the
required files for your modem.
v) You will be prompted Installation Completed Successfully. Click OK.
Click Exit from the Menu.
13
Page 14

Modem Card Easy Start
For RFC 2684 (RFC 1483) and RFC 2364 users:
Please proceed to Step 4 to configure the VPI/VCI values.
For RFC 2364 users, if you are installing a modem in your computer for the
first time, you may be prompted for your location information. Enter the
relevant information and click Close.
For RFC 2225 (RFC 1577) users:
a) From your Windows desktop, right-click on the icon My Network
Places. Select Properties.
b) From your Windows desktop, right-click on My Network Places icon
and select Properties.
At the Network and Dial-up Connections window, double-click on the
Local Area Connection icon.
14
If you have previously installed Network Card(s) and/or Modem Card(s) in your
system, you will see more than one Local Area Connection icons displayed.
Double-click on one of the icons. From the Connect using field at the
Properties dialog box, you should see ADSL PCI Modem listed (see the
following page for illustration). If not, double-click another Local Area
Connection icon and check.
Page 15

Modem Card Easy Start
Ensure that the field Connect Using indicates ADSL PCI Modem.
(Else, you need to re-install your modem driver.)
Select Internet Protocol (TCP/IP) and click Properties.
c) Select the option 'Use
the following IP
address'. Enter all
the required
information as given
by your Internet
Service Provider and
click OK.
Click OK again.
Please proceed to Step 4 to configure the VPI/VCI values.
15
Page 16

Modem Card Easy Start
Step 4: Configuring VPI/VCI Values for
Internet Connection
i) Right-click on the MAPI Icon . Select
Configuration.
ii) The following window will be prompted.
(The options for RFC 2684, 2225 and 2364 are similar. The illustration shown here
is based on RFC 2364.)
Click to
configure and
add multiple
VPI/VCI values
(see step iii)
Click to exit.
MAPI Icon will be displayed at your Windows system tray after you have successfully installed
your modem driver. This icon will allow you to monitor your ADSL line connection, configure your
VPI/VCI values and so on. The different MAPI LEDs light indicate different connection states.
For details, please refer to Appendix A - ADSL MAPI Icon on the User Manual.
16
Click to select your Internet
Service Provider.
Click to activate the listed
Service Provider.
Click Set Mode if you have
make changes to the ADSL
mode.
Page 17

Modem Card Easy Start
iii) To configure VPI/VCI values, add multiple ISP names or multiple VPI/VCI
values, click PVC Table.
(Illustrations shown here are examples
only.)
To edit the existing configuration or to change the ISP Name, double-click on
it. Overwrite the existing values with your new ones and click OK.
To add a new configuration, click Add. Enter your new ISP Name, VPI, VCI
values and click OK.
To remove an existing configuration, click on the ISP Name and click Remove.
You may activate any of your configurations by selecting the ISP Name and
click Activate.
For RFC 2684 and 2225 users, you may double-click your browser to begin your
Internet surfing!
For RFC 2364 users, please proceed to step 5 to establish your Internet connection.
17
Page 18

Modem Card Easy Start
Step 5: Establishing Your Internet
Connection
i) From your Windows desktop, a ADSL PCI Modem dial-up icon will be
generated. Double-click on it.
ii) A dialog box similar to the one shown on your right will be prompted.
(The illustrated screen is based on
Windows
systems may have their screen differ
slightly.)
Enter the required information.
Ensure that the MAPI Icon (at your
system tray) shows both the leds
black in colour (indicating ADSL line
is established).
Click Connect to dial up to the
Internet.
iii) Upon successful dial-up, you should be able to see an icon ( ) displayed
at the corner of your Windows taskbar. Double-click your browser to begin
your Internet surfing!
Double-click on the icon. You will be able to see the following information.
®
Me. Different operating
(For RFC 2364 only)
(The connection speed indicates the speed
that the ADSL modem can achieved. Your
actual connection speed will depend on
the subscription plan that you have signed-
up with your ADSL Service Provider.)
Check your connection time by looking at the Duration. Click Disconnect to
end the session.
18
Page 19

All other company or product names are trademarks or registered trademarks or service
marks of their respective owners.
© Copyright, August 2001. All Rights Reserved.
P/N: 040-511438-101 (Ref: 705)
 Loading...