

Page 1

ADSL PCI Modem
Easy Start
Read Me First)
(
Version 1.0
Protocols Discussed:
RFC 1483
RFC 1577
RFC 2364
Contents
About this Easy Start2
Package2
Installation Notes2
Safety Precaution3
Step 1: Installing Your ADSL PCI Modem3
Step 2: Connecting Your ADSL PCI Modem4
Step 3: Installing Your ADSL PCI Modem Driver5
Step 4: Verifying Your ADSL PCI Modem14
Step 5: Configuring Protocol Properties
(for RFC1577 users)16
Step 6: Setting VPI/PCI Values 18
Monitoring Your ADSL Connection19
Uninstalling Your ADSL PCI Modem20
Windows® 95, 98, 98 Second Edition, Me, and Windows® 2000 supported
Page 2

ADSL PCI Modem Easy StartADSL PCI Modem Easy Start
ADSL PCI Modem Easy Start
ADSL PCI Modem Easy StartADSL PCI Modem Easy Start
Product warranty does not apply to damage caused by lightning, power surges or wrong voltage usage.
About this
Easy Start
Please read the ReadMe.txt file on the Installation CD for any new updates
on the product.
This booklet contains information on setting up your ADSL
PCI Modem. It touches on the key installation procedures
to help you setup your modem.
Package
Ensure that you have the following items in your ADSL package. For any missing
items, please contact your dealer immediately.
üü
ü 1 ADSL PCI Modem Card
üü
üü
ü 1 Telephone cable (RJ-11) (optional)
üü
üü
ü 1 Micro-Filter (optional)
üü
üü
ü 1 ADSL PCI Modem Easy Start
üü
Installation Notes
The graphics and screens illustrations shown in this easy start may differ from
what you see from your system, but the steps still apply.
A Philips Screwdriver is required for the card installation.
The documentation for your computer should come in handy during the card
installation. Have it ready by your side.
It is recommended that any existing modem card be removed before installing
your new modem card.
2
Page 3
ADSL PCI Modem Easy StartADSL PCI Modem Easy Start
ADSL PCI Modem Easy Start
ADSL PCI Modem Easy StartADSL PCI Modem Easy Start
Safety Precaution
Do not remove your card from its protective bag until you are ready to install it.
Always try to hold your card by its edges. Avoid touching any electronic
components on your card.
Static electricity can cause permanent damage to your card. To prevent such
a damage, touch any non-painted surface of the computers chassis before
you begin installation, and again every minute or so until the installation is
completed.
This product is for use only in UL Listed computers
To reduce the risk of fire, use only No. 26 AWG or larger telecommunication
line cord.
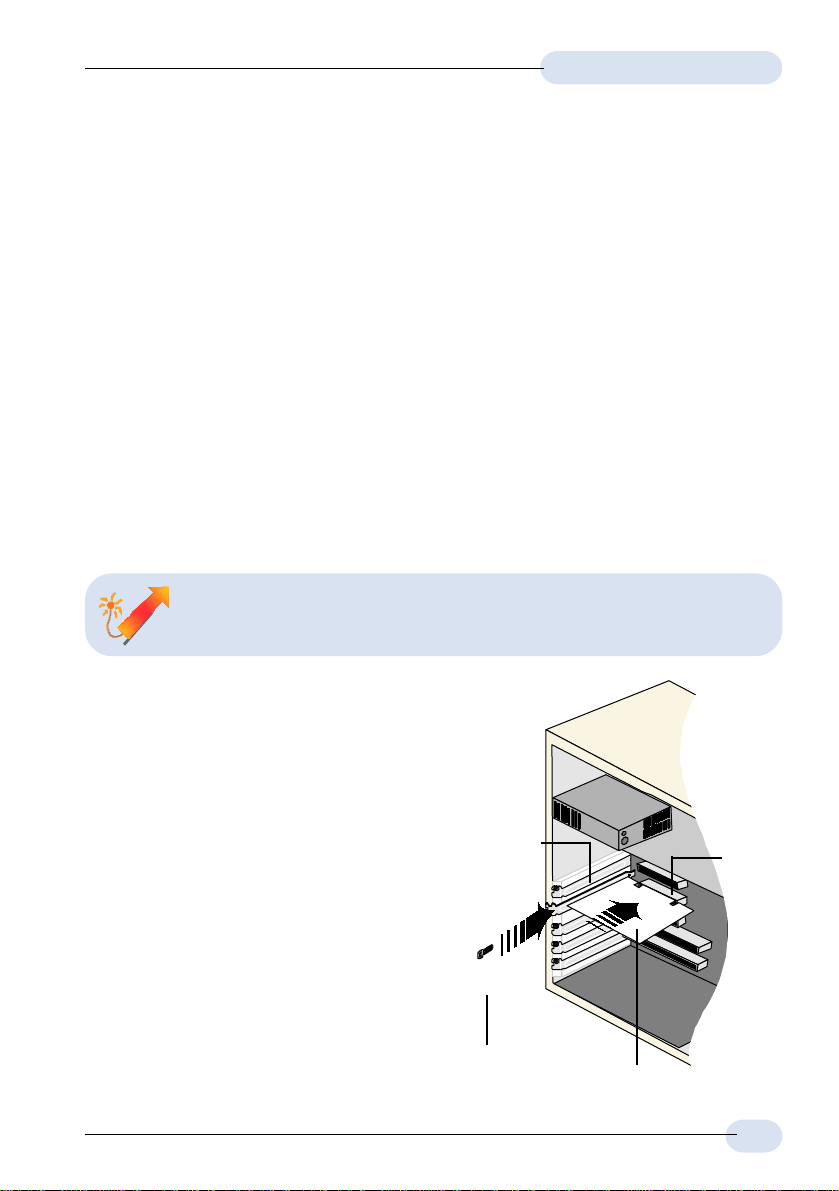
Step 1: Installing Your ADSL PCI Modem
Power off your computer and any connected devices before connecting
your modem!
After removing the cover of your computer,
locate any available PCI-Bus slot and
remove its cover plate. Save all the screws
removed.
Ê Insert your card firmly into the
selected PCI-Bus slot.
Ë Secure the card with the mounting
screw.
Replace the cover of your computer and
secure all the screws back in place.
Cover
Plate
Ë
Mounting Screw
PCI-bus
Slot
Ê
ADSL PCI Modem
3
Page 4
ADSL PCI Modem Easy StartADSL PCI Modem Easy Start
ADSL PCI Modem Easy Start
ADSL PCI Modem Easy StartADSL PCI Modem Easy Start
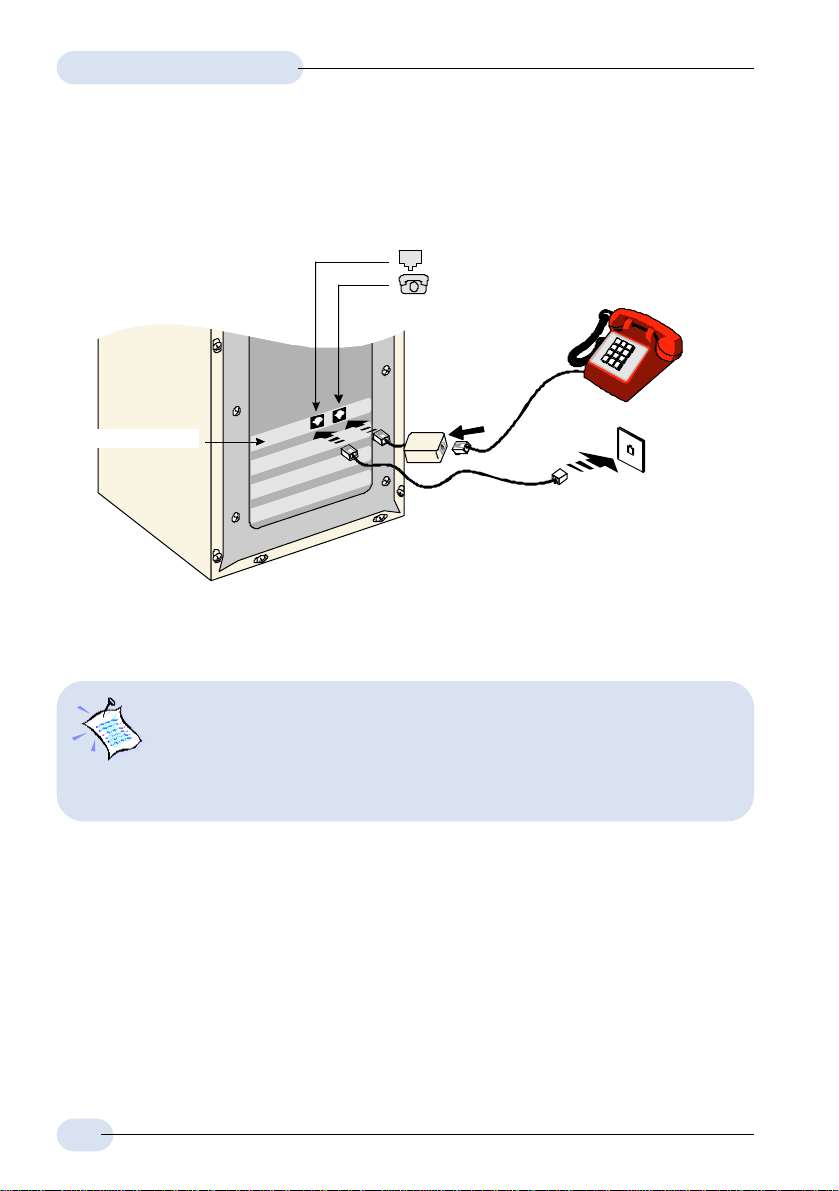
Step 2: Connecting Your ADSL PCI Modem
LINE Jack
PHONE Jack
Micro-Filter
ADSL PCI Modem
Telephone
extension cord*
Carry out the connections as illustrated above.
Telephone set
Telephone
Wall Socket
1. The connection to the Telephone Set is optional. The Phone Jack
provides convenience to users who need to use the Telephone when
accessing the computer.
2. A Micro Filter (can be purchased separately from your dealer) is required
between the Phone Jack on the modem card and the Telephone Set.
The use of Micro-Filter eliminates noise on the telephone line and ensure best possible networked
phone performance. If your house has more than one telephone sets all sharing the same ADSL
line, than each of the telephone sets will have to be connected to a Micro-Filter. (Connect the
Micro-Filter between your Telephone Set and the telephone wall socket)
If your ADSL uses a different line and not sharing with your telephone, then a Micro-Filter will not
be necessary.
* CAUTION ! - To reduce the risk of fire, use only No. 26 AWG or larger telecommunication line cord.
4
Page 5
ADSL PCI Modem Easy StartADSL PCI Modem Easy Start
ADSL PCI Modem Easy Start
ADSL PCI Modem Easy StartADSL PCI Modem Easy Start
Step 3: Installing Your ADSL PCI Modem Driver
1. The screen shots, screens information and steps illustrated in this
booklet serve only as a guide. The exact information and steps
you see on your system may vary, depending on your system
configurations. For any dissimilarities, follow closely to the
instructions as prompted on your PC screen.
2. Depending on your system configurations, you may be prompted for your
Windows CD-ROM during installation. Have it ready by your side.
This section contains the installation procedures for the following protocols. You
need to install only one of them, as determined by your Internet Service Provider
(ISP).
- RFC 1483
- RFC 1577
- RFC 2364
The following screen shots shows RFC 2364 protocol being used, unless otherwise
stated.
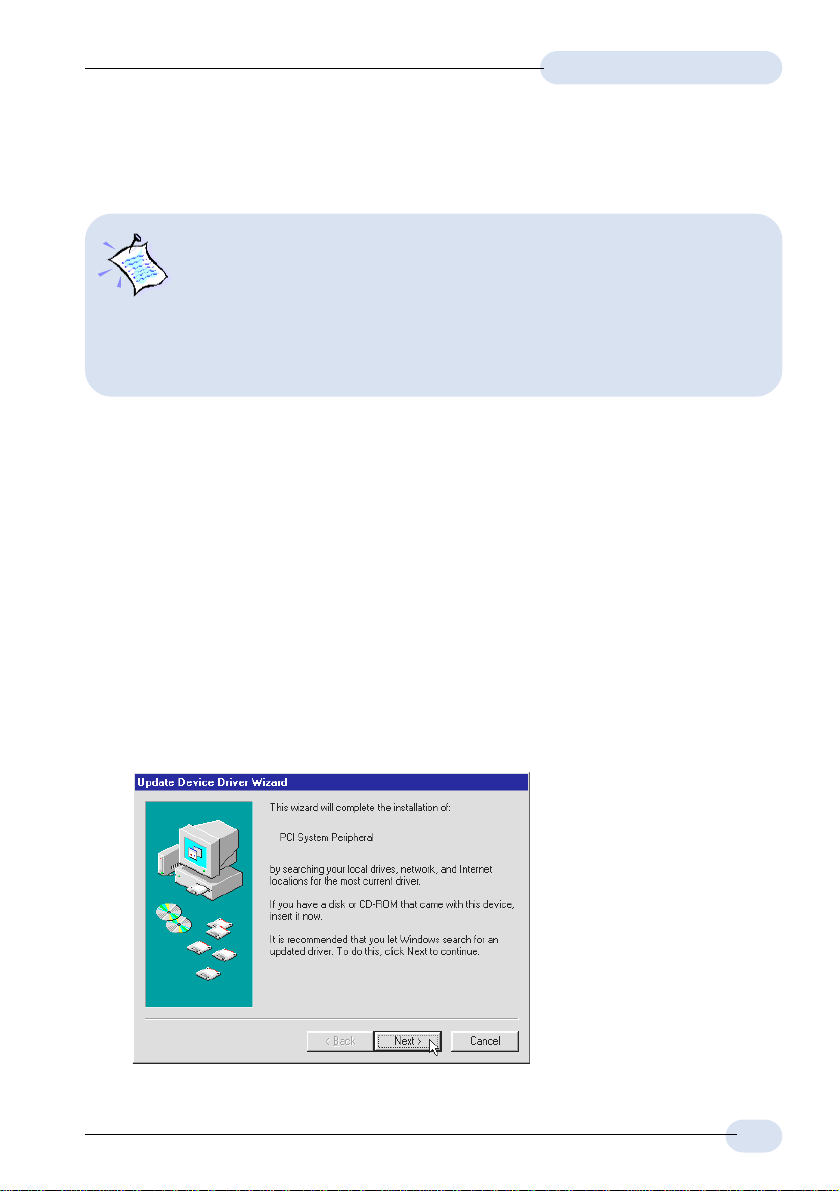
3.1 For Windows® 95 users
i) Power on your computer to start Windows. It will detect your newly-installed
modem and prompt for its driver.
Place the Installation
CD into your CD-ROM
drive and click Next.
5
Page 6
ADSL PCI Modem Easy StartADSL PCI Modem Easy Start
ADSL PCI Modem Easy Start
ADSL PCI Modem Easy StartADSL PCI Modem Easy Start
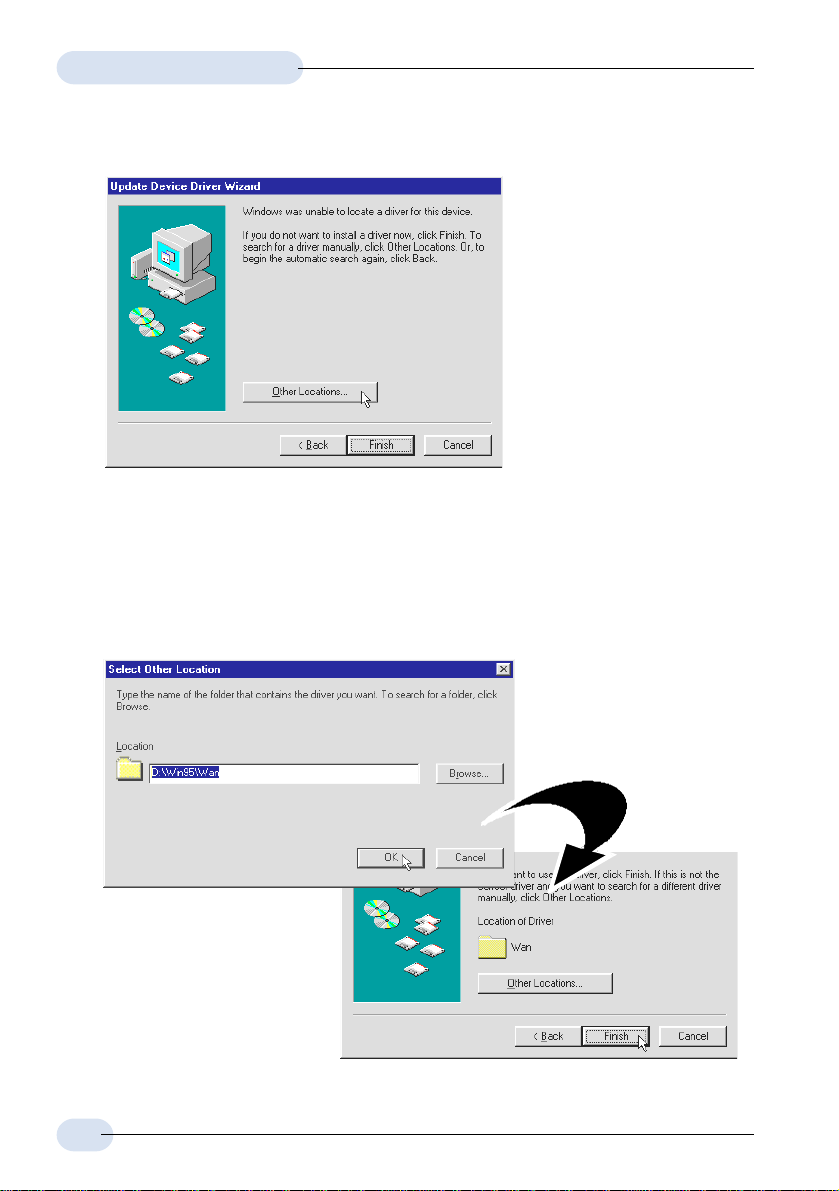
ii) Click Other Locations... to specify the driver location.
iii) For RFC 1483 or 1577 users, click Browse and navigate to the '\Win95\Lan'
folder on your CD-ROM.
For RFC 2364 users, click Browse and navigate to the '\Win95\Wan' folder
on your CD-ROM.
Click OK.
iv) Click Finish for the
driver installation to
progress.
6
Page 7

ADSL PCI Modem Easy StartADSL PCI Modem Easy Start
ADSL PCI Modem Easy Start
ADSL PCI Modem Easy StartADSL PCI Modem Easy Start
v) At the following prompt, ensure that your Installation CD is in your CD-ROM
drive and click OK.
At the prompt for file location,
enter '\Win95\LAN' for RFC
1483 and RFC 1577 or
'\Win95\WAN' for RFC 2364.
Click OK.
vi) Depending on your system configurations, you may be prompted for your
Windows CD-ROM for some missing files.
Replace your Installation CD with Windows CD-ROM on your CD-ROM Drive
and click OK.
At the prompt for file location,
enter the path of your Windows
CD-ROM and click OK.
vii) If there is a Version Conflict prompt, it is recommended that you keep your
existing file. Click Ye s.
viii) At the prompt for restart, click Ye s .
You may now proceed with Step 4 to verify if your modem has been installed
successfully.
7
Page 8

ADSL PCI Modem Easy StartADSL PCI Modem Easy Start
ADSL PCI Modem Easy Start
ADSL PCI Modem Easy StartADSL PCI Modem Easy Start
3.2 For Windows® 98 / 98 Second Edition(SE) users
i) Power on your computer to start Windows. It will detect your newly-installed
modem and prompt for its driver.
Place the Installation CD
into your CD-ROM drive
and click Next.
ii) Click the option Search
for the best driver for
your device.
(Recommended). and
click Next.
iii) Select Specify a location
and click Browse... .
For RFC1483 and 1577
users, navigate to
W2k98Me\Lan directory
on your Installation CD.
For RFC2364 users,
navigate to
W2k98Me\Wan directory
on your Installation CD.
Click Next.
8
Page 9

ADSL PCI Modem Easy StartADSL PCI Modem Easy Start
ADSL PCI Modem Easy Start
ADSL PCI Modem Easy StartADSL PCI Modem Easy Start
iv) Click Next again to proceed installation with the driver found.
The driver name (.inf) illustrated may be different from what you see on your
system. This is due to a different driver version being used during screens
capturing. What you see on your system is a more updated driver version.
v) Click Finish to complete the
driver installation.
vi) Depending on your system
configurations, you may be
prompted for your Windows
CD-ROM for some missing
files.
Replace your Installation CD
with Windows CD-ROM on
your CD-ROM Drive and click
OK.
vii) At the prompt for restart, click Ye s .
You may now proceed with Step 4 to verify if your modem has been installed
successfully.
9
Page 10

ADSL PCI Modem Easy StartADSL PCI Modem Easy Start
ADSL PCI Modem Easy Start
ADSL PCI Modem Easy StartADSL PCI Modem Easy Start
3.3 For Windows® Me users
i) Power on your computer to start Windows. It will detect your newly-installed
modem and prompt for its driver.
Select Specify the
location of the driver
(Advanced) option.
Place the Installation
CD into your CD-ROM
drive and click Next.
ii) Click Specify a location.
For RFC 1483 and 1577 users, click Browse and navigate to '\W2k98Me\Lan'
folder on your CD-ROM drive.
For RFC 2364 users, click Browse and navigate to '\W2k98Me\Wan folder.
Click Next.
10
Page 11

ADSL PCI Modem Easy StartADSL PCI Modem Easy Start
ADSL PCI Modem Easy Start
ADSL PCI Modem Easy StartADSL PCI Modem Easy Start
iii) Windows will prompt that the driver has been found. Click Next to proceed
installation with the driver found.
The driver name (.inf) illustrated may be different from what you see on your
system. This is due to a different driver version being used during screens
capturing. What you see on your system is a more updated driver version.
iv) Click Finish to complete the driver installation.
v) At the prompt to restart, click Ye s .
You may now proceed with Step 4 to verify if your modem has been installed
successfully.
11
Page 12

ADSL PCI Modem Easy StartADSL PCI Modem Easy Start
ADSL PCI Modem Easy Start
ADSL PCI Modem Easy StartADSL PCI Modem Easy Start
3.4 For Windows® 2000 users
i) Power on your computer to start Windows. It will detect your newly-installed
modem and prompt for its driver.
Place the
Installation CD into
your CD-ROM drive
and click Next.
ii) Select Search for a
suitable driver for my
device
(recommended) and
click Next.
12
iii) Select Specify a
location and click
Next.
Page 13

iv) Click Browse and navigate to
\W2k98Me\Lan directory
(for RFC 1483 and RFC
1577) or W2k98Me\Wan
directory (for RFC 2364) on
the Installation CD.
Click OK.
ADSL PCI Modem Easy StartADSL PCI Modem Easy Start
ADSL PCI Modem Easy Start
ADSL PCI Modem Easy StartADSL PCI Modem Easy Start
v) Windows will prompt
that a driver has been
found.
Click Next to proceed
installation with the
driver found.
If prompted for the
Installation CD, click
OK.
vi) A Digital Signature Not Found Window may appear. This occurs when
Windows detected a newer version of your driver. Click Ye s to proceed.
vii) Click Finish to
complete the
installation.
(If prompted with Digital
Signature Not Found
Window again, click Yes.)
You may now proceed with
Step 4 to verify if your
modem has been installed
successfully.
13
Page 14

ADSL PCI Modem Easy StartADSL PCI Modem Easy Start
ADSL PCI Modem Easy Start
ADSL PCI Modem Easy StartADSL PCI Modem Easy Start
Step 4: Verifying Your ADSL PCI Modem
4.1 For Windows® Me / 98 / 95 users
i) From your Windows desktop, right-click on My Computer and select Properties.
ii) Click on the Device Manager tab.
You should see ADSL PCI Modem listed.
If the driver was not installed properly, a yellow exclamation mark will appear
beside the installed device. In this case, uninstall the driver (select the device
and click Remove) and reinstall again.
iii) For RFC 1577 users, please proceed with Step 5 to configure the properties
of your protocol.
For RFC 1483 and 2364 users, please proceed with Step 6 to configure the
properties of your protocol.
14
Page 15

ADSL PCI Modem Easy StartADSL PCI Modem Easy Start
ADSL PCI Modem Easy Start
ADSL PCI Modem Easy StartADSL PCI Modem Easy Start
4.2 For Windows® 2000 users
i) From your Windows desktop, right-click on My Computer and select Properties.
ii) Click on the Hardware tab and then Device Manager....
You should see ADSL PCI Modem listed.
If the driver was not installed properly, a yellow exclamation mark will appear
beside the installed device. In this case, uninstall the driver (select the device
and click Remove) and reinstall again.
iii) For RFC 1577 users, please proceed with Step 5 to configure the properties
of your protocol.
For RFC 1483 and 2364 users, please proceed with Step 6 to configure the
properties of your protocol.
15
Page 16

ADSL PCI Modem Easy StartADSL PCI Modem Easy Start
ADSL PCI Modem Easy Start
ADSL PCI Modem Easy StartADSL PCI Modem Easy Start
Step 5: Configuring Protocol Properties
(for RFC1577 users)
i) From your Control Panel, locate ADSL PCI Modem icon and double-
click on it. From the window prompted, press <Alt><P>. The following
dialog box will be prompted. Click the Protocol Setup tab.
From the Encapsulation Mode drop-
down field, click and select
Classical IP over ATM (RFC1577).
Click Apply followed by OK.
16
Restart your system for changes to take effect!
Page 17

ADSL PCI Modem Easy StartADSL PCI Modem Easy Start
ADSL PCI Modem Easy Start
ADSL PCI Modem Easy StartADSL PCI Modem Easy Start
ii) Upon system restart, right-click on the Network Neighborhood icon and select
Properties.
iii) Locate TCP/IP -> ADSL PCI Modem and click Properties.
iv) Select the DNS
Configuration tab.
Enter the Host and DNS Server
Search Order values given
by your ISP and click Add.
v) Select the Gateway
tab.
Enter the New
Gateway value given
by your ISP and
click Add.
vi) Select the IP Address tab.
Enter the IP Address and Subnet
Mask given by your ISP and click
OK.
Click OK again.
vii) At the prompt for restart, click Yes.
Please proceed with Step 6 to set your
VPI/VCI values.
17
Page 18

ADSL PCI Modem Easy StartADSL PCI Modem Easy Start
ADSL PCI Modem Easy Start
ADSL PCI Modem Easy StartADSL PCI Modem Easy Start
Step 6: Setting VPI/PCI Values
From your Control Panel, locate ADSL PCI Modem icon and double-click
on it. From the window prompted, press <Alt><P>. The following dialog box
will be prompted. Click the Protocol Setup tab.
To change VPI/VCI values:
At the Virtual Circuit 0 field, enter the VPI and VCI values given by your ISP. Click
Apply and OK.
To change Encapsulation mode (for RFC 1483 and RFC 2364 only):
From the Encapsulation Mode drop-down field, click and select the appropriate
option as given by your ISP. Click Apply followed by OK.
You may proceed with the next section to monitor your ADSL Connection.
18
Restart your system for changes to take effect!
Page 19

ADSL PCI Modem Easy StartADSL PCI Modem Easy Start
ADSL PCI Modem Easy Start
ADSL PCI Modem Easy StartADSL PCI Modem Easy Start
Monitoring Your ADSL Connection
From your Control Panel, locate ADSL PCI Modem icon and double-click on
it. The following window will be prompted.
The ADSL Line Information
indicates the status of your
ADSL line connection.
Once the ADSL Line is
established, the connection
information will be displayed
at the ADSL Connection
Information field.
Click OK to close.
Alternatively, you may double-click the ADSL PCI Modem icon on your
Windows system tray. The following window will be prompted.
Your ADSL Line status and Bytes received/
sent are also indicated.
To reveal the Toolbox (as shown on your
left), press <Alt><A>.
Select Advanced Monitoring for receive and
transmit rates as shown on the window
above.
19
Page 20

ADSL PCI Modem Easy StartADSL PCI Modem Easy Start
ADSL PCI Modem Easy Start
ADSL PCI Modem Easy StartADSL PCI Modem Easy Start
Uninstalling Your ADSL PCI Modem in
Windows
i) From your Windows taskbar, click Start > Settings > Control Panel. Double-
click the Add/Remove Programs icon.
ii) At the Add/Remove Programs Properties Window, from the Install/Uninstall
tab, select ADSL PCI Modem and click Add/Remove... .
iii) Follow closely to the instructions prompted to start the uninstallation.
iv) Restart your system.
®
Me / 98 / 98SE / 95 / 2000
Windows® 95 / 98 / 98Second Edition / Me and Windows® 2000 are registered trademarks of Microsoft Corp.
All other company or product names are trademarks or registered trademarks or service marks of their
respective owners.
© Copyright, August 2001. P/N: 040-511413-101
20
(Ref:300)
 Loading...