

Page 1

NETCARD
Users Manual
Version 1.0
AZ-NC2100
AZ-NC2100(Lite)
Page 2
Contents
○○○○○○○○○○○○○○○○○○○○
4
5
6
6
6
7
7
10
11
15
20
11
19
22
25
13
Preface .......................................................................
Introduction..............................................................
Before You Begin .........................................................
2.1 Safety Precaution ................................................................
2.2 Installation Notes ................................................................
Setting Up Your Network Card ......................................
3.1 Installing the Network Card ..................................................
3.2 Connecting the Network Card ..............................................
Installing the Network Card Driver .................................
4.1 For Windows® 2000 .......................................................
4.2 For Windows® 98............................................................
4.3 For Windows® 95............................................................
4.4 For Windows for Workgroup 3.11 (WFW)......................
4.5 For Windows NT®3.51/4.0 ............................................
4.6 For Netware ODI Client (3.x/4.x) .................................
4.7 For Novell Netware 3.12 ...............................................
4.8 For Novell NetWare 4.1 .................................................
27
Page 3

P/N: 040-312308-101
29
34
37
4.9 For Novell NetWare 4.11 ...............................................
4.10 For Novell Client32 ........................................................
4.11 For Microsoft Network Client 3.0 for MS-DOS .............
4.12 For LAN Manager 2.1 Workstation/Sever (NDIS)..........
4.13 For SCO Unix 4.x...........................................................
4.14 For SCO Unix 5.x...........................................................
4.15 For UnixWare7 ...............................................................
4.16 For Packet Driver............................................................
LEDs Descriptions ......................................................
Technical Specifications .............................................
31
39
41
43
45
47
48
Page 4

4
○○○○○○○○○○○○○○○○○○○○○○○○○○○○○○○○○○○○○○○○○
Chapter 1 Introduction
Preface
This manual covers the models AZ-NC2100 and AZ-NC2100(Lite).
It includes installation and connection of the Network card (chapter 3) and
installation of the Network Card driver (chapter 4). Before you proceed with
the installation, make sure that you have read through the safety guidelines
and installation notes (chapter 2).
For further technical details on your card, you may refer to the ReadMe.txt file
found in your NetCard Installation CD.
Page 5

5
○○○○○○○○○○○○○○○○○○○○○○○○○○○○○○○○○○○○○○○○○
Chapter 1 Introduction
Introduction
Congratulations on your purchase of NetCard !
NetCard 10/100Mbps is a Fast Ethernet Adapter that gives you the flexibility to
connect 10Mbps Ethernet or 100Mbps Fast Ethernet without the need of tedious
configuration.
It can support 200Mbps full-duplex support and has a 32-bit Bus Master high-
performance data transfer to Host.
Proceed now to connect NetCard to your computer for a full-time dedication to a
network, either at home or in your office !
○○○○○○○○○○○○○○○○○○○○
Page 6

6
○○○○○○○○○○○○○○○○○○○○○○○○○○○○○○○○○○○○○○○○○
Chapter 2 Before You Begin
Before You Begin
This chapter contains the safety rules and the installation
guidelines that you need to know before you start installing
your network card.
○○○○○○○○○○○○○○○○○○○○
2.1 Safety Precaution
• Do not remove your card from its protective bag until you are ready to
install it.
• Always try to hold your card by its edges. Avoid touching any electronic
components on your card.
• Static electricity can cause permanent damage to your card. To prevent
such a damage, you must ground yourself during the installation:
» Use a grounding strap - a coiled wire with a clip at one end and an
elastic strap at the other. Wear the strap around your wrist and attach
the clip to any non-painted metal surface of your computer chassis.
» If you do not have a grounding strap, touch any non-painted surface
of your computer chassis before you begin installation, and again
every minute or so until the installation is completed.
2.2 Installation Notes
• The graphics and screens illustrations shown in this easy start may differ
from what you see in your system, but the steps still apply.
• A Philips screwdriver is required.
• The documentation for your computer should come in handy during the
installation. Have it ready by your side.
Page 7
7
○○○○○○○○○○○○○○○○○○○○○○○○○○○○○○○○○○○○○○○○○
Chapter 3 Setting Up the Network Card
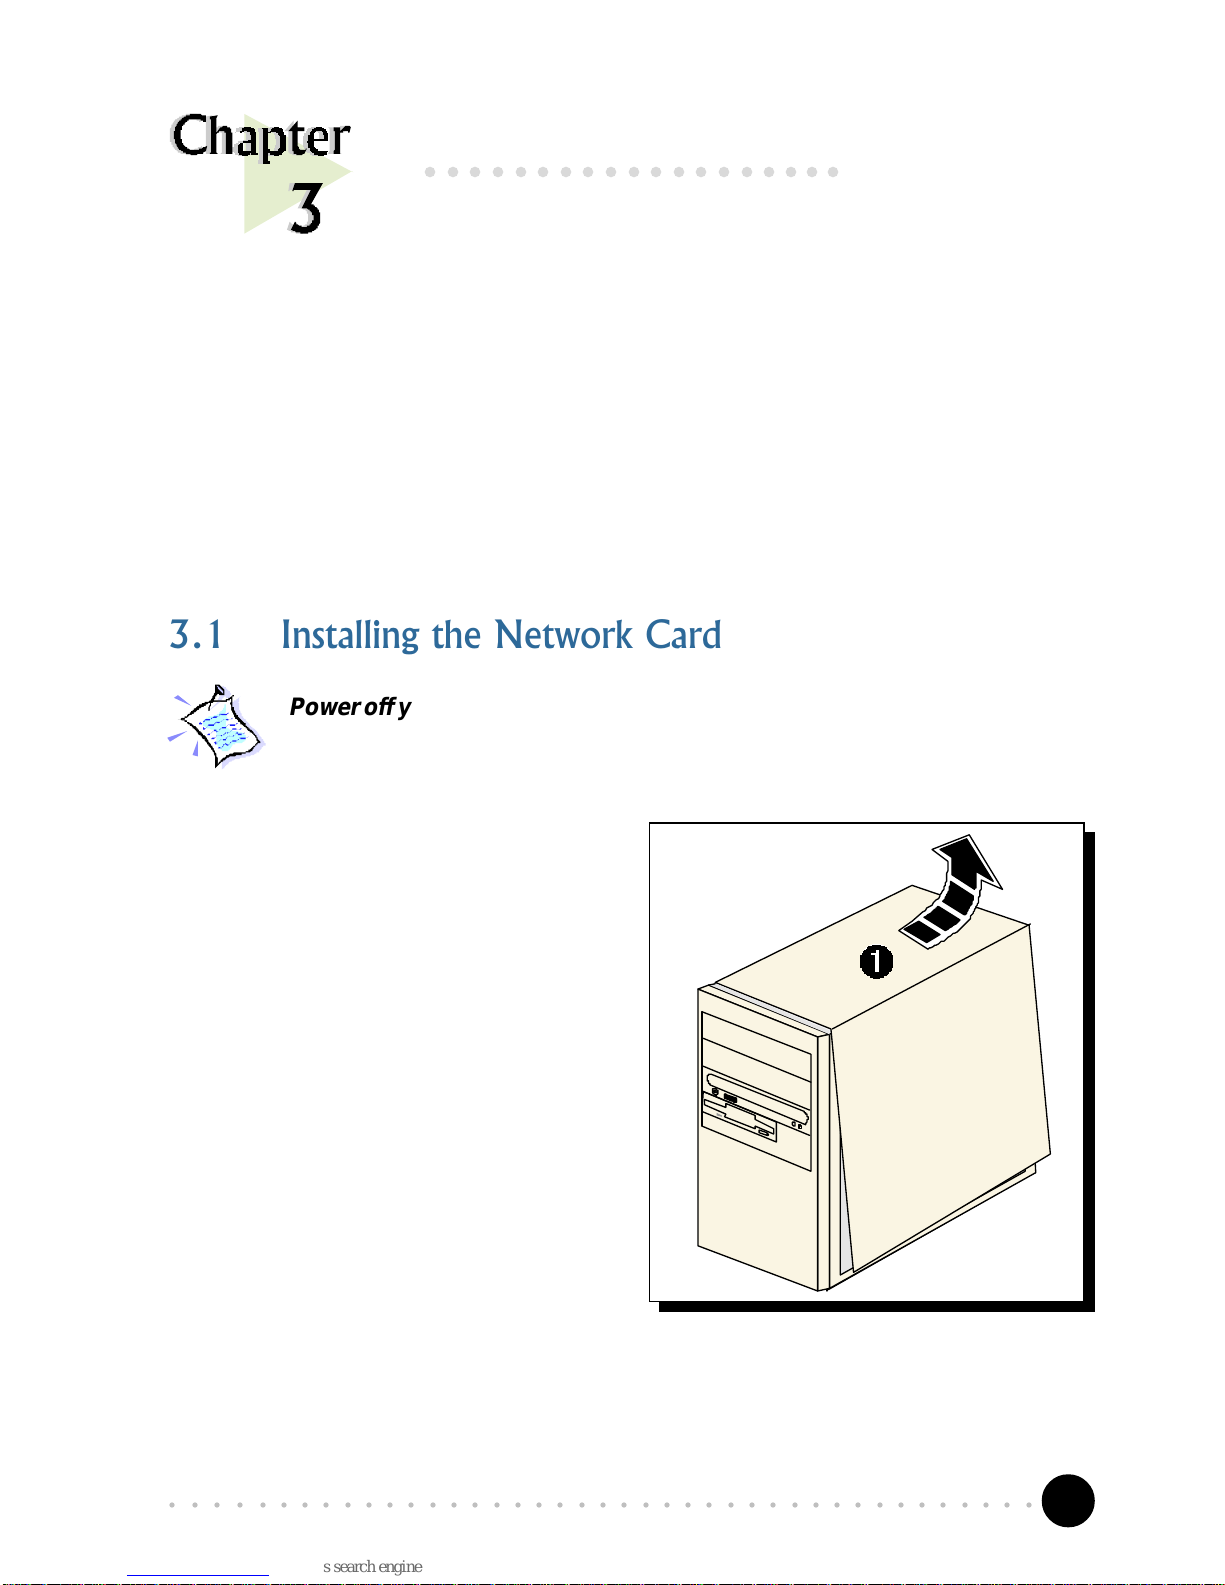
3.1 Installing the Network Card
Power off your computer and any connected devices before installing your
card !
¶ Remove the cover of your
computer.
Setting Up Your Network
Card
This chapter contains information on how to install and
connect your network card.
○○○○○○○○○○○○○○○○○○○
Page 8
8
○○○○○○○○○○○○○○○○○○○○○○○○○○○○○○○○○○○○○○○○○
Chapter 3 Setting Up the Network Card
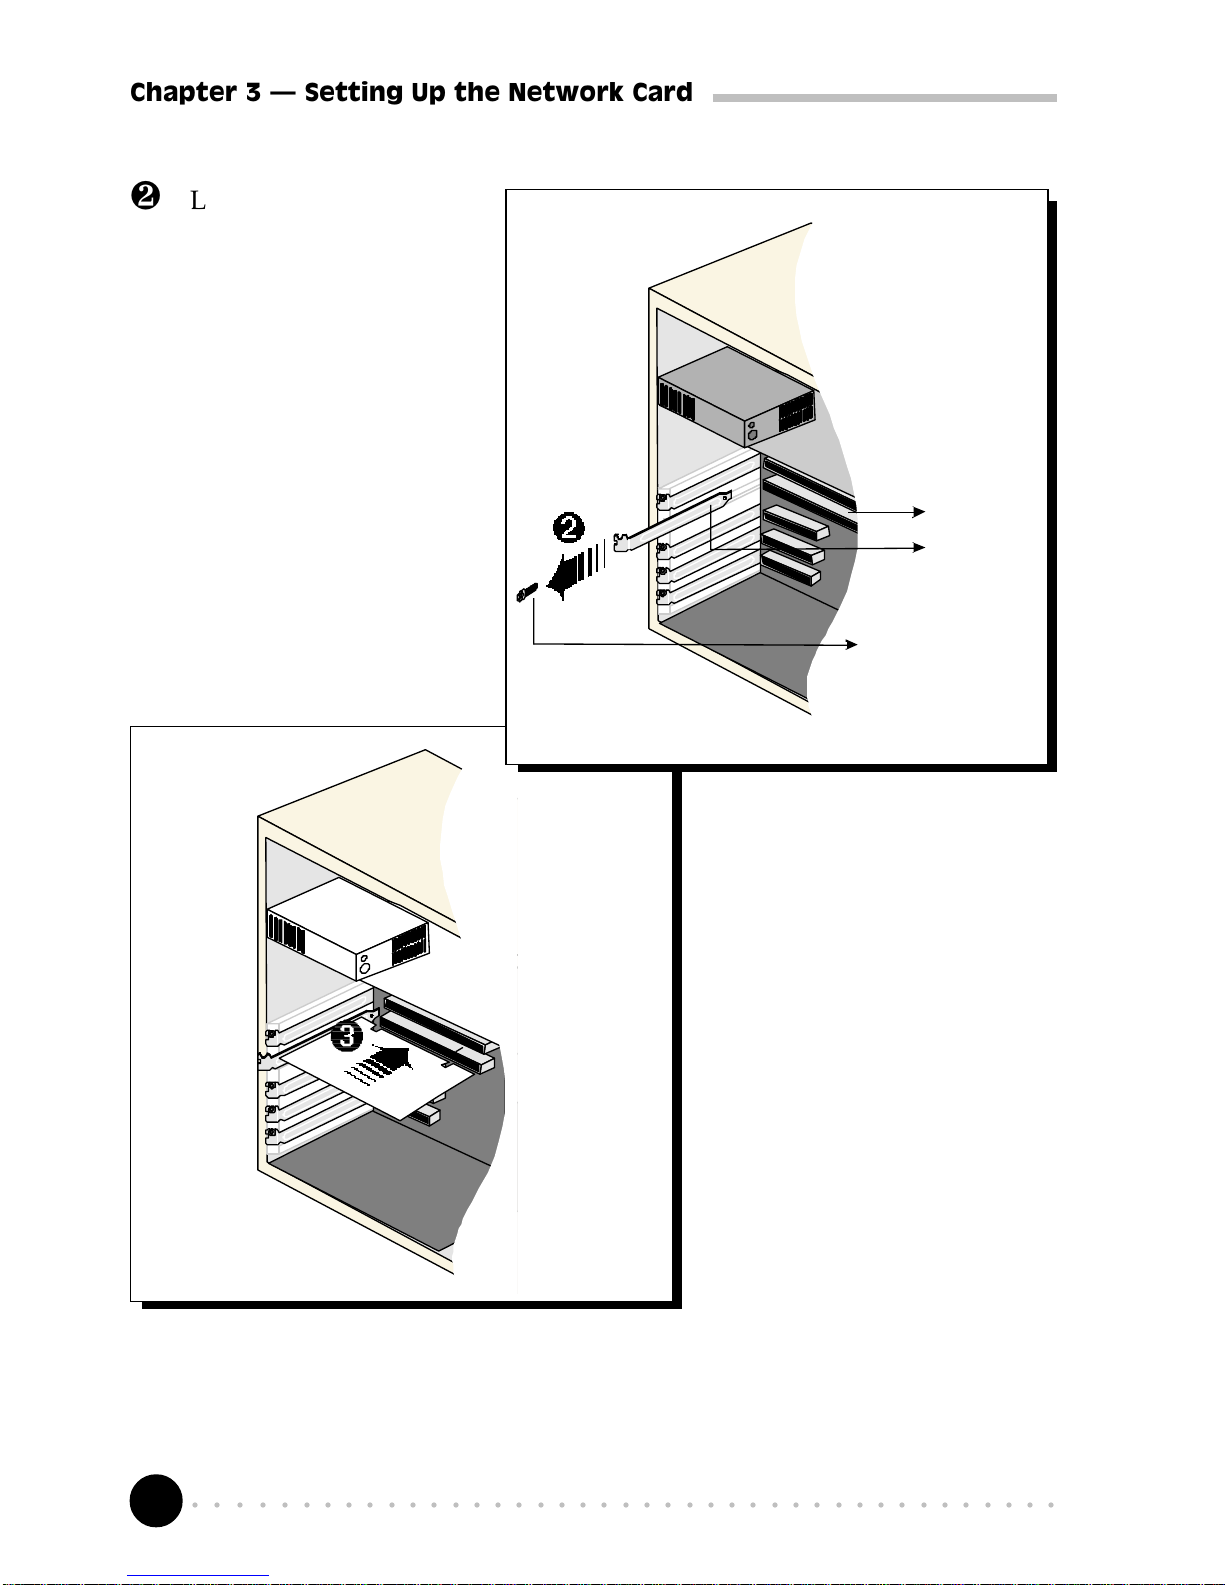
· Locate any available
PCI Bus slot and
remove its cover plate.
Keep the mounting
screw to secure your
card later.
PCI Bus Slot
Cover Plate
Mounting Screw
¸ Align your card with
the PCI Bus slot and
firmly push it into the
slot. If the card does
not slide in, do not
force it. Make sure that
the card is lined up
properly and try again.
Page 9
9
○○○○○○○○○○○○○○○○○○○○○○○○○○○○○○○○○○○○○○○○○
Chapter 3 Setting Up the Network Card
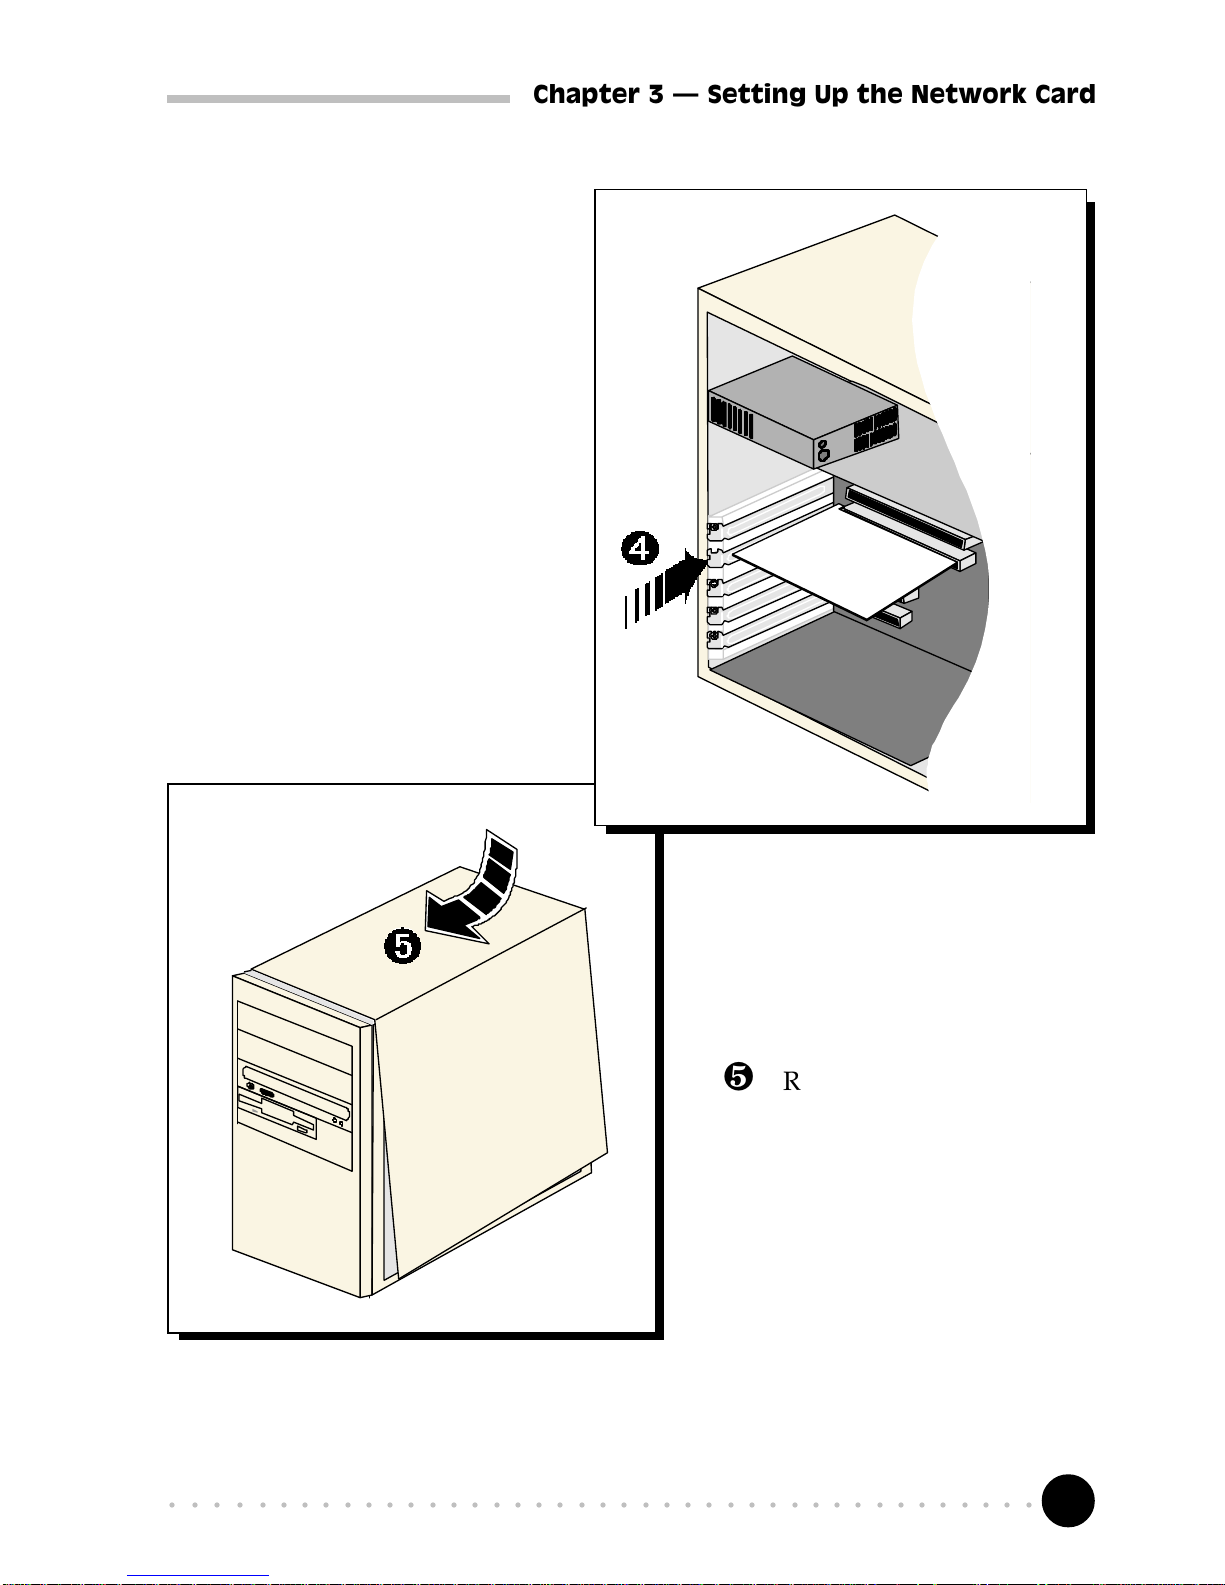
º Replace the cover of your
computer.
¹ Secure your card to your
computer chassis with the
mounting screw.
Page 10
10
○○○○○○○○○○○○○○○○○○○○○○○○○○○○○○○○○○○○○○○○○
Chapter 3 Setting Up the Network Card
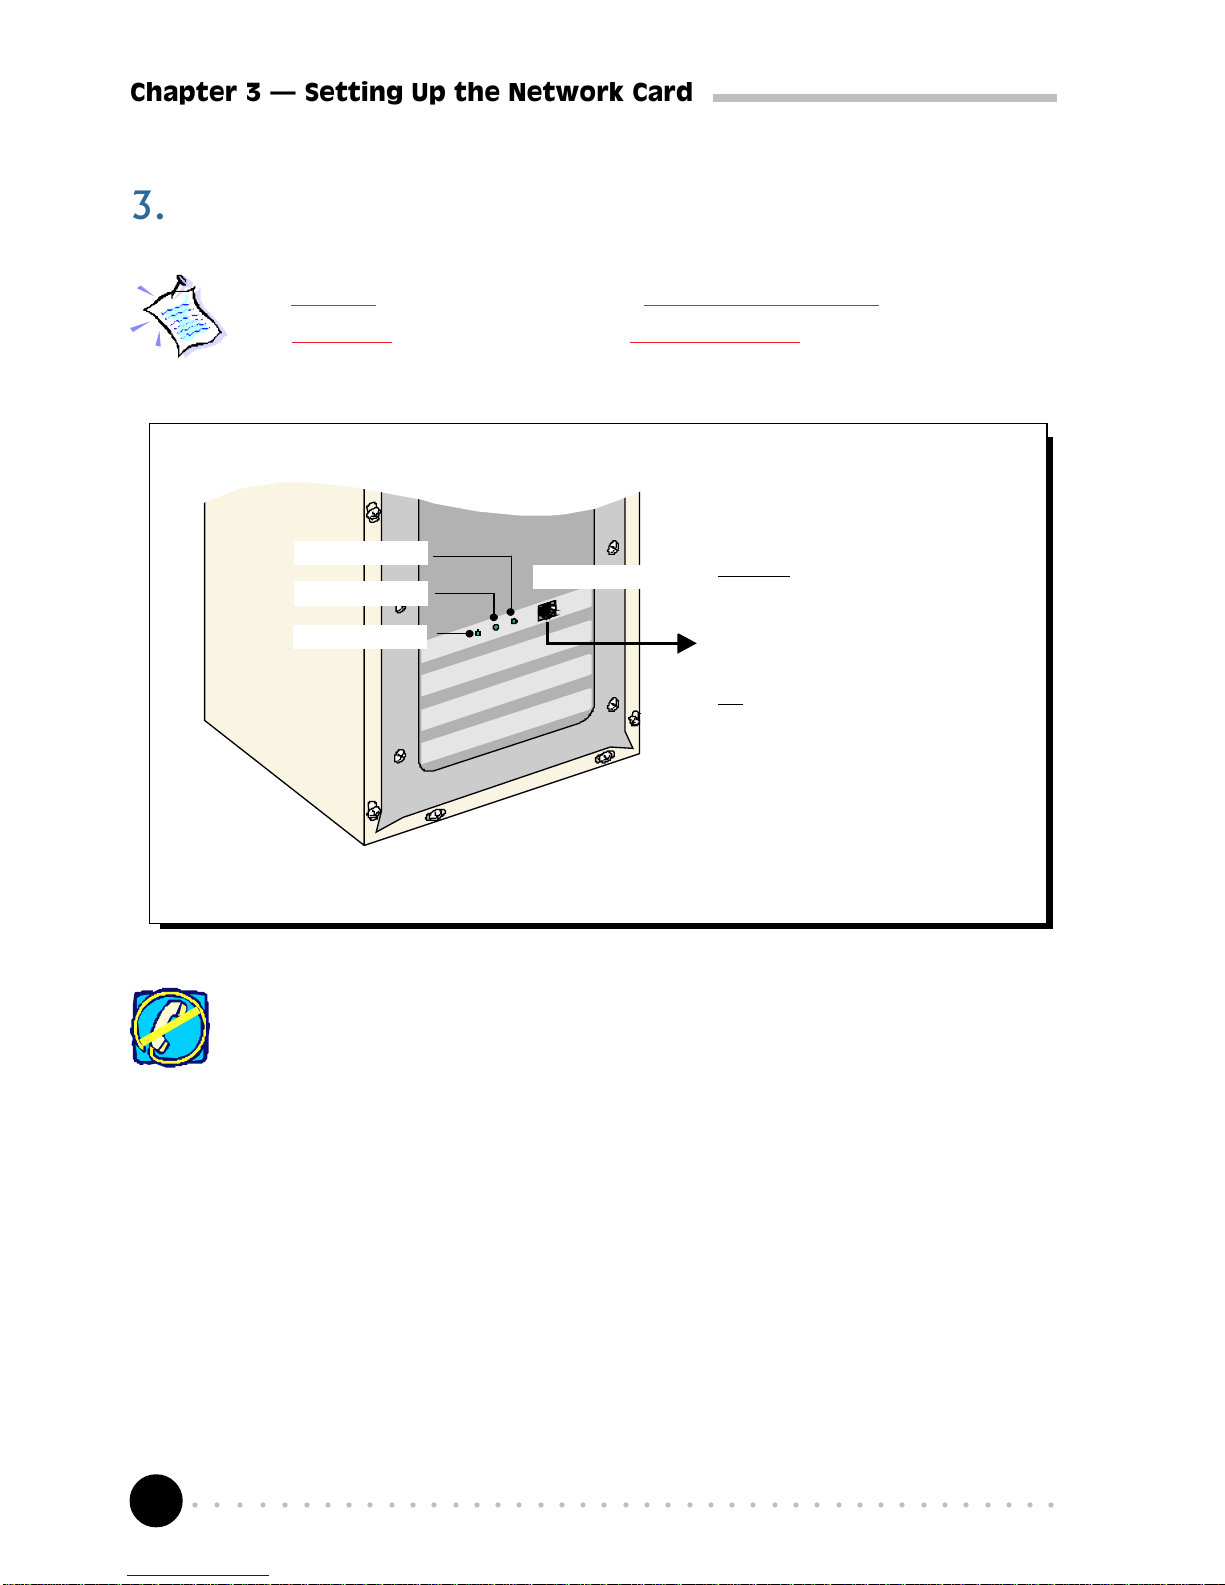
3.2 Connecting the Network Card
For 10Mbps connection, you may use Category 3, 4, or 5 UTP Ethernet cable.
For
100Mbps connection, use only Category 5 UTP Ethernet cable.
This completes the setting up of your network card. Please proceed to the next
chapter to install your network card driver.
For descriptions on the LEDs, you may refer to the section on LEDs Descriptions.
Do not plug in your telephone line to the Ethernet Jack! The Ethernet
Jack is only for the network cable.
Ethernet Jack
either connect the
Ethernet cable to
another computer that
has a PCI network card
or
connect it directly to a
Hub
For connection between 2 computers, a
crossover UTP cable must be used.
Link LED
Activity LED
100M LED
Page 11
11
○○○○○○○○○○○○○○○○○○○○○○○○○○○○○○○○○○○○○○○○○
Chapter 4 Installing the Network Card Drivers
Installing the Network
Card Driver
This chapter contains information on how to install the network
card driver in Windows® 2000, 98, 95, Workgroup 3.11,
Windows NT, NetWare ODI Client, Novell Netware, Novell
Client32, Microsoft Network Client 3.0 for MS-DOS, LAN
Manager Workstation/Server, SCO Unix, UnixWare and
Packet Driver.
○○○○○○○○○○○○○○○○○○○
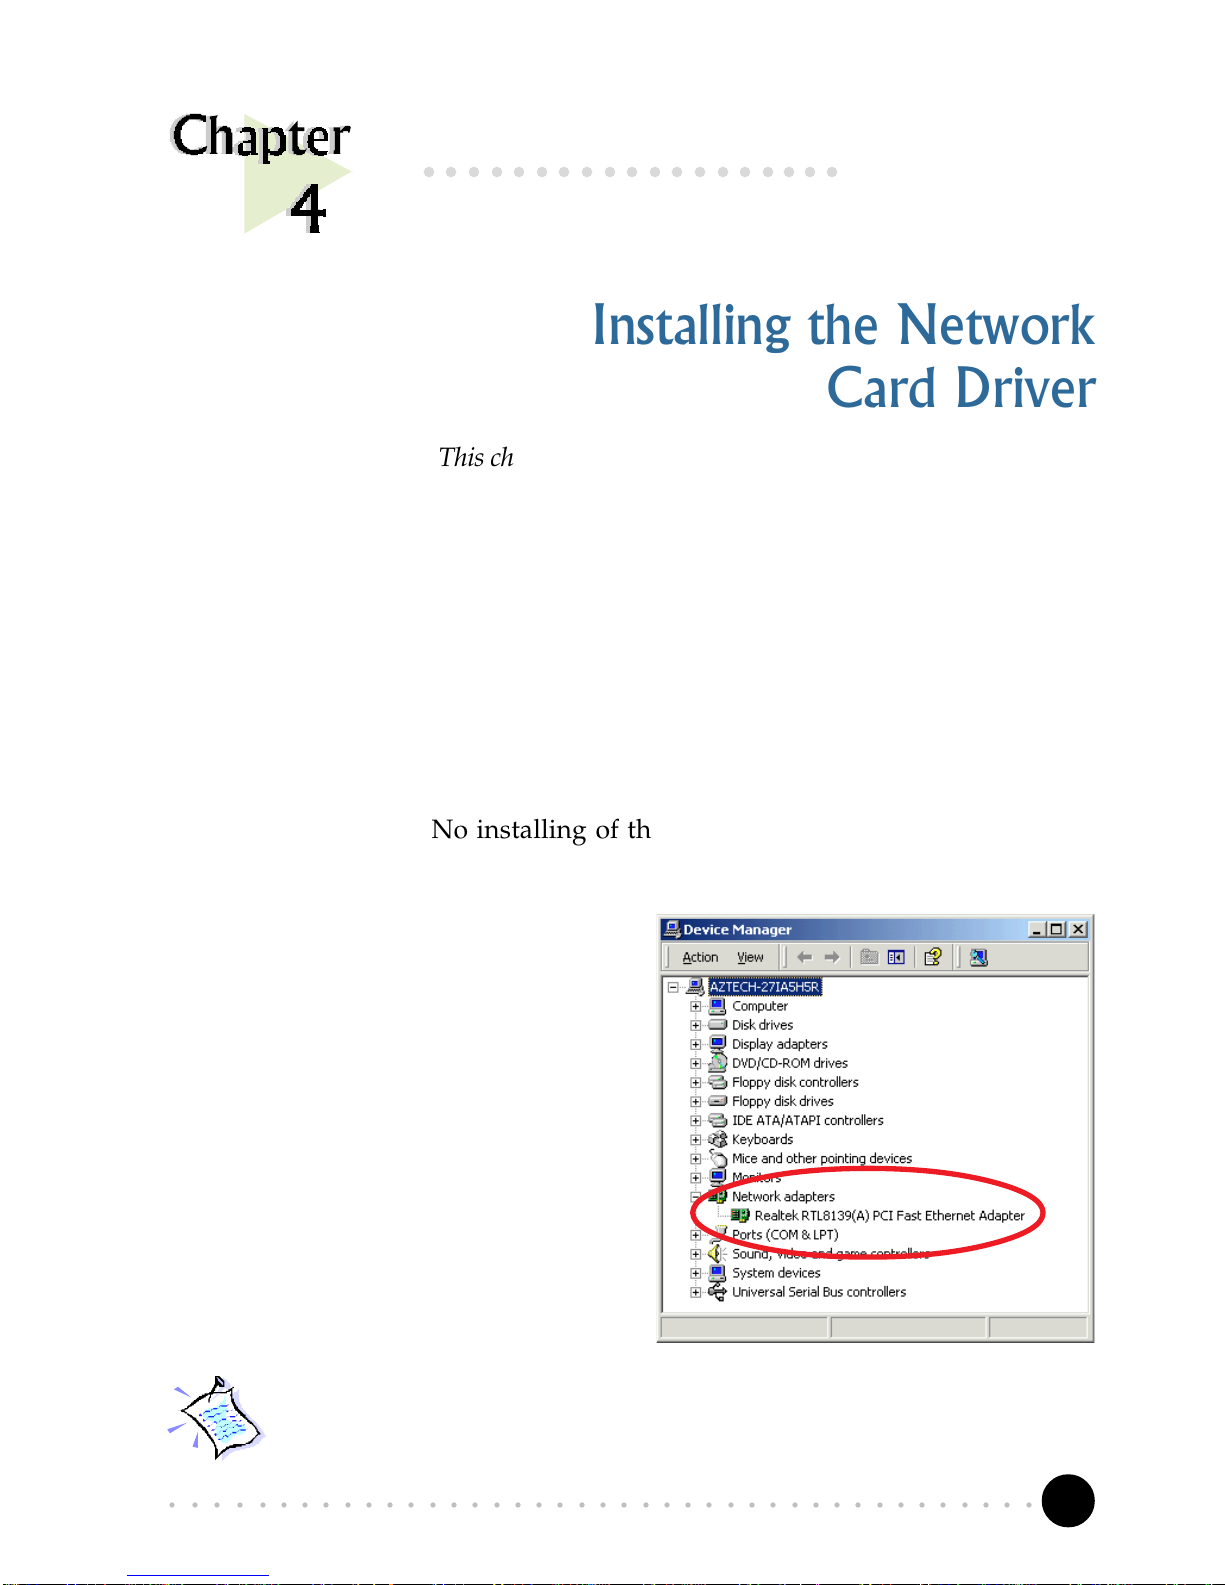
4.1 For Windows® 2000
Start your Windows. No installing of the Network Card driver is required as
the driver is already pre-installed in Windows®2000.
To verify this, from your Windows
desktop, right-click on My
Computer. Select Properties. Click
Hardware tab and click Device
Manager... .
Double-click on Network adapters.
You will see the Realtek device listed,
as shown on your right.
If you encounter any problems with the pre-installed driver, you may
perform the following update.
Page 12

12
○○○○○○○○○○○○○○○○○○○○○○○○○○○○○○○○○○○○○○○○○
Chapter 4 Installing the Network Card Drivers
4.1.1 Updating of Driver
1. From the Device Manager shown above, double-click on the device
'Realtek RTL8139(A) PCI Fast Ethernet Adaptor'.
2. Click the Driver tab and click Update Driver... button.
3. From the Upgrade Device Driver Wizard, click Next.
4. Select 'Search for a suitable driver for my device (recommended)' and
click Next.
5. Place the NetCard Installation CD on your CD-ROM drive. Select the
option 'CD-ROM drives' and click Next.
6. Select the option 'Install one of the other drivers' and click Next.
7. You will be prompted which driver to install. Select 'Realtek RTL8139(A/
B/C/8130) PCI Fast Ethernet NIC' with Provider and Manufacturer from
Realtek and click Next.
8. Click Finish to complete the driver upgrade.
Page 13
13
○○○○○○○○○○○○○○○○○○○○○○○○○○○○○○○○○○○○○○○○○
Chapter 4 Installing the Network Card Drivers
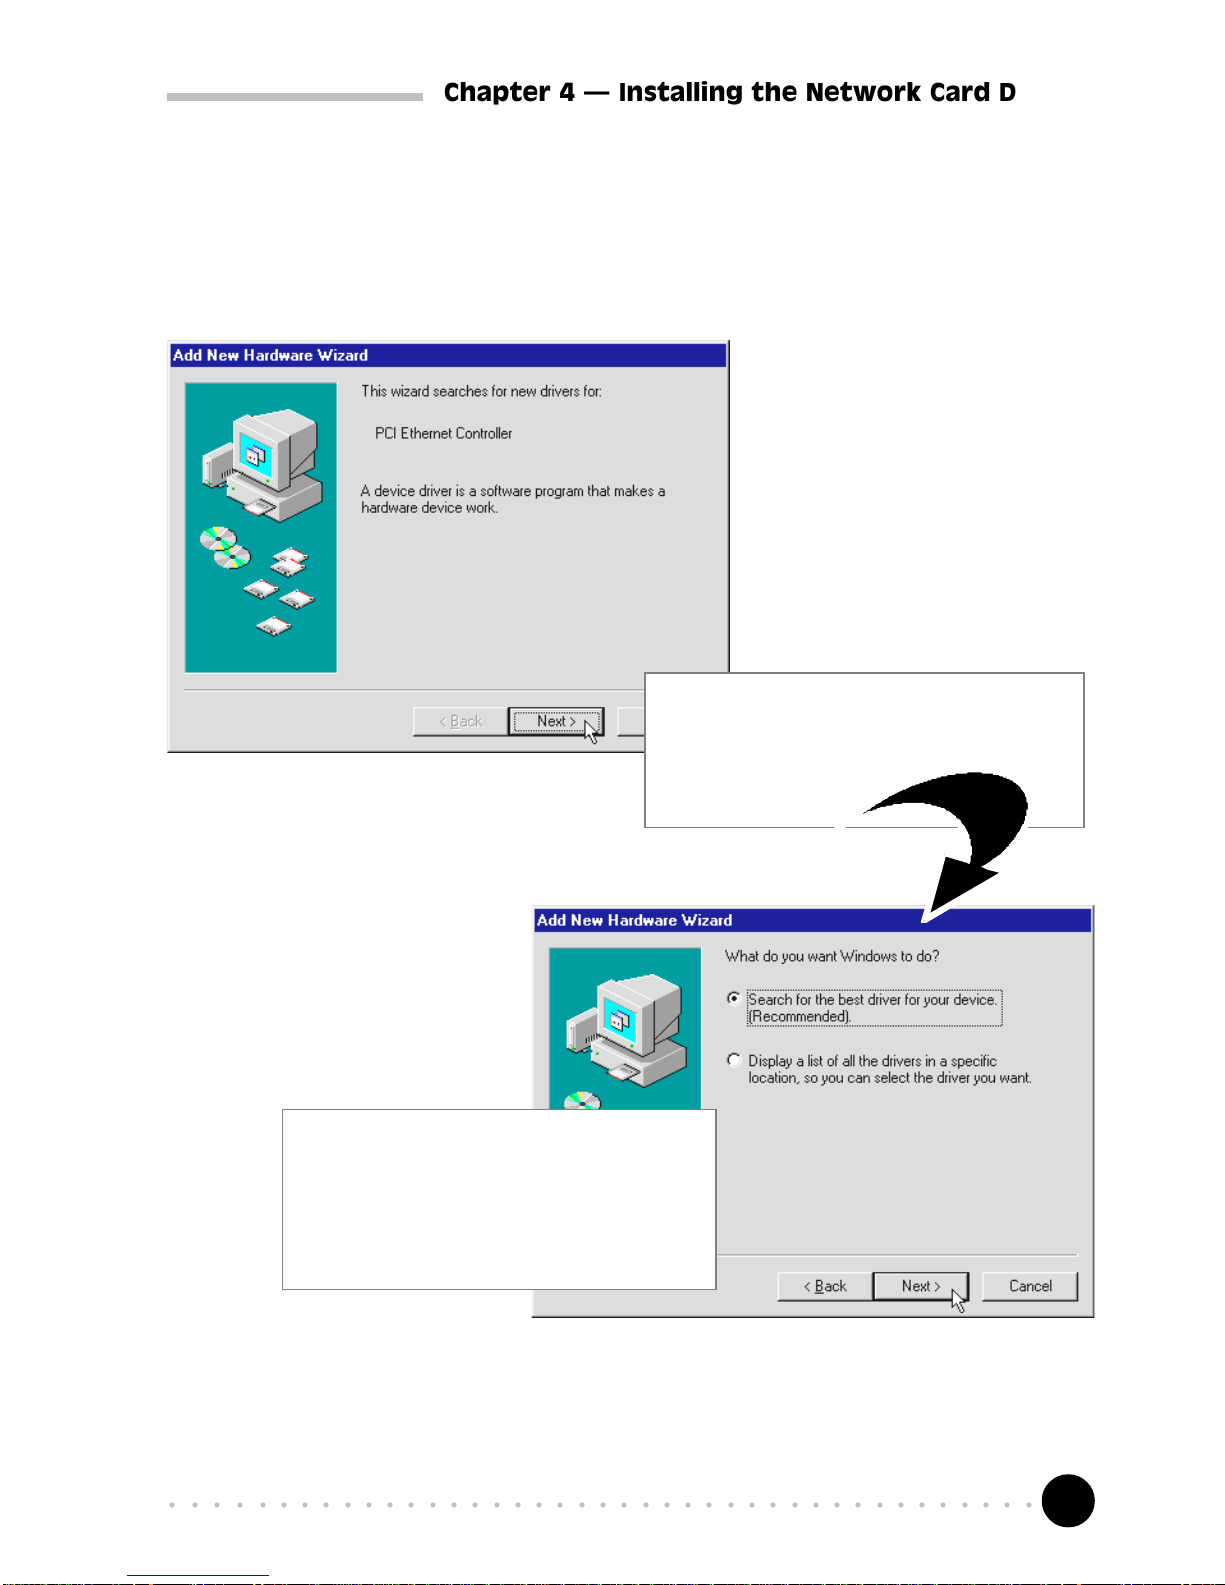
The next window
prompt will ask
for your network
card driver.
Place the NetCard Installation
CD into your CD-ROM Drive.
Click Next.
1
Click the option Search for the
best driver for your device
(Recommended).
Click Next.
2
4.2 For Windows® 98
Power on your
computer to start
Windows® 98.
Windows will detect the
newly-installed network
card and an Add New
Hardware Wizard window
will appear.
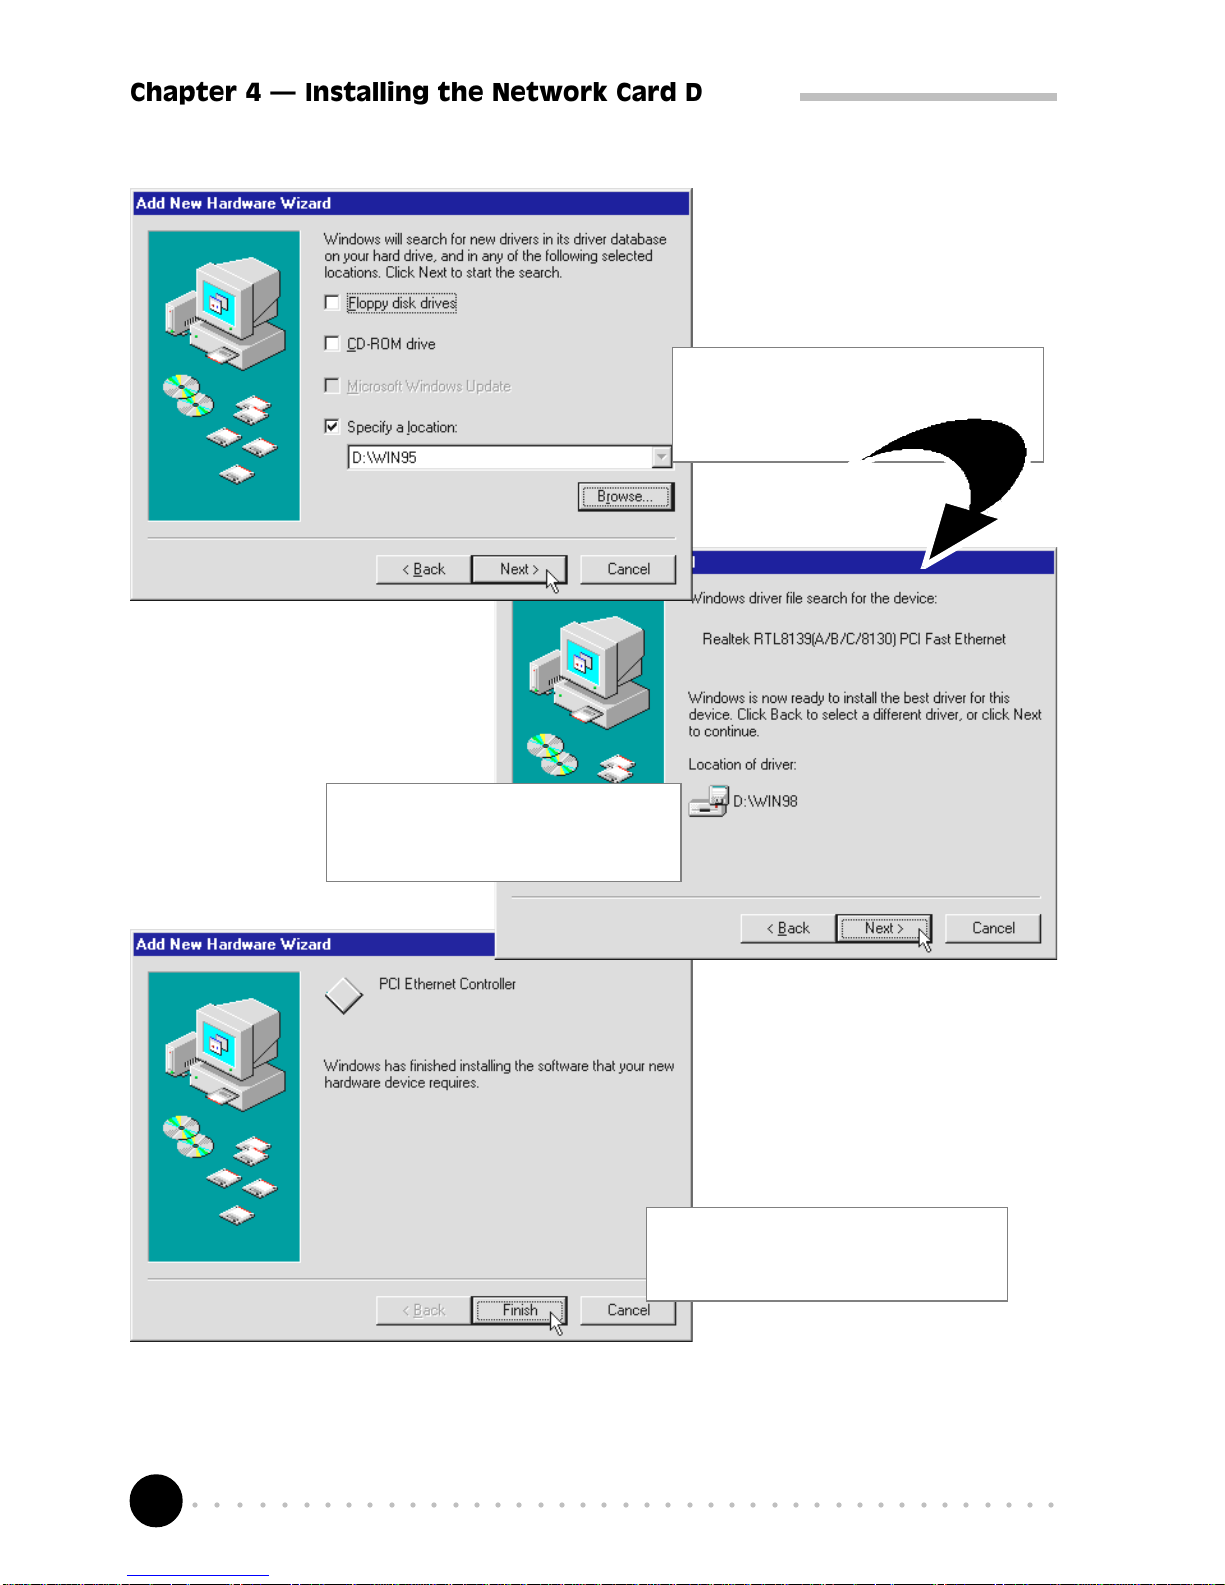
Location Of Driver: \WIN98
Page 14
14
○○○○○○○○○○○○○○○○○○○○○○○○○○○○○○○○○○○○○○○○○
Chapter 4 Installing the Network Card Drivers
This completes the installation of the network card driver in Windows® 98.
Please proceed to section 4.3.1 - Verifying Your Network Card.
Upon completion, the
following window
will be displayed.
Click Finish. Restart your
system, if prompted.
5
Windows will
prompt that it has
located the driver.
Click Next to proceed with
the installation.
4
Select the source of
your driver.
Click Specify a location.
Click Next.
3
Page 15
15
○○○○○○○○○○○○○○○○○○○○○○○○○○○○○○○○○○○○○○○○○
Chapter 4 Installing the Network Card Drivers
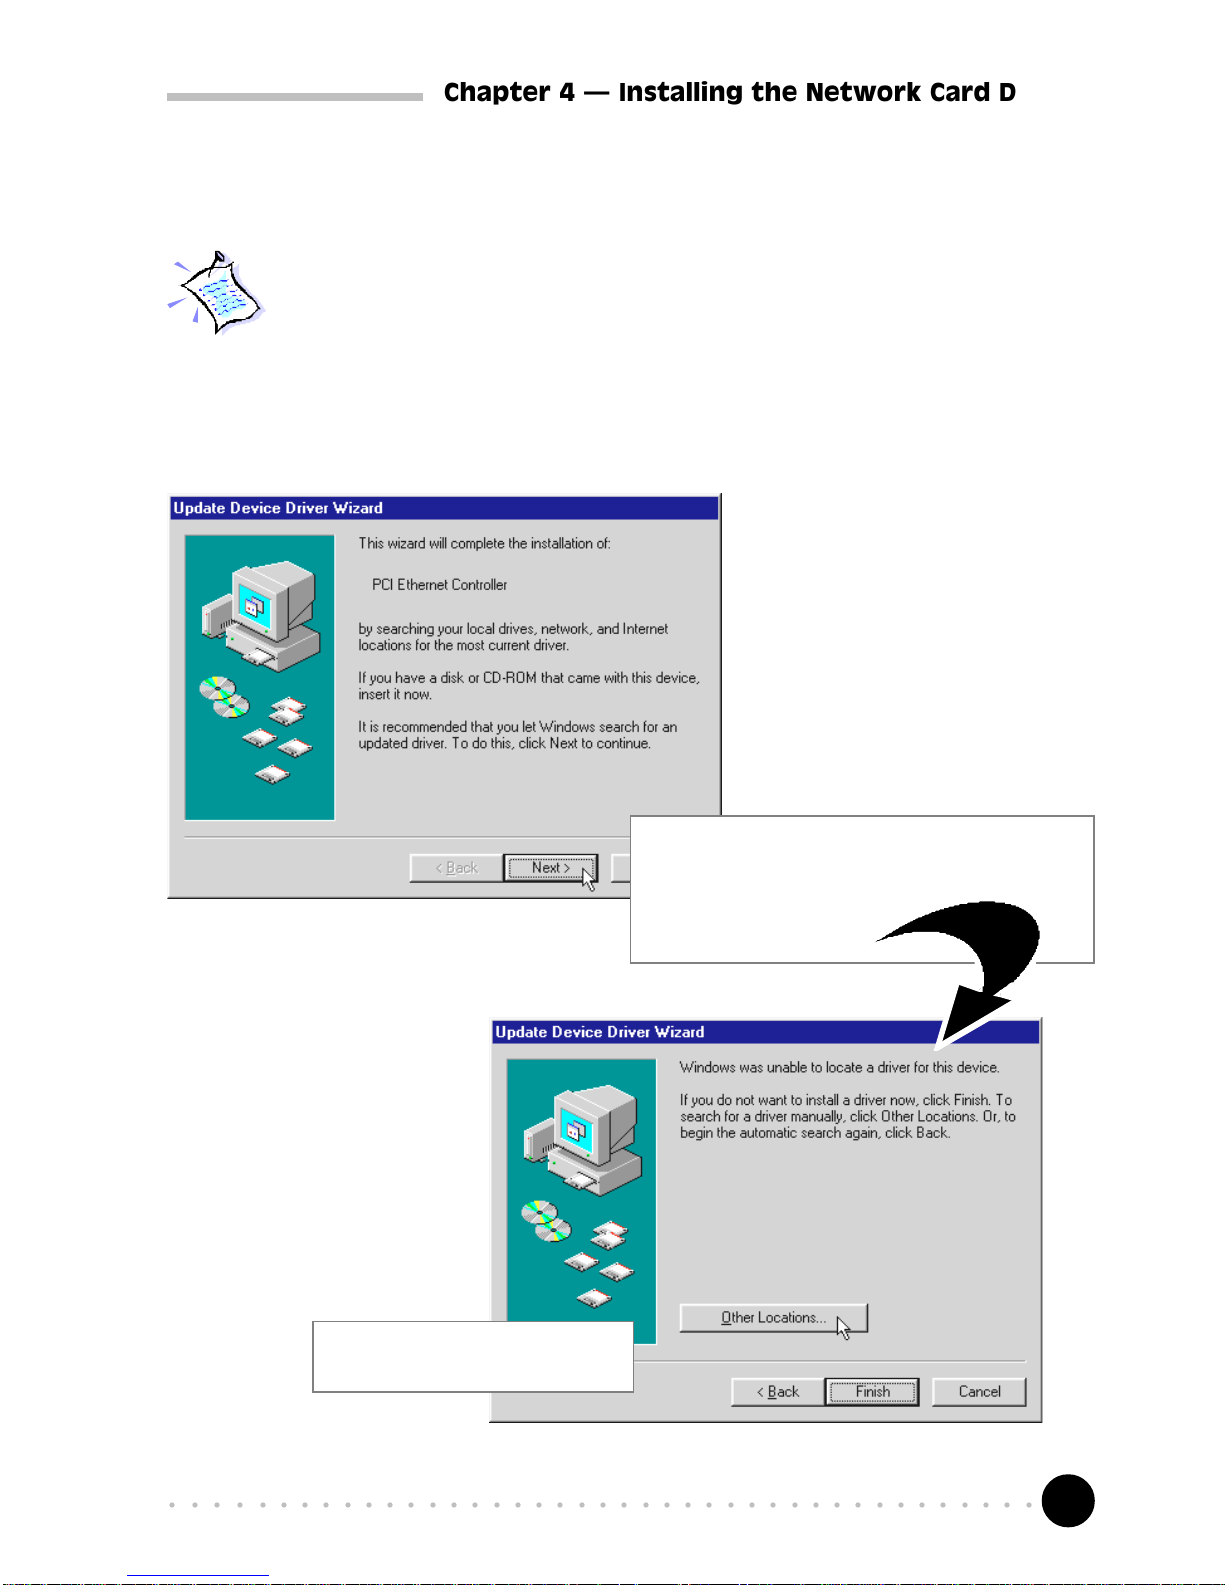
Windows will now
prompt for the
location of the
network card driver.
Click Other Locations.
2
4.3 For Windows® 95
System may prompt for Windows 95 Installation CD/diskettes for some
files. Be sure that you have them by your side during installation.
Place the NetCard Installation CD
into your CD-ROM Drive.
Click Next.
1
Power on your
computer to start
Windows® 95.
Windows will detect the
newly installed network
card and an Update Device
Driver Wizard window
will appear.
Location of Windows 95 rev 4.00.950 B driver : \WIN95
Location of Windows 95 rev 4.00.950/rev 4.00.950A driver : \WIN95A
Page 16

16
○○○○○○○○○○○○○○○○○○○○○○○○○○○○○○○○○○○○○○○○○
Chapter 4 Installing the Network Card Drivers
In the text box, type either
"D:\Win95" for Windows® 95 (rev 4.00.950 B) users
OR
"D:\Win95A' for Windows® 95 (rev 4.00.950/rev
4.00.950A) users
(Assuming your CD-ROM Drive is D. Else substitute the drive
letter accordingly.)
Click OK.
3
Click Finish to proceed.
4
Windows will
prompt that it has
located the driver.
Page 17

17
○○○○○○○○○○○○○○○○○○○○○○○○○○○○○○○○○○○○○○○○○
Chapter 4 Installing the Network Card Drivers
The Copying Files... dialog box will be prompted.
In the text box, type D:\Win95 or
D:\Win95A (see step 3).
(Assuming your CD-ROM Drive is D. Else
substitute the drive letter accordingly.)
Click OK.
Upon completion, restart your computer.
6
This completes the installation of the network card driver in Windows® 95.
Please proceed to section 4.3.1 - Verifying Your Network Card.
Upon system prompt for NetCard Installation CD, check that the
CD is in your CD-ROM Drive.
Click OK.
5
Page 18

18
○○○○○○○○○○○○○○○○○○○○○○○○○○○○○○○○○○○○○○○○○
Chapter 4 Installing the Network Card Drivers
4.3.1 Verifying Your Network Card for Windows® 98/95
1. From the Windows task bar, click Start > Settings > Control Panel.
2. Double-click icon.
3. From the Device Manager tab, double-click Network adapters.
Make sure that the Realtek RTL8139(A/B/C8130) PCI Fast Ethernet is
listed as shown. This means that the network card has been installed
successfully.
(If there is a yellow exclamation mark on the network device, select the device,
click Remove and reinstall your network card driver.)
Page 19

19
○○○○○○○○○○○○○○○○○○○○○○○○○○○○○○○○○○○○○○○○○
Chapter 4 Installing the Network Card Drivers
4.4 For Windows for Workgroup 3.11 (WFW)
Location Of Driver: \Wfw311\RTSND.386
Setup Procedure:
1. Select "Network Setup" icon in the Network Group.
2. Click on "Drivers...".
3. If you are replacing a previous LAN adapter, select Remove to delete that
adapter
4. Click on "Add Adapter".
5. Choose Unlisted or Updated Network Adapter.
6. Place the NetCard Installation CD into your CD-ROM drive. Specify the
path D:\Wfw311\RTSND.386 for the location of the driver.
(Assuming your CD-ROM drive is D. Else, substitute the drive letter accordingly.)
7. Restart your computer when prompted, for the changes to take effect.
NOTES:
1. Parameters for the PROTOCOL.INI file:
AdapterID: This keyword is provided by RTL8139, and is required when
more than one PCI Ethernet Adapters exist on one system.
2. Installing Multiple LAN Adapters
There are two different method to complete it:
(a) Under DOS mode, modify the AdapterID in file
C:\Wfw311\PROTOCOL.INI.or
(b) Enter Windows. Follow step 2 as described above. Click "Setup.." >
"Advanced...", fill AdapterID in Value item. Make changes and click
OK. Close the NETWORK SETUP.
Page 20

20
○○○○○○○○○○○○○○○○○○○○○○○○○○○○○○○○○○○○○○○○○
Chapter 4 Installing the Network Card Drivers
4.5 For Windows NT®3.51/4.0
Location of NT4.0 Driver: \WINNT4\RTL8139.SYS
Location of NT3.51 Driver: \WINNT351\RTL8139.SYS
1. From your Windows taskbar, click Start > Settings > Control Panel. Double-
click the Network icon.
2. From the Network Settings dialog box, click the Adapter tab > Add... . The
Add Network Adapter dialog box will appear.
3. From the list of network cards, select "<other> Requires disk from
manufacturer", and press <Enter>.
4. Place the NetCard Installation CD into your CD-ROM Drive.
In the text box, type
D:\WINNT4 for Windows NT4.0
D:\WINNT351 for Windows NT3.51
(Assuming your CD-ROM drive is D. Else, substitute the drive letter accordingly.)
Click OK.
5. From the Select Line Speed dialog box, ensure that the value is "auto".
This allows the network card to auto-detect the line speed (either 10 Mb or
100Mb).
The values, "10" or "100" are used only when you want to force the network card
to 10Mb or 100Mb.
6. Next, from the Input EthernetID dialog box, click SKIP if there is only one
adapter is installed on your computer. (This option is only required when
you have more than one NetCard on this computer.)
7. From the Bus Location dialog box, if your system has more than one
hardware bus, select the Bus Type and Bus number on which your network
adapter card is installed.
8. Windows will then perform the binding process.
(If any additional network software options were installed, you may be
prompted for specific information for these packages.)
10. Restart your system.
Page 21

21
○○○○○○○○○○○○○○○○○○○○○○○○○○○○○○○○○○○○○○○○○
Chapter 4 Installing the Network Card Drivers
Installing Multiple LAN Adapters:
Repeat step 1 to 2 as described above. From the Network Settings dialog box,
click Configure... The Input Ethernet ID dialog box will appear. Enter the
adapter's Ethernet ID and click OK. Close the NETWORK SETUP.
Page 22

22
○○○○○○○○○○○○○○○○○○○○○○○○○○○○○○○○○○○○○○○○○
Chapter 4 Installing the Network Card Drivers
4.6 For Netware DOS ODI Client (3.x/4.x)
Location of Driver: \NETWARE\DOSODI\RTSODI.COM
Sample Configuration Files:
STARTNET.BAT:
LSL
RTSODI
IPXODI
NETX or VLM (VLM's for NetWare 4.x)
NET.CFG:
LINK DRIVER RTSODI
SPEED 100 -- Specify adapter's speed.
BUSNO NN -- where NN is the PCI bus identifier of the PCI bus which
connects to the adapter.
DEVICENO NN -- where NN is the specific PCI BIOS device identification
number of the specified PCI adapter.
[or you can use "EtherID" to select a specific RTL8139 adapter:
EtherID NNNNNNNNNNNN -- Where NNNNNNNNNNNN specify
a RTL8139 adapter's node address.
This is only required when more than
one RTL8139 adapters exist on one
system.
]
FRAME Ethernet_802.2 -- Specify frame type
FRAME Ethernet_802.3
FRAME Ethernet_SNAP
FRAME Ethernet_II
NetWare DOS Requester
FIRST NETWORK DRIVE = F
NETWARE PROTOCOL = NDS BIND
PREFERRED SERVER = NW411
Page 23

23
○○○○○○○○○○○○○○○○○○○○○○○○○○○○○○○○○○○○○○○○○
Chapter 4 Installing the Network Card Drivers
4.6.1 Setup Procedures for NetWare 3.11/3.12 Client
1. Copy RTSODI.COM from the NetCard Installation CD:
\NETWARE\DOSODI to your harddisk.
2. Create a batch file, or add to your STARTNET.BAT file the commands
listed above under STARTNET.BAT.
3. Edit the NET.CFG file that you copied over. Edit the file according to your
requirements (see Sample Configuration Files). If there are two frame types
listed, the first one listed will be the one that the driver will load. See Sample
Configuration Files. The NET.CFG file should be in the same directory
with the LSL.COM file.
4.6.2 Setup Procedures for NetWare 4.X Client with vlm:
The installation utility INSTALL.EXE is located on NetWare's "Workstation for
DOS" disk. Run INSTALL.EXE from the Workstation for DOS Disk.
The NetWare Client Install program screen will appear. You must complete all
the questions. The options are specific to your needs.
1. Enter the destination directory for the NetWare Client. (The default
directory is C:\NWCLIENT).
2. Choose to either automatically update the CONFIG.SYS and the
AUTOEXEC.BAT files or modify them manually at a later stage.
3. When prompted Do you wish to install support for MS Windows? (Y/
N), type in Y for Yes or N for No.
(MS Windows Subdirectory: default C:\WINDOWS)
4. Select a network driver and the configuration options. System will use the
options you have selected to create NET.CFG file.
Insert the NetCard Installation CD when prompted for the driver disk
and specify the driver path D:\NETWARE\DOSODI.
(Assuming that your CD-ROM drive is D. If not, substitute the drive letter accordingly.)
5. Press <Enter> to install.
Page 24

24
○○○○○○○○○○○○○○○○○○○○○○○○○○○○○○○○○○○○○○○○○
Chapter 4 Installing the Network Card Drivers
NOTE:
1. Be sure to add LASTDRIVE=Z to your CONFIG.SYS file for the network
mappings to work properly.
2. When you have multiple NetCards on your system:
Use "BUSNO" and "DEVICENO" KEYWORD in NET.CFG to select which
adapter to use with your netware client. (or you can use "EtherID")
Page 25

25
○○○○○○○○○○○○○○○○○○○○○○○○○○○○○○○○○○○○○○○○○
Chapter 4 Installing the Network Card Drivers
4.7 For Novell Netware 3.12
Location of Driver: \NETWARE\NWSERVER\312\RTSSRV.LAN
Installation Procedure:
Before you start with the installation process, make sure that the Novell NetWare
v3.12 server is properly installed. Similarly, your network card should also be
properly installed in your server.
1. These files can be obtained from the NetCard Installation CD
D:\NETWARE\NWSERVER\312.
(Assuming that your CD-ROM drive is D. Else, substitute the drive letter accordingly.)
NBI31X.NLM
MSM31X.NLM
ETHERTSM.NLM
2. If you can logged in as a supervisor, copy RTSSRV.LAN relative files from
the NetCard Installation CD \NETWARE\NWSERVER\312 into the
NetWare 386 subdirectory SYSTEM of your server. (If some files exists,
rename the existing files in the SYSTEM subdirectory.)
3. When the NetWare server prompt appears (indicated by a colon), load your
server driver. Simply type:
: LOAD NBI31X <Enter>
: LOAD RTSSRV <Enter>
or, you can directly load file from the NetCard Installation CD:
: LOAD D:\NetWare\NwServer\312\NBI31X <Enter>
: LOAD D:\NetWare\NwServer\312\RTSSRV <Enter>
4. Bind IPX to the adapter driver. At the NetWare server prompt ,type:
:BIND IPX TO RTSSRV <Enter>
5. After pressing <Enter>, the computer will prompt you for the Network
Number. For details on how to assign this number, please refer to your
NetWare Server Installation Manual.
6. Add the load and bind statements you required to the server's
AUTOEXEC.NCF file so that the LAN driver will load automatically each
time the server starts up.
Page 26

26
○○○○○○○○○○○○○○○○○○○○○○○○○○○○○○○○○○○○○○○○○
Chapter 4 Installing the Network Card Drivers
NOTES:
1. Installing Multiple LAN Adapters
The keyword "SLOT" is provided for multiple LAN adapters in a single
server by the driver RTSSRV.LAN. So, add "SLOT" in LOAD commands.
For example:
LOAD RTSSRV FRAME=Ethernet_802.2 NAME=LAN_A SLOT=1
BIND IPX TO LAN_A NET=11
LOAD RTSSRV FRAME=Ethernet_802.2 NAME=LAN_B SLOT=2
BIND IPX TO LAN_B NET=22
2. The keyword "SPEED" is provided for specifying adapter's speed (10M/
100M). Add SPEED in LOAD commands.
For example:
LOAD RTSSRV FRAME=Ethernet_802.2 NAME=LAN_A SLOT=1 SPEED=100
BIND IPX TO LAN_A NET=11
3. Installing One LAN adapter with Multiple Frame Types
When binding multiple frame types to one adapter, enter a LOAD and BIND
statement for each frame type. Each LOAD statement will use a different
network number is required on the bind statement.
You need to supply a name on each load line in order to avoid being
prompted for which board to bind IPX to. If you do not have the name
option in the AUTOEXEC.NCF, it will not execute completely without user
intervention.
For example:
LOAD RTSSRV FRAME=ETHERNET_802.3 NAME=IEE8023
BIND IPX TO IEE8023 NET=11111
LOAD RTSSRV FRAME=ETHERNET_802.2 NAME=IEE8022
BIND IPX TO LAN8022 NET=22222
If problems occur during the binding process, you will be prompted with error
messages. Please refer to your NetWare 386 manual for details on these error
messages.
Page 27

27
○○○○○○○○○○○○○○○○○○○○○○○○○○○○○○○○○○○○○○○○○
Chapter 4 Installing the Network Card Drivers
4.8 For Novell NetWare 4.1
Location of Driver: \NETWARE\NWSERVER\41\RTSSRV.LAN
Installation Procedure:
Before you start with the installation process, make sure that the Novell NetWare
v4.10 server is properly installed. Similarly, your network card should also be
properly installed in your server.
1. These files can be obtained from NetCard Installation CD
D:\NETWARE\NWSERVER\41
(Assuming that your CD-ROM drive is D. Else, substitute the drive letter accordingly.)
NBI.NLM
MSM.NLM
ETHERTSM.NLM
2. If you can logged in as an ADMIN, copy RTSSRV.LAN relative files from
the NetCard Installation CD \NetWare\NwServer\41 into the NetWare
4.1 subdirectory SYSTEM of your server. (If some files exists, rename the
existing files in the SYSTEM subdirectory).
3. When the NetWare server prompt appears (indicated by a colon), load your
server driver. Simply type:
: LOAD NBI <Entet>
: LOAD RTSSRV <Enter>
or, you can directly load file from NetCard Installation CD:
: LOAD D:\NETWARE\NWSERVER\41\NBI <Enter>
: LOAD D:\NETWARE\NWSERVER\41\RTSSRV <Enter>
4. Bind IPX to the adapter driver. At the NetWare server prompt,type:
:BIND IPX TO RTSSRV <Enter>
5. After pressing <Enter>, the computer will prompt you for the Network
Number. For details on how to assign this number, please refer to your
NetWare Server Installation Manual.
6. Add the load and bind statements you require to the server's
AUTOEXEC.NCF file so that the LAN driver will load automatically each
time the server starts up.
Page 28

28
○○○○○○○○○○○○○○○○○○○○○○○○○○○○○○○○○○○○○○○○○
Chapter 4 Installing the Network Card Drivers
NOTES:
1. Installing Multiple LAN Adapters:
The keyword "SLOT" is provided for multiple LAN adapters in a single
server by the driver RTSSRV.LAN. So, add "SLOT" in LOAD commands.
For example:
LOAD RTSSRV FRAME=ETHERNET_802.2 NAME=LAN_A SLOT=1
BIND IPX TO LAN_A NET=11
LOAD RTSSRV FRAME=ETHERNET_802.2 NAME=LAN_B SLOT=2
BIND IPX TO LAN_B NET=22
2. The keyword "SPEED" is provided for specifying adapter's speed (10M/
100M). Add SPEED in LOAD commands.
For example:
LOAD RTSSRV FRAME=ETHERNET_802.2 NAME=LAN_A SLOT=1 SPEED=100
BIND IPX TO LAN_A NET=11
3. Installing One LAN adapter with Multiple Frame Types
When binding multiple frame types to one adapter, enter a LOAD and BIND
statement for each frame type. Each LOAD statement will use a different
network number on the bind statement.
You need to supply a name on each load line in order to avoid being
prompted for which board to bind IPX to. If you do not have the name
option in the AUTOEXEC.NCF, it will not execute completely without user
intervention.
For Example:
LOAD RTSSRV FRAME=ETHERNET_802.3 NAME=IEE8023
BIND IPX TO IEE8023 NET=11111
LOAD RTSSRV FRAME=ETHERNET_802.2 NAME=IEE8022
BIND IPX TO LAN8022 NET=22222
If problems occur during the binding process, you will be prompted with error
messages. Please refer to your NetWare 386 manual for details on these error
messages.
Page 29

29
○○○○○○○○○○○○○○○○○○○○○○○○○○○○○○○○○○○○○○○○○
Chapter 4 Installing the Network Card Drivers
4.9 For Novell NetWare 4.11
Location of Driver: \NETWARE\NWSERVER\411\RTSSRV.LAN
Installaton Procedure:
Before you start with the installation process, make sure that the Novell NetWare
v4.11 server is properly installed. Similarly, your network card should also be
properly installed in your server.
1. Place the NetCard Installation CD into your CD-ROM drive and check the
contents of subdirectory \NETWARE\NWSERVER\411. It should contain
the following file:
RTSSRV.LAN--- Novell NetWare V4.11 Server Driver
RTSSRV.LDI--- Novell NetWare V4.11 Server Driver Installation Information File
2. At the NetWare prompt (indicated by the Server name), run the
INSTALL.NLM program by typing:
server name: LOAD INSTALL <Enter>
3. Select "Maintenance/Selective Install" and press <Enter>.
4. Select "LAN Driver Options (Configure/Load/...)" and press <Enter>.
5. Press the <Ins> key to specify other drivers to install.
6. Press <F3> and specify the driver path (D:\NETWARE\NWSERVER\411)
and press <Enter>.
(It is assumed that your CD-ROM drive is D. Else, substitute the drive letter accordingly.)
7. The RTSSRV.LAN driver should appear in your choice list for the 'Select a
LAN Driver' field. Choose this driver to start the driver loading and binding
procedure. This will allow you to load and bind all 4 frame types supported
by NetWare.
8. Add the LOAD and BIND statements you required to the server's
AUTOEXEC.NCF file so that the LAN driver will load automatically each
time the server starts up.
Page 30

30
○○○○○○○○○○○○○○○○○○○○○○○○○○○○○○○○○○○○○○○○○
Chapter 4 Installing the Network Card Drivers
Installation Notes:
1. Installing Multiple LAN Adapters
The keyword "SLOT" is provided for multiple LAN adapters in a single
server by the driver RTSSRV.LAN. So, add EtherID in LOAD commands.
For example:
LOAD RTSSRV FRAME=ETHERNET_802.2 NAME=LAN_A SLOT=1
BIND IPX TO LAN_A NET=11
LOAD RTSSRV FRAME=ETHERNET_802.2 NAME=LAN_B SLOT=2
BIND IPX TO LAN_B NET=22
2. The keyword "SPEED" is provided for specifying adapter's speed (10M/
100M), add SPEED in LOAD commands.
For example:
LOAD RTSSRV FRAME=ETHERNET_802.2 NAME=LAN_A SLOT=1 SPEED=100
BIND IPX TO LAN_A NET=11
Page 31

31
○○○○○○○○○○○○○○○○○○○○○○○○○○○○○○○○○○○○○○○○○
Chapter 4 Installing the Network Card Drivers
4.10 For Novell Client32
Location of Driver: \NETWARE\CLIENT32\RTSSRV.LAN
Sample Configuration Files:
STARTNET.BAT (Client 32 for DOS will contain):
C:\NOVELL\CLIENT32\NIOS.EXE
LOAD C:\NOVELL\CLIENT32\LSLC32.NLM
LOAD C:\NOVELL\CLIENT32\CMSM.NLM
LOAD C:\NOVELL\CLIENT32\ETHERTSM.NLM
LOAD C:\NOVELL\CLIENT32\RTSSRV.LAN FRAME=ETHERNET_802.2
LOAD C:\NOVELL\CLIENT32\RTSSRV.LAN FRAME=ETHERNET_802.3
LOAD C:\NOVELL\CLIENT32\RTSSRV.LAN FRAME=ETHERNET_II
LOAD C:\NOVELL\CLIENT32\RTSSRV.LAN FRAME=ETHERNET_SNAP
4.10.1 Driver Installation Procedures on Client32 for DOS :
1. If you have completed installing the Netware Client 32 for DOS, all you
have to do is to modify STARTNET.BAT. Please see the Sample
Configuration Files STARTNET.BAT above. If not, follow steps 2 to 7.
2. Run INSTALL.EXE from Netware Client 32 for DOS diskette 1 (or from
Netware 4.11 CD). When the product manual appears, mark the "Netware
Client 32 for DOS" item, then press <Enter>.
3. Select "OTHER DRIVERS" item from "32-bit Network Board Drivers" menu
and press <Enter>.
4. Place the NetCard Installation CD and specify the driver path.
5. Select "Realtek Fast Ethernet driver" and press <Enter>.
6. Follow the on-screen instructions to complete the Client32 for DOS
software installation.
7. Reboot your machine.
Page 32

32
○○○○○○○○○○○○○○○○○○○○○○○○○○○○○○○○○○○○○○○○○
Chapter 4 Installing the Network Card Drivers
Installing Multiple LAN Adapters:
The keyword "SLOT" is provided for multiple LAN adapters in a single server
by the driver RTSSRV.LAN. So, add "SLOT" in LOAD commands.
For example:
C:\NOVELL\CLIENT32\NIOS.EXE
LOAD LSLC32.NLM
LOAD CMSM.NLM
LOAD ETHERTSM.NLM
LOAD RTSSRV FRAME=ETHERNET_802.2 SLOT=1
LOAD RTSSRV FRAME=ETHERNET_802.2 SLOT=2
4.10.2 Driver Installation Procedures on Client32 for Windows® 3.x:
Refer to 4.10.1.
On step 2, mark "Netware Client 32 for DOS" and "Client 32 for Windows".
On step 4, specify the driver path like D:\NETWARE\CLIENT32\RTSSRV.LAN,
then following steps 3 to 7 to complete the installation.
(Assuming that your CD-ROM drive is D. Else, substitute the drive letter accordingly.)
4.10.3. Driver Installation Procedures on Client 32 for Windows® 95:
If you have installed the Microsoft Client in your Windows® 95 system, you
should remove the adapter object & NDIS 2/3 driver of the RTL8139 adapter
from the Windows® 95 system. If you have installed previously NetCard NDIS
2/3 driver, you should do the following steps before installing the NetCard
Client 32 driver. (Note: If you have never plugged NetCard into your PC,
Procedure 4.10.3a is not necessary. You may proceed to Procedure 4.10.3b)
4.10.3a Remove the previously installed adapter object & driver of
NetCard, if any.
1. Under Windows® 95 system directory C:\WIN95\INF\, you should delete
NETRTS.INF, *.BIN files.
2. From the Main Program Group, click the "My Computer" icon.
3. Click the "Control Panel" icon from My Computer window.
Page 33

33
○○○○○○○○○○○○○○○○○○○○○○○○○○○○○○○○○○○○○○○○○
Chapter 4 Installing the Network Card Drivers
4. Click the "System" icon from the Control Panel window.
5. Click the "Device Manager" item.
6. Click the "Network adapter" item from System window.
7. Click the "NetCard Fast Ethernet Adapter" icon from System window.
8. Click Remove and then click OK.
9. Close the opened windows.
4.10.3b Driver Installation on Client 32 for Windows® 95 :
1. Plug in the NetCard into your PC machine.
2. Power on your computer to bootup Windows® 95.
3. Windows® 95 will then prompt for "Realtek Fast Ethernet Adapter" in
New Hardware Found dialog box.
4. Following instructions to complete the installation. Window® 95 will ask
for the proper path of the following diskette:
a. Netware Client 32 for Windows 95 Disk.
b. NetCard Installation CD.
Insert the diskette and assign the path to D:\NETWARE\CLIENT32.
(Assuming that your CD-ROM drive is D. If not, substitute the drive letter
accordingly.)
c. Windows 95 CD-ROM
Page 34

34
○○○○○○○○○○○○○○○○○○○○○○○○○○○○○○○○○○○○○○○○○
Chapter 4 Installing the Network Card Drivers
4.11 Microsoft Network Client 3.0 for MS-DOS
Location of Driver: NDIS2\NDIS2DOS\RTSND.DOS
Sample Configuration Files:
Ex1: [PROTOCOL.INI] (install creates this file)
[network.setup]
version=0x3110
netcard=RTL8139,1,RTL8139,1
transport=ms$ndishlp,MS$NDISHLP
transport=ms$netbeui,MS$NETBEUI
lana0=RTL8139,1,ms$netbeui
lana1=RTL8139,1,ms$ndishlp
[protman]
DriverName=PROTMAN$
PRIORITY=MS$NDISHLP
[MS$NDISHLP]
DriverName=ndishlp$
BINDINGS=RTL8139
[MS$NETBEUI]
DriverName=netbeui$
SESSIONS=10
NCBS=12
BINDINGS=RTL8139
LANABASE=0
[RTL8139]
; RTL8139 RPOTOCOL.INI SAMPLE
DriverName=RTSND$
EtherID=@52544C111111 ; This keyword is used to desinate a NetCard
; adapter by assigning its ethernet ID when more
; than one adapters exist on one system.
BusNo=@00 ; This keyword is used to desinate a NetCard adapter
; by assigning it's PCI bus number when more than
; one adapters exist on one system.(must be used with
; 'DeviceNo' keyword)
Page 35

35
○○○○○○○○○○○○○○○○○○○○○○○○○○○○○○○○○○○○○○○○○
Chapter 4 Installing the Network Card Drivers
DeviceNo=@0A ; This keyword is used to desinate a NetCard adapter
; by assigning it's PCI Device number when more
; than one adapters exist on one system.(must be
; used with 'BusNo' keyword)
Speed= 100/10 ; This keyword is used to force NetCard adapter to
; speed 10M or 100M mode. If not present, the driver
; will auto-detect the speed.
Installation Procedure:
Before you start with the installation procedure, make sure that the adapter is
properly installed and configured. Similarly, make sure that your Microsoft
Network Client is properly installed.
(If not, the installation utility SETUP.EXE is located on Microsoft Network Client
v3.0 for MS-DOS Disk. Run SETUP.EXE from Disk and the SETUP program
screen will appear. You must complete each of the questions where the options
are specific to your needs. The installation procedure will transfer files to a specific
directory on the client and modify existing configuration files to fit your specific
needs.)
1. Change to the Microsoft Network Client subdirectory, and run SETUP.EXE.
2. The screen will display some infomation. Press <Enter>.
3. Responds to the screen prompts, selecting "Change Network
Configuration", then press <Enter>.
4. Move the highlight to "Add Adapter", press <Enter>.
5. Select "Network adapter not shown on list below...".
6. Place the NetCard Installation CD into your CD-ROM drive,and specify
your pathname D:\NDIS2\NDIS2DOS,then press <Enter>.
(Assuming your CD-ROM Drive is D. Else, substitute the drive letter accordingly.)
7. Follow screen instructions to complete the process. Simply pressing
<Enter> for each screen display will select the default options. Press <Enter>
until you reach the display prompting you to reboot your system.
Page 36

36
○○○○○○○○○○○○○○○○○○○○○○○○○○○○○○○○○○○○○○○○○
Chapter 4 Installing the Network Card Drivers
Installing Multiple LAN Adapters:
There are two different method to complete it:
(a) Under DOS mode, you can modify the EtherID or BusNo+DeviceNo
keyword field in file C:\MSCLIENT\PROTOCOL.INI.
(b) Or you can also use the SETUP program and follow above setup procedurc
step 4, but move the highlight to "Change Setting,then press <Enter>, the
screen will prompt you to fill EtherID value.
Page 37

37
○○○○○○○○○○○○○○○○○○○○○○○○○○○○○○○○○○○○○○○○○
Chapter 4 Installing the Network Card Drivers
4.12 For LAN Manager 2.1 Workstation/Sever (NDIS)
Location of Driver:
NDIS2\MSLANMAN.DOS\DRIVERS\ETHERNET\RTL8139\RTSND.DOS
NDIS2\MSLANMAN.OS2\DRIVERS\ETHERNET\RTL8139\RTSND.OS2
Sample Configuration Files:
CONFIG.SYS (for DOS will contain):
DEVICE=C:\LANMAN.DOS\DRIVERS\PROTMAN\PROTMAN.DOS /I:C:\LANMAN.DOS
DEVICE=C:\LANMAN.DOS\DRIVERS\ETHERNET\RTL8139\RTSND.DOS
CONFIG.SYS (for OS/2 will contain):
DEVICE=C:\LANMAN.OS2\DRIVERS\PROTMAN\PROTMAN.OS2 /I:C:\LANMAN.OS2
DEVICE=C:\LANMAN.OS2\DRIVERS\ETHERNET\RTL8139\RTSND.OS2
PROTOCOL.INI (will contain):
[RTL8139]
; RTL8139 RPOTOCOL.INI SAMPLE
DriverName=RTSND$
EtherID=@0000B4000001 ; This keyword is used to desinate a NetCard adapter
; by assigning its ethernet ID when more than one
; adapters exist on one system.
BusNo=@00 ; This keyword is used to desinate a NetCard adapter
; by assigning it's PCI bus number when more than
; one adapters exist on one system (must be used with
'DeviceNo' keyword).
DeviceNo=@0A ; This keyword is used to desinate a NetCard adapter
; by assigning it's PCI Device number when more than
; one adapters exist on one system (must be used with
; 'BusNo' keyword).
Speed= 100/10 ; This keyword is used to force NetCard adapter to
; speed 10M or 100M mode. If not present, the driver
; will auto-detect the speed.
Page 38

38
○○○○○○○○○○○○○○○○○○○○○○○○○○○○○○○○○○○○○○○○○
Chapter 4 Installing the Network Card Drivers
4.12.1 Setup driver procedures on LAN Manager workstation/server
Before you start with the installation process, make sure that the adapter is
properly installed and configured. Make sure that your Microsoft LAN Manager
is properly installed.
1. Run the appropriate Microsoft Lan Manager SETUP for computer you are
setting up (DOS, OS/2 or OS/2 Server).
Select "Configuration" item and insert the NetCard Installation CD. Select
the Realtek driver and follow the instructions.
2. When completed, reboot your computer.
4.12.2 Installing Multiple LAN Adapters
Follow Setup driver Procedure and add two adapters. Under DOS mode, you
can modify the EtherID or BusNo+DeviceNo Keyword field in file
C:\LANMAN\PROTOCOL.INI.
Page 39

39
○○○○○○○○○○○○○○○○○○○○○○○○○○○○○○○○○○○○○○○○○
Chapter 4 Installing the Network Card Drivers
4.13 For SCO Unix 4.x
The following files will be used in this installation:
Files Contents
driver.o RTFSCO Driver Program
install Transfer dos format to unix format setup program
info Used by netconfig
init Used by netconfig
master Used by netconfig
node Used by netconfig
reconf Used by netconfig
remove Used by netconfig
space.c Used by netconfig
system Used by netconfig
1. Login as root user. (On maintenance mode)
2. Installation Diskette in DOS format.
Place the NetCard Installation CD into your CD-ROM Drive and use
doscp command to copy RTL SCO UNIX Driver into UNIXs directories.
(Assuming that your CD-ROM drive is D. If not, substitute the drive letter accordingly.)
# cd /
# doscp D:/sco/Exe/4.x/install
# chmod +x /install
# ./install
3. Use netconfig utility
Available options:
# netconfig
1) Add a chain
2) Remove a chain
3) Reconfigure an element in a chain
4) Quit Select 1. Add a chain
Page 40

40
○○○○○○○○○○○○○○○○○○○○○○○○○○○○○○○○○○○○○○○○○
Chapter 4 Installing the Network Card Drivers
4. Select top level of chain to Add or q to quit: 4. sco_tcp
(SCO TCP/IP for UNIX)
5. Select next level of chain to Add or q to quit: Select RTL PCI Family
Fast Ethernet Driver
6. Add chain sco_tcp -> r5e0 (y/n) board 0 type y
7. Enter the internet Address of this interface n.n.n.n
8. Enter the netmask for this interface (default 255.255.255.0)
9. Does the interface use a broadcast address of all 1s (y/n) default : y
10. Enter the boardcast address for this interface default: n.n.n.n
11. Are these values correct ? (y/n) y
12. Pseudo ttys are currently configured, do you want to:
1) Add Pseudo ttys
2) Remove Pseudo ttys
Select an option or enter q to quit [q] q
13. Available options:
1) Add a chain
2) Remove a chain
3) Reconfigure a element in a chain
q. Quit Select option: q
14. Do you want to relink to kernel now ? y
15. Do you want this kernel to boot by default (y/n) y
16. Do you want the kernel environment rebuilt (y/n) y
17. Reboot unix
# shutdown -y -g0
Page 41

41
○○○○○○○○○○○○○○○○○○○○○○○○○○○○○○○○○○○○○○○○○
Chapter 4 Installing the Network Card Drivers
4.14 For SCO Unix 5.x
Location of Driver: \SCO\5.X\8139.VOL
Before you start with the installation process, make sure that the SCO UNIX
system is properly installed. Similarly, your network card should also be properly
installed in your machine.
1. Installation Diskette in DOS format.
Place the NetCard Installation CD to your CD-ROM Drive and use doscp
command to copy RTL SCO UNIX PCI Driver into UNIXs directories.
(Assuming that your CD-ROM drive is D. If not, substitute the drive letter accordingly.)
# cd /
# doscp D:setup /setup
# chmod +x /setup
# ./setup
When the install program ask you for path of the files, key in:
D:/SCO/5.x
2. Run custom utility to add RTL8139 driver software to system.
Select the following option:
Software
-> Install New
-> From your computer
-> MediaImages
Then enter the directory of driver image(8139.VOL) which should be /
tmp
3. Use netconfig utility
Available options:
# netconfig
4. To add adapters, select Add New Lan Adapter from Hardware.
Page 42

42
○○○○○○○○○○○○○○○○○○○○○○○○○○○○○○○○○○○○○○○○○
Chapter 4 Installing the Network Card Drivers
5. Select the line speed from the menu:
(1)Hwset,(2)Auto,(3)10half.(4)10full.(5)100half.(6)100full.
if you select Hwset, driver will read configuration from EEPROM on the
card. the configuration can be modified by running rset8139 in the driver
disk. The program is for DOS.
6. Add Protocol to select SCO TCP/IP.
7. Enter the internet Address of this interface, for example : 192.9.9.1
8. Enter the netmask for this interface (default 255.255.255.0)
9. Enter the boardcast address for this interface use default: n.n.n.n
10. Do you want to relink to kernel now ? (y/n)
type in y
11. Do you want this kernel to boot by default (y/n)
type in y
12. Do you want the kernel environment rebuilt (y/n)
type in y
13. Reboot unix
# shutdown -y -g0
Page 43

43
○○○○○○○○○○○○○○○○○○○○○○○○○○○○○○○○○○○○○○○○○
Chapter 4 Installing the Network Card Drivers
4.15 For UnixWare7
Location of Driver: \UW7\EXE\RTSPKG.TAR
Installing driver procedure on SCO UnixWare7 :
Before you start with the installation process, make sure that the SCO UNIX
system is properly installed. Similarly, your network card should also be properly
installed in your machine.
1. Installation Diskette in DOS format. Place the NetCard Installation CD
into your CD-ROM Drive and use doscp command to copy RTL SCO
UnixWare Driver into UNIX's directories.
# cd /
# doscp D:uw7/rtspkg.tar /tmp
2. Run 'tar' utility to extract the driver.
# cd /tmp
# tar -xvf rtspkg.tar
3. Run 'pkgadd' utility to add the driver software to system.
# pkgadd -d /tmp/pkg
=> Select "1 RTL813x" to add the driver package to the system.
=> quit
4. Use 'scoadmin' utility to add adapters.
# scoadmin
=> Select "Networking" item from the item list and press enter.
=> Select "Network Configuration Manager" item from the item list and
press enter.
=> Select "Add New Lan Adapter" menu item from "Hardware".
=> Select the Realtek RTL8139A/B/C(8130) item from the item list.
=> Add protocol(s) to the adapter.
5. Return to the command prompt.
6. Shutdown the system and reboot.
Page 44

44
○○○○○○○○○○○○○○○○○○○○○○○○○○○○○○○○○○○○○○○○○
Chapter 5 Verifying the Network Card
NOTE:
1. If you want to install more than one network card, you should do the 4th,
5th, 6th steps for each network card separately.
2. This driver can support up to four network adapters.
Page 45

45
○○○○○○○○○○○○○○○○○○○○○○○○○○○○○○○○○○○○○○○○○
Chapter 5 Verifying the Network Card
4.16 For Packet Driver
Location of Driver: \PKTDRV\RTSPKT.COM
Sample Configuration Files:
AUTOEXEC.BAT
RTSPKT 0x60
Notes:
1. Load the packet driver using the software interrupt and any optional
switches if required.
Usage: RTSPKT [options] <software_int_no>
Example: RTSPKT -i 0x7e
The only required parameter is the software interrupt. A packet driver needs
to have a software interrupt assigned to it for other programs to access it.
The recommended interrupt is 0x7e. If you need any of the options listed
below, place them before the software interrupt on the command line.
-i - Force driver to report itself as 802.3 instead of Ethernet II.
-d - Delayed initialization. Used for diskless booting
-n - NetWare conversion. Converts 802.3 packets into 8137 packets
-w - Windows hack, obsoleted by winpkt
-p - Promiscuous mode disable
-h - Help
-u - Uninstall
-f - Line Speed = Fast ehternet 100Mbps
-e - Line Speed = Ethernet 10Mbps
2. Type command, C:\RTSPKT 0x60, the screen will appear following message:
System: [345]86 processor, PCI bus, Two 8259s
Packet driver software interrupt is 0x60
Interrupt number is 0x9
Page 46

46
○○○○○○○○○○○○○○○○○○○○○○○○○○○○○○○○○○○○○○○○○
Chapter 5 Verifying the Network Card
I/O port is 0x6100
My Ethernet address is 00:00:B4:00:00:01
3. Installing Multiple LAN Adapters:
If there are multiple network cards on the main board, run RTSPKT 0x60
directly. The screen will display:
Packet driver for RTS8139, PCI version 1.00
Copyright 1997 (c), Realtek Semiconductor Inc.
There are 2 network cards on your main board:
Card 1. IRQ= 0x9 I/O= 0x6100 NodeID= 00:00:B4:00:00:01
Card 2. IRQ= 0xA I/O= 0x6000 NodeID= 00:00:B4:00:00:02
Please select a Card No.(1-2): 1
System: [345]86 processor, PCI bus, Two 8259s
Packet driver software interrupt is 0x60
Interrupt number is 0x9
I/O port is 0x6100
My Ethernet address is 00:00:B4:00:00:01
Page 47

47
○○○○○○○○○○○○○○○○○○○○○○○○○○○○○○○○○○○○○○○○○
Chapter 5 Verifying the Network Card
There are 3 LEDs on your Network Card - Link, Activity and 100M. The
following table explains the activities of the LEDs.
LEDs Li ght Description
Activity
ON
OFF
transmission of data is in progress
no transmission of data
Li nk
ON
OFF
the link is go od
there is no link
100M
ON
OFF
card is configured at 100Mbps
card is configured at 10Mbps
Please contact your Network Administrator if your problems persist.
○○○○○○○○○○○○○○○○○○○○
This chapter explains the functions of the Network Card LEDs.
LEDs Descriptions
Page 48

48
○○○○○○○○○○○○○○○○○○○○○○○○○○○○○○○○○○○○○○○○○
Chapter 5 Verifying the Network Card
6.1 Main Features
• Highly integrated and cost-effective single-chip fast ethernet controller.
• Supports 32-bit PCI Bus Master for high performance.
• Supports IEEE 802.3 Auto-Negotiation algorithm of full-duplex and half-
duplex operation for 10Mbps and 100Mbps, meaning the network speed is
auto detected.
• Compliant to PCI Revision 2.2 specification
• Compliant to PC98/99
• Half/Full duplex capability
• Supports LED pins for various network activity indications.
• Support Advance Configuration Power Management Interface (ACPI)
• Support Remote Wake-Up (including Magic Packet, LinkChg and
Microsoft Wake-Up frame) in both ACPI and APM environment.
(for AZ-NC2100 only)
6.2 Technical Data
Network Type
• Ethernet 10BASE-T
IEEE 802.3 industry standard for a 10Mbps baseband CSMA/CD local
area network.
○○○○○○○○○○○○○○○○○○○○
This chapter contains the technical specifications of your card. The
information may be more useful for technically inclined users.
Technical Specifications
Page 49

49
○○○○○○○○○○○○○○○○○○○○○○○○○○○○○○○○○○○○○○○○○
Chapter 5 Verifying the Network Card
• Fast Ethernet 100BASE-TX
IEEE 802.3u industry standard for a 100Mbps baseband CSMA/CD local
area network.
6.3 Network Operating System
• Window
®
95, Window®98, Window®2000
• Window NT
®
3.51, NT®4.0, NT®5.0
• ODI driver for NetWare 3.x/4.x
• NetWare Client 32
• NDIS driver for Microsoft LAN Manager
• NDIS2 MAC drivers for DOS, OS/2
• Microsoft Windows for workgroups 3.11
• Packet Driver
• SCO Unix 4.x, 5.x drivers
• UnixWare7
6.4 Electrical
Power : 2Watts (max) @ 400 mA
6.5 Connector and Sockets
1 x 3 pins AMP Right-Angled Connector (2mm pitch) on NIC
2 x 3 pins AMP Connector (2mm pitch) assembled with WOL cables
1 RJ-45 Shielded Phone Jack
6.6 LEDs
3 Green 3.0mm LEDs
ACTIVE
LINK
100Mbps
 Loading...