

Page 1
ASM800
Aztech Bread Maker
USER MANUAL
PLEASE RETAIN THIS USER MANUAL FOR FUTURE USE.
Page 2

USER MANUAL CONTENTS
SAFETY INSTRUCTIONS 3
APPLIANCE OVERVIEW
4
CONTROL PANEL BUTTONS
4
PACKAGE CONTENTS
4
IMPORTANT TIPS BEFORE USE
5
USING THE BREAD MAKER
5
THE LED DISPLAY
6
THE MENU FUNCTION
6
USING THE CONTROL PANEL
6
BAKE COMPLETE ALERT
7
RESERVATION FUNCTION
7
DOSING BUZZER FUNCTION
7
PAUSE FUNCTION
8
CANCELLING A MENU FUNCTION
8
CHECKING THE CURRENT MENU SELECTED
8
HEAT PRESERVATION FUNCTION
8
CUT-OFF MEMORY FUNCTION
8
ADDITIONAL FUNCTIONS
8
TEMPERATURE PROTECTION FUNCTION
9
RECIPE RECOMMENDATIONS
9
BASIC 1
0
MENU FUNCTION RECIPES 1
0
INGREDIENT MEASUREMENTS 1
0
BASIC 10
NUTRITION 11
SWEET 1
1
FRUIT 1
2
WHOLE WHEAT 1
2
FRENCH 1
3
QUICK 1
3
BLEND 1
4
DOUGH 1
4
CAKE 1
4
RICE CAKE 1
5
JAM 1
5
YOGHURT 1
6
RICE WINE 1
6
FRIED PEANUT 1
7
BAKE 1
7
CLEAN AND MAINTENANCE 1
7
TROUBLESHOOTING 1
8
A.
B.
A.
B.
C.
D.
E.
F.
G.
H.
A.
A.
A.
B.
C.
D.
E.
F.
G.
H.
I.
J.
K.
L.
M.
N.
O.
P.
Q.
Page 3

3
SAFETY INSTRUCTIONS
Before using, check if the power voltage of your Bread Maker
corresponds to your home’s power supply.
Ensure that the appliance and all its parts are properly installed rst
before use.
Ensure that everything is thoroughly clean before making bread.
Position the Bread Maker on a smooth, dry, and stable ground. Placing
the appliance on unstable surfaces such as softly cushioned carpets
or sofa might make the appliance lose its balance.
Ensure that there is sufcient ventilation around the Bread Maker to
allow both heat and steam to escape the appliance during use.
Do not position the appliance in hot places or in places commonly
exposed to multiple sources of heat such as stoves, refrigerators, or
ovens. It is also important to keep it away from ammable materials
such as curtains and cloths.
Do not use wet hands in operating the appliance and in inserting or
removing its power plug to prevent electrical shocks. It is suggested to
thoroughly dry your hands rst before using the Bread Maker.
Remove the power plug before doing any cleaning, relocation, or
appliance maintenance.
During use, keep the Bread Maker and its wiring away from children
to avoid injuries.
During use, do not touch the surface of the appliance to avoid burns
and or scalds due to extreme heat exposure.
Should damages be found in the appliance, please do not use the
appliance and immediately bring it to the Aztech Service Center for
repair or replacement.
When unplugging the power plug, do not pull or tug its cord. Hold the
power plug properly on its base when unplugging it from the power
outlet. Also, ensure that the power cord is kept away from heat or
sharp edges that could cause external damage to the cord.
If the power cord is damaged, do not use the appliance and or
replace it by yourself. Always use the dedicated power cord included
in the product package.
The Bread Maker is not intended for use by persons with reduced
physical, sensory or mental capabilities, and or lack of experience or
knowledge. These individuals should be given constant supervision in
using the appliance by a person responsible for their safety.
•
•
•
•
•
•
•
•
•
•
•
•
•
•
Page 4

4
PACKAGE CONTENTS
• Bread Maker
• Measuring Cup
• Measuring Spoon
• Power Cord
APPLIANCE OVERVIEW
CONTROL PANEL BUTTONS
• User Manual
• Easy Start Guide
• Warranty Policy
Control
Panel
Cover
Housing
Power
Cord
Bread Barrel
Stir Bar
Measuring
Spoon & Cup
TIME (- +)
Allows you to
congure the time.
COLOR
Allows you to dene
the crust color of the
bread to be baked.
MENU
Allows you to shift
between the 16
menu functions.
START / STOP
Allows you to start or
stop the cooking /
baking operation.
LOAF
Allows you to
identify the size of
the bread.
LED DISPLAY
Shows alerts and
settings selected.
16 MENU
FUNCTIONS
Page 5
5
IMPORTANT TIPS BEFORE USE
For FIRST TIME USE, plug the Bread Maker to a power outlet, select the BAKE MENU
function, and then press the START/STOP button. Let the Bread Maker function
for 10 MINUTES without any contents.
Before use, ensure to CLEAN the Bread Barrel, the measuring Cups, and the stir
bar thoroughly.
Spread some edible cooking oil on the Bread Barrel’s inner surface to further
help the non-stick surface of the Bread Maker.
Ensure to place the Bread Maker on a smooth, heat resistant, and stable surface
and ensure that there are no ammable materials near the Bread Maker.
»
»
»
»
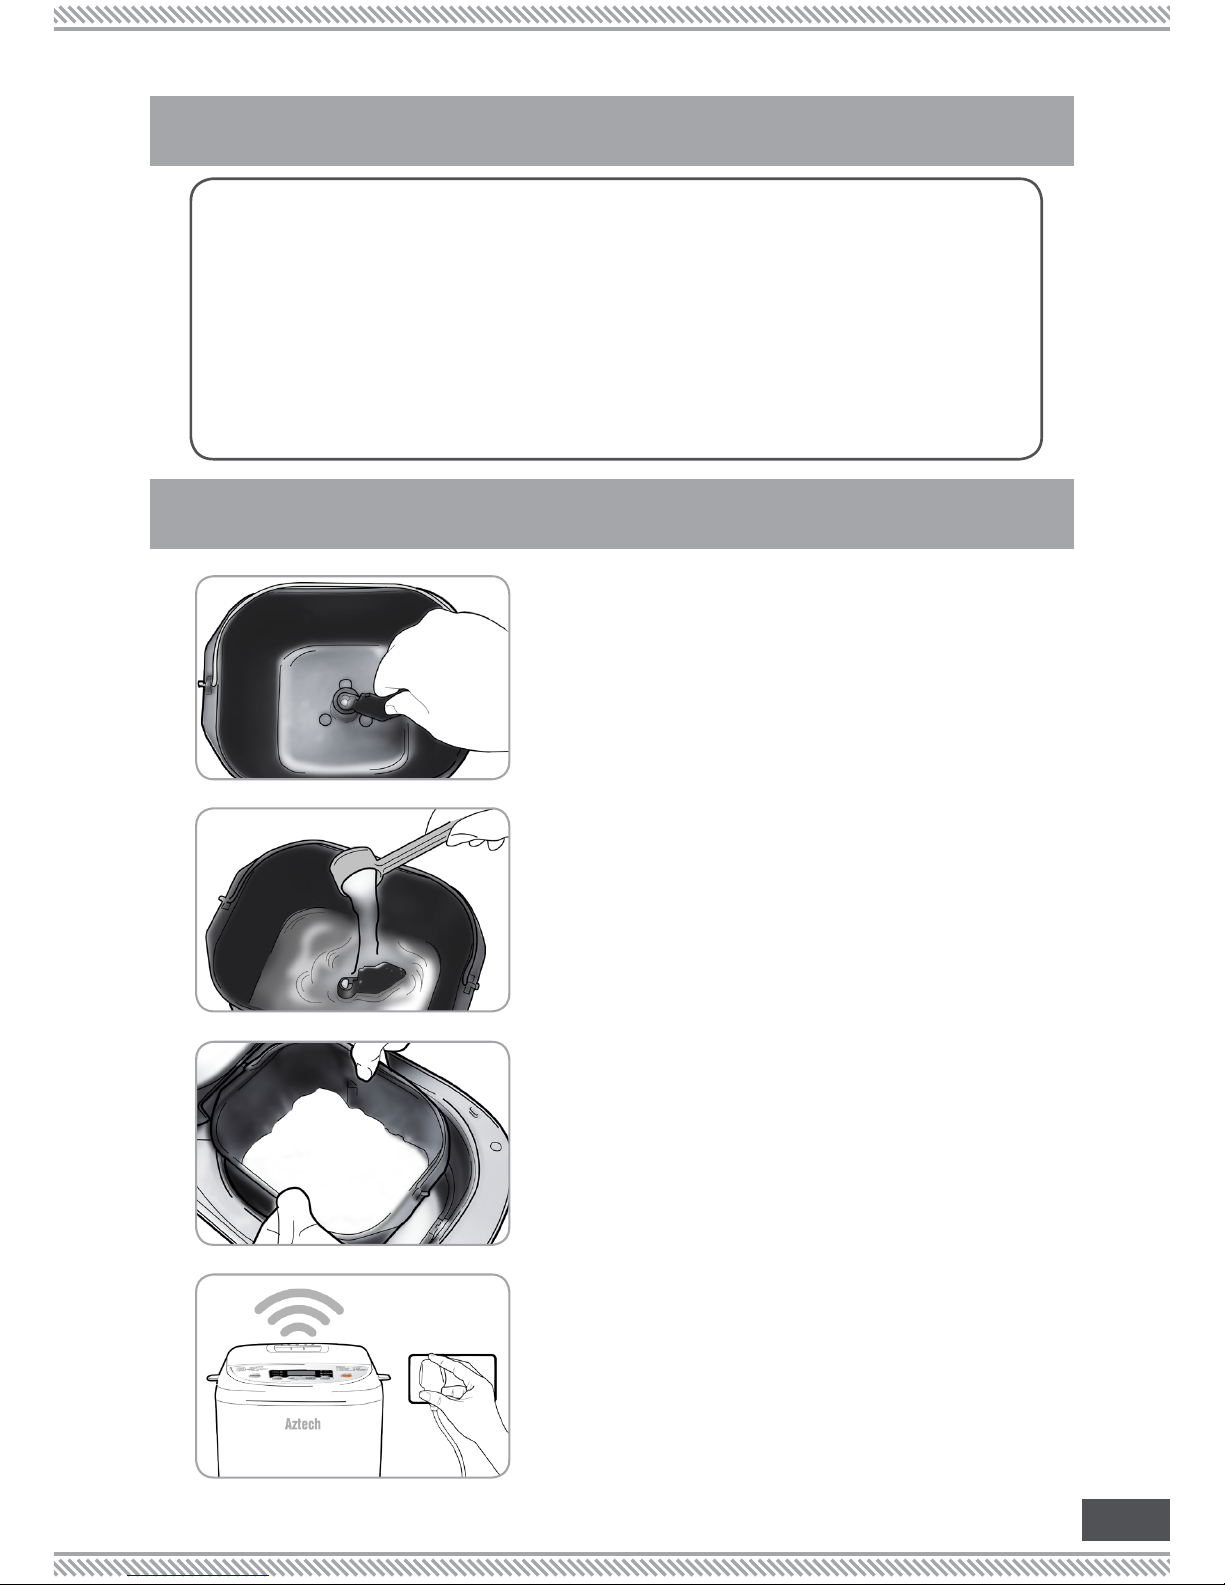
USING THE BREAD MAKER
Install the Stir Bar into the Bread Barrel.
Evenly distribute the properly measured
ingredients inside the Bread Barrel.
Place the Bread Barrel inside the Bread
Maker’s housing, and rotate it clockwise
to lock it in place.
Plug the Bread Maker’s power cord into
a compatible power outlet. A beep
sound would be heard upon plugging.
STEP 1
STEP 2
STEP 3
STEP 4
Page 6
6
USING THE CONTROL PANEL
The MENU function allows you to shift between the 16 functions provided
by your Bread Maker. Some of the MENU functions require pressing
additional settings before you can press the START / STOP button, while
some can have its TIME settings decreased or increased as preferred.
For the Basic, Nutrition, Sweet, Fruit, Whole Wheat, French, Quick
Menu functions (1 to 7) , please follow the sequence below:
For the Dough, Cake, Rice Cake, Jam Menu functions (9 to 12),
please follow the sequence below:
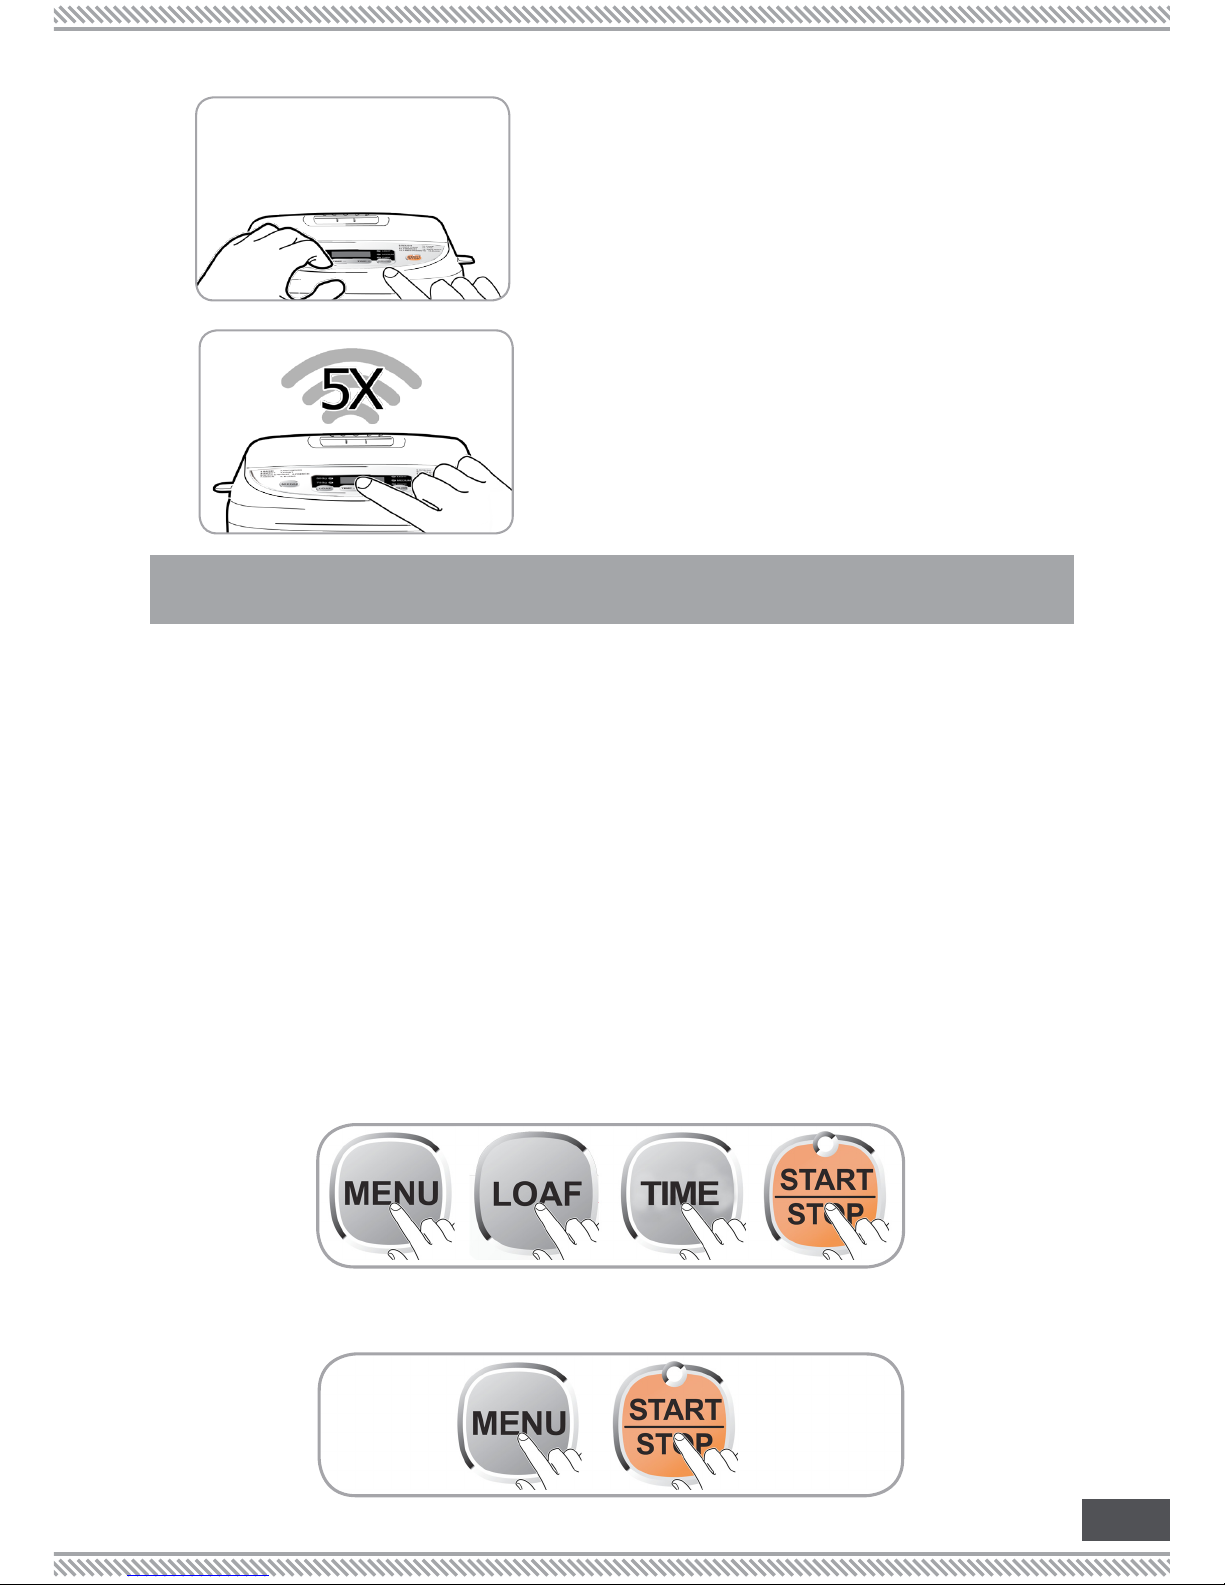
THE LED DISPLAYA.
Close the cover and select the relevant
function and its corresponding bread
settings (if needed) then press the START
/ STOP button to conrm.
STEP 5
Once nished, the Bread Maker will
beep FIVE TIMES and the LCD Display of
the LED Display will show 0:00. Press the
START / STOP button to revert the Bread
Maker to standby mode.
STEP 6
THE MENU FUNCTIONB.
On standby mode, the LED display shows “--”. Upon pressing the
MENU function button to shift between the 16 menu functions, the LED
display will show “C-X” (where X stands for the menu function number
selected). Once you have selected a menu function, the LED display
would show the selected function’s corresponding default time.
Page 7

7
For the Yoghurt, Rice Wine, Fried Peanuts, Bake Menu functions
(10 to 12) , please follow the sequence below:
BAKE COMPLETE ALERTC.
The Bread Maker provides FIVE LONG BEEPS to indicate that the
cooking / baking has been completed.
For menu functions 1-7 and 16, or the menu functions with Heat
Preservation included, once the LED Display ashes “0:00”, it means
that the bread baking has nished and has now entered Heat
Preservation mode. The Heat Preservation is fully done once the LED
Display continuously displays “0:00” without ashing.
With or without Heat Preservation, once the Bake Complete Alert
has been displayed or has beeped, the bread is ready to serve.
•
•
•
RESERVATION FUNCTIOND.
The Reservation Function allows you set the time wherein the Bread
Maker will start cooking / baking the ingredients inside the Bread
Barrel. This means that you can prepare it by night and have it fresh
and hot upon waking up in the morning.
Do take note that the menu functions: Basic, Nutrition, Sweet, Fruit,
Whole Wheat, French, Quick
are the ONLY ones that have the
Reservation Function.
To use the Reservation Function, select any of the menu functions
with Reservation feature and simply adjust the TIME through the + or
- buttons as desired to set the reservation period.
The longest reservation hour you can set is up to 15 hours. As an
example, if the ingredients has been prepared on 19:00PM (7:00PM),
and the Reservation time you have selected is 13 hours, the bread
would be fully baked and ready to serve by 8:00 the next morning.
Pressing the TIME + or - for other menu functions such as Yoghurt,
Rice Wine, Fried Peanuts, Bake, etc.
, WOULD ONLY BE ADJUSTING
THE NUMBER OF HOURS THE FOOD MATERIALS WILL BE COOKED
.
•
•
•
•
•
DOSING BUZZER FUNCTION E.
Menus 1 to 9 have a dosing buzzer feature which will remind you
to dose the food ingredients with baking soda during the kneading
period. Each dosing buzzer setting varies for each menu function.
•
Page 8

8
PAUSE FUNCTIONF.
Use the Pause function if you wish to dose further or if you wish to
add other ingredients or food materials in the Bread Maker during
the cooking period.
To use the Pause function, simply press the START / STOP button in
less than two (2) seconds to pause the cooking / baking. The current
LED display will start ashing to indicate that the operation has been
paused.
If you wish to start the cooking / baking operation, press the START/
STOP button again for less than two (2) seconds.
If no button has been pressed for 10 minutes, the cooking / baking
operation of the Bread Maker will automatically resume.
•
•
•
•
CANCELLING A MENU FUNCTIONI.
If you wish to cancel an ongoing cooking / baking function, simply
press the START / STOP button for more than two (2) seconds.
•
CHECKING THE CURRENT MENU SELECTEDJ.
If you wish to check the current menu function selected during the
cooking / baking operation, press the MENU button. The LED display
would show “C-X” for three (3) seconds (where X stands for the
current menu function being used).
•
ADDITIONAL FUNCTIONS
HEAT PRESERVATION FUNCTIONA.
Menu functions 1 to 7 and 16 automatically enters Heat Preservation
upon fully cooking / baking the ingredients. During this time, the
baked food is kept warm and fresh for a duration of one (1) hour.
Menu functions 8 to 15 does not have Heat Preservation function.
During Heat Preservation mode, the LED display will show “0:00” while
ashing to indicate that it is under the Heat Preservation mode.
The LED display would stop ashing and would only show “0:00” to
indicate that the Heat Preservation mode has ended.
You do not have to wait for the Bread Maker to nish the Heat
Preservation function before serving the bread. Upon completing the
menu function, the bread can already be served for consumption.
•
•
•
•
•
CUT-OFF MEMORY FUNCTIONB.
If the power is cut-off during the cooking period, the Bread Maker
can immediately resume cooking after having its power brought
back. Maximum time for the memory to be retained is 10 minutes.
•
Page 9

9
TEMPERATURE PROTECTION FUNCTIONC.
Yeast and lactobacilli need a suitable degree of temperature to
continually nurture. Varying temperature degrees will affect its
growth. Thus, we set the temperature protection function to ensure
that the cooking would be done properly.
The Basic, Nutrition, Sweet, Fruit, Whole Wheat, French, Quick,
Blend, Dough, Yoghurt, and Rice Wine are the Menu functions with
Temperature Protection Function.
If a high temperature is detected, the Bread Maker will alert you
with a beep and the LED display would be displaying “C:HH”. Simply
press the START / STOP button to stop the beeping. Open the cover
and allow it to cool down. Once the materials are cool enough,
press the MENU function again.
If a low temperature is detected, the Bread Maker will alert you with
a beep and the LED display would be displaying “C:LL”. Simply press
the START / STOP button to stop the beeping and select the BAKE
menu function to allow it to heat up for a while then press the MENU
button again.
If the baked bread would not be consumed immediately, allow it
to cool down rst, place it in a well sealed container, then place it
in a refrigerator.
•
•
•
•
•
RECIPE RECOMMENDATIONS
FLOUR: Use either high-gluten our or bread our. Ordinary our,
dumpling our, and or self-yeast our cannot be used to make
bread due to its low gluten content.
YEAST: Use high-active dry yeast. However, after opening the
package, ensure to keep the package tightly sealed after and kept
in cool in a refrigerator as soon as possible.
OIL: It is highly recommended to use butter or vegetable oil.
SALT: Ordinary salt would do.
SUGAR: Ordinary white sugar or soft white sugar is ne. You may also
look for healthier sugar substitutes and or variants.
MILK POWDER: Use sugar-free or low sugar milk powder. Milk powder
with high sugar or with low sugar will greatly affect the bread color.
WATER: Ordinary drinking water would do.
•
•
•
•
•
•
•
Page 10

10
MENU FUNCTION RECIPES
1 CUP : 250ml
1 TEASPOON : 5ml
1 TABLESPOON : 15ml
1 CUP HIGH GLUTEN FLOUR : 160g
1 TEASPOON SALT : 6.6
g
1 TABLESPOON MILK POWDER : 6.5
g
1 TABLESPOON OIL : 10
g
1 TABLESPOON SUGAR : 12
g
1 EGG : 50~60
g
•
•
•
•
•
•
•
•
•
INGREDIENT MEASUREMENTS
BASIC
A.
Ingredients
500G Bread 750G Bread
Weight Cup / Spoon Weight Cup / Spoon
Water +
(1) Egg
160g 160ml 210g 210ml
Butter or Oil
15g 1&1/2 Tbsps 20g 2 Tbsps
Salt 2.2g 1/3 Tspn 3.3g 1/2 Tspn
Sugar 18g 1&1/2 Tbsps 24g 2 Tbsps
Milk Powder 10g 1&1/2 Tbsps 13g 2 Tbsps
Gluten- Free
Flour
240g 1&1/2 Cups 320g 2 Cups
Yeast 2.5g 3/4 Tspn 3.3g 1 Tspn
Add the ingredients according to order into the Bread Barrel.
Select Basic as its menu function, set the loaf size and preferred color,
then press the START / STOP button.
Wait for the bread to be baked. The Bread Maker will beep to indicate
that it has nished baking.
2:20 (500g) / 2:25 (750g) dosing buzzer alerts.
1.
2.
3.
4.
Page 11
11
NUTRITIONB.
Ingredients
500G Bread 750G Bread
Weight Cup / Spoon Weight Cup / Spoon
Milk + (1) Egg 165g 165ml 220g 220ml
Butter or Oil
15g 1&1/2 Tbsps 20g 2 Tbsps
Salt 2.2g 1/3 Tspn 3.3g 1/2 Tspn
Sugar 18g 1&1/2 Tbsps 24g 2 Tbsps
Gluten- Free Flour
240g 1&1/2 Cup 320g 2 Cups
Yeast 2.5g 3/4 Tspn 3.3g 1 Tspn
Add the ingredients according to order into the Bread Barrel.
Select Nutrition as its menu function, set the loaf size and preferred
color, then press the START / STOP button.
Wait for the bread to be baked. The Bread Maker will beep to indicate
that it has nished baking.
2:17 (500g) / 2:22 (750g) dosing buzzer alerts.
1.
2.
3.
4.
SWEETC.
Ingredients
500G Bread 750G Bread
Weight Cup / Spoon Weight Cup / Spoon
Water + (1) Egg 160g 160ml 210g 210ml
Butter or Oil
15g 1&1/2 Tbsp 20g 2 Tbsps
Salt 2.2g 1/3 Tspn 3.3g 1/2 Tspn
Sugar 36g 3 Tbsps 48g 4 Tbsps
Milk Powder 10g 1&1/2 Tbsps 13g 2 Tbsps
Gluten- Free Flour
240g 1&1/2 Cups 320g 2 Cups
Yeast 2.5g 3/4 Tspn 3.3g 1 Tspn
Add the ingredients according to order into the Bread Barrel.
Select Sweet as its menu function, set the loaf size and preferred color,
then press the START / STOP button.
Wait for the bread to be baked. The Bread Maker will beep to indicate
that it has nished baking.
2:14 (500g) / 2:19 (750g) dosing buzzer alerts.
1.
2.
3.
4.
Page 12

12
FRUITD.
Ingredients
500G Bread 750G Bread
Weight Cup / Spoon Weight Cup / Spoon
Mashed
Vegetables
160g 160ml 230g 230ml
Butter or Oil
15g 1&1/2 Tbsp 20g 2 Tbsps
Salt 2.2g 1/3 Tspn 3.3g 1/2 Tspn
Sugar 18g 1&1/2 Tbsps 24g 2 Tbsps
Gluten- Free Flour
240g 1&1/2 Cups 320g 2 Cups
Yeast 2.5g 3/4 Tspn 3.3g 1 Tspn
Wash the vegetable carefully and evenly mash it.
Add the ingredients according to order into the Bread Barrel.
Select Fruit as its menu function, set the loaf size and preferred color,
then press the START / STOP button.
Wait for the bread to be baked. The Bread Maker will beep to indicate
that it has nished baking.
1.
2.
3.
4.
WHOLE WHEATE.
Ingredients
500G Bread 750G Bread
Weight Cup / Spoon Weight Cup / Spoon
Water + (1) Egg 150g 150ml 200g 200ml
Butter or Oil
15g 1&1/2 Tbsps 20g 2 Tbsps
Salt 2.2g 1/3 Tspn 3.3g 1/2 Tspn
Sugar 18g 1&1/2 Tbsps 24g 2 Tbsps
Milk Powder 10g 1&1/2 Tbsps 13g 2 Tbsps
Whole Wheat Powder
120g 3/4 Cup 160g 1 Cup
Gluten- Free Flour
120g 3/4 Cup 160g 1 Cup
Yeast 2.5g 3/4 Tspn 3.3g 1 Tspn
Add the ingredients according to order into the Bread Barrel.
Select Wheat as its menu function, set the loaf size and preferred
color, then press the START / STOP button.
Wait for the bread to be baked. The Bread Maker will beep to indicate
that it has nished its operation.
2:28 (500g) / 2:33 (750g), dosing buzzer alerts.
1.
2.
3.
4.
Page 13

13
FRENCHF.
Ingredients
500G Bread 750G Bread
Weight Cup / Spoon Weight Cup / Spoon
Water 180g 180ml 270g 270ml
Butter or Oil
7g 3/4 Tbsp 10g 1 Tbsp
Salt 6.6g 1 Tspn 9.9g 1 & 1/2 Tspn
Sugar 8g 2/3 Tbsp 12g 1 Tbsp
Gluten- Free Flour
320g 2 Cups 480g 3 Cups
Yeast 2.2g 2/3 Tspn 3.3g 1 Tspn
QUICKG.
Ingredients
500G Bread 750G Bread
Weight Cup / Spoon Weight Cup / Spoon
Water + (1) Egg 160g 160ml 210g 210ml
Butter or Oil
15g 1&1/2 Tbsp 20g 2 Tbsps
Salt 2.2g 1/3 Tspn 3.3g 1/2 Tspn
Sugar 18g 1&1/2 Tbsps 24g 2 Tbsps
Milk Powder 10g 1&1/2 Tbsps 13g 2 Tbsps
Gluten- Free Flour
240g 1&1/2 Cups 320g 2 Cups
Yeast 5g 1&1/2 Tspns 6.6g 2 Tspns
Add the ingredients according to order into the Bread Barrel.
Select Quick as its menu function, set the loaf size and preferred color,
then press the START / STOP button.
Wait for the bread to be baked. The Bread Maker will beep to indicate
that it has nished its operation.
1:36(500g)/1:41(750g), dosing buzzer alerts.
1.
2.
3.
4.
Add the ingredients according to order into the Bread Barrel.
Select French as its menu function, set the loaf size and preferred
color, then press the START / STOP button.
Wait for the bread to be baked. The Bread Maker will beep to indicate
that it has nished its operation.
3:00 (500g) / 3:05 (750g), dosing buzzer alerts.
1.
2.
3.
4.
Page 14

14
BLENDH.
Ingredients
Weight Cup / Spoon
Water 200g 200ml
Gluten- Free Flour
320g 2 Cups
DOUGHI.
Add the ingredients according to order into the Bread Barrel.
Select Dough as its menu function then press the START / STOP
button.
Wait for the dough function to nish. The Bread Maker will beep to
indicate that it has nished its operation.
0:55, dosing buzzer alerts.
1.
2.
3.
4.
Add the ingredients according to order into the Bread Barrel.
Select Blend as its menu function, then press the START / STOP button.
Wait for the blending to nish. The Bread Maker will beep to indicate
that it has nished its operation.
0:10, dosing buzzer alerts.
1.
2.
3.
4.
Ingredients
Weight Cup / Spoon
Water 200g 200ml
Gluten- Free Flour
400g 2 & 2/3 Cups
Yeast 3.3g 1 Tspn
CAKEJ.
Stir the egg evenly and thoroughly.
Stir egg with sugar evenly until the substance becomes a glaze.
Add in sugar three times.
1.
2.
3.
Ingredients
Weight Cup / Spoon
Egg 200g 4 Eggs
Sugar 96g 8 Tbsps
Refined Flour
160g 1 Cup
Pure Milk 40g 2 & 2/3 Tbsps
Coco Powder 3.3g 2 & 2/3 Tbsps
Page 15
15
Continue to stir the egg until the glaze can stick on the stirrer.
Slightly stir to make glaze.
Add low gluten our in three times separately while stirring it evenly.
Add the other ingredients while stirring evenly and thoroughly.
Place the ingredients into the Bread Barrel.
Take out the stir bar, apply oil evenly, and put the cake glaze into the
Bread Barrel.
Raise the Bread Barrel and shake it three (3) times to smoothen the surface
and let the bubbles inside come out.
Select Cake as its menu function then press the START / STOP button. Wait
for the cake function to nish. The Bread Maker will beep to indicate that
it has nished baking.
4.
5.
6.
7.
8.
9.
10.
11.
RICE CAKEK.
Ingredients
Weight Cup / Spoon
Water 270g 270ml
Glutinous
Rice
240g 1 Cup
Egg 48g 4 Tbsps
Clean the glutinous rice properly and pour it into the Bread Barrel.
Select Rice Cake as its menu function then press the START / STOP
button.
0:20, dosing buzzer alerts, add in sugar every time the buzzer alerts.
Wait for the Rice Cake function to nish. The Bread Maker will beep to
indicate that it has nished preparing the rice cake.
1.
2.
3.
4.
JAML.
Ingredients
Weight Cup / Spoon
Pineapple 500g 1 Pineapple
Lemon juice 10g 1 Tbsp
Sugar 65g 5 Tbsps
Pudding
Powder
13g 1 Tbsp
Cleanly peel off the pineapple. Cut the pineapple to small slices and
put it into a fruit juicer.
Add the lemon juice and sugar to the fruit juicer. Then switch on the
fruit juicer to start making pineapple juice.
1.
2.
Page 16

16
YOGHURTM.
Ingredients
Weight Cup / Spoon
Pure Milk 1000g 1000ml
Yoghurt 110g 110ml
Sugar 60g 5 Tbsps
Sterilize the Bread Barrel and other tools with hot water (no need to
install the stir bar).
Add the ingredients according to order into the Bread Barrel, stir it
thoroughly to ensure that the sugar is evenly dissolved.
Select Yoghurt as its menu function then press the START / STOP
button.
Wait for the yoghurt function to nish. The Bread Maker will beep to
indicate that it has nished preparing.
1.
2.
3.
4.
RICE WINEN.
Ingredients
Weight Cup / Spoon
Glutinous Rice 300g 1&1/4 Cup
Water 200g 200ml
Pudding
Powder
6g 2 Tspns
Soak the glutinous rice into water for 5 - 24 hours until it can easily be
mashed, then carefully drain the water.
Steam the glutinous rice and allow it to cool down to about 30
minutes.
Mix the sweet wine into the water, pour it into the rice, then slow mix
the it together.
Sterilize the Bread Barrel usng hot water (no need to use the stir bar for
this menu function).
Place the rice into the barrel, compress it tightly, then dig a hole on
the surface.
Use keep-fresh lm to cover the Bread Barrel and place the barrel into
the Bread Maker.
1.
2.
3.
4.
5.
6.
Pour in the pineapple juice into the Bread Barrel, and then pour in the
pudding powder.
Select Jam as its menu function then press the START / STOP button.
Wait for the Jam function to nish. The Bread Maker will beep to indicate
that it has nished preparing.
3.
4.
5.
Page 17

17
Select Rice Wine as its menu function then press the START / STOP
button.
Wait for the rice wine function to nish. The Bread Maker will beep to
indicate that it has nished preparing.
7.
8.
FRIED PEANUTO.
Ingredients
Weight Cup / Spoon
Peanuts 235g 1 Cup
Oil
4g 1 Tspn
Add the peanuts into the Bread Barrel, and pour in a small amount
of oil.
Select FRIED PEANUTS as its menu function then press the START / STOP
button.
Wait 25 to 35 minutes for the fried peanuts function to nish. The Bread
Maker will beep to indicate that it has nished preparing the fried
peanuts.
1.
2.
3.
BAKEP.
Add the ingredients into the Bread Barrel.
Select BAKE as its menu function and set the preferred working time.
Press the START / STOP button to begin operation.
Wait for the bake function to nish. The Bread Maker will beep to
indicate that it has nished baking.
1.
2.
3.
4.
CLEANING AND MAINTENANCE
Ensure that the machine is unplugged
and has properly and fully cooled down
before cleaning.
•
Use a wet soft cloth or apply a neutral
cleaning liquid to wipe the Bread
Maker’s surface, and then use a dry
cloth to dry.
•
Page 18
18
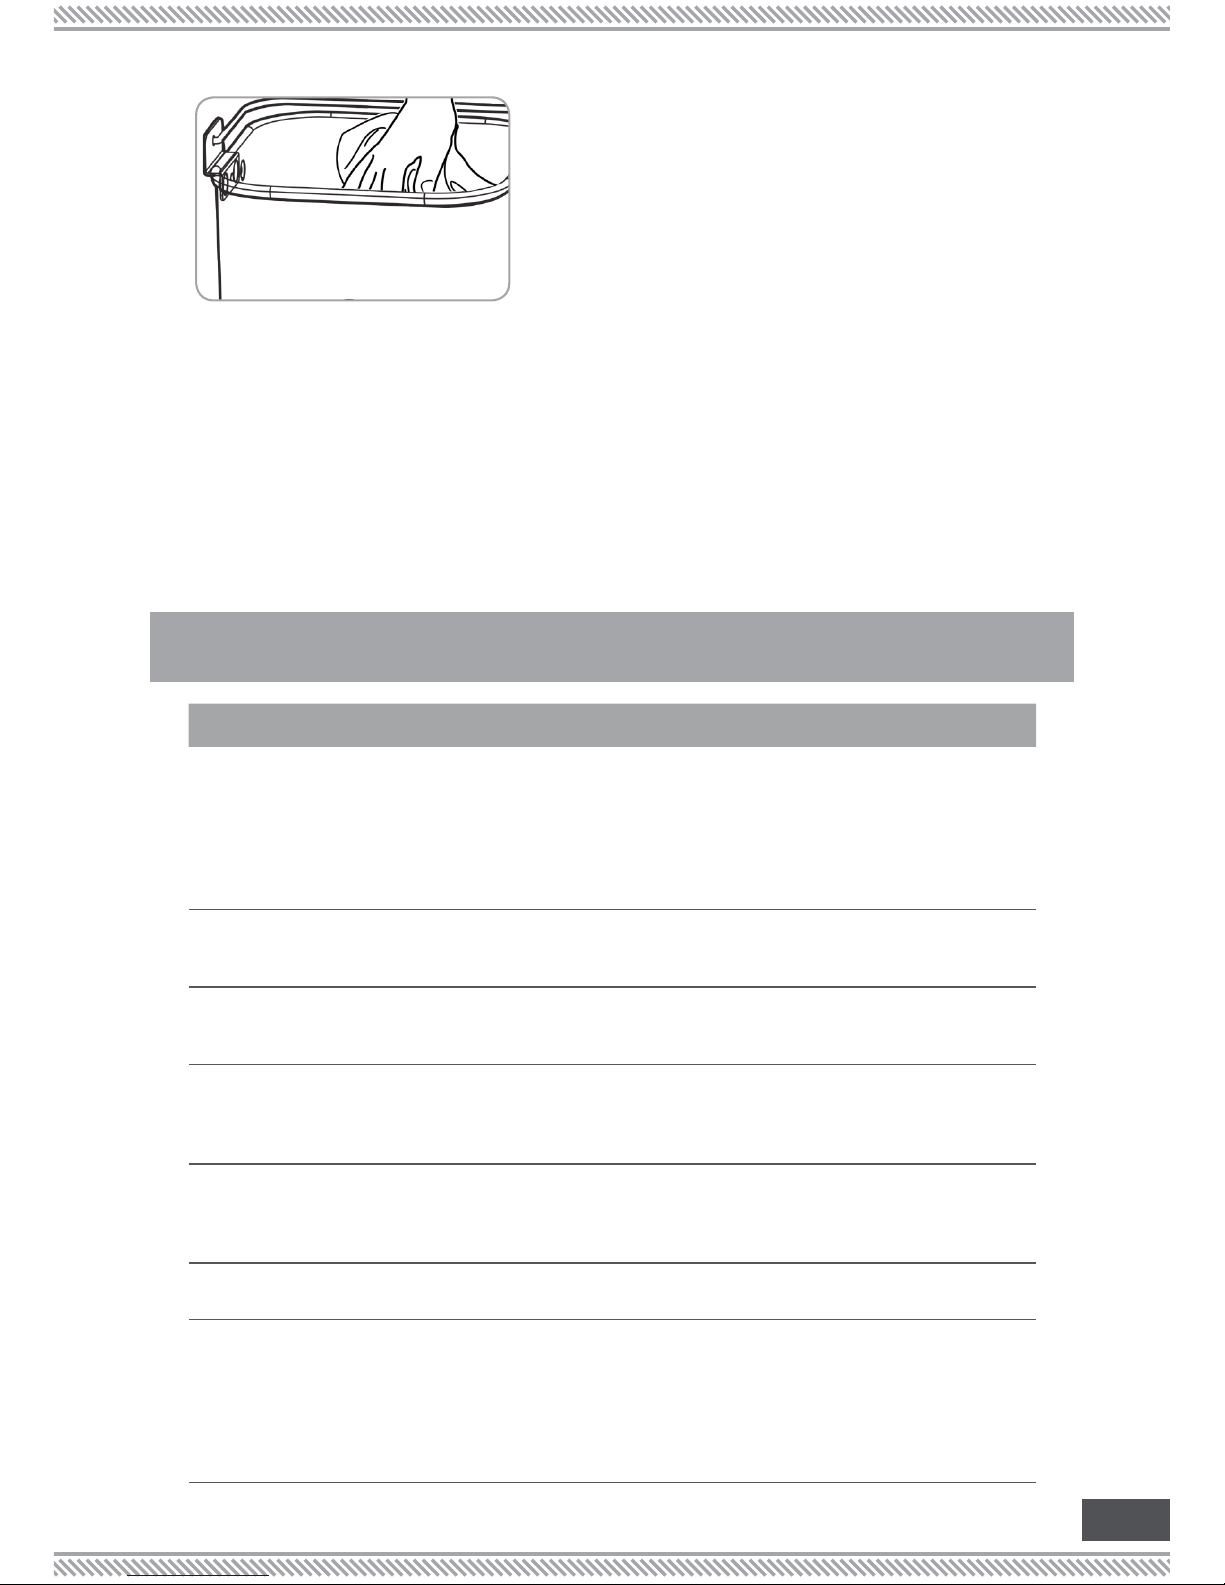
In cleaning the Bread Barrel, use a wet
cloth to wipe off the residues or stains
stuck inside.
After cleaning, ensure that all parts are
fully dry before storing the appliance in
a cool dry place.
•
•
Do not immerse the Bread Maker into water or any kind of liquid to
avoid electric shocks or damage.
The Stir Bar will be difcult to pull off. Before cleaning, pour in hot water
into the Bread Barrel and soak it.
Do not use any frictional materials (e.g. metal brush or aluminum
sponges) in cleaning the Bread Barrel’s inner surface to avoid damaging
its non-stick surface.
Do not pierce the Bread Maker, its function panel, including the Bread
Barrel’s inner surface with a sharp object.
•
•
•
•
TROUBLESHOOTING
PROBLEMS SOLUTIONS
Dark smoke is coming
out from the main body
For FIRST TIME USE, this is normal. Simply allow the Bread Maker
to operate for 10 minutes rst without any ingredients. There is
protection oil on the surface of electric heating tube for rst
time use.
Ingredients might have been stuck around the electrical
heating tube. Unplug the appliance and clean the electric
heating tube.
•
•
The LED shows:
C : HH
The inner temperature is too HIGH. Press the START / STOP button
to stop the alert, wait for it to cool down, and press the MENU
button again.
The LED shows:
C : LL
The inner temperature is too LOW. Press the START / STOP button
to stop the alert, select the BAKE menu function and allow it to
warm up for 3 minutes.
The our is not evenly
kneaded into a dough
The Stir bar is not in place. Install the stir bar properly in place.
The wrong amount of ingredients have been used which might
have caused low water content. Put in the correct ingredients
correctly as specied in the recipe.
•
•
The bread does not
ferment at all
Yeast was not added. Put in the correct ingredients correctly
as specied in the recipe.
The yeast became inactive. Ensure to keep the yeast in a
cool, dry, and constantly sealed environment.
•
•
LED shows
E : 01 or E : 02
The temperature sensor has short-circuited. Unplug the appliance
and bring the appliance to the Aztech Service Center.
Bread volume is too
large after fermentation
or bread tastes sour
Too much ingredients have been used. Dose according to the
recipe.
Room Temperature is too high, bread has been over
fermented. In summer, control the water temperature and
reduce yeast volume appropriately
Added too much water. Dose properly according to recipe.
Added too much yeast. Dose properly according to recipe.
•
•
•
•
Page 19

19
PROBLEMS SOLUTIONS
Bread has a
hard crust
During the cooking / baking period, the cover might have
been opened too frequently. As much as possible, avoid
opening the cover during the cooking / baking period.
Too much sugar or milk was added.Control the amount used.
Bread crust thickness below 4.5mm is normal.
•
•
•
The bread top is
still white
The ferment dough is too large and the top area cannot be
baked.
The top window of the machine will affect the color. If it is not
totally white, this is perfectly normal.
•
•
Bread has a
hard crust
During the cooking / baking period, the cover might have
been opened too frequently. As much as possible, avoid
opening the cover during the cooking / baking period.
Too much sugar or milk was added.Control the amount used.
Bread crust thickness below 4.5mm is normal.
•
•
•
Bread has a
hard crust
During the cooking / baking period, the cover might have
been opened too frequently. As much as possible, avoid
opening the cover during the cooking / baking period.
Too much sugar or milk was added.Control the amount used.
Bread crust thickness below 4.5mm is normal.
•
•
•
Bread has a
hard crust
During the cooking / baking period, the cover might have
been opened too frequently. As much as possible, avoid
opening the cover during the cooking / baking period.
Too much sugar or milk was added.Control the amount used.
Bread crust thickness below 4.5mm is normal.
•
•
•
Bread has a
hard crust
During the cooking / baking period, the cover might have
been opened too frequently. As much as possible, avoid
opening the cover during the cooking / baking period.
Too much sugar or milk was added.Control the amount used.
Bread crust thickness below 4.5mm is normal.
•
•
•
The bread does not
ferment well
The our might was low in gluten. Use high-gluten our or
bread our.
Adding of ingredients are not added in order. Add the
ingredients according to the speecied order.
Yeast was not added into the our. Ensure to add yeast
together with the our.
The temperature of water and our is too low. Control the
ingredient temperatures continuously at 15°C to 25°C.
Too much sugar and or salt content. Salt and sugar hinders
bread fermentation. Ensure to use the right amount of salt and
sugar.
Menu does not match the ingredients used. Ensure that the
proper ingredients are used for the menu function selected.
•
•
•
•
•
•
The bread loaf
has wrinkles
The bread was immediately sealed after cooking / baking.
Allow it to cool down rst before storage.
If the bread is too soft, reduce the yeast volume added to
avoid over softening.
•
•
The bread is difcult to
remove from the Bread
Barrel
Stir bar is stuck into the bread tightly. Use chopsticks or other
soft edged material to easily take it out.
Bread Barrel is out of shape. bring the appliance to the Aztech
Service Center.
•
•
There are plenty of
hollow holes after
cutting the bread apart
Too much or no salt has been added. Reduce water volume
or add salt.
The temperature of the water used is too high. Control the
ingredient temperatures continuously at 15°C to 25°C.
•
•
Some particles of our
are stuck on the bread
Sticky ingredients like butter are not fully melted. During melting
period, put the melted ingredients into the dough.
The water amount used is too small. Put enough water.
•
•
Page 20

Copyright © 2014 Aztech Technologies Pte Ltd (CRN:199800635M ). All rights reserved.
 Loading...