

Page 1

ASF40D
Aztech 16” Stand Fan
USER MANUAL
PLEASE RETAIN THIS USER MANUAL FOR FUTURE USE.
Page 2

SAFETY INSTRUCTIONS
Ensure that the appliance and all of its parts and components are properly
•
assembled, prepared, and locked into place.
Ensure to ALWAYS position your Stand Fan on a smooth, dry, and stable
•
ground. Placing the appliance on unstable surfaces such as cushioned
carpets and/or uneven surfaces may cause the appliance to lose its
balance during operation.
Before use, please check if the power voltage of your Stand Fan correctly
•
corresponds to your home’s power supply.
Always ensure that the fan ring’s clip is tightly holding the front and rear
•
fan grills in place.
Do not use wet hands in operating the Stand Fan and/or in inserting or
•
removing its power adapter to prevent electrical shocks. It is recommended
that you thoroughly dry your hands rst before using your Stand Fan or its
remote control.
Unplug the power adapter if you are done using your stand fan or before
•
doing any cleaning, relocation, or appliance maintenance.
If the remote control would not be used for long periods of time, remove
•
the remote control’s battery.
When unplugging the power adapter, do not pull or tug its cord. Hold the
•
power adapter properly on its base when unplugging it from the power
outlet. Also, ensure that its power cord is kept away from any source of
heat or sharp edges that could cause external damage to the cord.
Should damages be found in the appliance, please do not use the
•
appliance and immediately bring it to the Aztech Service Center for repair
or replacement.
Your Aztech Stand Fan is not intended for people with reduced physical,
•
sensory or mental capabilities, and/or lack of experience or knowledge.
Constant supervision (from a person responsible for their safety) should be
provided if such individuals would be using, cleaning, or operating, the
appliance.
2
Page 3
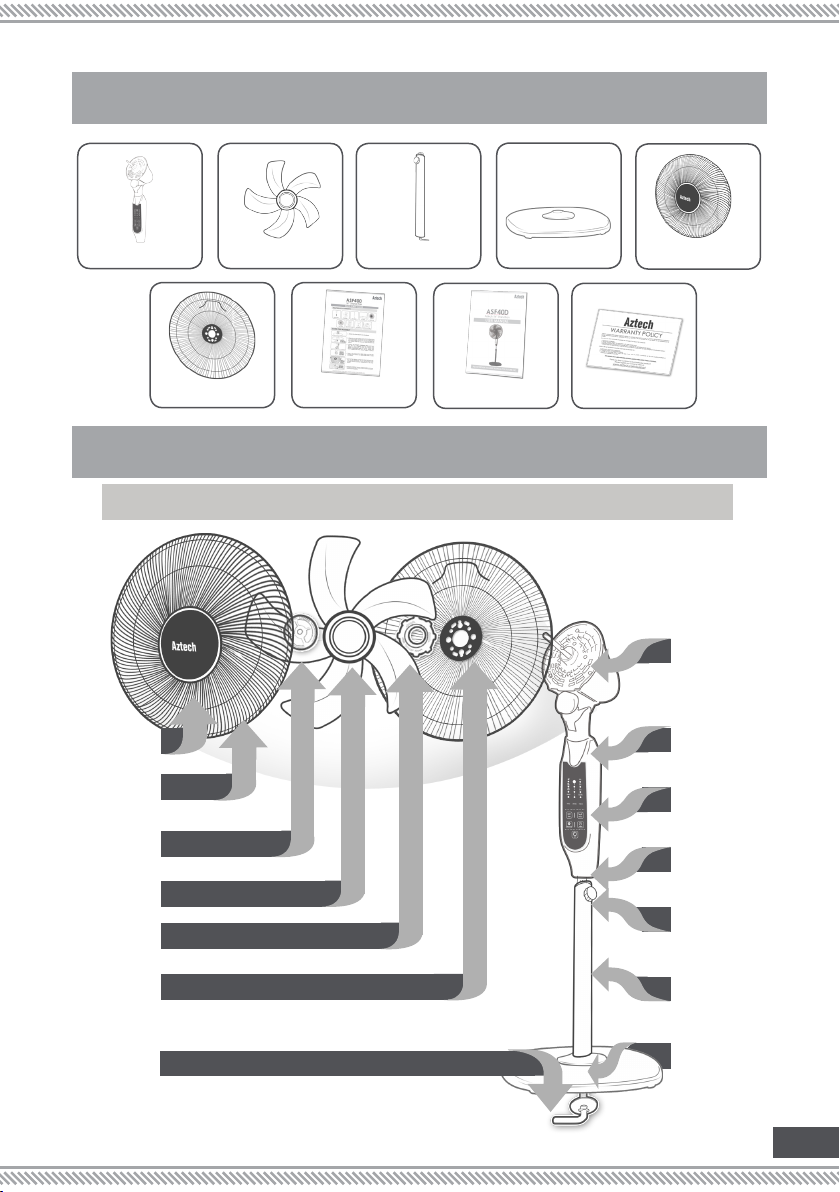
PACKAGE CONTENTSPACKAGE CONTENTS
Main Body Fan Blade Fan Stand
Rear Grill
Easy Start Guide
APPLIANCE OVERVIEW
FAN COMPONENTS
Front
Grill
Fan
Grill Ring
Fan
Blade
Cap
Fan
Blade
Grill
Nut
Rear
Grill
Fan Base
Front Grill
Warranty PolicyUser Manual
Fan
Motor/
Fan
Head
LED
Display
Fan
Control
Fan
Column
Height
Adjustment
Ring
Fan
Stand
Fan
Stand
Nut
Fan
Base
3
Page 4
FAN BUTTONS AND LED DISPLAY
LED DISPLAYS
TIMER SETTINGS. Displays the currently
•
selected operation time (0.5, 1H, 2H, and
4H) upon pressing the TIMER button.
SPEED INDICATOR. Displays the currently
•
selected fan speed (1 for Low, 2 for
Medium, and 3 for High).
FAN BUTTONS
ON/SPEED
•
»
»
•
WIND.
three blowing modes of your Stand Fan: (1) Normal, (2)
Natural, and (3) Sleeping (please see the Knowing and
Changing the Modes section).
SWING.
•
Oscillation / Swing.
SLEEP MODE.
•
mode is enabled.
NATURAL MODE. Indicates that SLEEP
•
blowing mode is enabled.
NORMAL MODE. Indicates that NORMAL
•
blowing mode is enabled.
SWING.
•
oscillation is enabled.
Press this button to turn ON your Stand Fan.
If your Stand Fan is ON, pressing this button repeatedly
will allow you to shift between HIGH / MEDIUM / LOW
Speeds.
Press this button repeatedly to shift between the
Press this button to enable or disable Fan
Indicates that SLEEP blowing
Indicates that SWING or fan
TIMER. Press this button repeatedly until the preferred
•
operation time (4H, 2H, 1H, 0.5H) is selected.
OFF.
Press this button to turn OFF your Stand Fan.•
4
Page 5

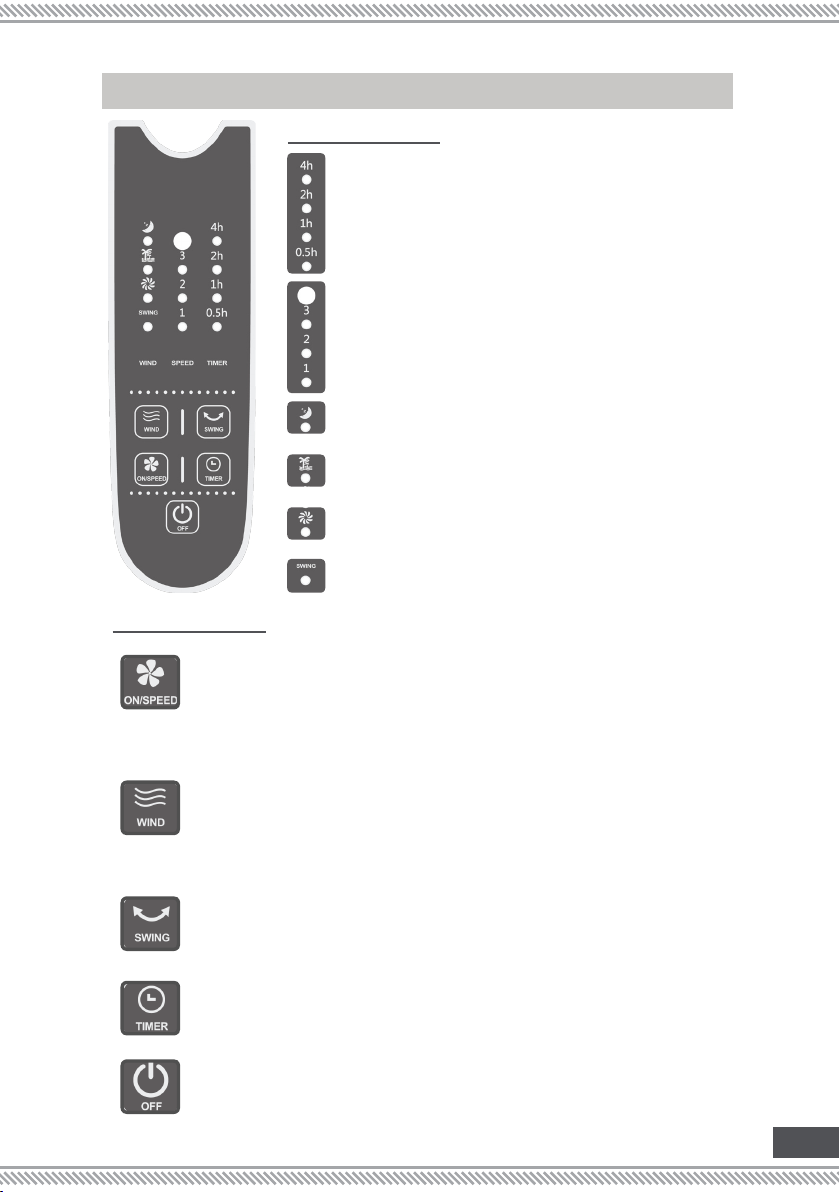
REMOTE CONTROL
ON/SPEED
•
Press this button to turn ON
»
your Stand Fan
If your Stand Fan is ON,
»
pressing this button
repeatedly will allow you
to shift between HIGH /
MEDIUM / LOW Speeds.
•
MODE.
repeatedly to shift between
the three blowing modes of
your Stand Fan: (1) Normal,
(2) Natural, and (3) Sleeping
(please see the Knowing and
Changing the Modes section).
TIMER.
•
repeatedly until preferred
operation time (4H, 2H, 1H, 0.5H)
is selected.
SWING.
•
to enable or disable Fan
Oscillation/Swing.
OFF.
•
Press this button to turn OFF
your Stand Fan.
TIPS IN USING THE REMOTE CONTROL
Press this button
Press this button
Press this button
Ensure to insert two (2) AAA batteries in the Remote Control’s battery
•
compartment while observing the correct polarity.
NOTE: Incorrect battery installation may damage the Remote
Control and/or cause unexpected operation failures.
In using the remote control, ensure that you are 10 meters near the
•
Stand Fan and that the remote control is properly aimed at your
stand fan’s front panel.
5
Page 6

STAND FAN ASSEMBLY
TIPS BEFORE ASSEMBLING YOUR STAND FAN
Ensure to unpack your stand fan and its components.
•
Remove the Fan Blade Cap and the Grill Nut from the motor shaft.
•
Remove the Fan Stand Nut from the Fan Stand.
•
ASSEMBLING THE STAND
Attach the Fan Stand to the Fan
1.
Base.
Using the Fan Stand Nut, fasten the
2.
Fan Base rmly to the fan stand.
Ensure that the Fan Stand Nut is
FASTEN THE FAN
BASE USING THE
FAN STAND NUT
LOOSEN
THE HEIGHT
ADJUSTMENT
RING AND
PULL THE FAN
COLUMN
wounded tightly to the Fan Stand,
and that the Fan Stand and Fan
Base are rmly locked into place.
Loosen the Height Adjustment
3.
Ring and pull out the Fan Column
until the desired fan height is
achieved.
You may then fasten the Height
4.
Adjustment Ring to tightly
clamp the Fan Column with
the desired height in place.
NOTE: Ensure that the Height
Adjustment Ring is solidly fastened
before assembling the fan motor’s
components.
ATTACH THE
MAIN BODY
TO THE FAN
STAND
Ease in the Stand Fan’s Main Body
5.
into the Fan Column and fasten
the Main Body Lock to hold it in
place.
6
Page 7

ASSEMBLING THE FAN
On the Fan Motor, position the
1.
Rear Grill with the Fan Handle
facing up. Ensure that the Rear
POSITIONED
INTO FAN
MOTOR’S
GROOVES
TIGHTEN THE
GRILL NUT TO
HOLD REAR
GRILL IN PLACE
SECURELY
INSERT THE
FAN BLADE
TIGHTEN
THE FAN
BLADE
CAP
Grill is stably positioned into the
grooves of the Fan Motor.
Using the Grill Nut, fasten the Rear
2.
Grill by turning it clockwise until
the Rear Grill is securely fastened
into place.
Install the Fan Blade by mounting
3.
it into the Motor Shaft. Ensure
that the Fan Blade has securely
reached the motor shaft’s
retaining pins.
With the Fan Blade in place, t
4.
the Fan Blade Cap into the motor
shaft and turn it counter clockwise
to tightly lock in the Fan Blade into
the motor shaft.
LOCK THE
FAN GRILLS
USING THE FAN
GRILL CLIP
ATTACH
FRONT
GRILL
Attach the Front Grill by easing it
5.
properly against the Rear Grill.
Using the Fan Grill Clip, securely
6.
lock in both grills in place.
7
Page 8

USING THE ASF40D
TIPS BEFORE USING YOUR STAND FAN
Before use, please check if the power voltage of your Stand Fan
•
correctly corresponds to your home’s power supply.
If the remote control would not be used for long periods of time,
•
remove the remote control’s battery.
Should damages be found in the appliance, please do not use the
•
appliance and immediately bring it to the Aztech Service Center
for repair or replacement.
STEP 1
ASSEMBLE AS
REQUIRED
Correctly assemble your Stand Fan as
seen on the Stand Fan Assembly section.
ADJUST
HEAD TILT
STABLE
GROUND
2METERS
LOW MED HIGH
PRESS THE
ON/SPEED BUTTON
REPEATEDLY TO
SHIFT FAN SPEEDS
STEP 2
Position your Stand Fan on a smooth and
stable ground and plug its power adapter
to a power outlet.
NOTE: Ensure that there are no objects
within 2 meters of your Stand Fan’s head
that may hinder its oscillation / swing
feature.
STEP 3
Firmly lower or raise the Fan’s head angle
until you get the desired fan head angle.
STEP 4
On the Remote Control, press the ON/
SPEED button to turn ON the fan. You may
press the ON/SPEED button repeatedly
until you select the preferred fan speed
(high, medium, low).
NOTE: By default, the speed is set to LOW.
Upon setting your preferred speed (e.g.
high), and turning it OFF and ON again,
the fan would resume using the previously
selected speed (e.g. high).
8
Page 9

OTHER INSTRUCTIONS
ADJUSTING THE FAN’S HEIGHT
SUPPORT THE
FAN HEAD
ADJUST
THE HEIGHT
ADJUSTMENT
RING
STEP 1
Hold the Fan Handle to support the
fan’s head.
STEP 2
Using your other hand, loosen the
Height Adjustment Ring.
STEP 3
ADJUST HEIGHT AND
TIGHTEN THE HEIGHT
ADJUSTMENT RING
CHANGING THE FAN’S SPEED
Once ON, on the Stand Fan’s control panel or through its remote control,
simply press the ON/SPEED button REPEATEDLY to shift between HIGH /
MEDIUM / LOW speed settings. The selected setting would immediately
reect on your Stand Fan’s LEDs.
Slowly lower or raise the Main Body
until the desired height is achieved
and tighten the Height Adjustment
Ring to hold it in place.
1ST PRESS
Turns ON.
NOTE: Default speed is LOW. However, upon changing this (e.g. to medium
speed) and by turning the fan OFF and ON again, the previous setting (e.g.
medium) would be used.
2ND PRESS
Medium
Speed
3RD PRESS
High
Speed
9
Page 10

KNOWING AND CHANGING THE MODES
BLOWING MODES
Your Stand Fan has three (3) Blowing Modes
for you to choose from.
Each mode would either use a constant
speed setting (e.g. Low while ON), or is preprogrammed with interval-based speed
changing (e.g. Low – Medium - Low speed
using 5 second interval).
To change between modes, simply press the
MODE button on your remote control (or the
WIND button on the Stand Fan) repeatedly
until the desired mode is selected.
1ST PRESS
NORMAL
NORMAL MODE. Simply uses one (1) speed setting (e.g. low) throughout
•
the operation.
NATURAL MODE. Depending on your initially selected speed, the Natural
•
Mode automatically changes speed using a regular set of intervals.
2ND PRESS
NATURAL
3RD PRESS
SLEEP
NOTE: Starting speed depends on your initially selected speed (e.g. Low
speed would enable LOW NATURAL SPEED).
SLEEP MODE. Depending on your initially selected speed, the Sleeping
•
Mode automatically decreases the speed using 30 minute intervals until it
reaches LOW speed setting.
NOTE: Speed decline rate depends on your initially selected speed (e.g. if
Medium speed has been selected, it would only take 30 minutes to reach
LOW speed).
10
Page 11

CARE AND MAINTENANCE
TIPS BEFORE CLEANING / MAINTENANCE
Your Aztech Stand Fan is not intended for people with reduced
•
physical, sensory or mental capabilities, and/or lack of experience
or knowledge. Constant supervision (from a person responsible for
their safety) should be provided if such individuals would be using,
cleaning, or operating, the appliance.
Unplug the power adapter of your Stand Fan before doing any
•
cleaning, relocation, or appliance maintenance.
CLEANING
Remove the fan components and
clean each component using a
damp cloth.
For the Main Body, use a dry cloth
to wipe off dust from its surface.
MAINTENANCE
Add a few drops of lubricant or oil
on the motor shaft’s base to extend
motor life.
11
Page 12

Copyright © 2015 Aztech Technologies Pte Ltd (CRN:199800635M ). All rights reserved.
 Loading...